

Page 1

Quick Start Guide –Sheeva64 page 1 / 16
GTI-2019.08.14
Rev1
Quick Start Guide for Sheeva64
Contents
A. Package contents .................................................................................................................................... 2
B. Internal modules equipped and options ............................................................................................... 3
C. Internal interfaces and connectors ....................................................................................................... 3
D. Appearance and external connecting ports ........................................................................................ 4
E. LED indication .......................................................................................................................................... 6
G. Connection for testing ............................................................................................................................. 7
H. Boot device mode ................................................................................................................................... 7
I. System bring up- connect to console port ........................................................................................... 8
J. Tools and files you need to start debugging ..................................................................................... 11
K. Basic procedures for debugging ......................................................................................................... 12
L. 2.4G Wi-Fi .............................................................................................................................................. 12
M. Other useful commands to check with I/O devices .......................................................................... 14
N. System reset button .............................................................................................................................. 16
O. Download sites ...................................................................................................................................... 16
Page 2
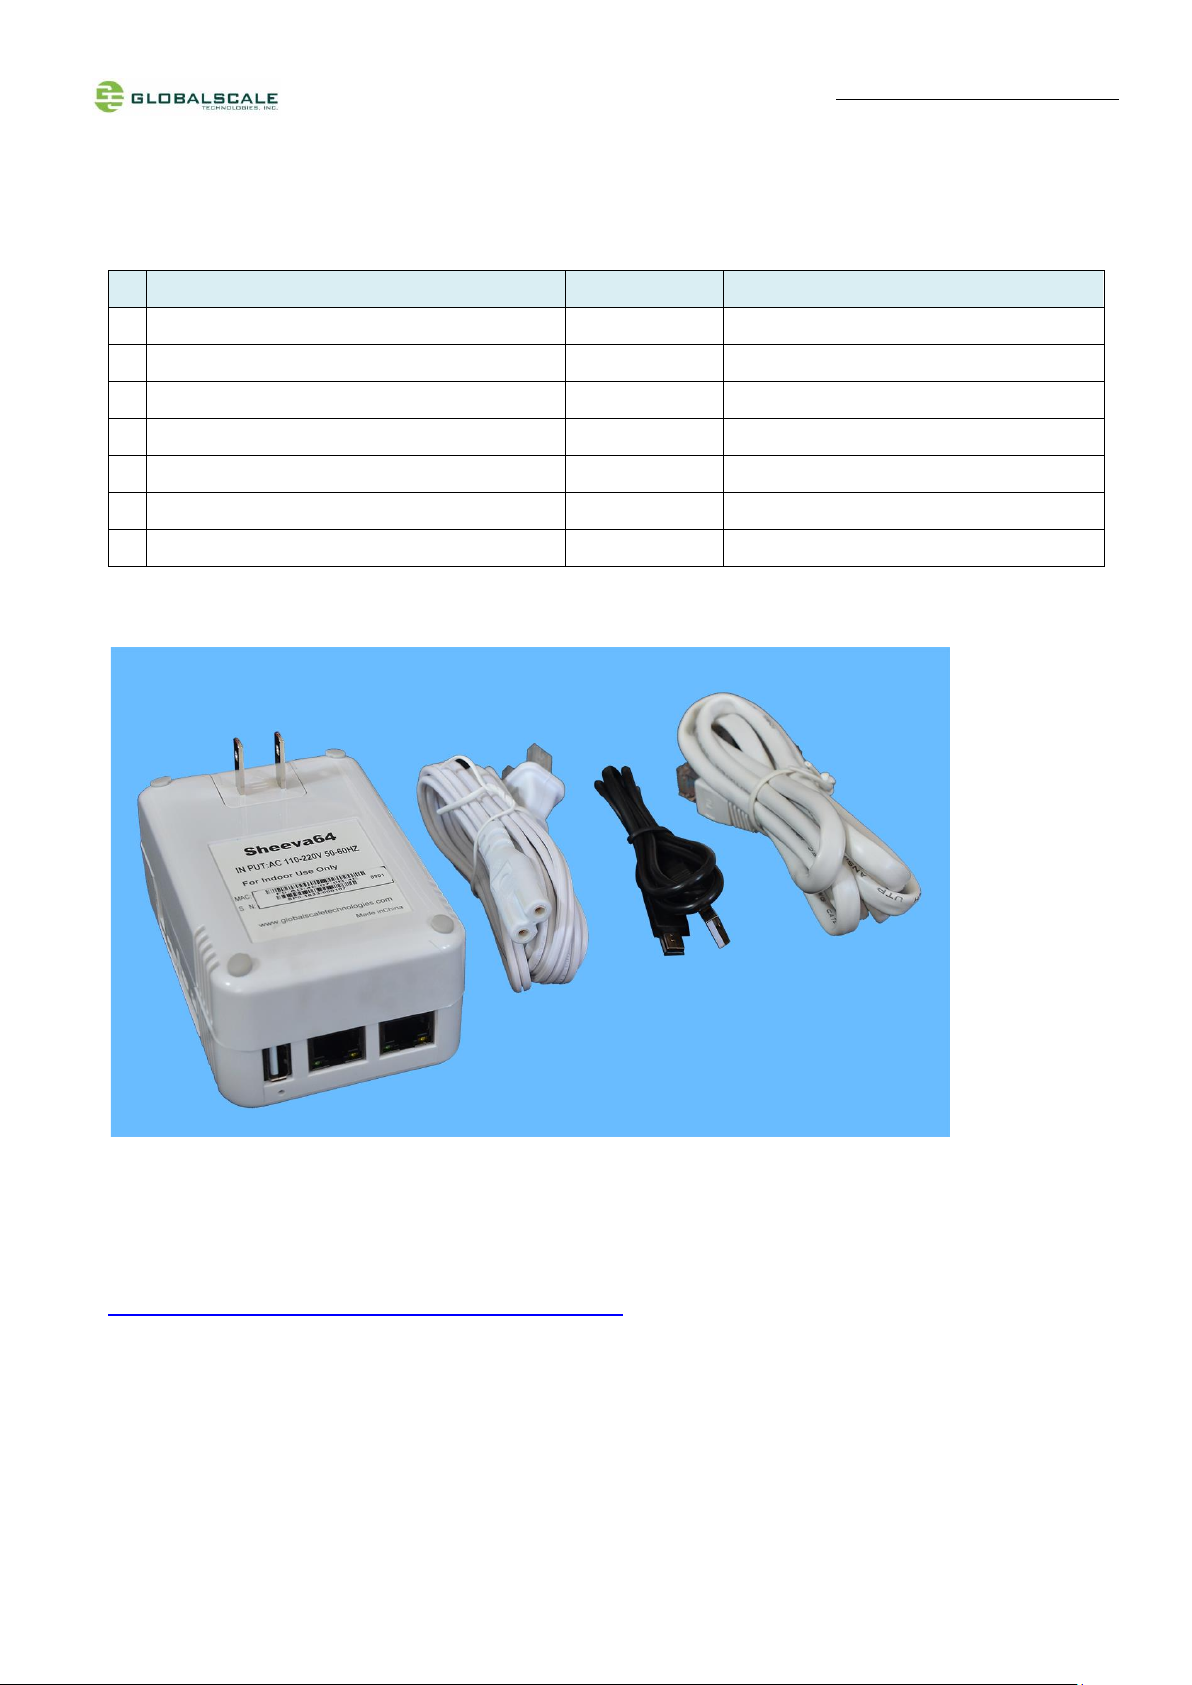
Contents
Remark
1
Sheeva64
1 unit
2 AC Power cord
1 pcs
Figure 8 shape AC power cord
3
Ethernet RJ45 cable
1 pcs
CAT5e
4
SATA cable
1 pcs
Inside enclosure
5
Mini-USB to USB cable
1 pcs
UART signals for console output
6
Warranty sheet
Yes
A. Package contents
Please check the package you’ve received with the following contents:
Quick Start Guide –Sheeva64 page 2 / 16
Note 1: All files will be put on the following website for downloading
http://www.globalscaletechnologies.com/t-downloads.aspx
Page 3
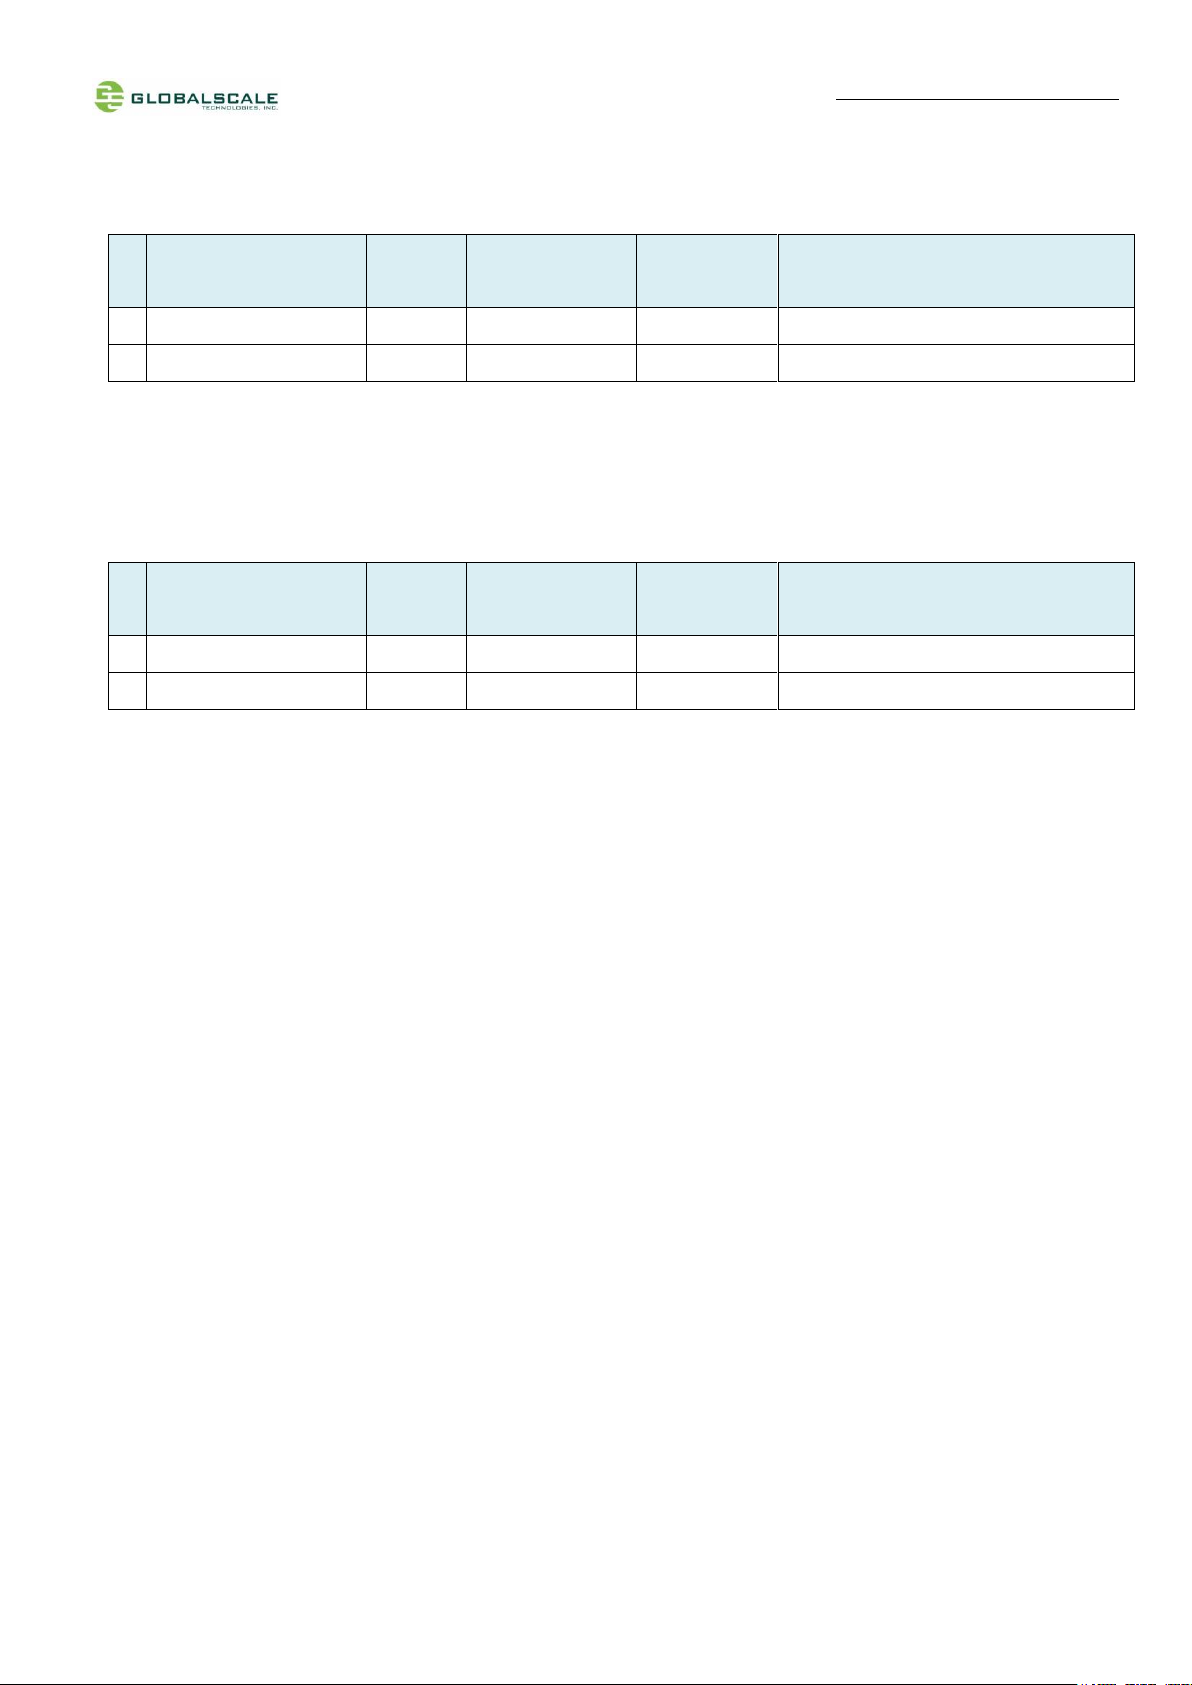
Module
Installed
or not
Slot
type
Signal
interface
Remark
1
WiFi
option
Solder on board
USB 2.0
Marvell 8997 802.11ac 2x2
Interface type
Installed
or not
Slot
type
Signal
interface
Remark
1
Debug
yes
Cortex debug 10 pin
JTAG
Inside enclosure
2
BAT1
yes
Li battery for RTC
RTC
CF1220 3V Li battery
B. Internal modules equipped and options
C. Internal interfaces and connectors
Quick Start Guide –Sheeva64 page 3 / 16
Page 4
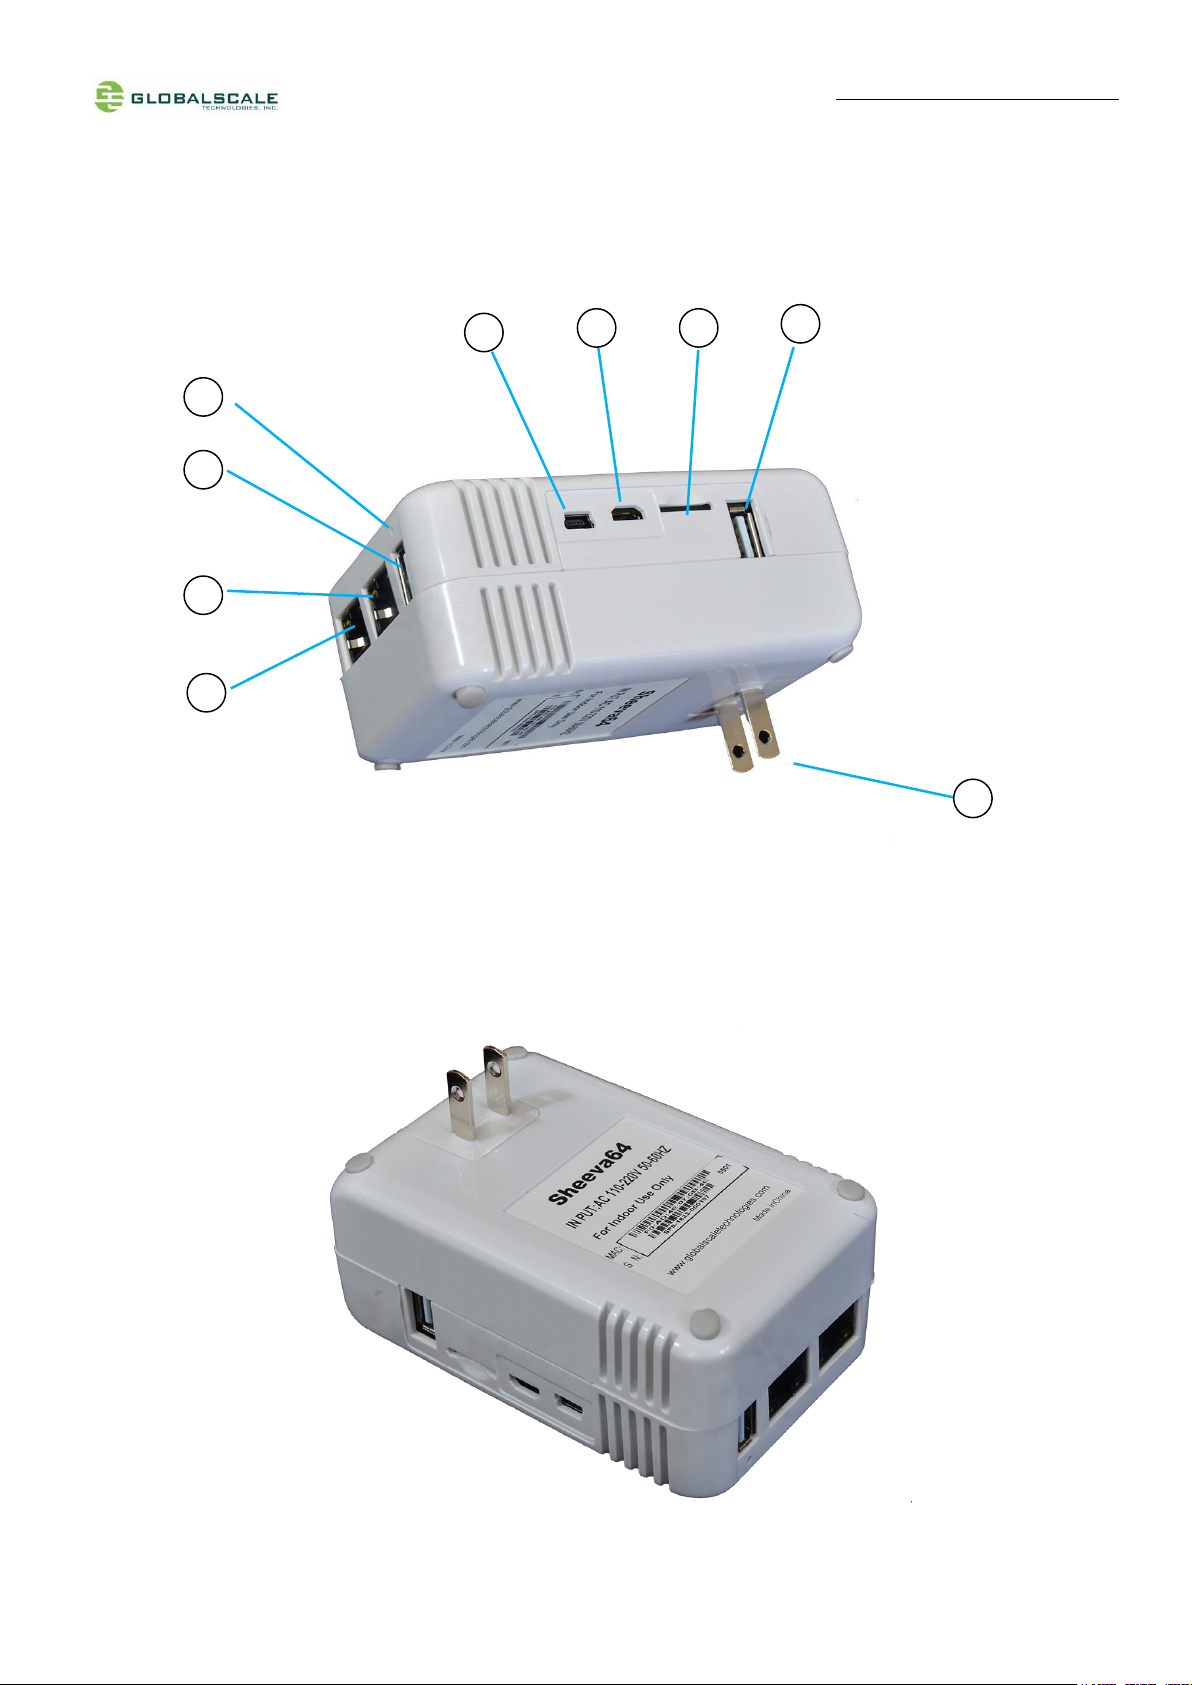
1
2
3
4 5 7 6 8
9
D. Appearance and external connecting ports
Quick Start Guide –Sheeva64 page 4 / 16
Page 5
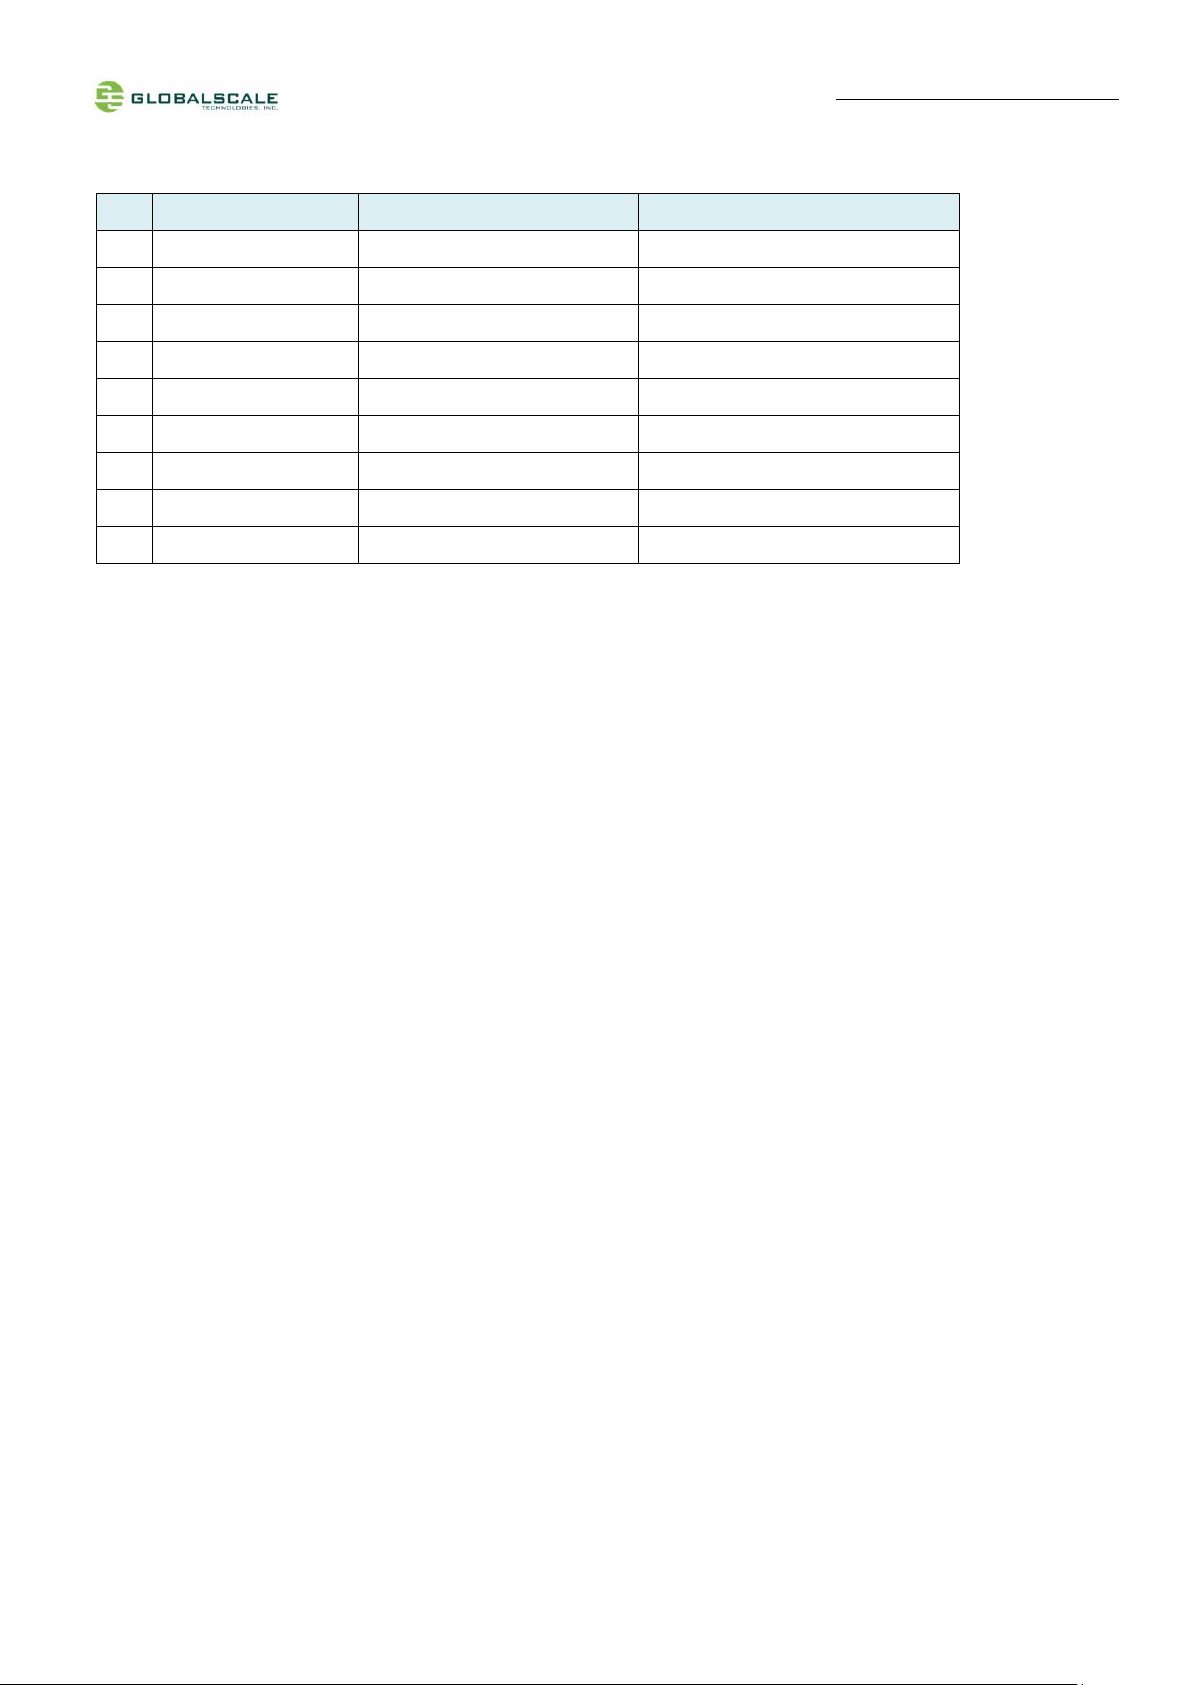
Connection port
Description
Remark
1
RJ45
Gb ethernet #1
2 RJ45
Gb ethernet #2
3 USB 2.0 type A
USB 2.0 port#1
4 Reset pin hole
System hard reset
5 Mini-USB UART
Connect to host for console
6 Micro-USB
USB2.0 port #2
7 Micro-SD card slot
For Micro-SD card
8
USB 2.0 type A
USB 2.0 port#3
9
AC plug
AC power
Quick Start Guide –Sheeva64 page 5 / 16
Page 6
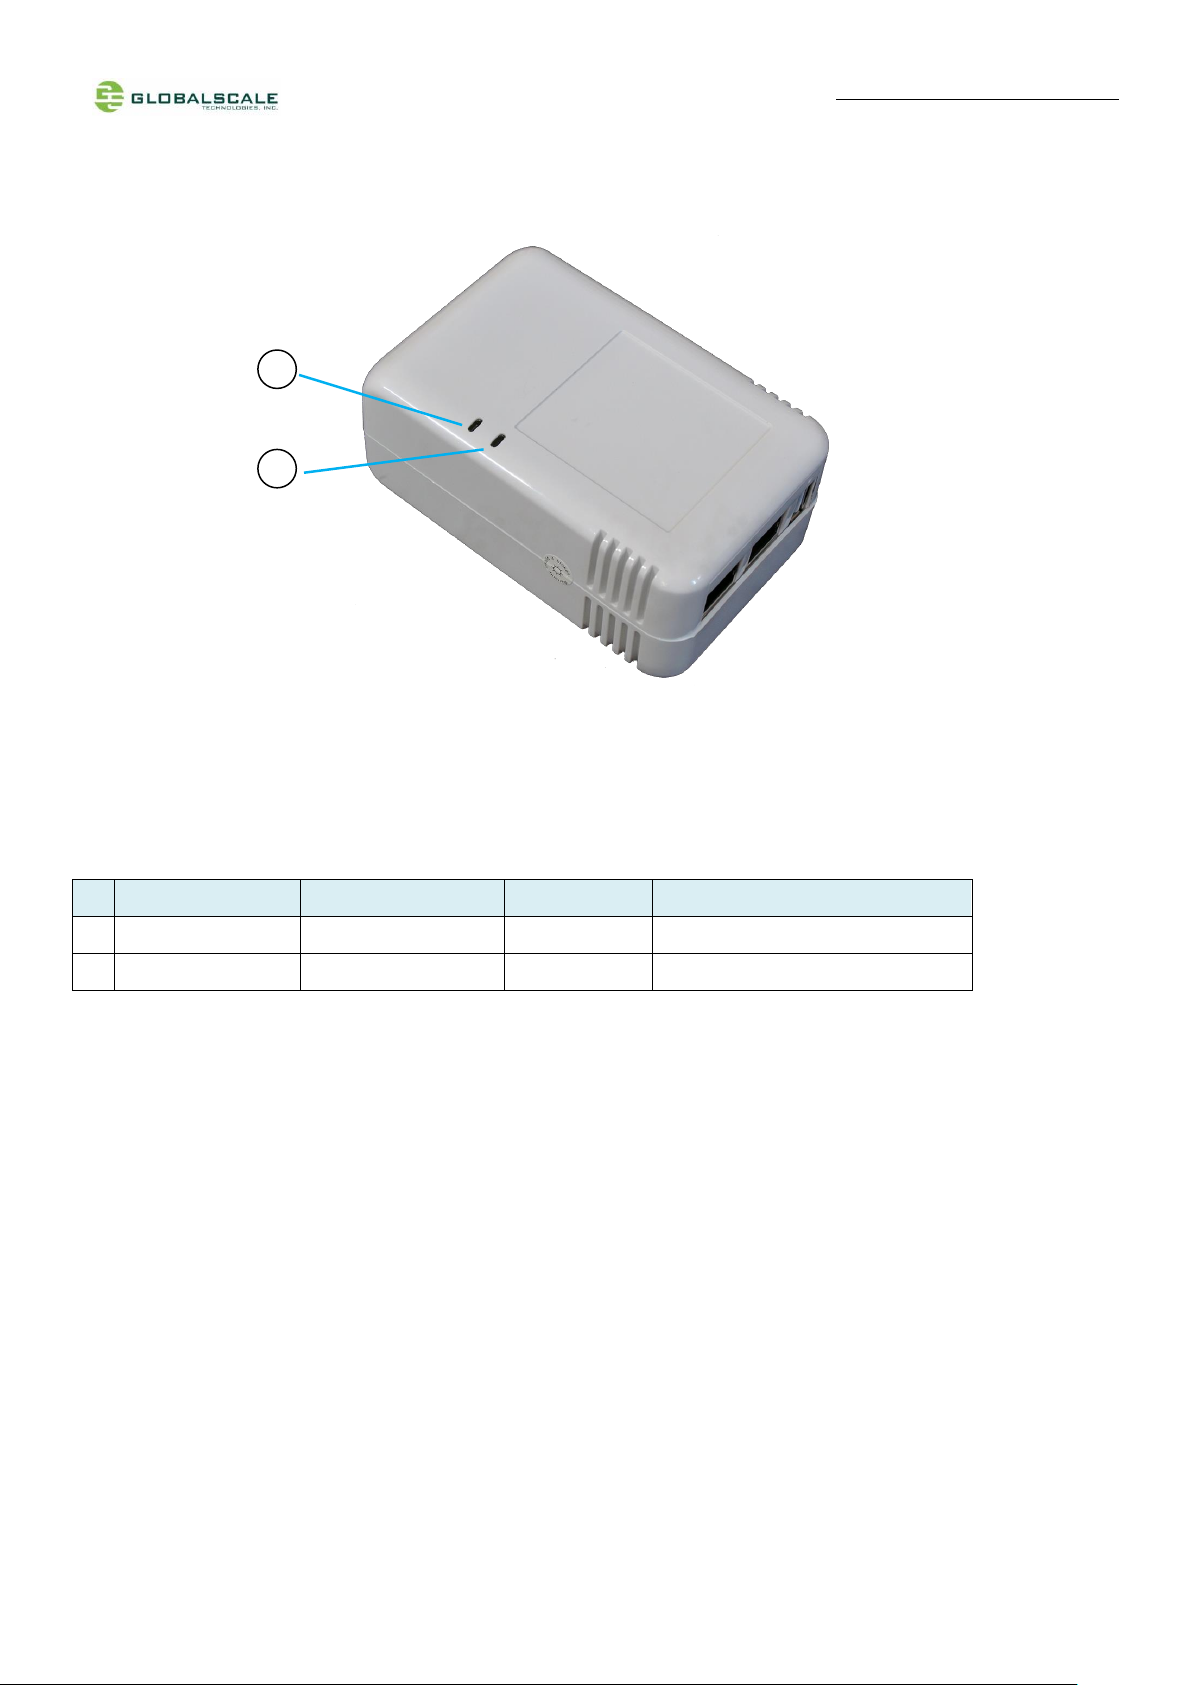
LED #
Connection port
Color/ Pattern
Description
1
LED1, LED2
MPP2_2, MPP2_3
Red, Green
Dual color LED controlled by GPIO
2
LED3, LED4
MPP2_4, MPP2_5
Green, Blue
Dual color LED controlled by GPIO
1
2
E. LED indication
Quick Start Guide –Sheeva64 page 6 / 16
LED indication table
Page 7
Boot up device
R79/ R224 (MPP1_7)
J10 pin 2-3 (MPP1_6)
J10 pin 1-2 (MPP1_5)
Serial NOR Flash
NP/ o ohm
in
out
eMMC
NP/ o ohm
out
in
eMMC alternate
NP/ o ohm
out
out
SATA
0 ohm/ NP
in
in
Serial NAND Flash
0 ohm/ NP
in
out
UART
0 ohm/ NP
out
in
SD card
0 ohm/ NP
out
out
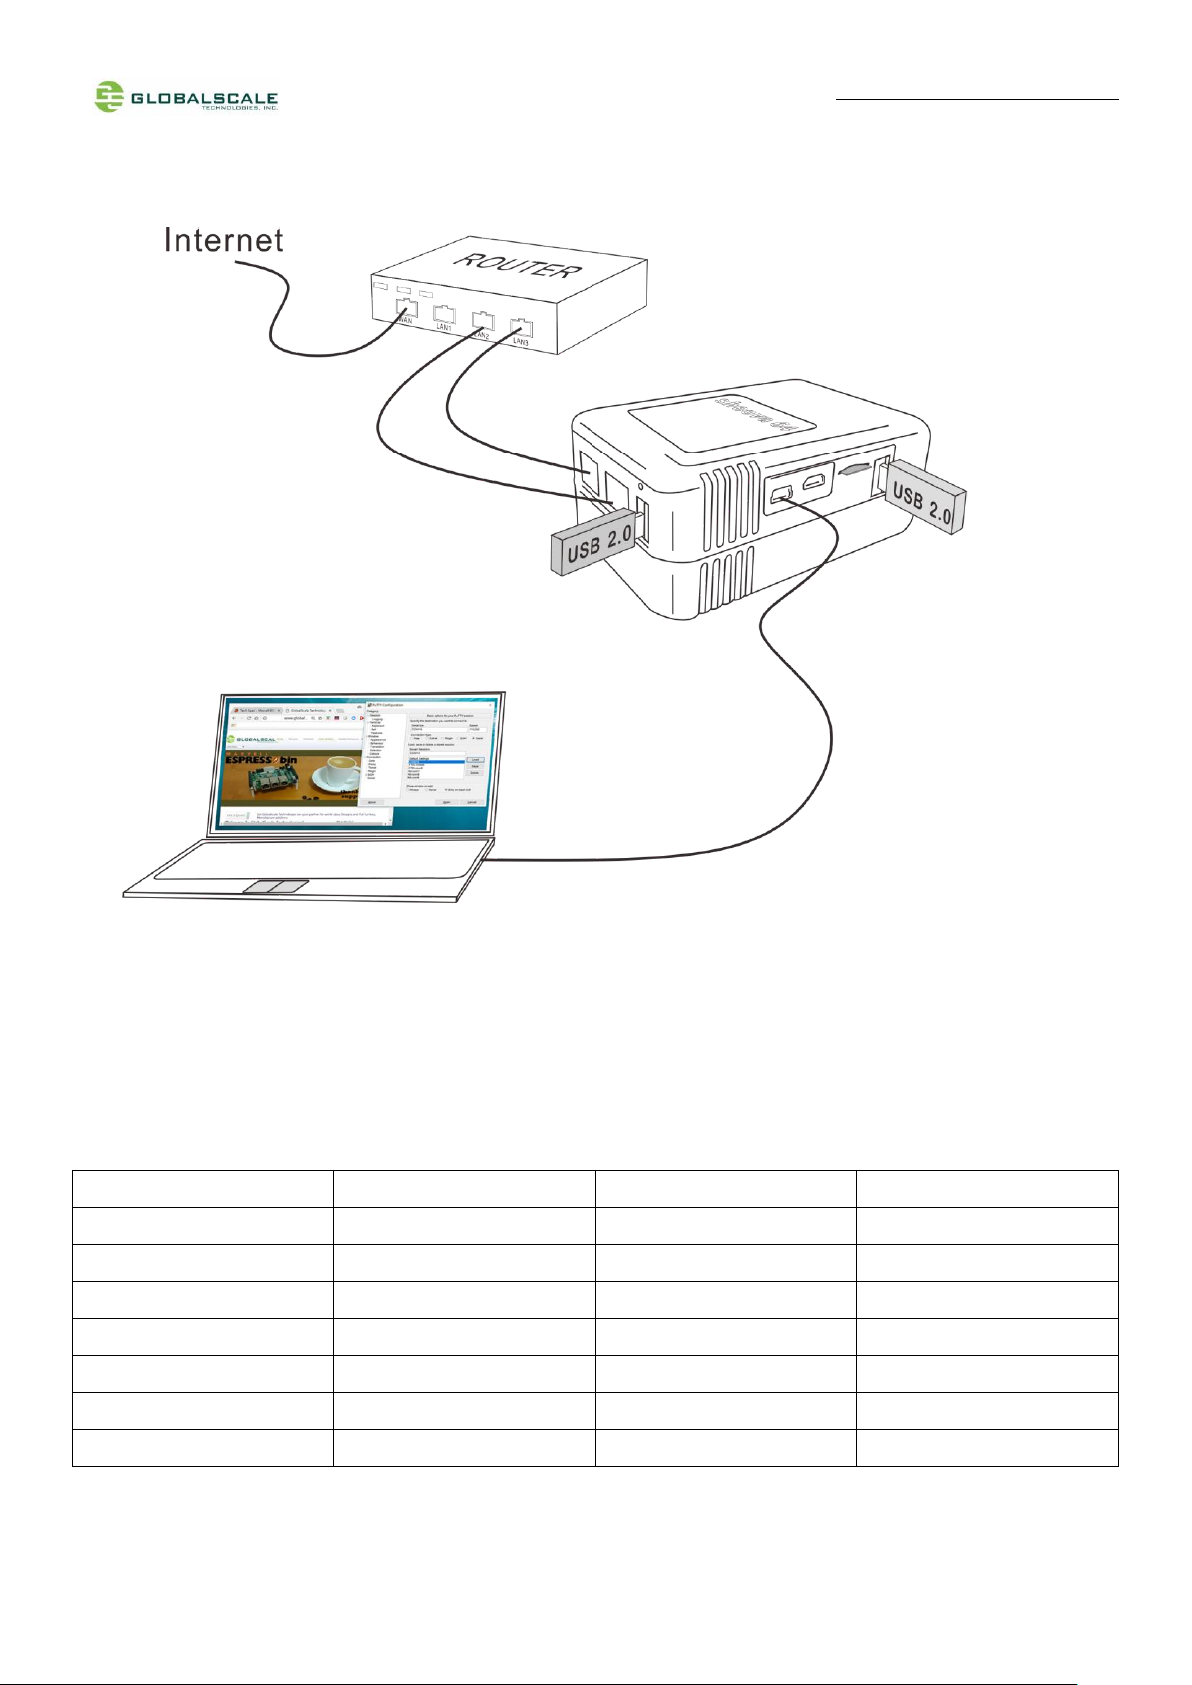
F. Connection for testing
Quick Start Guide –Sheeva64 page 7 / 16
G. Boot device mode
Page 8
Quick Start Guide –Sheeva64 page 8 / 16
H. System bring up- connect to console port
1. Use a Mini-USB cable connecting to USB port on PC for console message input and output.
Below is the console setup step.
a. Install FTDI driver:
Please visit http://www.prolific.com.tw/US/ShowProduct.aspx?p_id=225&pcid=41 web site to download the
PL3203 widnows driver. For Linux user, the PL3203 driver has built-in on linux kernel, so unnecessary to install
driver.
b. Install serial tty software
For UART console software, you can download below software to connect the USB serial console for the
Sheeva64 board.
Linux : minicom
Windows : putty, teraterm
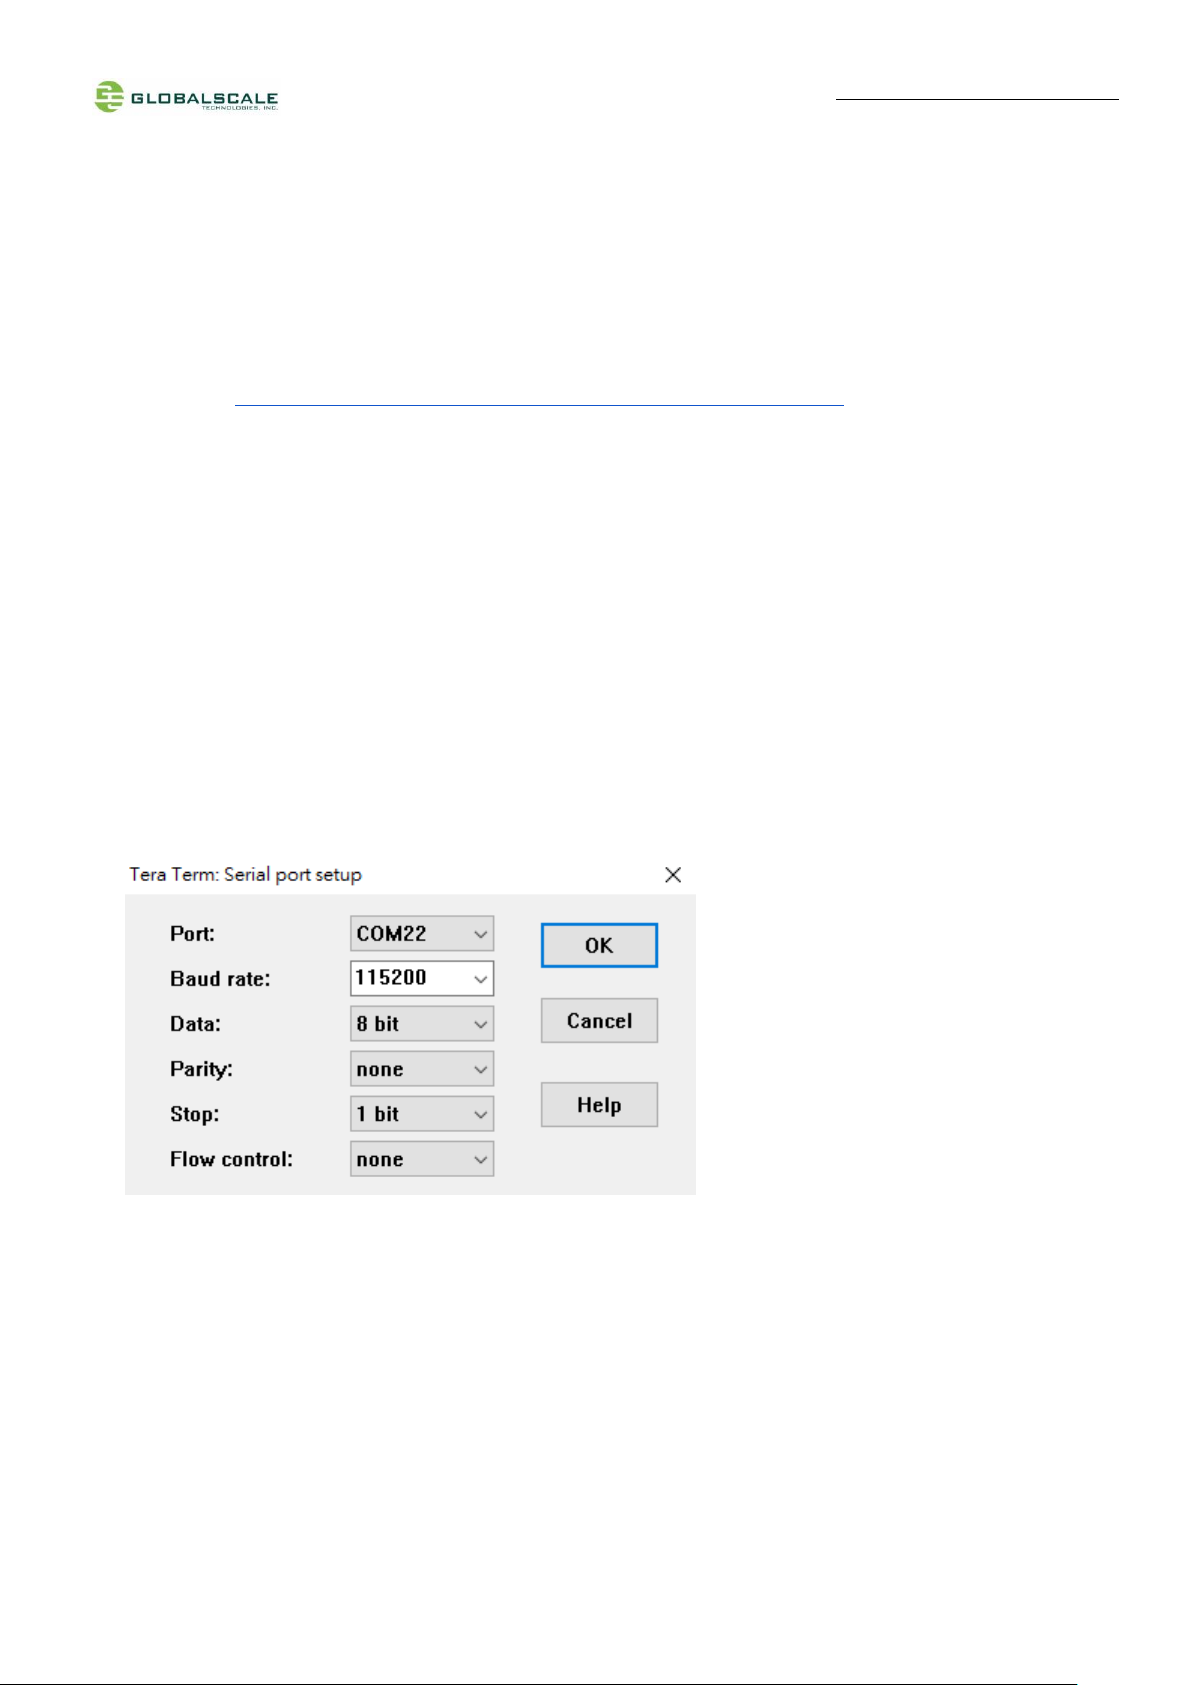
c. Setup UART baudrate
Open the above software and configure the UART baudrate to 115200 8N1 and no flow control.
Example: TeraTerm
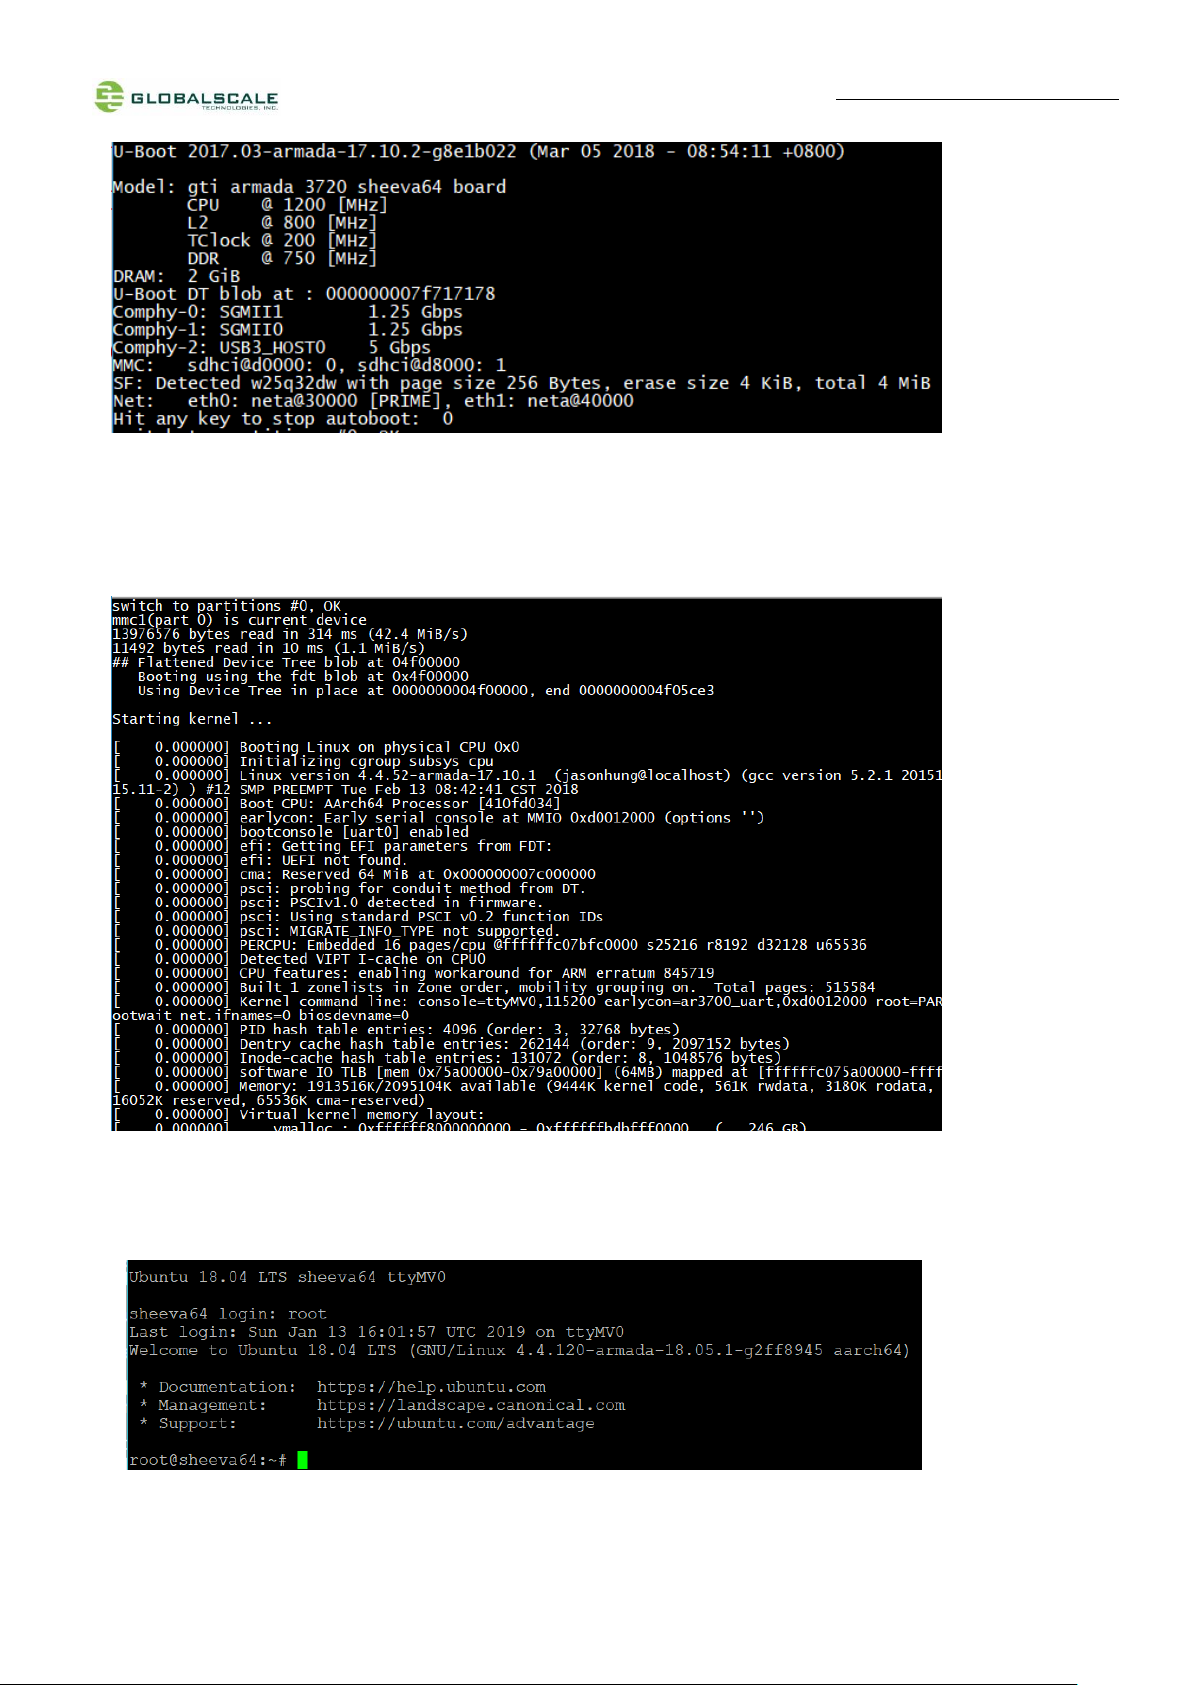
2. The system boot-up has two stages, the first one is bootloader stage, below is the output message, you can press
any key on console to interrupt the autoboot mode.
Page 9
Quick Start Guide –Sheeva64 page 9 / 16
3. If you don’t press any key, the u-boot will auto load the kernel image and dtb file to memory and start the kernel.
4. After boot-up completed, the system will boot into the Ubuntu Linux system.
Page 10
Quick Start Guide –Sheeva64 page 10 / 16
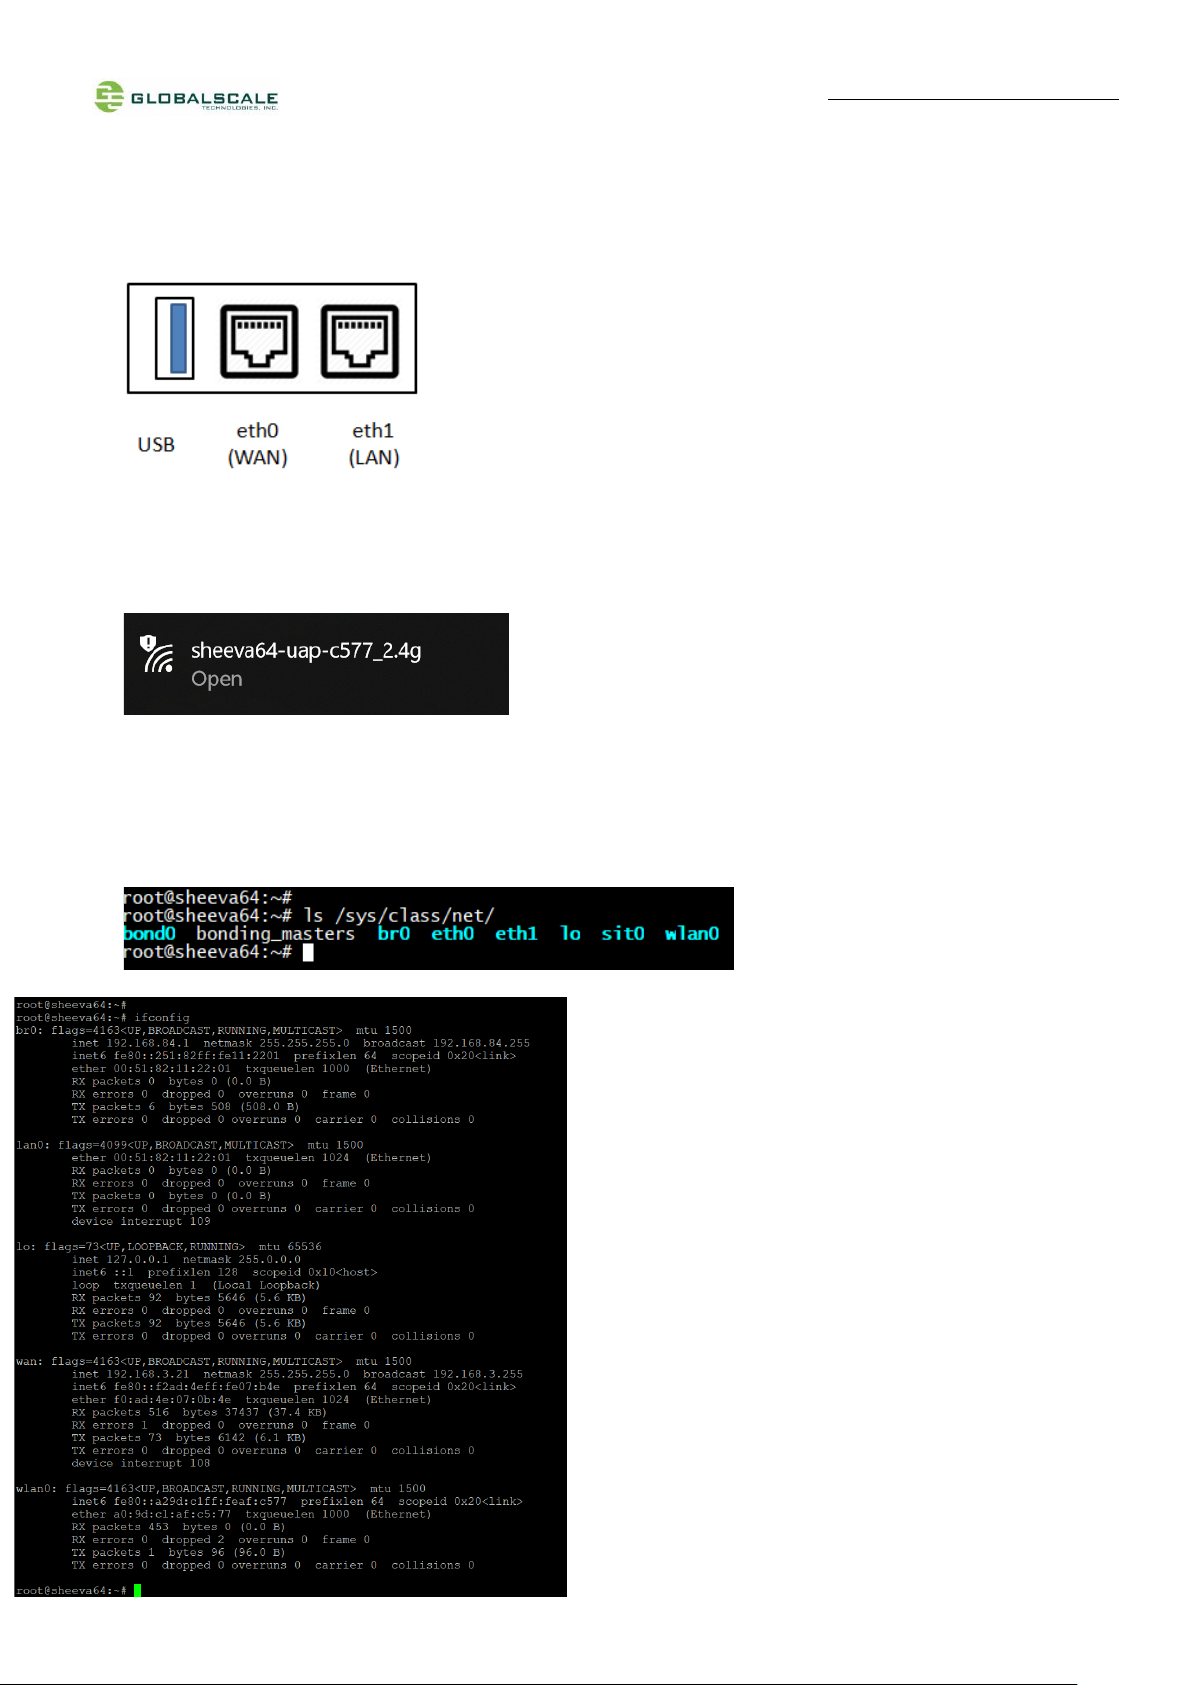
5. By Sheeva64 default, the system will start a router service to setup the ethernet and wifi-ap automatically.
a. Sheeva64 has two ethernet ports, we configured eth0 for WAN and eth1 for LAN, and WAN port will request IP
address through the dhcp service.
6. b. Configured the wifi module (wlan0) to wifi access point mode, and the ssid is “sheeva64-uap-xxyy_2.4g” without
password.
(xxyy is the wifi mac addres latest 4 digits number. Ex 12:34:56:78:xx:yy)
The user can type ’ifconfig’ or ‘ls /sys/class/net’ to make sure all the network interface are exist.
Page 11
File name
Description
Where to get it
1
Minicom
Used as Board console
Re-Install command: yum install minicom
2.
Ftdi_sio.ko
FTDI device driver
module for Linux
http://www.globalscaletechnologies.com/t-downloads.aspx
3.
Ftdi_sio.ko
FTDI device driver
module for Linux
http://www.globalscaletechnologies.com/t-downloads.aspx
I. Tools and files you need to start debugging
1. Prepare one PC with Fedora 14 (or later version) Linux operating system
2. Download and install the following tools and utilities
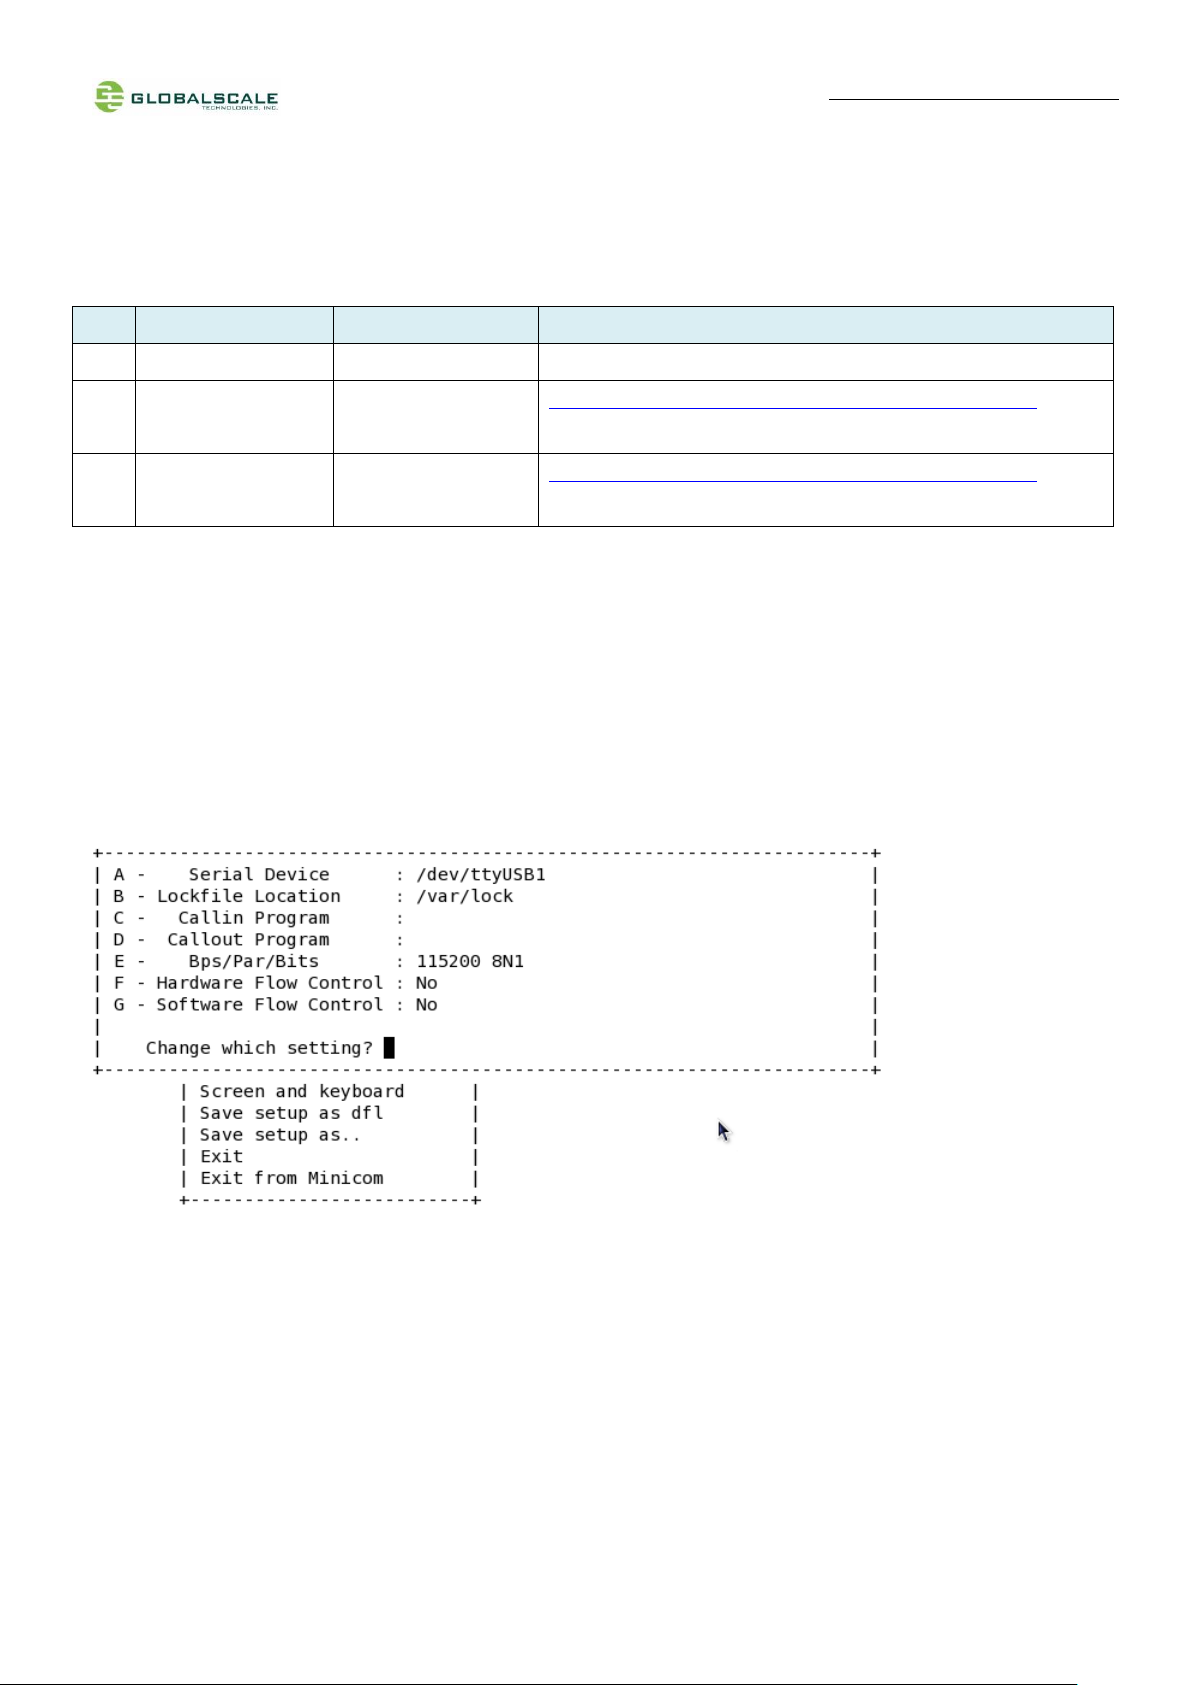
3. Setup minicom
# minicom –s
Set the Configure properties as follows:
Bits per sec field to 115200
Data bits to 8
Parity to None
Stop bit to 1
Flow Control to None
Quick Start Guide –Sheeva64 page 11 / 16
Page 12
Quick Start Guide –Sheeva64 page 12 / 16
J. Basic procedures for debugging
1. Connect cables as described in section G.
2. Run terminal program on Linux PC.
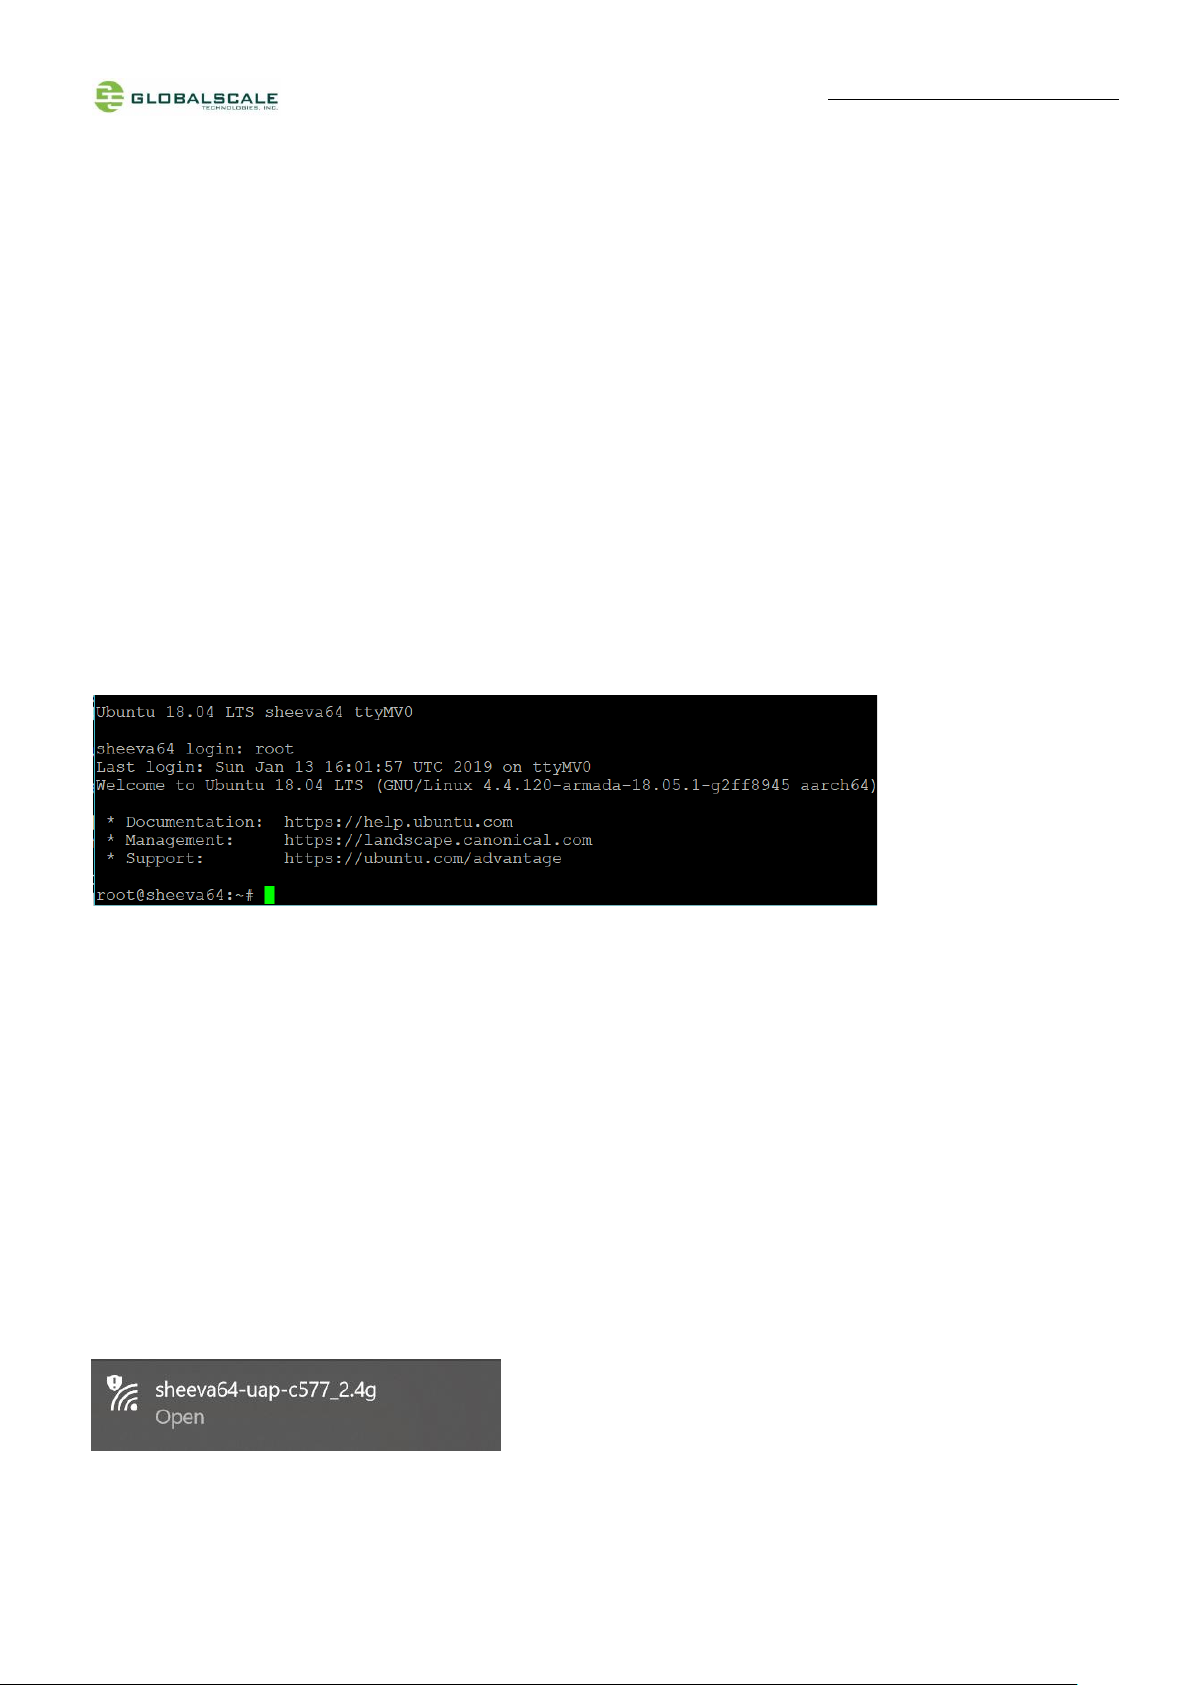
3. Type in # minicom –o marvell
4. Power on the board
You can press any key to stop auto-boot when you see the boot delay timer is counting down.
After entering the uboot prompt, you can also change the uboot environment variables such as boot delay time,
ipaddr, serverip and so on.
If no key has been pressed to interrupt the uboot, it will continue run to the login line where it prompts you to input the
login name and password, here is the default login information.
Login : root, Password: admin, Now, you have the full control of it.
K. 2.4G Wi-Fi
Sheeva64 WiFi works as both client and AP mode but only one at a time.
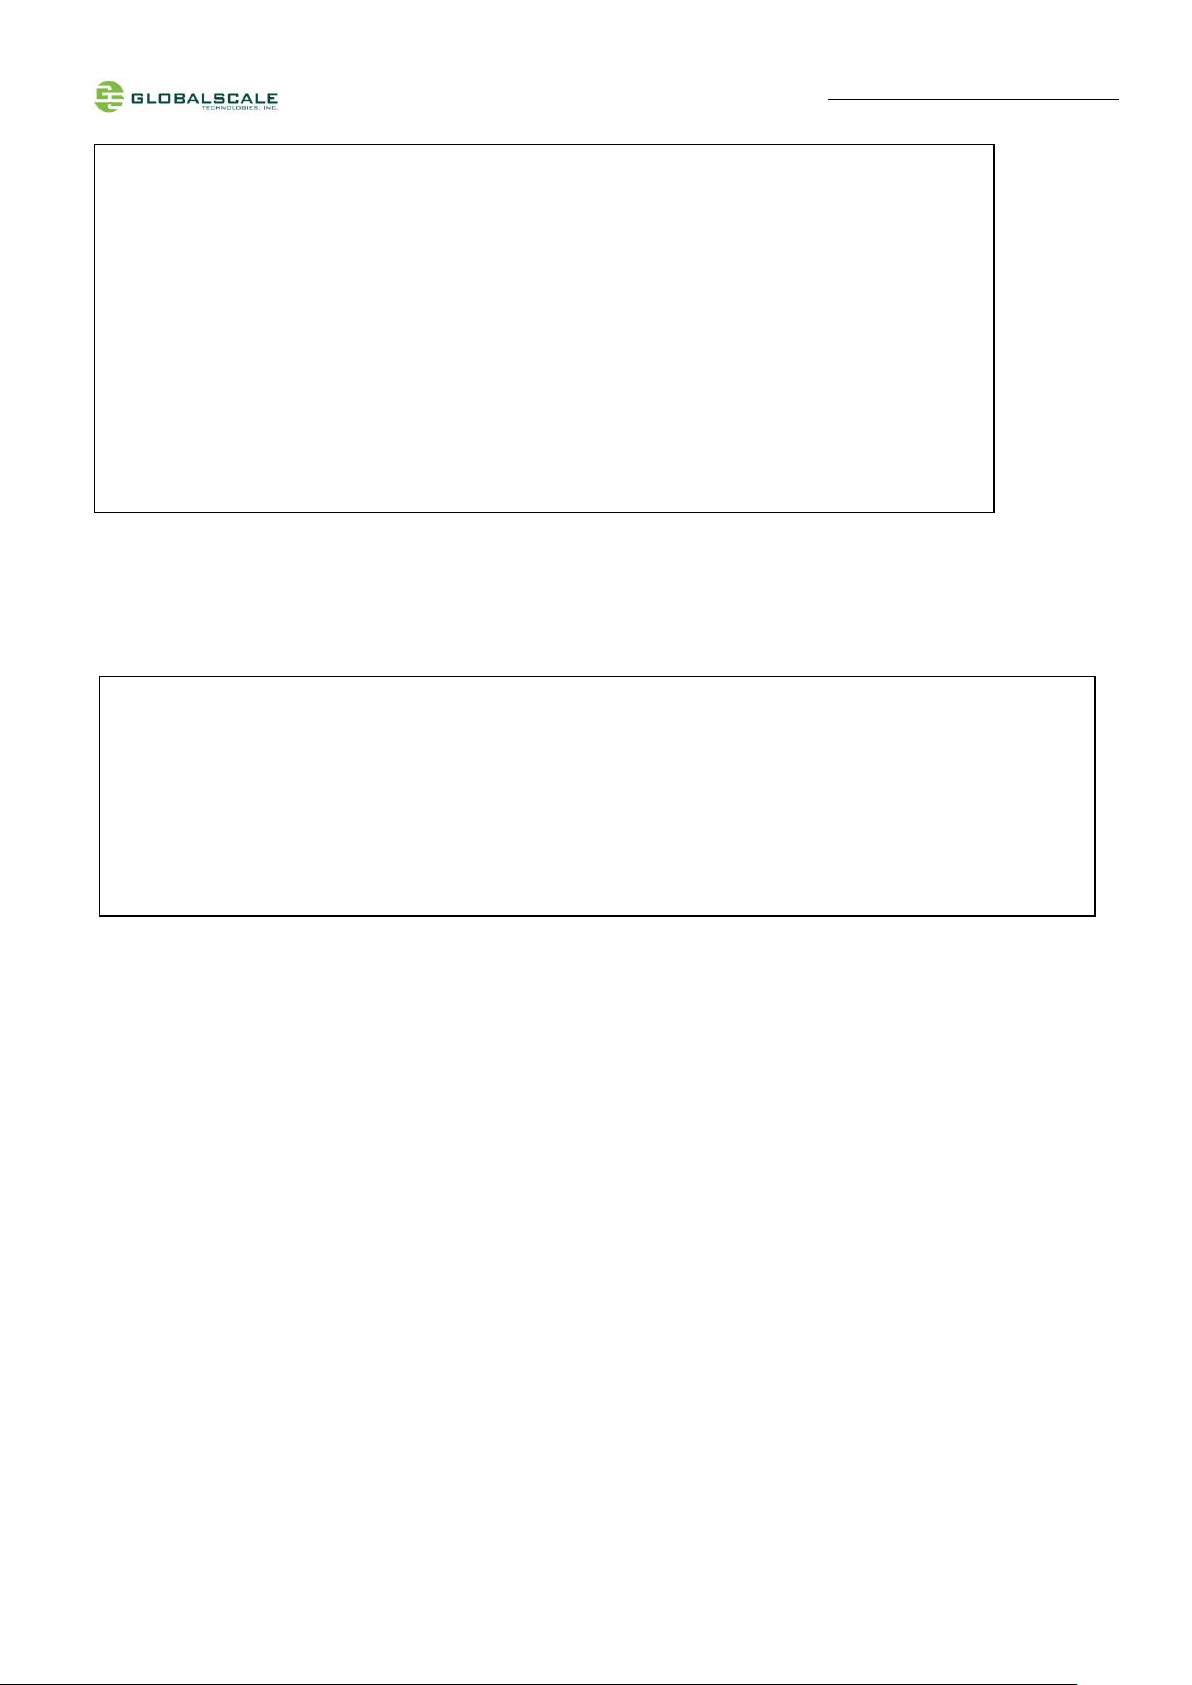
The default mode is AP mode every time when it powers on and can be switched to client mode manually by entering
the setup page, please follow the procedures below to set-up the functionalities for WIFi and Bluetooth.
1. Prepare a computer with Wi-Fi. Here we use computer with Windows 8 operating system for example.
2. Go to “Networks”, View Available Wireless Networks:
Page 13

root@sheeva64:~# ifconfig
br0: flags=4163<UP,BROADCAST,RUNNING,MULTICAST> mtu 1500
inet 192.168.84.1 netmask 255.255.255.0 broadcast 192.168.84.255
inet6 fe80::251:82ff:fe11:2201 prefixlen 64 scopeid 0x20<link>
ether 00:51:82:11:22:01 txqueuelen 1000 (Ethernet)
RX packets 0 bytes 0 (0.0 B)
RX errors 0 dropped 0 overruns 0 frame 0
TX packets 7 bytes 578 (578.0 B)
TX errors 0 dropped 0 overruns 0 carrier 0 collisions 0
lan0: flags=4099<UP,BROADCAST,MULTICAST> mtu 1500
ether 00:51:82:11:22:01 txqueuelen 1024 (Ethernet)
RX packets 0 bytes 0 (0.0 B)
RX errors 0 dropped 0 overruns 0 frame 0
TX packets 0 bytes 0 (0.0 B)
TX errors 0 dropped 0 overruns 0 carrier 0 collisions 0
device interrupt 109
lo: flags=73<UP,LOOPBACK,RUNNING> mtu 65536
inet 127.0.0.1 netmask 255.0.0.0
inet6 ::1 prefixlen 128 scopeid 0x10<host>
loop txqueuelen 1 (Local Loopback)
RX packets 92 bytes 6766 (6.7 KB)
RX errors 0 dropped 0 overruns 0 frame 0
TX packets 92 bytes 6766 (6.7 KB)
TX errors 0 dropped 0 overruns 0 carrier 0 collisions 0
wan: flags=4163<UP,BROADCAST,RUNNING,MULTICAST> mtu 1500
inet 192.168.3.21 netmask 255.255.255.0 broadcast 192.168.3.255
inet6 fe80::f2ad:4eff:fe07:b4e prefixlen 64 scopeid 0x20<link>
ether f0:ad:4e:07:0b:4e txqueuelen 1024 (Ethernet)
RX packets 103 bytes 12558 (12.5 KB)
RX errors 0 dropped 0 overruns 0 frame 0
TX packets 62 bytes 5392 (5.3 KB)
TX errors 0 dropped 0 overruns 0 carrier 0 collisions 0
device interrupt 108
3.Choose and click to connect:
4. Open console terminal ,type ifconfig to see the network configurations
Quick Start Guide –Sheeva64 page 13 / 16
Page 14
root@sheeva64:~# lsusb
Bus 001 Device 003: ID 0bda:b82c Realtek Semiconductor Corp.
Bus 001 Device 005: ID 0951:1624 Kingston Technology DataTraveler G2
Bus 001 Device 004: ID 0930:6545 Toshiba Corp. Kingston DataTraveler 102/2.0 / HEMA Flash Drive 2 GB /
PNY Attache 4GB Stick
Bus 001 Device 002: ID 1a40:0101 Terminus Technology Inc. Hub
Bus 001 Device 001: ID 1d6b:0002 Linux Foundation 2.0 root hub
root@sheeva64:~#
wlan0: flags=4163<UP,BROADCAST,RUNNING,MULTICAST> mtu 1500
inet6 fe80::a29d:c1ff:feaf:c577 prefixlen 64 scopeid 0x20<link>
ether a0:9d:c1:af:c5:77 txqueuelen 1000 (Ethernet)
RX packets 54 bytes 0 (0.0 B)
RX errors 0 dropped 6 overruns 0 frame 0
TX packets 1 bytes 96 (96.0 B)
TX errors 0 dropped 0 overruns 0 carrier 0 collisions 0
root@sheeva64:~#
L. Other useful commands to check with I/O devices
“lsusb” to list the USB devices
Quick Start Guide –Sheeva64 page 14 / 16
Page 15

root@sheeva64:~# fdisk -l
Disk /dev/ram0: 46.9 MiB, 49152000 bytes, 96000 sectors
Units: sectors of 1 * 512 = 512 bytes
Sector size (logical/physical): 512 bytes / 4096 bytes
I/O size (minimum/optimal): 4096 bytes / 4096 bytes
Disk /dev/mtdblock0: 1.5 MiB, 1572864 bytes, 3072 sectors
Units: sectors of 1 * 512 = 512 bytes
Sector size (logical/physical): 512 bytes / 512 bytes
I/O size (minimum/optimal): 512 bytes / 512 bytes
Disk /dev/mtdblock1: 64 KiB, 65536 bytes, 128 sectors
Units: sectors of 1 * 512 = 512 bytes
Sector size (logical/physical): 512 bytes / 512 bytes
I/O size (minimum/optimal): 512 bytes / 512 bytes
Disk /dev/mtdblock2: 2 MiB, 2097152 bytes, 4096 sectors
Units: sectors of 1 * 512 = 512 bytes
Sector size (logical/physical): 512 bytes / 512 bytes
I/O size (minimum/optimal): 512 bytes / 512 bytes
Disk /dev/mmcblk0: 3.6 GiB, 3867148288 bytes, 7553024 sectors
Units: sectors of 1 * 512 = 512 bytes
Sector size (logical/physical): 512 bytes / 512 bytes
I/O size (minimum/optimal): 512 bytes / 512 bytes
Disklabel type: dos
Disk identifier: 0x89708921
Device Boot Start End Sectors Size Id Type
/dev/mmcblk0p1 * 2048 7553023 7550976 3.6G 83 Linux
hci0: Type: Primary Bus: USB
BD Address: A0:9D:C1:AF:C5:78 ACL MTU: 1021:8 SCO MTU: 255:16
UP RUNNING
RX bytes:674 acl:0 sco:0 events:45 errors:0
TX bytes:2735 acl:0 sco:0 commands:45 errors:0
root@sheeva64:~#
“fdisk -l ” to list the partitions of disk
Quick Start Guide –Sheeva64 page 15 / 16
“hciconfig” to list the bluetooth devices
Page 16

M. System reset button
There is a pinhole above the USB 2.0 port on the back panel, see section D,
Insert the pinhole with a paperclip then push gently to reset the system
N. Download sites
To download the related files for Sheeva64, please visit:
http://www.globalscaletechnologies.com/t-downloads.aspx
http://espressobin.net/
=== End Of File ===
Quick Start Guide –Sheeva64 page 16 / 16
 Loading...