

Page 1
GTV-380
User Manual
Version 1.0
Page 2

Table of Content
Chapter 1 Features and Specification ................................ 3
Features................................................................................3
Specification..........................................................................4
Accessories............................................................................7
Overview...............................................................................9
Chapter 2 Getting Started................................................ 13
Download Application Software to memory card by card reader...13
Attach GTV-380 to Cradle (DVB-T module)............................... 15
Charging your GTV-380......................................................... 16
Chapter 3 Software Application....................................... 17
Main Screen......................................................................... 17
Media Mode......................................................................... 18
Music Player ........................................................................ 19
Photo Viewer ....................................................................... 21
Setup Mode.........................................................................22
Chapter 4 Bluetooth HandsFree..................................... 27
Bluetooth main screen........................................................... 27
Search and connect to your Bluetooth phone............................ 36
Answer or hang up a incoming call.......................................... 37
Make a call.......................................................................... 38
Bluetooth Stereo Playback .....................................................39
Chapter 5 DVB-T.............................................................. 40
DVB-T.................................................................................40
Remote Control.................................................................... 40
Enter TV Mode ..................................................................... 41
Chapter 6 Troubleshooting ..............................................49
If the GTV-380 does not boot up successfully or does not function
properly.............................................................................. 49
Reset.................................................................................. 49
Safely Remove Hardware....................................................... 51
2
Page 3

Chapter 1
Features and Specification
Features
• Complete car navigation solution in one box including car mount
• Simple touch-screen operation
• 4.3” screen, 65536 colours, bright TFT LCD
• Smart and easy:
- Attach, switch it on and go
- Large Function icons design for easy touched
- User-Friendly keypad
- Clear, high quality voice-guided instruction
- Powered by cigarette lighter or long-life rechargeable battery
- Easy to be mounted and removed
• Built-in antenna; MMCX-type connector for optional external
antenna
• SD storage card expansion slot
• Supports music playback function for “wma” file format.
• Supports photo view function for “jpg” file format.
Bluetooth
- Auto-Reply mode
- Profile: Headset/ HandsFree/ A2DP/ AVRCP/ OPP
- Phonebook download
- Music playback via Bluetooth
Digital TV
- Build-in EPG Functions(English、Germany、French、Italian、
Spanish、Swedish、Finnish、Traditional Chinese)
- Support MTS and Subtitle (Base on Region)
- Support Auto Scan/ Manual Scan mode
- Mobility and Receivability
3
Page 4

Specification
► System
Electrical Characteristics
Processor Samsung S3C2440, 400MHz
OS WinCE.NET 5.0
Flash Memory Default 64 MB, can up to 2GB
SDRAM Memory 64MB
Memory Card Slot SD/MMC
GPS SiRF Star III , built-in 18x18 Patch Antenna
DISPALY
Display 4.3”, TFT LCD with Touch Screen
Pixels H*W 480*272 (WQVGA)
Display Type COLOR TFT Transmissive
Color Number 65536 colors
Backlight Type LED x 7
Brightness Typ. 320 cd/m²
View Angle 50/55/60/60 (U/D/L/R)
Touch Panel Resistive Type, 30% Haze film
AUDIO
Internal Speaker built-in Stereo Speaker, 1W / 8 ohm x 2
Earphone Jack 3.5 mm, Stereo Output
USB
USB Support USB 1.1, Mass Storage Driver
USB Connector Mini USB
POWER SOURCE
Car Charger DC 5.0V / 2A
Power Switch Slide Switch (Battery ON/OFF)
BATTERY
Battery Cell Type Built-in Lithium Polymer rechargeable Battery
Battery Capacity 2200mAh
Charging time 4 hours
Operation time Up to 5 hours
Suspend time 180 hours
ANTENNA
GPS Antenna Type 18 x 18 mm, Patch Antenna
External GPS Antenna Active external antenna (MMCX)
Sensitivity -159dB
4
Page 5

KEY BUTTON
Power Press the power button to turn on the device, press it again
Reset Use the stylus tip to press down the reset button through the
Battery Slide Switch (ON/OFF switch) Slide to “OFF” to disable battery power
TOUCH PAD
Touch PAD support 6 Key with LED indicator
Zoom IN Press Zoom In button to zoom in ( Car Navigation Only )
Zoom Out Press Zoom Out button to zoom out ( Car Navigation Only )
Mute Press Mute button to mute voice or resume voice
Volume UP Volume up
Volume Down Volume down
Menu Press Menu button to go back to System menu
Mechanical
Dimension 126.5mm(L) x 84.6mm(W) x 24mm(H)
Main Unit Weight 250g
DVBT Unit Weight 121g
Temperature
Operating 0°C ~ 50°C
Storage -20°C ~ 70°C
Humidity Operational up to 95% non-condensing
Safety & EMI
FCC Approved, CE marked, BQB Approved
Bluetooth
Chip CSR, BC03 multimedia
Profile Support: Headset / Handsfree / A2DP / AVRCP / OPP
Sensitivity -75 dBm @0.1% BER
Accessory
Car charger 5V / 2A
Travel charger 5V / 2A
DVBT IR remote 26 Key, Name Card Type
DVBT antenna X 2, Length: 1.5m
to close any open windows and turn it off (enter a standby
mode)
hole to reset the system.
supply to the system.
5
Page 6

DVBT
Tuner Built-in Dual Tuner,
EPG Function Support
Channel Frequency UHF / VHF (470~862 MHz / 174~230 MHz)
Channel Band Width 6 / 7 / 8 MHz
Demodulation COFDM with 2K / 8K FFT
Receive Sensitivity -85 dBm
IR Remote Control 26 Key
► GPS Specification
Electrical Characteristics
GPS Chipset SiRF Star III
Frequency L1, 1575.42 MHz
C/A Code 1.023 MHz chip rate
Channels 20 channel all-in-view tracking
ACCURACY
Position Horizontal 10 meters, 2D RMS
1-5 meters 2D RMS, WAAS corrected
Velocity 0.1m/sec
Time 1 micro-second synchronized to GPS time
DATUM
Datum Default: WGS-84
ACQUISITION RATE
Hot start 1 sec., average
Warm start 38 sec., average
Cold start 42 sec., average
Reacquisition 0.1 sec. average
PROTOCOL
GPS Protocol Default: NMEA 0183 (Secondary: SiRF binary)
GPS Output format GGA(1sec), GSA(1sec), GSV(5sec), RMC(1sec), GLL, VTG
DYNAMIC CONDITION
Acceleration Limit Less than 4g
Altitude Limit 18,000 meters (60,000 feet) max.
Velocity Limit 515 meters/sec. (1,000 knots) max.
Jerk Limit 20 m/sec**3
is optional
6
Page 7

Accessories
GTV-380 Main Unit
DC charger
Mount
AC adapter
DVB-T module
USB cable
7
Page 8
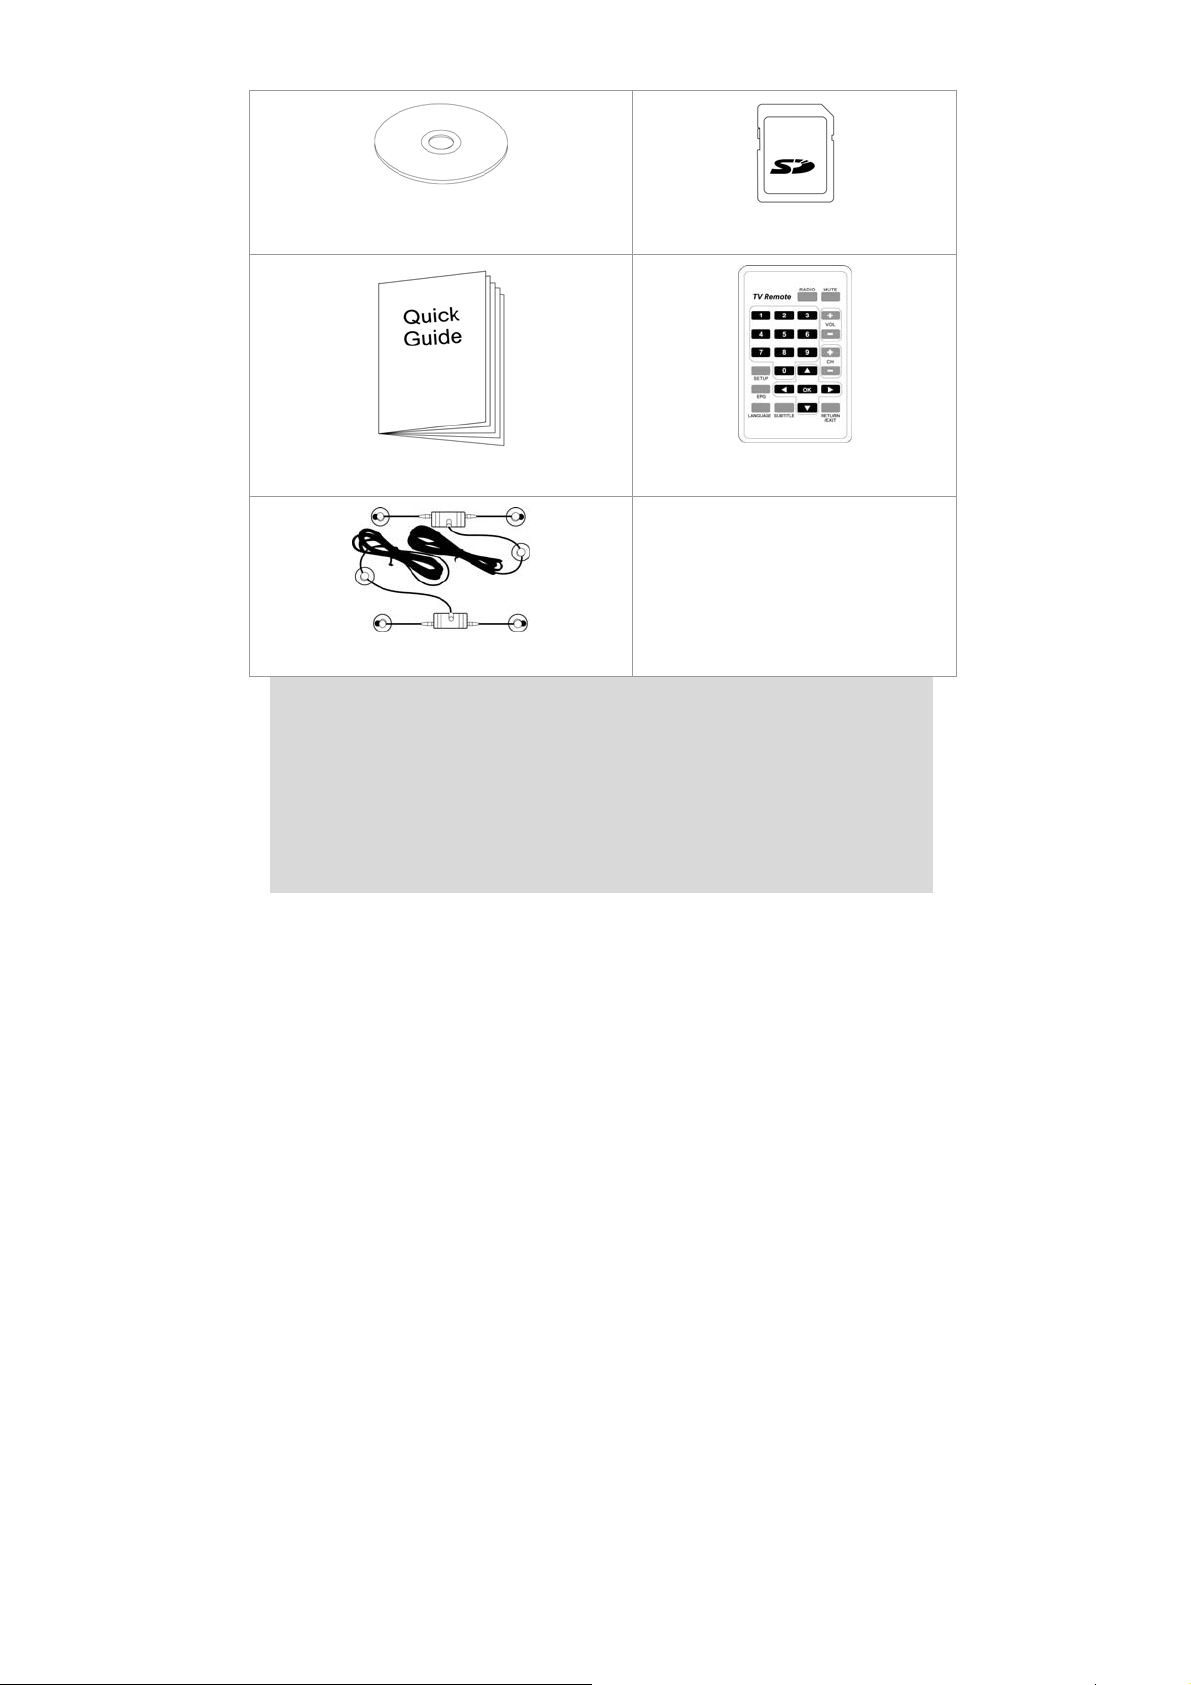
CD or DVD (user manual, driver,
Application, map data…)
Quick Guide
SD card (optional)
Remote control
DVB-T Antenna
Note:
1. If any item is missing or damaged, please contact with your local
retailer.
2. DVB-T antenna graphical representation meets and the material object
differs from, please take actual attach the antenna as
8
Page 9
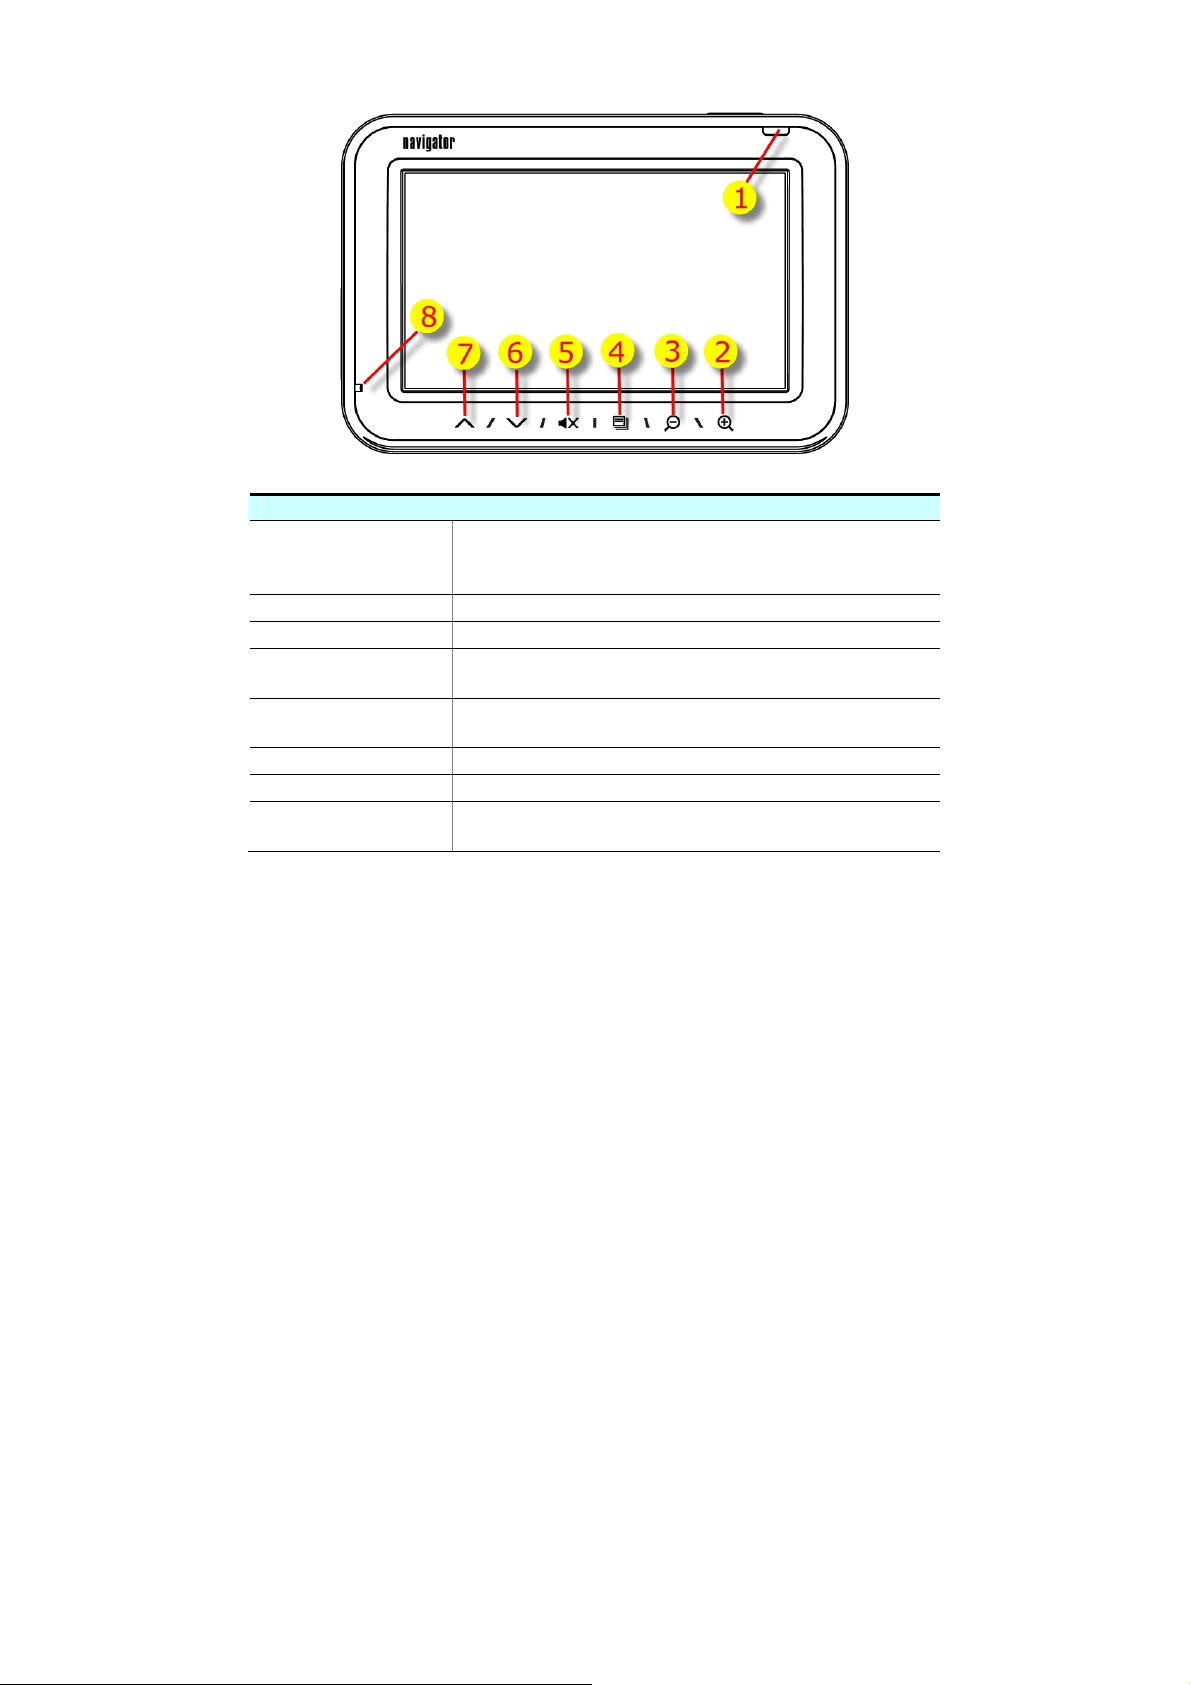
Overview
Front View
Solid Red – Battery is lower than 40%.
➊
Power LED
➋
Zoom in Zoom in button.
➌
Zoom out Zoom out button.
➍
Menu button
➎
Mute
➏
Volume down Volume down button.
➐
Volume up Volume up button.
➑
Microphone
Solid Amber – Battery is being charged.
Solid Green – Battery full charged.
Press the Menu button to go directly to Main
Menu of the application.
Press to mute the audio, press again to
resume.
Microphone is enabled when you connect
GTV-380 with your Bluetooth cell phone.
( For Car Navigation Only )
( For Car Navigation Only )
9
Page 10
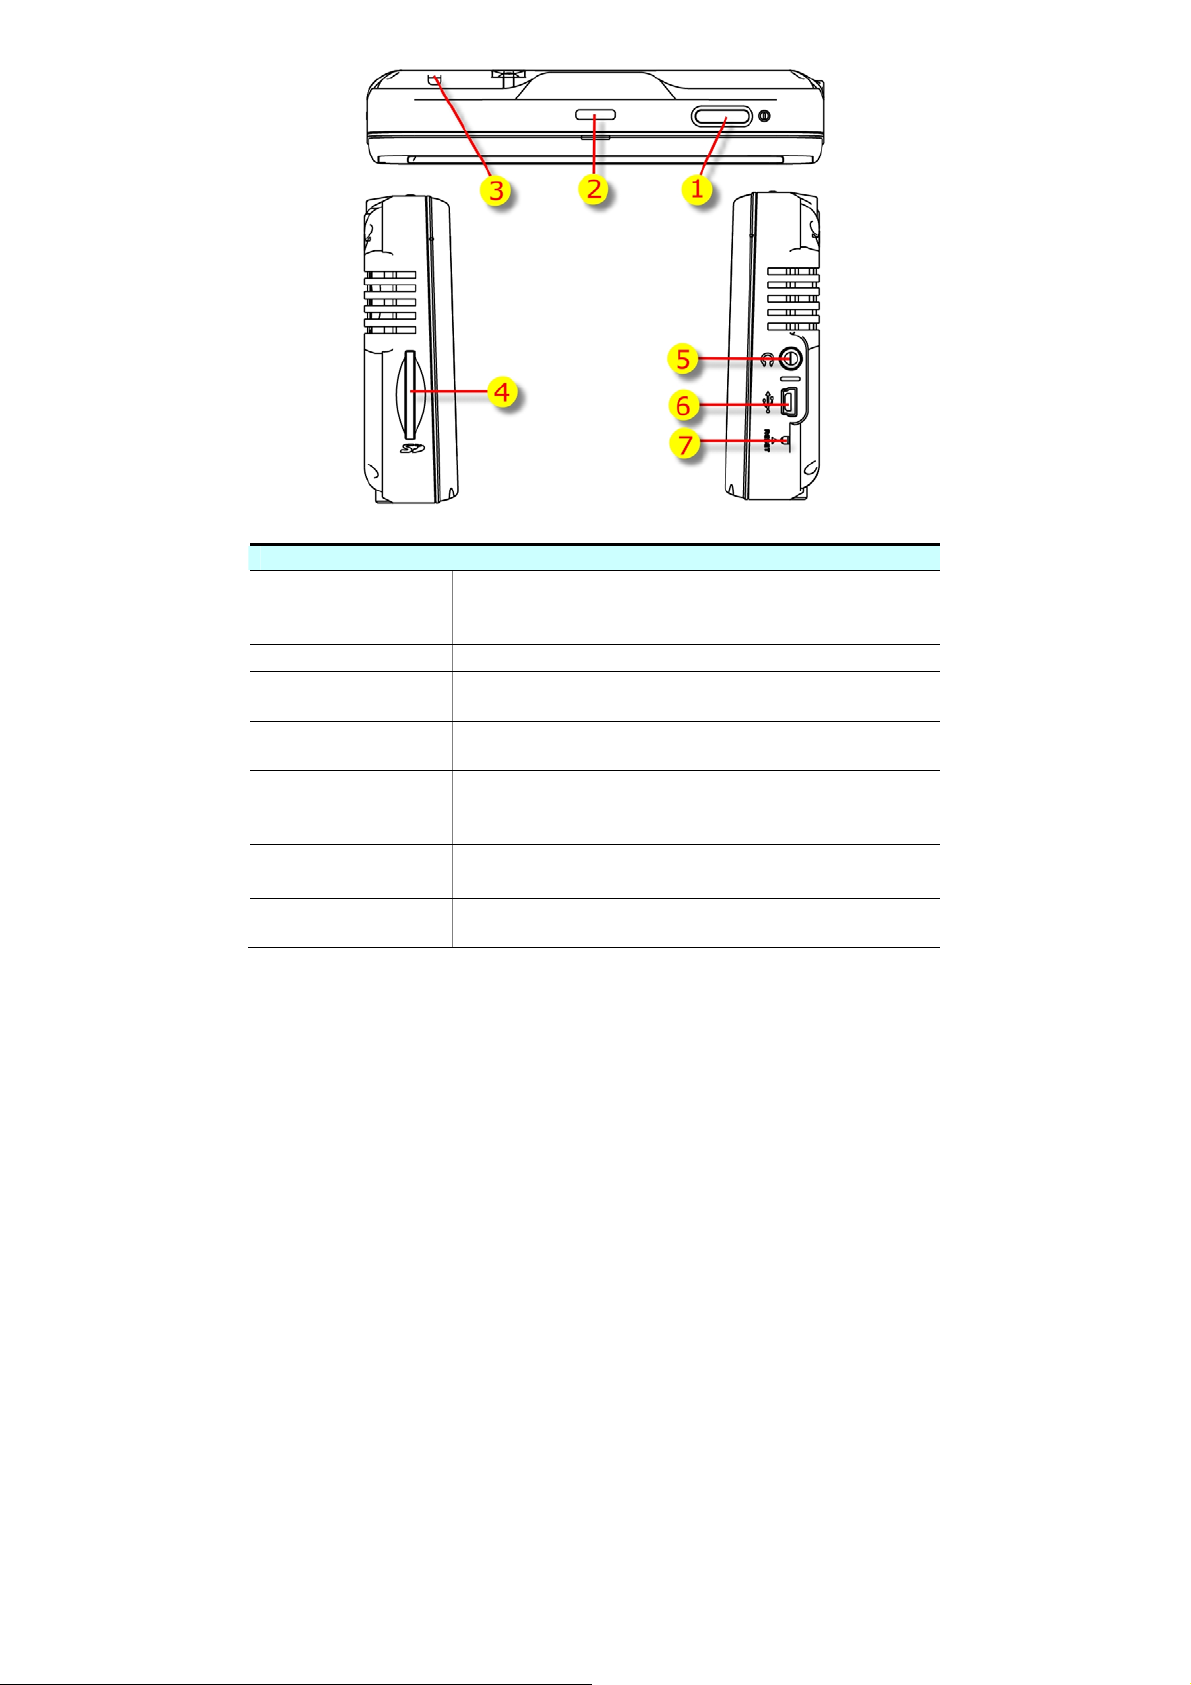
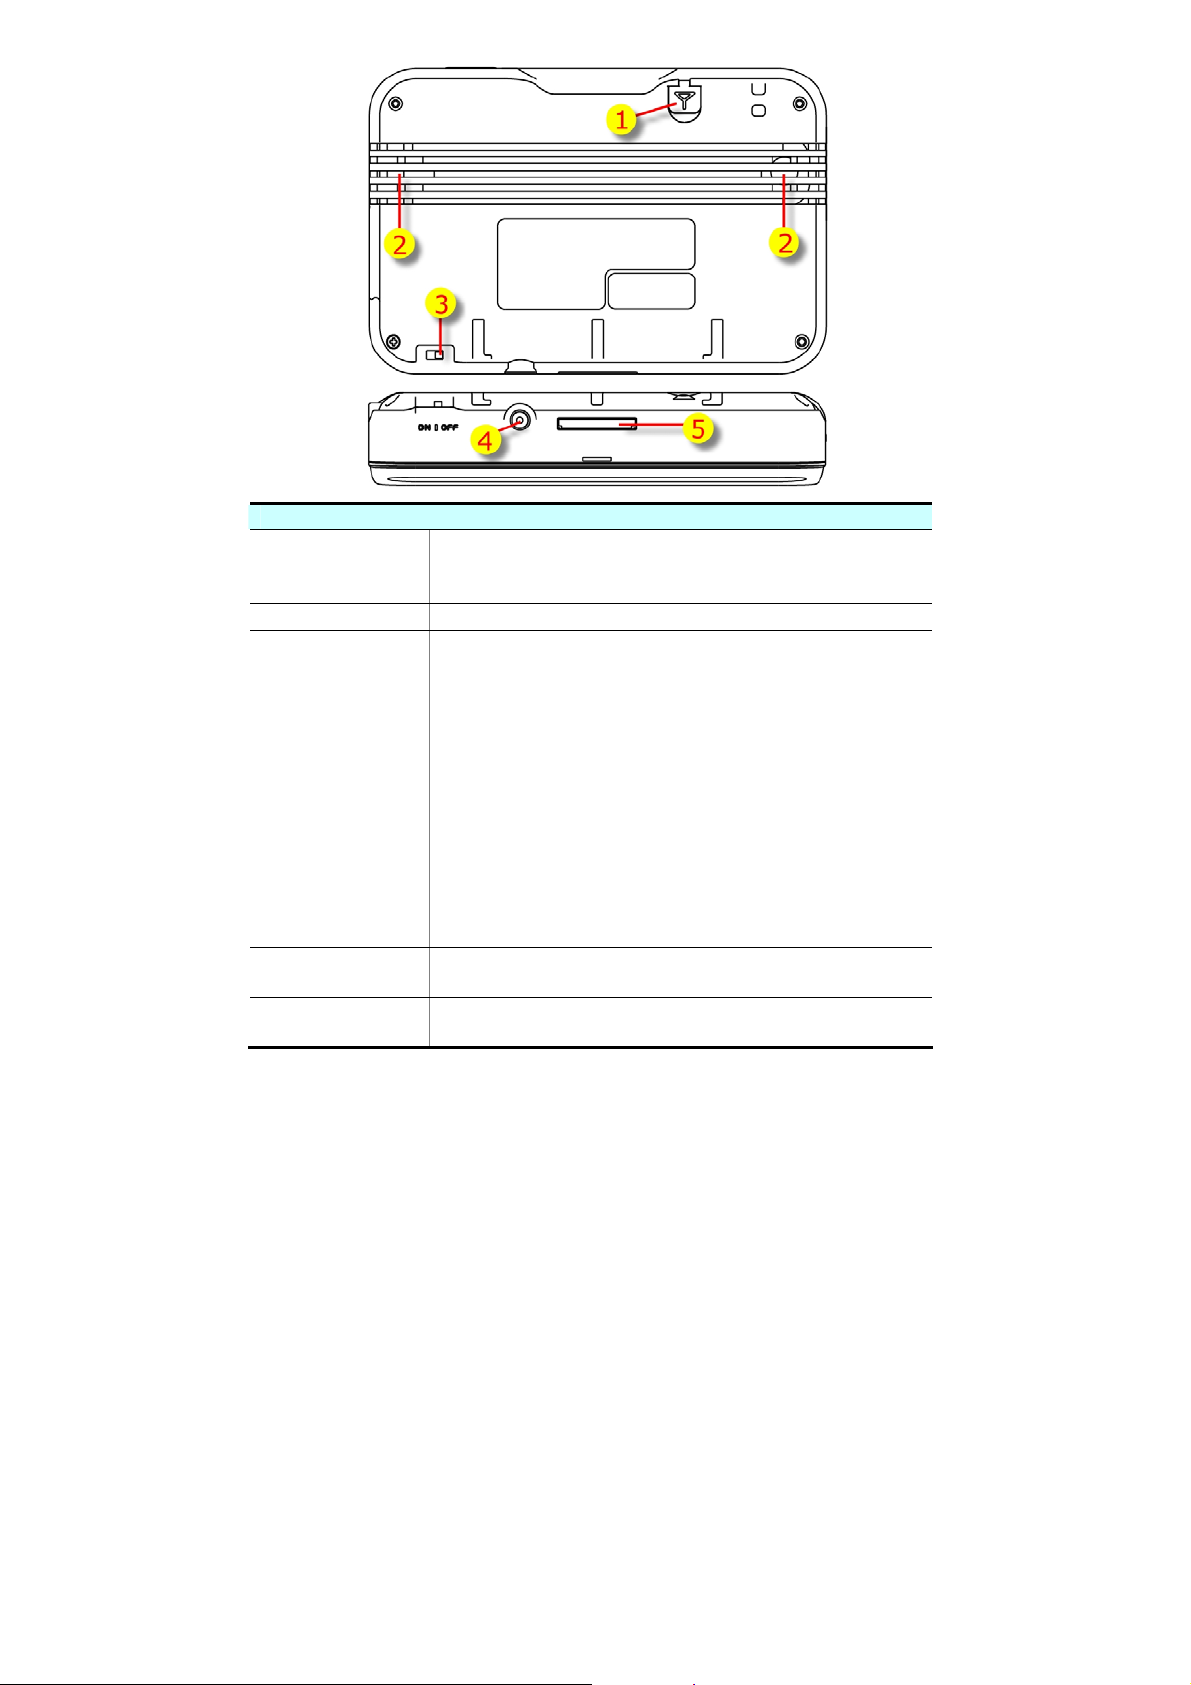
Side View and Top View
Press the Power button to turn on the
➊
Power button
➋
Clip groove For the cradle to clip tight to the main unit.
Lanyard
➌
Hook
➍
SD card slot
Earphone
➎
jack
➏
Mini USB port
➐
Reset button
GTV-380, press it again to turn it off (enter the
standby mode).
For you to attach a hand cord to the main unit.
The Navigation software, map data and other
media files can be stored in the SD card.
Plug the earphone or headset to the socket,
you can listen to the navigation voice guide or
enjoy your favorite music.
Connect the GTV-380 to PC via an USB cable
for data transfer.
Use the stylus tip to press down the reset
button through the hole to reset the system.
10
Page 11
Bottom View and Rear View
External
➊
Antenna
connector
➋
Speaker For output the music or navigation voice.
Battery
➌
Slide
Switch
Charging
➍
connector
Docking
➎
connector
For you to connect an optional MMCX-type
external antenna.
Slide the switch to “OFF” position to prevent
from accidentally turning on the device by
touching the power button. If you want to use
this device, be sure to slide the switch to the
“ON” position.
L The purpose of the Battery Slide Switch is
to cut off power to the unit. It is used to disable
the unit in transit from the factory and if the
unit will be in storage for long periods of time.
Be sure that the switch is in the “ON” position
when you remove the unit from the box. The
GTV-380 will NOT charge if the switch is in the
“OFF” position.
For power supply and battery charging.
Docking connector for DVB-T module.
11
Page 12
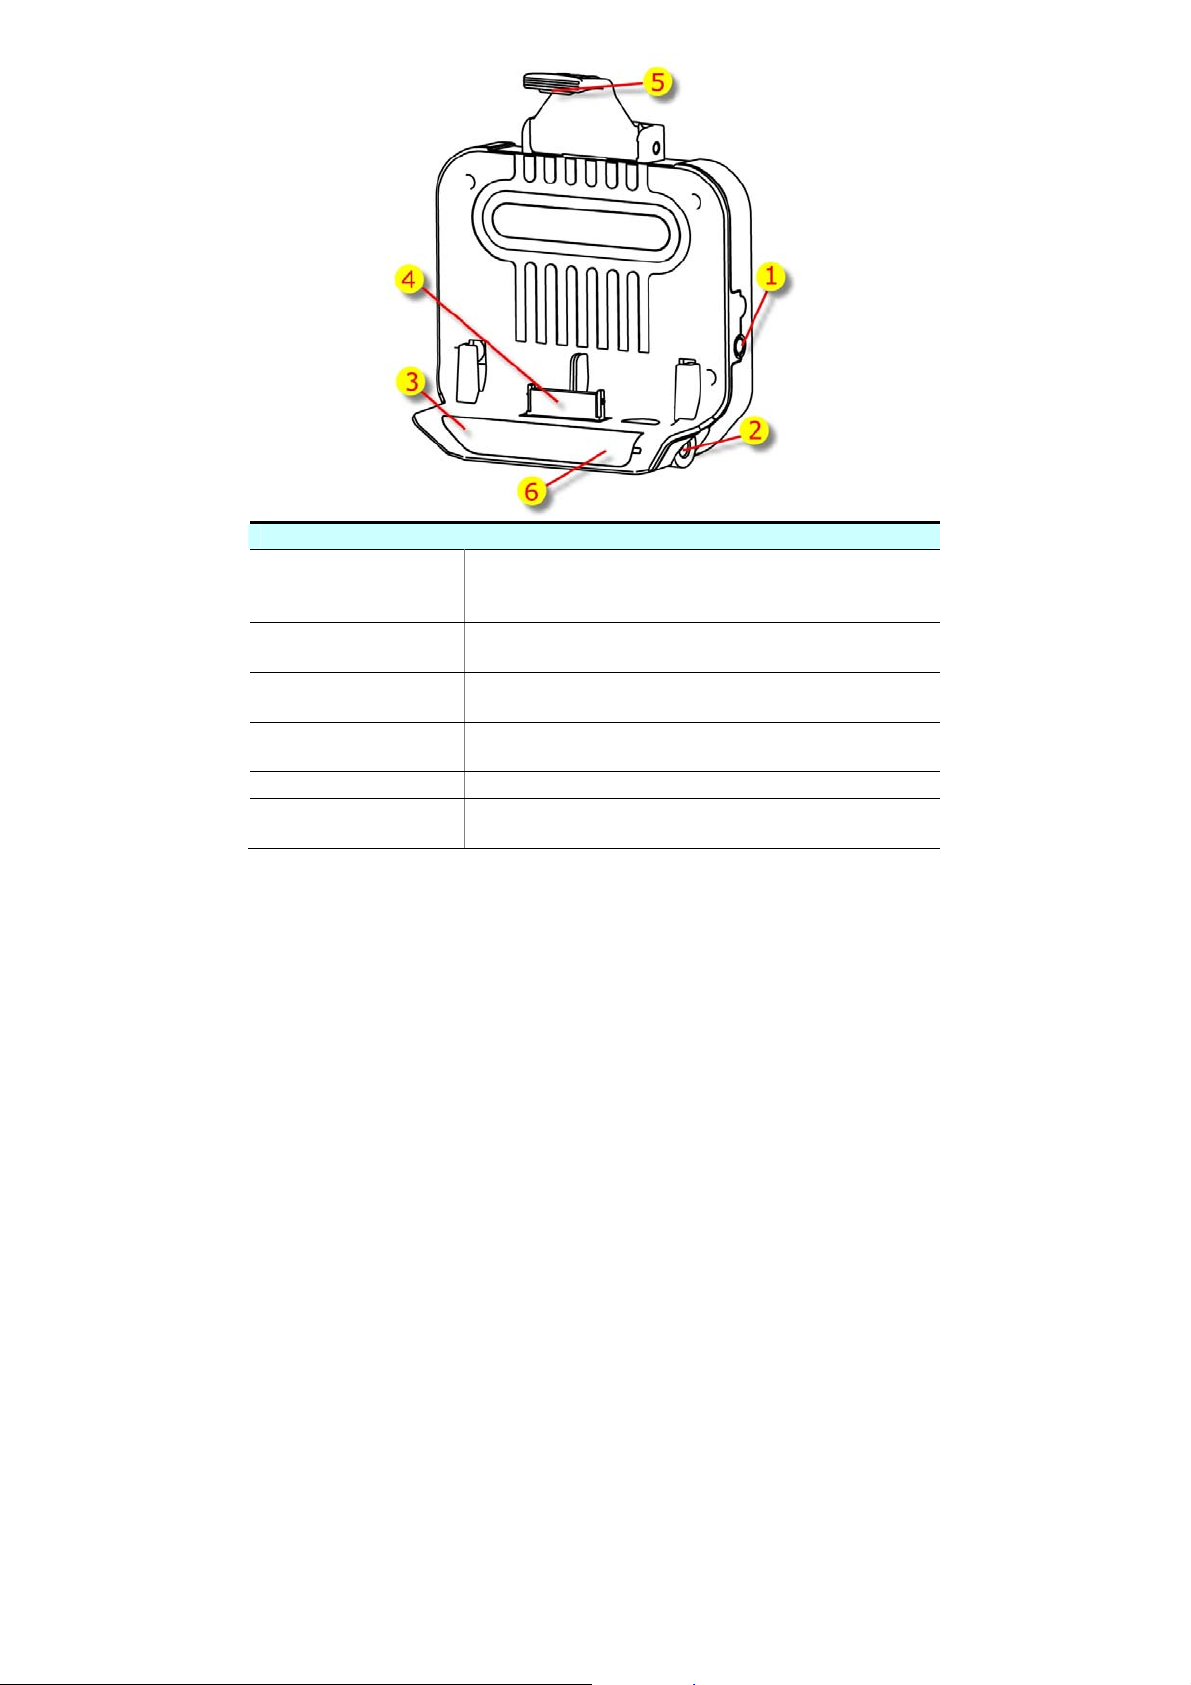
DVB-T module
DVB-T
➊
Antenna
connector
Charging
➋
connector
Infrared
➌
sensor
Docking
➍
connector
➎
Clip hook For clip into the groove of the main unit.
➏
DVB-T LED
For you to connect to DVB-T antenna. (on
both sides)
For power supply and battery charging.
Infrared sensor for receiving signal from
remote control.
Docking connector for DVB-T module.
The blue LED will light when DVB-T function
is operating.
12
Page 13

Chapter 2
Getting Started
Before you start to use the GTV-380, please connect it with the AC
adapter and plug to power socket for battery charging. When it is
in charging, the status indicator will be amber. If the battery is
fully charged, the status indicator will be lit on green.
Download Application Software to memory
card by card reader
Insert the SD card into your card reader which is connected to your
PC. Insert the CD/DVD into the CD/DVD-ROM drive; the installation
program will automatically start. (If your autorun feature is
disabled, please manually execute this program by double click the
"auto.exe" from the root directory of CD/DVD.) Click “Make
System Disk” button for downloading the application and map into
SD card.
13
Page 14

Click on the drive letter which your SD card is inserted, and click on
“Start” button. After the download process is finished, please
remove the SD card from card reader, insert it into your GTV-380
and restart it.
14
Page 15

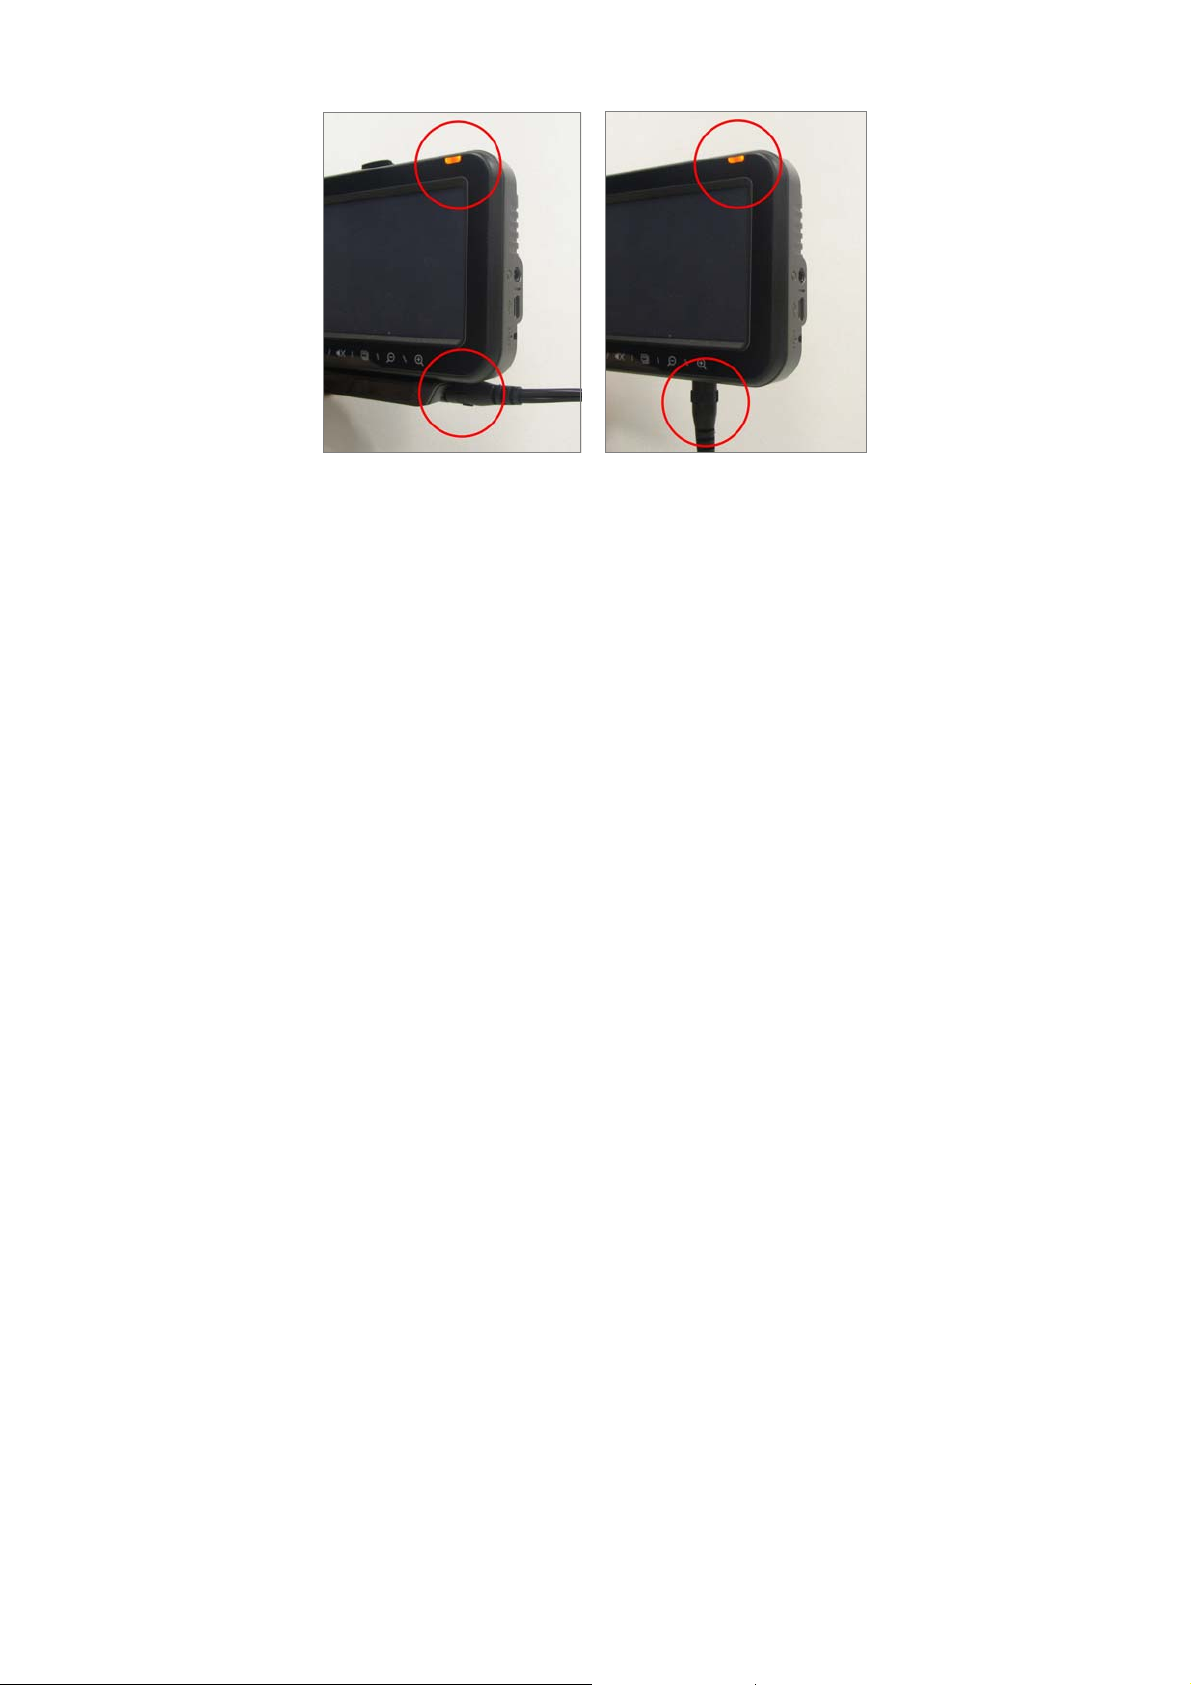
Attach GTV-380 to Cradle (DVB-T module)
Release
Lock
1. Place the GTV-380 at a downward angle into the base of the
cradle.
2. Align three grooves and docking connector to push down
GV-388 inward until the top clip locks into place.
3. Clean windshield glass thoroughly with glass cleaner.
4. Moisten suction cup and attach mount to the windshield.
5. Lock mount lever by moving forward.
z To release, bring lever back and pull on the suction cup’s clear
tab to release suction. Never pull on mounting arm to remove
from glass.
z It is suggested that you attach the mount in the appropriate
place in your car. Do not mount in front of an airbag panel, or
block the driver's vision.
15
Page 16
Charging your GTV-380
Plug the end of AC adapter or DC charger into the charging
connector of GTV-380 or DVB-T module. The power LED will light.
When battery is fully charged, the LED becomes green.
16
Page 17

Chapter 3
Software Application
Main Screen
Main Screen
Tap on the Navigation icon to start the Navigation
z
application.
z
Tap on the TV icon to start the DVBT function.
Tap on the HandsFree icon to start the Bluetooth HandsFree
z
application.
Tap on the Media icon to enter the sub-screen which
z
contains the music player and photo viewer.
Tap on the Setup icon to enter the sub-screen which you can
z
do the settings of the device.
Tap on the date and time on top right corner of screen; it
z
enters the date and time adjustment screen.
Battery capacity is 75%~100%.
Battery capacity is 50%~75%.
Battery capacity is 25%~50%.
z
Tap on the battery icon on top right corner of screen; it
enters the power setting screen.
Battery capacity is below 25%.
AC adapter is connecting to the device.
17
Page 18

Media Mode
z
Tap on the Music icon to start the music player.
z
Tap on the Photo icon to start the photo viewer.
Media Screen
18
Go back to Main Screen.
Page 19

Music Player
In the center of screen, it shows the music title, the timer
z
and the total length of this music.
Tap this button to play the next song.
Tap this button to play the current song.
Tap this button to pause the playing.
Tap this button to play the previous song.
Tap this button to stop the playing.
Sequentially play the songs from playing list.
Randomly play the songs from playing list.
Play all songs form playing list once and then stop playing.
Continuously play the songs from playing list without stop.
Edit the playing list.
Go back to Media Screen.
Music Player
19
Page 20

Edit Playing list
Music Player will search for the “Music” folder of the SD card
for all music files and display them on screen. T ap directly on
z
the file name of the song to add or remove it from playing
list. The song has been added to the list becomes blue. The
song has been removed from the list becomes black.
Use up or down arrow buttons to hi ghlight the song. Tap this
button to add this song to playing list.
Use up or down arrow buttons to hi ghlight the song. Tap this
button to remove this song from playing list.
Tap this button to add all songs to the list.
Tap this button to remove all songs from the list.
When you are done with the editing, tap this b utton to sa ve
and go back to Music Player screen.
T ap this button to cancel editing and go back to Music Player
screen.
20
Page 21

Photo Viewer
Photo Viewer will search for the “Photo” folder of the SD card
z
for all supported image files and display in thumbnail mode.
Use up or down arrow buttons to scroll the page.
T ap to select an image and tap the Full Screen button on left
side to view this image in full screen.
Photo Viewer
Go back to Media Screen.
Full Screen mode
Tap up or down arrow buttons on the right side to view
z
previous or next image.
Tap the close button on left top corner to end full screen
mode.
21
Page 22

Setup Mode
The details of these setup programs will be described in
z
following pages.
Setup Screen
Go back to Main Screen.
System Information
Display the Flash memory capacity, SD card capacity, the
z
PCB version and the firmware version information.
Go back to Setup Screen.
22
Page 23

Power
Display remaining capacity of battery power. When AC
z
adapter is connected to the device for charging, the battery
icon will flash from right to left
The auto shut down function is only valid when GV-388 is not
connected to external power. If it is connected to the AC
z
adapter, the system will not be shut down even if you have
checked this setting.
Cancel and go back to Setup Screen.
Save the setting you made and go back to Setup Screen.
23
Page 24

Brightness
You can change the backlight brightness by tapping on the
z
two bulb icons. Tap the left bulb to make the screen darker,
or the right bulb to make the screen brighter.
The backlight brightness has 0~6 levels from left to right.
z
The default is set to the 4
Cancel and go back to Setup Screen.
th
level.
24
Save the setting you made and go back to Setup Screen.
Page 25

Regional Setting
z
Setup the time and date of your local area.
Select the User Interface Language and make sure your
z
local Timezone is correctly set.
Cancel and go back to Setup Screen.
Save the setting you made and go back to Setup Screen.
About
z
Display the program version information.
Go back to Setup Screen.
25
Page 26

Screen
Run the screen calibration program. Press and hold the
stylus on the center of the target. Repeat on four corners.
z
When the new calibration is done, tap the screen to save the
setting or wait for 30 seconds to cancel the calibration.
26
Page 27

Chapter 4
Bluetooth HandsFree
Bluetooth main screen
HandsFree
Phone Dialer: Tap on this button, GTV-380 will
search and connect to the previous paired HandsFree
device. After connection is established, it enters
Phone Dialer mode.
Phone Book: Tap on this button, GTV-380 will
search and connect to the previous paired HandsFree
device. After connection is established, it enters
Phone Book mode.
Tap on this button to activate the Bluetooth function
and automatically search and connect to the previous
paired HandsFree device. If connection is
established, you will see the device name shown on
the right upper corner of screen. Tap on this button
again to disable the Bluetooth function.
T ap on this butto n to enter device list screen. Y ou can
select a device to connect A2DP/AVRCP profile. If
connection is established, it shows the A2DP screen.
Tap on this button to enter the Bluetooth setup
mode.
Go back to Main Screen.
27
Page 28

Phone Dialer
Backspace
button
Dial button
Go back to HandsFree Screen.
Call record
Phone book
28
Page 29

Call Record
Display the
missed call.
Display the
received call.
Display the
dialed call.
Dial button
Delete record
Go back to Setup
Screen.
29
Page 30

Talking mode
Press this button to
mute your voice.
The other party
could not hear your
voice. Tap it again
to resume.
Press this button to
show the extension
number input
screen.
Press this
button to hang
up the phone.
Press this
button to
switch calling
source between
cell phone and
GTV-380.
30
Page 31

Setup
Search Device: Tap on this button to search the
Bluetooth device nearby. Up to 10 devices can be
searched. If pairing process is finished, it returns to
Main screen. If pairing process is failed, it returns to
Pin Code screen. Up to 4 Bluetooth paired devices can
be stored in the list of PND.
Device List: Tap on this button to enter the device list.
Select the device to connect to Handsfree profile. If
connection is established, it returns to Main screen. If
the Bluetooth device you select does not support
Handsfree, you will see a warning message on screen.
Set PND Name: Tap on this button to set the PND
name.
Version: Tap on this button to display the hardware
and software version of Bluetooth module
Reset: Tap on this button to enter Reset mode.
Go back to HandsFree Screen.
31
Page 32

Device List
Up to 4 Bluetooth paired devices can be stored in the
z
device list. You can select a Bluetooth device from this
list. The selected device will be highlight.
Connect: Connect to the selected device and go back to
main screen. If the Bluetooth device you select does
not support Handsfree, you will see a warning message
on screen.
32
Delete: Delete the device from list.
Go back to Setup Screen.
Page 33

Set PND Name
z
The default name of the PND is “GPS BT Carkit”. You
can change it as your wish.
When you finish editing, press this button to confirm.
Press this button to switch between alphabetical and
numerical keypad.
Backspace key to delete from the last character.
Go back to Setup Screen.
33
Page 34

Version info
z
Display the hardware and software version of Bluetooth
module.
Go back to Setup Screen.
34
Page 35

Reset
Default: Restore the factory default settings of
Bluetooth.
Clean Phone Book: Clean the phone book data which
downloaded from you Bluetooth cell phone.
Auto-Reply Setup, Default:10 sec
Go back to Setup Screen.
35
Page 36

Search and connect to your Bluetooth
phone
Tap on Setup icon to
enter Setup mode.
Tap on Search Device
icon to search your
Bluetooth cell phone.
36
GTV-380 begins to
search the device.
Page 37

The found device is
shown on the list. Tap
on the device you want
to connect with.
If connection is
established, the name
of the connected device
will appear on the
upper right corner of
screen.
Answer or hang up a incoming call
When you receive a
incoming call, you can
press the left icon to
accept the call or press
the right icon to refuse
and hang up the call.
37
Page 38

Make a call
Tap on the Phone Dialer
icon.
The dialing screen
appears. Input the
number and tap on Dial
button.
The dialing screen
appears.
38
Phone call is
established.
Page 39

Bluetooth Stereo Playback
Tap on the Stereo
Playback icon, and then
select your device from
device list.
If connection is
established, it shows
the A2DP screen. You
can play, pause or stop
music from screen
buttons. Buttons for
Next and Previous are
also supported.
39
Page 40

Chapter 5 DVB-T
DVB-T
DVB-T is the abbreviation of Digital Video Broadcasting Terrestrial. It is a broadcast transmission standard for digital
terrestrial television mainly used in European area.
Remote Control
Switch to Radio
RADIO
MUTE
VOL + Volume up
VOL - Volume down
CH + Channel up
CH - Channel down
OK
RETURN/
EXIT
SETUP Enter Setup mode.
EPG
LANGUAGE Switch language
SUBTITLE Switch subtitle
NUMERIC
KEY
channel, press it again
to resume TV mode.
Mute the volume output.
Press it again to
resume.
Confirm for selecting
item.
Return to previous
channel or Exit.
Electronic Program
Guide
For input the channel
number
40
Page 41

Enter TV Mode
z If you want to watch TV program, you have to attach GTV-380 main
unit onto DVB-T module and plug in the charging adapter.
z Tap on TV icon, GTV-380 begins to search
41
Page 42

z While you are in TV mode, you can touch anywhere on screen to
display the OSD (On Screen Display) menu.
z If there is no touch action within 3 seconds, the OSD menu will
disappear automatically.
Main Setup screen
42
Close and back to
previous screen.
Enter Multichannel
television sound.
Select subtitle
language.
Enter Electronic
Program Guide.
Enter Setup
screen.
Switch
channel.
Page 43

z If your TV program supports Multichannel television sound, you can
choose to listen the different language or audio.
z You can choose to display a different subtitle if the TV program
supports this function.
43
Page 44

z Tap on the up or down arrow icon to switch channel. The channel
information will display for seconds and disappear automatically.
z EPG displays the program title, descriptive information and the
time schedule of previous and next program.
44
Page 45

Setup screen
z Display the related information of the program.
45
Page 46

z Select your country location.
z Select the OSD language.
46
Page 47

z Automatically search the channel of your local
area.
z Manually search the channel signal.
47
Page 48

z Select from the TV program list or Radio progr am
list.
48
z Reset the system to Factory default.
Tap on
Tap on
z Display system version information.
to confirm.
to Cancel.
Page 49

Chapter 6
Troubleshooting
If the GTV-380 does not boot up
successfully or does not function properly
1. Please check if the Application software is properly installed
in the SD memory card.
2. Please check if the SD memory card is inserted into the SD
expansion slot.
3. Please check the battery power. (The red light indicates the
battery power is low and needs to be charged. The amber light
indicates that it is in charging status, and the green light will be
on when the battery is fully charged.)
4. Perform the “Reset” to restart the device.
Reset
If your GTV-380 is down or it encounters an unexpected error, you
can reset it. You will need to use a stylus or pencil to press the reset
button. Pressing the reset button will restart the system retaining
all the information stored on the device.
49
Page 50

L
L
L
If your car windows equipped with Window Films for
reducing heat and blocking the harmful UV rays, it may
also slightly affect the receiving of GPS signal. Thus, the
cold start time will take longer then usual.
If the car is moving, it may also affect the time for GPS
fix. We suggest that you stop the car while you turn on
the GTV-380 for a quicker GPS fix time.
Please avoid excessive heat and humidity. Please do not
leave the GTV-380 in your car under the direct sunshine
with windows closed. Place it in a high temperature
environment may damage its LCD display or the device.
50
Page 51

Safely Remove Hardware
Before you remove the memory card from the card reader, or
before you unplug the USB cable from the device or USB port,
please safely remove the hardware by the following processes:
1. Double click the "Safely Remove Hardware" icon from the task
bar on the right bottom corner of desktop.
2. Select the hardware device and then click the "Stop" button.
3. Confirm by selecting the device again and click "OK" button.
4. When you see a message showing "Safe To Remove
Hardware" on desktop, then you can remove the memory card
or unplug the USB cable.
51
Page 52

FCC Notices
This device complies with part 15 of the FCC rules. Operation is subject to
the following two conditions:
(1) This device may not cause harmful interference, and
(2) This device must accept any interference received, including
interference that may cause undesired operation.
FCC RF Exposure requirements:
This device and its antenna(s) must not be co-located or operation in
conjunction with any other antenna or transmitter.
NOTE: THE MANUFACTURER IS NOT RESPONSIBLE FOR ANY RADIO
OR TV INTERFERENCE CAUSED BY UNAUTHORIZED MODIFICATIONS
TO THIS EQUIPMENT. SUCH MODIFICATIONS COULD VOID THE
USER’S AUTHORITY TO OPERATE THE EQUIPMENT.
52
 Loading...