

Page 1
Use Specification of
PPiixxiiee PPrriinncceesss
s
Uss
U
e
e
r
r
M
M
a
a
n
n
u
u
all
a
----------------------------------------------------------------------------1/14-----------------------------------------------------------------------------
Page 2
PPrreeffaacce
Use Specification of
e
PPiixxiiee PPrriinncceesss
Thank you for purchasing our digital camera.
Please read the following instructions carefully before use.
The photos and illustrations in this manual may differ from actual product due to custom requirements.
s
SSyysstteemm RReeqquuiirreemmeenntt:
System with better performance is strongly recommended.
Operating System Microsoft Windows2000, Me, XP
CPU IntelPentium166MHz Above or equivalent performance
RAM 128 MB or above.
Sound and Video DirectX8 or above
CDROM 4X or above
Hard disk 500 MB free space or above
I/O USB 1.1 or USB 2.0
:
CPU
System requirements
----------------------------------------------------------------------------2/14-----------------------------------------------------------------------------
Page 3

Use Specification of
PPiixxiiee PPrriinncceesss
s
Important Information:
Caution
1. Never attempt to open or dismantle the digital camera to avoid electric shock.
2. Do not dispose the batteries in fire.
3. Keep the digital camera away from water and other liquids and never let it get wet as this may damage
the product.
4. Do not leave camera in places subject to extremely high temperatures.
5. Avoid placing camera on an unstable surface where the camera may fall.
Memory and preservation
1. The camera memory allows for two test pictures to ensure proper camera function. To store additional
images, a SD card must be used.
2. An image can only be taken and stored on the SD card up to 1 GB. SD Card is not included in the
package
3. After SD card is inserted, images will be stored on SD card and not the cameras internal memory.
4. SD card has a write-protect switch, which may be used to prevent data from being deleted by mistake.
Push the switch to bottom of the card, data in the card will be protected; however, when the card is in
write protection state,it can not be used for shot or deletion.
LLoocckkeedd ◄◄WWrriittee pprrootteeccttiioonn sswwiittcchh
Preventive maintenance
Store your digital camera in a dry area away from direct light.
1. Use breakaway neck strap to carry and to hold digital camera steady while in use.
2. Camera comes with protective sleeve over display screen to prevent any scratches in manufacturing.
Please remove before use.
3. To clean display screen and lens, blow away any dust and dirt first, then use a lint-free soft cloth or lens
cleaning tissue. Never use organic solvent to clean the camera.
4. Never touch or press surface of lens or display screen by hand.
Guarantee
1 year limited guarantee. We will replace or repair free any defective parts. For guarantee service, send
product to: Global Point Products, 5815 County Road 41, Farmington, NY 14425 U.S.A. Enclose a check or
money order for $7.50 to cover handling charges and postage. Pack the product well and insure it.
Service
If you have a problem, DO NOT RETURN THE CAMERA TO THE RETAILER. Contact our Customer
Service Department for immediate assistance at (800) 367-0732, Extension 27, Monday through Friday
10:00 AM to 4:00 PM EST; or, by email at [email protected].
----------------------------------------------------------------------------3/14-----------------------------------------------------------------------------
Page 4

Use Specification of
PPiixxiiee PPrriinncceesss
s
Contents
1. Installing the driver
2. Before use
2.1 Inserting the batteries
2.2 Using the SD card
3. Physical features
3.1 Buttons and sockets
3.2 Display icons
4 .Main functions
4.1 Capturing still photos
4.2 Photo options
4.3 Capturing video clips
4.4 Video clip options
4.5 Playback
4.6 Playback options
4.7 Mass storage
4.8 Webcam
5 Setup
6 Specifications
11.. IInnssttaalllliinngg tthhee ddrriivveerr
1.1 Supported operating systems
• Windows Me
• Windows 2000
• Windows XP
Microsoft Windows 2000 Professional, Windows ME or Windows XP systems are pre-installed.
1.2 Installing the driver
Driver installation is similar for the various Windows systems. When specifying the path, you
must simply select the driver in the CD-ROM drive.
The camera has two USB driver modes: PC Camera and Mass Storage. Mass Storage is the default
setting. The procedure for installing the drivers for each of the two modes is described below.
1.3 Installing the driver in Mass Storage mode
When the camera is in Mass Storage mode, Windows ME, 2000 and XP automatically recognize the
camera and no driver must be installed. The description of the driver installation procedure refers to
Windows 98 SE.
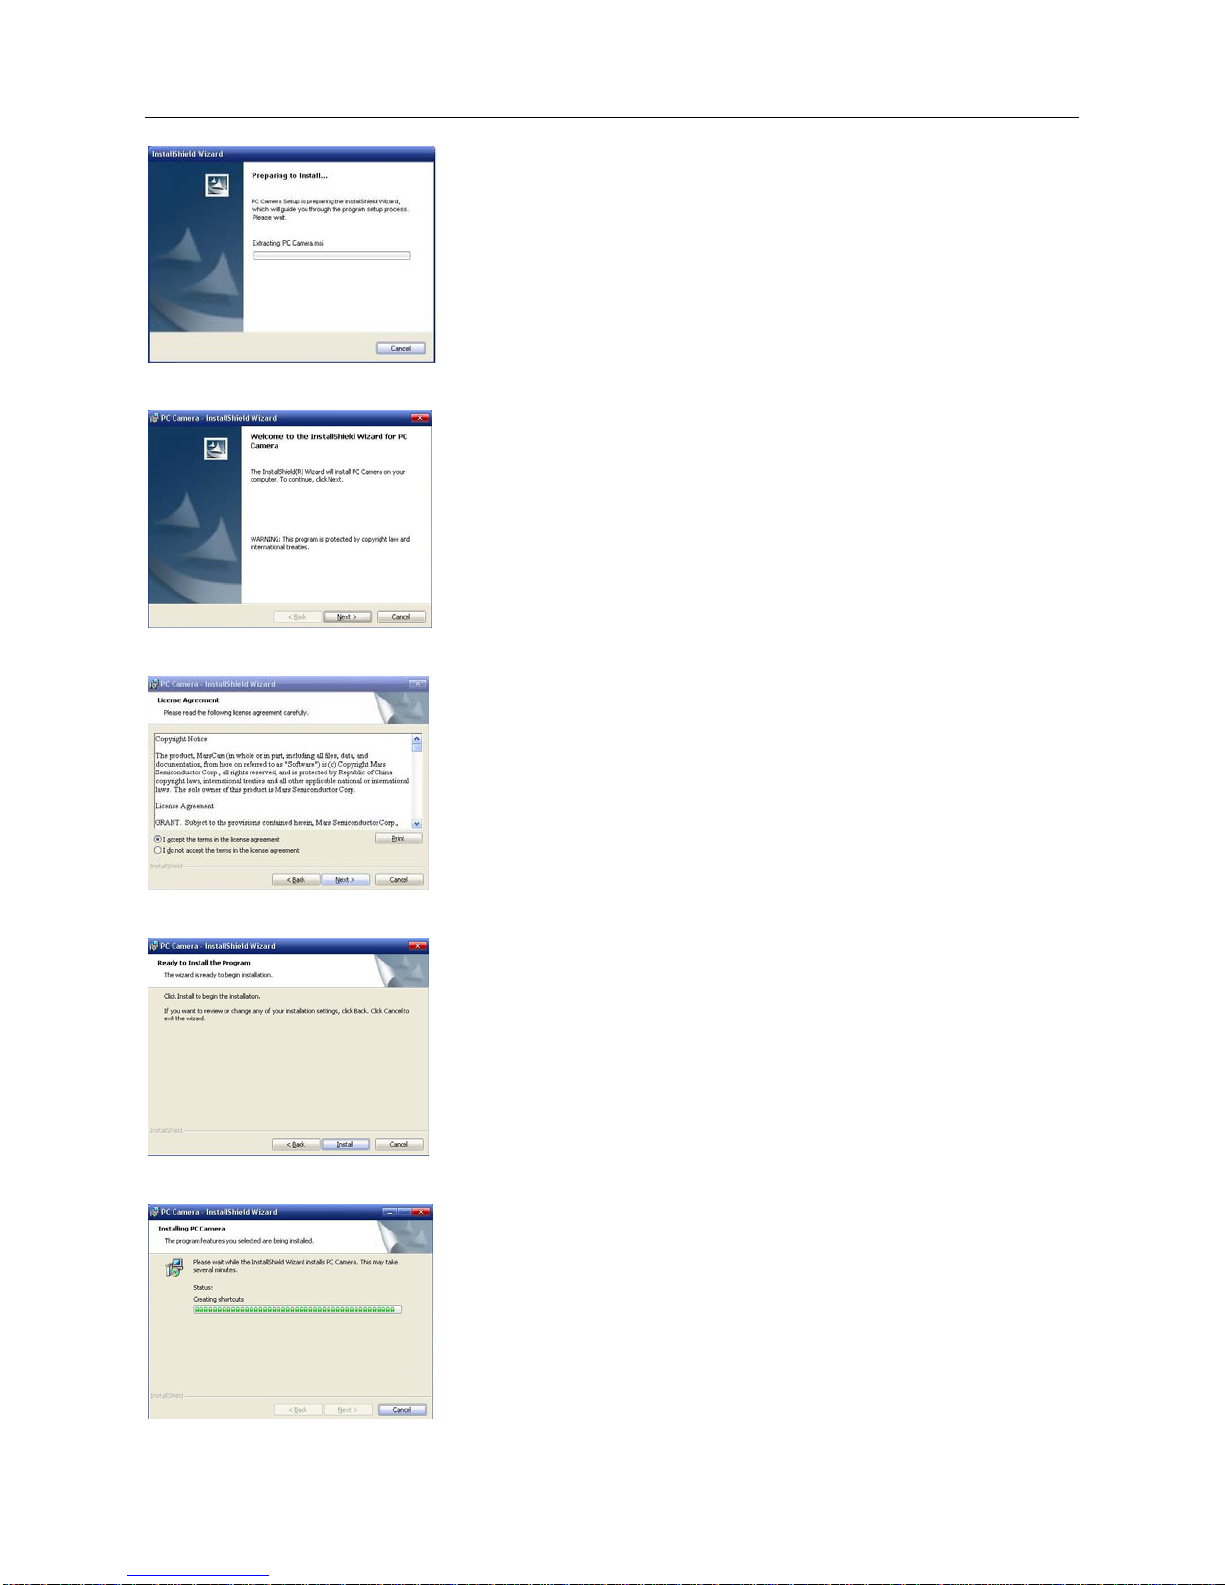
1. Run the driver in the CD-ROM drive , Wizard appears on your PC monitor. Click “Next” to open the
next window
----------------------------------------------------------------------------4/14-----------------------------------------------------------------------------
Page 5
Use Specification of
2. Click “Next”.
3. Select “I accept the terms in the license agreement”. Then click “Next”.
PPiixxiiee PPrriinncceesss
s
4. Now click “Install”:
5. Now The system are installing the driver When the following window appears:
----------------------------------------------------------------------------5/14-----------------------------------------------------------------------------
Page 6
Use Specification of
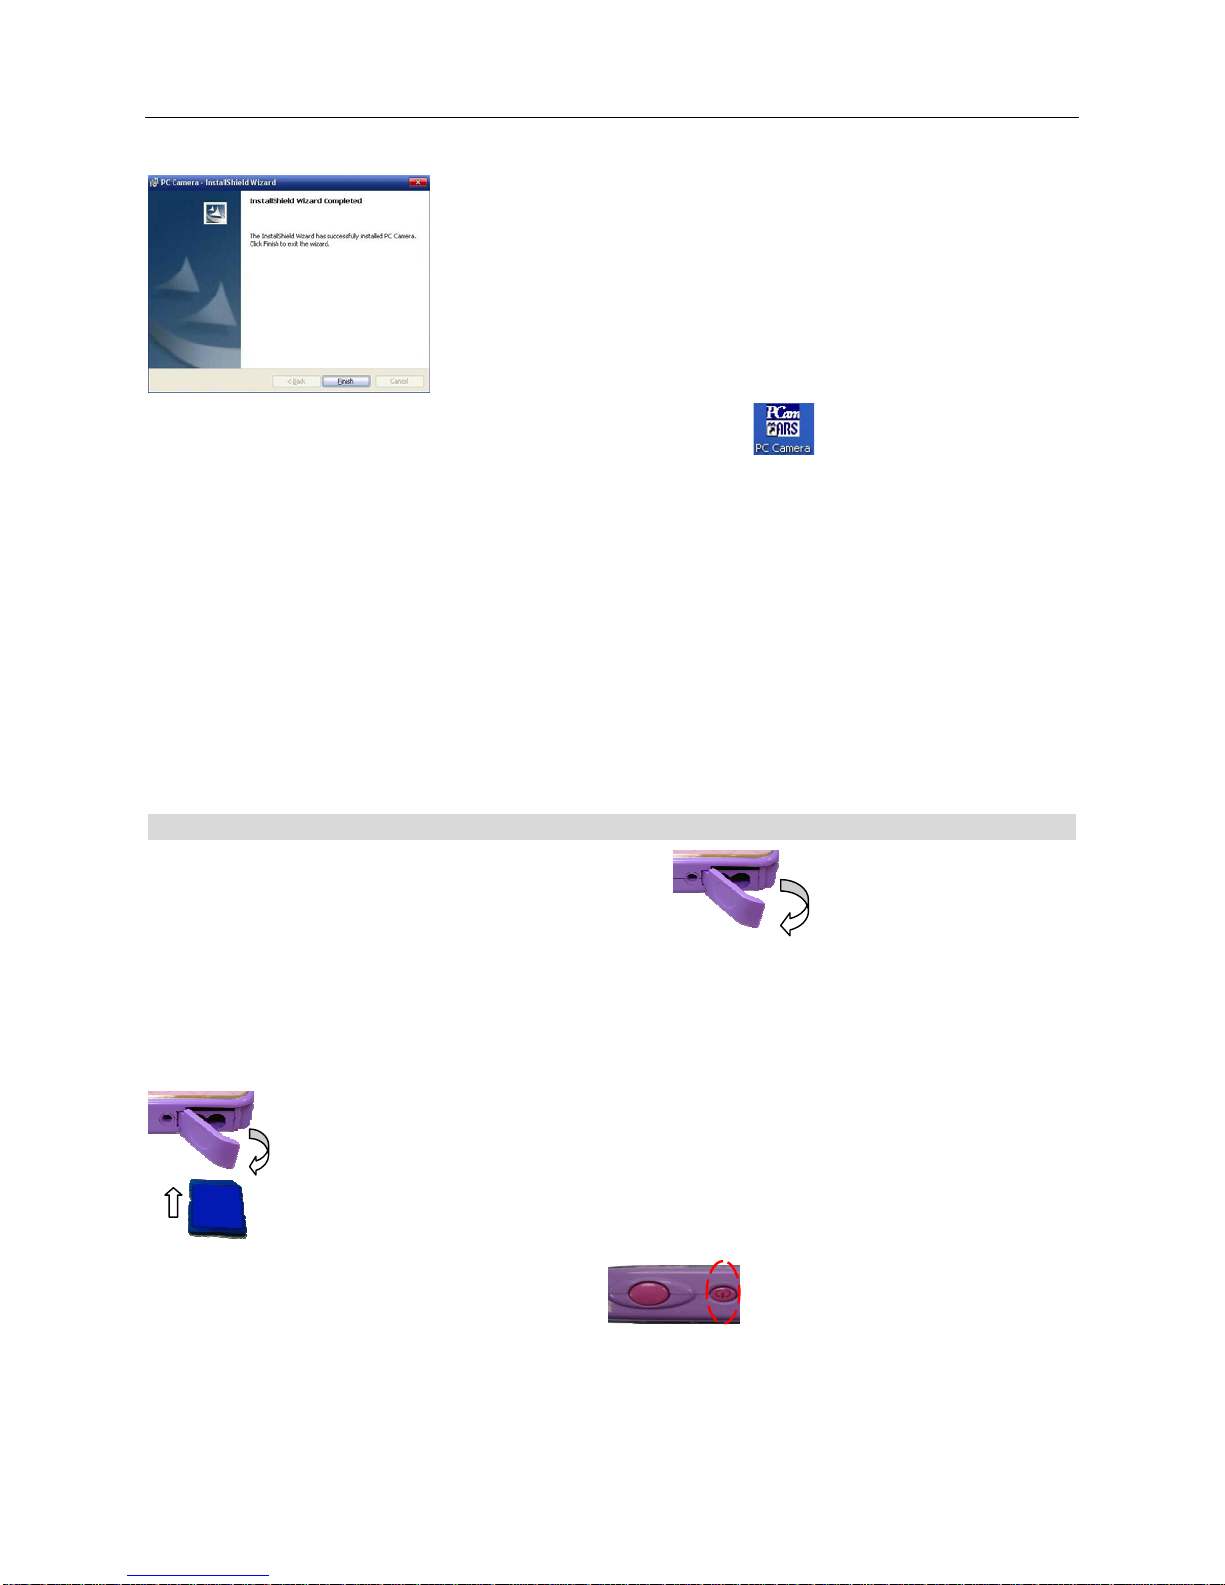
6. Click “Finish” to complete installation.
7. Now The system has complete ly installed the driver when the icon appears on your PC desktop.
You can double click the icon to run PC CAMERA .
8. USB line is used for connecting the camera to the computer. The system with then recognize the new
equipment, according to the suggestion to install the new software for the equipment.
Note: 。Always install the driver provided before connecting the camera to your computer.
。Driver is needed for all versions of Windows operating system
PPiixxiiee PPrriinncceesss
s
。Restart computer upon driver installation
。Select the desired PC mode in (see SETUP) before connecting the camera to your computer
B
.
22.
eeggiinn ttoo uusse
2.1 Inserting the batteries
1. Open the battery cover
2. Insert 2 AAA batteries as shown (observe polarity carefully)
2.2 Using the SD card
1. Open the battery cover
2. Insert the SD card as shown (observe orientation carefully)
3. Press the SD card inward gently, the SD card will pop out slightly for easy removal.
e
2.3 Switching on and off
1. Switching on the camera: Press the power switch briefly, the power indicator and the display will lit.
2. Switching off the camera: Press and hold the power switch for 3 seconds until camera shuts down.
The camera will turn off itself automatically after 1 minute of non-activity.
----------------------------------------------------------------------------6/14-----------------------------------------------------------------------------
Page 7
Use Specification of
r
.
33.
CCoommppoonneennttss
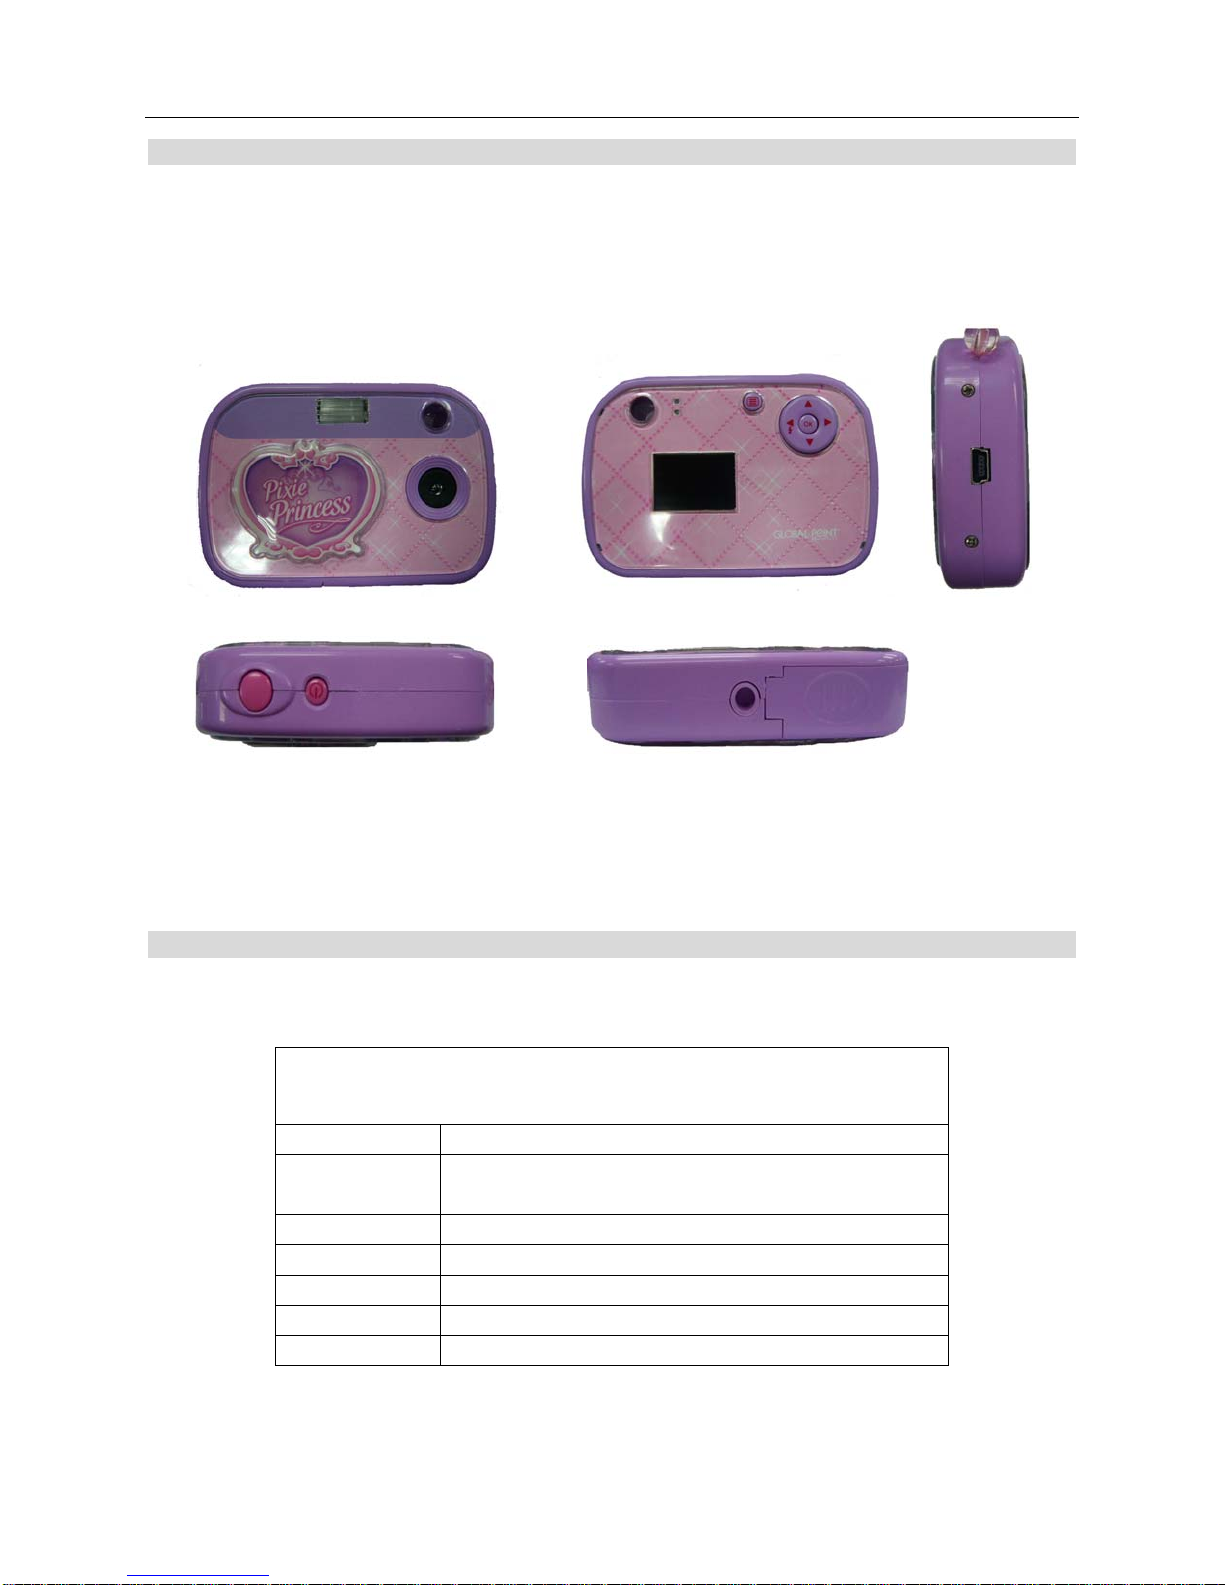
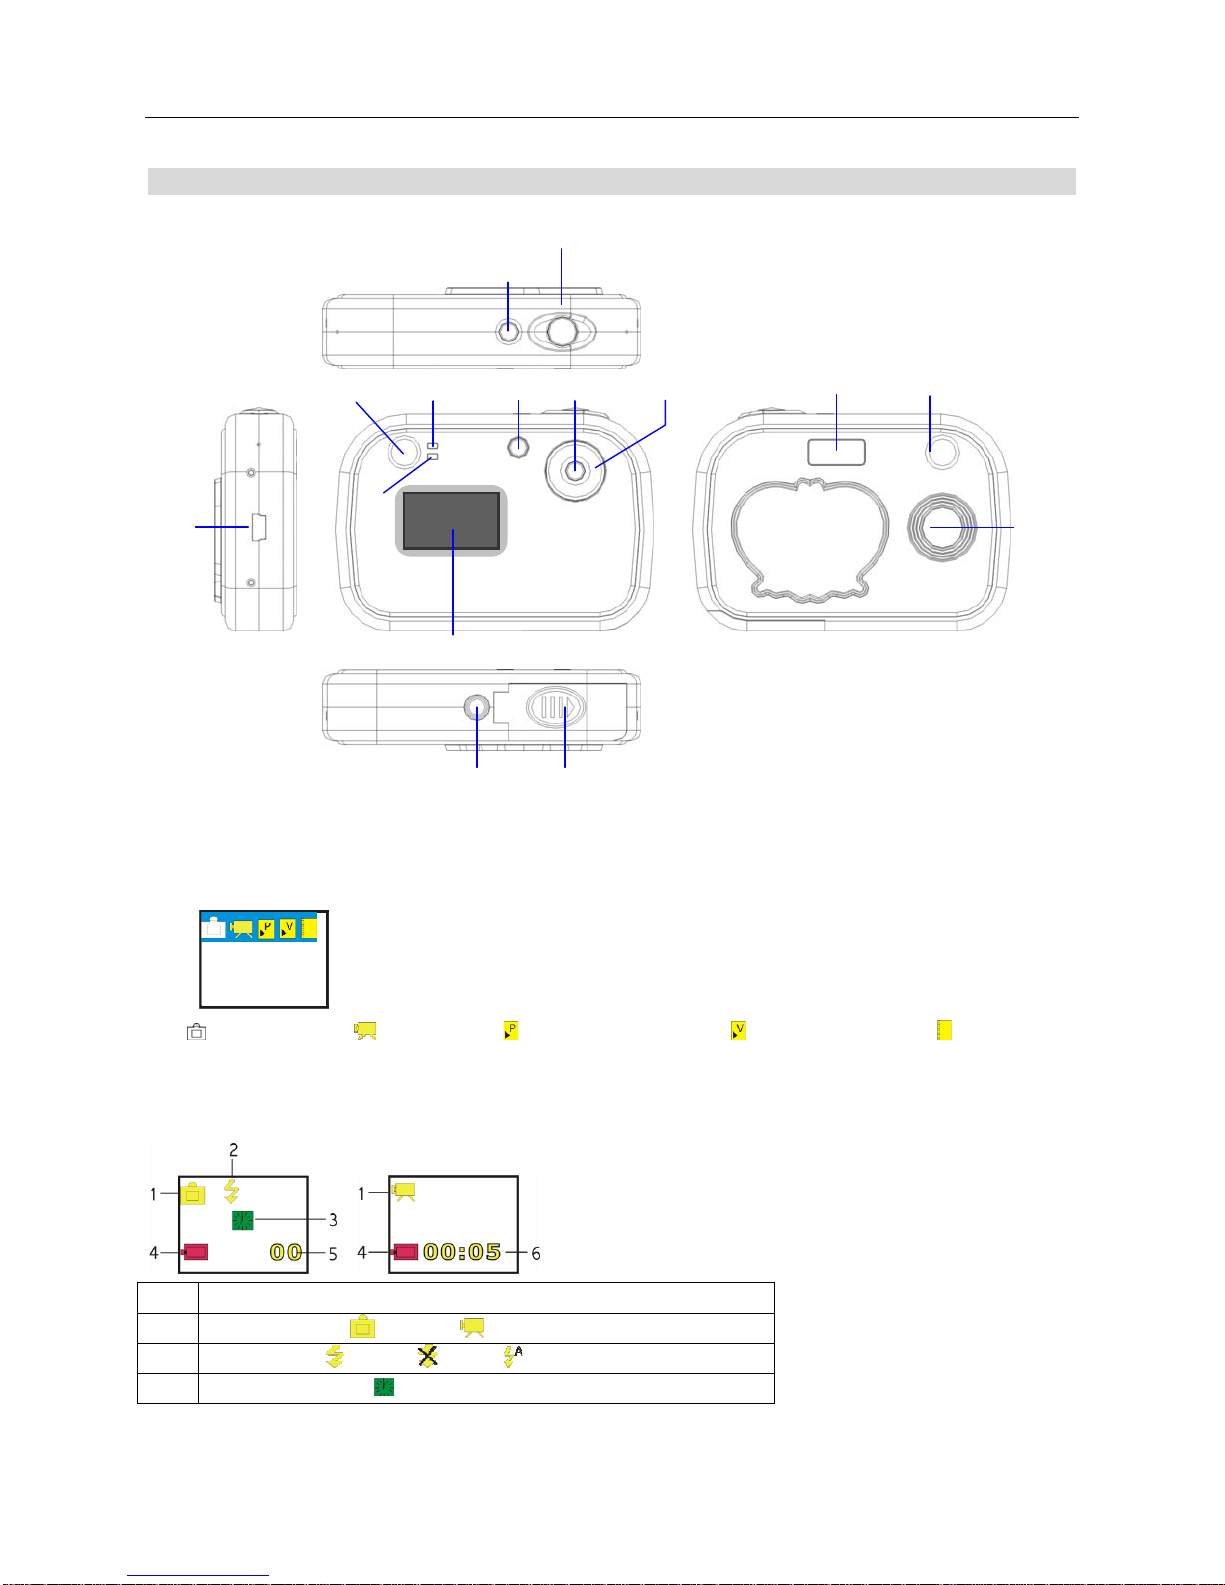
3.1 Physical features:
Power switch Shutter
PPiixxiiee PPrriinncceesss
s
OK
button
USB
socket
Viewfinder
Charge
indicator
Power indicator
Mode
switch
LCD display
Tripod socket
Battery cove
3.2 Display icons
The camera will enter Still image mode upon switching on.
Press MODE button to switch among the following modes:
Directional
Button
Flash
Viewfinder
Lens
Photo Mode Video Mode Photo playback Mode Video playback mode Setup mode
Use the directional button to select the desired mode, and press OK to confirm your selection.
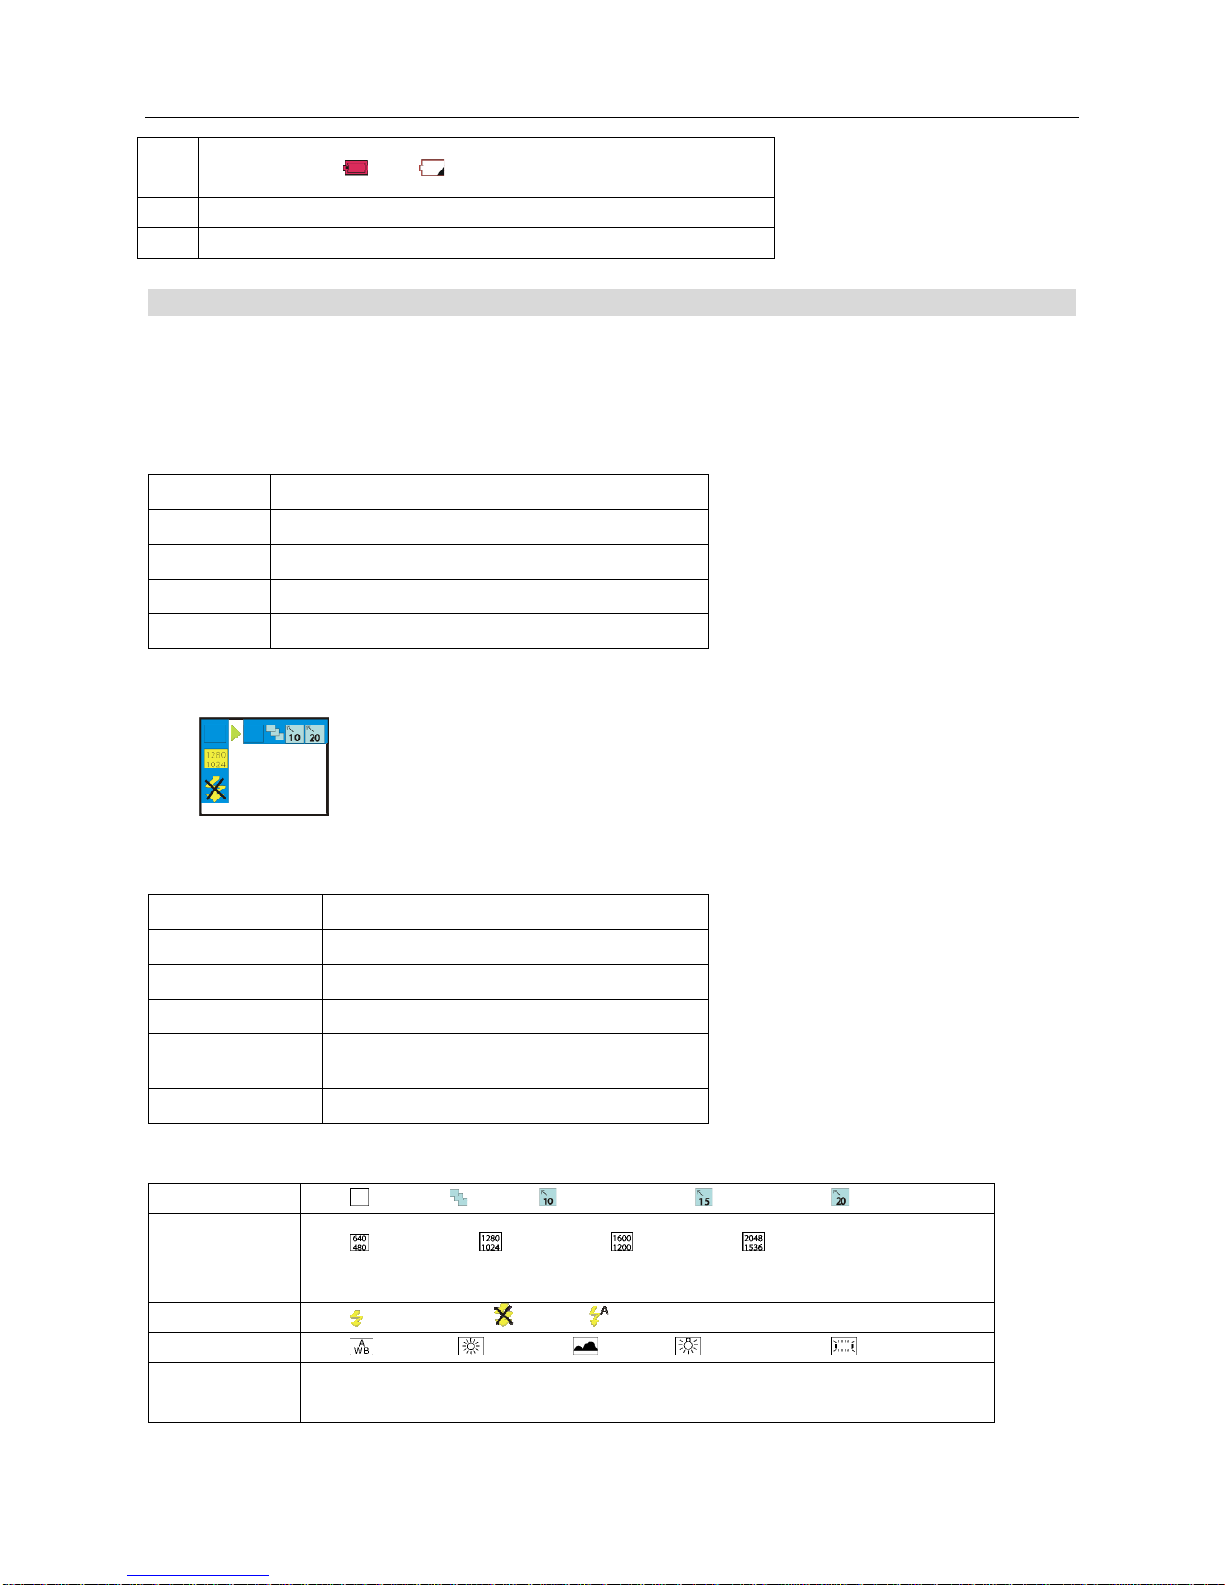
Display icons for Photo and Video Modes:
Icons
1
Capture Modes
2
Flash Modes:
Photo Video
Forced Off Auto
3 Self-timer indicator
----------------------------------------------------------------------------7/14-----------------------------------------------------------------------------
Page 8
Use Specification of
4
Battery meter:
5 Record counter: images / clips captured
6 Clip duration: time lapse of video being captured
Main
.
44.
4.1Capturing still images
1. Press the MODE button to enter Photo mode
(The camera will enter Photo mode automatically upon switching on)
Buttons and functions
4.2Photo options
1. Press MENU to ente r options’ menu
FFuunnccttiioonn
Buttons Functions
Shutter Capture
OK Enter / exit Menu
Left Flash mode switch
MODE Mode switch
Full Low
Photo Mode
PPiixxiiee PPrriinncceesss
s
2. Buttons and functions
Buttons Functions
OK Enter / exit menu
UP Up
Down Down
LEFT LEFT
RIGHT RIGHT
Note: You must press OK to confirm your selections
3.
Option List
Capture options
Resolutions
Flash modes
White balance Auto Sunny Cloudy Fluorescent Tungsten
Exposure
compensation
Photo options
Single Burst 10s self-timer 15s self-timer 20s self timer
640×480, 1280×1024, 1600×1200, 2048×1536
Forced Off auto
-2.0 to +2.0 step 0.5 (+EV brighter –EV darker)
----------------------------------------------------------------------------8/14-----------------------------------------------------------------------------
Page 9

Use Specification of
Note: The charging indicator will blink when charging, and stay lit upon completion.
The flash mode will be returned to “off” automatically after each execution.
4.3Capturing video clips
1. Press the MODE button to enter Video mode
2. Buttons and functions
Video Mode
Buttons Functions
Shutter Start / stop capture
OK Enter / exit menu
MODE Mode switch
4.4Video options
1. Press MENU to enter options’ menu
2. Buttons and functions
PPiixxiiee PPrriinncceesss
s
Video Options
Buttons Functions
OK
UP
Down
Left
Right
Note: The changes made will be activated automatically upon exiting the menu
2. Options
Resolutions:
Exposure compensation (see 4.2-3 photo options)
4.5 Playback modes
1. Press MODE button to switch to Photo playback or Video playback modes
2. Buttons and functions
QVGA 320×240; VGA 640×480
Enter / exit menu
UP
Down
Left
Right
----------------------------------------------------------------------------9/14-----------------------------------------------------------------------------
Page 10
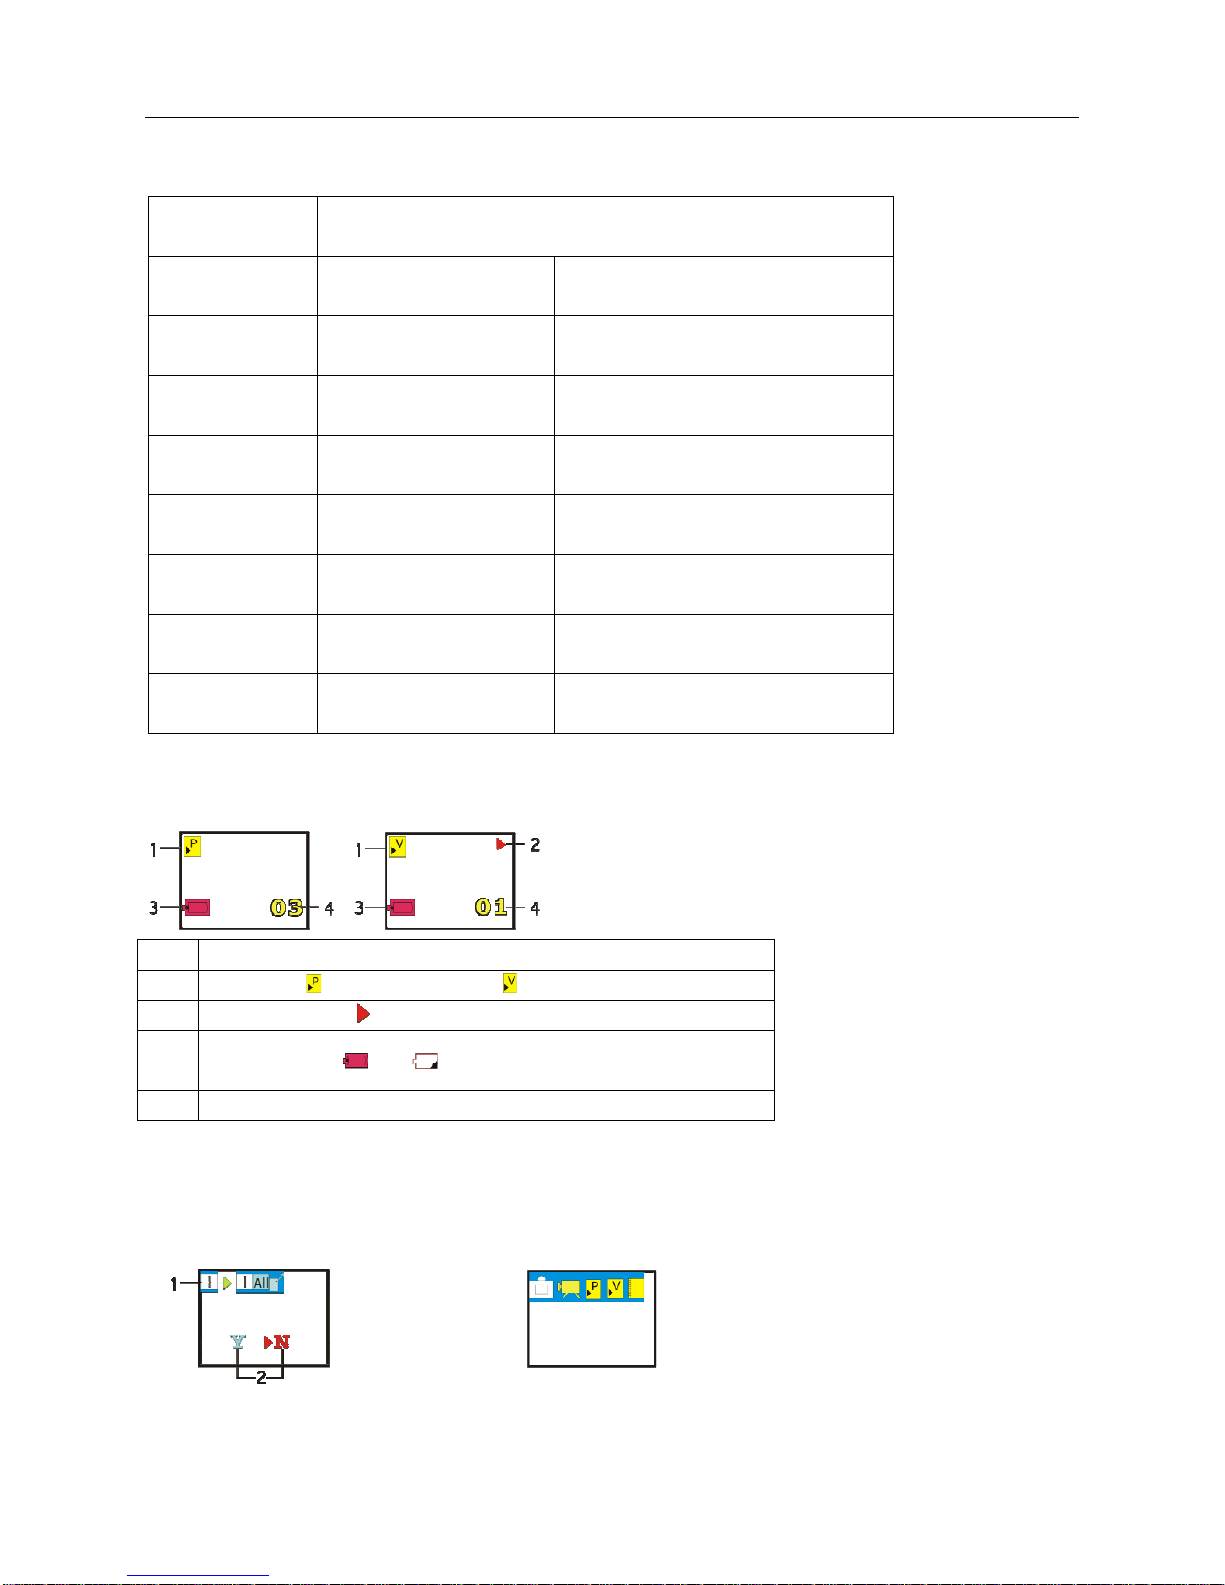
Playback modes
Buttons Functions
Use Specification of
PPiixxiiee PPrriinncceesss
s
File types
OK Mode switch Delete / confirm delete
Shutter Confirm selection Start / stop playback
Mode ------- Mode switch
left ------- Previous record
right Delete Next record
up Previous record -------
Down Next record -------
3. Display icons
Photo Video clips
Icons
1
Playback:
2
Playback indicator
3
Battery meter:
4 File number
4.6Playback options
1. In Photo playback mode, press RIGHT button to delete. Press OK to switch modes
2. In Video playback mode, press OK to delete. Press MODE button to switch modes
Buttons and Function
3.
----------------------------------------------------------------------------10/14-----------------------------------------------------------------------------
Photo playback Video Playback
full low
Page 11
Use Specification of
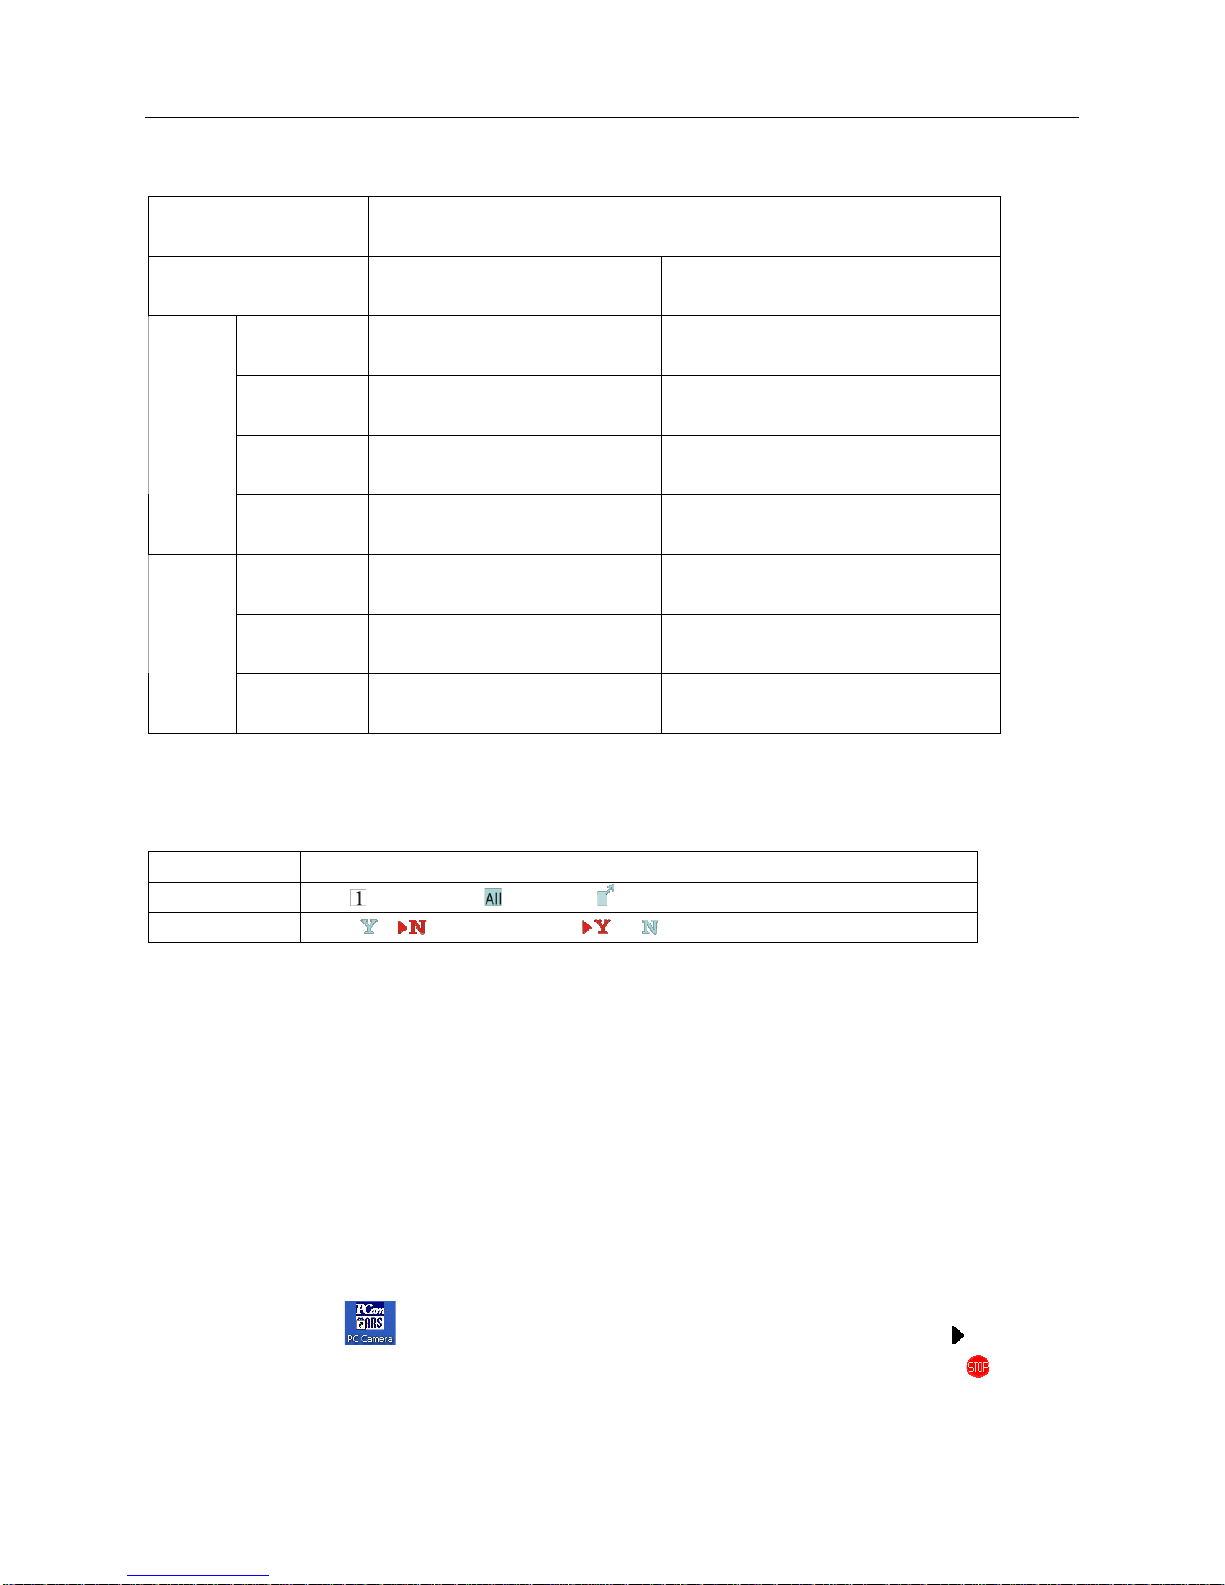
Play options
Buttons Functions
PPiixxiiee PPrriinncceesss
s
File types
OK Mode Switch Confirm selection
Delete
Options
Mode
Switch
Options
5. Delete options
4.7 Mass storage
1. Windows 2000 users must install driver provided (see 1 Installing the drivers)
Note: No drivers needed for ME or later versions of Windows
2. Enter SETUP mode and select the Mass Storage option (see 5 SETUP)
3. Connect the camera to your PC via the USB cable provided
4. A “removable disk” will show up in My Computer
Note: If no removable disk is found, restart your computer.
4.8 PCcam
1. Install the driver provided (see 1 Installing the drivers)
2. Enter SETUP m ode and select the Webcam option (see 5 SETUP)
Shutter Confirm selection? /
LEFT
RIGHT ------
OK Mode switch Confirm selection
LEFT
RIGHT
Icons
1
2 Cancel delete Confirm delete
Delete one Delete all exit
Photos Video clips
--------
---------
---------
LEFT
RIGHT
LEFT
RIGHT
3. Connect the camera to your PC via the USB cable provided。
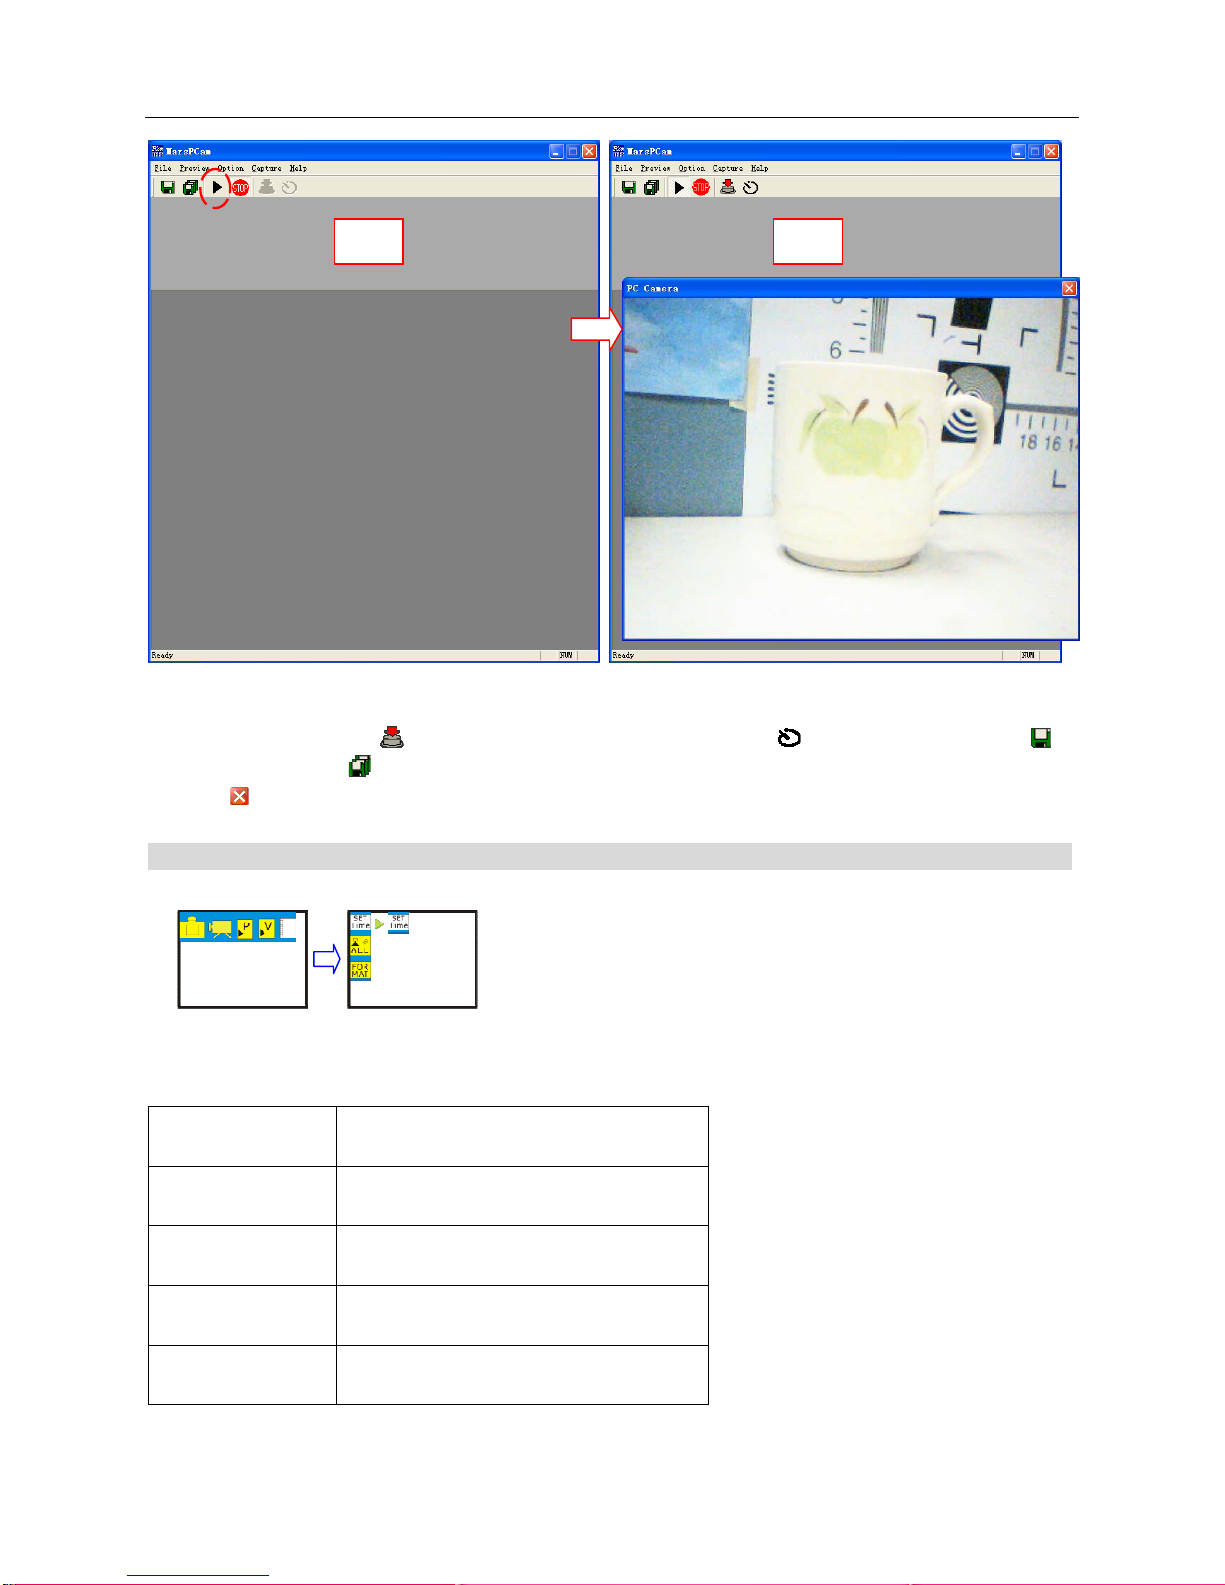
4. Double click the icon and the window (1) below will pop up. By clicking on the
Camera” preview window will display the corresponding image to the camera (Figure 2). Clicking the
close the “PC Camera" window.
----------------------------------------------------------------------------11/14-----------------------------------------------------------------------------
button, a “PC
button will
Page 12
Use Specification of
Note: if no live view is shown, restart computer and try again.
5. At window (2), press
store image shown. Click
6. Click
of “MarsPCCam” to exit.
55.. SSEETTUUPP
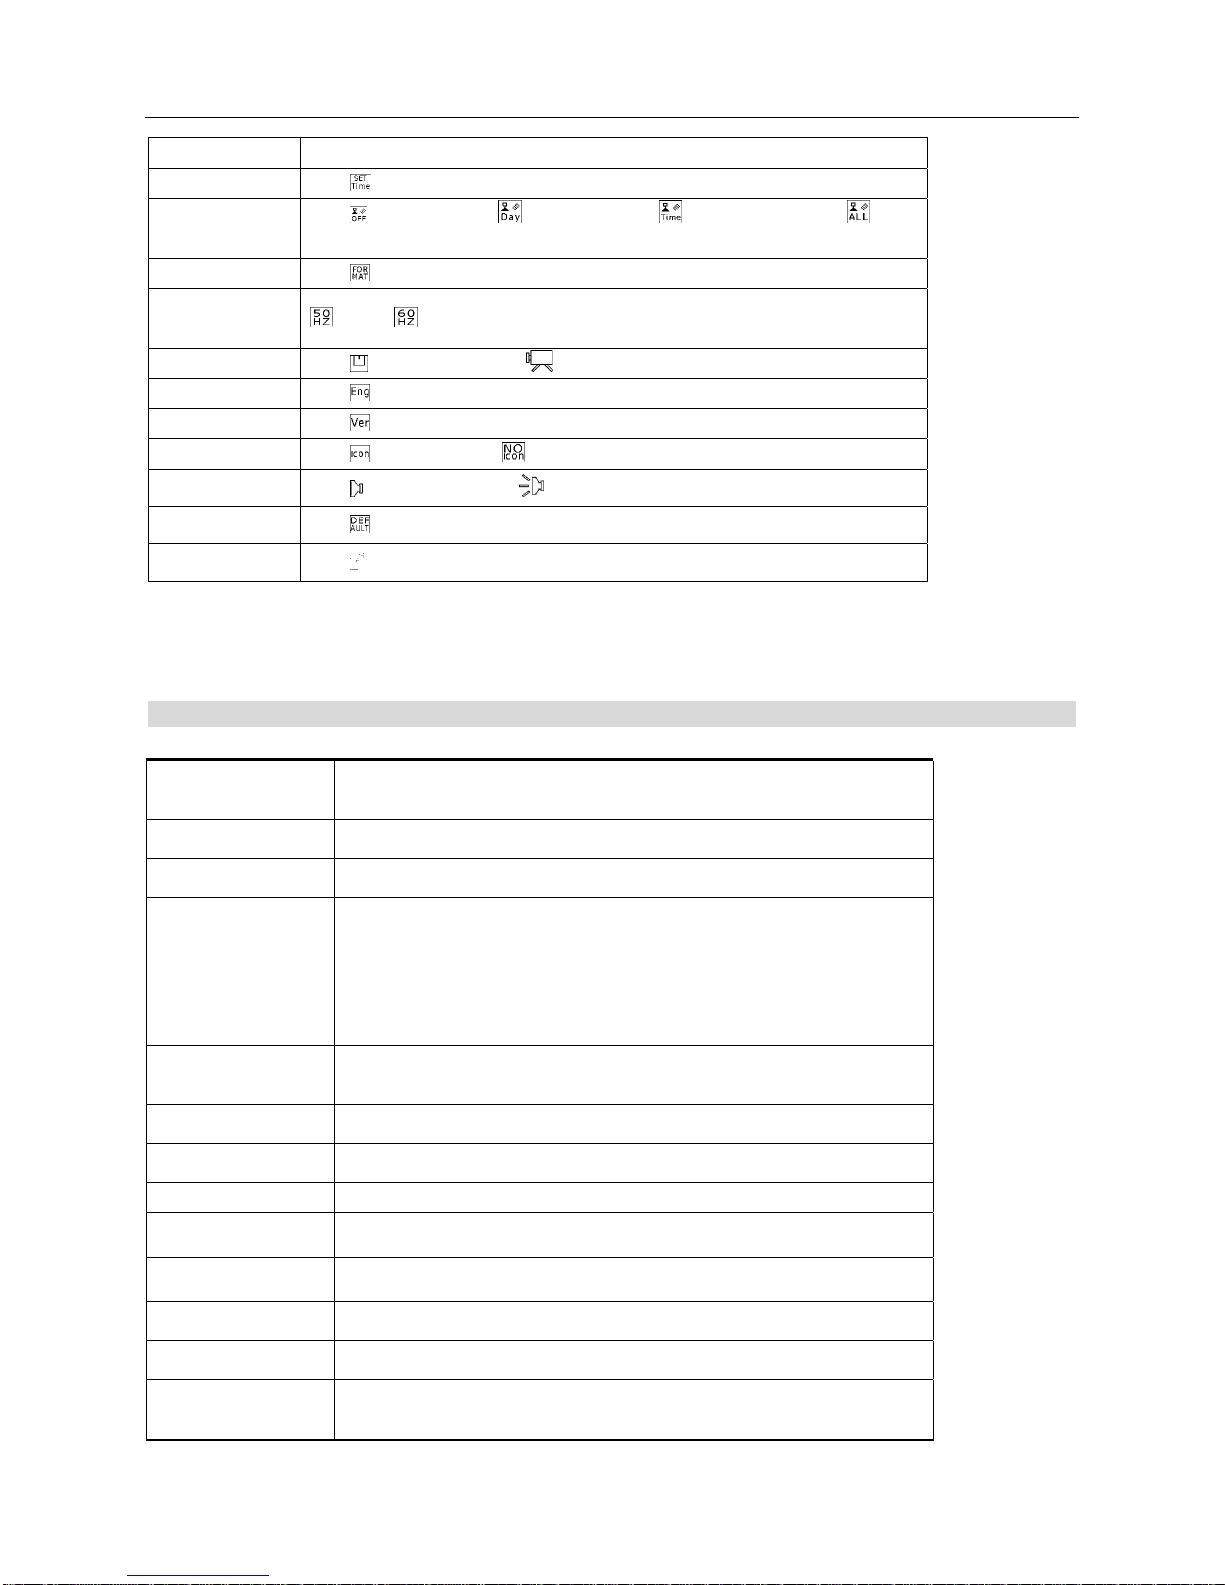
Press MODE button to switch to SETUP mode
to capture live view as a still image. Click to capture live video. Click to
to store all images.
PPiixxiiee PPrriinncceesss
s
2. Buttons and Functions
SETUP options
Buttons Functions
OK Mode Switch
Shutter Enter / Exit menu
UP UP- adjust date/time
Down Down – adjust date/time
3. Additional Options
----------------------------------------------------------------------------12/14-----------------------------------------------------------------------------
Page 13
Use Specification of
Menu Options
Set date /time Set date and time
Stamp
Format Re-format SD card (all files will be erased permanently)
Stamp off Day stamp only Time stamp only Date
and Time stamp
PPiixxiiee PPrriinncceesss
s
Frequency
USB modes
Language English
Info Production ID
Icon
Key sound
Default Return to default setting
Exit Exit menu
Note: Whenever batteries are removed, the default date will be restored.
All settings will be restored to default values after switching off, except Date, time and frequency
66.. SSppeecciiffiiccaattiioonns
50Hz, 60Hz
Mass Storge PC cam
Show Icons Icons off
Key sound on Key sound off
s
Maximum output
pixels
Effective pixels 1280x1024
Lens 1.2M~∞
2048x1536
2048×1536 3M interpolated
Photo resolutions
Video resolution
Exposure Control
Shutter speed 1/10 ~ 1/1000
Zoom 4 X Digital
Internal Memory 8MB(4X16)SDRAM
External Memory This camera takes SD Card up to 1 GB
Self-timer 10, 15 & 20 seconds duration
Built-in flash Flash range: 1.5 ~ 2 Meters / 4.5 ~ 6 feet
Supported
Language
----------------------------------------------------------------------------13/14-----------------------------------------------------------------------------
1600×1200 2M interpolated
1280×1024 1.3M
640×480 0.3M
460X330; 320×240
- 2.0 to + 2.0 EV in steps of 0.5 EV
English
Page 14

Use Specification of
PC Systems
required
Software(on
CDROM)
Display 1.1” CSTN LCD
Interface USB
Power Supply 2 1.5V AAA Alkaline batteries
Dimensions 95mm×65mm×23mm
Weight 2.65 Oz/ (without batteries & SD Card)
FCC Statement This equipment has been tested and found to c omply with the limi ts for a Class B digi tal device, pursuant
to part 15 of the FCC Rules. These limits are designed to provide reasonable protection against harmful interference in a
residential installation. This equipment generates, uses and can radiate radio frequency energy and, if not installed and
used in accordance with the instructions, may cause harmful interference to radio communications. However, there is no
guarantee that interference will not occur in a particular installation. If this equipment does cause harmful interference to
radio or television reception, which ca n be determ ine d by turn ing the eq u ipm ent of f and on, the user is encoura ge d to try to
correct the interference by one or more of the following measures:
• Reorient or relocate the receiving antenna.
• Increase the separation between the equipment and receiver.
• Connect the equipment into an outlet on a circuit different from that to which the receiver is connected.
• Consult the dealer or an experienced radio/TV technician for help
2000, ME & XP
ArcSoft Photo Impression V5&Video Impression V2
PPiixxiiee PPrriinncceesss
s
----------------------------------------------------------------------------14/14-----------------------------------------------------------------------------
 Loading...