

Global Phoenix MID M1006S, PC1001 User Manual
Tablet Palmtop
User Manual
Android 2.3

Product Model: PC1001
Operation Manual
The pictures or words may be inconsistent due to upgrade of product edition or specification
modification and are subject to actual products without further notice.
Content
Content………………………………………………………………………………1
1. Appearance Description..…………………………………………………………1
2. Getting Started……………………………………………………………………1
2.1 Battery Recharge..………………………………………………………………1
2.2 Memory Card……………………………………………………………………1
2.3 Hot Plug of Memory Card and External Flash Disk……………………………1
2.4 Storage Space……………………………………………………………………1
2.5 Power on and Power off…………………………………………………………1
2.6 V ibration…………………………………………………………………………1
2.7 Screen Rotation.…….……………………………………………………………1
2.8 Network Cable and Flash Disk……………………………………………………1
2.9 Network Connection………………………………………………………………1
3. Input Operation..…………………………………………………………………1
3.1 Keyboard..………………………………………………………………………1
3.2 T ouch Screen………………………………………………………………………1
3.3 Mouse……………………………………………………………………………1
4. Desktop……………………………………………………………………………1
4.1 Status Bar…………………………………………………………………………1
4.2 Main Interface……………………………………………………………………1
4.3 Shortcut…………………………………………………………………………1
4.4 Add Gadgets………………………………………………………………………1
4.5 Desktop Gadget……………………………………………………………………1
5. W ebsite Browsing…………………………………………………………………1
6. Application Software Management…………………………………………………1
6.1 Installation and Uninstallation……………………………………………………1
7. Classic Application Introduction……………………………………………………1
7.1 Instant Message……………………………………………………………………1
7.2 E-mail……………………………………………………………………………1
7.3 Document Browser………………………………………………………………1
7.4 Electronic Photo Frame……………………………………………………………1
7.5 Multimedia Library………………………………………………………………1
7.6 Music………………………………………………………………………………1
7.7 Camera….…………………………………………………………………………1

8. Hints and Tips………………………………………………………………………1
8.1 Convenient Operation Manners…………………...………………………………1
8.2 Shortcut Configuration……………………………………………………………1
8.3 Battery Hints………………………………………………………………………1
9. Personal Setting……………………………………………………………………1
9.1 Wireless and Network..……………………………………………………………1
9.2 Cable Network……………………………………………………………………1
9.3 Sound and Display………………………………………………………………1
9.4 Positioning and Security………..…………………………………………………1
9.5 Application..………………………………………………………………………1
9.6 TF Card and Equipment Memory…………………………………………………1
9.7 Language and Keyboard..…………………………………………………………1
9.8 Date and Time……………………………………………………………………1
9.9 Screen Adjustment…………………………………………………………………1
9.10 About the Equipment..……………………………………………………………1
10. HDMI..……………………………………………………………………………1
11. Tablet Palmtop Lock…….…………………………………………………1
12. Trouble Shooting……..……………………………………………………………1
12.1 Close Application
12.2 Mandatory Power off
12.3 Restore Default Setting
13. Toxic and Hazardous Substance or Element Name and Content Identification Table
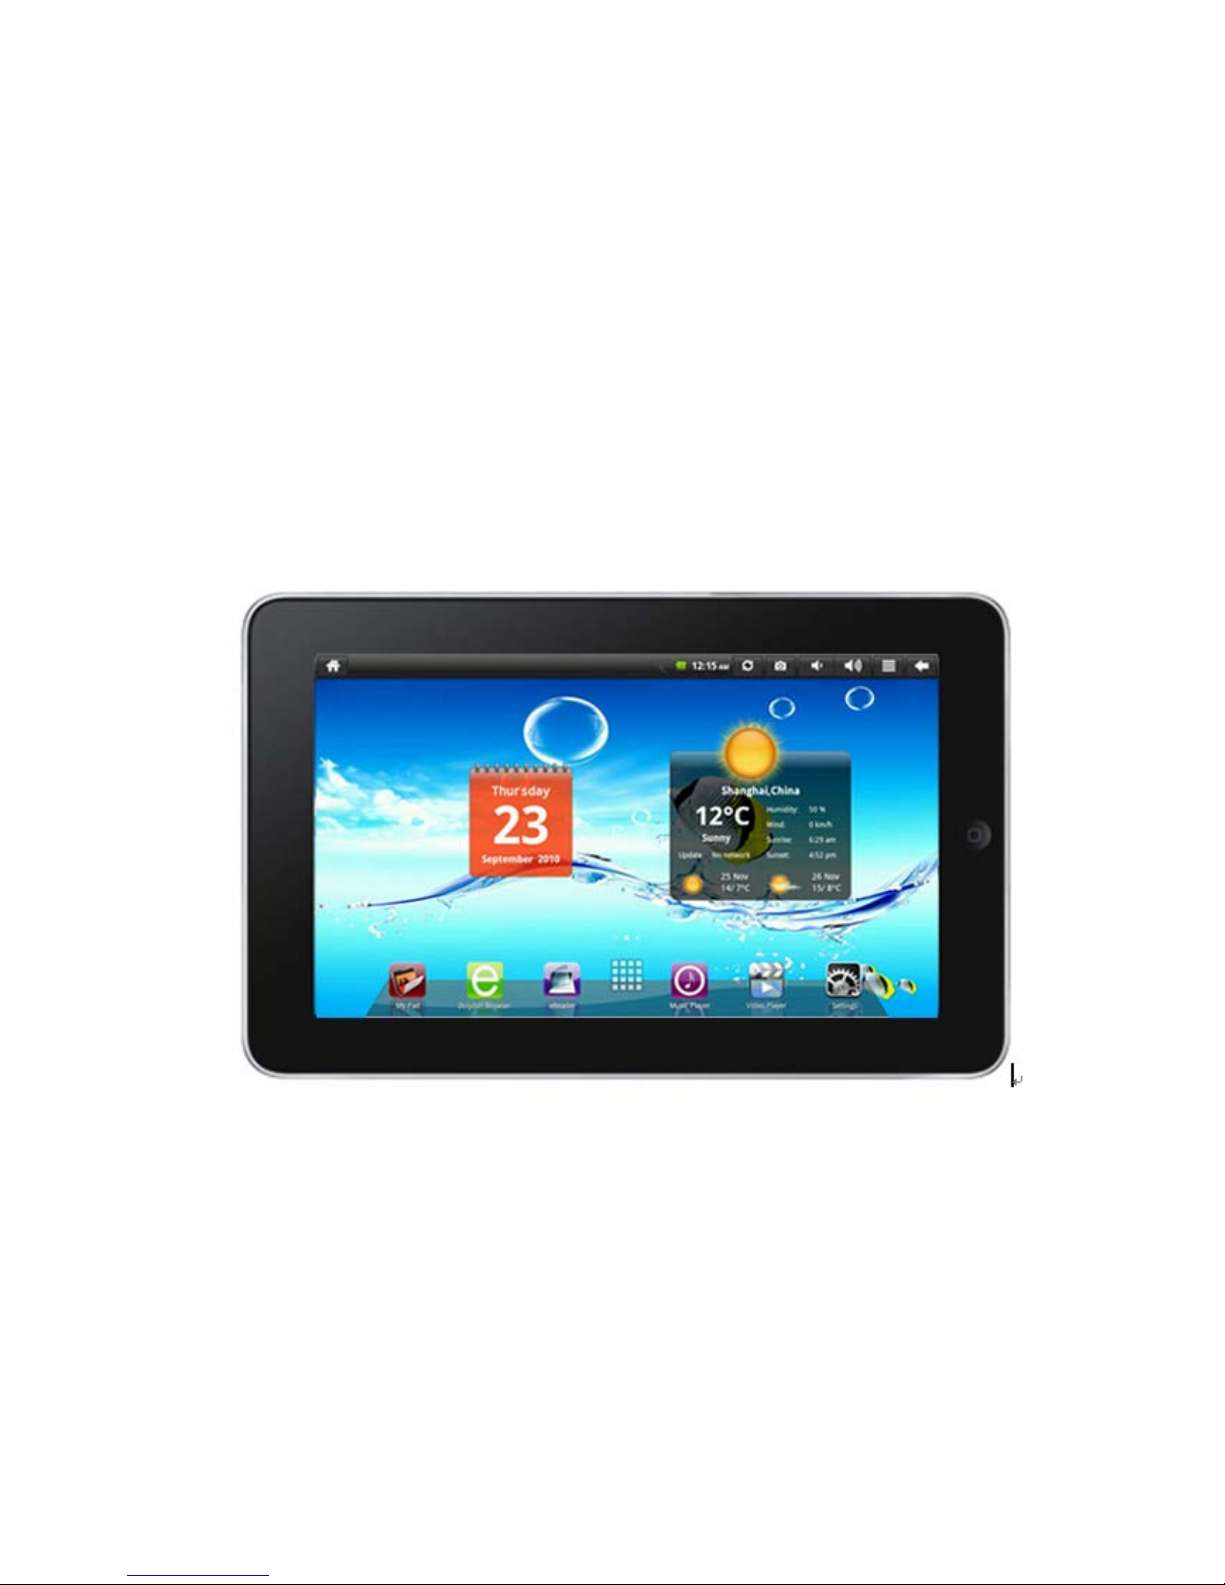
1. Appearance Descripti on
Product Structure:
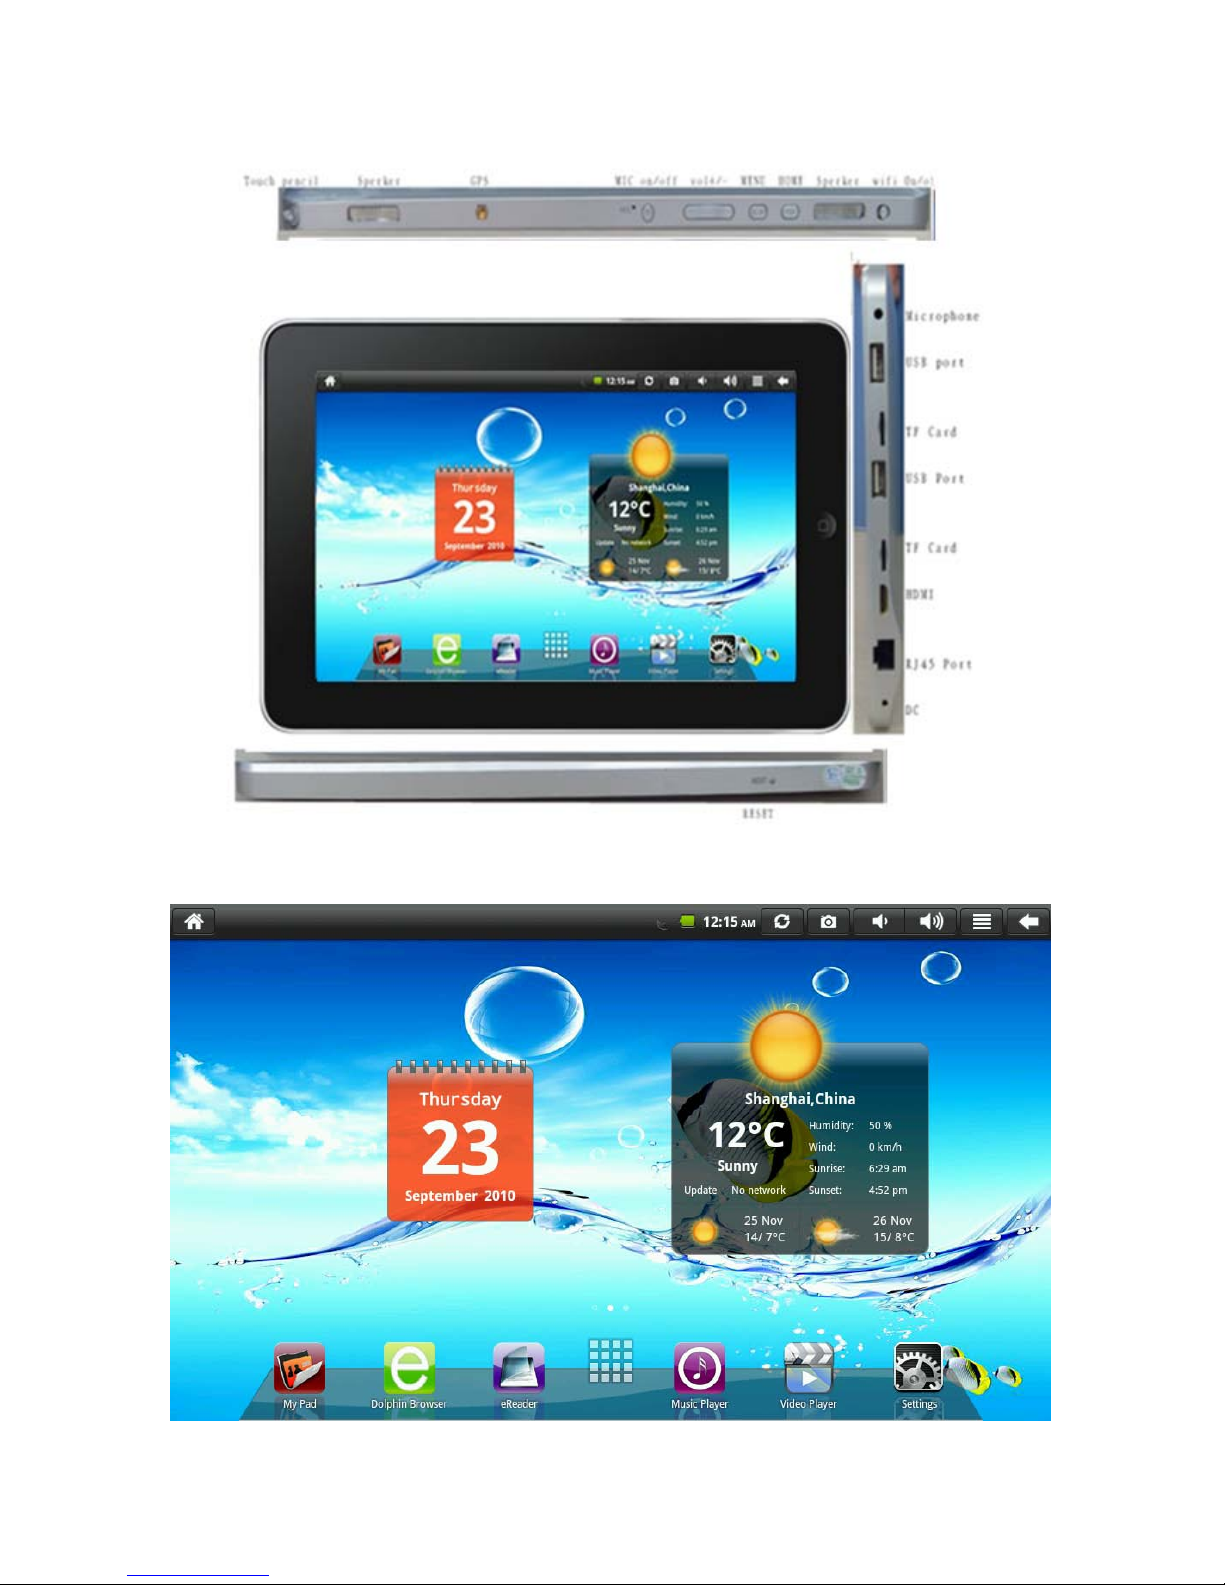
Front V iew:
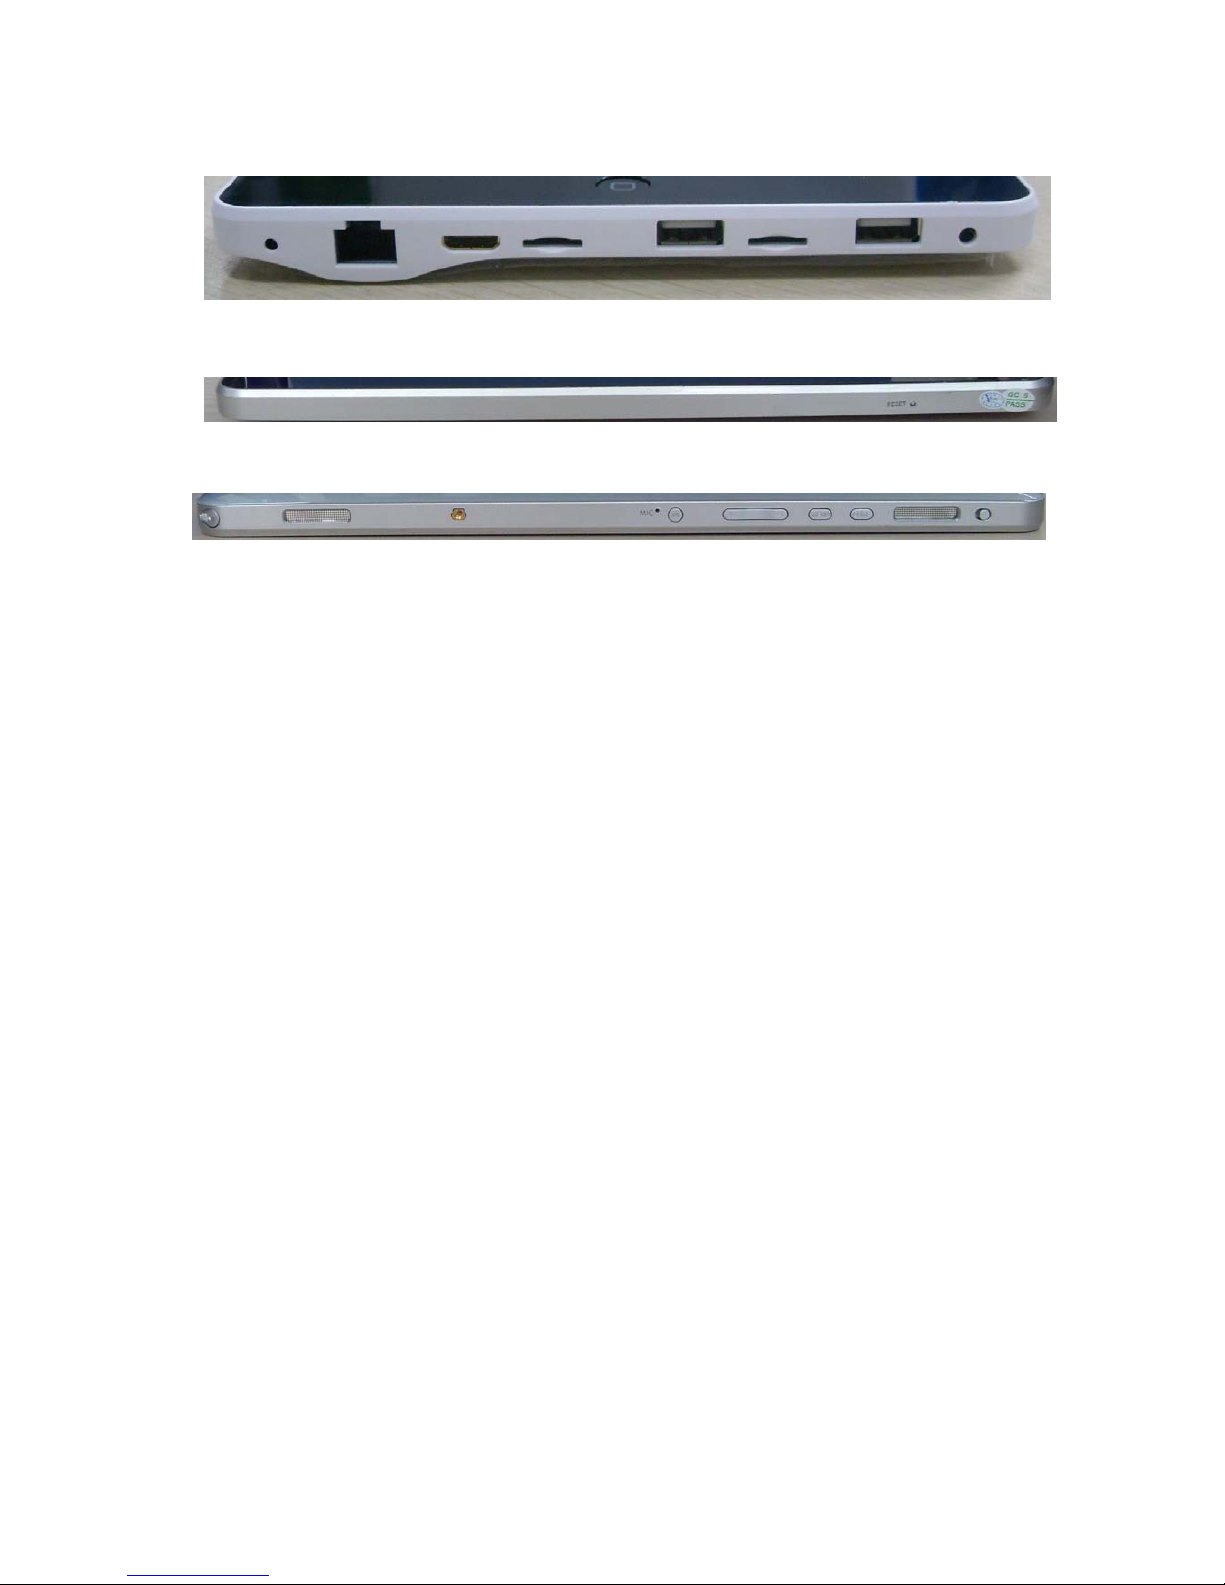
Right V ie w:
Bottom View:
T op View:
2. Getting Started
Announcement: our company has always been dedicating to improving product quality and
when the software edition is updated and if the finished product is inconsistent to functions
described in the user manual, the finished product shall prevail.
2.1 Battery Recharge
The tablet palmtop is equipped with one built-in battery and it would suggest recharging
when the battery is low.
Power Adaptor
Connect the plug of the power adaptor to the power socket and the other to the equipment
jacket to recharge.
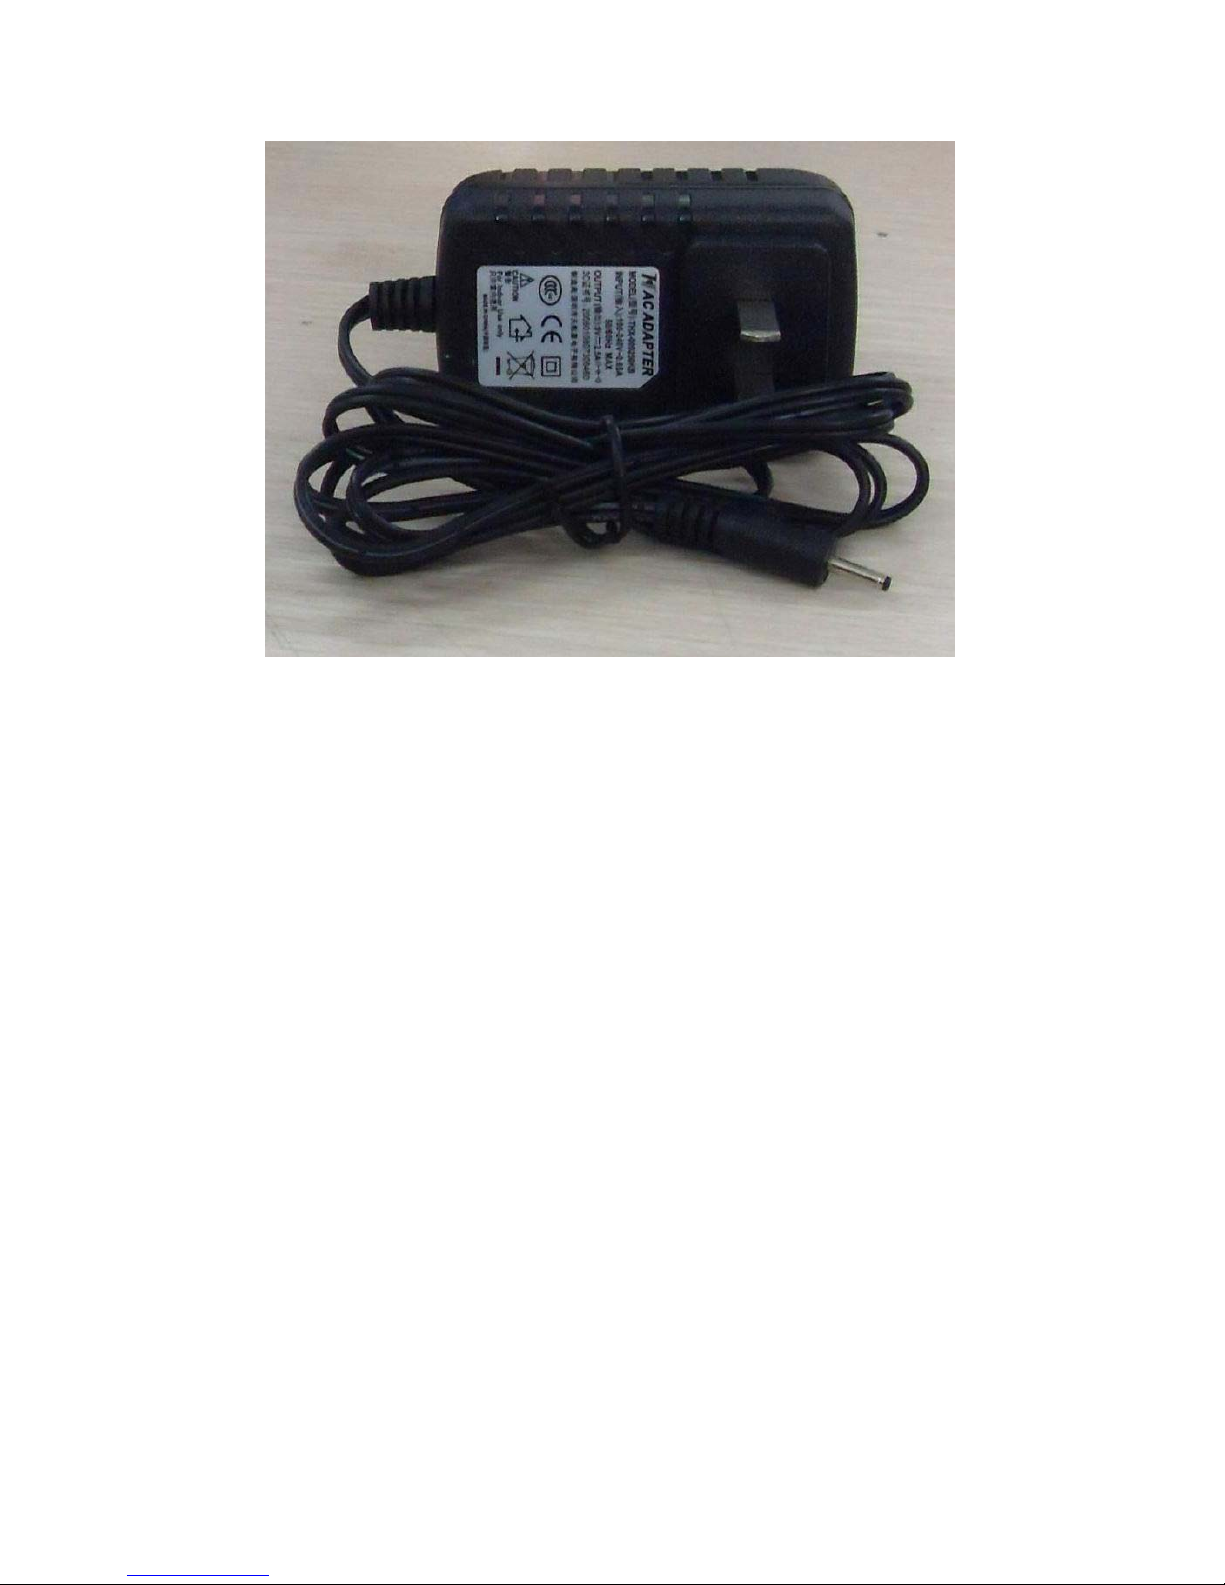
Recharging
1. Plug the power adaptor and the recharging indicator will be red which means it’s recha rging.
When the battery is full, the indicator will be green. Unplug the power adaptor, the indicator will
stay green.
2. During recharging, you could still use the equipment.
Notice:
The recharging time will be longer if the equipment is in operation.
2.2 Memory Card
Insert the Memory Card:
Insert the memory card into the slot and press until a crack is heard. The upper left of
the screen will indicate: Preparing TF card.
Browsing the Memory Card:
Run the Document Browser application to show all files under the root directory and
select Memory Card 1 to browse the contents in the card.
Unplug the Memory Card:
Close all files in the card, touch the menu icon and select setting→ TF Card and
Equipment Memory → Memory Card 1 → Uninstall TF Card. The system will show “TF Card is
safely removed". Press the card and the card will pop out. Take it out and the upper left screen
will show “The TF card is removed”.
Notice:
1. The card insertion has to be proper or the card will be damaged;

2. Don’t forcibly unplug the memor y card without the message “The TF card is removed”, or it
might damage the card;
3. If the card is write-protected, it wouldn’t be formatted or written before canceling
write-protection.
4. Mainstream memory cards are advised to avoid compatibility.
2.3 Hot Plug of Memory Card and External Flash Disk
Don't hot plug when you are using or browsing the files in the memory card or in the external
flash disk. For example, you’re browsing My Video, My Video or My Photo Album or using files
in the memory card or in the external flash disk, directly unplugging the memory card or ext ernal
flash disk may damage the card and the flash disk and the equipment may terminal the
application for self protection. For hot plug of the memory card, please refer to 2.2 Memory Card.
Close all files in the flash card before unplugging the external flash disk.
2.4 Storage Space
There are 3 storage spaces: equipment internal memory, flash disk and memory card. The
equipment internal memory will not be shown; the fold names of memory are Memory Card 1
and Memory Card 2; the fold names of the external flash disk are Flash Disk 1 and Flash Disk 2.
The system storage area is only for system file storage; the entire equipment internal space is
2GB and the flash disk and memory card are subject to the specific capacity supporting 32GB
maximum.
For detailed information, please refer to 9.6 TF Card and Equipment Memory
2.5 Power on/off
1. Power on:
When the battery is enough, press the power icon for 2 seconds. The equipment will
be vibrating for once during power on and it enters screen lock interface as follows after the
power on is finished:
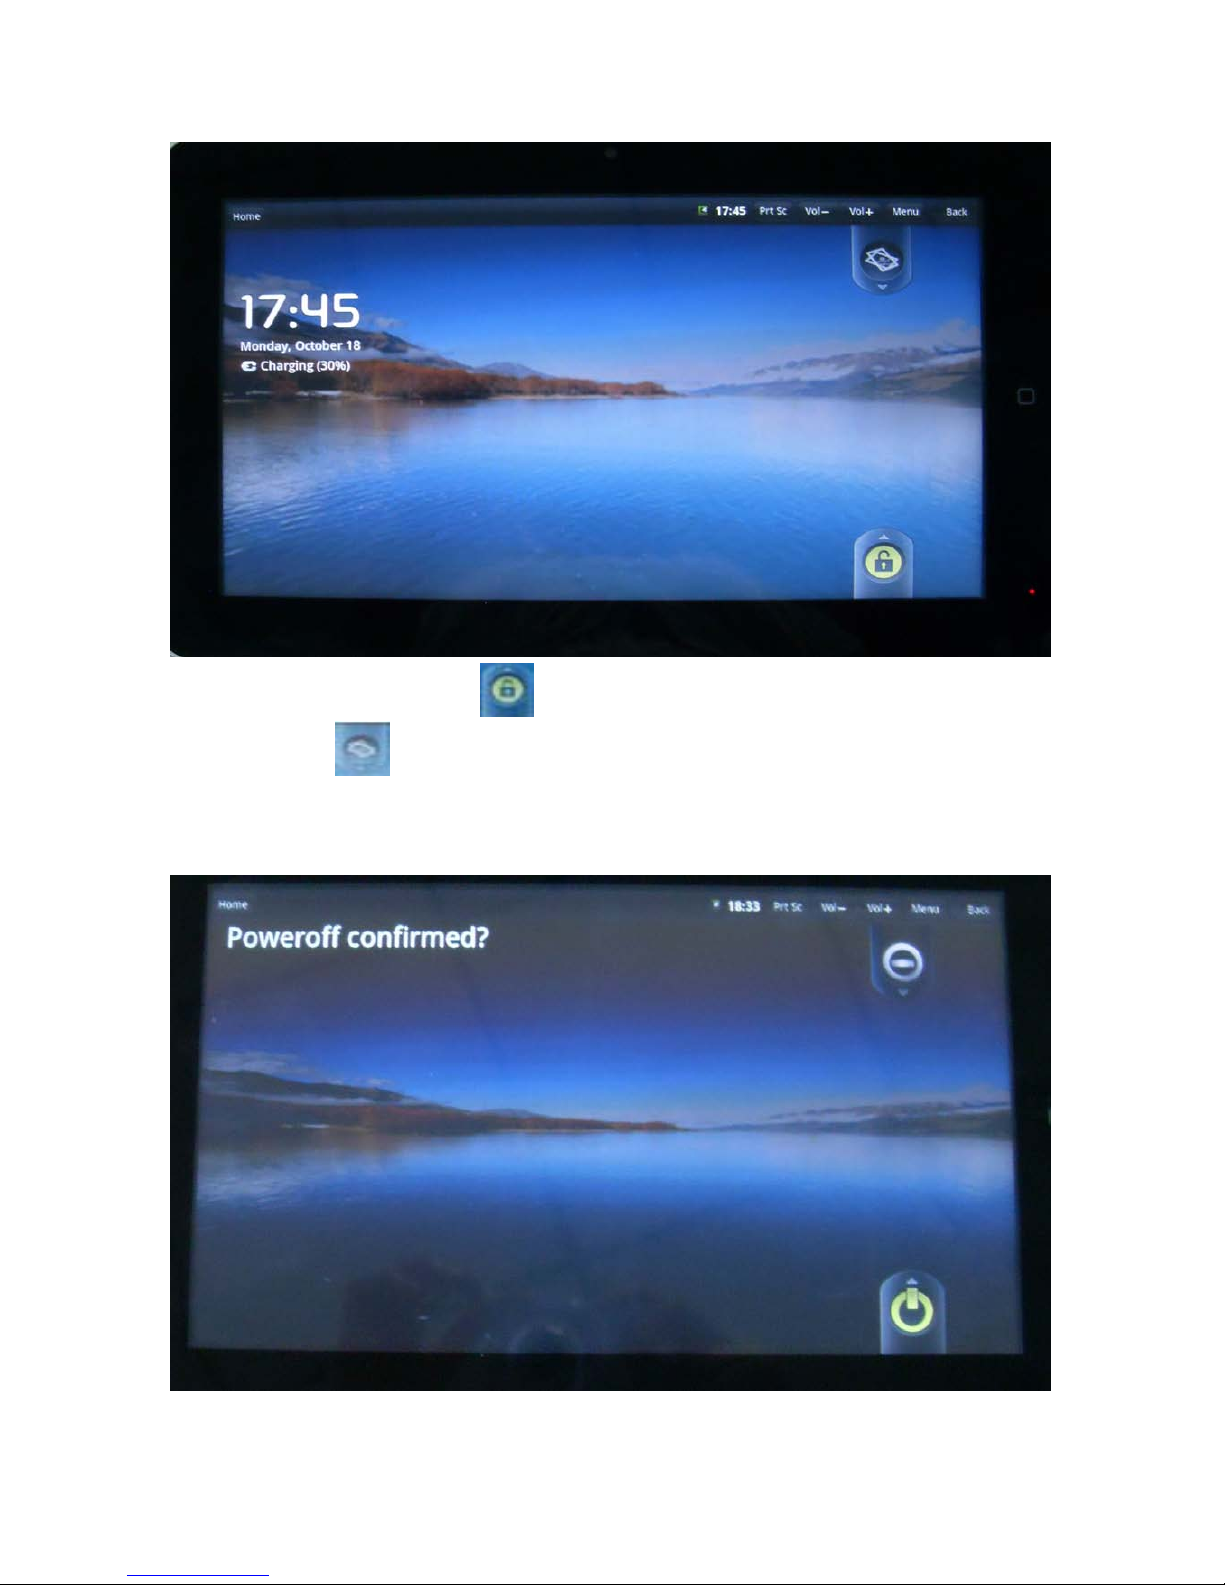
Slide the unlock icon upward to enter the main inter face; slide the electr onic
photo frame icon downward to enter photo play interface.
2. Power off:

Slide the power off icon upward to shut down the equipment and it will be vibrating for
once; slide the cancel icon downward to exit power off interface.
3. Dormancy:
Press the power icon (1 second) and the system will enter the dormant status and
the LCD screen will fade. Press the power icon to wake the system during dormancy and it enters
screen lock interface. If the battery is low during dormancy, the equipment will power on the
system and power off the system to save the power.
2.6 V ibration
Enable Vibration: touch setting icon on the shortcut bar, choose voice and display
setting and choose check box on the back of touch feedback to enable vibration.
Disable Vibration: when the vibration is on, touch setting icon
on the shortcut bar, choose voice and display setting and choose check box on the back of touch
feedback to disable vibration.
2.7 Screen Rotation
The screen will automatically rotate in responding to equipment direction. If you hold it
vertically, the screen will be vertical and if you hold it horizontally, the screen will be horizontal.
The screen rotation will be done in 2 seconds and be refreshed back to normal after rotation.
2.8 Network Cable and Flash Disk
External Cable:
Insert the cable into the Ethernet port and after the cable is connected, the equipment will
automatically be distributed an IP address or you can also acquire an IP address by manual
setting.
External Flash Disk:
Insert the flash disk into USB port. After flash disk connection, you can copy files between the
flash disk, the equipment and the memory card. For copy method, please r efer to 7.3 Document
Browser
2.9 Network Connection
Cable Network:
Insert the cable into the Ethernet port of the tablet palmtop and ETH icon will be shown on the
top status bar on the screen. The equipment will connect the network b y automatically acquiring
an IP address. You also can acquire an IP address by manual setting. Aft er the IP address is set,

you can surf the internet. Refer 8.2 Shortcut Configuration.
Wireless Network:
1. Turn the W i-Fi switch to the left and it’s enabled;
2. Touch the setting icon on the shortcut bar;
3. Touch the Wireless Network on the setting menu;
4. Open Wi-Fi on the check box;
5. Touch Wi-Fi Setting to set Wi-Fi network;
6. All equipment that are able to search AP will be listed. Touch the AP name that you want to
connect.
7. If the AP was connected successfully once, AP information is stored. Choose “Connect” on the
popup menu and choosing “Forget” will erase AP information.
8. If the AP is not encrypted, choose “Connect” to connect on the popup menu;
9. If the AP is not encrypted, input the password on the popup menu and choose “Connect” to
connect;
10. After the network is connected, a wireless connection icon will be shown on the top status
bar.
3. Input Operation
3.1 Keyboard
When you need to input text or number, the touch ke yboard of the screen will automati cally be
shown.
Notice: the equipment supports external USB keyboard but some buttons will not work if it’s
connected to an external USB keyboard.
3.2 T ouch Screen
The touch screen responds to finger touch and you can:
Notice: don’t place any object on the touch screen for it may damage or crush the screen.
Single Click: single click one icon to choose the icon or option you want.
Long Press: long press one icon to choose the icon and you can drag it to the bottom shortcut bar.
Drag: drag on the screen and you can move between magic cube sides or drag the application
icons into the shortcut bar.
You can also use the touch pen instead of your finger.
3.3 Mouse
The equipment supports external USB mouse. Connect an USB mouse and you can single click,
choose, drag, slide and right click.
4. Desktop
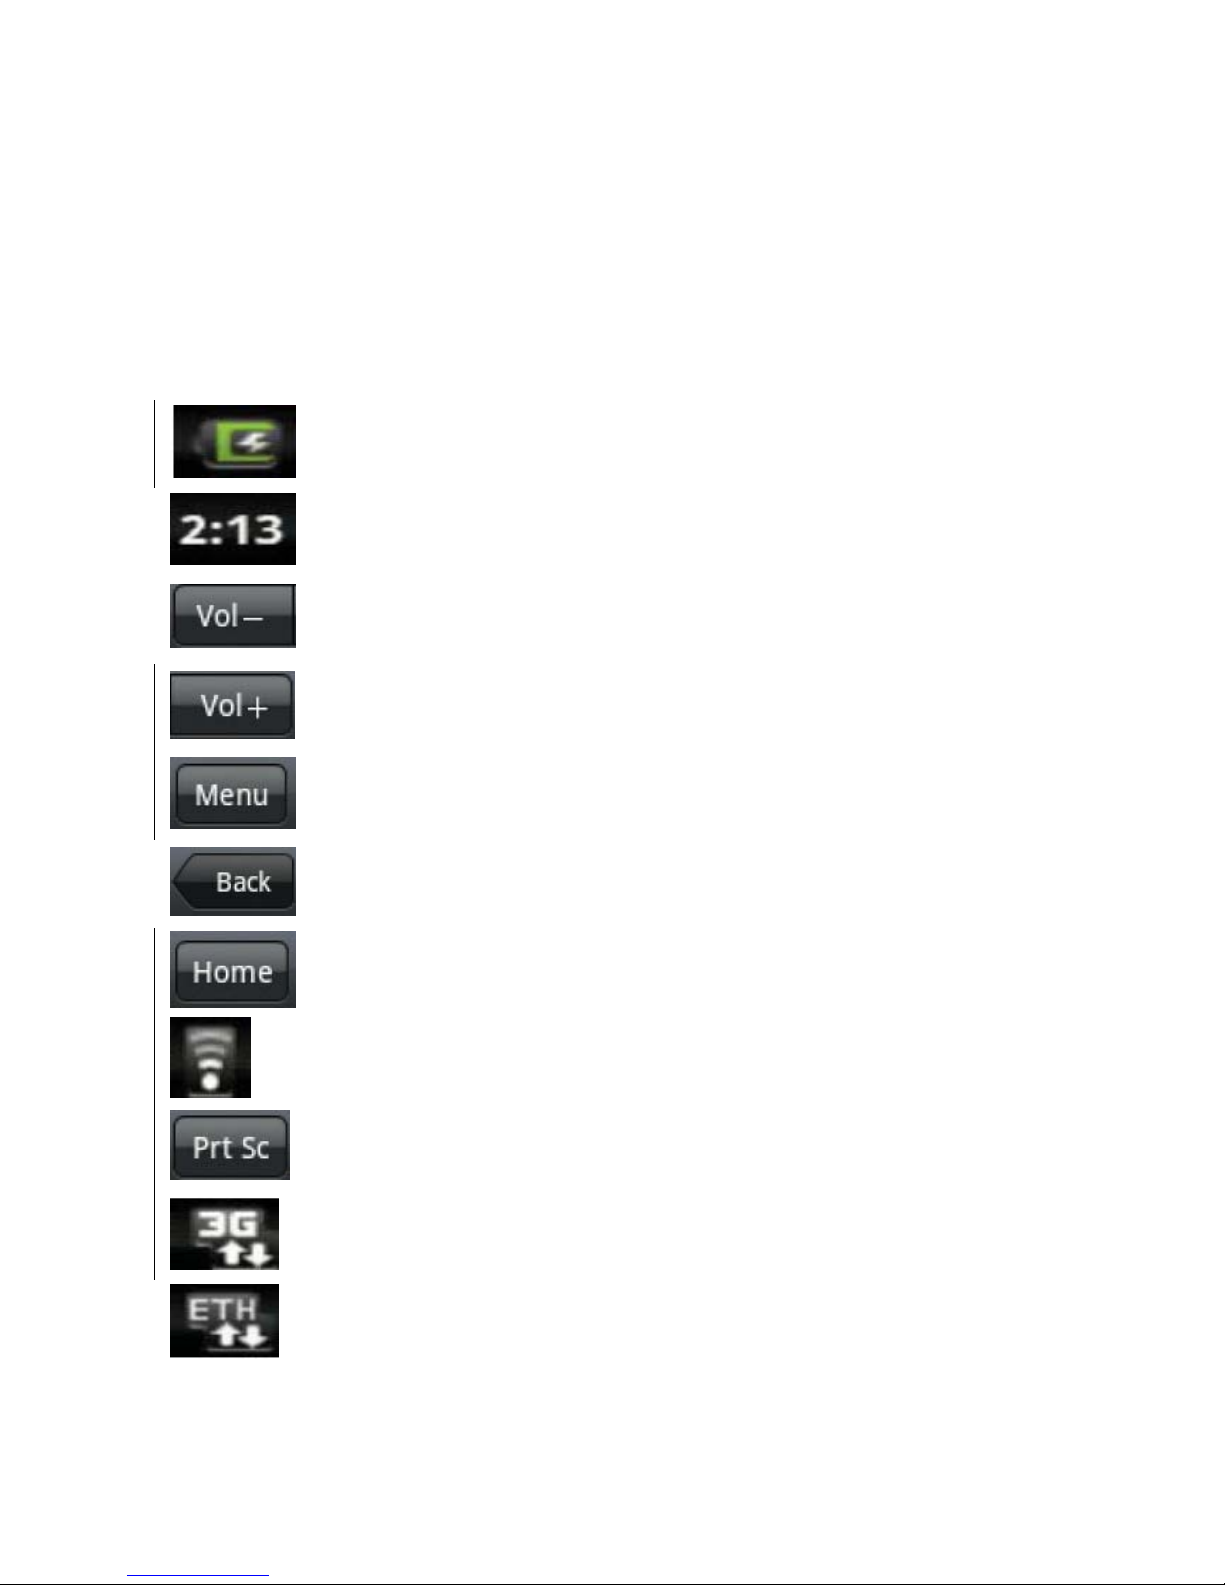
4.1 Status Bar
The top of the screen is the status bar and there is one button on the left and five buttons on the
right which are Desktop Button, Screen Capturing Button, Volume Button, Menu Button and
Return Button. On the status bar, there are system information including 3G signal status, Wi-Fi
signal status, Ethernet status, battery status and time.
Battery Status Icon
Time Display
volume Decreasin
Volume Increasing Icon
Shortcut Menu Icon
Return Icon
Desktop Icon
Wireless Network Status Icon
Screen Capturing Icon
3G Icon
Cable Network Icon
4.2 Main Interface
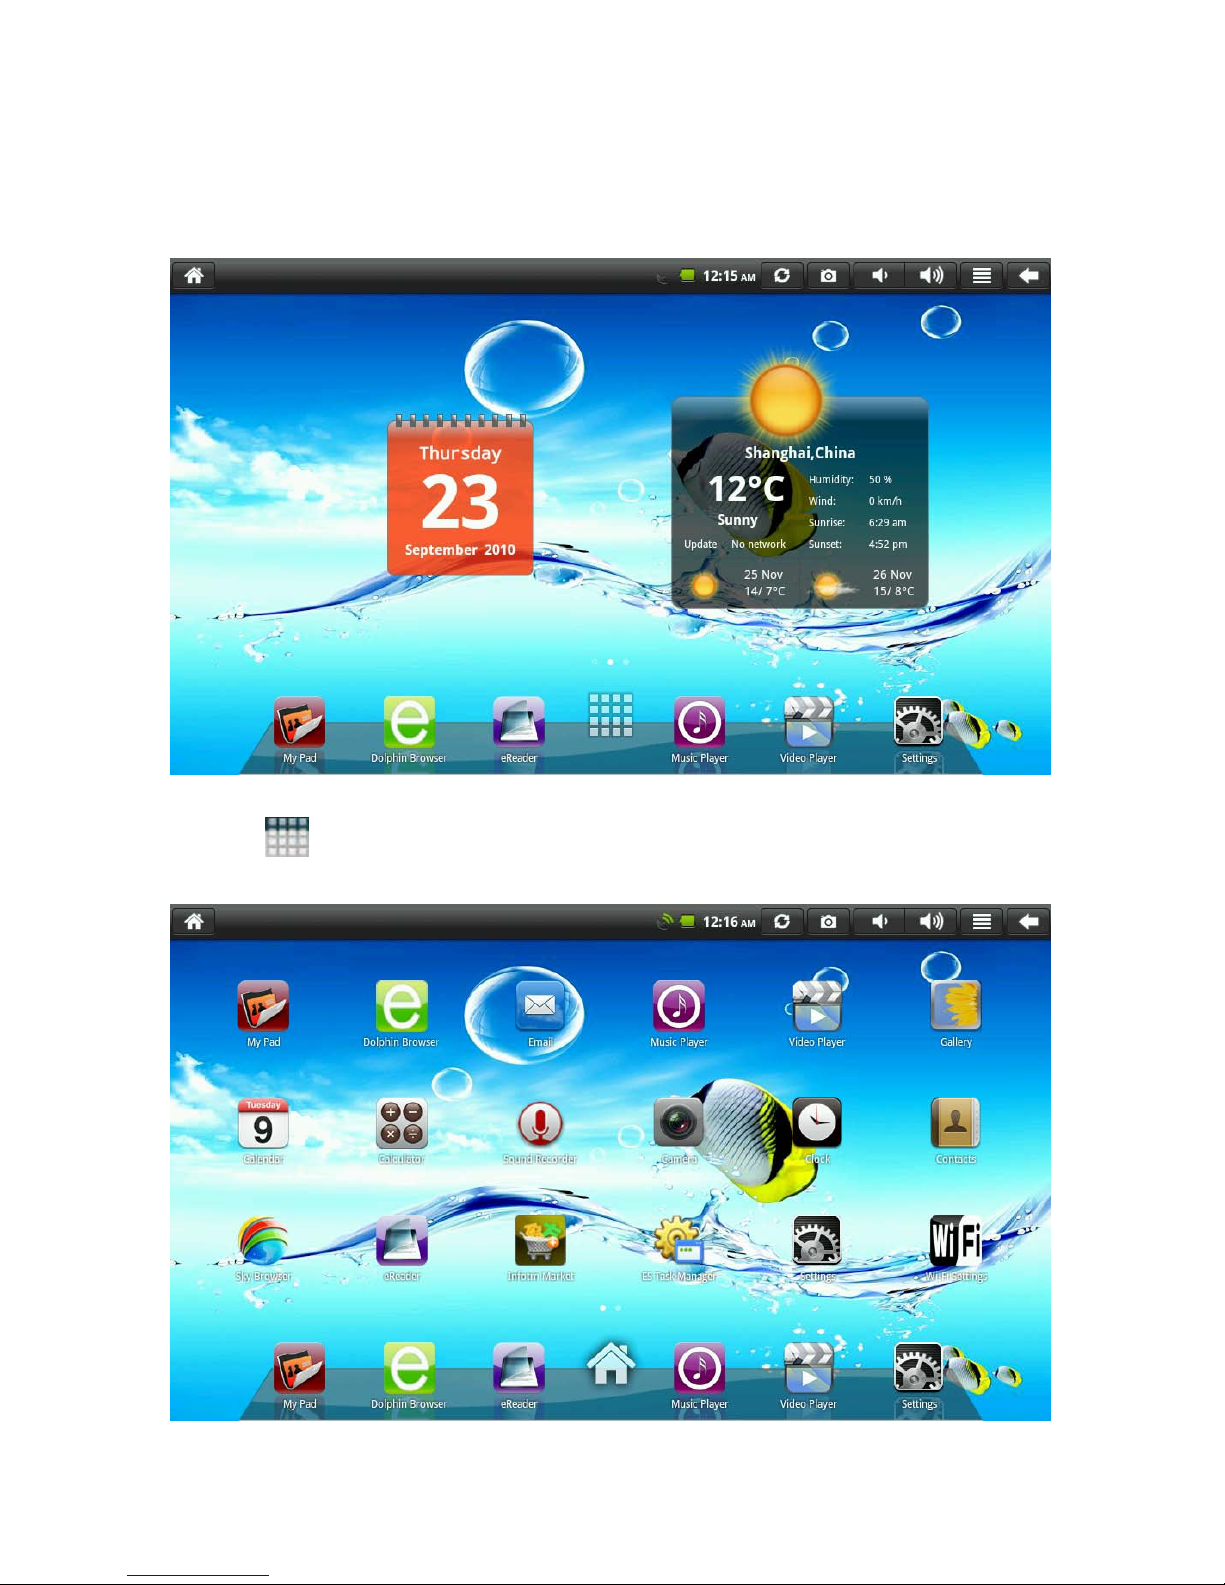
The main interface application pa ge of the tablet palmtop has two modes: desktop gadget mode
and application icon mode. You can switch modes by the central button on the shortcut bar. The
desktop gadget mode is shown as follows:
Click the button on the shortcut bar to enter application icon mode. The application icon
mode is shown as follows:

Click the button to enter desktop gadget mode.
4.3 Shortcut
On the desktop gadget mode interface, press the menu button or cl ick the menu icon on
the top status bar and a shortcut menu will pop up at the bottom of the screen. The shortcut menu
includes: Add, Wallpaper, Search, Notice, Desktop Setting, System Configuration. See the
picture below:
4.4 Add Gadgets
Shortcut
If you want to add the shortcut into the main screen, press Menu → Add → Shortcut on the
desktop gadget mode interface. Choose the shortcut and add it into the main screen. Click the
shortcut icon on the main screen and it will execute the corresponding operation.
 Loading...