

TALK-200
V oIP ATA / Gateway
Default Login Details
IP Address http://192.168.100.1
User Name zyxeladmin
Password gl0b@l1nx
Firmware Version 1.01
Edition 1, 09/2010
www.globalinx.com
www.zyxel.com
Copyright © 2010 GLOBALINX® Inc.


CHAPTER 1
Introduction
1.1 Overview
This guide helps you set up and use your GLOBALINX® TALK-200.
This guide contains the following sections:
SECTION PAGE DESCRIPTION
Installation
Requirements
Making Hardware
Connections
Initial Configuration 7 How to configure your TALK-200 to access the Internet
Placing Phone Calls 13 How to make calls from the phone(s) connected to the
Advanced Phone
Configuration
Speed Dial Settings 22 How to create a list of speed dial numbers.
Dial Plan with URL 24 How to create a list of peer-to-peer call numbers.
Supported Phone
Functions
System Mode and
Accounts
Auto-Provision 29 How to save the TALK-200 auto-provisioning file and
Troubleshooting 31 Possible solutions for any issues that may arise.
Specifications 37 Information about your TALK-200’s physical
Features 38 Supported firmware specifications.
Wall Mounting
Instructions
Safety Warnings 43 Using the TALK-200 safely.
Legal Information 43 Certifications, warranty and customer support
4 A checklist of things you need before you install the
TALK-200.
5 How to connect the TALK-200 to your network, your
computer and telephone(s).
and make Voice over Internet (VoIP) phone calls.
TALK-200.
14 How to configure advanced VoIP options.
25 A table of the key combinations you can enter on your
phone's keypad to use certain features.
27 How to change your operating mode (router or bridge)
and system passwords.
configure the TALK-200 to download the configuration
and firmware automatically from an auto-provisioning
server.
specifications
41 How to attach the TALK-200 to a wall.
information.
TALK-200 User’s Guide
3
Chapter 1 Introduction
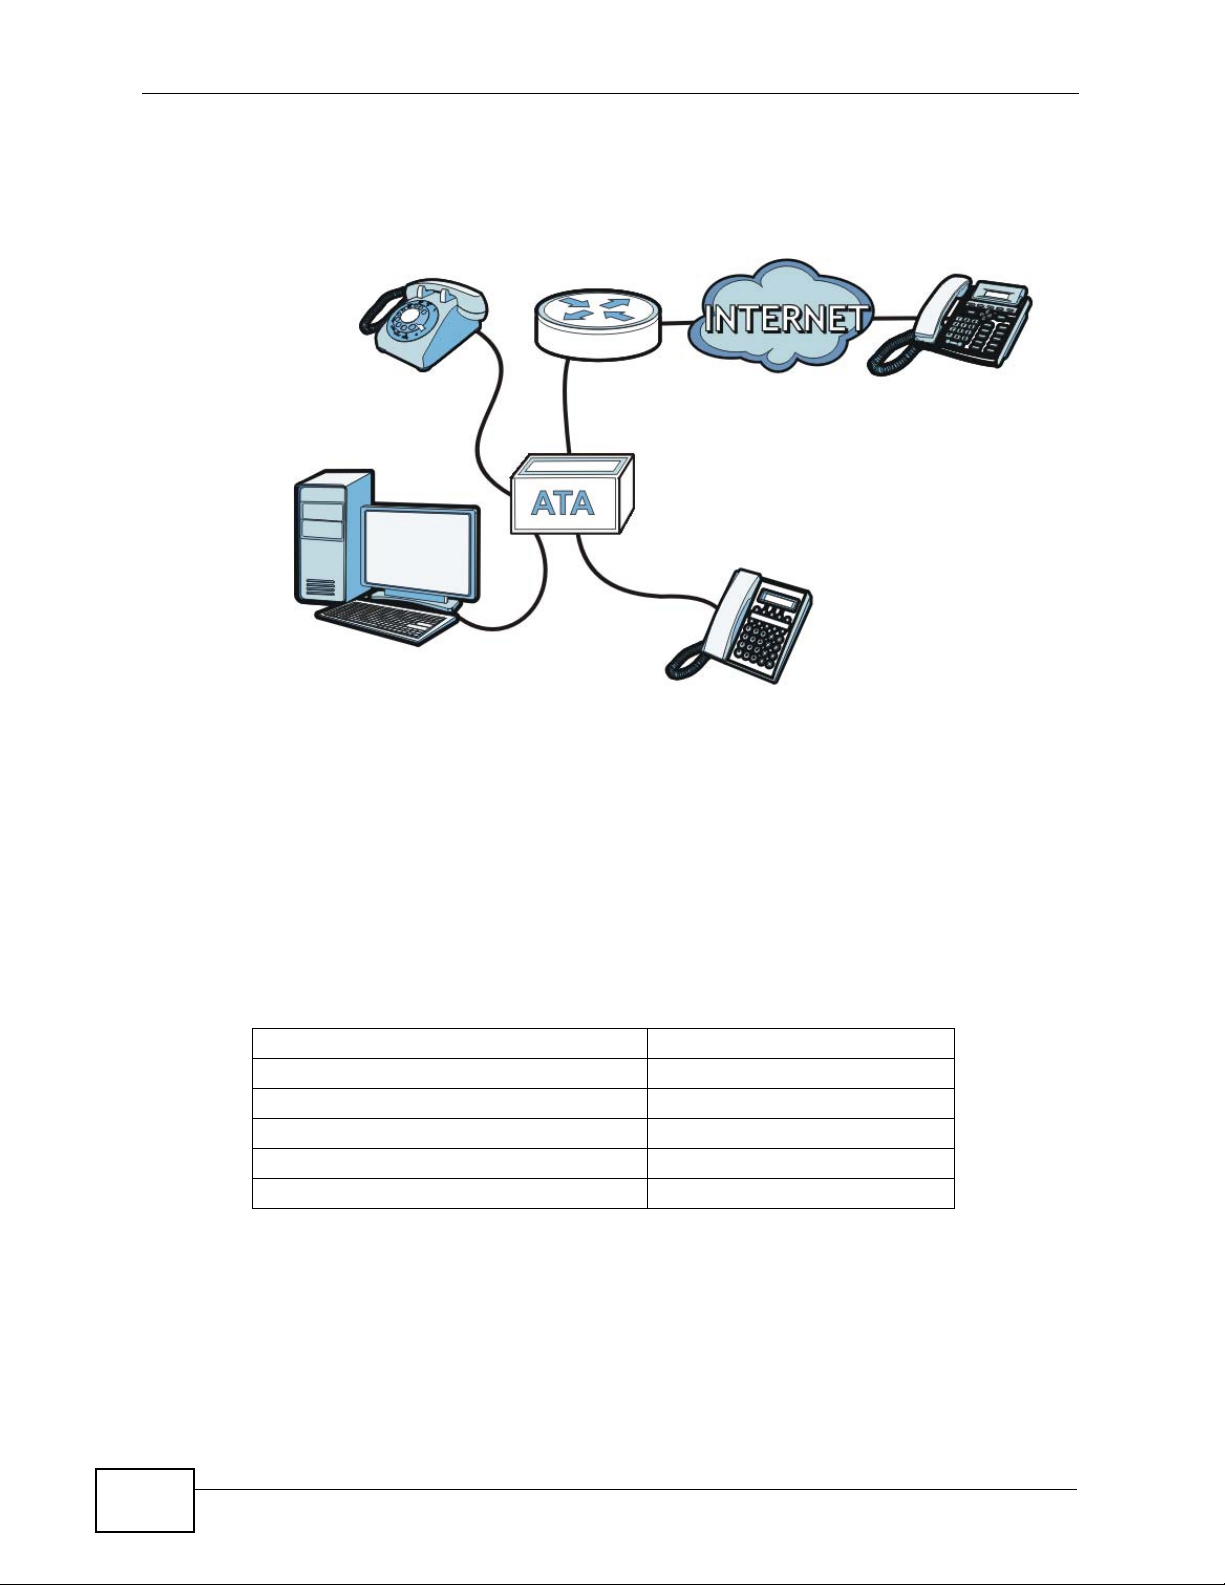
1.2 How It Works
The following figure shows how the TALK-200 works:
A
D
C
B
• When you make a phone call over the Internet, you use a telephone (A) to dial
the number.
The telephone is connected to your TALK-200 (C), which is connected to the
broadband modem or router that provides Internet access (D).
• When you want to use the Internet, you use your computer (B). Your computer
is connected to your T ALK -200 (C), which is connected to the broadband modem
or router that provides Internet access (D).
You also use your computer to configure the TALK-200.
A
Important information about your TALK-200:
Default Management IP Address 192.168.100.1
Default Subnet Mask 255.255.255.0
Default Admin User Name zyxeladmin
Default Admin Password gl0b@l1nx
Default User Name user
Default User Password user
1.3 Installation Requirements
Make sure you have the following things before you set up your TALK-200:
4
TALK-200 User’s Guide
• Internet Account - Information provided by y our ISP (the c ompany that let s you
connect to the Internet). This information might include your user name,
password, and so on.
• VoIP Account - Information provided by your VoIP service provider (the
company that lets you make phone calls over the Internet). This information
might include your URI, number, and so on.
• Web Browser - Internet Explorer 6.0 or later or Firefox 1.5 or later with
JavaScript enabled.
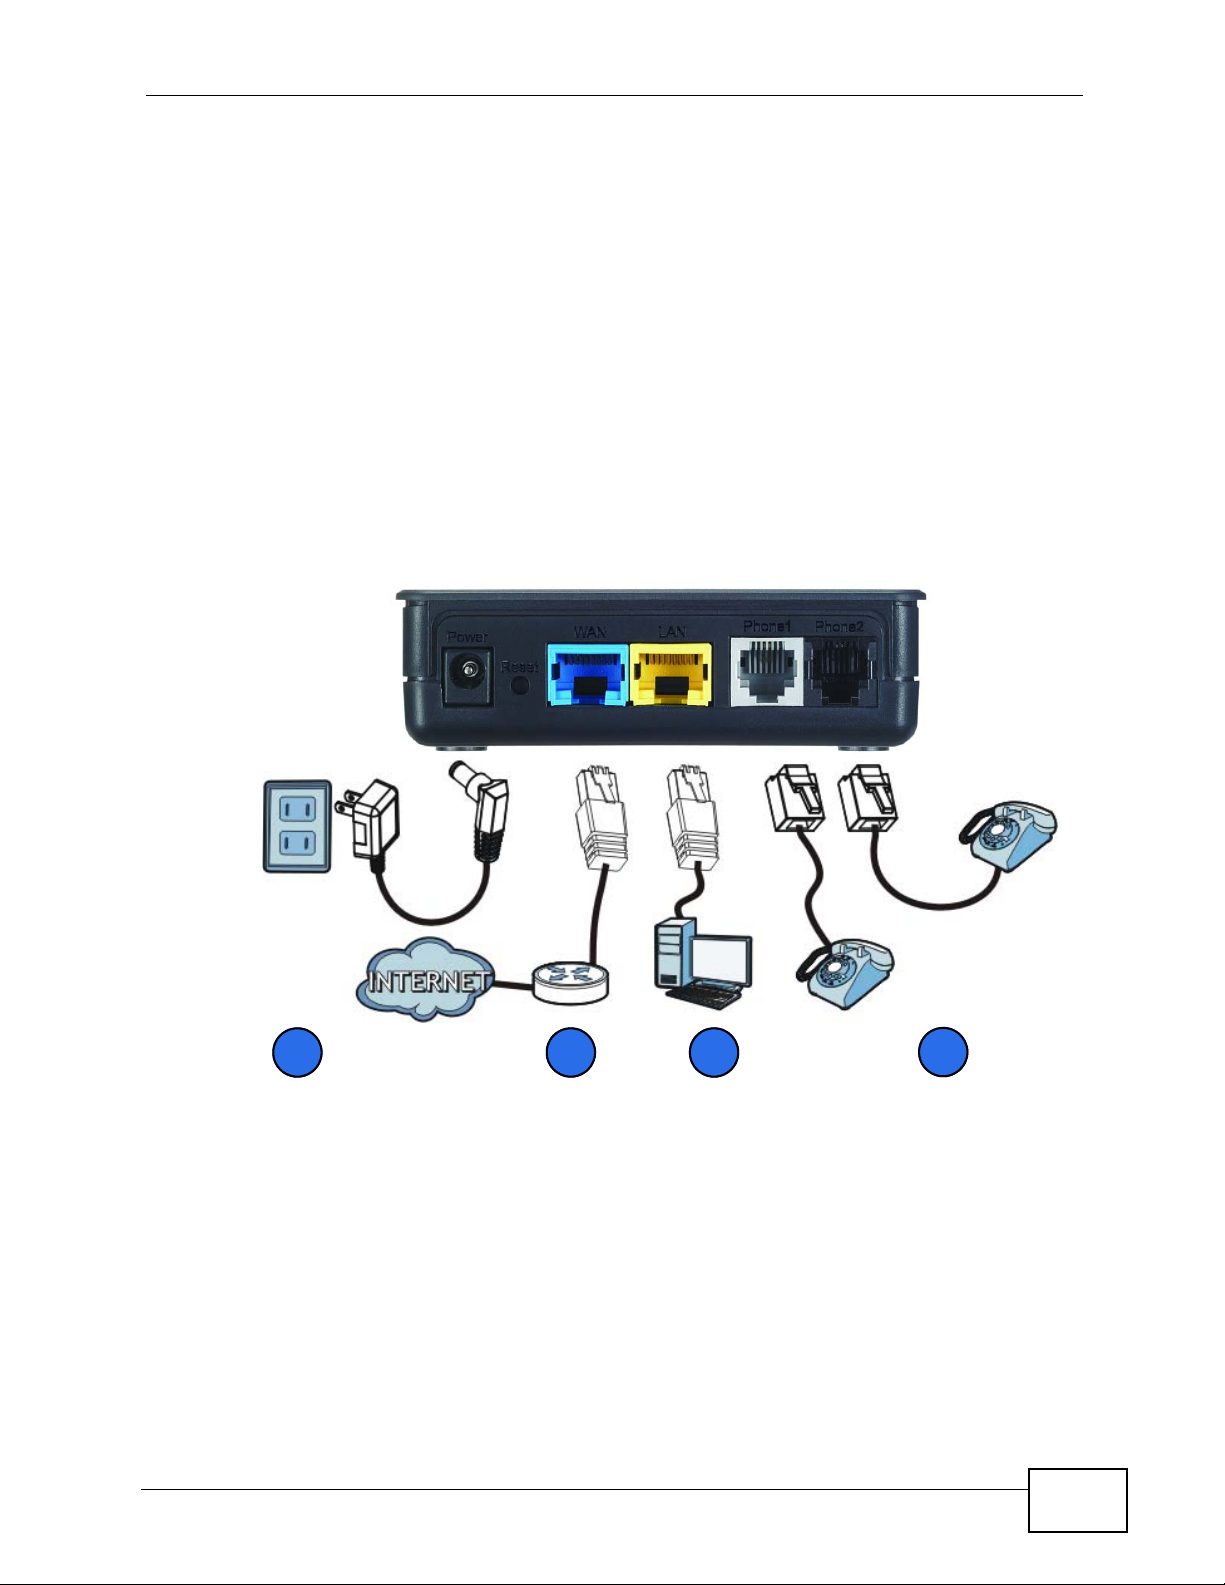
1.4 Making Hardware Connections
The following shows you how to make the TALK-200’s hardware connections.
Figure 1 Hardware Connections
Chapter 1 Introduction
1 PHONE 1 / PHONE 2: Use a telephone cable (and any telephone adaptor
provided with your TALK-200) to connect your telephone to this port.
2 LAN: Use an Ethernet cable to connect your computer to this port.
3 WAN: Use an Ethernet cable to connect your broadband modem or router to this
port.
4 POWER: Use the power adaptor provided with your TALK-200 to connect an
appropriate power source to this jack.
TALK-200 User’s Guide
1234
5

Chapter 1 Introduction
On the front panel, the POWER light flashes green while your T ALK -200 start s up,
and stays green once it is ready . The WAN and LAN lights turn on if the WAN and
LAN ports are properly connected. These lights flash when the TALK-200 is
sending or receiving data.
6
TALK-200 User’s Guide
CHAPTER 2
Initial Configuration
This chapter shows you how to set up your TALK-200 by connecting to its built-in
Web Configurator with your computer.
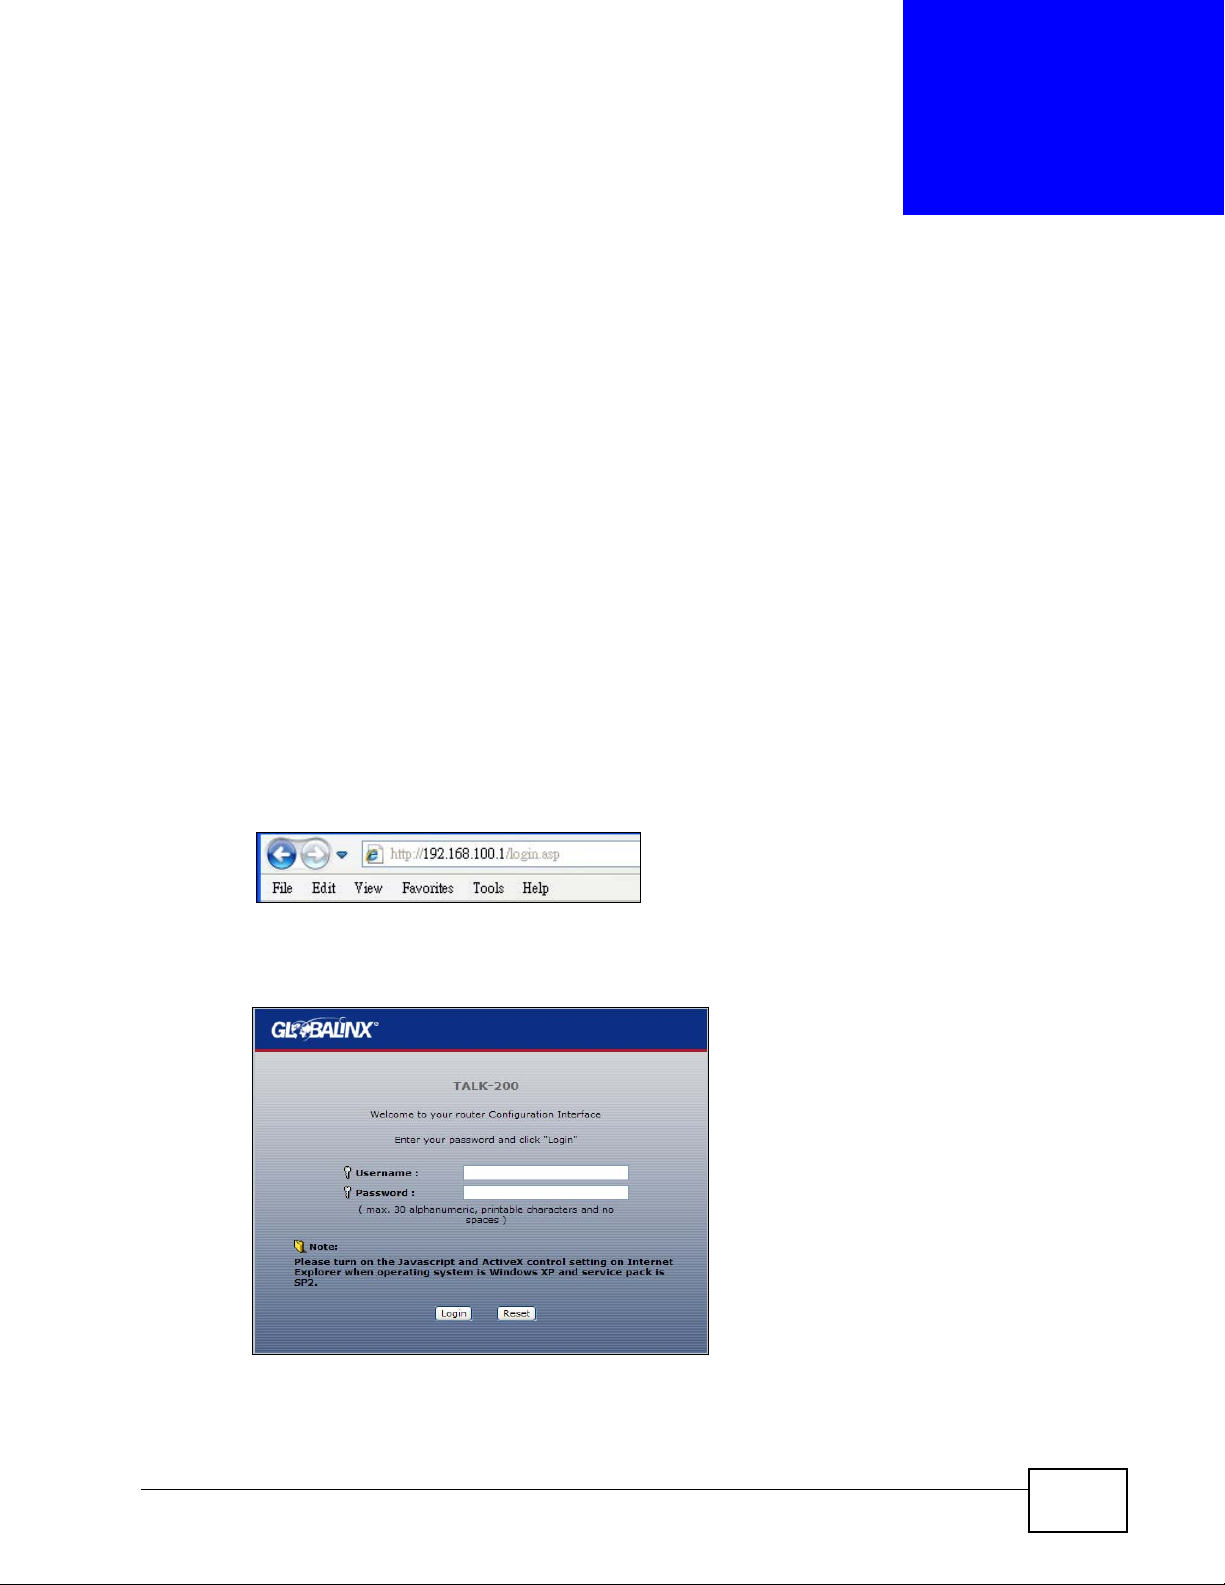
2.1 The Web Configurator
The web configurator is an HTML-based management interface that allows easy
device setup and management via a web browser.
To connect to the Web Configurator:
1 Launch your web browser.
2 Enter http://192.168.100.1 as the address.
3 Enter the default administrator Username (zyxeladmin) and Password
(gl0b@l1nx), then click Login.
TALK-200 User’s Guide
7
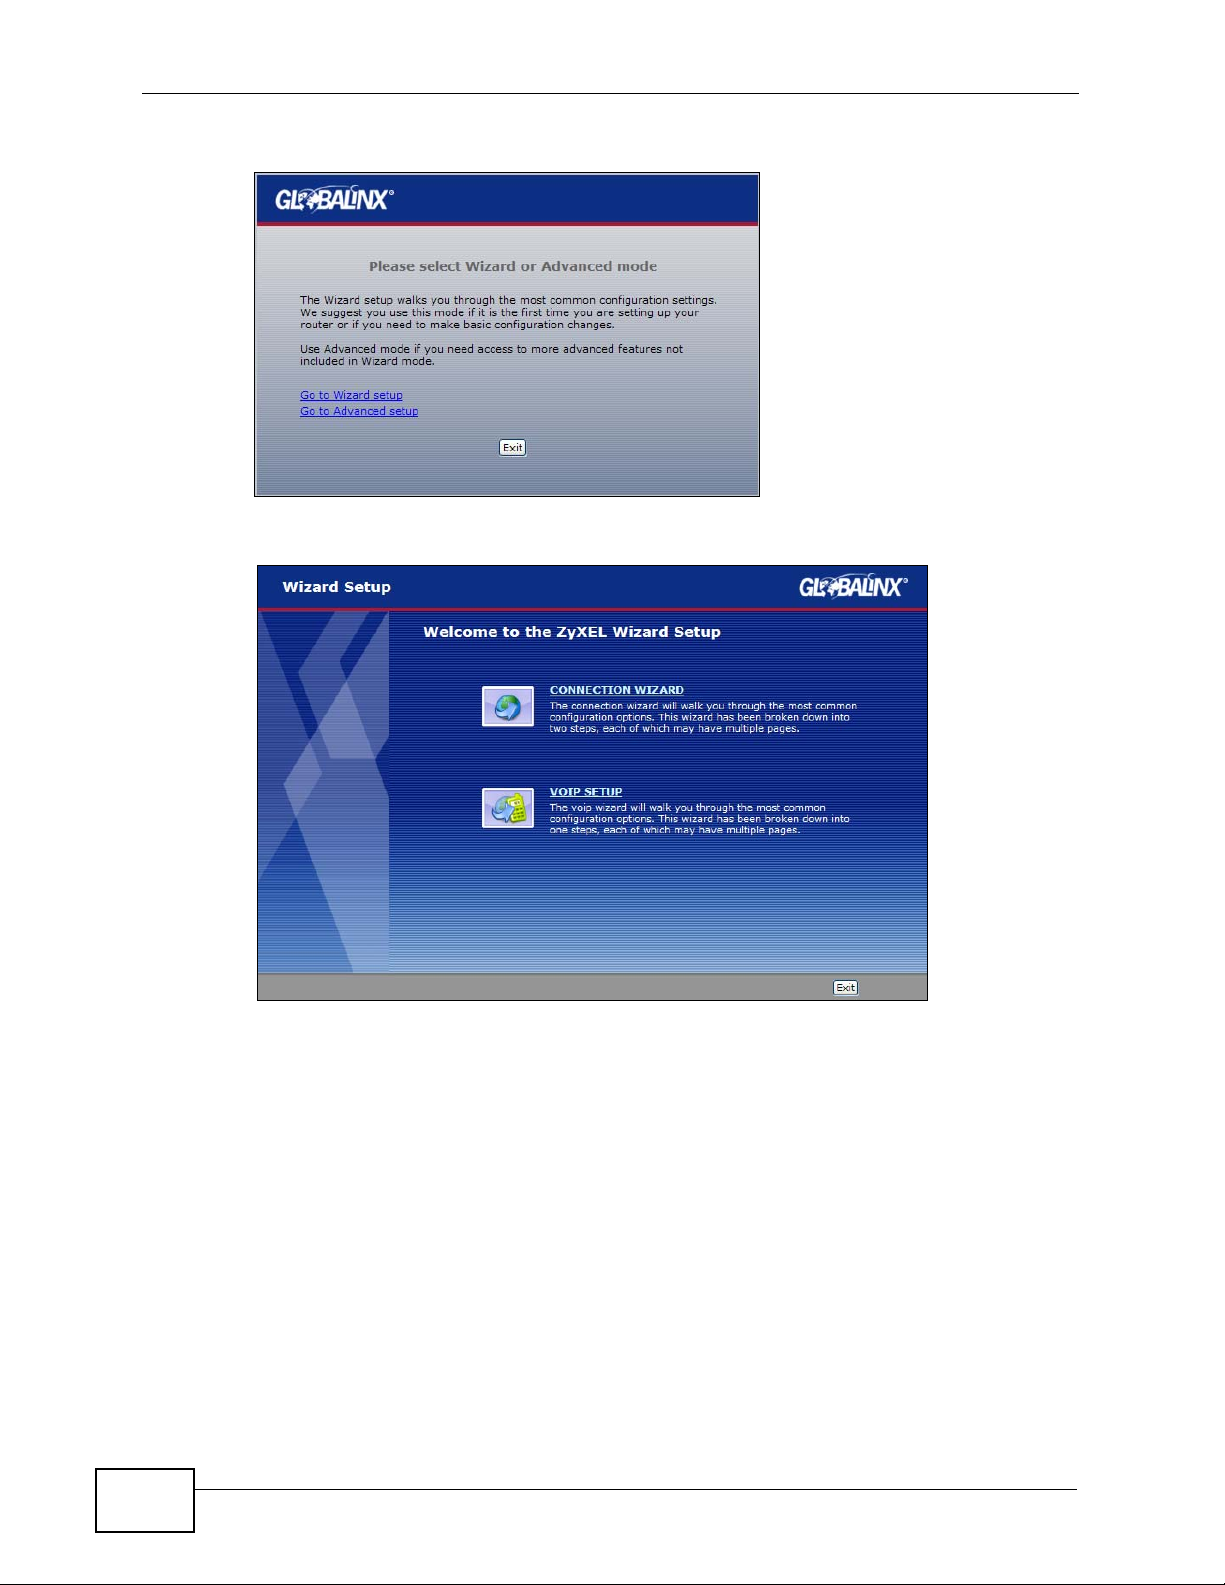
Chapter 2 Initial Configuratio n
4 Click Go to Wizard setup.
5 The Configuration Wizard opens.
2.2 The Connection Wizard
This section shows you how to configure your Internet connection settings using
the Connection Wizard.
Note: You must have an active Internet account with a service provider in order to
complete this section.
1 In the Wizard Setup screen, select Connection Wizard.
2 In the Welcome screen, click Next.
8
TALK-200 User’s Guide
Chapter 2 Initial Configuration
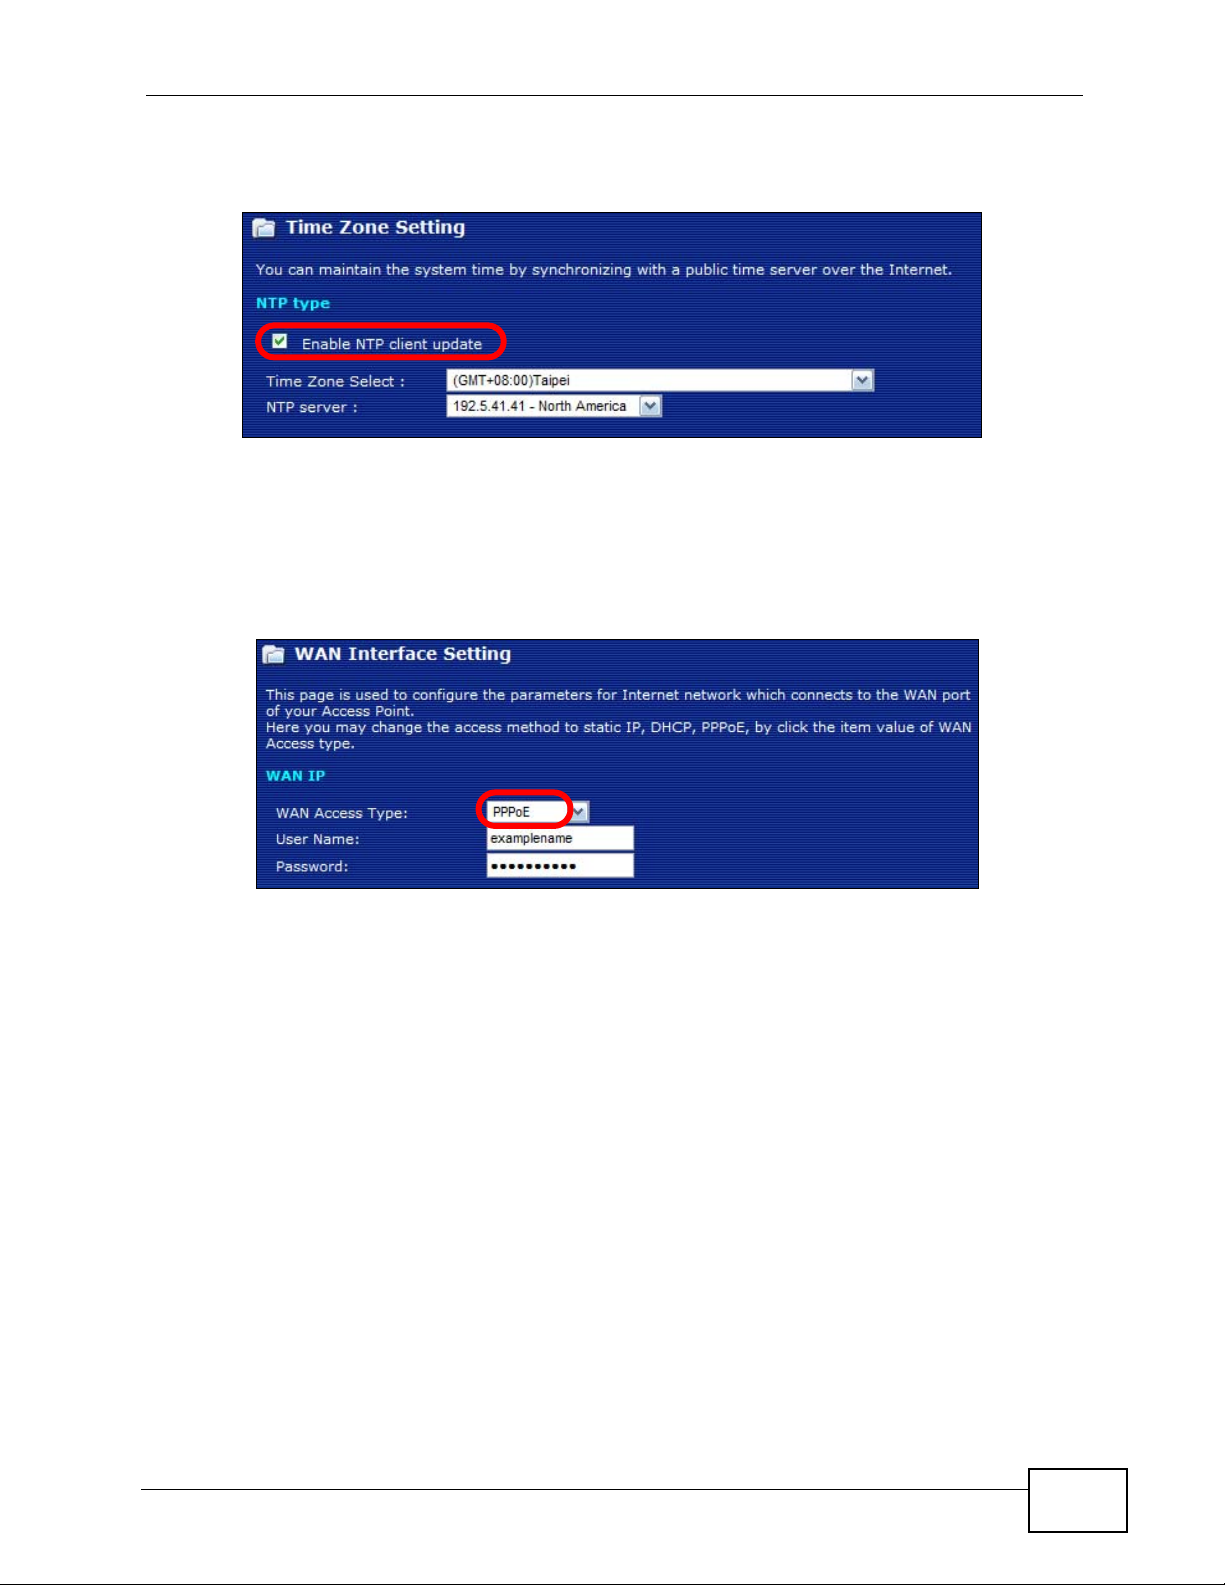
3 In the Time Zone Setting screen, select Enable NTP Client Update if you want
to maintain the TALK-200’s internal clock by synchronizing it with a time server.
If you do this, choose a Time Zone and an NTP Server closest to your location
from their respective menus, then click Next to save your settings and go to the
next screen.
4 The WAN Interface Setting screen has different fields, depending on the type of
Internet access your ISP uses.
You can choose either Static IP, Dynamic IP, or PPPoE:
• Static IP means the ISP has assigned your Internet access account a single
IP address that will never change, regardless of whether you are online or
not. See Section 2.2.1 on page 9 for details.
• Dynamic IP allows the ISP to randomly assign your TALK-200 an IP address
each time it requests a WAN (or Internet) session. The IP address is released
as soon as the TALK-200 disconnects from the ISP. See Section 2.2.2 on page
10 for details.
• PPPoE emulates a standard dial-up connection over the Internet and requires
that each time the T ALK -200 requests a W AN session you log in wi th your ISPassigned user name and password. See Section 2.2.3 on page 10 for details.
Choose the setting required by your ISP then follow the instructions in the
appropriate section below. If you are not sure which setting to use then contact
your ISP.
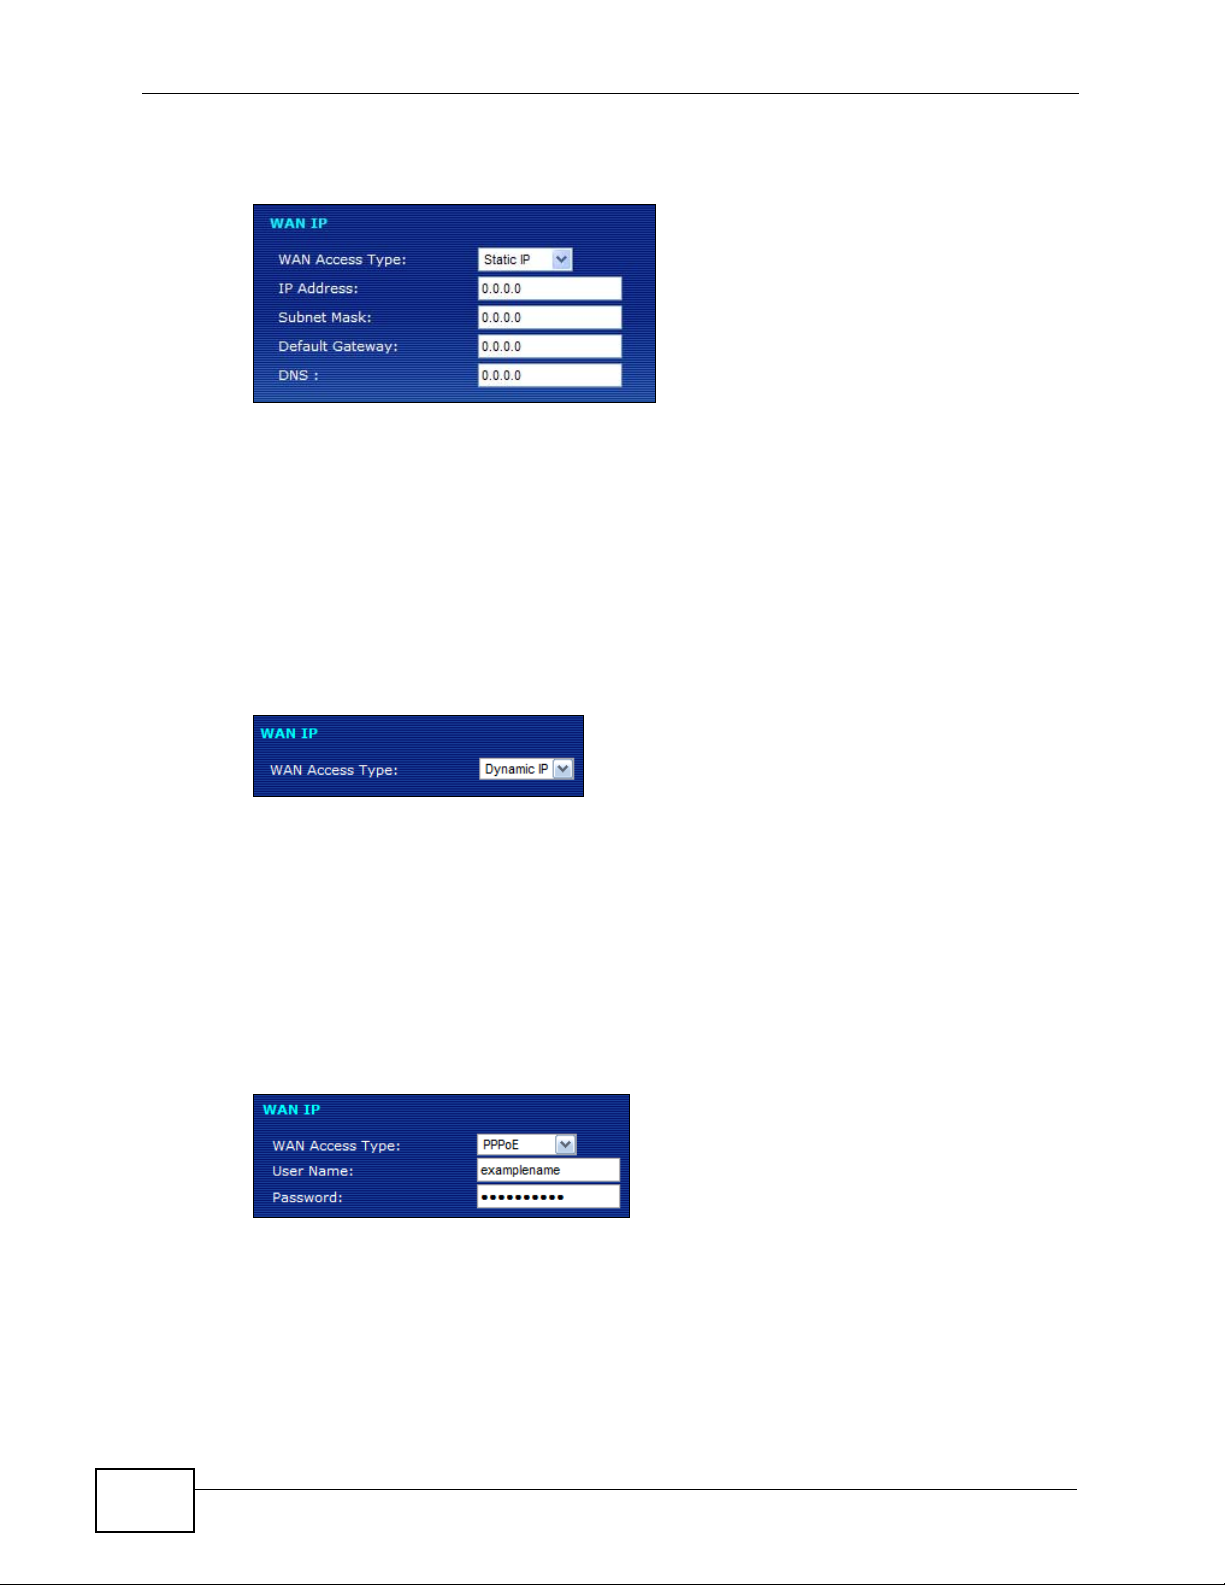
2.2.1 Static IP Connection Settings
Follow these steps if your ISP uses a static IP connection.
TALK-200 User’s Guide
9
Chapter 2 Initial Configuratio n
1 Select Static IP from the WAN Access Type menu. The screen changes to
provide options for this setting.
2 Enter the settings as provided by your ISP.
3 Click Finished to save your settings.
2.2.2 DHCP Connection Settings
Follow these steps if your ISP uses a dynamic IP connection.
1 Select Dynamic IP from the WAN Access Type menu.
2 Click Finished to save your settings.
2.2.3 PPPoE Connection Settings
Follow these steps if your ISP uses a PPPoE connection.
1 Select PPPoE from the WAN Access Type menu. The screen changes to provide
options for this setting.
2 Enter the User Name and Password assigned to you by your ISP.
10
3 Click Finished to save your settings.
TALK-200 User’s Guide
2.2.4 Test Your Internet Connection
Open another tab in your web browser and go to any web site (for example,
http://www.globalinx.com).
If you cannot access after using the configuration settings provided by your ISP,
see Troubleshooting on page 31.
2.3 The VoIP Setup Wizard
This section shows you how to configure your voice-over-Internet settings using
the VoIP Setup wizard.
Note: You must have Internet access and a VoIP account before you can complete
this section.
Chapter 2 Initial Configuration
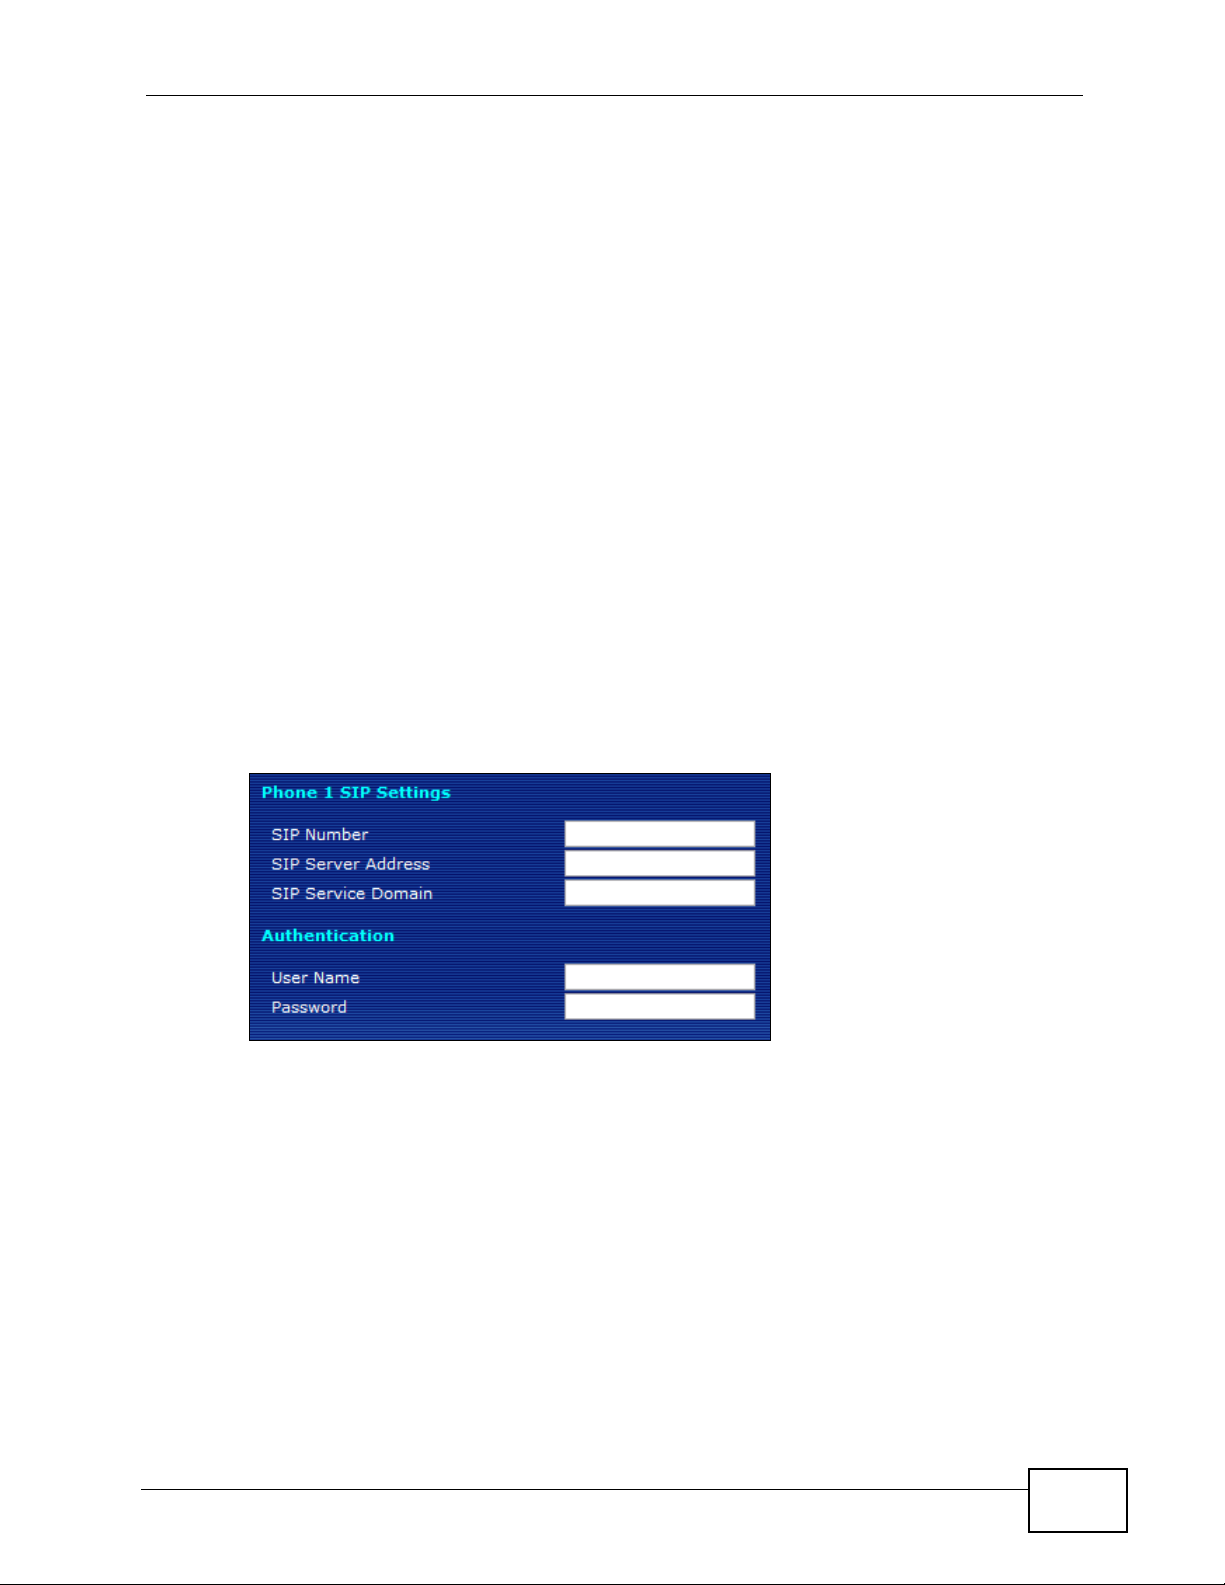
1 In the Wizard Setup screen, select VoIP Setup.
2 In the VoIP Configuration screen, enter the information provided by your VoIP
service provider.
If you have a VoIP account like “1234@VoIP-provider.com”, the SIP Number is
“1234”, and the SIP Service Domain is “V oIP-pro vider.com” . If y our V oIP service
provider did not provide information for any of the f ields in this screen, leave them
at their default settings.
TALK-200 User’s Guide
11
Chapter 2 Initial Configuratio n
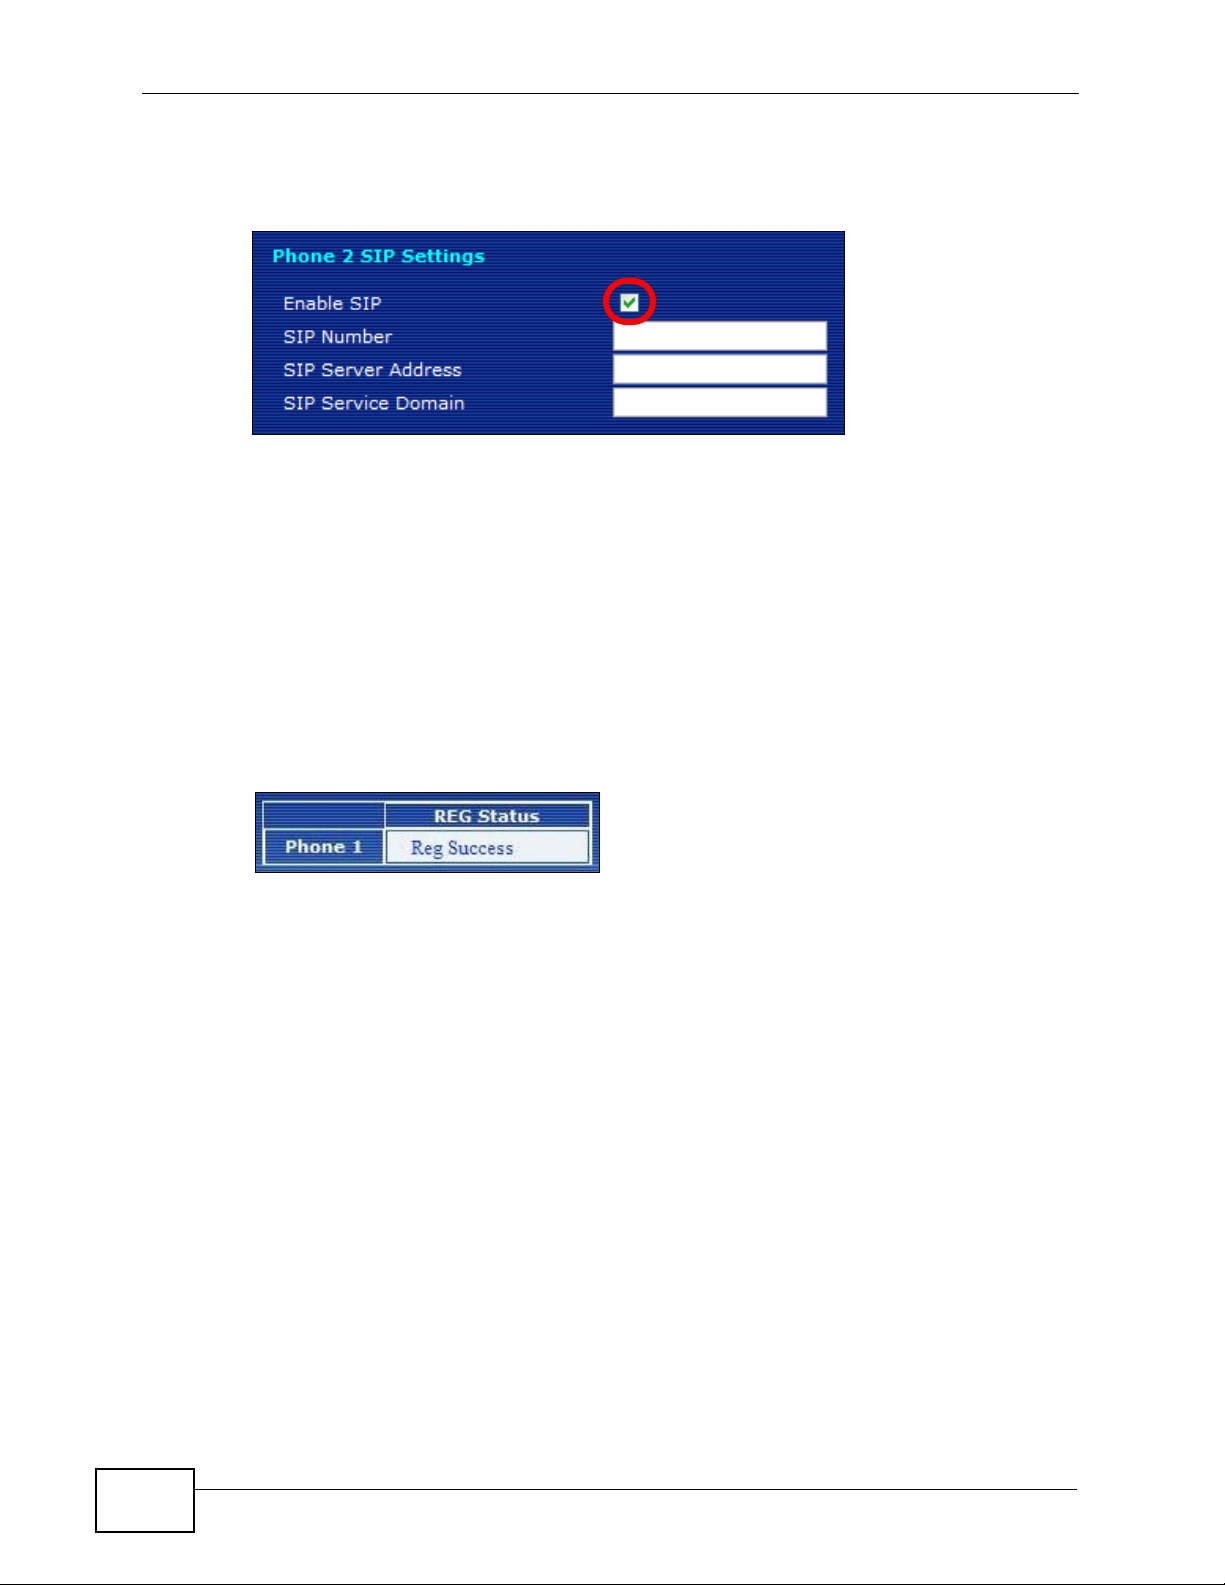
3 The Phone 2 SIP Settings screen appears next. If you want to set up a second
VoIP account, select Enable SIP then enter the information for the second VoIP
account as you did for the first one in step 2.
If you do not want to configure a second VoIP account at this time, you can do so
later in the VoIP > SIP > SIP Settings screen of the advanced Web
Configurator.
4 Click Finish to save your settings.
2.3.1 Test Your VoIP Connection
After you finish configuring your VoIP account (s), the wizard tests your SIP
account settings then indicates whether or not they are valid. If they are not, try
re-configuring them.
If you still cannot access after usin g the settings provided by your VoIP service
provider see Troubleshooting on page 31.
12
TALK-200 User’s Guide

CHAPTER 3
Phone Use and Configuration
This chapter describes basic phone setup and usage, as well as select advanced
VoIP configuration options for your TALK-200.
3.1 Placing Phone Calls
Use the following sections to make outgoing calls from a phone attached to the
TALK-200 to another phone.
Follow these directions to make calls over the Internet:
• If you want to dial a SIP number that only uses numbers (for example,
“12345”), dial the number on your phone’s k eypad. You can also set up a speeddial entry, if you want, in the VoIP > Phone Book > Speed Dial screen. See
Section 3.3 on page 22 for more information.
• If you want to make a peer-to-peer call, set up a dial plan with URL entry first.
Use the VoIP > Phone Book > Dial Plan with URL screen. Then dial the preconfigured SIP number to make the call to a peer VoIP device directly. See
Section 3.4 on page 24 for more information.
• If you want to call a PSTN phone over the Internet, follow your VoIP provider’s
instructions.
TALK-200 User’s Guide
13
Chapter 3 Phone Use and Configuration
3.2 Advanced Phone Configuration
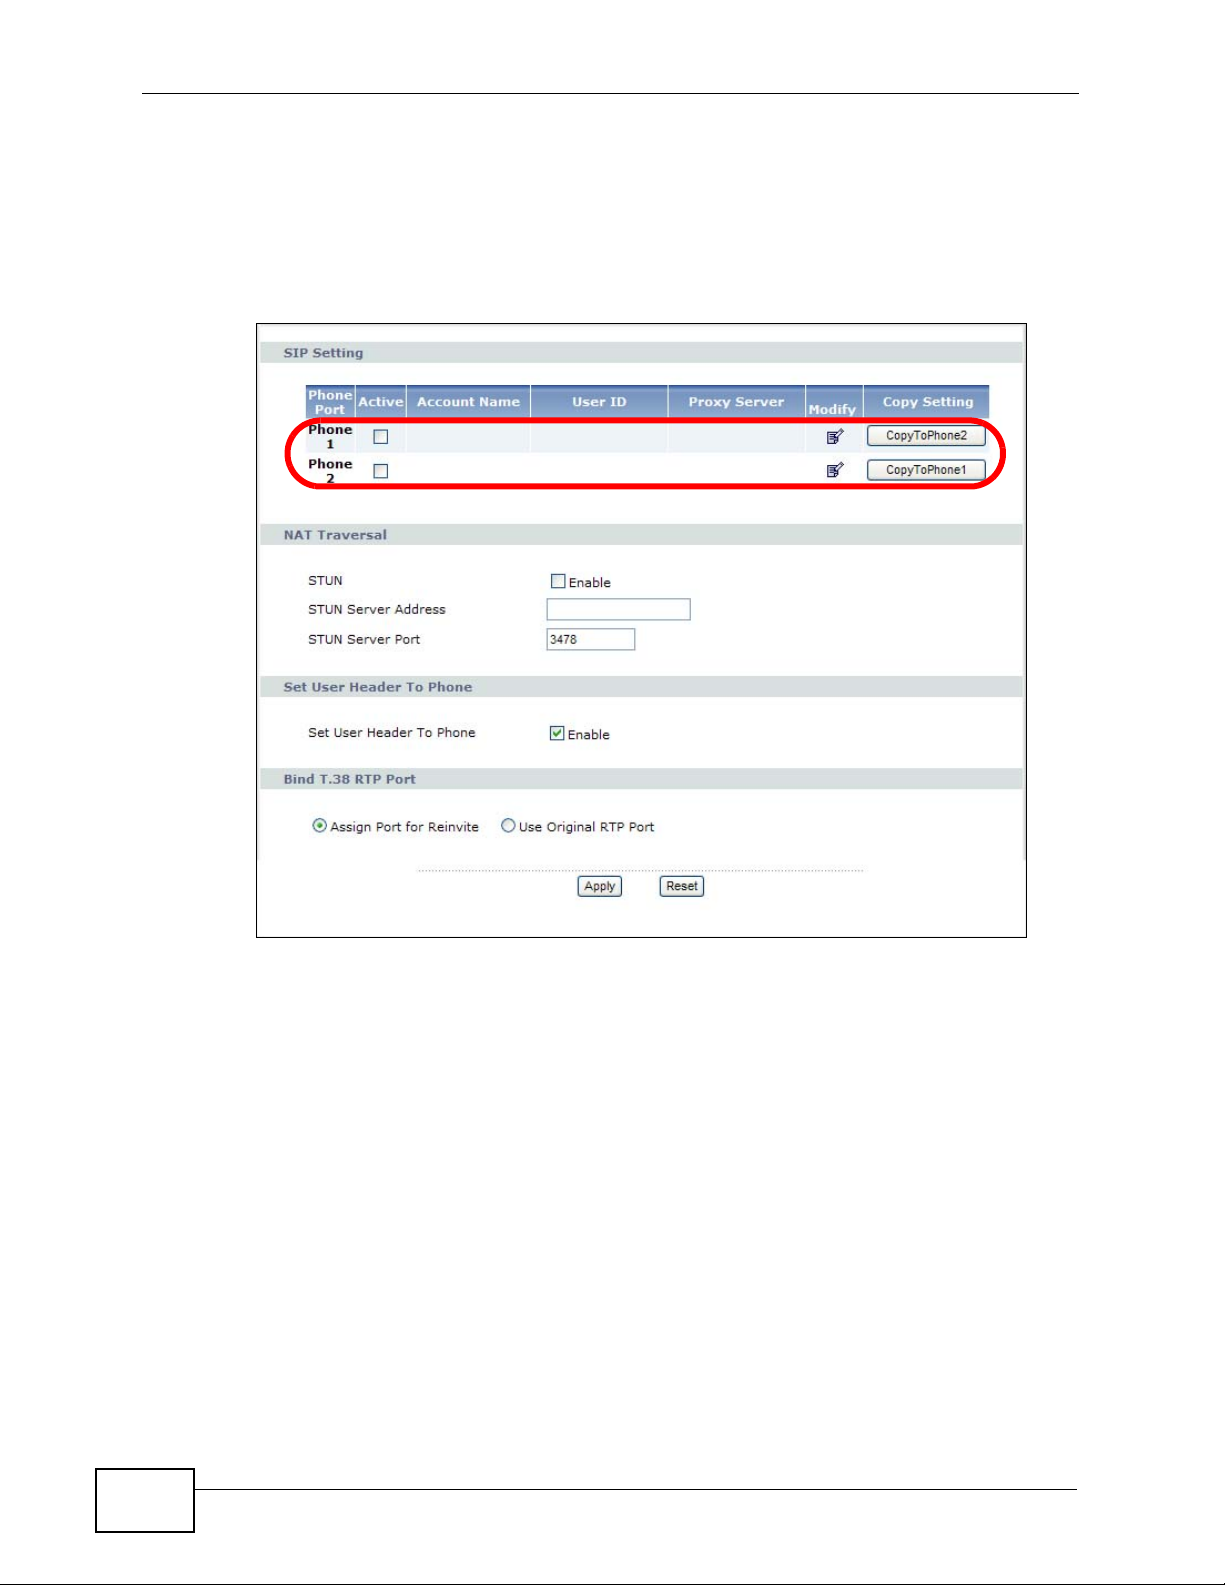
Click VoIP > SIP to open the SIP Settings screen. This screen allows you to
manage up to two SIP accounts.
Figure 2 The SIP Settings Screen
14
To have the TALK-200 add a “user=phone” parameter to the SIP URI before
sending a SIP INVITE request, select the Enable option next to Set User Header
To Phone. This parameter indicates the user part of the SIP URI
(<user>@<sipserver>) the TALK-200 is calling is a valid telephone number.
If you need to send fax messages using T.38 and want to always use the same
port number for both transmitted and received T.38 packets, select Use Original
RTP Port. Otherwise, select Assign Port for Reinvite to have the TALK-200
choose a port randomly for T.38 after the re-invite process.
Click Apply to save the changes you made in this screen.
Select Active for the phone yo u want to configure, then click the Modify icon. The
Phone SIP Settings screen opens, where you can set up and maintain your SIP
account(s) in the TALK-200. Your VoIP or Internet service provider should provide
you with your account information.
TALK-200 User’s Guide

Figure 3 The Phone SIP Settings screen
Chapter 3 Phone Use and Configuration
The following table describes the labels in this screen.
Table 1 SIP Setting
LABEL DESCRIPTION
Active SIP
Account
Account
Name
Number Enter your SIP number. In the full SIP URI, this is the part before the @
SIP Display
Name
SIP Server
Address
SIP Server
Port
SIP Service
Domain
Register
Expire (sec)
Select this if you want the TALK-200 to use this account. Clear it if you
do not want the TALK-200 to use this account.
Enter a descriptive name for this SIP account. You can use up to 127
printable ASCII characters.
symbol. You can use up to 127 printable ASCII characters.
Enter the name that appears on the other party’s device if they have
Caller ID enabled. You can use up to 127 printable ASCII characters.
Enter the IP address or domain name of the SIP server provided by
your VoIP service provider. You can use up to 95 printable ASCII
characters.
Enter the SIP server’s listening port number, if your VoIP service
provider gave you one. Otherwise, keep the default value.
Enter the SIP service domain name. In the full SIP URI, this is the part
after the @ symbol. You can use up to 95 printable ASCII Extended set
characters.
Enter the maximum amount of alloted time for the TALK -200 to attempt
to register with the SIP server.
TALK-200 User’s Guide
15

Chapter 3 Phone Use and Configuration
Table 1 SIP Setting (continued)
LABEL DESCRIPTION
Outbound
Proxy Server
Outbound
Proxy
Address
Outbound
Proxy Port
Authentication
User Name Enter the user name for registering this SIP account, exactly as it was
Password Enter the password for registering this SIP account, exactly as it was
Back
Apply Click to save your changes.
Reset Click to restore your previously saved settings.
Advanced
Select this if your VoIP service provider has a SIP outbound server to
handle voice calls. This allows the TALK-200 to work with any type of
NAT router and eliminates the need for STUN or a SIP ALG. Turn off any
SIP ALG on a NAT router in front of the TALK-200 to keep it from retranslating the IP address (since this is already handled by the
outbound proxy server).
Enter the IP address or domain name of the SIP outbound proxy server,
if your VoIP service provider gave you one. You can use up to 95
printable ASCII characters.
Enter the SIP outbound proxy server’s listening port number, if your
VoIP service provider gave you one.
given to you. You can use up to 127 printable ASCII characters.
given to you. You can use up to 127 printable ASCII Extended set
characters.
Click to return to the previous screen without saving your changes.
Click this to edit the advanced settings for this SIP account. The
Advanced SIP Settings screen appears.
3.2.1 Advanced SIP Settings
To access the following screens, connect to the Web Configurator as described in
steps 1-3 of Chapter 2 on page 7; however, instead of clicking Go to Wizard
Setup (as described in step 4) click Go to Advanced Setup.
Once you’re in the advanced Web Configurator, click Advanced in VoIP > SIP
Settings to set up and maintain advanced settings for each SIP account.
16
TALK-200 User’s Guide

Chapter 3 Phone Use and Configuration
Note: Enter any advanced SIP configuration information as it was given to you by
your SIP service provider. If you do not have any advanced configuration
information, you can skip this section.
Figure 4 Advanced SIP Settings (part 1)
The following table describes the labels in this screen.
Table 2 SIP Setting
LABEL DESCRIPTION
SIP Port Enter the port number on your TALK-200 that SIP calls made with the
selected phone should use.
Media Port Enter the port number on your TALK -200 that RTP media packets should
use.
Packetization Select the voice codec packetization interval in milliseconds. The default
is 20 ms. This is used to minimize loss that happens during
transmission of voice data over the network.
The packetization interval effectivately sets the size of each voice
sample contained within a data packet. At 20 ms, the codec employed
in digitizing the voice signal can usually compensate for data
degredation and attenuation by using Packet Loss Concealment (PLC).
However, if the loss becomes too great, noticeable distortion occurs.
Setting the packetization interval higher, however, may introduce more
problems depending on the codec (such as G.711). Other codecs (such
as G.729 and G.723) have improved PLC techniques and as such can
also withstand a higher packetization interval; this means more packets
can be lost in transit without a noticeable loss in quality.
TALK-200 User’s Guide
17

Chapter 3 Phone Use and Configuration
Table 2 SIP Setting (continued)
LABEL DESCRIPTION
DTMF Relay Dual-Tone Multi-Frequency (DTMF) relay detects DTMF signals and
sends them out-of-band (via SIP or RTP) to the remote party. DTMF
relay is used when a low-bitrate voice codec might distort DTMF signals
sent over the voice channel.
The available relay types are:
• RFC2833 - Relays DTMF tones in outband RTP packets.
• SIP INFO - Relays DTMF tones in outband SIP packets.
• PCM - Relays DTMF tones in the voice data stream. PCM provides
very good sound quality with certain codecs (such as G.711) but
requires 64 kbps of bandwidth. With other codecs (such as G.729),
sound distortion may occur.
RFC2833
Payload Type
SIP INFO
Duration (ms)
Call Waiting Select this to enable the call waiting feature, if supported by your phone
DNS SRV Select Enable to have the TALK-200 query your ISP’s DNS server for a
This defines the DTMF tone type in decimal encoding, and which allows
gateways to recognize a DTMF tone that has been embedded in a voice
signal and then respond accordingly.
Enter a digit that corresponds directly to a payload event type, as
defined in the RFC-2833 standard.
Specify DTMF tone play duration in milliseconds.
or SIP service provider.
list of any available SIP servers that it maintains. This is useful if your
static SIP server exeriences difficulties, making it hard for your IP
phone users to make SIP calls.
Figure 5 Advanced SIP Settings (part 2)
18
TALK-200 User’s Guide

Chapter 3 Phone Use and Configuration
The following table describes the labels in this screen.
Table 3 SIP Setting
LABEL DESCRIPTION
Forward Setting
Immediate
Forward to
Immediate
Number
Busy Forward to Select Enable to turn this feature on, and Off to disable it.
Busy Number Enter a SIP number to receive calls forwarded from the TALK-200.
No Answer
Forward to
No Answer
Number
No Answer
Time (sec)
Fax O ption
G.711 Fax
Passthrough
T.38 Fax
Relay
Select Enable to turn this feature on, and Off to disable it.
When enabled, all incoming calls are forwarded immediately to the
Immediate Number.
Enter a SIP number to receive calls forwarded from the TALK-200.
When enabled, incoming calls are forwarded to the Busy Number if
they receive a busy signal from the TALK-200.
Select Enable to turn this feature on, and Off to disable it.
When enabled, calls that receive no answer after the No Answer Time
has passed are forwarded to the No Answer Number.
Enter a SIP number to receive calls forwarded from the TALK-200.
Enter the number of seconds the TALK-200 waits while an incoming call
goes unanswered. Once this duration has expired, the incoming calls is
forwarded to the No Answer Number.
Select this if the TALK -200 should use G.711 to send fax messages. The
peer devices must also use G.711.
Select this if the TALK-200 should send fax messages as UDP packets
through IP networks.
P-AssertedIdentity
Dial
Termination Key
TALK-200 User’s Guide
This provides better quality, but it may have inter -operabilit y problems.
The peer devices must also use T.38.
Select Enable to add a P-Asserted-Identity header field which carries
the identity of the caller into SIP messages. If the TALK-200 does not
trust the user that sent the SIP request, the TALK-200 must
authenticate the user and then use the identity which results from the
authentication to generate a P-Asserted-Identity header field.
Select Enable if you want to use the pound k ey (#) to tell the T ALK -200
to make the phone call immediately, instead of waiting the number of
seconds you selected in the Interdigit Pause Duration field of the
VoIP > Phone > Common screen.
If you select this, dial the phone number, and then press the pound key .
The TALK-200 makes the call immediately, instead of waiting. You can
still wait, if you want.
19

Chapter 3 Phone Use and Configuration
Figure 6 Advanced SIP Settings (part 3)
The following table describes the labels in this screen.
Table 4 SIP Setting
LABEL DESCRIPTION
Session Timer
Enable Select Enable if you want to define how long the TALK-200 waits to
receive a session-alive packet for a voice session from the SIP server.
Minimum
Expiration
Time
Maximum
Expiration
Time
Dial Plan
Active Select Active to enable the dial plan feature. A dial plan is used by a
Enter the minimum time the TALK-200 waits for a session-alive packet
(90-65536 seconds).
If a session-alive packet is not received during this time, the voice
session is terminated.
Enter the maximum time the TALK-200 waits for a session-alive packet
(90-65536 seconds).
If a session-alive packet is not received during this time, the voice
session is terminated.
service provider to define the expected rules and digit patterns for the
telephone numbers it uses.
If your dial plan does not match the service provider’s, you probably will
not be able to connect to their servers.
20
TALK-200 User’s Guide

Chapter 3 Phone Use and Configuration
Table 4 SIP Setting (continued)
LABEL DESCRIPTION
Dial Plan
Rules
MWI (Message Waiting Indications)
Active Select this if you want to hear a waiting (beeping) dial tone on your
Expiration
Time
DND (Do Not Disturb)
DND Mode Select Enable to activate the Do Not Disturb feature during the time
Enter the dial plan rules pattern.
A rules pattern may look something like this:
(*xx|[3469]11|[2-9]xxx|011x)
A dial plan defines the dialing patterns, such as the length and range of
the digits for a telephone number. It also includes country codes, access
codes, area codes, local numbers, long distance numbers or
international call prefixes.
• The collection of rules is in parentheses ().
• Rules are separated by the | (bar) symbol.
• “x” stands for a wildcard and can be any digit from 0 to 9.
• A subset of keys is in a square bracket []. Ranges are allowed.
Without a dial plan, users have to manually enter the whole callee’s
number and wait for the specified dialing interval to time out or press a
terminator key (usually the pound key on the phone k eypad) before the
TALK-200 makes the call.
phone when you have at least one voice message. Your SIP service
provider must support this feature.
Keep the default value, unless your SIP service provider tells you to
change it. Enter the number of seconds the SIP server should provide
the message waiting service each time the TALK-200 subscribes to the
service. Before this time passes, the TALK -200 automatically subscribes
again.
period specified in the From and To fields.
From Enter the start hour and minutes for DND mode to be activated when
To Enter the end hour and minutes for DND mode to be deactivated when
TALK-200 User’s Guide
Select Always to activate the Do Not Disturb feature all the time.
Select Disable to deactivate the Do Not Disturb feature altogether.
the Enable option is selected.
the Enable option is selected.
21

Chapter 3 Phone Use and Configuration
Figure 7 Advanced SIP Settings (part 4)
The following table describes the labels in this screen.
Table 5 SIP Setting
LABEL DESCRIPTION
Codec Setting
Type This lists the available voice codecs.
Priority Use this section to indicate the codec priority.
Codecs are engaged in order of priority from 1 to 3, with 1 being the
highest on the list. The TALK -200 cycles through the codecs until it finds
one that matches the device of the other party in the telephone
conversation. If the TALK-200 does not have any codecs in common
with the other device then the call is dropped.
Back Click this to return to the previous screen with saving your changes.
Apply Click this to save your changes and then return to the previous screen.
Reset Click this to reset the options in this screen to their last saved settings.
3.3 Speed Dial Settings
Click VoIP > Phone Book > Speed Dial to open this screen. This is where you
can store pre-configured telephone numbers as speed dial numbers.
When you press a speed dial number on your phone, the telephone number is
dialed automatically. For example, if you configure speed dial number ‘#01’ with
22
TALK-200 User’s Guide

Chapter 3 Phone Use and Configuration
the telephone number for local information, ‘411’, then when you press #01 on
your phone’s keypad and wait 3 seconds, the TALK-200 dials 4-1-1.
Figure 8 The Speed Dial Screen
The following table describes the labels in this screen.
Table 6 Speed Dial
LABEL DESCRIPTION
Port Setting Select the phone port you want to configure in this screen.
Position This indicates the speed dial number.
Name Enter a name to associate with this speed dial number (such as
“Information” or “Emergency”).
Phone Number Enter a phone number to associate with this speed dial number.
Select Check this to select the speed dial number so it can be removed.
Remove
Selected
Remove All Click this to clear the settings for all speed dial numbers.
Back Click this to return to the previous screen with saving your changes.
Apply Click this to save your changes and then return to the previous screen.
Reset Click this to reset the options in this screen to their defaults.
Click this to clear the settings for the selected speed dial number(s).
TALK-200 User’s Guide
23

Chapter 3 Phone Use and Configuration
3.4 Dial Plan with URL
Click VoIP > Phone Book > Dial Plan with URL to open this screen. Use this
screen to create dial plan with URL entries which allow you to make peer -to-peer
calls. In peer-to-peer calls, you call another VoIP device directly without going
through a VoIP serv ice pr ovider’s SIP server. Enter the callee’s IP address or
domain name. The TALK-200 sends SIP INVITE requests to the specified peer V oIP
device when you dial the SIP number configured in this screen.
Figure 9 Dial Plan with URL
24
TALK-200 User’s Guide

Chapter 3 Phone Use and Configuration
The following table describes the labels in this screen.
Table 7 Dial Plan with URL
LABEL DESCRIPTION
Index This indicates the index number of each entry.
Port Setting Select the phone port you want to configure here.
SIP Number Enter the SIP number you want the TALK-200 to call.
Destination Enter the IP address or domain name of the party you want to call when
you dial the corresponding SIP number to make a peer-to-peer call.
Active Check this to select an entry so it can be enabled, removed or moved
up/down.
Remove
Selected
Remove All Click this to clear the settings for all entries.
Apply Click this to save your changes and then return to the previous screen.
Reset Click this to reset the options in this screen to their defaults.
Click this to clear the settings for the selected entry(ies).
Click the icon to change the position of an entry in the list.
3.5 Supported Phone Functions
The following table shows the key combinations you can enter on your phone's
keypad to use certain features after you pick up the phone's receiver.
Note: After pressing the flash key, if you do not issue the sub-command before the
default sub-command timeout (2 seconds) expires or issue an invalid subcommand, the current operation will be aborted.
Note: If the flash key is not available, you can t ap (press and immediately release) the
hook by hand to achieve the same effect.
Table 8 Call Features
FUNCTION
Call-Hold / CallRetrieve
Call-Waiting FLASH Put the current call on hold to answer an incoming
3-way Calling FLASH Put a current call on hold to place a second call.
KEY
COMBINATIONS
FLASH 1. Put the current call on hold and create a dial
DESCRIPTION
tone.
2. Switch back and forth between two calls.
call.
After the second call is successful, press the flash
key again to have a three-way conference call.
TALK-200 User’s Guide
25

Chapter 3 Phone Use and Configuration
Table 8 Call Features (continued)
FUNCTION
Blind Transfer FLASH *98# Do the following to transfer an incoming call (that
Consult-OnHold Transfer
Internal Call #### Call the phone(s) connected to the T ALK -200's other
Speed dial #01 ~ #10 Press a speed dial number on your phone to have
IVR Main Menu #120 Tell you the TALK-200’s WAN IP address.
KEY
COMBINATIONS
FLASH *98# Do the following to transfer an incoming call (that
#121 Tell you the TALK-200’s IP type.
#123 Tell you the TALK-200’s subnet mask.
#124 Tell you the TALK-200’s gateway address.
#125 Tell you the TALK-200’s DNS server address(s).
#126 Tell you the TALK-200’s LAN IP address.
#128 Tell you the TALK-200’s current firmware version.
DESCRIPTION
you have answered) to another phone.
1. Press the flash key to put the caller on hold.
2. When you hear the dial tone, dial *98# followed
by the number to which you want to transfer the
call.
3. After you hear a busy tone, hang up the phone.
you have answered) to another phone.
1. Press the flash key to put the caller on hold.
2. When you hear the dial tone, dial the number to
which you want to transfer the call.
3. When the second call is answered, press the
flash key and *98#, then hang up the phone.
phone port.
the TALK-200 automatically dial the pre-configured
telephone number. See Section 3.3 on page 22 for
more information.
26
TALK-200 User’s Guide

CHAPTER 4
Maintenance
This chapter shows you how to configure system related settings, such as
operating mode and system password, and auto-provision settings.
4.1 System Mode and Accounts
Use this screen to configure your TALK-200 as a router or a bridge, and the
system passwords.
4.1.1 Operating Mode
The TALK-200 is in router mode by default and functions as a router.
In bridge mode, the DHCP server on the T AL K -200 i s disabled. If you co nnect your
computer directly to the TALK-200, you need to assign your computer a static IP
address in the same subnet as the TALK -200's IP address in order to access the
TALK-200. You can configure the TALK-200's IP address in order to access the
TALK-200 in bridge mode for management.
You can NOT use the firewall, content filtering or NAT in bridge mode.
4.1.2 System Accounts
The TALK-200 provides two account types (administrator and user) with different
privilege levels. The web configu rator screens vary depending on which account
you use to log in.
The administrator account allows you to do all settings on the TALK-200. With the
user account, you can view the status page, configure the WAN, LAN, NA T, firewall
and content filtering settings, modify the us er account password and autoprovision server address, change operating mode and system time, do firmware
upgrade and view system logs.
TALK-200 User’s Guide
27

Chapter 4 Maintenance
Click Maintenance > System > General to open this screen.
Figure 10 System General
The following table describes the labels in this screen.
Table 9 System General
LABEL DESCRIPTION
System Setup
Mode Select Router to set the TALK-200 to router mode.
Select Bridge and configure the Manager IP Address to set the TALK200 to bridge mode.
Administrator
Inactivity Timer
Manager IP
Address
Administrator/User Account
User Name Type the user name you use to access the system.
User Password T ype your new system password (up to 30 ch aracters). Note that as you
Apply Click this to save your changes and then return to the previous screen.
Reset Click this to reset the options in this screen to their defaults.
Type how many minutes a management session (either via the web
configurator or telnet) can be left idle before the session times out. The
default is 5 minutes. After it times out you have to log in with your
password again. Very long idle timeouts may have security risks. A
value of "0" means a management session never times out, no matter
how long it has been left idle (not recommended).
Enter the management IP address of the TALK-200 if it is in bridge
mode.
type a password, the screen displays a dot for each character you type.
After you change the password, use the new password to access the
TALK-200.
28
TALK-200 User’s Guide

4.2 Auto-Provision
Click Maintenance > System > Auto Provision to open this screen. Use this
screen to configure the TALK-200 to download the configuration file (and
firmware) automatically from the auto-provisioning server, meaning you do not
have to upload them manually.
Figure 11 Auto Provision
Chapter 4 Maintenance
The following table describes the labels in this screen.
Table 10 Auto Provision
LABEL DESCRIPTION
Auto Provision
Protocol Select the networking protocol (HTTP, TFTP or FTP) you want to use to
access the auto-provisioning server to download the configuration file.
Otherwise, select Disable to not request and receive auto-provisioning
files.
HTTP/TFTP/FTP
Server Address
HTTP Server
Port
FTP Username If you select to transmit the auto-provisioning configuration file using
FTP Password If you select to transmit the auto-provisioning configuration file using
Expiration Time Specify how long the TALK-200 waits after it successfully receives an
Apply Click this to save your changes and then return to the previous screen.
Reset Click this to reset the options in this screen to their defaults.
Enter the auto-provisioning server IP address.
If you select to transmit the auto-provisioning configuration file using
HTTP, enter the server’s port number.
FTP, enter your FTP account user name for authentication.
FTP, enter your FTP account password for authentication.
auto-provisioning file before it requests another.
TALK-200 User’s Guide
29

Chapter 4 Maintenance
30
TALK-200 User’s Guide

CHAPTER 5
Troubleshooting
This chapter offers some suggestions to solve problems you might encounter.
None of the lights turn on when I plug in the TALK-200.
• Make sure that you are using the power adaptor provided with the TALK-200.
• Check all the hardware connections.
• Make sure the power source is turned on.
• If the problem continues, contact your vendor.
The POWER light is red.
• Unplug the device, and plug it in again.
• If the problem continues, contact your vendor.
I can open the web browser, but I cannot see the Login screen.
• Make sure your web browser meets the requirements identified in section 1.3.
• Check the connection between your computer and the TALK-200. See section
1.4.
• If the TALK-200 is configured to work as a DHCP server for LANs, ensure that
your computer is set up to receive an IP address automatically (consult your
operating system’s help to determine how to do this if you do not know).
• Make sure your computer’s Ethernet adapter is installed and functioning
properly.
• If you changed the IP address, make sure you use the new IP address in the
Address or URL field in the web browser.
• If the problem continues, contact your local vendor.
TALK-200 User’s Guide
31

Chapter 5 Troubleshoot ing
My password is not working.
or
I forgot my password for the TALK-200.
• Make sure you enter the password correctly. It is case-sensitive.
• If you changed the password and then forgot it, you can reset the device
pressing down the TALK-200’s Reset button and holding it for 3 seconds.
The web configurator returns to the Login screen when I try to do something.
By default, the Web Configur ator times ou t after fi ve minutes and y ou must log i n
again.
When I pick up the phone’s receiver, I hear no dial tone.
Makes sure that your telephone and the TALK-200 are properly connected.
Test the telephone wire:
1 Connect the wire to a telephone and a regular telephone outlet.
2 If you cannot hear the dial tone, the wire might be broken. Use a different one.
If the problem continues, contact your local vendor.
I cannot make VoIP phone calls.
or
The dial tone beeps or pulses.
• Log in to the TALK-200. On the Status page, consult the VoIP Status section
at the bottom to see if at least one VoIP account is registered. If not, click
Register for the VoIP account(s) in question.
32
• If the problem continues, contact your vendor.
TALK-200 User’s Guide

5.0.1 Resetting the TALK-200
This changes all the TALK-200’s settings to their original values. You will need to
configure any custom settings again.
Note: Make a note of your custom settings before you reset the TALK-200.
To reset the TALK-200:
1 Press the RESET button until the POWER, PHONE 1, and PHONE 2 lights starts
to blink in sequence. (This usually takes ten seconds or less.)
2 Release the RESET button.
5.0.2 REG Status List
REG Status allows you to see your SIP connection’s current status. This can be
useful in diagnosing connection problems or troubleshooting why a call cannot go
through. REG Status information appears in two places: in the Connection
Wizard, after you finish setting up your VoIP connections:
Chapter 5 Troubleshooting
Figure 12 The Connection Wizard
TALK-200 User’s Guide
33

Chapter 5 Troubleshoot ing
And in the Web Configurator’s main Status screen under VoIP Status:
Figure 13 The Status Screen
Use the following table to determine your phone’s REG status:
Table 11 REG Status
CODE STATUS
380 Alternative Service response
400 Bad Request response
401 Unauthorized response
402 Payment Required response
403 Forbidden response
404 Not Found response
405 Method Not Allowed response
407 Proxy AuthenticationRequired response
408 Request Timeout response
410 Gone response
411 Length Required response
413 Request Entity Too Large response
414 Request-URI Too Long response
415 Unsupported Media Type response
34
TALK-200 User’s Guide

Table 11 REG Status
CODE STATUS
416 Unsupported URI Scheme response
420 Bad Extension response
421 Extension Required response
422 Session Timer IntervalToo Small response
423 Interval Too Brief response
428 Use Authentication Token response
429 Provide Referror Identity response
480 Temporarily Unavailable response
481 Dialog/Transaction Does Not Exist response
482 Loop Detected response
483 Too Many Hops response
484 Address Incomplete response
485 Ambiguous response
486 Busy Here response
487 Request Terminated response
488 Not Acceptable Here response
489 Bad Event response
491 Request Pending response
493 Request Undecipherable response
501 Not Implemented response
502 Bad Gateway response
503 Service Unavailable response
504 Gateway Timeout response
505 Version Not Supported response
513 Message Too Large response
600 Busy Everywhere response
603 Decline response
604 Does Not Exist Anywhere response
606 Not Acceptable response
Chapter 5 Troubleshooting
TALK-200 User’s Guide
35

Chapter 5 Troubleshoot ing
36
TALK-200 User’s Guide

CHAPTER 6
Specifications
Specifications are accurate at the time of writing.
FEATURE SPECIFICATION
Default IP address 192.168.100.1
Default subnet mask 255.255.255.0
Default Admin User Name zyxeladmin
Default Admin Password gl0b@l1nx
Default User Name user
Default User Password user
Dimensions (mm) 98 (Wide) x 82 (Deep) x 28 (High)
Distance between the wall-
mounting holes on the
device’s back
Screw size for wall-mounting M3 tap screw
Weight 110 g
Ethernet ports Two RJ-45, 10/100Mbps Half / Full Auto-negotiation, Auto-
Phone ports Two FXS (Foreign eXchange Station) POTS ports.
Feeding Voltage On hook: -48V; Minimum Voltage: -20V
77 mm
crossover Ethernet ports
Ringing Voltage 40V RMS at 5 REN
Operation Temperature 0º C ~ 40º C
Storage Temperature -30º ~ 70º C
Operation Humidity 20% ~ 90% RH
Storage Humidity 20% ~ 95% RH
TALK-200 User’s Guide
Off hook: -24V
37

Chapter 6 Specifications
6.1 Features
FEATURE DESCRIPTION
WAN Interface DHCP (Static IP/Dynamic IP)
LAN Interface DHCP (Server/Disable)
Voice Functions SIP version 2 (RFC 3261)
PPPoE (Dynamic IP)
PPTP
DNS SRV (RFC 2782)
SDP (RFC 2327)
SIP INFO (RFC 2976)
STUN (RFC 3489)
RTP (RFC 3550)
RTCP (RFC 3551)
SIP Session Timers (RFC 4028)
Reliability of Provisional Response in SIP (RFC 3262)
Locating SIP Servers (RFC 3263)
An Offer/Answer Model with the Session Description Protocol
(RFC 3264)
SIP-Specific Event Notification (RFC 3265)
SIP UPDATE method (RFC 3311)
SIP REFER method (RFC 3515)
Flexible Dial Plan (RFC3525 section 7.1.14)
Early Media and Ringing Tone Generation (RFC 3960)
Message Waiting Indicator (RFC 3842)
38
TALK-200 User’s Guide

FEATURE DESCRIPTION
Protocol Support TCP / IP
UDP / IP
DNS
ICMP
TELNET
TFTP
FTP
HTTP
NTP
ARP
Dynamic DNS
RIP-1(RFC 1058), RIP-2(RFC1389)
Security IP Filtering
Chapter 6 Specifications
MAC Filtering
URL Filtering
Port Filtering
Port Forwarding
DMZ
MD5 encryption
Supervision and Control Two Tier WEB I nterfaces
Telnet
Firmware Upgrade via FTP or TFTP or HTTP
Backup and Restore Configuration
Proprietary Auto-Provision
Traffic Statistics
Reset to Default
Web Access Account Configuration
Time Zone Configuration
NAT SUA (Many to One)
QoS SIP/RTP TOS & DiffServ Marking
TALK-200 User’s Guide
Port Forwarding
NAT Concurrent 1024 sessions
VLAN Tagging
39

Chapter 6 Specifications
FEATURE DESCRIPTION
Audio Codec ITU-T G.711 (64 Kbps)
ITU-T G.729 AB
Detection and Suppression of Silence (VAD)
Comfort Noise Generation of (Comfort Noise)
Echo Cancellation: G.168/G.165
Volume Adjustment
Dynamic Jitter Buffer (Adaptive)
PLC (Packet Loss Concealment)
DTMF Detection and Generation
DTMF: In-Band and Out-of-Band (PCM, RFC 2833, SIP INFO)
G.711 PCM Fax, Modem Detection and Pass-through
Duration of hook flash is adjustable
Different Country Tone Table
1. Dial Tone
2. Busy Tone
3. Congestion Tone
4. Ring back Tone
5. Call Waiting Tone
6. Howler Tone
LED Indicators LAN
WAN
POWER
PHONE 1
PHONE 2
40
TALK-200 User’s Guide

6.2 Wall Mounting Instructions
To hang your TALK-200 on a wall:
1 Select a position free of obstructions on a sturdy wall.
2 Drill two holes for the screws. Make sure the distance between the centers of the
holes and the size of screws match the following specifications:
Chapter 6 Specifications
Note: Be careful to avoid damaging pipes or cables located inside the wall when
drilling holes for the screws.
3 Do not screw the screws all the way into the wall. Leave a small gap of about 0.5
cm between the heads of the screws and the wall.
4 Make sure the screws are snugly fastened to the wall. They need to hold the
weight of the TALK-200 with the connection cables.
5 Align the holes on the back of the TALK-200 with the screws on the wall. Hang the
TALK-200 on the screws.
TALK-200 User’s Guide
41

Chapter 6 Specifications
5a For a horizontal installation, do not place the device in an inverted position;
make sure the holes on the back of the T ALK -200 are p ositioned at the top and
that they match the positions of the holes drilled into the wall. Ensure that the
two side vents remain unblocked.
5b For a vertical installation, ensure that the holes on the TALK-200 match the
positions of the holes drilled into the wall and that the two side vents remain
unblocked.
42
TALK-200 User’s Guide

APPENDIX A
Appendix
Safety Warnings
• Do NOT use this product near water, for example, in a wet basement or near a swimming pool.
• Do NOT expose your device to dampness, dust or corrosive liquids.
• Do NOT store things on the device.
• Do NOT install, use, or service this device during a thunderstorm. There is a remote risk of electric shock from light ning.
• Connect ONLY suitable accessories to the device.
• Do NOT open the device or unit. Opening or removing covers can expose you to dangerous high voltage points or other risks.
ONLY qualified service personn el should service or disassemble this device. Please contact your vendor for further information.
• Make sure to connect the cables to the correct ports.
• Place connecting cables carefully so that no one will step on them or stumble over them.
• Always disconnect all cables from this device before servicing or disassembling.
• Use ONLY an appropriate powe r adaptor or cord for your device. Connect it to the right supply voltage (for example, 110V AC in
North America or 230V AC in Europe).
• Do NOT allow anything to rest on the power adaptor or cord and do NOT place the product where anyone can walk on the power
adaptor or cord.
• Do NOT use the device if the power adaptor or cord is damaged as it might cause electrocution.
• If the power adaptor or cord is damaged, remove it from the device and the power source.
• Do NOT attempt to repair the power adaptor or cord. Contact your local vendor to order a new one.
• Do not use the device outside, and make sure all the connections are indoors. There i s a remote risk of electric shock from lightning.
• Do NOT obstruct the device ventilation slots, as insufficient air flow may harm your device.
• Use only No. 26 AWG (American Wire Gauge) or larger telecommunication line cord.
• If you wall mount your device, make sure that no electrical lines, gas or water pipes will be damaged.
Legal Information
Certifications
Federal Communications Commission (FCC) Interference Statement
The device complies with Part 15 of FCC rules. Operation is subject to the following two conditions:
• This device may not cause harmful interference.
• This device must accept any interference received, including interference that may cause undesired operations.
This device has been tested and found to comply with the limits for a Class B digital device pursuant to Part 15 of the FCC Rules.
These limits are designed to provide reasonable protection against harmful interference in a residential installation. This device
generates, uses, and can radiate radio frequency energy, and if not installed and used in accordance with the instructions, may
cause harmful interference to radio communications. However, there is no guarantee that interference will not occur in a
particular installation.
If this device does cause harmful interference to radio/television reception, which can be determined by turning the device off and
on, the user is encouraged to try to correct the interference by one or more of the following measures:
1 Reorient or relocate the receiving antenna.
2 Increase the separation between the equipment and the receiver.
3 Connect the equipment into an outlet on a circuit different from that to which the receiver is connected.
This product is recyclable. Dispose of it properly.
TALK-200 User’s Guide
43

Chapter 6Appendix A SpecificationsAppendix
4 Consult the dealer or an experienced radio/TV technician for help.
Notices
Changes or modifications not expressly approved by the party responsible for compliance could void the user's authority to
operate the equipment.
This Class B digital apparatus complies with Canadian ICES-003.
Cet appareil numérique de la classe B est conforme à la norme NMB-003 du Canada.
Limited Warranty
GLOBALINX® warrants to the original purchaser of this product that it shall be free of defects resulting from workmanship or
components for a period of one (1) year from the date of sale. Defects covered by this Limited Warranty shall be corrected either
by repair or, at GLOBALINX's discretion, by replacement. In the event of replac ement, th e replacemen t unit will be warranted for
the remainder of the original one (1) year period or thirty (30) days, whicheve r is longer. There are no other oral or written
warranties expressed or implied, including but not limited to those of merchant ability or fitness for a particular purpose.
This Limited Warranty is nontransferable and does not apply if the product has been damaged by negligence, accident, abuse,
misuse, modification, misapplication, shipment, or service by someone other than GLOBALINX®. Transportation and/or shipping
charges to GLOBALINX® are not covered by this Limited Warranty. To be eligible for warranty service, the purchaser must have
previously spoken with GLOBALINX® Technical Support. Once GLOBALINX® Technical Support has determined that the unit
should be replaced, a RMA number will be issued to the purchaser. The defective product must be sent to and received by
GLOBALINX® within fourteen (14) months of the date of sale and be accompanied with account number and phone number.
GLOBALINX® does not warrant that this product will meet your requirements; it is your sole responsibility to determine the
suitability of this product for your purposes.
GLOBALINX® does not warrant the compatibility of this product with your computer or related pe ripherals, software.
GLOBALINX's sole obligation and liability under this warranty is limited to the repair or replacement of a defective product.
GLOBALINX® shall not in any event be liable to the purchaser or any third party for any incidental or consequential damages or
liability in the tort relating to this product or resulting from its use or possession.
This document is subject to change without notice. The latest electronic version of this user manual is available for download at:
http://www.globalinx.com.
Copyright
© Copyright 2010 GLOBALINX®. All rights reserved.
No part of this document may be copied or reproduced in any form or by any means without the prior written consent of
GLOBALINX®.
GLOBALINX® makes no warranties with respect to this documentation and disclaims any implied warranties of merchantability,
quality, or fitness for any particular purpose. The information in this document is subject to change without notice. GLOBALINX®
reserves the right to make revisions to this publication without obligation to notify any person or entity of any such changes.
Trademarks or brand names mentioned herein are trademarks or registered trademarks of their respective owners.
44
TALK-200 User’s Guide
 Loading...