

Page 1

globalindustrial.ca
User Manual
Customer Service
US: 1-800-645-2986
Manual de Usuario
Servicio de atención al Cliente
US: 1-800-645-2986
Manuel de l'Utilisateur
Service à la clientèle
Canada: 888-645-2986
Facial Recognition & Body Temperature
Camera System
Read this manual thoroughly prior to
installation and operation. Keep these
instructions in a safe location for future
reference. For questions, visit
globalindustrial.com or contact
Customer Service at 1-800-645-2986.
Model 708528
Model 708528: Counter Stand
Model 708529: 3’H Floor Mount
Model 708530: 4’H Floor Mount
Model 708529
Model 708530
Page 2
Specifications:
Sensor: Thermal Imaging Infrared Temperature Sensor
Temperature Range:
Display:
Recognition Distance:
Response Time:
Memory Data:
Camera:
Lens:
Dynamic:
Signal to Noise Ratio:
Video:
Max Resolution: 800 x 1280 @ 30fps
Audio Compression:
USB Interface:
Device Storage:
Power:
Interfaces:
Mounting Stand Options: Counter Stand, 3’H Mount or 4’H Mount
Connection:
Operating System:
Recording Capacity:
Product Dimensions:
Weight: 2 lbs.
95 - 108°F; ±0.5° (35 - 42°C; ±0.3°)
8” LCD
1.6 to 16 ft.
≤ 0.3 Second
30,000 Faces
2 MP
1:2.8, Focal Length .07”, Field of View: 118°
≥ 105dB
≥ 35dB
Auto, Indoor, Outdoor, Sodium Lamp Mode, ManualWhite Balance:
H.265 Main Profile / H.264 High profile / M-JPEG
Auto, Indoor, Outdoor, Sodium Lamp Mode, ManualOutput Bit Rate:
G711,PCM
(1) USB
8G
DC12V 2A
Rich Hardware, Integrated 100M Ethernet, Audio,
Wiegand, Relay, USB
Ethernet, Wifi, Hotspot
Linux OS
5 million
9-1/2” x 5-1/3” x 1”
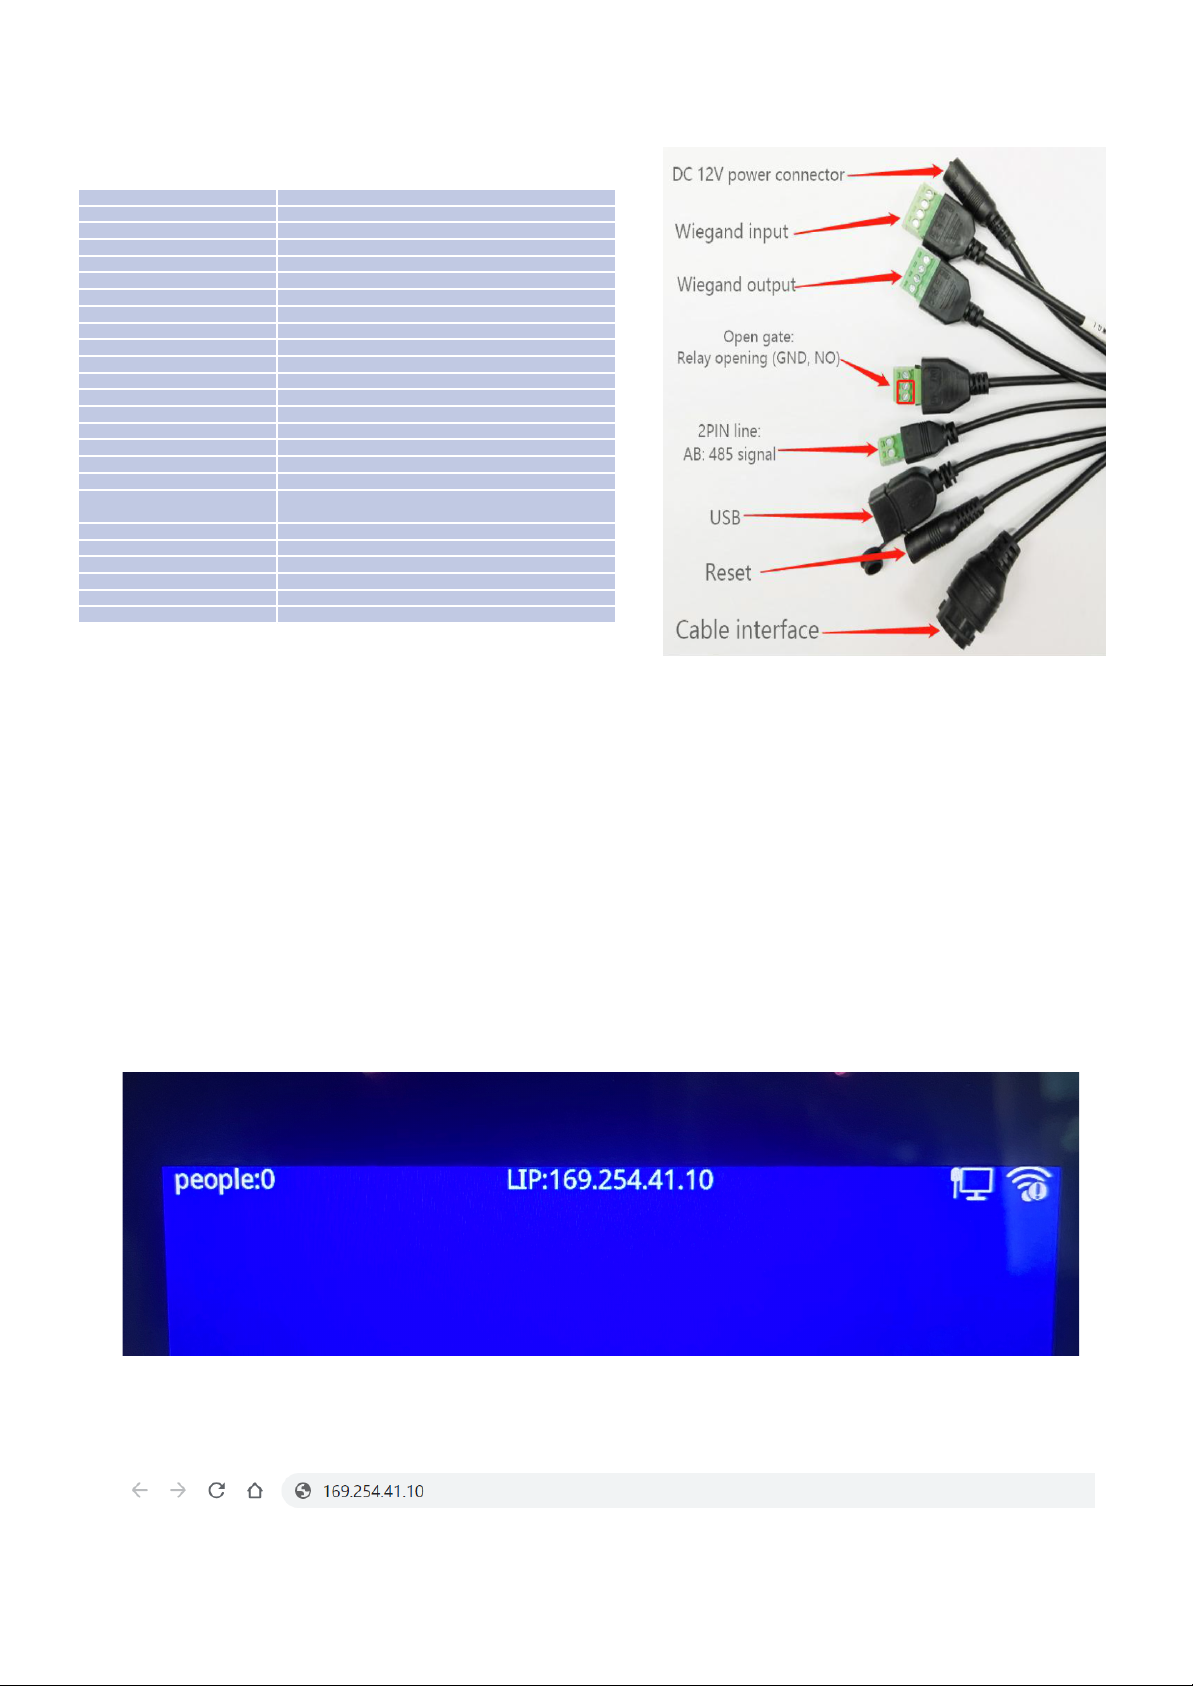
Equipment Wiring:
Device Management Background Settings - Local Debugging Tools
Note: Before debugging, the computer and equipment must be in the same LAN.
There are two ways to put the device and the computer in the same LAN:
(1) Computer and device are connected to the same switch or router through network cables.
(2) Computer and device are connected directly through network cables.
Once the device is powered on, locate the LIP or WIP number displayed on the top of the
device (see image below).
Enter this IP address number of the device into your browser:
Note: Google Chrome is recommended.
Page 3
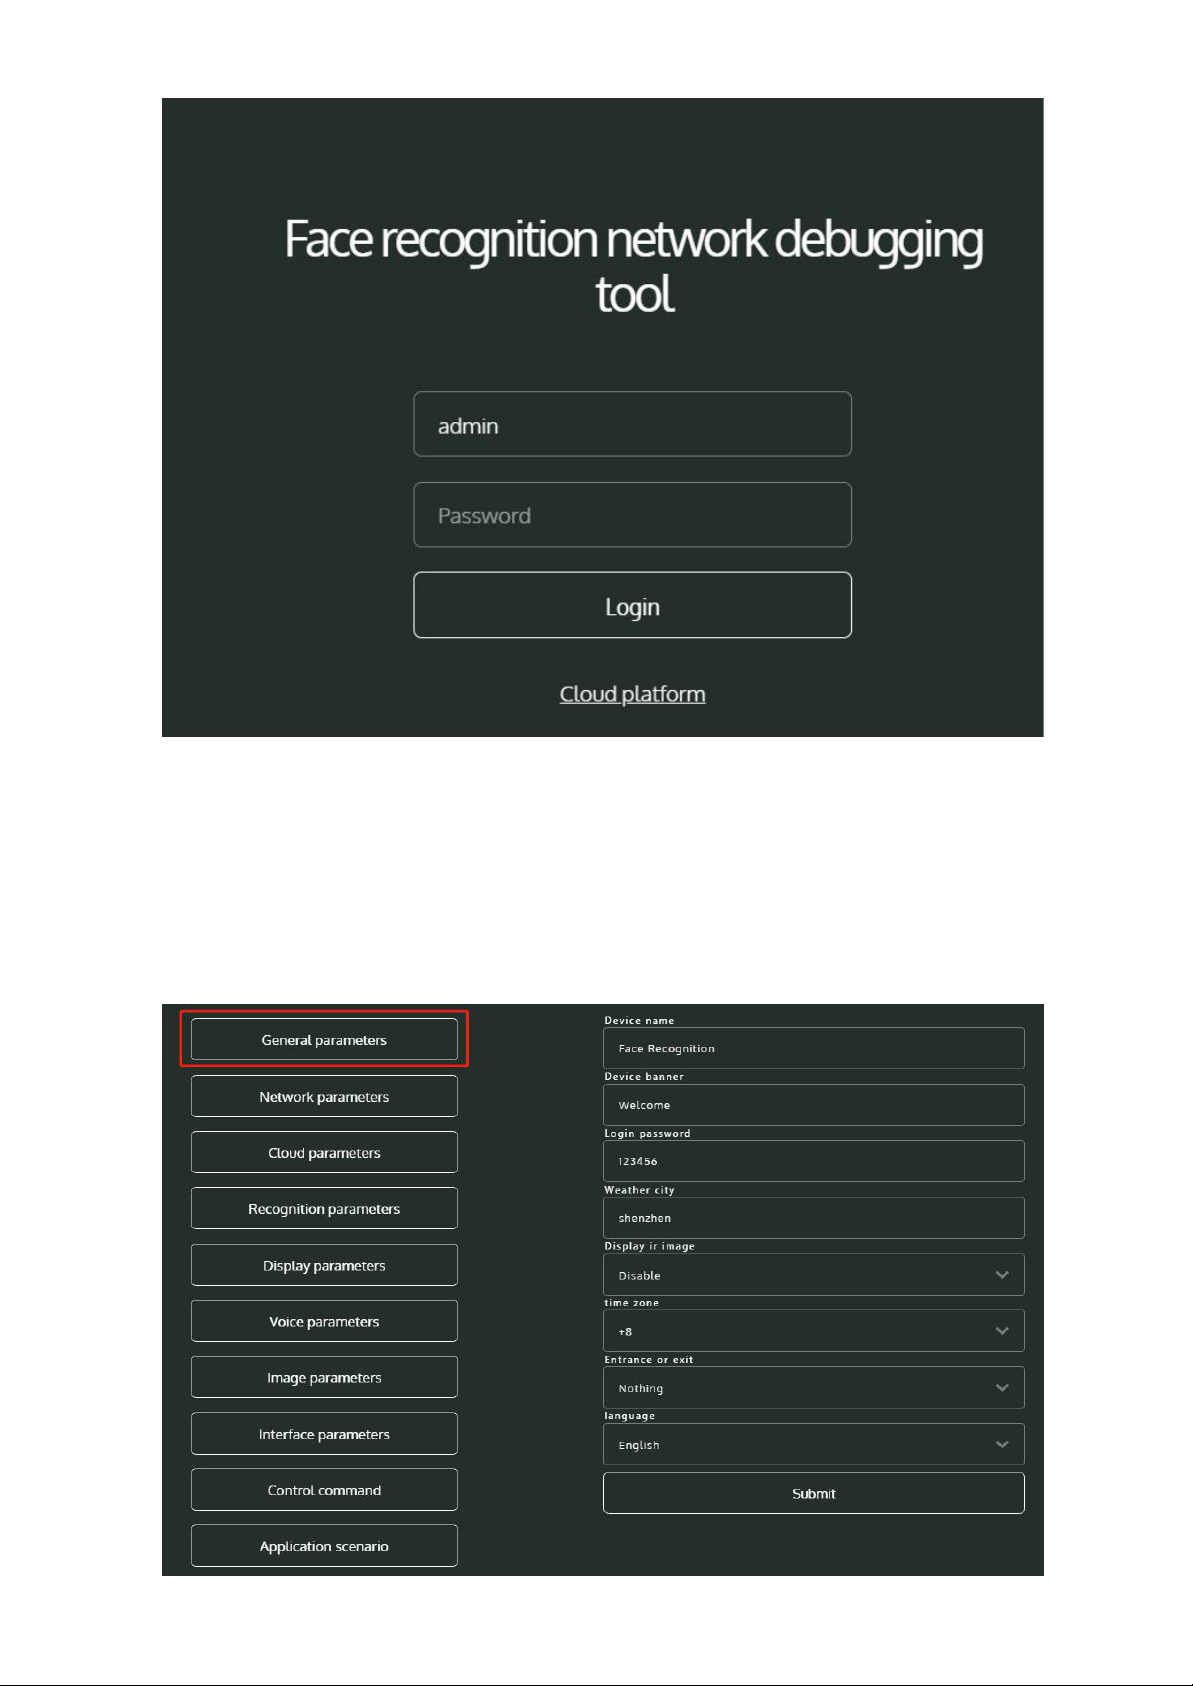
> Enter Account: admin
> Enter Password: 123456
Note: Login password can be reset under “General Parameters” once user is logged in.
1. General Parameters
Page 4
• Device Name: The name displayed in the lower left corner of the device. User can customize.
• Device Banner: The text that will scroll in the lower left corner of the device. User can customize.
• Login Password: The password used to enter the background management program. Default
password is 123456. User can customize.
• Weather City: Weather temperature displayed. This feature is not offered for this device; keep
default selection blank to disable.
• Display IR Image: When enabled, infrared imaging will be displayed on the device when the
screen is open. Note: This feature is disabled by default.
• Time Zone: The time displayed on the device. User can customize based off current time zone
(select between -11 and +12).
• Entrance or Exit: This function is for setting the device for the entrance or exit of traffic. This
feature is not offered for this device; keep default selection to “Nothing”.
• Language: The system supports multiple languages, for both text and voice. Select your
language and allow the device to restart.
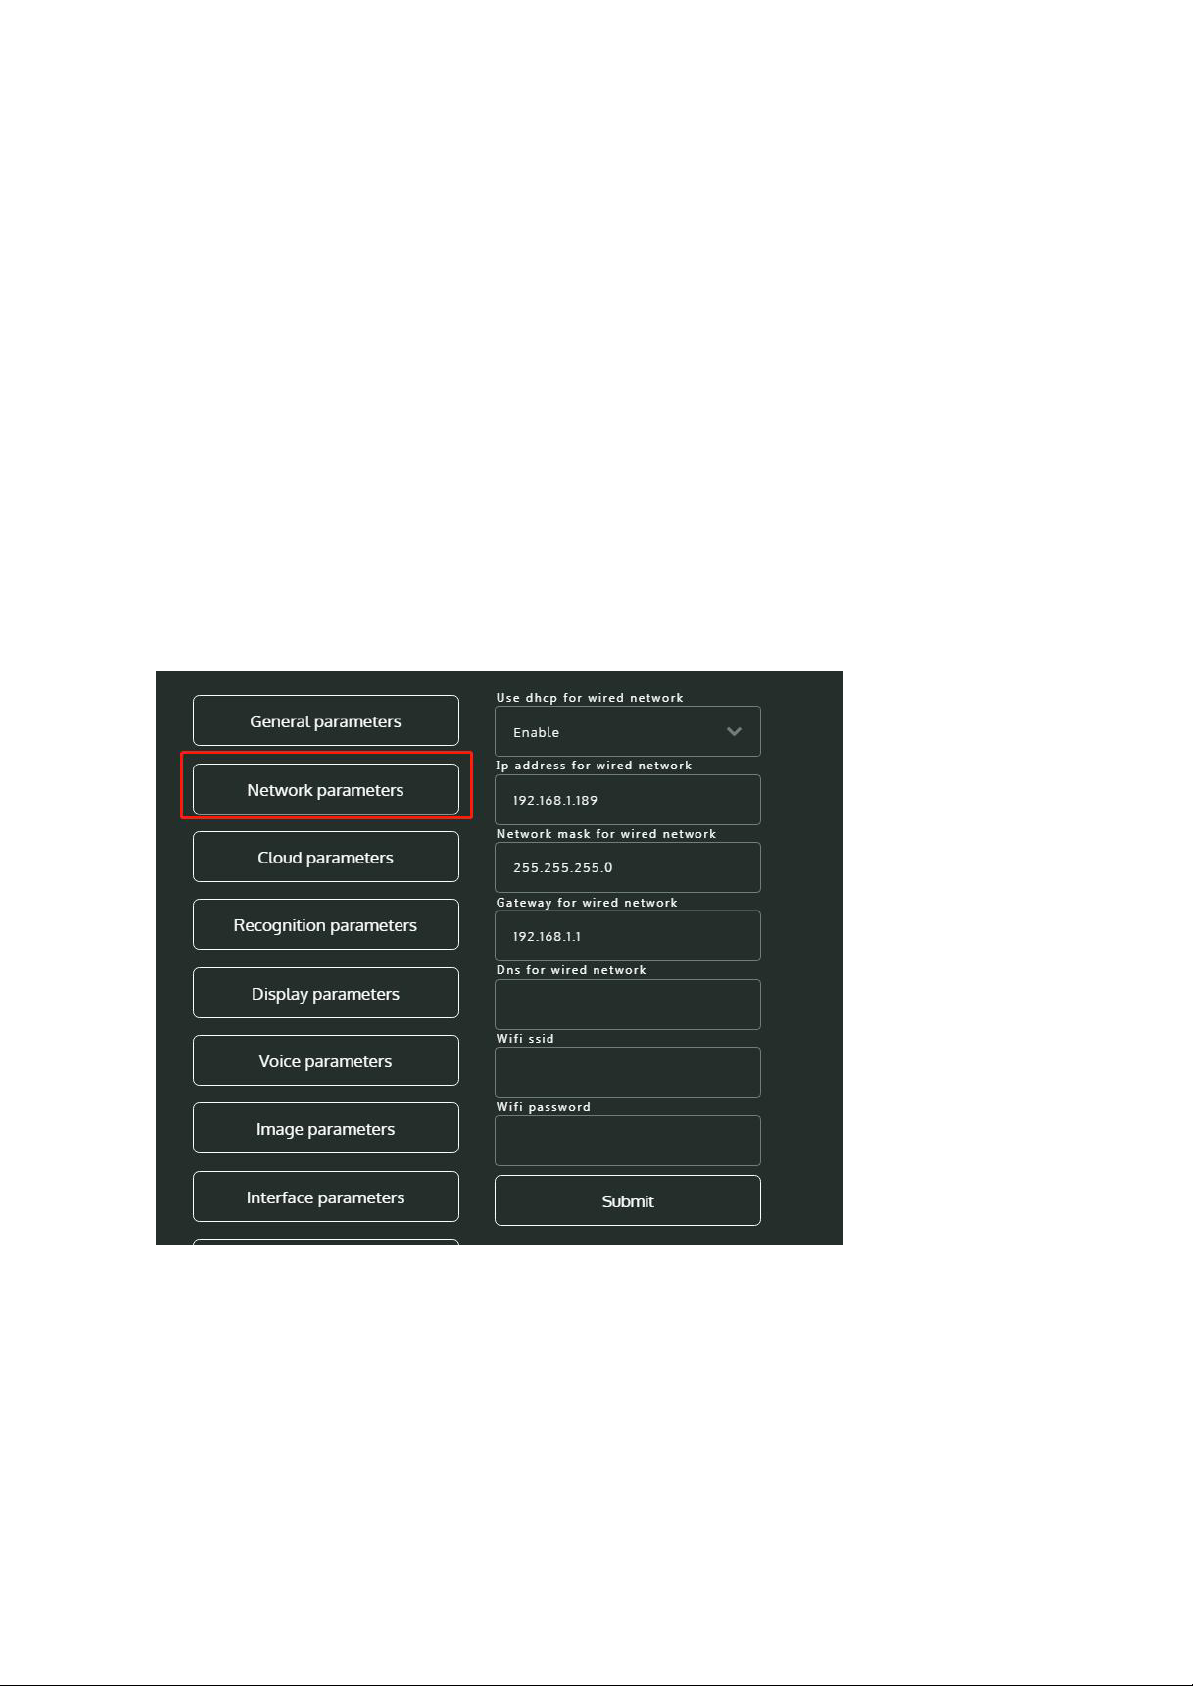
2. Network Parameters: Device Access
A) Wired Network Connection
DHCP Enable: Automatically configure network IP and other information. It is recommend-
ed to enable this feature, so the device can automatically obtain the Internet-capable IP.
DHCP Disable: Manually configure the network IP and other information, need to fix the IP
address of the computer, add a network segment for the device to access the Internet;
B) Wireless Network Connection
Enter the available WiFi name and password. Note: This field is upper and lower case
sensitive.
Page 5

3. Cloud Parameters: Cloud Platforms and Docking on Devices
Main Parameters:
> Change the Cloud Push Mode to: “WEBSOCKET”
> Change the Websocket URL to: ws://www.ys2b.com/webfnzn/face/fnkx
Note: To modify the push address, you must power off and restart
Note: All other Cloud Parameter fields should generally not be modified.
4. Recognition Parameters: Device Identification Comparison Parameters
Page 6

• Face Recognition Method: Generally use automatic recognition.
• Recognition Mode: Face; Face or IC Card.
• Recognition Distance: Set the recognition distance at either: <0.5m,<1m,<2m,<3morUnlimited.
• Recognition Interval (Seconds): 0-99 seconds; the greater the number, the longer the interval.
• Live Face Detection Level: Closed, Low, Medium or High (generally set low). Used to distinguish real
people’s faces from photos. If closed, photos can also be recognized. Low, medium and high are the levels
utilized for real face detection. High means the requirement of live person authentication is strict. We recommend customers using photo and real face to make a comparison and then choose the level they want.
• Face Quality: Low,MediumorHigh. Capture the clarity of the picture.
• Live Face For Stranger: Disable or Enable. Whether to use live person detection for “strangers” not
currently registered in the face database.
• The Largest Face Recognized Only: Disable or Enable. Typically, the closest user to the camera will get
recognized.
• Face Detection Threshold: 30 (recommended default)
• Face Critical Point Threshold: 45 (recommended default)
• Entered Face Recognition Threshold: 92 (recommended default)
Note: The above thresholds with number 30, 45, 92 are key for face information acquisition and recognition.
These default values have been tested and modified by the manufacturer and are highly recommended.
User modification may cause problems in face acquisition and recognition.
• Recognize Strangers: Enable or Disable. Whether or not to turn on the “stranger” recognition function for
those not currently registered in the face database.
• Recognition Time for Strangers (Seconds): 0-99 seconds. How many seconds the screen will recognize
“strangers” not currently registered in the face database. The larger the number, the longer the interval
between identifying the “stranger”.
Note: If the interval is set to “0” seconds, the screen will constantly recognize the user and broadcast. It is
recommended to experiment with different seconds to experience different results and set time to the users'
requirements.
5. Display Parameters: Configure Device to Display Content Parameters
Page 7

Note: The “no use” fields are not active and have no functionality.
• Display Mode for Whitelist: The content displayed after successful face comparison.
Note: The “whitelist” is the user whose face is registered through the cloud or local client platform.
• Salutation for White List: Add title after displaying name.
• Fixed Words Before Whitelist Names: User can customize.
• Fixed Words After Whitelist Names: User can customize.
• Alarm Display: User can turn “on” or “off”.
• Display Content for Period Impassable: User can customize.
• Display Content for Expired: Default: “Expired”; user can customize.
• Display Content for Strangers: Default: “Stranger”; user can customize.
• Screen Saver Mode: Default screen saver already set. User can customize; refer to “Setting a New
Screen Saver” section below.
• Main UI Overlay Mode: Default.
• Main UI Overlay: Disable or Enable. The Main UI Overlay is the area of the screen with the blue
reference block.
• Company QR: Disable or Enable. After opening, if the recognition is successful, a QR code can be
displayed. The QR code can be used to display names, small videos or tips. Upload a QR code image:
Requires resolution 800x840, format file .png; UI Overlay format: Requires resolution 800x840, format
file .png; Screen saver package: requires resolution 800x1280, format file .jpg, named from 1.jpg, 2.jpg,
to 10.jpg, compressed into zip file and no secondary directory; as shown in the figure below:
Page 8

Setting a New Screen Saver:
1) Set screen saver mode to “Custom”
2) Upload the compressed file in the format of XXX.zip
3) Click “Submit”
6. Voice Parameters: Device Voice Content Parameters
• Volume: 0-10, 0 = Minimum; 10 = Maximum.
• Voice Enabling: Enable or Disable. If enabled, the user can customize the voice content
using the remaining parameters under this section.
Page 9
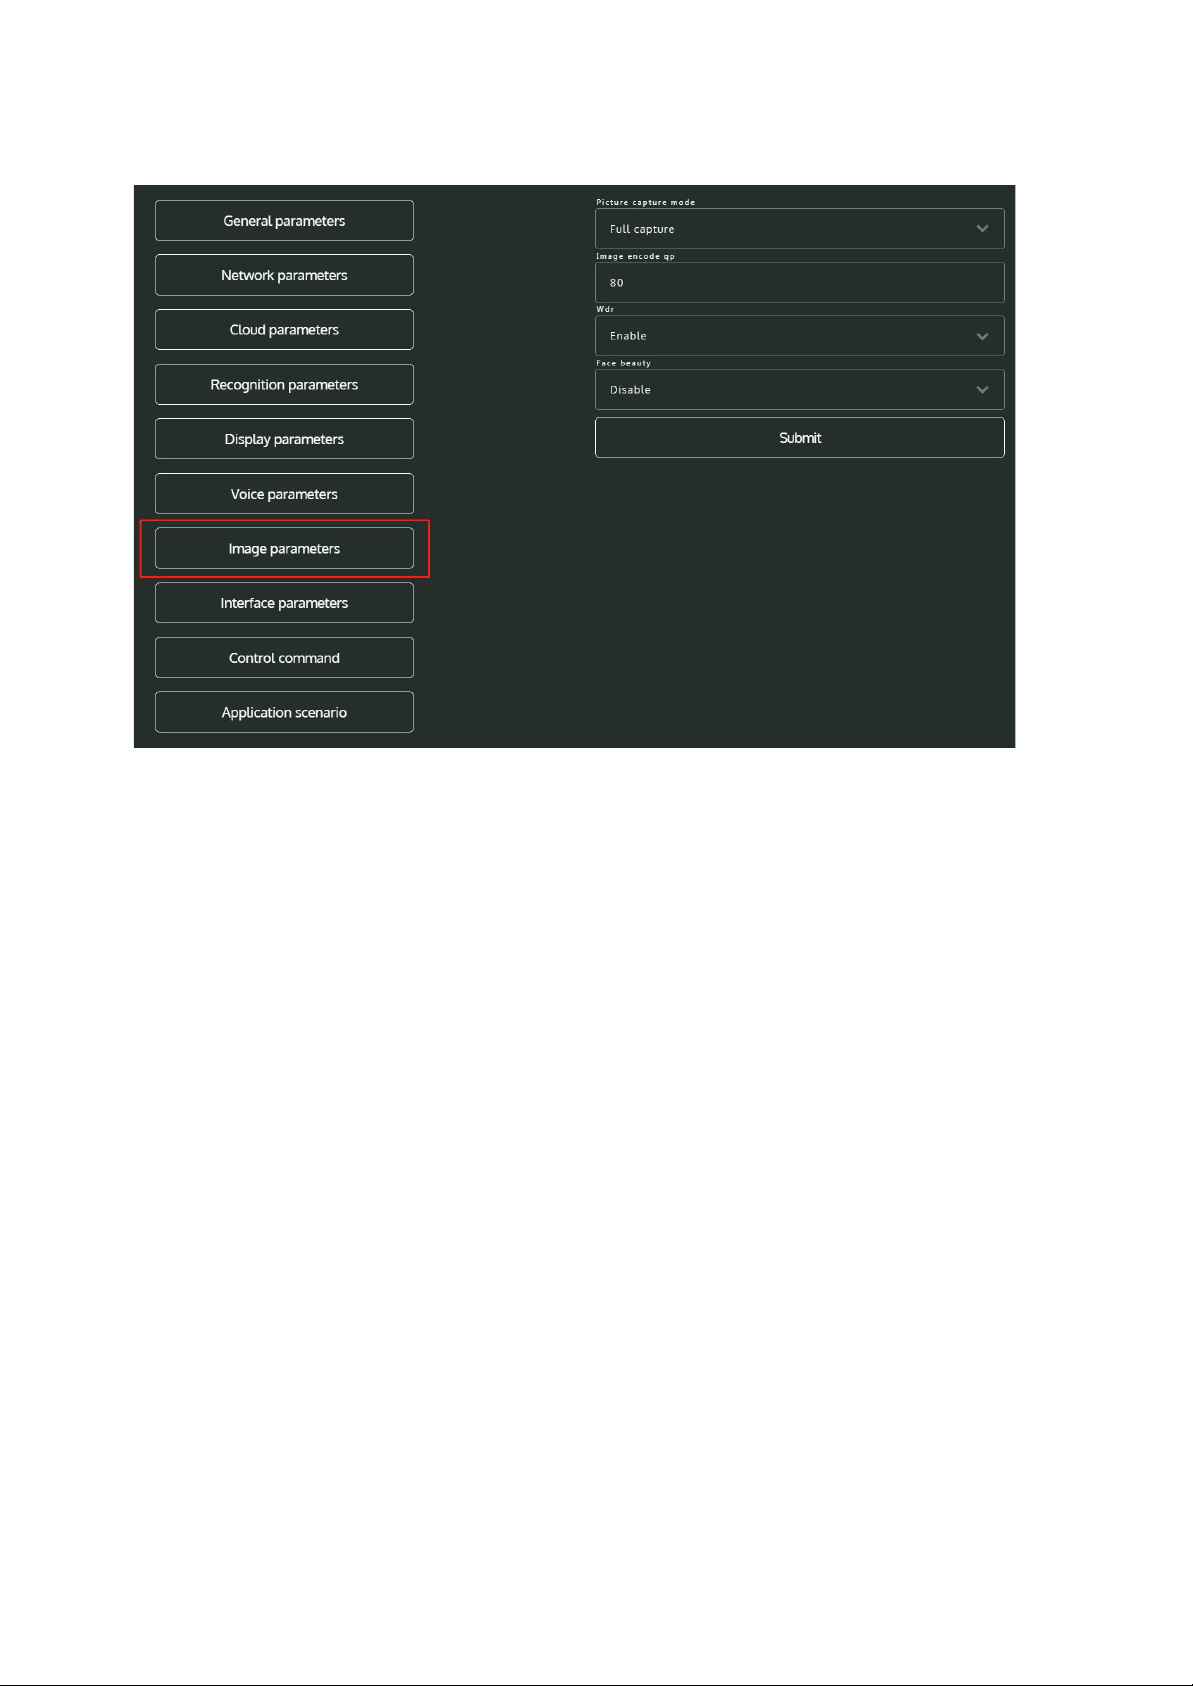
7. Image Parameters: Device Image Parameters
• Picture Capture Mode: Full capture, Face capture, or No capture. The capture modes
of the face appearing in front of the camera.
• Image Encode QP: The quality of the captured image. Default: 80. This default value is
recommended, otherwise the recognition effect may be affected.
• WDR: Enable or Disable. This feature is not offered for this device; either selection will
have no effect.
• Face Beauty: Enable or Disable. This feature is not offered for this device; either selection will have no effect.
8. Interface Parameters: Configure Device Additional Function Parameters
Note: The equipment interface parameters are used with other external devices such as
gate machines. If user isn’t using an external device, keep the default parameters
selected.
Page 10
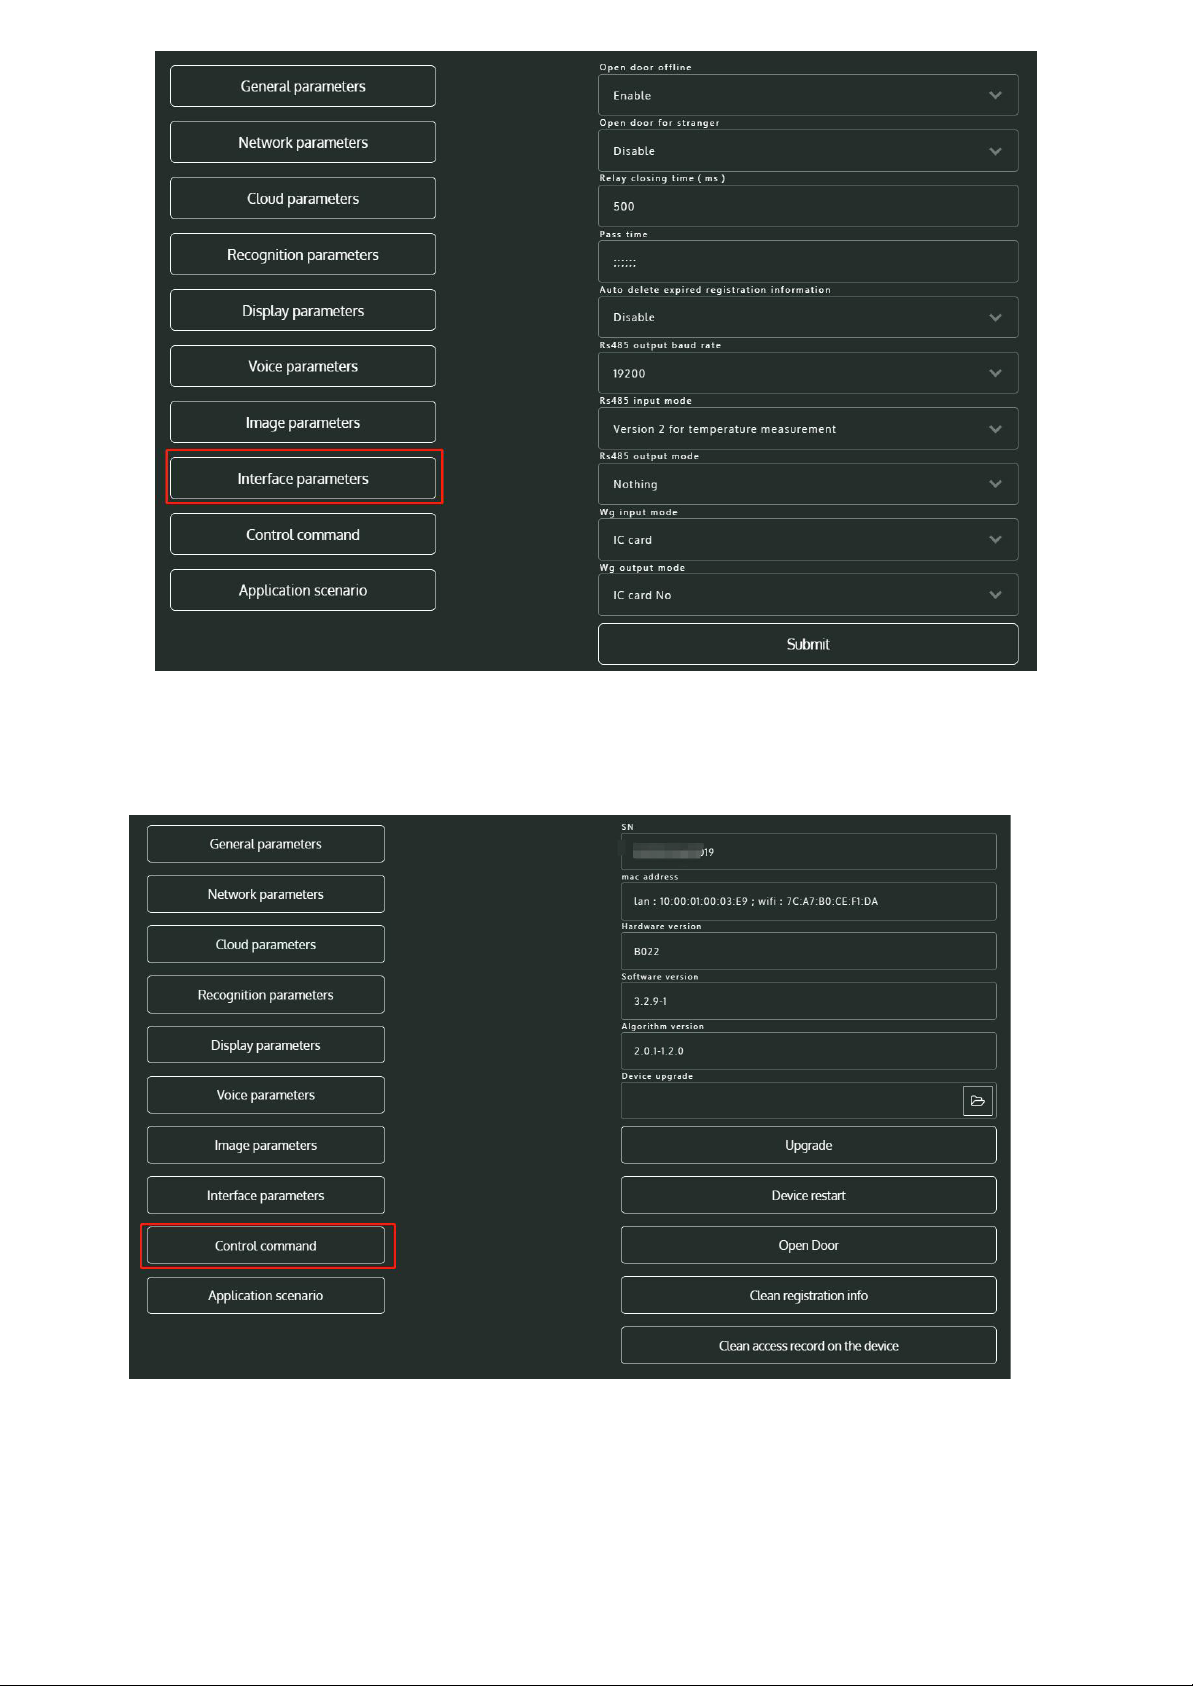
9. Control Command: Device Firmware Parameters
Upgrading firmware: Uploading .bin files in compressed packages, Prompting
web pages to appear after upgrading, Clearing up registration information: clean-
ing personnel sent to equipment, cleaning the traffic record: clean the record data
of equipment identification.
Page 11
Upgrade Steps:
1) Choose the XXX.bin file
2) Click “Upgrade”
3) Allow interface/device to restart
4) Re-enter the “IP” address
5) View device version number. “Algorithm Version”
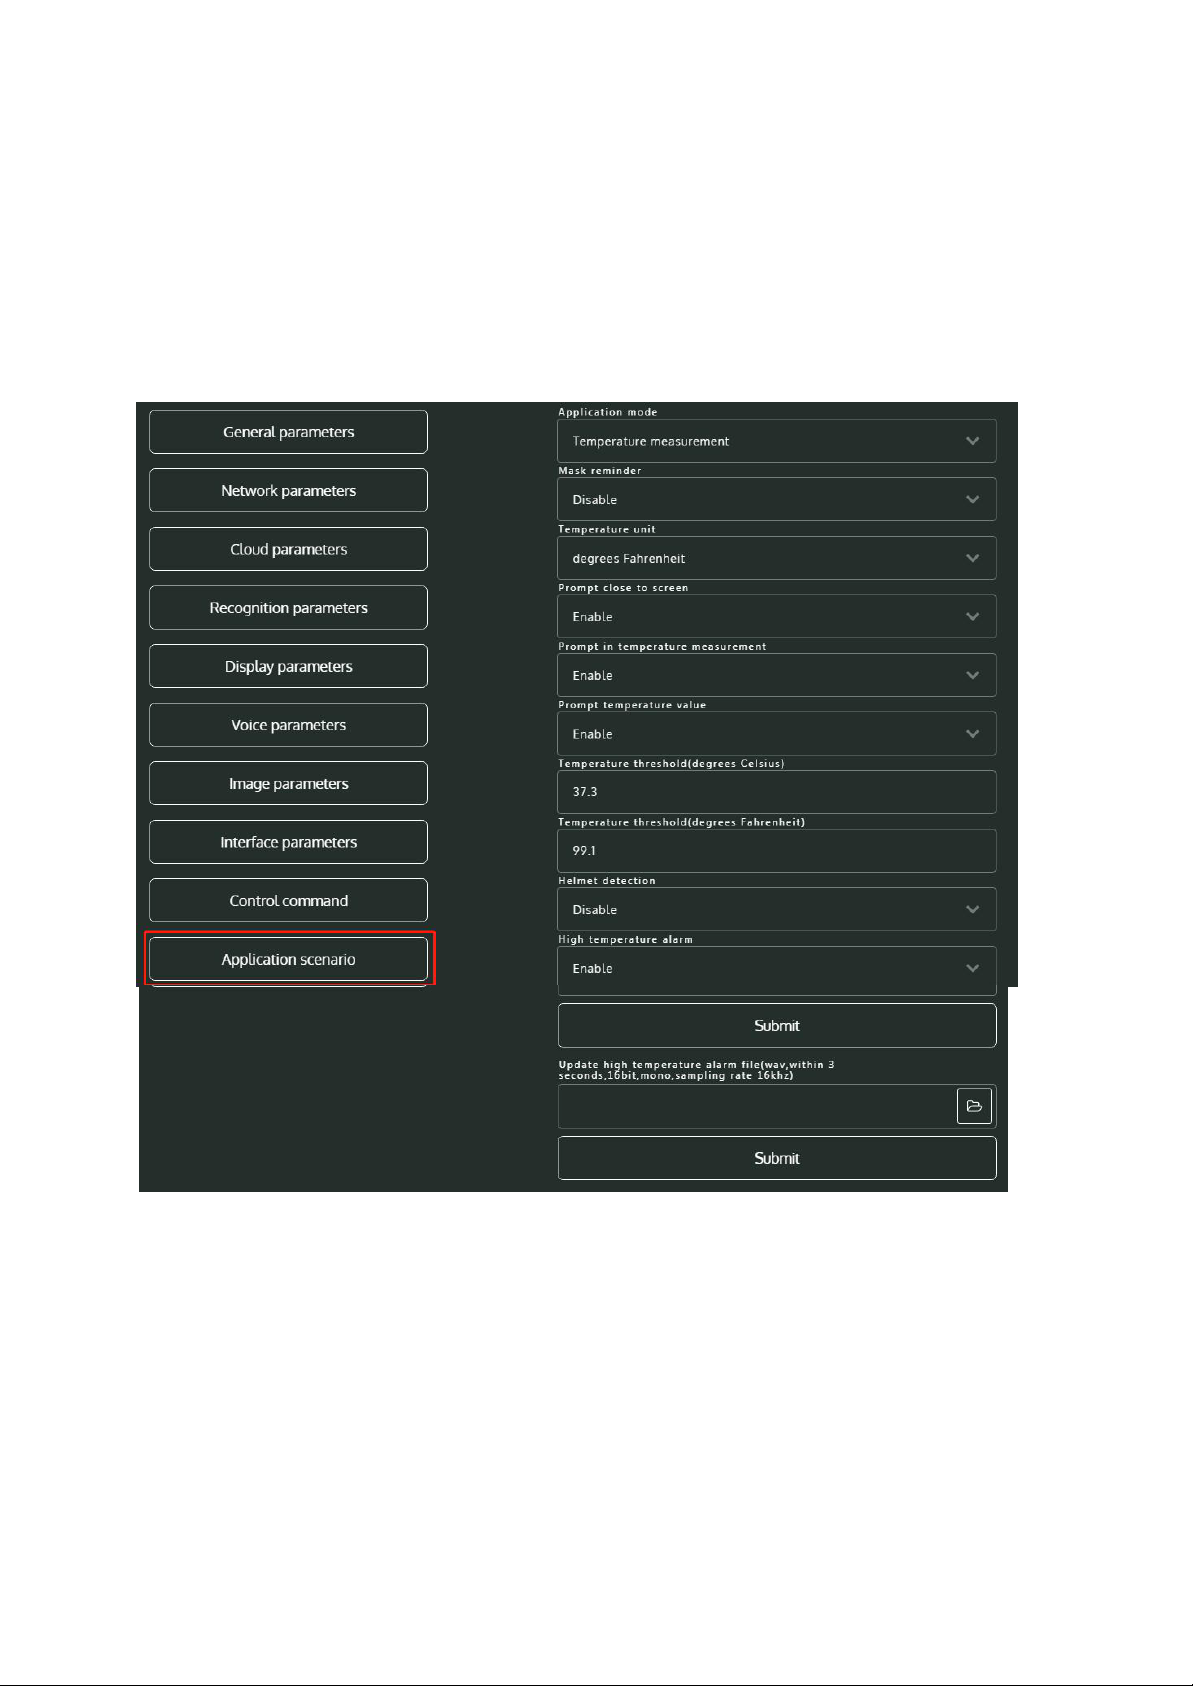
10. Application Scenario: Device Application Scenario Configuration
• Application Mode: Temperature Measurement or Normal (without temperature).
• Mask Reminder: Disable or Enable. When enabled, will alert user if mask is not detected.
• Temperature Unit: Degrees in Celsius or Fahrenheit.
• Prompt in Temperature Measurement: Disable or Enable.
• Prompt Temperature Value: Enable or Disable.
• Temperature Threshold (Degrees Celsius): XX.X (keep decimal)
• Temperature Threshold (Degrees Fahrenheit): XX.X (keep decimal)
• Helmet Detection: Disable or Enable. When enabled, will alert user if helmet is not detected.
• High Temperature Alarm: Enable or Disable.
Note: Update high temperature alarm file (.wav, within 3 seconds,16 bit, mono.sampling
rate 16khz).
Page 12

Face Recognition Cloud Platform
and Client Instructions
Cloud account login information is provided on the label inside the camera system box.
If unable to locate, contact Global Industrial Customer Service at
1-800-645-2986.
http://www.fnzn.net/en/faceapp64.zip
Page 13

*NOTE: Use of Win10 system must open port 8081 or close firewall.
* NOTE: Be sure to click “Save”
Page 14

Page 15

Access Control Equipment
1 Device List
Page 16

Page 17

:
Page 18

Page 19

Page 20

Page 21

Page 22

Page 23

Page 24

Page 25

Page 26

Page 27

Page 28

Attendance
We use attendance mainly to clock in/out at work (Personnel
punch in/out when scanners do the recognition). You can follow
our examples to set up attendance.
1. Time rule setting:
Take work from 9:00 to 18:00 as an example to set up attendance. Let’s
create a new time rule first, as shown below:
The specific settings are as follows:
Then go down the page and set the rules for clocking in at work (for
example, what time is considered late)
Page 29

Then set the rules for clocking out. Here pay attention the value type is
set max.
Then click save
2. Attendance rule setting:
Attendance rule setting is for company’s working and rest time in a week.
Page 30

Let’s click new to create a new attendance rule:
The specific attendance rules are set as shown in the figure below. If
Saturdays and Sundays are off-work days, please choose Rest.
Then click save
Then click select below to select the person who needs to use
attendance rule:
Page 31

At this time, ViewDialog will appear, select the employees and click
OK
People shown below are those who have been selected
Page 32

3. Set up timed tasks
The function of timed tasks is to let the system update the attendance
information every day. We first click Timed tasks, and then select new
Save after setting as shown below
:
Note: Difference (check pic below): “Everyday” execution time in
attendance statistics of timed tasks is for collecting statistics of the
previous day every night; “Timing” execution time is for collecting
statistics of the day (“Timing” execution includes “Everyday” execution,
Page 33

also collecting statistics of the previous day every night).
Using Local client and LAN, statistics are collected according to the user's
local time, and the result is normal.
Using Cloud platform, there is no problem with the punch in/out time
(for example, employees punch in at 9 o'clock, collected punch in time is
9 o'clock). However, the exported daily/monthly attendance report
statistics will come out later because the timing server is in China (about
half day later for American users).
4. Check employees' attendance status:
As shown in the figure below, select the corresponding time query
Page 34

Daily attendance report and monthly attendance report perform similar
query functions.
Page 35

5. Leave type setting and registration
If employee asks for a leave, we can register into the system (register and
then the attendance export system will display normal instead of
absence). Let’s take sick leave as an example. First create a new leave
type:
The settings are shown below:
Page 36

If John is sick today, we can register his situation
The specific settings are as follows:
Then we click select, select John
Click save to complete the registration, as shown in the figure below:
 Loading...