

Global Industrial 641164 User Manual
globalindustrial.ca
Distribucion Industrial Globales S DE RL DE CF
User's manual Manual del usuario Manuel de l'utilisateur
Customer Service
US: 1-800-645-2986
Servicio de atención al Cliente
México: 01.800.681.6940
Service à la clientèle
Canada: 888-645-2986
High Velocity Automatic Hand Dryer
• This product must be installed by a certified electrician in
accordance with local codes.
• Use only for drying hands as intended by the manufacturer. Do not
use hand dryer for any purpose other than drying hands.
• Carefully follow all instructions for installation in the enclosed
mounting instructions.
• When cutting or drilling into wall or ceiling, be cautious of electrical
wiring and other hidden utilities.
• Always connect to a branch circuit with circuit breaker or fuse
protection with an electrical rating greater than hand dryer’s rated
amperage shown in this manual, in accordance with the NEC
(National Electrical Code) and/or CEC (Canadian Electrical Code).
• Use only the electrical power (voltage and frequency) specified for
the hand dryer being installed.
• Each hand dryer must have a dedicated circuit.
• For indoor use only. Do not use outdoors. Do not expose to rain,
sun or extreme temperature. Do not use near sources of water or
extreme heat.
• Repair work should only be performed by qualified and licensed
personnel. Only use genuine replacement parts.
Model 641164
• Caution and supervision is necessary when appliance is used
near children.
• Children should be supervised, and not play with the appliance.
• Turn power switch off before servicing or cleaning unit.
• Do not block intake and outlet.
• Do not hang any objects on dryer.
Please read and save these instructions. Read carefully before attempting to assemble, install, operate or service the product described.
Protect yourself and others by observing all safety information. Failure to comply with instructions could result in personal injury and/or
property damage. Retain instructions for future reference.
WARNING
Risk of Fire, Electric Shock, Personal Injury or Property
Damage Are Possible If Local Codes or Safety
Recommendations Are Not Followed.
Failure to Disconnect Power Source Before Installation or Servicing
Can Result in Serious Injury or Death From Electric Shock.
Always disconnect power source before servicing or
1
DANGER
installing hand dryer.
080216
1
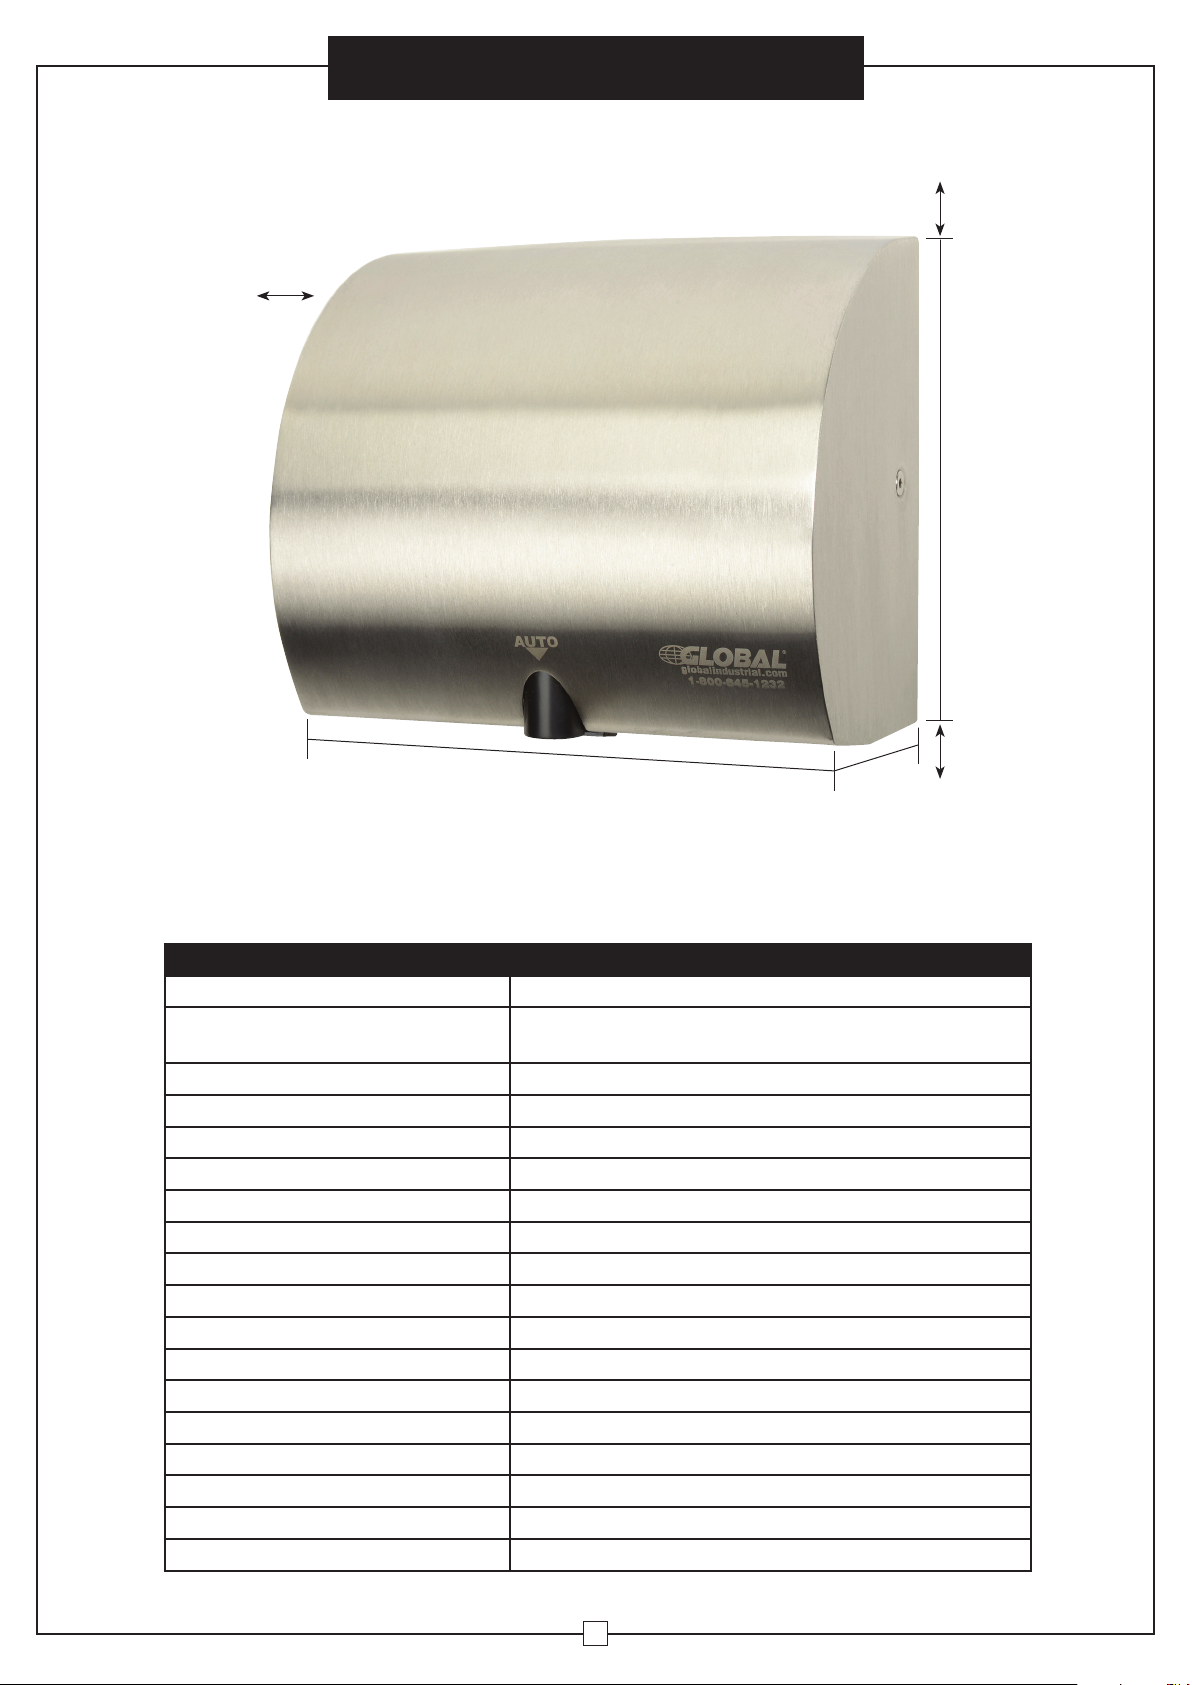
3
/2" Minimum
Clearance
On Each Side
User’s Manual
High Velocity Automatic Hand Dryer
OPERATING INSTRUCTIONS
1" Minimum
Clearance
85/8"
15" Minimum
913/16"
57/8"
Clearance
TECHNICAL SPECIFICATIONS
ITEM CATEGORY PERFORMANCE DATA
Operating Voltage 110-120 VAC, 60 Hz, 1150W
Cover Type/Cover Finish Model 640305 - Stainless Steel (#304), Satin Finished 0.059"
Anti finger coating
Air Output Temperature 122°F (50°C) - Ambient Temperature 77°F (25°C)
Warm Air Speed Output 64 mph
Dryer Shall Deliver 67 CFM
Motor Type 3/4HP, 500W, 25000rpm, Brush type, Dual Ball Bearings
Motor Thermal Protection Thermostat turns unit off at 212°F
Heater Element 650W
Heater Thermal Protection Thermal cut-off at 212°F (100°C)
Drying Time Less than 15 seconds
Circuit Operation Infrared Automatic
Sensor Range Up to 8.66"
Timing Protection 40 seconds auto shut off
Drip Proof IPX1
Isolation Class 1
Net Weight 6.6 lbs.
Shipping Weight 7.7 lbs.
Unit Size 9.84"W x 8.66"H x 5.9"D
2

User’s Manual
High Velocity Automatic Hand Dryer
Fuse
L
Indicator
N
Temperature
Probe
Sensing
Probe
Motor
CONTENTS
Part Qty. Description
1 1 Hand Dryer
2 4 #9 x 1" Lg. Self Tapping
Phillips Screw
3 4 Plastic Anchor
4 1 4mm Hex Key
READ COMPLETELY BEFORE STARTING INSTALLATION
PROCEDURE
1. Make sure power supply breaker is switched off. Installation
must be carried out in accordance with the current edition
of the local wiring regulations code. Installation should be
performed only by a licensed electrician.
2. It is recommended to leave a 3.5" clearance at both
sides, 1" clearance above the unit and 15" clearance
below the unit.
3. Dryer should be connected to an individual circuit
breaker rated at 15 Amp.
4. The power supply wire should be at least 16 AWG
NOTE: For two or more dryers, units should be no closer
than 24 inches on center. Do not install dryer over washbasin.
*ADA compliant
Temperature
Switches
Heater
Thermal Fuse
RECOMMENDED
MOUNTING HEIGHTS
From bottom edge of dryer above finished floor
Men 45"
Women 43"
Teenagers 41"
Small Children 35"
*Handicapped 34"
Over countertop
15" minimum from
countertop
3
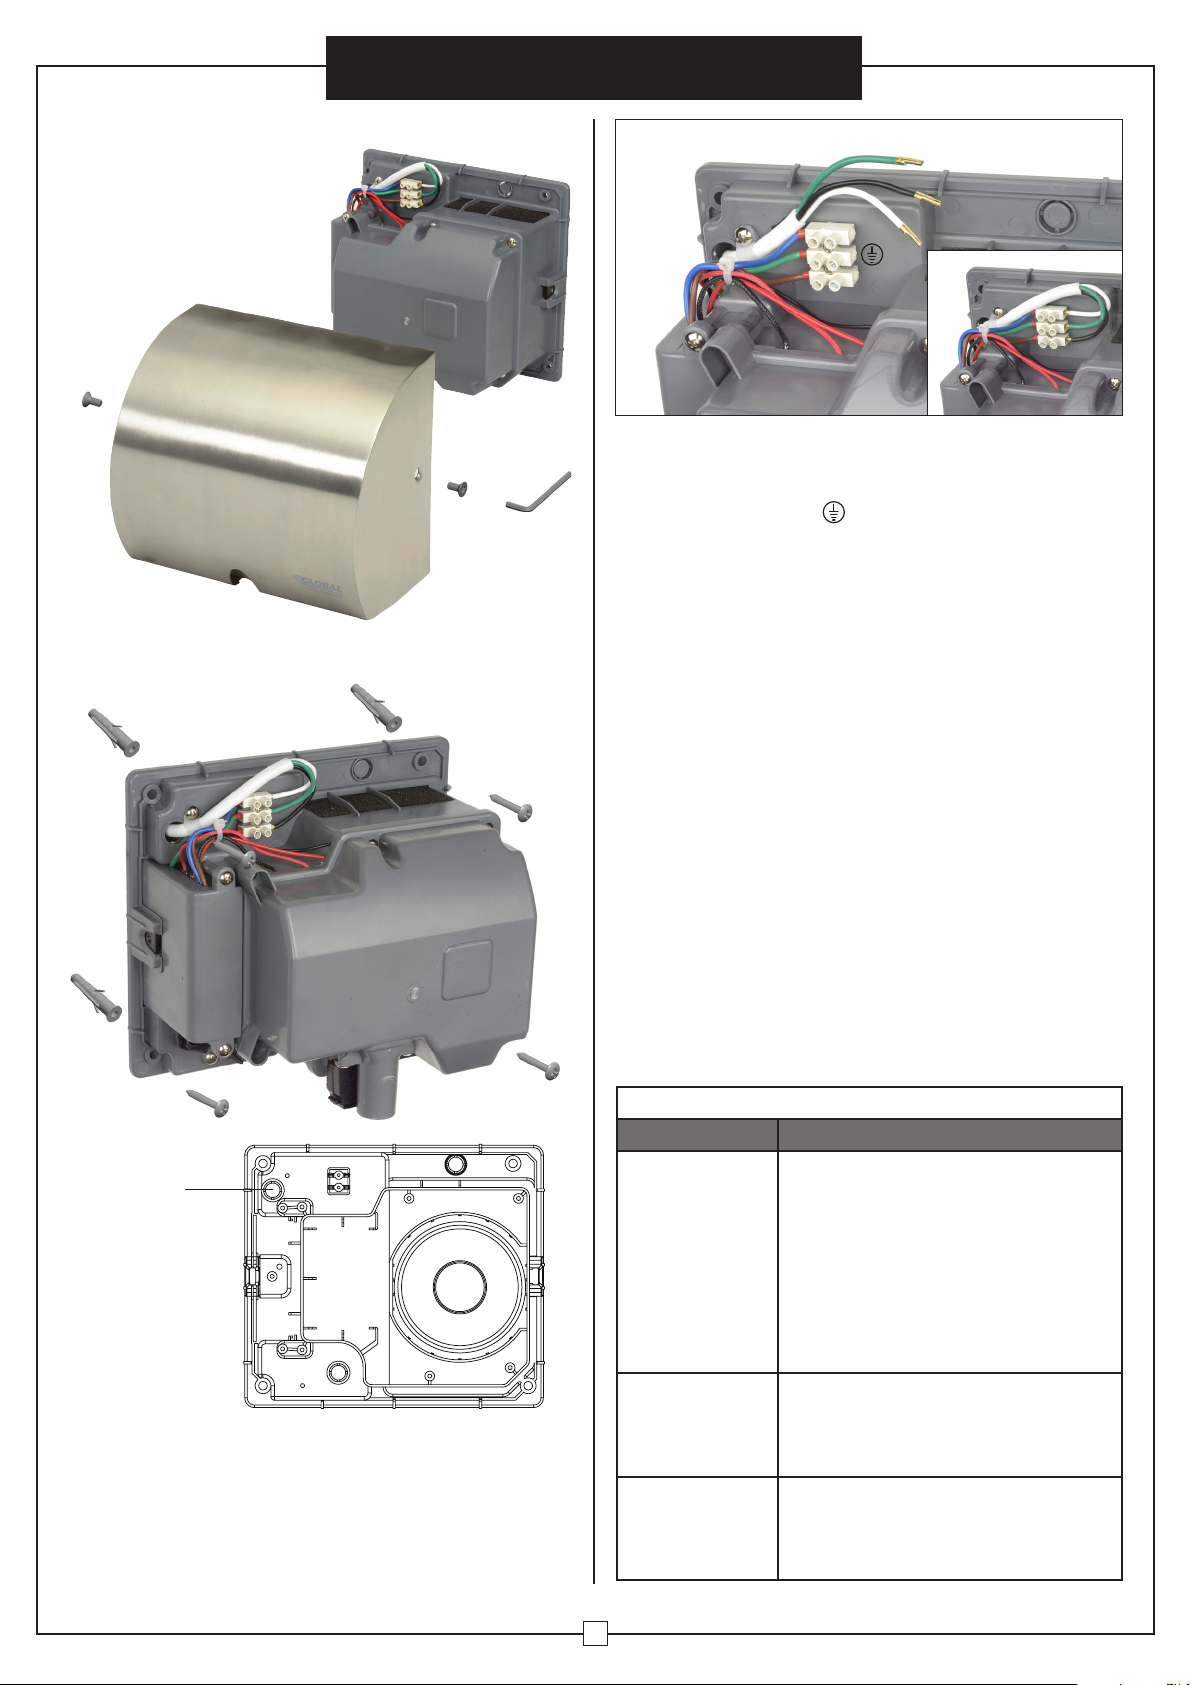
1. Remove stainless steel
cover by unscrewing
counter-sink socket head
screw using hex key.
(provided).
User’s Manual
High Velocity Automatic Hand Dryer
L
N
3. Connect wires into the terminal. Connect Live wire to
terminal block marked "L". Connect Neutral wire to the
terminal block marked "N". Connect Ground wire to the
terminal block marked .
4. Replace and secure front cover with counter-sink socket
head screw. Do not over-tighten.
5. Switch on circuit breaker to test unit. If dryer does not
operate, refer to Troubleshooting.
Knock
out hole
OPERATION
1. No touch operation.
2. Shake excess water from hands.
3. Place hands under outlet to start operation.
4. Rub hands lightly and rapidly.
5. Stops automatically after hands are removed.
CLEANING AND MAINTENANCE
1. Disconnect electrical supply.
2. Remove the two cover-mounting screws.
3. Remove cover.
4. Clean all dust and lint from dryer interior.
5. Wipe cover with damp cloth or mild cleaning solution.
Do not soak. Never use abrasives to clean cover.
6. Replace cover. Do not over tighten screws.
TROUBLESHOOTING
PROBLEM SOLUTION
The dryer does
not run.
Check that breaker supplying dryer
power is on and working.
If working, disconnect the power
and verify that wiring is correct.
If wiring is correct, dryer may be
too close to counter (less than 15")
or an object may be below infrared
sensor. Remove object or relocate
the dryer.
2. Punch out knock out hole for the power supply wires.
Determine wall mounting location and mark hole locations
with screw holes in the dryer. Use a 0.1875" drill bit and drill
4 holes 1" deep. Insert plastic anchors flush to wall. Feed
power supply wires through knock out hole. Place dyer
against wall and tighten screws using #9 x 1" Lg. phillips
screws. (provided).
The dryer
cycles by
itself or runs
constantly.
The infrared
sensor only
“sees” close
range objects.
4
Ensure that there is no obstruction
on or below infrared sensor. Clean
any dirt or debris from sensor lens.
Ensure that there is no obstruction
on or below infrared sensor. Clean
any dirt or debris from sensor lens.
 Loading...