

Page 1
ASSEMBLY
MANUAL
and TUNING
GUIDE
HTTP://XTM.GLOBALHOBBY.COM
Features of Your XTM Racing X-Terminator Pro:
●
Factory-Assembled Chassis and Drive Train
●
3 Millimeter 7075 Aluminum Milled Chassis
●
CVA-Type Front & Rear Drive Axles
●
Threaded Shock Bodies
●
Dual-Chamber Aluminum Racing Tuned Pipe
●
Exhaust Header w/Coupler & Spring Retainer
●
Performance 3-Shoe Clutch Assembly
●
Aluminum Heat-Sink Engine Mounts
●
7075 Aluminum Shock Towers & Chassis Support Braces
●
Carbon-Fiber Radio Tray
●
Complete Ball-Bearing Set - Including Steering
Thank you for purchasing the XTM Racing X-Terminator Pro. This Assembly Manual is provided to help you enjoy your new X-Terminator Pro
without any of the hassles you might expect. Please read through all of the literature that is provided in the box.
✦✦
✦IMPORTANT
✦✦
could lead to bodily harm and/or injury. The XTM Racing X-Terminator Pro is not intended for persons under 12 years of age, unless closely
supervised by an adult.
✦✦
✦ Before operating your new X-Terminator Pro, please read and understand the warnings listed on the next page. Failure to do so
✦✦
The XTM Racing X-Terminator Pro is distributed exclusively by Global Hobby Distributors
All contents copyright © 2004, Global Hobby Distributors Version V1.0 January 2004
18480 Bandilier Circle, Fountain Valley, CA 92708
●
Fuel Line w/Fuel Filter
●
Clear Body w/Rear Spoiler, Body Clips & Decal Sheet
●
Rear Sway Bar
●
Dual Vented Disc Brakes
●
0º - 3º Rear Suspension Mounts
●
Dish Wheels
●
Shock Dust Boots
●
Dustproof Receiver and Battery Boxes
●
Silicone Dustproof Switch Cover
●
Dual-Sponge Air Filter w/Prefilter Sleeve
●
Transponder Mount
Kit Product # 145603
Need help or have any questions? Call us at 1-714-963-0329 or send us an Email at service@globalhobby.net
1
Page 2

FOR YOUR SAFETY - PLEASE READ THESE WARNINGS FIRST!
ENGINE WARNINGS
●
Never use any fuel in your engine other than glow fuels
specifically designed for use in model car engines. Use of any
other types of fuel can cause severe damage to your engine and/or
personal injury. NEVER USE GASOLINE!
●
Never operate your model on any public streets. This could
cause traffic accidents, personal injury or property damage.
●
Glow fuel engines emit exhaust vapors that are poisonous and
can be dangerous to your health. It is important that you operate
your engine in a very well-ventilated area, preferably outdoors.
●
Before starting your engine, make sure that the throttle trim is
set to the idle position. Starting your engine at any setting above
idle can cause the model to lurch out of your hands.
●
When your engine is running, there are certain parts that
rotate at high speeds. Be careful not to touch the drive shafts,
gears, clutch assembly or any other moving parts. Otherwise,
serious injury could result.
●
It is normal for your engine, exhaust header and tuned pipe to
get very hot during operation. Never touch these parts while
they are hot or you might be burned.
●
Model car engines produce vibration when they are running. It
is important to periodically check the engine mounting screws
and other assemblies to ensure they are tight. Running your
engine with the engine mounting screws loose can lead to
severe engine and/or chassis damage.
FUEL WARNINGS
●
Glow fuels like those used in your X-Terminator Pro are
poisonous. Follow all the precautions that are printed on the fuel
manufacturer's container.
●
Keep fuel out of the reach of children.
●
Glow fuel is extremely flammable. Keep away from high heat,
sparks and flame.
GENERAL WARNINGS
●
Under no circumstances should you operate your model in
crowds of people. Serious injury could result.
●
Never operate your model on busy streets or if there are cars
around.
●
Do not use your model to chase pets or other animals.
●
The receiver and battery boxes are not waterproof; therefore,
do not drive through water, wet grass, mud or snow.
●
Because your model is operated by radio control, it is important
to make sure you always are using fresh and/or fully charged
batteries. Never allow the batteries to run low or you could lose
control of the model.
●
If your model becomes stuck, allow the engine to idle, then
retrieve your model by hand.
●
To prevent excessive r.p.m.'s from damaging your engine and/or
drive-train components, we suggest reducing throttle while in the
air during jumps.
FOR YOUR INFORMATION
If you should have any trouble with any of the steps listed in this Assembly Manual and Tuning Guide, we have provided an extensive
troubleshooting guide beginning on page # 16. The troubleshooting guide is provided to help you find a quick and immediate resolution
to a number of problems that might occur. If you cannot solve a problem using the troubleshooting guide, or if you have any other
questions or concerns, please contact us at the address below:
Global Services
18480 Bandilier Circle
http://globalservices.globalhobby.com
Fountain Valley CA 92708
Phone: (714) 963-0329 Fax: (714) 964-6236 Email: service@globalhobby.net
CHECK IT OUT! We urge you to come check out our website at http://globalservices.globalhobby.com. There you will find public message boards
frequented by other XTM Racing product owners and the XTM Racing support staff. This is a great place to learn about new XTM Racing products,
get help and suggestions for your current XTM Racing products or just simply hang out and chat with people that share your same interests.
To allow us to serve your needs better, please include your email address with any correspondence you send to us. Your email address will be added to our Customer
Service Database so you will automatically receive free updates and tech notices for your particular product. You will also receive repair status updates (if applicable) and
other important information about your product as it becomes available.
IMPORTANT INFORMATION ABOUT YOUR EMAIL ADDRESS
Global Hobby Distributors will not disclose the information it collects to outside parties. Global Hobby Distributors does not sell, trade, or rent
your personal information to others . Your privacy is important to us.
Visit Our Website
2
Visit our website at http://xtm.globalhobby.com or for Customer Service at http://globalservices.globalhobby.com
Page 3
INTRODUCTION
Thank you for purchasing the XTM Racing X-Terminator Pro 1/8th scale Nitro Buggy. The XTM Racing X-Terminator Pro is one of the
best, most affordable 1/8th scale nitro buggies available today. This Pro version of the great X-Terminator RTR Nitro Buggy is an 80%
factory-assembled chassis complete with many options that are normally only available as upgrade items: 7075 aluminum shock
towers, 7075 aluminum chassis braces, aluminum shocks with threaded shock bodies, dual vented disc brakes, carbon-fiber radio tray,
3-shoe clutch and much more. It doesn't get any better than that. XTM Racing gives you everything serious racers want and none of the
things they don't. We've included everything we could for you to customize your X-Terminator Pro to your favorite track's conditions
and we've done all the tedious work for you. We've left the stylish racing body clear, too, so that you can paint it in your own favorite
colors. And, of course, we've included a great set of die-cut XTM Racing decals to liven up your color scheme.
If you're a racer, you'll want to use your own favorite radio control system and your own favorite .21 size rear-exhaust racing engine,
according to your racing program's rules. We leave choosing tires up to you, too, since track conditions and personal preference differ
so much. You'll be able to use the tires you want the first time. So, forget about the rest, you have the best. Go from the box to
the Winner's Circle in only hours, with the X-Terminator Pro from XTM Racing.
SECTION 1: PARTS IDENTIFICATION
Before beginning assembly, carefully remove the main chassis and the separate parts bags from the box. Use the parts list below to
verify that your kit contains all of the correct parts bags. If your kit is missing a parts bag, or even just a singe part, please contact us
immediately, using the contact information listed on the bottom of page # 2.
1 - Assembled Chassis with Wheels
1 - Tuned Pipe Bag
1 - Exhaust Header Bag
1 - Engine Air Filter Bag
1 - Air Filter Prefilter Bag
1 - Clutch Assembly Bag
1 - Throttle & Brake Linkage Bag
1 - Switch Dust Cover Bag
1 - Engine Mount Bag
1 - Fuel Line & Filter Bag
1 - Molded Toe-Angle Blocks Sprue
1 - Molded Miscellaneous Parts Sprue
1 - Antenna Tube
1 - Tools Bag
1 - Clear Polycarbonate Body w/Wing
1 - Decal Sheet
The different parts bags contain a number of small parts that are identified throughout this assembly manual. We don't suggest
opening the parts bags until you actually need to take a part out of them. This will prevent you from loosing any of the small parts. It
will also make it easier for you to identify the parts.
Need help or have any questions? Call us at 1-714-963-0329 or send us an Email at service@globalhobby.net
3
Page 4

SECTION 2: RECOMMENDED TOOLS AND SUPPLIES NEEDED
This section lists the recommended items you need to purchase and have on-hand to finish assembling and to run and maintain your
new XTM Racing X-Terminator Pro.
●
Fuel to Suit Your Engine
●
Glow Plug to Suit Your Engine
●
Paint and Materials for the Body
●
Assorted Metric Hex Wrenches
●
Needle Nose Pliers
●
Adjustable Wrench
●
Flat Head Screwdriver
●
Phillips Head Screwdriver
●
.21 Size Rear Exhaust Engine
w/SG-Style Crankshaft
Radio Control System with 1 50oz/in or More Torque
Servo for Throttle and Brake, and 1 100oz/in
or More Torque Servo for Steering
Wire Cutters
●
Rubbing Alcohol
●
Optional Differential Oil
●
Optional Shock Oil
●
Optional Shock Spring Sets
XTM Racing 5 Cell 1000Mah NiCD
Receiver Battery Pack (P/N 145801)
Associated Thread-Lock
Adhesive (P/N 588996)
12V Battery
(P/N 110171)
12V Charger
(P/N 110270)
XTM Racing 1/8th Scale
Starter Box (P/N 146055)
XTM Racing Air Filter
Oil (P/N 149571)
1/8th Scale Tires
to Suit Your Track
XTM Racing Mega-Stick
Tire Glue (P/N 145900)
XTM Racing 1/8th Scale
4-Way Wrench (P/N 146036)
Trinity "Final Solution"
After-Run Oil (P/N 843744)
XTM Racing Curved Lexan
Scissors (P/N 145945)
4
Visit our website at http://xtm.globalhobby.com or for Customer Service at http://globalservices.globalhobby.com
XTM Racing Glow Starter
w/Meter & Charger (P/N 146045)
XTM Racing Body
Reamer (P/N 146085)
XTM Racing
500cc Fueling Bottle
(P/N 145920)
Page 5
SECTION 3: ASSEMBLING YOUR X-TERMINATOR PRO
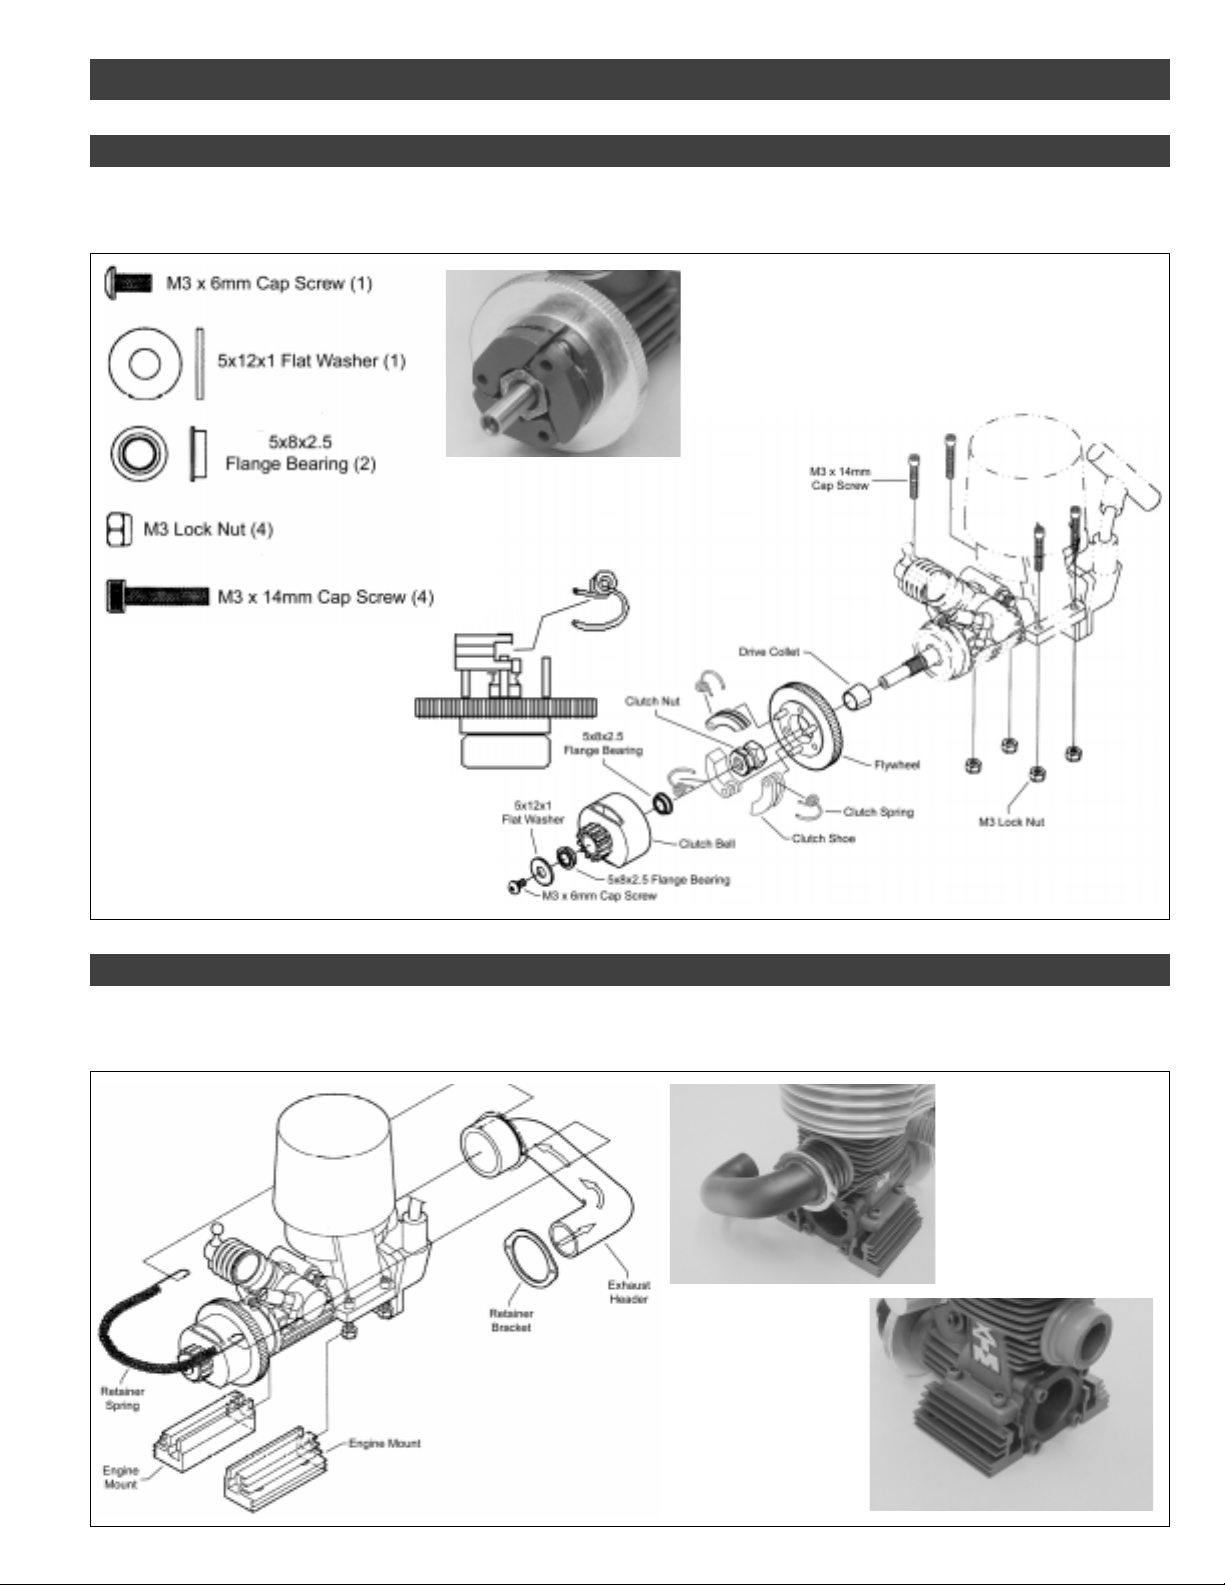
Step 1: Installing the Clutch Assembly
●
Install the flywheel, clutch shoes, clutch springs and clutch bell assembly onto your engine.
●
Temporarily install the M3 cap screw and lock nuts onto your engine mounting lugs in preparation for installing the engine.
Take your time when installing the clutch shoes and springs. This
is a high-performance clutch with very stiff springs. Patience is
necessary to get it installed properly. After installing the clutch
bell, make sure it spins freely. It should not drag over the clutch shoes.
*Note the direction the clutch shoes are installed.
Make sure that the long portion
of the clutch springs fit firmly in
the groove in the clutch shoes.
Install the flywheel and the
clutch nut before installing the
clutch shoes and springs.
Place the clutch shoes, with the clutch
springs, over the three pins on the flywheel.
Using a small screwdriver as a lever, bend
the short end of each clutch spring behind
the clutch nut and push the clutch shoes
down to snap them into place.
Tighten the clutch nut firmly.
Before installing the clutch bell, lightly sand the inside
surface of the clutch bell, using 600 grit sandpaper ,
then clean it thoroughly, using rubbing alcohol.
Doing this will allow the clutch shoes to "bite" better,
reducing clutch slipping.
For now, only partially thread the lock
nuts onto the cap screws.
Step 2: Installing the Engine Mounts & Exhaust Header
●
Temporarily slide the two aluminum engine mounts over the M3 lock nuts.
●
Install the exhaust header onto your engine, using the exhaust hanger spring and retainer bracket to hold it in place.
The retainer spring connects
to the retainer bracket and
wraps around the engine to
hold the exhaust header
firmly in place.
The exhaust header fits most .21 size round-port,
rear exhaust engines. If you're using a side exhaust
engine, after-market headers are available.
The flat sides of the hex nuts must line up with the
channel in the engine mounts, so that the engine
mounts can be slid into position. Do not tighten the
cap screws yet.
Need help or have any questions? Call us at 1-714-963-0329 or send us an Email at service@globalhobby.net
5
Page 6
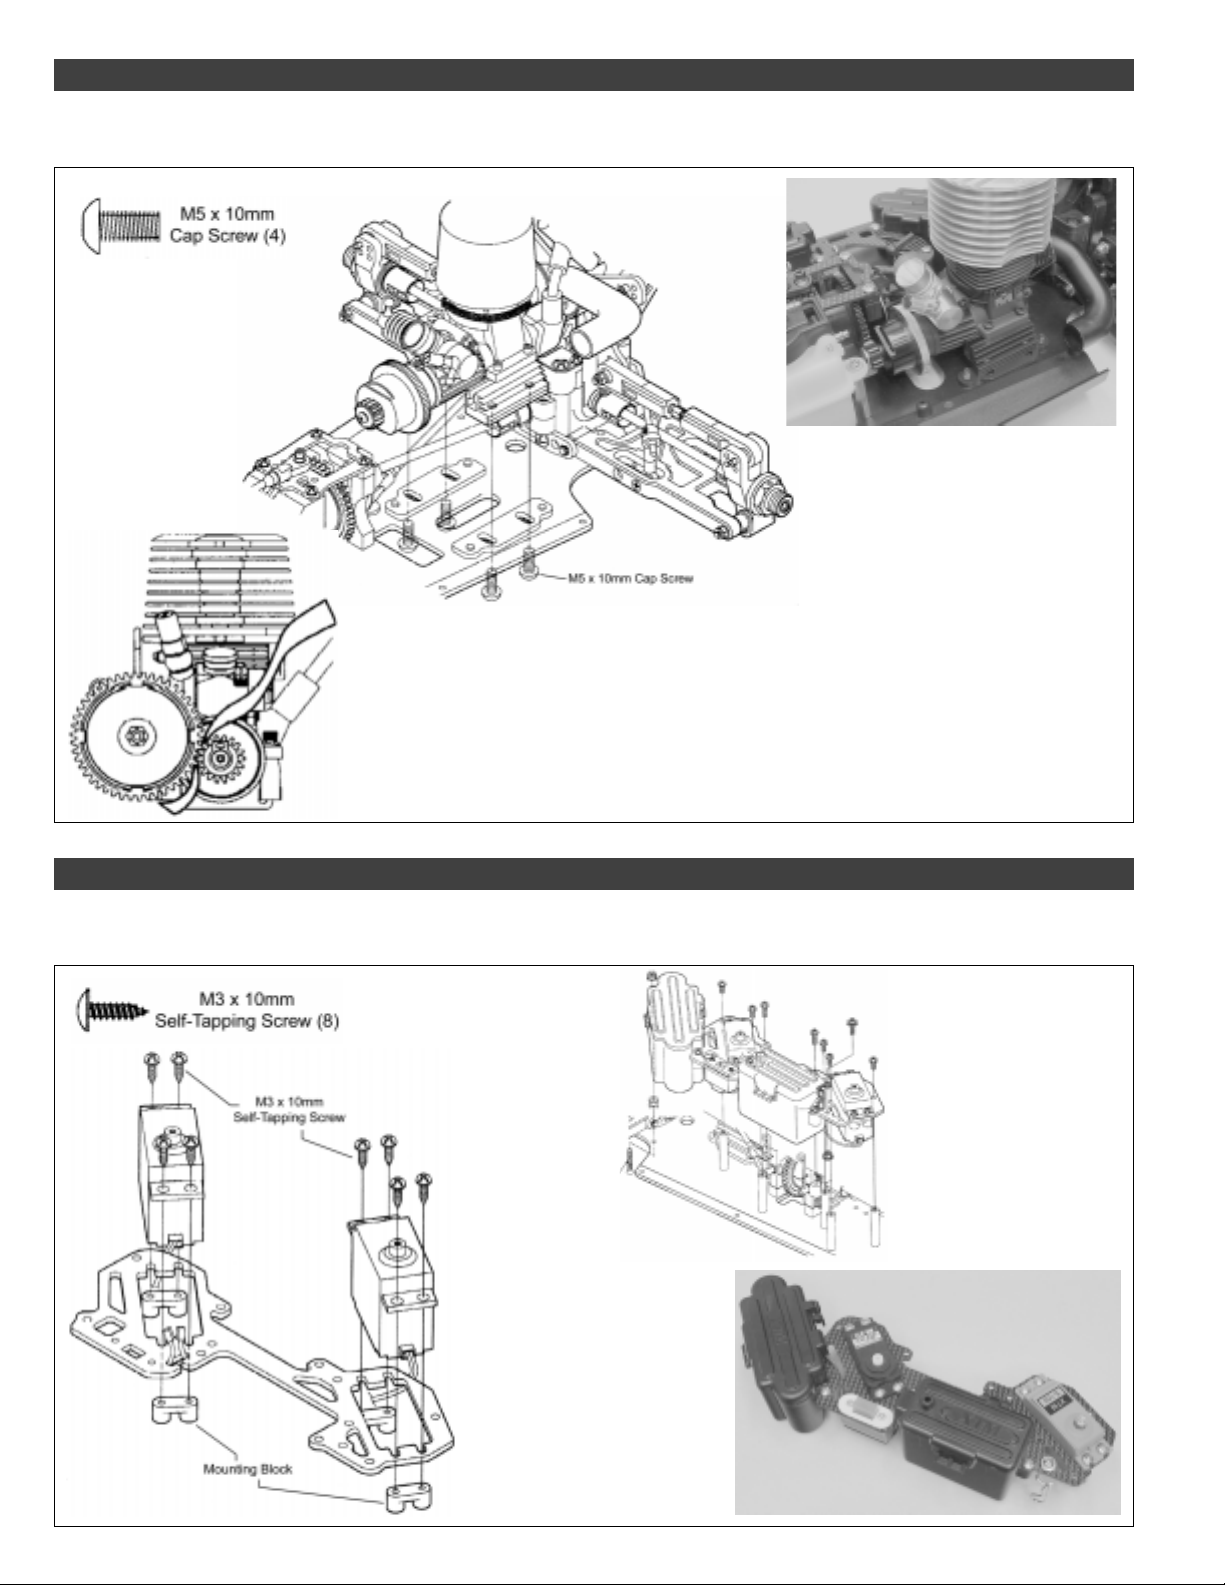
Step 3: Installing Your Engine Assembly
●
Install your engine to the chassis, taking care to ensure that the engine is lined up properly and that the gear mesh between the clutch
bell and the spur gear is correct. It's important that the gears do not bind.
Set your engine assembly onto the
chassis and temporarily hold it in place,
using the four M5 cap screws. Don't
tighten the cap screws yet, though.
With the engine mount assembly temporarily
in place, slide the engine back within the
mounts until the teeth on the clutch bell are
even with the spur gear. When satisfied with
the alignment, tighten the M3 cap screws to
secure the engine to the engine mounts.
With the wheels off the ground, you should be able to
To set the gear mesh, place a piece of notebook
paper between the clutch bell and the spur gear.
When set properly, there should be very slight
play between the gears. If the gears are too tight
they will bind and if they are too loose they will
strip out. When satisfied with the alignment,
tighten the M5 cap screws securely.
spin the clutch bell with your finger. The clutch bell
should rotate the spur gear and other drive-train
components rather easily. If it's difficult to rotate the
clutch bell, your gear mesh is likely too tight. Readjust
the gear mesh, making sure to use a piece of
notebook paper between the gears. When set
properly, the paper should be tightly crinkled, but not
ripped or punctured.
Step 4: Installing Your Servos and Switch
●
Install your throttle and steering servos and your switch harness into the carbon fiber radio deck. When you install your switch, make
sure to slide the silicone dust cover over the switch before installing it.
To make it easier to install your servos
and switch, we suggest removing the
radio deck from the chassis.
Install your switch, using the
mounting screws provided with
your switch. Don't forget to slide
the silicone dust boot over your
switch before installing it.
Use Lock-Tite on the machine
screws when reinstalling the
radio deck.
6
Visit our website at http://xtm.globalhobby.com or for Customer Service at http://globalservices.globalhobby.com
Page 7

Step 5: Installing Your Receiver and Battery
●
Install your battery into the battery box, then install your receiver into the receiver box.
The receiver and battery box covers have been preinstalled. You'll
need to remove them first before installing your receiver and battery.
When reinstalling the covers, be careful not to pinch the wires.
When reinstalling the covers,
make sure that they snap firmly
into place.
Slide the antenna into
one end of the plastic
antenna tube and out the
other end, then push the
end of the antenna tube
into the molded hole in
the top of the receiver
box cover.
Step 6: Installing the Steering Assembly
●
Install the servo arm onto your servo, making sure that it's centered, as shown in the photo. You'll need to first connect your radio
control system and turn it on to center the servo. Make sure that the steering trim lever on your transmitter is centered, too.
If necessary, you may need to cut off
the unused steering arm, using a pair
of wire cutters.
Three different servo arm adapters are included.
They are labeled for use with Hitec, Futaba and
Sanwa. Make sure that you use the correct
servo arm adapter for the particular brand of
servo you're using.
Secure the servo arm to your servo, using the retaining screw
provided with your servo.
Step 7: Assembling the Throttle and Brake Linkage
●
Assemble the throttle and brake linkage, paying careful attention to how the linkage wires are orientated and to the dimensions shown.
●
The linkage assembly is designed to be used with engines that feature a slide carburetor. If your engine features a rotary carburetor,
you will need to modify the linkage accordingly.
When fully assembled, the
throttle and brake linkage
should look like the one below.
A servo horn is not included. You
must use the servo horn included
with your radio control system.
Need help or have any questions? Call us at 1-714-963-0329 or send us an Email at service@globalhobby.net
Cut one arm from your servo
horn, as shown.
7
Page 8

Step 8: Installing and Adjusting the Throttle and Brake Linkage
●
Install the two linkage wires onto your engine's throttle arm and through the brake levers, then install the servo arm onto the servo,
making sure that it's centered, as shown. You'll need to first connect your radio control system and turn it on to center the servo. Make
sure that the throttle trim lever on your transmitter is centered, too.
●
We suggest waiting to make the final adjustments to the throttle and brake linkages until after you have completed assembly of the
buggy. The dimensions given below are rough starting points.
Secure the servo arm to your servo,
using the retaining screw provided
with your servo.
With the transmitter and receiver turned on, and the throttle and brake
trim lever centered, the spur gear should turn easily (i.e., the brakes should
be disengaged). If the brakes are dragging when the throttle trigger is at
neutral, the brake discs will wear out very quickly. To ensure that the brakes
are disengaged, always make sure that there is a small gap between the
linkage collars and the brake levers when the brake levers are in their
neutral position.
The X-Terminator Pro features a dual-disc brake design that allows each
brake disc to be set independently from the other. This means that you can
now have differential braking. Depending on your track conditions and
driving techniques, you might want the front brakes to engage before the
rear brakes or vice-versa.
Step 9: Air Filter Assembly and Installation
●
Assemble the air filter, making sure to wet the filter element, using air filter oil, so that small dust and debris cannot enter your engine
when it's running.
●
Install the air filter onto your engine, using a cable tie to secure it to the carburetor, then cut and install the prefilter element.
It's very important to oil
the white filter element to
trap small dust and debris.
Slide the gray prefilter sleeve
over the filter assembly, as
shown. This is the prefilter. Do
not oil it like you did the white
filter.
8
Visit our website at http://xtm.globalhobby.com or for Customer Service at http://globalservices.globalhobby.com
Page 9

Step 10: Tuned Pipe and Fuel Line Installation
●
Install the tuned pipe onto the header, using the silicone coupler and cable ties, then secure the tubed pipe to the tuned pipe mount.
●
Install the fuel lines to the carburetor, pressure nipple and fuel tank. Use the preinstalled clip to hold the fuel filter in place.
Tighten the grub screw firmly to secure
the tuned pipe to the tuned pipe
mount. If the grub screw is not in the
parts bag, it is likely already threaded
into the end of the tuned pipe.
The plain piece of fuel line should be connected from the pressure
nipple on the tuned pipe to the nipple on the fuel tank lid. One end
of the fuel line with the fuel filter attached should be connected to
Double-check that the lock nut and
screw that secure the tuned pipe
mount to the chassis are tight.
the fuel nipple on the carburetor and the other end should be
connected to the nipple on the back of the fuel tank.
Step 11: Mounting Your Tires and the Wheels
●
Carefully install the foam inserts that came with your tires into your front and rear tires, making sure that they lay flat within the tires.
It's important that they don't kink or cause the tires to bulge.
●
Carefully install your tires onto the wheels. You must glue the tires to the wheels, as shown below. Do not drive the X-Terminator Pro
without first gluing the tires to the wheels.
●
Install the front and rear wheels, making sure to tighten the wheel retaining nuts firmly.
After mounting the tire onto the
wheel, carefully glue the tire to the
wheel, using a good quality tire glue.
Tighten the wheel retaining
nuts firmly, using a
17mm diameter wrench.
Make sure that the tire
bead fits firmly into the
molded grooves in the
wheel.
Need help or have any questions? Call us at 1-714-963-0329 or send us an Email at service@globalhobby.net
9
Page 10

Step 12: Mounting the Body
●
Carefully cut out the clear body along the molded scribe lines, using a pair of Lexan scissors.
●
Using 220 grit sandpaper, carefully sand the edges of the body smooth and straight. Be very careful not to scratch the body during this
process.
●
Using a body reamer, cut out the holes in the top of the body for the three body posts and the receiver antenna tube to exit. These
locations are marked by molded dimples in the top of the body.
●
Carefully cut out the tuned pipe clearance notch in the left side of the body, the engine cooling hole in the front windshield and the
cylinder head clearance hole in the top of the body. Again, follow the molded scribe lines when making these cutouts.
●
Wash the inside of the body with warm water and non-abrasive liquid detergent to remove any chemicals left from the molding
process, then completely dry the body, using a soft cloth. After drying with a soft cloth, allow the body to air dry for a while.
●
Paint the inside of the body, using your favorite materials and methods. Do not paint the outside of the body.
●
After the paint dries completely, peel back and remove the protective plastic material from the outside of the body, then apply the
decals that are included to the body.
●
Secure the wing to the chassis, using the two nylon washers and long metal mounting clip provided.
●
Secure the body in place, using the two metal body clips provided - one long and one short.
The body comes with a thin, self-adhesive
protective covering attached to the outer
surface of the body. Leave this in place until
after painting the inside of the body, then
remove it before applying the decals.
Drawings represent general trimming, cutting, washing and painting steps. The X-Terminator Pro
body shape will differ, although the steps will generally be the same.
SECTION 4: PREPARING TO RUN YOUR X-TERMINATOR PRO
Now that you are done with the final assembly of your X-Terminator Pro, it's time to prepare your X-Terminator Pro for its first run.
Step 1: Final Assembly
Step 1: Range-Checking Your Radio System
To prevent any chance of a runaway vehicle, your radio system should be range-checked before the first run of the day and/or after a
crash. Your radio control system instructions may have similar procedures. To range-check your radio system, do the following:
❑ With the transmitter and receiver turned on, extend the transmitter antenna completely.
✦✦
✦IMPORTANT
✦✦
✦✦
✦ Remember to always turn on the transmitter first, then turn on the receiver.
✦✦
❑ With the X-Terminator Pro on the ground (without the engine running) walk away from it about 150 feet. Move the steering wheel
while looking at the vehicle's wheels. The wheels should pivot back and forth as you rotate the steering wheel back and forth.
✦✦
✦WARNING
✦✦
✦✦
✦ Never attempt to operate your X-Terminator Pro if your radio control system is not functioning properly. Doing so could
✦✦
be harmful to others around you and/or to you or your car.
10
Visit our website at http://xtm.globalhobby.com or for Customer Service at http://globalservices.globalhobby.com
Page 11

Step 2: Double-Check the Steering and Throttle and Brake Controls
❑ With the transmitter and the receiver turned on, rotate your
transmitter's wheel forward (to the right). The front wheels on the
X-Terminator Pro should turn right.
✦✦
✦IMPORTANT
✦✦
reversing switch on your transmitter to change the direction.
❑ Rotate your transmitter's wheel backward (to the left). The front
wheels on the X-Terminator Pro should turn left. Let go of the wheel.
The X-Terminator Pro's wheels should return to center.
✦✦
✦IMPORTANT
✦✦
after you return the steering wheel to center, move the steering trim
lever on your transmitter to adjust the wheels so that they point
straight ahead.
❑ Carefully pull the air filter assembly off of your engine's carburetor.
❑ Pull back on your transmitter's throttle trigger. The carburetor barrel
should open completely and both brakes should be disengaged.
❑ Let go of your transmitter's trigger and the carburetor barrel should
return to its idle position - open about 1/16". Both brakes should still be
disengaged.
✦✦
✦ If the wheels don't turn right, flip the steering servo
✦✦
✦✦
✦ If the wheels do not point straight ahead (center)
✦✦
✦✦
✦IMPORTANT
✦✦
pull back on the trigger, flip the throttle servo reversing switch on
your transmitter to change the direction.
If the carburetor barrel does not open completely, move the throttle
trim lever on your transmitter until the barrel is opened completely
when you pull back completely on the trigger.
❑ Push your transmitter's throttle trigger forward. The carburetor
barrel should stay in the idle position and both brake levers should
move forward and engage the brakes.
❑ Let go of the trigger and both brake levers should disengage.
✦✦
✦IMPORTANT
✦✦
page # 15 "Adjusting the Brake Linkage" for more details.
❑ Turn off your transmitter and receiver for now and push the air
filter back onto your carburetor. Never run your X-Terminator Pro
without the air filter in place. If you don't use the air filter, your engine
will be damaged within a short period of time.
✦✦
✦ If the carburetor barrel does not open when you
✦✦
✦✦
✦ If you need to adjust the brake linkage, see
✦✦
Need help or have any questions? Call us at 1-714-963-0329 or send us an Email at service@globalhobby.net
11
Page 12

SECTION 5: FUELING AND STARTING YOUR ENGINE
The following procedures show the general way to start a nitro engine mounted in the XTM Racing X-Terminator Pro. The starting
procedures for your particular engine may differ. Make sure you are familiar with the starting and running procedures for your engine.
✦✦
✦IMPORTANT
✦✦
prevents dust and debris from entering the engine and damaging it.
❑ Using your glow plug wrench, install and tighten a glow plug into your engine's cylinder head.
✦✦
✦ Under no circumstances should you operate your engine without the air filter installed. The air filter
✦✦
❑ Lift the fuel tank lid and carefully fill the fuel tank until the fuel level is just below the top
of the tank.
✦✦
✦WARNING
✦✦
USE GASOLINE!
❑ Connect a fully-charged glow starter to the top of the glow plug, making sure that the
glow starter is locked firmly onto the top of the glow plug. You don't want it to fall off while
you're trying to start your engine.
❑ Carefully start your engine, using your starter box or other favorite method.
The X-Terminator Pro's fuel tank does not feature a primer pump. This is consistent
☞
with most 1/8th scale buggies. If you're using a starter box to start your engine, the starter
box will spin the engine over fast enough to draw fuel on its own.
✦✦
✦ Use fuel that is appropriate for nitro car and buggy engines. DO NOT
✦✦
❑ To stop your engine, carefully pinch the fuel line firmly with your fingers until the
engine stops. Make sure to pinch the fuel pick-up line and not the fuel pressure line. The
fuel pick-up line is connected to your carburetor.
Hold your buggy while pinching the fuel line. When you pinch the fuel line, the engine
☞
will speed up and quickly stop.
✦✦
✦WARNING
✦✦
they will be hot.
✦✦
✦ Be careful not to touch any parts of the engine or tuned pipe because
✦✦
SECTION 6: MAKING CHASSIS ADJUSTMENTS
Chassis alignment and geometry are important if you want your X-Terminator Pro to perform well. A good performing buggy means a
buggy that is easier to drive, too. Follow our guidelines in this section to get the most out of your X-Terminator Pro.
✦✦
✦IMPORTANT
✦✦
each side. For example, if you change the camber angle on the right front tire, you should change the camber angle on the left front
tire the same amount. If you change the spring tension on the left front shock, you should change the spring tension on the right
front shock the same amount, and so on.
Do not make any changes that are more than 3 degrees from the initial settings listed or the handling characteristics of your buggy will
become very poor.
✦✦
✦ It's very important when making changes to the settings of your buggy that you make the settings the same for
✦✦
12
Visit our website at http://xtm.globalhobby.com or for Customer Service at http://globalservices.globalhobby.com
Page 13

Step 1: Adjusting the Toe Angle
The toe angle is the angle of both front tires (or rear tires) to each other, when viewed from above. Toe-in is when the front of both tires
point toward each other and toe-out is when the front of both tires point away from each other.
●
For the front tires, toe-in will make your buggy track straighter, but the steering will be more sensitive. Toe-out will desensitize the
steering, making your buggy a little more driver-friendly.
●
For the rear tires, if you're running on a smooth surface, we suggest no toe-in. If you are running on a rough surface, we suggest about
1 - 2 degrees of toe-in. This will give the rear end a little more "bite."
Toe Angle Exaggerated for
Photo Clarity
RECOMMENDED INITIAL SETTINGS:
●
0 degrees toe-in on the front and rear for overall best 4WD driveability on most surfaces.
Adding more than 3 degrees of toe-in or toe-out will result in excessive loss of speed
☞
and erratic handling.
✦✦
✦IMPORTANT
✦✦
✦✦
✦ For more precise toe-in adjustments, use the R.P.M. Toe-in Gauge
✦✦
part # 708049.
To adjust the toe-angle of the front tires, turn the tie-rods (steel rods connecting each wheel to the steering arm) in or out with an
adjustable wrench. To adjust the toe angle of the rear tires, you need to replace the toe angle block, using the reference below:
To adjust the toe-in on the rear tires, use one of the different composite toe angle blocks
provided in your kit to set the desired toe angle. For convenience, the degree of toe angle
in each block is molded into the back of the blocks.
To change the rear toe angle block, carefully remove the two C-Clips holding the rear
hinge pins in place. Next, remove the two screws that hold the toe angle block in place.
Replace the toe-angle block with the desired one. Installation is the reverse of the
disassembly procedure.
Step 2: Adjusting the Camber Angle
Camber is referred to as the amount of the tire's surface that contacts the ground. Tires that are exactly perpendicular to the ground
have 0 degrees of camber. If the top of the tire leans in toward the chassis, the tire has negative camber. If the top of the tire leans out
away from the chassis, the tire has positive camber.
RECOMMENDED INITIAL CAMBER SETTINGS:
●
For driving on smooth surfaces set both the front and back wheels at 0 degrees.
●
For driving on rough surfaces set the front wheels at -1 degree and the back wheels at -2 degrees.
Negative Camber
Exaggerated for
Photo Clarity
Positive Camber
Exaggerated for
Photo Clarity
Camber settings should be measured
☞
with the vehicle at its normal ride height.
✦✦
✦IMPORTANT
✦✦
camber adjustments, use the R.P.M.
Precision Camber Gauge part # 708099.
Negative Camber
Positive Camber
Adjust the camber angle of the wheels by turning the upper turnbuckles in or out using an adjustable wrench.
Need help or have any questions? Call us at 1-714-963-0329 or send us an Email at service@globalhobby.net
✦✦
✦ For more precise
✦✦
13
Page 14

Step 3: Adjusting Shock Spring Tension
By adjusting the spring tension of the shocks, you can increase steering sensitivity and increase the ride-height of your buggy. How you
drive your buggy will dictate what settings you should be using. As an example, if you're using your buggy off-road and going over lots
of jumps, you may want to increase the spring tension of the front shocks to help prevent the front of the buggy from bottoming out.
RECOMMENDED INITIAL SETTINGS:
●
We recommend initially leaving the adjustment rings in the factory locations.
Increase or decrease spring tension by threading the adjustment ring up or down the
shock body. Threading the ring down increases spring tension and the buggy's ride height
and threading the ring up decreases spring tension and the buggy's ride height.
When adjusting the spring tension, make sure to adjust the right and left sides equally.
☞
Step 4: Adjusting Shock Dampening and Replacement Shock Springs
Changing the shock oil (the oil inside the shocks) will change the dampening characteristics of the shocks. Typically, if you are running
on smooth surfaces, use a heavier weight oil. If you are running on rough surfaces, use a lighter weight oil.
✦✦
✦IMPORTANT
✦✦
shocks is good for most off-road applications.
Shock springs are easy to change and can make a difference in the way your buggy handles relative to the type of terrain you're running
on. If you run your buggy off-road, in a smooth, high-traction area, use stiffer springs to reduce body roll and weight shift. If the area
where you run your buggy is very bumpy, you might consider using softer springs to help absorb the bumps. If the area is bumpy and you
use harder springs, the buggy will have a tendency to jump and hop around. The shock springs included with the X-Terminator Pro are
suitable for most general off-road applications, but experimentation with different shock springs may be necessary to find a setup that
suits your particular driving style and location.
✦✦
✦ We recommend using only 100% Silicone Shock Oil. Do not use motor oil. The shock oil in the X-Terminator Pro's
✦✦
Step 5: Adjusting the Brake Linkage
The X-Terminator Pro uses a dual-disc brake system that can operate the front and rear brakes independently. This design allows you
to set up differential braking. Depending on your track conditions and driving techniques, you might want the front brakes to engage
before the rear brakes or vice-versa.
With the transmitter and receiver turned on, and the throttle and brake trim lever centered,
the buggy should roll smoothly (i.e., the brakes should be disengaged). If the brakes
are dragging when the throttle trigger is at neutral, the brake discs will wear out very
quickly. To ensure that the brakes are disengaged, always make sure that there is a 1/16"
wide gap between the two rear adjustment collars and the brake levers. Both adjustment
collars should be adjusted so that they are equal distance behind each of the two brake
levers (see important note below). This will ensure that both brake levers engage equally
during braking.
●
To make adjustments to the brake linkage, simply loosen the grub screw in the
adjustment collar behind each brake lever and reposition it, then retighten the grub screw.
✦✦
✦IMPORTANT NOTE
✦✦
rear brakes to engage at the same time. If you want the rear brakes to engage just before the front brakes, move the collar at the front
brake lever just a fraction further back from neutral. This will result in the back brakes engaging just before the front brakes. If you
want the front brakes to engage just before the rear brakes, move the collar at the rear brake lever just a fraction further back from
neutral. This will result in the front brakes engaging just before the back brakes. Experimentation will be necessary to achieve the
desired braking response, dependant on your track conditions and driving style.
14
✦✦
✦ Since the front and rear brakes can be adjusted independently of each other, you may not want both front and
✦✦
Visit our website at http://xtm.globalhobby.com or for Customer Service at http://globalservices.globalhobby.com
Page 15

Step 6: Adjusting the Front and Rear Differentials
The X-Terminator Pro features front and rear gear differentials that each feature five o-ring seals and cup-style housings. Both differentials
are packed with differential grease that is good for most driving conditions.
You can make fine-tuned adjustments to each differential by removing the differentials from the chassis, opening them up and replacing
the grease already inside the differentials with heavy-weight silicone shock oil. Removal, disassembly and reinstallation of the differentials
can be done, using the exploded parts diagram included with your kit.
●
Adding heavier silicone oil will tighten the differentials and adding lighter silicone oil will loosen the differentials. If your buggy feels
loose during turns, you can tighten the front differential or loosen the rear differential. If your buggy is pushing during turns, you can
loosen the front differential or tighten the rear differential. We recommend using silicone shock oil weights between 30,000 and 100,000.
✦✦
✦WARNING
✦✦
remove, disassemble and reassemble gear differentials. If you don't reassemble the differentials properly, damage to the differentials
will happen quickly and will not be covered by warranty.
Step 7: Changing the Rear Sway Bar
Out of the box, the X-Terminator Pro has a stiff sway bar installed. This sway bar will give good performance in most conditions. We
have included a more flexible sway bar should you want to change it.
✦✦
✦ We don't recommend attempting to make adjustments to the differentials unless you have knowledge of how to
✦✦
To remove the stock sway bar, first loosen the grub screws in the collars at each end of the
sway bar. Next, remove the four screws that hold the sway bar block in place, then
remove the sway bar block and pull the sway bar out. Replace the sway bar with the more
flexible one. Installation is the reverse of the disassembly procedure.
For your convenience we've included a
maintenance list, along with an extensive
troubleshooting guide on the next few pages.
If you need to purchase replacement parts for your
X-Terminator Pro, please check the information
listed on the back page of this Assembly Manual
and Tuning Guide.
Need help or have any questions? Call us at 1-714-963-0329 or send us an Email at service@globalhobby.net
15
Page 16

SECTION 7: MAINTAINING YOUR X-TERMINATOR PRO
Following a simple maintenance schedule will ensure that your X-Terminator Pro, engine and radio system operate in top condition
every time you use them. It is strongly suggested.
●
Check the foam air filter element for dirt blockage. If the foam
is dirty, remove it from the filter housing and wash it in liquid soap
and warm water. Dry the foam element with a paper towel,
reinstall it and "wet" it with after-run oil.
●
Check the chassis for any loose screws, especially the engine,
tuned pipe and outdrive cup mounting screws. Tighten them if
necessary.
●
Check the steering linkage and the throttle and brake linkage
for any signs of wear or misalignment. Tighten and/or readjust
them if necessary.
●
Once in a while, remove the wheels and clean the wheel bearings
using a bearing cleaner. This will remove any dust and grit that
may, over time, damage the bearings. After cleaning the
bearings, re-oil them using a good quality bearing oil. Never run
the bearings dry or damage to the bearings will result.
●
Check the fuel system, including the fuel tank and fuel lines,
for any signs of cracking or looseness. Replace any fuel line you
suspect may be damaged.
●
Periodically check the condition of the transmitter and receiver
batteries. If you think they might be low, replace them with a
fresh set and/or recharge them.
●
Included in your kit is a plastic sprue that includes some plastic
replacement parts. Included are fuel line clips, throttle linkage
mounts and other small accessories.
●
After a period of time the chassis will accumulate a lot of dirt
and debris, especially around the engine area. This build-up
should be cleaned off using a high-powered spray cleaner like
Emerald Nitro Car Cleaner. Some nitro car cleaners will damage
anodized and/or plated parts. Test on an inconspicuous
area first.
●
After cleaning the chassis and engine with Nitro Car Cleaner
you should oil the moving parts of the chassis. Do not oil the
clutch bell, spur gears or the brake discs.
●
Always use new fuel and keep the cap on the fuel tightly closed.
As fuel ages it absorbs water, which degrades the fuel's performance
and causes erratic engine operation.
●
After you have finished using the engine for the day, remove
the glow plug and squirt several drops of a high-quality after-run
oil into the cylinder. Reinstall the glow plug and crank the engine
over a couple of times (without the glow starter attached) to
distribute the oil. This will prevent corrosion inside the engine.
●
Never leave unused fuel in the fuel tank for more than a couple
of days. The nitromethane and methanol in the fuel will
evaporate, leaving the oil behind. This will eventually turn into a
thick sludge that will require replacement of the fuel tank to fix.
16
Visit our website at http://xtm.globalhobby.com or for Customer Service at http://globalservices.globalhobby.com
Page 17

SECTION 8: TROUBLESHOOTING GUIDE
This troubleshooting guide has been provided to help you diagnose and solve most problems that you may encounter with your X-Terminator
Pro. Most problems encountered can be solved by carefully following the problem-cause-solution sections. If you cannot solve the
problem using this troubleshooting guide, please feel free to contact us at the address, phone number or email address shown on the
second page of this Assembly Manual and Tuning Guide.
PROBLEM CAUSE SOLUTION
1) Vehicle pulls to one side A) Steering trim out of adjustment A) Readjust trim to center both wheels
B) Toe angle out of adjustment B) Readjust toe angle
C) One wheel is hanging or has damaged bearing C) Remove wheel and clean bearing. Replace if necessary
2) Brakes seem ineffective A) Brake linkage out of adjustment A) Readjust brake linkage
B) Brake disc(s) worn B) Replace brake disc(s)
3) Clutch does not engage A) Clutch shoes damaged or worn A) Replace clutch shoes
B) Clutch bell damaged or worn B) Replace clutch bell
4) Clutch does not disengage A) Clutch springs worn or damaged A) Replace clutch springs
5) Buggy does not "go" A) Stripped spur gear A) Replace spur gear
B) Stripped differential gear(s) B) Replace differential gear(s)
C) Clutch shoes slipping D) C lean clutch bell as described on page # 6 and
carefully remove any "glaze" from the clutch
shoes, using the same method
6) Suspension not smooth or free A) One or more shocks sticking A) Clean and/or rebuild the affected shock
B) Bent shock shaft B) Rebuild affected shock
C) Bent or otherwise damaged hinge pin C) Replace hinge pin
7) Shocks leaking oil A) Shock seals worn A) Replace shock seals
B) Bent shock shaft B) Rebuild affected shock
8) Brakes are ineffective A) Brake linkage out of adjustment A) Readjust brake linkage as described on page # 14
B) Brake disc(s) worn or damaged B) Replace brake disc(s)
9) Spur gear strips out A) Gear mesh too loose A) Replace spur gear and readjust gear mesh as
described on page # 5
10) Vehicle rolls while engine A) Engine idle is too high A) Lower your engine's idle speed
is idling
Need help or have any questions? Call us at 1-714-963-0329 or send us an Email at service@globalhobby.net
17
Page 18

18
Visit our website at http://xtm.globalhobby.com or for Customer Service at http://globalservices.globalhobby.com
Page 19

Need help or have any questions? Call us at 1-714-963-0329 or send us an Email at service@globalhobby.net
19
Page 20

IMPORTANT WARRANTY INFORMATION - PLEASE READ!
Your XTM Racing X-Terminator Pro is warranted against manufacturer defects in materials and workmanship for a period of 90 days
from the date of purchase. Warranty service will be provided within 90 days of the date of purchase only if you are able to provide the
original or a copy of the original dated sales receipt.
IMPORTANT WARRANTY SERVICE INFORMATION
Before returning your X-Terminator Pro for warranty consideration, the status of the unit must be within the guarantee as stated above.
Do not return your X-Terminator Pro to the place of purchase. They are not authorized or equipped to perform warranty work on XTM
Racing products. When requesting warranty service, please observe the following:
●
Crash damage will not be covered under warranty. Do not request warranty service for a crash-damaged product.
●
This warranty only covers the XTM Racing X-Terminator Pro only. It does not cover your own engine or radio control system. Please
remove your engine, radio control system and batteries from the chassis before sending the product to us.
●
Include a note detailing the problem or service you are requesting. Service cannot be provided without this information. Include your
daytime phone number, shipping address and/or email address in the event we need more details pertaining to the service requested.
●
If your vehicle is out of the warranty period you may request an estimate of services at the time you return your vehicle for service. An
omission of this request implies permission for Global Services to service your vehicle at our discretion.
●
Include a method of payment for any service charges.
●
Send the unit to us by United Parcel Service, Federal Express or by Insured Mail. Postage is non-refundable. Send your package to:
Global Services
18480 Bandilier Circle
http://globalservices.globalhobby.com
Visit Our Website
Fountain Valley CA 92708
Phone: (714) 963-0329 Fax: (714) 964-6236 Email: service@globalhobby.net
PURCHASING REPLACEMENT PARTS
Included with your X-Terminator Pro is a separate booklet listing all of the replacement parts that are available, along with their
respective part numbers. Replacement parts are available through your local authorized XTM Racing dealer or directly from us.
To locate the dealer nearest you, please call us at (714) 963-0133 or visit our dealer directory on the Internet at
www.globalhobby.com/where2buy.htm
or Order Directly From Us at the Address, Phone Number or Web Site Shown Above
20
Visit our website at http://xtm.globalhobby.com or for Customer Service at http://globalservices.globalhobby.com
 Loading...