

Page 1

READY-TO-FLY MICRO-ELECTRIC HELICOPTER
EF Helicopters presents a new ready-to-fly helicopter, the Sabre. Big on performance and small in size, this new helicopter fills a
direct need for people interested in real helicopter flight who need a small and simple-to-operate machine that is affordable. The
Sabre is built and ready to fly right from the box. The integrated receiver, mixer, gyro and twin ESC assembly is factory-installed as
are the servos. This helicopter is 99% assembled out of the box. All you have to do is charge the flight battery with the included
110V AC wall charger and install 8 AA Alkaline batteries (sold separately) into the transmitter and you're ready to fly!
The Saber features a simple fixed-pitch head and lifting rotor blades for low head speed. This makes the Sabre easy to operate and
very durable for those “rough landings”. For those “seriously rough landings," EF Helicopters supports the Sabre with a complete
line of replacement parts.
Fly it indoors, fly it on calm days outdoors. The Sabre is fun, tough, and a great way to learn to fly and enjoy true R/C helicopter
performance.
FINAL ASSEMBLY and SETUP GUIDE
SPECIFICATIONS AND FEATURES:
The EF Helicopters Sabre RTF Micro-Electric Helicopter
is distributed exclusively by:
Global Hobby Distributors
18480 Bandilier Circle, Fountain Valley, CA 92708
●
Rotor Span: 20 Inches (51 Centimeters)
●
Length: 18.5 Inches (46.9 Centimeters)
●
Weight RTF: 10 Ounces (285 Grams)
●
Motor: 370 Electric (Included)
●
Battery: 7 Cell 650mAH NiMH (Included)
All contents copyright © 2004-2005, Global Hobby
Distributors Version V2.0 January 2005
●
99% Assembled Out of the Box
●
Lightweight, Strong Airframe
●
Includes Four-Channel 72Mhz Transmitter
●
Separate Main Rotor Motor and Tail Rotor Motor
●
Integrated Receiver, Mixer, Gyro and Twin ESCs
●
Composite-Molded Airframe
1
Kit Product Number 163130
Page 2

TABLE OF CONTENTS
Safety Warnings ....................................................................................2
Customer Service Information ..............................................................3
Parts Identification ................................................................................ 3
Recommended Items ............................................................................4
Becoming Familiar with Your Sabre RTF Micro-Electric Helicopter ........ 4
Helpful Hints from the Pros ................................................................... 5
Installing the Antenna and Transmitter Batteries .................................6
Installing the Flight Battery ................................................................... 7
Setting Up Your Sabre RTF Micro-Electric Helicopter .........................9
Getting Ready to Fly Your Sabre RTF Micro-Electric Helicopter ........... 12
Sabre RTF Micro-Electric Helicopter Preflight Recommendations ............ 13
Flying the Sabre RTF Micro-Electric Helicopter - The Basics ................14
Troubleshooting Guide ........................................................................ 15
Sabre RTF Exploded View Drawing ...................................................16
Sabre RTF Micro-Electric Helicopter Replacement Parts ................. 18
Warranty Service Information .............................................. Back Cover
SAFETY WARNINGS
This R/C helicopter is not a toy! If misused or abused, it can cause serious bodily injury and/or damage to property. Fly only in
open areas and preferably at a dedicated R/C flying site. We suggest having a qualified instructor carefully inspect your
helicopter before its first flight. Please carefully read and follow all instructions included with this helicopter, your radio control
system and any other components purchased separately.
●
GENERAL WARNINGS
●
Just because the Sabre is powered by an electric motor
doesn't mean that you shouldn't exercise caution when flying
and operating it. You must use the same amount of caution
during use as when flying and operating a glow-powered helicopter.
●
We strongly suggest that when you first begin flying the
Sabre that you perform only basic maneuvers, such as hovering,
until you are more familiar with the setup and flight characteristics
of the helicopter. This will give you time to feel comfortable
with the way the helicopter reacts to control inputs and power.
●
You must be cautious when plugging the flight battery into
the helicopter. Unlike glow-powered helicopters that use a clutch
assembly to allow the engine to idle without the rotor blades
spinning, an electric helicopter features no such clutch. You
must be sure that your transmitter is turned on and the throttle
control stick and throttle trim lever are pulled all the way back
before plugging in the flight battery. This will prevent any chance
of the rotor blades spinning and harming you while plugging in
the flight battery.
●
Do not fly your helicopter if another model is on the same
frequency as you. The frequency number is printed on the
transmitter and the helicopter.
●
Never fly your helicopter from the street or at night. Always
fly in an open area free of obstructions.
●
When flying, make sure any spectators are behind you.
●
Always be conscious of the rotor blades. Be careful not to
allow loose clothing to be drawn into the rotor blades.
●
Because your helicopter is operated by radio control, it is
important to make sure you are always using fresh and/or fully
charged batteries. Never allow the batteries to run low or you
could lose control of the helicopter.
Do not allow any of the electrical components to get wet or
electrical damage may occur.
●
You should complete a successful range check of your radio
equipment prior to each new day of flying, or prior to the first
flight of a new or repaired model.
●
If your helicopter gets dirty, do not use any solvents to clean
it. Solvents may damage the plastic and composite parts.
FLIGHT BATTERY WARNINGS
●
Never overcharge the flight battery or damage to the flight
battery may occur.
●
To prevent the flight battery from overheating during the
charging process, allow the flight battery to completely cool
before recharging it.
●
Always completely discharge the flight battery by running
the motor until it stops before recharging the flight battery.
●
Always remove the flight battery from the helicopter before
recharging the flight battery.
RADIO SYSTEM WARNINGS
●
Always turn on the transmitter before plugging in the flight
battery and always unplug the flight battery before turning off
the transmitter.
●
Always unplug the flight battery when not flying the helicopter.
●
Never cut the receiver antenna shorter or you could lose
control of the helicopter during flight.
●
When flying the helicopter, make sure that the transmitter
antenna is completely extended and is pointed up toward the
sky, not down toward the ground.
● Never attempt to disassemble or modify any of the radio
system components.
2
Page 3
CUSTOMER SERVICE INFORMATION
If you should find a part missing or damaged, or have any questions about assembly, please contact us at the address below:
Check out our website for more information on
Global Services
18480 Bandilier Circle
Fountain Valley, CA 92708
Phone: (714) 963-0329 Fax: (714) 964-6236 Email: service@globalhobby.net
CHECK IT OUT! We urge you to come check out our website at http://globalservices.globalhobby.com. There you will find public
message boards frequented by other EF Helicopters product owners and the EF Helicopters support staff. This is a great place to learn
about new products, get help and suggestions for your current EF Helicopters products or just simply hang out and chat with people that
share your same interests.
To enable us to better serve your needs, please include your email address with any correspondence you send to us. Your email
address will be added to our Customer Service Database so you will automatically receive free updates and tech notices for your
particular product. You will also receive repair status updates (if applicable) and other important information about your product
as it becomes available.
IMPORTANT INFORMATION ABOUT YOUR EMAIL ADDRESS
Global Hobby Distributors will not disclose the information it collects to outside parties. Global Hobby Distributors does not sell,
trade, or rent your personal information to others . Your privacy is important to us.
this and other exciting EF Helicopters products!
http://ef.globalhobby.com
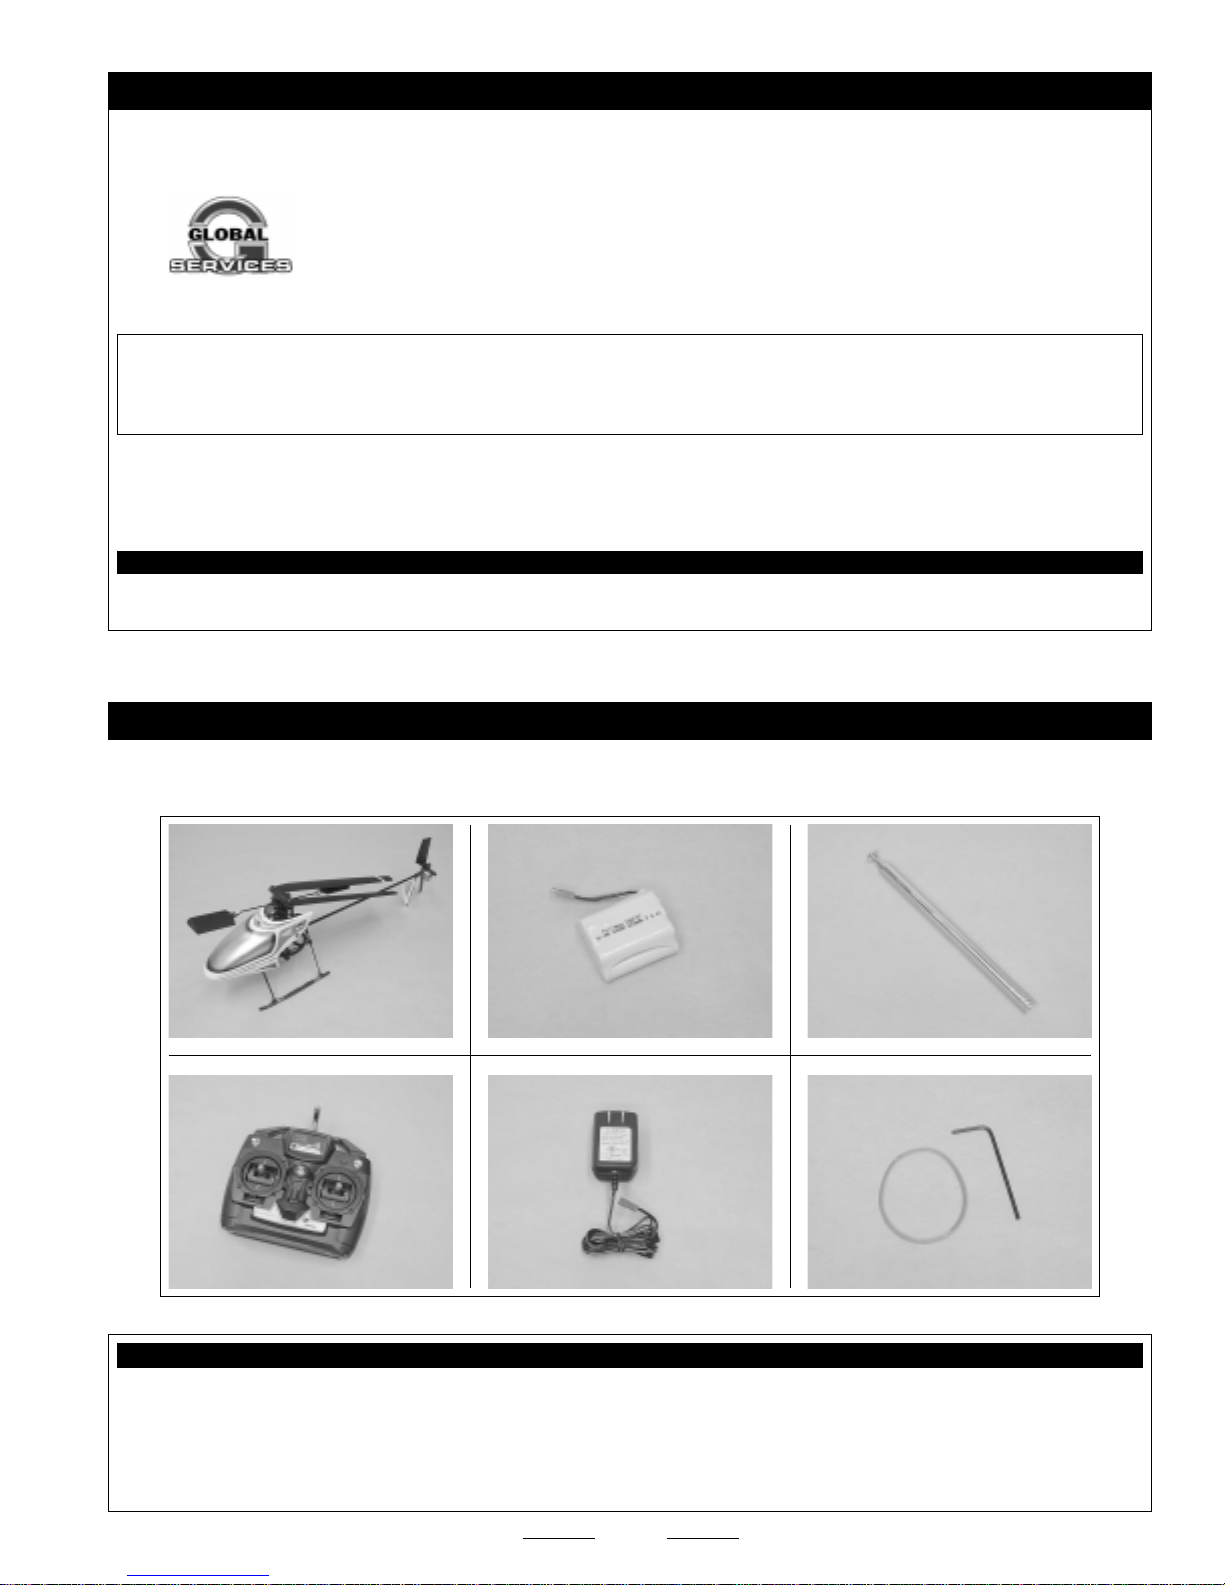
PARTS IDENTIFICATION
Before beginning final assembly, remove the different parts from the box and use the photos below to verify that your kit contains all
of the correct parts. If your kit is missing a part, please contact us immediately, using the Customer Service Information above.
EF Helicopters guarantees this kit to be free from defects in both material and workmanship at the date of purchase. This does not cover any
component parts damaged by use, misuse or modification. In no case shall EF Helicopter's liability exceed the original cost of the
purchased kit.
In that EF Helicopters has no control over the final assembly or material used for final assembly, no liability shall be assumed for any damage
resulting from the use by the user of the final user-assembled product. By the act of using the final user-assembled product, the user accepts all
resulting liability.
OUR GUARANTEE
3
Page 4
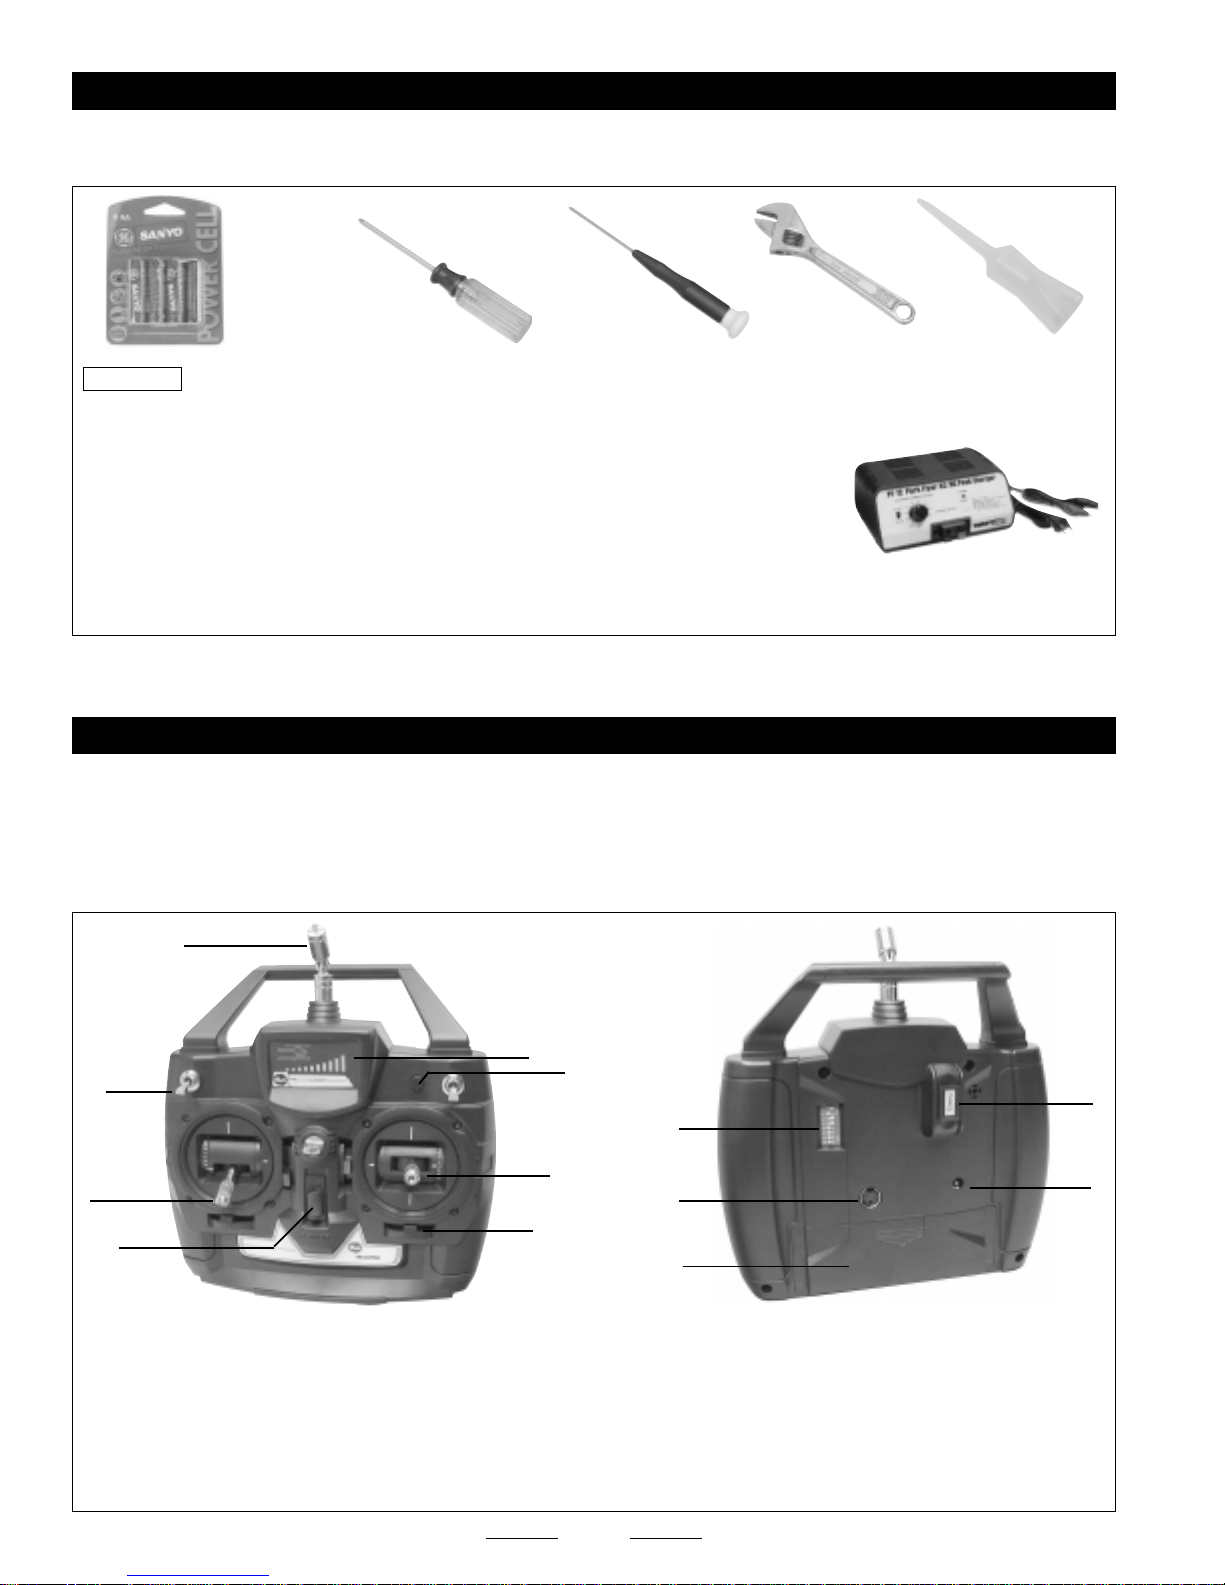
RECOMMENDED ITEMS
This section lists the items that are not included in your kit that you will need to fly and maintain your new Sabre RTF Micro-Electric
Helicopter. As you can see, there's not much to it!
PRO TIP
# 1 Phillips Head
Screwdriver
8 Pack Trinity "Sanyo"
AA Alkaline Batteries
(Part # 837801)
# 0 Phillips Head
Screwdriver
The Sabre RTF Micro-Electric Helicopter includes a 7 cell Nickel Metal-Hydride flight battery and a 110V AC 2.5
Adjustable
Wrench
Lightweight
Machine Oil
hour wall charger to charge the flight battery. If you want to, you can purchase a second flight battery (P/N 165070) so you have
two. That way, you can take two fully-charged flight batteries with you to fly. That means twice as much flying fun!
We also sell a high-performance quick-charger that can charge the flight battery in about 30
minutes and is powered from your car's 12 volt DC battery or from a 110V AC wall outlet. This
enables you to charge the flight battery at the flying field, so you can fly as many times during
the day as you want.
For learning to fly, try our Training Gear (P/N 165251). The Training Gear attaches to
the landing skids and therby extends the landing gear, and adds protection and
Wattage PF-12 AC/DC Peak Charger
Part # 130108
stability to the helicopter during takeoff and landing.
BECOMING FAMILIAR WITH YOUR SABRE RTF MICRO-ELECTRIC HELICOPTER
Each transmitter comes with a sticker on the back showing which frequency in the 72Mhz band that the radio control system operates
on. The 72Mhz band is for aircraft and helicopter use only, so it's important to check the frequency if others are in the area before
turning on the radio control system. No two models can operate near each other if they are on the same frequency. If you turn on the
transmitter and someone else is flying on the same frequency, their model will lose control and crash.
If you go to fly at a dedicated R/C flying site, make sure to first become familiar with the frequency coordination that's in place.
1
2
5
7
1 - Antenna Mount
2 - Auxiliary Switch (2) - Not Used
3 - Auxiliary Button - Not Used
4 - Battery Condition LEDs
5 - Throttle/Yaw Control Stick
6 - Cyclic Control Stick
7 - On/Off Switch
4
3
12
9
6
10
8
11
13
8 - Trim Tab (4)
9 - Servo Reversing Switches
10 - DIN Connector for Simulator Adaptor
11 - Battery Cover
12 - Crystal Mount
13 - Charge Jack (for Optional NiCD Batteries)
4
Continued On Next Page
☛☛
☛
☛☛
Page 5
BECOMING FAMILIAR WITH YOUR SABRE RTF MICRO-ELECTRIC HELICOPTER CONTINUED....
20
15
18
28
17
16
25
29
19
24
23
21
22
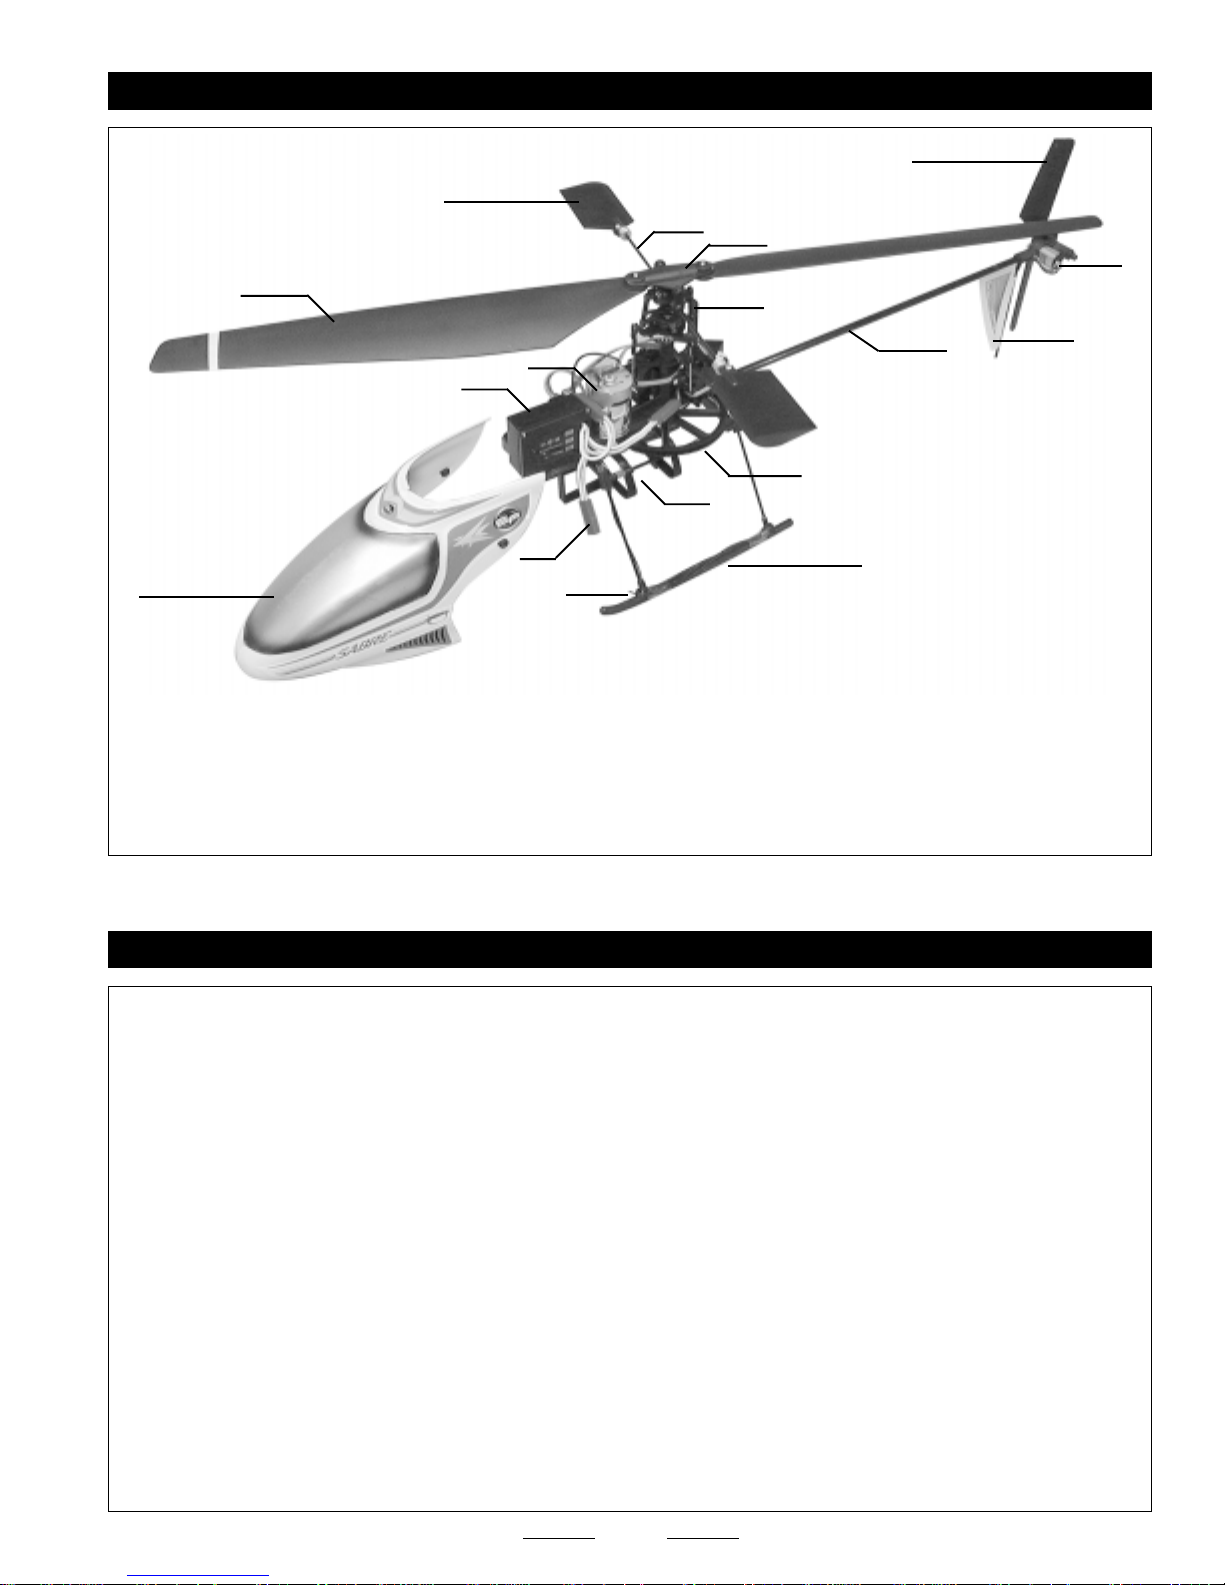
14
14 - Fuselage Body
15 - Paddle
16 - Integrated Receiver, Gyro, ESCs & Mixer
17 - Main Motor
18 - Flybar
19 - Swashplate Assembly
30
27
20 - Tail Rotor
21 - Tail Rotor Motor
22 - Stabilizer
23 - Tail Boom
24 - Main Gear
25 - Flight Battery Mount
26
26 - Landing Skid
27 - Receiver Antenna
28 - Main Rotor
29 - Rotor Head
30 - Flight Battery Plug
HELPFUL HINTS FROM THE PROS
●
The servo reversing switches on the back of the transmitter are preset from the factory. For reference, Ch 1 is tail rotor control,
Ch 2 is right/left cyclic control, Ch 3 is forward/back cyclic control and Ch 4 is throttle control. The remaining switches are not
used. If the flight battery is plugged in, unplug the motor connector before adjusting the throttle reversing switch. This
will prevent the motor from going to full throttle when the reversing switch is moved.
●
You can use your transmitter with a computer-based flight simulator that uses a transmitter adapter with the same DIN-style plug.
●
A charge outlet is provided should you wish to use rechargeable NiCD batteries in the transmitter instead of Alkaline cells.
NiCD batteries and compatible chargers are available separately.
●
The two toggle switches and the push-button switch are not used in this application.
●
The tail rotor, main rotor blades and paddles are designed to move during a mishap. This greatly reduces the chance of
breaking these and other parts of the helicopter. Because of this, though, it's important that you double-check that the rotor blade
hub screws and paddle clamp screws are tight and that the rubber tail rotor retainer is in place before each flight.
●
For smooth operation it's important that both rotor blades are straight. If they aren't, the helicopter will wobble severely when
you apply throttle.
●
The paddles should be adjusted so that they are flat when viewed from the end of the paddles.
●
During initial power-up and transition to hover, you will need to hold right cyclic to compensate for the torque of the rotor blades.
●
Do not cut the receiver antenna shorter. It should be left wrapped around the landing skid.
5
Page 6
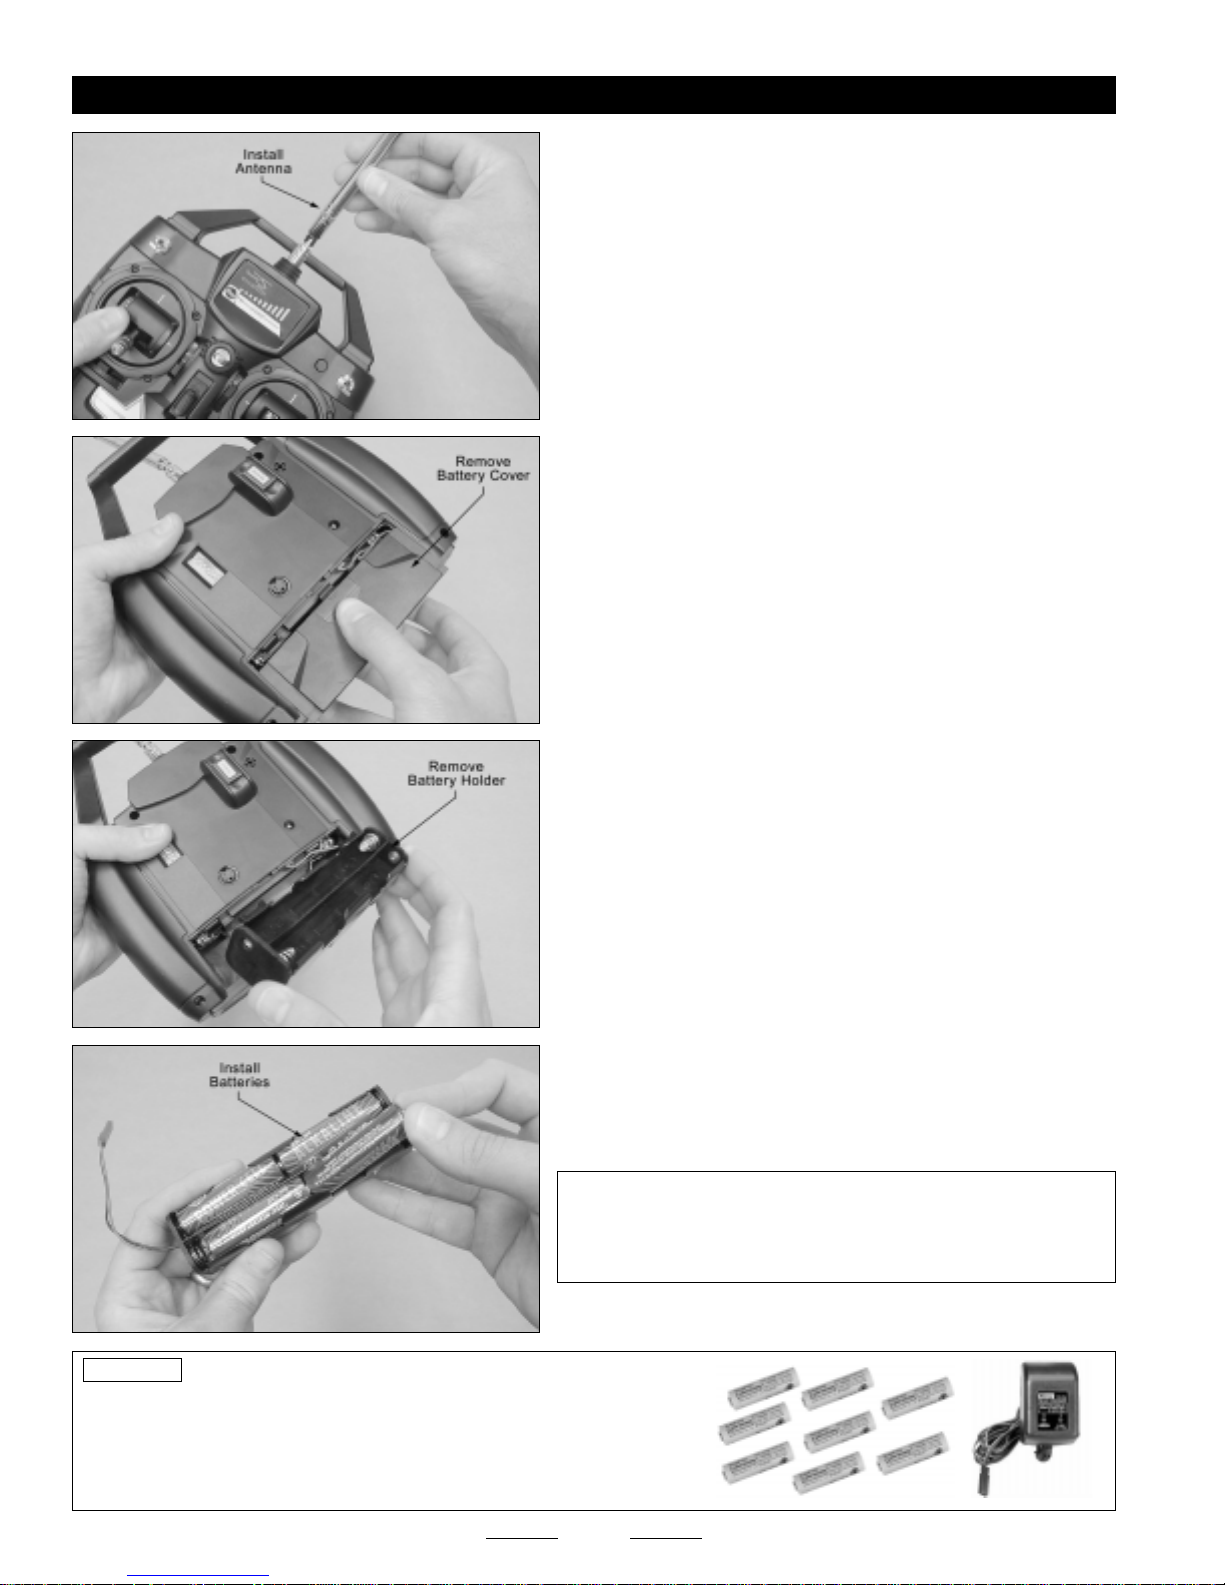
INSTALLING THE ANTENNA AND TRANSMITTER BATTERIES
❑ Carefully thread the antenna onto the antenna mount and tighten
it gently.
Leave the antenna down for now, but always make sure to extend
☞
it fully before flying your helicopter. The antenna mount should also be
adjusted so that it's always pointing up into the air.
❑ Remove the battery cover from the back of the transmitter by
pulling down on it with one hand while holding the transmitter with your
other hand.
PRO TIP
easy. All you need to do is purchase 8 AA rechargeable NiCD cells (P/N 256911)
and a 110V AC overnight charger (P/N 759805). This will allow you to recharge
the battery pack without removing the batteries from the transmitter and it will
save you money in the long run, since you won't need to purchase Alkaline
batteries when they run low.
Upgrading your transmitter to use rechargeable NiCD cells is
❑ Carefully remove the battery holder from the transmitter and
unplug the red connector.
❑ Install 8 fresh AA Alkaline batteries into the battery holder, being
careful to make sure that the polarity is correct for each battery.
✦✦
✦IMPORTANT
✦✦
can be charged using a standard 110V AC transmitter charger
plugged into the back of the transmitter. Never attempt to charge
or recharge Alkaline cells.
6
✦✦
✦ If you opt to use rechargeable AA NiCD cells, they
✦✦
Continued On Next Page
☛☛
☛
☛☛
Page 7

❑ Plug the red connector on the battery holder into the transmitter
(the connector will fit only one way), then reinstall the battery holder.
❑ Reinstall the battery cover, making sure it's firmly seated into place.
INSTALLING THE FLIGHT BATTERY
✦✦
✦WARNING
✦✦
✦✦
✦ Do not charge the flight battery before installing it. Charging will be done later.
✦✦
❑ Remove the fuselage body from the mainframe by first gently
pulling the back sides of the fuselage body off of the mounting posts.
Now pull the body forward off of the mainframe.
BEFORE INSTALLING THE FLIGHT BATTERY, YOU'LL NEED TO MAKE SURE THAT THE TRANSMITTER IS
TURNED ON AND THAT THE THROTTLE CONTROL STICK AND THE THROTTLE TRIM LEVER ARE PULLED
ALL THE WAY BACK. IF THEY AREN'T, THE MOTOR COULD TURN ON AND THE ROTOR BLADES WILL SPIN AT
A HIGH RATE OF SPEED WHEN YOU PLUG THE FLIGHT BATTERY IN.
✦✦
✦WARNING
✦✦
you. This is especially important if you're flying at a designated R/C flying site.
✦✦
✦ Before turning on the transmitter, always check to make sure that nobody else is flying on the same frequency as
✦✦
PRO TIP
flying, unplug the flight battery first, then turn off the transmitter. This will prevent unexpected radio signals from interfering
with the radio control system.
✦✦
✦WARNING
✦✦
be powered up and the motor will be armed. Do not move the throttle control stick forward.
Always make sure you turn on the transmitter first, before plugging in the flight battery. After you're done
✦✦
✦ The helicopter does not have an on/off switch. When you plug in the flight battery, the receiver and servos will
✦✦
❑ Turn on the transmitter. The LEDs should light up in the green
"safe" area. If they don't, replace the batteries with a fresh set.
❑ Make sure that the throttle control stick and the throttle trim lever
are pulled all the way back. This will ensure that the motor won't turn
on when you plug in the flight battery.
7
Continued On Next Page
☛☛
☛
☛☛
Page 8

❑ Slide the flight battery holder open, then slide the back of the flight
battery into the molded recess in the back of the flight battery holder.
The battery wire with the red plug should be toward the front of
the helicopter.
Notice that the flight battery will fit only one way. The flight battery
☞
holder is molded in the same profile as the flight battery.
❑ Slide the front of the flight battery holder over the flight battery and
secure the flight battery holder together using the rubber band provided.
Loop the rubber band around the molded tabs on the flight battery
☞
holder a couple of times to ensure that the flight battery holder is held
securely closed.
❑ Carefully slide the battery holder forward so that the front of the
flight battery is even with the front of the landing skid struts. Adjust the
position of the rubber grommets to hold the battery holder in position.
✦✦
✦IMPORANT
✦✦
This allows you to balance the helicopter to suit your flying style. Initially, we suggest positioning the flight battery as shown
above. We will balance the helicopter later on.
✦✦
✦ The flight battery holder can be moved forward or backward by adjusting the position of the rubber grommets.
✦✦
❑ Plug the connector on the flight battery into the matching loose
connector on the mainframe.
✦✦
✦IMPORTANT
✦✦
plugged in one way.
✦✦
✦ As a safety feature, the connectors can only be
✦✦
For now, don't reinstall the fuselage body. It needs to be removed so you are able to check and adjust the swashplate assembly.
☞
PRO TIP
flight battery from the mainframe to charge the flight battery.
The battery plug is accessible from under the fuselage body, so it's not necessary to remove the fuselage body and
8
Page 9

SETTING UP YOUR SABRE RTF MICRO-ELECTRIC HELICOPTER
BASIC OPERATION
Climbing and Hovering: Climbing is controlled by pushing the throttle control stick on the transmitter (the left-hand stick) forward
to turn on the motor. The throttle is proportional, so motor speed is directly related to control stick position. To lift off and hover,
slowly move the throttle control stick forward until the helicopter lifts off into a stable hover. To continue climbing from hover, move
the throttle control stick farther forward to increase the speed of the motor.
Descent: Descent is also controlled by the throttle control stick. When you pull the throttle control stick back, the motor slows down
and the helicopter will descend. Adjust the speed of the motor using the throttle control stick to control the descent speed of
the helicopter.
Right and Left Turns: Right and left turns are made by moving the cyclic control stick (the right-hand stick) on the transmitter.
When you move the stick to the right, the right side of the swashplate tilts down, causing the helicopter to turn right. When you move
the control stick to the left, the left side of the swashplate tilts down, causing the helicopter to turn left.
Forward and Backward Pitch: Moving the cyclic control stick (the right-hand stick) forward or backward will cause the helicopter
to pitch forward or backward. This allows the forward speed, climb and descent angle and hover stability of the helicopter to be
maintained. When you move the control stick forward, the front of the swashplate tilts down. When you move the control stick
backward, the back of the swashplate tilts down.
Yaw control: Yaw is controlled by moving the tail rotor control stick (left-hand control stick) right and left. When you move the
control stick to the right, the nose of the helicopter pivots to the right. When you move the control stick to the left, the nose of the
helicopter moves to the left. Yaw control is used to stabilize the position of the helicopter's nose.
ROTOR HEAD AND SWASHPLATE SETUP
❑ Unplug the flight battery and turn off the transmitter. When adjusting the rotor blades, we suggest unplugging the flight
battery and turning off the transmitter for your safety.
THE MAIN ROTOR BLADES ARE DESIGNED TO BE ABLE TO PIVOT UNDER PRESSURE TO REDUCE STRESS
AND THE CHANCE OF BREAKING THEM OR THE SWASHPLATE COMPONENTS DURING A CRASH OR IF THE
HELICOPTER SIMPLY TIPS OVER DURING HOVER. BECAUSE OF THIS, IT'S IMPORTANT TO MAKE SURE
BEFORE EVERY FLIGHT THAT THE ROTOR BLADES ARE STRAIGHT AND THAT THE BOLTS THAT HOLD
THE ROTOR BLADES TO THE ROTOR HEAD ARE TIGHT.
❑ Gently grab one rotor blade in each hand, then pull out on the rotor
blades to make both of them straight to one another.
✦✦
✦IMPORTANT
✦✦
will vibrate and wobble excessively when throttle is applied.
✦✦
✦ If the rotor blades are not straight, the helicopter
✦✦
❑ Using a Phillips head screwdriver, firmly tighten the two bolts that
hold the rotor blades to the rotor head.
✦✦
✦IMPORTANT
✦✦
will still be able to pivot under pressure. This is normal. You just
don't want the rotor blades to be loose.
9
✦✦
✦ Even after tightening the bolts, the rotor blades
✦✦
Continued On Next Page
☛☛
☛
☛☛
Page 10

LIKE THE MAIN ROTOR BLADES, THE PADDLES ARE DESIGNED TO BE ABLE TO PIVOT UNDER PRESSURE
TO REDUCE STRESS AND THE CHANCE OF BREAKING DURING A CRASH OR IF THE HELICOPTER SIMPLY
TIPS OVER DURING HOVER. BECAUSE OF THIS, IT'S IMPORTANT TO MAKE SURE BEFORE EVERY FLIGHT
THAT THE PADDLES ARE FLAT AND THAT THE BOLTS THAT HOLD THE PADDLES TO THE FLYBAR ARE TIGHT.
❑ With the swashplate level, view each paddle from the end of the
paddle. When they're aligned properly, the paddles should be flat, as
shown. They should not be angled up or down.
✦✦
✦IMPORTANT
✦✦
qualities of the helicopter will be compromised and the helicopter
will be more difficult to control.
❑ Using a Phillips head screwdriver and a small adjustable wrench,
firmly tighten the screws that hold the paddles to the flybar.
❑ Turn on the transmitter, make sure that the throttle control stick and trim lever are pulled all the way back, then plug in the flight
battery to power up the helicopter.
✦✦
✦ If the paddles are out of alignment, the flying
✦✦
❑ Carefully adjust the three control trim tabs on the transmitter so
that they are centered, as shown.
✦✦
✦WARNING
✦✦
so that the motor will not turn on.
❑ Look carefully at the swashplate from both the front and from the side. The swashplate should be level in both axes. If looking
from the front and the swashplate is not level, move the roll trim lever right or left until the swashplate is even. If looking from the
side and the swashplate is not level, move the pitch trim lever up or down until the swashplate is level.
✦✦
✦ The throttle trim tab should be pulled back completely,
✦✦
10
Page 11

LIKE THE MAIN ROTOR BLADES AND THE PADDLES, THE
TAIL ROTOR IS DESIGNED TO COME OFF DURING A CRASH
OR HARD LANDING. YOU SHOULD DOUBLE-CHECK THAT
THE RUBBER GROMMET IS PUSHED ON COMPLETELY
AND SECURELY HOLDING THE TAIL ROTOR IN PLACE.
❑ Double-check that the rubber grommet that holds the tail rotor in
place is firmly pushed up against the tail rotor.
CONTROL OPERATION VERIFICATION
❑ Looking from the back of the helicopter, push the cyclic control stick
to the right. The right side of the swashplate should tilt down.
❑ Looking from the back of the helicopter, push the cyclic control stick
to the left. The left side of the swashplate should tilt down.
✦✦
✦IMPORTANT
✦✦
direction, flip the Ch 2 servo reversing switch on the back of the
transmitter.
❑ Looking from the side of the helicopter, push the cyclic control stick
forward. The front of the swashplate should tilt down.
❑ Looking from the side of the helicopter, pull the cyclic control stick
back. The back of the swashplate should tilt down.
✦✦
✦IMPORTANT
✦✦
direction, flip the Ch 3 servo reversing switch on the back of the
transmitter.
❑ With the helicopter sitting on the ground, push the throttle control stick forward only enough to turn on the motor. The main rotor
blades should begin to spin at a low rate of speed and the tail rotor should begin to spin, too.
❑ Apply just enough throttle for the tail rotor to begin spinning. Looking
from the back of the helicopter, push the yaw control stick to the right.
The tail rotor should continue to spin and/or spin faster.
✦✦
✦ If the swashplate is not moving in the correct
✦✦
✦✦
✦ If the swashplate is not moving in the correct
✦✦
❑ After you're satisfied that the controls are lined up correctly and operating in the correct direction, unplug the flight battery and
turn off the transmitter.
❑ Looking from the back of the helicopter, push the yaw control stick
to the left. The tail rotor should stop spinning.
✦✦
✦IMPORTANT
✦✦
Ch 1 servo reversing switch on the back of the transmitter.
✦✦
✦ If the tail rotor is not operating correctly, flip the
✦✦
11
Page 12

GETTING READY TO FLY YOUR SABRE RTF MICRO-ELECTRIC HELICOPTER
CHARGING THE FLIGHT BATTERY
❑ Plug the flight battery connector into the flight battery charger
connector.
✦✦
✦IMPORTANT
✦✦
plugged in one way.
❑ Plug the flight battery charger into a 110V AC wall outlet.
❑ Charge the flight battery for 2-1/2 hours. Be careful not to
overcharge the flight battery and don't leave the flight battery
unattended during the charging process.
PRO TIP
flight battery from the mainframe to charge the flight battery.
❑ The flying field you choose should be a large, open field with grass and a hard surface to take off from. There should not be any
vehicles, buildings, power lines, trees, large rocks or anything else that your helicopter can crash into.
The battery plug is accessible from under the fuselage body, so it's not necessary to remove the fuselage body and
CHOOSING YOUR FLYING FIELD
✦✦
✦ As a safety feature, the connectors can only be
✦✦
Each transmitter comes with a sticker on the back showing which frequency in the 72Mhz band that the radio
control system operates on. The 72Mhz band is for aircraft and helicopter use only, so it's important to check
the frequency if others are in the area before turning on the radio control system. No two models can operate
near each other if they are on the same frequency. If you turn on the transmitter and someone else is flying on
the same frequency, their model will lose control and crash.
If you go to fly at a dedicated R/C flying site, make sure to first become familiar with the frequency coordination
that's in place.
RANGE TESTING THE RADIO CONTROL SYSTEM
After getting out to your flying field, but before you fly for the first time, you must range test the radio control system. This will ensure
that the transmitter is "talking" correctly to the helicopter. You should follow this procedure before every first flight of the day and
after you have a hard landing, crash, or after a repair.
❑ Turn on the transmitter, then plug in the flight battery.
❑ Set the helicopter on the ground and double-check that the transmitter's antenna is fully collapsed. Move the right-hand control
stick on the transmitter several times to check the controls. They should operate smoothly.
❑ Walk approximately 75 feet from the helicopter and move the right-hand control stick on the transmitter once more. Check to
make sure that the controls are operating smoothly at this distance.
✦✦
✦WARNING
✦✦
✦✦
✦ If the helicopter does not range check, don't fly! Please refer to the troubleshooting guide on page # 15.
✦✦
12
Page 13

CHOOSING A DAY TO FLY
❑ Because of the helicopter's small size, we strongly suggest flying when there is little to no wind. Winds above 5 - 10 miles per
hour will make the helicopter difficult to control.
BALANCING THE SABRE RTF MICRO-ELECTRIC HELICOPTER
For smooth, trouble-free flying, you should check the balance of the helicopter before flying it for the first time. Positioning the flight
battery in the location described on page # 8 should result in the helicopter balancing properly, but double-check the balance just to
be sure. It might be necessary to move the flight battery further forward to get the helicopter to balance correctly.
❑ Balance the helicopter by carefully lifting the helicopter up by the
flybar with two fingers, as shown. When balanced properly, the
helicopter should hang level when you lift it. If the nose of the helicopter
hangs down, move the flight battery back a little. If the tail of the
helicopter hangs down, move the flight battery forward a little.
SABRE RTF MICRO-ELECTRIC HELICOPTER PREFLIGHT RECOMMENDATIONS
●
Double-check that the flight battery is fully charged and that the transmitter batteries are good. When the transmitter is turned
on the green LEDs should light up.
●
The flight battery should be charged and/or "topped off" shortly before flight. The flight battery will lose some of its charge over
time, so don't charge the flight the day before, then expect it to produce full power when you're ready to fly.
●
Double-check that the main rotor blades are straight and that the rotor head screws are tight. Even with the rotor head screws
tightened, the rotor blades can still pivot under pressure. This is normal.
●
Double-check that the paddles are level and that the screws and hex nuts that hold the paddles in place are tight.
●
Double-check that all of the machine screws, hex nuts and grub screws are tight.
●
Double-check that the trim levers are adjusted so that the swashplate is level in both axes.
●
Double-check that the tail rotor is held firmly in place with the rubber grommet.
●
Look carefully for any damage to the helicopter, especially the main rotor blades and the tail rotor. If the rotor blades and/or the
tail rotor show any signs of damage, they should be replaced before flying.
●
Double-check the position of the flight battery and adjust the rubber grommets to hold it in the proper position.
●
The upper hole in the Integrated Receiver is a gyro gain adjustment pot. This is set by the factory and we don't
suggest adjusting it or the flying qualities of the helicopter may be compromised.
●
Make sure that the motor and battery wires are out of the way of any moving parts, especially the main gear.
●
Check to make sure that nobody else is flying on the same frequency before turning on the transmitter.
●
Make sure to fully extend the transmitter antenna before flying.
13
Page 14

FLYING THE SABRE RTF MICRO-ELECTRIC HELICOPTER - THE BASICS
Learning to fly any R/C helicopter takes patience, time and practice. If you've never flown an R/C helicopter before, we suggest
trying to find someone in your area or at your local flying field who can help you learn to fly. An experienced helicopter pilot can also
test-fly your helicopter to double-check that it is trimmed and set up properly. This will make it a little easier for you to learn to fly. If
you don't have someone to help you, a good alternative is to practice with a computer-based R/C helicopter simulator. Depending
on the adapter provided with the software you purchase, you may even be able to connect the Sabre's transmitter to your computer.
Below we list basic flight tips that should get you well on your way to flying your Sabre helicopter successfully. If you're just starting
out, we suggest flying two battery's worth of flight time per day for about 7-10 days. This will get you familiar with the helicopter
without overdoing it. When learning something new like this, it's often better to do a little at a time, let it sink in overnight, then come
back the next day.
Before continuing, we suggest reading the Basic Operation section on page # 9 to familiarize yourself with how the different controls
operate and how they affect the helicopter during flight.
●
Always fly off of a hard surface. If you try to fly off of grass, the landing skids and tail rotor will catch in the grass and cause the
helicopter to tip over easily. Landing in grass is no problem, but you should always take off from a hard surface.
●
When first starting out, always keep the helicopter in front of you with the nose pointing away from you (like if you were sitting
in the cockpit). This will make orientation much easier.
●
Always remember that you should "fly the nose" of the helicopter, not the tail. Getting used to this concept will really help with
orientation and the respective control inputs, especially right and left control inputs.
●
When the helicopter's nose is pointing toward you, the roll and yaw controls will seem "reversed." This takes some time to get
used to until it becomes second nature. Imagining yourself sitting in the cockpit will help you get used to this.
●
When you throttle up and begin to take off, the helicopter will have a tendency to move to the left. This is normal and is caused
by the torque of the spinning rotor blades. You will need to hold a small amount of right cyclic and right tail rotor to counteract
this tendency.
●
When you're ready to take off, it's usually more difficult if you slowly advance the throttle and attempt to make many small
corrections for a perfectly smooth climb to hover. It's better to get the helicopter off the ground and out of the wake of the rotor
blades as soon as possible.
●
Here's our technique for take off: With the helicopter on a hard surface with the nose pointing away from you, advance the
throttle to one-quarter to get the main rotors and the tail rotor spinning. Wait a few seconds for the rotor speed to stabilize, then
push the throttle to half throttle. At half throttle the helicopter will start to get "light" and begin to slide to the left. Apply a small
amount of right cyclic and right tail rotor as described above to keep the helicopter in one place. Apply a couple of more clicks of
throttle and the helicopter will lift off. To achieve a stable hover with the nose pointing away from you, you will need to make minor
control inputs on all of the controls. This takes a lot of practice to learn and get used to. Start by doing just short hovering "hops"
and then progress until you can hover the helicopter in one spot for more than a few seconds. Once you're comfortable with that,
practice hovering in one spot for longer periods of time.
●
If you're only a few feet off the ground and you start to get into trouble, pull the throttle all the way back and the helicopter will
land without damage. Remember that you may need to straighten the rotor blades and paddles if they hit the ground.
●
Once you're comfortable hovering the helicopter with the nose pointing away from you, practice hovering the helicopter
sideways, then at a 45 degree angle, then finally with the nose pointing toward you.
●
After you're comfortable hovering the helicopter, you're ready for forward flight. Keep in mind that this is a fixed-pitch helicopter.
Altitude is controlled by throttle, so if you want to climb you need to add more throttle and if you want to descend you need to
reduce throttle. Moving the cyclic control stick right and left causes the helicopter to roll right and left. To help keep the helicopter
from "skidding" when you roll right or left, you will need to apply right or left tail rotor depending on the direction you're turning.
Moving the cyclic control stick forward or backward will cause the helicopter to fly forward and accelerate or backward and
decelerate. The helicopter can fly backwards from a hover by pulling back on the cyclic control.
●
Smooth, controlled flight from take off, hover, transition to forward flight, then back to hover and finally landing is a combination
of using all of the control inputs at one time. Again, this takes time and a lot of practice, so don't get discouraged if it takes more
time than you'd like. Keep at it and you'll be flying your Sabre helicopter like a pro!
14
Page 15

TROUBLESHOOTING GUIDE
This troubleshooting guide has been provided to help you diagnose and solve most problems that you may encounter with the
Sabre RTF Micro-Electric Helicopter. Most problems encountered can be solved by carefully following the problem-cause-solution
sections listed below.
If you cannot solve the problem using this troubleshooting guide, please feel free to contact us,
using the Customer Service Information on page # 3.
PROBLEM CAUSE SOLUTION
1) Transmitter does not turn on A) Transmitter batteries depleted A) Replace batteries with new ones
B) Transmitter batteries not installed properly B) Reinstall batteries, double-checking polarity
C) Battery box not plugged into transmitter C) Plug battery box into transmitter
2) Motor does not turn on A) Flight battery depleted A) Recharge flight battery
B) Transmitter batteries depleted B) Replace batteries with new ones
C) Transmitter not turned on C) Turn on transmitter
D) Flight battery not plugged in D) Plug in flight battery
E) Motor wires not plugged in E) Plug in motor wires
F) A crash has damaged an internal component F) Contact Global Services
3) Helicopter is difficult to control A) You are flying in too much wind A) Fly when there is no wind
B) Transmitter batteries depleted B) Replace batteries with new ones
C) Flight battery depleted C) Recharge flight battery
D) Transmitter antenna not extended D) Extend transmitter antenna completely
E) Paddles are not level E) Level paddles and make sure they're both even
F) Rotor blades are not straight F) Straighten rotor blades and tighten rotor head screws
G) Receiver antenna damaged G) Repair receiver antenna or contact Global Services
4) Helicopter vibrates excessively A) Main rotor blades not straight A) Straighten main rotor blades
B) Rotor head screws not tight B) Tighten rotor head screws
C) Tail rotor loose C) Adjust rubber grommet to secure tail rotor
5) Helicopter is difficult to trim A) Main rotor blades not straight A) Straighten main rotor blades
B) Tail rotor loose B) Adjust rubber grommet to secure tail rotor
C) You are flying in too much wind C) Fly when there is little to no wind
D) Helicopter is out of balance D) Check and adjust balance
E) Paddles are not level E) Level paddles and make sure they're both even
6) Radio system fails range test A) Transmitter batteries depleted A) Replace batteries with new ones
B) Flight battery depleted B) Fully charge flight battery
C) Receiver antenna damaged C) Repair receiver antenna or contact Global Services
D) A crash has damaged an internal component D) Contact Global Services
7) Controls move the wrong A) Servo direction is reversed A) Adjust servo reversing switches
direction
8) Cyclic trim lever(s) out of A) More trim required than available from trim A) Adjust pushrod wire(s) and/or servo arm(s) as
range lever(s) described below
In some cases, it may not be possible to level the swashplate in one or both axes
by adjusting the cyclic trim levers on the transmitter. In this situation, you can
shorten the pushrod wires by carefully making a shallow V-shaped bend in the
middle of the pushrod wires, using a pair of needle nose pliers. If the pushrod
wires are not long enough you can remove the servo arms from the servos,
rotate them one tooth on the output shaft, then reinstall them onto the servos.
15
Page 16

16
SABRE RTF MICRO-ELECTRIC HELICOPTER EXPLODED VIEW DRAWING
CODE DESCRIPTION QTY
034 Motor Retaining Screw 2
035 Battery Retainer 1
036 Rubber Grommet 9
037 Battery Frame 2
038 Landing Skid Assembly 2
039 Main Gear 1
040 Main Gear Shaft 1
041 Flight Battery 1
042 Battery Support Rod 2
043 Tail Boom 1
044 Canopy Retaining Grommet 2
045 Canopy 1
046 Stabilizer Fin 1
047 Tail Skid 1
048 Tail Motor Retaining Washers 2
049 Tail Motor Retaining Screw 2
050 Tail Motor Pinion Gear 1
051 Tail Rotor Gear 1
052 Tail Rotor 1
053 Tail Rotor Bearing 2
054 Tail Rotor Housing 1
055 Tail Rotor Motor 1
056 Tail Rotor Shaft 1
057 Tail Rotor Retainer 1
058 Flybar 1
CODE DESCRIPTION QTY
021 Swashplate Bearing 1
022 Servo Connector 2
023 Pushrod Wire "A" 1
024 Pushrod Wire "B" 1
025 Swash Outer Plate 1
026 Swashplate Support Tube 1
027 Main Motor 1
028 Circuit Board Set 1
029 Main Motor Pinion Gear 1
030 Servo 2
031 Canopy Support Rod 1
032 Mainframe 1
033 Motor Retaining Washer 2
CODE DESCRIPTION QTY
001 Rotor Retaining Nut 2
002 Rotor Head 1
003 Main Rotor Blade 2
004 Short Connector 2
005 Rotor Retaining Washer 2
006 Rotor Retaining Screw 2
007 Pivot Bearing Retaining Screw 2
008 Rotor Head Pivot Bearing 2
009 Inner Fixer 1
010 Main Rotor Head 1
011 Paddle Retaining Screw 2
012 Paddle 2
013 Paddle Retaining Nut 2
014 Inner Controller Pivot 1
015 Outer Controller Pivot 1
016 Grub Screw 2
017 Locking Pin 1
018 Steering Controller 1
019 Long Connector 2
020 Swash Inner Plate 1
EXPLODED VIEW DRAWING
VERSION 1.0 9-10-2004
USE THE CODE NUMBERS TO CROSS-REFERENCE
REPLACEMENT PARTS.
Page 17

SABRE RTF MICRO-ELECTRIC HELICOPTER REPLACEMENT PARTS
We stock a complete line of replacement parts for your EF Helicopters Sabre RTF Micro-Electric Helicopter. Listed below are the
replacement parts that are available, along with their respective part numbers for easy ordering convenience. We suggest
ordering directly from your local EF Helicopters dealer.
If your local dealer does not stock EF Helicopters products, you can order directly from us
using the Customer Service Information on page # 3
NUMBERS IN PARENTHESIS ARE ASSEMBLY CODE NUMBERS. NUMBERS IN THE PHOTOS ARE MANUFACTURER NUMBERS.
165215
Instruction Manual
165219 (028)
Circuit Board
165223 (027,029,033,034)
Main Rotor Motor
165216
Transmitter
165220
110V AC Charger
165224 (048,049,050,055)
Tail Rotor Motor
165217
Transmitter Antenna
165221
Motor Connectors
165225
Screw Set
165218 (030)
Servo
165222
Accessory Wires
165226 (044,045)
Fuselage Body Set
165227 (032)
Main Frame
165231 (017,018)
Steering Controller
165228 (039,040)
Main Gear w/Shaft
165232 (001,002,005,006)
Rotor Head
165229 (008)
Main Shaft Bearing
165233 (015,016)
Rotor Frame
17
165230 (020,021,025)
Swashplate Assembly
165234 (004)
Short Connector
Continued On Next Page
☛☛
☛
☛☛
Page 18

165235 (019)
Long Connector
165236 (022,023,024)
Servo Linkage
165237 (003)
Main Rotor Blades
165238 (058)
Flybar
165239 (011,012,013)
Paddles
165243 (043)
Tail Boom
165247 (051,056,057)
Tail Rotor Gear
165240 (007,009,010,014)
Head Connector
165244 (046,047)
Tail Skid & Fin
165248 (052)
Tail Rotor
165241 (035,037,042)
Battery Holder
165245 (054)
Tail Assembly Frame
165249 (036)
Rubber Grommets & Band Set
165242 (038)
Landing Skids & Gear Legs
165246 (053)
Tail Bearing
165070 (041)
NiMH Flight Battery
18
Page 19

19
Page 20

SABRE RTF MICRO-ELECTRIC HELICOPTER WARRANTY SERVICE INFORMATION
Before returning your Sabre RTF Micro-Electric Helicopter for warranty consideration, the status of the unit must be within
the guarantee as stated at the bottom of this page. Do not return your helicopter to the place of purchase. They are not
authorized or equipped to perform warranty work on EF Helicopters products. When requesting warranty service, please
observe the following:
●
Crash damage will not be covered under warranty. Do not request warranty service for a crash-damaged product.
●
Always send the helicopter complete with the transmitter. Please unplug and/or remove the batteries from both the transmitter
and the helicopter, but include them in the package for testing.
●
Include a note detailing the problem or service you are requesting. Service cannot be provided without this information.
Include your daytime phone number, shipping address and/or email address in the event we need more details pertaining to the
service requested.
●
You may request an estimate of services at the time you return your helicopter for service. An omission of this request implies
permission for EF Helicopters to service your helicopter at our discretion.
●
Include a method of payment for any service charges.
●
Send the unit to us by United Parcel Service, Federal Express or by Insured Mail. Postage is nonrefundable. Send your
package to:
Global Services
EF Helicopters Repair Department
18480 Bandilier Circle
Fountain Valley, CA 92708
Phone: (714) 963-0329 Fax: (714) 964-6236
Email: service@globalhobby.net
OUR GUARANTEE
EF Helicopters guarantees this kit to be free from defects in both material and workmanship, at the date of purchase. This does
not cover any component parts damaged by use, misuse or modification. In no case shall EF Helicopters's liability exceed the
original cost of the purchased kit.
In that EF Helicopters has no control over the final assembly or material used for final assembly, no liability shall be assumed for
any damage resulting from the use by the user of the final user-assembled product. By the act of using the final user-assembled
product, the user accepts all resulting liability.
Your EF Helicopters Sabre RTF Micro-Electric Helicopter is warranted against manufacturer defects in materials and workmanship
for a period of 90 days from the date of purchase. Warranty service will be provided within 90 days of the date of purchase only
if you are able to provide the original or a copy of the original dated sales receipt.
IMPORTANT WARRANTY INFORMATION
20
 Loading...