

Page 1

Thank you for purchasing the Model Boat Products Air Buggy electric boat. These Operating Instructions are
provided to help you enjoy your new Air Buggy without any of the hassles you might expect. Please read
through any and all literature that is provided with your Air Buggy. Doing so will help you become familiar with
how your Air Buggy and radio control system operates.
OPERATING INSTRUCTIONS
The MBP Air Buggy is distributed exclusively by
18480 Bandilier Circle, Fountain Valley, CA 92708
All contents copyright © 2004, Global Hobby
Global Hobby Distributors
Distributors Version V1.0 June 2004
Product Part Number: 151151
✦✦
✦IMPORTANT
✦✦
✦✦
✦ Before beginning assembly, please read and understand the warnings listed on the next page.
✦✦
SPECIFICATIONS AND FEATURES:
●
Length: 13.75 Inches
●
Width: 8.25 Inches
●
Run-Time: 12 Minutes (Approximately)
●
Completely Built and Ready-to-Run
●
Preinstalled Solid State ESC and FM Receiver
●
Twin 280 Size Electric Motors with Propellers
●
6 Cell 900mAH NiMH Battery and 110V AC Charger
●
Safety Cage Keeps Fingers Out of Propellers
Failure to do so could lead to bodily harm and/or injury. The Model Boat Products Air Buggy is not intended for
those under 12 years of age, unless closely supervised by an adult.
1
Page 2
FOR YOUR SAFETY - PLEASE READ AND UNDERSTAND THESE WARNINGS!
GENERAL WARNINGS
●
Under no circumstances should you operate the Air Buggy
if people are in the water nearby. Serious injury could result.
●
Never operate the Air Buggy at night.
●
Never use the Air Buggy to chase wildlife.
●
Because the Air Buggy is operated by radio control, it is
important to make sure you are always using fresh and/or
fully charged batteries. Never allow the batteries to run low
or you could lose control of the Air Buggy.
●
If the Air Buggy becomes stuck, release the throttle lever
to turn the motors off, then retrieve the Air Buggy by hand.
●
Before testing the motors, make sure that the propeller
cage is securely in place. If it's not, serious injury could
result. The propellers are very sharp and spin at a high
rate of speed.
●
When carrying the Air Buggy, keep your hands away from
the propellers.
●
Electric-powered models produce vibration when they are
running. It is important to periodically check for any loose
mounting hardware. Operating the Air Buggy with loose
screws or fasteners can lead to damage.
●
Because the hull, hatch and motor covers are assembled
from molded plastic parts, use of chemical spray cleaners
is not recommended. These cleaners may damage the parts.
●
Only use paper towels or a soft cloth to clean the Air
Buggy. Use of any abrasives will damage the plastic parts.
BATTERY WARNINGS
●
Always follow the directions provided with your battery
charger to charge the battery.
●
Periodically check the battery for excessive heat build-up
during charging. If the battery is hot to the touch, remove it
from the charger and let it cool.
●
Never leave the battery unattended while charging.
●
To prevent the battery from overheating during charging,
always allow the battery to completely cool before recharging.
●
Never over-charge the battery or serious damage to the
battery and/or charger could result
RADIO SYSTEM WARNINGS
●
Always turn on the transmitter before turning on the
Air Buggy.
●
Always turn off the Air Buggy before turning off the
transmitter.
●
Always unplug the battery from the Air Buggy when not
in use.
●
Never cut the receiver antenna wire shorter or you could
lose control of the Air Buggy.
●
When operating the Air Buggy, always check to make
sure that the transmitter antenna is completely extended.
●
Do not use a battery that has more than 6 cells or the
electronics in the Air Buggy will be damaged.
CUSTOMER SERVICE INFORMATION
If you should have any trouble with any of the steps listed in these operating instructions, we have provided a
troubleshooting guide on page # 13. The troubleshooting guide is provided to help you find a quick and immediate
resolution to any number of problems that might occur. If you cannot solve a problem using the troubleshooter, or if
you have any other questions or concerns, please contact us using the information below:
Global Services (Model Boat Products)
18480 Bandilier Circle
Fountain Valley, CA 92708
On the Web
http://globalservices.globalhobby.com
Phone: (714) 963-0329
http://mbp.globalhobby.com
Fax: (714) 964-6236
Email: service@globalhobby.net
2
Page 3
INTRODUCTION
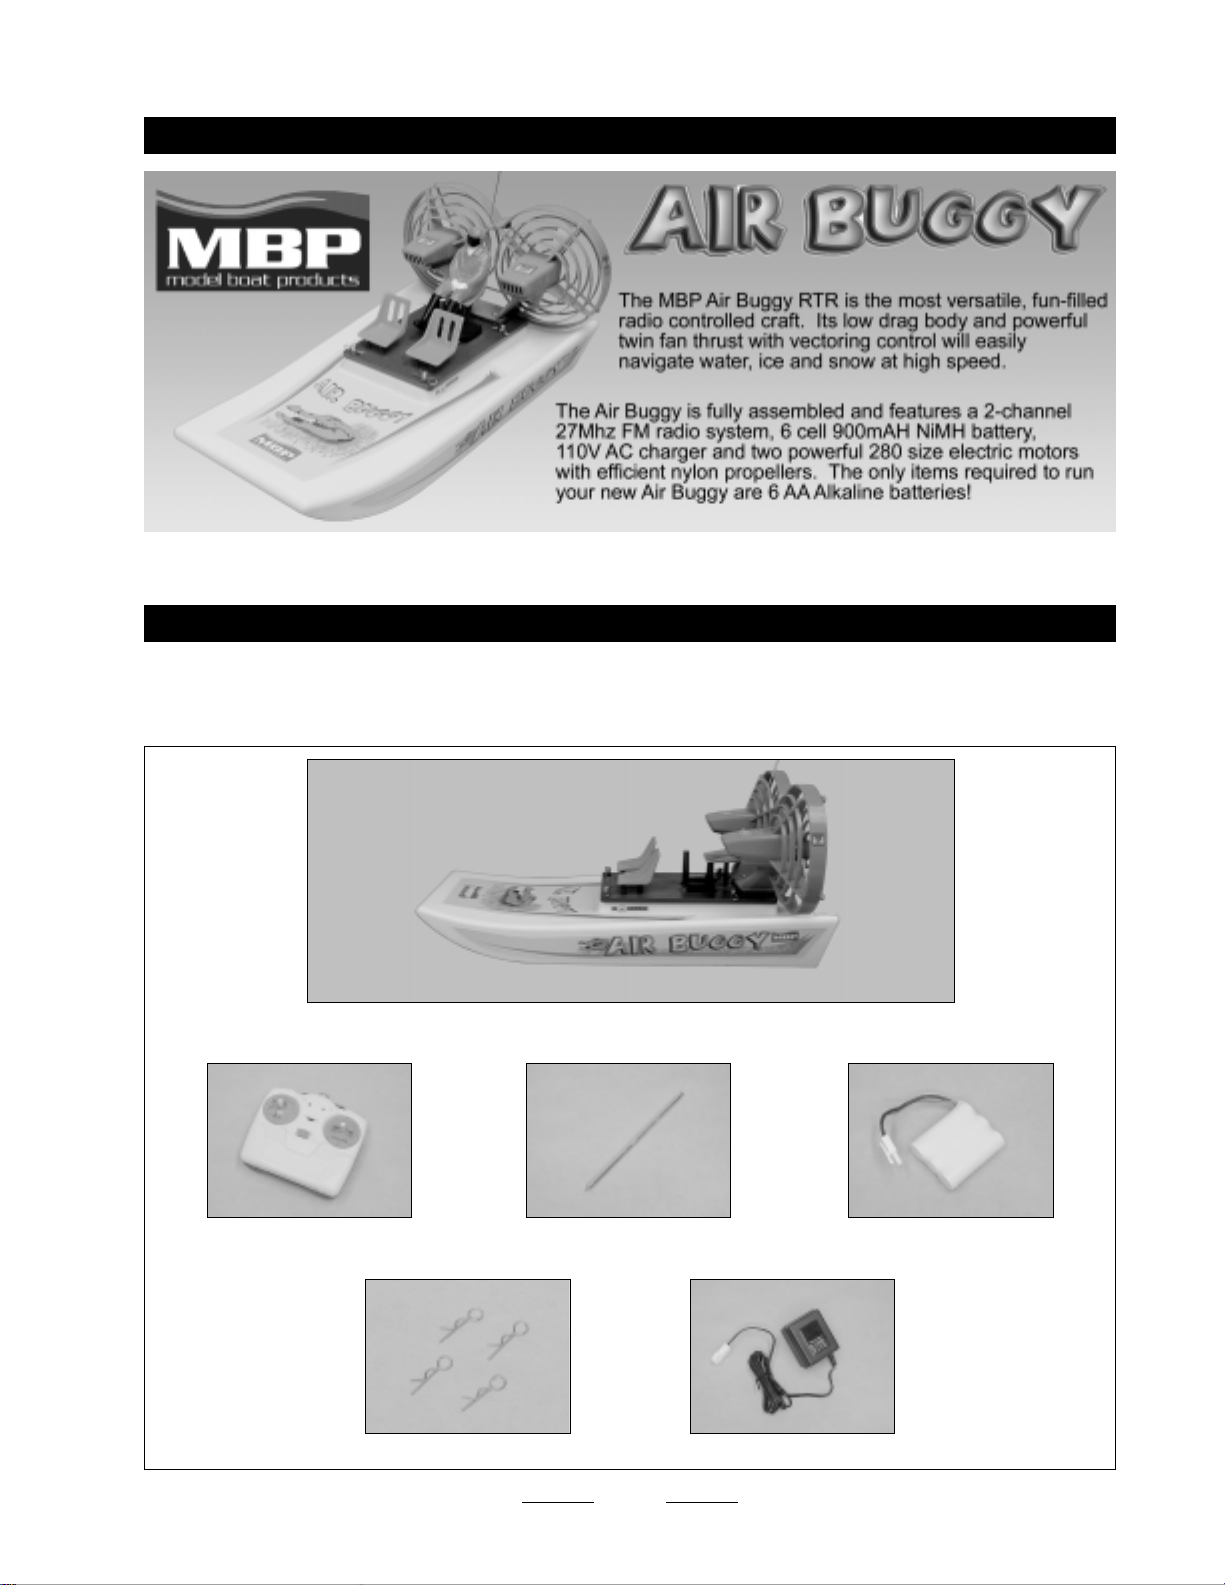
SECTION 1: PARTS IDENTIFICATION
Before beginning assembly, remove the different parts from the box and use the photos below to verify that the correct
parts are included. If you're missing a part, please contact us immediately, using the contact information listed on the
bottom of page # 2.
Air Buggy Boat
Spare Hatch Latches (4) 110V AC Charger
3
6 Cell NiMH BatteryTransmitter AntennaTransmitter
Page 4
SECTION 2: RECOMMENDED ITEMS
This section lists the items you will need to run and maintain your Air Buggy. As you can see, there's not much to it!
●
8 Pack Trinity AA Alkaline batteries for the transmitter Part # 837801
PRO TIP
charge the battery. If you want to, you can purchase a second battery (Part # 151245) so you have two. That
way, you can take two fully-charged batteries with you to the lake. That means twice as much fun!
We also sell a high-performance quick-charger that can charge the Air
Buggy battery in about 45 minutes (instead of 4-4.5 hours) and is powered
from a 110V AC power source or from your car's 12 volt DC power source.
This enables you to charge the battery at the lake, so you can use your Air
Buggy as many times during the day as you want.
Your Air Buggy includes a 6 cell Nickel Metal-Hydride battery and a 4.5 hour 110V AC wall charger to
Promax Black Widow
6A Peak Charger
Part # 353363
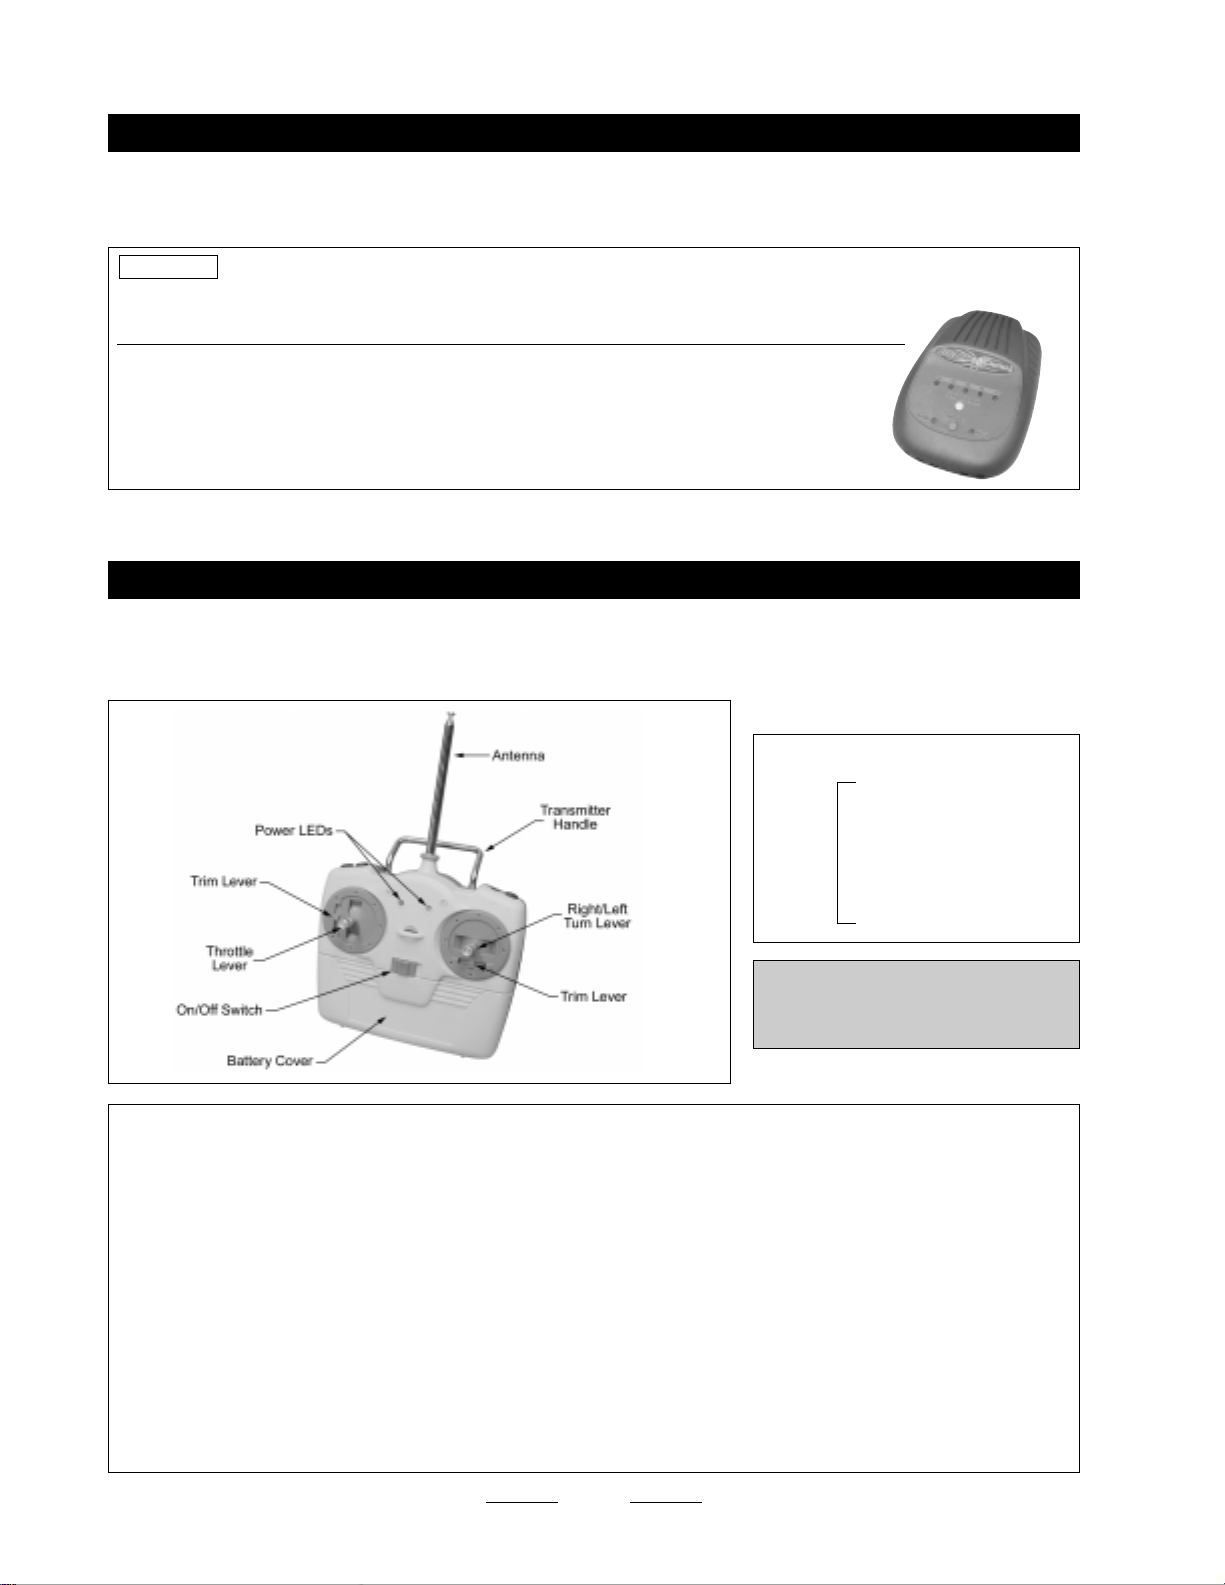
SECTION 3: BECOMING FAMILIAR WITH YOUR AIR BUGGY
Each Air Buggy comes with a sticker on the top of the transmitter showing which frequency in the 27Mhz band that the radio
control system operates on. The 27Mhz band is shared between model cars and boats, so check the frequency if others are
in the area before turning on the Air Buggy. No two cars or boats can operate near each other if they are on the same frequency.
Channel # Frequency
01 16.995
02 27.045
27Mhz
03 27.095
04 27.145
05 27.195
06 27.255
Radio control systems operating on
27Mhz are licensed to operate
surface vehicles only.
Battery Cover: This cover houses the 6 AA Alkaline batteries that power the transmitter.
On/Off Switch: Turns the transmitter on and off. Two LEDs show the power status of the batteries.
Trim Levers: These levers, one for turning and one for throttle control, allow you to fine tune the center positions of the
throttle lever and the right/left turn lever.
Antenna: Transmits the signal from the transmitter to the receiver inside the Air Buggy.
Right/Left Turn Lever: Used to steer the Air Buggy. Pushing the lever left or right causes the Air Buggy to turn left or right.
Throttle Lever: Used to control the forward speed of the Air Buggy.
Power LEDs: Shows the condition of the transmitter batteries. Both LEDs glow when the batteries are good. When
only the red LED glows, the batteries should be replaced.
Transmitter Handle: Molded into the transmitter case to give you a convenient way to carry the transmitter.
4
Continued On Next Page
☛☛
☛
☛☛
Page 5
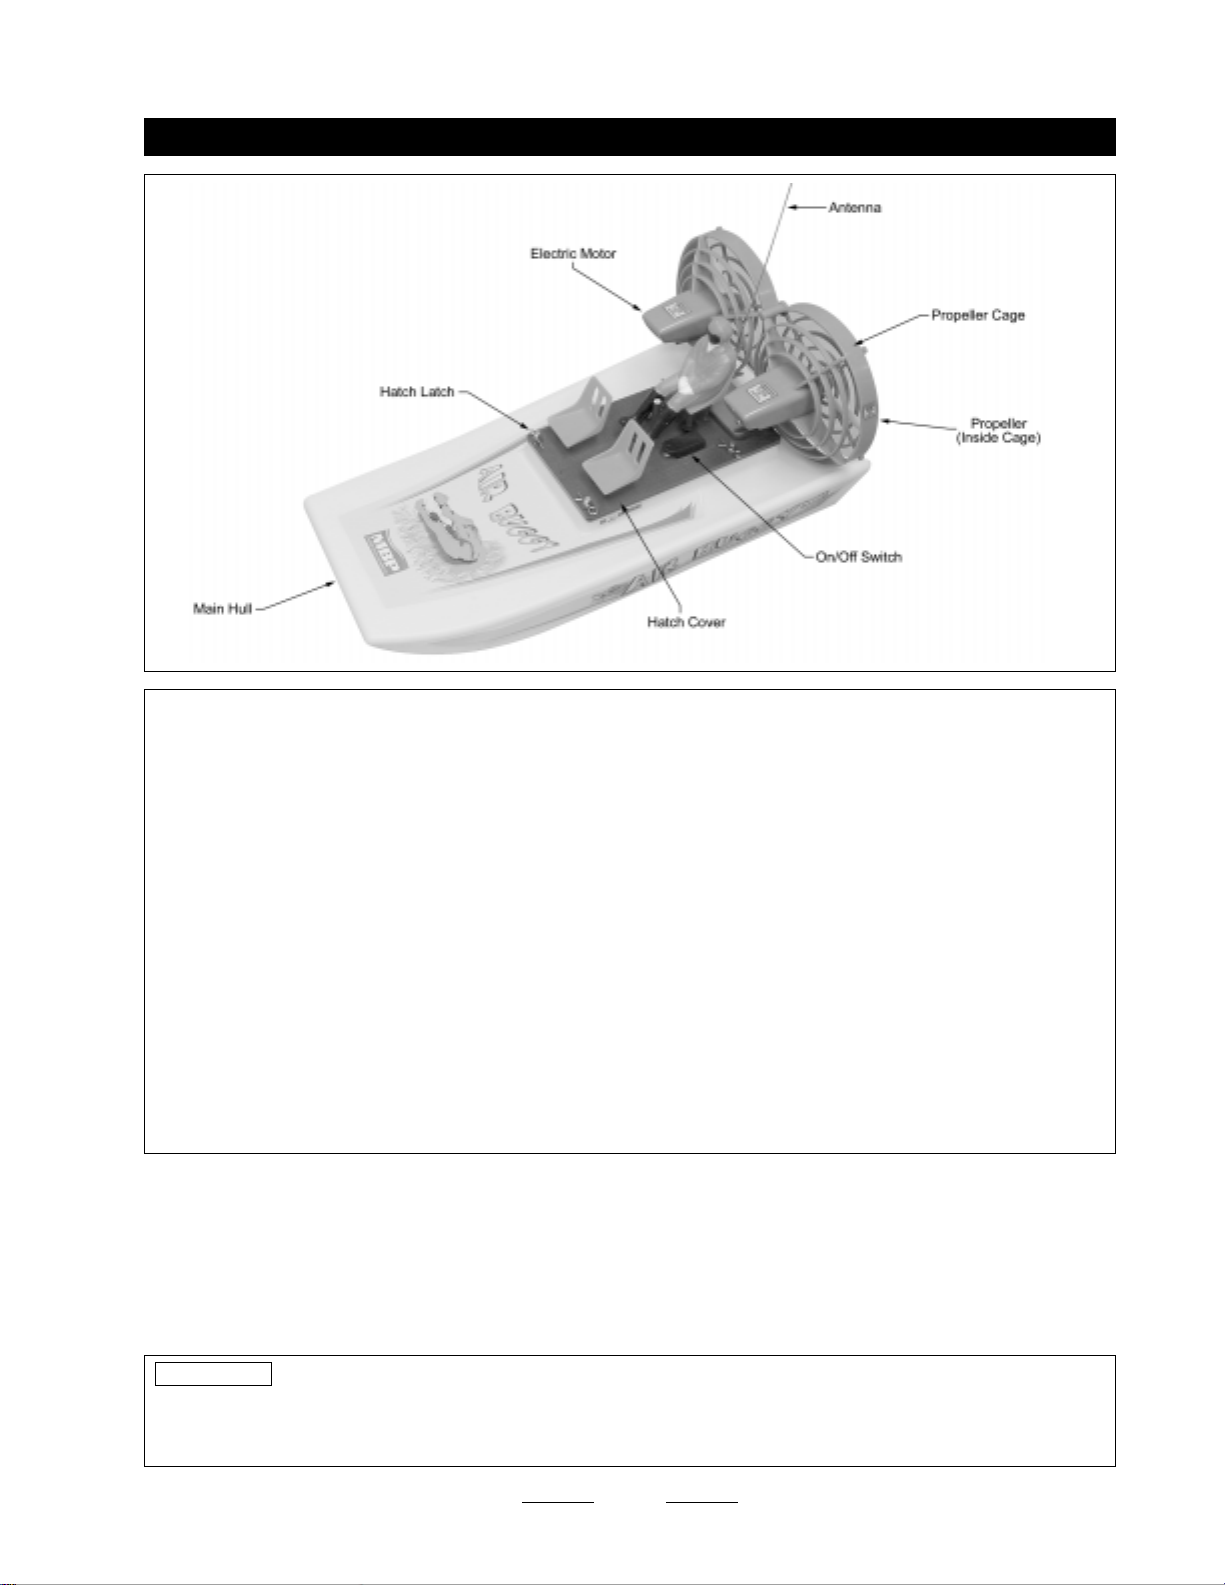
BECOMING FAMILIAR WITH YOUR AIR BUGGY, CONTINUED....
Main Hull: The main body of the Air Buggy. The hull is molded from lightweight, high-strength plastic.
Electric Motor: Provides power to the Air Buggy. The Air Buggy features two powerful electric motors to reach high speeds.
Antenna: Receives the signals from the transmitter. Never cut the antenna shorter or you'll loose control of the Air
Buggy after a very short distance.
Hatch Cover: Both motors and the electronics are built into the hatch cover. Remove the hatch cover to install the
battery into the hull.
On/Off Switch: Turns the Air Buggy on and off. The switch is covered by a rubber boot that helps keep water out of it.
Propeller: The propeller is attached to the back of the motor. When spinning, the propeller creates thrust which pushes
the Air Buggy forward. The Air Buggy features two efficient nylon propellers.
Propeller Cage: This plastic cage covers the propellers so they don't get damaged. It's also an important safety device
that prevents you from being injured by the spinning propellers. Never use the Air Buggy without the safety
cage installed.
Hatch Latch: These metal latches keep the hatch cover firmly secured to the main hull. The Air Buggy features four
hatch latches.
Now that you're familiar with your new MBP Air Buggy,
it's time to finish it up and get to the lake!
WARNING
NOT charge the battery until after testing the motors. This will ensure that the battery is run down completely
before recharging it. This is important to ensure that the battery receives a full charge and is cycled before you
first use your Air Buggy.
The 6 cell NiMH battery included with your Air Buggy comes from the factory partially charged. DO
5
Page 6

SECTION 4: ASSEMBLING YOUR AIR BUGGY
STEP 1: INSTALLING THE TRANSMITTER ANTENNA
❑ Push the antenna down into the molded hole in the top
of the transmitter.
❑ Thread the antenna (clockwise) into place and tighten it
gently until it stops.
STEP 2: INSTALLING THE TRANSMITTER BATTERIES
✦✦
✦IMPORTANT
✦✦
tighten it too strongly. Doing so could cause damage to
the antenna and/or transmitter.
❑ Carefully remove the battery cover from the front of the
transmitter by pulling down on it with one hand while
holding the transmitter with your other hand.
✦✦
✦ Do not force the antenna into place or
✦✦
❑ Install 6 fresh AA Alkaline batteries, being careful to make
sure that the polarity is correct for each battery.
PRO TIP
double-check to make sure that they are fully charged
before installing them into the transmitter. Never attempt
to charge or recharge Alkaline cells.
❑ After double-checking that the batteries are installed
correctly, reinstall the battery cover, making sure it's firmly
seated into place.
6
If you use rechargeable AA NiCD cells,
Continued On Next Page
☛☛
☛
☛☛
Page 7

STEP 3: INSTALLING THE AIR BUGGY BATTERY
✦✦
✦WARNING
✦✦
the transmitter and the Air Buggy are in the "OFF" position. This will ensure that the motors don't turn on by accident
when you install the battery.
✦✦
✦ Before installing the battery into the Air Buggy, it's important that you verify that the on/off switch on both
✦✦
❑ Double-check that the transmitter on/off switch is in the
"OFF" position.
❑ Lift the rubber boot from over the on/off switch on the Air
Buggy, then double-check that the on/off switch is in the
"OFF" position.
❑ Remove the four metal hatch latches and set them aside.
❑ Carefully pull up on the hatch cover assembly and pull it
off of the hull. Set it aside for now.
✦✦
✦IMPORTANT
✦✦
place, so that you can find them when needed. Never use your Air Buggy without all four hatch latches installed.
✦✦
✦ Should you ever lose a metal hatch latch, four extras have been included for you. Keep them in a safe
✦✦
7
Continued On Next Page
☛☛
☛
☛☛
Page 8

INSTALLING THE AIR BUGGY BATTERY, CONTINUED....
❑ Set the battery into the hull and secure it into place with
the preinstalled Velcro
center of the Velcro
wires are toward the front of the hull.
Note that a short strip of Velcro® is preinstalled onto
☞
one side of the battery, in addition to the longer strip
preinstalled in the bottom of the hull.
❑ Plug the connector on the battery into the connector
that is coming out of the hatch cover assembly. When
plugged in properly the connectors should "click" together.
✦✦
✦IMPORTANT
✦✦
only be plugged in one way.
®
strips. Position the battery in the
®
strip and make sure that the battery
✦✦
✦ As a safety feature, the connectors can
✦✦
❑ Push the battery wires down into the hull, then carefully
push the hatch cover assembly back into place. Notice that
the four molded holes in the corners of the hatch cover
assembly fit over the four metal posts in the hull.
❑ Hold the hatch cover assembly down firmly and install
one metal hatch latch through the small hole in each metal
post to secure the hatch cover assembly into place.
✦✦
✦IMPORTANT
✦✦
make sure that each one snaps into place over the metal
posts. This will ensure that they don't come off during use.
✦✦
✦ When installing the metal hatch latches,
✦✦
8
Page 9

SECTION 5: CHECKING THE CONTROLS
STEP 1: SETTING UP THE TRANSMITTER
❑ Verify the position of the two trim levers. The trim lever
below the right/left turn lever should be centered. The trim
lever to the left of the throttle lever should be pulled all the
way back. If the trim levers aren't in these positions,
simply slide them into position, using your finger.
STEP 2: TURNING ON THE RADIO CONTROL SYSTEM
✦✦
✦IMPORTANT
✦✦
described above to prevent the motors from turning on
when you turn on the Air Buggy. If you don't set up the
trim levers as described above, the motors may turn on
when you turn on the Air Buggy and that can be dangerous.
❑ Turn on the transmitter by moving the on/off switch into
the "ON" position. Both LEDs should glow brightly.
✦✦
✦IMPORTANT
✦✦
turning on the Air Buggy. This will prevent unwanted
radio signals from interfering with the radio system.
If the green LED does not glow brightly or if ONLY the
☞
red LED is glowing, replace the transmitter batteries with
new, fresh ones.
✦✦
✦ The trim levers must be set up as
✦✦
✦✦
✦ Always turn on the transmitter before
✦✦
❑ Lift the rubber boot from over the on/off switch on the Air
Buggy, then turn on the Air Buggy by moving the on/off switch
into the "ON" position.
✦✦
✦IMPORTANT
✦✦
the Air Buggy, make sure to pull the trim lever to the left
of the throttle lever all the way back.
❑ After turning on the Air Buggy, push the rubber boot back
over the switch. This boot helps keep water out of the switch
during use.
9
✦✦
✦ If the motors turn on when you turn on
✦✦
Continued On Next Page
☛☛
☛
☛☛
Page 10

STEP 3: CHECKING THE CONTROLS
PRO TIP
the motors. This will allow you enough time to become familiar with how the controls react to the inputs from the
transmitter control sticks and it will prepare the battery for its first full recharge before use.
You'll want to check the controls until the battery in the Air Buggy no longer has enough power to operate
Before checking the controls, double-check that the propeller safety cage is firmly
snapped into place. It's also a good idea to check the propeller safety cage after each
time you run the Air Buggy. This is for your safety.
❑ With both the transmitter and the Air Buggy turned on,
push the throttle lever forward. Both motors will turn on
and the propellers will spin at a high rate of speed.
❑ Release the throttle lever and both motors will turn off
and the propellers will stop spinning.
The throttle lever can be pulled backwards from
☞
center, but this does nothing. The propellers will not spin
in reverse.
❑ While holding the throttle lever all the way forward, push
the right/left turn lever to the right. The right motor will turn
off and the left motor will stay on. This will make the Air
Buggy turn to the right.
❑ While holding the throttle lever all the way forward, push
the right/left turn lever to the left. The left motor will turn off
and the right motor will stay on. This will make the Air Buggy
turn to the left.
❑ Pushing the right/left turn lever right and left without
pushing the throttle lever forward will cause the Air Buggy
to do 360º circles and spins.
10
Continued On Next Page
☛☛
☛
☛☛
Page 11

CHECKING THE CONTROLS, CONTINUED....
❑ Continue testing the controls until the battery in the Air Buggy no longer has enough power to operate the motors. This
should give you enough time to become familiar with how the Air Buggy's controls operate. Once the battery no longer has
enough power to operate the motors, turn off the Air Buggy, then turn off the transmitter. Remove the hatch cover
assembly from the Air Buggy, then unplug and remove the battery and allow it to cool.
SECTION 6: CHARGING THE AIR BUGGY BATTERY
✦✦
✦IMPORTANT
✦✦
motors until they stop. This will ensure that you don't overcharge the battery.
✦✦
✦ Before charging the battery, the battery must be fully discharged. Discharge the battery by running the
✦✦
Never run the battery down so low that the motors stop while the Air Buggy is in an unaccessible
area (like in the middle of the lake). Always allow enough reserve power to return to shore, then
run the battery down until the motors stop.
If the battery is hot to the touch,
it is fully charged. Unplug it from
the charger immediately.
❑ To unplug the connectors, squeeze the tab on the battery connector and pull the two connectors apart.
❑ Plug the battery connector into the battery charger
connector. When plugged in properly, the connectors should
"click" together.
PRO TIP
be plugged in one way.
❑ Plug the charger into a 110V AC wall outlet.
❑ Charge the battery for 4 - 4.5 hours. Be careful not to
overcharge the battery.
As a safety feature, the connectors can only
❑ After completely charging the battery, install it into the Air Buggy, using the same techniques as when you installed
it previously.
Air Buggy Battery Charging Warnings:
●
Always remove the battery from the Air Buggy for the charging process.
●
Always allow the battery to cool before recharging it.
●
If the battery gets hot during the charging process, remove it from the charger immediately.
●
Charge the battery in a well-ventilated area, away from any combustibles.
●
Do not charge the battery for any longer than 4.5 hours.
●
Never leave the battery unattended during the charging process.
Now that you're familiar with how your Air Buggy operates and
the battery is fully charged, it's time to head to the lake, learn to drive
your Air Buggy and have lots of fun! Turn the page for more information.
11
Page 12

SECTION 7: DRIVING YOUR AIR BUGGY
STEP 1: RANGE TESTING THE RADIO CONTROL SYSTEM
After getting out to the lake, but before you put the Air Buggy in the water, you must range test the radio control system.
This will ensure that the transmitter is "talking" correctly to the Air Buggy.
❑ Turn on the transmitter, then turn on the Air Buggy.
❑ Set the Air Buggy on the ground and extend the transmitter's antenna completely. Move the control sticks on the
transmitter several times to check the controls. They should operate normally.
❑ Walk approximately 75ft. from the Air Buggy and move the control sticks on the transmitter once more. Check to make
sure that the controls are operating normally at this distance. You may need a friend to help you with this step. If the
controls work normally, the Air Buggy has passed its range check and it's okay to use. If the controls don't operate
normally, don't use the Air Buggy. See the warning below.
✦✦
✦WARNING
✦✦
guide on page # 13.
STEP 2: AT THE LAKE
After you've checked the motors and are satisfied that the range check has been completed successfully, set the Air Buggy
in the water pointing away from shore. At first, you should drive the Air Buggy at slower speeds until you get used to the
way the Air Buggy handles. Notice that the throttle lever is proportional, meaning that the motors will speed up from off to
high power in relation to the position of the throttle lever. Move the throttle lever forward slightly and the motors turn on
slightly. Move the throttle lever forward a little more and the motors speed up a little more. Move the throttle lever forward
completely and the motors run at full speed.
Driving the Air Buggy is very simple and a lot of fun. With the throttle lever pushed forward, both motors will turn on and the
Air Buggy will go straight. Pushing the turn lever right or left while holding the throttle lever forward makes the Air Buggy
turn right or left. Notice that the Air Buggy slides and skids into turns. This is because the Air Buggy has a flat bottom hull.
It may take a few minutes for you to get used to how the Air Buggy turns.
Once you are familiar with the handling qualities of the Air Buggy, feel free to open the throttle completely. You will find that
at full throttle the Air Buggy is quite fast and very maneuverable and agile. You can even use the turn lever without the
throttle lever for crazy, fast 360º spins.
✦✦
✦WARNING
✦✦
short period of time. When this happens, immediately drive the Air Buggy to shore so it doesn't completely run out of
power in the middle of the lake.
✦✦
✦ If the Air Buggy does not pass its range check, don't put it in the water! Please refer to the troubleshooting
✦✦
✦✦
✦ When the battery in the Air Buggy begins to run low, the Air Buggy will slow down drastically in a very
✦✦
SECTION 8: CARE AND MAINTENANCE
●
When driving in rough water, some water may get into the hull. This will not cause damage, but you should remove the
hatch cover assembly and soak up any water, using a paper towel or rag. Do not drive the Air Buggy without the rubber
plug installed into the back of the hull.
● If any of the electronics get wet, remove the hatch cover assembly from the Air Buggy and soak up any visible water,
using a paper towel or rag, then allow the Air Buggy to sit 24 hours (with the hatch cover assembly removed) to allow any
condensation to evaporate from the electronics.
●
Because the hull is assembled from molded plastic parts, use of chemical spray cleaners is not recommended. These
cleaners may damage the parts. Replacement of parts damaged by chemical cleaners will not be covered under warranty.
12
Continued On Next Page
☛☛
☛
☛☛
Page 13

CARE AND MAINTENANCE, CONTINUED....
●
Always check the condition of the transmitter batteries before going out to the lake. If you think they might be going bad,
replace them with a fresh set.
●
After you're done running the Air Buggy for the day, dry the outside of the Air Buggy off, using paper towels or a clean
towel. If the transmitter has gotten wet from handling, dry it off too.
●
After a period of time the hull may accumulate dirt or grass from taking the Air Buggy in and out of the water. This debris
should be cleaned out, using a paper towel or rag.
●
After each time you drive the Air Buggy, check to make sure that the propeller cage is firmly secured into place.
●
Periodically double-check that both propellers are pushed firmly onto the motors.
SECTION 9: TROUBLESHOOTING GUIDE
This troubleshooting guide has been provided to help you diagnose and solve most problems that you may encounter with
your Air Buggy. Most problems encountered can be solved by carefully following the problem-cause-solution sections
below. If you cannot solve the problem using this troubleshooting guide, please feel free to contact us at the address or
phone number listed at the bottom of page # 2.
PROBLEM CAUSE SOLUTION
1) Radio system does not operate A) Transmitter batteries and/or Air Buggy batteries depleted A) Replace transmitter batteries and/or charge
B) Transmitter batteries not installed properly B) Reinstall batteries, double-checking for
C) Air Buggy battery connectors loose C) Double-check connectors
2) Operating range is short A) Transmitter antenna is retracted A) Extend transmitter antenna completely
B) Receiver antenna is cut or otherwise damaged B) Return to Global Services for repair
C) Transmitter batteries and/or Air Buggy battery low C) Replace transmitter batteries and/or charge
3) When the Air Buggy is running, A) Air Buggy battery connector is loose A) Double-check connectors
radio system operates erratically B) Damage to hatch cover assembly electronics B) Return to Global Services for repair
C) Hatch cover assembly electronics are wet C) Allow to dry, uncovered, for 24 hours
4) Air Buggy always veers to one side A) Steering trim out of adjustment A) Readjust steering trim until Air Buggy drives
B) Damaged propeller B) Replace damaged propeller
C) One propeller loose C) Check and push propeller firmly onto motor
D) One motor damaged D) Replace damaged motor
5) Air Buggy does not "go" A) Damage to hatch electronics A) Return to Global Services for repair
B) Air Buggy battery not charged or plugged in B) Completely charge battery and plug in firmly
6) Air Buggy battery will not charge A) Battery not plugged into charger properly A) Plug battery into charger securely
B) 110V AC Outlet is not functioning B) Try a different 110V AC outlet
7) Air Buggy only turns one way A) Damaged or loose propeller A) Check propeller and firmly push onto motor
Air Buggy battery
correct polarity
Air Buggy battery
straight
8) Air Buggy vibrates excessively A) One or more propellers damaged A) Check propellers and replace if damaged
9) Motors do not turn off A) Throttle trim lever pushed forward A) Pull throttle trim lever all the way back
B) Right/Left steering trim lever not centered B) Center right/left steering trim lever
13
Page 14

14
Page 15

If you enjoyed the fun and excitement of your MBP Air Buggy, check out these
other fun and exciting MBP Boats, the OffShore Flyer and the Seamaster.
Both are Ready-to-Run and feature high-quality components and are
designed for fast, exciting racing fun.
Both the OffShore Flyer and the Seamaster can be purchased from your local
authorized MBP dealer, or by calling 1-800-854-8471.
Don't forget to check out our website for more information on other
exciting MBP products!
http://mbp.globalhobby.com
15
Page 16

AIR BUGGY WARRANTY SERVICE INFORMATION
Before returning your Air Buggy for warranty consideration, the status of the unit must be within the guarantee as stated at
the bottom of this page. Do not return your Air Buggy to the place of purchase. They are not authorized or equipped to
perform warranty work on MBP products. When requesting warranty service, please observe the following:
●
Crash damage will not be covered under warranty. Do not request warranty service for a crash-damaged product.
●
Always send the Air Buggy complete with the transmitter. Please unplug and/or remove the batteries from both the
transmitter and the Air Buggy, but include them in the package for testing purposes.
●
Include a note detailing the problem or service you are requesting. Service cannot be provided without this information.
Include your daytime phone number, shipping address and/or email address in the event we need more details pertaining
to the service requested.
●
You may request an estimate of services at the time you return your Air Buggy for service. An omission of this request
implies permission for MBP to service your Air Buggy at our discretion.
●
Include a method of payment for any service charges.
●
Send the unit to us by United Parcel Service, Federal Express or by Insured Mail. Postage is non-refundable. Send your
package to:
Global Services (Model Boat Products)
18480 Bandilier Circle
Fountain Valley CA 92708
Phone: (714) 963-0329 Fax: (714) 964-6236 Email: service@globalhobby.net
http://globalservices.globalhobby.com
http://mbp.globalhobby.com
OUR GUARANTEE
Model Boat Products (MBP) guarantees this kit to be free from defects in both material and workmanship, at the date of
purchase. This does not cover any component parts damaged by use, misuse or modification. In no case shall MBP's
liability exceed the original cost of the purchased kit.
In that MBP has no control over the final assembly or material used for final assembly, no liability shall be assumed for
any damage resulting from the use by the user of the final user-assembled product. By the act of using the final
user-assembled product, the user accepts all resulting liability.
Visit Our Website
IMPORTANT WARRANTY INFORMATION
Your Model Boat Products (MBP) Air Buggy is warranted against manufacturer defects in materials and workmanship for
a period of 90 days from the date of purchase. Warranty service will be provided within 90 days of the date of purchase
only if you are able to provide the original or a copy of the original dated sales receipt.
16
 Loading...