

Page 1
Global Cooling
F P S C
F
Free Piston Stirling Cooler
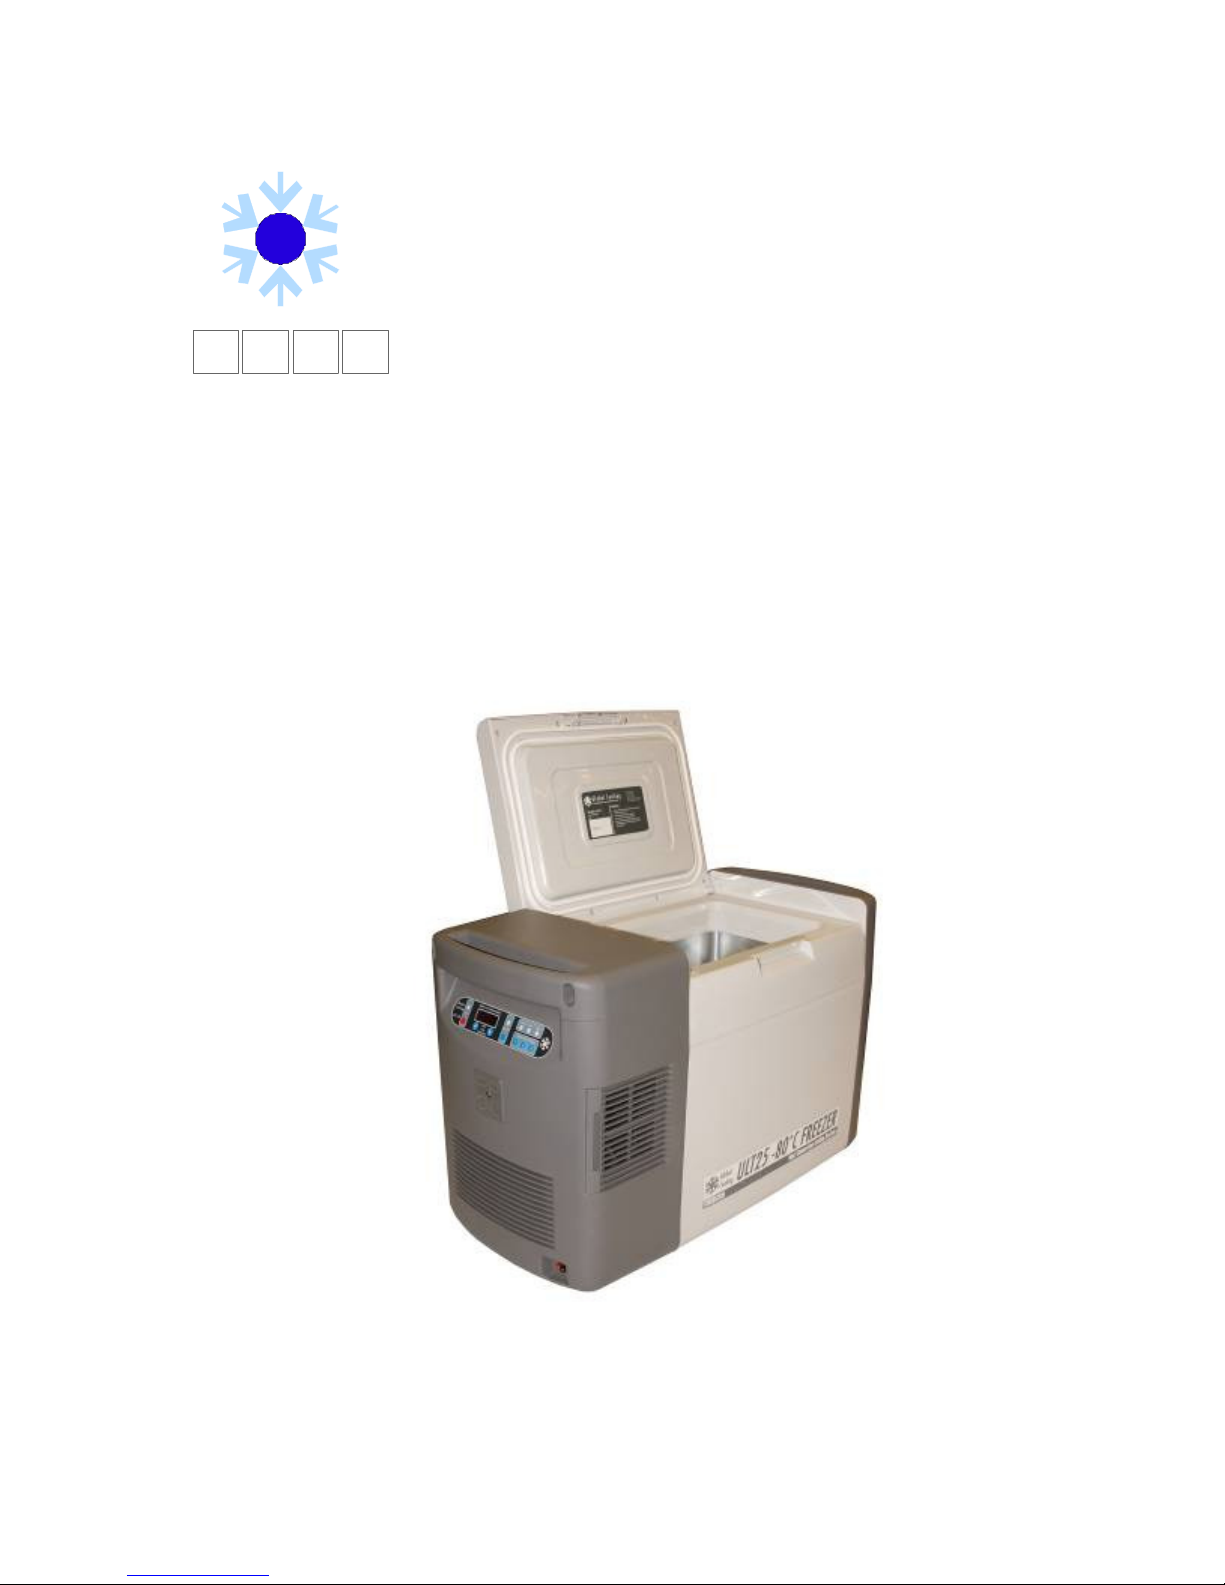
ULT25 -80º C Portable Freezer
User Manual
Page 2

INTRODUCTION
The ULT25 (Ultra Low Temperature, 25 liter volume) incorporates next generation Free-Piston
Stirling Cooler (FPSC) technology.
FPSCs differ from conventional compressor based refrigeration in that they provide high
efficiency, deep-temperature cooling in a lightweight package allowing true portable operation.
TABLE OF CONTENTS
INTRODUCTION ..................................................................................................................... 2
TABLE OF CONTENTS.......................................................................................................... 2
SAFETY PRECAUTIONS ....................................................................................................... 3
UNPACKING AND SET-UP ................................................................................................... 4
FEATURES................................................................................................................................ 5
Freezer..................................................................................................................................... 5
Control panel ........................................................................................................................... 6
OPERATION QUICK GUIDE ................................................................................................ 7
OPERATION............................................................................................................................. 8
General Operating Principles .................................................................................................. 8
How to Turn the Freezer On/Off............................................................................................. 8
Changing the set temperature .................................................................................................. 8
To see the current set temperature................................................................................................... 8
Change the Set Point to a new value ............................................................................................... 8
Using Preset Temperatures.............................................................................................................. 9
Changing the preset values.................................................................................................... 10
Min and Max Temperature.................................................................................................... 10
Over Temperature Alarm ...................................................................................................... 10
How to silence the audible Temperature Alarm ............................................................................ 10
To postpone an Alarm.................................................................................................................... 11
How to change the Over (Under) Temperature Allowance ........................................................... 11
To Silence the Temperature Alarm ................................................................................................ 11
Error conditions..................................................................................................................... 12
Locking the Panel.................................................................................................................. 12
To Lock the freezer panel............................................................................................................... 12
To Unlock the freezer panel........................................................................................................... 12
How to switch between power supplies ................................................................................ 12
Error Codes ........................................................................................................................... 13
MAINTENANCE .................................................................................................................... 14
Air Intake Filter ..................................................................................................................... 14
Storage................................................................................................................................... 14
Cleaning ................................................................................................................................ 14
TROUBLESHOOTING.......................................................................................................... 15
SPECIFICATIONS ................................................................................................................. 16
WARRANTY........................................................................................................................... 17
© Global Cooling, 2009 10/29/2009
Version 1.2u
2
Page 3

SAFETY PRECAUTIONS
To prevent personal injury, injury to others, or damage to property, read these safety
precautions carefully before use.
• Do not disassemble, modify or repair. There are no user serviceable parts inside the
covers.
• Do not immerse in water or pour water on the unit.
• Do not put ice or liquid water directly in the freezer box, always use suitable containers.
• Do not use glass containers when the contents might freeze and break.
• Do not store flammable items such as gasoline, thinner, or solvents in the freezer. The
freezer is NOT rated as an explosion proof freezer.
• Do not remove any frost or ice which has accumulated on the inside of the freezer using
hard and/or sharp objects, such as knives, screwdrivers, etc. The inside panels are heat
exchangers and can be damaged.
• Do not cut, change or modify the power cable.
• When removing the plug, hold onto the plug and not the cord.
• Do not block the air intake or air discharge vents.
• Do not drop, throw, or abuse the freezer.
• Do not operate under extreme environmental conditions, such as in a car trunk, in very
high humidity environments, in rain or other severe weather.
• Do not use solvents to clean the panel or the outside or inside of the freezer.
• An Ultra Low Temperature Freezer is qualitatively different than a home freezer. At -80º
C frostbite can occur in seconds
• . You should establish and follow a protocol for safe ULT operating procedures. This
should include (but not limited to):
Never handle samples or freezer accessories with bare hands.
Do not use gloves which become brittle at ultra low temperatures
Nitrile and latex gloves are inadequate
Liquid permeable gloves are dangerous because ULT liquids can be held against the skin
and increase the amount of damage.
Be especially careful that liquids at ULT are not spilled onto skin or clothing.
Use only sample containers that have been approved or tested for ULT use.
Some plastics shatter at Ultra Low Temperatures. Avoid splinter hazards.
Biological and Chemical Hazards are still hazardous at ULT. Always wear
proper protective equipment and follow appropriate isolation protocols.
Many types of labels will fall off and/or break at ULT. Some types of ink which
stick to glass and/or plastic at room temperature lose adhesion at ULT.
• In addition to the ULT hazards above, there are also physical hazards to consider:
Be cautious when closing the lid to avoid a pinching hazard.
Be careful when loading the box with heavy items.
Always use the handles to carry the freezer.
© Global Cooling, 2009 10/29/2009
Version 1.2u
3
Page 4
UNPACKING AND SET-UP
1. Remove the freezer and all accessories from the box. Carefully inspect the freezer and
all accessories for any shipping damage.
2. The following items are included;
¤ ULT25 Freezer with inner foam lid ¤ User Manual on CD
¤ SS-18 AC Power Supply with cord ¤ Warranty Registration
¤ 12V DC Power Cord (for auto accessory plug) ¤ Bag with stoppers for access port
¤ Key for lock ¤ Bag with sealing material for access port
3. Place the freezer on a level surface.
4. Make sure that the air inlets and outlets are not blocked
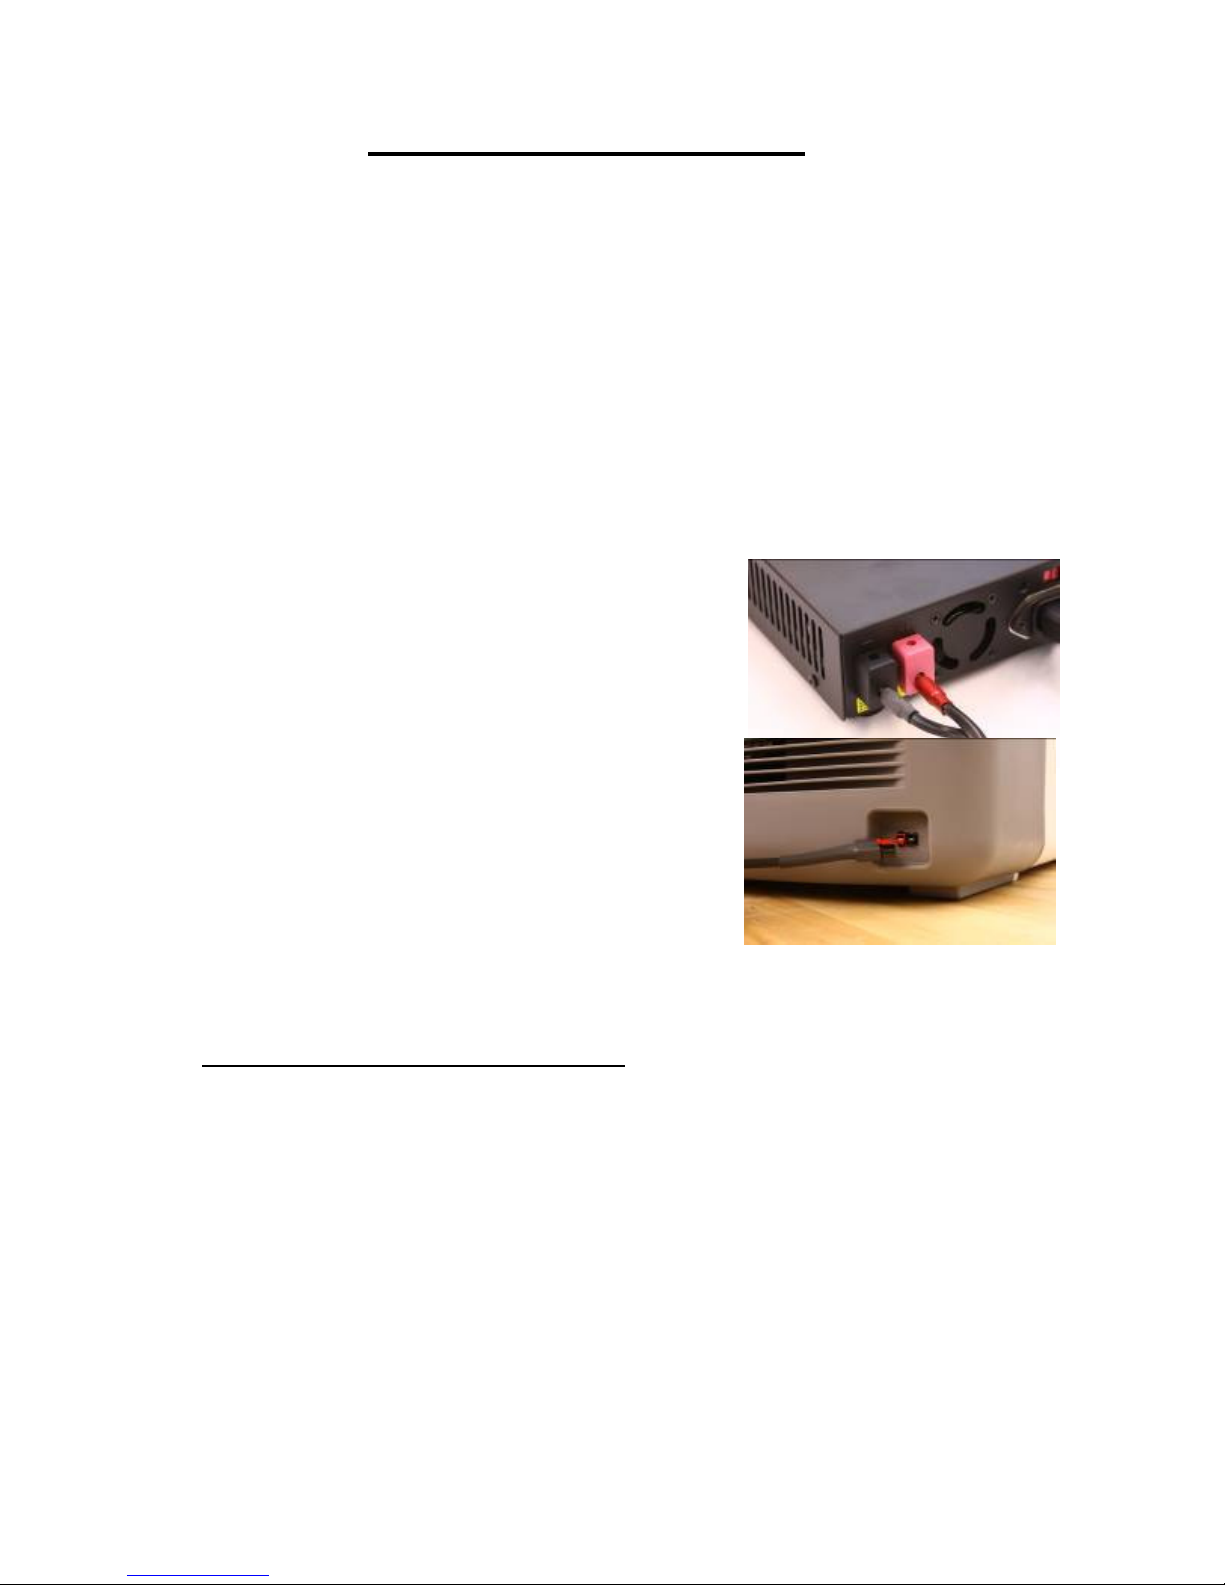
5. Connect to a power source. The freezer can be used with either the AC Power Supply
for lab, home or office use, or the DC Power Cord for automotive use.
a. To use the AC Power Supply:
i. Connect the square plugs on the end of the cord to the power supply as shown.
Securely tighten the terminal screw against the
pin using a flat screwdriver.
ii. Be certain to observe the correct polarity.
Failure to do so may harm the freezer.
iii. Plug the black and red connectors into the
ULT25.
iv. Plug the AC Power Supply cord into a 115 volt
AC source. To use with a 220-240 V supply,
the red switch on the AC Power Supply must be
moved to the 230 V position.
v. Turn on the power supply
b. To use the DC Power Cord in a motor vehicle:
i. Make sure the freezer remains level. Exceeding
an angle of 12 degrees may cause loss of
cooling.
ii. Plug the DC Power Cord into a 12V outlet that is rated at 18 amps or greater.
Consult your automotive specialist if your vehicle lacks 18+ A rated 12V outlets.
iii. Plug the black and red connectors into the ULT25.
6. NOTES ON OPERATION IN A VEHICLE
a. The ULT25 will operate on battery power for a limited time before the battery is
drained and the car cannot be started. This time will vary from vehicle to vehicle but
is generally only a few hours.
b. The engine should be running to prevent accidental total discharge of the battery.
c. The power to 12V outlets in some vehicles may be interrupted during engine
starting. This will cause a sudden stop of the cooling unit which may produce a
sound that is different than when the turning off the ULT25 by using the OFF
button. This is normal and will not damage the cooling unit. The cooling unit will
restart automatically once power resumes.
d. Do not operate the ULT25 an unattended in a vehicle. This may lead to overheating
if left in the sun and subsequent damage to stored contents
© Global Cooling, 2009 10/29/2009
Version 1.2u
4
Page 5
7. Disconnecting from power
a. Turn off the freezer (see OPERATION section below)
i. The 7-segment display will show the word “OFF” while the FPSC turns off.
ii. Unplug the freezer after the word “OFF” disappears and the display goes dark.
iii. If you unplug the freezer while it is ON, you will hear a sudden noise when the
FPSC shuts OFF. Power outages will also cause the same noise.
FEATURES
Freezer
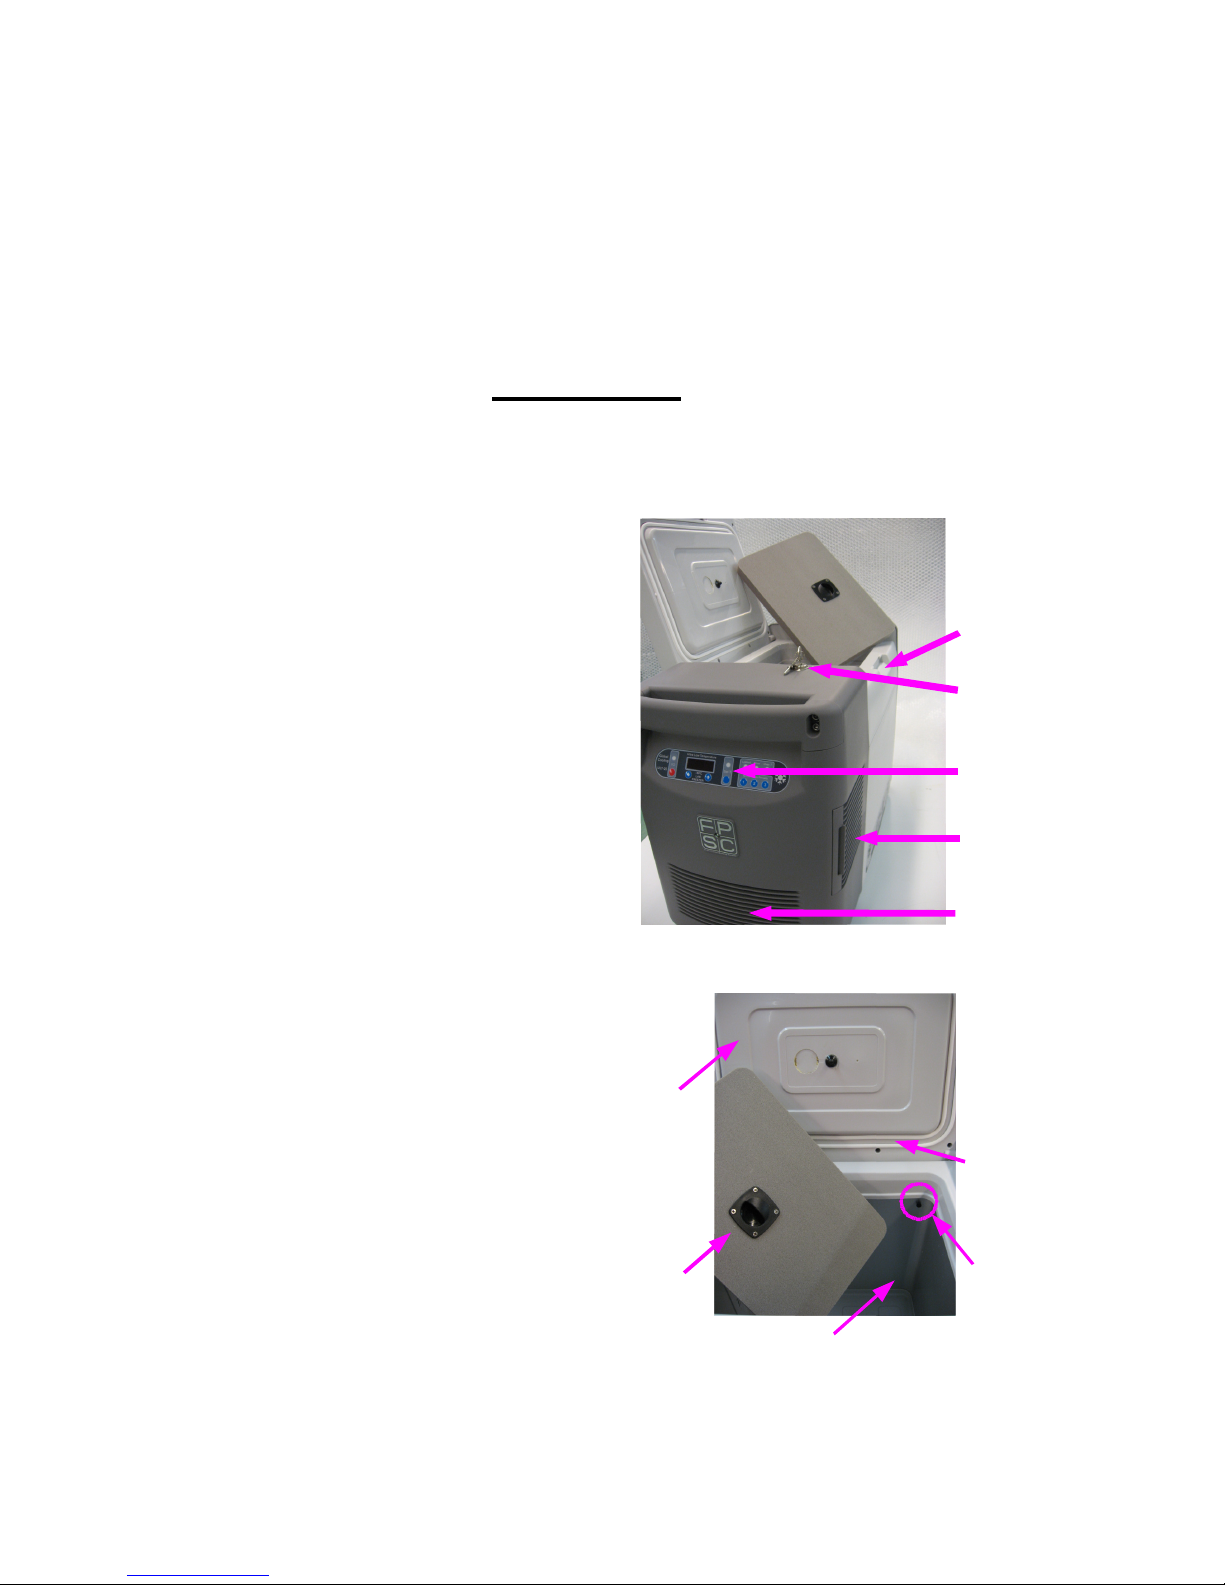
The Global Cooling ULT25 FPSC freezer has the
following features:
• A freezer chamber which is protected by
two lids
o Inner lid – a tight fitting foam lid
o Outer lid – a latching lid with a lock
• Control Panel
o Described in more detail in the next
section
• Locking latch
o Can be locked to provide sample
security
• Access port
o For thermocouple wires, purge gas, etc
• Cleanable filter
o Helps protect the heat rejection fins
from dust
• Power Connector
o Color coded for positive/negative,
can only mate with cords one way
Lid
Latch
Key
Lock
Control
Panel
Cleanable
Filter
Vent
Outer
Lid
Double
Gasket
Moisture
Seal
© Global Cooling, 2009 10/29/2009
Version 1.2u
Inner
Lid
1/4”
Access
Port
Freezer Chamber
5
Page 6
Control panel
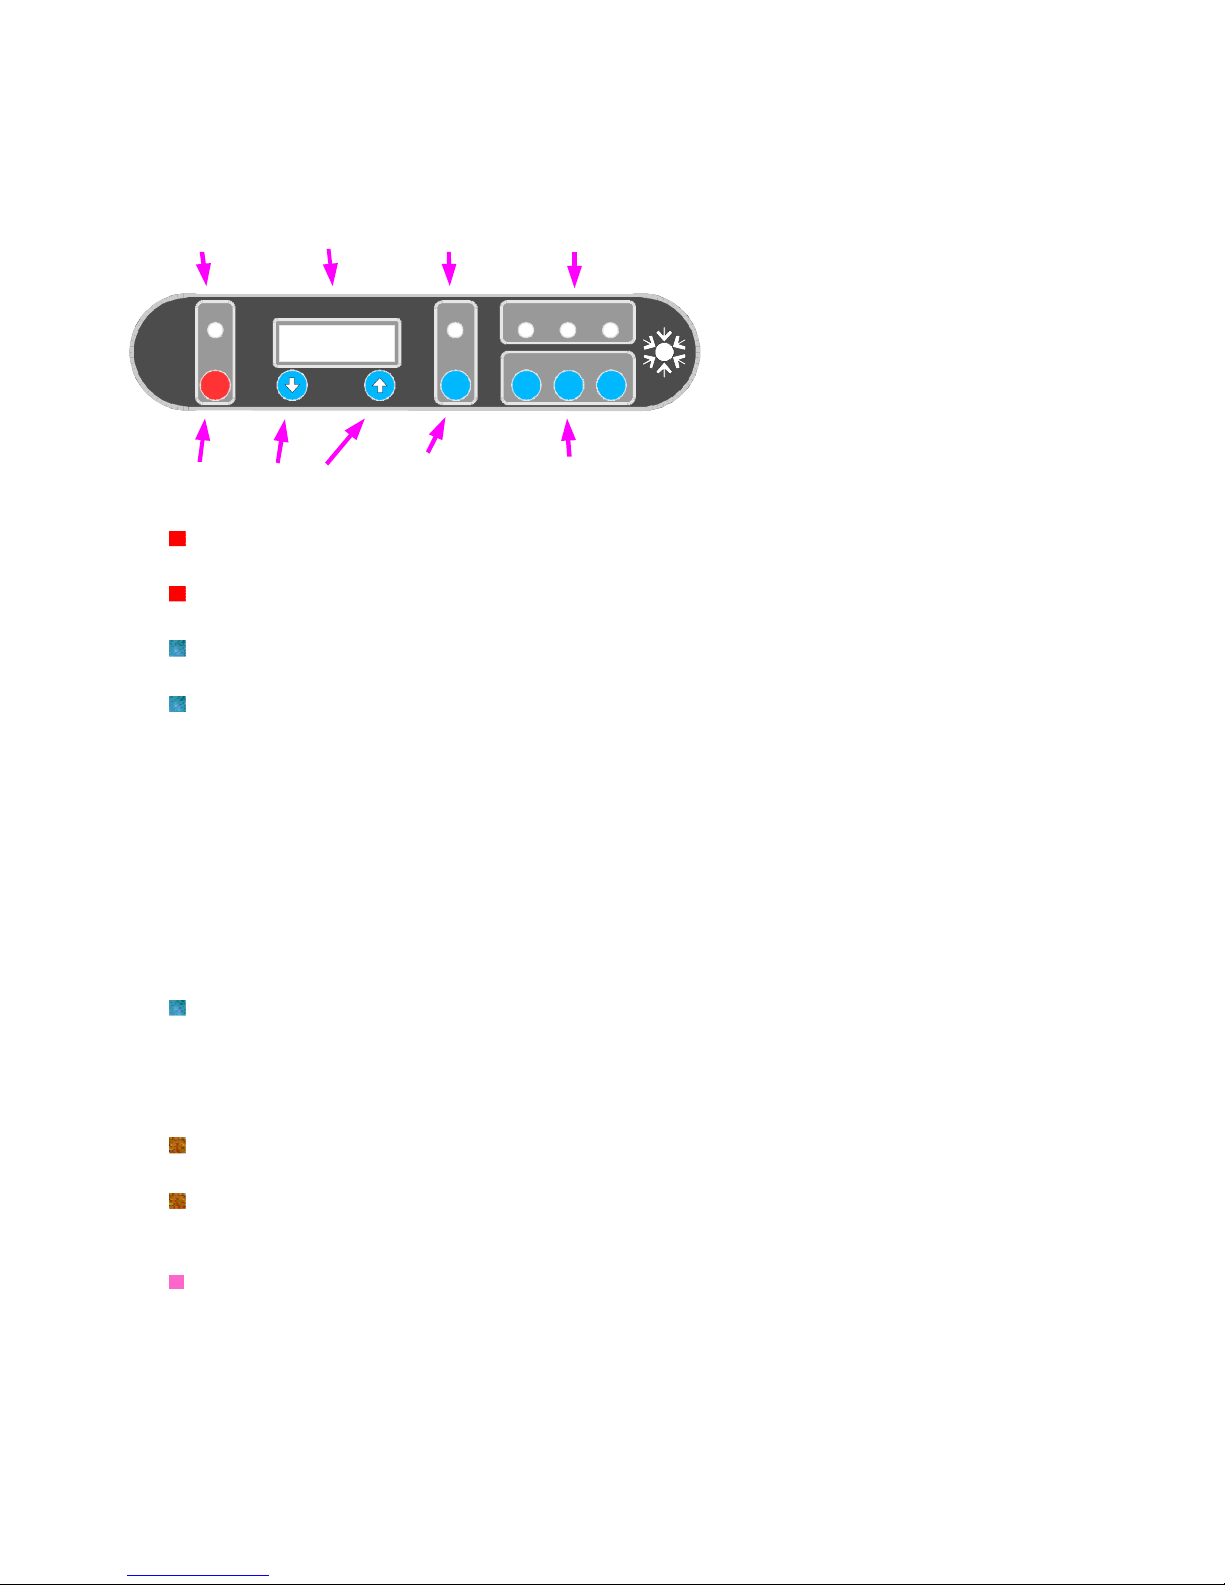
ON/OFF
LED
7-segment
display
Set T
LED
Indicator
LEDs
Global
Cooling
ULT-25
ON/OFF
button
I/O
Ultra Low Temperature
- 80ºC
LAB
FREEZER
DOWN/UP
buttons
Set T
Set T
Temperature
button
ErrorLocked Over T
Temperature Presets
1 2 3
Buttons 1, 2 and 3
Multifunctional, see
OPERATION section
7-Segment display
o Shows all numerical displays – default display is chamber temperature
ON/OFF button and LED
o Turns freezer on and off and shows state
Set T button and Set T LED
o This must be pressed to adjust the Set Temperature
Temperature Presets 1, 2 and 3
o These control the temperature Presets
When the Set T LED is not glowing, pressing the button shows the
value
When the Set T LED is glowing, pressing this button changes the set
point to the preset value
Pressing and holding one of these buttons and / changes the value
o When the Error / Over T LEDs are lit then
2 – shows and controls errors
3 – controls the audible over/under temperature alarm
o Pressing all three buttons simultaneously controls the panel LOCK function
/ buttons
o Used to adjust Set Point Temperature (when the display shows S ##)
o Used to adjust Preset Temperatures (when the display shows P ##)
o Used to adjust Over/Under Temperature alarm settings (display shows ## h)
o Used to show MIN / MAX temperatures since last reset (H### or L###)
Error LED
o Indicates when there is an electrical, mechanical or similar error condition.
Over T LED
o Indicates when the chamber is over / under the set point.
The audible beeper can be set to delay warning.
Locked LED
Indicates when the panel is locked.
In this User Guide indicator LEDs are italicized, control buttons and 7-segment display
values are BOLD. Colored bullets and text are used to group similar features and are the
same color through the text and in the Quick Guide at the end of the manual.
© Global Cooling, 2009 10/29/2009
Version 1.2u
6
Page 7

QUICK GUIDE
- - - - - - - - - - - - -
clip, laminate, keep with freezer
- - - - - - - - - - - - - - - - -
Global Cooling ULT-25 Freezer
ON Press & hold I/O for two beeps
OFF Press & hold I/O for three beeps
Change Set Point Press & hold Set T until Set T LED glows, S ## displayed, then or
See Set Point Press Set T briefly. S ## displayed
Return to Temp Display Press Set T briefly, or wait 8 seconds.
7-segment display number only – chamber temperature; S ## – set point;
Change to Preset Press & hold Set until Set T LED glows, S ## displayed, then Preset 1 2 or 3
Change Preset Temp Press & hold Preset 1 2 or 3, P ## is displayed, and then or
Max Temp Set T LED must be off. Push briefly. H### displays the Max temperature.
Min Temp Set T LED must be off Push briefly. L### displays the Min temperature.
Clear Temp Min/Max Set T LED must be off Push both and simultaneously.
Postpone Over T Alarm When Over T light glows, press Preset 3 until time shows (1.0h default)
(If Over T LED is not glowing, then Preset 3 acts as a Temp Preset)
Change Silence Time When Over T light glows, press Preset 3 until time shows (1.0h default)
then use or while continuing to press Preset 3
Perm. Silence Alarm Change silence time to negative number. LED will function, but not Audible
Change Temp Allowance When Over T light glows, press Preset 2 and 3 until A## shows, then or
Return to Temp Display Wait 8 seconds
See Error Code Again If Error LED is on then Press Preset 2 briefly
(If Error LED is not glowing, then Preset 2 acts as a Temp Preset)
Turn off Error LED Press & hold Preset 2 for 5 seconds when Error LED is on (will turn on again
if error condition persists)
Lock Panel Press & hold Preset 1 AND 2 AND 3 until Locked LED turns on (5 seconds)
Unlock Panel Press & hold Preset 1 AND 2 AND 3 until Locked LED turns off (5 seconds)
7-segment display H### – Max temp; L### – Min temp; P ## – Preset temp; ## h – alarm silence;
A ## – Temp Allowance; E ## – Error code
© Global Cooling Inc, 2009
- - - - - - - - - - - - -
clip, laminate, keep with freezer
- - - - - - - - - - - - - - - - -
BASIC FUNCTIONS
ADVANCED FUNCTIONS
© Global Cooling, 2009 10/29/2009
Version 1.2u
7
Page 8

OPERATION
General Operating Principles
Important changes to the freezer settings require sustained button pushes. This helps
prevent accidental changes to the settings during transportation. Some sequences require a 3
second button press and hold while other sequences require a 5 second button press and hold.
For example,
Turning the freezer ON requires a 3 second press and hold (two beeps)
Turning the freezer OFF requires a 5 second press and hold (three beeps)
The default display is the chamber temperature. Other displays such as Set Point,
Alarm Postpone, etc., are marked with a letter such as S (set point), h (alarm postpone), etc.
These secondary displays revert to the default display after approximately 8 seconds of button
inactivity.
How to Turn the Freezer On/Off
To turn the freezer on
o Press and hold the I/O button for two beeps (~3 seconds)
o The freezer will display a greeting message, and then the chamber temperature
To turn the freezer off
o Press and hold the I/O button for three beeps (~5 seconds)
o The freezer will display “OFF” for 10 seconds, and then go dark.
Changing the set temperature
To see the current set temperature
Press the Set T button briefly
The current set temperature will be displayed with the letter S ##
o After 8 seconds of inactivity the display will revert to the current temp
Change the Set Point to a new value
There two ways to change the Set Point
o Manually adjusting the temperature using /
o Using one of three adjustable Preset Buttons
Adjusting the Set Point manually
o Because of the importance of the Set Point Temperature, changing the Set Point
requires a “two button procedure”. This means:
Method A - either holding the Set T button while simultaneously
pressing / -- OR
Method B - holding down Set T until the Set T LED glows and then
pressing / .
Methods A and B achieve the same effect. The user can use whichever
method they prefer.
© Global Cooling, 2009 10/29/2009
Version 1.2u
8
Page 9

To change the set Set Point by method A
o Press and hold the Set T button and then push the / buttons (do not
release the Set T button).
The Set Point temperature will appear with the prefix S in the 7-segment
display.
When the / buttons are pushed the Set Point will change by 1º C.
at first
If the / buttons are held for 5 seconds the step size will increase to
5º C.
If the / buttons are briefly released (less than ½ second) while
continuing to hold down the Set T button the increment/decrement size
will return to 1º C.
Release all buttons once the desired Set Point is achieved. The display
will return to chamber temperature after about 8 seconds.
To change the Set Point by method B
o Press and hold the Set T button until the Set T LED is lit.
The Set Point temperature will appear with the letter S in the first 7-
segment display.
o The / buttons can be used to change the Set Point.
When the / buttons are pushed the Set Point will change by 1º C.
at first
If the / buttons are held for 5 seconds the step size will increase to
5º C.
If you briefly release (a half second) the / buttons while
continuing to hold down the SET button the increment/decrement size
will return to 1º C.
Release the / buttons once the desired Set Point is achieved.
o Press the Set T button briefly (less than 1 second) to turn off the Set T LED.
The display will return to chamber temperature.
Using Preset Temperatures
The three buttons labeled 1, 2 and 3 can be used to quickly change the Set Point to
frequently used values. When shipped the Presets are set to -80º C, -40º C, and -20º C.
They can be set to any preferred values (see next section).
To choose one of the preset temperatures:
o Press and hold the Set T button until the Set T LED glows
o Push one of the Preset Temperature buttons briefly
o The new set temperature will be shown in the 7-segment display
o If this is the desired Set Temperature the user can either:
Briefly press the Set T button to turn off the Set T LED OR
Wait for approximately 8 seconds when the freezer panel will return to
normal operation
© Global Cooling, 2009 10/29/2009
Version 1.2u
9
Page 10

Changing the preset values
Many users will have protocols that specify temperatures such as -75º C, etc. The
Preset buttons allow users to quickly change the Set Point to those temperatures.
Changing the preset value does not change the Set Point itself. Only the value of the
preset is being changed. This means the Set T button is NOT pressed for this
procedure.
Press and hold one of the PRESET TEMPERATURE buttons
o Use the / buttons to change the value of the preset button.
This value will be saved even if the freezer is turned off or powered off.
To change the Set Point to this new Preset value follow the instructions in the previous
section.
Min and Max Temperature
The freezer remembers the highest and lowest temperatures since being turned on or
since the min/max was last reset (min initially reads 0 until chamber T falls below 0).
o Do not use Set Temperature mode (The Set T LED should be off)
o Press () briefly to see the Min (Max) temperature
o To reset the Min/Max memory, simultaneously press both and
Over Temperature Alarm
The freezer has an adjustable over and under Temperature Alarm mode. This alarm
can be activated whenever the freezer is on, even when the panel is locked.
o If T
If the freezer compartment temperature is 10º warmer or colder
than the set point for 5 seconds then it will go into Temperature Alarm mode.
o The Over T light will go on (this is used for under temperature alarms as
o The freezer will make a double beep every 10 seconds.
o Situations which can affect the freezer’s ability to maintain a steady state or
How to silence the audible Temperature Alarm
The Over T light will always be on when the cooler temp is over or under the set temp
by more than 10º C
The audible alarm can be silenced in two different ways
o Postponed - The audible alarm will be silenced for an adjustable time period.
o Silenced – it will be off until it is manually reset or the freezer is turned
chamber
≥ 15º C when the freezer is turned on, the Temperature Alarm is
automatically postponed for 3.0 hours to allow initial cooldown.
(adjustable, see below)
well).
cooling rate include:
The lid is ajar
The air vents are blocked
Addition of a large relatively warm mass
Power supply problems
Mechanical and/or electrical problems.
(adjustable, see below)
.
OFF/ON
© Global Cooling, 2009 10/29/2009
Version 1.2u
10
Page 11

To postpone an Alarm
When the audible alarm is sounding it can be postponed
Press and hold the button beneath the Over T LED until a time is displayed… it will
look like ###h which represents a decimal fraction of an hour -- 1.0 h is the default.
The audible alarm will be turned off for the amount of time shown
If you wish to change the amount of time before the audible alarm is armed again,
o Continue to press and hold button 3 under the Over T LED
o While holding button 3, push the / buttons to change the delay by 0.1 h
increments. If the button is held for approximately 5 seconds the time will
begin to change by 1.0 h increments.
Typical times for recovery to -80º C after adding RT samples to -80º C chamber
o 16 15-ml centrifuge tubes w. centrifugate 0.8 h
o 96 2 ml cryovials w. 1.8 ml cryopreservant 1.5 h
o 8 50-ml centrifuge tubes filled w water 3.5 h
o 2 freezer bottles w 500-ml water 8.0 h
How to change the Over (Under) Temperature Allowance
The Over T LED is lit whenever the chamber temperature is either higher or lower
than the set point by an “allowance” (
is 10º C. For Example - if the Set Point is -60º and the default allowance is used, then
the Over T alarm occurs at T>-50º or T<-70º. This allowance can be changed from 1º
C to 50º C.
o Small values ensure tight temperature control during long storage.
o Large values can be used to reduce the number of Over Temperature alarms
when the freezer is being open and closed frequently.
This can only be changed when the Over T LED is glowing.
o To view the allowance
Press both buttons 2 and 3 briefly to see the current allowance setting.
• It will be display with the letter A, such as A 10.
o To change the allowance
Press and hold both buttons 2 and 3 and then /
The allowance value will change by 1 degree increments
o To dismiss the allowance display
Either press and hold both buttons 2 and 3 briefly, OR
The display times-out after approximately 8 seconds.
T alarm = T set +/- T allowance
). The factory default
To Silence the Temperature Alarm
Press the button beneath the Over T indicator light until the display shows 1.0 h, then
use the down button to set the time to any negative time (e.g. -0.1 h). This will turn
OFF the audible alarm.
The Over T indicator LED will always glow whenever the chamber T is out of range.
You can turn the silenced alarm back on by either
o Resetting the postpone time to a positive number
o Turning the freezer OFF and ON
© Global Cooling, 2009 10/29/2009
Version 1.2u
11
Page 12

Error conditions
Certain conditions will cause an Error Code to be displayed on the 7-segment display,
and the Error LED will be lit.
o The error code will be of the form E ##, where ## is the error code.
o The error code will be displayed for about 5 seconds and then the display will
return to showing the chamber temperature. The Error LED will stay on.
o The error code can be recalled by briefly pressing the button under the Error
LED. This will recall the error code for approximately 10 seconds.
o If button 2 is pressed and held for 5 seconds (three beeps) this will clear both
the 7-segment display and the Error LED. However, if the error condition
persists the error cycle will start over again.
Locking the Panel
To Lock the freezer panel
Press and hold buttons 1, 2 and 3 until the freezer beeps three times
o The Locked indicator LED will light up
o You cannot Lock the panel if there is an over temperature or error condition
To Unlock the freezer panel
Press and hold buttons 1, 2 and 3 until the freezer beeps three times
o The Locked indicator LED will go turn off
o The freezer will still indicate over temperature alarms or error conditions while
it is locked. You have to unlock the panel to handle those alarms/conditions.
How to switch between power supplies
There are several possible power sources for the ULT-25:
o GC provided SS-18 13.8 V power supply
o Automobile accessory plug (cigarette lighter)
When changing from one power supply to another you should first stop the ULT-25.
o Turn OFF the ULT-25 (Press and hold the I/O button)
o Wait for the FPSC to slow and stop (15 seconds).
o Unplug the ULT-25 from one power source and plug it into the next.
o The ULT-25 can be restarted immediately. There is no need to wait, unlike
some compressor systems.
o Turn ON the ULT-25 by pressing and holding the I/O button.
© Global Cooling, 2009 10/29/2009
Version 1.2u
12
Page 13

Error Codes
These are displayed in the 7-segment display as E ##
10 The FPSC is not maintaining a working temperature on the heat rejection fins. This could
arise from blocked filters, blocked air passages, unusually hot ambient temperatures (for
example >45º C), or a fan failure. Check air passages and clear any blockages to good air
circulation. Remove from hot environments (car interiors, etc).
11 The problem described in error code 10 has become critical. The freezer has stopped
freezing in order to prevent damage to temperature sensitive parts. Please perform the
maintenance described above before restarting the freezer.
20 This error code may arise from a simple sensor failure or a more complex failure of the
controlling board. The FPSC may be overheating. Continued operation of the freezer to
protect samples may result in damage to the FPSC. Please return for repair.
21 This error code may arise from a simple sensor failure or a more complex failure of the
controlling board. The freezer has entered a maximum cooling mode which has no
temperature regulation. If the problem is more than simple sensor failure the freezer might
not maintain an ultra low temperature. Continued use has risks – no chamber temperature
control, possible damage to the FPSC, etc. Please return for repair.
30 Input voltage too high. Check the input voltage, and reduce to acceptable input levels.
Continued operation of the freezer may result in damage to the electronic controls. The
operation of the FPSC protects the electronics to some extent by dropping the voltage. If the
FPSC is turned OFF using the panel then the complete over voltage is put across the
electronics. If you decide to stop using the freezer then unplug the freezer from the voltage
source rather than using the I/O button to turn it OFF. This may cause it to make a noise
when the linear motor stops suddenly – the noise does not signal that damage has occurred.
31 Input voltage slightly low. Check the input voltage, and increase to acceptable input levels.
Check seating of plugs, wiring, etc. The freezer will continue to operate with decreased
performance.
32 Input voltage too low. Check the input voltage, and increase to acceptable input levels.
Check seating of plugs, wiring, etc. The electronics can operate but the FPSC will not
provide significant cooling when the voltage is too low.
40 A component which monitors FPSC performance has failed. The FPSC cannot regulate
itself. Please return for repair.
90 An electronics memory problem has occurred which might cause loss of set point data
between uses. Please return for repair.
© Global Cooling, 2009 10/29/2009
Version 1.2u
13
Page 14
MAINTENANCE
With the exception of the filter, there are no user serviceable parts to maintain.
Air Intake Filter
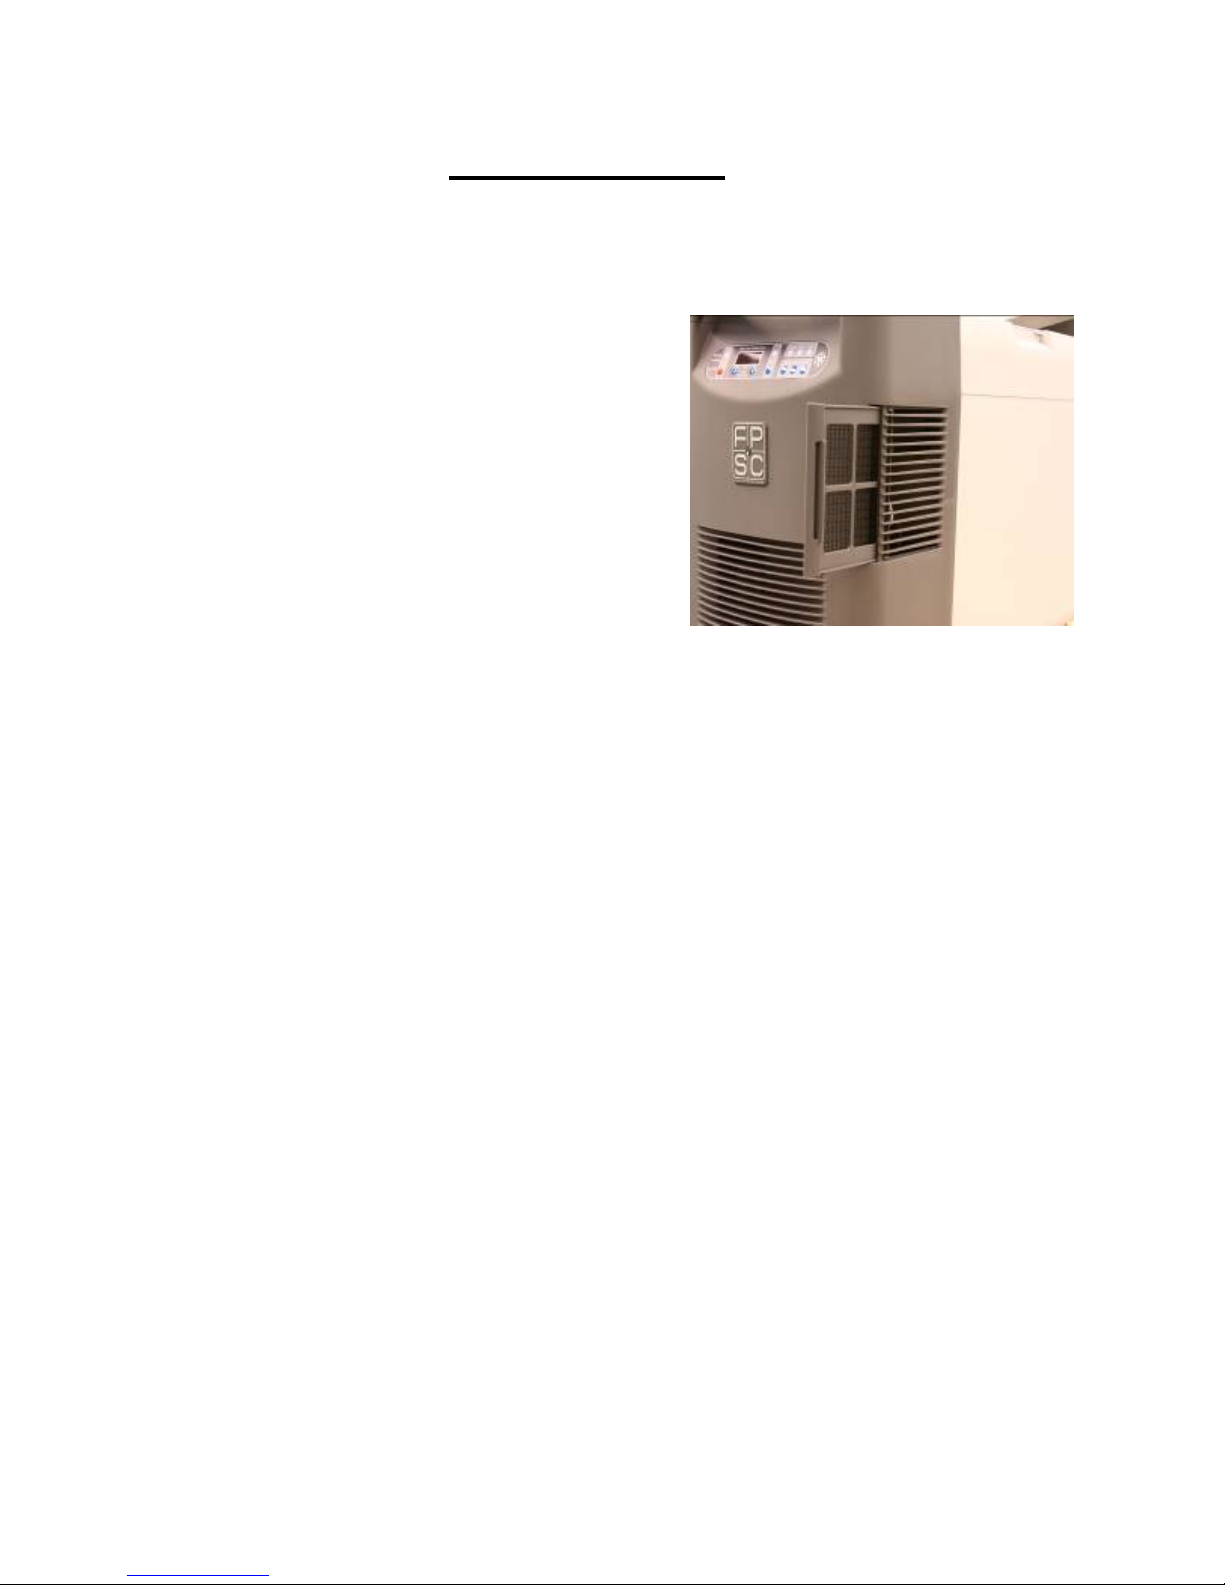
Clean accumulated dust and dirt on the AIR INTAKE
FILTER every month. Pull the FILTER COVER to the
left as shown. Please note that it cannot be completely
removed. Gently clean the filter with a vacuum cleaner.
If there are stubborn residues use a soft brush to work
them loose.
Storage
1. Turn off the power and allow the freezer to come to room temperature.
2. Dry the inside of the freezer compartment, and clean any spills.
3. Disinfect with suitable sterilizing agent if the freezer has been used for biohazards.
Cleaning
The exterior surfaces of the ULT25 can be cleaned as needed by using a soft cloth and mild
detergent. Do not use solvent or harsh abrasive cleansers or pads.
© Global Cooling, 2009 10/29/2009
Version 1.2u
14
Page 15
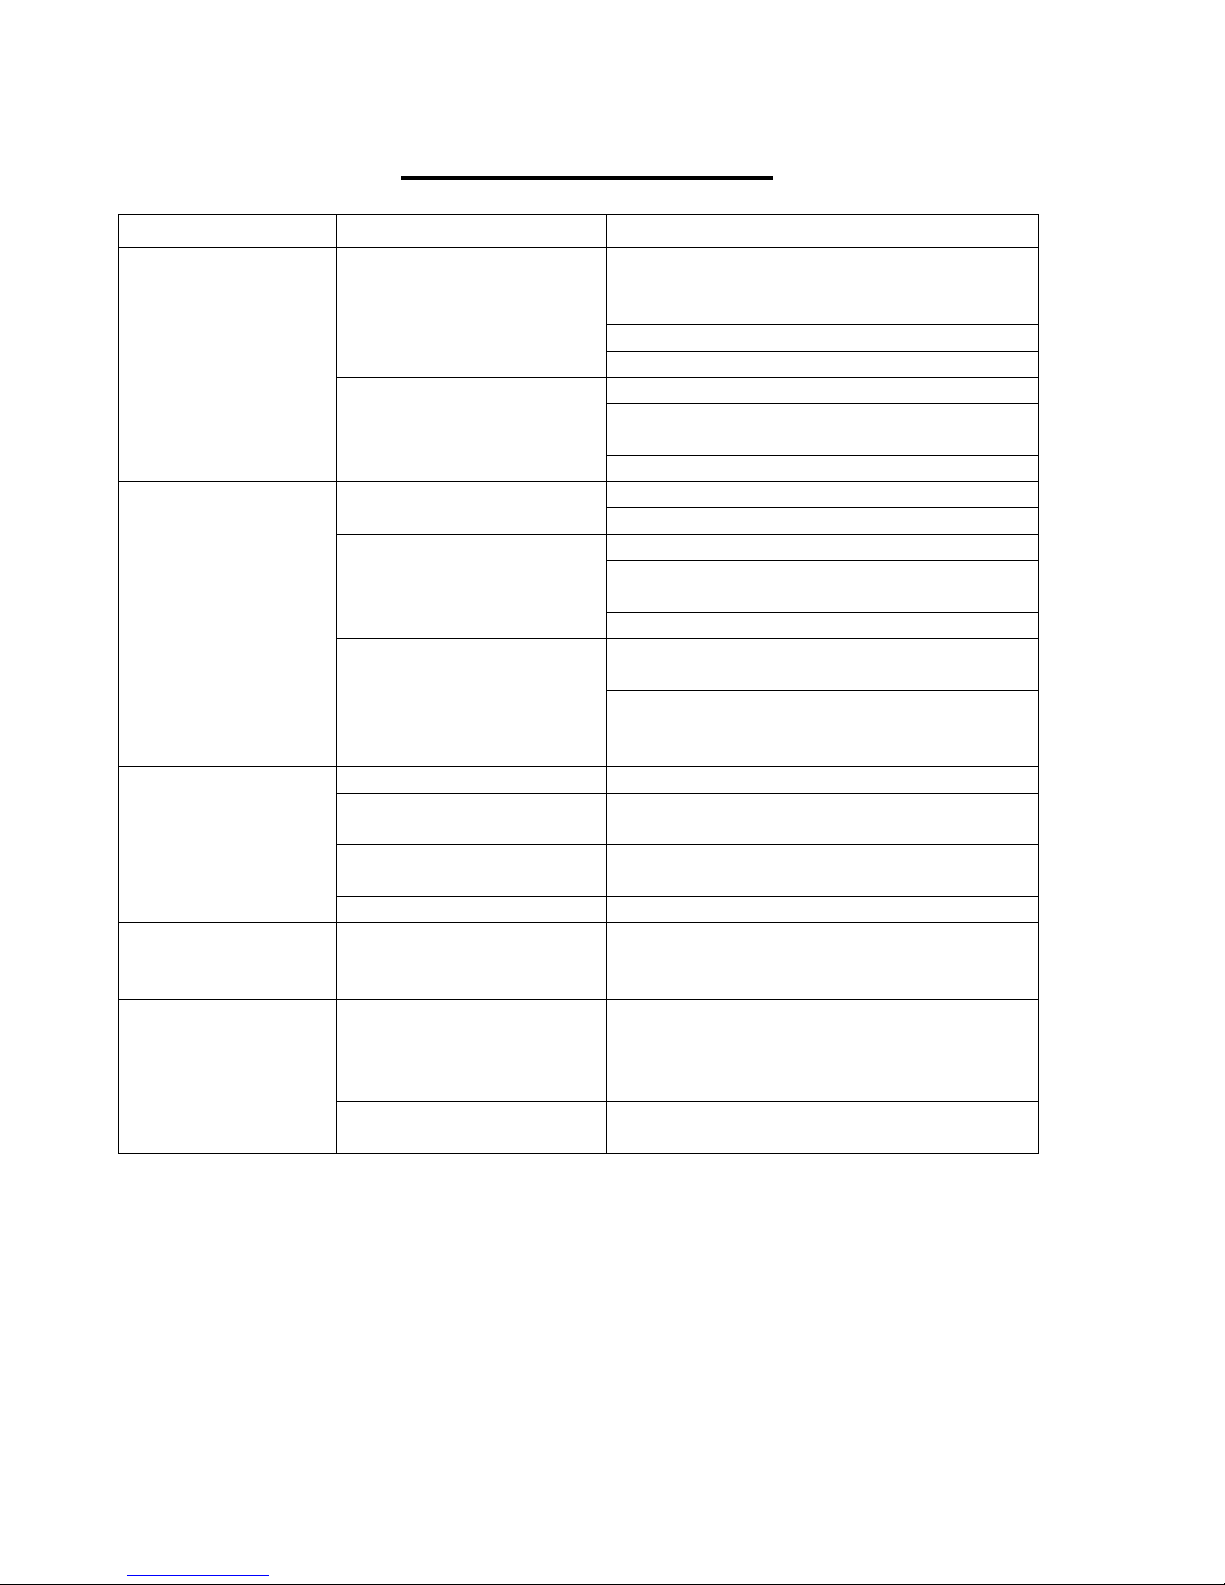
TROUBLESHOOTING
Problem Possible Cause Solution
Check that the power supply is turned on
Check the connections to the power supply
Assure that the wall plug is firmly seated
Reseat the connections to the accessory plug
Remove any dirt or burnt material inside the
accessory socket or on the plug
Replace any blown automobile fuses
Clean air filter screen
Remove air flow obstructions
Assure that the wall plug is firmly seated
Remove any dirt or burnt material inside the
automotive accessory socket or on the plug
Run Freezer only when automobile is running
Remove Freezer from direct sunlight, hot
room, etc
Check that Freezer is level. Tilts of more than
12º in some directions will degrade
performance.
Check for ice buildup, remove if necessary,
and properly close lid
Minimize opening and closing of lid
Clean the socket
Clean socket, cease using splitters, turn off
other devices, use better or shorter cables
Charge battery. If in vehicle, start vehicle
before charge is too low to start vehicle.
Freezer does not
power on.
Freezer does not
achieve desired
temperature
Freezer cools
slowly
12 V plug becomes
unusually hot
Error indicator
shows low voltage
Power is not getting to the
Freezer from the Power
Supply
Power is not getting to the
Freezer from the Auto
Accessory Plug
Inadequate air circulation
Inadequate power
Improper environment
Overloading of Freezer Remove some items from Freezer
Lid is not completely
closed
Lid is open and closed too
often
Inadequate Air Circulation Clean Filter and unblock air vents
Dirt and/or burnt organic
matter in the accessory
socket
Dirty sockets, splitters and
overly long extension
cables. Other devices on
same circuit
Battery losing charge
© Global Cooling, 2009 10/29/2009
Version 1.2u
15
Page 16
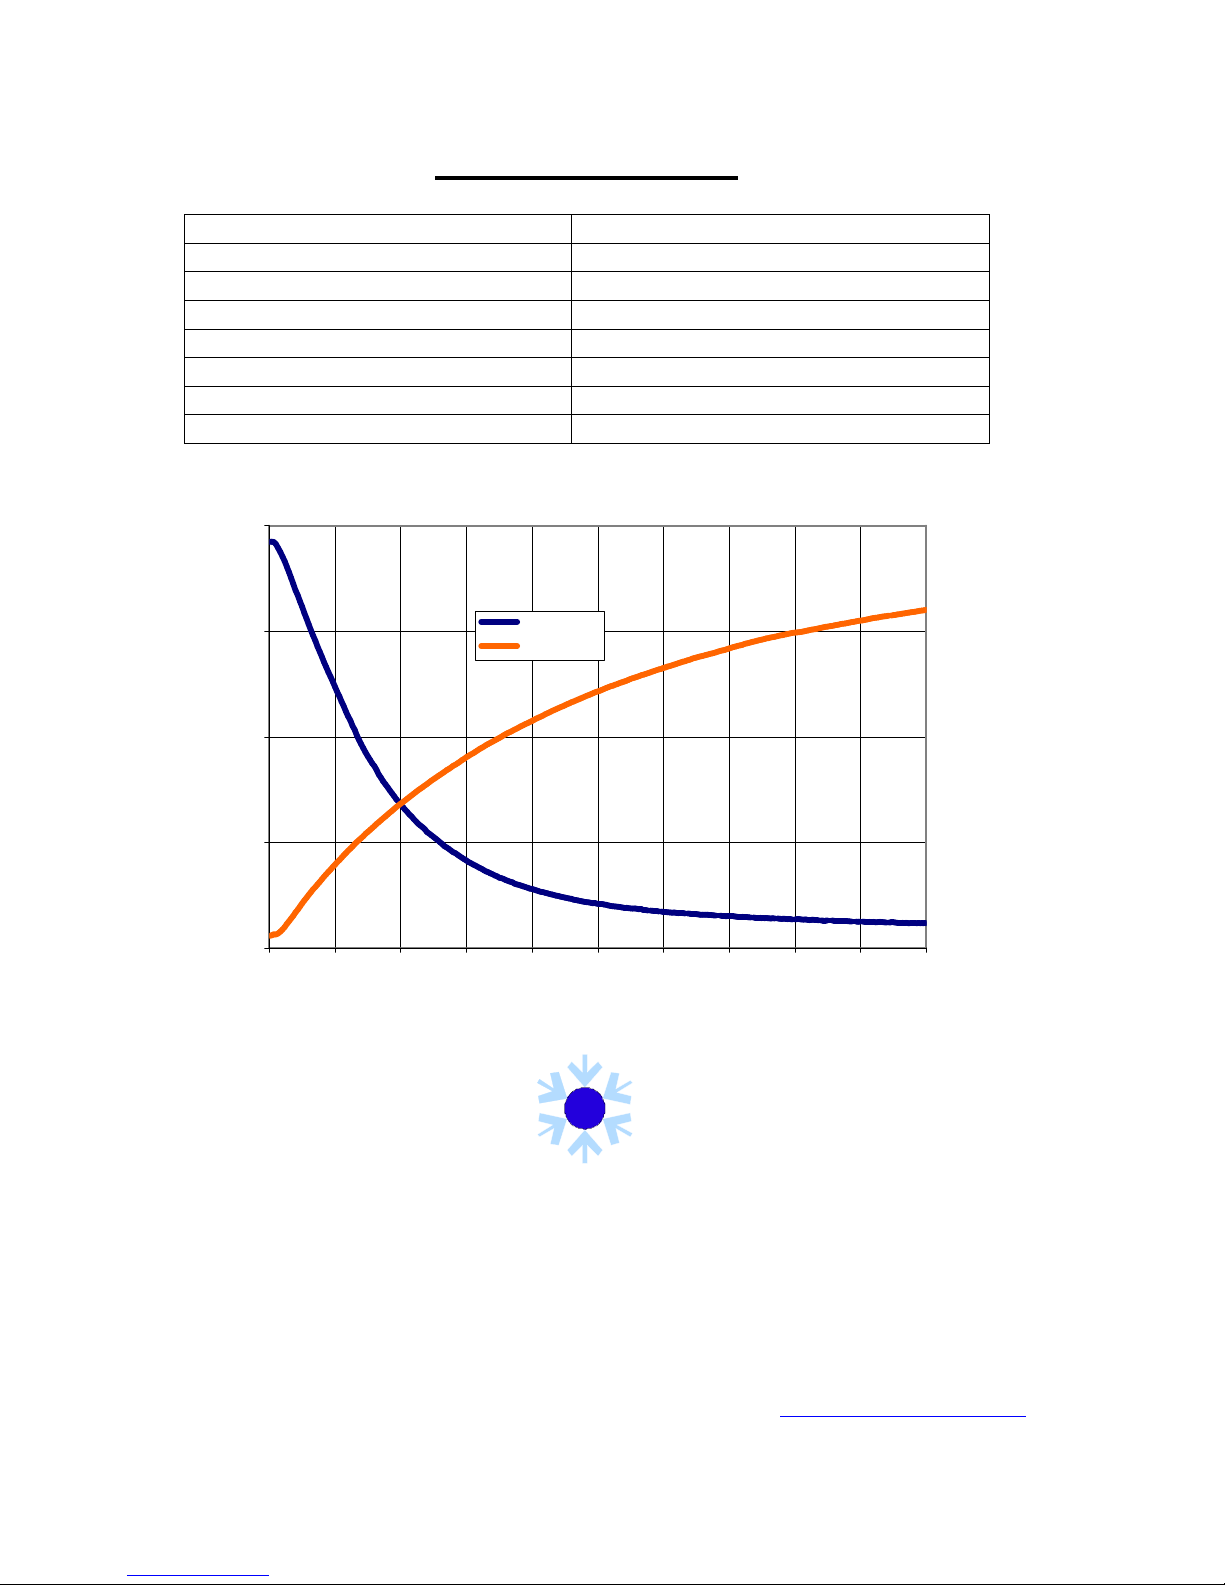
SPECIFICATIONS
Operating Voltage DC 13.8 V (11 – 16 V)
Power Consumption ~150 W
Set Temperature Range -80º C to -20 º C
Ambient Operating Temperature 0º C to +35 º C
Freezer Compartment Capacity ~ 25 l
Freezer Compartment Dimensions D340 x W225 x H340 mm
Overall Dimensions D695 x W350 x H460 mm
Weight 39 lbs. (18 kg)
30
0
Cool Down
Warm Up
Temp (C)
-30
-60
-90
0 0.5 1 1.5 2 2.5 3 3.5 4 4.5 5
hours
Made in the USA
Global Cooling Inc
More information on the ULT-25, FPSCs and Global Cooling can be found at http://www.globalcooling.com
© Global Cooling, 2009 10/29/2009
Version 1.2u
141 Columbus Road
Athens, OH 45701
740-592-2655
16
Page 17

WARRANTY
GLOBAL COOLING INC., as the Manufacturer warrants the quality of all parts used in the
construction of the ULT25 to be free from defects to the original purchaser.
1. This WARRANTY shall continue for one year from the original delivery date, i.e. one
year from the time of delivery to the shipper (e.g. UPS, Fed Ex, etc).
2. This WARRANTY shall have force and effect only if all items are operated in
accordance with instructions provided by the manufacturer.
3. This WARRANTY shall not extend to ordinary wear and tear.
4. This WARRANTY shall not extend in any way to liability (whether or not construed
on tort or contract or any other theory of law) to consequential damages resulting from:
• Ordinary use of the product
• Abuse or misuse of the product
• Interruption or cessation of the operation of the product from any cause whatsoever,
including but not limited to power failure, low voltage, acts of God, explosion,
negligent operation and the like.
5. This WARRANTY shall extend only to furnishing for replacement a part found by the
manufacturer to be defective.
6. This WARRANTY shall not extend nor cover any part used as a replacement part
beyond the original one year product WARRANTY: nor does the manufacturer
undertake any obligation in connection with this WARRANTY other than that
specifically set forth above. No person is authorized to make any representation as to
this WARRANTY except duly authorized officers of Global Cooling Inc.
7. Global Cooling Inc. agrees if instructions as to operation and use are strictly followed,
and power sources (circuits, voltages, etc.) are properly applied, to provide within one
year after original delivery to the shipper, labor free of charge to maintain the product
in good working condition.
8. The customer will pay for the cost of returning the freezer to Global Cooling Inc (or to
the distributor if approved by Global Cooling Inc). Global Cooling Inc will pay for
the cost of returning the freezer to the customer, unless examination of the freezer
demonstrates that the freezer was damaged by operation or handling outside the
instructions provided by the manufacturer.
9. This WARRANTY is limited to products purchased and used in the United States of
America.
“Consequential damages” shall be defined to include, but not limited to spoilage of., or damage to
contents placed in the product, loss of profits, expenses of delay resulting from interruption or cessation of the
operation of the product, loss of customers or business good will, any time element loss, or any other special
damages.
ALL WARRANTY returns MUST be decontaminated according to current laboratory
protocols appropriate for any Bio Hazards which were contained in the freezer. A list of
all Bio Hazard agents which had been contained in the freezer and a copy of the
decontamination protocol used must accompany every freezer returned for repair.
Global Cooling Inc reserves the right to change all specifications for the mechanical, physical
or firmware portions of this product without notice.
© Global Cooling, 2009 10/29/2009
Version 1.2u
17
 Loading...