

Page 1

Corby
Installation Manual
201 8
Descor Collection
REVISED: JANUARY 2018
Visit us on the Internet at globalcontract.com • (905) 470-0010
ISO 9001:2008 ISO 14001:2004
Descor Industries Inc. 15 Riviera Drive
Markham, Ontario, L3R 8N4
Page 2

GLOBALContract
INSTALLATION GUIDELINES
PRODUCT INSTALLATION
Descor Collection • January 2018
ACTxxxxHxx - Occasional table
ARxx32 - Peninsula table
ARTxxxx - Freestanding work table
ACMPWxxHxx - Modesty panel
ARxx32 & APxxLB32 - Peninsula table with low base (LB) pedestal 32”D
ARxx32 & APxxHB32 - Peninsula table with high base (HB) pedestal 32”D
ASxx & ACxxLB/ACxxHB - Stack-on bookcase with credenza
02
02
02
03
04
05
06
Please contact your Global Contract Service Representative at (905) 470 - 0010 for
any questions or concerns.
NOTE: Any alterations to listed components will void the manufacturer’s warranty.
The manufacturer will not be responsible for any damage or bodily harm caused by
alterations in accordance with national or local electrical codes and manufacturer’s
Page • globalcontract.com1
• Corby
specifications. In accordance with the manufacturer’s policy of continual
product improvement, the product presented in this document is subject to
change without notice or obligation.
Page 3

GLOBALContract
Descor Collection • January 2018
INSTALLATION GUIDELINES
ACTxxxxHxx - OCCASIONAL TABLE / ARxx32 - PENINSULA TABLE / ARTxxxx - FREESTANDING WORK TABLE
ACTxxxxHxx - Occasional table ARxx32 - Peninsula table ARTxxxx - Freestanding work table
NOTE: Open and assemble one product at a time
to avoid potential mix-up of parts and hardware.
It is advisable to assemble the unit on a clean
padded surface to avoid scratches.
CAUTION: Do not drag the assembled
furniture across the floor. Lift the unit completely
off the floor, and move it to the desired location.
Required tools
Safety glasses
Included hardware
Fully assembled leg
Bit #2 Robertson Screwdriver #2 Robertson
ASSEMBLY [freestanding wOrk table shOwn as an example]
STEP 1: Place the worksurface upside down on a clean padded surface.
Countersunk FH screw
1/4-20 x 3/4
STEP 2: Position the preassembled legs to align the holes in the bracket with
the preinstalled inserts in the worksurface. Secure each bracket to
the worksurface with the provided countersunk-
FH screws
Cordless drill
(1/4-20 x 3/4, Qty. 20).
Fluid leveler
STEP 3: Flip the assembled table upright. Adjust the glides to level the worksurface.
NOTE: Occasional tables and Freestanding work tables have four legs.
Peninsula tables have two legs.
• Corby
• Pageglobalcontract.com 2
Page 4
GLOBALContract
INSTALLATION GUIDELINES
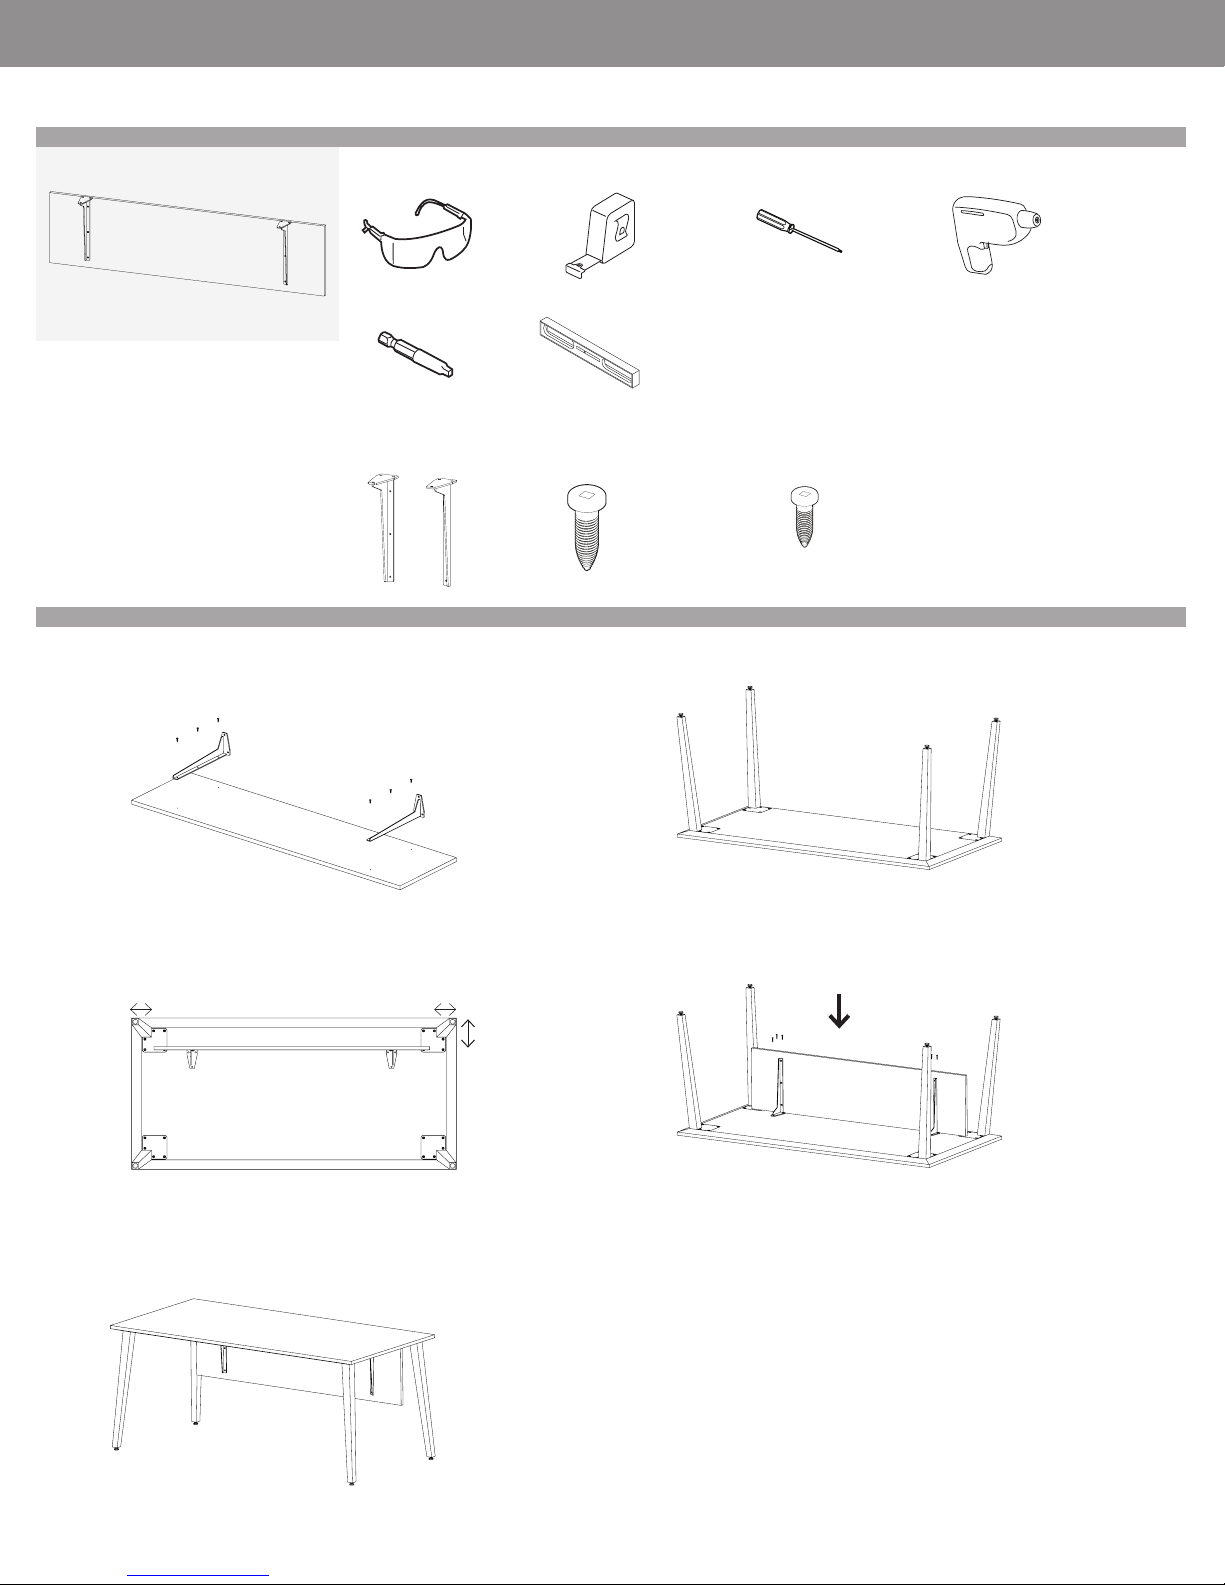
ACMPWxxHxx - MODESTY PANEL
Required tools
Safety glasses
Measuring tape Cordless drill
Descor Collection • January 2018
Screwdriver #2 Robertson
Bit #2 Robertson
NOTE: Open and assemble one product at a time
to avoid potential mix-up of parts and hardware.
It is advisable to assemble the unit on a clean
padded surface to avoid scratches.
CAUTION: Do not drag the assembled
furniture across the floor. Lift the unit completely
off the floor, and move it to the desired location.
Included hardware
Modesty panel bracket
Qty. 1 set
LH RH
ASSEMBLY [freestanding wOrk table shOwn as an example]
STEP 1: Place the modesty panel flat on a clean padded surface. Attach brackets to
the modesty panel with provided screws.
(Pilot holes on modesty panel indicate the location)
(#8 x 5/8”, Qty. 6)
Fluid leveler
Robertson PH screw
#8 x 1”, Qty. 6
STEP 2: Place the assembled table upside down on a clean padded surface.
Robertson PH screw
#8 x 5/8”, Qty. 6
STEP 3: Place the assembled modesty panel on the bottom surface of the table.
Align the modesty panel 6” inset from the edge and ensure equal spacing on
either side.
=
BOTTOM VIEW
STEP 5: Flip the assembled table upright. Adjust the glides to level the worksurface.
=
6” inset
STEP 4: Mount screws
surface of the table.
(#8 x 1”, Qty. 6)
through the brackets into the bottom
Page • globalcontract.com3
• Corby
Page 5
GLOBALContract
Descor Collection • January 2018
INSTALLATION GUIDELINES
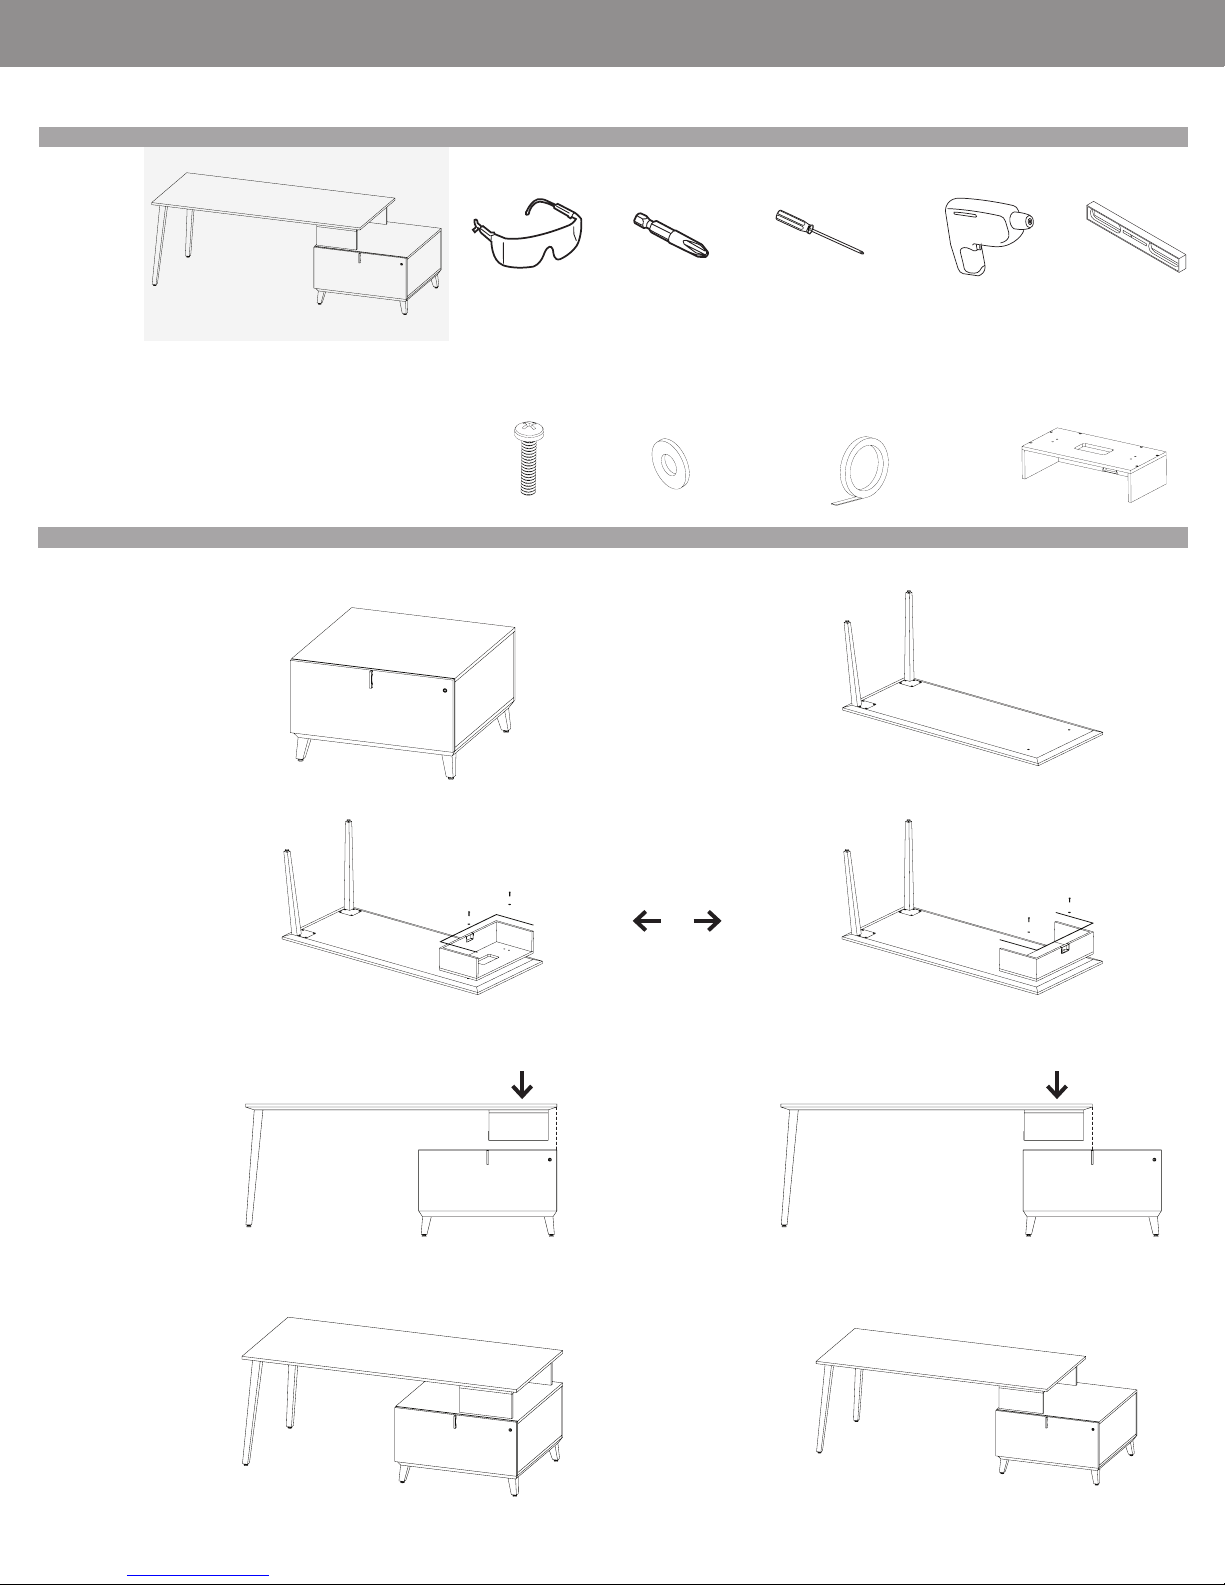
ARxx32 & APxxLB32 - PENINSULA TABLE WITH LOW BASE (LB) PEDESTAL 32”D
Required tools
Safety glasses Cordless screwdriverBit #6 Phillips Screwdriver #6 Phillips Fluid leveler
NOTE: Open and assemble one product at a time
to avoid potential mix-up of parts and hardware.
It is advisable to assemble the unit on a clean
padded surface to avoid scratches.
CAUTION: Do not drag the assembled
furniture across the floor. Lift the unit completely
off the floor and move it to the desired location.
Included hardware
Phillips PH screw
1/4-20 x 1
1/4
, Qty. 2
Washer plate
Ø 1/4”, Qty. 2
ASSEMBLY
STEP 1: Clean the top surface of the pedestal with a damp cloth, followed by a soft
dry cloth in the direction of grain.
STEP 3: Attach the riser box to the peninsula table with Phillips PH screws
bottom of the riser box.
OUTSIDE RISER BOX OPENING INSIDE RISER BOX OPENING
(1/4-20 x 1
Double-sided adhesive tape
Qty. 1
STEP 2: Place the peninsula table upside down on a clean padded surface.
1/4
, Qty. 2)
and washer plates
or
(Ø 1/4”, Qty. 2)
. Apply double-sided adhesive tape to the
Riser box (
Qty. 1
sold separately)
STEP 4: Flip the assembled peninsula table and the riser box and set them on the low base (LB) pedestal as per chosen configuration (see below). Apply moderate pressure
from the top of the peninsula table (at least one minute for the pressure sensitive double sided tape to adhere).
FLUSH CONFIGURATION
STEP 5: Adjust the glides to level the assembled unit.
FLUSH CONFIGURATION OFFSET CONFIGURATION
(Configuration shown for outside riserbox opening)
OFFSET CONFIGURATION
• Corby
• Pageglobalcontract.com 4
Page 6
GLOBALContract
Descor Collection • January 2018
INSTALLATION GUIDELINES
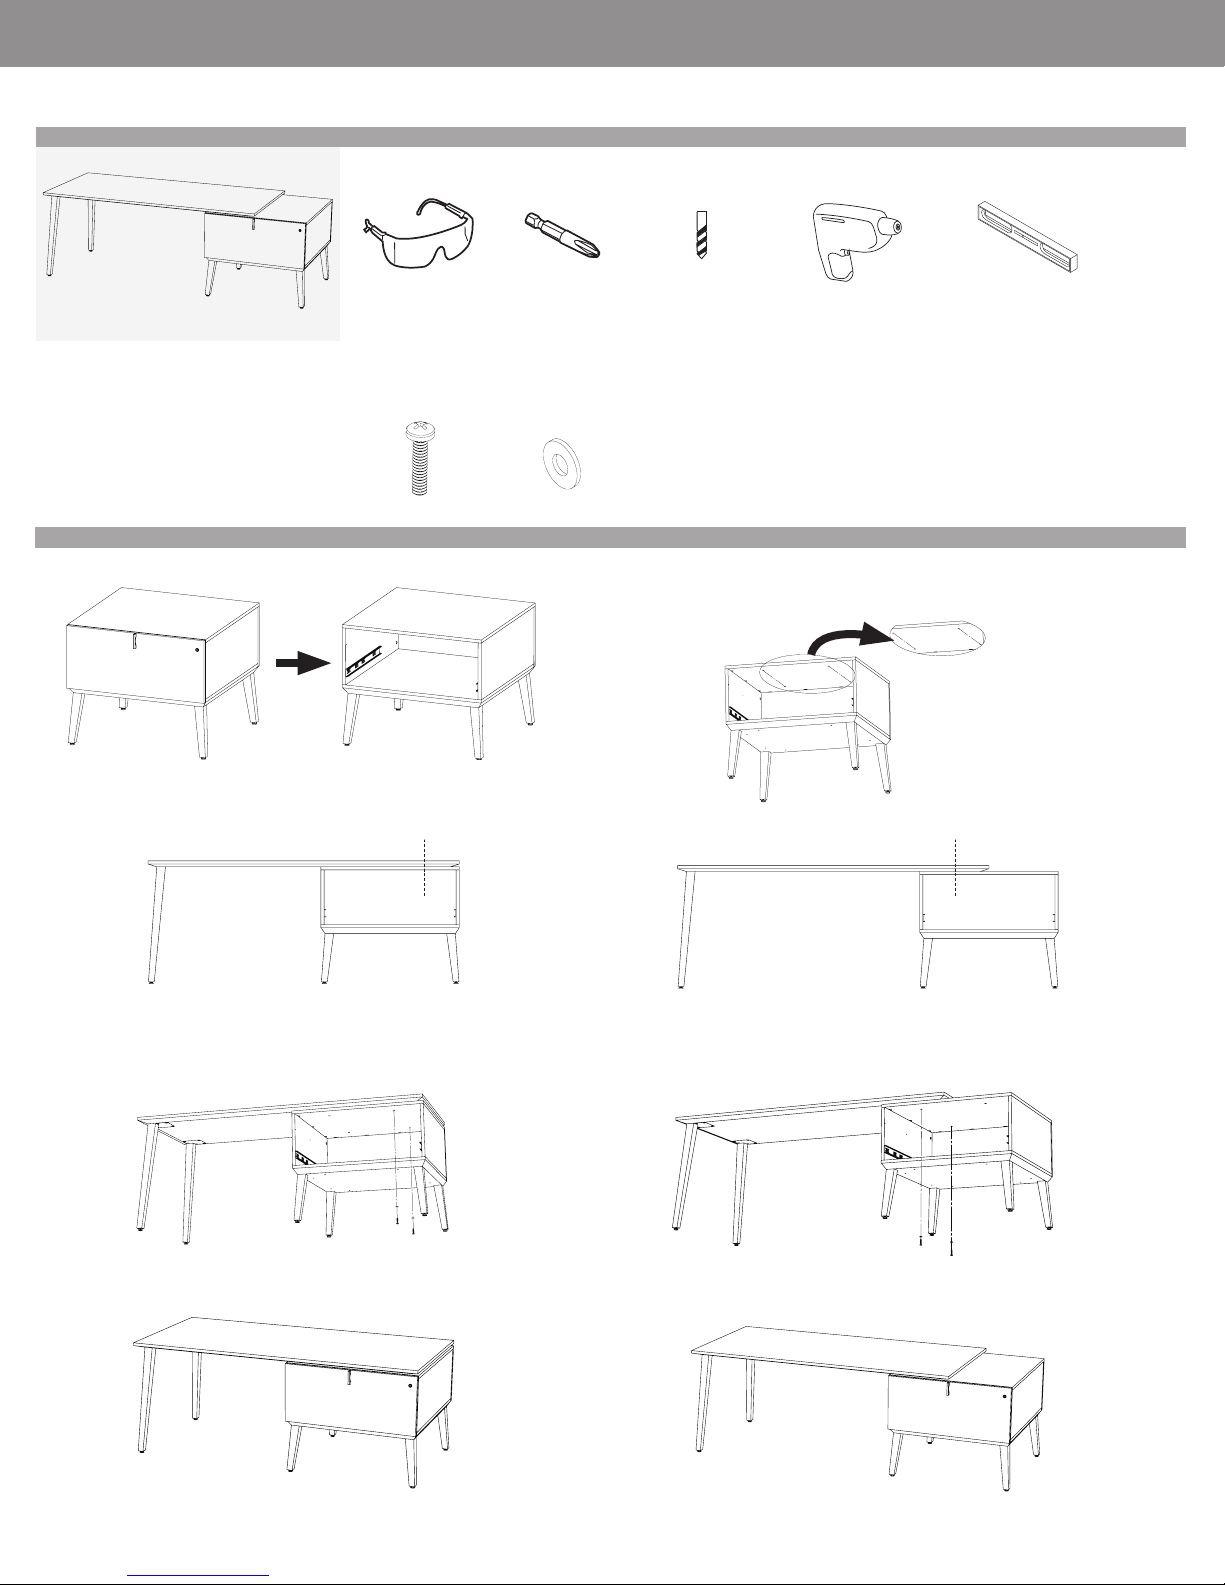
ARxx32 & APxxHB32 - PENINSULA TABLE WITH HIGH BASE (HB) PEDESTAL 32”D
Required tools
Safety glasses Cordless drill/screwdriverBit #6 Phillips Drill bit 10mm Fluid leveler
NOTE: Open and assemble one product at a time
to avoid potential mix-up of parts and hardware.
It is advisable to assemble the unit on a clean
padded surface to avoid scratches.
CAUTION: Do not drag the assembled
furniture across the floor. Lift the unit completely
off the floor and move it to the desired location.
Included hardware
Phillips PH screw
1/4-20 x 1
1/4
, Qty. 2
Washer plate
Ø 1/4”, Qty. 2
ASSEMBLY
STEP 1: Remove the drawer from the pedestal (if any). STEP 2: Four (4) predrilled holes in the pedestal top are provided.
STEP 3: Type of configuration
FLUSH CONFIGURATION OFFSET CONFIGURATION
Depending on the configuration
must be drilled all the way through the top of the unit.
(as shown in step 3)
, two (2) holes
STEP 4: Place the peninsula table on the pedestal to align the two (2) predrilled holes in the pedestal with the two (2) inserts installed in the bottom of the worksurface.
Mount Phillips PH screws
STEP 5: Slide the drawers back into the pedestal (if any). Adjust the glides to level the assembled unit.
Page • globalcontract.com5
• Corby
(1/4-20 x 1
FLUSH CONFIGURATION
FLUSH CONFIGURATION OFFSET CONFIGURATION
1/4
, Qty. 2)
through the bottom of the pedestal top.
OFFSET CONFIGURATION
Page 7
GLOBALContract
INSTALLATION GUIDELINES
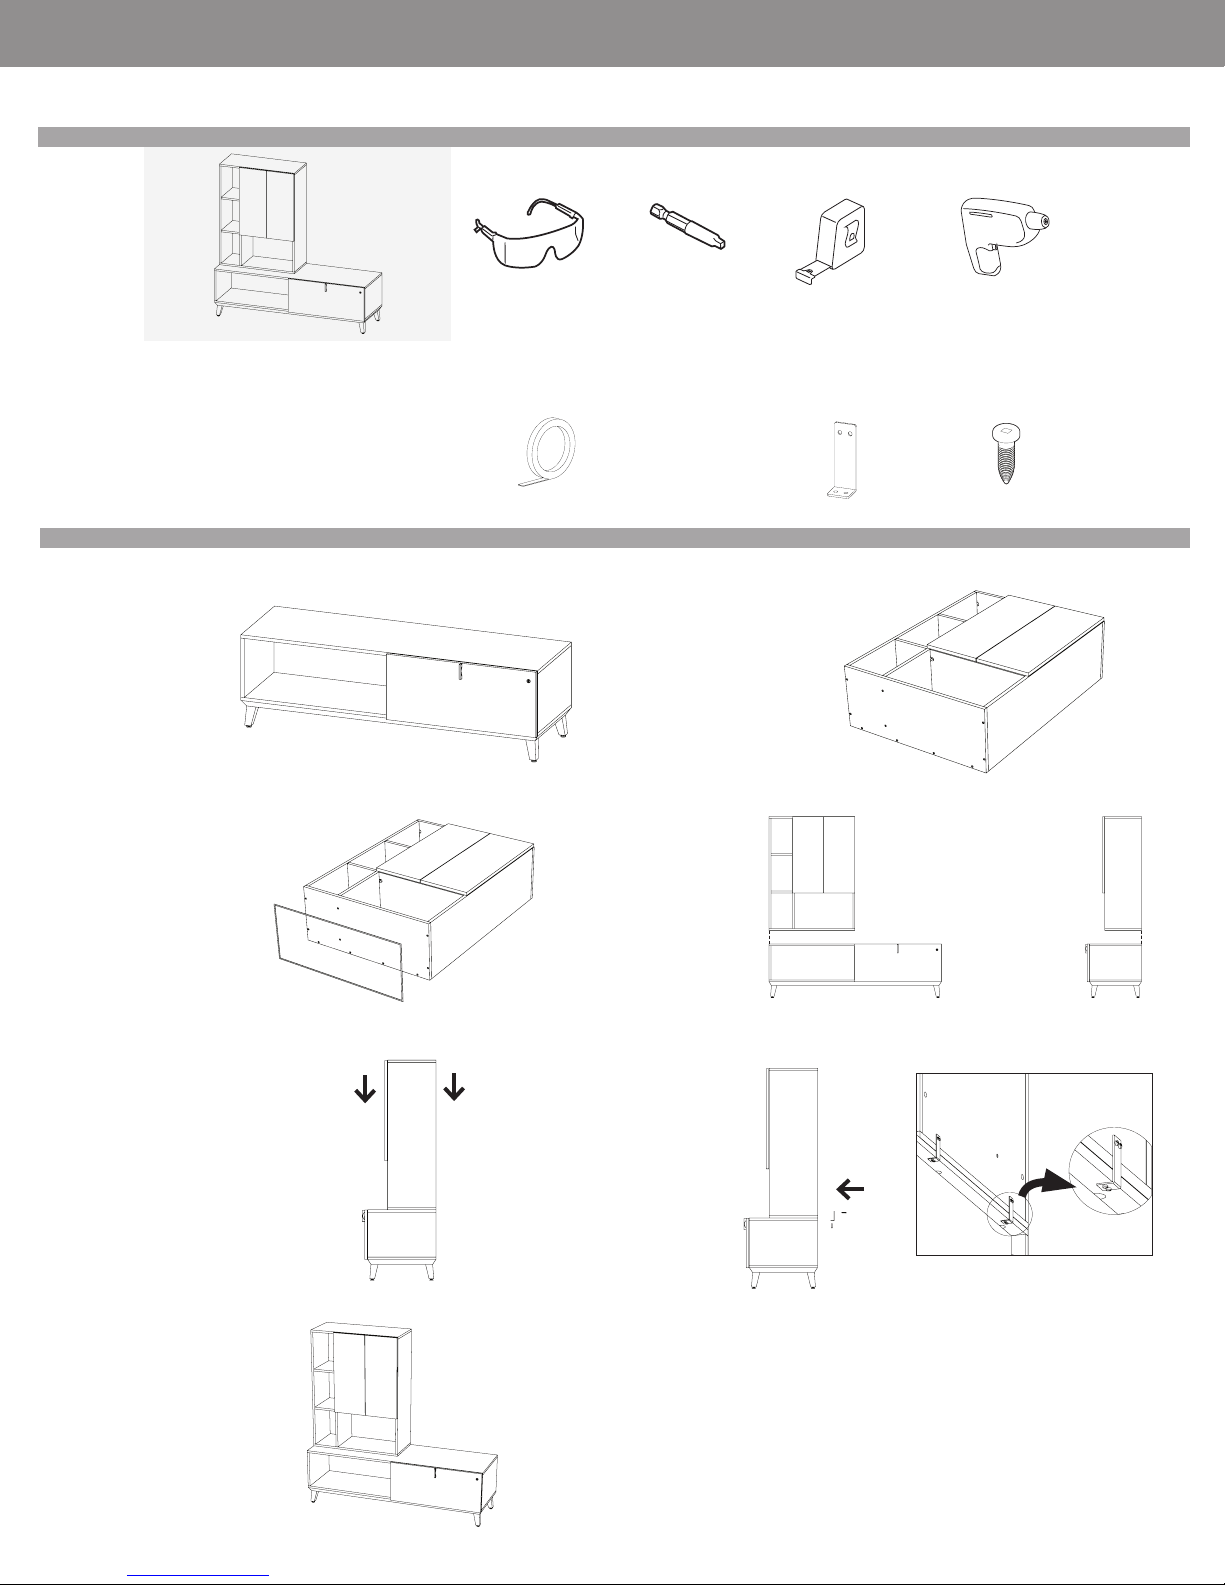
ASxx & ACxxLB/ACxxHB - STACK-ON BOOKCASE WITH CREDENZA
Required tools
Safety glasses Cordless screwdriverBit #2 Robertson Measuring tape
Descor Collection • January 2018
NOTE: Open and assemble one product at a time
to avoid potential mix-up of parts and hardware.
It is advisable to assemble the unit on a clean
padded surface to avoid scratches.
CAUTION: Do not drag the assembled
furniture across the floor. Lift the unit completely
off the floor and move it to the desired location.
Included hardware
Double sided adhesive tape
Qty. 1
ASSEMBLY
STEP 1: Clean the top surface of the credenza with a damp cloth, followed by a soft
dry cloth in the direction of grain. Adjust the glides to level the unit.
STEP 3: Apply double sided adhesive tape to the bottom edges of stack-on bookcase
Optional hardware
L- bracket
Qty. 2
STEP 2: Place the stack-on bookcase flat on a clean padded surface.
STEP 4: Align the stack-on bookcase on the credenza on any desired corner.
Front view Side view
Robertson PH screw
#8 x 5/8, Qty. 8
STEP 5: Apply moderate pressure from the top of the stack-on bookcase (at least
one minute for the pressure sensitive double sided tape to adhere).
STEP 7: Re-level the unit if necessary.
STEP 6: [OPTIONAL] To further secure stack-on bookcase, optional
L-bracket may be installed using screws
(#8 x 5/8, Qty. 8)
• Corby
• Pageglobalcontract.com 6
Page 8

GLOBALContract
Descor Collection • January 2018
INSTALLATION GUIDELINES
THE GLOBAL GROUP SHOWROOM
1350 Flint Road, Toronto, Ontario, M3J 2J7
Sales & Marketing • TEL: 1-877-446-2251 • FAX: 416-667-0338
Customer Service • TEL: 905-470-0010 • FAX: 905-470-6262
VANCOUVER SHOWROOM
3823 Still Creek Avenue, Burnaby, BC, V5C 4E2 • TEL: 604-432-1701
EDMONTON SHOWROOM
201 - 10158 103 Street N.W., Edmonton, AB, T5J 0X6 • TEL: 780-444-8922
CALGARY SHOWROOM
302 - 237 8th Avenue SE, Calgary, AB, T2G 5C3 • TEL: 403-250-7770
WINNIPEG SHOWROOM
1-1080 Waverley Street, Winnipeg, MB, R3T 5S4 • TEL: 204-925-3350
OTTAWA SHOWROOM
251 Laurier Avenue West, Suite 400, Ottawa, ON, K1P 5J6 • TEL: 613-234-2881
Please call ahead to book an appointment.
MONTREAL SHOWROOM
996 St-Antoine West, Montreal, QC, H3C 1A7 • TEL: 514-866-4331
HALIFAX SHOWROOM
1310 Hollis Street, Suite 150, Halifax, NS, B3J 3P3 • TEL: 902-422-7434
QUEBEC SHOWROOM
Complex Lebourgneuf 2, 815, boul. Lebourgneuf, Suite 502, Quebec, QC, G1V 3V9 • TEL: 418-653-6111
Please call ahead to book an appointment.
Descor Collection
Visit us on the Internet at globalcontract.com
Page • globalcontract.com7
• Corby
 Loading...