

Page 1
Technical Manual
Premier-Slide 100
©
CE
Page 2

Table of Contents
Introduction Pages 3-4
Preparation of Doors Pages 5-6
Installation of the Track & Door Heights Page 7
Installation of Floor Guides Page 8
Hanging & Aligning Doors Pages 9-10
Assembly of the Belt Brackets Page 11
Control Unit /Battery Unit Overview Page 12
Types of Access Switch Page 13
Customer Door Operating Modes Page 14
Using the Access panel Page 15
Door Start up Procedure Page 16
Installers Menu – Layout Page 17
Installers Menu- Features Explained Pages 18 -19
Technicians Menu – Layout Page 20
Technicians Menu – Features Explained Pages 21 -25
Wiring Diagram – Standard Hotron sensors Page 26
Wiring diagram – Monitored Hotron Sensors Page 27
Door weight – Rough Guide Page 28
Fault Codes Pages 29- 30
General Fault finding Page 31
Technical Specification Page 32
Page 3

CAUTION
AN INADEQUATELY INSTALLED AND ADJUSTED DOOR COULD
CAUSE DAMAGE TO THE EQUIPMENT AND MAY
CAUSE INJURY TO OTHERS.
• HAVE YOUR DOOR PERIODICALLY INSPECTED & SERVICED AT
LEAST TWICE PER YEAR BY AN ADSA (Automatic Door Suppliers
Association) CERTIFIED TECHNICIAN.
• THIS DOOR IS NOT
INTENDED TO BE DISCONECTED FROM THE
MAINS AT NIGHT!
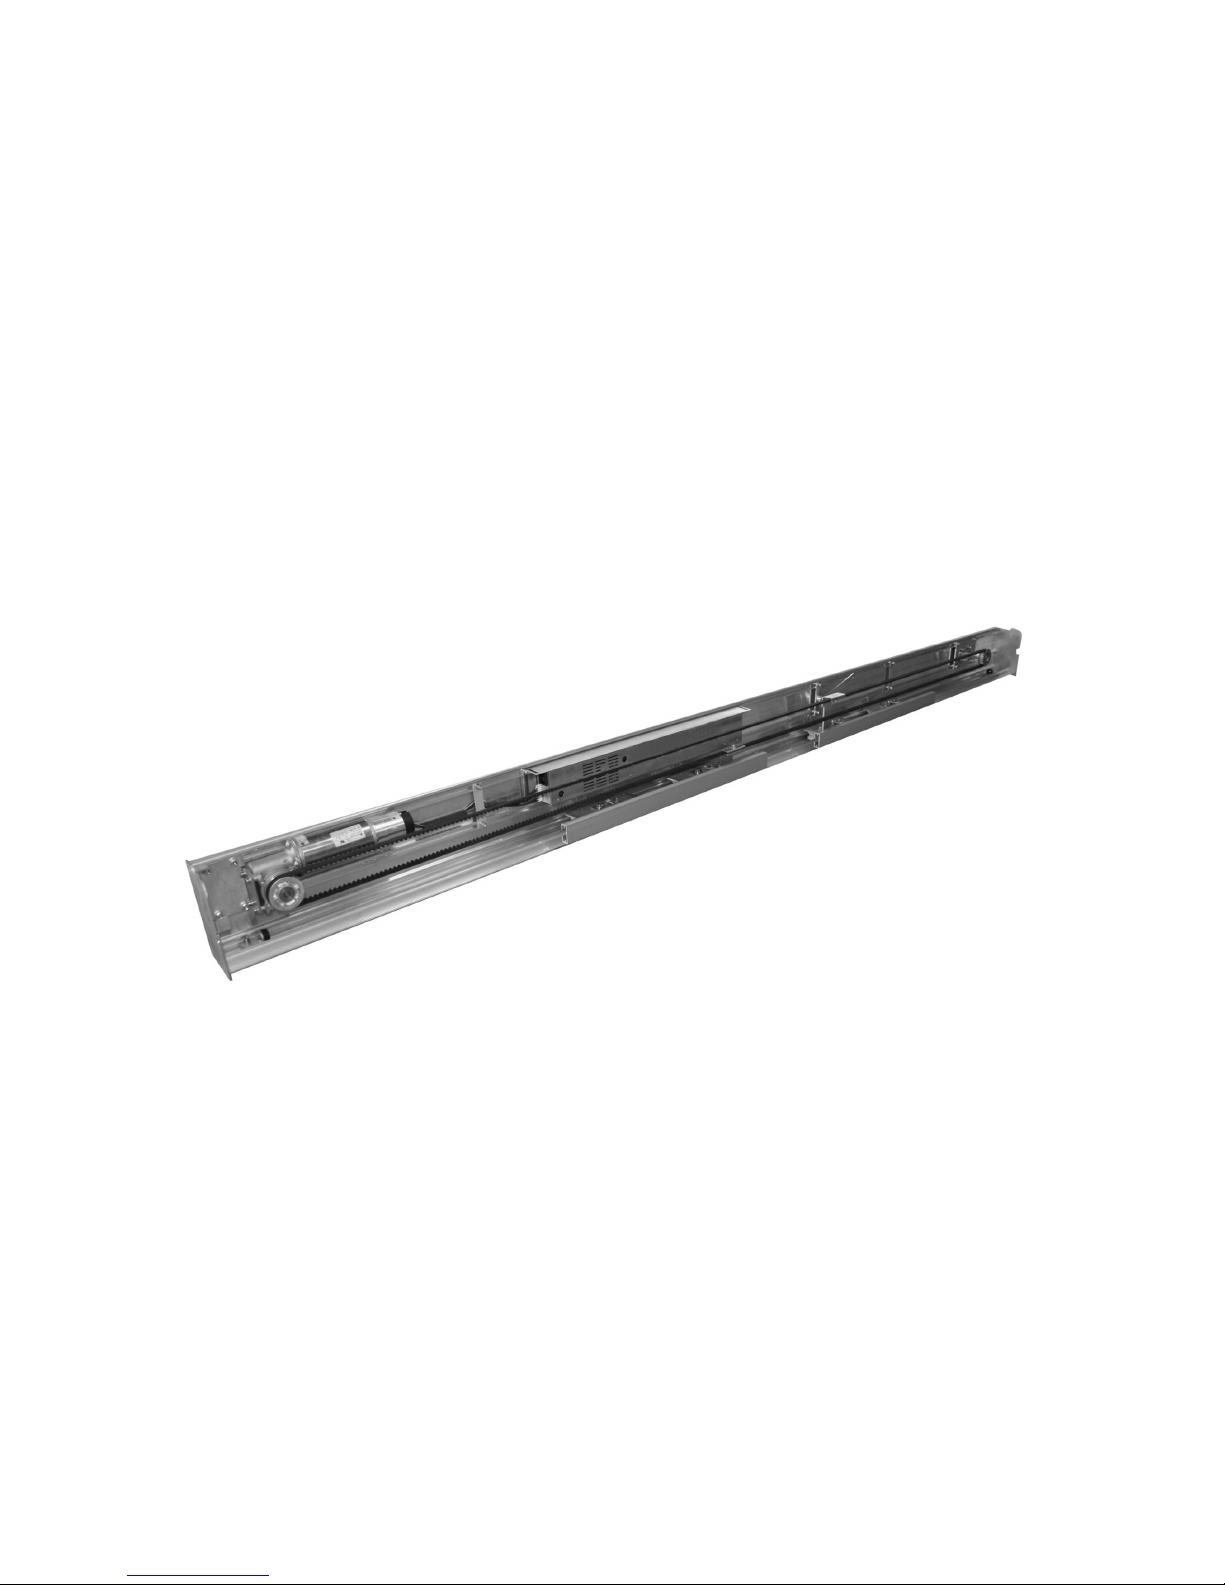
Introduction
This Manual contains all the information you require to install, maintain and service your
Premier-slide 100 automatic sliding door operator.
The Premier-Slide 100 automatic sliding door system has been designed to create a reliable
sliding door system which is simple to install and which has an easy setup procedure.
It uses a self diagnostic system to identify faults and make installations / maintenance as
easy as possible.
Safety Standard
Your door system has been manufactured to the latest applicable safety standard; in order
for you to comply you will need to have the door installed to any relevant safety standards
by a qualified company. The door will need to comply with the British standard BS: 7036:
1996 as a minimum but may need to comply with other standards such as Part M, Building
regulations or Disability Discrimination act. Please consult the relevant professional bodies
for details.
Envir
onmental Requirements
The premier-slide 100 contains electronics and batteries that may have materials that could
be hazardous to the environment. Please remove these products and dispose of them safely
in accordance with your countries laws before the operator is scrapped.
Intended Use
This operator has been manufactured for dry use within or inside weather tight buildings.
3
Page 4

Main Features:
Personalised Colour Logo
Self diagnostic system
Only 100mm in Height
Full microprocessor control with smooth motor control using encoder technology.
Easy to adjust wheel systems.
“Creep Speed” input.
Electromagnetic motor lock as standard
Fast Installation – minimal tools required.
Monitored battery backup with optional opening Programs
Switch-able Motor direction
Slim-line mode switch: available in Surface, flush fit and canopy mounting options.
Interlock – for security lobby systems
Monitored safety sensor inputs
Dedicated plugs for each sensor
Easy adjustments via the Access Panel
CUST
OMER MODES
Automatic
Exit Only
Enter Only
Hold Open
Partial Opening
Closed
Pharmacy Mode
Auto Width
Extrusion
80mm
165mm
100mm
4
Page 5
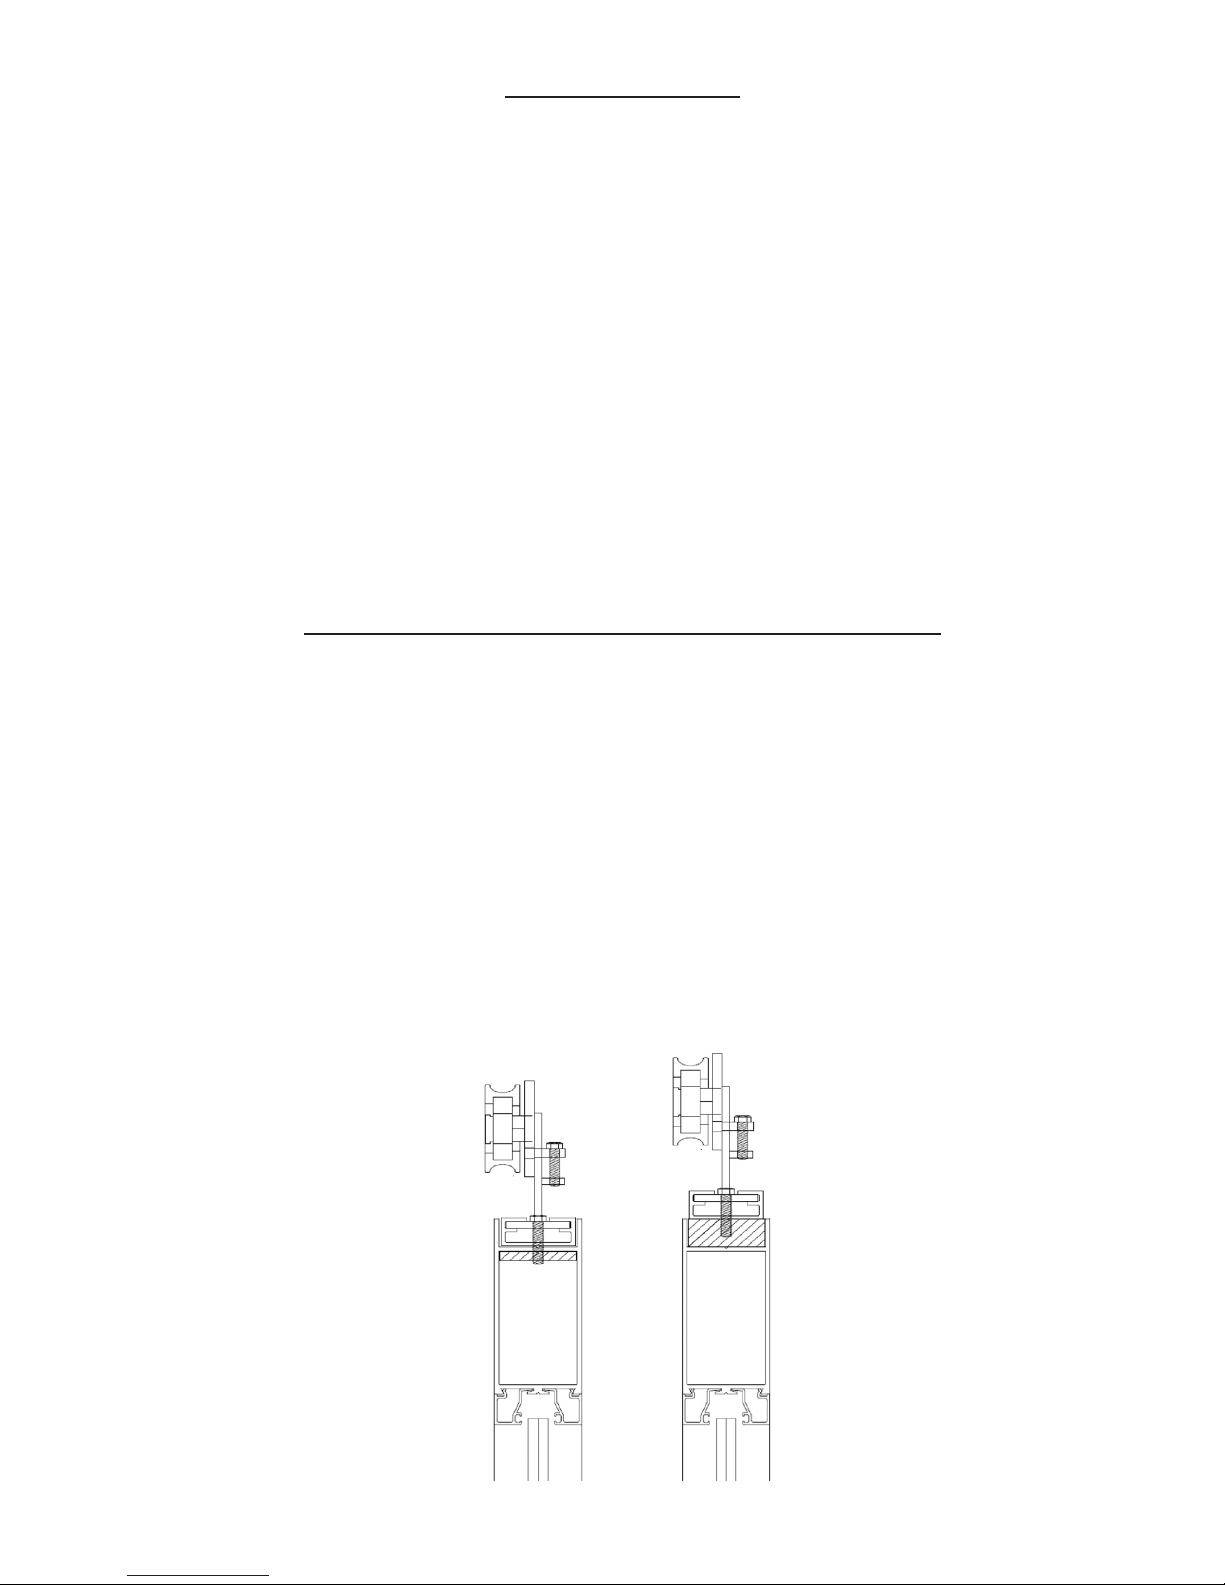
Preparation of doors
The door operator kit is supplied with an aluminium adaptor rail which needs to be fitted in
the top to the door leaf. This adaptor allows the “door hanging brackets” to be easily
attached to the door leaf. This should be cut the full internal width of the door leaves.
Sufficient fixings / re-enforcement must be installed to carry the weight of the door leaf.
Max distance between fixings = 100mm
If a new door leaf is to be supplied, then suitable re-enforcement should be added during
manufacture. We recommend a minimum thickness of 5mm aluminium bar. This should be
installed inside the top door rail. (see Fig 1/2)
If the unit is to be fitted to an existing door (see Fig 2), then a suitable fixing such as a
“threaded insert” should be used. The top of the door rail will need to be in-filled with a
suitable material and the adaptor rail would need to be finished the same as the door leafs.
Never
r
ely on just tapped threads in an aluminium door.
The adaptor can be fitted into the top door rail if space allows or it can be fitted flush on
the top (using suitable packing if required).
If the adaptor rail is being fitted into the top of the door rail, then remember to insert the
steel threaded plates into the adaptor rail before it is fitted to the door.
It requires 4 x fixing plates per door leaf.
Fig 1 Fig 2
5
Page 6
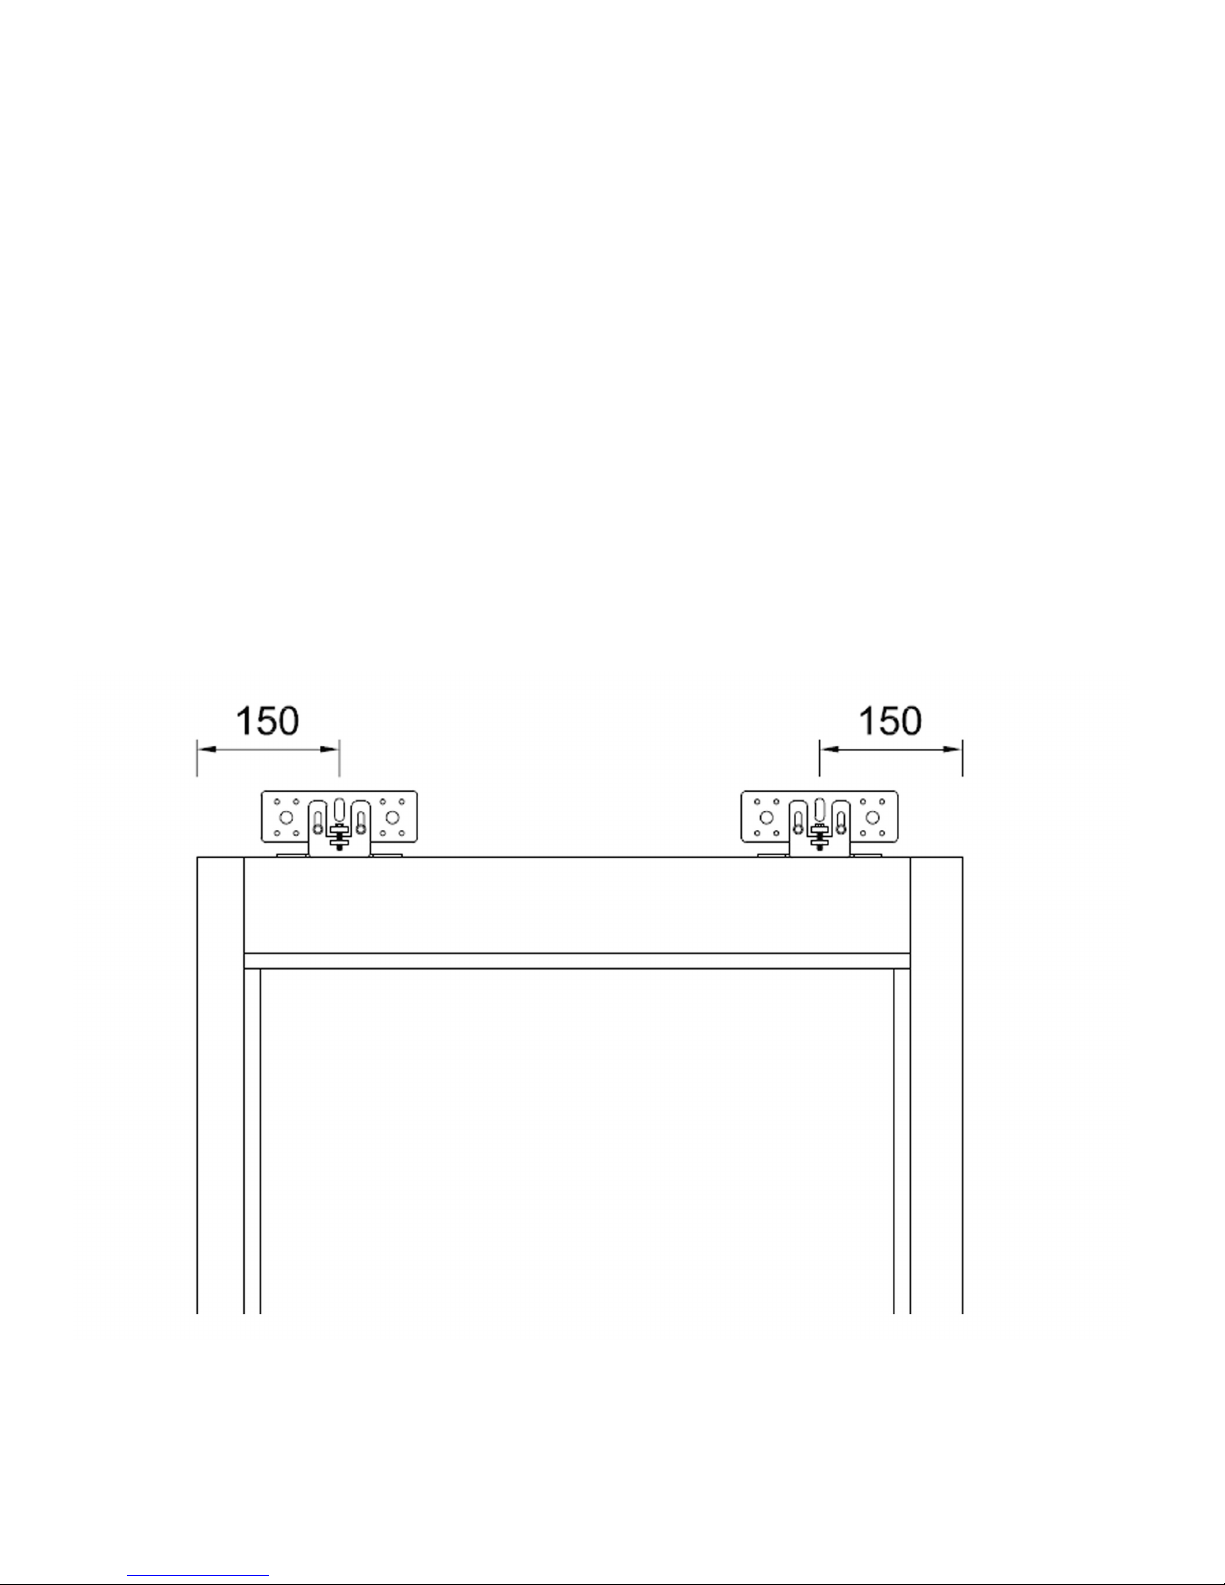
Once the adaptor rail has been installed on the door leaf, then the “Door Hanging” brackets
can be fitted to the adaptor, using the M8 bolts fitted to the steel threaded fixing plates.
The door hanging brackets have slots to allow the door distance from the frame, to be
adjusted as necessary.
Position the hanger brackets so that the centre of the bracket is approx 150mm from the
edge of the door.
Once the door is suitably located and adjusted, ensure all M8 bolts are fully tightened.
For Door leafs wider than 1150mm we would supply an additional Carriage assembly per
leaf to spread the weight of the doors.
6
Page 7
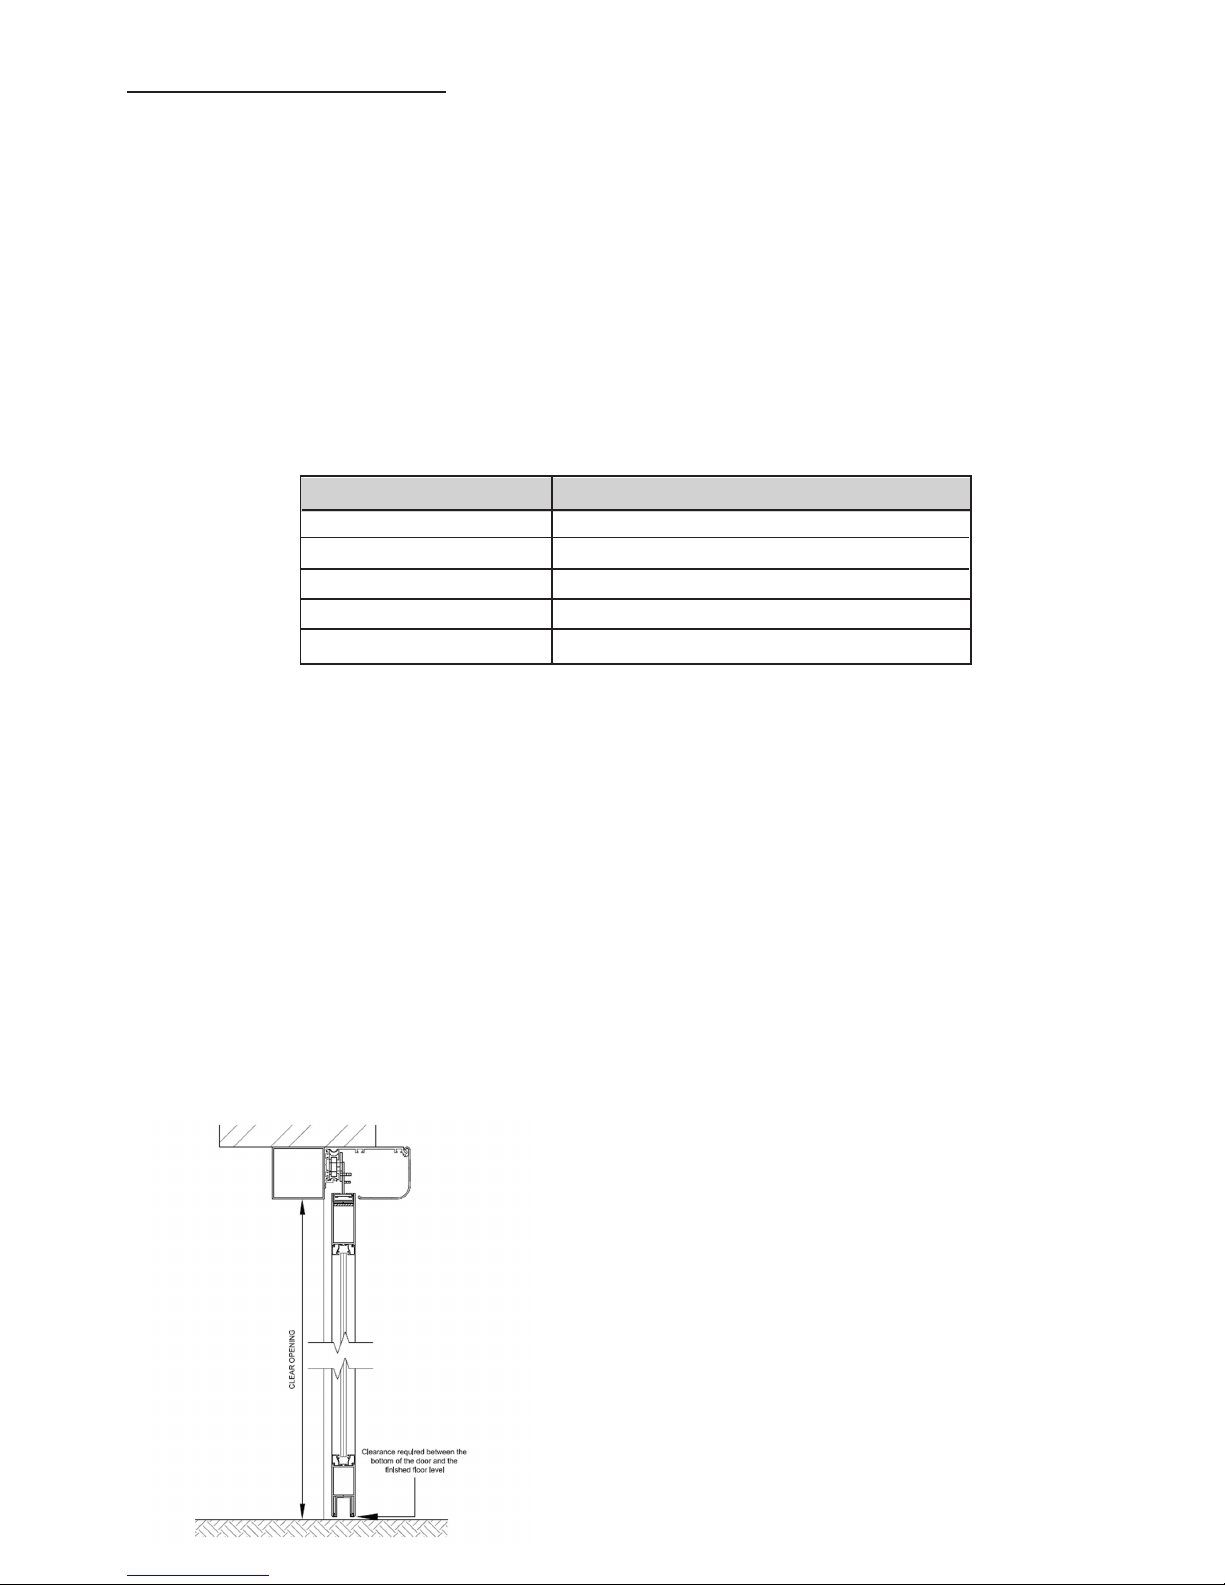
Installation of Track System - Always work in pairs.
• The track system comprises an aluminium track section and a hinged / removable cover.
(Please note: Sometimes there can be a slight bend to the length of long track extrusion
but this is easily removed by fixing from one end and straightening it up as you go).
Being made from aluminium the track has a certain amount of flexibility.
• The operator is mounted either on framework or on the area above the doorway, which
should always be checked to ensure a suitable fixing can be obtained to carry the
imposed weight of the proposed door leaf/s. Below is an indicator of fixing types,
this is a guide only as each door set should be assessed individually by the installation
engineers.
• Align the header on the fitting section 20mm up from clear opening height and level.
Mark through one of the bottom fitting holes at each end. Remove the header, drill tap
and fix the unit.
• Attention should be paid to what fixings are used when fitting in the area the wheels roll
past. Take into consideration wire runs from sensors and Mains spurs.
• Keep the inside of the track where the wheels run free from dirt and drilling swarf.
• Allow a minimum of 330mm from the frame outward, for the canopy to be raised for
repairs and maintenance.
TRACK INSTALLATION HEIGHT
(Flush Adaptor) = Door Leaf + Bottom Gap + 6mm
(Surface Mounted) = Door Leaf + Bottom Gap+ 22mm
DOOR HEIGHT CALCULATIONS
(Flush fitted Adaptor Rail) = Clear Opening height - Bottom Gap + 15mm
Surface Mounted Adaptor Rail) = Clear Opening height - Bottom
Fixing Material Minimum fixing requirements
Steel* 5mm
Aluminium* 6mm
Re-enforced Concrete Min 50mm up from the Underside
Wood No 10 50mm Wood Screws
Brick Expansion Plugs/ Bolts - 50mm Fixings
* Please use Rivnuts/ Threaded Inserts for thinner wall profiles
7
Page 8

Installation of Floor Guides
The standard floor guide system available with the Premier-Slide uses a guide track installed into the
bottom of the door rail and a floor mounted adjustable guide.
The guide channel is simply cut to the inside dimension of the door leaf and attached using countersunk
self tapping screws straight into the door rail. The rear of the door can be notched out to allow the guide
block to slide in if required.
The floor mounted guide block assembly is simply drilled into the floor and secured with countersunk
screws and rawl plugs. The guide should be positioned so that the side of the floor guide nearest the
frame is positioned as follows:
Required clearance gap + 6.5mm from framework and the front of the guide should be approx 60mm into
the opening (see diagram above) ) the guide itself is adjustable for sideways movement +/- 4mm
Simply insert a slim 19mm spanner beneath the nylon block
and turn either clockwise or anticlockwise. As the shaft of
the guide is eccentric, the guide will move closer to
8
Page 9
Hanging & Aligning Doors
Procedure for wheel adjustment:
When the Doors are hung, you need to adjust the anti-riser (Centre Wheel) up so that it touches the top of
the track. This is to stop the doors from coming off of their track. Please do not have these tight against
the track as they may cause friction problems.
When adjusted properly you should be able to manually push each leaf with minimum effort and no
friction.
To Adjust the doors up and down, loosen the two M6 Bolts. Now you can turn the M5 adjustment bolt
Counter Clockwise to bring the doors up or clockwise to lower them. When the doors are at the correct
height simply tighten the two M6 Bolts to secure the hanging bracket to the assembly.
This assembly gives you approx 7mm of adjustment in each direction from the centre point.
9
Page 10
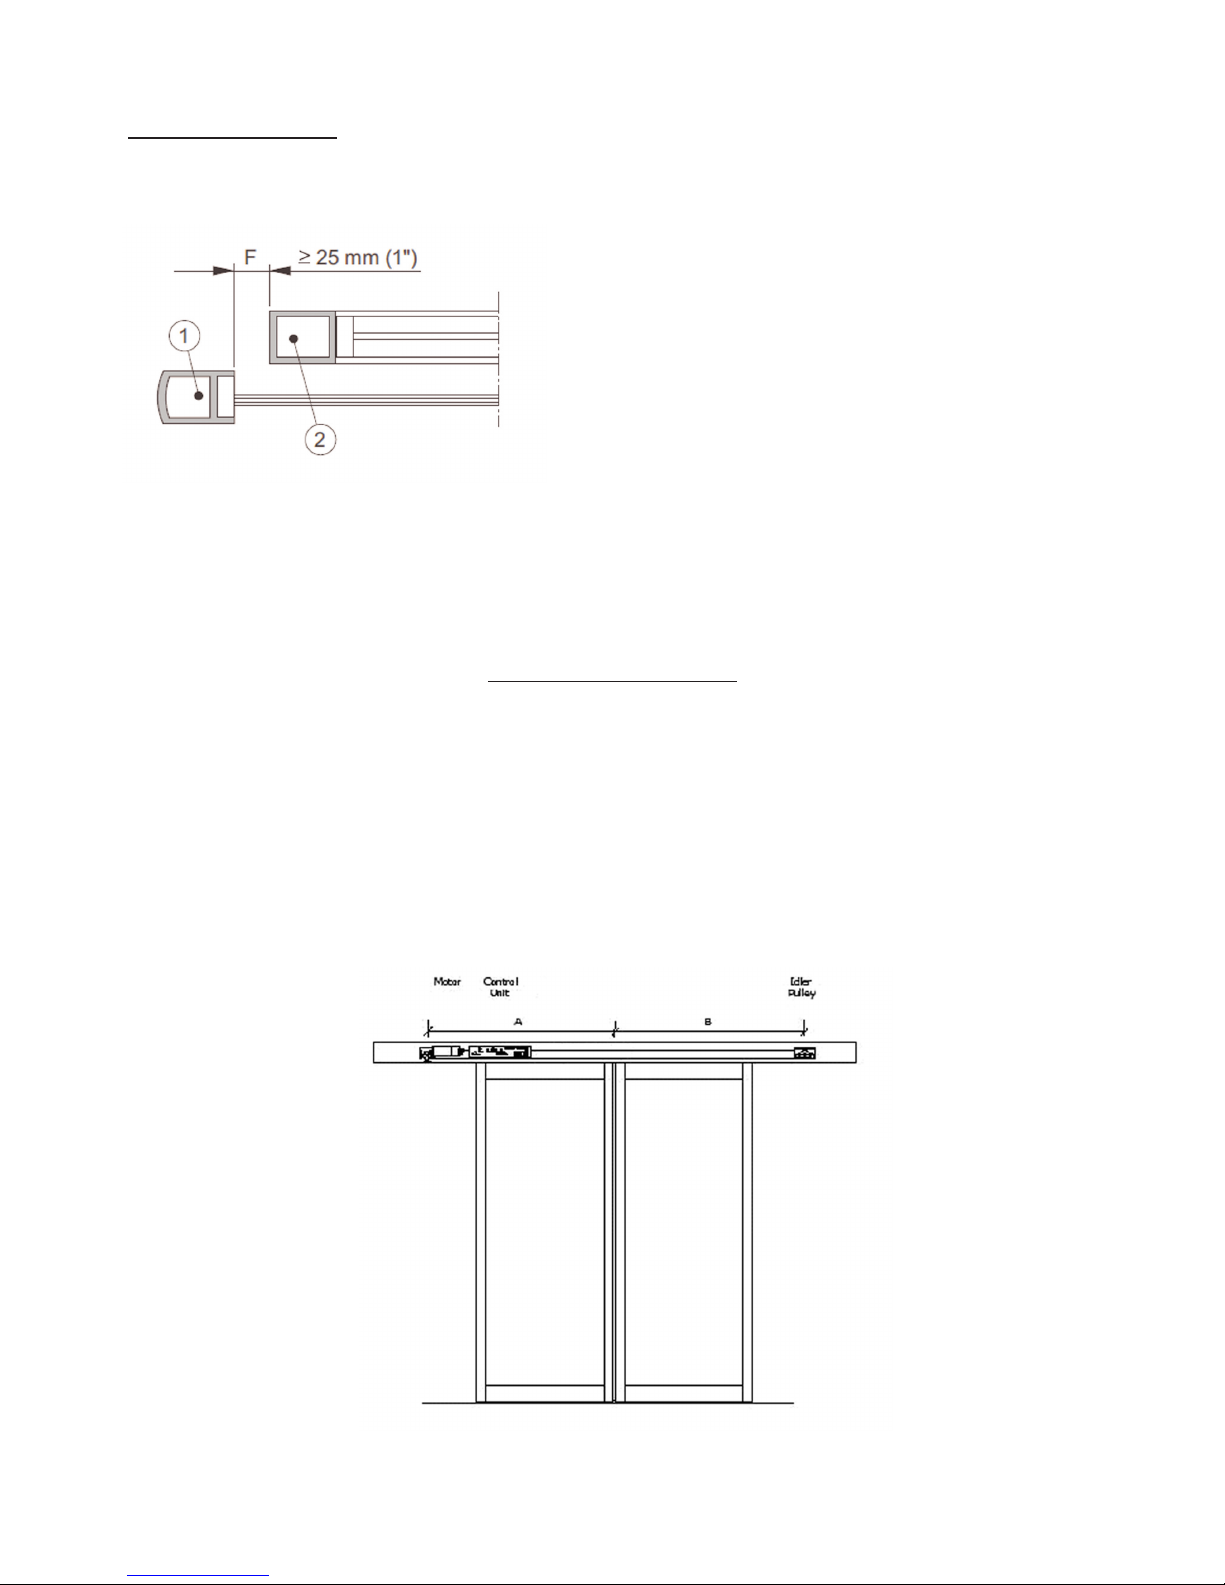
Aligning the doors
Loosen the Door stops. Push the doors to the required maximum open position.
Please remember that there must be a minimum of
25mm between the leading edge of the door (1) and
the mullion of the fixed screen to avoid a finger
trap. (2)
When In the required opening position, tighten the door stops so they touch the wheels when the door is
in the required position.
Installation of Equipment
Position the motor/gearbox unit to the left hand side 5 mm from the end and the idler pulley assembly to
the right hand side so that the centre of the pulley wheel on each align
Install new control unit to the right hand side of the motor within distance of motor wiring loom and
connect motor to the left hand side socket connector.
Please Note: You can move the idler wheel inward to suit your operator to reduce belt sag if required.
The Premier-Slide Compact uses a system of captive nuts that slide in the extrusion to secure the equipment
into the operator. This makes installing the equipment very quick and easy
10
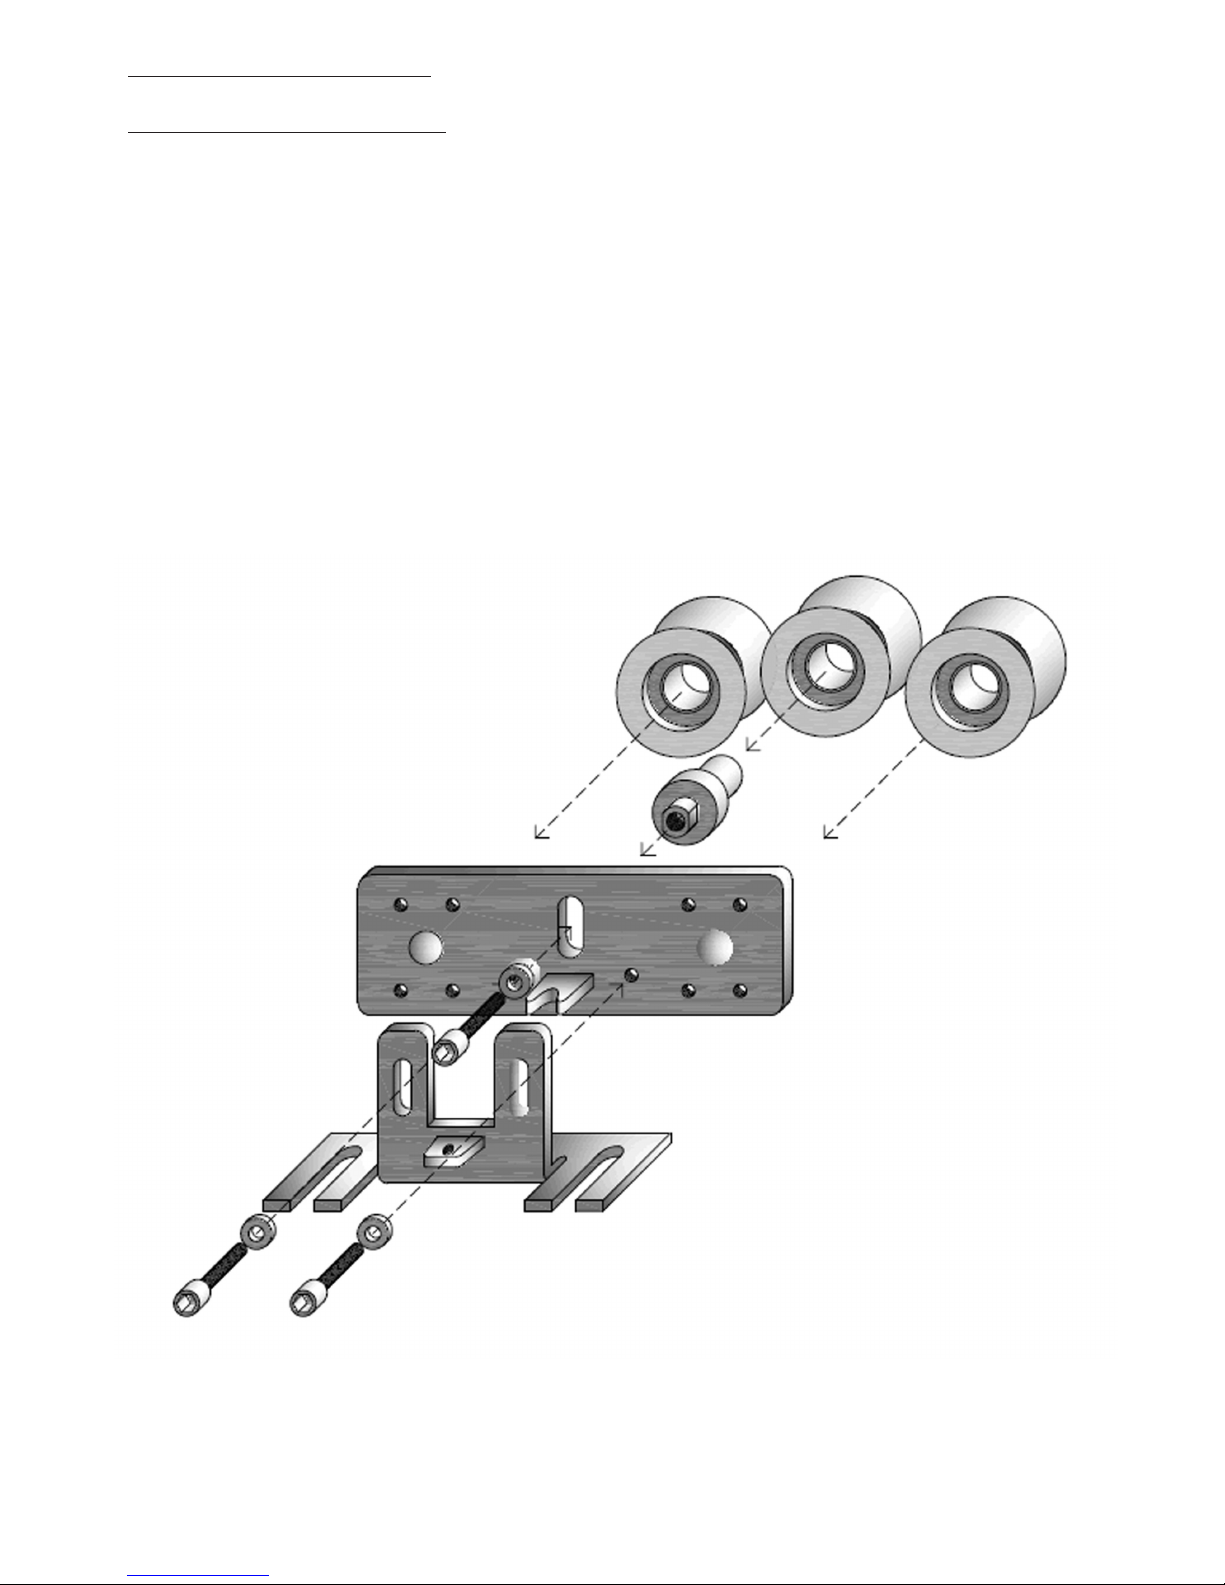
Page 11

Belt
The Belt should be installed with the door in the closed position. Making sure the doors do not move;
wrap the belt around the motor and Idler wheel. Measure and cut as required. The belt should now be
clamped to the carriage assemblies and tensioned to allow the door to work properly.
The Belt bracket is secured to the carriage assemblies via 2 x Bolts. The belt ends are then pressed into
the belt clamp and securely fastened to the belt clamp via the centre bolt.
For Bi-parting doors there will be one longer and one smaller belt bracket.
Idler
Wheel Adjustment
The idler pulley assembly installs like the rest of the equipment into the right hand side of the operator.
The belt tension should then be adjusted by loosening the 4 x holding bolts around the shaft on the idler
pulley assembly and then use the adjuster bolt , (turning clockwise to tighten) to adjust the belt tension.
Use the locking nut on the adjuster to secure in place and tighten the holding bolts.
The belt should be adjusted fairly tight with no sagging of the belt or it may slip teeth causing the
operator to lose its positions. Approx Torque of 1.1Nm
11
Page 12

Control Unit
The Premier-slide 100 Control unit is an “all in one” control system incorporating A Control system,
Power supply unit, monitored battery backup and dedicated wiring system.
The Mains Power is supplied via an IEC “Kettle” Plug in the L/H side of the Control Unit. Next to this
on the L/H Side this is the motor connection plug.
To the R/H side is a removable lid where most wiring
connections are made.
There is a test button located next to the sensor
connectors under the removable lid. A single press will
work as an activation for when you are adjusting door
speeds.
If you hold it for 5 seconds the red LED stops flashing
and lights up constantly. By doing this you can instigate
a factory reset.
Please Note
: During a factory reset, all your previous
adjustments and settings will be deleted and returned to
the default values.
The following connections as listed below are normally open:
Inner sensor, Outer sensor, Key Input
The following connections as listed below are normally closed:
Inner Threshold Safety , Outer Threshold Safety , L/H Side screen safety , R/H Side screen safety,
Emergency Stop
Battery Backup
Our battery Backup system uses two x 12v 0.8ah sealed lead acid Type batteries. These are held firmly in
place by the battery strap and have dedicated plugs on the Right hand side of the PSU. Please remember
to isolate the mains via the Kettle plug before removing or connecting the Batteries.
Our Battery backup system provides a constant variable charge when the door is not in operation
depending on the condition of the batteries. I.e. If the batteries are new, our system uses a “trickle
charge”, for older batteries it assesses the require voltage and charges accordingly.
The Batteries are constantly monitored to confirm that
they have enough power in them to carry out their
emergency power failure procedure.
12
Page 13

Access Switch
The Access Switch comes with 3 Meters of cable as standard, This can be extended as required up to 15
meters with screened cable. (Do not Disconnect the Access switch whilst the Power is on.)
Surface Mounted
Locate a suitable position for Access panel / switch and install using 4 x screws. If mounting to a hollow
section such as aluminium frame mullion, you will need to drill a 20mm hole so the wiring can be
concealed within the hollow chamber of the frame section.
Flush Fitting Switch
This switch has been designed to fit flush for Installation in hollow Aluminium frame sections and
Hollow walls.
You will need to cutout/remove part of the Section wall and drill 4 x fixing holes in accordance with the
Sizes given in the Instructions supplied with this type of Switch.
Canopy Mounted Switch
This switch has been designed to fit flush for Installation in the Canopy of the operator. Careful
consideration should be paid to the Location of this so it does not affect any internal workings of the
operator.
You will need to cutout/ remove part of the canopy Section and drill 4 x fixing holes in accordance with
the Sizes given in the Instructions supplied with this type of Switch.
13
Page 14

CUSTOMER DOOR MODES
Automatic
This is the Main mode for Customer Use. Activation Sensors or press pads work from both directions.
Exit Only
Only the Inner activation sensor works – Allows people to exit via the door.
Enter
Only
Only the Outer activation sensor works – Allows people to enter via the door.
Hold Open
When set to this function, the door will stand in the open position until the mode is changed.
Par
tial Opening
This function will act the same as the Automatic but will only partially open. (*) This is normally used
for larger doors during winter months to help retain the buildings heat.
Closed
The door will close and ignore all activations except the Key Impulse. The door will lock if switched on
(Via engineer’s mode)
Pharmacy Mode
When selected, the door will open to the desired position (*) and Lock. When you change it back to
closed, the door will close and lock - if switched on (*) This Function is commonly used for late night
deliveries as a security feature.
Auto
W
idth
When the sensor is activated the door will open to a partial position, If the sensor is reactivated (someone
else walks up to the door) within a certain time (*) the door will then open to its full position.
The door will carry on opening to its full position until the door has not been activated for a certain time.
(*)
(*) = Adjustable in engineers Mode
SPECIALS
Interlock
When installed in a “security lobby” setup, the door will use one of the above modes but will ignore any
activations until its sister door is in the closed position and locked.
Connection is made from the Interlock Input terminals(35+36) to the Aux Lock output on the sister doors
control unit .
14
Page 15

USING THE ACCESS PANEL
- CUSTOMER
When the Access Switch is Inactive it will automatically lock to stop unauthorised usage. To gain access
to the Customer menu where you can change the mode of the door you simply hold the Select button in
for 2-3 seconds. The access switch will then display the mode you are in.
To change Mode, press the up or down until you get to your desired mode and press select.
RESET: Should your customer encounter any problems where the
door may require a reset, they need to press and hold the select button whilst they press and release the hidden Reset button that is
located in the bottom right Hand corner of the Grey membrane.
Please hold the select button in until the door starts moving.
(Please Note: If you have fitted the “Canopy” Switch then the reset
is in the Top Right Hand corner.)
Errors
The Access panel has a complex self diagnostic System. There are two sets of error codes.
The first sets are customer indicator codes. These are problems with the door that can be resolved by the
customer. These will be displayed on screen in YELLOW. I.e. if the emergency stop is pressed it will
display on the screen to tell the customer to reset the button. Upon re-instating this, the door will
continue as normal.
The second sets of Errors are engineer’s codes. These are problems that require an engineer to fix. These
will display on the screen in RED along with a message to contact an engineer. The screen will also
display the Phone
Examples of these codes are shown below:
Errors the customer could possibly fix themselves:
• Fire alarm
• Mains failure
Errors that may require an engineer to attend:
• Battery failure
• Sensor fault
15
Page 16

DOOR START
UP
PROCEDURE
When the doors are hung, the sensors fitted and wired you can now start the door up.
The door has a learn cycle it goes through. With the mains on,
• Turn on the Conrol unit.
Please make sure the Area the door opens/closes and the sensor fields are clear from people and objects
as they may affect the learn cycle.
• The Access switch will ask you to confirm if it is a single or double sliding door system.
After this has been confirmed press ok to start the configuration.
When this is complete the door should start to open (If it closes, you will need to change the door
direction – in Engineers mode after the learn cycle).
When the door is full open, it will pause whilst it checks if the threshold safety sensors are connected
properly and if they are the monitored type.
The door will then close and pause for a second whilst it checks if the side screen safety sensors are
connected properly and if they are the monitored type.
The door will start in the Technicians mode.
The door is now ready for you to make the final adjustments to suit site conditions and the BS7036:1996.
If a Contact requires changing to allow the door to work (I.e Fire alarm – N.C , Change to N.O) the door
will sit open and display the fault on the operating mode screen. Enter the Technicians mode and change
accordingly.
If a sensor is wired wrong, seeing the door or there is an obstruction error the door will state “Learn
Cycle failed” and display the error. Correct the error accordingly by manually adjusting sensors/doors or
adjusting via the engineers mode ( 3 x up arrow then 3 x down then Select).
Hold Select and press the hidden reset and the doors will go into a new learn cycle, repeat untill the Door
is free from errors and is ready to use.
During the Learn cycle the operator weighs the door and starts it in one of nine preset speed groups. This
should be approx correct for the weight of door. Please use the Individual screens in the Technicians
menu to make final adjustments.
You can now fine tune and adjust your door system in one of our Programming menus.
When the door is all setup and running as desired, remember to enter the Time and Date for the error
logs.
16
Page 17

Access Panel – Installer Setup Mode ( 2x Down, 2x Up, Select)
To gain Access to the installer’s mode, you need to press the down button twice, then the up button twice
and press select.
This will take you to the first screen of the Installers menu. From here you can navigate up or down
through the Menu as detailed below. To exit a sub menu press scroll down to the Exit screen( In Yellow)
17
Page 18

INSTALLERS MENU EXPLAINA
TION
Monitored Safety
On This screen you can see the Safety sensors of your doors. This serves two purposes.
1) If the Writing is green it means that your sensors are not active. If any are in Red, this indicates that
the particular Safety sensor is receiving any activation.
2) This screen shows you if your sensors are monitored or not. If you fit a monitored sensor, that
particular one will say “YES” next to it
Example:
SIDE SCREEN L/H – NO = Left hand side screen sensor is not a monitored sensor but it is being
activated, Check for Objects in the sensor field and check the sensor, is not adjust so it is seeing the door.
Door
Information
This screen shows you the PSU Voltage and the battery voltage.
This screen also shows you the last thing to happen to the door ( Last = L> ) and if anything is currently
happening to the door ( Current = C> )
The bottom line of the screen will show you any alarms currently active on the control unit.
Err
or
Log
The Control Unit will Log the last 20 faults with the door – saving the time and date
There is also an option to delete the log and start again.
Set
Time and Date
This screen is to set the time and date use in the Error logs. Scroll up or down to select the digit required
and press select. (Please note: this control unit uses a 24 Hour time format)
Opening speed (Gr
oup) 1 – 9
1-5 - Single door settings
6-9 – Double door settings
The Speed Group combines the high speed, Braking force, Braking Distance, Low Speed and Safety
speed into one convenient group.
These groups have been assembled to allow a smooth operation of the sliding door. Group Number 5 Is
the fastest for a single door and Group number 1 is the slowest. Upon Start up of your Premier-slide
operator, it will weigh the doors and select an appropriate group so that the speeds and forces are as close
to the British standard as possible.
PLEASE BE AWARE THAT WE CANNOT GUARANTEE THIS AND IT IS THE CERTIFIED
ENGINEERS JOB TO TEST AND ADJUST EACH INDIVIDUAL DOOR SO THAT IT COMPLIES
TO THE RELEVANT STANDARD.
Auto Reverse For
ce – Opening
This is a force form 1- 20 that dictates the amount of force required on the door to stop it during its
opening cycle. General use is set at 1 which is the minimum amount required to stop the door. Please
adjust up if you get Reversing failures.
Please note: if this number is set too low the door may stop at different positions in its travel as it will
see them as obstructions
18
Page 19

Closing Speed Group
1-5 - Single door settings
6-9 – Double door settings
The Speed Group Combines the High speed, Braking Force, Braking Distance, Low Speed and Safety
Speed into one convenient group. These groups have been assembled to allow a smooth operation of the
sliding door. Group Number 5 Is the fastest and Group number 1 is the slowest. Upon Start up of your
Premier-slide operator, it will weigh the doors and select an appropriate group .
PLEASE BE AWARE THAT WE CANNOT GUARANTEE THIS AND IT IS THE CERTIFIED
ENGINEERS JOB TO TEST AND ADJUST EACH INDIVIDUAL DOOR SO THAT IT COMPLIES
TO THE RELEVANT STANDARD.
Auto Reverse For
ce – Closing
General use is set at 1 which is the minimum amount required to stop the door. Please adjust up if you
get Reversing failures.
Please note:
if this number is set too low the door may stop at different positions in its travel as it will
see them as obstructions
Door
Hold Open
Time
This is where you adjust the time in seconds, which the door waits in its fully open position once it has
received an activation from the Inner & Outer Sensor Contacts before it starts to close. (No 3+4/11+12)
Key Entr
y Hold Open
Time
This is where you adjust the time in seconds, which the door waits in its fully open position once it has
received an activation from the Key Input contacts before it starts to close.
(No 33+34)
Opening Dir
ection
When you start the door in its “Learn mode” The door will start to open first. If the door starts to close
then you need to change the opening direction.
This is the direction the door opens to from its closed position.
Par
tial Opening
This Screen is where you select a percentage of the overall opening. This percentage is then use in Partial
opening and Auto width operating Modes.
Asset Description
This screen is to set an asset Reference or name to the door that is displayed on screen for identification
purposes. Scroll up or down to select the digit or letters required and press select. (9 available)
Please note: An identifying Asset Ref is only displayed if you enter it here.
Service Number
This screen is to set the Telephone number that is displayed on screen when a major fault occurs. Scroll
up or down to select the digit or letters required and press select.
(12 available)
TIP: When you have finished your adjustments, you can press the up and down arrows together at any
time to short cut you straight back to the exit screen.
19
Page 20

Access Panel – Technicians Mode (3x up, 3x down, select)
To gain Access to the Technicians mode, you need to press the up button three times and then the down
button three times followed by select. This will take you to the first screen of the Technicians menu.
From here you can navigate up or down through the Menu as detailed below.
To exit a sub menu press select on your desired choice and the access panel will take you to the next sub
menu choice.
Main Menu Options Sub Menu
START - 1. Return to Customer Operating N/A
2. High speed opening 17- 100%
3. Low speed opening 8 - 99%
(Won’t exceed the High Speed )
4. Creep speed opening 10-20%
5. Braking force – opening 1 .- 40
6. Braking distance 1-100%
7. Auto reverse force 1.-20
8. High speed closing 15- 100%
9. Low speed closing 8 - 99%
(Won’t exceed the High Speed )
10. Safety speed Closing 10- 20%
11. Braking force - Closing 1.-40
12. Braking distance 1-100%
13. Auto reverse force 1.-20
14. Holding force - Closed 0-2
15. Partial opening 50-80%
16. Pharmacy width 5-50%
17. Motor lock ON / OFF
18. Aux lock ON / OFF
19. Lock type FAIL SAFE / FAIL SECURE
20. Lock open delay 0-60 SECONDS
21. Battery monitoring ENABLED / DISABLED
22. Battery mode SINGLE OPEN/
SINGLE CLOSE/CONTINUOUS
23. Door hold time 0-60 SECONDS
24. Key hold time 0-60 SECONDS
25. Auto width change time 10-60 SECONDS
26. Auto width Resume time 10-60 SECONDS
27. Fire – n/c – no NORMALLY OPEN /
NORMALLY CLOSED
28. Service number 12 SELECTABLE DIGITS
29. Opening direction RIGHT TO LEFT
/ LEFT TO RIGHT
30. Asset description 9 SELECTABLE LETTERS
& DIGITS
31. Interlock – enable ENABLED / DISABLED
32. Door info – mains, battery , Act INFORMATION ONLY
33. Monitored safety screen INFORMATION ONLY
34. Set time and date 24HR CLOCK AND CALENDAR
35. Error log HOLDS LAST 20 LOGS
/ DELETE LOGS
20
Page 21

Technicians Mode – Explanation
TIP: When you have finished your adjustments, you can press the up and down arrows together at any
time to short cut you straight back to the exit screen. Press select on the exit screen and you will exit
engineer’s mode and return to the customer menu.
Opening Speed
Adjustments
1. RED - High Speed Opening
(plus Braking force and distance)
2. BLUE - Low Speed Opening
3. GREY – Final Speed ( Relates to low speed)
This diagram is an indicator of the opening movement of the front edge of a sliding door. The first Part is
the high speed opening. It’s during this first part of its cycle that the door travels its quickest. The door
will then brake, and cut into its low speed opening. The door will then slow into creep speed for its very
last part of travel.
The smooth motion is very important with an automatic sliding door, if you change the high speed or low
speed settings then you may need to increase the braking force or how long the brake is applied to create
a smooth flowing cycle.
Opening – Auto Reverse = This is an adjustable force you need to set that will tell the door how much
force is needed before the door will back away from an obstacle. This is important to get right, too gentle
and a stone will cause the door to stop working, too strong and you could make the door unsafe. The
Bs7036:1996 states a maximum 150Nm.
Please use your Newton Meter on all installations to confirm that your particular door is compliant with
the BS7036:1996.
Closing Speed
Adjustments
1. RED - High Speed Closing
(plus Braking force and distance)
2. BLUE - Low Speed Closing
3. GREY - Final Speed ( Relates to low speed)
This diagram is an indicator of the closing movement of the front edge of a sliding door. The first Part is
the high speed closing. It’s during this first part of its cycle that the door travels its quickest. The door
will then brake, and cut into its low speed closing. The door will then slow into creep speed for its very
last part of travel.
The smooth motion is very important with an automatic sliding door, if you change the high speed or low
speed settings then you may need to increase the braking force or how long the brake is applied to create
a smooth flowing cycle.
Closing–
Auto Reverse = This is an adjustable force you need to set that will tell the door how much
force is needed before the door will back away from an obstacle. This is important to get right, too gentle
and a stone will cause the door fully close, too strong and you could make the door unsafe. The
Bs7036:1996 states a maximum 150Nm. Please use your Newton Meter on all installations to confirm
that your particular door is compliant with the BS7036:1996. states a maximum 150Nm. Please use your
Newton Meter on all installations to confirm that your particular door is compliant with the
BS7036:1996.
21
Page 22

Holding force – Closed
This is an adjustable force applied to the door when in the closed position. This force is only applicable
if the Motor Lock is turned OFF.
0. The door has little holding force. The door can be pulled manually and the “Push & Go”
will activate after approx 20mm.
1. The door has a small holding force. The door can be pulled manually and the “Push &
Go” will activate after approx 20mm.
2. The Motor powers against the stop slightly. This is quite strong but can still be overcome
manually.
(For total security Please turn the Motor Lock to ON.)
Par
tial opening
This adjustment is the Percentage of the door width that you want the door to open to when set in
“Partial open” Mode. (Adjustable from 50% to 80% of the full opening width.)
Pharmacy width
This adjustment is the % of the door width that you want the door to open to when set in “Pharmacy”
Mode. (Adjustable from 10% to 50% of the full opening width.)
Motor lock
This Function allows you to turn the Motor Lock On or off when the door reaches its closed position.
Aux lock – on/ of
f
Should you wish to fit an additional Lock to the door via the Auxiliary lock output, you will need to
enable this function.
Lock type – safe/secur
e
Should you wish to fit an additional Lock or Relay to The door via the Auxiliary lock out put you will
need to pick from Fail safe or fail secure option.
Fail safe – Power to lock – Default when off is UNLOCKED
Fail secure – Power to unlock – Default when off is LOCKED
Lock open delay
This is an adjustable time (In seconds) between the lock turning off and the Door opening. Especially
useful when installing electric locks that have a tendency of binding.
Batter
y monitoring
Default to ON as per the requirements of the BS7036:1996.
The door should always be ran with a battery.
This function enables you to isolate the batteries if faulty,
to confirm that this is the only problem with the door system.
The System monitors the battery constantly to confirm it has enough power to
run the door in the event of a power failure.
22
Page 23

Battery mode
This is a selectable option for the Type of operation you wish the door to do upon mains failure.
Fail open – In the event of a mains power failure the door will sit in the open position until the mains is
reinstated.
Fail Closed – For use on security doors - In the event of a mains power failure the door will sit in the
closed position & lock until the mains is reinstated.
Continuous - In the event of a mains power failure the door will continue to operate as normal on the
batteries. When the system detects that the batteries only have enough power left for a few operations
then the door will sit in the open position until charged enough to continue or the mains is reinstated.
Please Note
: If the batteries are completely extinguished, they may take several hours to recharge
dependant on the age of the cells.
Door hold time
This is an adjustable time (in seconds) that the door will count down from, once it reached its open
position before it closes.
Key hold time
This hold open Time is only for activations that are wired into the KEY input. (Predominantly used for
morning entry key-switches.)
This is an adjustable time (in seconds) that the door will count down from, once it reached its open
position before it closes.
Auto width change time
If using the Auto width function, you may need to adjust this timer; this timer is the Time (In Seconds)
that the control unit counts down from at its open position. If the door is activated the door will open to
its partial opening %. If activated again within the number of second adjust here, It will open but to the
full door width.
Fir
e Alarm
The Fire alarm input for the premier-slide is a volt free activation.
On this screen you can choose between N.C and NO dependant on your fire alarm requirements.
N.C = Normally Closed
N.O = Normally Open
23
Page 24

Service number
Here you enter your service telephone Number. This is the number that is displayed on the screen when a
fault is detected. Use the up and down arrow to run from 0 to 9 plus a space , when you get to the digit
you need press the select button and it will move to the next character. When you have entered the whole
number, press select twice to exit this screen
Opening dir
ection
Here you select the opening Direction of the Operator. Mainly used when installing Single sliding doors.
When you start up a new door system, it should open first on it’s learn cycle. If the door tries to close
first, please change the opening direction via this screen.
Asset description
Here you can enter a 9 Digit description or number; this is to help you identify the door. This will be
displayed on the bottom of the screen in Grey.
Interlock – enable
When installed in a “security lobby” setup, the door will use one of the above modes but will ignore any
activations until its sister door is in the closed position and locked.
You will need to enable this Interlock function, the aux lock function and set the lock type to fail safe.
Connection is made from the Interlock Input terminals (35+36) to the Aux Lock output on the sister
doors control unit .
Door
info – mains, battery, activations
This screen gives you all the information on the system with activation sensors.
For example, If the door is stood open, you can check this screen to see if any of the activations
connected to the door are active and keeping the door open.
Line 1 – Mains voltage
Line 2 – Battery Voltage
Line 3 – The last activation received
Line 4 – Current Activation received
Line 5 – Any current ERRORS
24
Page 25

Monitored safety screen
On this screen it gives you the details of your safety sensors (Threshold and side screen sensors)
Each sensor will be in Green and will have a yes or No next to it.
This Yes or No indicates if the Sensors are monitored or not. (Automatic detection upon installation of
sensors)
If any of the Sensors are activated, the Text turns to red.
Example:
SIDE SCREEN L/H – NO = Left hand side screen sensor is not a monitored sensor but it is being
activated, Check for Objects in the sensor field and check the sensor is not adjust so it is seeing the door.
Set time and date
Here you enter your time and date. This is saved when a fault is detected in fault Logs.
Use the up and down arrow to run from 0 to 9 plus a space, when you get to the digit you need to press
the select button and it will move to the next character. When you have entered the whole number, press
select twice to exit this screen.
Err
or log
This is a list of the last 20 Faults recorded on the operator with the time and date.
There is also an option to clear the log if required.
To exit please press select on any of the displayed errors or scroll down to the
“Clear Logs” and press select.
Exit
Press Select here to exit the engineers mode and return to the customer menu.
TIP: When you have finished your adjustments, you can press the up and down arrows
together at any time to short cut you straight back to the exit screen.
25
Page 26

26
Page 27

27
Page 28

Door
Weight
Below is an approximate Graph to help you calculate the door weight.
Please bear in mind that this table is for guidance only, it assumes that the door is made of typical 3mm
wall aluminium without a midrail. Wooden, steel and other types of door should be assessed individually.
You will need to Times the Door Height by the Door width to get an overall area to use the table below.
I.E 1.1mtr wide door x 2.2m High door = 2.42 Overall area (meters)
On our Example a 2.42 area door with 6.4mm Laminated glass would be approximately 44Kg in Weight.
Please use this table for Guidance only, for an exact door weight you will have to weigh the individual
Doors.
28
Page 29

Fault Finding
Fault Finding is made easy on the Premier-slide 100 as it has a comprehensive diagnostic system. For all
major faults the door will display an error on the screen.
For sensors it will say “Sensor Failure”.
You can then enter the technician’s mode and identify the exact sensor in the Fault Log or Information
screen.
Activation Constant > 4 minutes - ACTIVATION SENSOR FAILURE
Threshold Safety constantly active > 4 minutes – SAFETY SENSOR FAILURE
OR The monitoring system detects that the sensor has gone faulty
Side Screen Safety constantly active > 4 minutes – SIDE SCREEN SENSOR FAILURE
OR The monitoring system detects
that the sensor has gone faulty
If the Key Input is constantly active > 4 minutes – KEY SENSOR FAILURE
If the Fire alarm is activated – FIRE ALARM
If the Emergency stop is used – EMERGENCY STOP
If the Power is switched off or the Mains fuse is faulty- MAINS FAILURE
If the batteries or Battery fuse are faulty - BATTERY FAILURE
If you wire the Sensor Power in the wrong contact SHORT CIRCUIT
Obstruction on Opening or closing OBSTRUCTION ERROR
If the motor does not respond to the Controller MOTOR DRIVE FAILURE
If the Access panel is wired Wrong or Faulty NO COMMUNICATION
29
Page 30

30
SHORT CIRCUIT
Page 31

31
P
aint Care
Although Powder coating is a long life finish of up to 25 Years, care should be taken when handling
products that have been finished. Sharp edges can scratch and Pierce Powder coated surface.
Powder coating should be cleaned down with warm water and a mild detergent. Do not use any strong
cleaning chemicals as it may affect the paint.
Page 32

Technical Specification
Single Door Double Door
Max Door Width 2000mm 3000mm
Max Door Height 3000mm 3000mm
Max Door Weight 120kgs(Guidance) 180kgs(Guidance)
Mains Voltage 180v - 250 v ac
Hold Open time 0 – 60 Sec
Opening Speed Max 600mm / Sec
Closing Speed Max 600mm / Sec
Partial Opening Adjustable 50 - 80% of Opening Width
Aux Power Supply 24v dc 2amp
Ambient Temp - 20 to +55
Warranty
The Company warrants to the authorised distributor that all products will be free from defects in
materials and construction under normal use and for its intended purpose. The Company obligation is
limited to repairing or replacing components from its Factory within the 18month period from purchase.
The Batteries are only warranted for a 12 Month Period. The warranty does not cover misuse, accidental
damage or negligence.
There is no warranty or guarantee of fitness for a particular installation as each are bespoke
to user and site conditions. The Company does not authorise any distributor to offer any other warranty
to any user on behalf of the Manufacturer.
The Company shall not be liable in any event for special or subsequent damages from the buyer or third
parties against the buyer. Unauthorised modifications to the operator exclude the manufacturer from
any warranty or resulting damage or liability.
Declaration of Conformity (CE)
73-25 EEC (Low voltage Directive)
89-336 EEC (Electromagnetic Compatibility)
32
 Loading...