

Page 1
User Manual
MOVING HEAD
MODEL: 600SZ
www.g-lites.com
1
Page 2

CONTENTS
Introduction 5
1. Packing 5
2. Installation and safety operation 7
3. Lamp replacement 9
4. Power supply & control
4.1 power supply connection & control 11
4.2 signal connection 11
4.3 Fixture connection 12
5. Moving Head IP Code Programming 12
6. Moving Head IP Function selection 13
7. Display Menu Map 13
8. DMX Channels & Photometrics
8.1 Channel Table 15
8.2 DMX Protocol Chart 16
9. Luminosity intensity 19
10. GOBO an GOBO Size 19
Maintenance 20
Technical Data 21
Troubleshooting 23
www.g-lites.com
2
Page 3

IMPORTANT TERMS:
This manual covers important information about installation and operation of this
moving head. Please read this manual carefully before installing and operating
this Moving Head. Follow the safety precautions listed below:
A. Read this manual carefully and keep manual near moving head.
B. Follow the safety regulations mentioned in this manual when operating or
installing this fixture.
C. Warranty is void if the product is misused, damaged or modified in any
way, or for unauthorized repairs or parts
D. For maintenance or lamp replacement, disconnect the fixture from main
power before opening the moving head.
www.g-lites.com
3
Page 4
www.g-lites.com
4
Page 5
600SZ
INTRODUCTION
Thank you for choosing G-Lites products. Our products are created to satisfy
your highest expectations and complete quality control.
This manual covers important information about installation & operation of this
moving head. Please read this user manual carefully before installing or
operating this product. Please carefully follow the safety instructions listed below
and keep this manual in a safe place for future reference.
Note: As part of our ongoing commitment to continuous products update,
the company will keep the right to improve this product; the information in
this menu may be changed without notice.
Transportation
Please be sure to lock the head before
transportation.
Cardboard box:
The cardboard box is not designed for repeated use and for transportation of the
fixture; we recommend the use of our fixture cases
Single flight case:
The fixture case is made of plywood and is designed for safe transportation and
protection of the moving head. They include caster wheels with lock and handles.
1. Packing
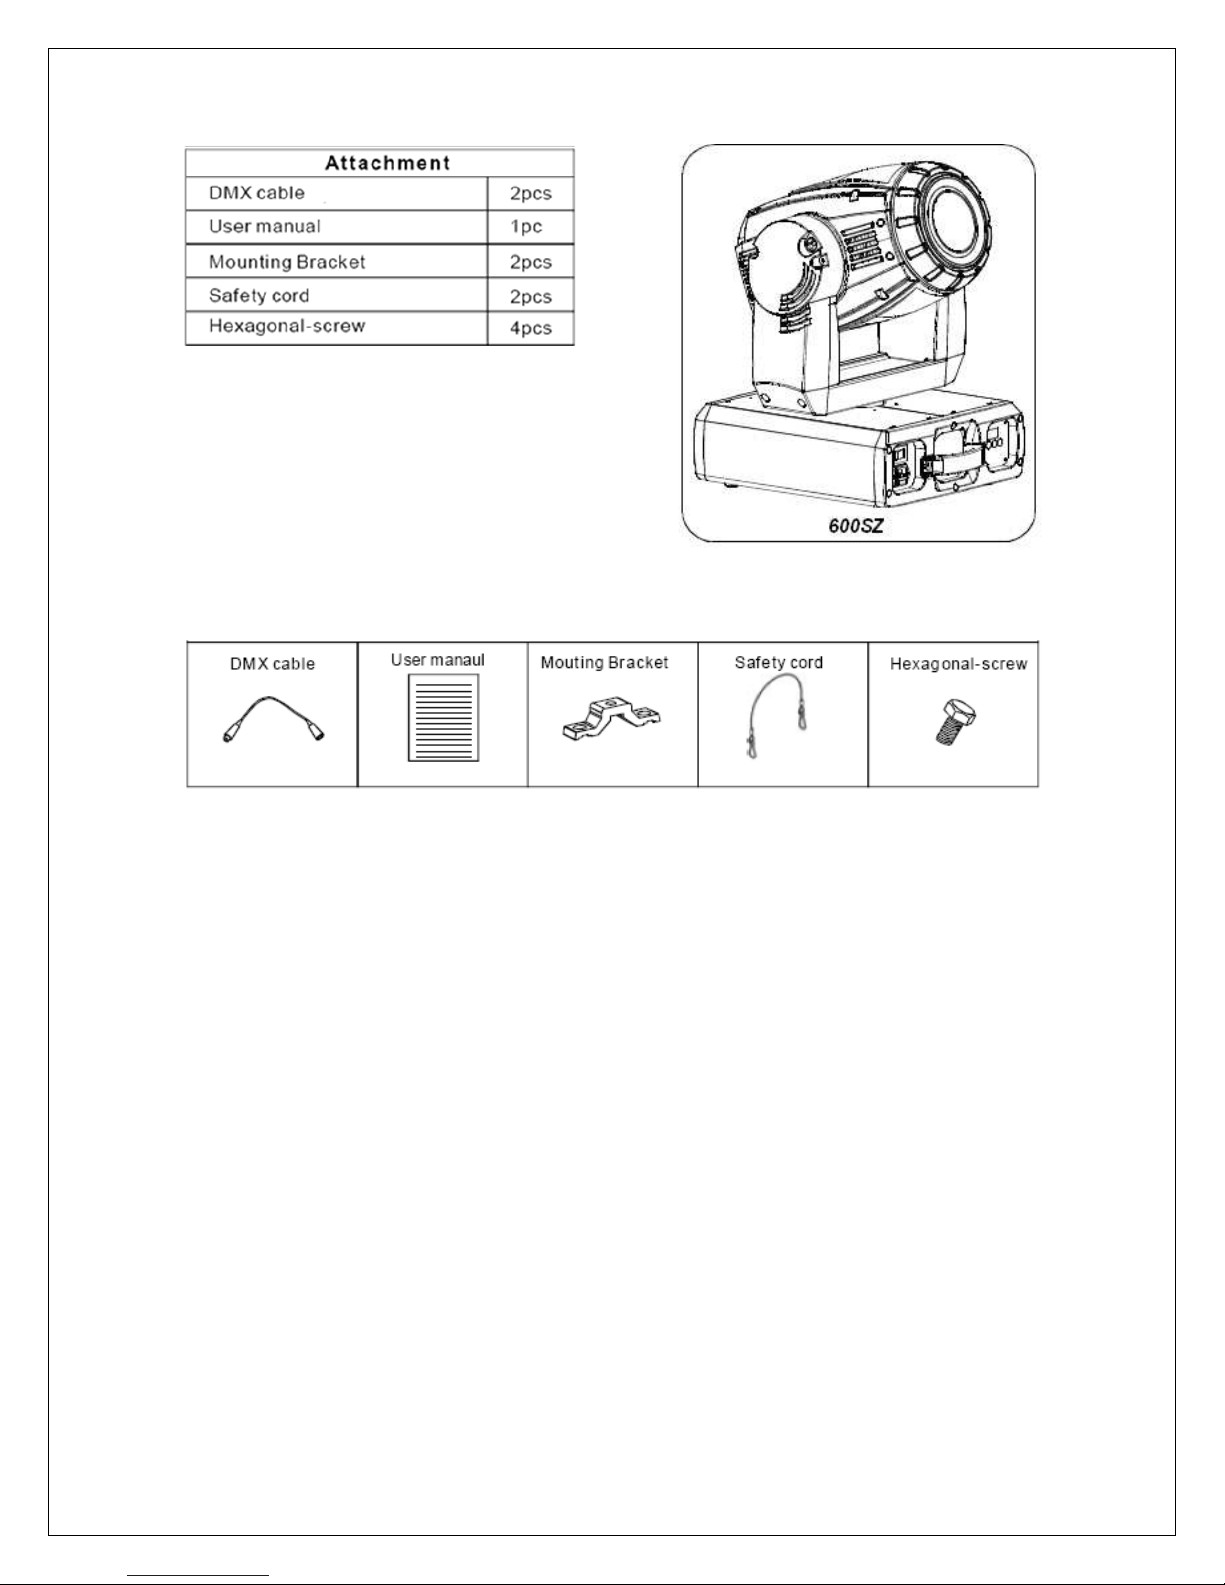
Unpack the moving head and verify that it arrived complete and without any
damage. The shipping carton contains the following accessories:
.
www.g-lites.com
5
Page 6
www.g-lites.com
6
Page 7
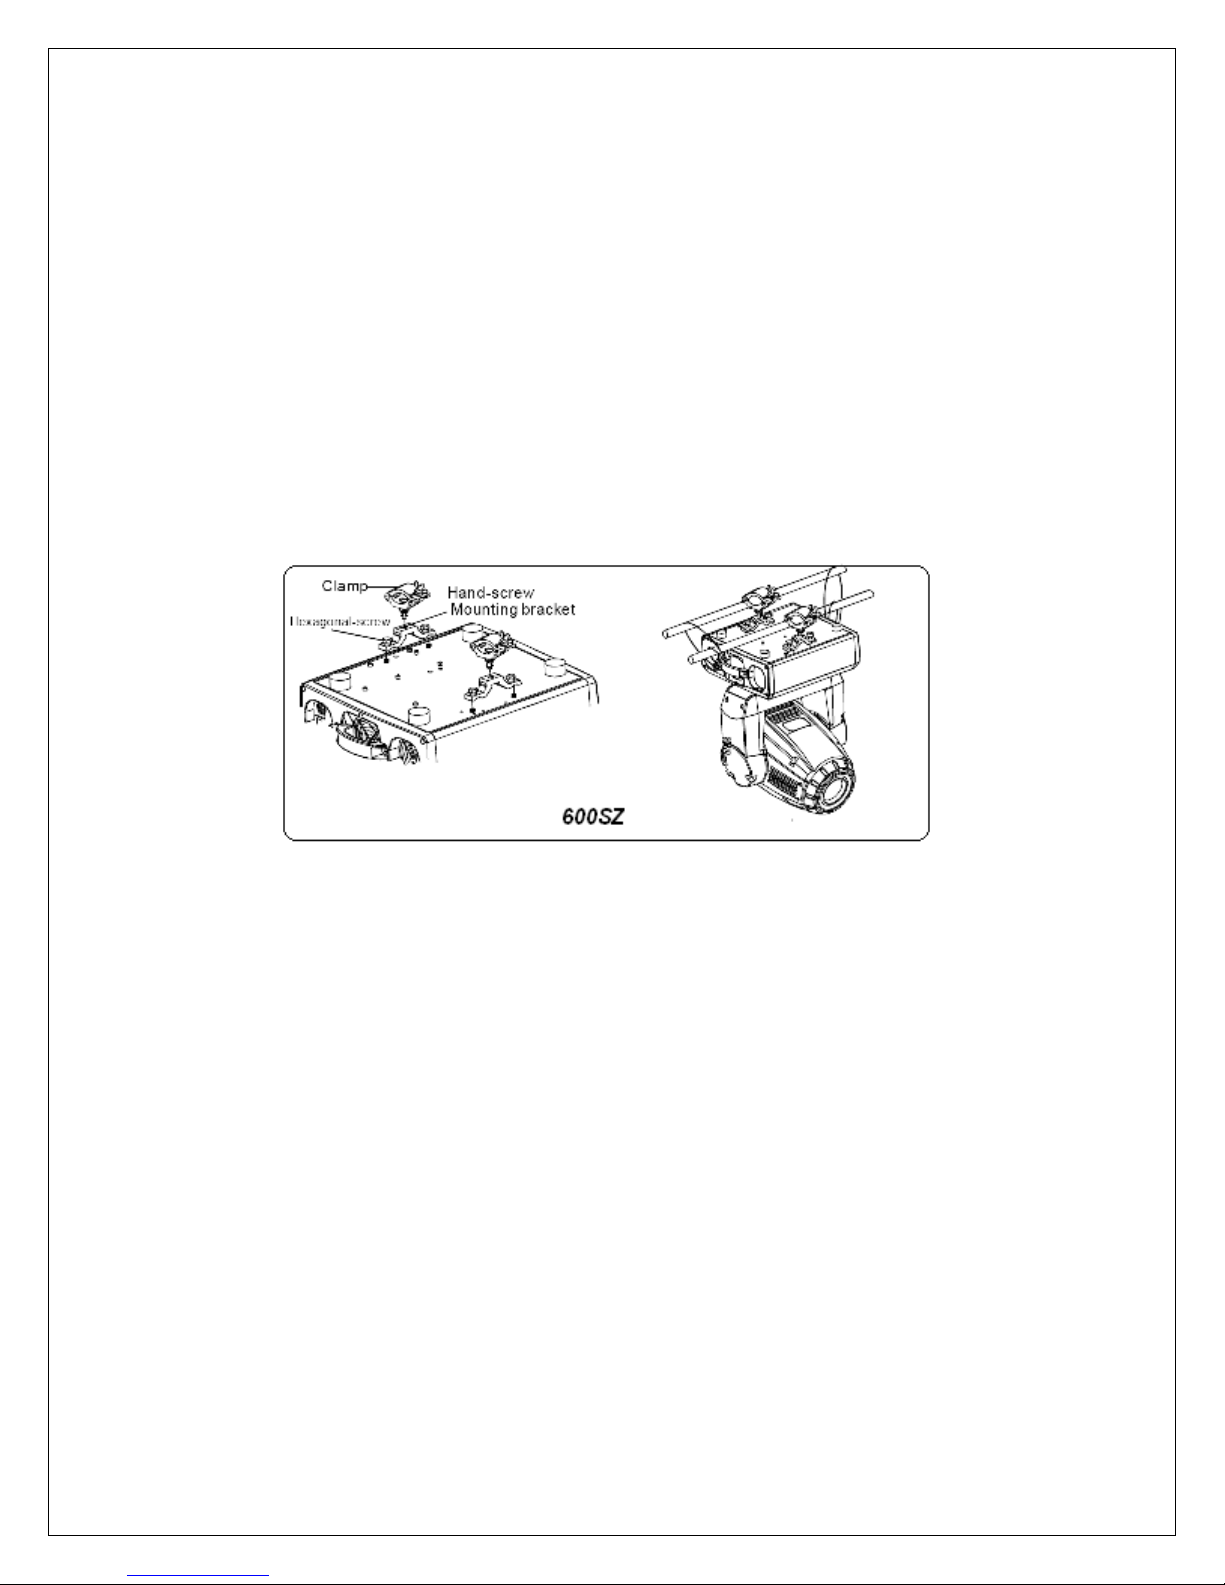
2
. Installation and safety operation
• Installation Requirements
Please make sure to fasten the mounting bracket firmly before installing.
The mounting bracket must share the weight 10 multiple weight of the
moving heads.
• Connect the mounting bracket and fix the clamp firmly to the truss in order
to avoid the moving head from getting loose or falling down.
• The moving head should be mounted with appropriate clamp by using 2
bolts. The mounting bracket itself is attached to the bottom of the moving
head with 4 bolts provided in the package. Always make sure that the
moving head is anchored firmly to avoid any vibration or fall.
• For safety purposes the moving head should be connected with the safety
cable ends by looping the cable over the truss, running it through the
truss and the handle of the moving head .The safety cable will fasten the
moving head on the truss tightly to avoid any vibration or falling.
o When installing the moving head, do not allow anyone nearby.
o After installing the fixture, weekly inspection of the safety cable,
clamp or truss are necessary to moving head from slipping. If any
accidents occur, the manufacturer is not at fault.
www.g-lites.com
7
Page 8
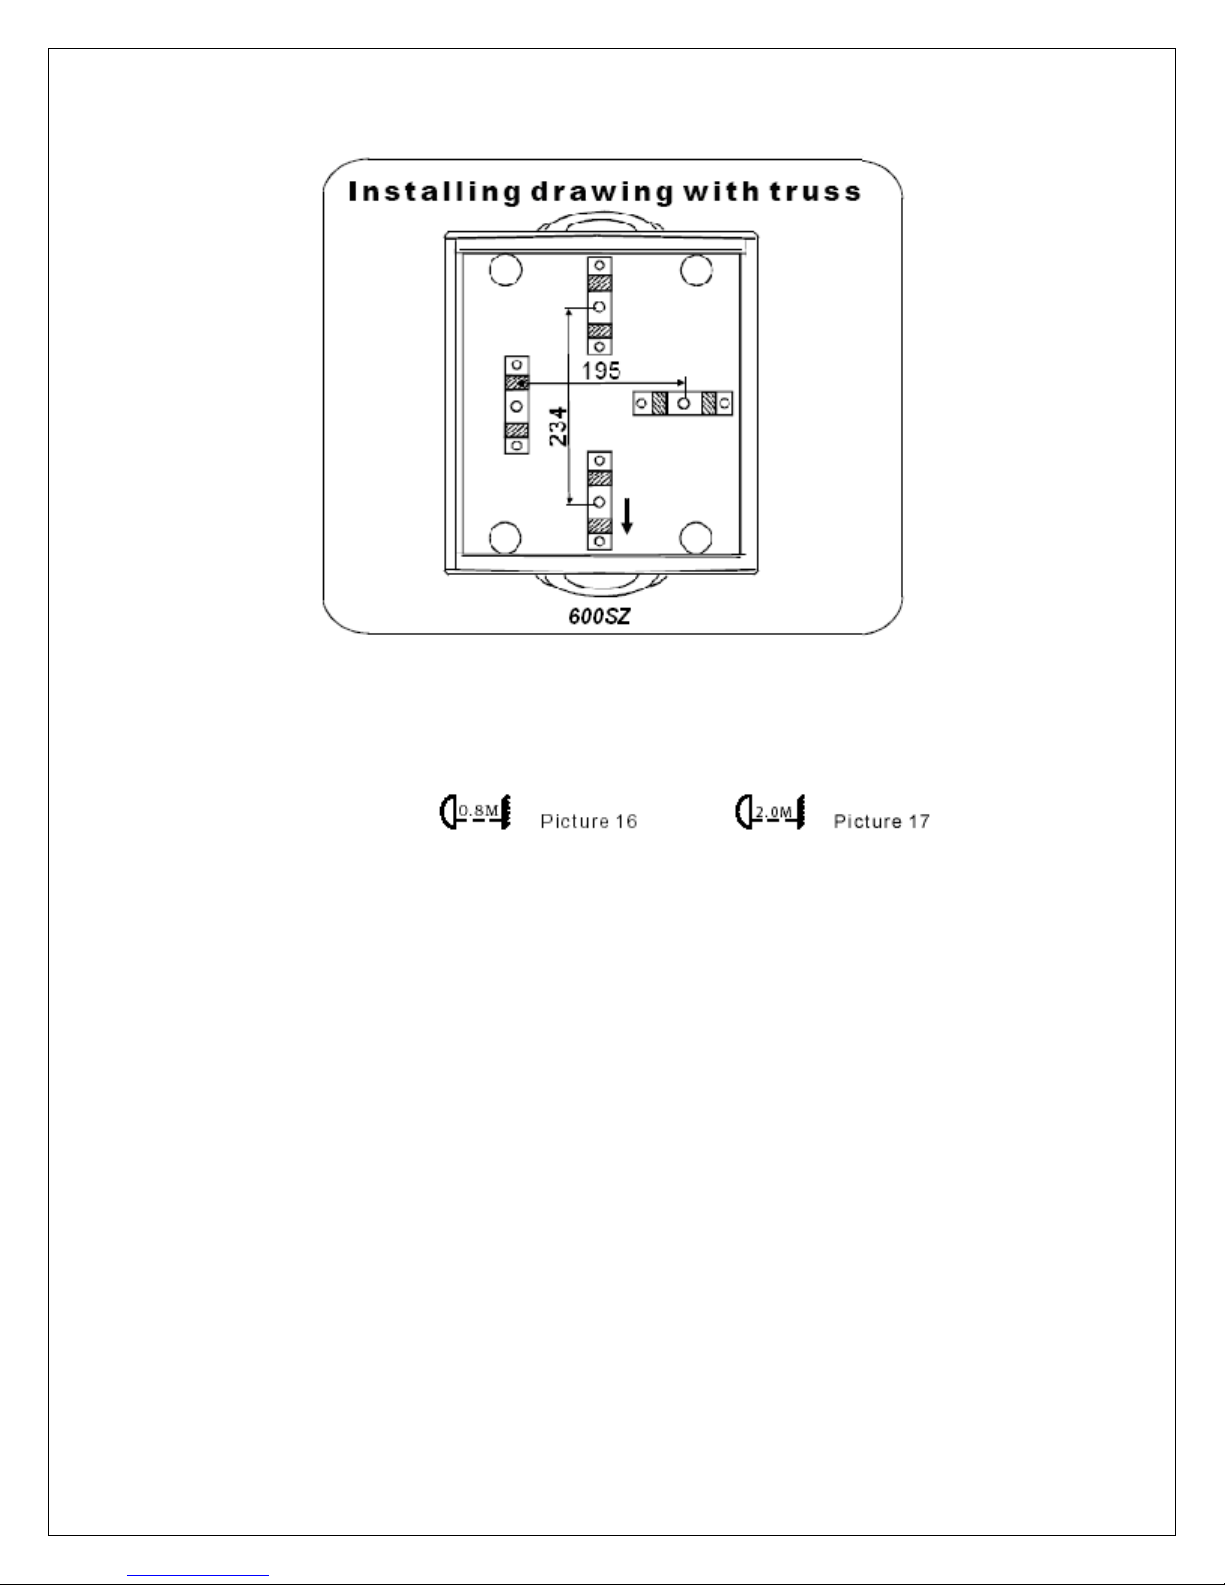
o Other safety terms
Maintain minimum distance of 0.80 cm (3.28 Feet) from
combustible materials.
o Observe minimum distance to lighted objects of 2.0 meters (6.6
feet)
o Do not mount on a flammable surface. Keep flammable objects at
least 1 meter away from fixture. Do not light objects closer than 1
meter.
o Replace fuses only with the specified type and rating.
o Ambient temperature:
In order to ensure proper fixture operation, the room temperature
must be higher than 33° and no lower than 2°
o Surface temperature:
Equipment surfaces may reach temperatures up to 100° C (212° F).
Allow 5 minutes for cooling before handling.
www.g-lites.com
8
Page 9
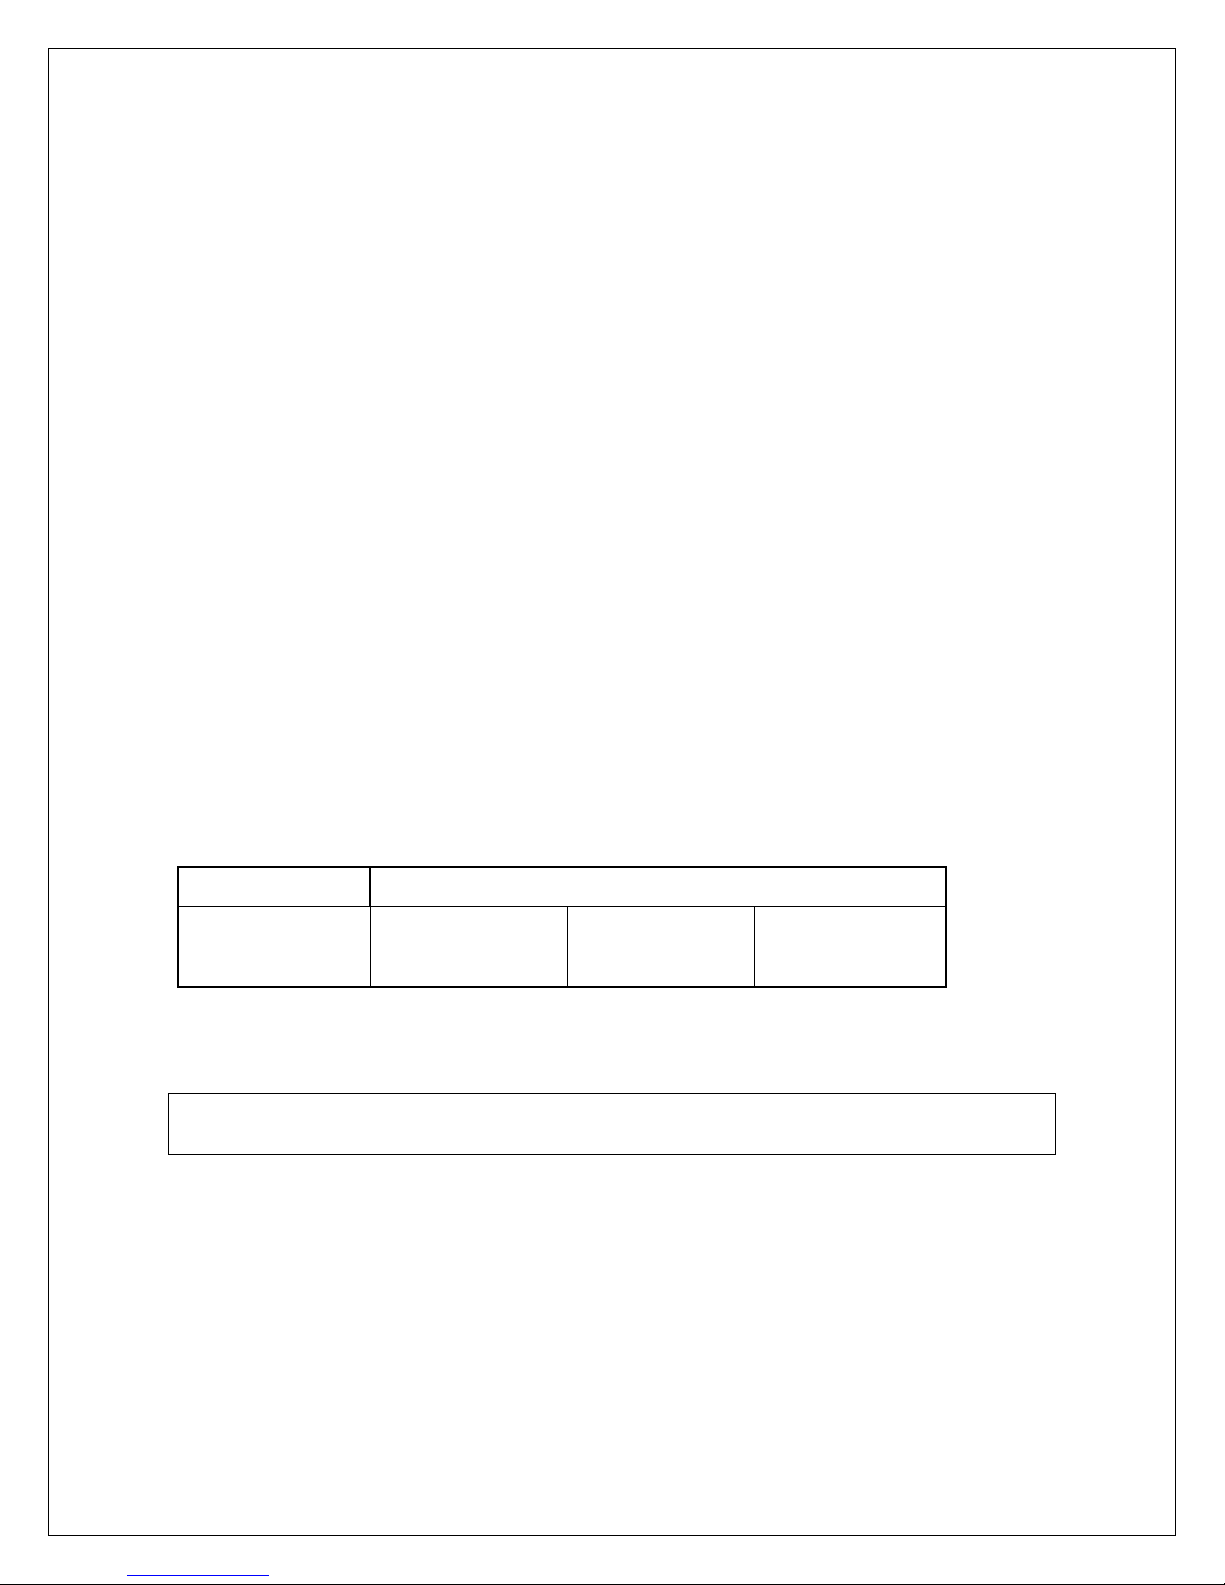
o Electric shock & static protection:
These moving heads are designed to work and depend on the
electric shock protection. The moving head should be connected
with the power supply system. The moving head's ground cable
should be connected with the ground cable of the power supply
system. The ground mark of the fixture metal cover should be
securely connected with the installation bracket.
o Connect the main power supply:
Connecting of the main power supply should be done by a
professional.
o Please check the voltage, frequency data of power supply system
of the moving head to avoid different voltage or melting.
o Please refer to the actual wattage allowed of the moving head's
lamp. Multiply 1.5 total quantity of the moving head then you could
get the minimum power loading. If your power cable can't share the
minimum power supply loading. Do not connect all the moving
heads
3. Lamp replacement
Lamp Description
Model
Philips Osram
600SZ MSI 575W HR HMI 575W /GS
6000 K 1000 Hr 5600K 1000 Hr
Lamp Description
Lamp Replacement
Warning:
Disconnect the power supply before replacing the lights.
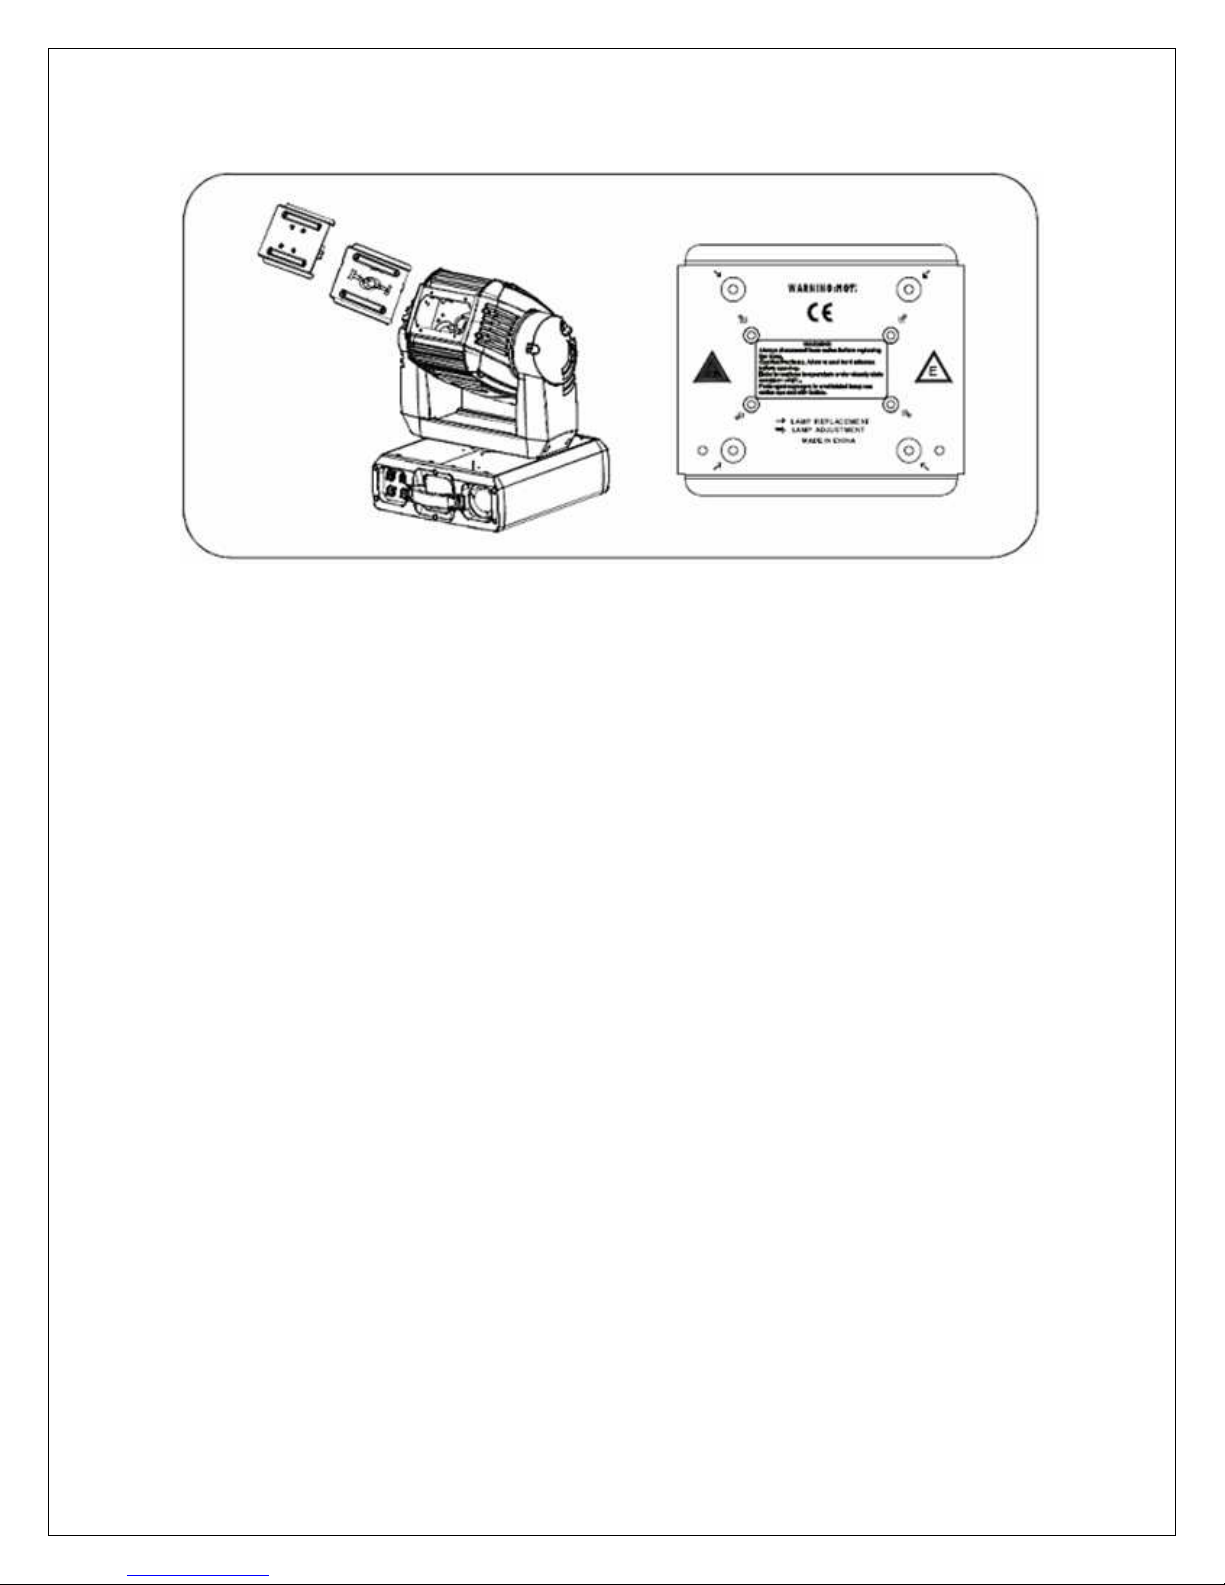
Open the lamp access panel at the rear of the moving head by undoing the 4
hand-operated screw .Then you can begin to replace the lamp. Pull out the old
lamp from the lamp bracket and then plug in the new lamp. Remount the lamp
bracket and fasten the screw at both sides tightly or the lamp's loose connection
will result in high tension short circuit or electric discharge which will effect the
lamp life or damage the PCB board. When replacement is complete, close the
cover and fasten the screw at both sides tightly.
www.g-lites.com
9
Page 10
Lamp features
HMI series lamp is a high-voltage recharge lamp. Always be careful when
handling the lamp before operating. Please read the following information
carefully. Manufacture will not be responsible for misuse or incorrect operation.
Warnings:
Warning 1:
Disconnect the power supply if there are no lamps fixed inside the fixture. Or it
will melt down the fixture.
Warning 2:
Disconnect the power supply before replacing the fixtures.
Warning 3:
When the lamp is operating, its temperature will be extremely
the recharge lamp can not work under the interruption power supply. Therefore,
please let the lamp cool down completely (Approx 15 minutes at least).Then it’s
ready to operate again. Other wise, it will lead to high tension, short circuit or
electric discharge. It may cause the part of the control board to burn down.
Warning 4:
All the lamps have its usage life, please inspect the lamp timing and ensure the
lamp's usage life not to exceed the rated life span; otherwise, it may result in
damaged, broken, deformation or blacken. If the lamp is broken, the impact will
damage the moving head's spot system. The electric parts on the circuit board
may cause cracks by the high voltage. The hot lamp fragments may injure
people, explode, or set on fire.
www.g-lites.com
high. The feature of
10
Page 11
Warning 5:
When the lamp is blackening, cracking, deformed or damaged, let the lamp cool
down 15 minutes. If replacement of lamp is needed, read the user manual
forwarded by the manufacturer.
Warning 6:
The inside temperature is much higher under normal working conditions. Do not
touch the moving head with bare fingers. Negligence or misuse of directions in
manual may lead to damage.
Advertisement:
Use the OSRAM or PHILIPS lamp is the first choice. (The average lift time of the
OSRAM and PHILLIPS is 700 hours; the average lift time of other brand is 70100 hours).
4. Power Supply & Control
4.1 Power Supply Connection and Control
Use a professional plug to connect the moving head and main power supply. Pay
attention to the voltage, frequency the same as mentioned on the moving head;
suggest each fixture has an independent switch of the power supply so that it can
be turned on or off.
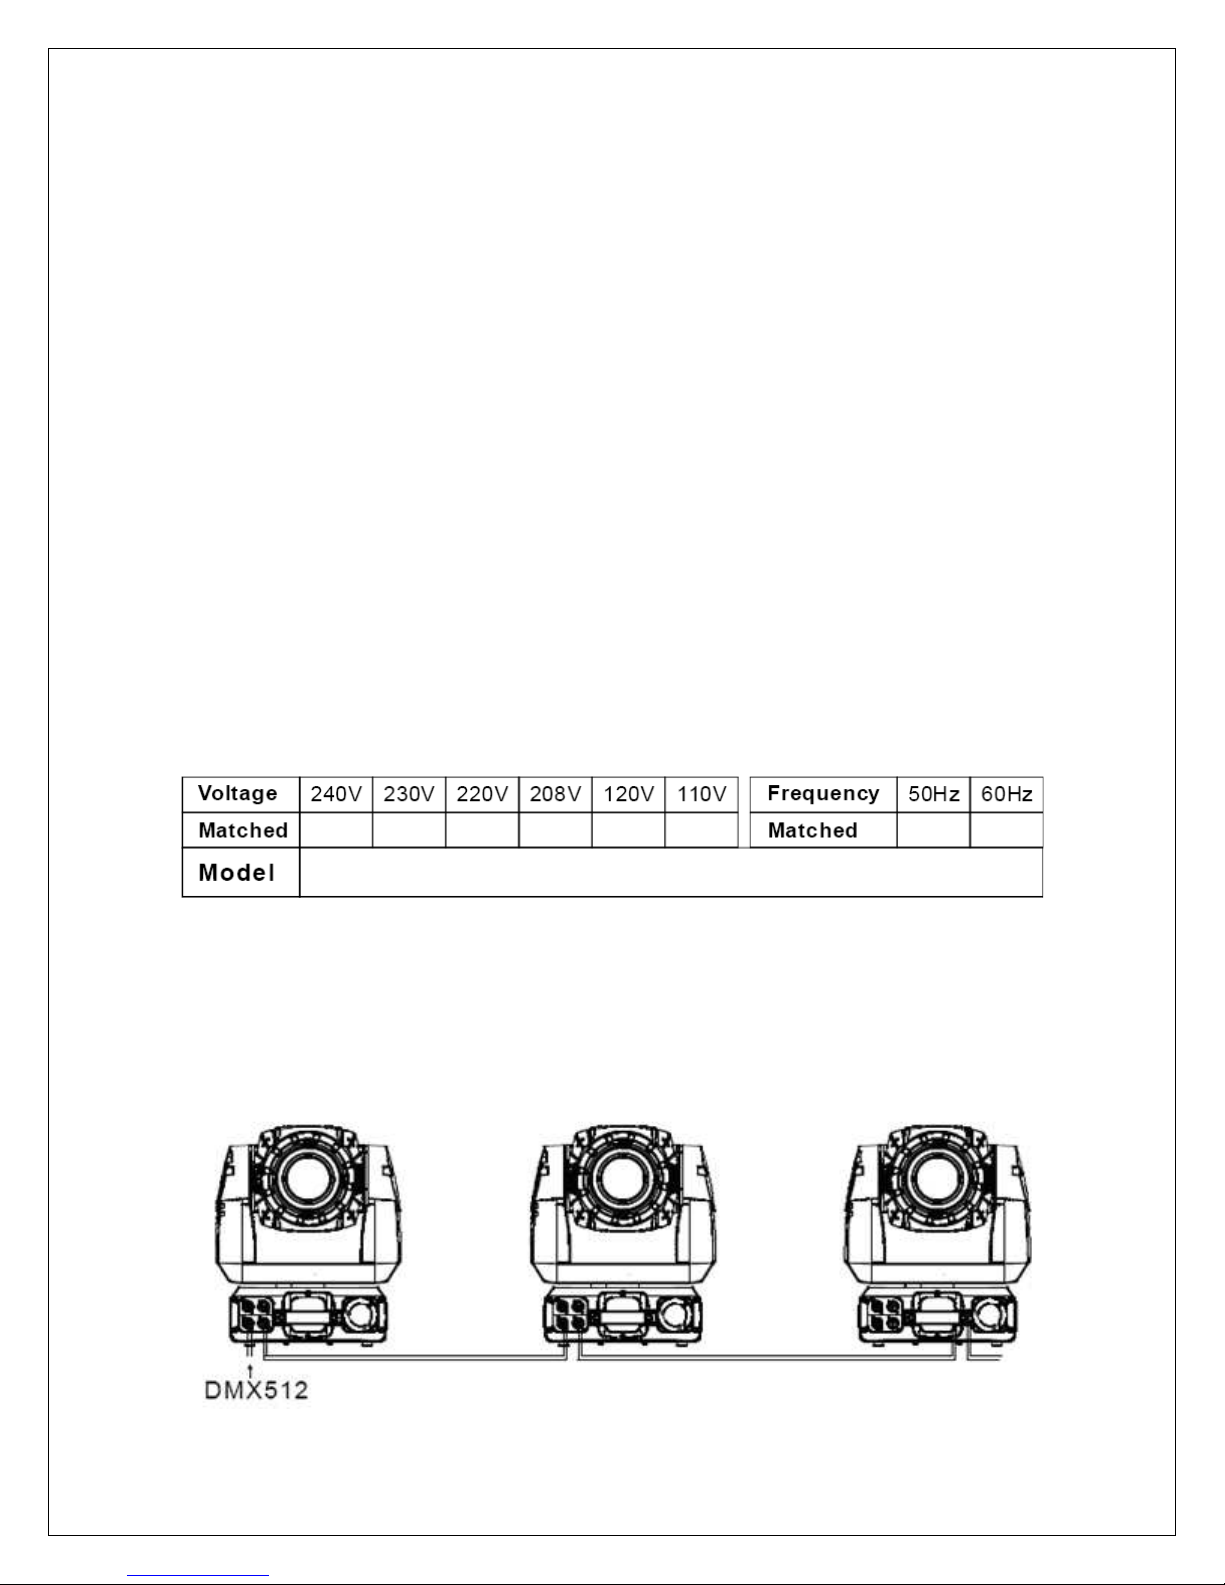
4.2 Signal connection
Please use the round 3-pin XLR plugs & sockets offered by manufacture to
connect the first moving head's output to the second moving head's input and
connect the second moving head's output to the third moving head's input and in
the same way for the rest as shown below.
www.g-lites.com
11
Page 12
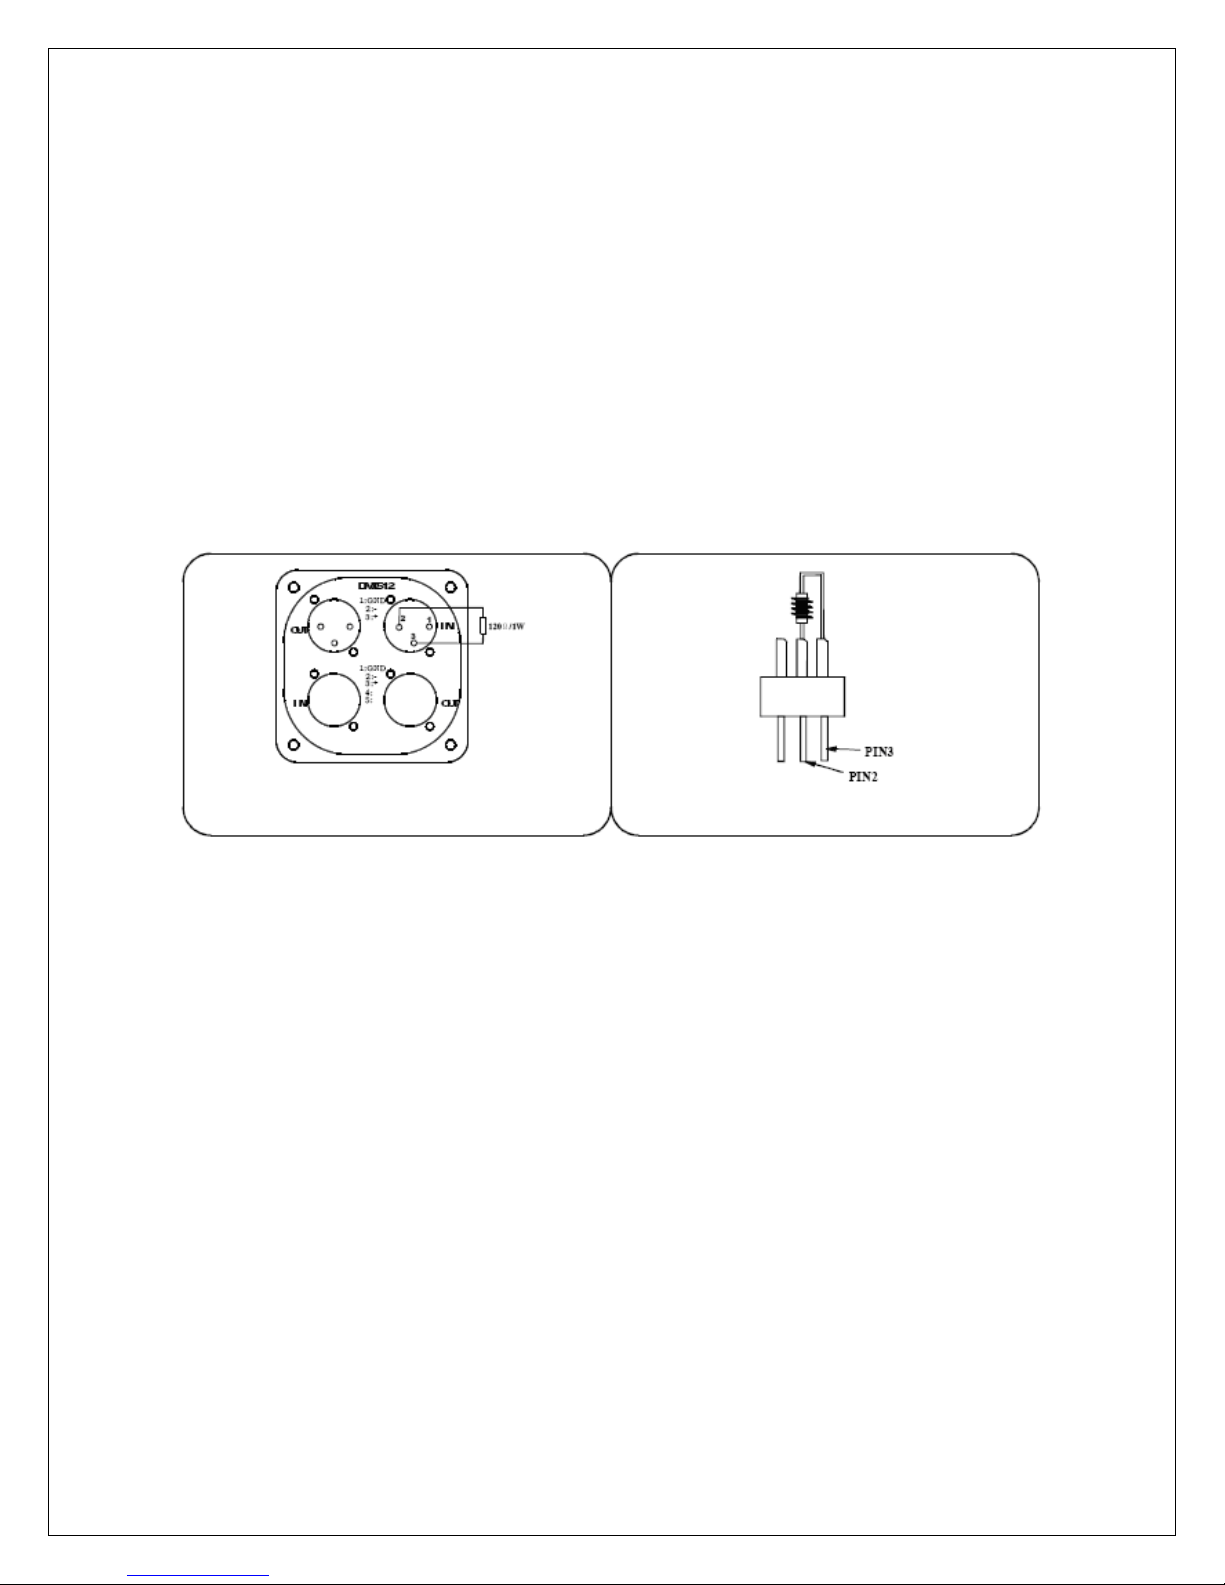
The moving head's control signal output or input by using the 3 pin or
5 pin XLR pug and socket. If need to lengthen the communication cable. Make
sure that both sides of 3-pin plug are one to one (one to one, two to two, three to
three). Otherwise, the communication cable will be interrupted. The communicate
Ω
cable is 2-pin shielded cable 75
RESISTANCE with each core is at least a
0.5mm diameter. (Caution: All the inside leading wire of 3-pin XLR plug can not
touch each other or plinth).
We recommend using the DMX signal terminator for the installation to avoid
electronic noise damage to the digital control signal. Simply speaking, DMX
terminator is an XLR connector with a 120 /1w resistor connected across pin 2
and 3, which is then plugged into the output socket on the last moving head in
the chain. Refer to the connection as below. We suggest using the DMX signal
distributor when the distance of the fixtures is over 15meter.
4.3 Fixture Connection
After performing the above instructions and after making sure the moving heads
have the appropriate lamps, press the power switch to check whether everything
is working normally. The LED display will show the
original DMX signal address.
The moving head has a reset function. It means that if draw out the communicate
cable or turn off the control 30 seconds later, re-draw in the communicate cable
or turn on the controller. The moving head will be mechanically set (reset). The
lamp will be fixture after connecting the power. Several minutes later the moving
head will begin the mechanical positioning.
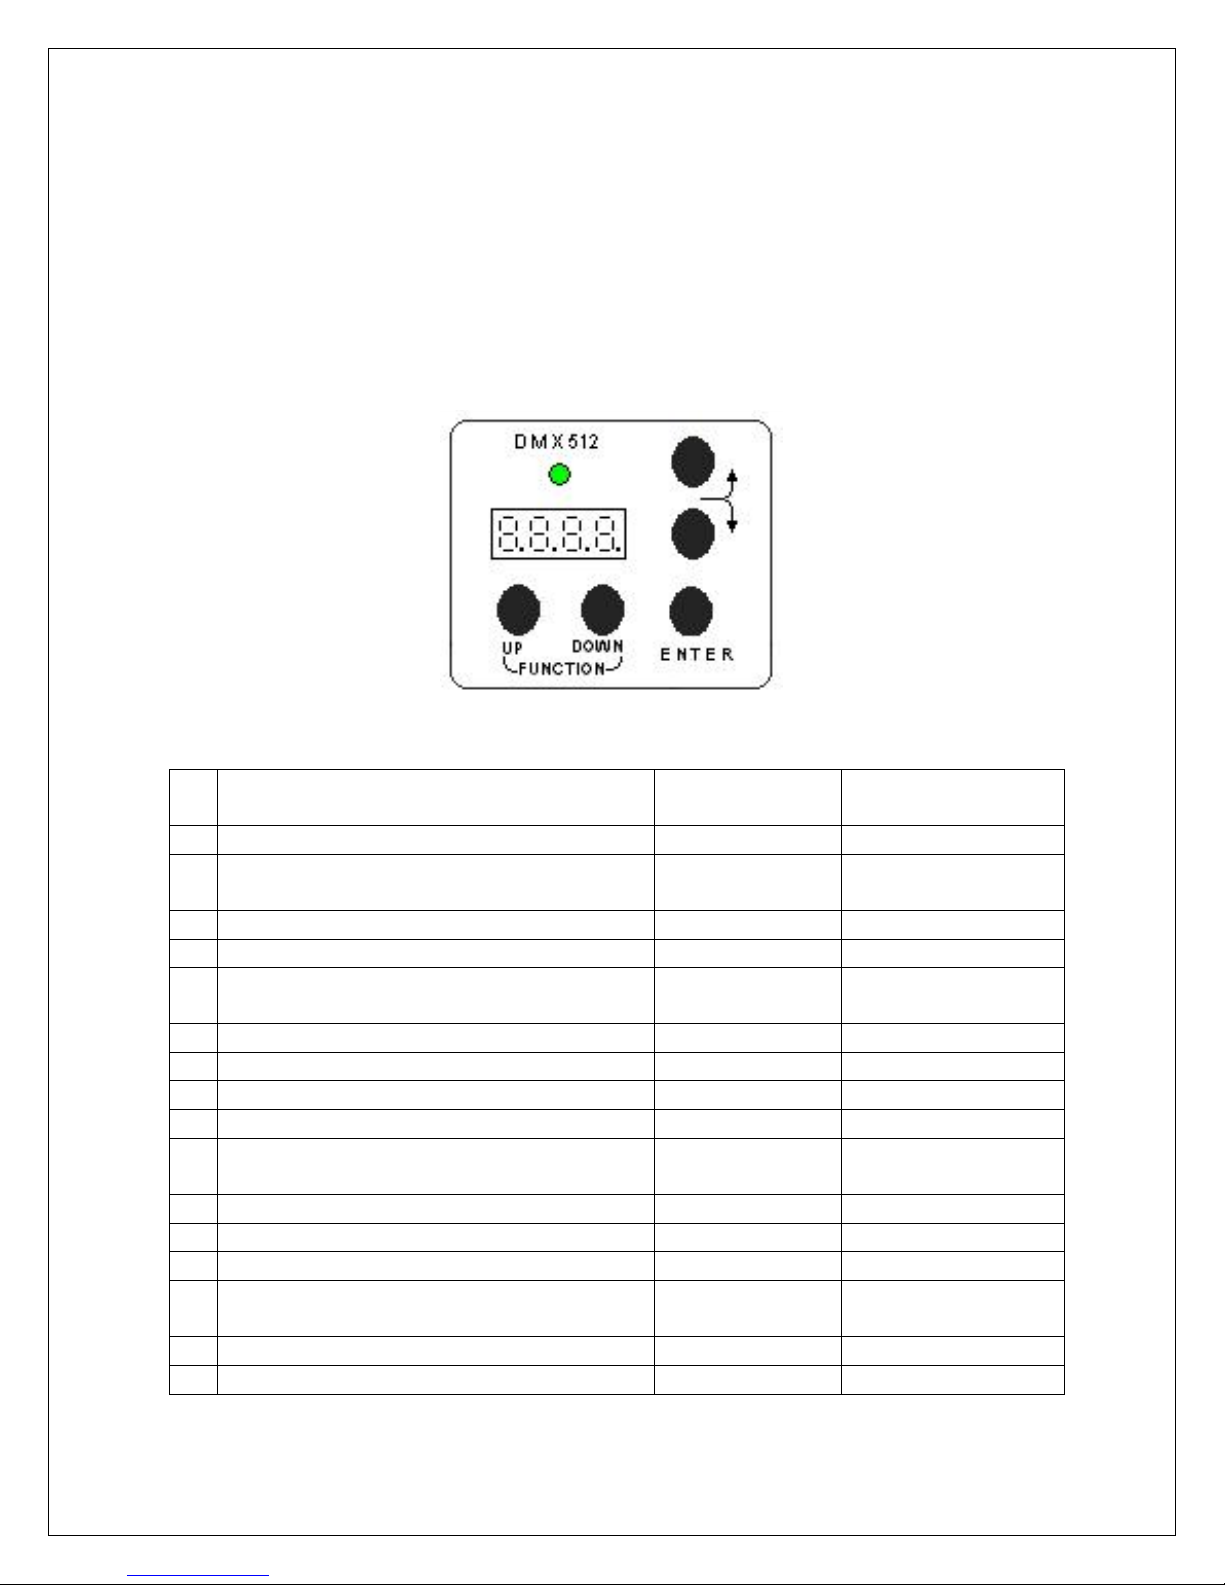
5. MOVING HEAD IP CODE PROGRAMMING
To make sure every moving head reacts to the control signal correctly, a digital
starting IP code should be given to every G-Lites moving head. Digital starting IP
code should be given to every G-Lites moving head. Digital Starting code is a
channel number. By this number, the moving head should obey the command
from the controller. Digital starting IP code is set by the operation panel,
progressing to the starting IP value.
www.g-lites.com
12
Page 13
FIRST FIXTURE’S IP CODE VALUE = (VALUE OF THE FORMER IP CODE) +
(CHANNEL ON THE CONTROLLER)
Note: The first moving head’s starting IP code is 001.
Channel number on the controller should not be less than the channel number on
the moving head.
6. MOVING HEAD IP FUNCTION SELECTION
There are 16 IP function selections on the G-Lites Moving heads. These
functions could be selected by the operation panel.
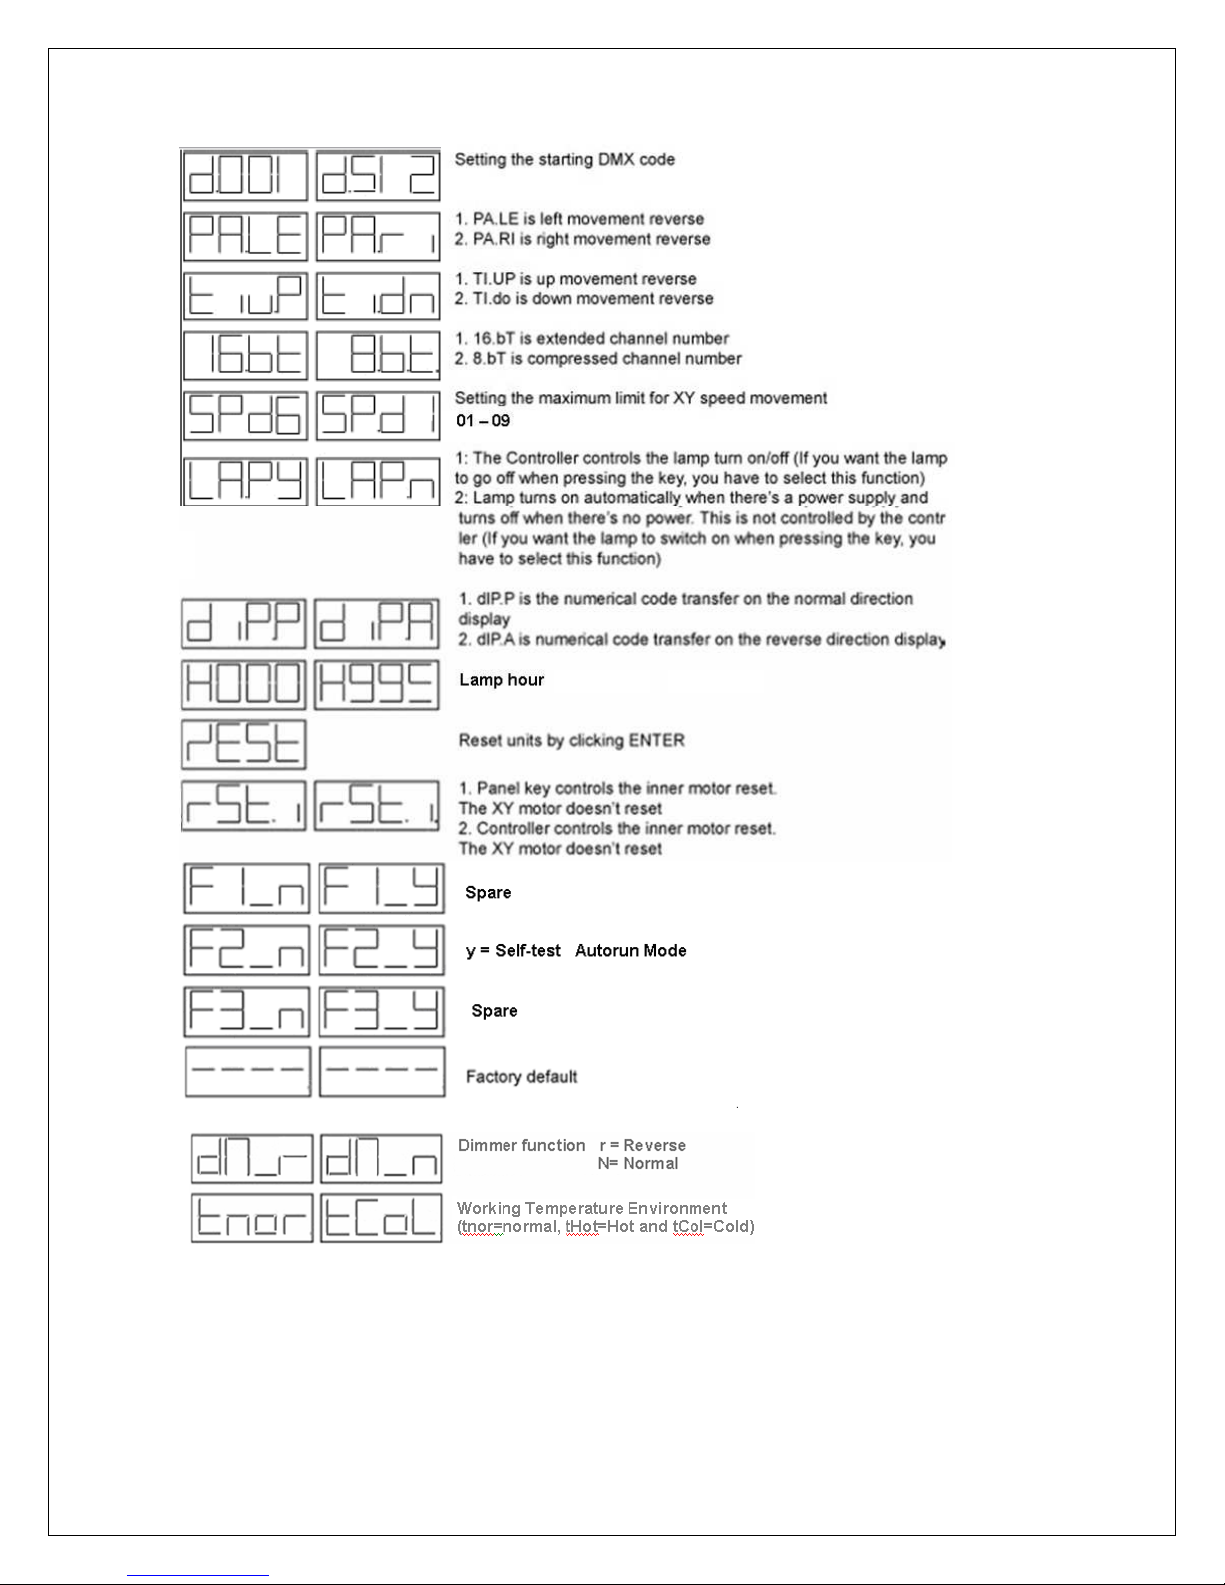
7. DISPLAY MENU MAP:
N Description Default Up/Down key
letter
1 DMX setting address setting d.001 d.512
2 PAN normal/anticlockwise 180 degree
Pa.rI PA.LE
setting
3 TILT normal/anticlockwise setting TI.Dn TI.Up
4 Extend/compress channel setting 16 bit 8 bit
5 PAN/TILT run speed setting total 1-10
SPd 6 SPd 1/10
level
6 Lamp on/controller turn on setting LAP y LAP n
7 Display normal/inversion mode dIP.P dIP.A
8 Fixture working hours H000
9 Key-press restoration enactment rESt
10 Interior electronic restoration
rST.I rST.I
enactment
11 Spare F1-N F1-Y
12 Self-test F2-N F2-Y
13 Master/slave mode F3-N F3-Y
14 Restore default setting of leave the
------- -------
factory
15 Dimmer function dn-r dn-n
16 Temperature contrast T.Nar T Hot / T.Col
www.g-lites.com
13
Page 14
www.g-lites.com
14
Page 15
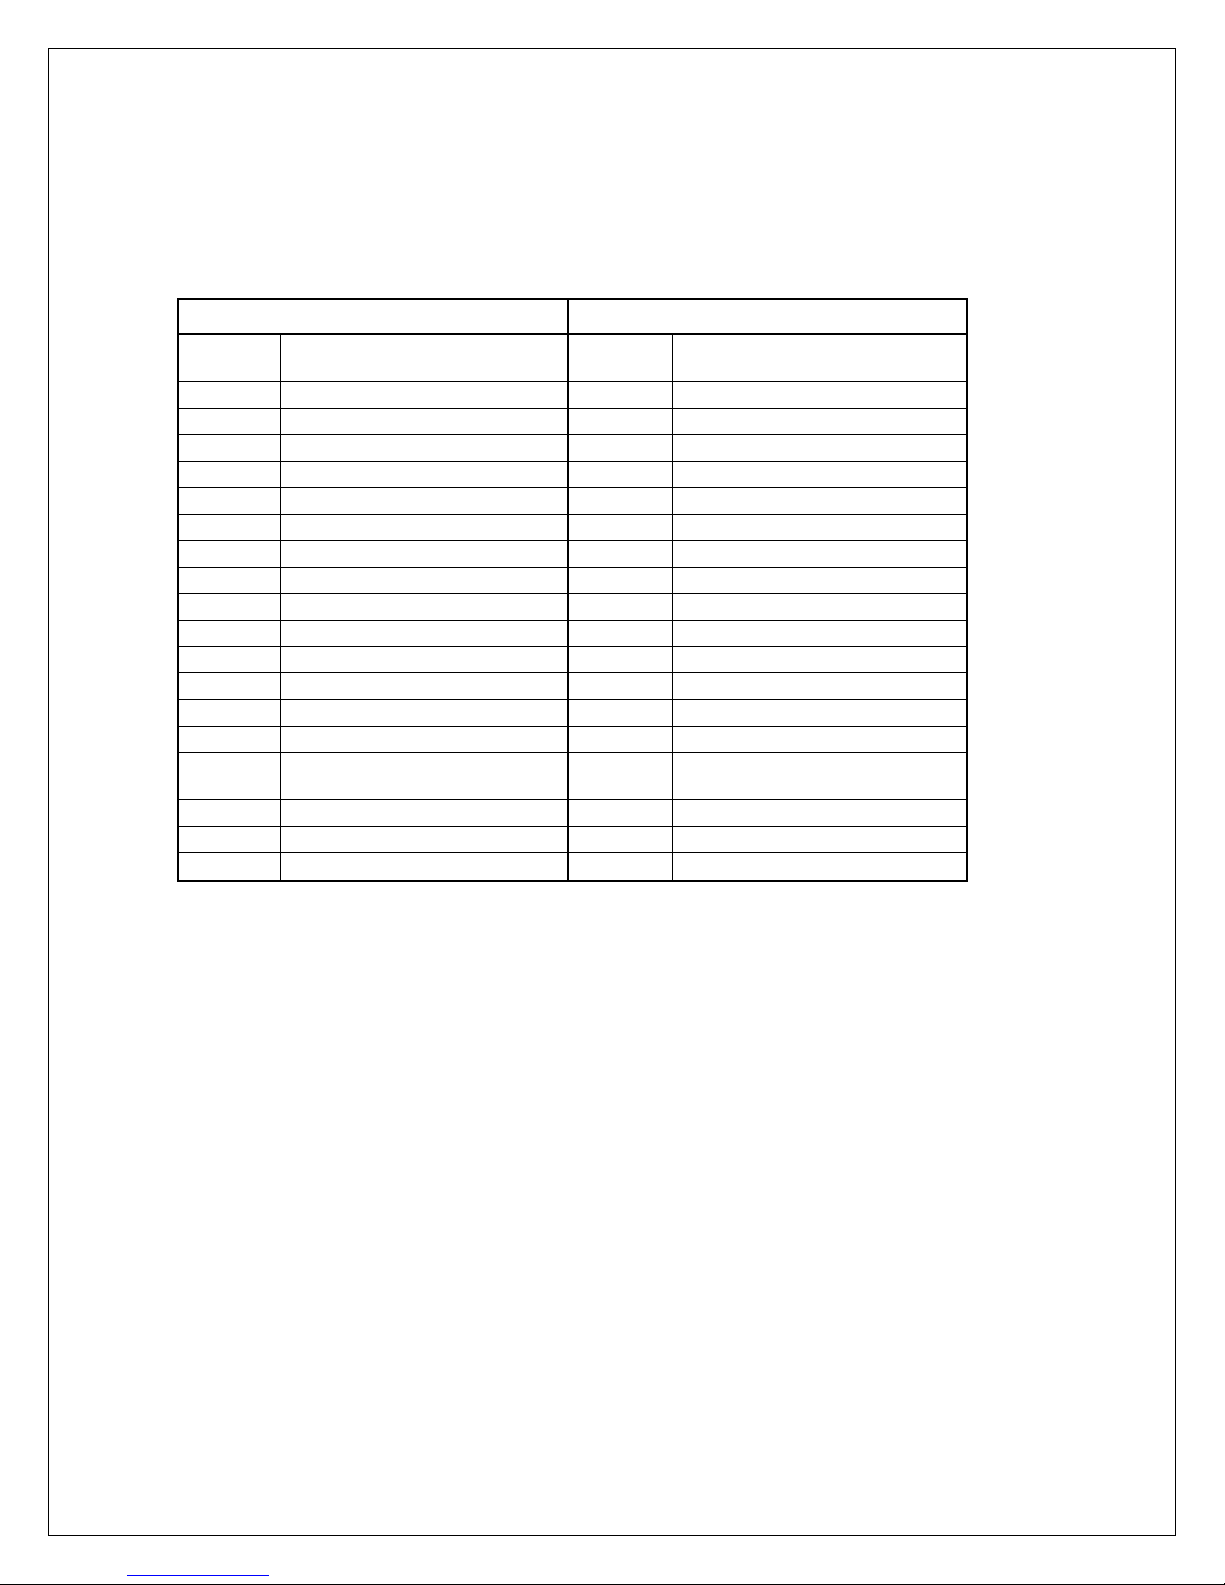
8. DMX CHANNELS & PHOTOMETRICS
8.1 CHANNEL TABLE
Channel #
1 Lamp On / Reset 1 Lamp On / Reset
2 Dimmer 2 Dimmer
3 Shutter / Strobe 3 Shutter / Strobe
4 Pan Coarse 4 Pan Coarse
5 Tilt Coarse 5 Tilt Coarse
6 Color Wheel A 6 Color Wheel A
7 Gobo Wheel B 7 Gobo Wheel B
8 Gobo Wheel A 8 Gobo Wheel A
9 Gobo Wheel A Rotation 9 Gobo Wheel A Rotation
10 Iris 10 Iris
11 Focus 11 Focus
12 Zoom 12 Zoom
13 Prism & Rotation 13 Prism & Rotation
14 Color Wheel B 14 Color Wheel B
15
16 Pan / Tilt Speed 16 Pan / Tilt Speed
~ ~ 17 Pan Fine
~ ~ 18 Tilt Fine
8 Bit MODE
Description
Blackout movement /
functions 15 Blackout movement / functions
Channel #
16 Bit MODE
Description
www.g-lites.com
15
Page 16
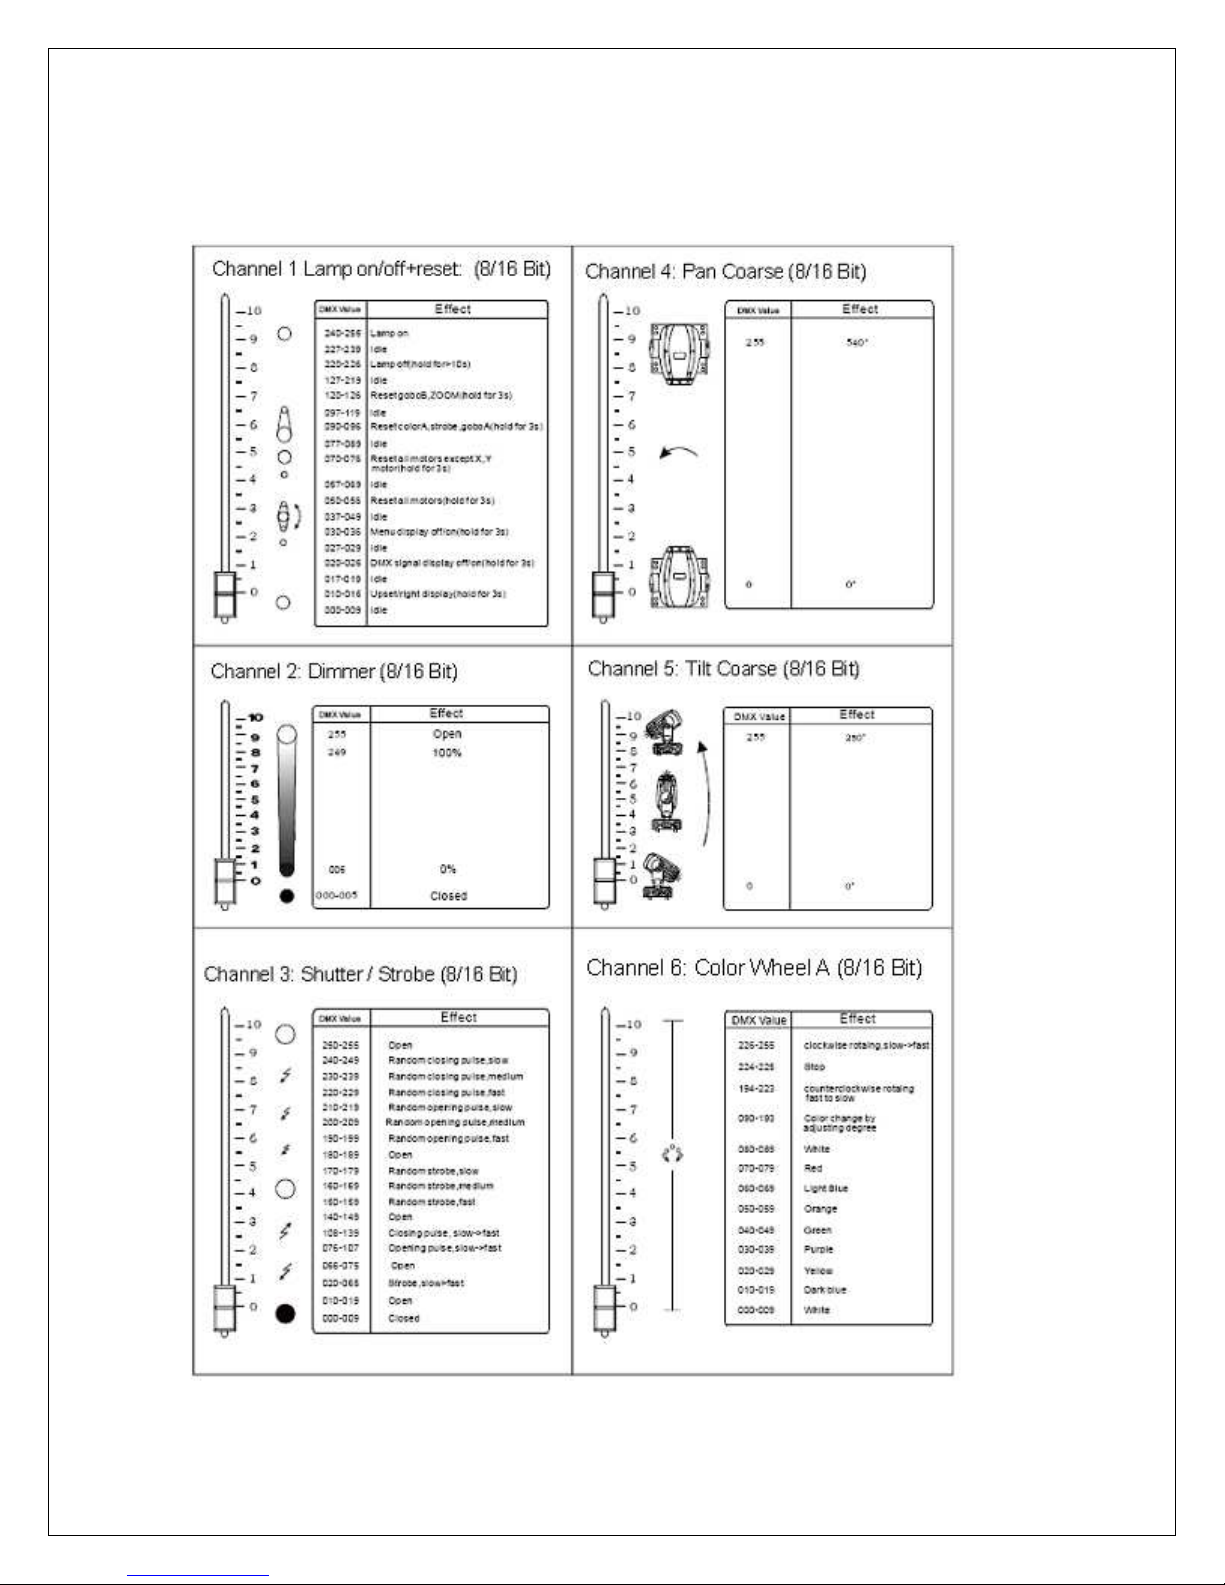
8.2 DMX PROTOCOL CHART
www.g-lites.com
16
Page 17
www.g-lites.com
17
Page 18
www.g-lites.com
18
Page 19
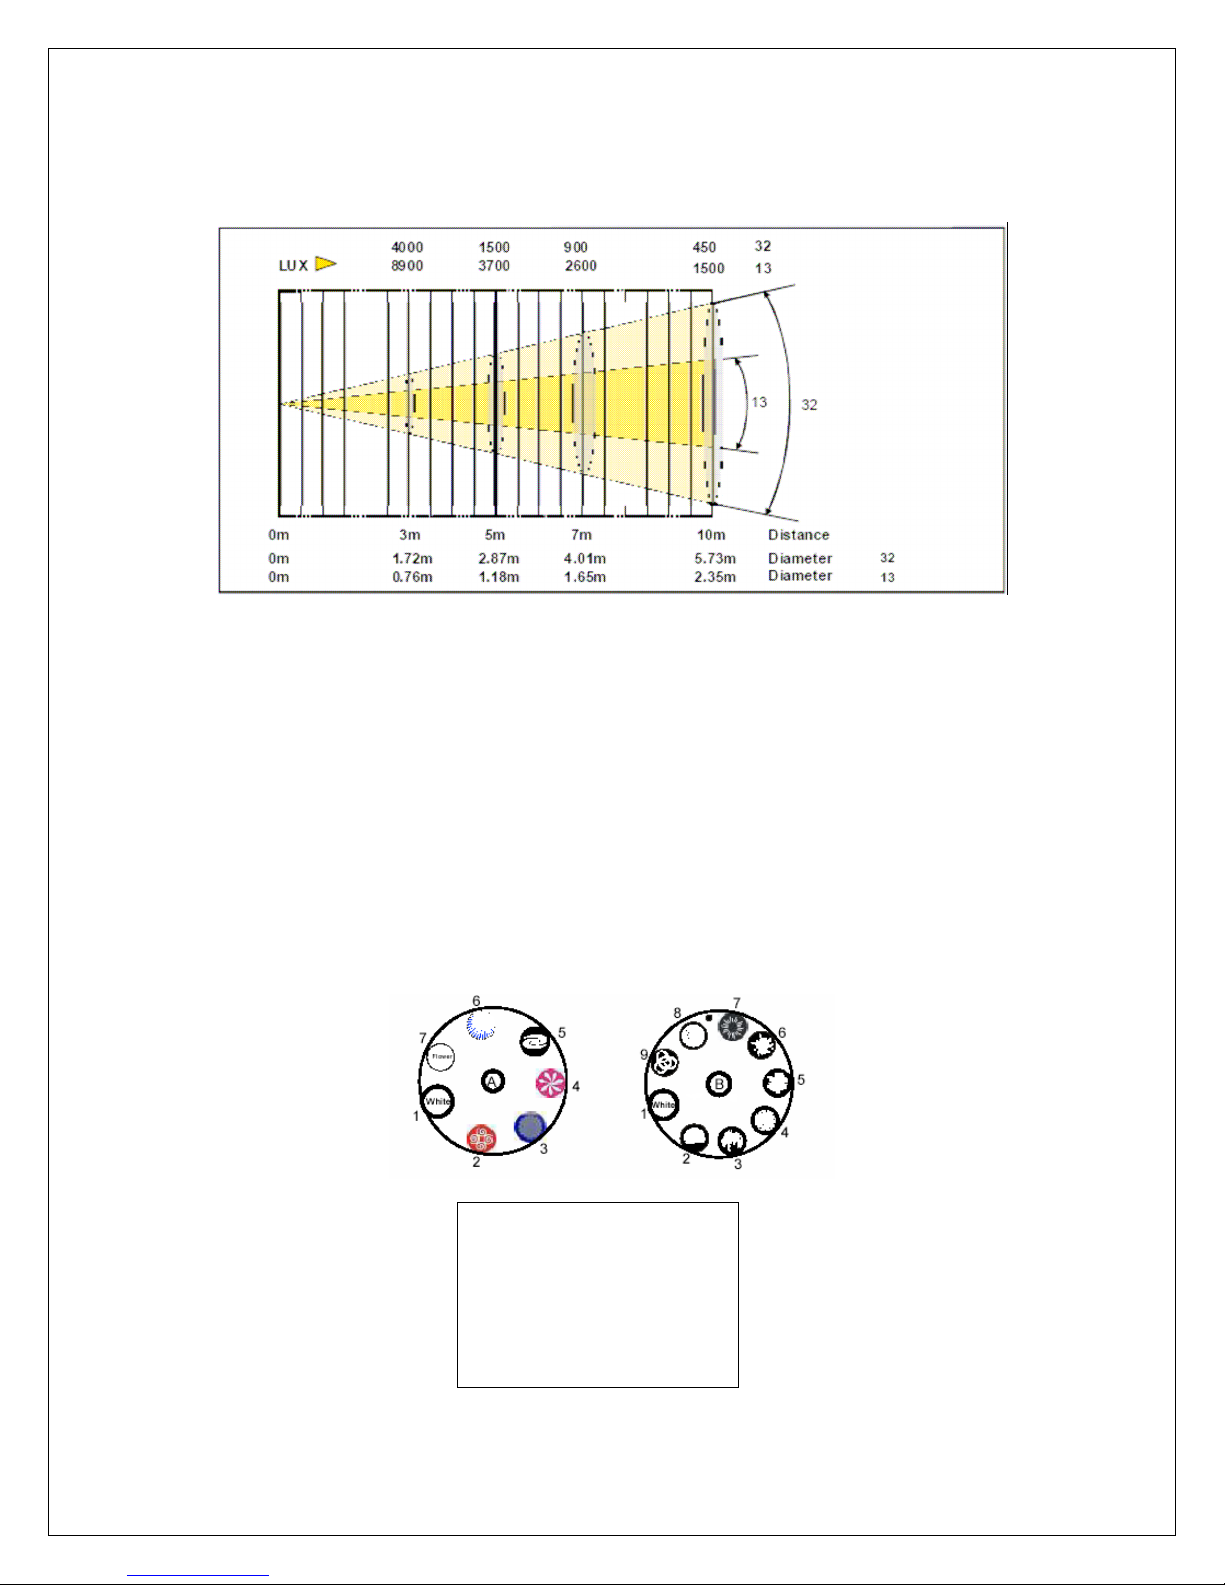
9. LUMINOUS INTENSITY
10. GOBO AND GOBO SIZE
Thickness stainless (0.2mm) / glass GOBO (1.1mm)
Rotating metal GOBO Wheel A outside (28mm) /inside (22mm)
Rotating glass GOBO Wheel A outside (28mm)/inside (21.5mm)
Fixing GOBO Wheel B outside (28mm) / inside (20.5mm)
White: outside (28mm)/inside (23mm)
The GOBOS can be
different than the picture
that you see in this
manual; the manufacturer
has the right to make any
adjustment without notice.
www.g-lites.com
19
Page 20

MAINTENANCE
This chapter includes information on replacing parts, and cleaning the fixture.
This fixture must be serviced by qualified personnel. The information listed in
this chapter is intended to assist qualified personnel only.
Important Information:
o Disconnect the fixture from power before servicing.
o Exterior surfaces can reach 200˚ C and interior surfaces can exceed 250˚
C. Allow the fixture to cool for five minutes before touching any surface.
o Always wear hand and eye protection when servicing the fixture.
o Do not touch the lamp with bare fingers. The oils from your skin can
damage the lamp and cause it to explode. If the lamp is accidentally
touched, clean it immediately with a soft cloth and isopropyl alcohol
((CH³)²CH0H).
o Clean the lens and dichroic filters on a regular basis. Do not use any type
of solvent since it may damage the fixture, just use a clean cloth.
It is not recommended to use the fixture for more than 4 hours.
Continuous use will shorten the life of the lamp.
o Clean your fixture on a regular basis. Dust, fog and smoke particles can
accumulate and cause malfunctions.
o To clean the exterior surfaces, wipe with a soft lent-free polyester cloth or
use a small vacuum to remove any built-up dust and dirt. Do not use a
blower because it will force foreign particles into the fixture.
o For optimal cleaning, use a mixture of 70% alcohol to 30% water for the
initial cleaning. Then clean the same parts with 100% alcohol.
www.g-lites.com
20
Page 21

LAMP
Osram (included):
HMI 575W/GS (6000 K).
Phillips:
MSI 575 (5600 K).
Average Lamp life - 750 + hours (Osram/Phillip lamp)
COLOUR
8 main interchangeable colors (7 + 1 white/ open) + 8 mixed colors. Can
freely move clockwise or anticlockwise, fast or slowly.
Linear CMY/COLOR wheel.
GOBO
8 fixed interchangeable metal gobos + white light.
6 rotating glass gobos + white light (all can be custom made).
Rotating gobos can freely move clockwise or anticlockwise, fast or slowly.
Angles for rotating gobos can be separately adjusted (to ensure
consistency of gobo orientation and angle).
EFFECTS
3 faces prism lens with free clockwise or counterclockwise rotation.
13° – 32° stepless zooming feature, freely tunable.
OPTICS
Motorized focus.
Motorized iris (Adjustable aperture size).
TECHNICAL DATA
www.g-lites.com
21
Page 22

DIMMER-SHUTTER-STROBE
0 – 100% mechanical linear dimming (adjustable from full blanking to full
opening effects).
1-7 flashes/second ultra high speed strobe effect.
PAN TILT
Horizontal direction 540° scanning, smooth scanning action and accurate
orientation.
Vertical 250° scanning, smooth scanning action and accurate orientation.
Pan/Tilt lock.
Pan/Tilt w 8/16 bit resolution.
Automatic Pan/Tilt repositioning.
Precise adjustment on horizontal and vertical position.
Precise speed adjustment on horizontal and vertical position.
INPUT
3 pin or 5 pin in and out DMX 512 signal.
18 Channel (16 Bit) or 12 Channel (8 Bit).
SET UP
Separate motor debug remote control.
Separate DMX address functions remote control: stand, inverted, light on,
light off.
Auto test all functions.
Display “flip” function 180° rotation.
Working temperature adjustment.
POWER
Magnetic Ballast Version.
200V -220 V – 60 Hz.
100V -120 V – 60 Hz (optional).
220V -240 V – 50 Hz (optional).
Built-in over heat protection and high voltage protection.
PFC power factor compensation.
According to various kinds of safety standards, IP20 protect grades, the
cable accords to CE20/22 standard.
www.g-lites.com
22
Page 23

CONSUMPTION
Power Consumption: 680 W.
DIMENSION
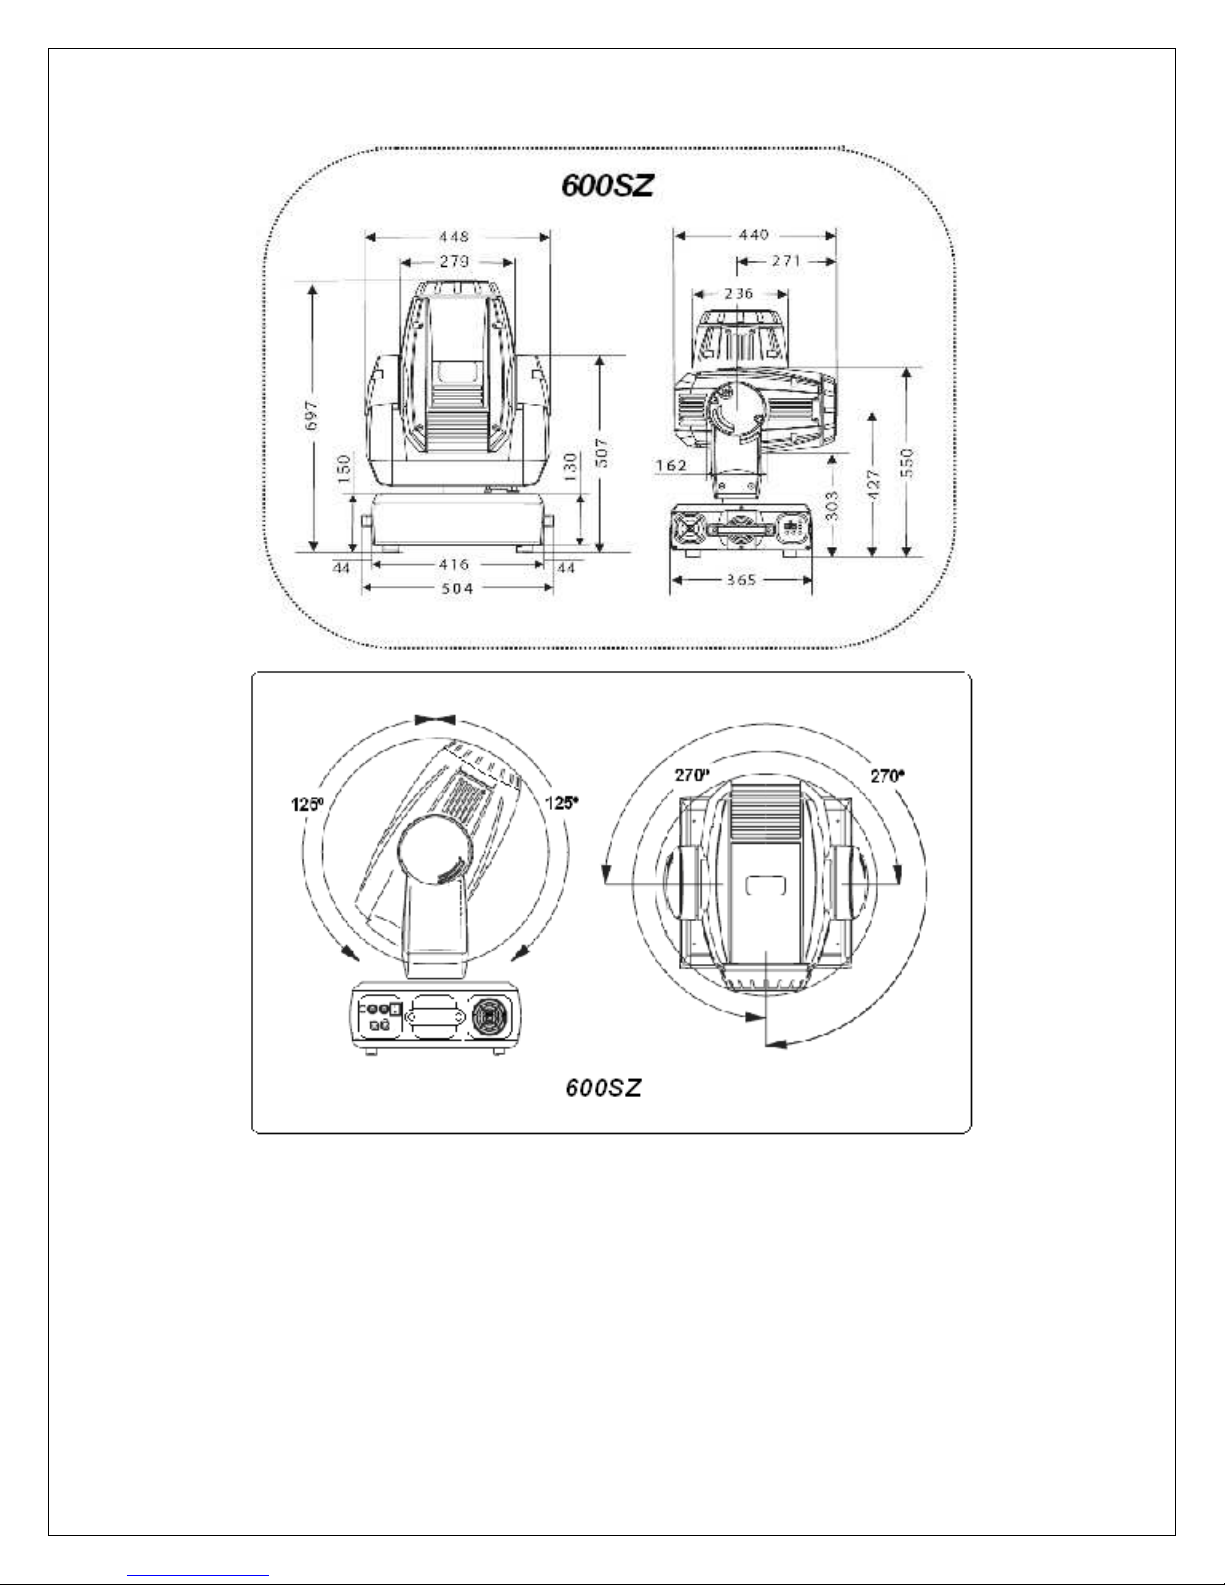
L470mm W365mm H697mm.
WEIGHT
43.5 Kg.
www.g-lites.com
23
Page 24

General Troubleshooting
This Chapter provides information on diagnosing and solving operational
problems. If a solution to your problem cannot be found in the following
subsections, contact your authorized dealer or LED-G technical Support.
Unit functions but lamp does not strike:
o Make sure the correct lamp has been installed in the fixture.
o Check for loose igniter or power supply connection.
o Replace lamp.
o If lamp is still hot from recent operation, leave the unit turned on and when
the lamp’s temperature drops, it will restrike.
Color system is not producing the correct color
o Replace the lamp.
o Clean optics.
o Re-home the fixture
Unit is producing unexpected results
o Check DMX starting address on the fixture and console match.
o Verify that the last fixture on the link is terminated.
Unit is not responding to console:
o Verify that the fixture has the correct DMX address
o Check and replace data cables
o Verify that the last fixture on the link is terminated.
Unit is not moving
o Check if the power supply is suitable for the voltage of the fixture.
o Replace sensors.
o Please checks if the inside lead wire and the connector are loose.
o Please check the electric part (such as the switch, transformer, ballast,
electric capacity, piezo resistor, filter, PCB board, controller to motor).
Pan or Tilt position is off:
o Verify that all belts are tight.
o Home the fixture.
www.g-lites.com
24
 Loading...