

Page 1
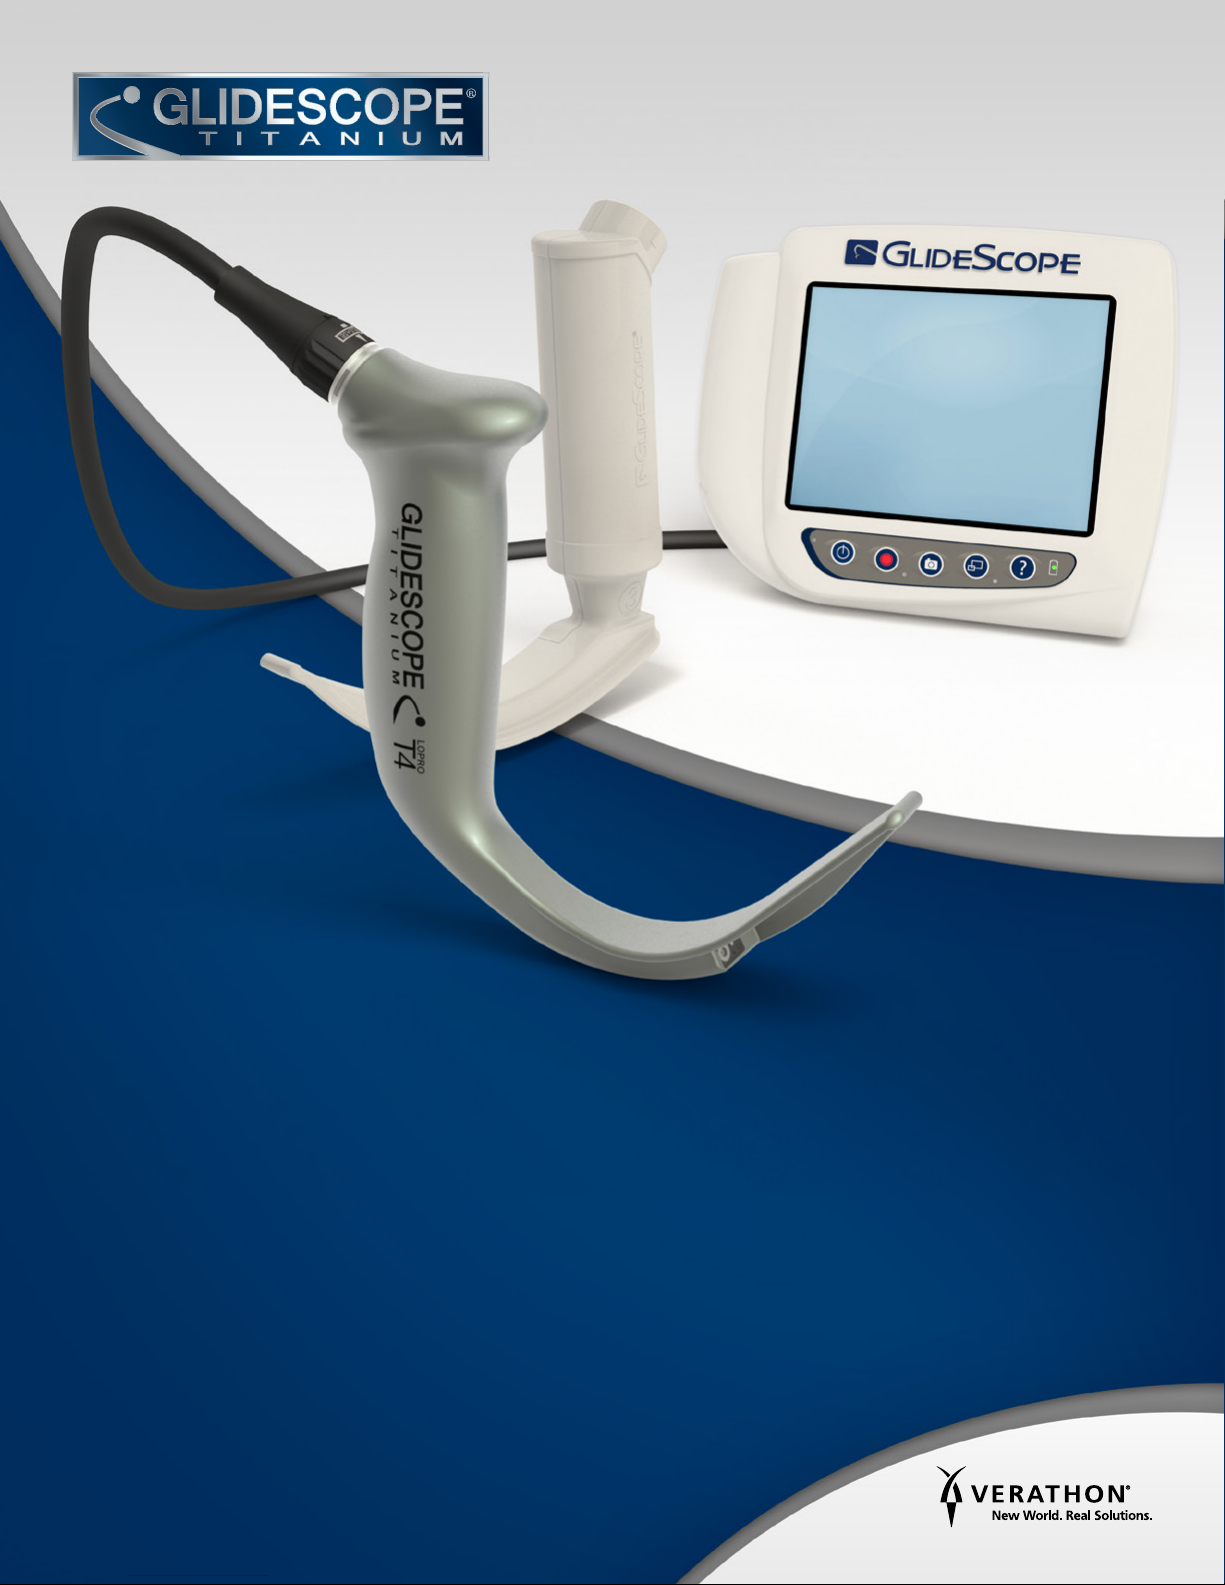
GLIDESCOPE SYSTEM
TITANIUM
Operations & Maintenance Manual
Page 2

0900-4391-09-60
Page 3

GLIDESCOPE SYSTEM
TITANIUM
Operations & Maintenance Manual
Effective: May 29, 2015
Caution: Federal (United States) law restricts this
device to sale by or on the order of a physician.
For customers with Titanium Systems utilizing the GlideScope Video Monitor (Version 0570-0338).
Page 4

CONTACT INFORMATION
To obtain additional information regarding your GlideScope Titanium system,
please contact Verathon® Customer Care or visit verathon.com/contact-us.
Verathon Inc.
20001 North Creek Parkway
Bothell, WA 98011 U.S.A.
Tel: 800.331.2313 (US and Canada only)
Tel: 425.867.1348
Fax: 425.883.2896
verathon.com
Verathon Medical (Europe) B.V.
Willem Fenengastraat 13
1096 BL Amsterdam
The Netherlands
Tel: +31 (0) 20 210 30 91
Fax : +31 (0) 20 210 30 92
Verathon Medical (Canada) ULC
2227 Douglas Road
Burnaby, BC V5C 5A9
Canada
Tel: 604.439.3009
Fax: 604.439.3039
Copyright© 2014, 2015 by Verathon Inc. All rights reserved. No part of this manual may be copied or transmitted by any method
without the express written consent of Verathon Inc.
GlideRite, GlideScope, the GlideScope symbol, Reveal, Verathon, and the Verathon Torch symbol are trademarks of Verathon Inc.
All other brand and product names are trademarks or registered trademarks of their respective owners.
Information in this manual may change at any time without notice. For the most up-to-date information, contact Verathon
Customer Care or your local representative.
0413
Page 5

TABLE OF CONTENTS
IMPORTANT INFORMATION .......................................................................................................................................1
Product Information ..................................................................................................................................................1
Product Description ..................................................................................................................................................1
Statement of Intended Use ........................................................................................................................................1
Essential Performance ...............................................................................................................................................1
Statement of Prescription ..........................................................................................................................................1
Notice to All Users ....................................................................................................................................................1
Precautions & Warnings ............................................................................................................................................2
INTRODUCTION ..........................................................................................................................................................7
Single-Use & Reusable Systems .................................................................................................................................7
Language Settings ....................................................................................................................................................7
System Parts & Accessories .......................................................................................................................................8
Video Laryngoscope Components ...........................................................................................................................10
Video Monitor Buttons, Icons, & Connections ......................................................................................................... 11
SETTING UP ............................................................................................................................................................... 14
Procedure 1. Perform Initial Inspection ...........................................................................................................14
Procedure 2. Mount the System (Optional) ..................................................................................................... 15
Procedure 3. Charge the Monitor Battery .......................................................................................................18
Procedure 4. Attach the Video Cable & Blade .................................................................................................19
Procedure 5. Connect to an External Monitor (Optional) ................................................................................. 21
Procedure 6. Configure User Settings .............................................................................................................22
Procedure 7. Perform a Functional Check .......................................................................................................23
USING THE DEVICE ...................................................................................................................................................25
Procedure 1. Prepare the GlideScope System ..................................................................................................26
Procedure 2. Intubate Using the GlideScope 4-Step Technique ........................................................................27
Procedure 3. Use the Record & Snapshot Features (Optional) ..........................................................................29
Procedure 4. Use the Playback Feature (Optional) ...........................................................................................31
Operations & Maintenance Manual: Table of Contents
i
Page 6

CLEANING & DISINFECTING .....................................................................................................................................32
Procedure 1. Clean a Blade, Video Cable, or Smart Cable ...............................................................................34
Procedure 2. Disinfect a Blade, Video Cable, or Smart Cable ...........................................................................39
Procedure 3. Sterilize a Blade, Video Cable, or Smart Cable (Optional) ............................................................42
Procedure 4. Clean & Disinfect the GlideRite Rigid Stylet .................................................................................43
Procedure 5. Clean the GlideScope Video Monitor ..........................................................................................46
Procedure 6. Clean the GlideScope Premium Cart ...........................................................................................46
MAINTENANCE & SAFETY ........................................................................................................................................47
Periodic Inspections ................................................................................................................................................47
Elution Compatibility ............................................................................................................................................... 47
GlideScope Video Monitor Battery ..........................................................................................................................47
System Software .................................................................................................................................................... 48
Device Repair ......................................................................................................................................................... 48
Device Disposal ...................................................................................................................................................... 48
WARRANTY...............................................................................................................................................................49
PRODUCT SPECIFICATIONS ....................................................................................................................................... 51
System Specifications, Standards, & Approvals .........................................................................................................51
Component Specifications ......................................................................................................................................52
Battery Specifications ..............................................................................................................................................58
Electromagnetic Compatibility ................................................................................................................................. 59
SYMBOL DIRECTORY ................................................................................................................................................63
GLOSSARY ................................................................................................................................................................ 66
ii
Page 7

IMPORTANT INFORMATION
PRODUCT INFORMATION
GlideScope® Titanium video laryngoscopes combine innovative blade options, angles, and construction in order
to enable rapid intubations for more patients in more settings. The GlideScope Titanium system is designed with
low profile blades, and the slimmer design allows for more working space in the airway and accommodates
smaller mouth openings.
PRODUCT DESCRIPTION
The new GlideScope Titanium reusable and single-use video laryngoscopes are the most advanced GlideScope
instruments ever, designed to deliver clear airway views and enable rapid intubation. New low-profile designs
and innovative construction make these blades streamlined and lightweight, offering improved maneuverability
and working space for routine and difficult airways. With more VL options, including new Mac-style blades,
clinicians can choose their preferred airway tool for a wide range of patients and clinical settings. And whether
it’s reusable or single use, the new GlideScope Titanium system features a high-resolution, full-color digital
camera and monitor for real-time viewing and recording.
GlideScope Titanium video laryngoscopes are designed to work with the GlideScope Video Monitor version0570-0338.
STATEMENT OF INTENDED USE
The GlideScope Titanium system is intended for use by qualified professionals to obtain a clear, unobstructed
view of the airway and vocal cords for medical procedures.
ESSENTIAL PERFORMANCE
Essential performance is the system performance necessary to achieve freedom from unacceptable risk. The
essential performance of the GlideScope Titanium system is to provide a clear view of the vocal cords.
STATEMENT OF PRESCRIPTION
Caution: Federal (United States) law restricts this device to sale by or on the order of a physician.
GlideScope Titanium video laryngoscopes should be used only by individuals who have been trained and
authorized by a physician or used by healthcare providers who have been trained and authorized by the
institution providing patientcare.
NOTICE TO ALL USERS
Verathon® recommends that all users read this manual before using the GlideScope Titanium system. Failure to
do so may result in injury to the patient, may compromise the performance of the system, and may void the
system warranty. Verathon recommends that new users:
• Obtain instruction from a qualified individual
• Practice using the video laryngoscope on a mannequin before clinical use
• Acquire clinical training experience on patients without airway abnormalities
Operations & Maintenance Manual: Important Information
1
Page 8
PRECAUTIONS & WARNINGS
Warnings indicate that injury, death, or other serious adverse reactions may result from use or misuse of the
device. Cautions indicate that use or misuse of the device may cause a problem, such as a malfunction, failure, or
damage to the product. Throughout the manual, pay attention to sections labeled Important, as these contain
reminders or summaries of the following cautions as they apply to a specific component or use situation.
To ensure safe and reliable operation for the user and patient, please heed the following warnings and cautions.
PRECAUTIONS
CAUTION
Medical electrical equipment requires special precautions regarding electromagnetic compatibility
(EMC) and must be installed and operated according to the instructions in this manual. See the
Electromagnetic Compatibility section for additional information.
To maintain electromagnetic interference (EMI) within certified limits, the GlideScope Titanium
system must be used with the cables, components, and accessories specified or supplied by
Verathon
Specifications sections. The use of accessories or cables other than those specified or supplied may
result in increased emissions or decreased immunity of the system.
The GlideScope Titanium system should not be used adjacent to or stacked with other equipment.
If adjacent or stacked use is necessary, the GlideScope Titanium system should be observed to verify
normal operation in the configuration in which it will be used.
®
. For additional information, see the System Parts & Accessories and Component
This device can radiate radio frequency energy and is very unlikely to cause harmful interference
with other devices in the vicinity. There is no guarantee that interference will not occur in a
particular installation. Evidence of interference may include degradation of performance in this
device or other devices when operated simultaneously. If this occurs, try to correct the interference
by using the following measures:
• Turn devices on and off in the vicinity to determine the source of interference
• Reorient or relocate this device or other devices
• Increase the separation between devices
• Connect the device to an outlet on a circuit different than the other device(s)
• Eliminate or reduce EMI with technical solutions (such as shielding)
• Purchase medical devices that comply with IEC 60601-1-2 EMC standards
Be aware that portable and mobile radio frequency communications equipment (cellular phones,
etc.) may affect medical electrical equipment; take appropriate precautions during operation.
CAUTION
The video cables and video laryngoscopes contain electronics that could be damaged by ultrasonic
and automated washing equipment. Do not use an ultrasonic device or automated washing
equipment to clean this product.
2
Page 9
WARNINGS
CAUTION
When cleaning reusable video laryngoscopes, do not use metal brushes, abrasive brushes, scrub
pads, or rigid tools. They will scratch the surface of the unit or the window protecting the camera
and light, which may permanently damage the device.
CAUTION
Caution. Risk of permanent equipment damage.
This product is sensitive to heat, which will cause damage to the electronics. Do not expose the video cables or
reusable Titanium video laryngoscopes to temperatures above 60°C (140°F).
Do not use autoclaves or pasteurizers for video cables or reusable Titanium video laryngoscopes. Use of such
methods to clean, disinfect, or sterilize the components will cause permanent device damage and void the
warranty. Refer to the Cleaning & Disinfecting chapter for a list of approved cleaning procedures and products.
WARNING
Before every use, ensure the instrument is operating correctly and has no sign of damage. Do not
use this product if the device appears damaged. Refer servicing to qualified personnel.
To ensure patient safety, routinely inspect the reusable video laryngoscope before and after every use
in order to ensure the blade is free of rough surfaces, sharp edges, cracks, protrusions, or any other
indication of wear. If found, do not use the damaged or worn blade.
Always ensure that alternative airway management methods and equipment are readily
available.
Report any suspected blade defects to Verathon
®
Customer Care at:
Phone: 800.331.2313 (U.S. and Canada)
+1.425.867.1348 (International)
Email: [email protected]
WARNING
Reusable Titanium video laryngoscopes are delivered nonsterile and require cleaning and high-level
disinfection prior to initial use.
Operations & Maintenance Manual: Important Information
3
Page 10
WARNING
Because the product will likely be contaminated with human blood or body fluids capable of
transmitting pathogens, all cleaning facilities must be in compliance with (U.S.) OSHA Standard
29 CFR 1910.1030 “Bloodborne Pathogens” or an equivalent standard. For more information, visit
www.osha.gov.
WARNING
Cleaning is critical to ensuring the component is ready for disinfection. Failure to
properly clean the device could result in a contaminated instrument after completing the
disinfection procedure.
When cleaning, ensure all foreign matter is removed from the surface of the device. This allows the
active ingredients of the chosen disinfection method to reach all the surfaces.
WARNING
This product may only be cleaned, disinfected, or sterilized by using the approved processes
provided in this manual. Cleaning, disinfection, and sterilization methods listed are recommended by
Verathon
®
based on efficacy or compatibility with component materials.
WARNING
Availability of cleaning, disinfection, and sterilization products varies by country, and Verathon is
unable to test products in every market. For more information, please contact Verathon Customer
Care at 1.800.331.2313 or your local representative. For additional contact information, visit
verathon.com/contact-us.
WARNING
Ensure that you follow the manufacturer’s instructions for handling or disposing of the cleaning,
disinfection, or sterilization solutions provided in this manual.
WARNING
Do not reuse, reprocess or resterilize single-use components. Reuse, reprocessing or resterilization
may create a risk of contamination of the device, cause patient infection or cross-infection.
WARNING
To reduce the risk of cytotoxic residual when cleaning with Metrex® CaviCide®, thoroughly rinse the
component as instructed in this manual.
4
Page 11
WARNING
This instrument and related devices may contain mineral oils, batteries, and other environmentally
hazardous materials. When the instrument or accessories have reached the end of their useful
service life, see the section Device Disposal on page 48. Dispose of used, single-use components
as infectious waste.
WARNING
Several areas of the video laryngoscope that contact the patient can exceed 41°C (106°F) as part of
normal operation:
• The first area is the light-emitting area surrounding the camera. When used as indicated,
continuous contact with this area is unlikely because, if tissue were to contact this area, the view
would be lost and devices would need to be adjusted to regain the airway view.
• The second area is the area surrounding the camera, out of view of the camera. Continuous
contact with this area is unlikely because the product is typically not held stationary for an
extended period of time exceeding 1minute.
If continuous contact is maintained for longer than 1minute, it is possible to cause thermal damage
such as a burn to the mucosal tissue.
Note: Typical intubations are less than 1minute in duration.
WARNING
The reusable Titanium video laryngoscope is considered a semi-critical device intended to contact
the airway. It must be thoroughly cleaned and undergo high-level disinfection after each use.
WARNING
When you are guiding the endotracheal tube to the distal tip of the video laryngoscope, ensure that
you are looking in the patient’s mouth, not at the video monitor screen. Failure to do so may result
in injury to the tonsils or soft palate.
WARNING
The external monitor must be safety-approved medical equipment.
WARNING
Use only a passive-type USB flash drive. Do not use USB drives powered by another external source.
Operations & Maintenance Manual: Important Information
5
Page 12
WARNING
In order to maintain electrical safety, use only the provided, medical-approved power supply.
WARNING
To reduce the risk of electrical shock, use only the accessories and peripherals recommended by
Verathon
®
.
WARNING
No modification of this equipment is allowed.
WARNING
Electric shock hazard. Do not attempt to open the system components. This may cause serious
injury to the operator or damage to the instrument and will void the warranty. Contact Verathon
Customer Care for all servicing needs.
6
Page 13
INTRODUCTION
SINGLE-USE & REUSABLE SYSTEMS
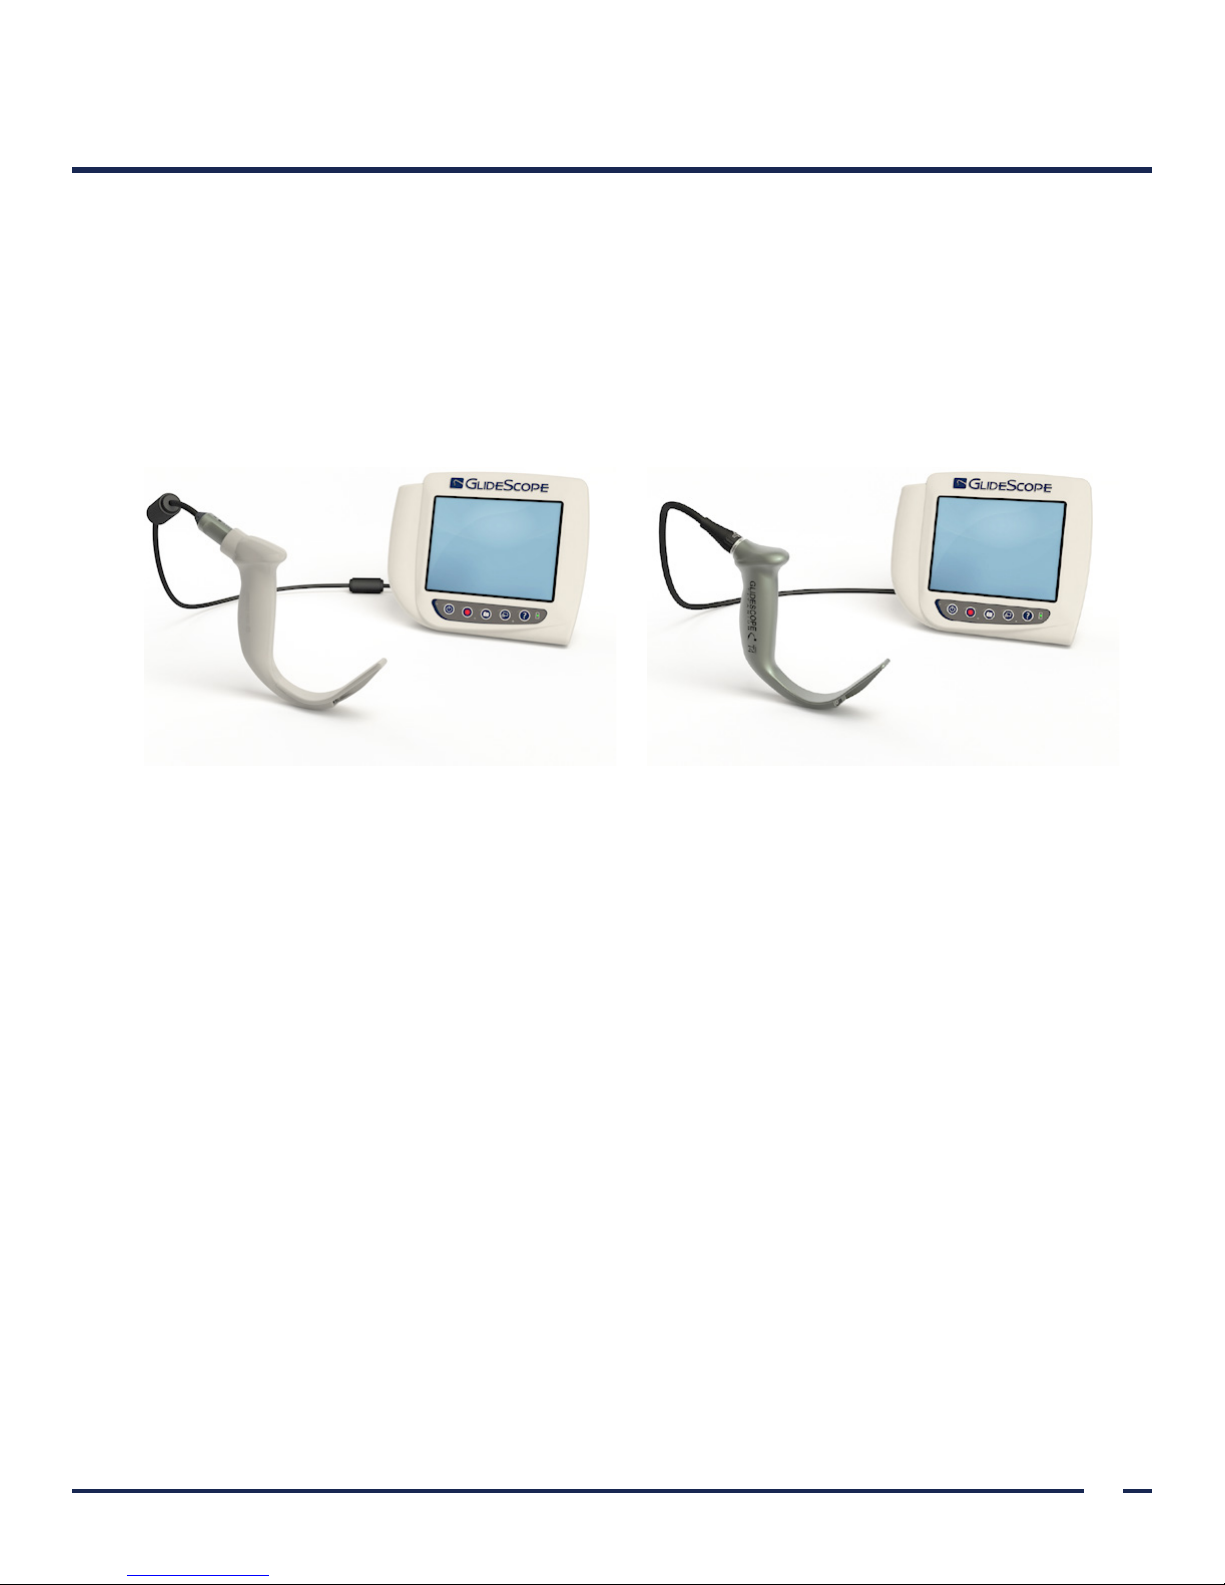
The GlideScope Titanium system is available in single-use and reusable configurations. Both configurations
feature the same video monitor, the cables and adapters to power the device, and any optional system
components that may facilitate intubations or provide convenience to the user. The primary differences between
the reusable and single-use systems are the video laryngoscopes and the cables that connect the laryngoscope
to the video monitor.
Figure 1. Titanium Single-Use System Figure 2. Titanium Reusable System
The single-use system features durable, plastic blades that must be disposed of after one use. It also features the
GlideScope Smart Cable—a reusable video cable that connects the single-use blade to the video monitor and
contains the electronics that process the video data captured by the blade. Single-use video laryngoscopes are
identified by an S in the blade name, such as LoPro S4.
The reusable system features a titanium video laryngoscope that must be cleaned and high-level disinfected
between uses. The blade is connected to the video monitor via a reusable video cable. Unlike the single-use
system, the reusable system video electronics are located within the laryngoscope. Due to their titanium
construction, reusable video laryngoscopes contain a T in the blade name, such as LoP ro T4.
You may use either the single-use or reusable system configurations, or your facility may elect to provide both
configurations. This manual details both single-use and reusable system information and notes where the
systems differ. In this document, unless otherwise noted, the term video cable describes both the GlideScope Smart
Cable for the single-use system and the video cable for the reusable system.
LANGUAGE SETTINGS
The GlideScope Titanium video monitor software is available in a variety of languages. To change the
language used on your system, you must install a new software version via a USB flash drive. For more
information, contact Verathon® Customer Care or your local representative. For contact information, see
verathon.com/contact-us.
Operations & Maintenance Manual: Introduction
7
Page 14

SYSTEM PARTS & ACCESSORIES
Table 1. Required System Components
REQUIRED PARTS & ACCESSORIES
GlideScope Video Monitor Video cable
(for reusable system)
Note: Cable shortened for
illustration purposes.
One or more of the following reusable or single-use video laryngoscopes:
LoPro T3 LoPro T4 MAC T3 MAC T4
GlideScope Smart Cable
(for single-use system)
Note: Cable shortened for
illustration purposes.
LoPro S3 LoPro S4 MAC S3 MAC S4
Video monitor 12V DC poweradapter (0400-0105)
Power cable
8
Page 15
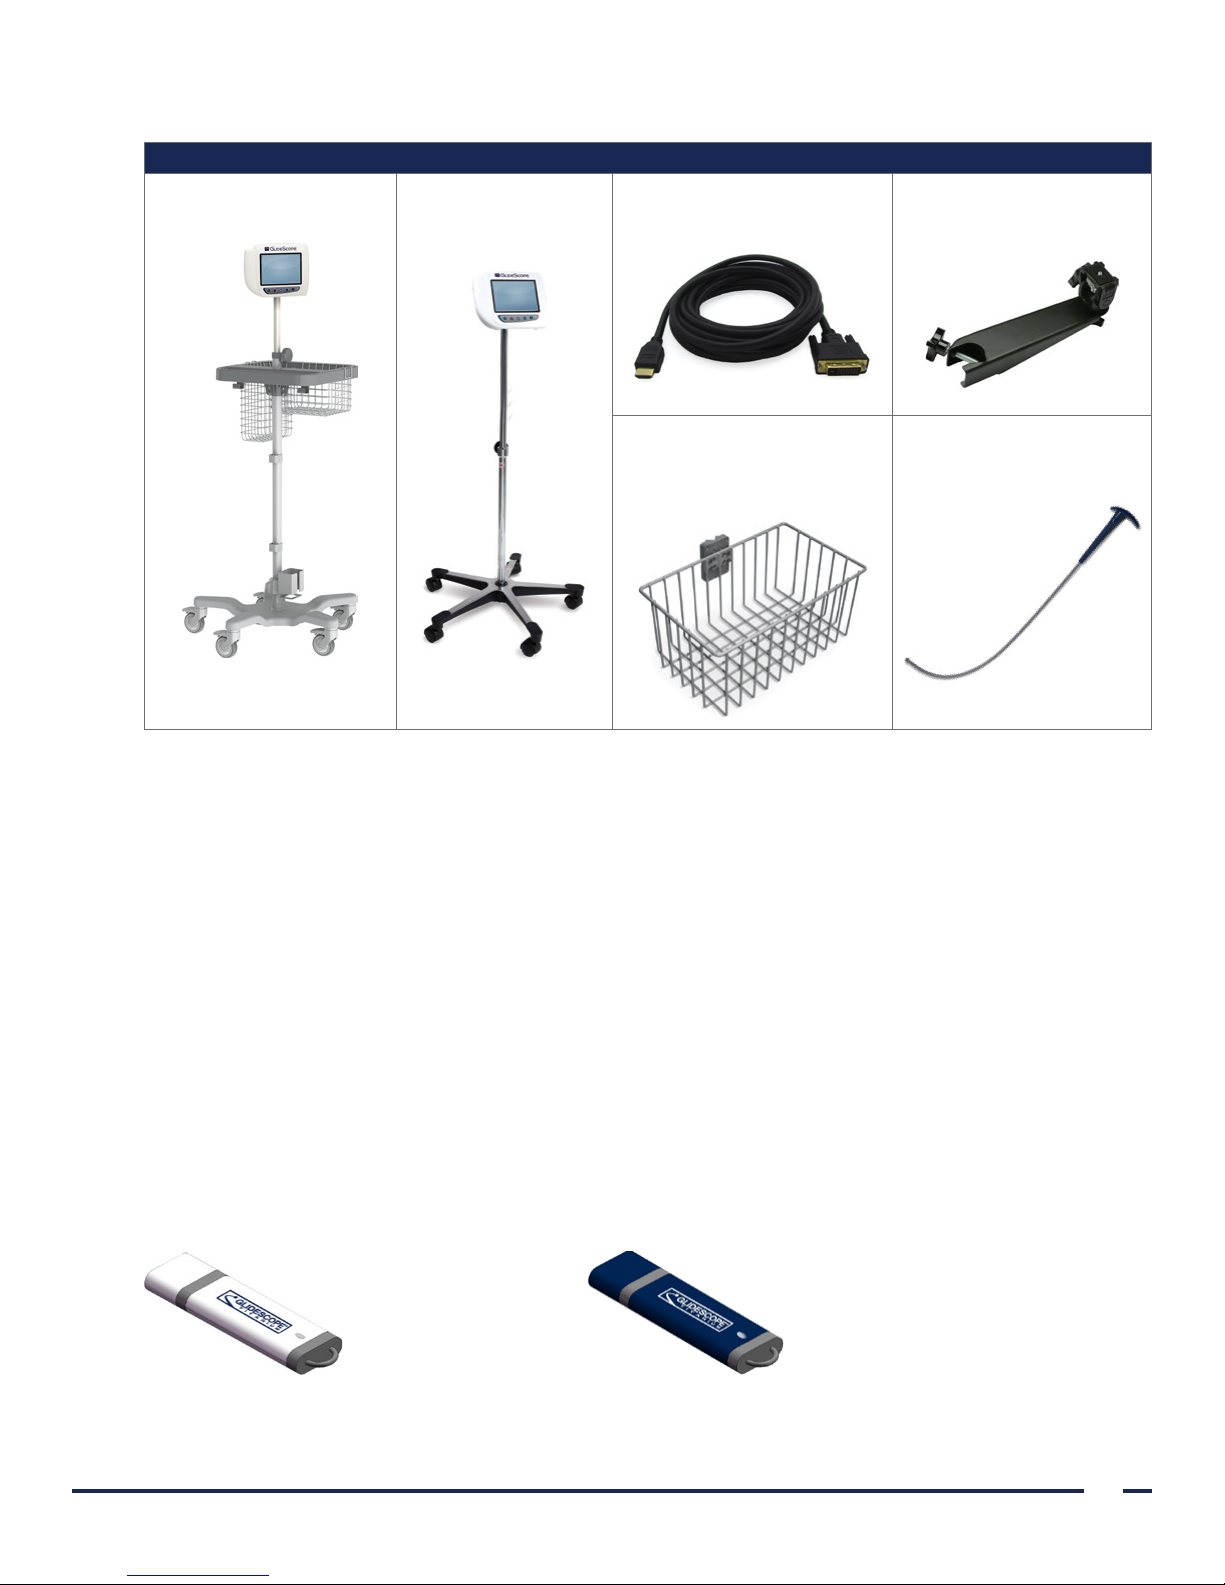
Table 2. Optional System Components
Premium cart AVL portable stand HDMI-to-DVI cable IV pole mounting kit
OPTIONAL PARTS & ACCESSORIES
The monitor is also compatible with GlideScope AVL system blades. For more information, contact Verathon®
Customer Care or see the GlideScope AVL System Operations & Maintenance Manual.
TRAINING & INFORMATION PACK
The GlideScope Titanium Training and Information Pack contains recommended accessories for the system and
reference materials that provide instructions for use. The following items are included in the pack:
• (2) GlideRite Rigid Stylet—A stylet that facilitates quick placement of an endotracheal tube and is
recommended for use with GlideScope systems.
• (1) Quick Reference Card Ring Assembly—Quick reference information that may be attached to the
system, for your convenience and ease of use.
• (1) In-Service USB Flash Drive—A white, 2 GB USB flash drive that contains reference documentation in
multiple languages. See Figure 3.
• (1) Media Storage USB Flash Drive—A blue, 2 GB USB flash drive that can be connected to the video
monitor and used for recording video or taking snapshots. See Figure 4.
Universal accessory basket
Note: For use with AVL
portablestand
GlideRite® Rigid Stylet
Figure 3. In-Service USB Flash Drive Figure 4. Media Storage USB Flash Drive
Operations & Maintenance Manual: Introduction
9
Page 16
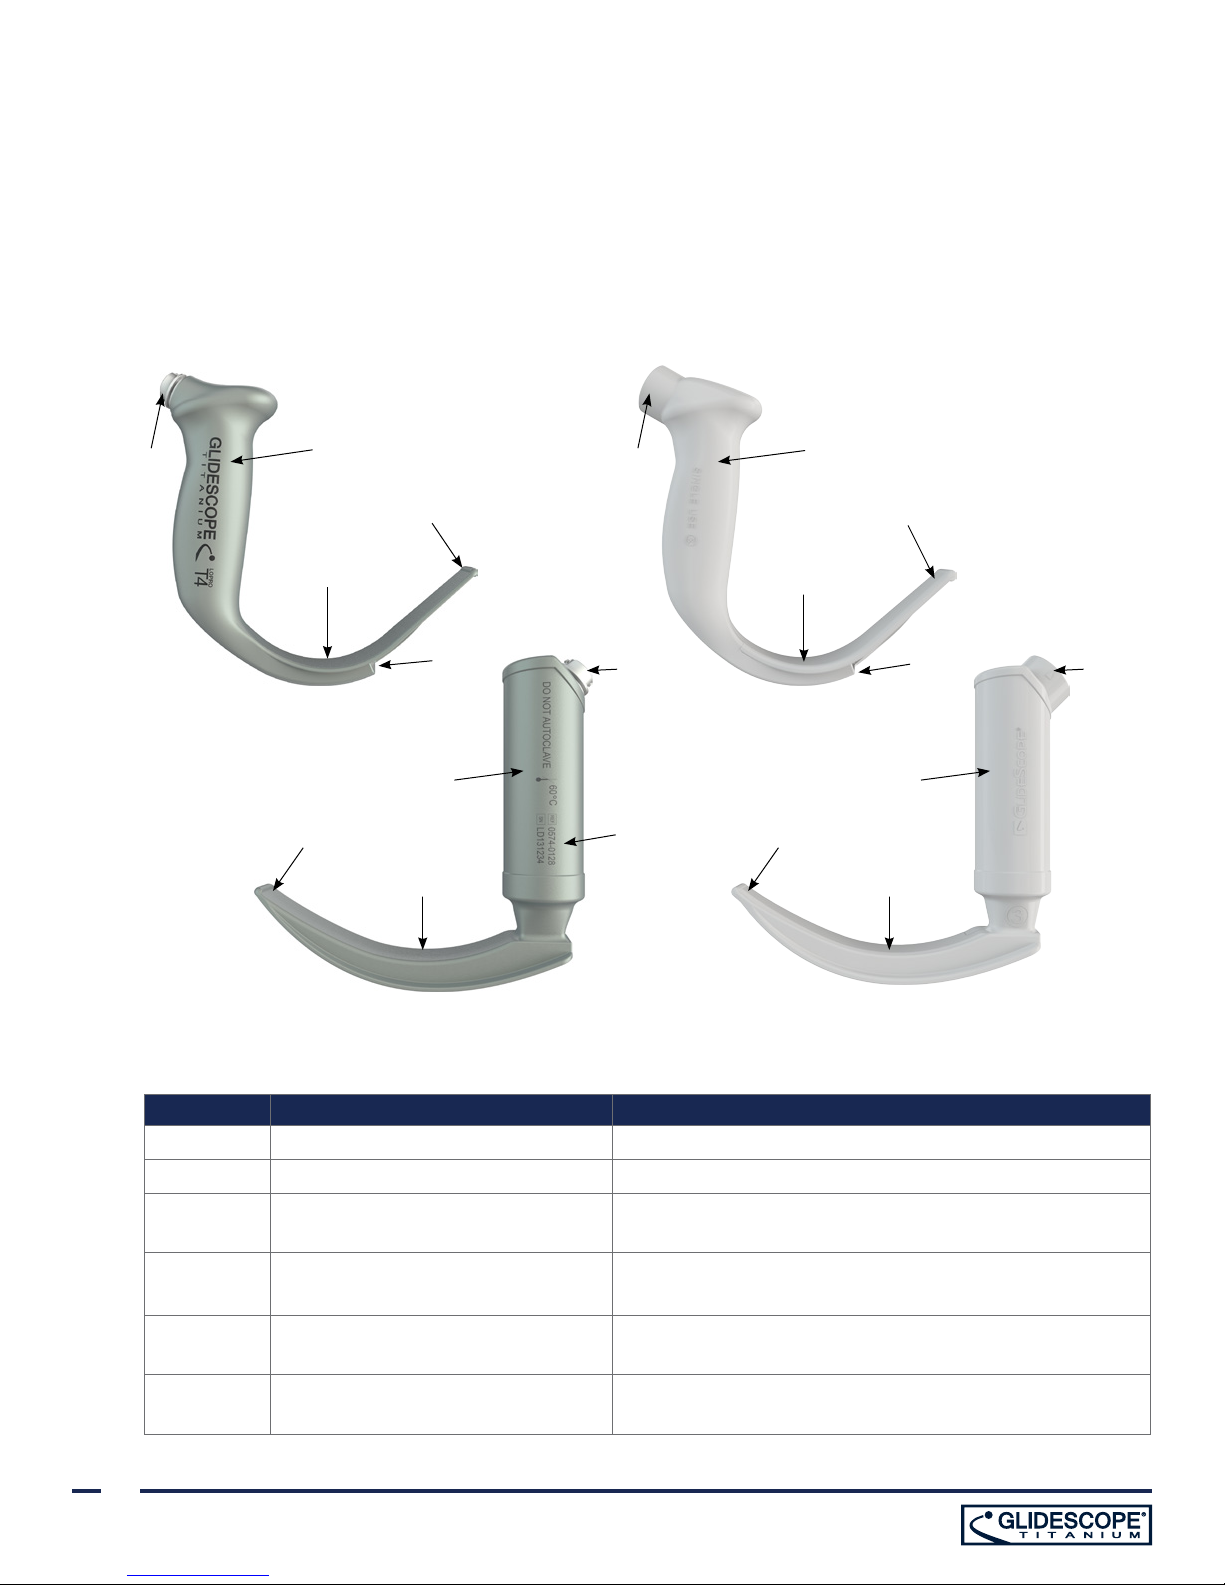
VIDEO LARYNGOSCOPE COMPONENTS
The main components of the GlideScope Titanium system are the LoPro or MAC video laryngoscopes in either
single-use (S) or reusable (T) configurations. The LoPro S3 and S4 single-use blades feature the signature
GlideScope curve in an easy-to-use, disposable format. The LoPro T3 and T4 reusable blades combine the
performance of a GlideScope blade with the strength of titanium, and the MAC blades incorporate the look and
feel of traditional Macintoshblades.
Figure 5. Video Laryngoscope Components
1 1
2
4
3
5
1 1
6
2
4
3
5
22
44
33
Table 3. Video Laryngoscope Components
FIGURE KEY COMPONENT NOTES
1 Connector —
2 Handle —
3 Blade
4 Distal tip/lifter —
5 Camera and light
6 Product number and serial number
10
The low-profile, thinner blade design allows for more
working room in the airway and mouth
High-resolution, full-color camera with integrated LED
light source
On the left side of the handle of reusable LoPro and MAC
blades. (Not available on single-use blades.)
Page 17
VIDEO MONITOR BUTTONS, ICONS, & CONNECTIONS
The digital, full-color GlideScope Video Monitor clearly displays the images transmitted from the camera in the video
laryngoscope. The front of the monitor includes the screen and a keypad with the buttons you use to operate the
system.
The back panel of the monitor includes the sockets and ports for connecting the power cord, the video cable,
an HDMI-to-DVI cable for external video display, and a USB flash drive. When a socket or port is not in use, it is
recommended that the rubber cap is inserted into the opening. This protects the exposed connectors from dust
and other contamination. The back of the video monitor also features a mounting plate fitting that allows you to
attach the monitor to a mobile stand or IV pole.
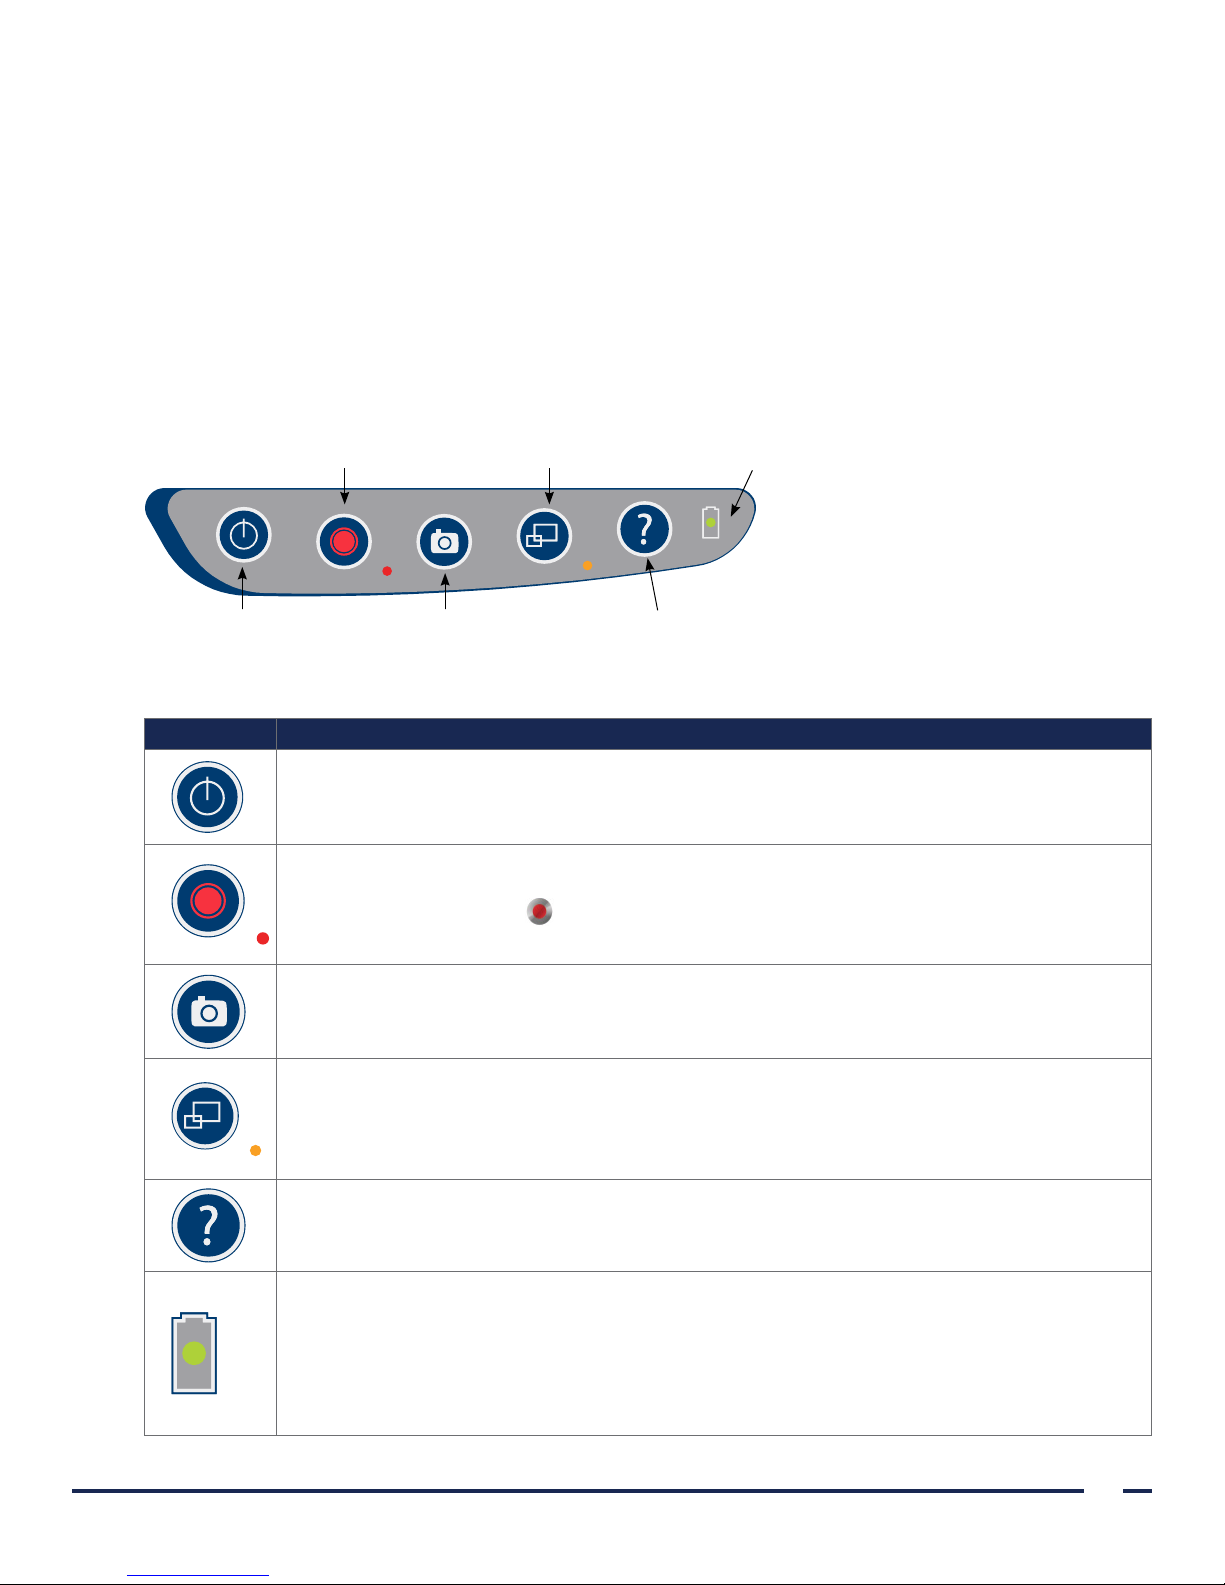
Figure 6. GlideScope Video Monitor Keypad
Record button External video button
Power button Snapshot button
Tutorial button
Table 4. Keypad Buttons
BUTTON FUNCTION
Power: Press and release to turn on the monitor. Press and hold to turn it off.
Note: If the monitor freezes at any time during use, press and hold the Power button for
10 seconds to reset the system.
Record: Press to start and stop recording directly to a USB flash drive that has been inserted in
the USB port. When you are recording, the red LED indicator to the right of the button will be
lit, and the Recording icon will be shown on the screen.
Note: To record video, a USB flash drive must be inserted into the monitor USB port.
Snapshot: Press this button to save a snapshot of the live display to the USB flash drive. You
may take a snapshot while video recording or independent of recording.
Battery indicator
Note: To take a snapshot, a USB flash drive must be inserted into the monitor USB port.
External Video: Press to display video on an external monitor. The yellow LED to the right
of the button will light up to indicate that the key has been activated. Press the key again to
deactivate the external video.
Note: An HDMI-to-DVI cable is required in order to display video on an external monitor.
Tutorial: If a USB flash drive is not inserted into the monitor, press and hold to access the
video tutorial. If a USB flash drive is inserted into the monitor, press and hold to access the
Playbackmenu.
Battery Indicator: LED is:
Green: Unit fully charged
Red: Unit charging
Flashing Red: Indicates a problem with the battery. Charge for 6hours, and if still flashing,
contact Verathon® Customer Care.
Operations & Maintenance Manual: Introduction
11
Page 18
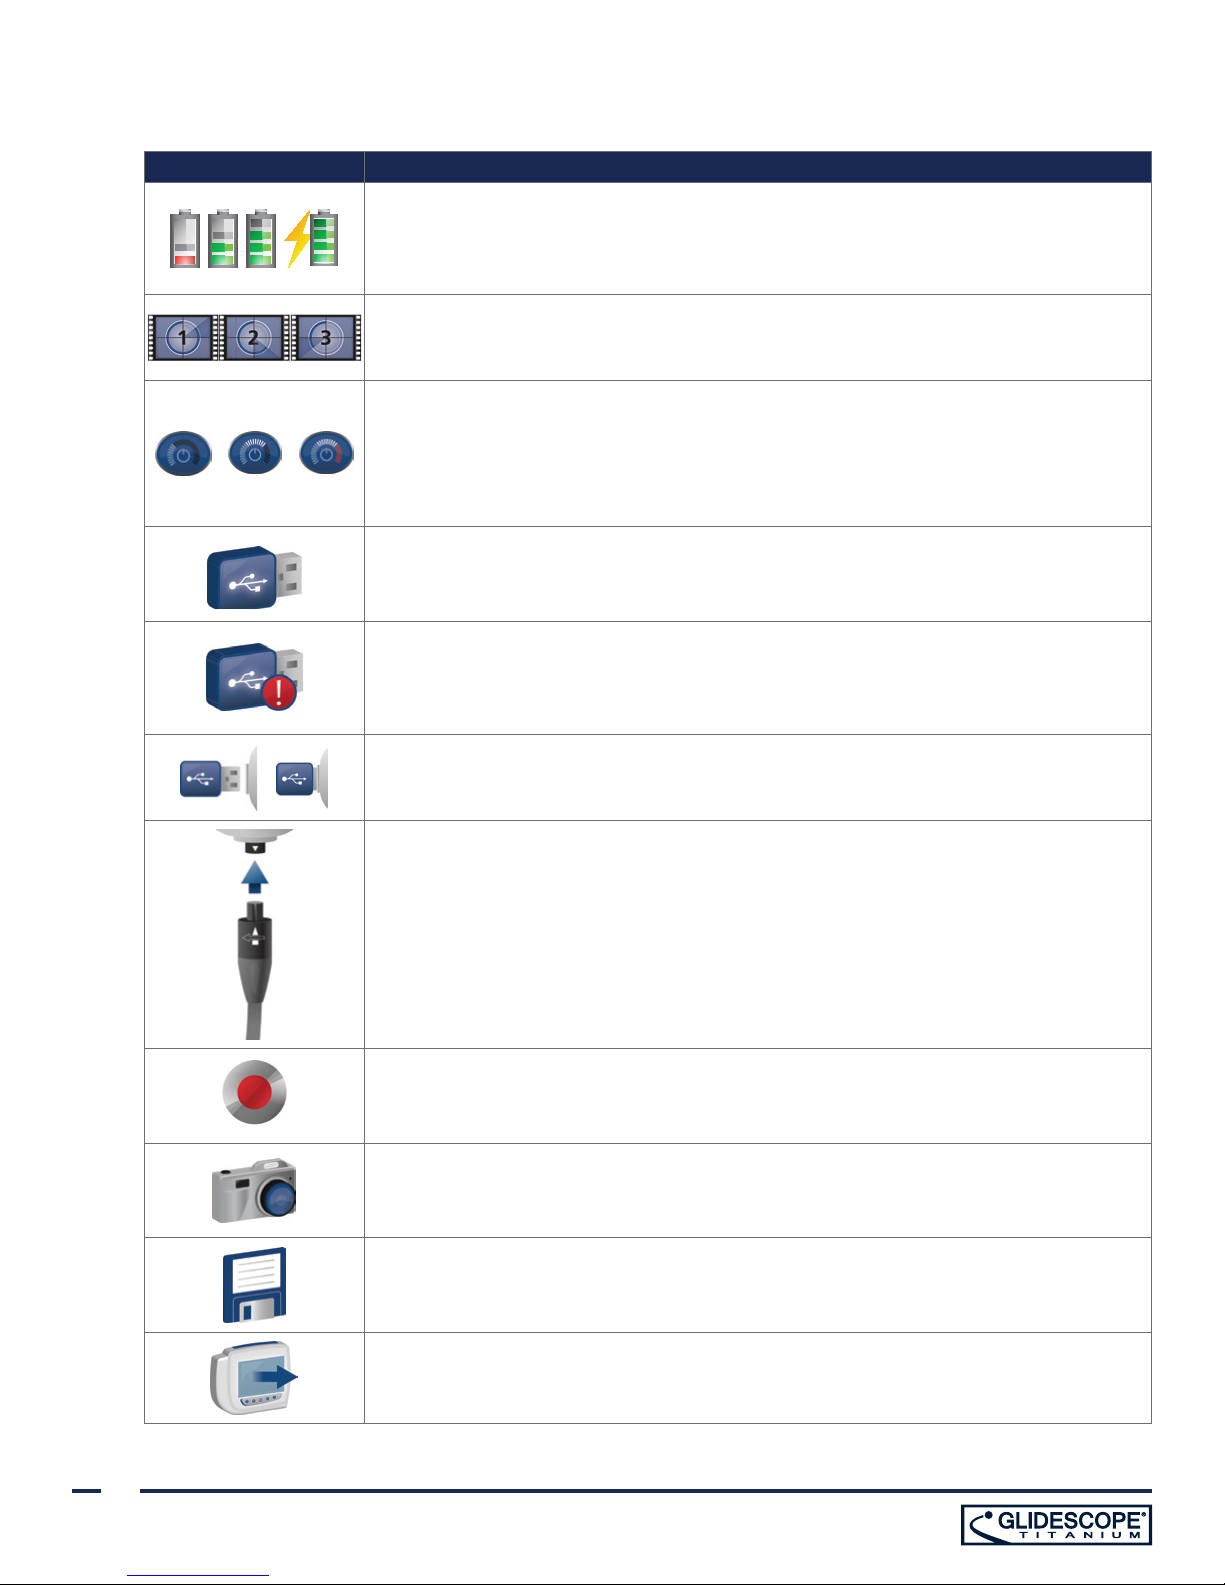
Table 5. On-Screen Icons
ICON FUNCTION
Battery Status: The remaining battery power is indicated by the Battery Status icon
and the percentage above the icon. If the icon is red, the battery should be charged
as soon as possible. (See Charge the Monitor Battery.) While the battery is being
charged, a lightning bolt will be displayed alongside the Battery Status icon.
Progress Confirmation: While the user is pressing a button, the operation is loading.
If the button is released before the loading process is completed, the operation is
canceled.
Power-Down Countdown: The unit is about to turn off. If this is due to the Auto
Power Off feature that saves battery life, pressing any button stops the power-down
sequence.
Note: The Auto Power Off feature can be adjusted or disabled on the User Settings
screen. For more info, see Configure User Settings on page 22.
USB Flash Drive: A USB flash drive is detected.
While recording, a number next to the icon indicates approximately what percentage
of the USB flash drive has been used. When the USB flash drive is full, recording stops.
Incompatible USB Drive: The USB flash drive that is plugged into the monitor is not
suitable for recording videos. (This normally occurs when using an encrypted USB
flash drive or when using an older, inexpensive model that is not capable of the speed
necessary to save video in real time.)
USB Flash Drive Not Found: A USB flash drive needs to be inserted into the monitor
USB port.
Attach Video Cable: The video cable is not attached to themonitor.
Recording: The system is recording video to the USB flash drive.
Note: Do not remove the USB flash drive while recording is in progress, or the
recording will be lost.
Saving Snapshot: The system is saving a snapshot to the USB flash drive.
Note: Do not remove the USB flash drive while saving a snapshot, or the snapshot will
be lost.
Saving File: The system is saving a recorded file to the USB flash drive.
Note: Do not remove the USB flash drive while this icon is displayed, or the recording
will be lost.
External Monitor: The HDMI-to-DVI connection for external video is enabled, and
videois being displayed on an external monitor.
12
Page 19
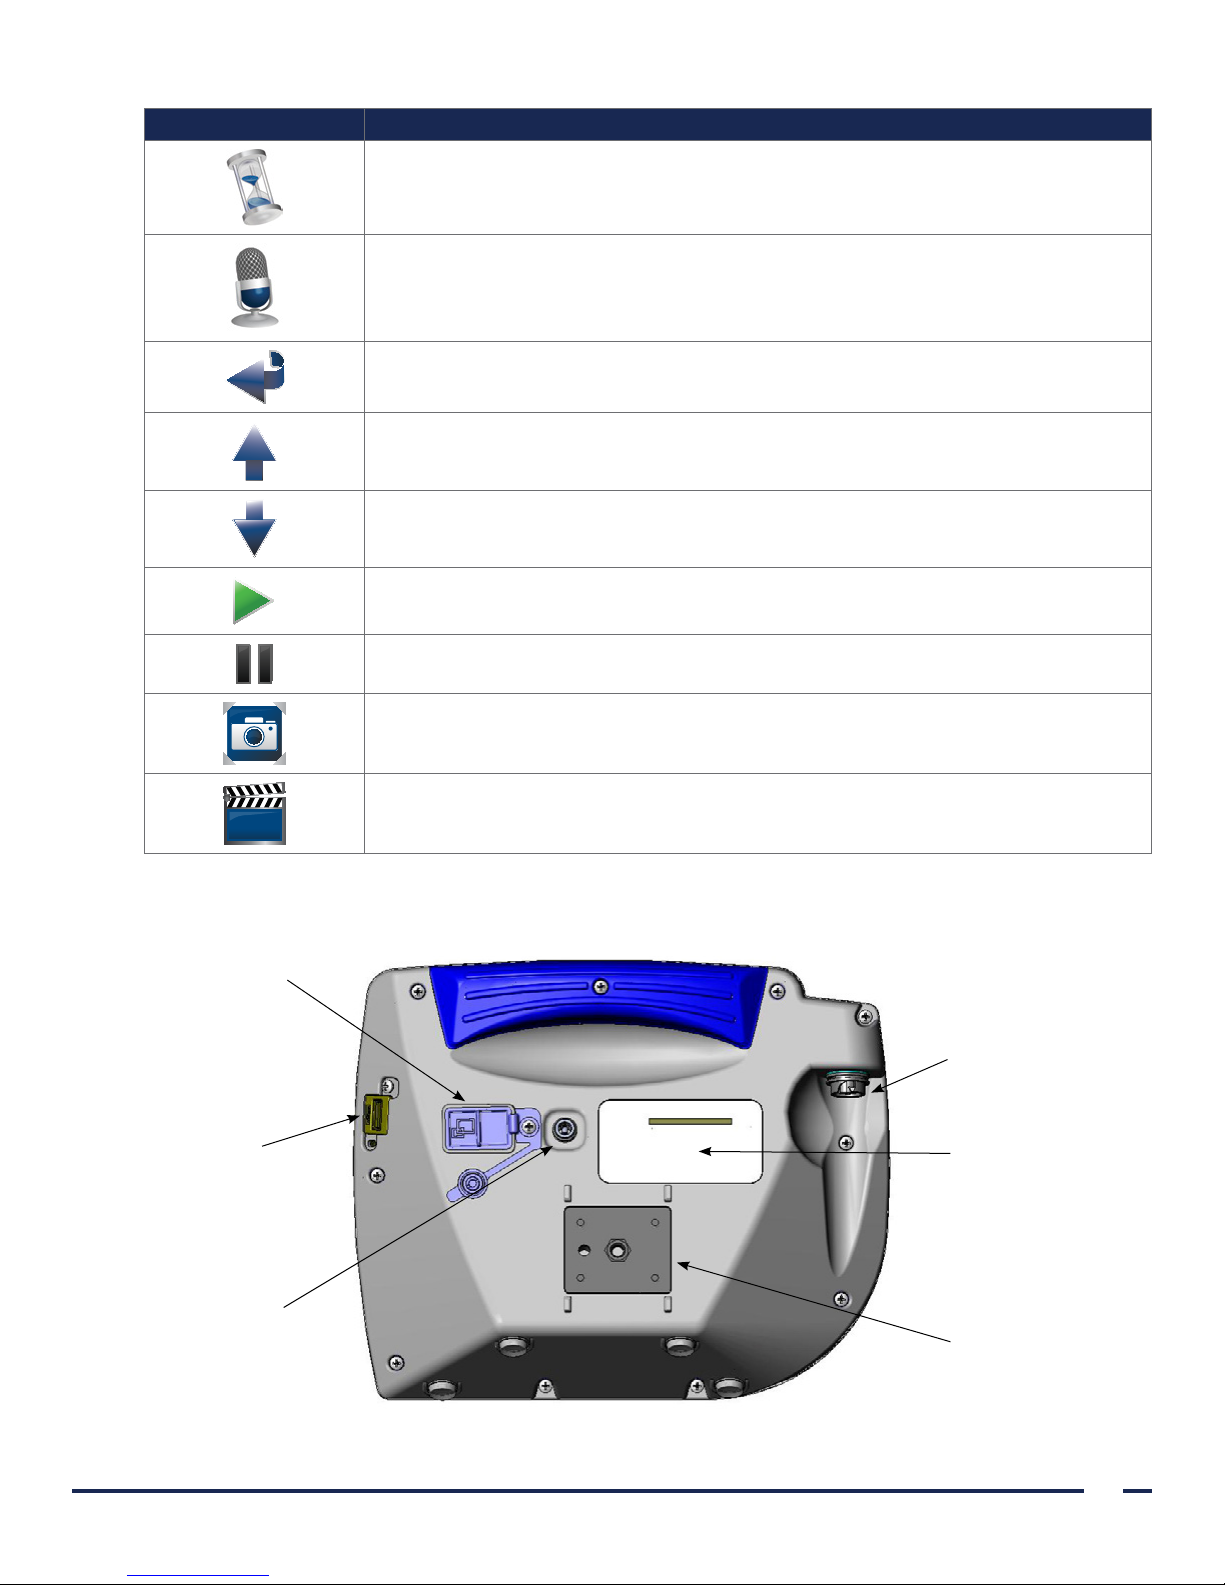
ICON FUNCTION
Hourglass: Please wait while the system prepares for the next action.
Audio Recording is Active: Audio is being recorded on the video.
Note: The default for audio recording is OFF, so audio recording on the video occurs
only if the setting has been changed to ON in user settings.
Back Arrow: Exit to previous screen.
Up Arrow: Select previous file for playback.
Down Arrow: Select next file for playback.
Play: Play the selected file or continue playing a paused video file.
Pause: Pause the video playback.
Snapshot: On the Playback menu, this icon indicates that a file is a snapshot.
Video: On the Playback menu, this icon indicates that a file is a video.
Figure 7. GlideScope Video Monitor Back Panel
Video-out port:
Connect the
HDMI-to-DVI cable
from the external
monitor
USB port:
Connect a USB
flash drive to
record video or
take a snapshot
Power socket:
Connect the barrel
plug from the 12V
power adapter
Video cable port:
Attach the video cable or
GlideScope Smart Cable
Product identification:
Includes product serial
number
Mounting plate fitting:
Connect the monitor to a
mobile stand or IV pole
Operations & Maintenance Manual: Introduction
13
Page 20

SETTING UP
Before you can use the GlideScope Titanium system for the first time, you must inspect the components, set up
the system, and perform a functional test as recommended by Verathon®. Complete the following procedures:
1. Perform Initial Inspection—Inspect the system for any obvious physical damage that may have occurred
during shipment.
2. Mount the System (Optional)—Set up the GlideScope Video Monitor on a mobile stand or IV pole.
3. Charge the Monitor Battery—Note that you can use the system while the battery is charging.
Note: The monitor will operate without charging the battery by using the GlideScope Video Monitor 12V DC
power adapter that shipped with the unit.
4. Attach the Video Cable & Blade—Connect the video cable or GlideScope Smart Cable to the monitor, and
then connect the video laryngoscope to the video cable or Smart Cable.
5. Connect to an External Monitor (Optional)—Connect the monitor to an external display source, such as a
larger monitor screen, by using the HDMI-to-DVI cable.
6. Configure User Settings—Enter data customized to your clinic, and configure settings such as the date
and time.
7. Perform a Functional Check—Before you use the device for the first time, perform a functional check to
ensure that the system is working properly.
PROCEDURE 1. PERFORM INITIAL INSPECTION
When you receive the GlideScope Titanium system, Verathon recommends that an operator familiar with
the instrument perform a full visual inspection of the system for any obvious physical damage that may have
occurred during shipment.
Note: Due to the hand-polishing method used to create the titanium exterior of the reusable blades, slight
variations or irregularities may occur in the finish. These variations do not affect the cleaning process or
system efficacy.
1. Verify that you have received the appropriate components for your system by referring to the packing list
included with the system.
2. Inspect the components for damage.
3. If any of the components are missing or damaged, notify the carrier and Verathon Customer Care or your
local representative:
800.331.2313 (Canada and US)
+1.425.867.1348 (International)
+31 (0) 20 210 30 91 (Europe)
For additional contact information, see Contact Information.
14
Page 21
PROCEDURE 2. MOUNT THE SYSTEM (OPTIONAL)
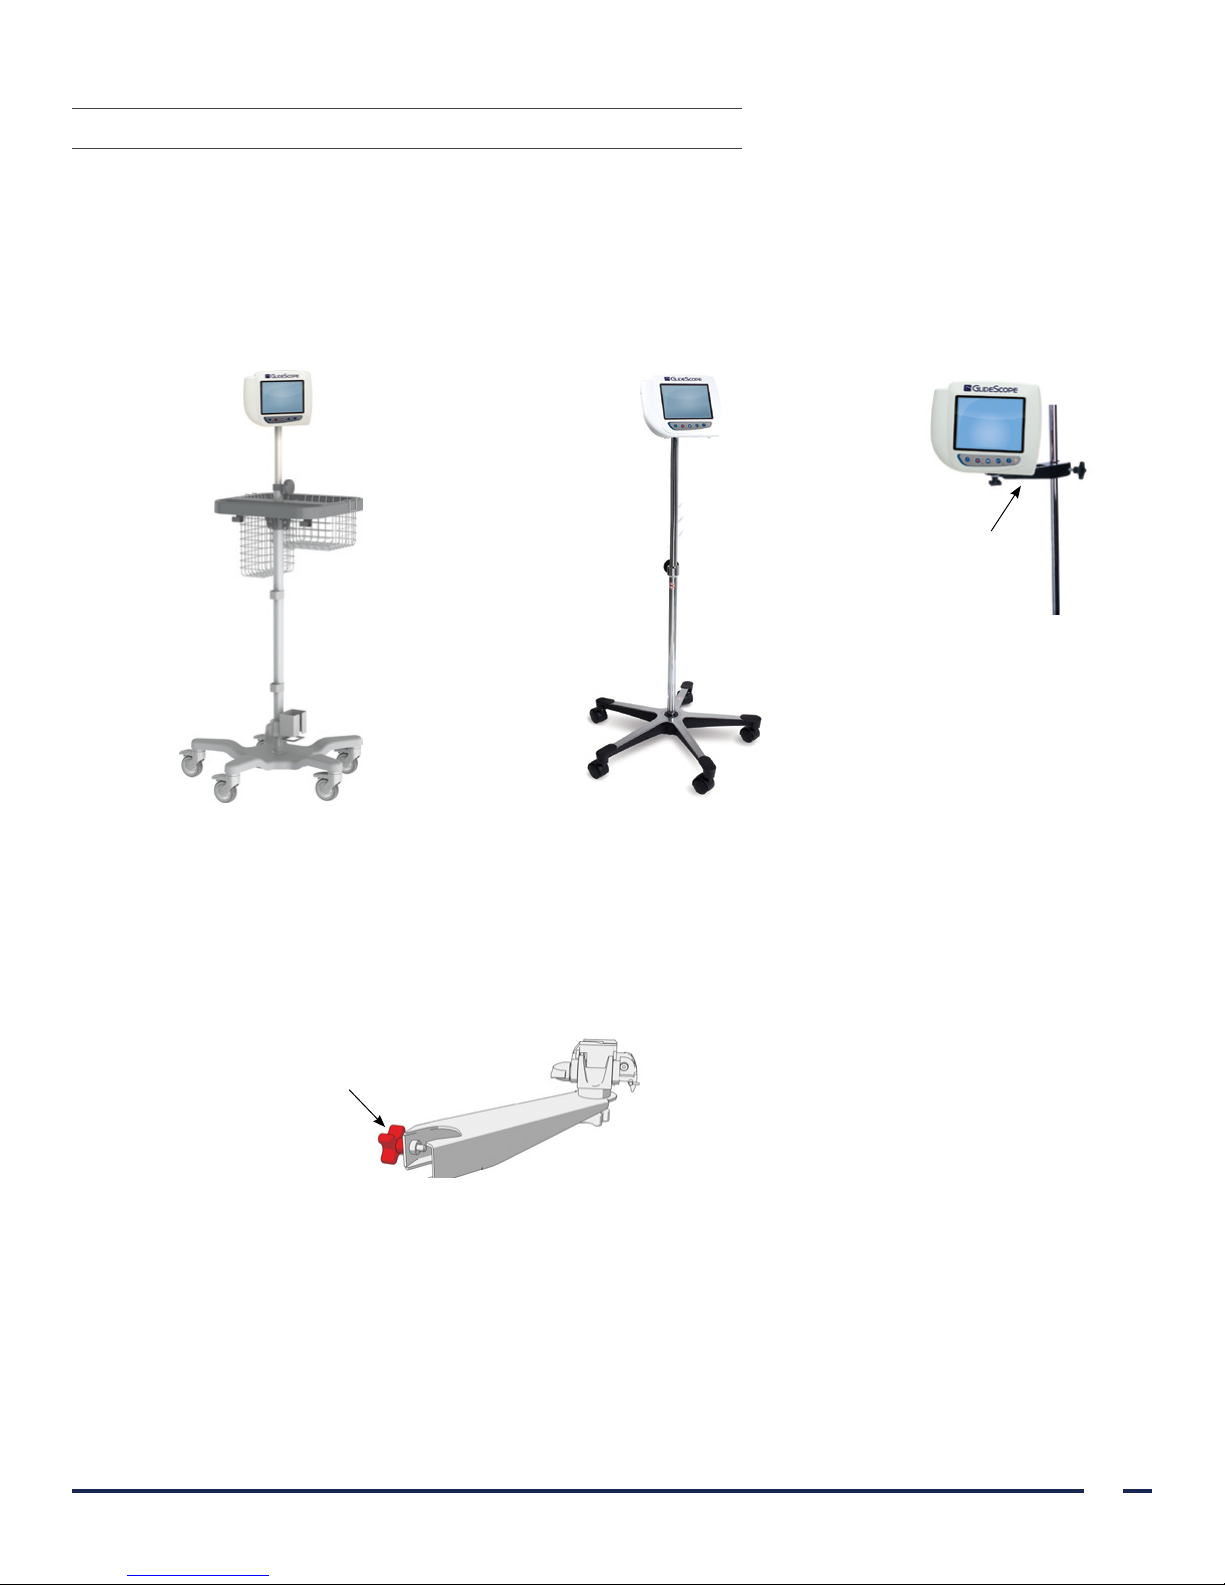
If you choose to mount the system, you may use either of the following configurations:
• Mount it on a GlideScope premium cart or AVL portable stand (Figure 8 or Figure 9). These solutions
make it easy for you to move the system from one location to another.
• Mount it on an IV pole (Figure 10).
Figure 8. GlideScope Premium Cart Figure 9. AVL Portable Stand Figure 10. IV Pole Mount
IV pole mount
ATTACH THE MONITOR TO THE CART OR IV POLE
1. If you are using the GlideScope premium cart or AVL portable stand, assemble it according to the
instructions included with the component.
2. If you are using an IV pole mount, place the mounting bracket on the IV pole, and then tighten the bracket
attachment knob until the IV pole mount is secure.
Bracket attachment knob
Operations & Maintenance Manual: Setting Up
15
Page 22
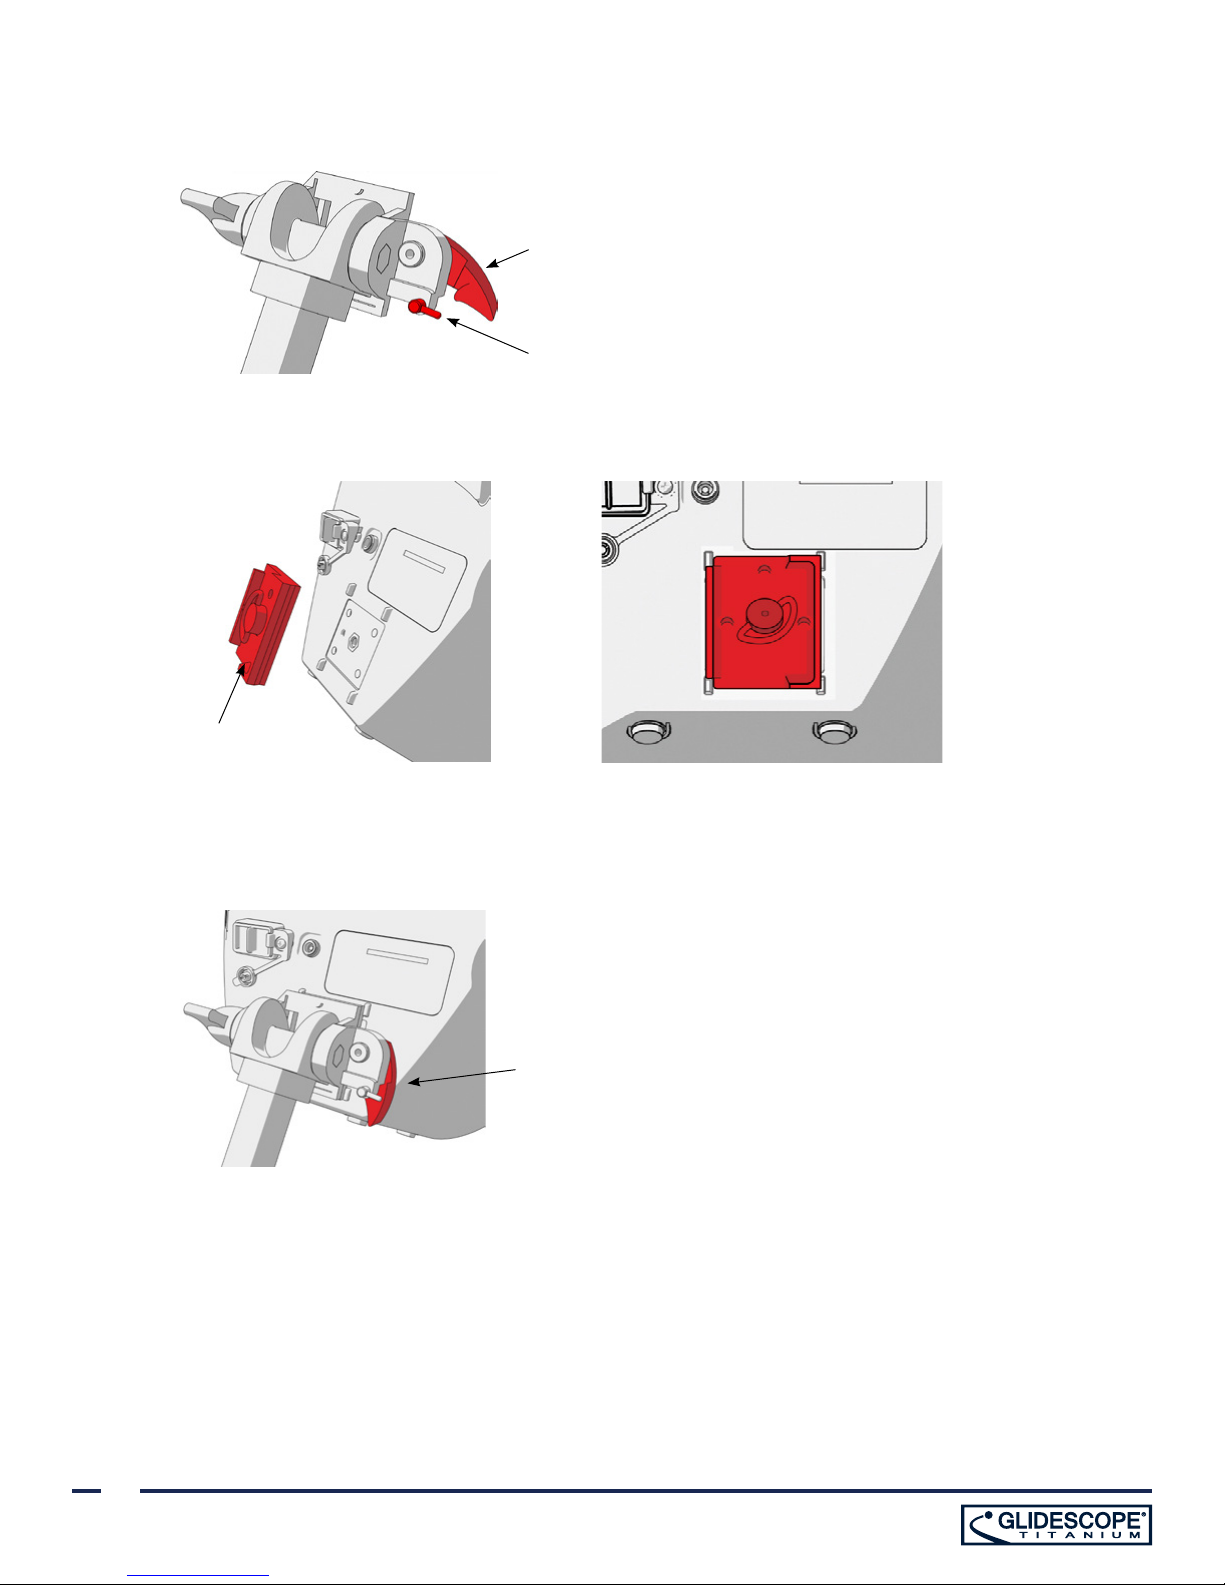
3. On the cart mount or the IV pole mount, ensure that the locking pin and quick-release lever are in the
unlocked (horizontal) position.
Quick-release lever
in unlocked position
Locking pin in
unlocked position
4. Using the orientation shown in the following images, screw the quick-release locking plate to the back panel
of the monitor.
Quick-release
locking plate
5. Seat the locking plate of the monitor on the quick-release mount. When properly situated, the monitor sits
securely on the mount, and the quick-release lever automatically snaps into the locked (down) position.
6. Ensure that the quick-release lever is fully in the locked (down) position. This secures the monitor in place.
Quick-release lever
in locked position
16
Page 23
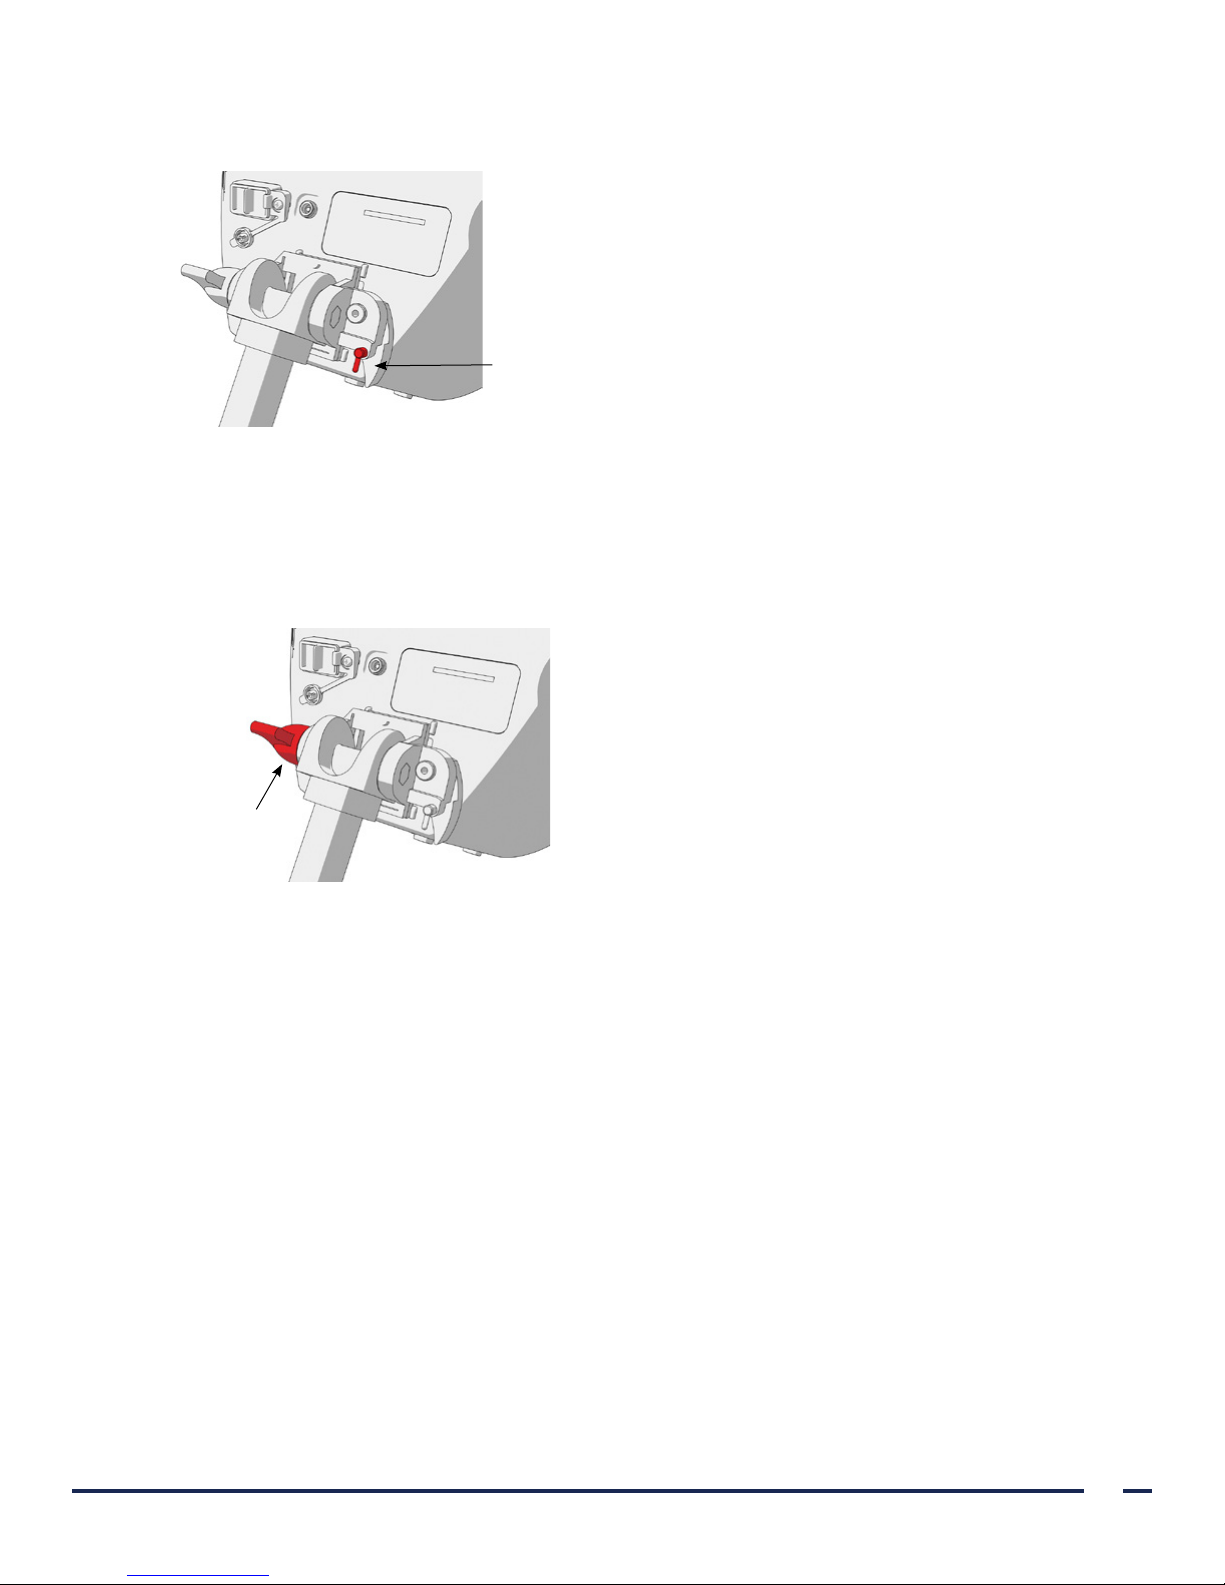
7. Adjust the locking pin to the locked (down) position. This secures the quick-release lever in the
locked position.
Locking pin in locked position
ADJUST THE MONITOR ANGLE
Before you start using the video monitor, adjust the angle of the monitor for optimal viewing. The ideal angle
minimizes glare and maximizes visibility.
8. Turn the angle adjustment knob counterclockwise.
Angle
adjustment
knob
9. Tilt the monitor to the desired angle.
10. Turn the angle adjustment knob clockwise. This secures the monitor at the desired angle.
Operations & Maintenance Manual: Setting Up
17
Page 24
PROCEDURE 3. CHARGE THE MONITOR BATTERY
WARNING
In order to maintain electrical safety, use only the provided, medical-approved power supply.
The GlideScope Video Monitor includes an internal lithium battery. Verathon® recommends that you charge the
battery fully prior to first use.
Under normal operating conditions, a fully charged battery lasts approximately 90minutes before it needs to be
recharged. For optimal battery life, ensure that the battery is fully charged before you try to use the monitor in
battery mode. You should charge the battery at temperatures between 0–35°C (32–95°F).
The percentage above the Battery Status icon indicates the remaining battery charge.
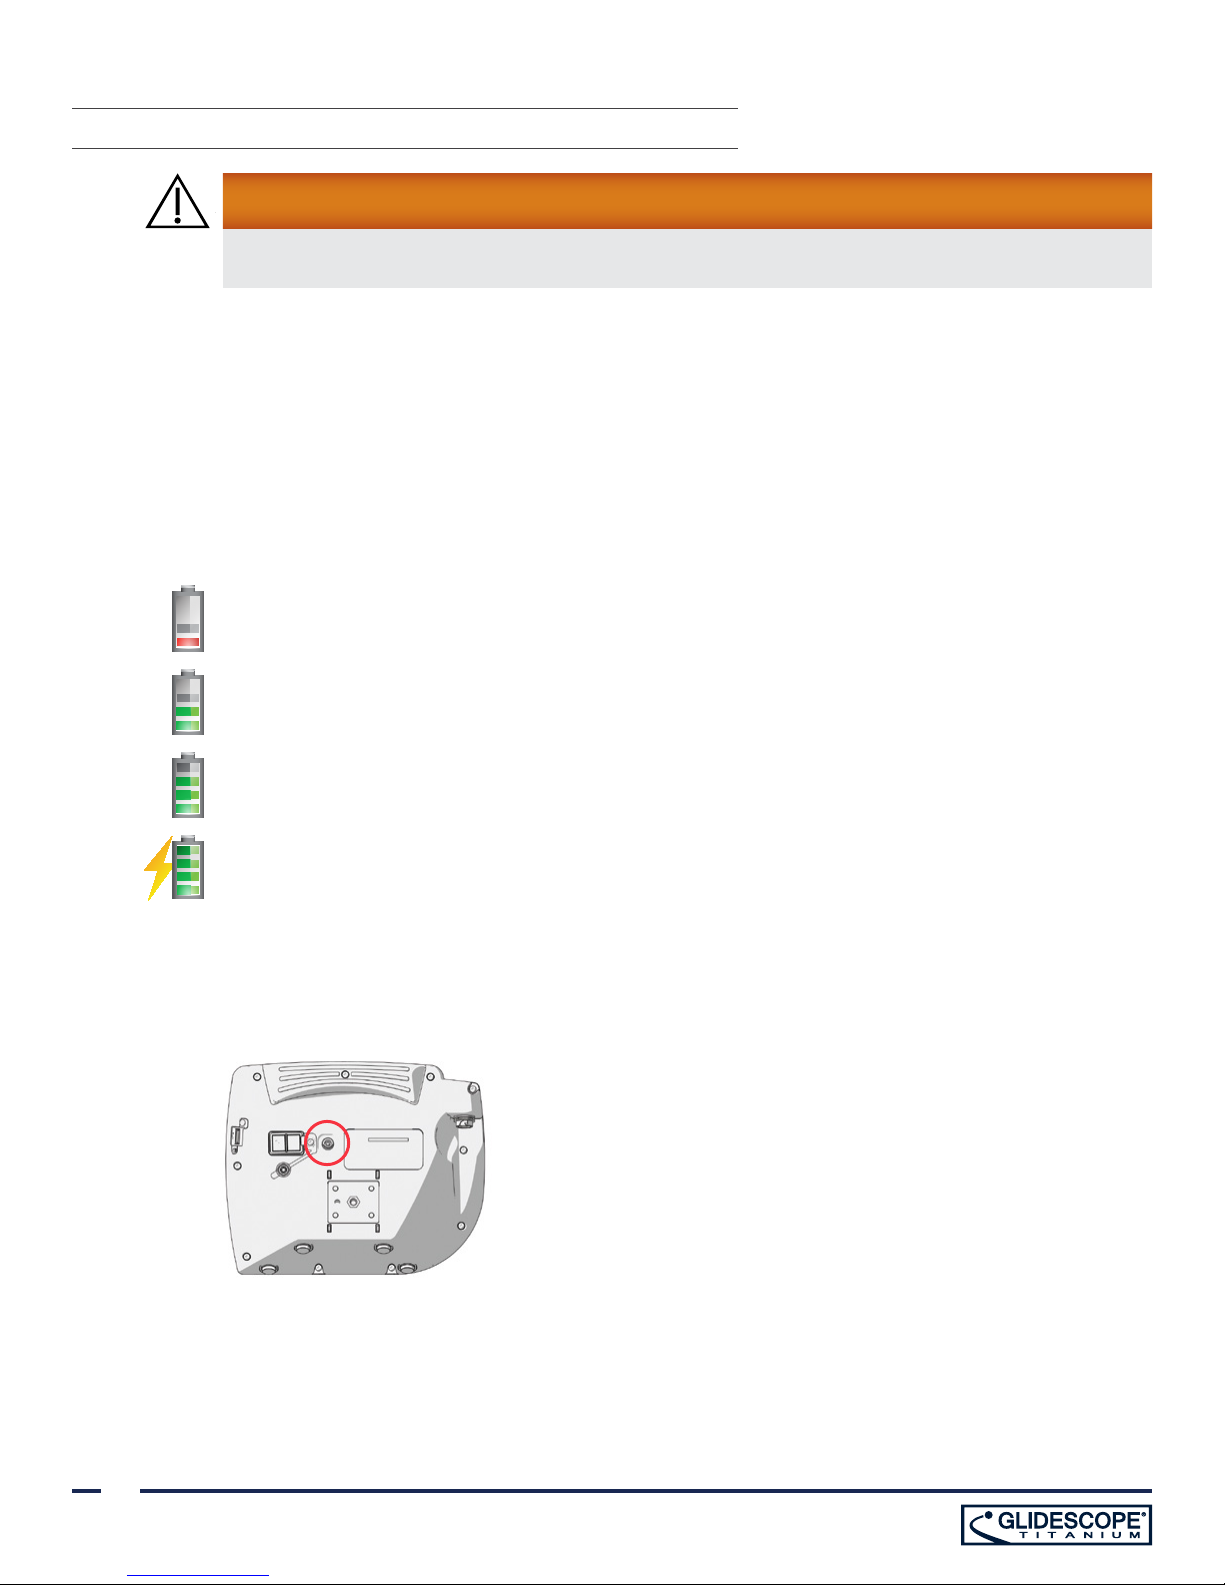
Figure 11. Battery Status Icons
Battery must be charged
Approximately ⅓ battery life remaining
Approximately ⅔ battery life remaining
Battery is ⅔ to fully charged. The lightning bolt indicates that the battery is charging.
1. Connect the video monitor 12V DC poweradapter to the power cable.
2. On the back panel of the monitor, remove the power socket cap, and then connect the 12V DC power
adapter to the power socket.
3. Plug the power supply into a hospital-grade power outlet.
4. Allow the battery to charge. Fully charging the battery may take up to 6hours.
18
Page 25
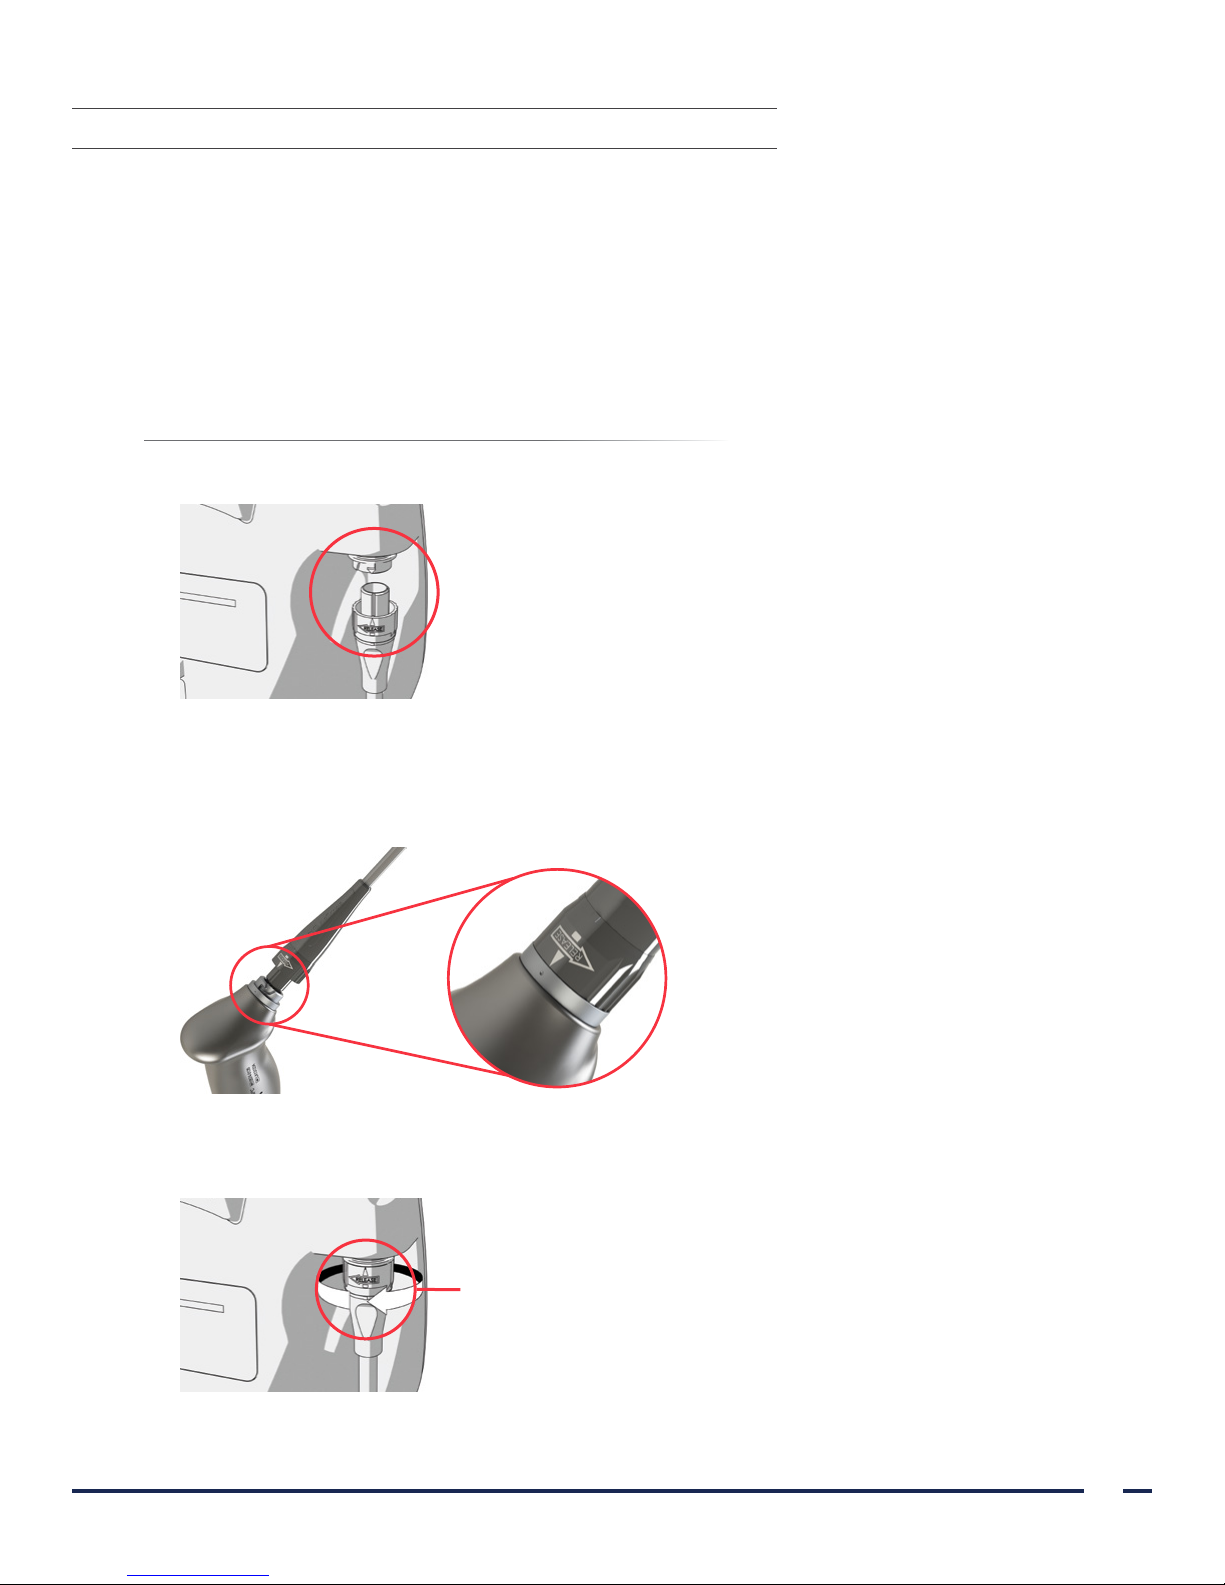
PROCEDURE 4. ATTACH THE VIDEO CABLE & BLADE
The video cable attaches the video laryngoscope to the GlideScope Video Monitor, supplying power to the blade
and transmitting video data from the camera to the monitor. This procedure provides options for single-use and
reusable systems—complete the option appropriate for your configuration.
Ensure that the video monitor is turned off prior to connecting or disconnecting a video cable or blade.
The GlideScope Video Monitor is also compatible with GlideScope AVL system blades. For more information,
contact Verathon® Customer Care or see the GlideScope AVL System Operations & Maintenance Manual.
OptiOn 1. REUSABLE SYStEM
1. Align the arrow on the video cable and the arrow on the video cable port.
2. Insert the video cable connector into the port. You will hear a click when the cable is successfully connected.
3. Align the arrow on the video cable with the dot on the reusable blade, and then insert the video cable into
the blade port. You will hear a click when the cable is successfully connected.
4. To disconnect the video cable from the monitor or reusable blade, rotate the connector ring in the direction
of the release arrow, and then remove the connector from the port.
Connector ring
Operations & Maintenance Manual: Setting Up
19
Page 26
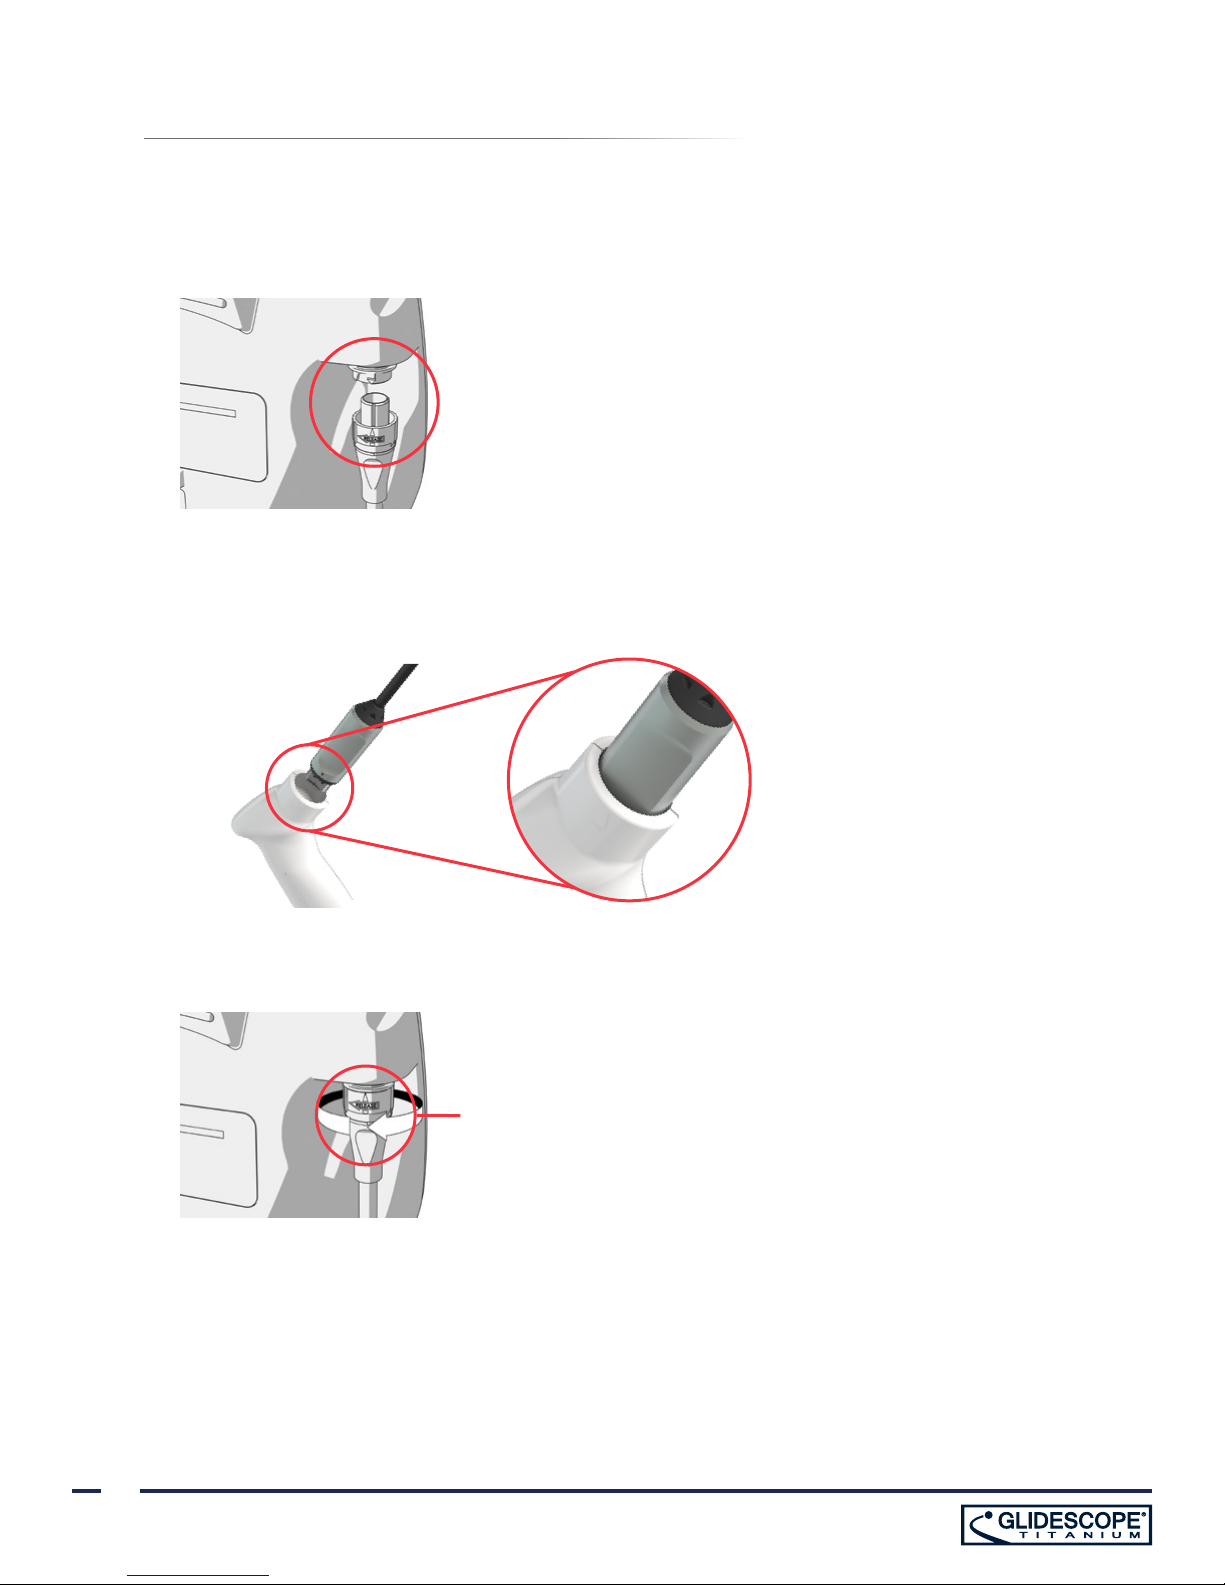
OptiOn 2. SinGLE-USE SYStEM
It is recommended that you leave the sterile, single-use blade in the packaging while connecting the blade and
that you do not remove the blade until you are ready to perform an intubation procedure. This helps ensure that
the blade remains as clean as possible.
1. Align the arrow on the GlideScope Smart Cable and the arrow on the video cable port.
2. Insert the Smart Cable connector into the port. You will hear a click when the cable is successfully connected.
3. Align the arrow on the Smart Cable with the dot on the single-use blade port, and then insert the connector
fully into the port.
4. To disconnect the GlideScope Smart Cable from the monitor, rotate the connector ring in the direction of the
release arrow, and then remove the connector from the port.
Connector ring
5. To disconnect a single-use blade from the GlideScope Smart Cable, hold the cable connector in one hand
and the blade handle in the other, and then pull. The blade disconnects from the cable.
20
Page 27
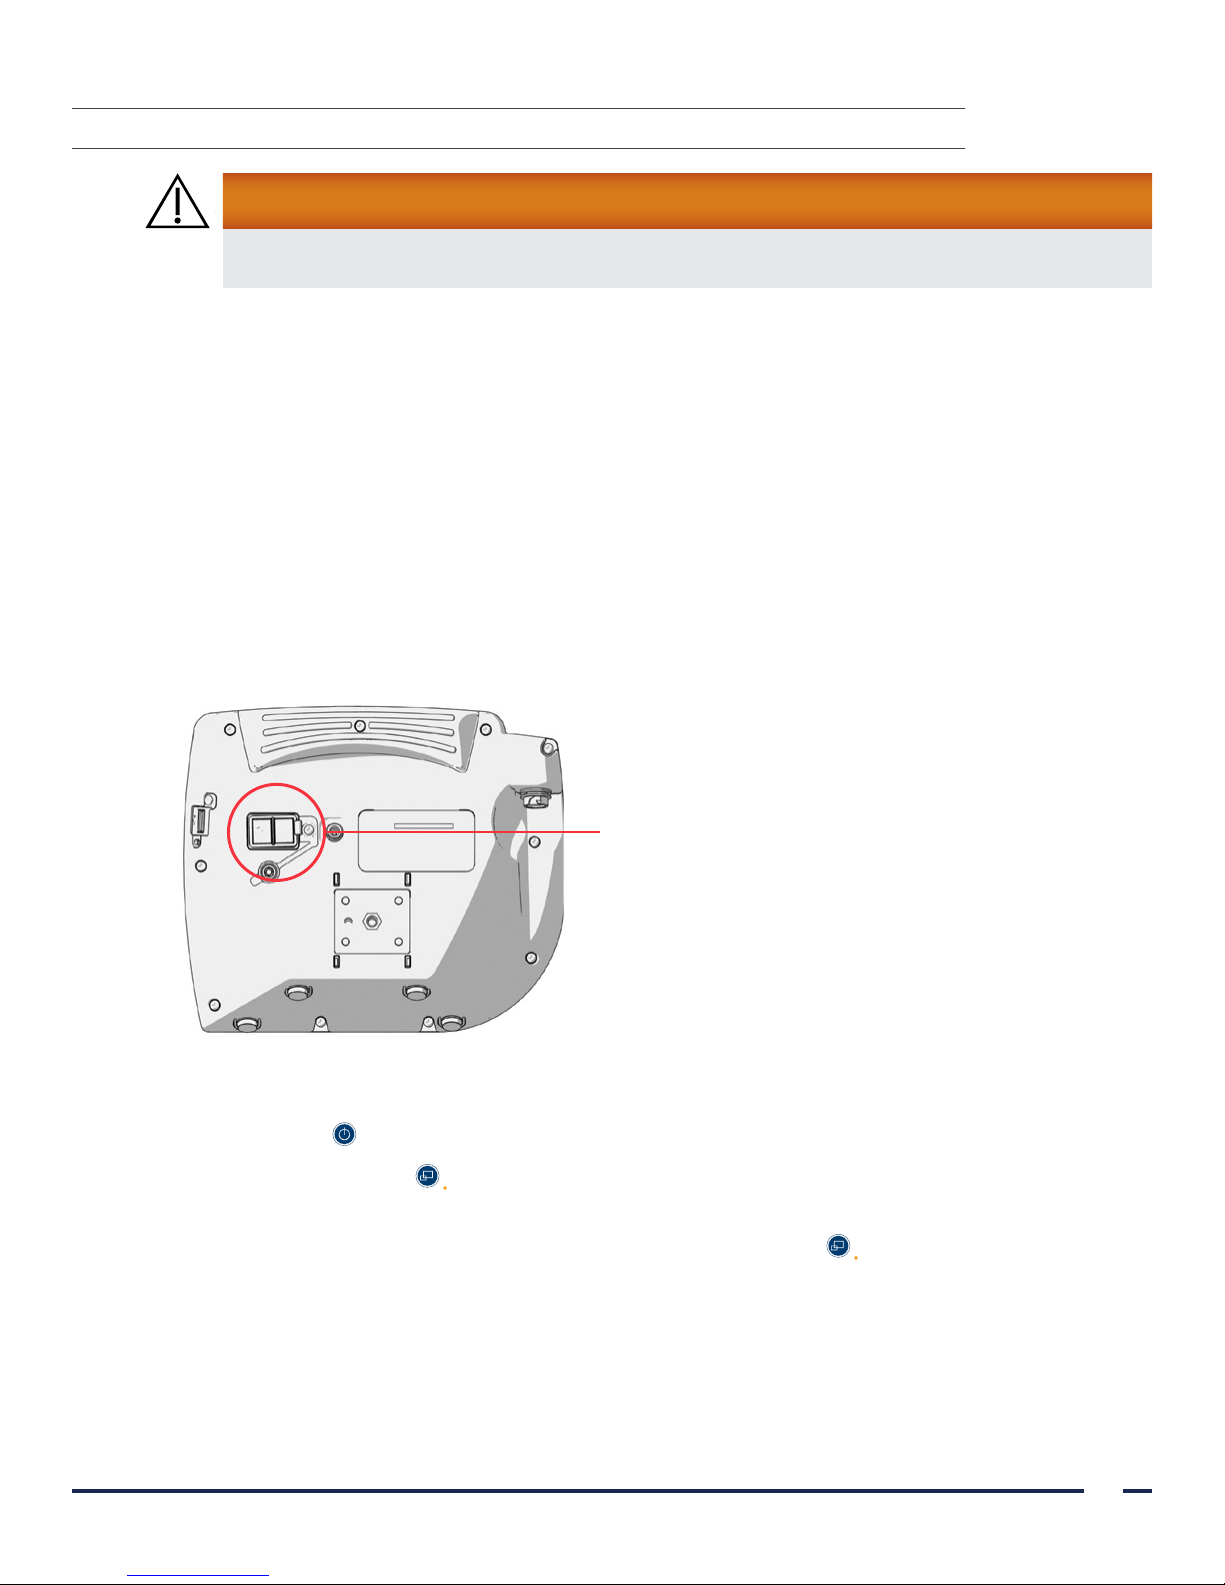
PROCEDURE 5. CONNECT TO AN EXTERNAL MONITOR (OPTIONAL)
WARNING
The external monitor must be safety-approved medical equipment.
By using an HDMI-to-DVI cable, you can connect the GlideScope Video Monitor to an external monitor that is
approved for medical use. For more information, please contact your Verathon® Customer Care representative.
Note: Image quality on the external monitor may vary according to the resolution of the external monitor.
Note: To maintain electromagnetic interference (EMI) within certified limits, the GlideScope Titanium system
must be used with the cables, components, and accessories specified or supplied by Verathon. For additional
information, see the System Parts & Accessories and Component Specifications sections. The use of accessories
or cables other than those specified or supplied may result in increased emissions or decreased immunity of the
system.
1. Ensure that the video monitor is turned off.
2. On the back of the monitor, remove the HDMI cap from the video-out port.
3. Connect the HDMI end of the cable to the video-out port.
Video-out port
4. Connect the other end of the cable to the DVI port on an external monitor that is approved for medical use.
5. Press the Power button. The monitor turns on.
6. Press the External Video button. The indicator LED to the right of the button illuminates when the
connection is successful, and the video displays on the external monitor.
7. To stop sending video to an external monitor, press the External Video button again.
8. Prior to disconnecting the HDMI-to-DVI cable, ensure the video monitor is turned off.
Operations & Maintenance Manual: Setting Up
21
Page 28
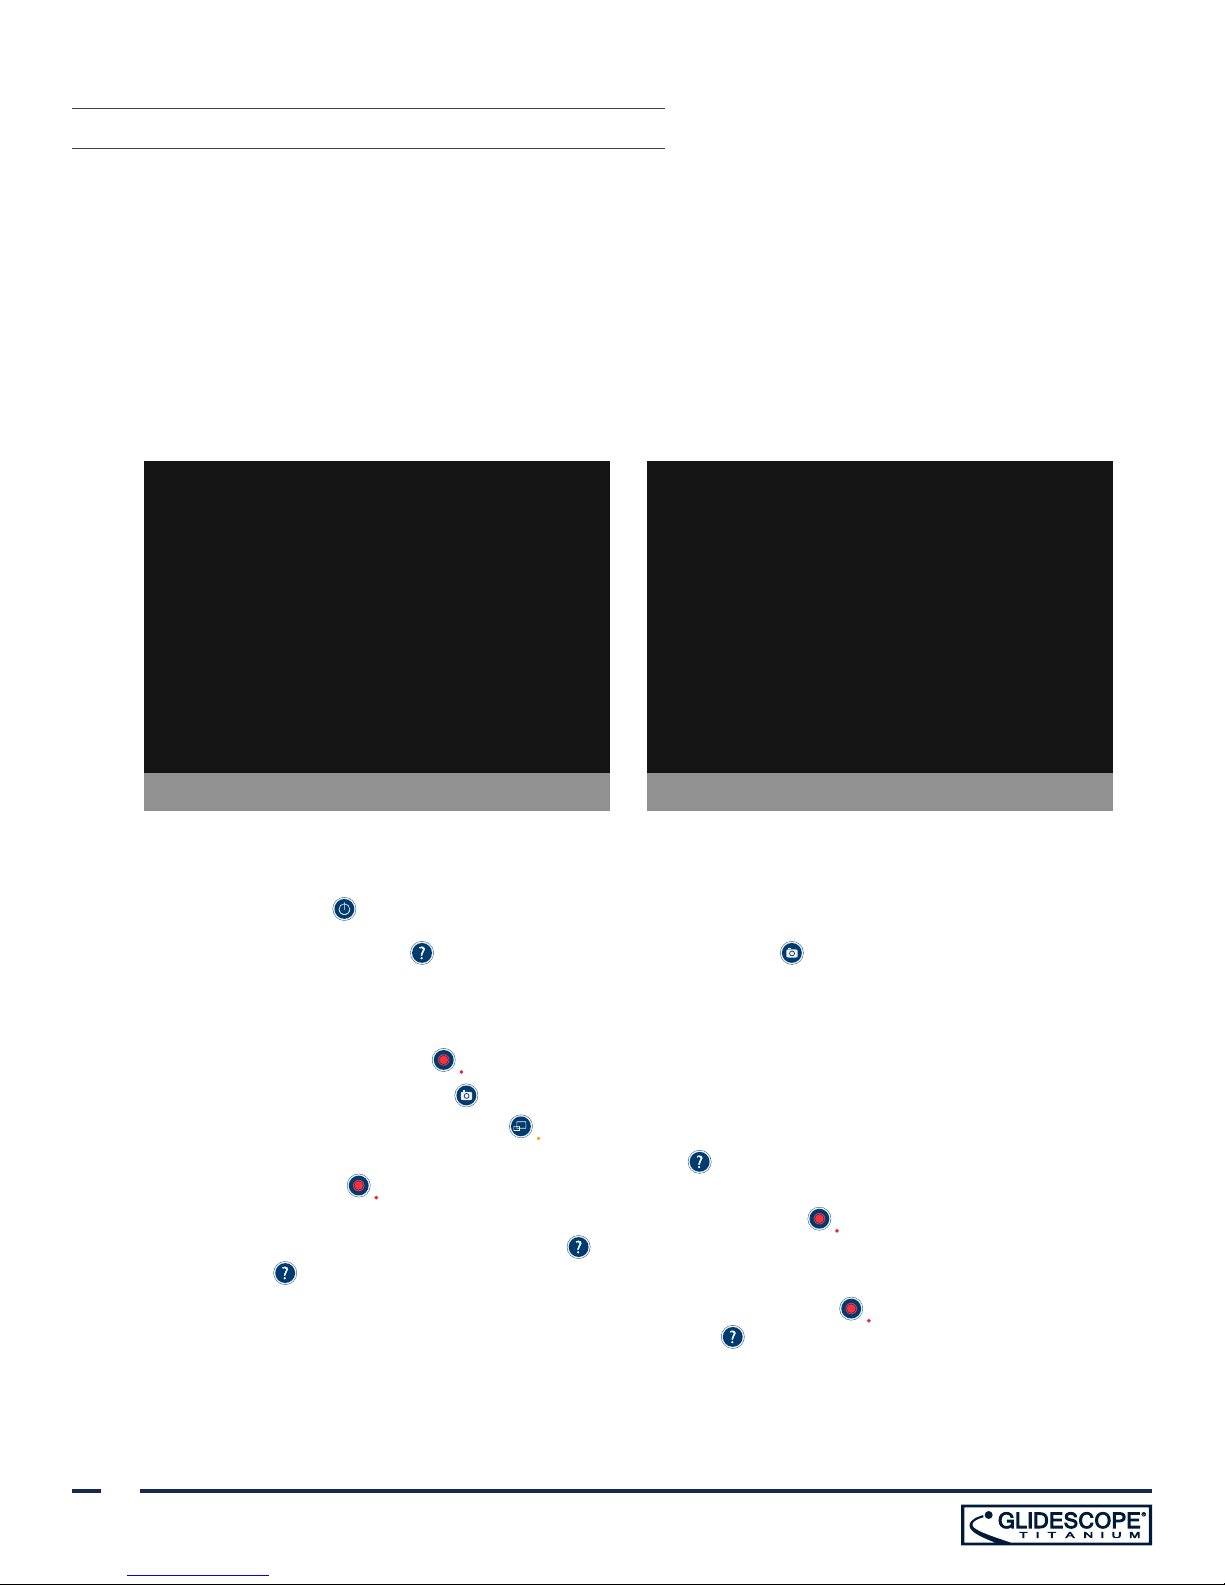
PROCEDURE 6. CONFIGURE USER SETTINGS
Mode Exit
GlideScope User Settings
Change Date, Time & Settings
01-15-2014 20:35:51 US
UBL Version: 1.4
Core Version: 3.4
Tutorial Version: 1.3
Baton Version:
Key Click Sound: OFF
Audio Recording: ON
Auto External Video: OFF
Clinic Name: CLINIC NAME
Auto Power Off: OFF
Auto Recording: OFF
Next Page
NOTE: PLUG IN POWER ADAPTER TO ENABLE SOFTWARE UPGRADING
UBoot Version: 2.1
Filesystem Version: 3.5
App Version: 3.5
+-
Scope
Power Cycle: 19
Running Time: 0 d 11 h 30 m
Back
GlideScope User Settings
Monitor
Power Cycle: 3
Running Time: 0 d 0 h 30 m
Battery Level: 94%
No USB Drive Detected.
Monitor
Download
Scope
Download
You may configure the following settings directly on the unit:
• Date and Time
• Date and Time Format
• Key Click Sound
• Auto Power Off
• Audio Recording
• Auto Recording
• Auto External Video
• Clinic Name
The second page of user settings, as seen in Figure 13, displays system-use information, and it does not contain
any configurable settings.
Figure 12. User Settings Screen Page 1
Figure 13. User Settings Screen Page 2
1. If a USB flash drive is inserted into the monitor, remove it.
2. Press the Power button. The monitor turns on.
3. Hold the Tutorial button , and then press the Snapshot button . The User Settings screen appears on
the monitor. The configurable user settings are displayed in yellow, and the selected setting is highlighted in red.
4. Customize your user settings by using the following buttons:
• Press the Record button to select the parameter you want to set.
• Press the Snapshot button to decrease the parameter value.
• Press the External Video button to increase the parameter value.
• When inputting the Clinic Name, the Tutorial button moves the selection to the next letter. Press the
Record button twice to return the selection back to the Date/Time setting.
• To view the second page of user settings, press the Record button until Next Page is highlighted in
5. When you are finished customizing the settings, press the Record button until the option Exit is
22
red, and then press the Tutorial button . To exit the second page of user settings, press the Tutorial
button again.
available in the gray bar, and then press the Tutorial button . This saves the parameters, and the User
Settings screen closes.
Page 29
PROCEDURE 7. PERFORM A FUNCTIONAL CHECK
Before you use the device for the first time, perform the following functional check to ensure that the
system is working properly. Please contact your Verathon® Customer Care representative if your GlideScope
Titanium system does not function as described below.
1. Fully charge the monitor battery (this takes approximately 6hours).
2. Attach the video cable and video laryngoscope to the monitor, according to the instructions in Attach the
Video Cable & Blade.
3. Press the Power button. The monitor turns on.
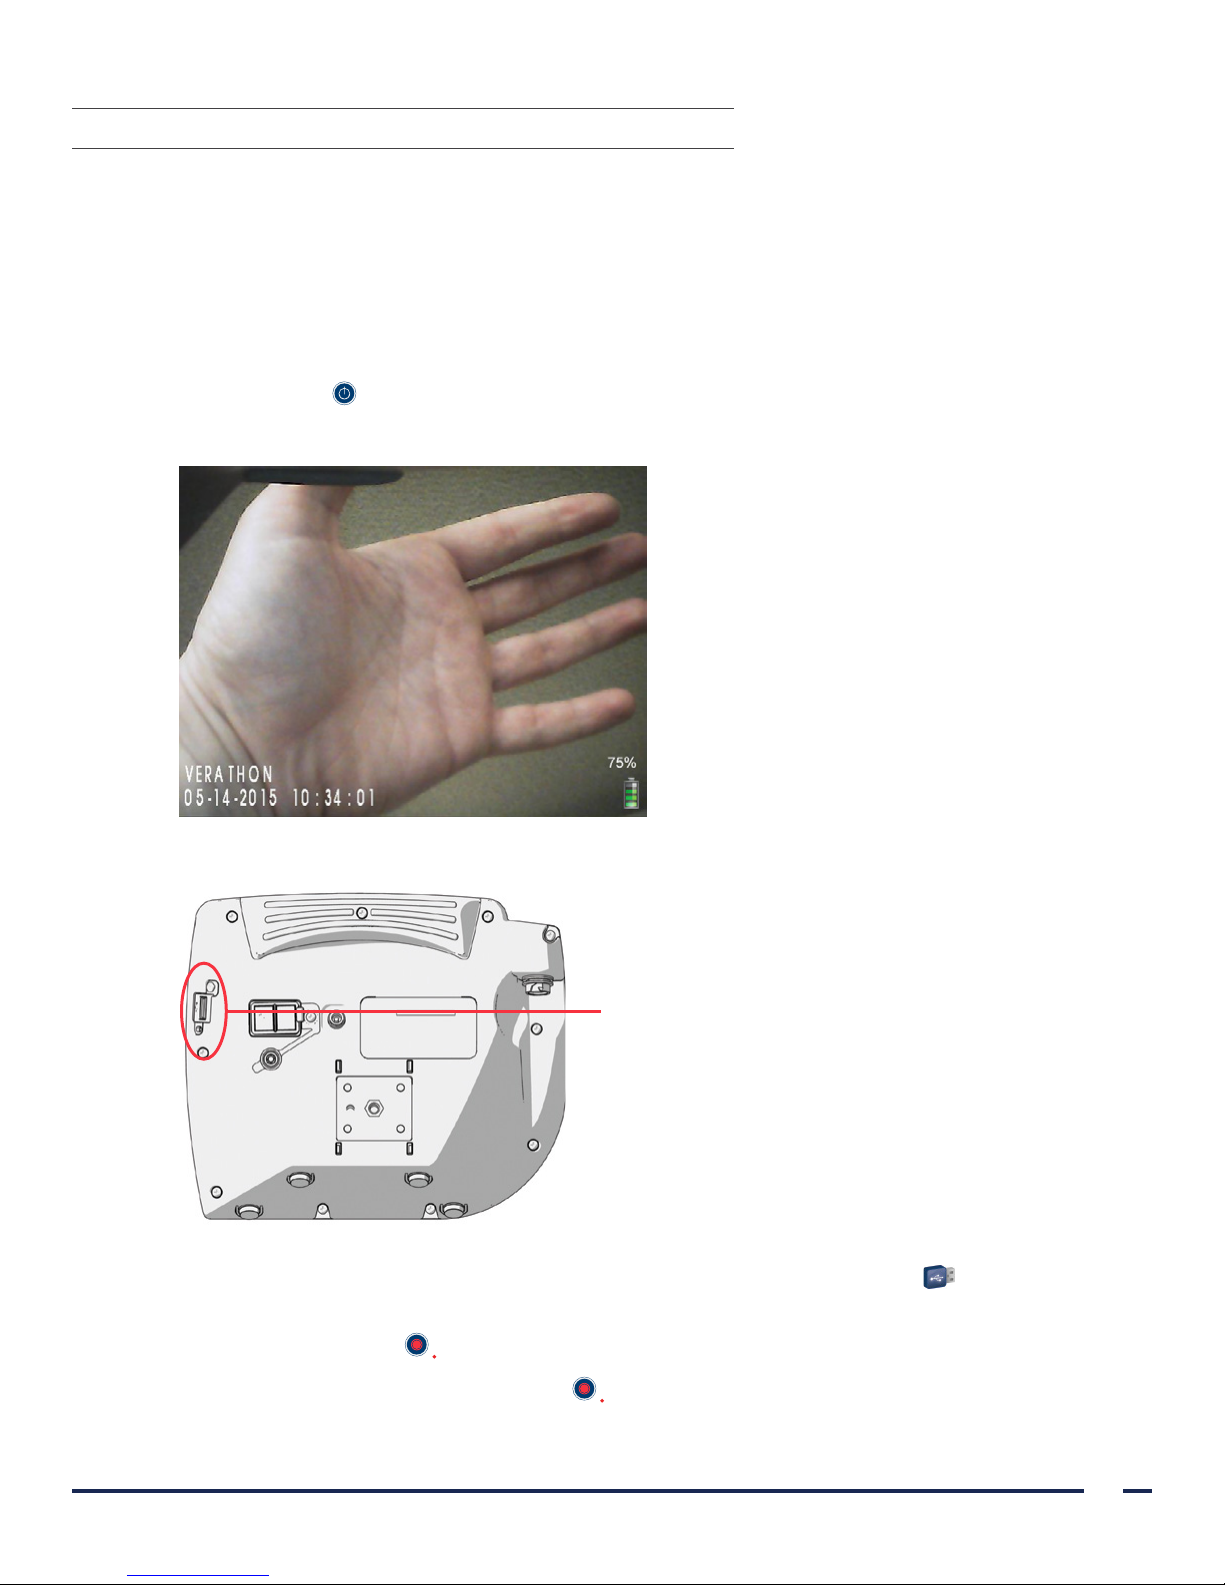
4. Look at the monitor screen, and verify that the image displayed is being received from the blade.
Note: There may be a slight blade intrusion in the
upper-left corner of the monitor, and a thin line
may appear along the top. These blade edges are
captured in the view because of the wide-angle
camera lens used in the video laryngoscope. This
image acts as a frame of reference during the
intubation process and ensures that the orientation
of the image is correct in the monitor.
5. On the back of the monitor, remove the USB port cap, and then insert a USB flash drive into the port.
USB port
6. Ensure that the USB flash drive is detected by checking if the USB Flash Drive icon on the bottom of the
screen is displayed.
7. Press the Record button . Recording starts.
8. To stop recording, press the Record button again.
Operations & Maintenance Manual: Setting Up
23
Page 30

9. Wait until the Saving File icon has disappeared from the screen, and then remove the USB flash drive
from the monitor.
10. On a computer, verify that the recorded video (.avi) file can be played.
Note:
If you are viewing the recorded file on a Windows® operating system (OS), use an application such as
Windows Media Player®.
If you are viewing the recorded video file on Mac OS®, use an application such as one of the following:
• MPlayerX (free in the App StoreSM)
• VLC® (free at http://www.videolan.org/vlc/index.html)
If you are viewing the recorded video file on iOS®, use an application such as one of the following:
• VLC® for iOS® (free in the App StoreSM)
• 8player lite (free in the App StoreSM)
• Media Player - PlayerXtreme™ HD (free in the App StoreSM)
24
Page 31
USING THE DEVICE
Prior to using the device, set up the device according to the instructions in the previous chapter, and verify the
setup by completing the procedure Perform a Functional Check.
WARNING
Reusable Titanium video laryngoscopes are delivered nonsterile and require cleaning and high-level
disinfection prior to initial use.
WARNING
Before every use, ensure the instrument is operating correctly and has no sign of damage. Do not
use this product if the device appears damaged. Refer servicing to qualified personnel.
To ensure patient safety, routinely inspect the reusable video laryngoscope before and after every use
in order to ensure the blade is free of rough surfaces, sharp edges, cracks, protrusions, or any other
indication of wear. If found, do not use the damaged or worn blade.
Always ensure that alternative airway management methods and equipment are readily
available.
Report any suspected blade defects to Verathon
Phone: 800.331.2313 (U.S. and Canada)
+1.425.867.1348 (International)
Email: [email protected]
WARNING
Use only a passive-type USB flash drive. Do not use USB drives powered by another external source.
Reusable Titanium video laryngoscopes are equipped with the Reveal™ anti-fog feature, which reduces camera
fogging during the intubation procedure. To fully optimize the feature, you must allow the reusable video
laryngoscope to warm up for 30-120 seconds prior to use, depending on the ambient temperature and humidity
of the clinical environment. Full optimization of the Reveal™ anti-fog feature is not necessary to use the device; if
desired, you may begin the intubation procedure immediately.
Using the Titanium system consists of the following:
1. Prepare the GlideScope System—Select and attach the correct video laryngoscope for the patient, turn the
system on, and verify that it is working properly.
2. Intubate Using the GlideScope 4-Step Technique—Perform the intubation.
®
Customer Care at:
3. Use the Record & Snapshot Features (Optional)—Record the intubation and take snapshots during
theprocedure.
4. Use the Playback Feature (Optional)—View recorded videos or snapshots on the video monitor.
Operations & Maintenance Manual: Using the Device
25
Page 32

PROCEDURE 1. PREPARE THE GLIDESCOPE SYSTEM
In this procedure, you select and attach the appropriate video laryngoscope for the patient, turn the system on,
and verify that the system is functioning properly.
Ensure that the video monitor is turned off prior to connecting or disconnecting a video cable, GlideScope Smart
Cable, or video laryngoscope.
The monitor is also compatible with GlideScope AVL system blades. For more information, contact Verathon®
Customer Care or see the GlideScope AVL System Operations & Maintenance Manual.
Table 6. Video Laryngoscope Sizes
GLIDESCOPE TITANIUM BLADE RECOMMENDED PATIENT WEIGHT/SIZE
LoPro T3 or LoPro S3 10 kg to adult
LoPro T4 or LoPro S4 40 kg to morbidly obese
MAC T3 or MAC S3 Medium adult
MAC T4 or MAC S4 Large adult
1. Ensure that each GlideScope system component has been properly cleaned, disinfected, or sterilized
according to the guidance provided in Table 7 on page 33.
2. Using the information in Table 6, in combination with a clinical assessment of the patient and the experience
and judgment of the clinician, select the GlideScope video laryngoscope that is appropriate for the patient.
3. Attach the video cable and video laryngoscope to the monitor, according to the instructions in Attach the
Video Cable & Blade.
4. Press the Power button . The video monitor turns on.
Note: If the GlideScope Video Monitor locks up or becomes unresponsive for any reason, press and hold the
Power button for 10seconds to reboot the system.
5. Ensure that the battery is sufficiently charged. If necessary, connect the monitor directly to power.
6. On the monitor screen, verify that the image displayed is from the video laryngoscope camera. A small
portion of the blade may be visible on the upper-left corner or top of the monitor screen.
7. If you are using a reusable blade and if needed, allow the GlideScope Reveal™ anti-fog feature to warm up
for 30–120seconds.
Note: The time required for the anti-fog feature to be fully optimized varies according to the ambient
temperature and humidity where the equipment is being stored or used. If the video laryngoscope is stored
in cold conditions, additional warming time may be required for optimal performance of the anti-fog feature.
8. If desired to provide additional anti-fog benefits, you may apply Dexide™ Fred™ Lite to the camera window
on the reusable blade.1 Use the solution according to the manufacturer’s instructions.
1 Compatibility has been demonstrated for up to 100 cycles on reusable blades.
26
Page 33
PROCEDURE 2. INTUBATE USING THE GLIDESCOPE 4-STEP TECHNIQUE
WARNING
When you are guiding the endotracheal tube to the distal tip of the video laryngoscope, ensure that
you are looking in the patient’s mouth, not at the video monitor screen. Failure to do so may result
in injury to the tonsils or soft palate.
WARNING
Several areas of the video laryngoscope that contact the patient can exceed 41°C (106°F) as part of
normal operation:
• The first area is the light-emitting area surrounding the camera where the anti-fog feature is
located. When used as indicated, continuous contact with this area is unlikely because, if tissue
were to contact this area, the view would be lost and devices would need to be adjusted to
regain the airway view.
• The second area is the area surrounding the camera, out of view of the camera. Continuous
contact with this area is unlikely because the product is typically not held stationary for an
extended period of time exceeding 1minute.
If continuous contact is maintained for longer than 1minute, it is possible to cause thermal damage
such as a burn to the mucosal tissue.
Note: Typical intubations are less than 1minute in duration.
To perform an intubation, Verathon® recommends using the GlideScope 4-Step Technique as outlined in this
procedure. Each step begins with where the user should be looking to complete that action. Prior to beginning
this procedure, verify that the monitor is receiving an accurate image from the video laryngoscope.
Operations & Maintenance Manual: Using the Device
27
Page 34
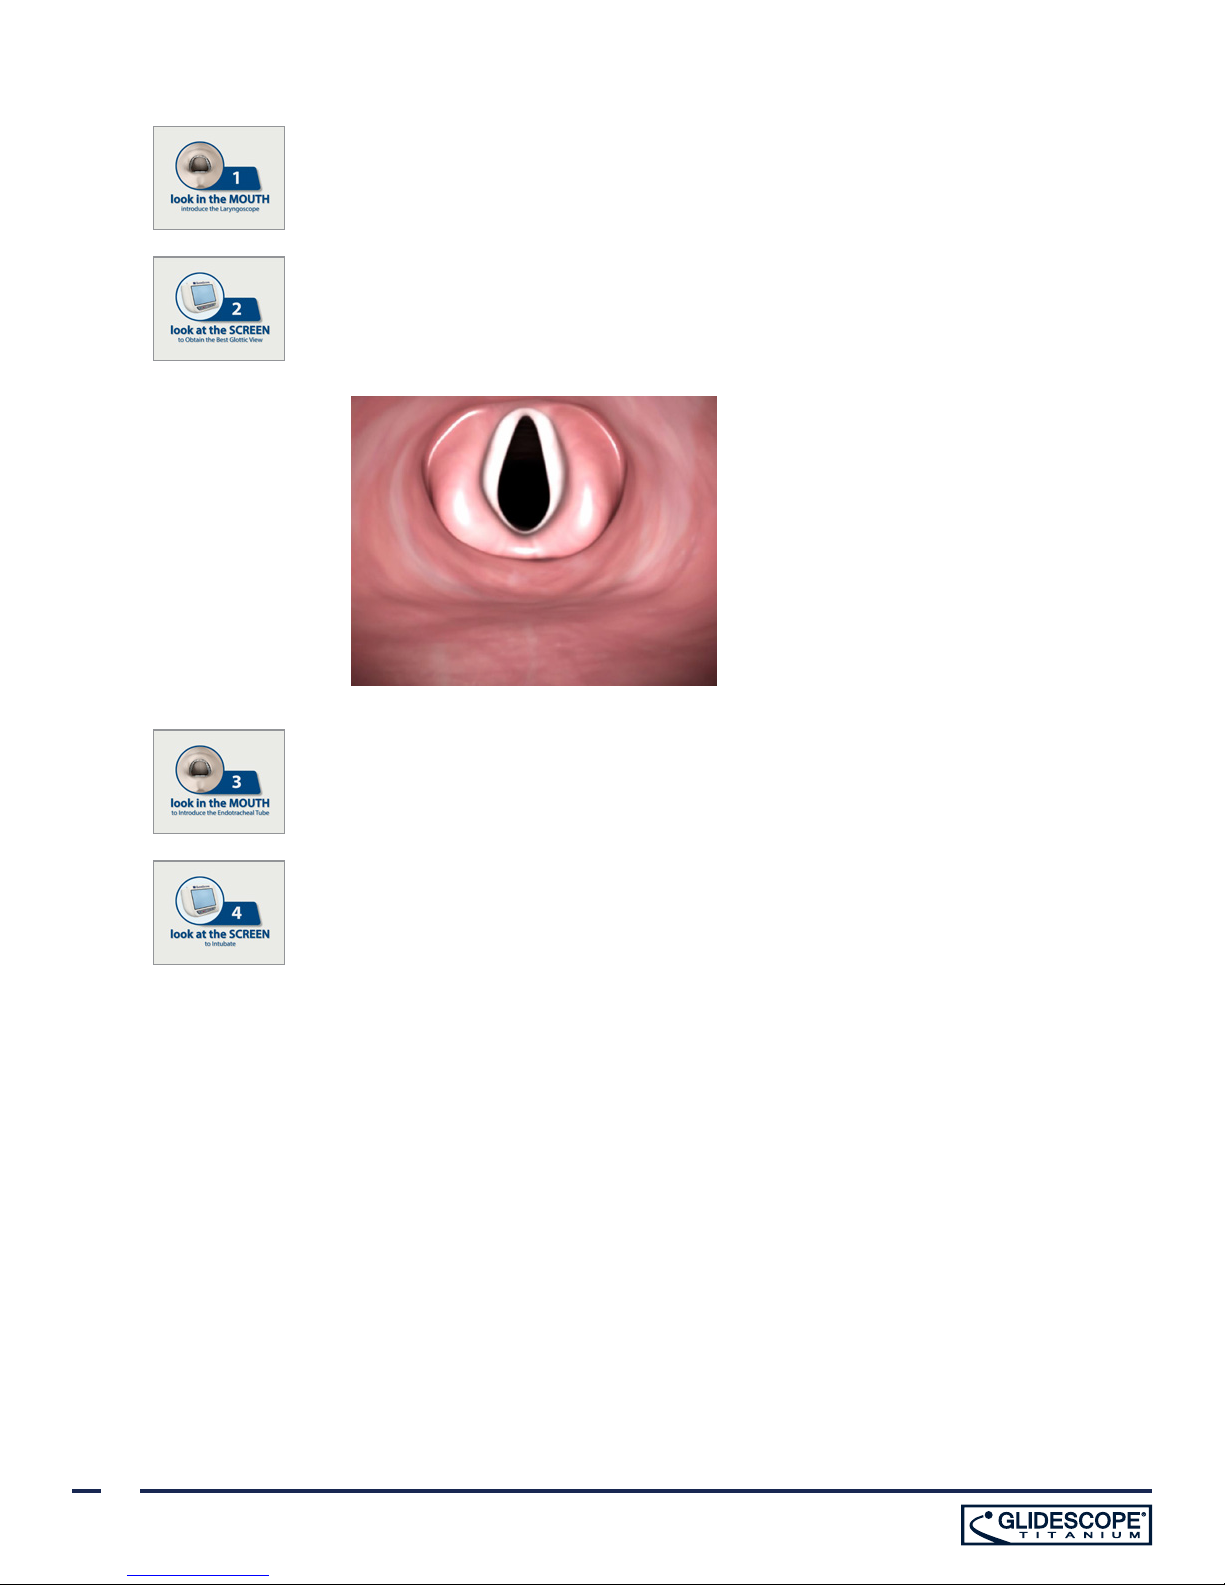
1. Look in the Mouth: With the video laryngoscope in the left hand, introduce it
into the midline of the oral pharynx.
2. Look at the Screen: Identify the epiglottis, and then manipulate the blade in
order to obtain the best glottic view.
Figure 14. Ideal Glottic View
3. Look in the Mouth: Carefully guide the distal tip of the tube into position near
the tip of the laryngoscope.
4. Look at the Screen: Complete the intubation, gently rotating or angling the tube
in order to redirect it as needed.
28
Page 35
PROCEDURE 3. USE THE RECORD & SNAPSHOT FEATURES (OPTIONAL)
WARNING
WARNING
Use only a passive-type USB flash drive. Do not use USB drives powered by another external source.
Use only a passive-type USB flash drive. Do not use USB drives powered by another external source.
The GlideScope Titanium system is equipped with video and audio recording features and the ability to save a
snapshot of the live display on the monitor. The GlideScope Titanium system saves this data to a USB flash drive,
and you can view the recordings or snapshots on the video monitor or a computer.
By default, audio recording is disabled on the GlideScope Titanium system. If you would like the system to record
audio in addition to video, complete the procedure Configure User Settings to enter the User Settings screen,
and then change the Audio Recording setting to On.
While recording, a number next to the icon indicates approximately what percentage of the USB flash drive has
been used. When the USB flash drive is full, recording stops.
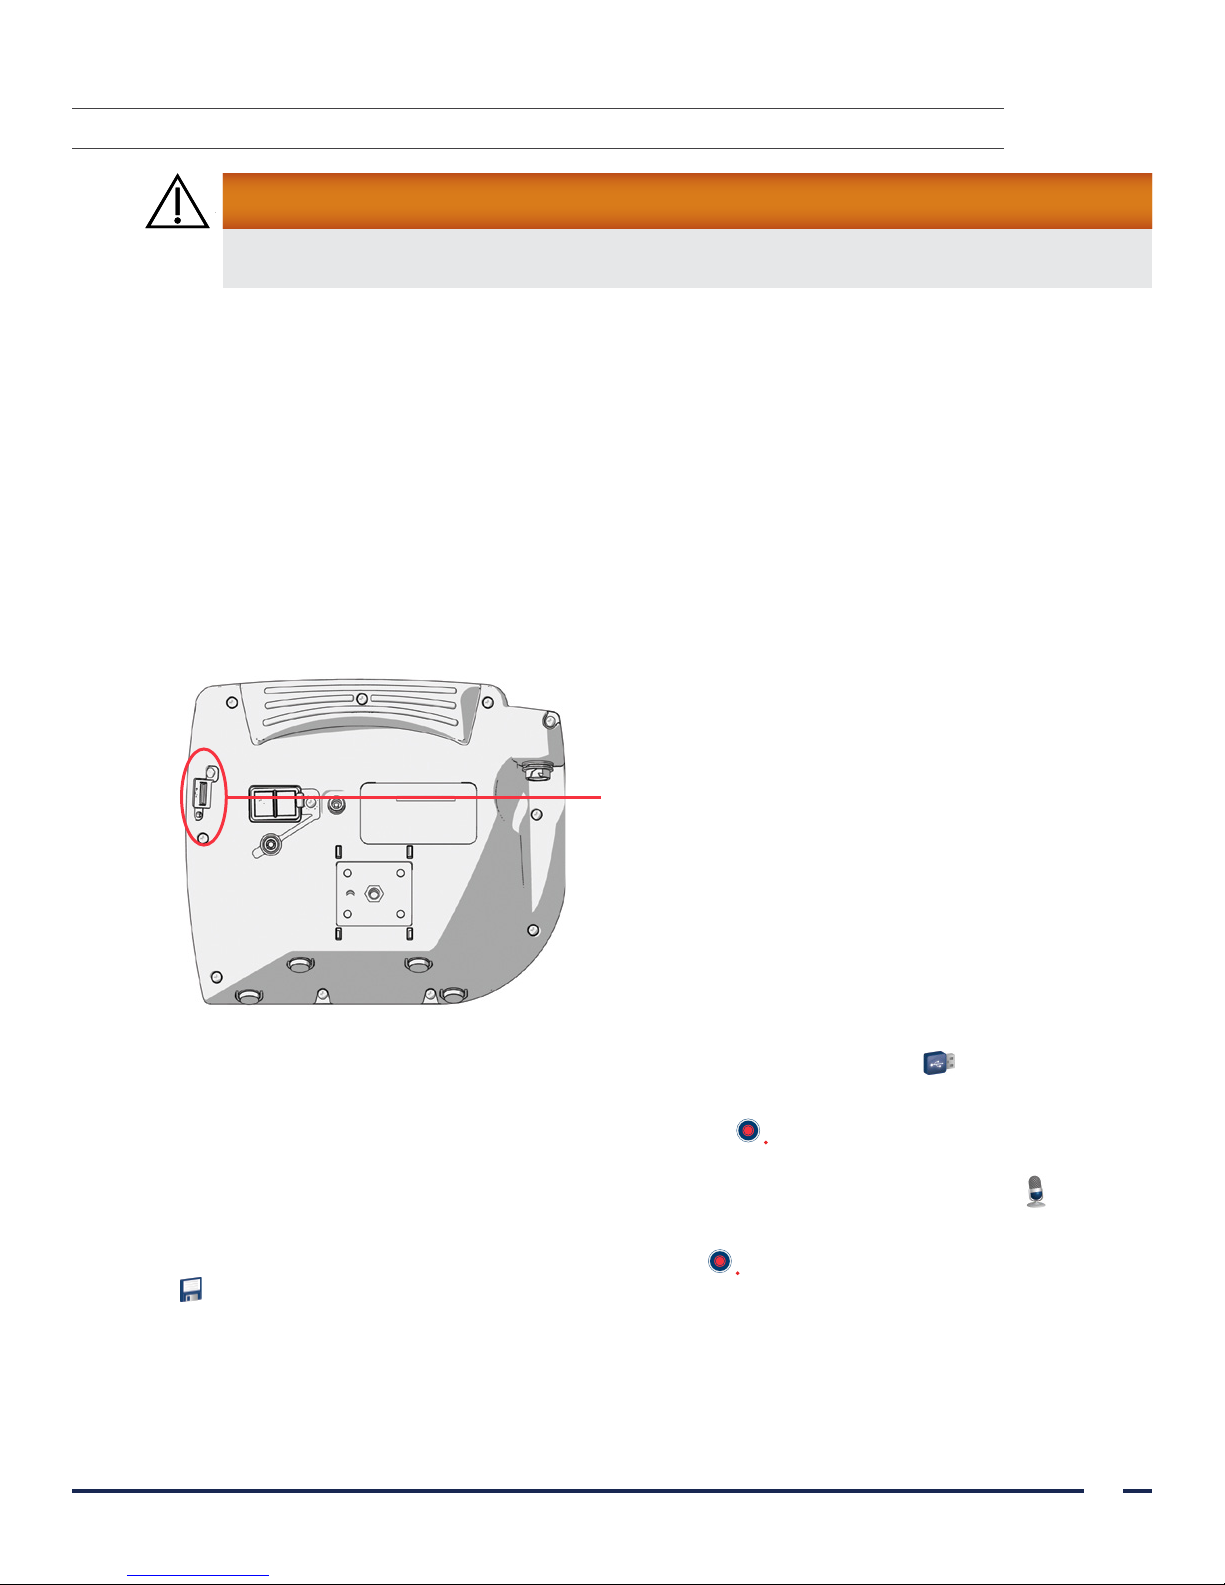
1. On the back of the monitor, remove the USB port cap, and then insert a USB flash drive into the port.
Note: If you do not insert a USB flash drive, the video recording, audio recording, and snapshot features will
not be available.
USB port
2. Ensure that the USB flash drive is detected by checking if the USB Flash Drive icon on the bottom of the
screen is displayed.
3. If you want to record the intubation, press the Record button . Video recording starts and is saved to the
USB flash drive.
If audio recording is enabled in the User Settings display, the Audio Recording is Active icon will
appear on the screen, and audio will be recorded with the video.
4. When you are finished recording, press the Record button again, and then wait for the Saving File icon
to disappear.
Note: If you remove the USB flash drive before the Saving File icon disappears, the recording will be lost.
Operations & Maintenance Manual: Using the Device
29
Page 36

5. If at any point you would like to save a photo of the live display to the USB flash drive, press the Snapshot
button , and then wait for the Saving Snapshot icon to disappear.
Note: If you remove the USB flash drive before the Saving Snapshot icon disappears, the photo will be lost.
6. If you would like to review the recorded files on the video monitor, complete the following procedure, Use
the Playback Feature (Optional).
If you would like to review the recorded files on a computer, insert the USB flash drive into the PC, and then
view the .avi or .jpg files.
Note:
If you are viewing the recorded file on a Windows® operating system (OS), use an application such as
Windows Media Player®.
If you are viewing the recorded video file on Mac OS®, use an application such as one of the following:
• MPlayerX (free in the App StoreSM)
• VLC® (free at http://www.videolan.org/vlc/index.html)
If you are viewing the recorded video file on iOS®, use an application such as one of the following:
• VLC® for iOS® (free in the App StoreSM)
• 8player lite (free in the App StoreSM)
• Media Player - PlayerXtreme™ HD (free in the App StoreSM)
30
Page 37
PROCEDURE 4. USE THE PLAYBACK FEATURE (OPTIONAL)
20140114_205213.jpg
20131101_132217.jpg
Tutorial
20140114_203419.avi
20140110_203355.avi
20130411_143605.avi
20131101_132115.avi
20130411_213043.avi
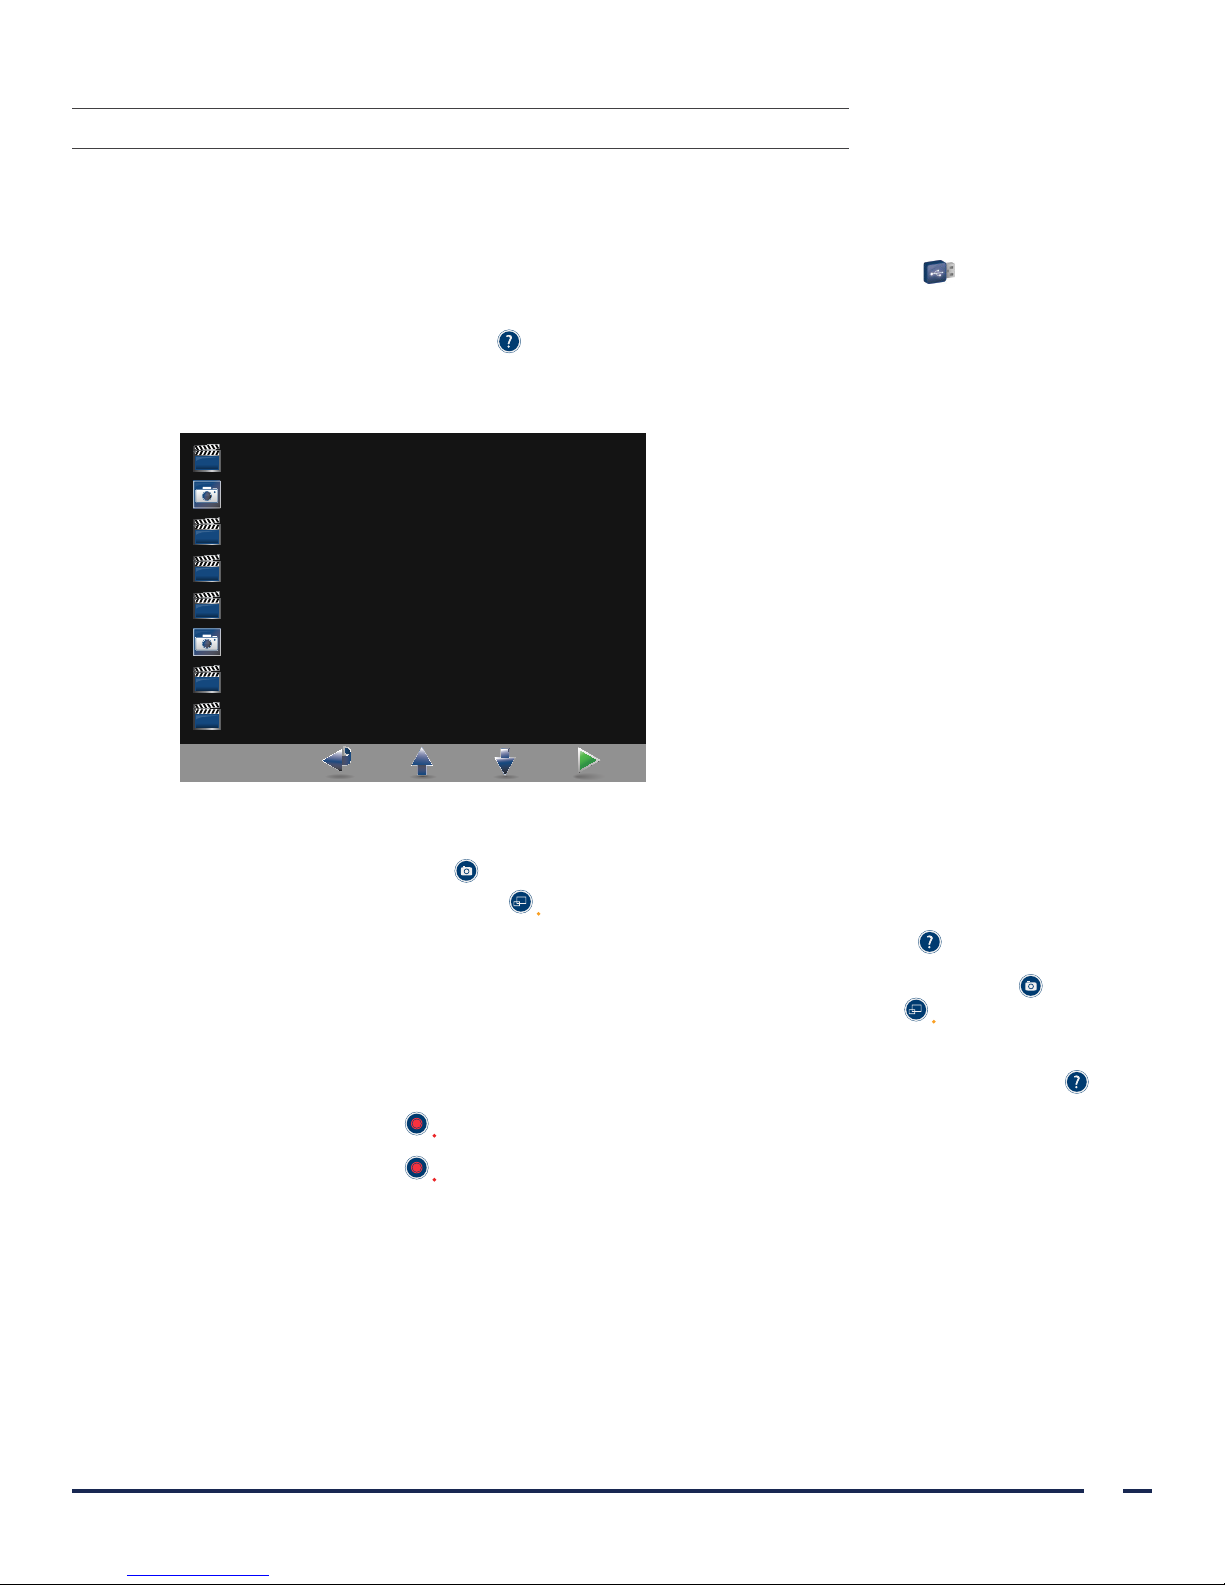
Recorded videos and snapshots on a USB flash drive can be viewed on the GlideScope Video Monitor.
1. On the back of the monitor, remove the USB port cap, and then insert a USB flash drive into the port.
2. Ensure that the USB flash drive is detected by checking if the USB Flash Drive icon on the bottom of the
screen is displayed.
3. Press and hold the Tutorial button 3 seconds or longer. The playback menu is displayed.
Figure 15. Playback Menu
4. Navigate the menu as follows:
5. When you have selected the item that you want to play, press the Tutorial button . Playback starts.
6. When the file is being played back and is displayed on the screen, press the Snapshot button to playback
7. If the file being played back is a video, pause and resume playback by pressing the Tutorial button .
8. Press the Record button to return to the playback menu.
9. Press the Record button again to close the playback menu.
• Press the Snapshot button to move up the list of playback files.
• Press the External Video button to move down the list of playback files.
the next file above the one currently displayed. Press the External Video button to play the next file
below the one currently displayed.
Operations & Maintenance Manual: Using the Device
31
Page 38
CLEANING & DISINFECTING
IMPORTANT
In this chapter, the term video cable refers to the cable for the reusable system, and the term Smart Cable
refers to the cable for the single-use system.
WARNING
Because the product will likely be contaminated with human blood or body fluids capable of
transmitting pathogens, all cleaning facilities must be in compliance with (U.S.) OSHA Standard
29 CFR 1910.1030 “Bloodborne Pathogens” or an equivalent standard. For more information, visit
www.osha.gov.
WARNING
Availability of cleaning, disinfection, and sterilization products varies by country, and Verathon®
is unable to test products in every market. For more information, please contact Verathon
Customer Care at 1.800.331.2313 or your local representative. For contact information, visit
verathon.com/contact-us.
WARNING
This product may only be cleaned, disinfected, or sterilized by using the approved processes
provided in this manual. Cleaning, disinfection, and sterilization methods listed are recommended by
Verathon based on efficacy or compatibility with component materials.
WARNING
The reusable Titanium video laryngoscope is considered a semi-critical device intended to contact
the airway. It must be thoroughly cleaned and undergo high-level disinfection after each use.
WARNING
Ensure that you follow the manufacturer’s instructions for handling or disposing of the cleaning,
disinfection, or sterilization solutions provided in this manual.
WARNING
Do not reuse, reprocess or resterilize single-use components. Reuse, reprocessing or resterilization
may create a risk of contamination of the device, cause patient infection or cross-infection.
32
Page 39
Cleaning and disinfecting the GlideScope Titanium system is an important part of using and maintaining the
system. Prior to each use, ensure that each system component has been cleaned, disinfected, or sterilized
according to the guidance provided in Table 7.
The availability and regulatory compliance of the cleaning, disinfection, and sterilization products provided in this
manual vary by region; ensure that you select products in accordance with your local laws and regulations.
Titanium single-use blades arrive sterilized by ethylene oxide, and they do not require cleaning, disinfection, or
sterilization prior to use. Dispose of single-use blades once they have been used. Do not attempt to disinfect and
reuse single-use video laryngoscopes.
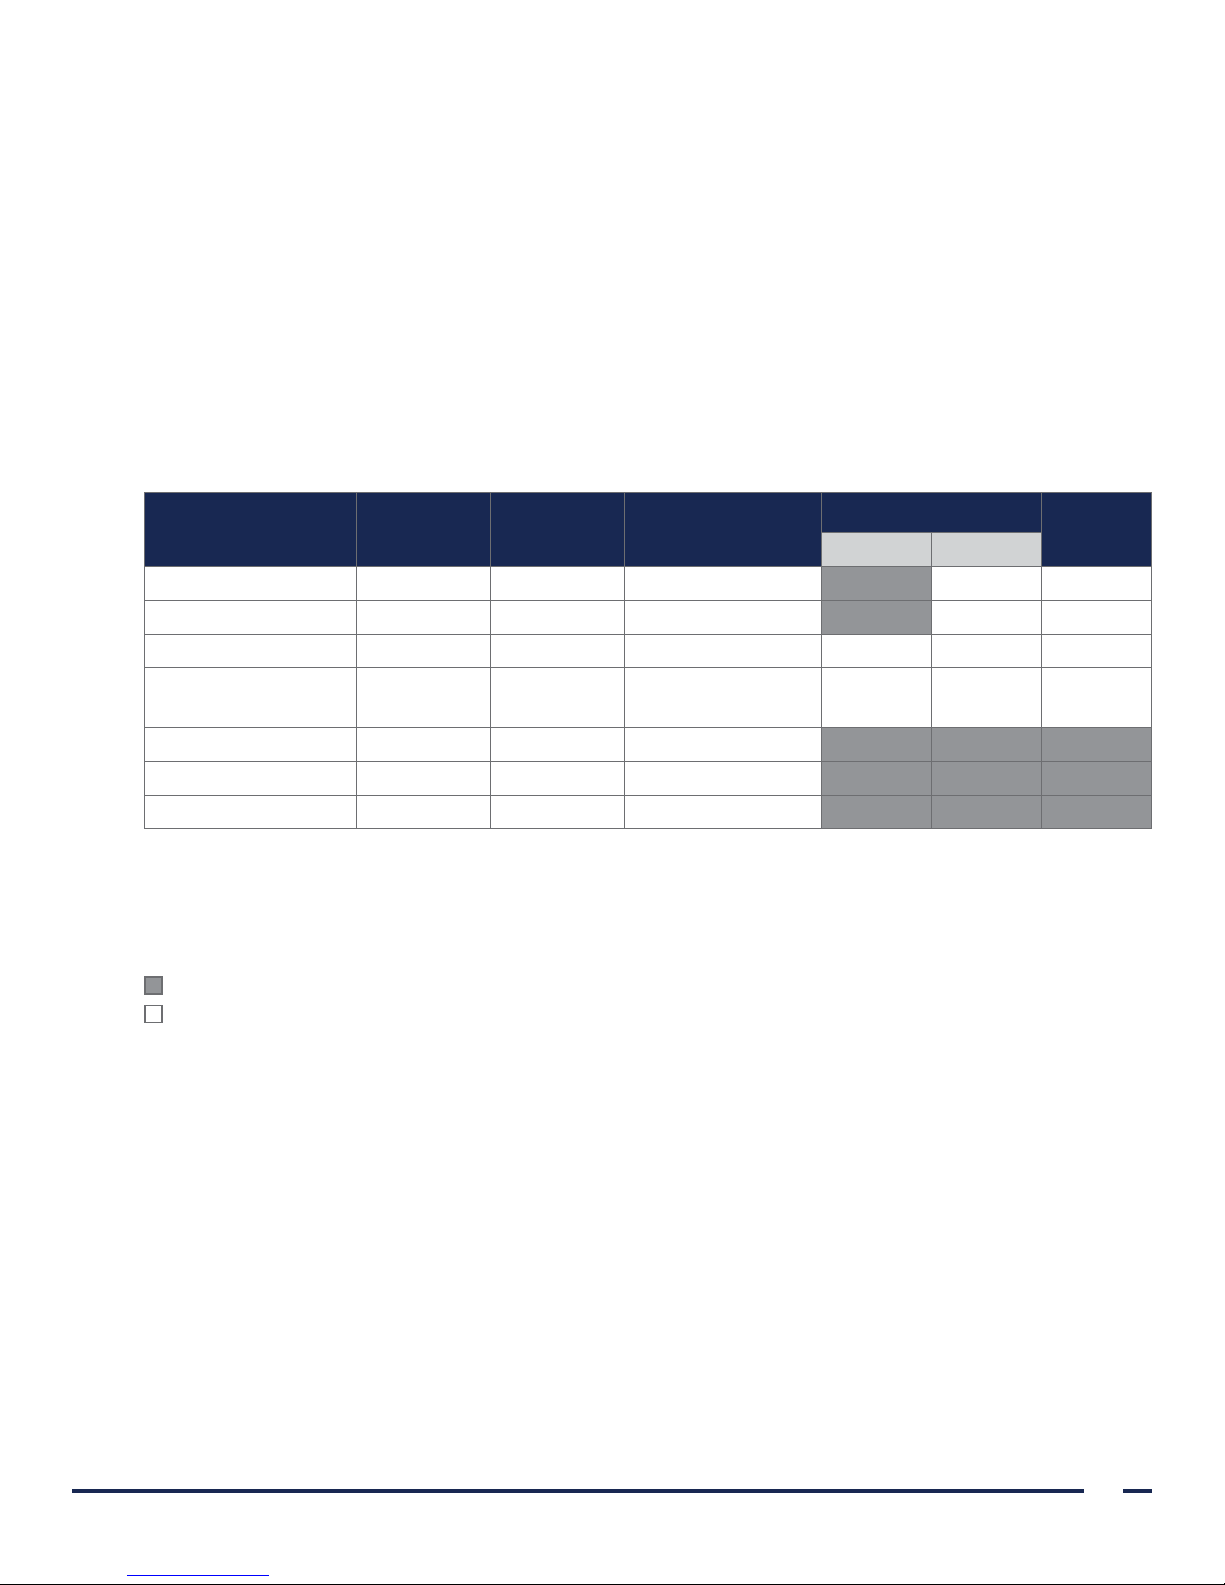
The following table describes the risk assessment for each system component, including the Spaulding’s/CDC
classification for the minimum required disinfection level.
Table 7. Titanium System Risk Assessment
DEVICE PACKAGED USE
SPAULDING’S/CDC
CLASSIFICATION
DISINFECTION LEVEL
STERILIZE
Low High
GlideRite® Rigid Stylet Nonsterile Reusable Semi-critical X
Blade Nonsterile Reusable Semi-critical X
Video cable Nonsterile Reusable Noncritical X*
GlideScope
Smart Cable
Cart
†
†
Monitor
Single-use blades
* The low-level disinfection solutions in this manual are not available in all geographic regions. If they are not available in your region, such as
the United States, use a high-level disinfection method only.
† Clean the video monitor or cart when visibly soiled and on a regular basis, as per a schedule established by the medical care facility or provider.
‡ Single-use blades may not be cleaned, disinfected, or sterilized. Dispose of single-use blades after use.
X Checked boxes show minimum disinfection level requirement.
Shaded areas indicate that the disinfection/sterilization level is not required/not compatible with the device materials.
Unshaded areas show permissible levels of disinfection or sterilization based on compatibility with the device materials.
Nonsterile Reusable Noncritical X*
Nonsterile Reusable Noncritical
Nonsterile Reusable Noncritical
‡
Sterile Single-use —
After reviewing Table 7, complete the following procedures to clean, disinfect, or sterilize the GlideScope
Titanium system components:
• Clean a Blade, Video Cable, or Smart Cable
• Disinfect a Blade, Video Cable, or Smart Cable
• Sterilize a Blade, Video Cable, or Smart Cable (Optional)
• Clean & Disinfect the GlideRite Rigid Stylet
• Clean the GlideScope Video Monitor
• Clean the GlideScope Premium Cart
Operations & Maintenance Manual: Cleaning & Disinfecting
33
Page 40
PROCEDURE 1. CLEAN A BLADE, VIDEO CABLE, OR SMART CABLE
WARNING
Cleaning is critical to ensuring the component is ready for disinfection. Failure to
properly clean the device could result in a contaminated instrument after completing the
disinfection procedure.
When cleaning, ensure all foreign matter is removed from the surface of the device. This allows the
active ingredients of the chosen disinfection method to reach all the surfaces of the device.
Use this procedure in order to clean the GlideScope Smart Cable, video cable, or reusable Titanium video laryngoscope.
By reducing as many hard-to-access areas as possible, all of the reusable GlideScope Titanium blades have been designed
to be easy to clean. It is critical to remove all traces of contamination from the component prior to completing disinfection
or sterilization procedures.
To significantly reduce the amount of effort needed to clean the system, do not let contaminant(s) dry on any
system component. Bodily contaminants tend to become securely attached to solid surfaces when dried, making
removal more difficult.
The reusable GlideScope Titanium blades and reusable system video cable are IPX8 compliant and can be
completely immersed in the recommended cleaning solutions. The GlideScope Smart Cable is IPX7 compliant and
may also be completely immersed in the solutions.
IMPORTANT
Do not use metal or abrasive brushes, scrub pads, or rigid tools when cleaning the reusable video
laryngoscope. The window that protects the camera and light can be scratched, permanently damaging
the device.
This product is heat-sensitive, and exposing the components to temperatures in excess of 60°C (140°F) will
cause damage to the electronics.
34
Page 41

Table 8. Cleaning Methods for Video Cables, Smart Cables, and Reusable VideoLaryngoscopes
CHEMICAL LEVEL COMPONENT CYCLES* CONDITIONS
Water temperature: 33– 40 °C (91–104°F)
Exposure: Spray all surfaces until drenched. Allow to remain wet
Blade 3000
for 3 minutes. Brush all surfaces.
Rinse: Rinse for 5 minutes under running water. While rinsing,
use a soft-bristled brush and a syringe to flush and brush any
hard-to-reach areas.
Water temperature: 33– 40 °C (91–104°F)
Exposure: Spray all surfaces until drenched. Allow to remain wet
for 5 minutes. Brush all surfaces. Rinse under running water for
3 minutes. Spray all surfaces until drenched. Allow to remain wet
for 10 minutes.
Video Cable 3000
Rinse: Rinse under running water for 5 minutes. Fully immerse
in water and agitate for 2 minutes. Before removing from water,
Metrex®
CaviCide
Cleaner
®
brush the cable with a soft-bristled brush. Remove from water
and flush the connectors with running water and a syringe. Fully
immerse in fresh water and agitate for 2 minutes. Rinse under
running water for 1 minute.
Water temperature: 33– 40 °C (91–104°F)
Getinge®
Tec Wash III
Metrex®
EmPower
Exposure: Spray all surfaces until drenched. Allow to remain wet
for 10 minutes. Brush all surfaces. Rinse under running water for
5 minutes. Spray all surfaces until drenched. Allow to remain wet
for 10 minutes.
Smart Cable 1500
Rinse: Rinse under running water for 5 minutes. Fully immerse
in water and agitate for 3 minutes. Before removing from water,
brush the cable with a soft-bristled brush. Remove from water
and flush the connectors with running water and a syringe. Fully
immerse in fresh water and agitate for 3 minutes. Rinse under
running water for 2 minutes.
Water temperature: 20–40°C (68 –104°F)
Exposure: Soak for 3 minutes. Brush all surfaces.
Rinse: Rinse for 3 minutes under running water.
Water temperature: 19–29°C (66–84°F)
†
Blade 3000
Cleaner
Video Cable 3000
Blade 3000
Exposure: Prepare solution at 1ounce/gallon (7.81 mL/L). Soak
Cleaner
™
Video Cable 3000
component for 3 minutes. Before removing from solution, brush
all surfaces and pay special attention to hard-to-reach areas.
Smart Cable 1500
Rinse: Rinse for 3 minutes under running water.
Operations & Maintenance Manual: Cleaning & Disinfecting
35
Page 42

CHEMICAL LEVEL COMPONENT CYCLES* CONDITIONS
Water temperature: 30– 40°C (86 –104° F)
Exposure: Prepare solution at 0.125–1ounce/gallon (1–8mL/L).
STERIS®
eSSENTIALS
Concentrates
Cleaner Blade 750
™
Soak component for 5 minutes. Before removing from solution,
brush all surfaces and pay special attention to hard-to-reach
areas. Use a syringe to flush the connector.
Rinse: Rinse for 3 minutes under running water. Flush the
connector with running water and a syringe.
Pro-Line
Solutions
EcoZyme
®
Metrex®
Cavi Wip es™
Wip’Anios
Premium
Clinell®
Universal
Sanitizing
Wipes
Sani Cloth®
Active Wipes
Cleaner
Cleaner
Cleaner
Cleaner
Cleaner
Blade 3000
Video Cable 3000
Smart Cable 1500
Video Cable 1500
Smart Cable 150 0
Video Cable 1500
Smart Cable 150 0
Video Cable 1500
Smart Cable 150 0
Video Cable 1500
Smart Cable 150 0
Water temperature: 19–29°C (66–84°F)
Exposure: Prepare solution at 1ounce/gallon (7.81 mL/L) in
30–40°C (86–104°F) water. Soak component for 5 minutes.
Before removing from solution, brush all surfaces and pay special
attention to hard-to-reach areas. Using a syringe, flush the
connectors.
Rinse: Rinse for 5 minutes under running water. Using a syringe,
flush the connectors.
Water temperature: N/A
Exposure: Use towelette(s) to remove all visible contamination
from the component. Using fresh towelette(s), wet all surfaces
and allow to remain wet for 3 minutes.
Rinse: N/A. Allow the component to thoroughly air dry.
Water temperature: N/A
Exposure: Use towelette(s) to remove all visible contamination
from the component. Using fresh towelette(s), wet all surfaces
and allow to remain wet for 5 minutes.
Rinse: N/A. Allow the component to thoroughly air dry.
Water temperature: N/A
Exposure: Use towelette(s) to remove all visible contamination
from the component. Using fresh towelette(s), wet all surfaces
and allow to remain wet for 5 minutes.
Rinse: N/A. Allow the component to thoroughly air dry.
Water temperature: N/A
Exposure: Use towelette(s) to remove all visible contamination
from the component. Using fresh towelette(s), wet all surfaces
and allow to remain wet for 5 minutes.
Rinse: N/A. Allow the component to thoroughly air dry.
* Value indicates number of compatibility cycles tested on the component. Exceeding the recommended number of cycles may affect the potential life of
the product.
† Do not use this solution to clean a GlideScope Smart Cable.
36
Page 43
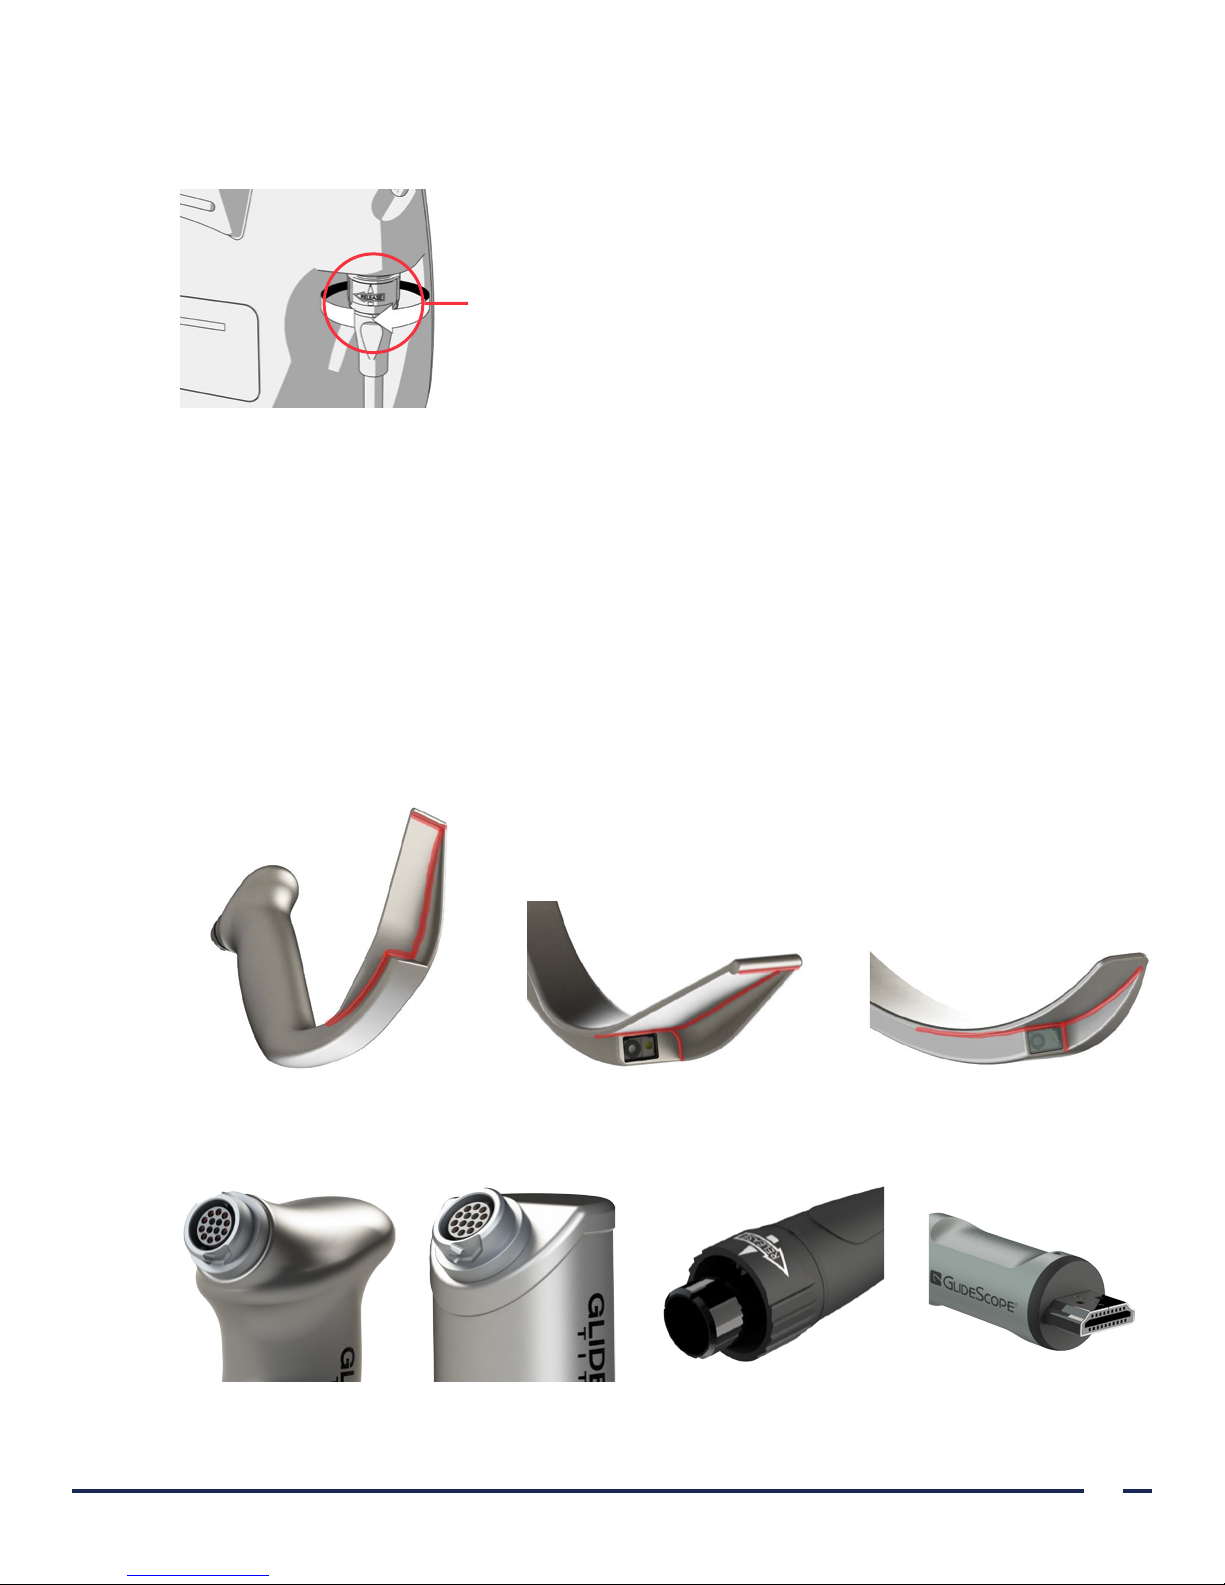
1. Ensure the video monitor has been turned off.
2. Detach the video cable from the monitor by turning the connector ring in the direction of the release arrow.
Connector ring
3. If you are cleaning a reusable system, detach the cable from the blade by rotating the connector ring in the
direction of the release arrow, and then pulling gently in order to disconnect the components.
If you are cleaning a single-use system, detach the cable from the blade by holding the GlideScope
Smart Cable connector in one hand and the blade handle in the other, and then pulling. Dispose of the
single-use blade.
4. If you are using a wipe method to clean the component, skip to Step 9.
5. Using the water temperature specified in Table 8, rinse the component in clean tap water and scrub with a
soft-bristled brush until all visible contamination has been removed.
If you are cleaning a reusable video laryngoscope, to prevent damage, use a cotton swab in order to clean
around the camera window. Pay extra attention to cleaning the areas highlighted in the following figures:
around the tip, inner corners, and camera.
LoPro T3 or T4 Blade LoPro T3 or T4 Blade MAC T3 or T4 Blade
6. Examine all connectors for contamination.
LoPro T3 or T4 Connector MAC T3 or T4 Connector Smart Cable ConnectorVideo Cable Connector
Operations & Maintenance Manual: Cleaning & Disinfecting
37
Page 44
7. If there is any visible sign of contamination in the connectors, use a long, soft-bristled brush or cotton swab
to remove it.
8. Prepare one of the approved cleaning solutions in Table 8 according to the solution manufacturer’s
instructions.
9. Expose the components to the cleaning solution according to the instructions in Table 8. The exposure
process and times vary depending on the solution and the component.
Note:
• If you are using Metrex® CaviCide®, spray additional solution as needed in order to ensure that the
component remains visibly wet for the duration of the exposure period(s).
• If you are using a wipe method, rewipe the component as needed in order to ensure that it remains visibly
wet for the duration of the exposure period. You may use multiple wipes as necessary.
10. If applicable for the cleaning solution, rinse the components according to the instructions in Table 8. The
rinsing process and times vary depending on the solution and the component.
WARNING
To reduce the risk of cytotoxic residual when cleaning with Metrex® CaviCide®, thoroughly rinse the
component as instructed in this manual.
11. Visually inspect the component for contamination. If there is any sign of contamination, restart the
procedure.
12. Using hospital-grade clean air, which is free from oils and residuals found in common compressed air, blow
out the connectors. This dries the connectors and removes any remaining residuals.
13. Using a clean, lint-free cloth, hospital-grade clean air, or a low-temperature dryer, dry the component.
Note: If you are using a wipe method, allow the component to thoroughly air dry.
14. Examine the component for any signs of damage. Reusable titanium blades should not have any signs of
damage other than minor surface scratches or discoloration of the metal as the result of use. If damage is
present, do not use the component, and contact Verathon® Customer Care.
The component should now be clean and free of contamination. Handle the product carefully to avoid
recontamination.
Note: Before each use, reusable video laryngoscopes must be high-level disinfected, and video cables and Smart
Cables must be low-level disinfected.
38
Page 45

PROCEDURE 2. DISINFECT A BLADE, VIDEO CABLE, OR SMART CABLE
Before each use, reusable video laryngoscopes must be high-level disinfected, and video cables and Smart Cables
must be low-level disinfected. Use the following instructions to disinfect the GlideScope Smart Cable, video cable,
or reusable Titanium video laryngoscope. Not all chemical solutions listed in Table 9 are compatible with each
component. Ensure that you select a chemical that is compatible with the component you are disinfecting.
In this procedure, the term pure water refers to water that is suitable for disinfection according to local
regulations and your medical facility.
IMPORTANT
Do not use metal or abrasive brushes, scrub pads, or rigid tools when disinfecting the reusable video laryngoscope.
The window that protects the camera and light can be scratched, permanently damaging the device.
This product is heat-sensitive, and exposing the components to temperatures in excess of 60°C (140°F) will
cause damage to the electronics.
When high-level disinfecting a blade, video cable, or Smart Cable, you may use a Medivators® CER
Optima1&2AER, DSD-201AER, or SSD-102AER system, provided you do the following:
• Use an approved high-level disinfectant from Table 9.
• Use a disinfectant that is compatible with the Medivators® system. For more information about chemical
compatibility, contact Medivators.
• Use the conditions provided in Table 9, such as temperature, exposure, and concentration.
• Do not expose the component to temperatures exceeding 60°C (140°F) on any cycle.
®
Table 9. Disinfection Methods for Video Cables, Smart Cables, and Reusable VideoLaryngoscopes
CHEMICAL
DISINFECTION
LEVEL
COMPONENT CYCLES* CONDITIONS
Conditioning: N/A
Clinell® Universal
Sanitizing Wipes
Video Cable 1500
†
Low
Smart Cable 150 0
Water temperature: N/A
Exposure: Using fresh towelette(s), wet all surfaces and
allow to remain wet for 6 minutes.
Rinse: N/A. Allow the component to thoroughly air dry.
Conditioning: N/A
Clorox® Bleach
Germicidal Wipes
Video Cable 3000
Low
Smart Cable 150 0
Water temperature: N/A
Exposure: Using fresh towelette(s), wet all surfaces and
allow to remain wet for 3 minutes.
Rinse: N/A. Allow the component to thoroughly air dry.
STERIS®
Revital-Ox™
Resert® XLHLD
Revital-Ox™
Resert® HLD/
Chemosterilant
Resert® XL HLD
Blade 3000
‡
High
‡
‡
Video Cable 3000
Smart Cable 150 0
Conditioning: 20°C (68°F) or higher
Water Temperature: 20°C (68°F) or higher
Exposure: Soak for 8 minutes, ensuring that all air bubbles
are removed from the surface of the component.
Rinse: (1) 1-minute immersion with agitation in pure
water. Ensure the connector is properly rinsed.
Operations & Maintenance Manual: Cleaning & Disinfecting
39
Page 46

CHEMICAL
STERIS® S40™
or S20™
DISINFECTION
LEVEL
High
COMPONENT CYCLES* CONDITIONS
Blade 675
Standard cycles in the following processors:
STERIS® SYSTEM 1® (outside U.S.)
Video Cable 600
Smart Cable 750
SYSTEM 1E® (in U.S.)
SYSTEM 1 EXPRESS (outside U.S.)
SYSTEM 1 PLUS (outside U.S.)
Conditioning: 20°C (68°F) or higher
Water Temperature: 20°C (68°F) or higher
Blade 3000
Exposure: Soak for 12 minutes, ensuring that all air
bubbles are removed from the surface of the blade.
ASP®
Cidex® OPA
Metrex®
MetriCide® OPA
Plus
High
High
Video Cable 3000
Smart Cable 150 0
Blade 3000
Video Cable 3000
Smart Cable 150 0
Rinse: (3) 1-minute immersions with agitation in pure water.
Conditioning: 20°C (68°F) or higher
Water Temperature: 20°C (68°F) or higher
Exposure: Soak for 10 minutes, ensuring that all air
bubbles are removed from the surface of the cable.
Rinse: (3) 1-minute immersions with agitation in pure water.
Conditioning: 20°C (68°F) or higher
Water Temperature: 20°C (68°F) or higher
Exposure: Soak for 12 minutes, ensuring that all air
bubbles are removed from the surface of the blade.
Rinse: (3) 1-minute immersions with agitation in pure water.
Conditioning: 20°C (68°F) or higher
Water Temperature: 20°C (68°F) or higher
Exposure: Soak for 10 minutes, ensuring that all air
bubbles are removed from the surface of the cable.
Rinse: (3) 1-minute immersions with agitation in pure water.
Conditioning: 25 ± 2°C (77 ± 4°F)
Water temperature: 33– 40 °C (91–104°F)
Metrex®
MetriCide® 28
§
High
Video Cable 3000
40
Blade 3000
Exposure: Soak for 20 minutes, ensuring that all air
bubbles are removed from the surface of the blade.
Rinse: (3) 3-minute immersions in pure water, while
agitating, flushing, and brushing with a sterile,
soft-bristled brush.
Conditioning: 25 ± 2°C (77 ± 4°F)
Water temperature: 33– 40 °C (91–104°F)
Exposure: Soak for 20 minutes, ensuring that all air
bubbles are removed from the surface of the cable.
Rinse: (3) 1-minute immersions in pure water, while
agitating, flushing, and brushing with a sterile,
soft-bristled brush.
Page 47

CHEMICAL
DISINFECTION
LEVEL
COMPONENT CYCLES* CONDITIONS
Conditioning: 20 ± 2°C (68 ± 4°F)
Water Temperature: 33– 40°C (91–104°F)
Sultan®
Healthcare
Sporox® II
§
High Video Cable 3000
Exposure: Soak for 30 minutes, ensuring that all
air bubbles are removed from the surface of the cable.
Following soak, brush and flush. Repeat 30-minute soak.
Rinse: (3) 3-minute immersions with brushing and
flushing in pure water.
Blade 100
Concentration: 850 ± 100 parts per million
Conditioning: 28–32°C (82–90°F)
Medivators®
Rapicide® PA
30°C
High
Video Cable 100
Smart Cable 100
Exposure: 5 minutes in a Medivators® Advantage Plus AER
reprocessing system with the following configuration:
• Hookup: 2-8-002HAN Rev. B
• Parameter: 1-24-010 C DISF
* Value indicates number of compatibility cycles tested on the component. Exceeding the recommended number of cycles may affect the potential life of
the product.
† Clinell® Universal Sanitizing Wipes are not available in all geographic regions, such as the United States.
‡ This chemical may cause discoloration of metal components, but the discoloration does not affect system efficacy or functionality.
§ Do not use this solution to disinfect a GlideScope Smart Cable.
1. Ensure the video laryngoscope, video cable, or Smart Cable has been properly cleaned, according to the
procedure Clean a Blade, Video Cable, or Smart Cable.
2. Prepare and condition the disinfection solution according to the solution manufacturer’s instructions and the
conditions stated in Table 9.
3. Disinfect the component according to the conditions stated in Table 9. The exposure process and times vary
depending on the solution and the component.
Note: If you are using a wipe method, rewipe the component as needed in order to ensure that it remains
visibly wet for the duration of the exposure period. You may use multiple wipes as necessary.
4. Rinse the component according to the conditions stated in Table 9. The rinsing process and times vary
depending on the solution and the component.
5. Dry the component by using a sterile cloth, hospital-grade clean air, or a low-temperature dryer.
Note: If you are using a wipe method, allow the component to thoroughly air dry.
6. Examine the component for any signs of damage. Reusable titanium blades should not have any signs of
damage other than minor surface scratches or discoloration of the metal as the result of use. If damage is
present, do not use the component, and contact Verathon® Customer Care.
7. Store the component in a clean environment.
Operations & Maintenance Manual: Cleaning & Disinfecting
41
Page 48
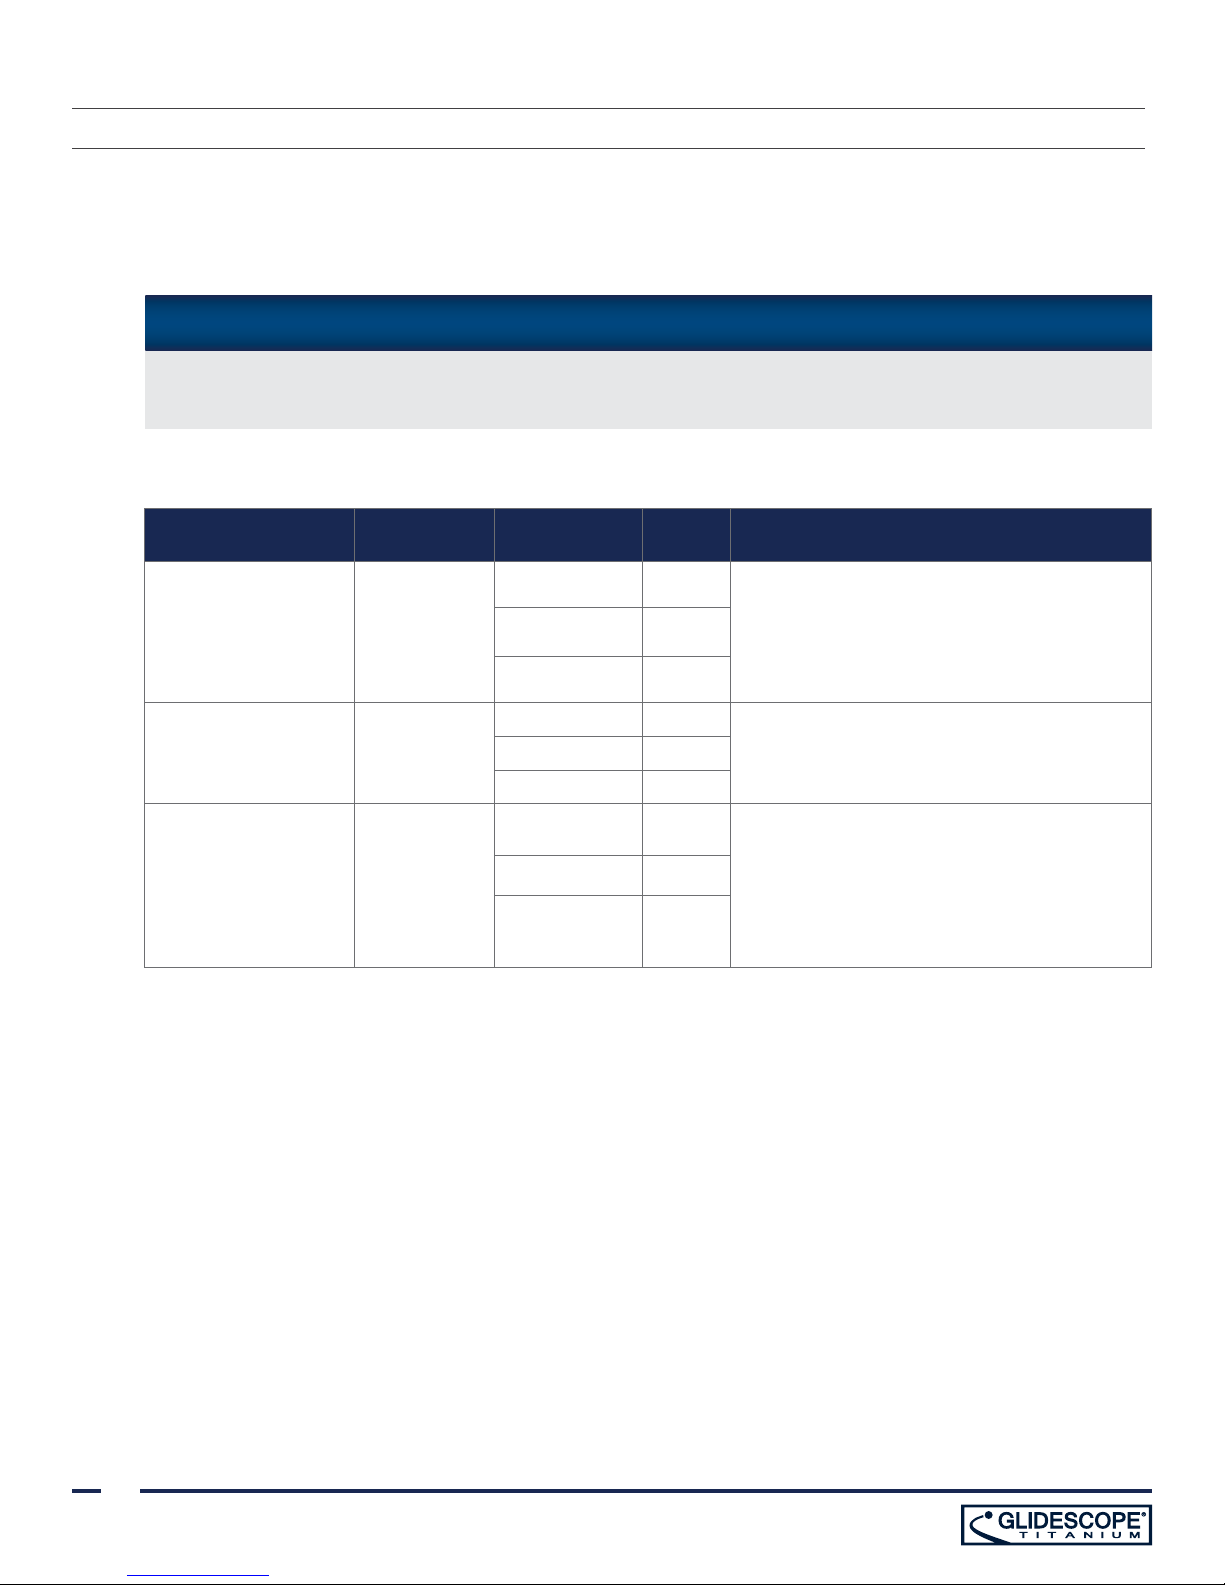
PROCEDURE 3. STERILIZE A BLADE, VIDEO CABLE, OR SMART CABLE (OPTIONAL)
Reusable Titanium video laryngoscopes are considered to be semi-critical devices; therefore, sterilization of the
blade, video cable, or GlideScope Smart Cable is optional. Your medical care facility or provider may require
sterilization of these components prior to use. These components use an identical sterilization process, so you
may use the following instructions to sterilize any component.
IMPORTANT
This product is heat-sensitive, and exposing the components to temperatures in excess of 60°C (140°F) will
cause damage to the electronics.
Table 10. Sterilization Methods for Video Cables, Smart Cables, and Reusable VideoLaryngoscopes
CHEMICAL
STERIS® S40™
or S20™
DISINFECTION
LEVEL
High/
Sterilization
COMPONENT CYCLES
Blade 675
Video Cable 600
Smart Cable 750
*
CONDITIONS
Standard cycles in the following processors:
STERIS® SYSTEM 1® (outside U.S.)
SYSTEM 1E® (in U.S.)
SYSTEM 1 EXPRESS (outside U.S.)
SYSTEM 1 PLUS (outside U.S.)
Blade 125
STERIS® Vaprox® HC Sterilization
Video Cable 125
Non-lumen cycle in any STERIS® Amsco®
V-PRO® low-temperature sterilization system.
Smart Cable 100
Blade 125
STERRAD® 100S (in U.S.)
STERRAD® 100S short cycle (outside U.S.)
ASP® Hydrogen
Peroxide Gas Plasma
Sterilization
Video Cable 125
Smart Cable 100
STERRAD® NX standard cycle
STERRAD® 100NX standard cycle
STERRAD® 50
STERRAD® 200 short cycle
* Value indicates number of compatibility cycles tested on the component. Exceeding the recommended number of cycles may affect the
potential life of the product.
1. Ensure that the component has been properly cleaned according to the procedure Clean a Blade, Video
Cable, or Smart Cable.
2. Package the component according to the instructions provided by the manufacturer of the sterilization
system (Example: trays, pouches, or wraps).
3. Sterilize the component according to the manufacturer’s instructions or according to the conditions stated in
Table 10.
4. Examine the component for any signs of damage. Reusable titanium blades should not have any signs of
damage other than minor surface scratches or discoloration of the metal as the result of use. If damage is
present, do not use the component, and contact Verathon® Customer Care.
5. Store the component in a clean environment that is appropriate for sterile equipment.
42
Page 49

PROCEDURE 4. CLEAN & DISINFECT THE GLIDERITE RIGID STYLET
The GlideRite® Rigid Stylet is a reusable device that requires cleaning and either high-level disinfection or
sterilization prior to use.
In this procedure, the term pure water refers to water that is suitable for disinfection according to local
regulations and your medical facility.
Table 11. Cleaning and Disinfection Methods for the GlideRite Rigid Stylet
METHOD LEVEL CYCLES* CONDITIONS
Water temperature: 33– 40 °C (91–104°F)
Exposure: Spray all surfaces until drenched. Allow to
Metrex® CaviCide
®
Cleaner 3000
remain wet for 3 minutes. Brush all surfaces.
Rinse: Rinse for 5minutes under running water. While
rinsing, use a soft-bristled brush and a syringe to flush and
brush any hard-to-reach areas.
Water temperature: 20–40°C (68 –104°F)
Getinge® Tec Wash III Cleaner 3000
Metrex® EmPower
Pro-Line Solutions
EcoZyme
Metrex®
MetriCide®28
™
®
Cleaner 3000
Cleaner 3000
High 3000
Exposure: Soak for 3 minutes. Brush all surfaces.
Rinse: Rinse for 3 minutes under running water.
Water temperature: 19–29°C (66–84°F)
Exposure: Prepare solution at 1ounce/gallon (7.81 mL/L).
Soak component for 3minutes. Before removing from
solution, brush all surfaces and pay special attention to
hard-to-reach areas.
Rinse: Rinse for 3 minutes under running water.
Water temperature: 19–29°C (66–84°F)
Exposure: Prepare solution at 1ounce/gallon (7.81 mL/L) in
30–40°C (86–104°F) water. Soak component for 5minutes.
Before removing from solution, brush all surfaces and pay
special attention to hard-to-reach areas. Using a syringe,
flush the connectors.
Rinse: Rinse for 5minutes under running water.
Conditioning: 23–27°C (73–81°F)
Water temperature: 33– 40 °C (91–104°F)
Exposure: Soak for 20 minutes, ensuring that all air bubbles
are removed from the surface of the component.
STERIS® Revital-Ox™
Resert® XLHLD
Revital-Ox™ Resert®
HLD/Chemosterilant
Resert® XL HLD
†
High 3000
†
†
Operations & Maintenance Manual: Cleaning & Disinfecting
Rinse: (3) 3-minute immersions in pure water, while agitating,
flushing, and brushing with a sterile, soft-bristled brush.
Conditioning: 20°C (68°F) or higher
Water Temperature: 20°C (68°F) or higher
Exposure: Soak for 8 minutes, ensuring that all air bubbles
are removed from the surface of the component.
Rinse: (1) 1-minute immersion with agitation in pure water.
43
Page 50

METHOD LEVEL CYCLES* CONDITIONS
Conditioning: 20°C (68°F) or higher
ASP®
Cidex® OPA
Metrex®
MetriCide® OPA Plus
®
Medivators
Rapicide®
PA 30°C
STERIS® S40™
or S20™
ASP® Hydrogen
Peroxide Gas Plasma
High 3000
High 3000
High 100
High 675
Sterilization 500
Water Temperature: 20°C (68°F) or higher
Exposure: Soak for 12 minutes, ensuring that all air bubbles
are removed from the surface of the component.
Rinse: (3) 1-minute immersions with agitation in pure water.
Conditioning: 20°C (68°F) or higher
Water Temperature: 20°C (68°F) or higher
Exposure: Soak for 12 minutes, ensuring that all air bubbles
are removed from the surface of the component.
Rinse: (3) 1-minute immersions with agitation in pure water.
Concentration: 750–950 parts per million
Conditioning: 28–32°C (82–90°F)
Exposure: 5 minutes in a Medivators® Advantage Plus AER
reprocessing system with the following configuration:
• Hookup: 2-8-002HAN Rev. B
• Parameter: 1-24-010 C DISF
Standard cycles in the following processors:
STERIS® SYSTEM 1® (outside U.S.)
SYSTEM 1E® (in U.S.)
SYSTEM 1 EXPRESS (outside U.S.)
SYSTEM 1 PLUS (outside U.S.)
STERRAD® 100S (in U.S.)
STERRAD® 100S short cycle (outside U.S.)
STERRAD® NX standard cycle
STERRAD® 100NX standard cycle
STERRAD® 50
STERRAD® 200 short cycle
STERIS® Vaprox®HC Sterilization 500
Autoclave
(steam cycle)
* Value indicates number of compatibility cycles tested. Exceeding the recommended number of cycles may affect the potential life of the
product.
† This chemical may discolor metal, but the discoloration does not affect efficacy or functionality.
Sterilization 300
44
Non-lumen cycle in any STERIS® Amsco® V-PRO®
low-temperature sterilization system.
Temperature: 132–137° C (270 –279 °F)
Exposure: 4–18 minutes
Page 51
CLEAN THE STYLET
1. Using the water temperature specified in Table 11, rinse the stylet in clean tap water and scrub it with a
soft-bristled brush until all visible contamination has been removed.
2. Prepare one of the approved cleaning solutions in Table 11 according to the solution manufacturer’s
instructions.
3. Expose the components to the cleaning solution according to the instructions in Table 11.
Note: If you are using Metrex® CaviCide®, spray additional solution as needed in order to ensure that the
stylet remains visibly wet for the duration of the exposure period(s).
4. Rinse the stylet according to the instructions in Table 11.
WARNING
To reduce the risk of cytotoxic residual when cleaning with Metrex® CaviCide®, thoroughly rinse the
component as instructed in this manual.
5. Visually inspect the stylet for contamination. If there is any sign of contamination, restart the procedure.
6. Using a clean, lint-free cloth, hospital-grade clean air, or a low-temperature dryer, dry the stylet.
The component should now be clean and free of contamination. Handle the product carefully to avoid
recontamination.
DISINFECT OR STERILIZE THE STYLET
7. Ensure the stylet has been properly cleaned according to the previous steps.
8. Prepare and condition the disinfection or sterilization solution according to the solution manufacturer’s
instructions and the conditions stated in Table 11.
9. Disinfect or sterilize the stylet according to the conditions stated in Table 11.
10. Rinse the stylet according to the conditions stated in Table 11.
11. Dry the stylet by using a sterile cloth, hospital-grade clean air, or a low-temperature dryer.
12. Visually inspect the stylet and ensure that there are no signs of damage or cracking. If the stylet is damaged,
discard it and contact Verathon® Customer Care to order a new stylet.
13. Store the stylet in a clean environment.
Operations & Maintenance Manual: Cleaning & Disinfecting
45
Page 52
PROCEDURE 5. CLEAN THE GLIDESCOPE VIDEO MONITOR
IMPORTANT
Ensure that you do not use any abrasive substances, brushes, pads, or tools when cleaning the video monitor
screen. The screen can be scratched, permanently damaging the device.
Clean the video monitor when it is visibly soiled and on a regular basis, as per a schedule established by the
medical care facility or provider.
1. Turn off the GlideScope Video Monitor, and then unplug the device.
2. Using 70% isopropyl alcohol (IPA),* Metrex® CaviWipes™,* AHP® Oxivir®,* or PDI® Chlorascrub™,* wipe the
exterior of the video monitor.
* Tested for 100 compatibility cycles. Exceeding the recommended number of cycles may affect the potential life of the product.
PROCEDURE 6. CLEAN THE GLIDESCOPE PREMIUM CART
Clean the cart when it is visibly soiled and on a regular basis, as per a schedule established by the medical care
facility or provider.
Table 12. Cleaning Methods for the GlideScope Premium Cart*
PRIMARY ACTIVE INGREDIENT
†
BRAND NAME CONCENTRATION
Sodium hypochlorite Clorox® Bleach 0.16% (1600ppm)
Virox® Technologies Accel® TB Wipes
Hydrogen peroxide
0.5%
Diversey® Oxivir® TB Wipes
Isopropyl alcohol — 70%
Quaternary ammonium
compound (alcohol-based)
* All solutions have been tested for 100 compatibility cycles. Exceeding the recommended number of cycles may affect the potential life of the
product.
† See solution manufacturer’s label for additional active and inactive ingredients.
PDI® Super Sani-Cloth® Germicidal Disposable Wipes 0.5%
Metrex® Cavi Wip es™ 0.28%
1. If you are using bleach, prepare the solution to the concentration indicated in Table 12.
Note: If you are using a product containing 5% bleach, dilute 120mL (4ounces) of bleach in 3.8L (1 gallon)
of water.
2. Using one of the solutions in Table 12, expose the cart to the cleaning solution according to the solution
manufacturer’s instructions.
46
Page 53

MAINTENANCE & SAFETY
PERIODIC INSPECTIONS
Periodic inspections should be performed to ensure safe and effective operation, in addition to performing
routine inspection by the user before and after every use. It is recommended that an operator familiar with the
instrument perform a full visual inspection of all components at least every three months. The inspector should
check the system for the following:
• External damage to the equipment
• Damage to the power supply or adapter
• Damage to the connectors or cable insulation
Report any suspected defects to Verathon® Customer Care at:
Phone: 800.331.2313 (U.S. and Canada)
+1.425.867.1348 (International)
Email: [email protected]
ELUTION COMPATIBILITY
For use with GlideScope Titanium reusable blades, Verathon® has completed testing of compatibility with a
1%sodium dodecyl sulphate (SDS) solution with pH11.0.
The SDS solution is commonly utilized in Europe as an eluting solution to collect residual protein samples from
medical tools or devices that are cleaned after contacting patient tissue. The protein sample solution is then
examined as a verification of the hospital cleaning process.
The testing concluded that 1% SDS solution with pH 11.0 is chemically compatible with the reusable blades and
gives no adverse results when performing repeated 30-minute soaking for 100cycles.
GLIDESCOPE VIDEO MONITOR BATTERY
Under normal operating conditions, the monitor battery will last 2–3 years, or approximately 500charge and
discharge cycles. For more information about the battery, see Battery Specifications.
The battery is not user-replaceable. In case of battery malfunction, do not attempt to replace the monitor
battery. Any attempts to replace the battery by unauthorized service technicians may cause serious harm to the
user and will void the warranty. Please contact your Verathon Customer Care representative for more information
on battery replacement.
Operations & Maintenance Manual: Maintenance & Safety
47
Page 54

SYSTEM SOFTWARE
Verathon® may release software upgrades for the GlideScope Video Monitor. Software upgrades are supplied
directly by Verathon or an authorized representative, and installation instructions are provided with the upgrade.
Do not perform any software upgrades from third-party vendors or attempt to modify the existing software.
Doing so may damage the monitor and void the warranty.
For information about software language options, see Language Settings on page 7.
DEVICE REPAIR
The GlideScope Titanium system components are not user-serviceable. Verathon® does not make available any
type of circuit diagrams, component parts lists, descriptions, or other information that would be required for
repairing the device and related accessories. All service must be performed by a qualified technician.
If you have any questions, contact your local Verathon representative or Verathon Customer Care.
WARNING
No modification of this equipment is allowed.
WARNING
Electric shock hazard. Do not attempt to open the system components. This may cause serious
injury to the operator or damage to the instrument and will void the warranty. Contact Verathon
Customer Care for all servicing needs.
DEVICE DISPOSAL
The GlideScope Titanium instrument and related devices may contain batteries and other environmentally
hazardous materials. When the instrument has reached the end of its useful service life, it must be disposed of in
accordance with WEEE requirements. Coordinate disposal through your Verathon Service Center, or alternatively,
follow your local protocols for hazardous waste disposal.
48
Page 55

WARRANTY
Verathon® includes a one-year warranty when you buy a GlideScope Titanium system. You may also purchase a
Premium Customer CareSM warranty that extends your warranty from the date of purchase.
ORIGINAL FIRST YEAR TOTAL CUSTOMER CARE WARRANTY
Verathon warrants the GlideScope Titanium system against defects in material and workmanship. This warranty
applies for one (1) year from the date of shipment from Verathon. This warranty applies only to the original
purchaser of the GlideScope system.
Verathon is firmly committed to providing our customers with best-in-class, reliable products through authorized
dealers. Our policy is to honor product warranties and to perform services only on products purchased from an
authorized Verathon dealer. If you purchase a Verathon product or system components from an unauthorized
dealer or if the original factory serial number has been removed, defaced or altered, your Verathon warranty will
not be valid. Purchasing Verathon products from unauthorized entities could result in receipt of product that is
counterfeit, used, defective, or not intended for use in your region.
If a customer’s system requires service or repair, Verathon will, at its discretion, either repair or replace the
customer’s unit and provide a loaner unit within one (1) business day from the date of customer service
notification. The customer agrees to send the defective unit to Verathon (cleaned and disinfected as appropriate)
upon receipt of the loaner unit, and the customer agrees to return the loaner unit within two (2) business days of
receipt of the repaired unit.
• This warranty provides coverage for damage from accidental drops or mishandling. It does not cover
damage due to deliberate mishandling.
• This warranty does not apply if the product has been damaged due to, or as the result of, service or
modification by anyone other than an authorized Verathon Service Center.
• This warranty does not apply if there is evidence of the equipment being exposed to temperatures in
excess of 60°C (140°F).
• All exchanged parts become property of Verathon.
The product shall be used in accordance with the instructions contained in this manual. Consumable items
(e.g., single-use blades) shall be used in conformance with Verathon product specifications. Consumable items
are not covered under this warranty.
WHAT IS COVERED?
Warranty coverage applies to the GlideScope Titanium system:
• GlideScope Video Monitor
• GlideScope Smart Cable (single-use system only)
• Reusable video cable (reusable system only)
• Reusable GlideScope Titanium video laryngoscope (reusable system only)
Additional reusable video laryngoscopes, video monitors, or video cables purchased either singularly or as a part
of a system are warranted separately.
Operations & Maintenance Manual: Warranty
49
Page 56

PREMIUM CUSTOMER CARE WARRANTY
The Premium Customer CareSM warranty from Verathon® may be extended from the date of purchase.
DISCLAIMER OF ADDITIONAL WARRANTIES
There are no understandings, agreements, representations of warranties expressed or implied (including
warranties of merchantability or fitness for a particular purpose) other than those set forth in this chapter. The
contents of this manual do not constitute a warranty.
Some states disallow certain limitations on applied warranties. The purchaser should consult state law if there is a
question regarding this disclaimer. The information, descriptions, recommendations, and safety notations in this manual
are based upon Verathon experience and judgment with GlideScope systems. The contents of this manual should not be
considered to be all-inclusive or to cover all contingencies.
50
Page 57
PRODUCT SPECIFICATIONS
SYSTEM SPECIFICATIONS, STANDARDS, & APPROVALS
Table 13. Titanium System Specifications
GENERAL SPECIFICATIONS
Classification: Electrical Class II, Applied Part BF
Line voltage: Range: 100–240 VAC, 50 and 60 Hz. Connect to a medical-grade power supply
DC power supply: 12V DC, 2.5A max
Fuse: Internal 2.5A hold / 5A trip, 15V max
Video monitor IP54
Ingress protection
against water:
Expected product life:
Temperature: 10 to 35°C (50 to 95°F)
Relative humidity: 0 to 95%
Atmospheric pressure: 540 –1060 hPa
Temperature: -20 to 40°C (-4 to 104°F)
Relative humidity: 0 to 95%
Atmospheric pressure: 440–1060 hPa
Single-use blade IPX4
GlideScope Smart Cable IPX7
Reusable blade and video cable IPX8
Single-use blade 1 use or 3-year shelf life
Reusable blade 3 years or 3000 cycles
OPERATING & STORAGE SPECIFICATIONS
Operating Conditions
Shipping & Storage Conditions
Operations & Maintenance Manual: Product Specifications
51
Page 58
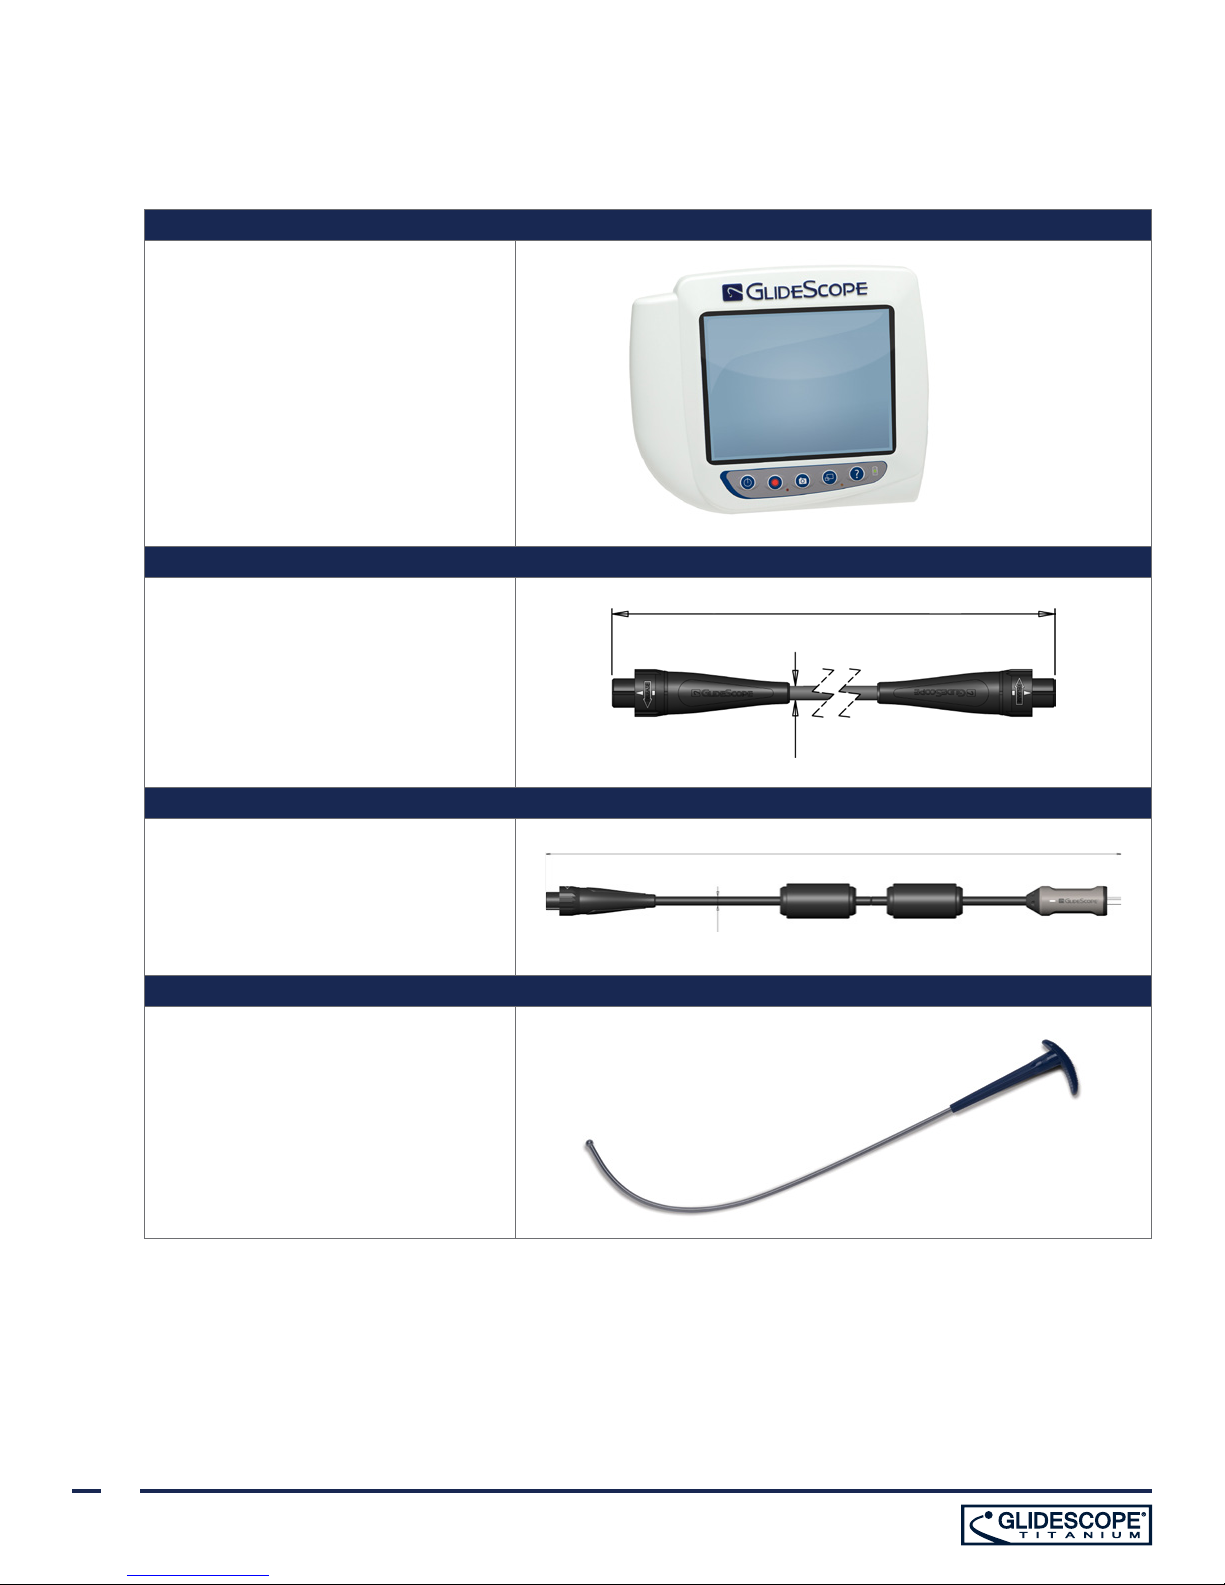
COMPONENT SPECIFICATIONS
Table 14. System Component Specifications
GLIDESCOPE VIDEO MONITOR
TFT Color, VGA 640 x 480 px
Monitor: 6.4 in
Height: 174 mm
Width: 223 mm
Depth: 80 mm
Weight: 1.0 kg
VIDEO CABLE (REUSABLE SYSTEM)
Cable length: 2190 ± 55mm
Diameter: 5.4 mm
2190±55 (cable length)
Length: 1540 ± 50mm
Diameter: 5.4 mm
Handle Length: 82 mm
Handle Width: 16 mm
Stylet Rod Length: 266 mm
Distal Tip Diameter: 5 mm
5.4 (diameter)
GLIDESCOPE SMART CABLE (SINGLE-USE SYSTEM)
1540 ± 50 (cable length)
5.4 (diameter)
GLIDERITE® RIGID STYLET
52
Page 59
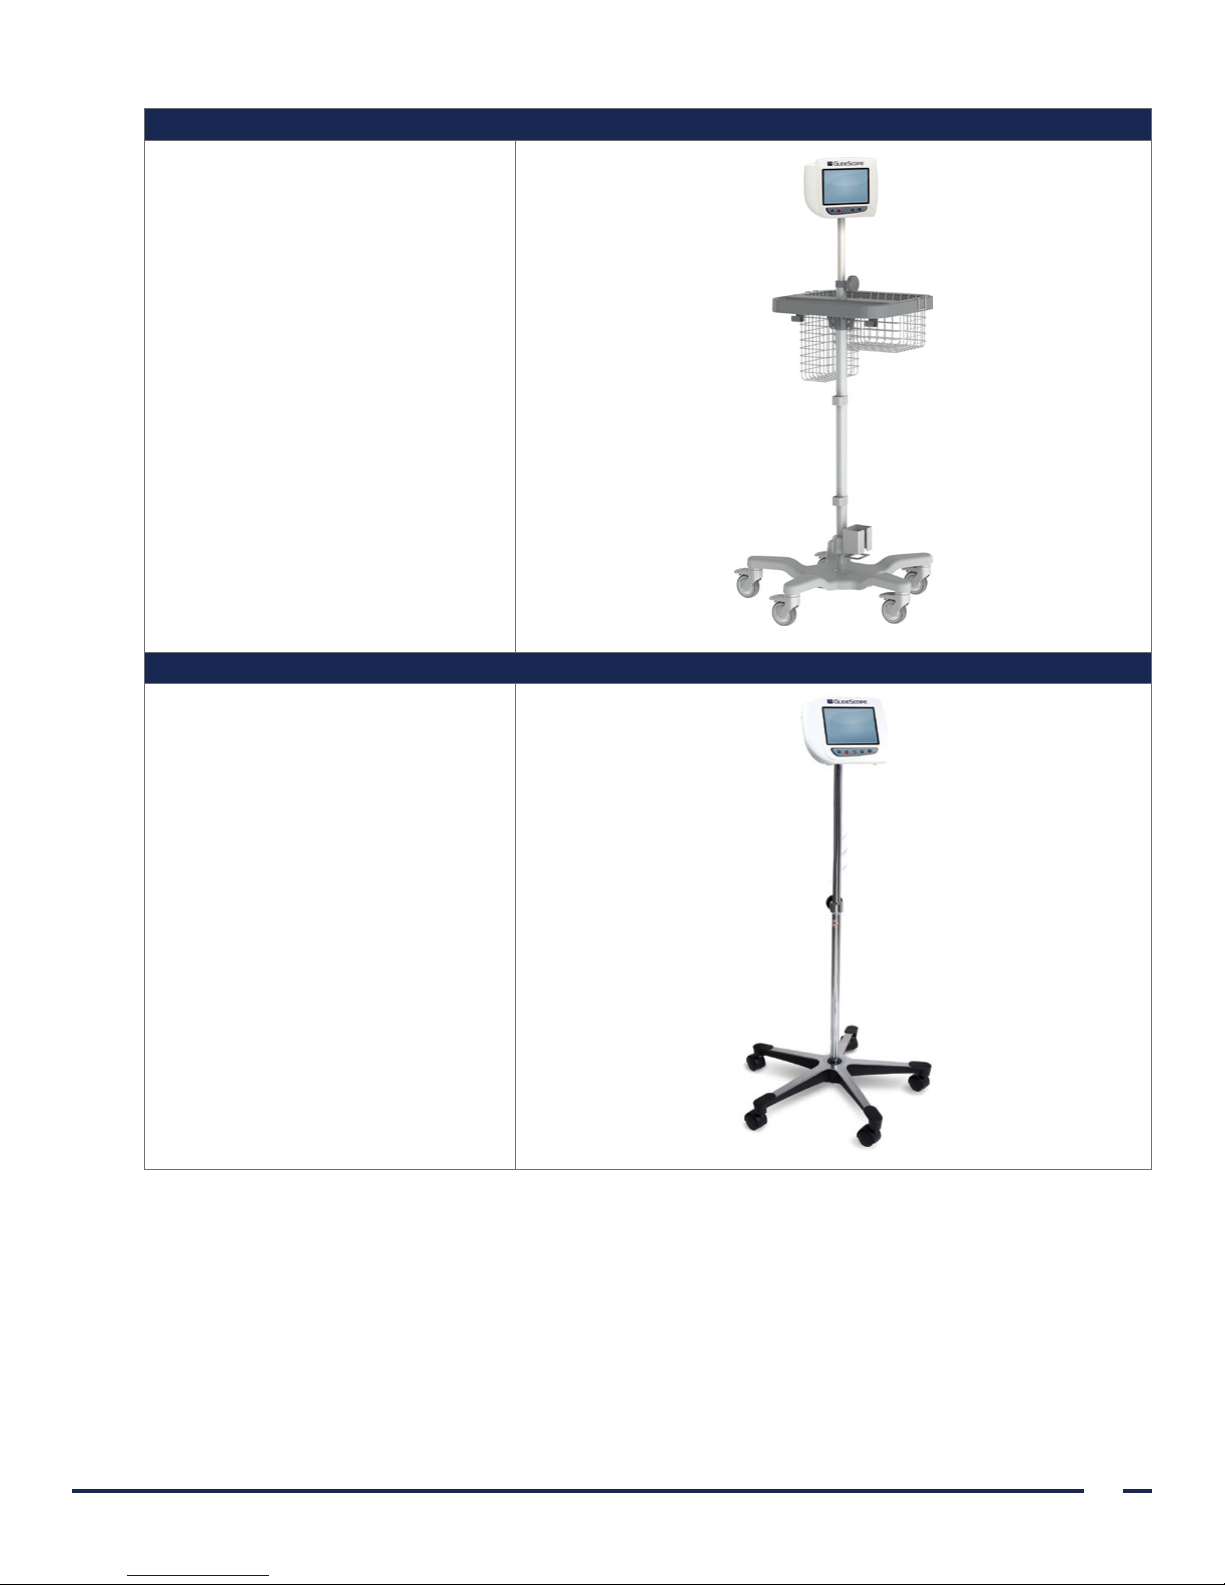
Wheelbase: 53.3 cm
Min. height: 101.6cm
Max. height: 132.1 cm
Weight: 8.0–8.4kg
GLIDESCOPE PREMIUM CART
AVL PORTABLE CART
Wheelbase diameter: 61 cm
Min. height: 76cm
Max. height: 122 cm
Operations & Maintenance Manual: Product Specifications
53
Page 60
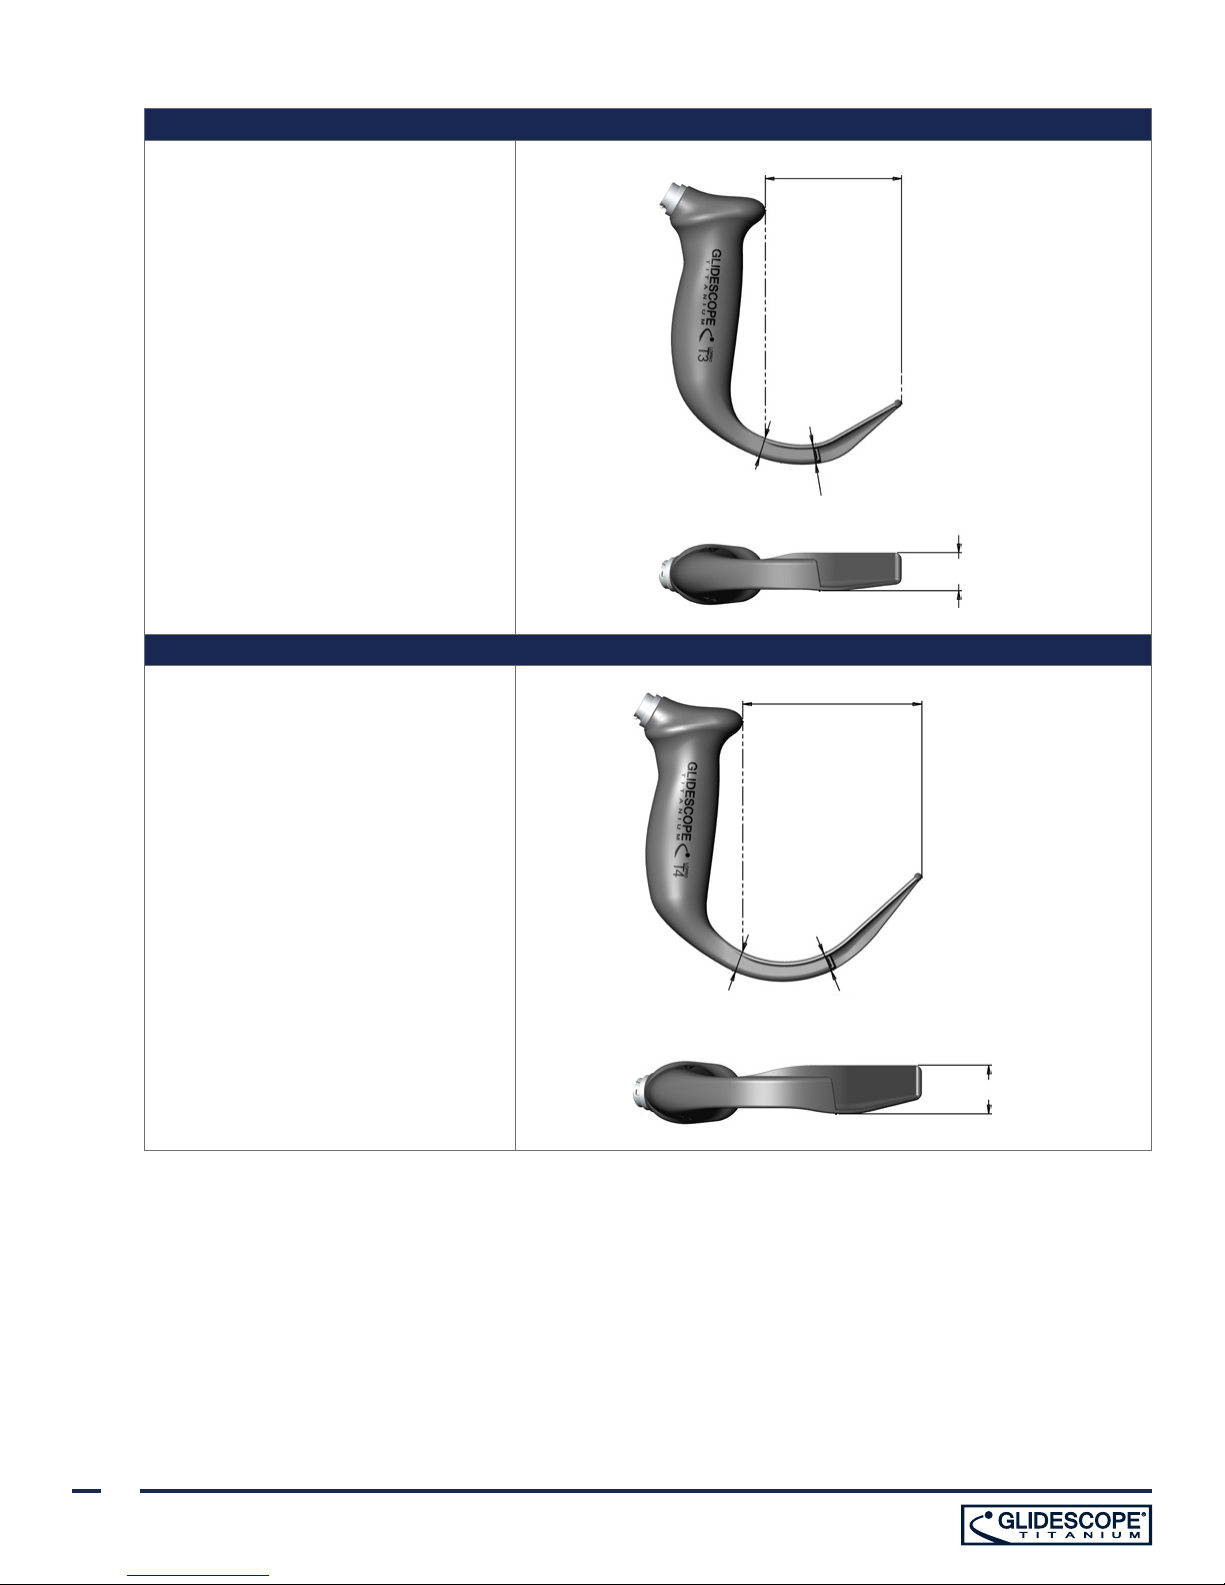
Height at handle: 10.8mm
Height at camera: 10.5mm
Blade tip to handle: 72mm
Width at camera: 20mm
LOPRO T3 (REUSABLE SYSTEM)
72 (blade tip to handle)
10.8 (height at handle)
10.5 (height at camera)
20 (width at camera)
LOPRO T4 (REUSABLE SYSTEM)
91 (blade tip to handle)
Height at handle: 11.0mm
Height at camera: 10.0 mm
Blade tip to handle: 91 mm
Width at camera: 25 mm
10.0 (height at camera)11.0 (height at handle)
25 (width at camera)
54
Page 61
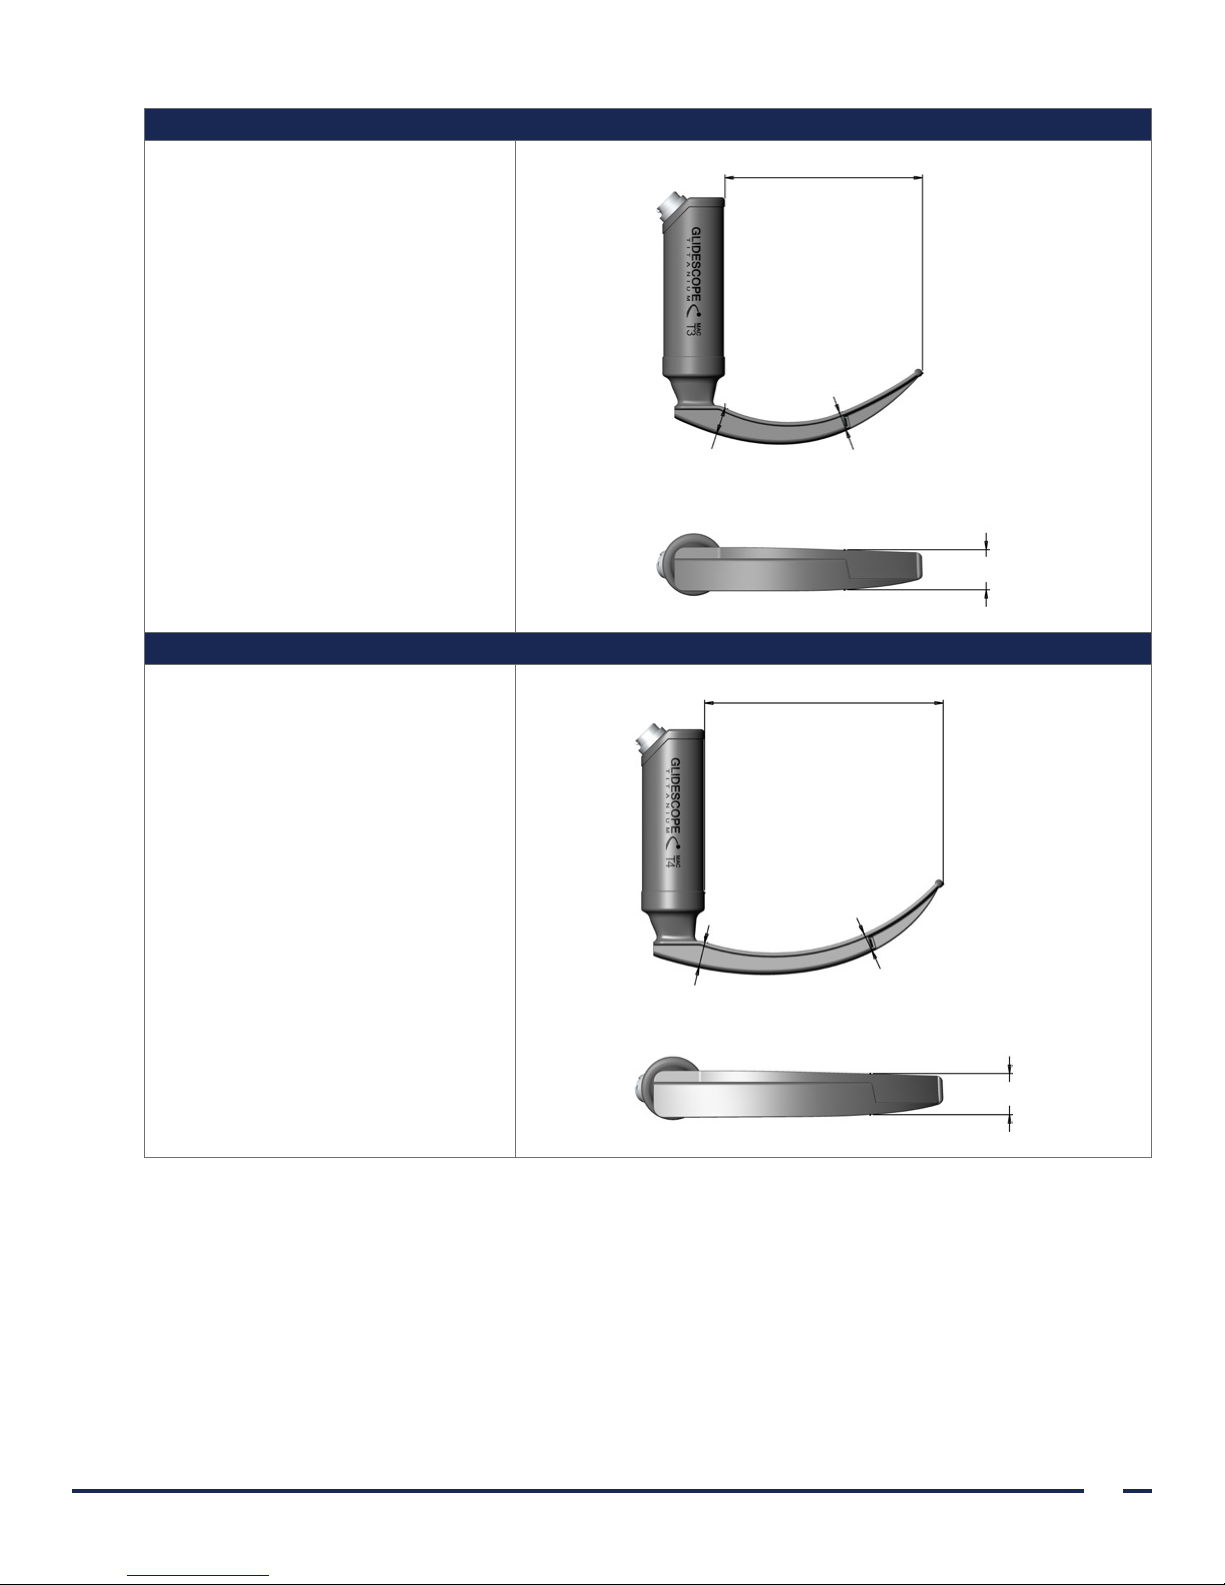
Height at handle: 14.5mm
Height at camera: 9.6 mm
Blade tip to handle: 107 mm
MAC T3 (REUSABLE SYSTEM)
107 (blade tip to handle)
Width at camera: 22 mm
Height at handle: 13.4mm
Height at camera: 9.6 mm
Blade tip to handle: 128 mm
Width at camera: 22 mm
14.5 (height at handle)
MAC T4 (REUSABLE SYSTEM)
128 (blade tip to handle)
13.4 (height at handle)
9.6 (height at camera)
22 (width at camera)
9.6 (height at camera)
Operations & Maintenance Manual: Product Specifications
22 (width at camera)
55
Page 62
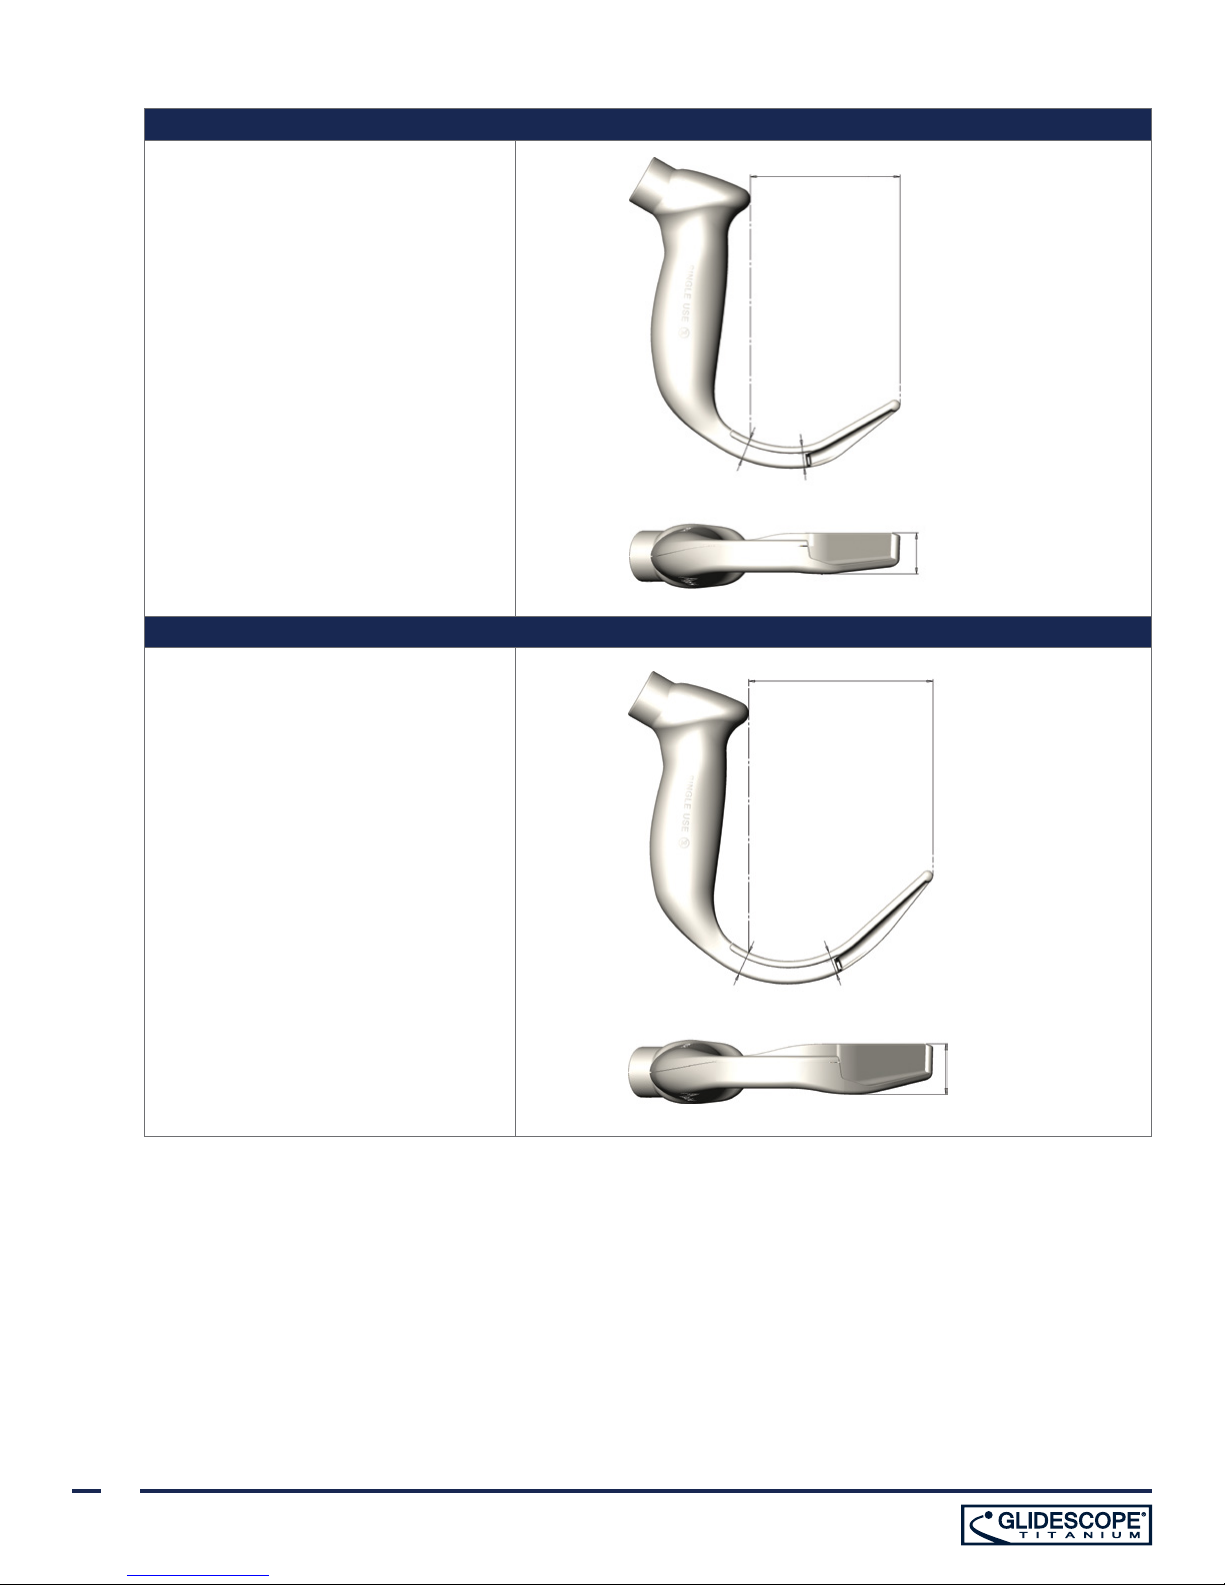
Height at handle: 11.0mm
Height at camera: 11.0mm
Blade tip to handle: 74mm
Width at camera: 20mm
LOPRO S3 (SINGLE-USE SYSTEM)
74 (blade tip to handle)
Height at handle: 12.0mm
Height at camera: 11.3 mm
Blade tip to handle: 91 mm
Width at camera: 25 mm
11.0 (height at handle)
LOPRO S4 (SINGLE-USE SYSTEM)
91 (blade tip to handle)
12.0 (height at handle)
11.0 (height at camera)
20 (width at camera)
11.3 (height at camera)
56
25 (width at camera)
Page 63
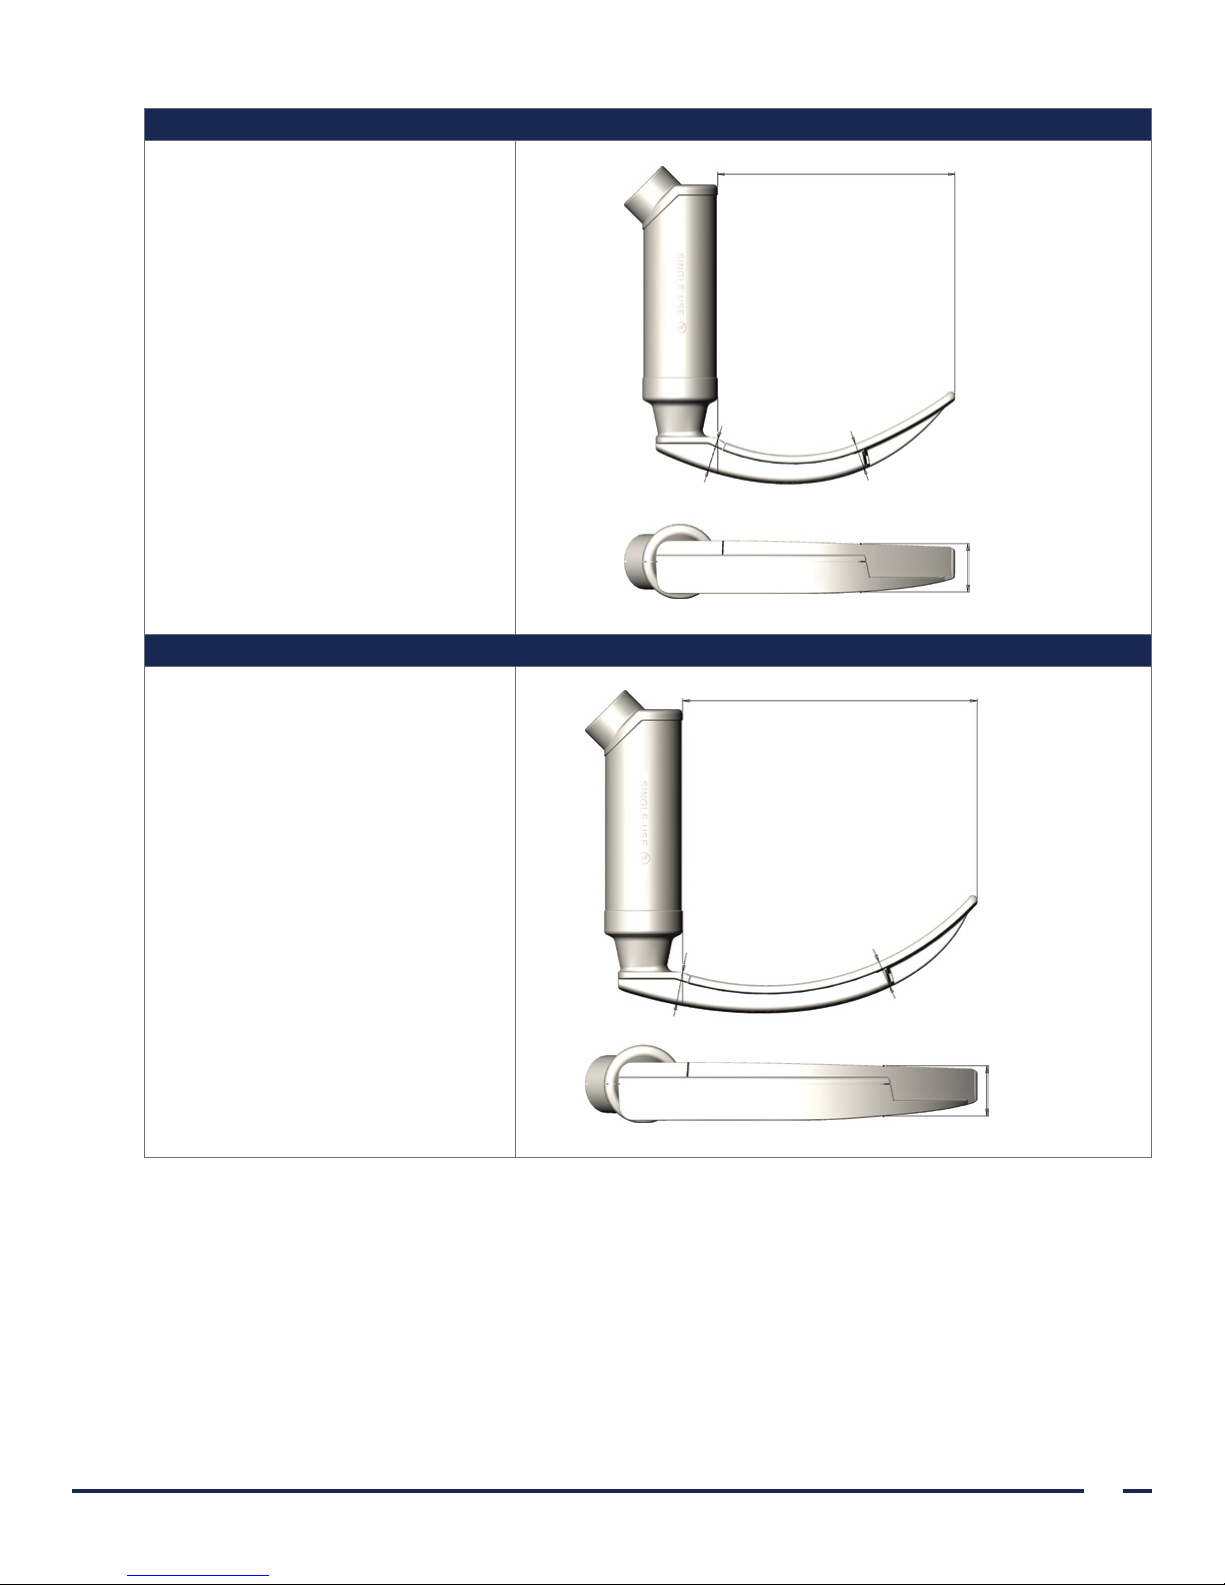
Height at handle: 14.3mm
Height at camera: 11.2 mm
Blade tip to handle: 107 mm
Width at camera: 22 mm
MAC S3 (SINGLE-USE SYSTEM)
107 (blade tip to handle)
11.2 (height at camera)14.3 (height at handle)
22 (width at camera)
MAC S4 (SINGLE-USE SYSTEM)
127 (blade tip to handle)
Height at handle: 13.4mm
Height at camera: 11.0 mm
Blade tip to handle: 127 mm
Width at camera: 22 mm
13.4 (height at handle)
11.0 (height at camera)
22 (width at camera)
Operations & Maintenance Manual: Product Specifications
57
Page 64
BATTERY SPECIFICATIONS
Table 15. Battery Specifications
CONDITION DESCRIPTION
Battery type Lithium-ion
Battery life
Charging time
Rated capacity 2150mAh
Nominal voltage 7.2V
Max charging voltage 8.4V
Nominal weight 90g
Width 0.9in (23mm)
Length 5.4in (391mm)
Thickness 0.9in (23mm)
Under normal operating conditions, a fully charged battery lasts approximately
90minutes
Charging time off line will take no more than 6hours from an empty battery to a
full charge
58
Page 65

ELECTROMAGNETIC COMPATIBILITY
GlideScope Titanium system is designed to be in compliance with IEC 60601-1-2:2007, which contains
electromagnetic compatibility (EMC) requirements for medical electrical equipment. The limits for emissions and
immunity specified in this standard are designed to provide reasonable protection against harmful interference in
a typical medical installation.
The GlideScope Titanium system complies with the applicable essential performance requirements specified in
IEC 60601-1 and IEC 60601-2-18. Results of immunity testing show that the essential performance of the system is
not affected under the test conditions described in the following tables. For more information about the essential
performance of the GlideScope Titanium system, see Essential Performance on page 1.
ELECTROMAGNETIC EMISSIONS
Table 16. Guidance and Manufacturer’s Declaration—Electromagnetic Emissions
The GlideScope Titanium system is intended for use in the electromagnetic environment specified below. The
customer or the user of the GlideScope Titanium system should assure that it is used in such an environment.
EMISSIONS TEST COMPLIANCE ELECTROMAGNETIC ENVIRONMENT – GUIDANCE
RF emissions
CISPR 11
RF emissions
CISPR 11
Harmonic emissions
IEC 61000-3-2
Voltage fluctuations/
flicker emissions
IEC 61000-3-3
Group 1
Class A
Class A
Complies
The GlideScope Titanium system uses RF energy only for its internal
function. Therefore, its RF emissions are very low and are not likely to
cause any interference in nearby electronic equipment.
The GlideScope Titanium system is suitable for use in all
establishments other than domestic and those directly connected to
the public low-voltage power supply network that supplies buildings
used for domestic purposes.
Operations & Maintenance Manual: Product Specifications
59
Page 66

ELECTROMAGNETIC IMMUNITY
Table 17. Guidance and Manufacturer’s Declaration —Electromagnetic Immunity
The GlideScope Titanium system is intended for use in the electromagnetic environment specified below. The
customer or the user of the GlideScope Titanium system should assure that it is used in such an environment.
IMMUNITY TESTS IEC 60601 TEST LEVEL
Electrostatic discharge
(ESD)
IEC 61000-4-2
Electrical fast transient/
burst
IEC 61000-4-4
Surge
IEC 61000-4-5
± 6 kV contact
± 8 kV air
± 2 kV for power supply lines
± 1 kV for input/output lines
± 1 kV line(s) to line(s)
± 2 kV line(s) to earth
<5% Ut (>95% dip in Ut)
for 0.5 cycle
Voltage dips, short
interruptions and
voltage variations on
power supply input lines
IEC 61000-4-11
40% Ut (60% dip in Ut)
for 5 cycles
70% Ut (30% dip in Ut)
for 25 cycles
<5% Ut (>95% dip in Ut)
for 5 s
Power frequency
(50/60 Hz) magnetic
field
3 A/m In compliance
IEC 61000-4-8
Conducted RF
IEC 61000-4-6
3 Vrms
150 kHz to 80 MHz
COMPLIANCE
LEVEL
In compliance
In compliance
In compliance
In compliance
3 V
ELECTROMAGNETIC ENVIRONMENT
– GUIDANCE
Floors should be wood, concrete,
or ceramic tile. If floors are covered
with synthetic material, the relative
humidity should be at least 30%.
Mains power quality should be that
of a typical commercial or hospital
environment.
Mains power quality should be that
of a typical commercial or hospital
environment.
Mains power quality should be
that of a typical commercial or
hospital environment. If the user
of the GlideScope Titanium system
requires continued operation
during power mains interruptions,
it is recommended that the
GlideScope Titanium system be
powered from an uninterruptible
power supply or a battery.
Power frequency magnetic
fields should be at levels
characteristic of a typical location
in a typical commercial or hospital
environment.
Portable and mobile RF
communications equipment
should be used no closer to any
part of the GlideScope Titanium
system, including cables, than the
recommended separation distance
calculated from the equation
applicable to the frequency of the
transmitter.
60
Recommended separation
distance d (m)
d=1.2 √P
Page 67
Table 17. Guidance and Manufacturer’s Declaration —Electromagnetic Immunity
The GlideScope Titanium system is intended for use in the electromagnetic environment specified below. The
customer or the user of the GlideScope Titanium system should assure that it is used in such an environment.
IMMUNITY TESTS IEC 60601 TEST LEVEL
Radiated RF
IEC 61000-4-3
3 V/m
80 MHz to 2.5 GHz
COMPLIANCE
LEVEL
3 V/m
ELECTROMAGNETIC ENVIRONMENT
– GUIDANCE
d=1.2 √P 80 MHz to 800 MHz
d=2.3 √P 800 MHz to 2.5 GHz
where P is the maximum output
power rating of the transmitter
in watts (W) according to the
transmitter manufacturer and d
is the recommended separation
distance in meters (m).
Field strengths from fixed RF
transmitters, as determined by an
electromagnetic site survey,a should
be less than the compliance level in
each frequency range.
b
Interference may occur in the
vicinity of equipment marked with
the following symbol:
Note: Ut is the AC mains voltage prior to application of the test level.
At 80 MHz and 800 MHz, the higher frequency range applies.
These guidelines may not apply in all situations. Electromagnetic propagation is affected by absorption and
reflection from structures, objects and people.
a. Field strengths from fixed transmitters, such as base stations for radio (cellular/cordless) telephones and land mobile radios, amateur radio,
AM and FM radio broadcast and T V broadcast cannot be predicted theoretically with accuracy. To assess the electromagnetic environment
due to fixed RF transmitters, an electromagnetic site survey should be considered. If the measured field strength in the location in which the
GlideScope Titanium system is used exceeds the applicable RF compliance level above, the GlideScope Titanium system should be observed to
verify normal operation. If abnormal performance is observed, additional measures may be necessary, such as re-orienting or relocating the
GlideScope Titanium system.
b. Over the frequency range 150 kHz to 80 MHz, field strengths should be less than 3 V/m.
Operations & Maintenance Manual: Product Specifications
61
Page 68

RECOMMENDED SEPARATION DISTANCES
Table 18 . Recommended Separation Distances between Portable and Mobile RF Communications Equipment
and the GlideScope Titanium System
The GlideScope Titanium system is intended for use in an electromagnetic environment in which radiated
RF disturbances are controlled. The customer or the user of the GlideScope Titanium system can help
prevent electromagnetic interference by maintaining a minimum distance between portable and mobile RF
communications equipment (transmitters) and the GlideScope Titanium system as recommended below,
according to the maximum output power of the communications equipment.
RATED MAXIMUM
OUTPUT POWER OF
TRANSMITTER (W)
SEPARATION DISTANCE ACCORDING TO FREQUENCY OF TRANSMITTER (m)
150 kHz to 80 MHz
d=1.2 √P
0.01 0.12 0.12 0.23
0.1 0.38 0.38 0.73
1 1.2 1. 2 2.3
10 3.8 3.8 7.3
100 12 12 23
For transmitters rated at a maximum output power not listed above, the recommended separation distance d in
meters (m) can be estimated using the equation applicable to the frequency of the transmitter, where P is the
maximum output power rating of the transmitter in watts (W) according to the transmitter manufacturer.
Note: At 80 MHz and 800 MHz, the separation distance for the higher frequency range applies.
These guidelines may not apply in all situations. Electromagnetic propagation is affected by absorption and
reflection from structures, objects and people.
ACCESSORY CONFORMANCE TO STANDARDS
To maintain electromagnetic interference (EMI) within certified limits, the system must be used with the cables,
components, and accessories specified or supplied by Verathon®. For additional information, see the System Parts
& Accessories and Component Specifications sections. The use of accessories or cables other than those specified
or supplied may result in increased emissions or decreased immunity of the system.
80 MHz to 800 MHz
d=1.2 √P
800 MHz to 2.5 GHz
d=2.3 √P
Table 19. EMC Standards for Accessories
ACCESSORY MAX LENGTH
AC power cord 4.5 m (15 ft)
DC medical power adapter —
HDMI-to-DVI cable 6 m (20 ft)
Video cable (reusable system) 2.2 m (7.2 ft)
Smart Cable (single-use system) 1.6 m (5.2 ft)
62
Page 69
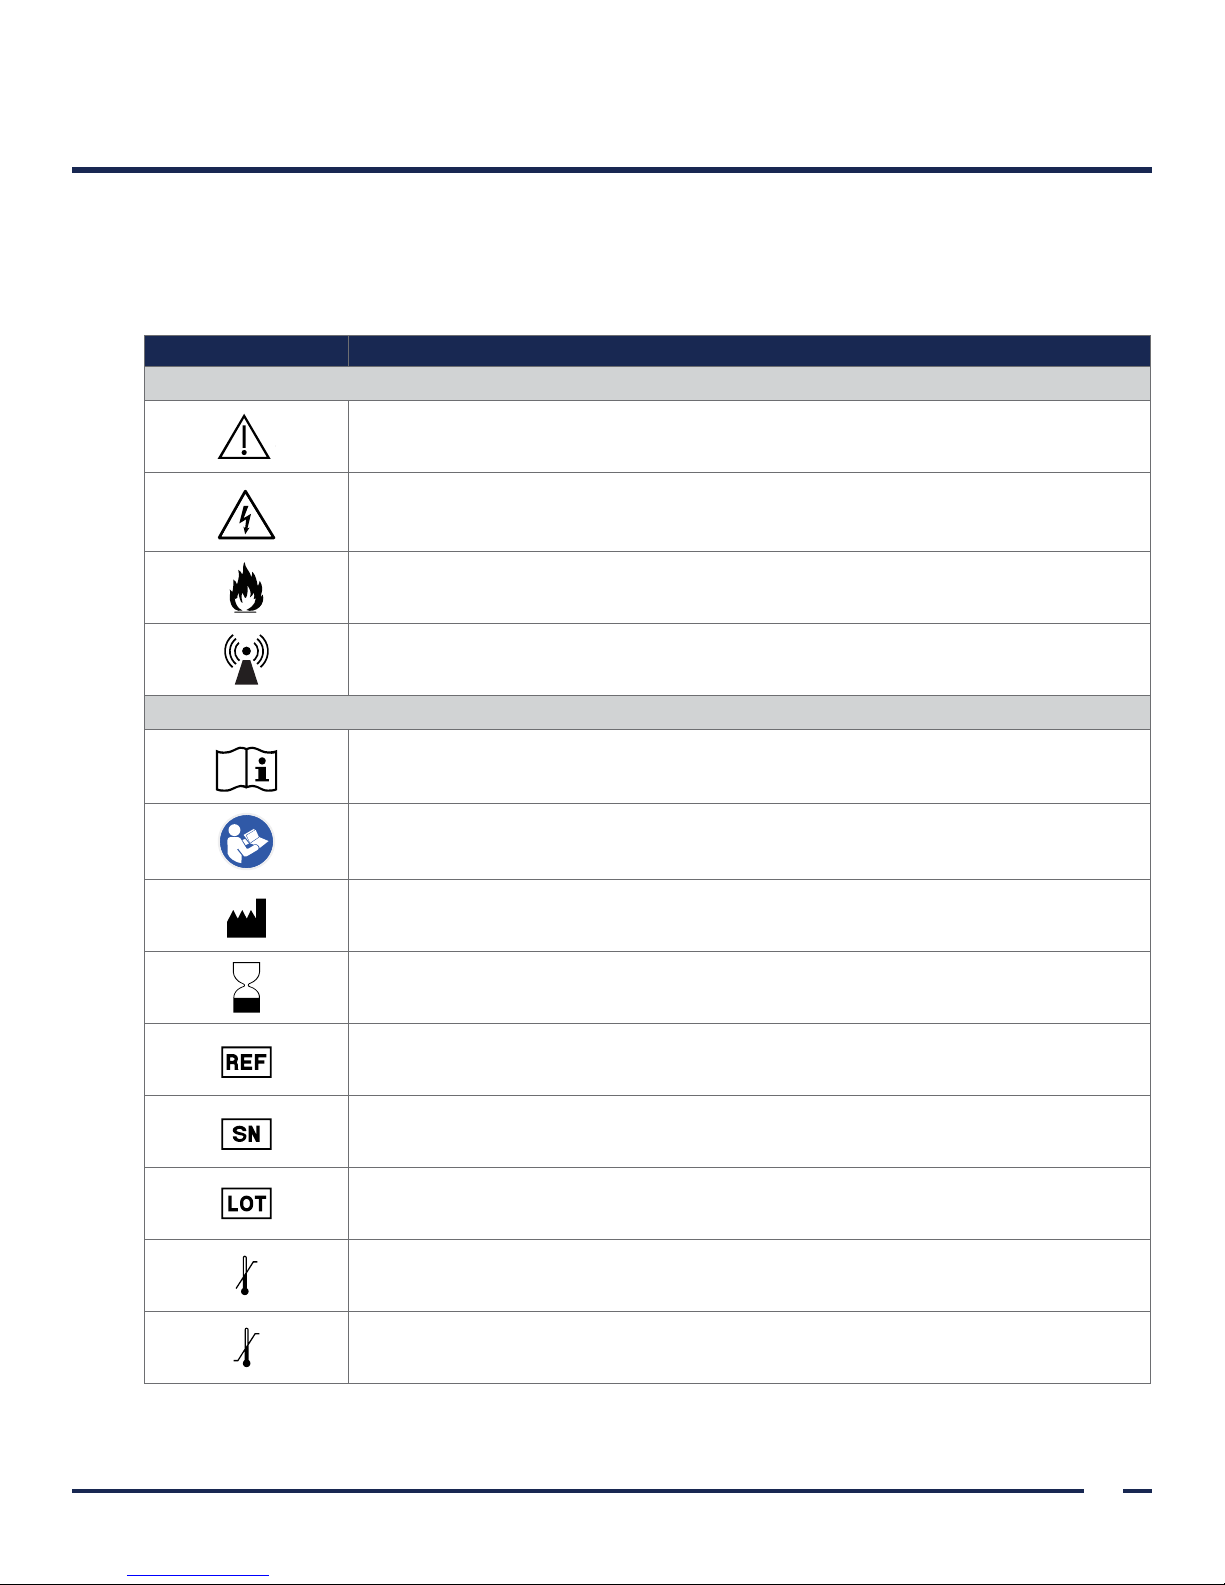
SYMBOL DIRECTORY
The following table explains the symbols used with the system in order to indicate safety information,
instructions for use, and compliance with standards and regulations.
Table 20. Directory of Symbols
SYMBOL MEANING
Warnings & Cautions
Warning or Caution—Consult accompanying documents. Read instructions before
connecting or operating.
Risk of electric shock
Flammable material
Non-ionizing, electromagnetic radiation
Product Use & Specifications
Refer to the operations & maintenance manual
Refer to the operations & maintenance manual
Manufacturer
Use-by date
Catalogue (part) number
Serial number
Batch code
Upper temperature limit
Temperature limitation
Operations & Maintenance Manual: Symbol Directory
63
Page 70
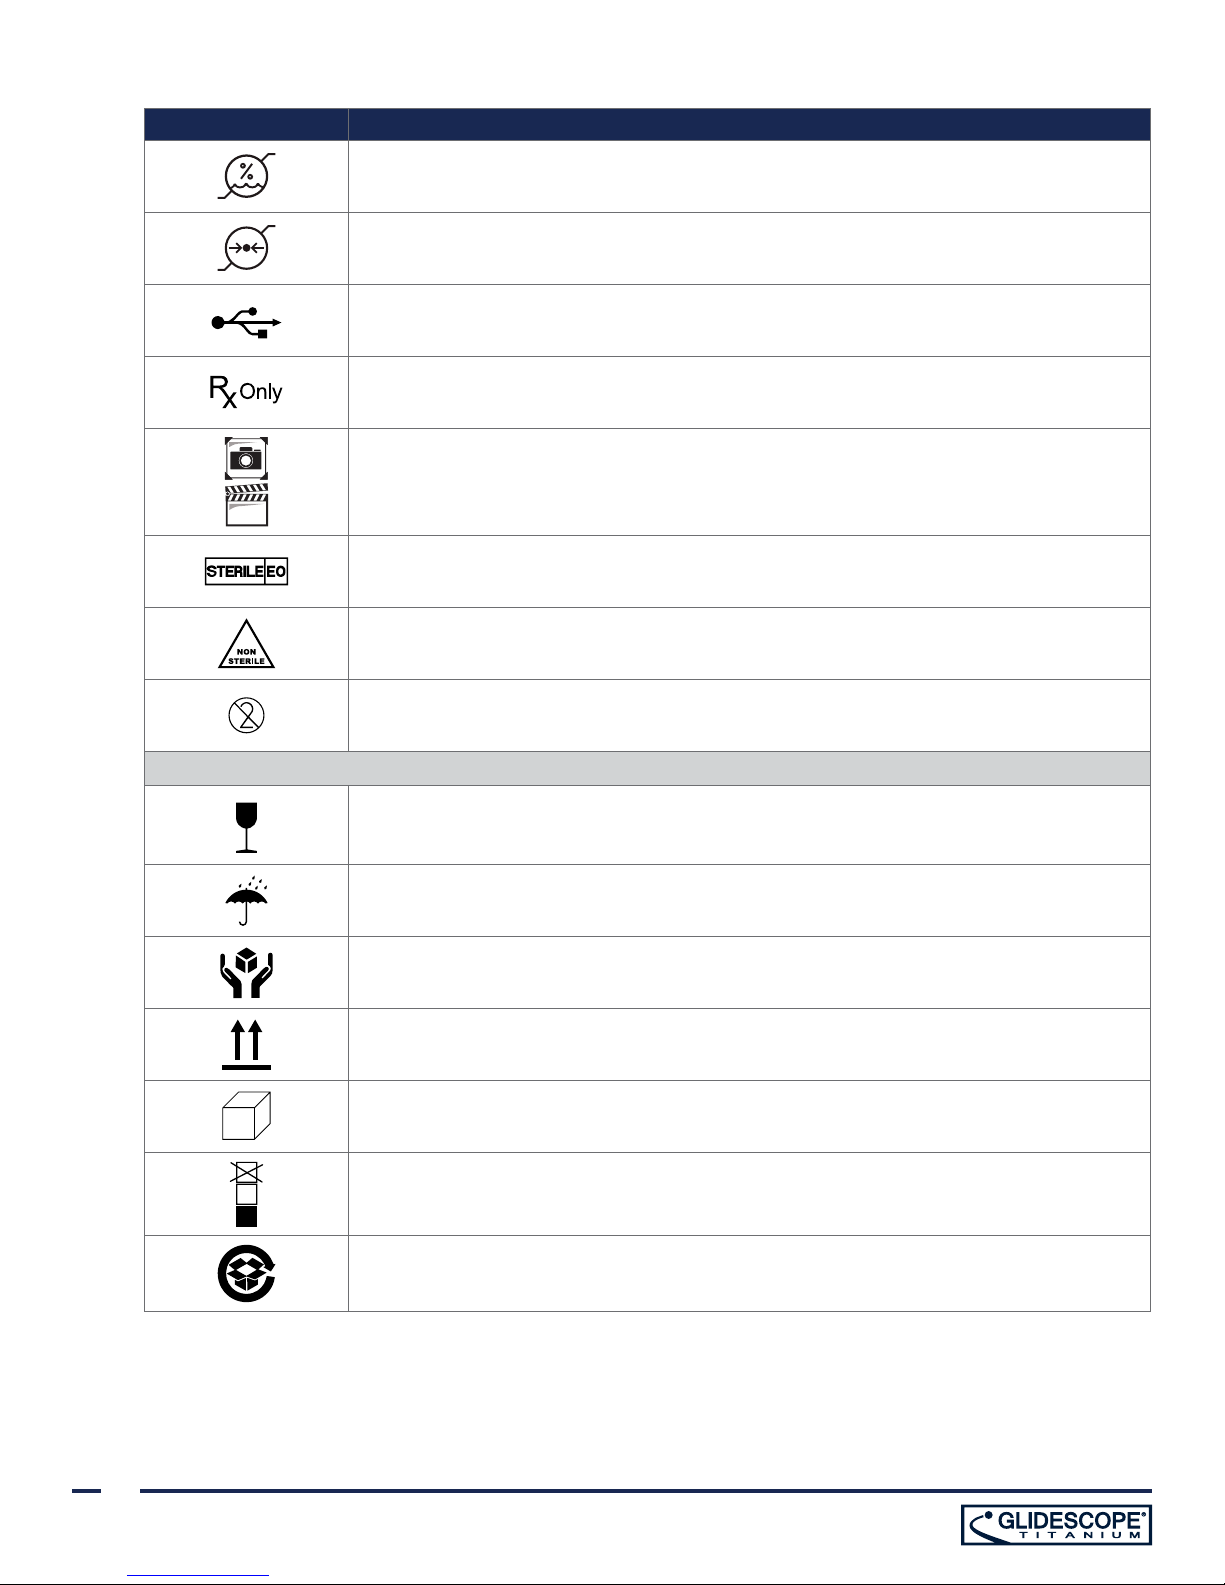
SYMBOL MEANING
Humidity limitation
Atmospheric pressure limitation
USB
Statement of prescription
USB flash drive for media storage
Sterilized using ethylene oxide
Non sterile
Reuse is not allowed
Shipping
Fragile item, handle carefully
Keep dry
Handle with care
This way up
Quantity per box
Stacking limit by number—Indicates that the items are not to be vertically stacked
higher than the specified number of items
Shipping box is made of corrugated cardboard and should be recycled accordingly
64
Page 71
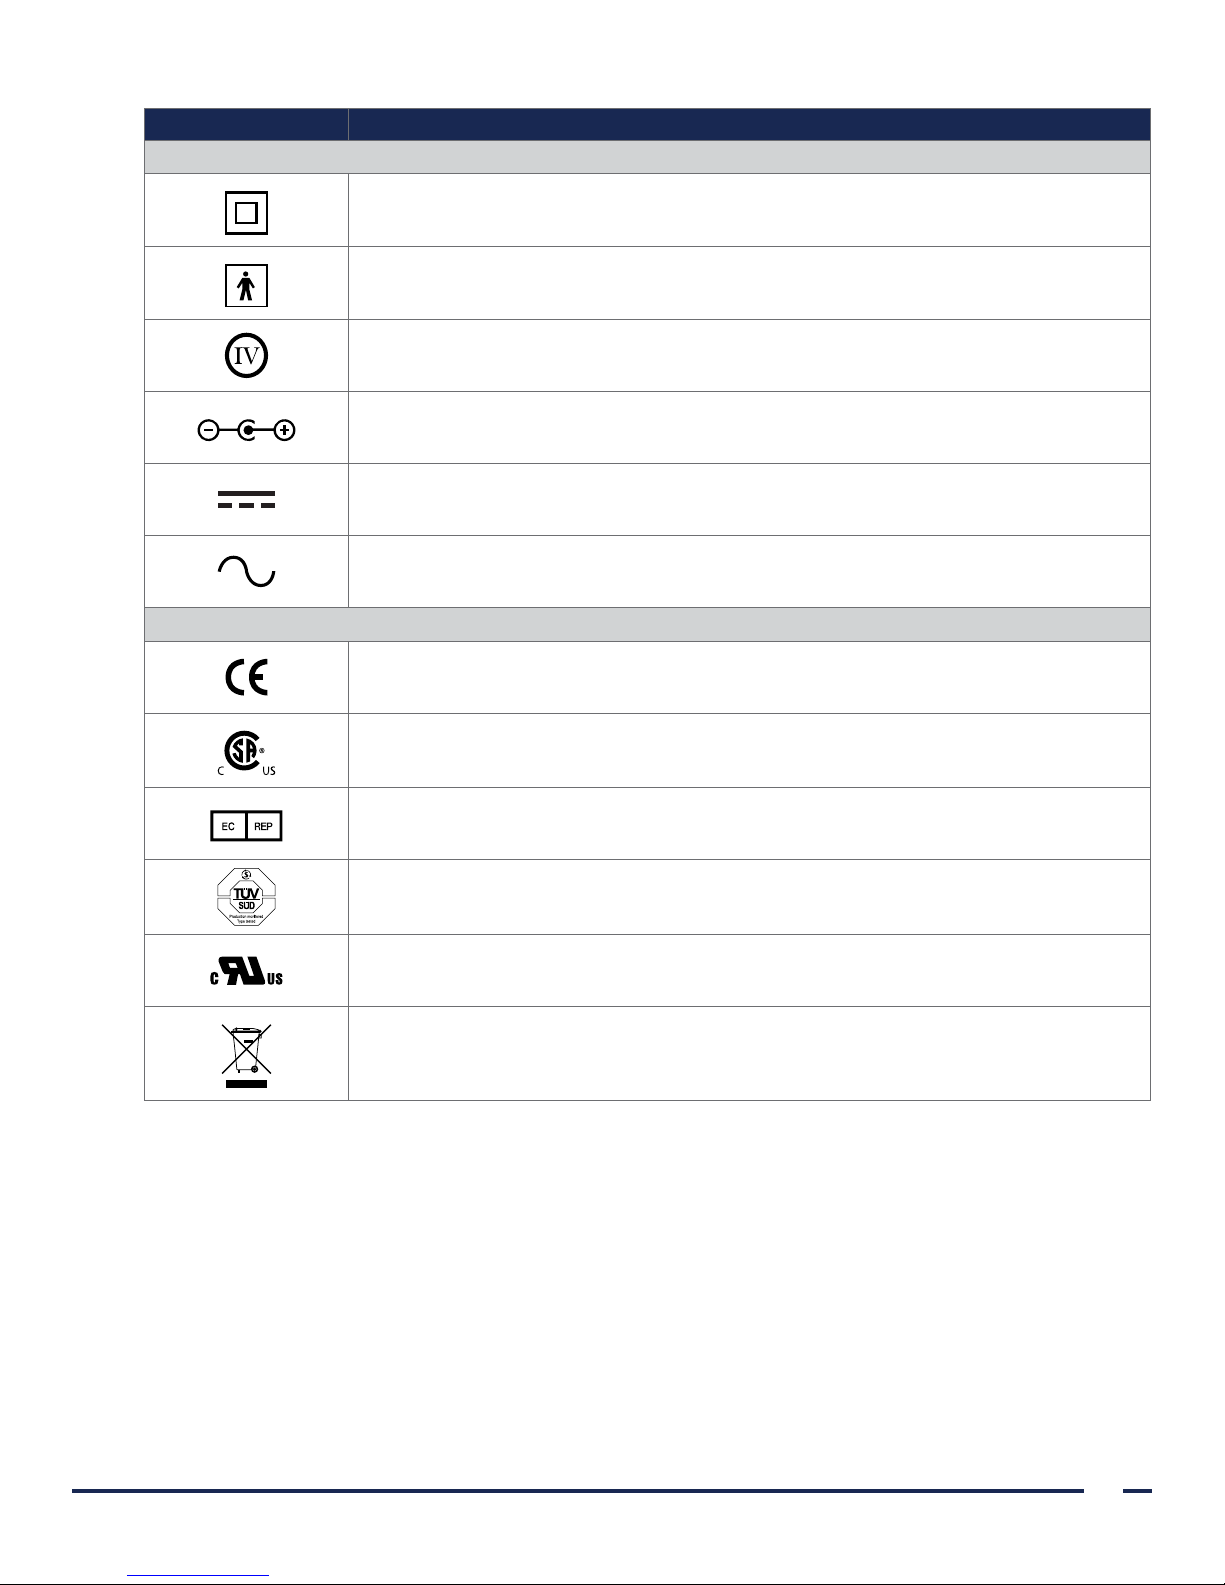
SYMBOL MEANING
Electrical & Power
Class II equipment
Type BF applied part
Energy Efficiency Level IV
Connector polarity mark
Direct current
Alternating current
Standards & Certifications
CE—Marked in accordance with the Medical Device Directive (MDD)
CSA—Canadian Standards Association mark of certification to applicable standards for
electromedical equipment
EC REP—Authorized Representative in the European Community
TUV—Safety approval mark for components or subassemblies
UL—Underwriters Laboratories Recognized Component certification mark in Canada
and the United States
WEEE—Subject to waste electrical and electronic equipment regulations
Operations & Maintenance Manual: Symbol Directory
65
Page 72

GLOSSARY
TERM DEFINITION
A Ampere
AC Alternating current
AER Automated endoscope reprocessor
C Celsius
CFR Code of Federal Regulations (U.S.)
CISPR International Special Committee on Radio Interference
cm Centimeter
CSA Canadian Standards Association
DL Direct laryngoscopy
EMI Electromagnetic interference
ESD Electrostatic discharge
Essential performance The system performance necessary to achieve freedom from unacceptable risk
F Fahrenheit
g Gram
GHz Gigahertz
HDMI High-definition multimedia interface
hPa Hectopascal
Hz Hertz
IEC International Electrotechnical Commission
in Inch
IPA Isopropyl alcohol
ISM Industrial, scientific, and medical
kHz Kilohertz
kV Kilovolt
L Liter
m Meter
mAh Milliampere-hour
MDD Medical Device Directive
MHz Megahertz
mL Milliliter
mm Millimeter
MSDS Material Safety Data Sheet
OSHA Occupational Safety and Health Administration (federal agency in U.S.)
psia Pounds per square inch absolute
Pure water
Water that is suitable for high-level disinfection according to local regulations and
your medical facility
66
Page 73
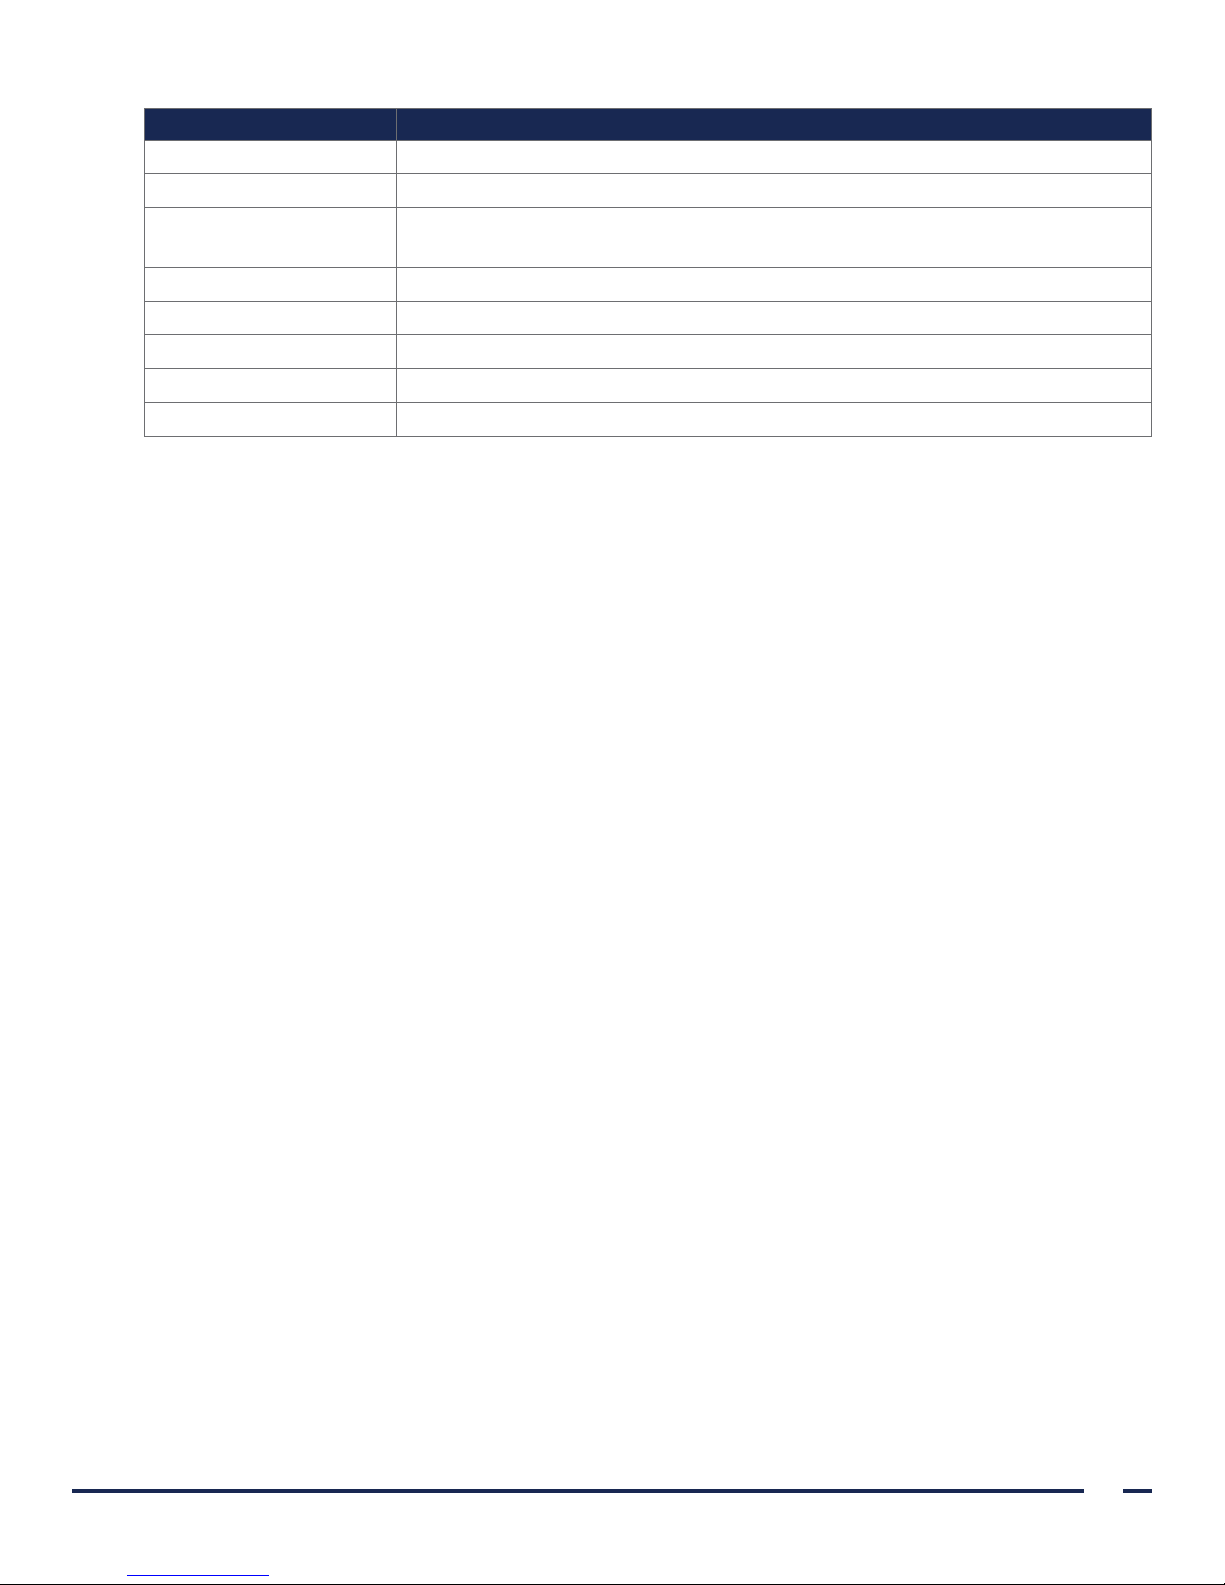
TERM DEFINITION
RF Radio frequency
RH Relative humidity
RoHS
Restriction of the Use of Certain Hazardous Substances in Electrical and
Electronic Equipment
SDS Sodium dodecyl sulphate
V Volt
Vrms Voltage root mean squared
W Watt
WEEE Waste electrical and electronic equipment
Operations & Maintenance Manual: Glossary
67
Page 74

Page 75

Page 76

 Loading...