

Page 1
GliderGuider
USER GUIDE
1
www.gliderguider.net
Thank you for purchasing the GliderGuider. A hand-held computing device
dedicated to the running of a selection of Moving Map applications as an aid to VFR
navigation.
Note! The GliderGuider is an aid to navigation, and must never be
considered as a replacement for an air-map or any other legally required onboard equipment.
It is nonetheless important however to become familiar with the functionality
provided by the device and your chosen software application before use in
flight. Please read this User Guide carefully and in conjunction with the User
Manual and other relevant information provided by the application software
provider.
The software applications used with this device are sophisticated and fairly
complex. The correct operation and usage of these applications is well
beyond the scope of this User Guide. Please refer to the relevant Operators
Manual for detailed information. Read it carefully and make sure that you
familiar with its operation before using the system in flight! There are
numerous User Settings which demand your careful consideration.
This User Guide is intended to introduce the user to the various features and
functions of the device itself, primarily as an aid to accessing and maintaining the
relevant application software programs.
Contents:
Page
1. Scope of Supply
2
2. Specification
3
3. The Internal Battery
3
4. Getting to know your GliderGuider
4
5. Getting Started
15
6. Power Off
15
7. Connecting to a computer
16
8. Other Important Information
16
8.1. Location of application software – and associated user files
17
8.2. External Interfaces
20
8.3. COM Port settings for the internal GPS
20
8.3. Setting up a Bluetooth connection
21
Page 2
GliderGuider
USER GUIDE
2
www.gliderguider.net
1. Scope of Supply:
Item
Qty
Description
Comment
1 1 GliderGuider
Pre-installed.
2 1 Sucker Mount
With ball & socket adaptor.
3 1 Holder
Fits to the sucker mount, with stylus.
4 1 Mains Charger
UK style 3 pin plug, 5V at 2000mA.
5 1 USB Cable
USB – A to USB Mini-B (5 Pin).
6 1 Micro SD-Card
Quality 4GB-Class 4 Storage Card.
(with standard SD Card adaptor)
Page 3
GliderGuider
USER GUIDE
3
www.gliderguider.net
2. Specification:
Model Name
GliderGuider
Dimensions (mm)
135 x 85 x 13 (WxHxD)
Net Weight (g)
182
Battery
Rechargeable LiOn, 3.7V, 1750mAh
Operating Time
~2 Hours
CPU
Huawei Hisilicon K3 / 460 MHz
SDRAM
128 MB
NAND Flash Memory
256 MB
Local FLASH Memory
256 MB
Expansion Memory
Micro SDCard (Max 32GB)
Operating System
Windows Mobile Ver. 6.1
Operating Language
English
Display Type
5” TFT LCD, Sunlight Readable
Display Resolution
480 x 272
Display Brightness
800-1000 NITS
Internal GPS Engine
SiRF Star III GDS3TW
GPS Sensitivity
-147 dBm
GPS Channels
20
Operating Temperature
-20 to +50 deg. Centigrade
Network
Bluetooth – with support for file transfer & SPP
USB
USB 2.0 via 10 pin Mini B USB interface
COM4
Reserved for the internal GPS Engine.
COM7
Serial port – reserved for external data.
COM8
Serial port – reserved for external data.
Note: Specifications subject to change without notice.
Page 4
GliderGuider
USER GUIDE
4
www.gliderguider.net
3. The Internal Battery:
The internal battery will be partially charged on delivery, please place the
GliderGuider on charge now - and ensure that the battery charge state is
maintained before use using any combination of the Mains Charger, Car Charger or
the USB Cable (via a suitably equipped computer interface).
Battery LED - RED while charging.
Battery LED - GREEN when charged
When new, the internal battery has sufficient capacity to sustain normal operation for
about two hours or more. It is therefore recommended that the unit be powered from
an external 5V supply while in continued use.
Note: the GliderGuider typically draws 700mA at 5V from the external
supply (at max. brightness) while charging. Ensure that the source of the
external supply is capable of delivering the adequate level of power for the
intended duration of operation.
Avoid running the internal battery completely flat by maintaining the charge state
using any combination of the Mains Charger, Car Charger or the USB Cable (via a
suitably equipped computer interface).
4. Getting to know your GliderGuider
Power On/Off button.
(top edge)
Mini-B USB Interface & Micro SD Card.
(side edge)
Hardware Reset.
(back of case)
Use a ball point pen to access – only
when really necessary!
Page 5
GliderGuider
USER GUIDE
5
www.gliderguider.net
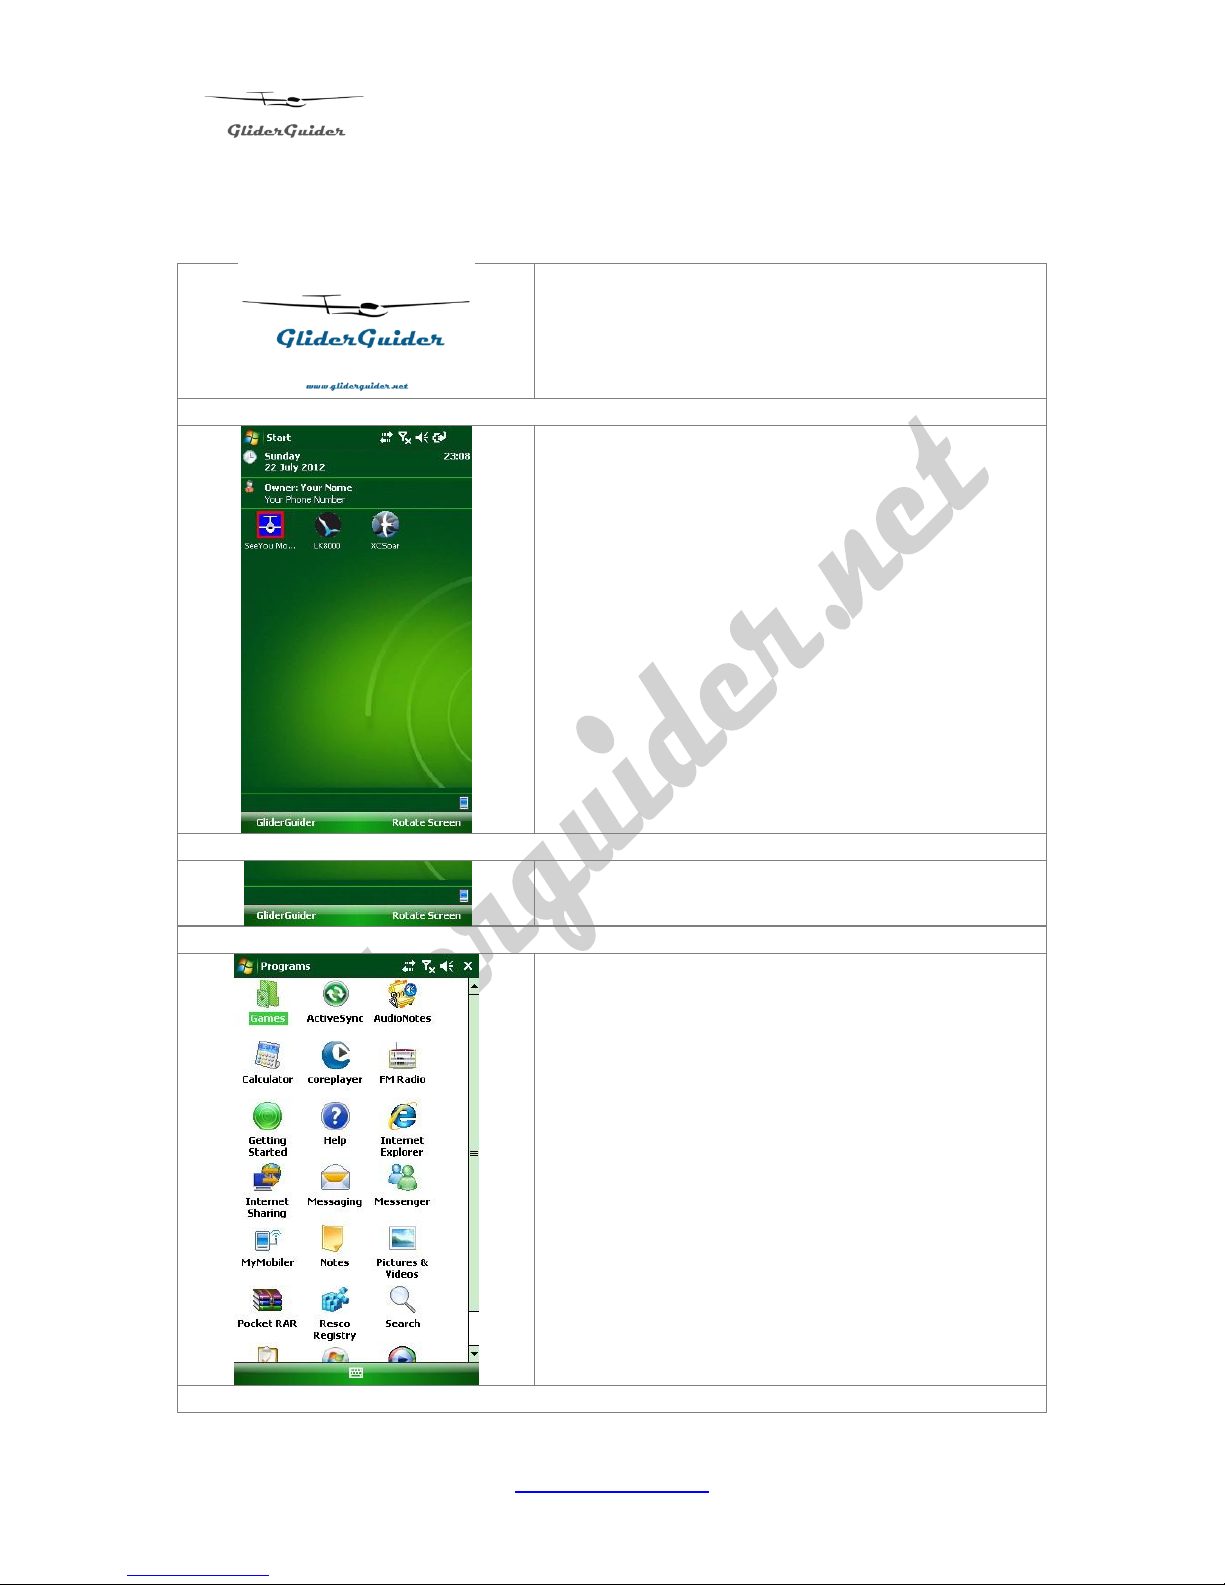
5. Getting Started:
Power on – press and hold the Power On/Off
button for approximately 1 second.
The GliderGuider flash screen – always
shown in landscape mode.
The TODAY screen.
The best place to start and finish each session.
TODAY provides access to all Programmes,
Files and Settings via the Start Menu (which will
be familiar to Windows users).
The two navigation buttons at the bottom of the
TODAY screen, Glider Guider & Rotate Screen:
Tap “GliderGuider” – to open a list of other
supplied applications.
Some may find the “Notes” application useful for
note taking at briefings. Use it to make notes of
notams, radio frequencies and any other
information you might need. Both handwriting
(use a suitable stylus) and keyboard entry is
supported!
Note: Not all applications are supported as there
is no GPRS or WiFi network available.
Page 6
GliderGuider
USER GUIDE
6
www.gliderguider.net
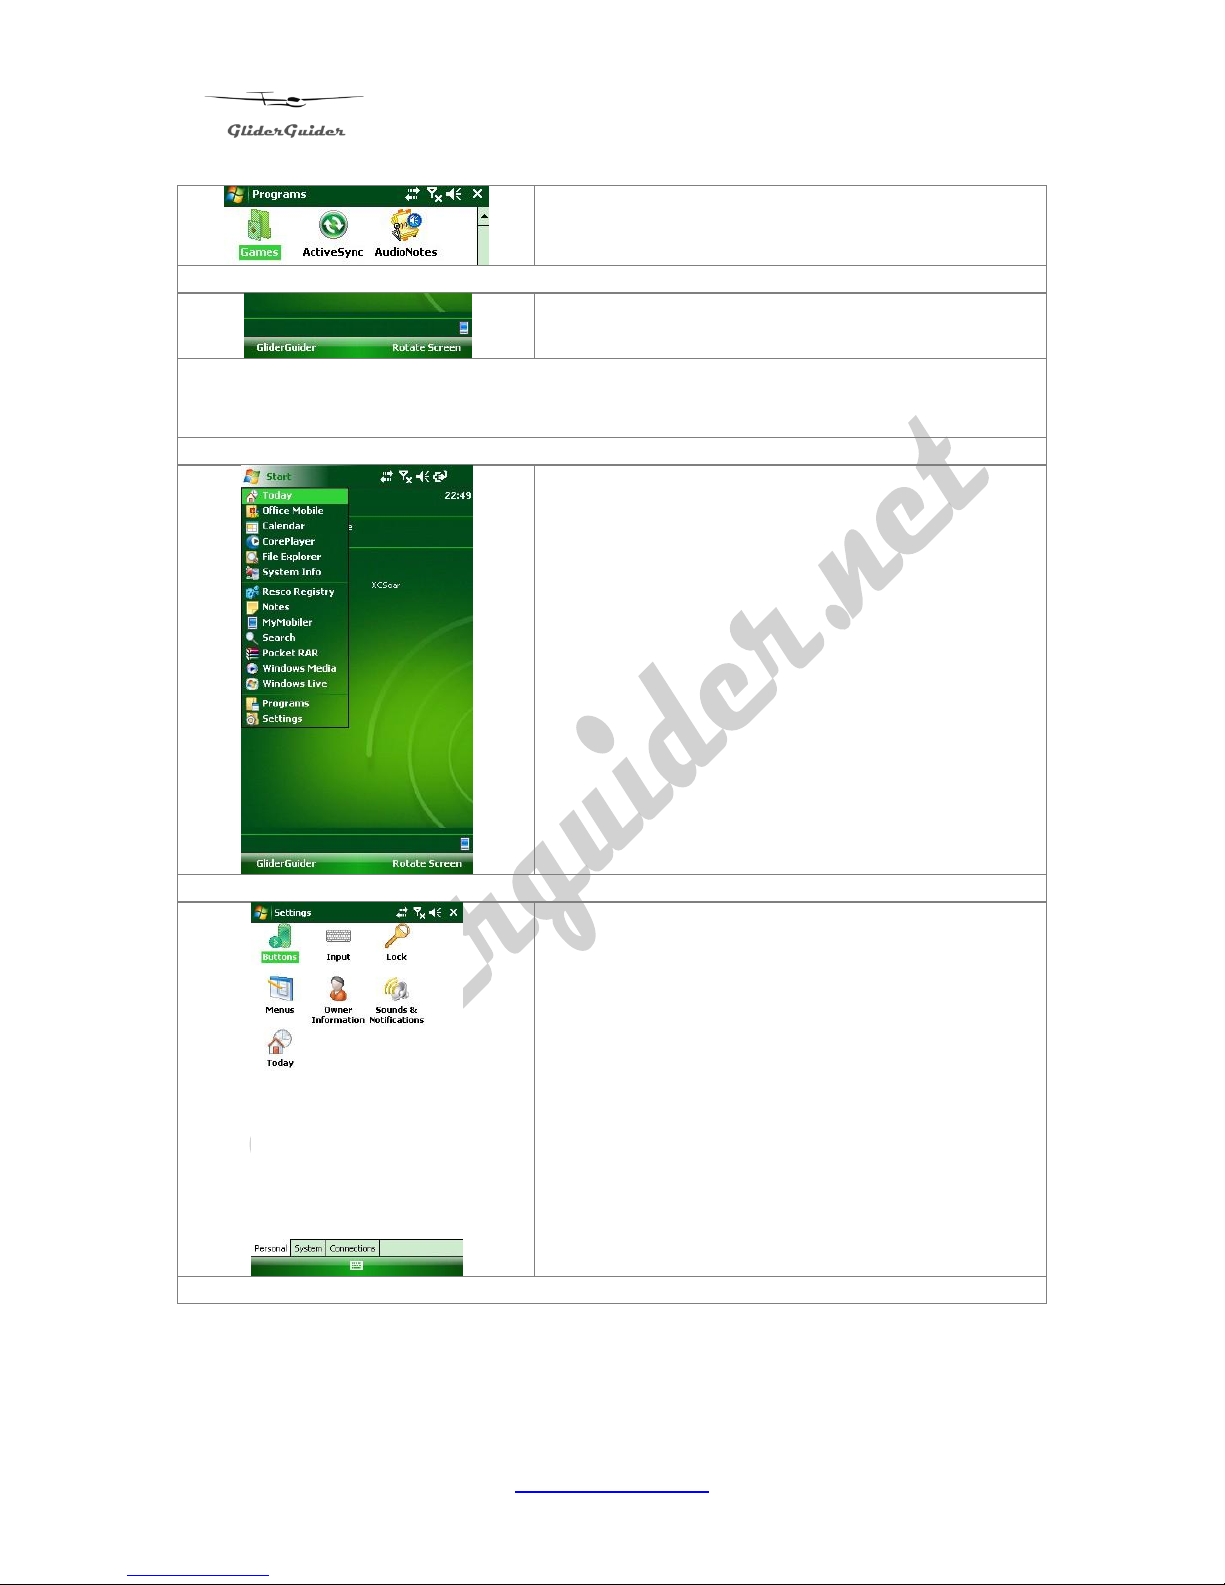
Tap the “x” (top right) to close the current
window.
Tap “Rotate Screen” – to switch the screen
format between Portrait and Landscape
Note: Some Moving Map applications allow user configuration of the screen format
and in such cases these User Settings will take precedence. If not, the application
will start in the format selected using “Rotate Screen”.
From the TODAY screen, tap “Start”
Select “Settings”
Page 7
GliderGuider
USER GUIDE
7
www.gliderguider.net
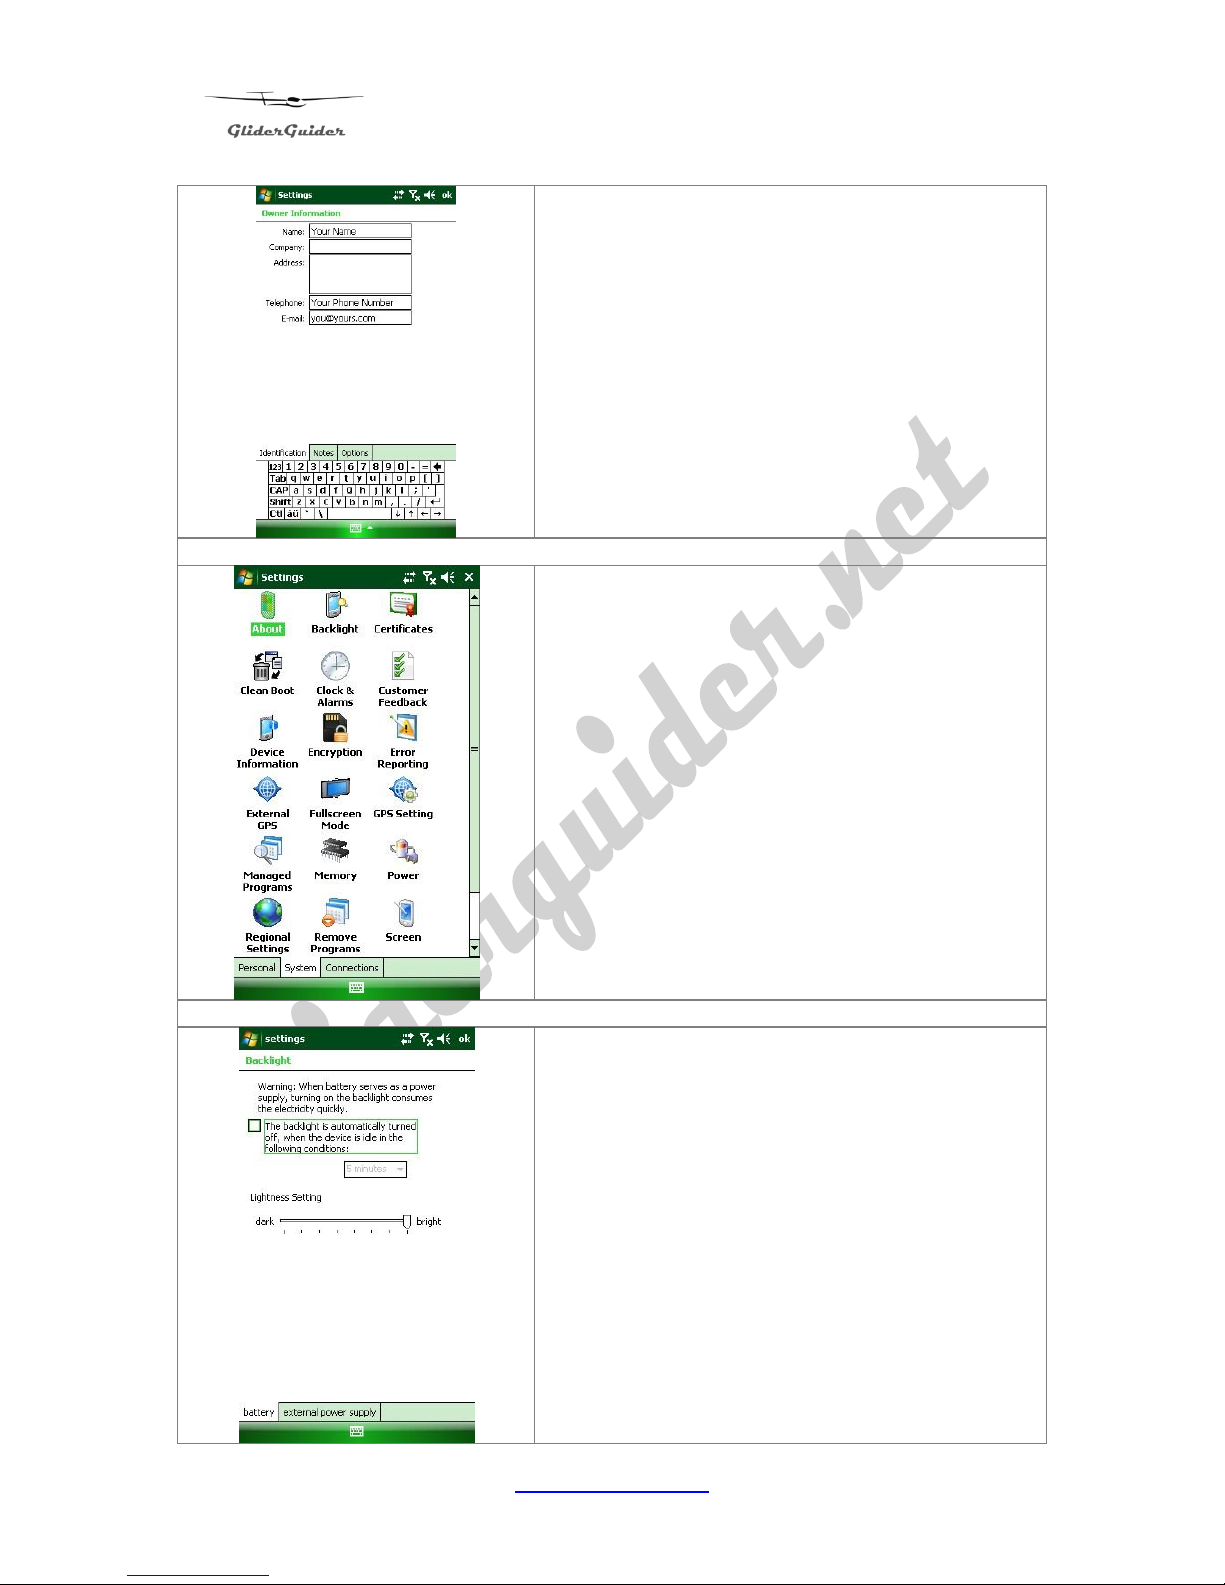
Select “Owner Information”.
Use the on-screen keyboard to enter your details
– if required. This may prove useful in the event
that you lose your GliderGuider!
Tap “ok” (top right) to save and close.
Select the “System” tab (bottom)
Tap “Backlight”.
Un-check the Tick Box and select maximum
brightness – using the slider.
Page 8
GliderGuider
USER GUIDE
8
www.gliderguider.net
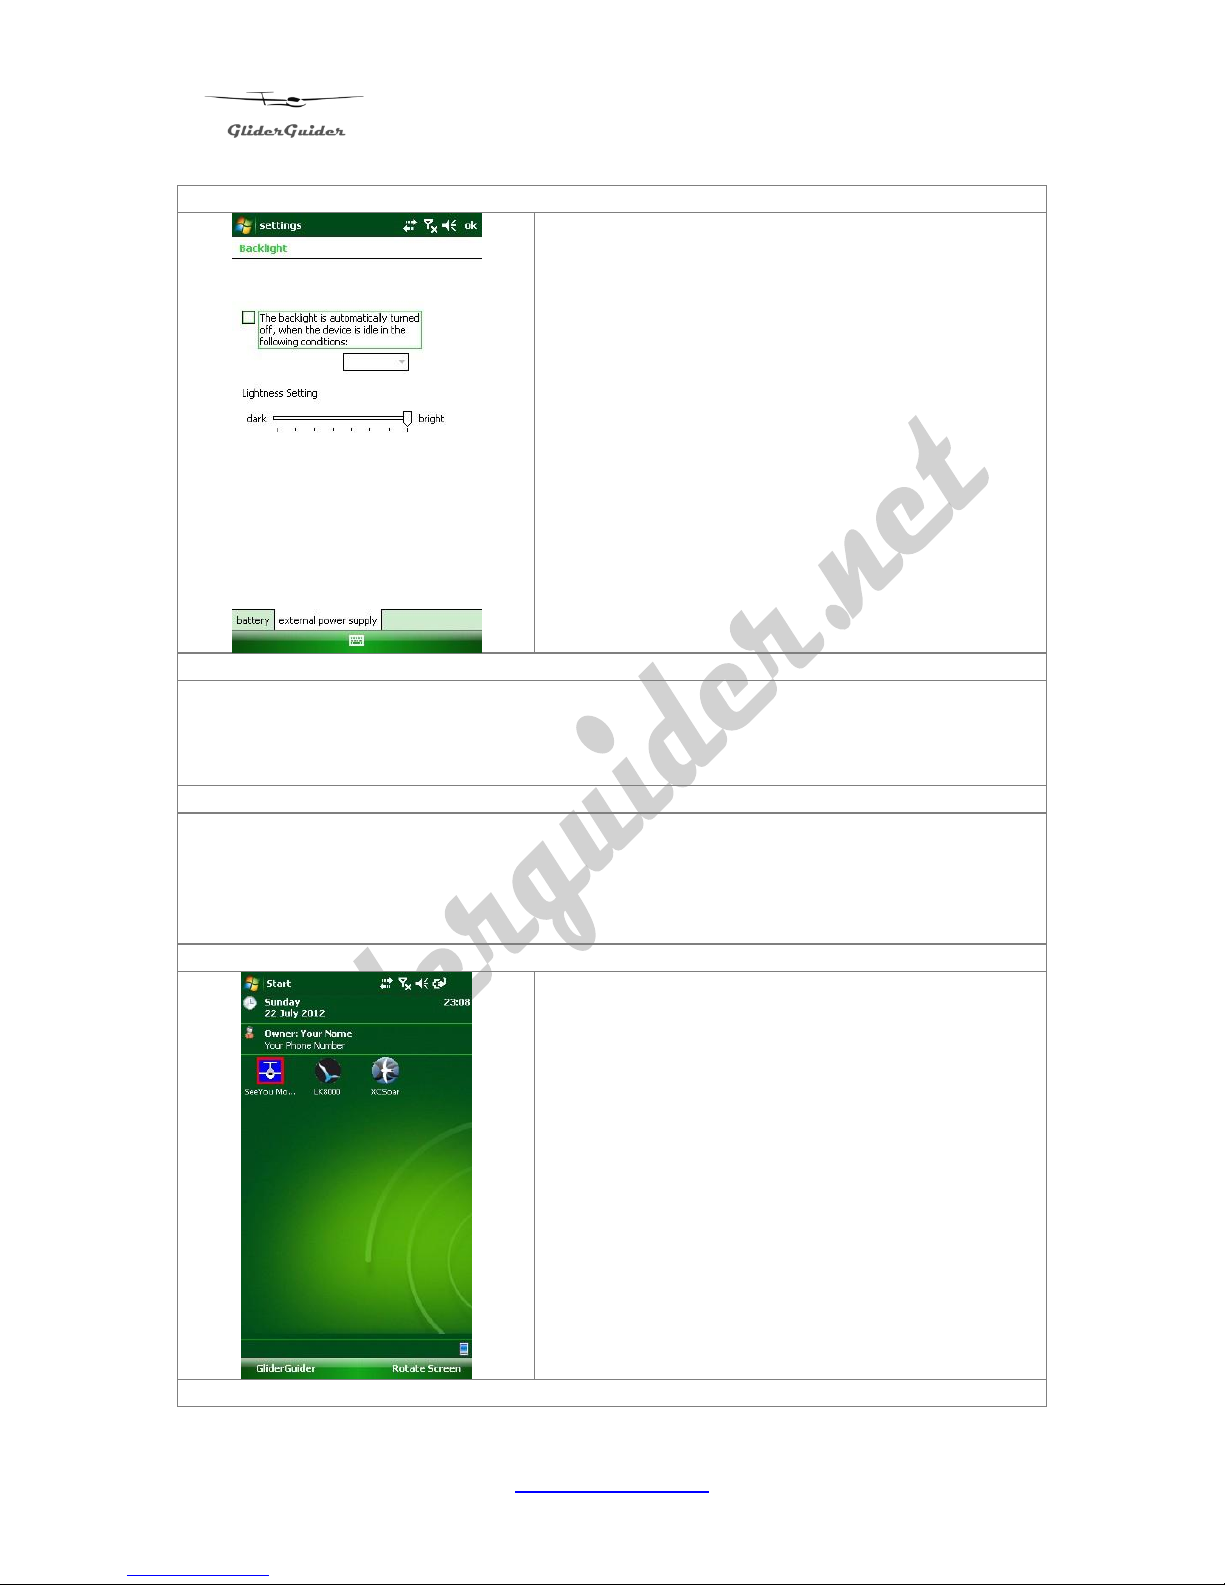
Select the “external power supply” tab.
Un-check the Tick Box and select maximum
brightness – using the slider.
Tap “ok” (top right) to save & close.
While here, take a moment to familiarise yourself with some of the other User
Settings – such as Clock & Alarms and Regional Settings etc.
Tap “ok” (top right) to save changes and close - when done.
Finally, tap “x” (top right) to close the current window.
Opening & closing the various applications:
Note: Both examples (SeeYou Mobile & LK-8000) are shown here in the Portrait
Format, this is just for convenience. Both can be run in Landscape Format if
required.
From the TODAY Screen - select the Moving
Map application you wish to run.
Note: The selection of installed applications may
vary according to your preferences.
Page 9
GliderGuider
USER GUIDE
9
www.gliderguider.net
SeeYou Mobile - is a sophisticated and fairly complex software application and its
operation is well beyond the scope of this User Guide. Please visit www.naviter.si
to download the relevant Operators Manual. Read it carefully and make sure that
you are familiar with its operation before using the system in flight! There are
numerous User Settings which demand your careful consideration.
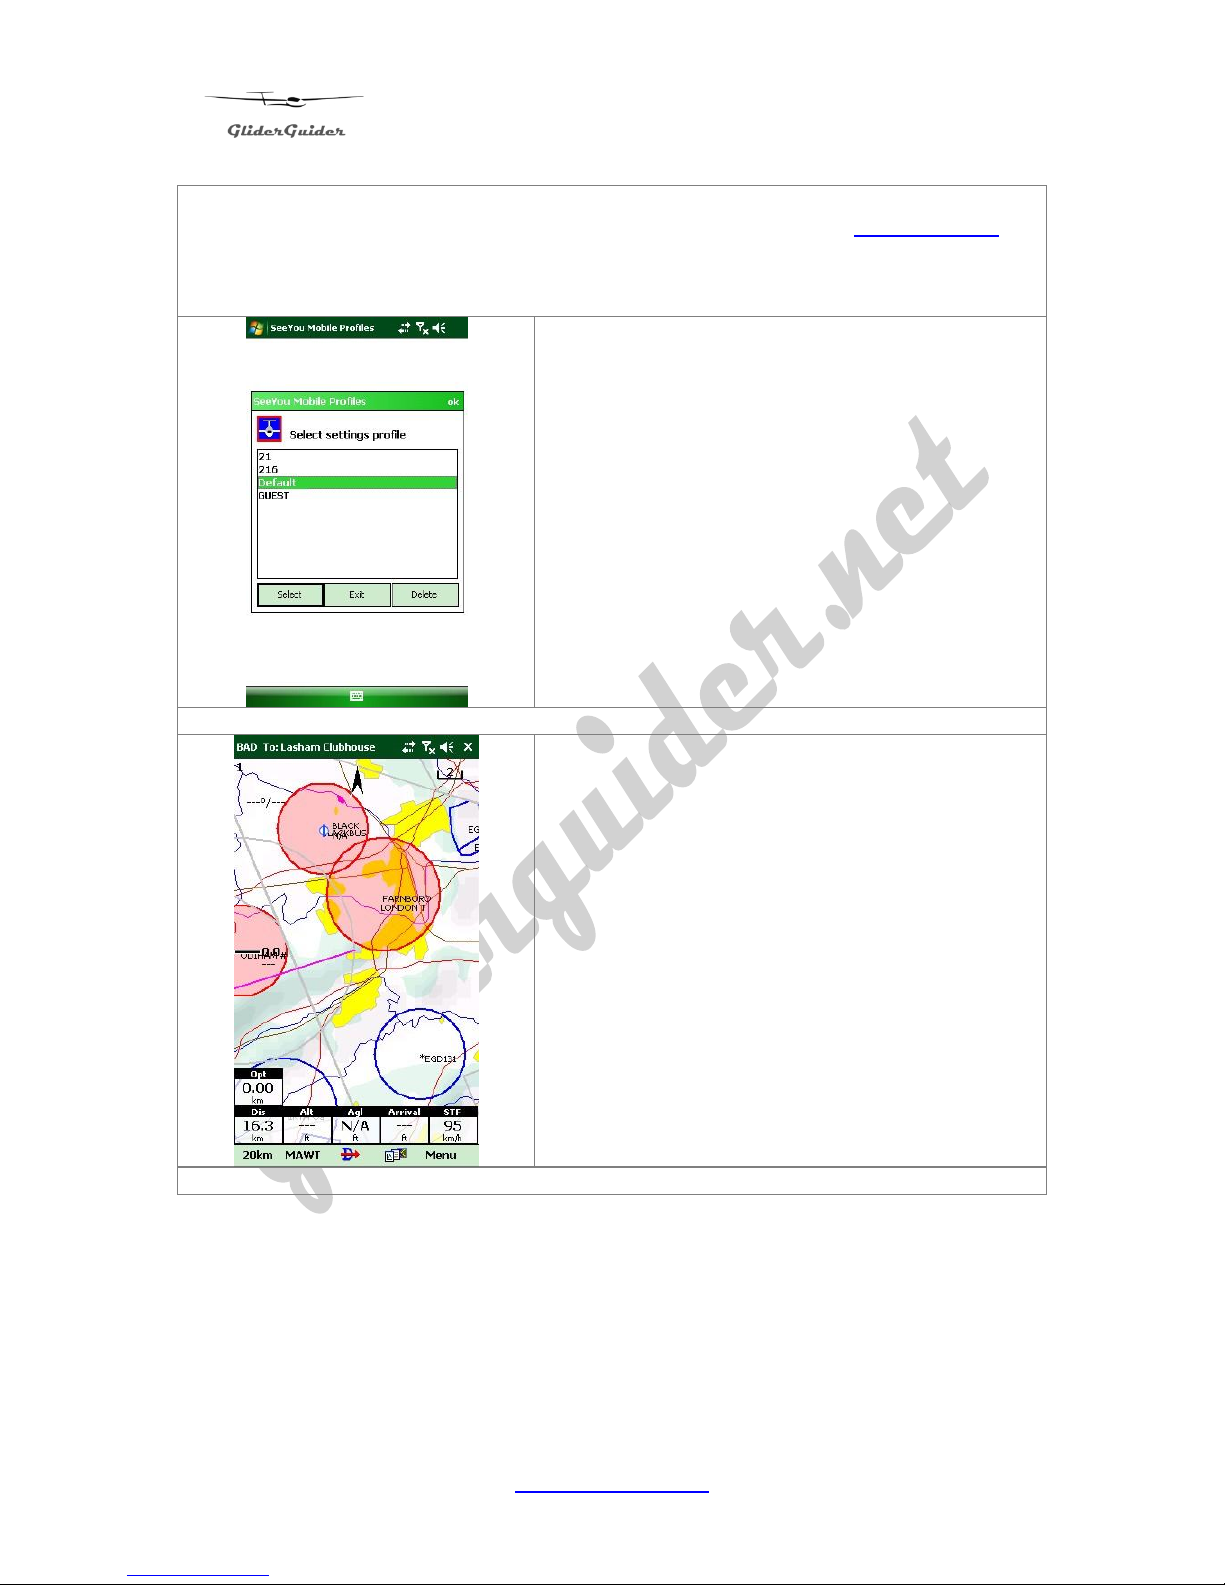
Start by tapping “SeeYou Mobile”.
Select the “Default” profile.
Profiles are an important aspect of SeeYou
Mobile. It’s via these Profiles that you will store
all your User Preferences including glider type,
registration, pilot details and other user settings.
Be sure to read and understand this section of
the Operation Manual!
See You Mobile opens.
Note: This is Screen 1 (see “1” at top left).
See You Mobile provides for two screens (1 & 2)
and you can setup each of these separately via
your user settings. There are lots of them!
The Nav Boxes are displayed at the bottom of
the screen – again, you select which ones to
display (on each of two screens) via the Settings.
Page 10
GliderGuider
USER GUIDE
10
www.gliderguider.net
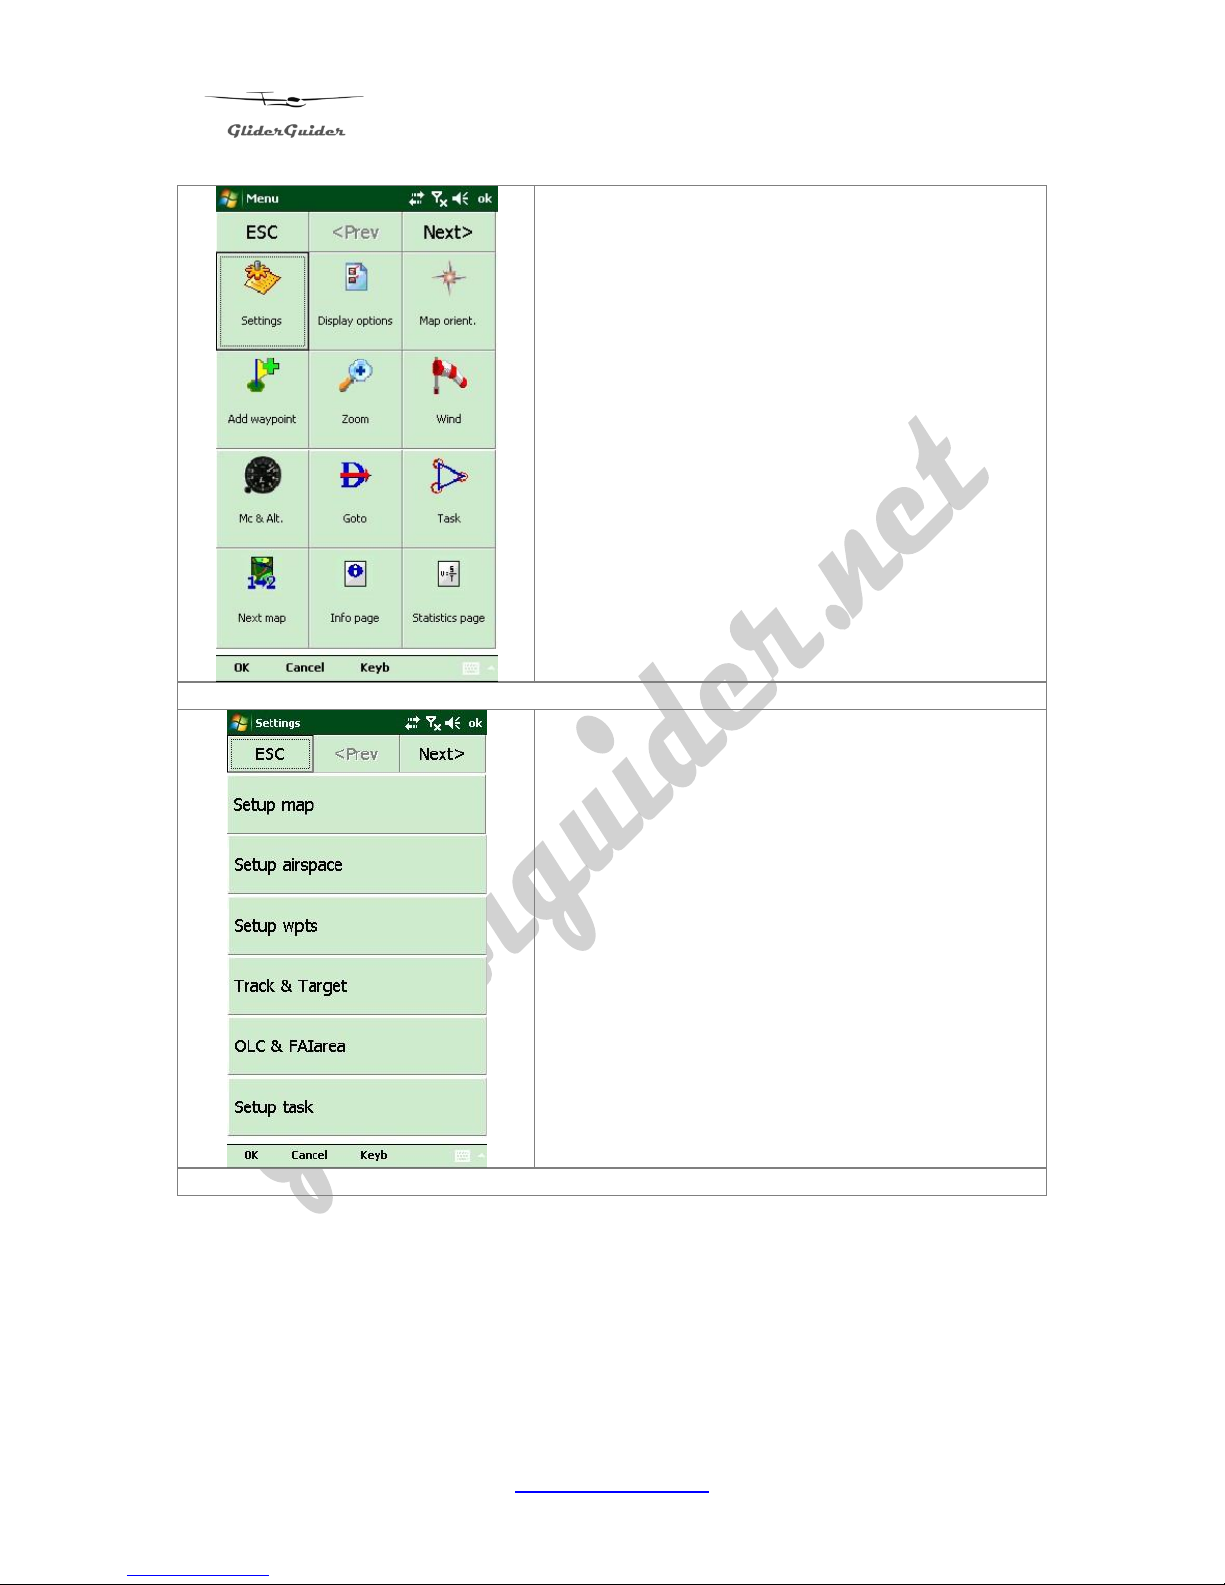
Tap “Menu” (bottom right) to reveal the Menu
page.
Lots of nice toys here – but for the purpose of
this exercise please tap “Settings”.
This is the first of several “Settings” pages via
which you will setup SeeYou Mobile.
You will need to refer to the Operation Manual
for details on each setting, but for the purpose of
this exercise please tap “Next>” (top right).
Page 11
GliderGuider
USER GUIDE
11
www.gliderguider.net
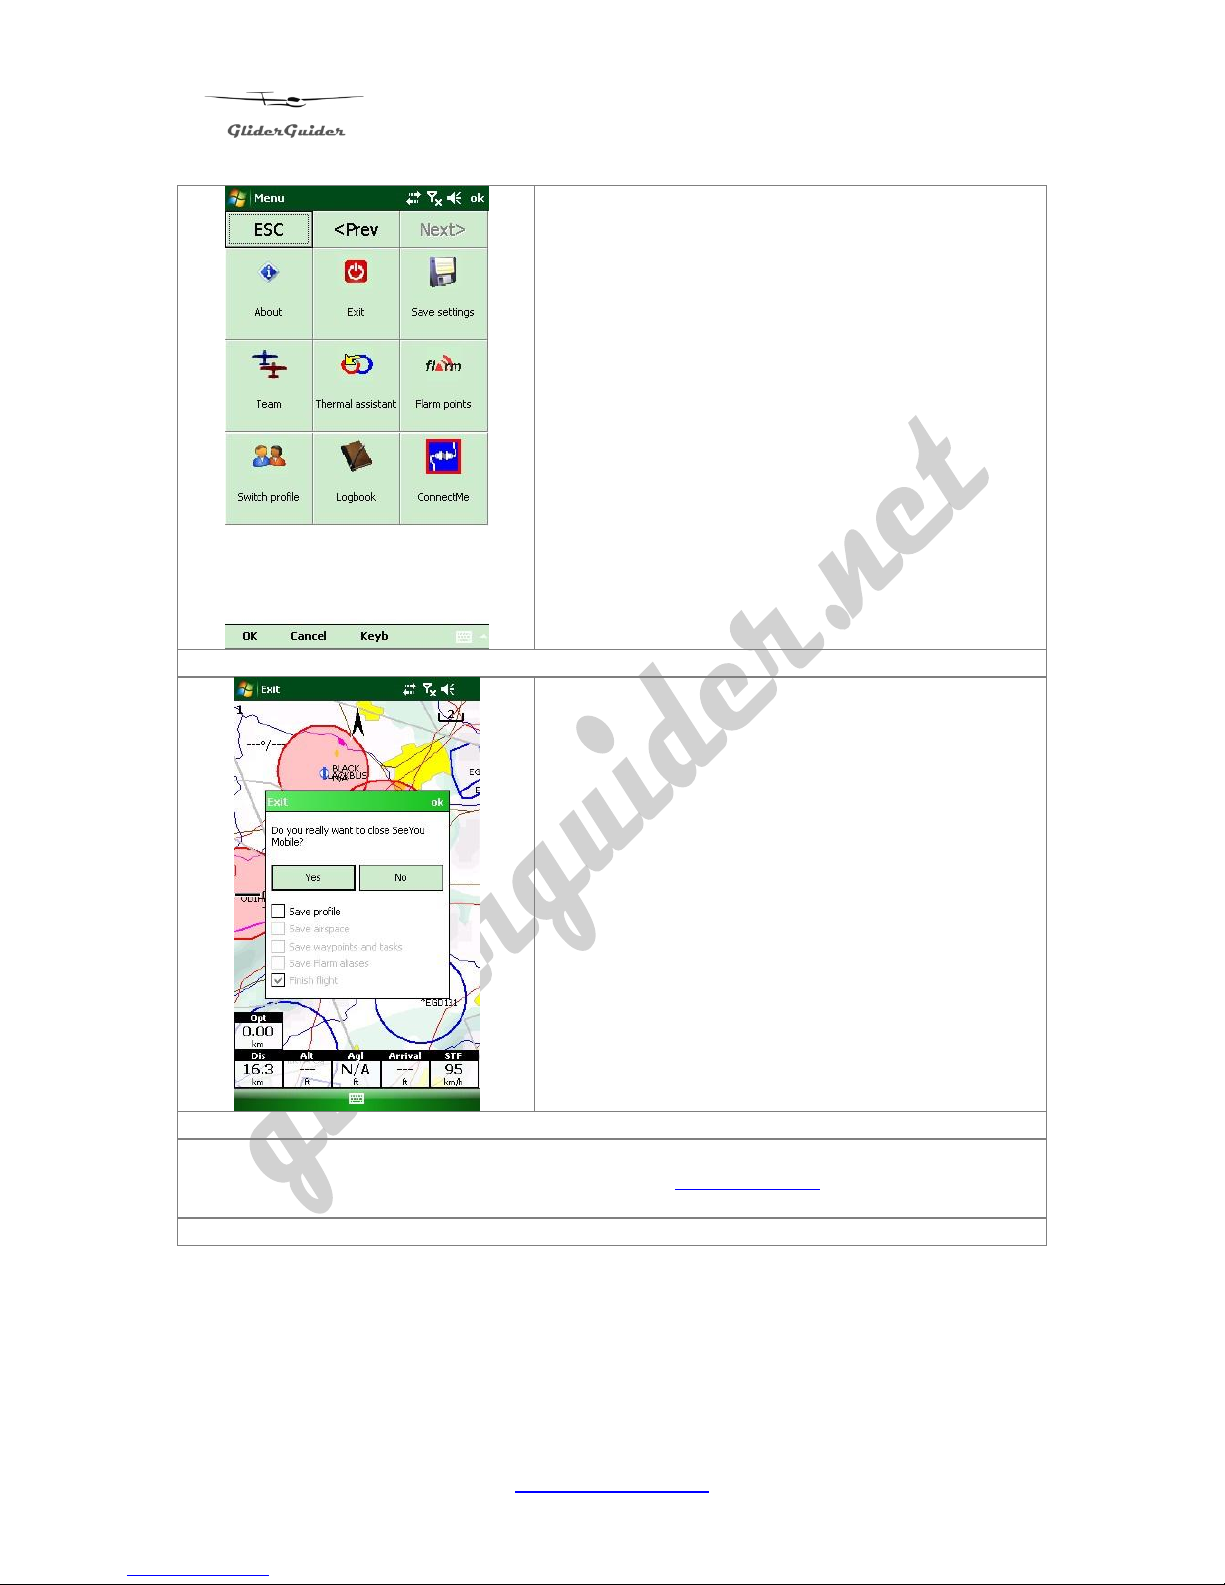
Tap “Exit”
Tap “Yes” to close SeeYou Mobile.
Note the option to Save profile, and other
parameters – depending on what (if any)
changes you might have made during this
session.
Note: While SeeYou Mobile will open and run, it is a Trial Version only and requires
payment and registration for continued use. See www.naviter.si for details. You will
require a licence for SeeYou Mobile PNA version.
Page 12
GliderGuider
USER GUIDE
12
www.gliderguider.net
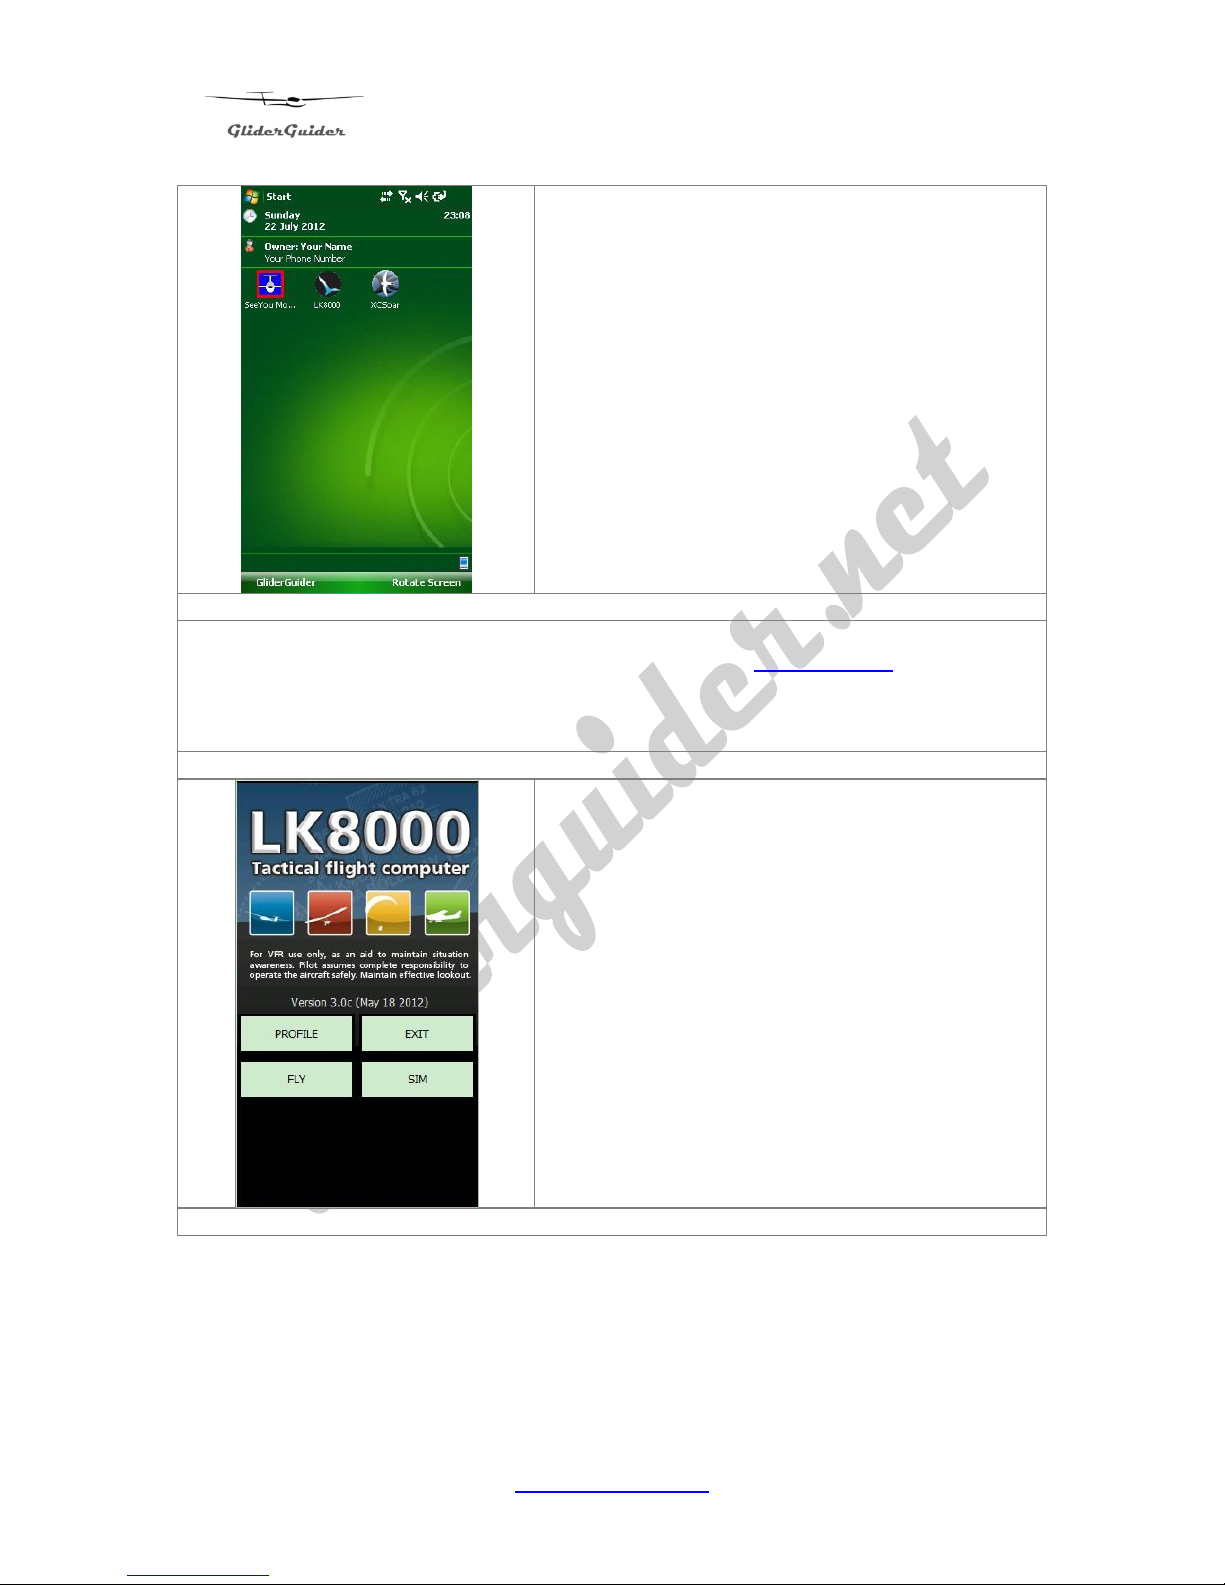
Back to the TODAY screen.
LK-8000 - is a sophisticated and fairly complex software application and its operation
is well beyond the scope of this User Guide. Please visit www.lk8000.it to download
the relevant Operators Manual. Read it carefully and make sure that you are familiar
with its operation before using the system in flight! There are numerous User
Settings which demand your careful consideration
Tap “LK-8000”
LK-8000 plays a tune and opens at the Home
Screen.
From here you can select to run the Simulator,
edit your Profile, Exit or Fly!
For the purpose of this exercise, please tap “Fly”.
Page 13
GliderGuider
USER GUIDE
13
www.gliderguider.net
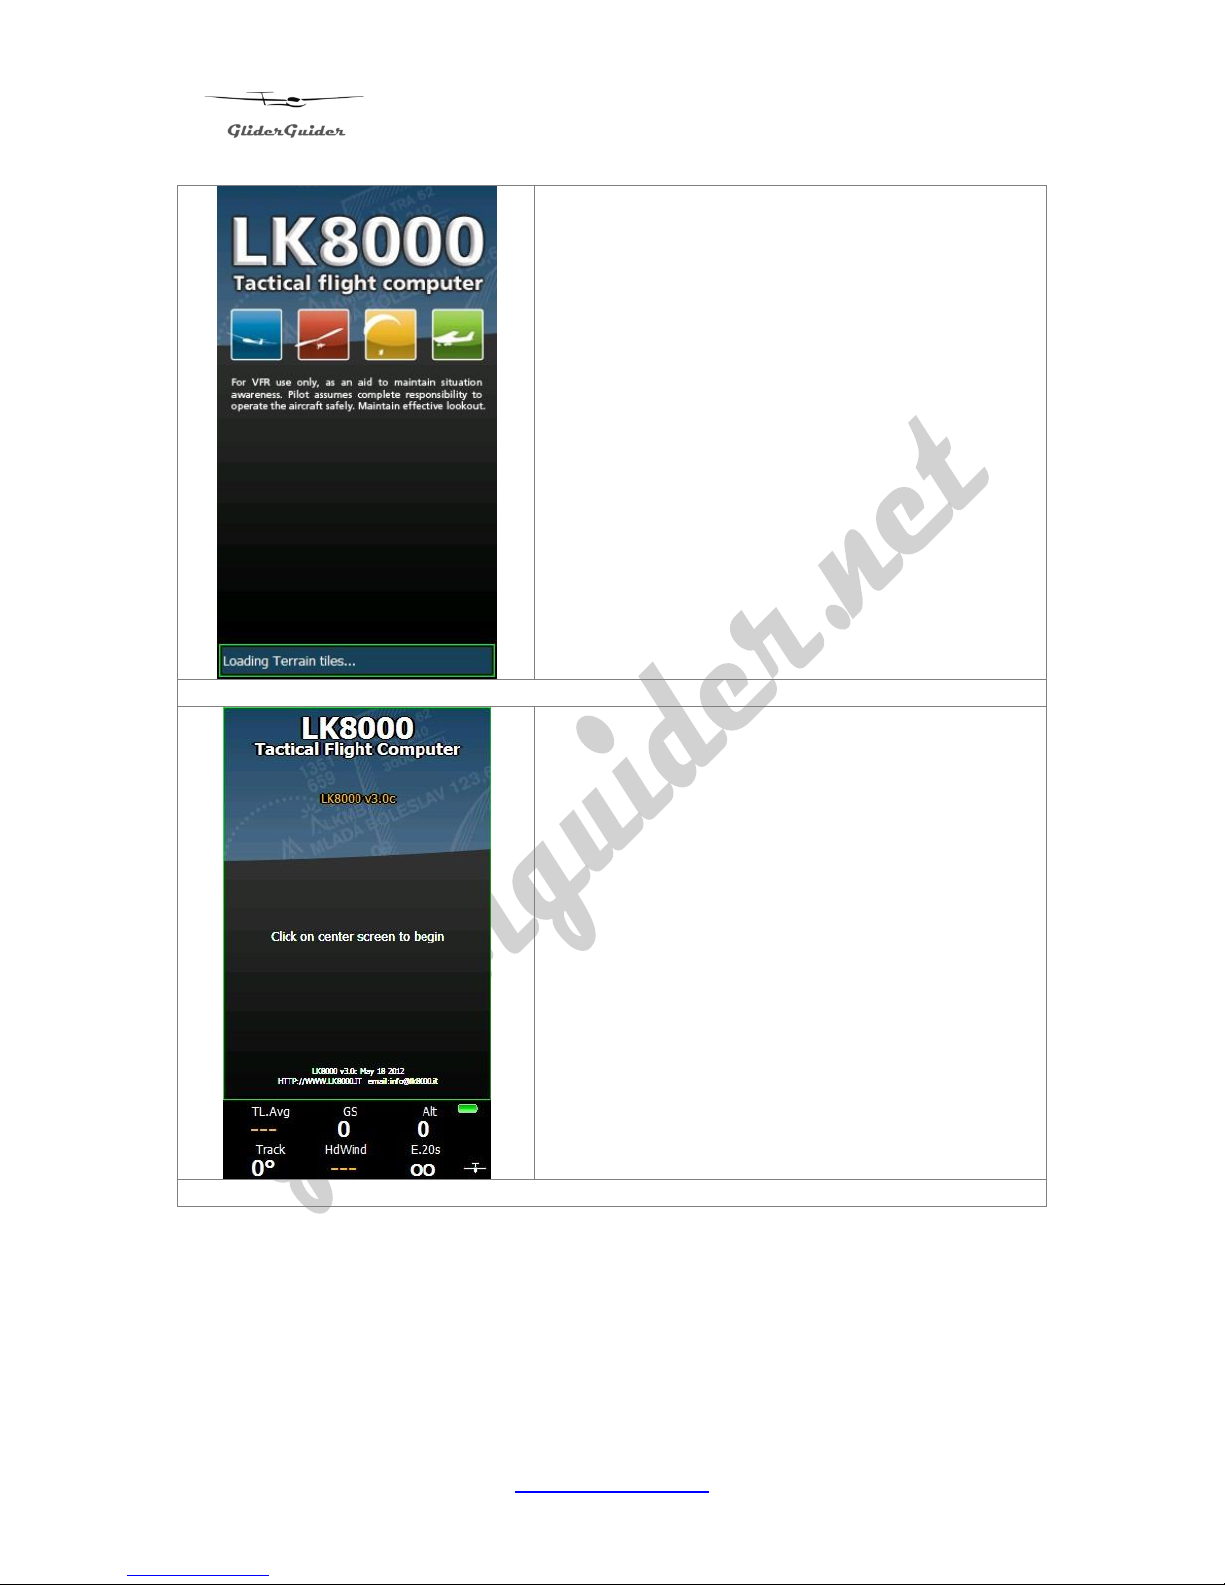
LK-8000 Initialises.
Note the disclaimer – its really important!
Press and hold in the centre area of the screen
for 1 second.
Note: LK-8000 supports several different screen
taps, each accompanied by a distinctive tone –
to make the interface more intuitive in the
cockpit.
Page 14
GliderGuider
USER GUIDE
14
www.gliderguider.net
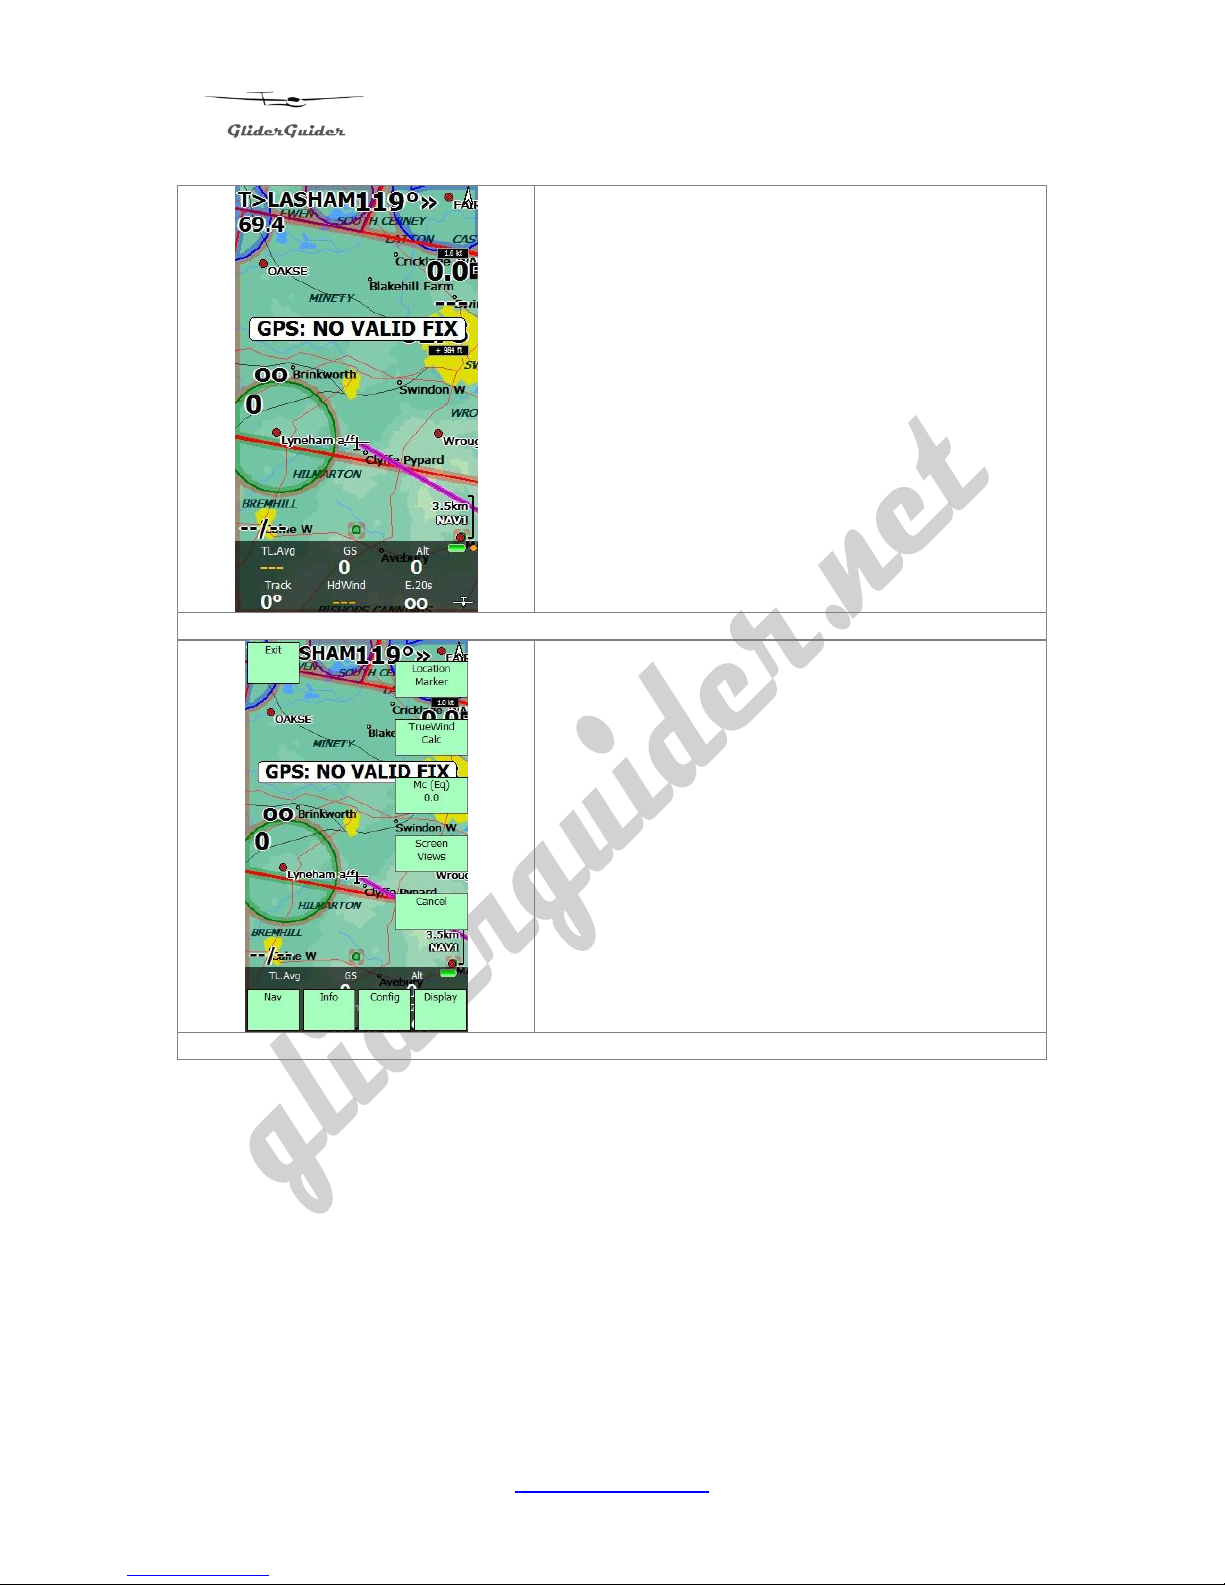
LK-8000 - Navigation Screen.
Don’t worry about the error message at this
stage, its just because we have yet to select the
correct COM Port for the GPS data, this is just
one of many user settings you will need to make!
Tap the small aircraft symbol (bottom right) to
reveal the Menu Page.
Its from here that you navigate around all the
settings in LK-8000.
For the purpose of this exercise, please tap
“Exit”.
Page 15
GliderGuider
USER GUIDE
15
www.gliderguider.net
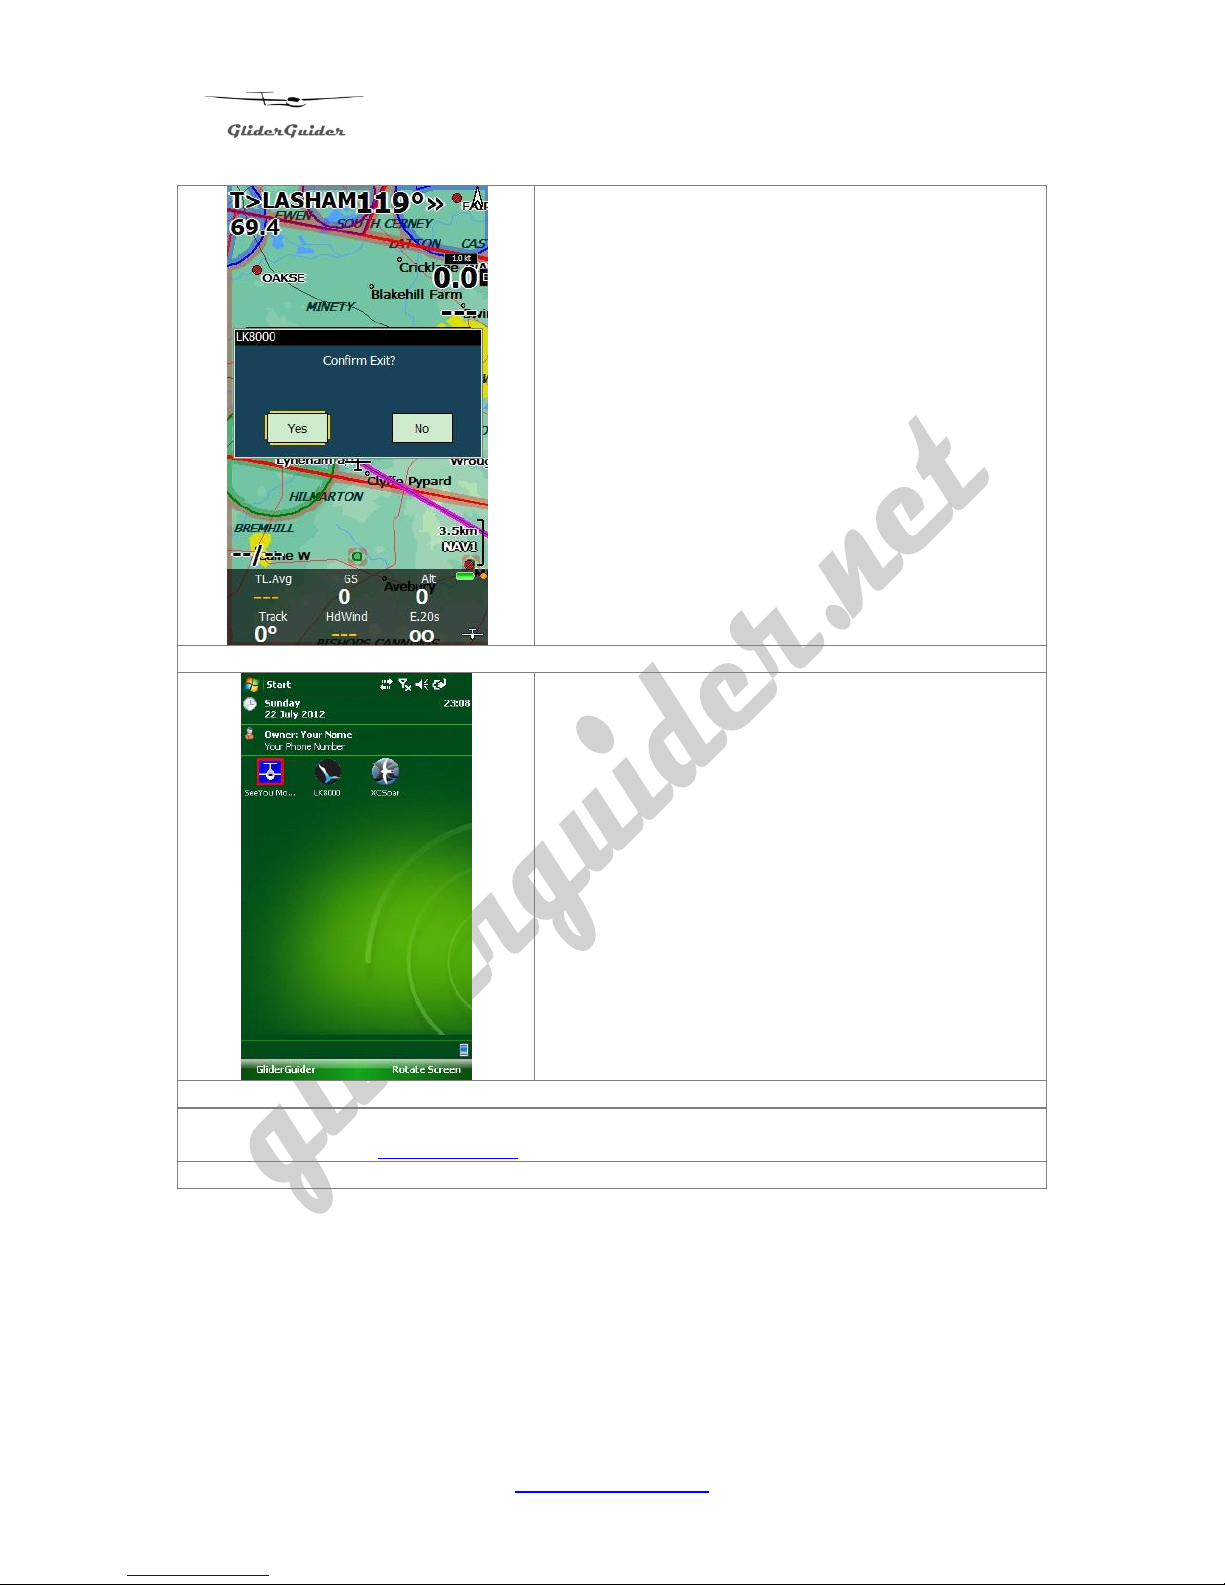
Tap “Yes” to confirm Exit.
Back to the TODAY screen.
Note: LK-8000 is open source software and as such there is no user licence fee – it
is free to use. Visit www.lk8000.it for more information.
Page 16
GliderGuider
USER GUIDE
16
www.gliderguider.net
6. Power off
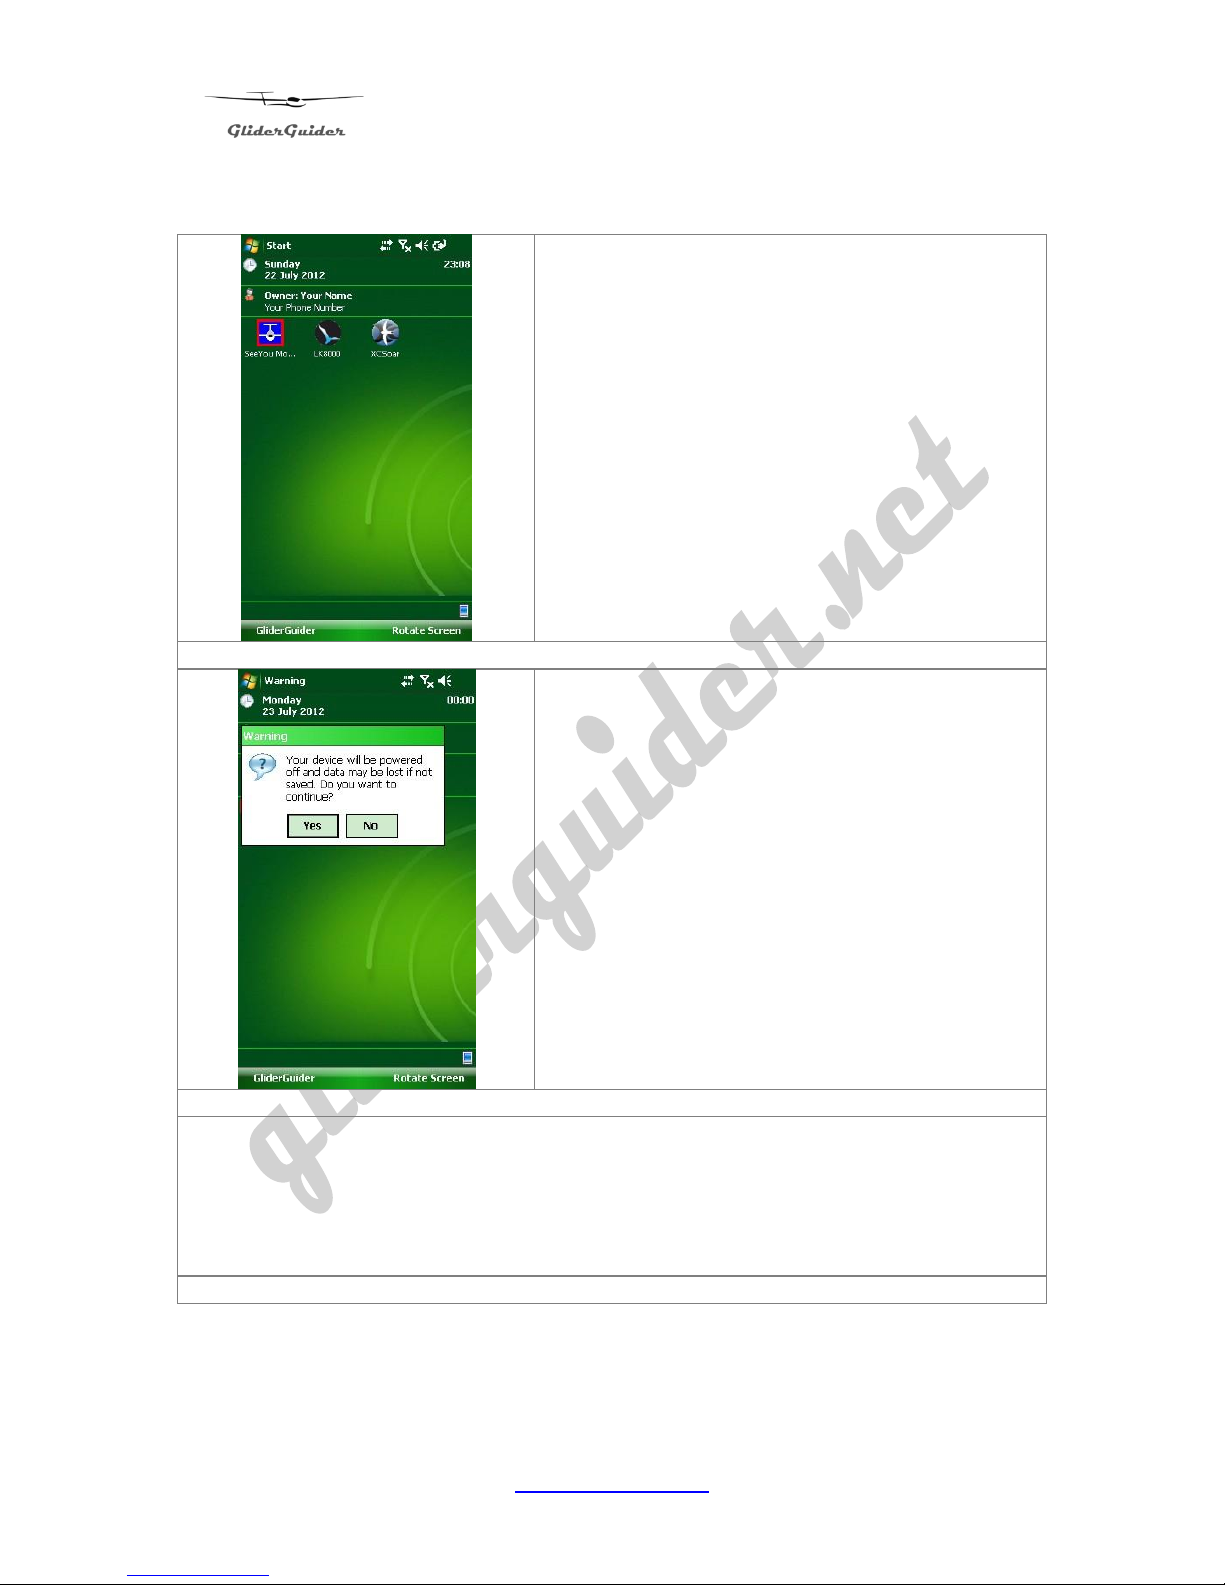
Always close the Application Program in use and
return to the TODAY screen before power down.
Power off – press and hold the Power On/Off
button for approximately 1 second.
Tap “Yes” to power off.
Note: A momentary press of the Power On/Off button will put the GliderGuider
into “suspend mode”. Any applications running at the time will be maintained but
power consumption is radically reduced.
A further momentary press of the Power On/Off button will resume operation –
before the “suspend” operation.
Page 17
GliderGuider
USER GUIDE
17
www.gliderguider.net
7. Connecting to a computer:
You will, from time to time require to connect your GliderGuider to a Personal
Computer – primarily for the purpose of accessing and maintaining User Files
including Log Files.
Connect the device to your Personal Computer using the supplied USB
Interface Cable.
Power on – press and hold the Power Button for approximately 1 second.
The GliderGuider flash screen – always shown in landscape mode.
The “Connect Screen” shows.
Select “Disk Drive” and tap “OK”.
Note: “Active Sync” and “Windows Mobile Device Centre” are additional applications
for Windows computers which support additional levels of connectivity with Windows
Mobile devices. While occasionally useful, these are not essential for the normal
day-to-day use of your GliderGuider device. However, some will find connecting
the device to a computer more convenient than updating the User Files via the
Storage Card.
8. Other Important Information:
User Files:
All Moving Map software applications require a selection of additional information in
the form of computer readable data files in order to operate correctly:
Terrain Map(s)
For the area of intended flight – for location with respect to the
ground.
Vector Map(s)
For the area of intended flight – for location with respect to
ground topology.
Airspace Map(s)
For the area of intended flight – for location with respect to local
airspace
Waypoint File(s)
For the area of intended flight - for location of waypoints (and
other features) for the purpose of navigation flying tasks.
Note: It is essential that these files are installed and maintained in accordance
with the local flying laws and rules as well as any competition rules (where
appropriate). Details regarding the selection and use of these files is beyond
the scope of this User Guide. Please refer to the relevant Application Software
and appropriate Operators Manual for further information.
Page 18
GliderGuider
USER GUIDE
18
www.gliderguider.net
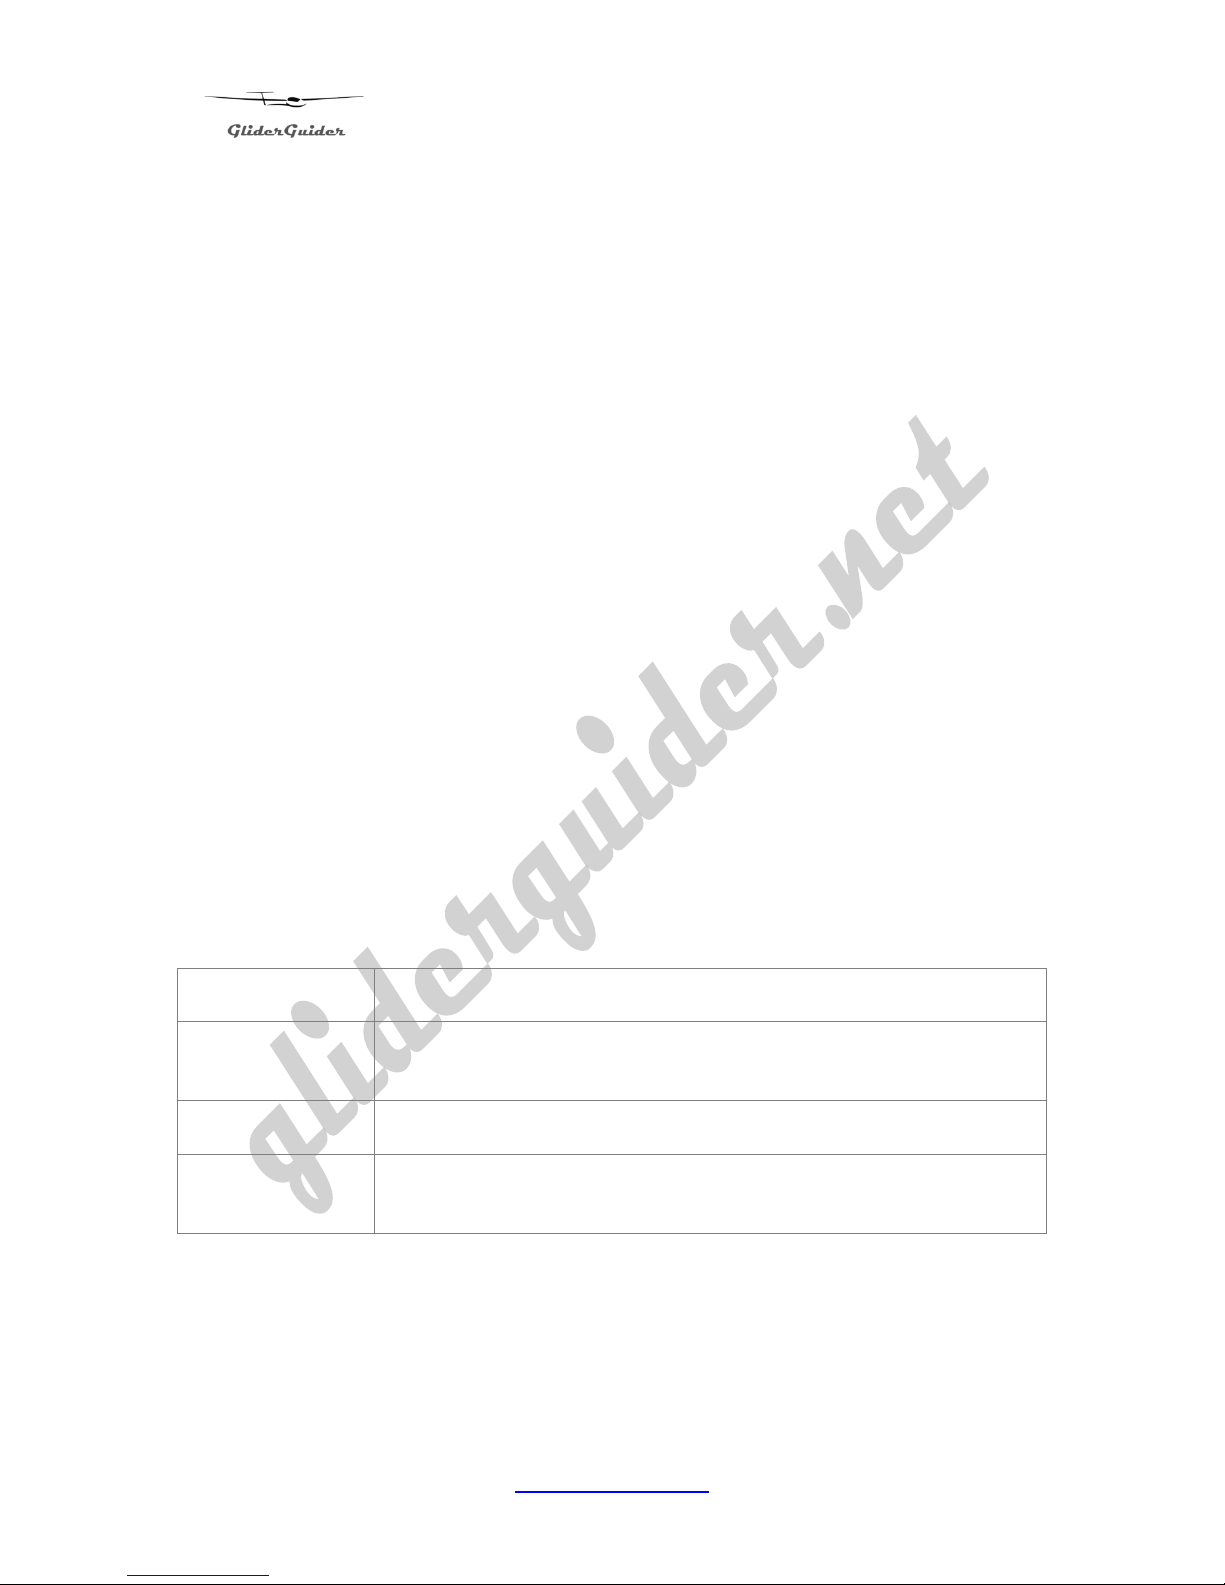
8.1. Location of application software – and associated user files:
The application program files themselves are pre-installed on the supplied MicroSDCard. To locate or view the relevant file locations – proceed as follows:
From the TODAY screen, Tap “Start” and
then “File Explorer”.
“My Device” (top) shows a list of all
Folders & Files on your GliderGuider.
Note: The list on your device may appear
slight be different!
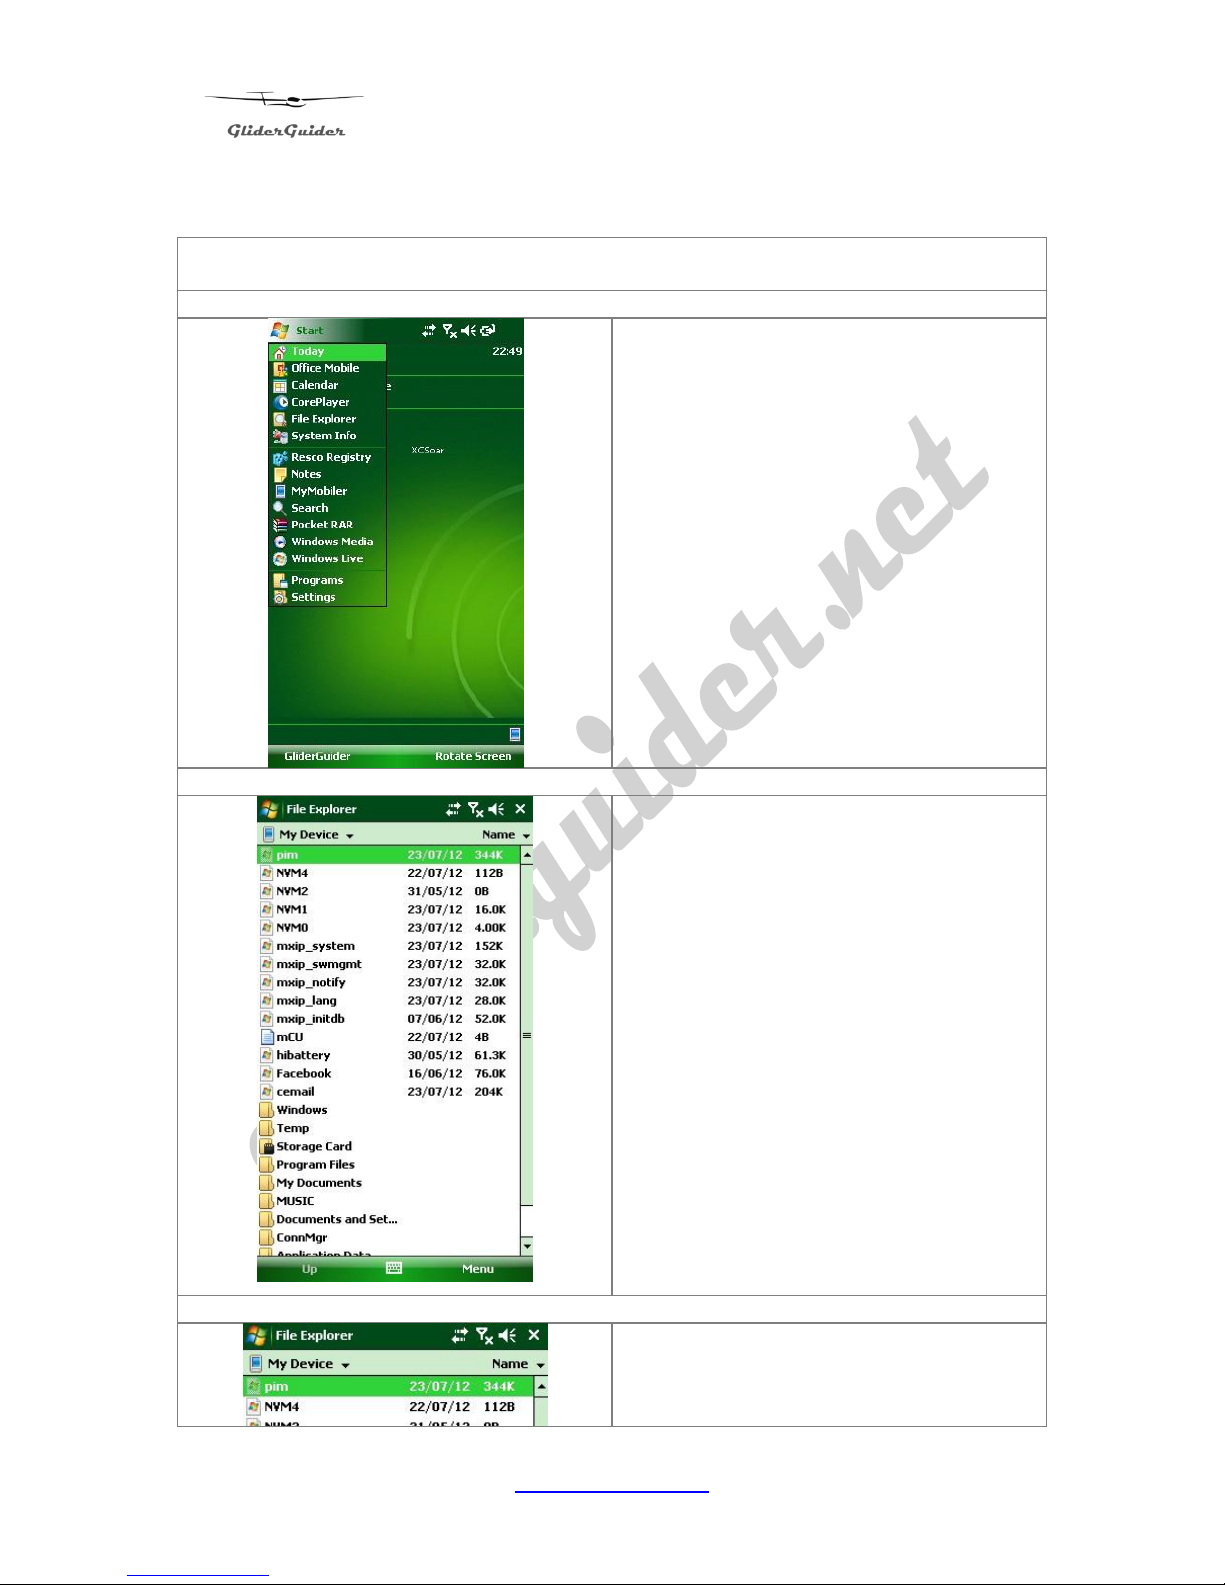
Tap the down arrow to the right of “My
Device” and Select “Storage Card”
Page 19
GliderGuider
USER GUIDE
19
www.gliderguider.net
See list of all Folders & Files on the
Micro SDCard.
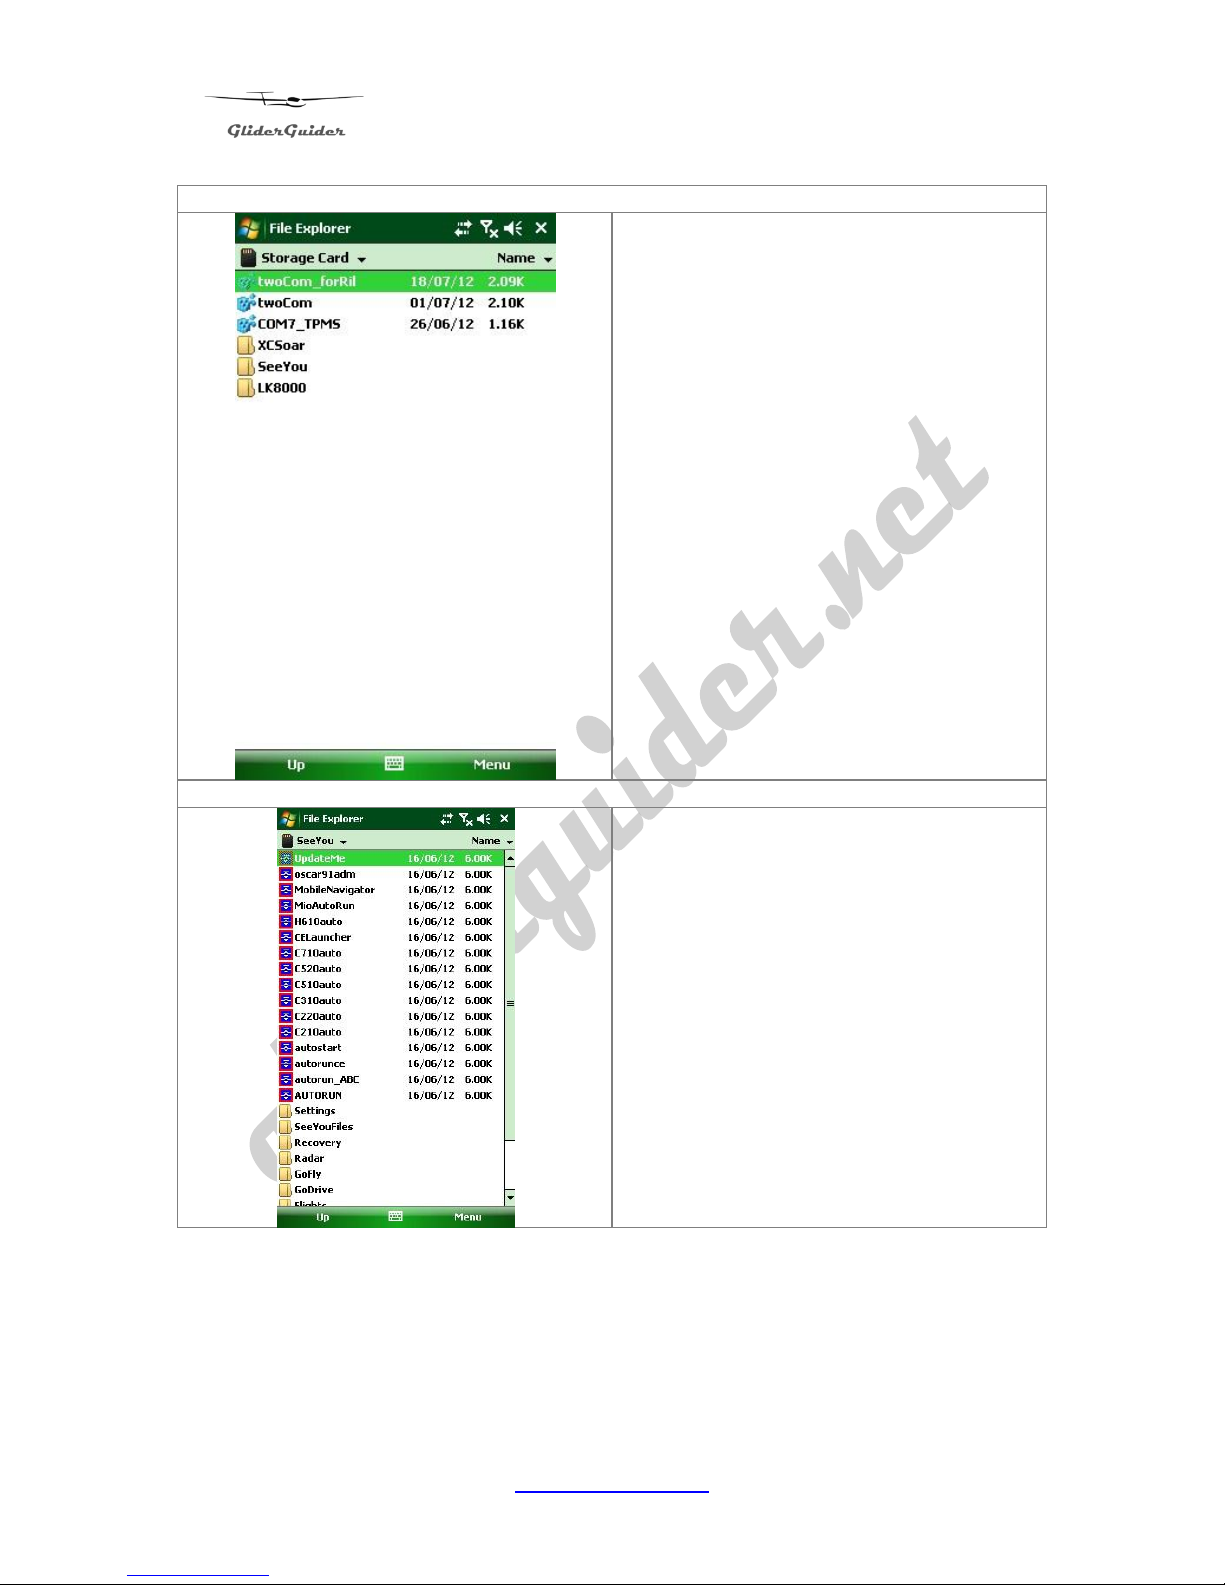
Select “SeeYou”
Note: Always take care when inserting
the Storage Card into the device. Make
sure that the card is properly aligned with
the internal card slot before pressing it
home. Some may find the use of a stylus
(or similar) may help.
See list of Folders & Files associated
with the SeeYou Mobile application.
Page 20
GliderGuider
USER GUIDE
20
www.gliderguider.net
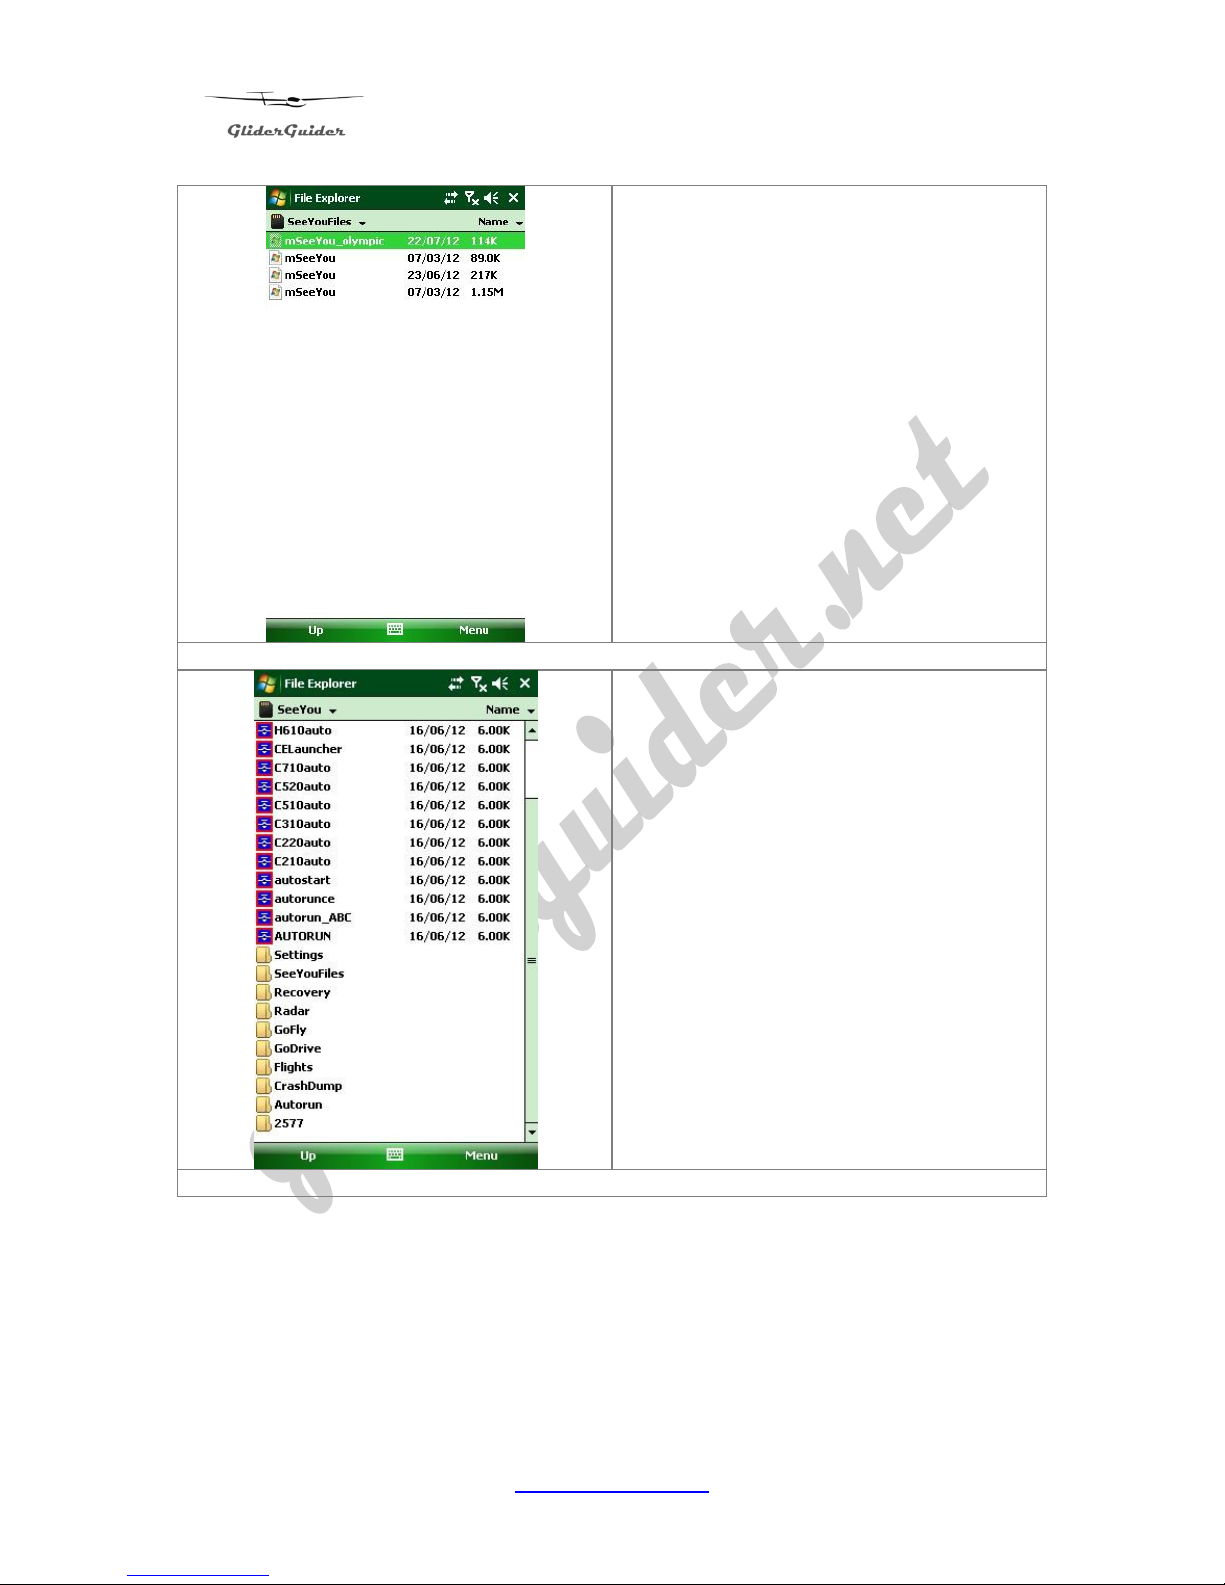
The User Files described above are
stored in the “SeeYouFiles” folder.
Tap “Up” (lower short-cut bar) to return to
the full listing and note that the Log Files
recorded by SeeYou will be saved in the
“Flights” folder.
Page 21
GliderGuider
USER GUIDE
21
www.gliderguider.net
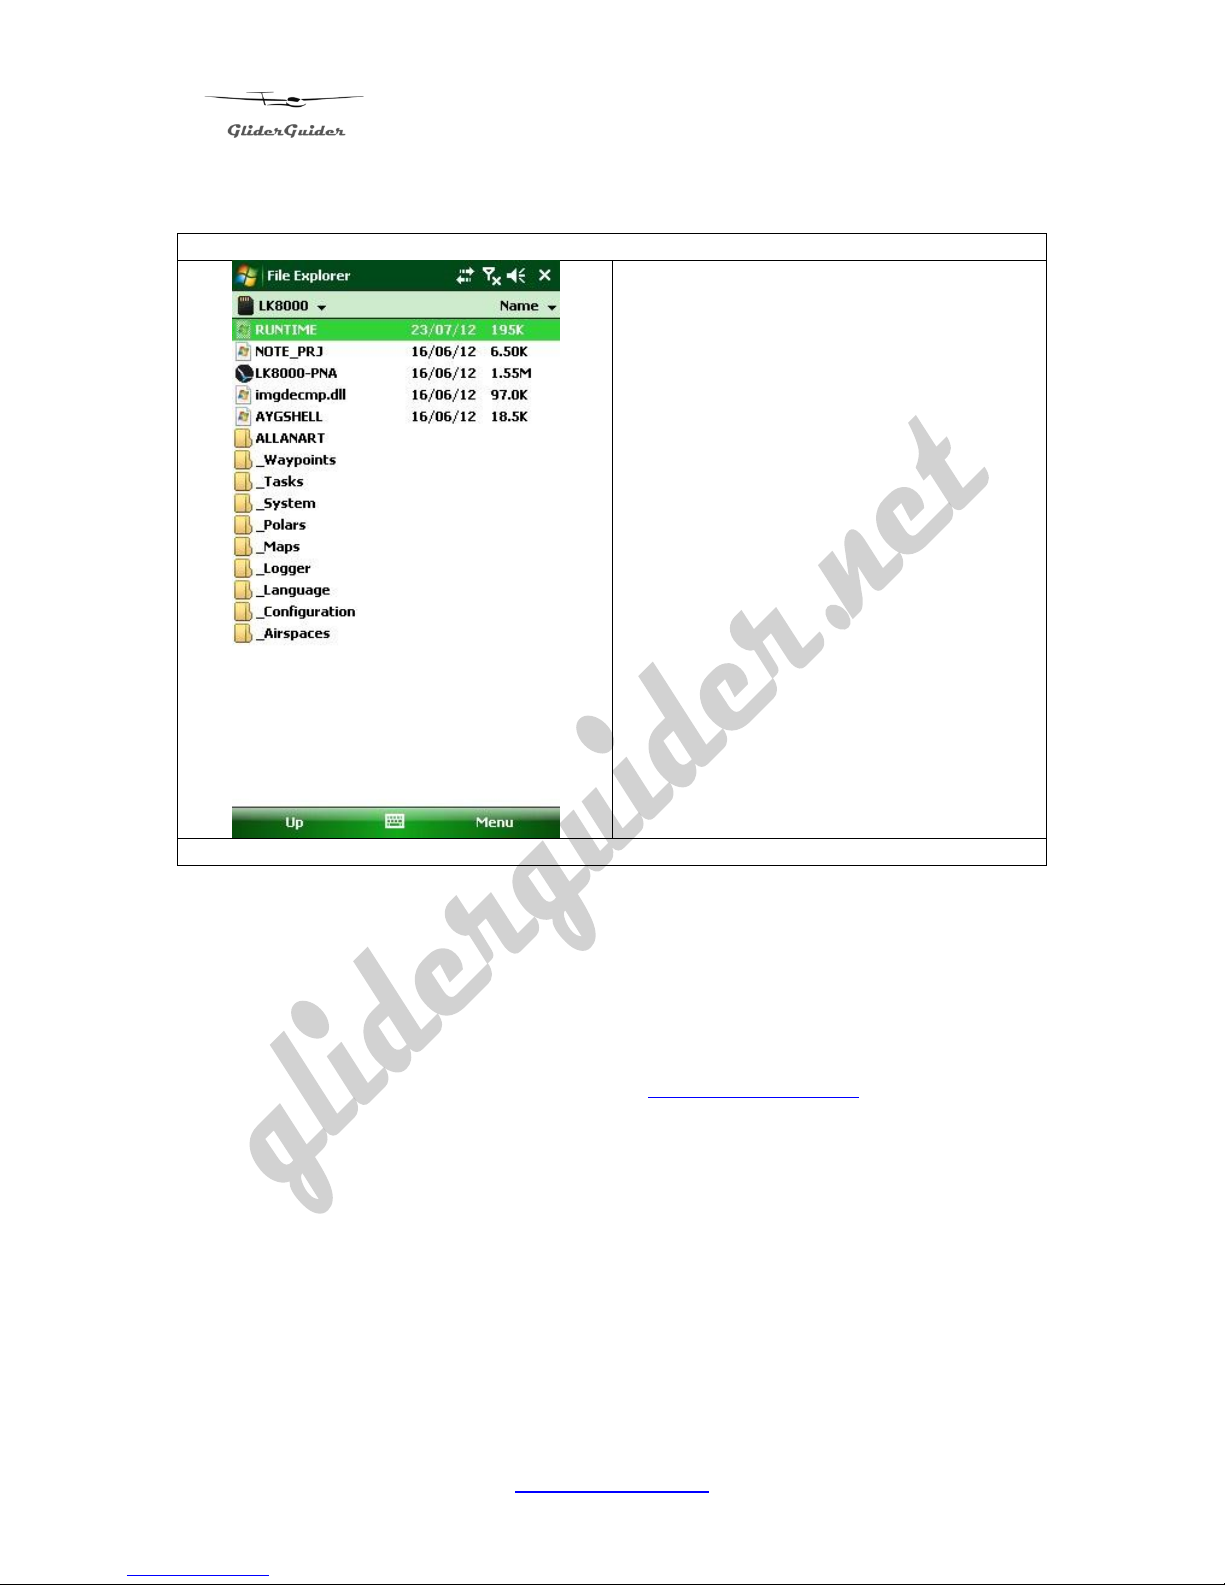
Next we will take a look at the file locations for LK-8000
Select “Storage Card” and this time
select the “LK8000” folder.
See list of Folders & Files associated
with the LK-8000 application.
The User Files described above are
stored in the relevant named folders:
_Waypoints
_Maps
_Airspaces
Log Files recorded by LK-8000 will be
saved in the “_Logger” folder.
Note: We offer an annual update service to those customers who want it please contact us for details.
8.2. External Interface:
The device supports a 10 pin Mini-B USB connector which provides options for
interfaces to a variety of external instruments such as Vario Systems, Flight
Recorders and FLARM units – please refer to www.gliderguider.net for further details
regarding External Interfaces.
8.3. COM Port Settings – for the internal GPS:
The internal GPS is assigned to COM 4. While this COM Port assignment can be
changed it is not recommended to so as this may result in Port Conflicts.
Typical communication port settings are:
Baud Rate:
9600
Parity:
None
Bits:
8
Stop Bit:
1
DTR:
No
RTS:
No
Page 22
GliderGuider
USER GUIDE
22
www.gliderguider.net
Setting up a Bluetooth connection:
Characteristics of Bluetooth devices vary considerably and as such the precise
process involved may differ from that shown. Please use the steps outlined below a
general guide.
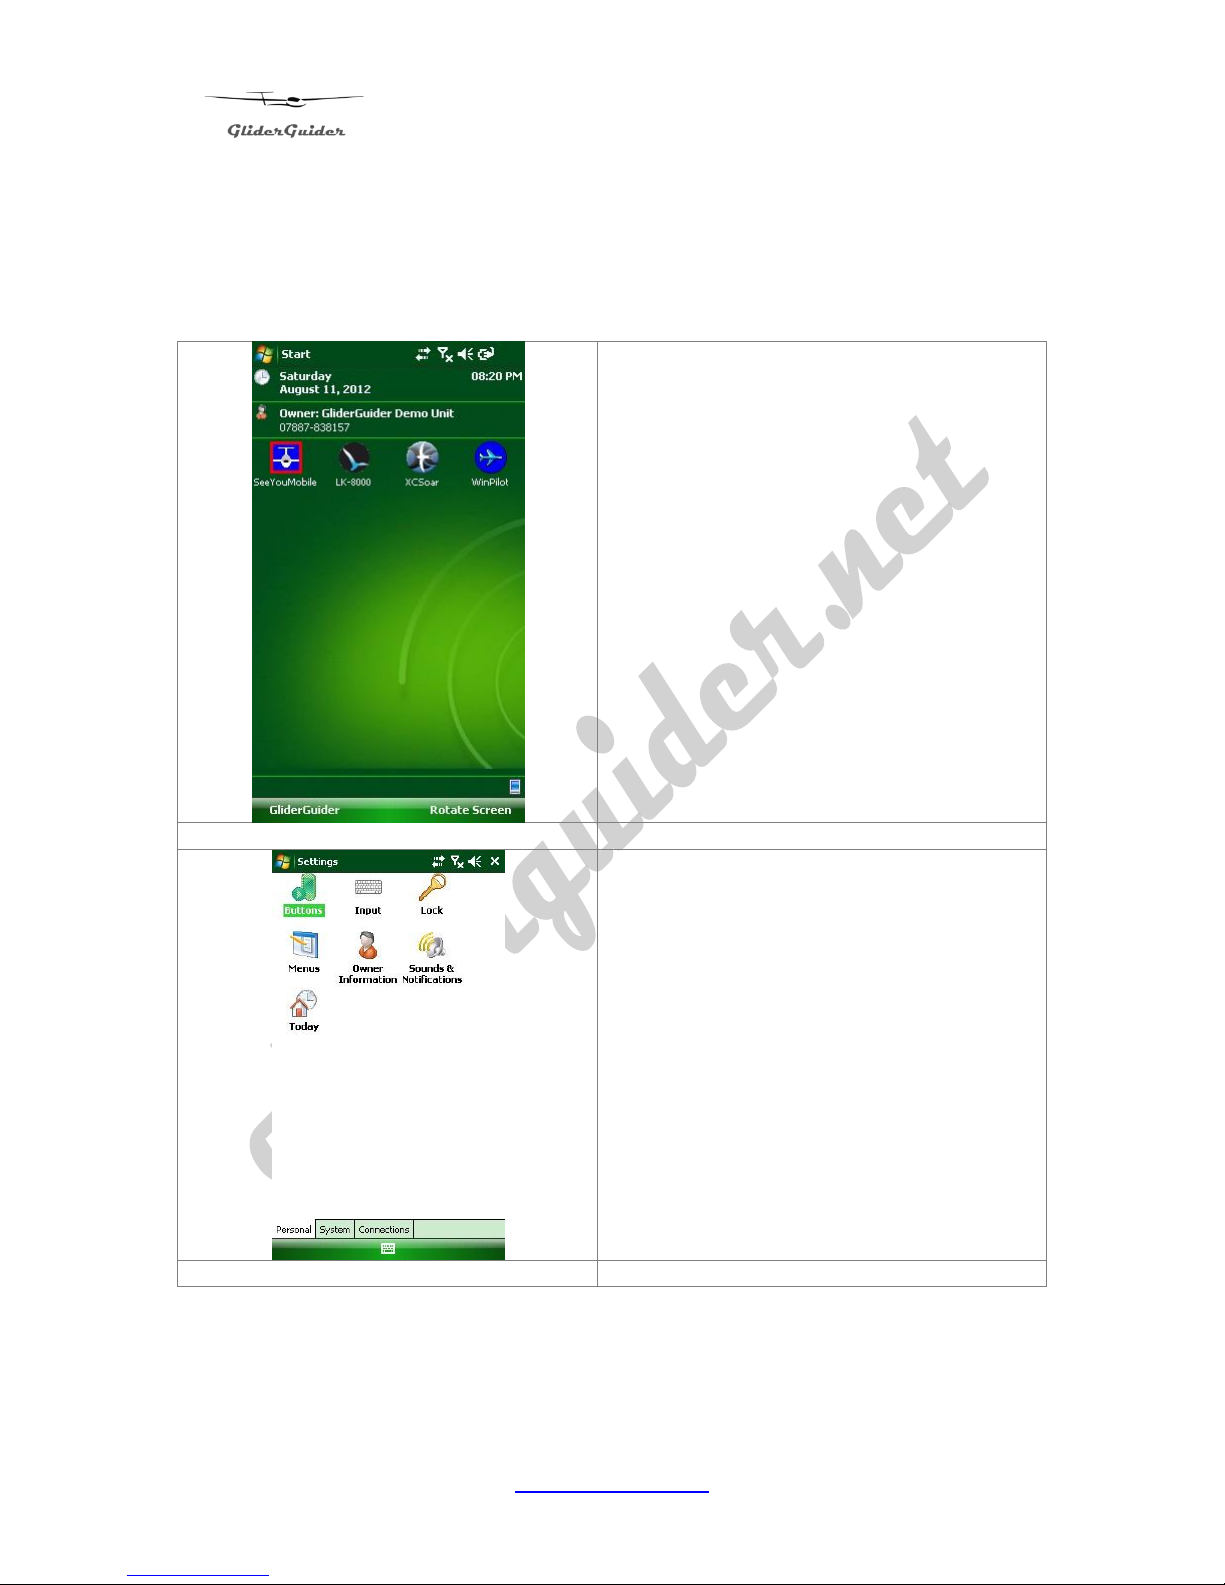
From the Start Menu – select “Settings”.
Select the “Connections” tab – from the
menu at the bottom.
Page 23
GliderGuider
USER GUIDE
23
www.gliderguider.net
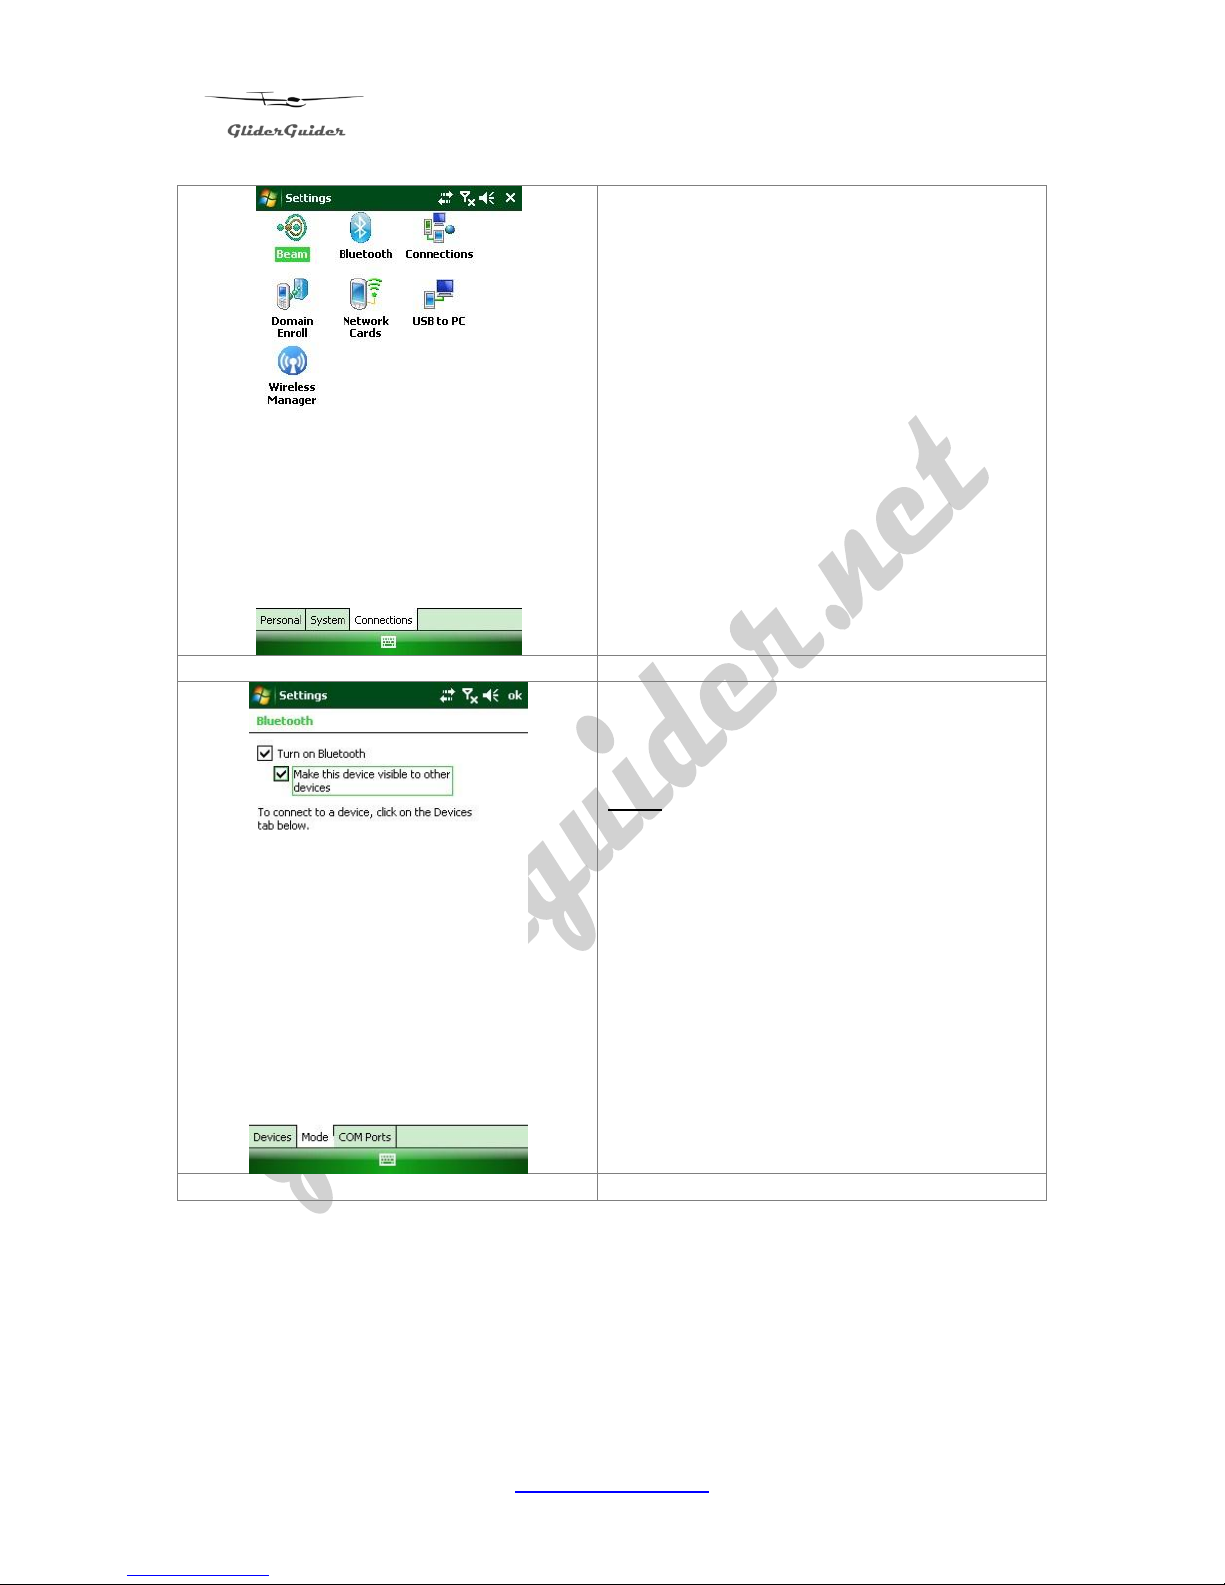
Tap the Bluetooth icon to open the
connection dialogue.
Select the Mode Tab at the bottom and
tick both boxes to enable the Bluetooth
service.
Note: Enabling the Bluetooth service will
place an additional burden on the battery.
Page 24
GliderGuider
USER GUIDE
24
www.gliderguider.net
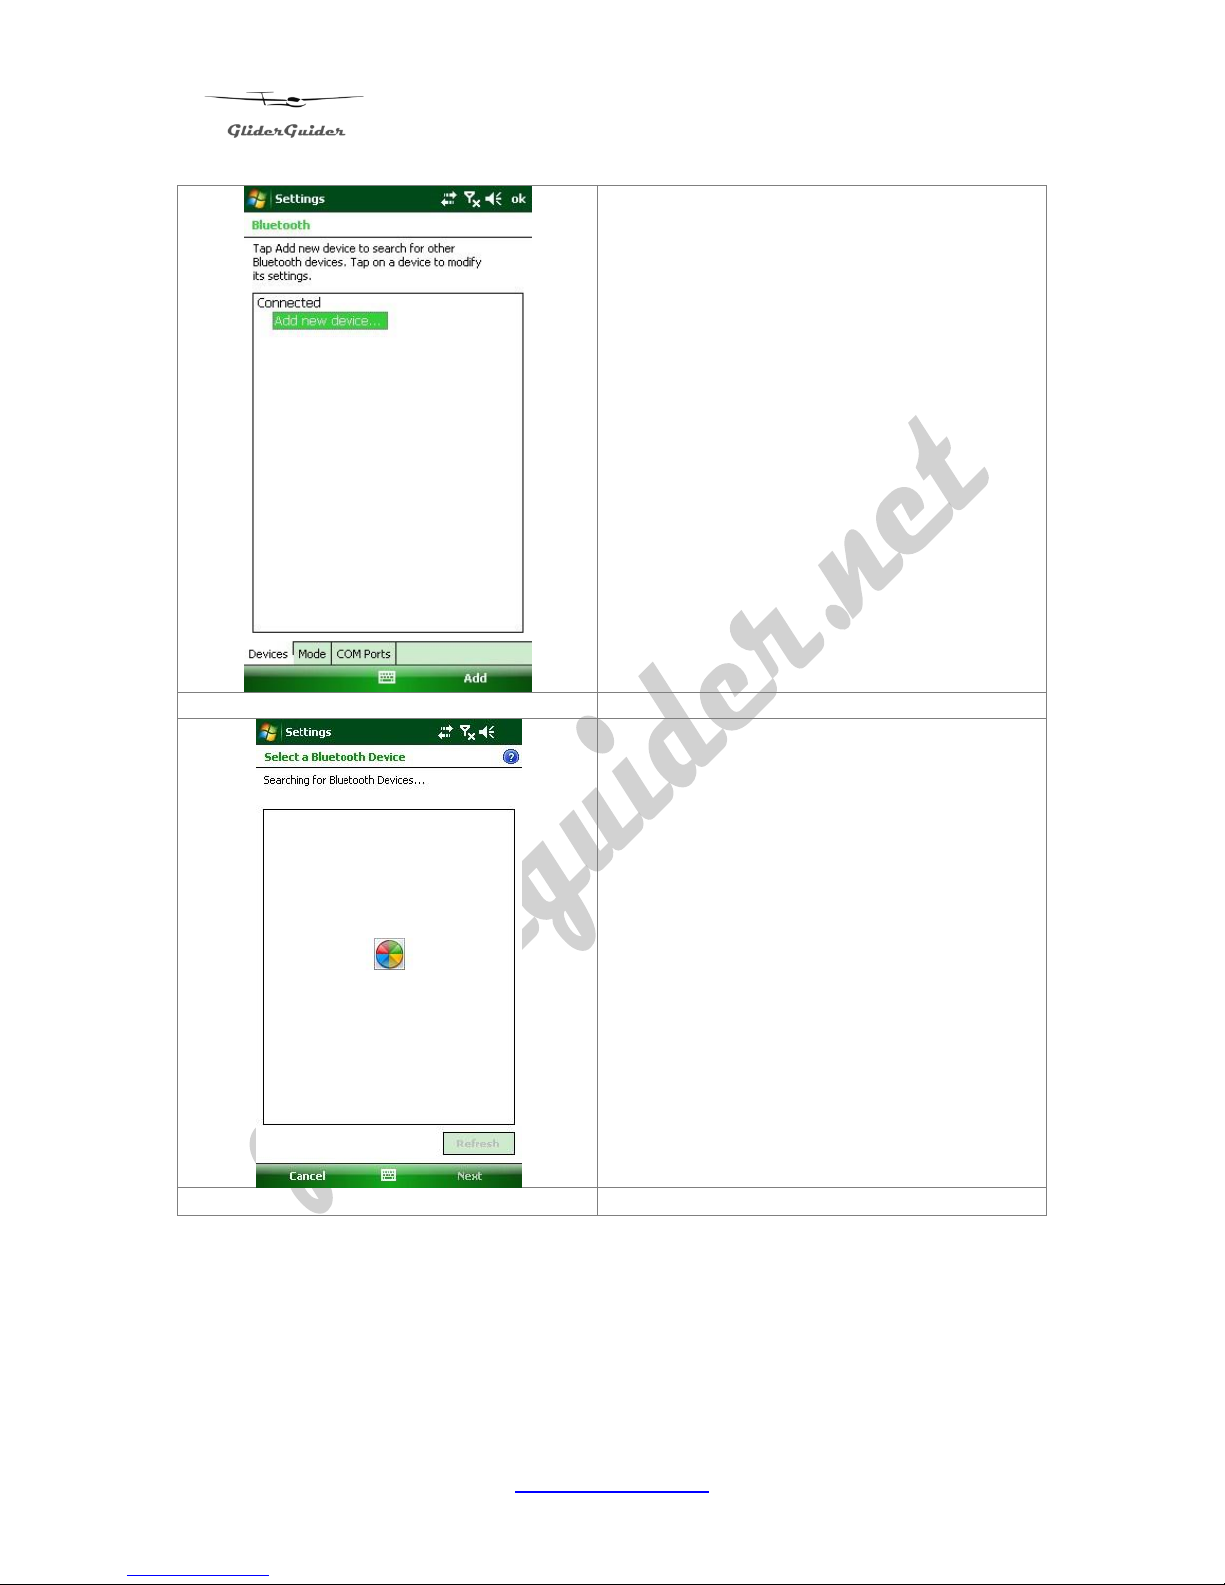
Select the Devices Tab and tap on “Add
new device” – then tap “Add” in the bottom
right-hand corner.
The GliderGuider searches for all/any
Bluetooth devices within range..
Page 25
GliderGuider
USER GUIDE
25
www.gliderguider.net
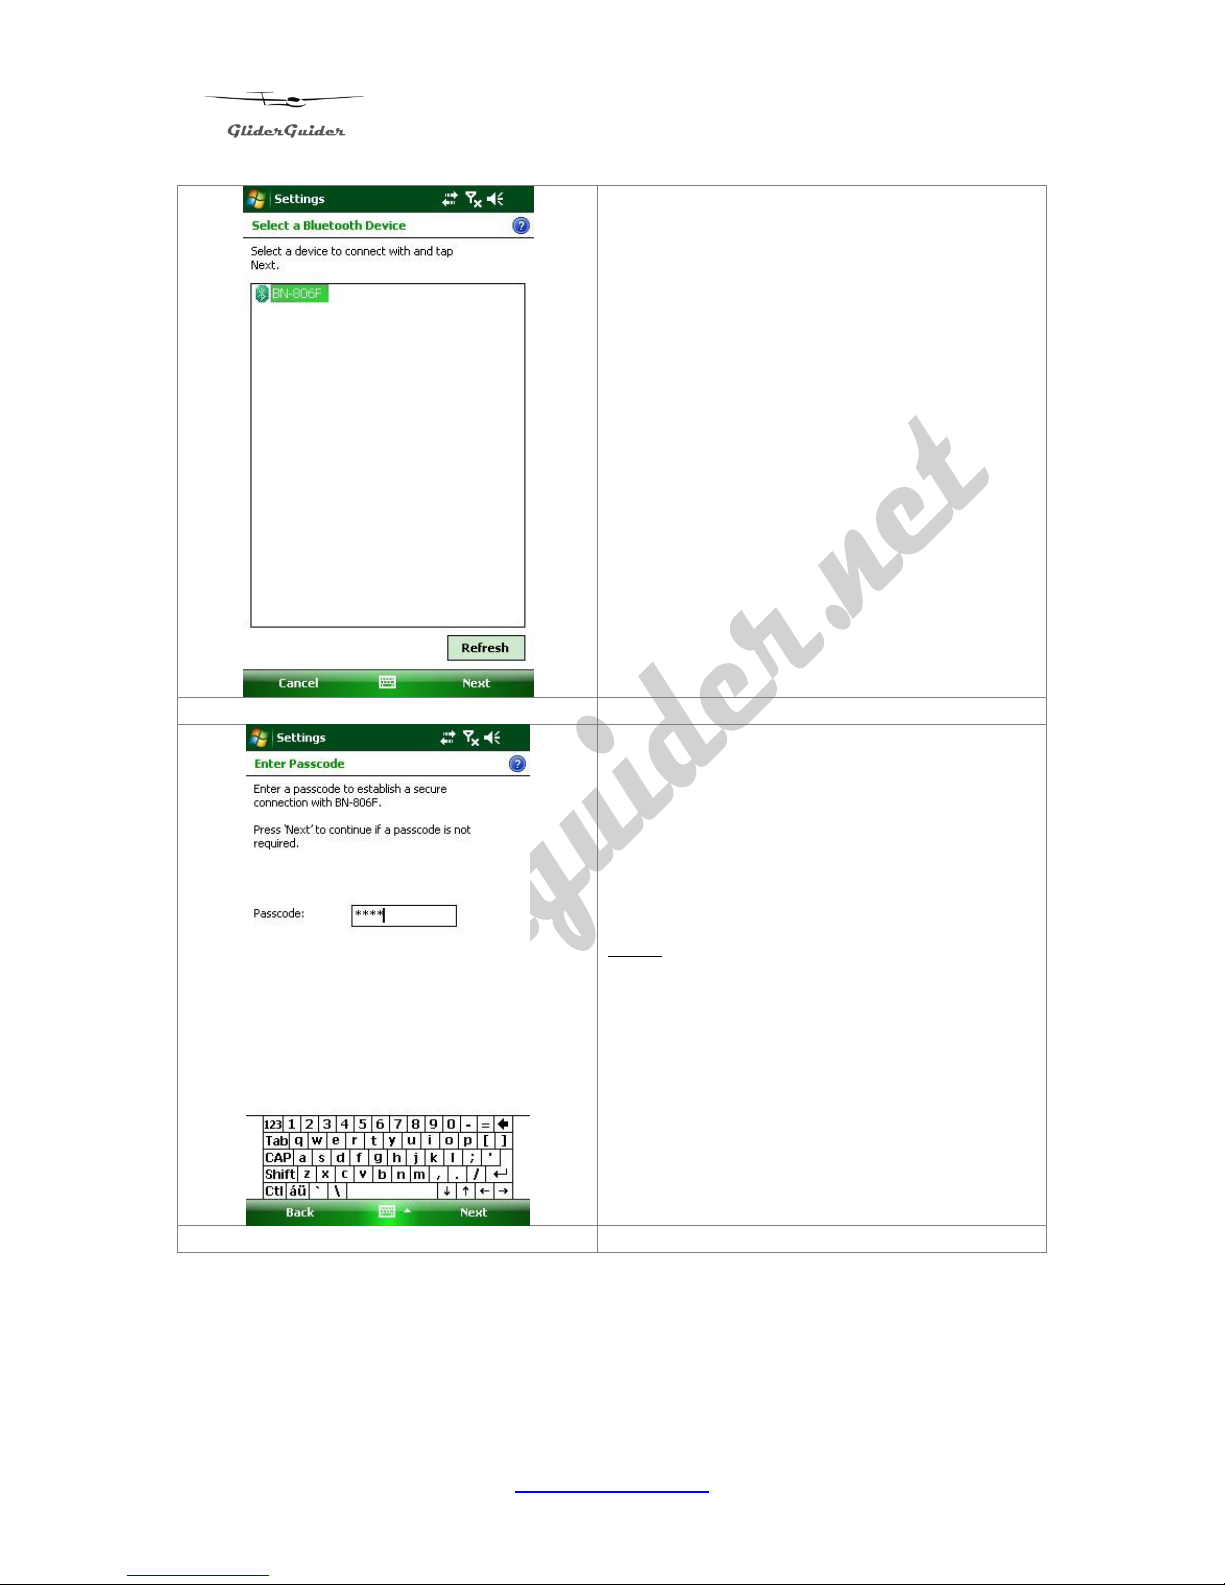
One device has been found. In this case
it’s a Bluetooth GPS Receiver which
identifies itself as BN-806F.
Note. Your device ID will almost certainly
be different.
Tap on “Next” in the bottom right.
Most, but not all Bluetooth Devices will
request a Pass Code. Please refer to the
information supplied with your device for
details.
Key in the Pass Code using the on-screen
keyboard and tap on “Next”.
Note: some older Bluetooth GPS receivers
have a default Pass Code of “0000” or
“1234” while others are automatic. Please
refer to the documentation supplied with
the device.
Page 26
GliderGuider
USER GUIDE
26
www.gliderguider.net
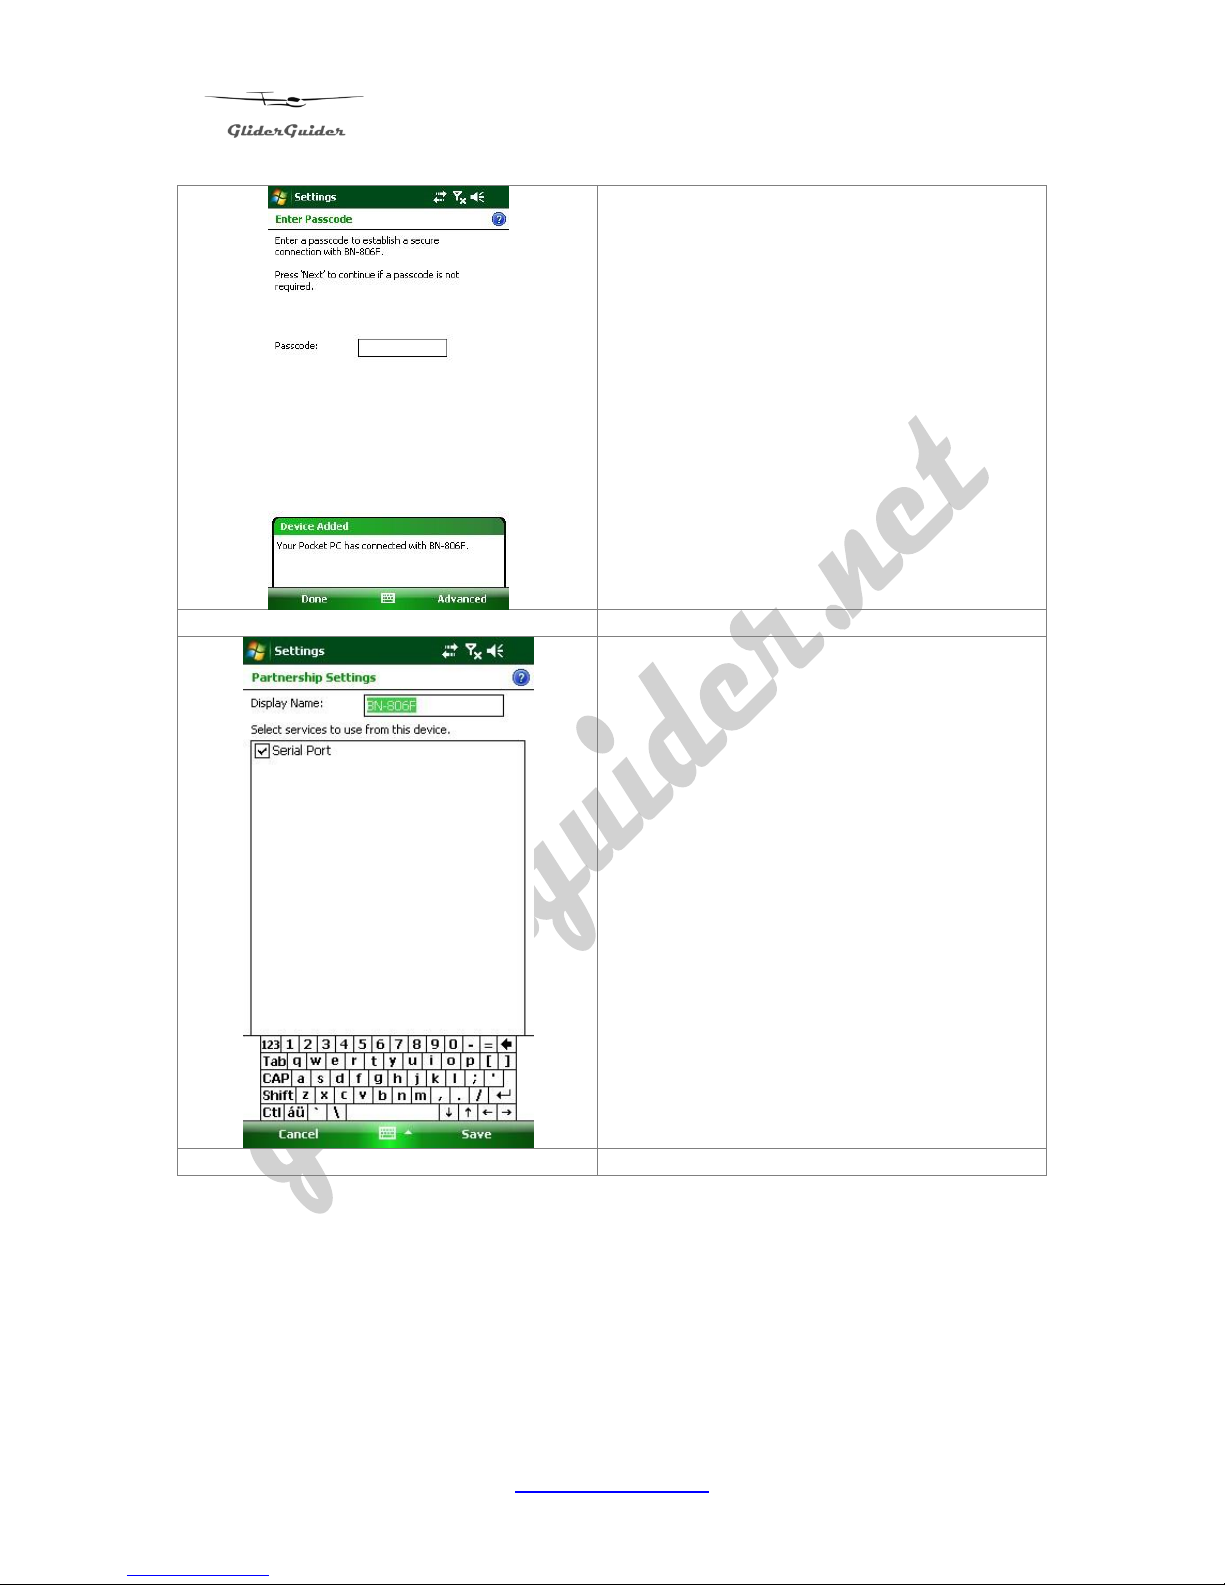
The Device Added dialogue box confirms
that the Bluetooth Device has been
connected.
Tap “Done” to close the setup dialogue.
Your Bluetooth Device should then prompt
to select a “service”. Most of the devices
that we are interested (e.g. GPS
Receivers) will require a Serial Port (SPP
– Serial Port Protocol).
Click the check-box to enable SPP and tap
“Save”.
Page 27
GliderGuider
USER GUIDE
27
www.gliderguider.net
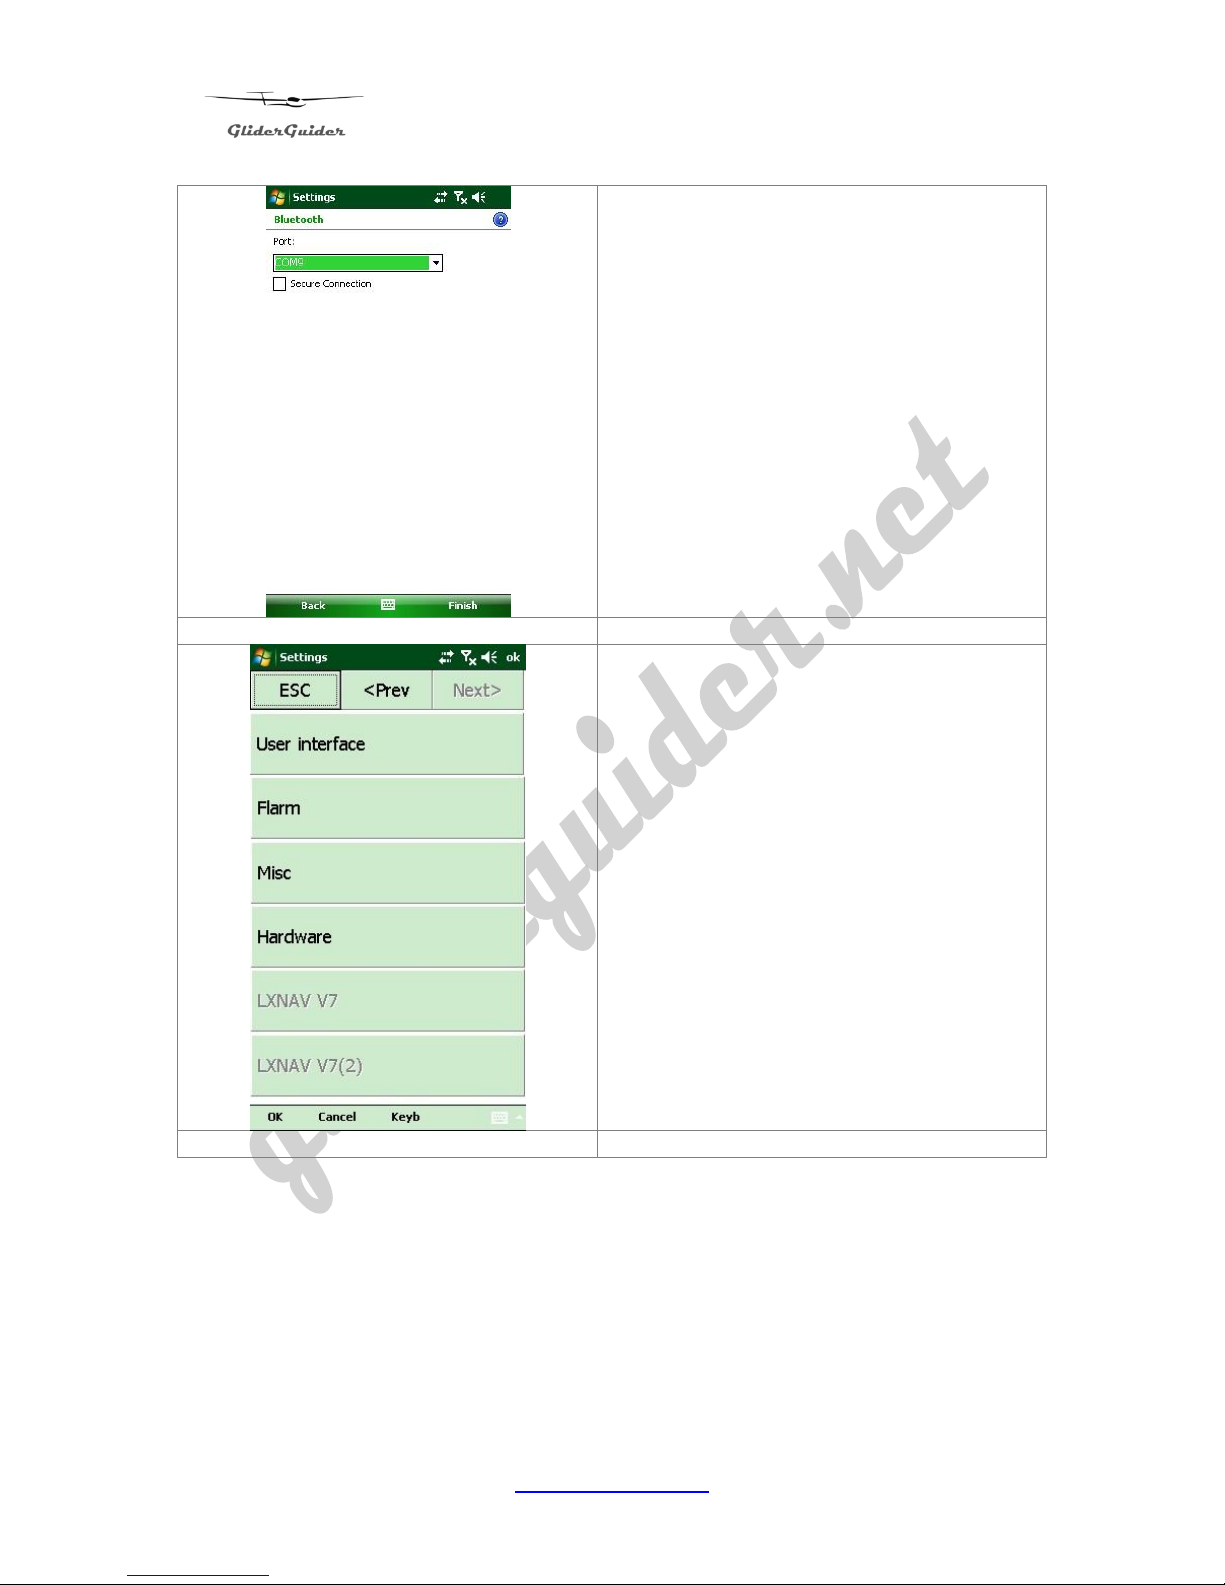
Tap the Com Ports tab (at the bottom of
the screen) and tap on “New Outgoing
Port” and tap Next to reveal the screen
shown on the left.
Use the pull-down menu to select the
COM Port for your device. In this example
it is COM9.
Leave the Secure Connection un-ticked.
Tap Finish to close the dialogue.
Note: COM4, COM7 & COM8 are
allocated and should not be selected.
To check the system in this example - we
are using SeeYou Mobile as it provides a
useful Com Port Analyser which you will
find in:
SeeYouMobile>Menu>Settings>Hardware.
Page 28
GliderGuider
USER GUIDE
28
www.gliderguider.net
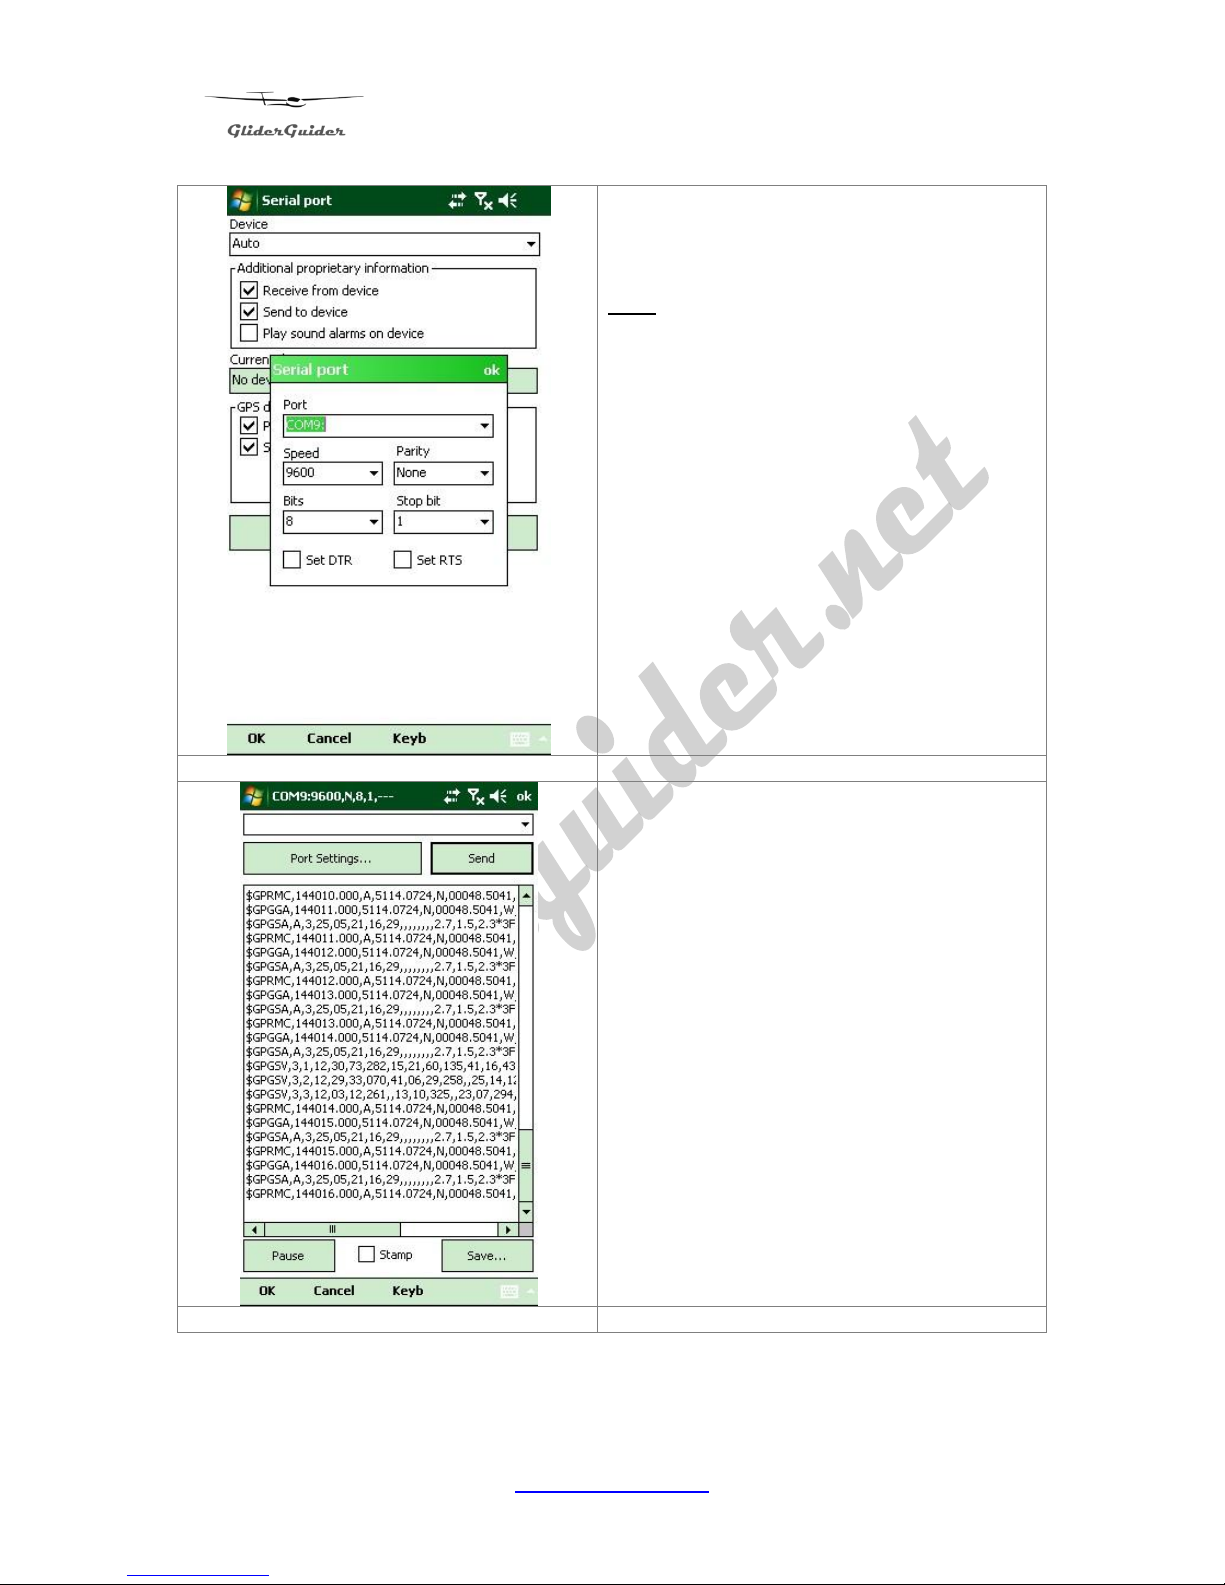
Tap on “Port Settings” and set the COM
Port to match that which you set earlier
(COM9 in this example).
Note the other Com Port settings. These
may vary according to your individual
Bluetooth device.
Tap ok to accept the settings and then
“Terminal” to run the terminal emulator.
If all is well, the Terminal screen should
quickly fill with valid NMEA data – like that
shown on the left.
The Com Port and Settings are shown on
the top right (COM9:9600,N,8,1 in this
example).
Note: An empty screen indicates that the
assigned Com Port is open, but that there
is a no data present, while an error
message (e.g.“mcu failed!”) indicates that
the assigned Com Port is not available.
Page 29
GliderGuider
USER GUIDE
29
www.gliderguider.net
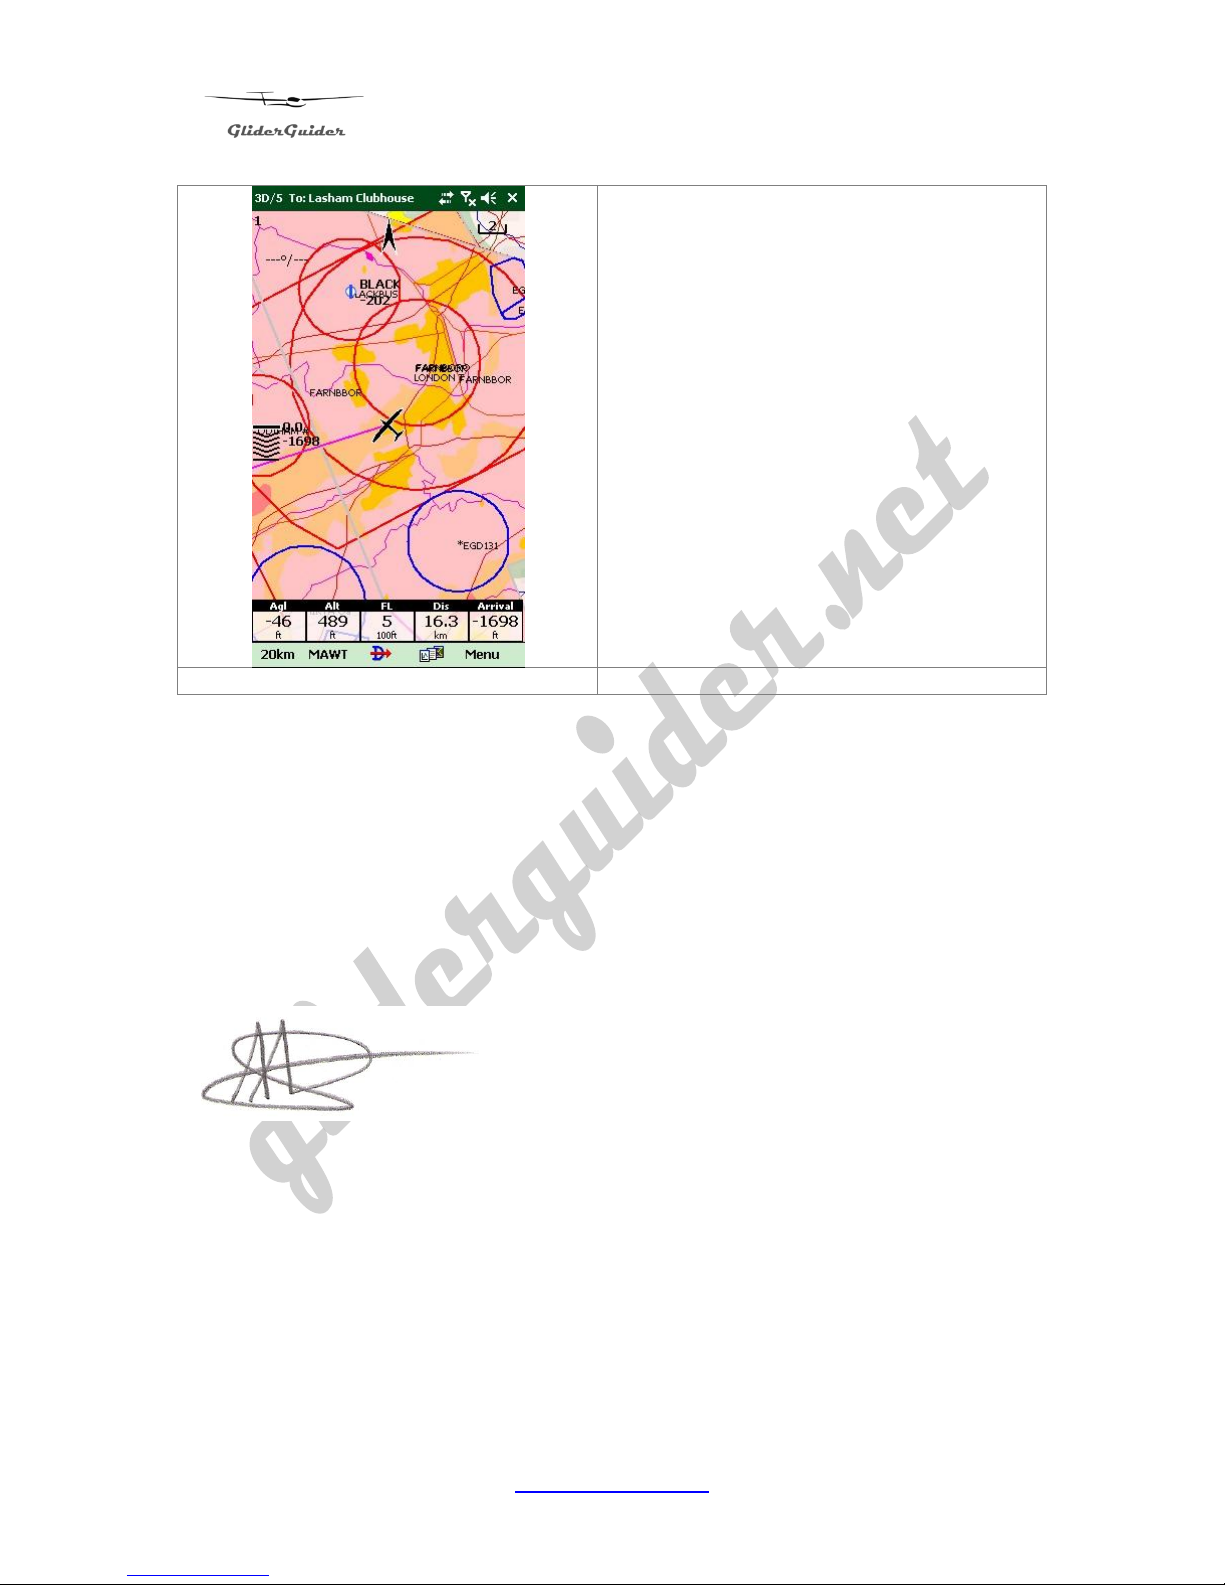
If all s well, when you close the Setting
Menu and return to the Moving Map you
should see the GPS satellite status shown
at the top left (3D/5 in this example).
Enjoy your flight!
Thank you!
Thank you for following this User Guide – we sincerely hope that you will find it a
helpful introduction to using your GliderGuider and wish you many years of
satisfaction with the product.
We are constantly seeking to improve our products and services and will welcome
any constructive advice or suggestions regarding this User Manual.
Allan Arthurs
Managing Director
 Loading...