

Page 1

GLIDE GEAR JB4 QUICK-JIB
4 Ft Portable Telescoping Video Camera Jib Crane
Setup and Operation Manual
MODEL JB4 4Ft Telescoping Jib
Page 2

Overview
Congratulations! You are now the lucky owner of Glide Gear JB4 4’ Telescoping Jib
or Quick-Jib, the jib of choice for professional videographers and cinematography
enthusiasts among the Glide Gear Camera jib selection.
Before you start, let us remind you that a stable setup requires that you balance
your specic camera with the Glide GearQuick-Jib. You will need to take a few minutes to gure out how to calibrate the equipment for various lengths and dierent
cameras, but you’ll get the hang of it after a few tries. You can use a sandbag as a
counterweight but Glide Gear recommends standard dumbbell sized counterweights
(between 5 and 10 lbs depending on the camera, not included) available at any sport-
ing goods store to avoid swinging. Metal washers are included in the set to x the
dumbbell counterweights to the counterbalance arm.
The main purpose of the jib is to serve as an extension of the human arm to easily
enable high shots without the need of a crane. It can also be used to get low shots or
extended panning to create a smooth ow. If you have ever watched a movie scene
which seems to glide eortlessly and smoothly over the terrain, zooming in and out,
and creating a 3D view of a central object, it was probably shot using a type of jib
with the appropriate camera. Anyone can achieve these cinematic eects using the
Glide Gear Quick-Jib and a home video camera. Don’t believe it? Check it out for
yourself at: https://www.youtube.com/watch?v=V8cwuPlNh5o. The speaker is a
self-confessed jib newbie, but you will see how professional-looking his pan shots
are using the Quick-Jib.
The Glide Gear Quick-Jib is highly exible, limited only by the user’s imagination and
sense of adventure. It has an adjustable reach ranging from as short as 20” to as
long as 4 feet as measured from the fulcrum. It canaccommodate a camera or two
(yes it has multi-camera capabilities) plus accessories for a total of up to 9 pounds.
Made from CNC machined 6061 aluminum coated in a scratch-resistant black paint,
it is strong but lightweight, weighing only a mere 6 pounds.
As mentioned earlier, the Quick-Jib can accommodate a second camera using the
L-bracket included in the box that is attachable to the side of the camera platform.
Both the camera platform and the removable L bracket have built-in bubble levels so
that you can easily align the cameras as you extend the arms. The jib is designed to
be mounted on any professional grade tripod (not included) via either the included ¼
“-20 or 3/8”-16 threaded mounting stud. The camera platform and L bracket feature
1/4”-20 camera tie-downs.
2
Page 3

Table of Contents
Overview .......................................................................................................................
A Brief Tour of Glide Gear Quick-Jib ......................................................................
Expanded View of Parts ............................................................................................
Out of the box .........................................................................................................
Assembly ......................................................................................................................
Balancing Your Glide Gear Quick-Jib .....................................................................
Troubleshooting .....................................................................................................
Notes .............................................................................................................................
Tips, Tricks and Techniques ....................................................................................
Tips ...........................................................................................................................
Tricks ........................................................................................................................
2
4
5
5
10
13
14
15
16
17
18
Techniques ..............................................................................................................
20
3
Page 4

A Brief Tour of Glide Gear Quick-Jib
To start with, let’s identify the Glide Gear Quick-Jib functional components. It is important to get to know the parts by name and sight especially if or when you should
need a replacement or a spare. You can unpack the unit as you read this comprehensive guide. Handle it, smell it, get to know it. By the second or third try you’ll b e
able to assemble it in 6 minutes or less even if you aren’t used to working with jibs.
A common feature in many amateur video is jittery, jerky, fuzzy shots because video
cameras do not have the built-in stabilization that your brain has when you walk
through or scan a scene. Because your video camera does not have this stability,
any unguarded movement or even shaky hands will have a dramatic and usually
unpleasant eect on your footage.
The Glide Gear Quick-Jib is not only an incredibly easy and portable solution to this
dilemma, it also provides an ergonomic way to hold your camera to take those spec-
tacular shots and produce smooth, uid motion that can rival those taken with a
camera mounted on a crane. The Glide Gear Quick-Jib alters the way your camera is
supported, and when it is balanced correctly, will oat it in the air while giving you
enhanced ability to frame and aim your shots.
The Glide Gear Quick-Jib is your quick-re and aordable solution to professional
quality camera work ideal for weddings, conventions, and other events either indoor
or outdoor. With this imminently portable and lightweight but eminently sturdy Glide
Gear Quick-Jib, you can nally kiss jittery shots and shoddy, shaky framing goodbye.
Now, you can indulge your inner cinematographer without having to spend a fortune
on professional-grade equipment. All you need is your existing camera and the Glide
Gear Quick-Jib.
4
Page 5

Expanded View of Parts
OUT OF THE BOX
The Glide Gear Quick-Jib comes with the following components:
Fulcrum arm
5
Page 6

The fulcrum arm is the half of the jib pole that connects to the tripod which is
preferably equipped with a uid head such as the Glide Gear SYL-707 Professional HDSLR and Video Fluid Tripod Head. This will allow you to achieve more
range of motion for both panning and tilting. It can accommodate most standard tripod screw sizes.
Close-up view of the fulcrum and various screw sizes
Accessory Arm
The accessory arm connects to the 2nd half of the jib and can also be extended
to a full length of 4 feet from the main arm. This is where the detachable mount
is attached.
6
Page 7

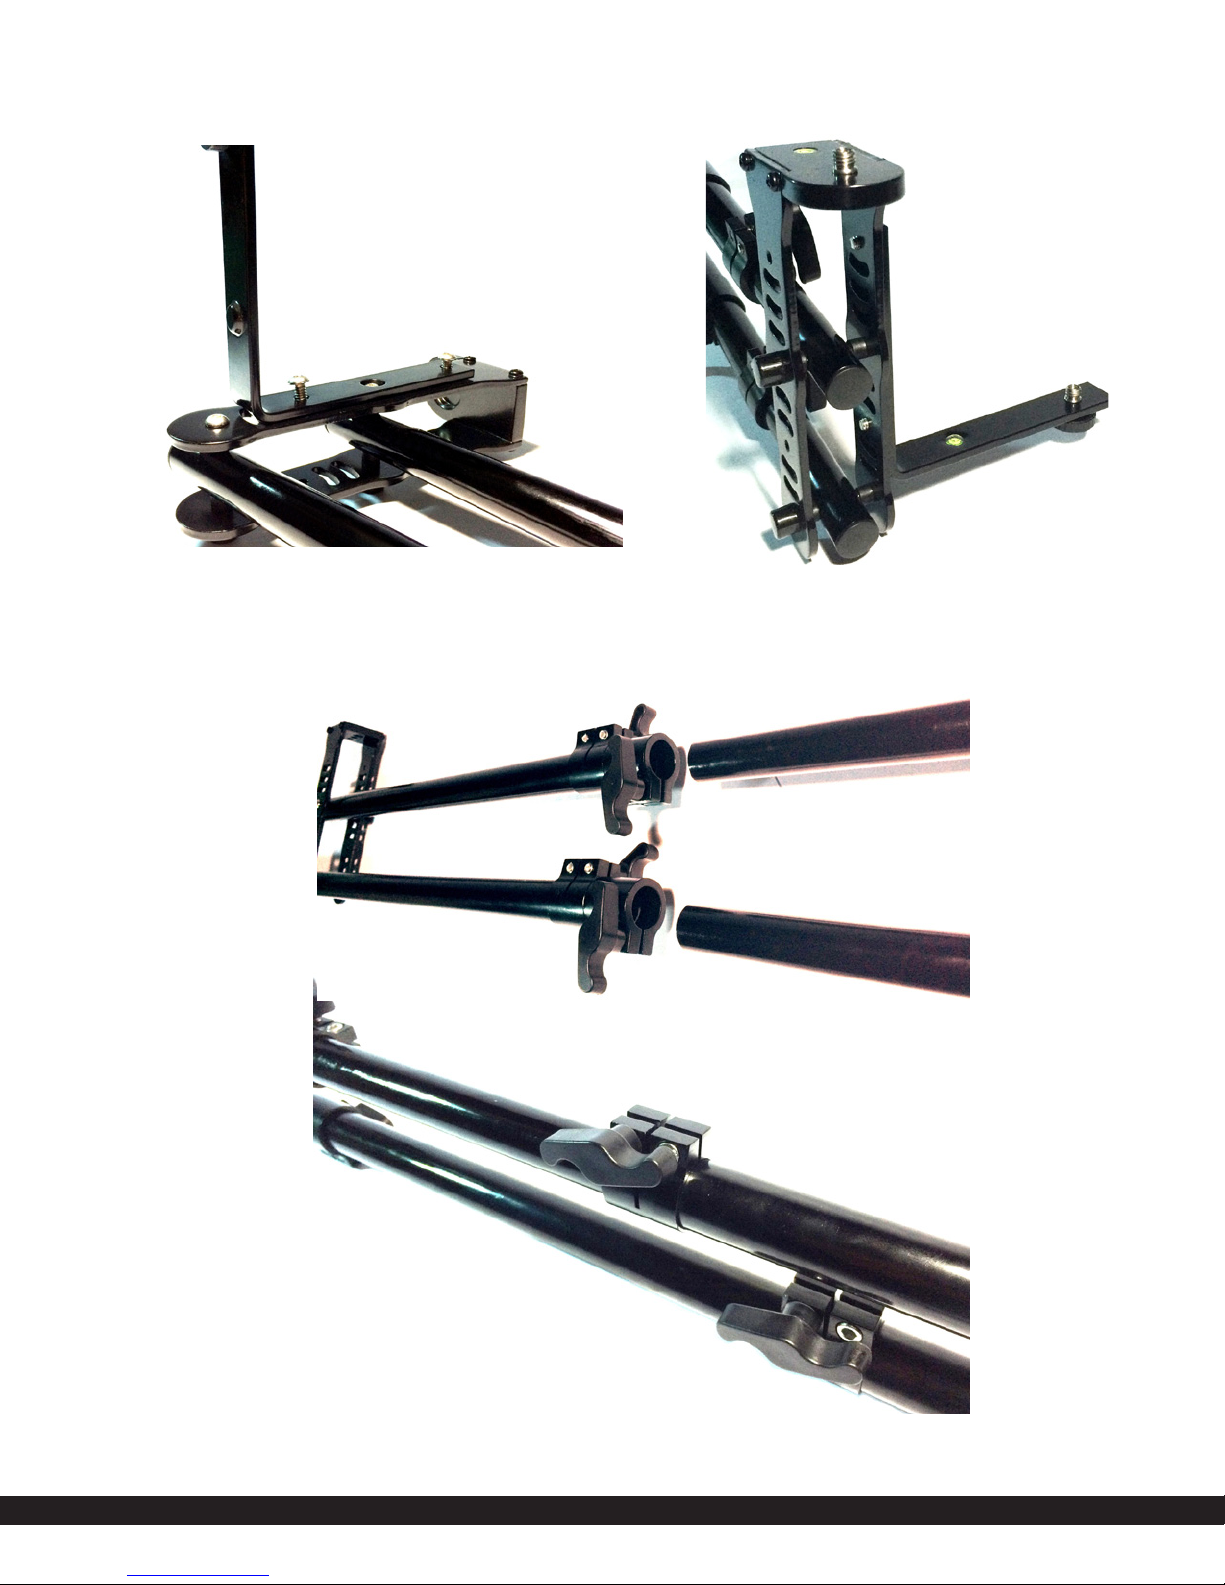
Detachable mount
You will know it is the accessory arm because of the bubble levels incorporated
into the camera platform (see below). The accessory arm is where the camera can be mounted using the built-in ¼ inch (20) or detachable 3/8 inch (16)
mount (picture below). The jib can accommodate two cameras provided the to-
tal weight does not exceed 9 lbs. The total maximum length of the Glide Gear
Quick-Jib is 6.5 feet from camera to counterweight handle. The accessory arm
and detachable mount comes with built-in bubble levels to make alignment
easy to accomplish.
1/4 Mounting
Screw
Bull’s-eye Bubble Levels
1/4 Mounting Screw
7
Page 8

Counterbalancing arm
Metal Washers
This is the second half of the jib system which provides the counterweight for
the jib and camera.
The counterbalancing arm comes in two main parts: the arm and the handle
which screws on. Counterweights (not included) are easily available in sporting
goods stores in various weights which may then be attached to the counterbalancing arm using the included metal and rubber washers. To ensure compatibility, bring the counterbalancing arm and handle when purchasing these items.
Metal washers are placed to stabilize
counterweights (not included)
8
Page 9

Carrying bag
Last but not least, the carrying bag accommodates all the parts of the jib into a
20” package for easy carrying and storing.
9
Page 10
Assembly
1. The Glide Gear Quick-Jib attaches to any
standard professional tripod rated for up
to 15 pounds of gear not including counter-
weights, preferably equipped with a uid
head. If your tripod does not have a uid
head, it is recommended that you obtain one
otherwise the jib will be limited to vertical
movement only. Make sure that the tripod
legs are seated rmly to avoid any mishaps
during set up and operation.
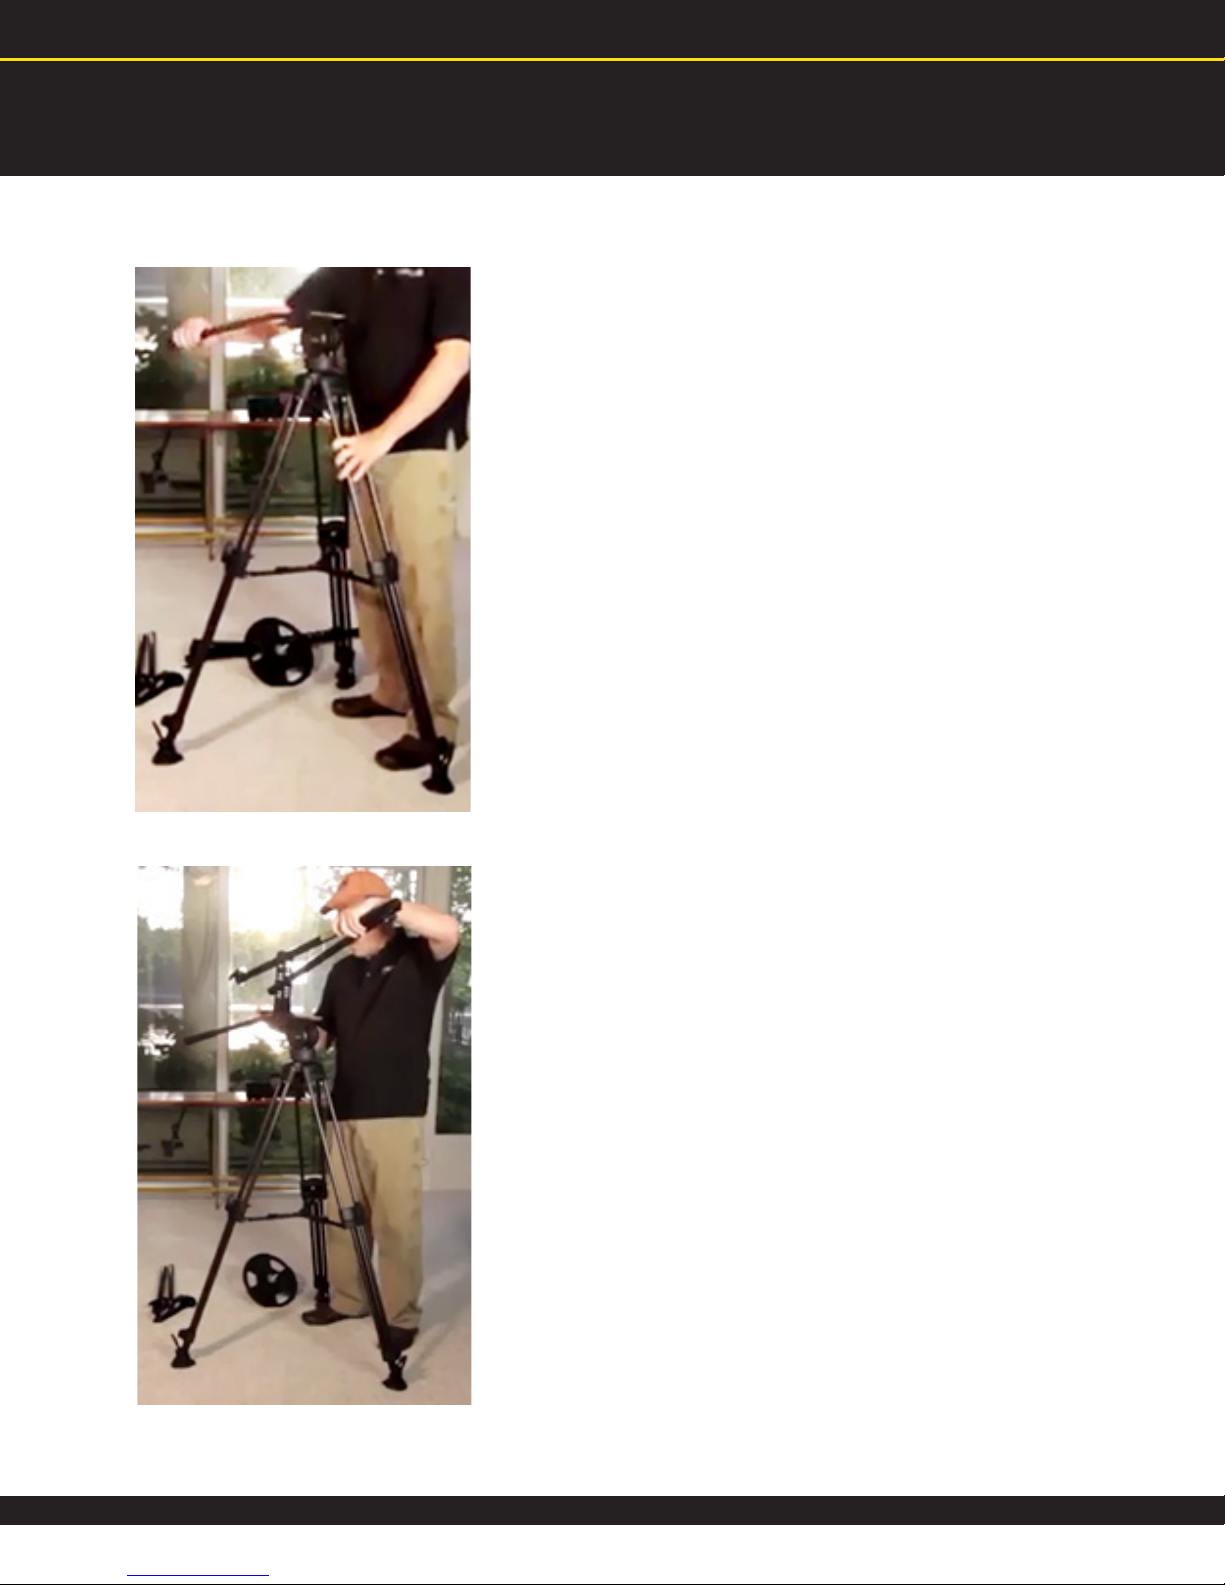
2. Once the tripod has been set up, slide the
fulcrum onto the uid head. Make sure that
it is rmly attached using the provided Allen
wrench.
10
Page 11
3. Attach detachable mount to accessory arm.
4. Attach the accessory arm and fulcrum arm, extending it to the desired length*
and aligning it using the bubble levels built into the jib head.
* Telescoping poles can be easily adjusted using the built-in clamps.
11
Page 12

5. Screw the handle onto the counterbalancing arm and attach the assembly to
the other end of the fulcrum.
Attach the appropriate counterweights to the counterbalancing arm, securing
them with the included metal and rubber washers (see Balancing your Glide
Gear Quick-Jib).
Attach the camera to the platform, and an additional camera or wireless monitor
to the provided detachable mount, if desired.
Once you’ve mounted your camera on the Glide Gear Quick-Jib (with required
accessories), the unit must be balanced to achieve optimal and eective image
stabilization. Fine-tune the balance by adjusting the length of the counterbal-
ancing arm. Once balance has been achieved, x the counterbalancing arm in
position using the clamp.
12
Page 13

Balancing Your Glide Gear Quick-Jib
Balancing the jib once the camera/s and accessories are attached will be the
longest process in assembly when you rst start out with the Quick-Jib. However, once you’ve done the math and tried it out a few times, you’ll be able to do
it in no time at all.
The key to eective balancing of your Glide Gear Quick-Jib is to make sure the
center of gravity of the jib and the fulcrum point are aligned. You can achieve
this by adjusting 2 parameters: how much counter weight you have and how
far the counter weight is from the fulcrum point. As a general rule of thumb, it
is a good idea to start with a counter weight slightly heavier than your camera.
When the jib is leveled (parallel to the ground), it should oat in place once the
balance has been perfectly set. Note: at full extension, you may notice the jib
wants to move when tilted all the way up or down – tighten the tilt brake slightly
to hold position.
Set up your camera and jib exactly as you intend to use it before going out on a
shoot. The main factor to dial in is the amount of counterweight needed. Unless
your camera is very small, to use the jib at its longest extension you will need
additional weights. Likewise, using the jib at its shortest may require smaller
weights. Standard barbell plates with a 1” hole can be easily purchased at sporting goods stores. We recommend buying one each 1.25, 2.5, and 5 lbs plate for
maximum exibility.
13
Page 14

Assembled
TROUBLESHOOTING
Symptom: the jib is pointing down on the camera side
Possible Diagnosis: there is not enough counter weight. Try to extend the jib on
the counter weight side or add some more weight
Symptom: the jib is pointing up on the camera side
Possible Diagnosis: there is too much counter weight. Try to reduce the length of
the jib on the counter weight side or remove weights
14
Page 15

Notes
1. Make sure that the jib is supported when removing either the camera or
the counterweights or it could cause the jib to swing and cause damage
or injury.
2. Remove the camera when making changes to the length of the telescoping sections of the jib. If the camera is still mounted, its weight could cause
a section to slide suddenly and pinch your handsor damage the camera.
3. Make sure that the jib is securely mounted to the tripod (which is in turn
on stable ground) and leveled soit won’t slip or loosen during operation.
4. Secure all joints to keep the sections from moving.
5. Never swing the jib around in a crowd of people.
6. You can increase the exibility of the jib by loosening the tilt of the uid
head and keeping constant control over the jib’s movements to avoid the
camera from tilting forward.
15
Page 16

Tips, Tricks and Techniques
Now that you have completed your balance training, it is time to see what the
Quick-Jib can do.
The best way to maximize the benets of the Quick-Jib is to practice and experiment, experiment and practice. The beauty of the digital video recorder is that
you literally have unlimited opportunities to do this without incurring additional
costs and get instant results. If something doesn’t work, you can simply delete
the le and try again.
Glide Gear Quick-Jib is designed to hold and operate a camera easily when creating moving shots without the jitter and jag of a handheld camera. With this
simple but clever jib crane system, you can let your creativity loose by composing scenes that would make any professional videographer proud.
The main purpose of a jib crane for video cameras
is to extend the reach of the videographer for a
wider range of shots and to reduce the jiggle and
jangle that characterizes a handheld camera when
the shot is not stationary. It makes for a more
dynamic and interesting shot if you use the right
techniques.
Using a tripod does almost the same thing for panning and tilting shots, but again the range is limited
to the angle capacity of the tripod, even with a uid
head.
The standard full-sized jib crane is rather bulky and not designed to be mobile.
It does have a long reach (up to 28 feet) but in many cases you won’t need
that kind of extension, such as for weddings and similar events. This is where
the portable jibs come in. They have a shorter reach but easy to carry around
and assemble. They are generally adequate for many situations short of a full
feature lm, especially when supplemented by dollies, tracks and other video
camera accessories. They are also a cost-eective alternative to the standard
professional jib crane.
16
Page 17

A portable jib can either be handheld or xed to a tripod. In either case the shots
are a lot more uid and smooth. However, the jib is a tool. In the hands of a prac-
ticed videographer, it can help produce professional-grade shots. In the hands
of an eager beaver amateur, however, you can still induce a migraine in your
viewers.
A tripod-supported jib can be controlled from the rear (where the counterweights
are), the middle (where the jib is attached to the tripod), and the front (where the
camera is). If the jib is properly assembled, all it takes is a light hand on any part
of the jib to move the arm as you want. A handheld crane is supported with a
vest and harness or by a forearm support and always from the rear, and takes
a little more control which can be minimized by using a camera stabilizer such
as the SYL 1000.
The thing to remember when operating a jib crane of any type is to make calculated movements. The jib minimizes the jiggle but not when you move carelessly.
TIPS
1. Get to know your equipment thoroughly. If you are serious about improving
your videography skills, you need to become technically procient in the uses
and capabilities of your tools. The video camera, no matter how advanced, is
only as good as its support system, so take the time to practice using it with the
jib on and o a tripod, with and without a dolly and track, steady and in motion.
2. Start with simple moves. It can be tempting to get ambitious when you have
a new toy, and there’s no harm in going crazy with it. But if you want to seriously
understand what you can do, you have to start with the basics such as tilt and
pan shots. This will give you a chance to develop muscle memory you will be
able to use when you try more complex moves.
3. Avoid jerking the jib in any direction. This may be next to impossible when
moving while shooting such as with a handheld jib, but it pays to make the ef-
fort. The nal product will benet by keeping jerky movements to a minimum.
17
Page 18

4. Avoid moving the camera too fast. Even if the movement is smooth and uid,
zipping from one scene to another can still make you dizzy. In some instances
this can work but not when it happens in succession and inappropriately. For example, if you want to create the impression of speed, you can use this technique
but not all the time. Use it sparingly.
5. Check your footage constantly. When you are rst starting out with a jib,
you are pretty much guessing about the eect you are creating. You don’t really
know what the footage looks like until you sit down and watch it. Practice with
dierent techniques and check it constantly. Eventually, you will be able to intuit
what technique will produce the results you want.
If you have a segment planned, it would be best to do a run-through before you
do the actual footage if it is possible. You will be able to gure out where you will
problems and what angles or techniques would work very well with what you are
trying to do with the video segment.
TRICKS
Sometimes a little sleight of hand makes it seem like magic…
1. Keep your shot wide – A too tight shot will wobble a little no matter how good
your equipment is or how well you are as an operator. Shoot wide and increase
the drama.
2. Use foreground – To make a high shoot look impressive, you need a reference point. Find foreground for your shot so that your shot from height will seem
huge.
3. Emphasize mystery – You can heighten anticipation by starting a shot with
something close that appears to be hiding something interesting i.e. wall and
then slowly revealing what is just beyond it by moving the jib up. Rather like a
game of peek-a-boo, and the audience is your baby.
18
Page 19

4. Sun ares –You can get a really dramatic shot by using the sun to signify
movement and dazzle the eye. Sunspots or a solar are will change as you shift
angles, or as you move forward or back. The best time of day to do this is at sunrise and sunset, but even full daylight will work if you get the angles just right.
5. Maximize your height – Sometimes all you have to do is to fully extend both
your tripod and jib as high as it will go and x your camera. This will work well if
you’re shooting over a crowd which has a lot of movement into an area where
the real action is taking place, such as a football game. You can use a wireless
monitor and remote control to zoom in and out to pick out interesting moments.
6. Use trajectory for more interesting shots – How you place your tripod rela-
tive to where the camera is pointing will result in completely dierent eects
with the same jib movement. For example, when the tripod is at a perpendicular
angle to the camera, moving the jib up will make your camera go into a half-arc
whilst if the tripod is parallel to where the camera is facing, the motion is straight
up. Use this trick in various scenarios and see what you get.
7. Hedge your shots – Unless you are in a controlled environment such as a
studio, you will rarely be able to duplicate a scene exactly in case you have to
go back for a re-take. Just to make sure you got the best possible shot, do sev-
eral takes using dierent techniques and angles. Do this for every shot that you
think is complicated. There will come a time that you won’t need more than two
or three to get the perfect shot, but until then maximize your storage capability
and the patience of your subjects and crew.
19
Page 20

TECHNIQUES
1. Tilt shots
Anyone with a video camera can make tilt shots; it only takes a basic up and
down movement. Because it is such a simple technique, it is often overused and
badly done. A well-executed tilt shot will pay back in spades in action and interest if the shot is appropriately coordinated with the action, expression, whatever.
Try practicing with tilt shots using a jib on a tripod with the panning axis of the
uid head locked so that you can only tilt up and down. Do it at varying speeds
until you develop a feel for the shot. You will want to determine the speed of your
tilt up and down so that it feels natural and to develop an instinct for when to
stop so that your shot is perfectly framed without making an amateurish back
track.
When the jib is handheld, you will nd that the eectiveness of your support
system (forearm support or vest and arm) will depend on your posture and balance. You are essentially taking the place of the tripod, which makes it even
more important for you to practice your shots. The same goes for panning shots.
2. Pan shots
The pan shot is like the tilt shot, except that it goes side to side instead of up and
down. Practicing this shot requires you to lock the tilt axis instead so that you
get a pure pan without any tilting. Panning shots are used to give a panoramic
view, so it should look smooth and feel condent. In fact, both tilt and pan shots
should not distract the viewer from the scene and be practically unnoticeable.
3. Zoom shots
Despite its popular connotation, zoom does not mean actually mean “to move
fast”; it means “to move in close.” Etymologically, zoom refers to a sound associated with moving fast, and became a popular term with aviators. In photography,
zoom shots are made to simulate movement towards or away from an object.
It is essentially a dramatic shot capable of conveying a wide range of emotions
from nostalgia to fear. It can also engender shock value for climactic shots.
20
Page 21

Zoom shots require a camera that can execute it smoothly, a feature that isn’t
always available in small video cameras. Before planning a zoom shot, experiment with your intended camera to see how well it executes the move. Once
you’ve done that, take practice shots until you achieve smooth footage.
Don’t be discouraged if your shots looks corny; it is experience that will let you
ne tune your technique so keep at it until you see a result you can live with.
4. Combination shots
All that practice will pay o when you start trying combination shots. This
means the ability to pan, tilt and zoom in one uid motion on or o the tripod.
With a jib connected to a camera stabilizer, you can even take execute these
techniques while on the move such as walking, running, biking, skateboarding,
or riding in a car.
With a tripod with a uid head, you can use the jib to tilt the camera without
tilting the jib by controlling it from the rear by releasing the pan and tilt axes. It
can be a bit tricky but with practice you can do it and get fantastic movement.
21
Page 22
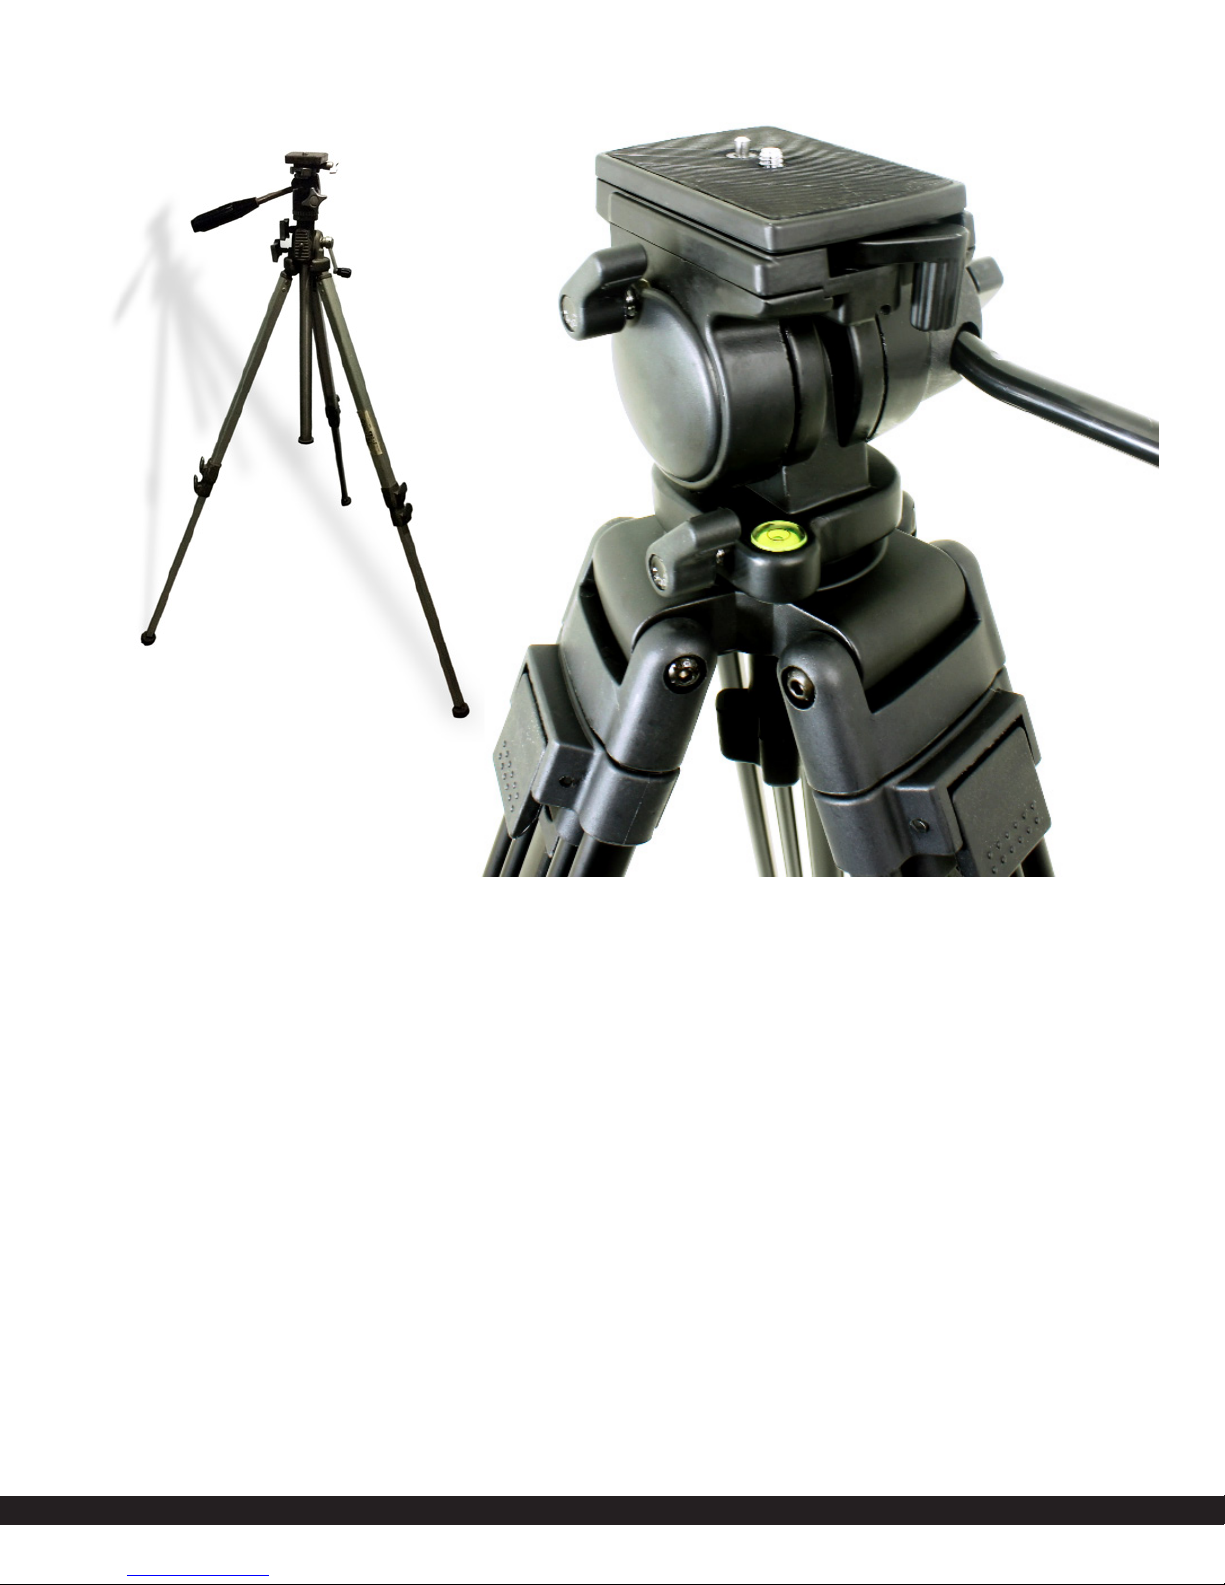
Glide Gear Professional Camera Tripod with Fluid Drag Head
To do this most eectively, you should release the tension completely on the
tripod head but make sure that you have complete control over the jib arm or
your camera will eat concrete/grass/oor!
Operating the Glide Gear Quick-Jib is simple once you have achieved the mus-
cle memory required to make specic shots. This is achieved through practice
alone and it won’t even take that long with this simple system. Once you get it
down pat you will have this advanced lmmaking skill for life. You will be able to
make magic just like the pros in Hollywood.
WARNING: After you become practiced with your Glide Gear Quick-Jib, you will
not want to lm without it ever again!
22
Page 23

Manufactured by Koncept Innovators Inc.
Glidegear Products
10838 Kings Road
Myrtle Beach, SC 29572
PH: 843.945.4031
FAX: 843.390.5334
www.glidegear.net
U.S. and Foreign patents applied for and pending.
Page 24

Glidegear Products • 10838 Kings Road • Myrtle Beach, SC 29572
Manufactured by Koncept Innovators Inc.
Telephone: 843.945.4031 • Fax: 843.390.5334
www.glidegear.net
 Loading...