

GlideCycle GlideTrak Training Manual
GlideTrak™ Training Guide
1

Table of Contents
1: GlideTrak™ Features & Specifications
2. GlideTrak
3: GlideTrak™ Drawing with Correct Set-Up Tips
4: GlideTrak™ Quick Start Guide
5: GlideCycle™ Unweighted Training Products
1. Unweighted Training Concept
2. Neurological Rehabilitation Applications
3. Orthopedic Applications
4. Orthopedic Conditions
5. Sport Rehabilitation
6. Athletic Performance Enhancement
7. Weight Loss and Management
8. Geriatric Clients
9. Prosthetic Training
10. Aerobic Exercise
11. Core Strengthening & Balance Training
12. Personal Fitness Tool for Healthy Individuals
13. Fitness Center Applications
14. Adaptive Sports Programs
15. Applications in School Therapy and Adaptive PE Programs
6: GlideTrak™ & GlideCycle™ Products
1. GlideTrak™ Overview
2. GlideCycle™ Overview
3. Unweighted Training
7: GlideTrak™ Sample Orthopedic Protocols
1. ACL
2. Total Knee Arthroplasty
3. Total Hip Arthroplasty
4. Meniscal Repair
5. Non-Operative MCL Injury (Grade 2-3)
8: Business Value Proposition & Billing Codes
TM
Training Guide
2

From The Leaders in Unweighted Technology
The New Standard in Body
Unweighted Therapy
GlideTrak™ is proud to offer the most comprehensive, versatile and
affordable Body Unweighted Treadmill Training for your patients.
GlideTrak’s™ unique, comfortable suspension system is the first of its kind
and provides all of the body support necessary to remove harmful joint
impact. Your patients can now enjoy safe, pain-free walking or running
exercise beyond their limitations.
Features
Easily convert YOUR treadmill to a Body Unweighted System Now
Saddle assembly removable for regular treadmill use
Patented suspension seating concept progressively lifts patients by the
pelvis without pressure to sensitive perineal tissues
Simple strap adjustments allow desired amount of unweighting from non
to full weight bearing
Safe, secure exercise with optional shoulder stabilizing strap
Effective upright mobility, gait training and the ability to walk or run again
Ability to walk within frame over a floor or treadmill
Extends joints fully and allows motion gains not achieved on other
exercise machines
Earlier weight bearing and safe gait training for accelerated recovery
Patients are able to progress to lifelong exercise at home on their own
GlideTrak™ or GlideCycle™
The most affordable Body Unweighted Treadmill Training System
Available
Specifications
Weight in Box
98 Pounds: Includes Frame, Saddle, Straps,
Packaging (Box: 44” X 37” X 10”)
Dimensions
89” height X 42.5” width X 52” length (front to back)
Weight bearing
Non Weight Bearing to Full Weight Bearing
Frame Material
4130 Chromoly
Finish
Powder Coating, White, Silver, Green
Assembly
Easily Snaps Together in 8 Pieces Within Minutes
Saddle Assembly
Removable for Regular Treadmill Use
Ratchet System
Easy Raising and Lowering of Patients
Safety
Shoulder Stabilizing Strap
Weight Range
Up to 350 Pounds
GREAT FOR PATIENTS
GREAT FOR BUSINESS
AND AFFORDABLE
One Solution: A Multitude
Of Applications
Your patients, regardless of
age, injury or disability, can
experience greatly enhanced
mobility and exercise on the
GlideTrakTM.
Orthopedic Surgeries
Fractures & Painful Joints
Neurological Conditions
Geriatric Training
Painful Joints & Injuries
Balance Issues
Sports Injury Recovery
Sports Performance
Fitness & Cross Training
Obesity & Weight Loss
Prosthetic Training
3

GlideTrackTM Training Guide
This guide has been developed to provide an efficient GlideTrak™ orientation and training tool.
Experienced practitioners will set most patients up for GlideTrak™ Body Unweighted Therapy in
less than 5 minutes. This is an achievable goal with the key being practice.
The simple steps below will help you get started and greatly accelerate your training experience:
1. Browse GlideTrak™ introductory videos at: www.glidetrak.com .
Examples of video choices include:
Introducing the GlideTrak
Chief Therapist at Omega Sports Rehab Discusses GlideTrak™
Applications
Orthopedic Surgeon Discusses the GlideTrak™
GlideTrak™: Sports Fitness Workout
Vasona Creek Rehabilitation Center Evaluates the GlideTrak™
Omega Sports Rehabilitation Owner Reviews the GlideTrak™
The Santa Cruz Dominican Hospital Rehabilitation Team
GlideTrak™ Exercise for Stroke Recovery
2. Make sure to View the GlideTrak
Click “Support” (The upper right tab)
Click “Training Videos”
Scroll down to video #12, “GlideTrak™ Seat Set Up”
Click to play video
TM
(Plays automatically)
TM
Seat Set Up Video at: www.glidecycle.com
3. Study the documents listed in this Table of Contents.
4. Attend a live or Skype in-service training lesson
5. Review study materials from Lesson 1-3 as needed.
4

6. Practice:
After reviewing the learning materials and attending an in-service,
it is time to begin the most important component: Practice
First: Practice walking and running on the GlideTrak™ until you are comfortable
with the set-up process and are familiar with the sensation of Body Unweighted
Exercise. Several longer GlideTrak™ exercise sessions are recommended as the
more experience you personally have, the more efficient you will become at
training patients.
Just like Yoga, Pilates, Therapeutic Exercise, etc…, it is important to learn the
techniques and exercises before teaching them to patients.
Questions: An advanced training session with a trainer/representative is often
helpful as most practitioners have new questions and are ready to progress.
Second: Practice setting up co-workers in the GlideTrak™ and ask them for
feedback. It is helpful to practice with different body types and sizes.
Questions: Contact your representative for additional review or questions as
needed. Work together with your staff as a team to set up new patients.
Important Tip: Remember to choose easier patients when you are first learning
to use the GlideTrak™ and expand to more challenging patients as your
confidence and efficiency quickly grow.
Expectations: Take a short moment with each new GlideTrak™ patient to explain
expectations just as you would before applying a modality, mobilization, stretch or
beginning a new exercise: For example:
o Demonstrate for them
o Explain the purpose of the gentle slope of the seat or how a good seat set-
up should feel
o Reassure patients that they will be safe with the shoulder stabilizer
o Remind patients about the incredible benefits of Body Unweighted Therapy
specific to their condition
o Help focus their attention on proper gait, arm swing and what they are
accomplishing rather than focusing largely on seat set-up
Document Settings (time saver): Be sure to record pin placement settings for
the seat and hook placements so that it will be easily reproducible for the next
treatments.
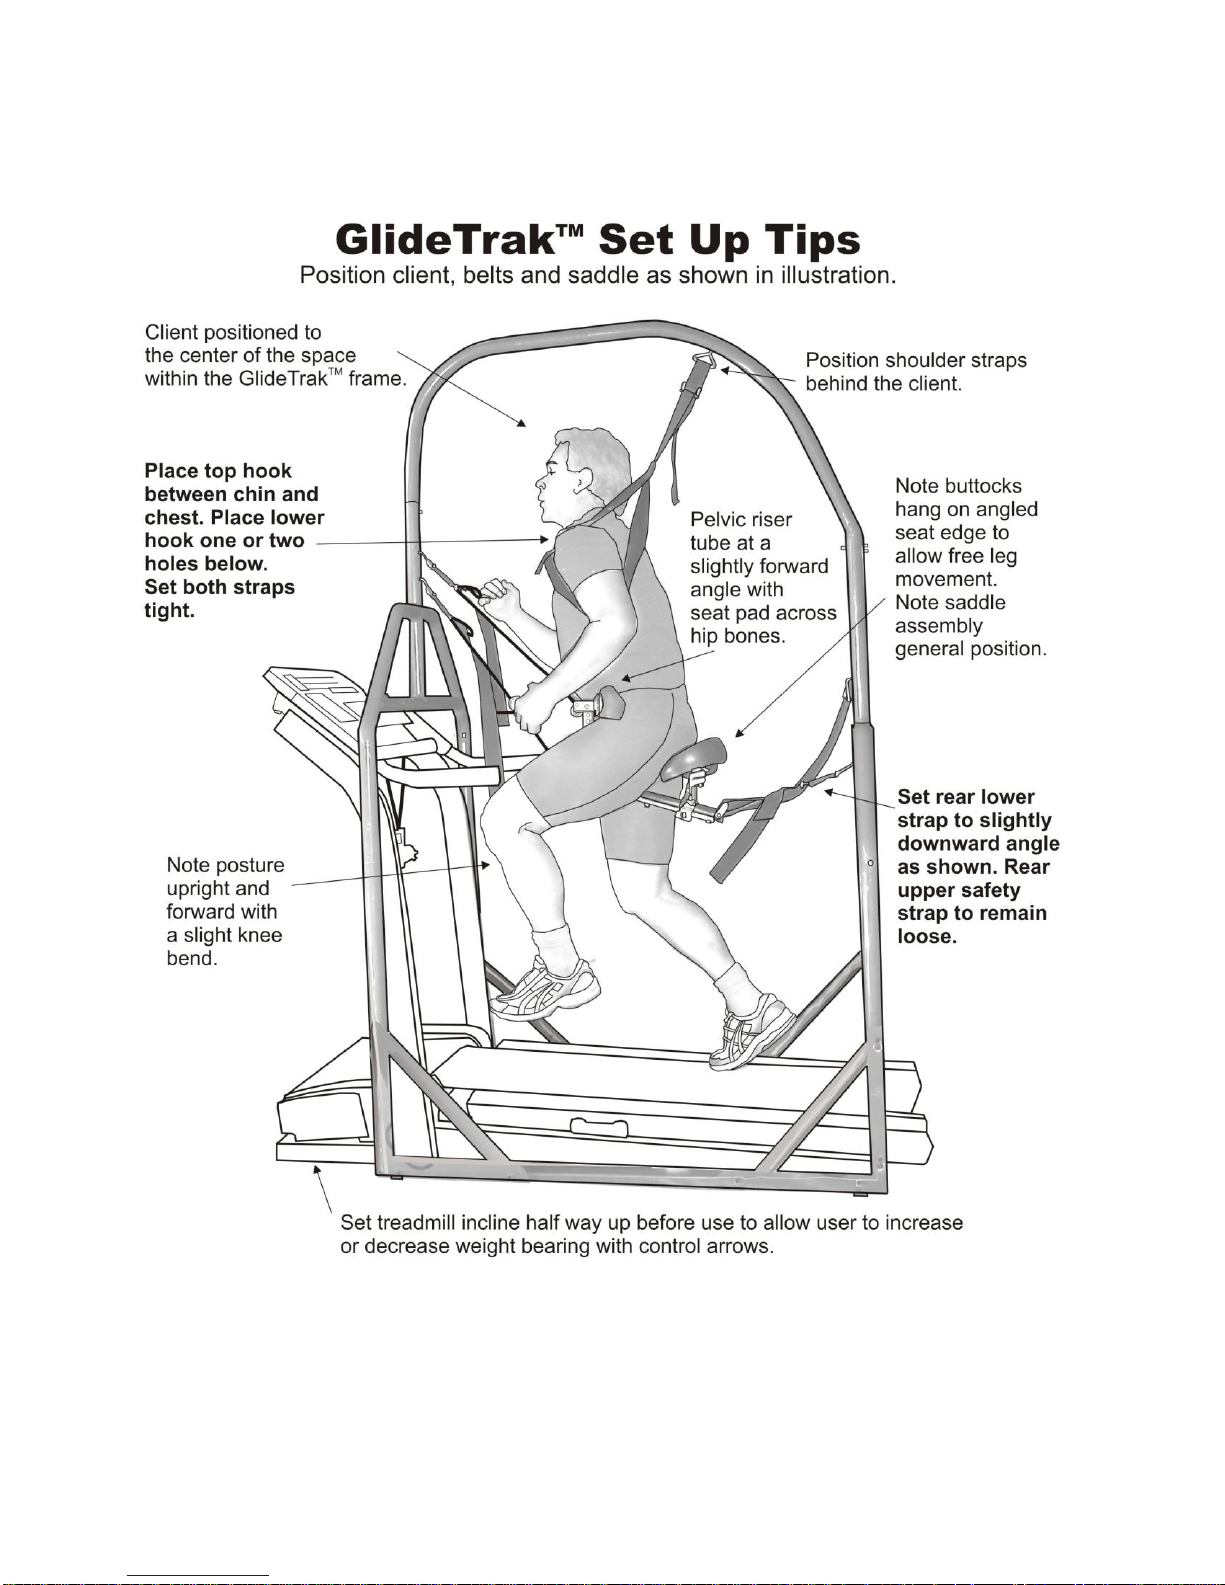
Diagram: Refer to the diagram on the next page for GlideTrak™ set-up.
Last: Note: We hope you enjoy your GlideTrak™ training and wish you many successful
and memorable experiences with your patients.
5
6

GlideTrakTM Quick Start Guide
1. Treadmill: Have client step onto treadmill at zero incline. Once client is safely on treadmill,
increase incline to about 50%.
2. Shoulder harness: Fit shoulder harness on client.
3. Strap Positions: Hook straps into proper holes on frame (see tips on page 6).
4. Rear Seat Strap: Adjust lower rear seat strap to center the client fore and aft within the
GlideTrakTM frame.
5. Seat pad adjustment: Seat setting is made by moving the seat forward or backward. In most
cases, the front pelvic pad will be set in the third or fourth hole down and will not require adjustment
(Refer to more detailed instructions as needed). Be sure the pelvic pad sits across the front hip
bones, below the belly button and above the crease where hips bend forward. The “sit” bones
(ischial tuberosities) should be at forward edge of the seat pad.
6. Front seat straps: Lower two front straps to allow client to step over seat, or completely remove
front hooks and pass the seat between the client’s legs and then replace the hooks into proper
holes.
7. Mount: Pull seat onto client’s pelvis and tighten front straps.
8. Seat height adjustment: Tighten front lower strap until knees are slightly bent. Use the ratchet
and/or treadmill decline button. Knees should have a slight bend, 10-20 degrees or just enough
that the patient can walk with a heel strike.
9. Pelvic pad angle (tilt) adjustment: Adjust angle of pelvic pad riser bar to a slightly forward angle
by tightening front top strap.
10. Ready to Glide: Shoulders back, upright posture, relaxed arm swing, settle into seat and allow
seat to take full body weight. Avoid bouncing out of seat.
11. Position Rechecks: (knee bend, seat tilt angle, comfortable upright position)
12. Comfort: Your body will need to adjust over a few training sessions not unlike breaking in a new
pair of shoes. Be patient and adjust occasionally as needed.
13. Have fun!
7
 Loading...