

Page 1
motion
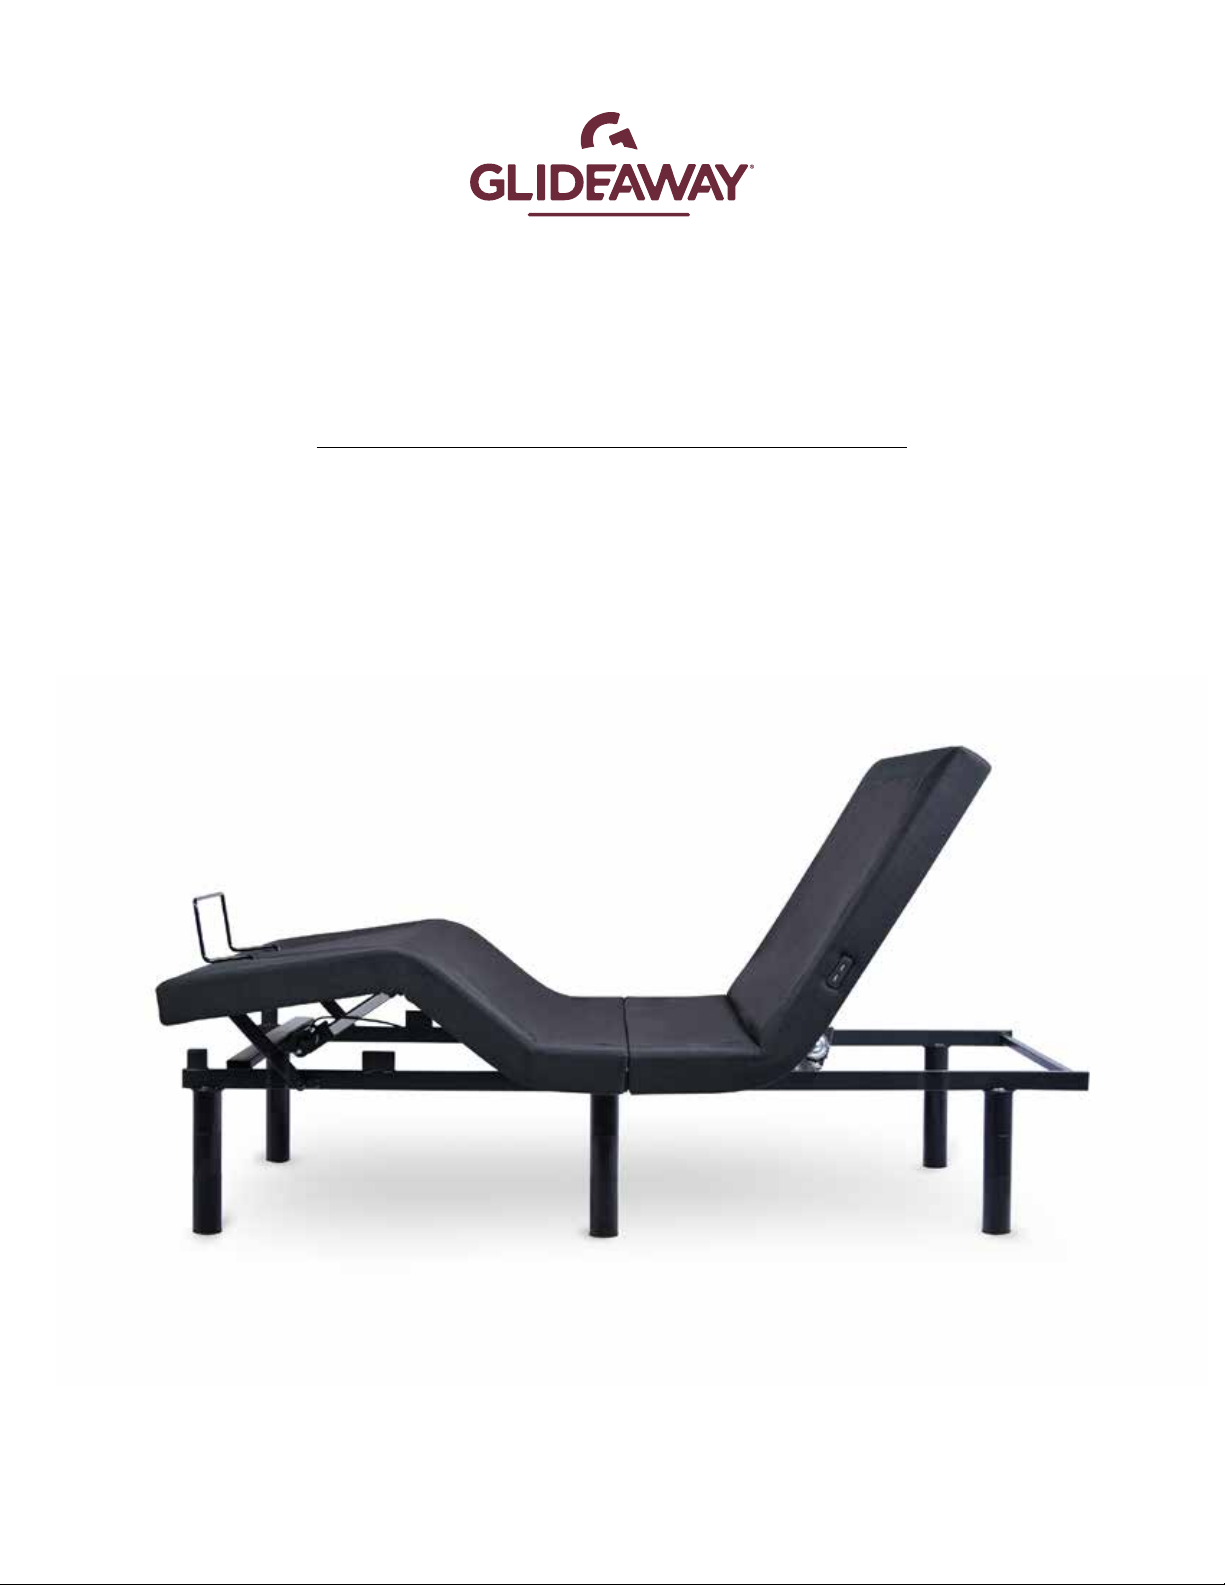
MOTION 500
OWNER’S MANUAL
REV 11.23.20
Page 2

OWNER’S MANUAL: MOTION 500
CONTENTS
SAFETY INFORMATION 3
WHAT IS INCLUDED 6
ASSEMBLY 7
REMOTE GUIDE 10
OPERATION 12
PAIRING REMOTE 15
TROUBLESHOOTING 16
REPROGRAMMING REMOTE 17
ACCESSORIES 18
BASE HEIGHT GUIDE 19
APP INFORMATION 19
RESOURCES 19
USER INFO
Please take a moment and write down the serial number in the space provided below, in case you need to
refer to it in the future. This information can be found by raising the head section of the bed.
SKU: GM-A5Z
Serial Number _____________________
This number will be required for future service claims.
2
2
Page 3
OWNER’S MANUAL: MOTION 500
SAFETY INFORMATION
DANGER!
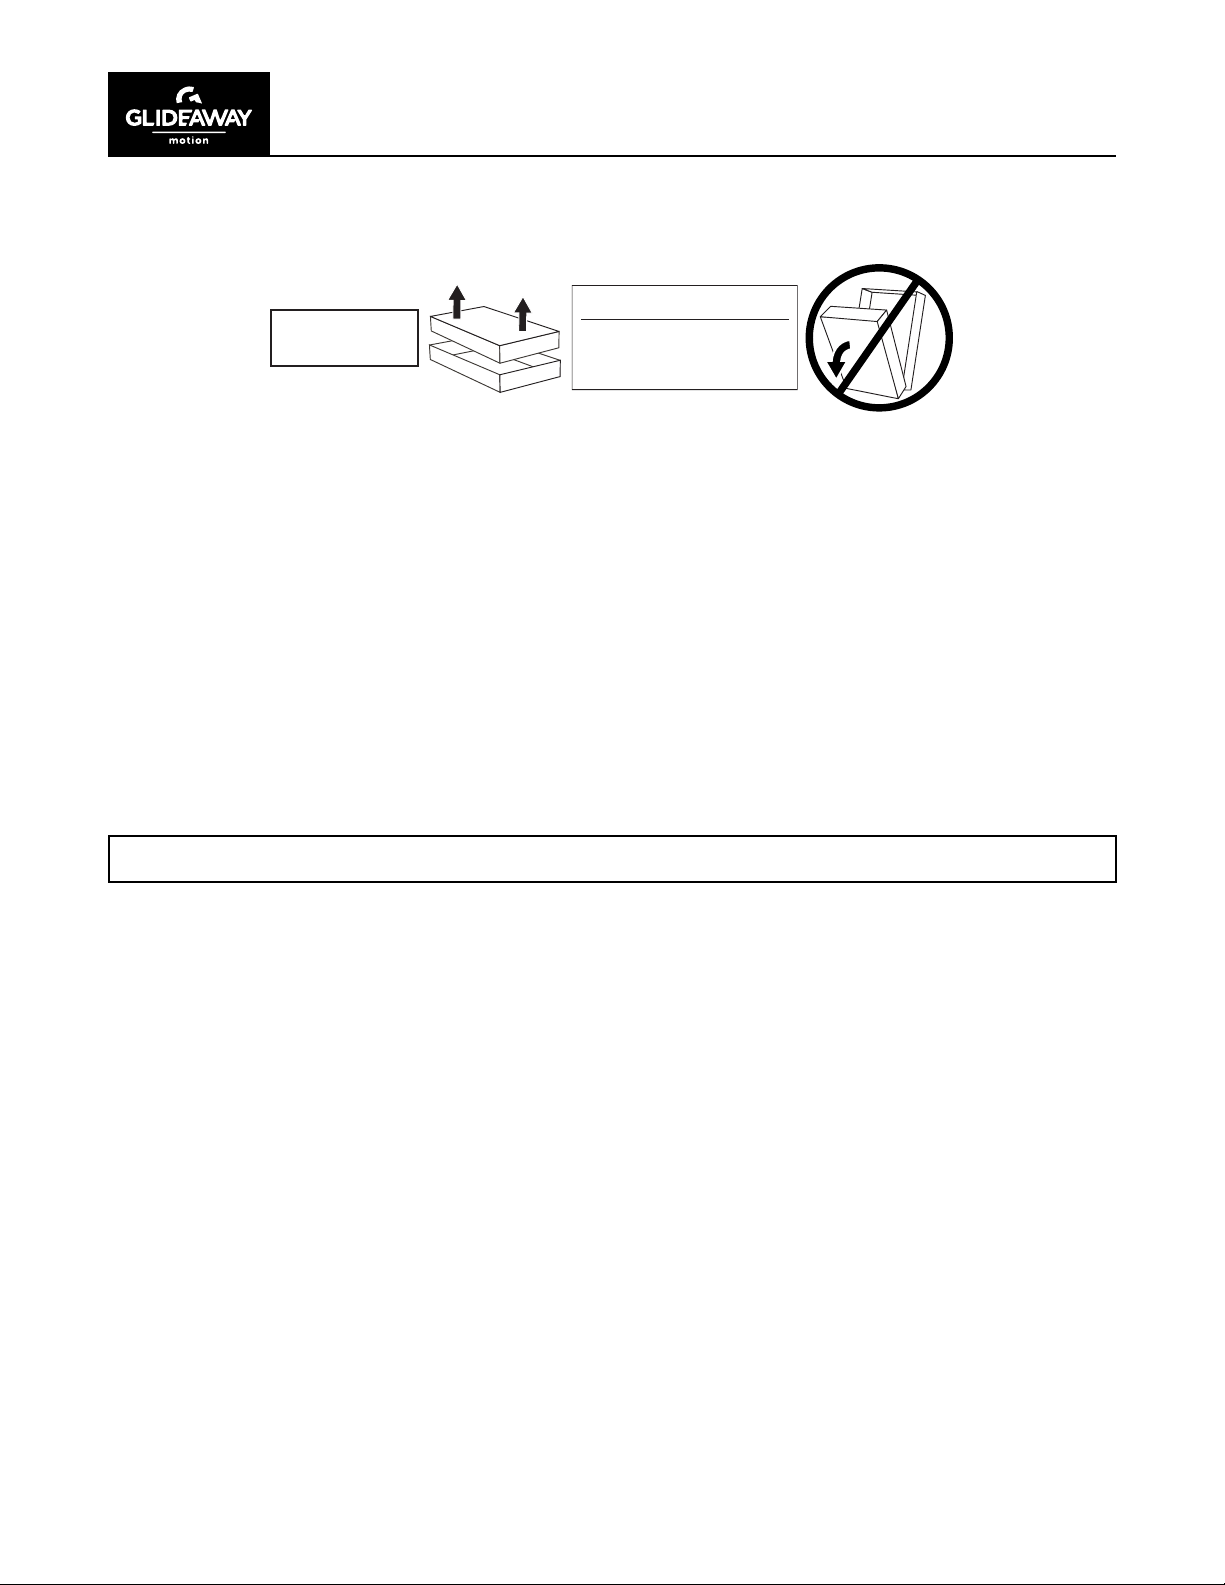
OPEN BOX IN
FLAT POSITION
ATTENTION!
IMPORTANT SAFETY INSTRUCTIONS. SAVE THIS MANUAL!
PLEASE READ THESE INSTRUCTIONS THOROUGHLY BEFORE USING THIS PRODUCT.
PROPER OPERATION OF YOUR ADJUSTABLE BED IS NECESSARY TO ENSURE THE LONG LIFE
AND DURABILITY YOU EXPECT FROM A HIGH-QUALITY PRODUCT. THE MANUFACTURER HAS
TESTED AND INSPECTED THIS PRODUCT PRIOR TO SHIPMENT.
RADIO FREQUENCY IS 2.4Ghz.
This device complies with part 15 of the FCC Rules and Industry Canada’s license exempt RSSs.
Operation is subject to the following two conditions:
1. This device may not cause interference, and
2. This device must accept any interference received, including interference that may cause undesired
operation of the device.
Any change to the antenna or the device could result in the device exceeding the RF exposure requirements and void
the user’s right to operate the device. The input voltage is AC100 -240 50/60HZ; the output voltage is DC29V 1.8A.
Total USB power output is 2 AMP.
DO NOT OPEN FROM
VERTICAL POSITION. THIS
CAN DAMAGE BASE.
WARNING: TO PREVENT FIRE OR SHOCK HAZARD, DO NOT EXPOSE THIS UNIT TO MOISTURE.
ELECTRICAL SAFETY
Always unplug this adjustable bed from the electrical outlet before any cleaning or maintenance of the adjustable bed.
To safely disconnect, remove the plug from the outlet. Keep cord away from heated surfaces. Use only indoors.
Discontinue use of this adjustable bed and contact the manufacturer for repair if:
1. It has a damaged cord or plug,
2. It is not working properly, or
3. It has been dropped or damaged.
FOR OPTIMAL SAFETY, YOUR ADJUSTABLE BED SHOULD BE PLUGGED INTO A SURGE PROTECTOR
(not supplied with this adjustable bed).
BATTERY PRECAUTIONS
Follow these precautions when using batteries in this device:
1. Warning – Danger of explosion if battery is incorrectly replaced. Replace only with the 6LR61 9V batteries and LR03
AAA batteries.
2. Be sure to follow the correct polarity when installing the batteries as indicated in the battery compartment.
A reversed battery may cause damage to the device.
3. Do not mix different types of batteries together (e.g. Alkaline, Rechargeable and Carbon-zinc) or old batteries with
fresh ones.
4. If the device is not to be used for a long period of time, remove the batteries to prevent damage or injury from
possible battery leakage.
5. Do not try to recharge a battery not intended to be recharged; it can overheat and rupture.
(Follow battery manufacturer’s directions.)
3
Page 4

OWNER’S MANUAL: MOTION 500
SAFETY INFORMATION
WARRANTY WARNING!
This bed is specically designed to require no maintenance by you, the user. Any opening or tampering with the control box, motors or hand controls (with the exception of the battery compartment, if
equipped) will void the warranty. Do not attempt to alter component wiring or adjust or modify the structure of the product in any way or the warranty will be void. Only those authorized may conduct repairs or
part replacement on your adjustable bed.
IN-HOME USE ONLY
This adjustable bed is designed exclusively for in-home use.
HOSPITAL/COMMERCIAL DISCLAIMER
This base is NOT designed for commercial or hospital use and is NOT designed to meet hospital standards.
Do not use this base with TENT TYPE oxygen therapy equipment or use near explosive gases.
CONSUMERS WITH PACEMAKERS
It is possible that the vibrating feature of this bed may be interpreted falsely by some pacemakers as
movement and/or exercise. This is common with any product that produces a vibrating motion, and may or
may not affect your pacemaker. Please consult your physician with any concerns.
PRODUCT RATINGS
Lift Motor Restrictions:
The lift motors in this bed are NOT designed to operate continuously for more than one (1) minute over a
nine (9) minute time period, or approximately 12% duty cycle. To ensure reliable functionality and full life
of this product, do not attempt to exceed these limits. NOTE: Attempting to circumvent or exceed this
rating will shorten the life expectancy of the product and may void the warranty.
Weight Restrictions:
The recommended weight limits on our adjustable beds are:
■
1/pc King: 800 lb
■
Queen: 650 lb
■
Full/XL: 500 lb
■
Twin/XL: 400 lb (800 lb if using two twin XLs as a King)
—
■
The structure of the bed will support the recommended weight when distributed evenly
across the bed.
■
The head and foot sections are not designed to individually support or lift this amount of weight.
■
For optimal performance and integrity of structure, entering and exiting the adjustable bed with
the bed in the at position is recommended.
■
NOTE: Exceeding the recommended weight restrictions could damage your adjustable bed
and void your warranty.
4
Page 5

OWNER’S MANUAL: MOTION 500
SAFETY INFORMATION
SMALL CHILDREN AND PETS WARNING
Immediately dispose of all packing materials, as they can pose a smothering risk to small children and pets.
Injury could also occur if children or pets are permitted to play on or under the bed. Do not allow children to
operate this bed without adult supervision.
LUBRICATION AND CLEANING
This product is designed to be maintenance free. The lift motors are permanently lubricated and sealed—no
additional lubrication is required. Do not apply lubricant to lift motor lead screws or any nylon nuts or the
base may inadvertently creep downward from the elevated position.
LIFT WARNING
DO NOT SIT ON THE HEAD OR FOOT SECTIONS WHILE IN THE RAISED POSITION, OR DURING LIFT OR
LOWERING CYCLES.
MOVING AFTER INSTALLATION
Do not place adjustable bed base vertically on its head or foot sections. This may cause injury to persons or
damage to base.
WARNING!
To reduce the risk of burns, re, electric shock, or injury to persons:
■
Unplug from outlet before putting on or taking off accessories.
■
Close supervision is necessary when this base is used by, or near children, invalids,
disabled persons, or pets.
■
Use this base only for its intended use as described in these instructions.
Do not use attachments not recommended by the manufacturer.
■
Never operate this base if it has a damaged cord or plug, is not working properly,
has been dropped or damaged, or dropped in water.
■
Keep the cord away from heated surfaces.
■
Never drop or insert any object into any opening.
■
Do not use outdoors.
■
Do not operate where aerosol (spray) products are being used or where oxygen is being administered.
■
To disconnect, remove plug from outlet.
■
DO NOT USE NEAR PEOPLE USING OR WEARING MEDICAL DEVICES.
FOR HOUSEHOLD/RESIDENTIAL USE ONLY.
5
Page 6
OWNER’S MANUAL: MOTION 500
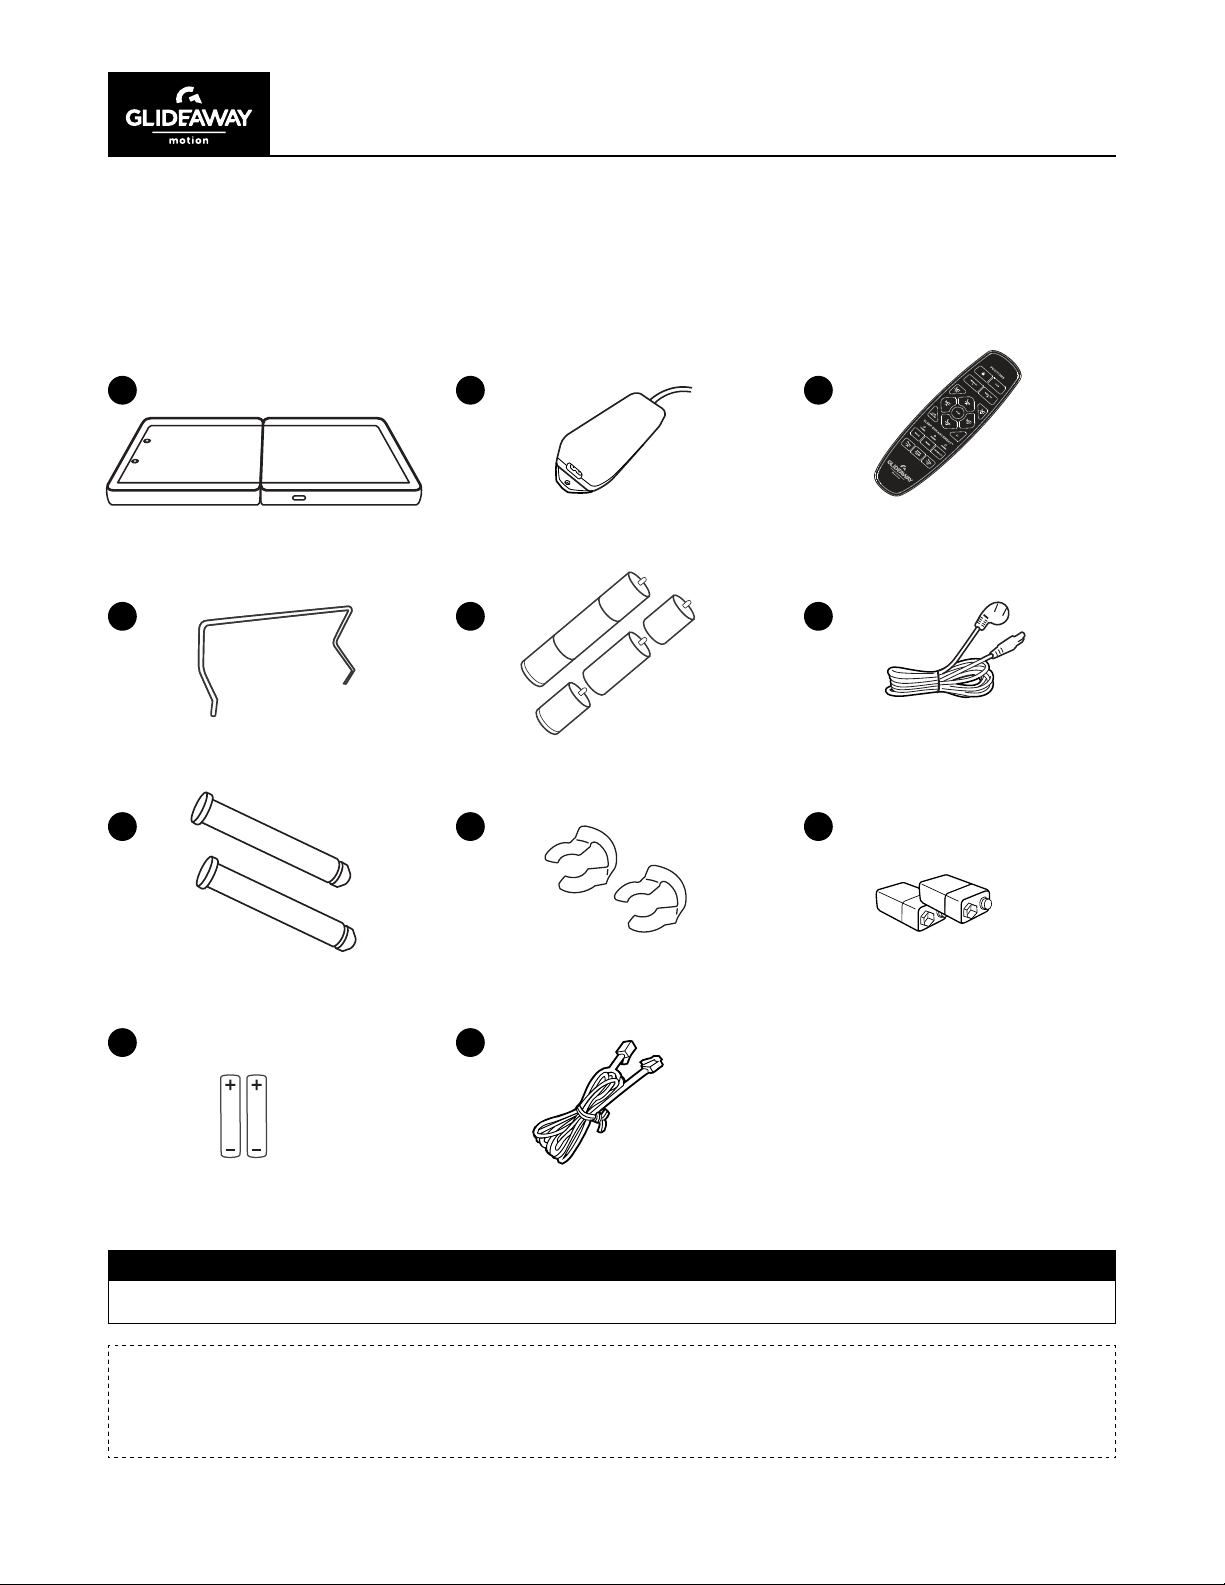
WHAT’S INCLUDED
Before discarding any packing materials, check the adjustable base
shipping carton and verify the following items are included:
A
D E
B C
x6
(1) Foot Mattress Retainer
G H I
(6) Legs
x2x2
(1) Remote Control(1) Power Supply
F
(1) AC Power Cord
x2
(2) C Clips(2) Hinge Pins
J K
x2
(2) AAA Batteries
IMPORTANT:
USE 2 PEOPLE TO LIFT BASE TO AVOID DAMAGE.
NOTE:
Carefully lift base from the shipping carton, keeping the unit’s top-side down.
Remove the plastic wrapping from the bottom to access the base.
(1) Sync Cable
for use with TXL ,
SCK, SQ models only
6
(2) 9V Batteries
Page 7
OWNER’S MANUAL: MOTION 500
ASSEMBLY
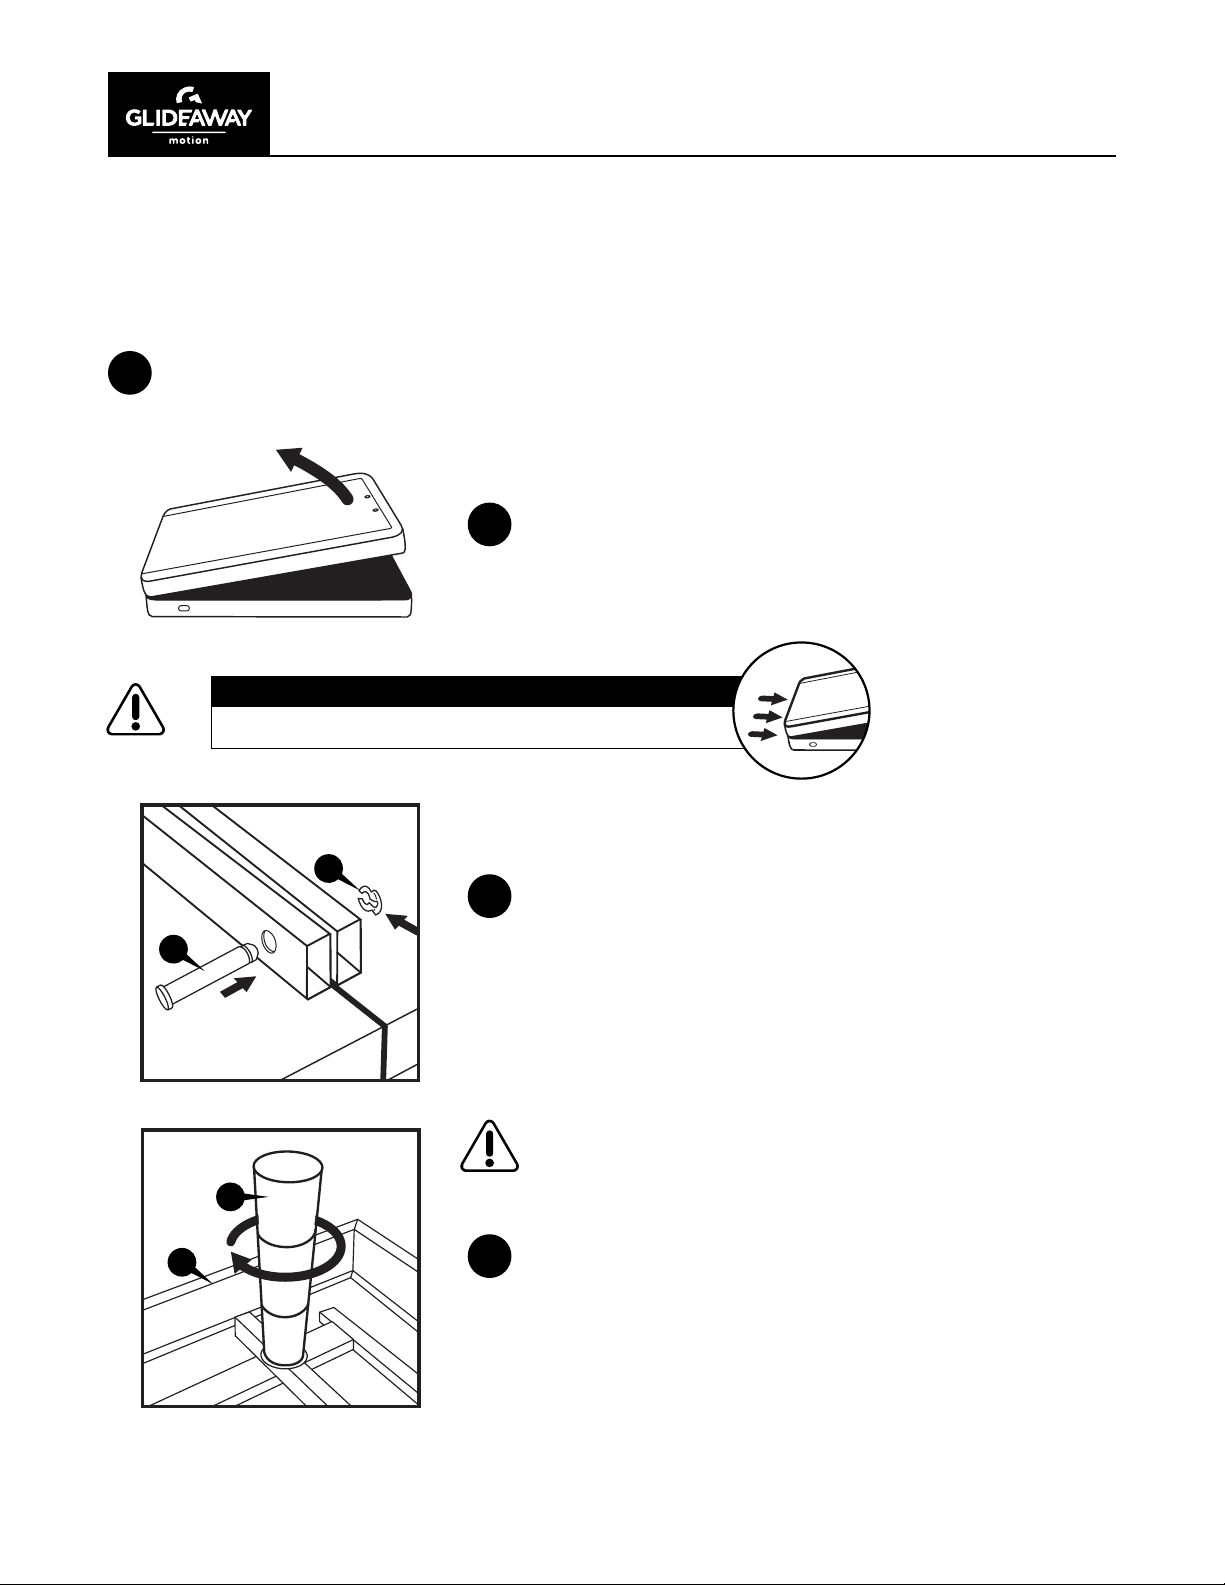
It is HIGHLY recommended to use two people for the installation of this product.
To assemble, please perform the following steps:
Carefully lift the base from the shipping carton, keeping the unit’s topside down.
1
Remove the plastic wrapping from the bottom to access the bases.
Lay base at and unfold topside down.
2
KEEP HANDS CLEAR OF HINGE PINCH POINT
Lay the base at before unfolding base.
H
Insert hinge pins and secure with retaining clips.
3
Repeat on both sides of base.
G
If installing on a platform base or foundation, do not install
legs. Follow the instructions included in the MULTI-FUNC-
E
A
4
TION BRACKETS accessory kit.
Insert all 6 legs into the threaded holes and securely tighten
before turning base over for use. There must not be any gap
or wobble in the leg in order to avoid risk of injury or damage to the base which may void warranty.
7
Page 8
OWNER’S MANUAL: MOTION 500
ASSEMBLY
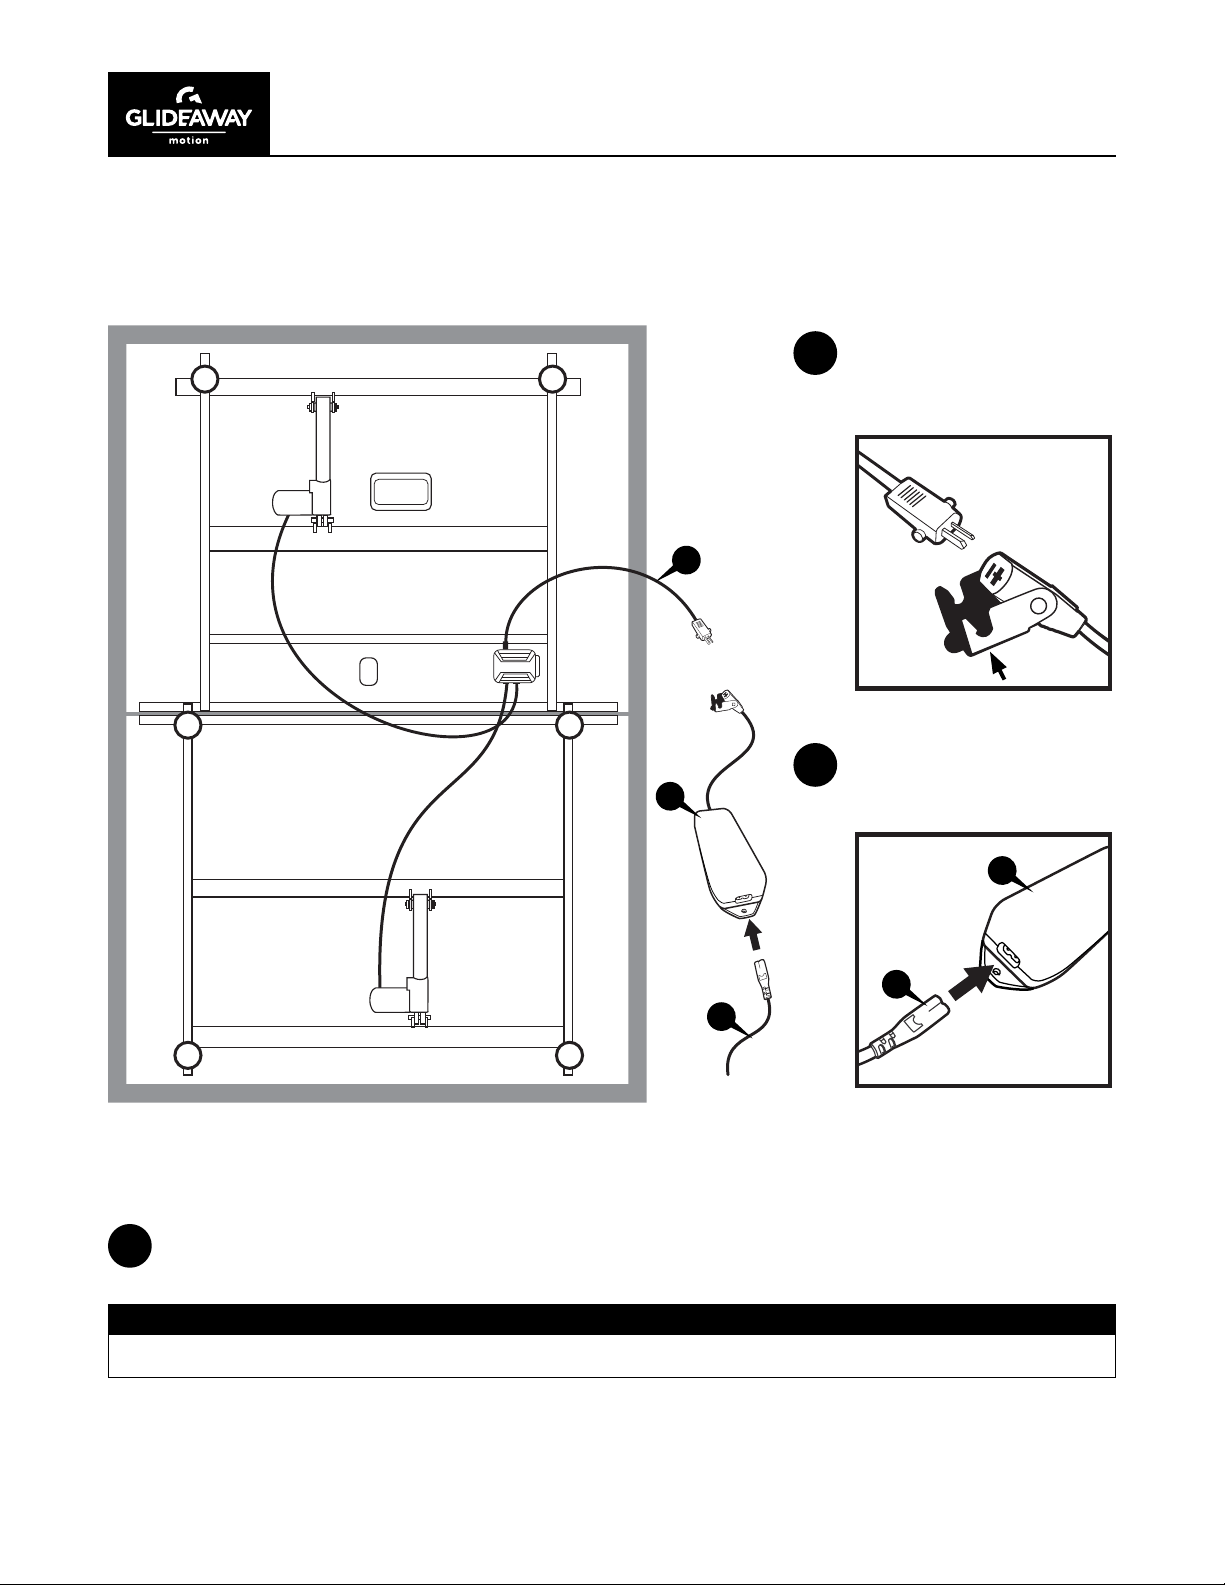
Insert DC cord from
5
base into the power
supply.
L
LOCK
Carefully rotate the base on its side, then lift and place on legs.
7
WARNING
B
F
TO OUTLET
Insert the AC cord into
6
the power supply.
F
B
DO NOT TILT or LEAN base on the installed legs when turning base over.
8
Page 9
OWNER’S MANUAL: MOTION 500
ASSEMBLY
D
J
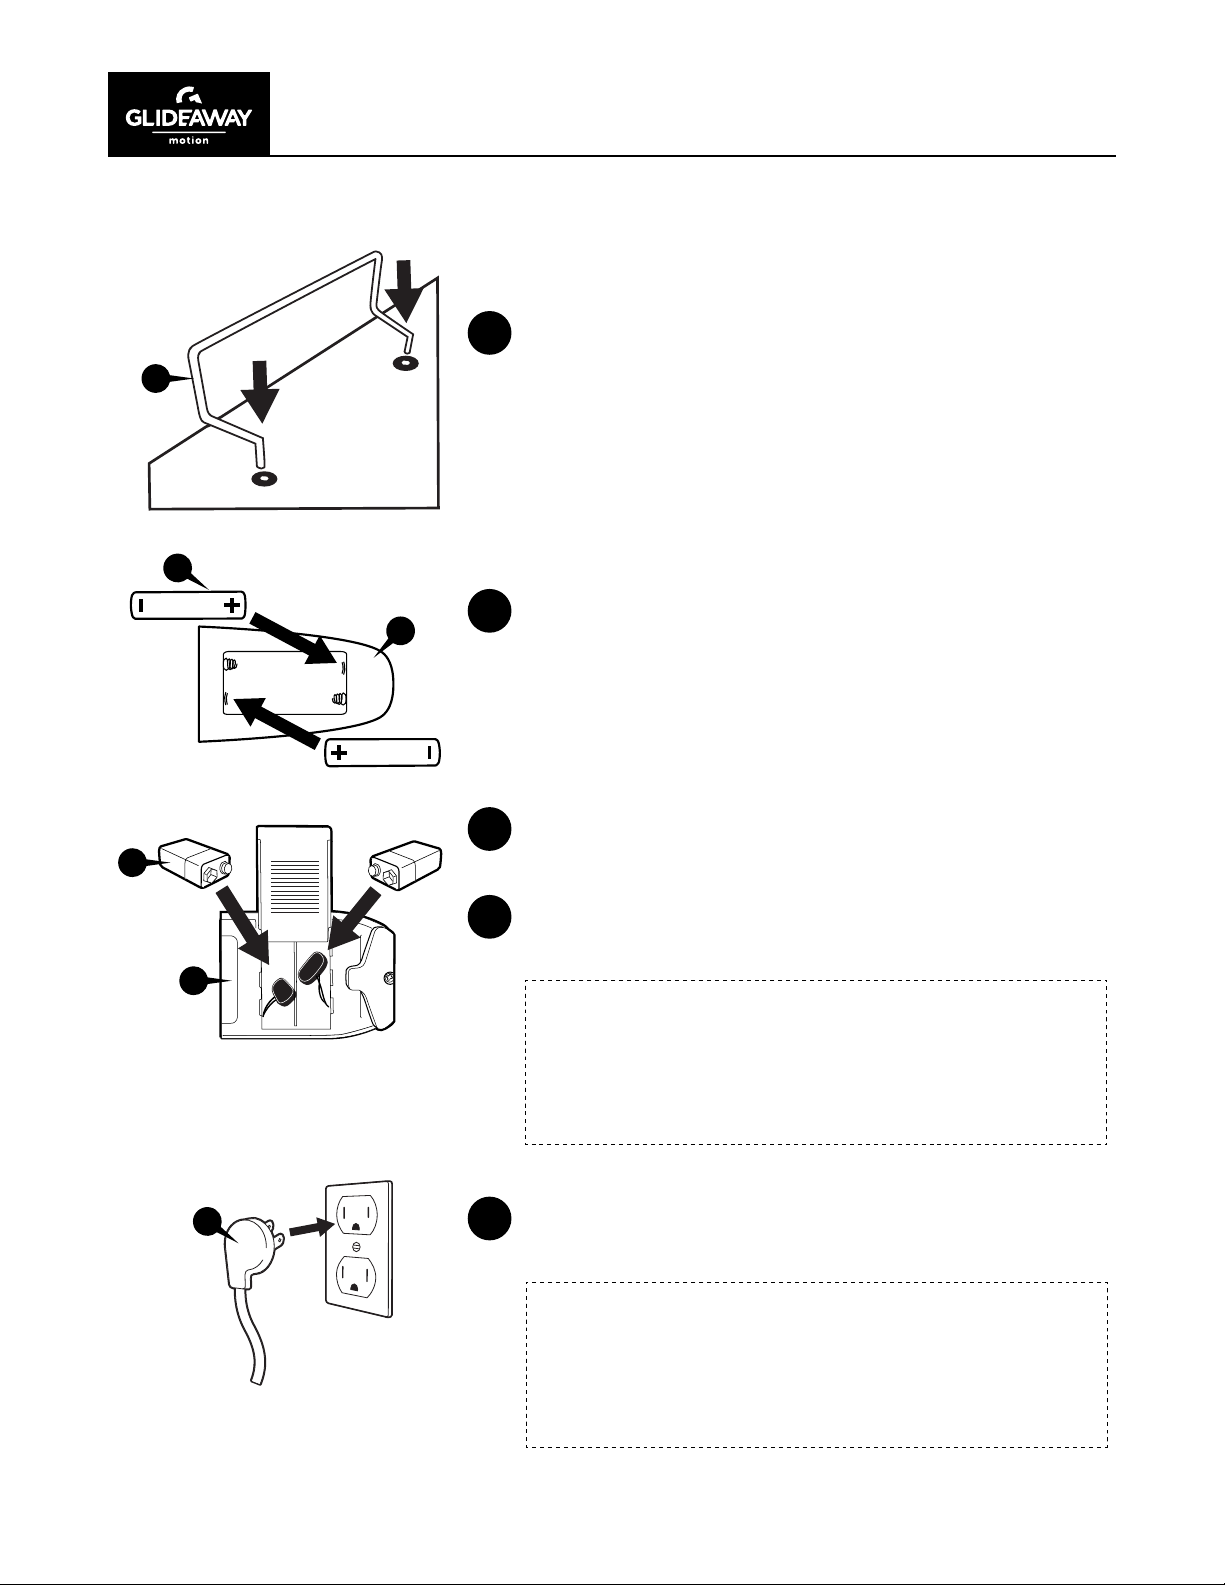
Insert the mattress retainer bar upright as shown.
8
Lift the battery cover and insert the two AAA size batteries
C
9
(included) into the remote as shown in the gure.
Replace the battery cover.
Remote is already linked with the base.
Turn the power supply upside down to access the battery
10
I
B
F
cover, then slide the battery cover off.
Insert the two 9V batteries (included) into the compartment
11
and slide the cover back on.
NOTE:
The battery backup will allow for the bed to be lowered
if a power outage occurs. It is not recommended to do
anything except lower the bed, as the battery backup will
not last if the features are continually used.
Insert AC plug into an AC outlet having 100-240V AC,
12
50/60Hz. Avoid outlets that work only with light switch.
NOTE:
If attaching headboard brackets (available separately) to
the base, see the included instructions. Otherwise, place
the desired mattress onto the base and enjoy your new
adjustable base!
9
Page 10
OWNER’S MANUAL: MOTION 500
REMOTE GUIDE
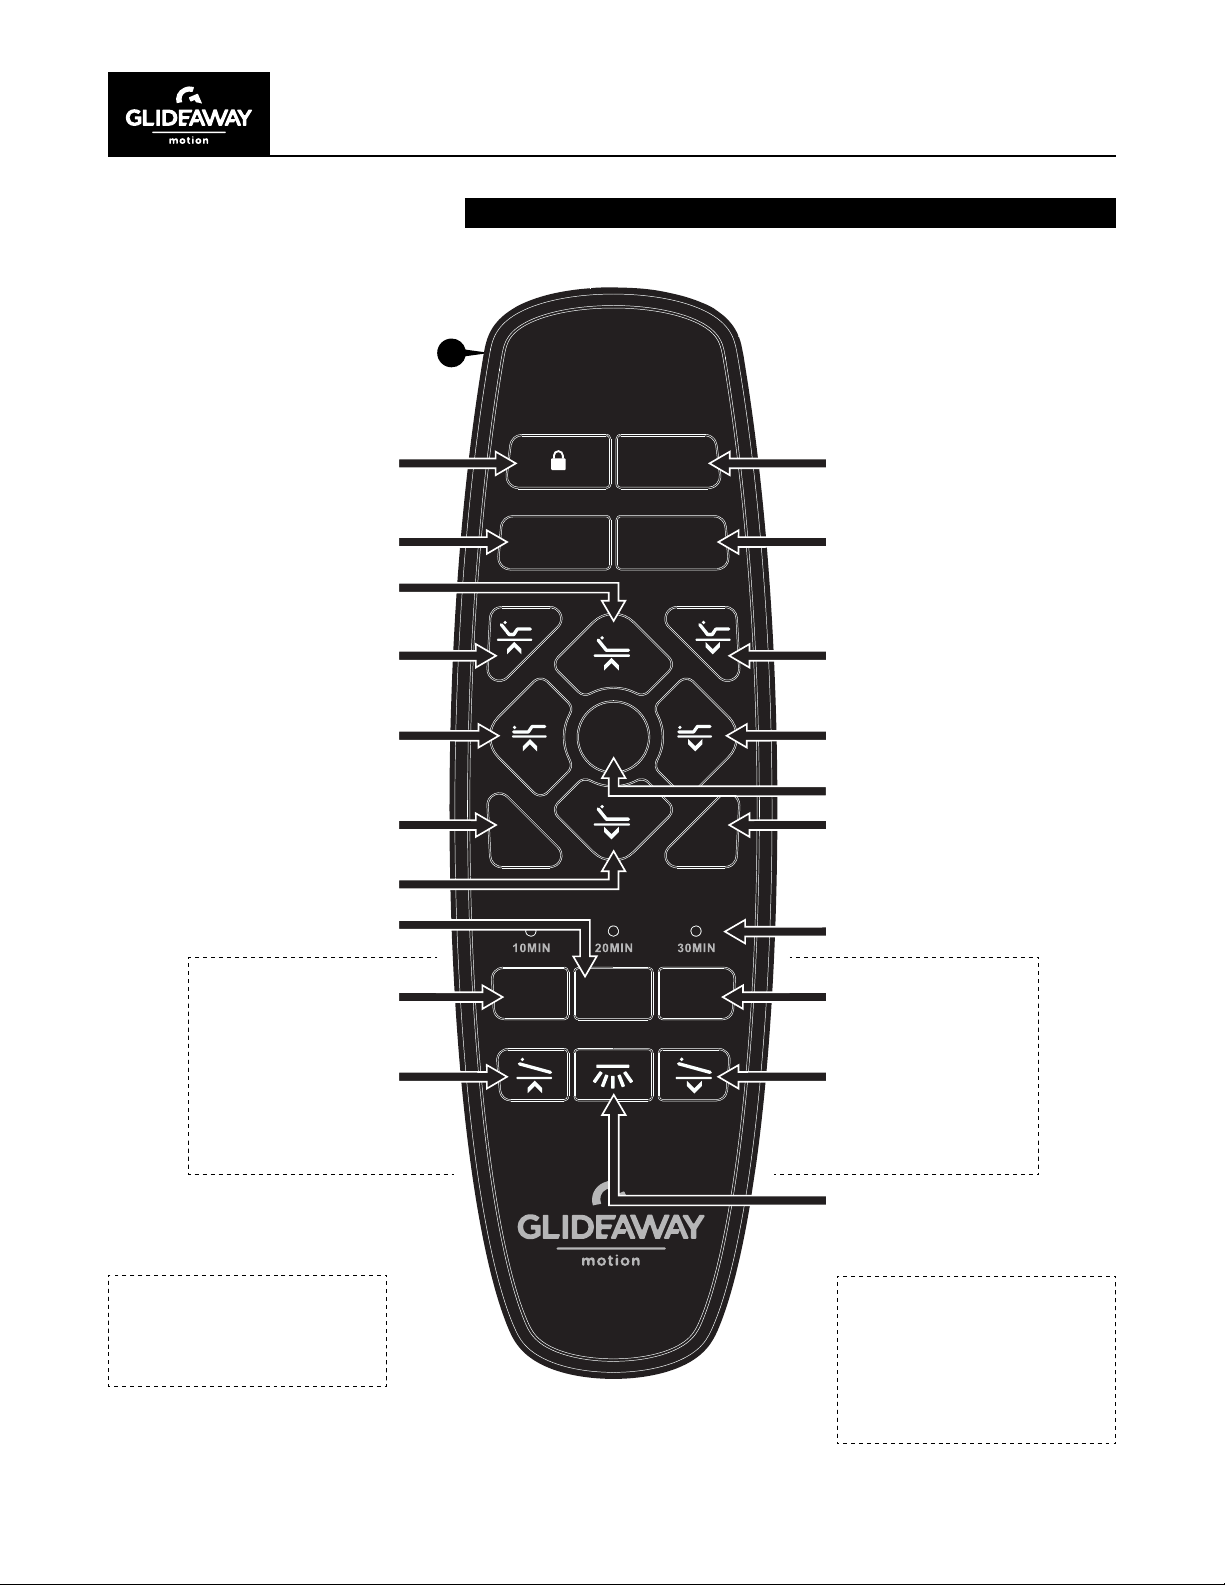
Lock
Memory Position A Memory Position B
Head Up
Head Up + Foot Up
Foot Up
Anti Snore Position
FOR TWIN XL, FULL, QUEEN AND SPLIT CAL KING
C
POSITIONS
MEMORY
A
PAIR
MEMORY
B
Pairing
Head Down + Foot Down
FLAT
Foot Down
Flat
ANTI
SNORE
ZG
Zero Gravity Position
For KING
Increase / Decrease
see page 11
NOTE:
Some buttons require a
double click to function.
Head Down
Massage Timer
Wave
Elevation Up
only available when
ELEVATION KIT is
installed
SLEEP ENHANCEMENT™
TIMERWAVE INTENSITY
Timer Indicators
Intensity
Increase / Decrease
Elevation Down
only available when
ELEVATION KIT is
installed
Under-bed Light
NOTE:
ELEVATION function
available on TXL and Q
sizes only with optional
elevation kit.
For KING
see page 11
10
Page 11
OWNER’S MANUAL: MOTION 500
REMOTE GUIDE
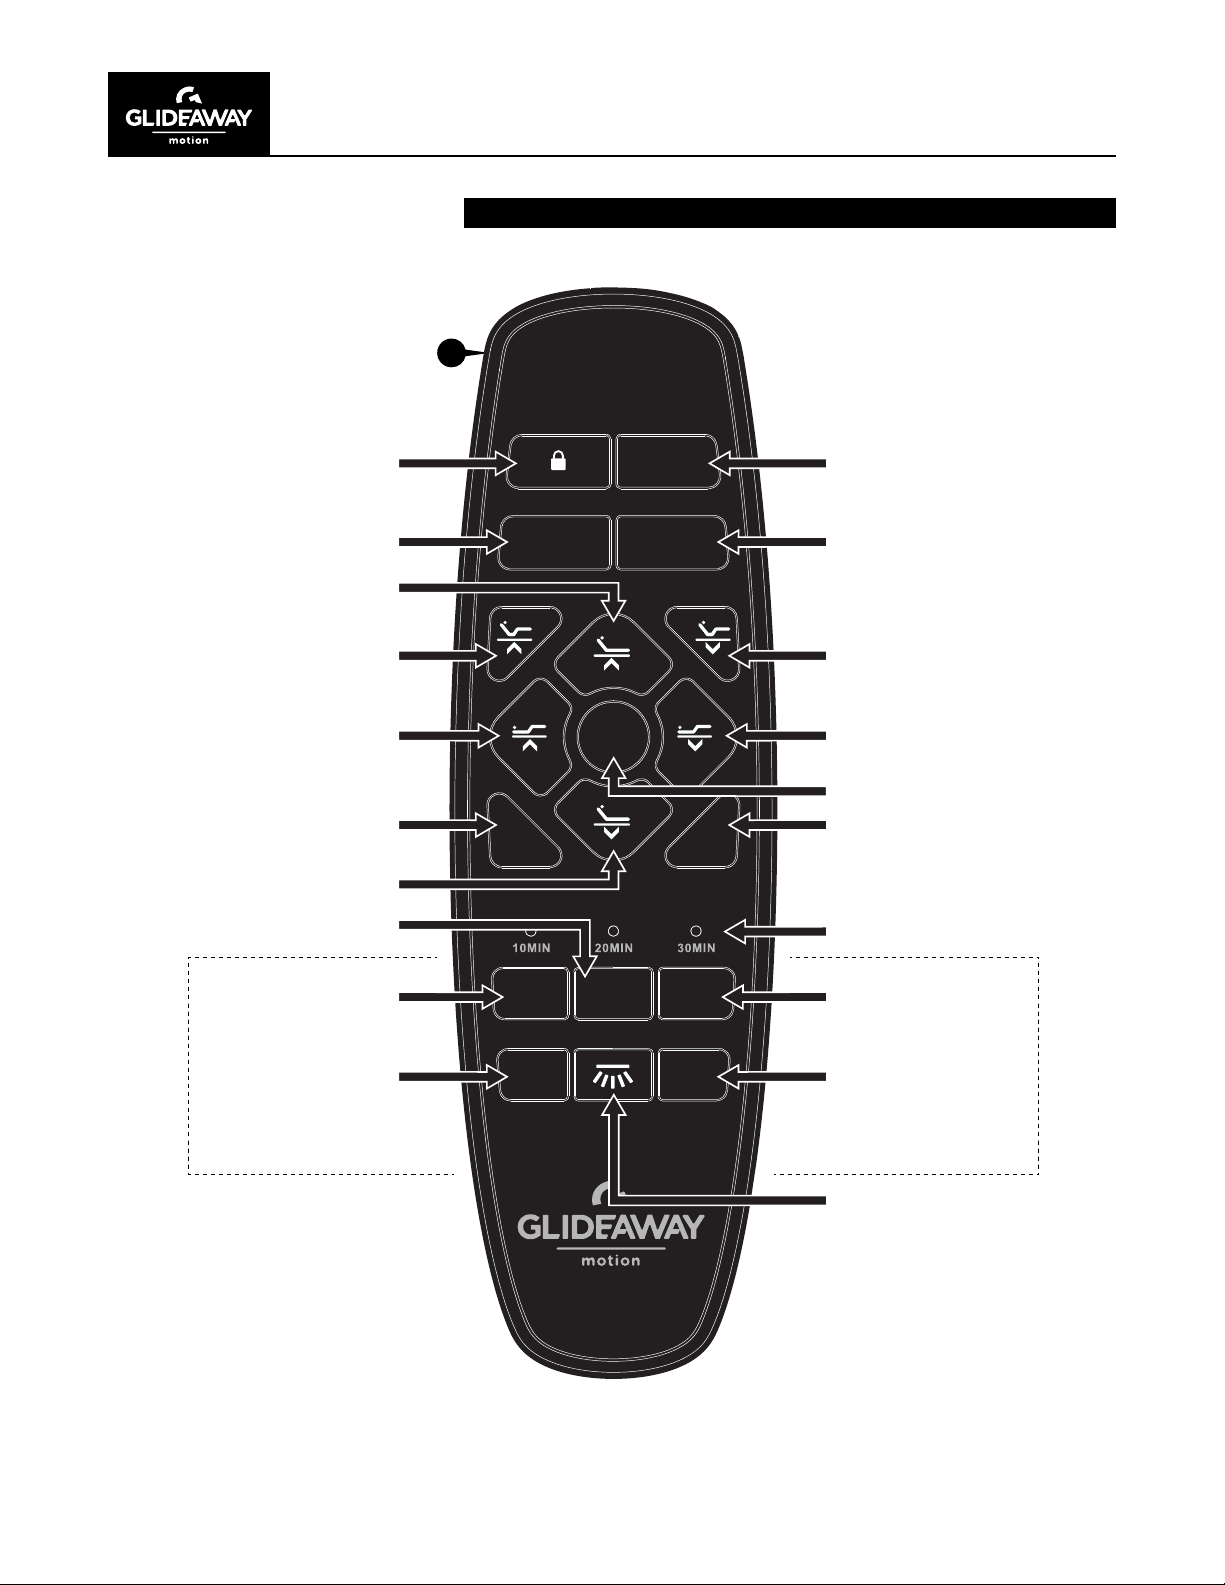
Lock
Memory Position A Memory Position B
Head Up
Head Up + Foot Up
Foot Up
Anti Snore Position
FOR KING
C
ANTI
SNORE
POSITIONS
MEMORY
A
FLAT
PAIR
MEMORY
B
Pairing
Head Down + Foot Down
Foot Down
Flat
ZG
Zero Gravity Position
Head Down
SLEEP ENHANCEMENT™
Massage Timer
Wave Decrease Wave Increase
WAVE
-
INTENSITY
-
TIMER
WAVE
+
INTENSITY
+
Timer Indicators
Intensity IncreaseIntensity Decrease
Under-bed Light
11
Page 12
OWNER’S MANUAL: MOTION 500
OPERATION
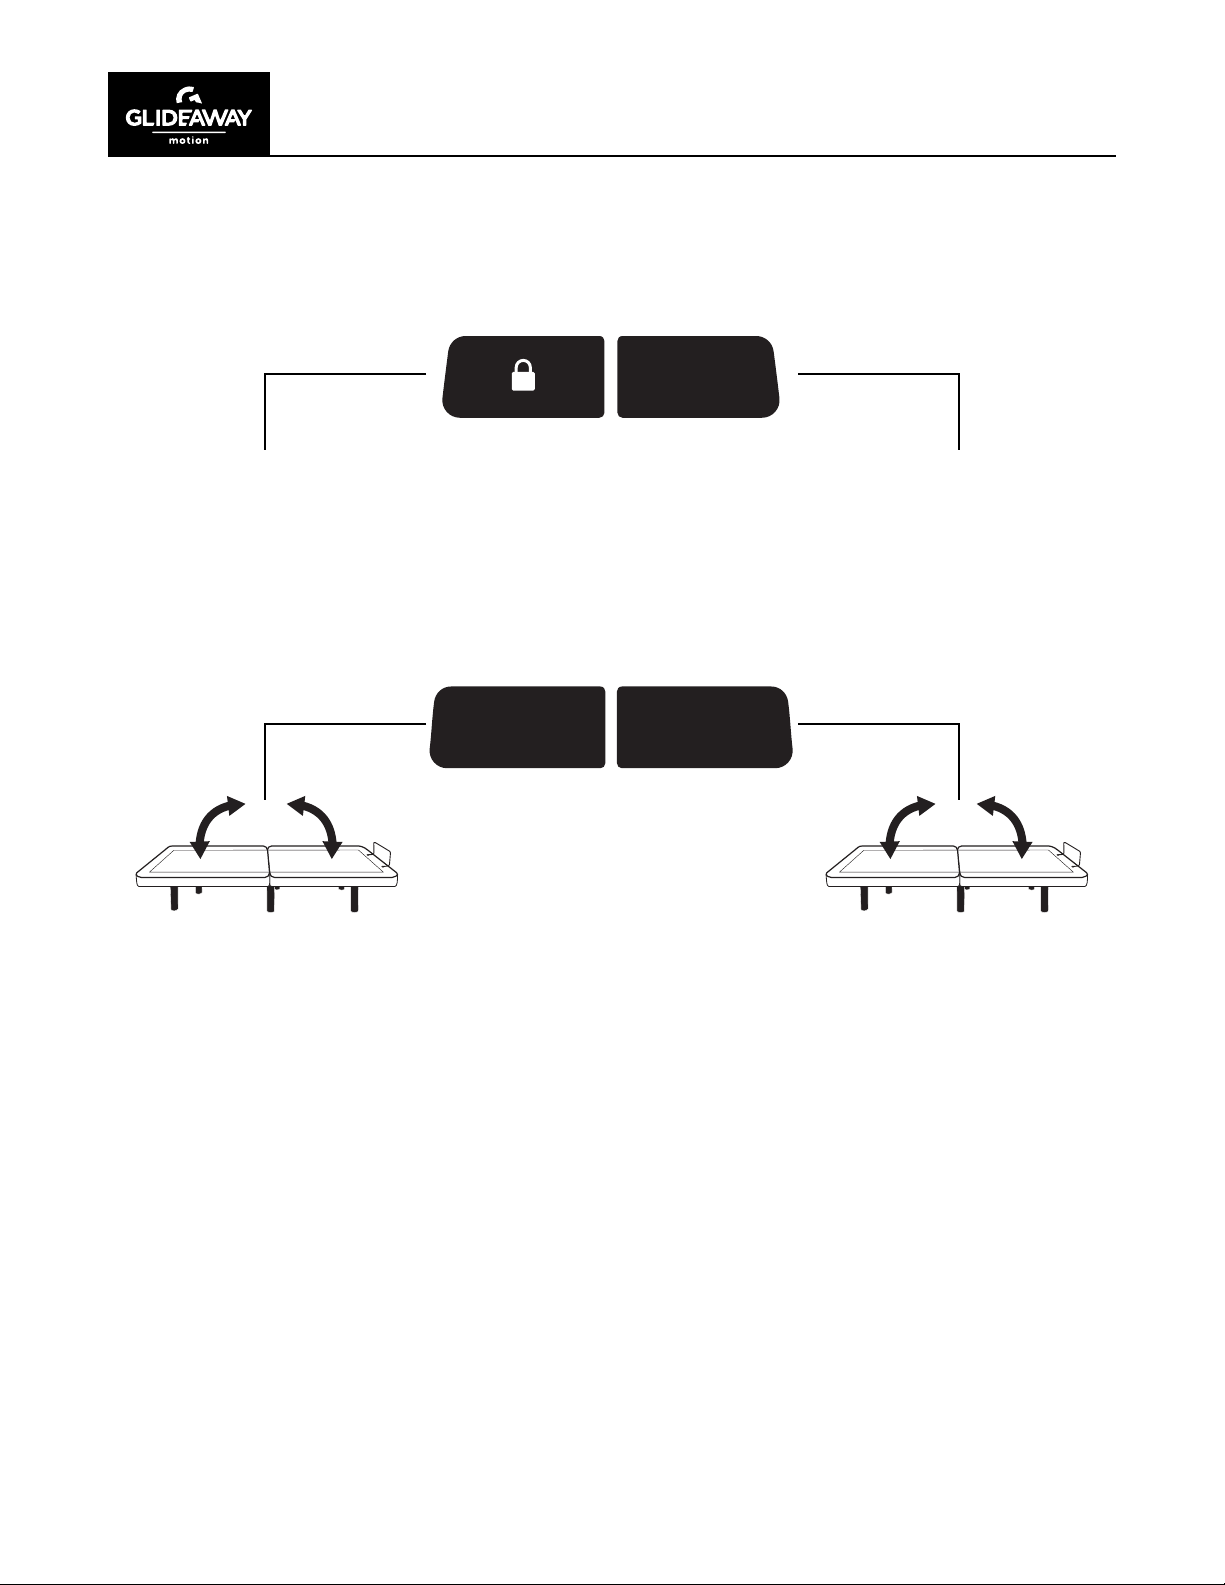
PAIR
Locks and unlocks remote
control. Press and hold lock
button until lock button ashes
red. To unlock, press and hold for
5 seconds.
Adjust head and/or foot
section(s) and/or elevation angle
(if equipped) to desired positions.
Press and hold MEMORY A
button until the back-light on
remote ashes. Release button
and wait for ash to stop. Button
has now been programmed.
Repeat process if new preset
position is desired.
MEMORY
A
Pairs remote to base.
See page 14 for details.
MEMORY
B
Adjust head and/or foot
section(s) and/or elevation angle
(if equipped) to desired positions.
Press and hold MEMORY B
button until the back-light on
remote ashes. Release button
and wait for ash to stop. Button
has now been programmed.
Repeat process if new preset
position is desired.
12
Page 13
OWNER’S MANUAL: MOTION 500
OPERATION
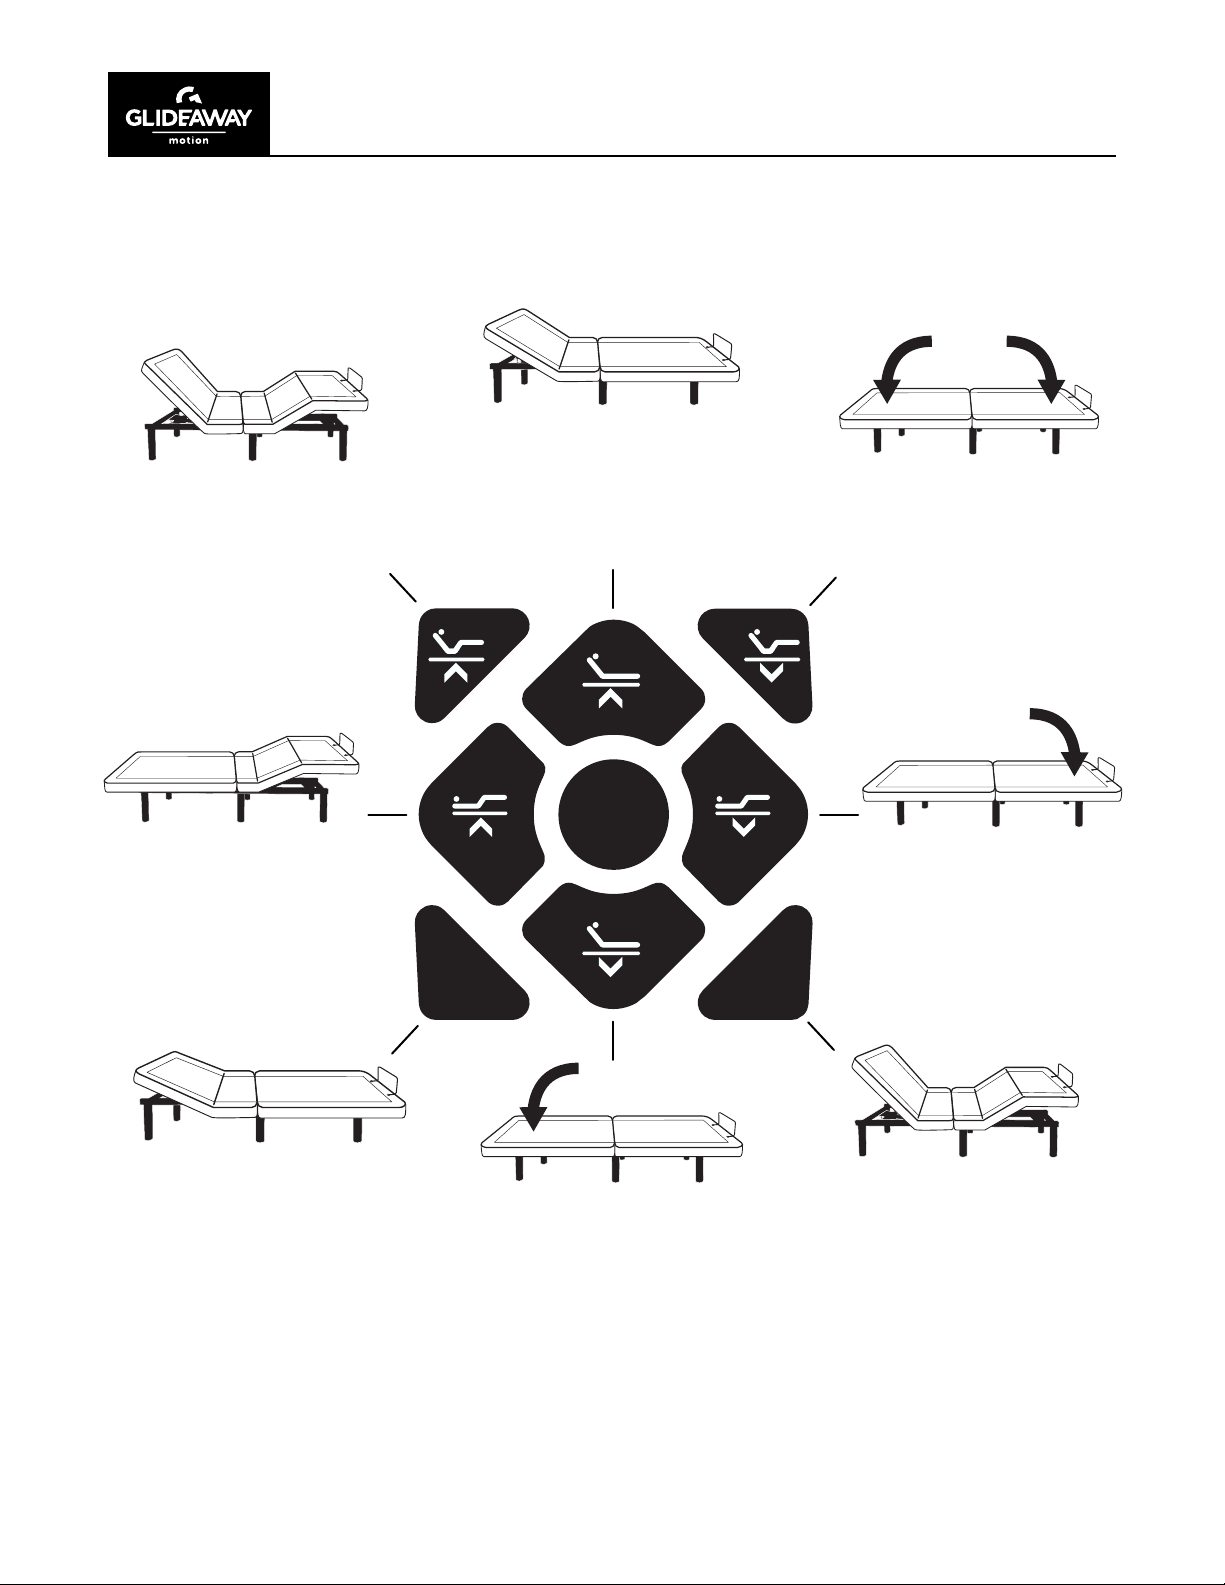
Press and hold the HEAD
UP + FOOT UP button to
raise the head and foot
simultaneously. Release
button when desired
position is reached.
Press and hold the HEAD
UP button to raise the
head position. Release
button when desired
position is reached.
Press and hold the HEAD
DOWN + FOOT DOWN
button to lower the head
and foot simultaneously.
Release button when
desired position is
reached.
Press and hold the FOOT
UP button to raise the
foot position. Release
button when desired
position is reached.
Press the ANTI-SNORE button
and the head will go to the
Anti-Snore position. This action
can be stopped at any time by
pressing another button.
FLAT
ANTI
SNORE
Press and hold the HEAD
DOWN button to lower
the head position. Release
button when desired
position is reached.
Press and hold the FOOT
DOWN button to lower
the foot position. Release
button when desired
position is reached.
ZG
Press the ZERO G RAVITY
button to move the head and
foot to the Zero Gravity position.
This action can be stopped at any
time by pressing another button.
13
Page 14
OWNER’S MANUAL: MOTION 500
OPERATION
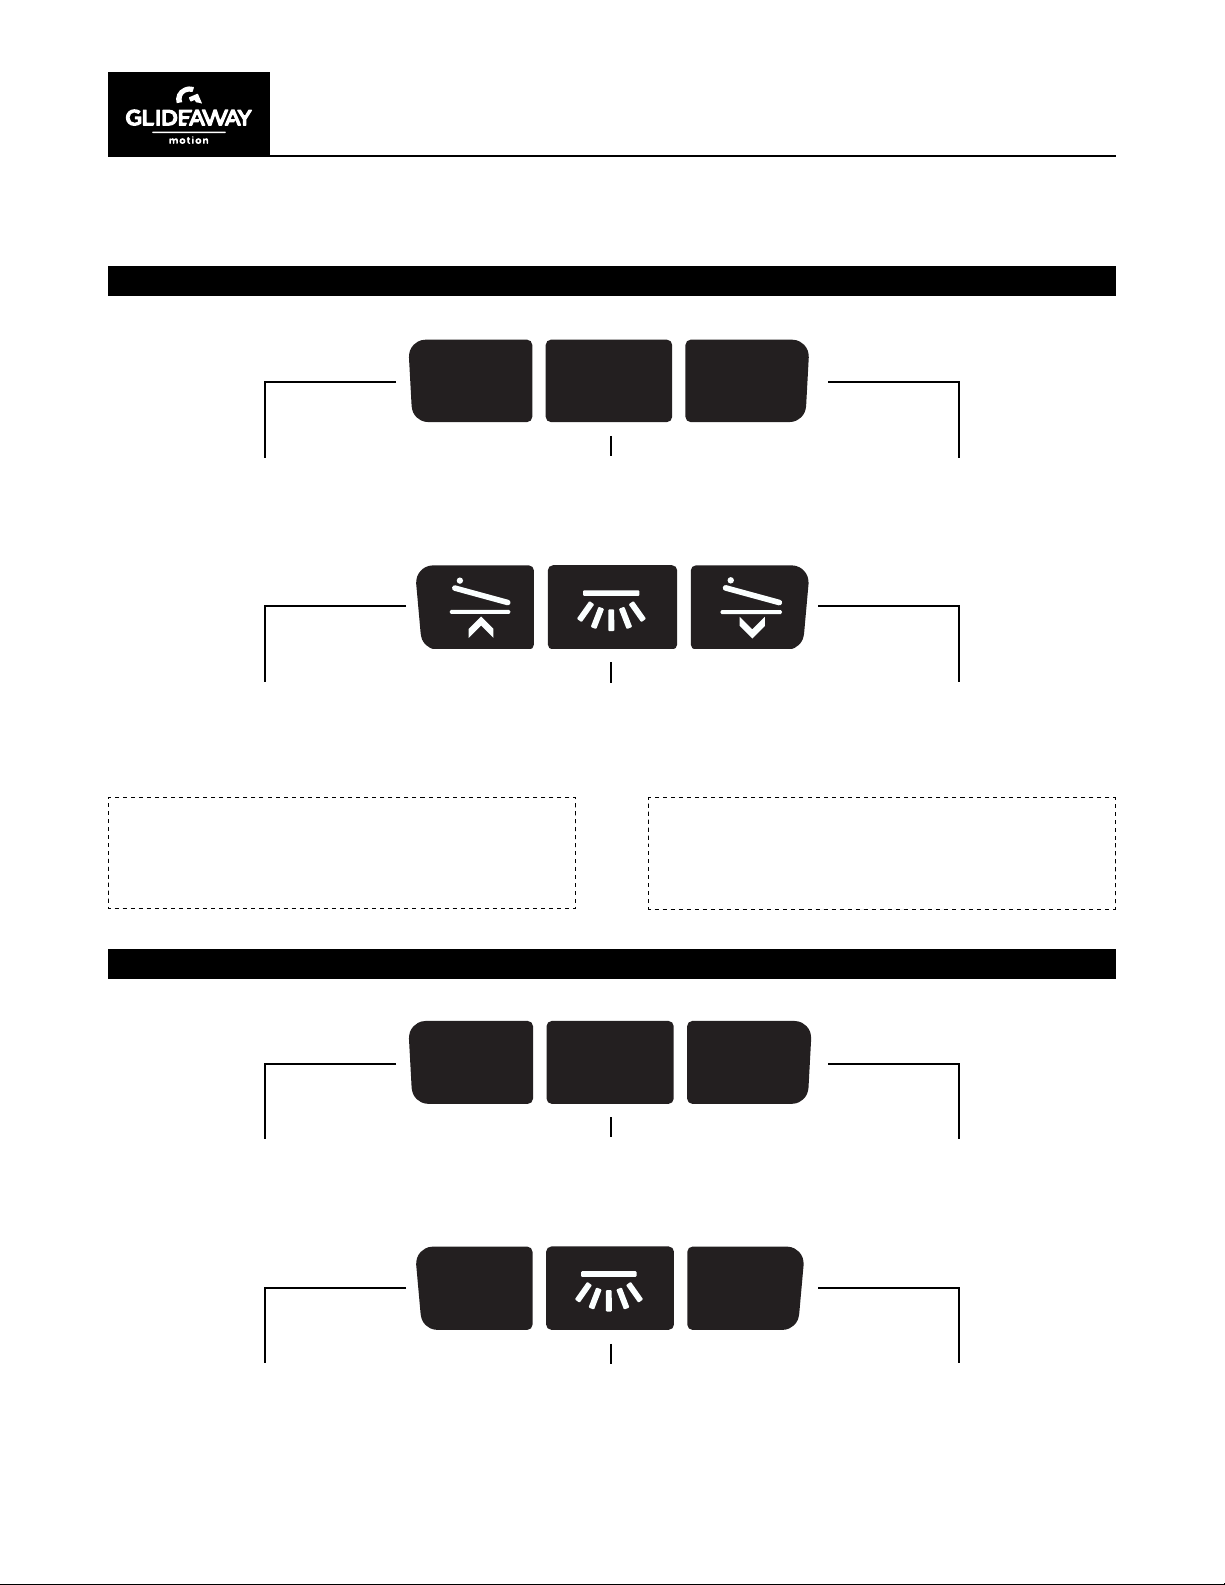
FOR TWIN XL, FULL, QUEEN AND SPLIT CAL KING
TIMERWAVE INTENSITY
Press the WAVE button to
increase and decrease the pulse
of the massage.
Press the ELEVATION UP
button to elevate the angle.
NOTE:
ELEVATION UP and DOWN feature requires
optional accessory (page 17) to function.
FOR KING
Set time for massage to run.
Press to turn on and off under-
bed lighting. Lighting will turn off
automatically after 5 minutes.
Press the INTENSITY button
to increase and decrease the
intensity of the massage.
Press the ELEVATION DOWN
button to lower the angle.
NOTE:
ELEVATION function available on TXL and Q
sizes only with optional elevation kit.
Press the WAVE– button
to decrease the pulse of
the massage.
Press the INTENSITY– button
to decrease the intensity of
the massage.
–
TIMERWAVE
Set time for massage to run.
INTENSITY
–
Press to turn on and off under-
bed lighting. Lighting will turn off
automatically after 5 minutes.
14
WAVE
+
Press the WAVE+ button
to increase the intensity of
the massage.
INTENSITY
+
Press the INTENSITY+ button
to increase the intensity of
the massage.
Page 15
OWNER’S MANUAL: MOTION 500
PAIRING REMOTE
NOTE:
Your base comes with a ready-to-use, factory paired remote.
Pairing instructions are for replacement remotes or trouble
shooting purposes.
PAIRING REMOTE TO BASEPAIRING REMOTE TO BASE
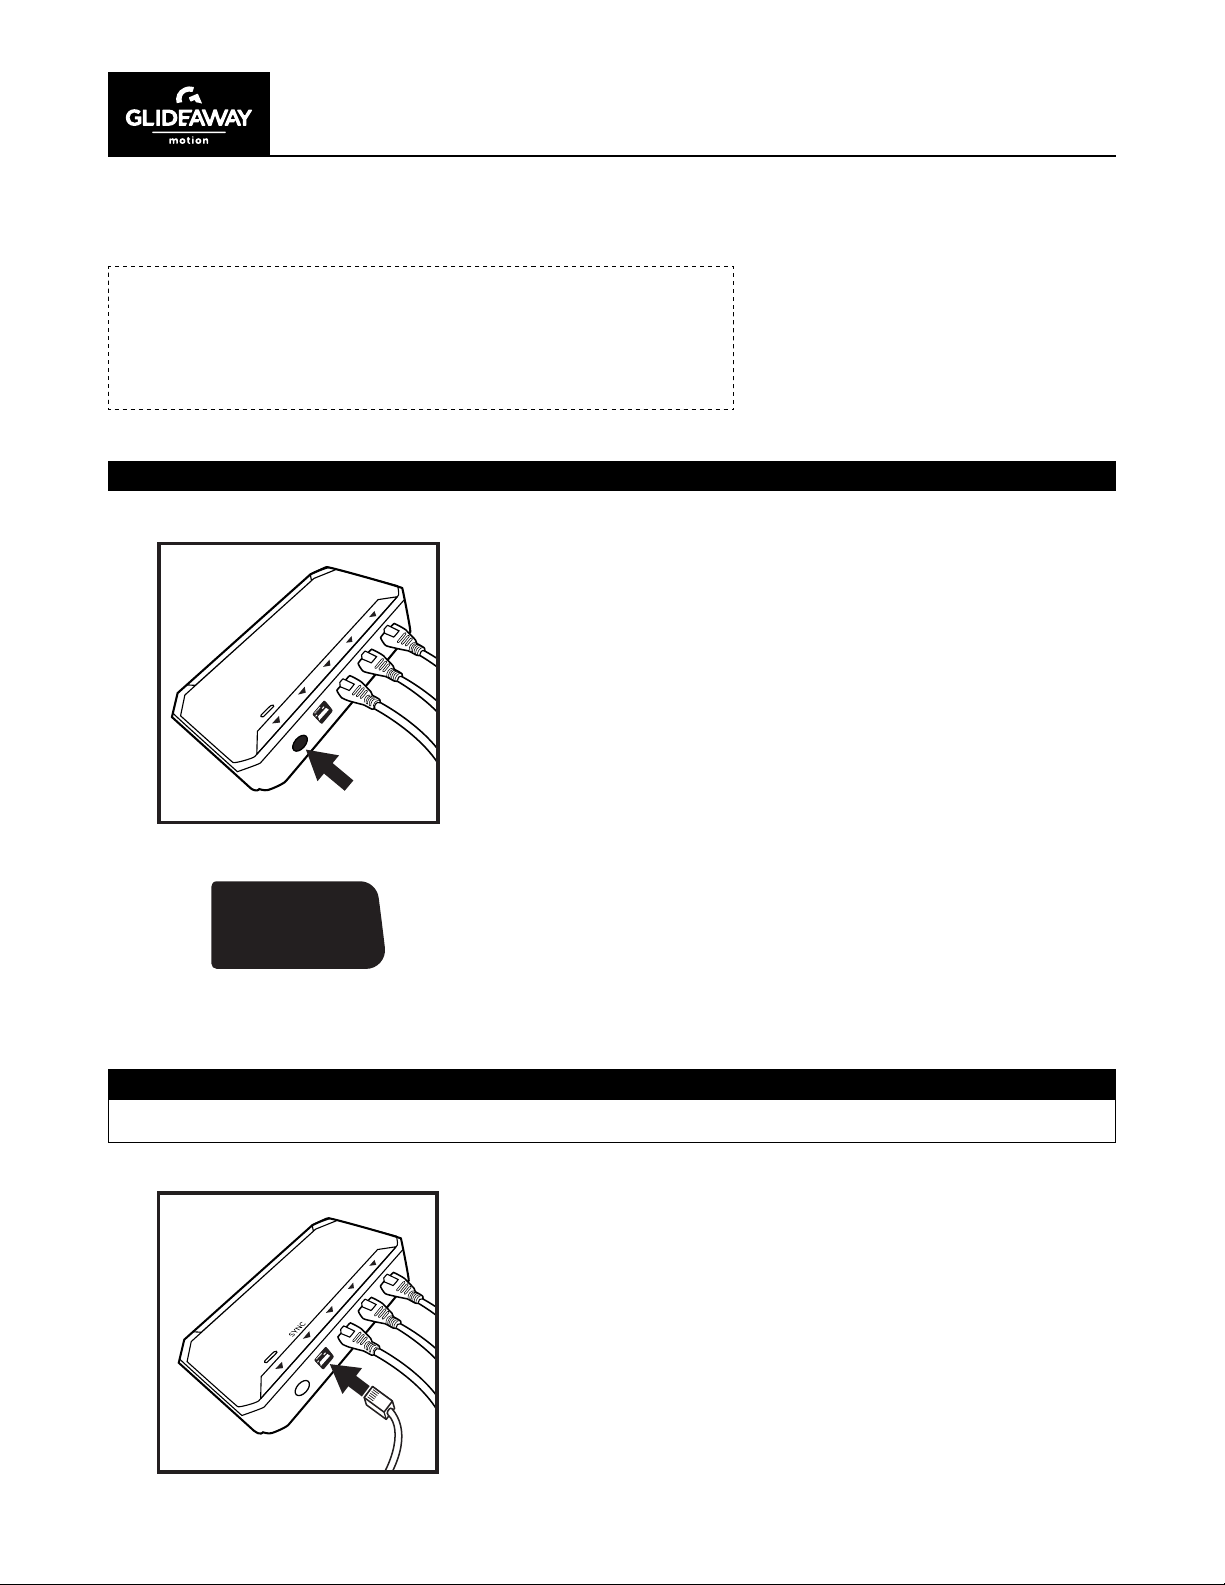
Double click the PAIR button on the control box
(light will turn blue during the pairing process).
PAIR
SYNCING 2 BASES TO ACT AS ONE
If SYNCING 2 bases (TXL, SCK, SQ) together, follow these instructions.
Press and hold PAIR button on the remote until
under-bed lights stop blinking.
With both bases in FLAT position, connect each
base to the other by inserting SYNC CABLE into
each control box slot labeled sync.
15
Page 16
OWNER’S MANUAL: MOTION 500
TROUBLESHOOTING
In the event the base fails to operate, investigate the symptoms and possible solutions provided below:
Remote control illuminates and appears to be operable, but no features of the base will activate.
■
Unplug power cord, wait 30 seconds and plug in to reset electronic components.
■
Defective surge protection device or electrical outlet. Test outlet by plugging in another working appliance.
■
Electrical circuit breaker may be tripped. Check electrical service breaker box to verify.
■
Re-pair the remote control (see Pairing Remote section of this manual for programming procedures).
■
Replace batteries in the remote control & re-pair remote control.
No features of the base will activate.
■
Unplug power cord, wait 30 seconds and plug in to reset electronic components.
■
Defective surge protection device or electrical outlet. Test outlet by plugging in another working appliance.
■
Electrical circuit breaker may be tripped. Check electrical circuit breaker box to verify.
Remote control will not illuminate.
■
Replace batteries in the remote control.
Head section will elevate, but will not return to the horizontal (at) position.
■
Base mechanism may be obstructed. Elevate base and check for obstruction. Remove obstruction.
■
Headboard may be too close to the edge of the mattress. Verify that distance between headboard
brackets and mattress is sufcient. Adjust if required.
Head or foot lift function has minor interference during operation.
■
Check batteries in remote, replace if necessary.
■
Make sure that you are following the duty cycle of the motor (do not operate more than
one (1) minute over a nine (9) minute period, or approximately a 12% duty cycle).
■
Press the lift buttons squarely and accurately.
■
Control box may be experiencing common Radio Frequency Interference from other
radio transmitting devices (see Pairing Remote section).
Reset remote to original factory settings.
■
To reset the factory ANTI-SNORE, ZERO GRAVITY, MEMORY A and MEMORY B settings, hold down
the FL AT and ZE R O - GRAVIT Y buttons until the back light blinks.
Bases are not well synced to one another.
■
Refer to the REPROGRAMMING REMOTE section; page 16.
NOTE:
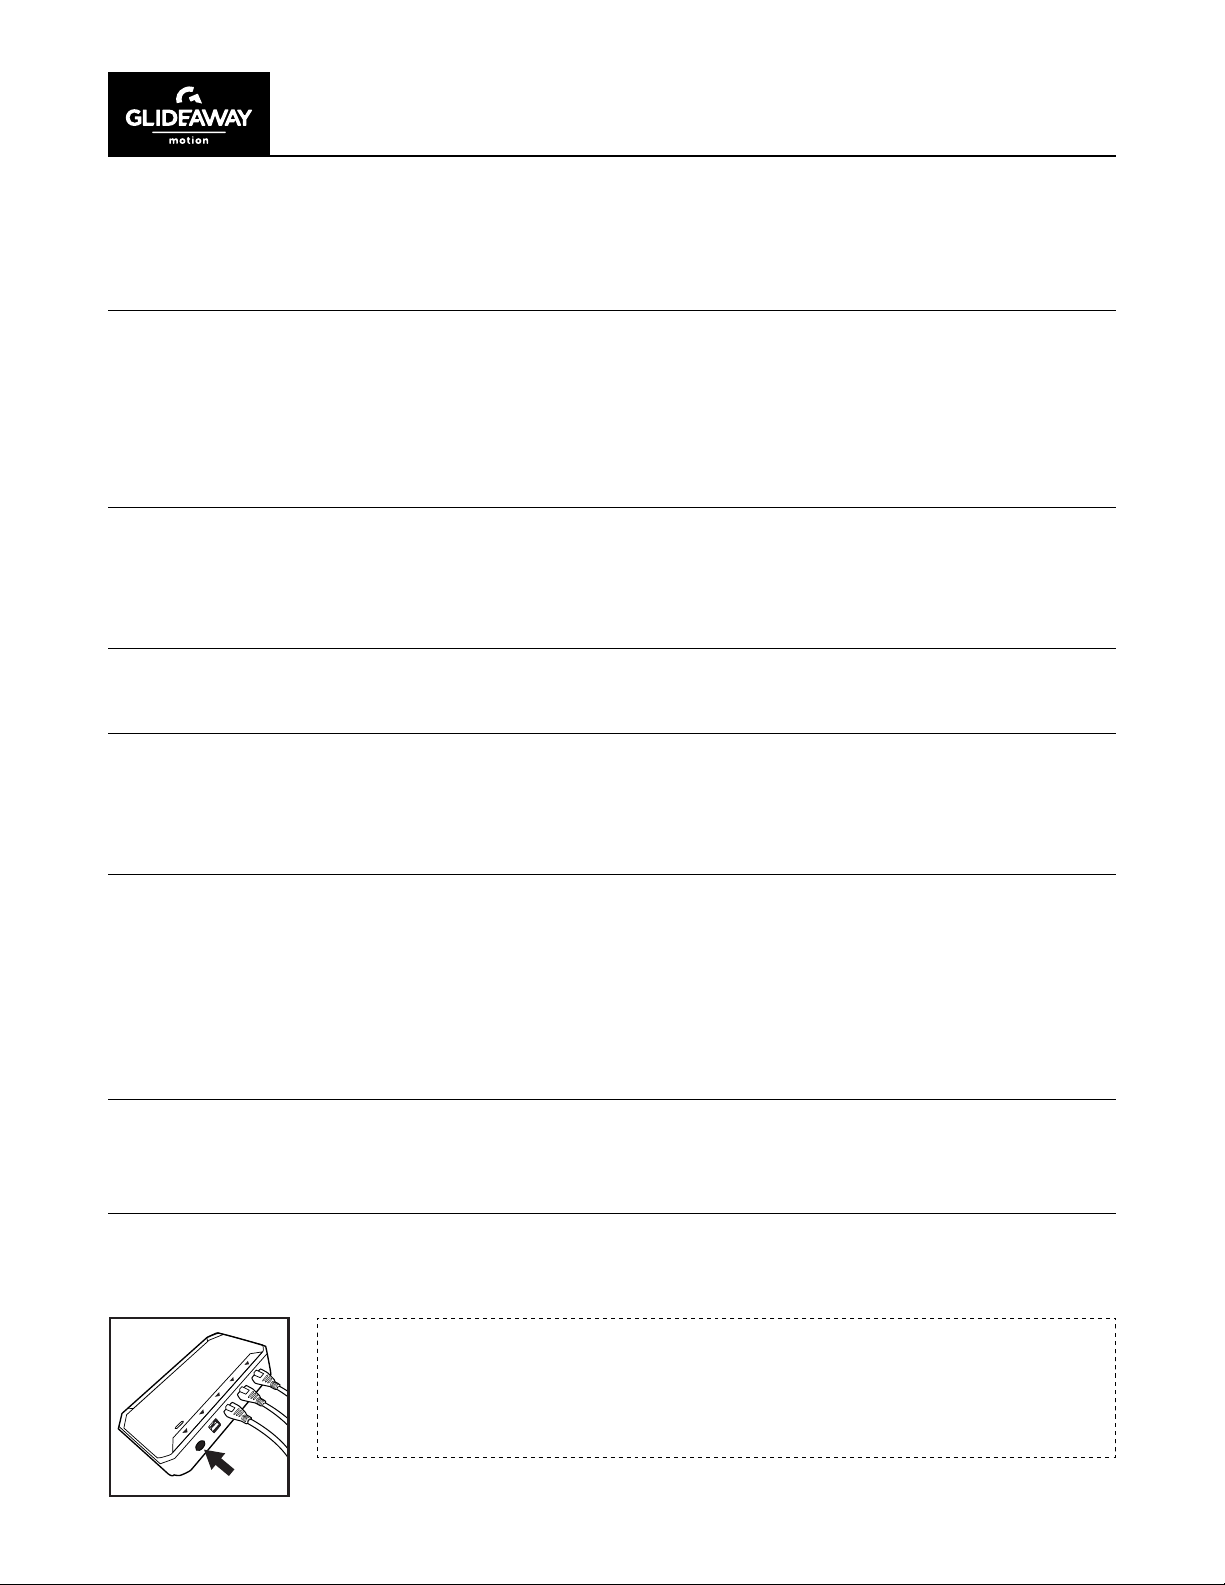
EMERGENCY LOWERING: If you cannot nd the remote control, locate, press
and hold the PAIR button located on the main control box on the bottom of the
bed (shown to the left).
16
Page 17
OWNER’S MANUAL: MOTION 500
REPROGRAMMING REMOTE
When syncing 2 TXL, SQ, SCK bases, the ANTI-SNORE, ZERO GRAVITY, MEMORY A and MEMORY B
may need to be reprogrammed to match the 2 bases to the same program.
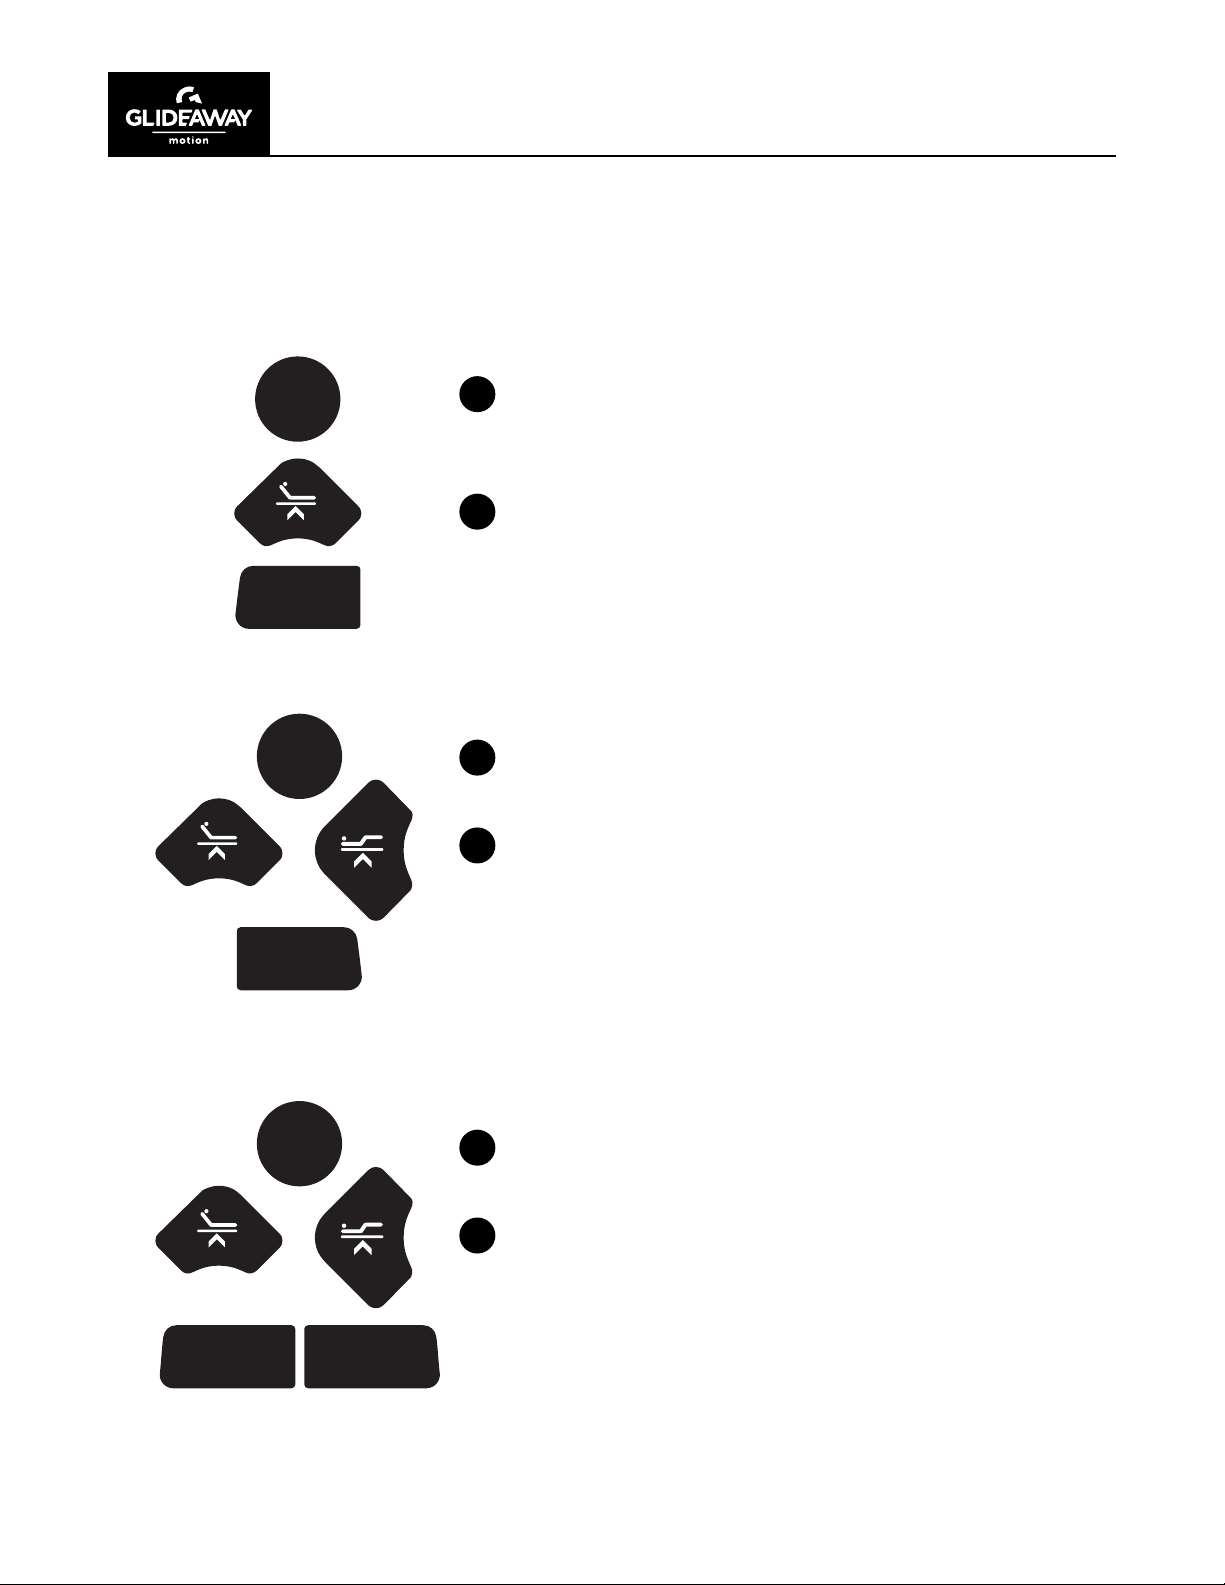
ANTI-SNORE
FLAT
ANTI
SNORE
1
After connecting the sync cable into both bases, press the
FLAT button on the remote.
Press the HEAD UP button until the 2 bases are at a 10 degree
2
angle. Push and hold the ANTI-SNORE button until the remote
back lights blink.
FLAT
ZG
FLAT
ZERO GRAVITY
1
Press the F L AT button on the remote.
Press the HEAD UP button until the 2 bases reach the 15
2
degree angle. Next, push FOOT UP button until the foot section
of both bases reach the 25 degree angle. Next, press and hold
the ZERO G R AVIT Y button until the remote back lights blink.
SETTING MEMORY A OR MEMORY B
1
Press the F L AT button on the remote.
Using the HEAD UP and FOOT UP, adjust the base to a
2
comfortable position. Next, press and hold MEMORY A button
until the remote back lights blink.
MEMORY
A
MEMORY
B
Repeat this process for the MEMORY B position.
17
Page 18
OWNER’S MANUAL: MOTION 500
ACCESSORIES
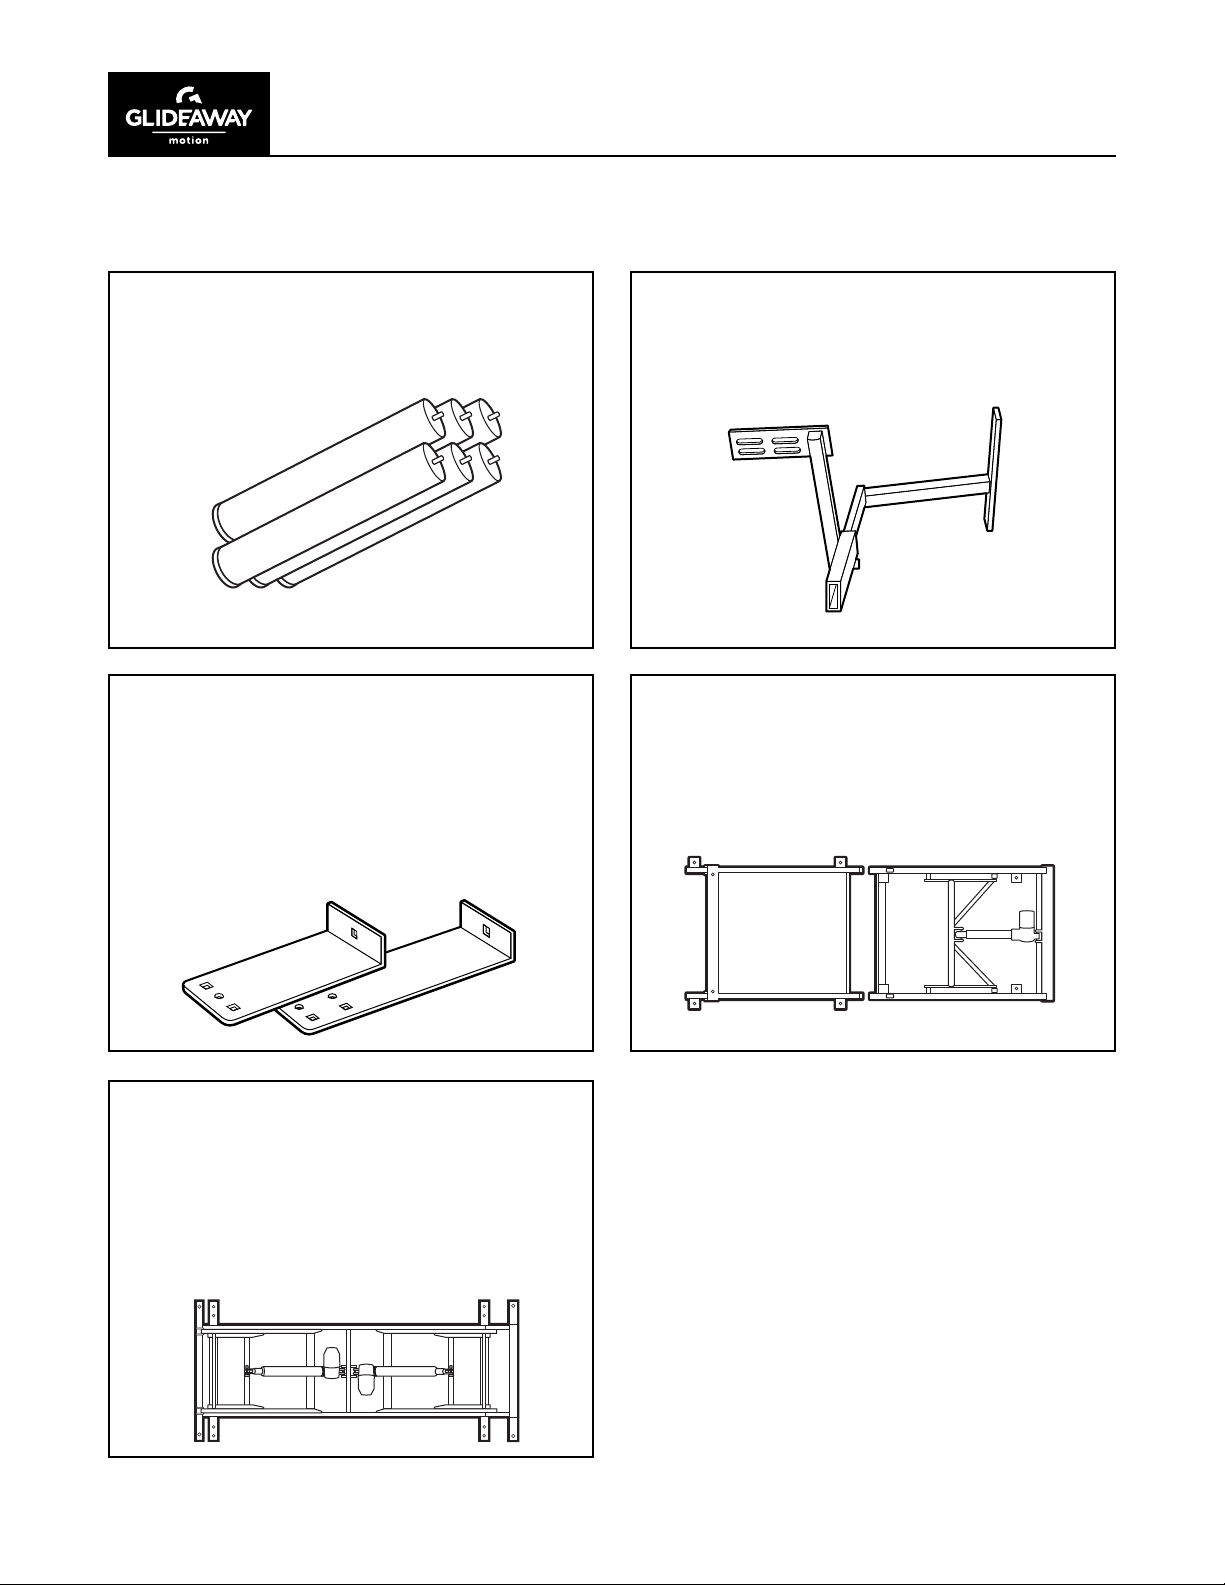
HIGH PROFILE LEG KIT
Raise height of base to 20”.
SKU: GM6LEGEXT
X6
MULTIFUNCTION BRACKET KIT
NOTE: 2 MULTIFUNCTION BRACKET KITS
required for connecting 2 platform bases.
NOTE: Not to be used with ELEVATION KIT.
SKU: GM-ZCAZ-1 (TWIN and TWIN XL)
SKU: GM-ZCAZ-2 (FULL, QUEEN and KING)
HEADBOARD BRACKET KIT
Attach base to headboard.
SKU: CB18HBBRKT
X2
ELEVATION KIT
NOTE: Compatible with TXL and Q sizes only.
SKU: GMAZELV-TXL (TWIN XL)
SKU: GMAZELV-Q (QUEEN)
HI-LO LIFT KIT
Raise and lower bed.
SKU: RXSYS2-TXL (TWIN XL KIT)
SKU: RX2.AZ-TXL (TWIN XL BRACKETS)
SKU: RXSYS2-Q (QUEEN KIT)
SKU: RX2.AZ-Q (QUEEN BRACKETS)
X4
18
Page 19
OWNER’S MANUAL: MOTION 500
BASE HEIGHT GUIDE
LEG CONFIGURATION HEIGHT FROM FLOOR
NO LEG INSTALLED 4 1/2”
STANDARD 3-IN-1 15”
TWO LEG SECTIONS INSTALLED 11 1/2”
ONE LEG SECTION INSTALLED 8”
OPTIONAL HIGH PROFILE LEG 20”
NOTE:
Height will increase by 4" when used with ELEVATION KIT.
DOWNLOAD THE APP
This adjustable base* is compatible with our
Glideaway Motion for Bluetooth remote app.
Go to www.glideaway.com/app to learn more.
*With Bluetooth module accessory, sold separately.
19
Page 20

MOTION 500
SLEEP WELL. LIVE BETTER. BE YOUR BEST.
 Loading...