


M
USER
ANUA
L
Pastello Zoom MKII
www.goedlichtengeluid.nl info@goedlichtengeluid.nl
Lightsky series
GLG LIGHTING EQUIPMENT
www.goedlichtengeluid.nl
info@goedlichtengeluid.nl
CON
TE
NTS
1. General information
2.
Safety
instructions
3. Trait
and skill speci cations
4. Operation
panel
5.
Dimensional
drawings 6
6. Photometric
data
7.
Mounting and
Installation 8
8. Power supply and Signal connection
9.
Display menu
10.
DMX
traits
11. Circuit
connecting
diagram 26
12. Trouble
dispose
13.
Cleaning and
Maintenance
14.
Duty exonerat
ive and
Copyright protection
10
12
21
27
28
28
2
3
4
5
7
1
GLG LIGHTING EQUIPMENT
www.goedlichtengeluid.nl
info@goedlichtengeluid.nl
1
. GENERAL
IN
FORMATIO
N
INTRODUCTION: Congratulations, you have just purcha sed one of the
most innovative and reliable LED xtures on the market today. Our
company has been designed to perform reliably for years when the
guidelines in this booklet are followed. Please read and understand the
instructions in this manual carefully and thoroughly before attempting to
operate this unit. These instructi
ons contain important information
regarding safety during use and maintenance.
Notice: As part of our ongoing commitment to continuous products
update, company will keep the right to improve this
products, the information in this menu may be changed in
the future, the company reserve the right to change the
data without any advises.
UNPACKING: Thank you for purchasing our company pro ducts. Every
product has been thorou
ghly tested and has been shipped in perfect
operating condition. Carefully check the shipping carton for damage that
may have occurred during shipping. If the carton appears to be damaged,
carefully inspect your xture for damage and be sure all accessories
necessary to operate the xture have arrived intact. In the event damage
has been found or parts are missing, please contact our customer support
team for further
instructions. Inside the box you should nd: the xture,
a DMX XLR cable, a power cable, and this user manual.
Please do not discard the shipping carton in the trash. Please recycle
whenever possible.
2
GLG LIGHTING EQUIPMENT
www.goedlichtengeluid.nl
info@goedlichtengeluid.nl
2
Notice:
. SAFETY
To guarantee proper and consistent operation, it is
INSTRUCT
IO
NS
important to follow the guidelines in this manual. Our
company will not accept responsibility for damages
resulting from the misuse of this xture due to the
disregard of the information printed in this manual.
1. In order to ensure the light could operate normally, the ambient
temperature couldn't be higher than 38
and no lower than- 2
2. Under normal condition, the highest sectional surface temperature
may be up to 60
.
3.These projectors are designed depends on the electric shock
protection, the projector should be connected with the power supply
system which connected ground enough. The projector's ground
cable should be connected with the ground cable of the power
supply system as well. The ground mark of the light metal cover
should be connecting with the installation bricked steadily.
4. Don't use the power cable when the insulation is damaged.
It must be the manufacturer or distributor or the professional person
to change the damaged power cable in order to avoid any
dangerous.
5.Please check the voltage, frequency data of power supply system is
suitable for the mentioned on the projector. Please do avoid the
dierent voltage between them and burn the projector.
6.Do not attempt to operate this xture if the power cord has become
damaged or frayed.
7.Never open this xture while in use.
8.Never look directly into the light source. You risk injury to your
retina, which may induce blindness.
9.Please be aware that damages caused by modications to the device
are not subject to warranty.
.
3

GLG LIGHTING EQUIPMENT
www.goedlichtengeluid.nl
info@goedlichtengeluid.nl
3. PERFORMANCE
Voltage
TRAIT AND SKILL S
AC100~240V 50/60Hz.
PECIFICATIO
NS
Power
LED chip
LED QTY
LED life
Beam angle
246W.
10W
RGBW 4 in 1 LED chip.
18PCS.
50000H.
Zoom function min.7°,max.55°.
Color: RGBW macro color system.
Strobe
Dimmer
Pan/Tilt
1-30 times/ second electronic strobe and random strobe.
65536 class dimmer.
Pan
540° times /2.0 seconds Tilt
180°/1.2 seconds.
Control Mode: DMX512, RDM, Stand-alone mode ,Voice Control
mode , Mater-Slave mode , Wireless DMX512.
Channel: Simple(10CH),Standard(16CH), Extended1(20C H),
Extended2(24CH)
Display Menu:
1. 2.4 inches TFT touch screen, Chinese and English two version
language.
2, Display board can record device’s using time , show device’s
temperature, channel data and software version .
3, Edit the procedure
4
Lightsky series
GLG LIGHTING EQUIPMENT
www.goedlichtengeluid.nl
info@goedlichtengeluid.nl
Other feature :
1.Extend IP address function , each IP address maximum can set 64
ID
2.Support DMX signal priority identication, when lose the signal
it would be turn into Black , default scene , Automatic function
etc according to your set.
3.Remote control function: control the procedure, speed etc function
by the remote controller when the product under the condition
without signal.
4.Software upgrade : upgrade
Outlooking: adopt ABS anti-re plastic.
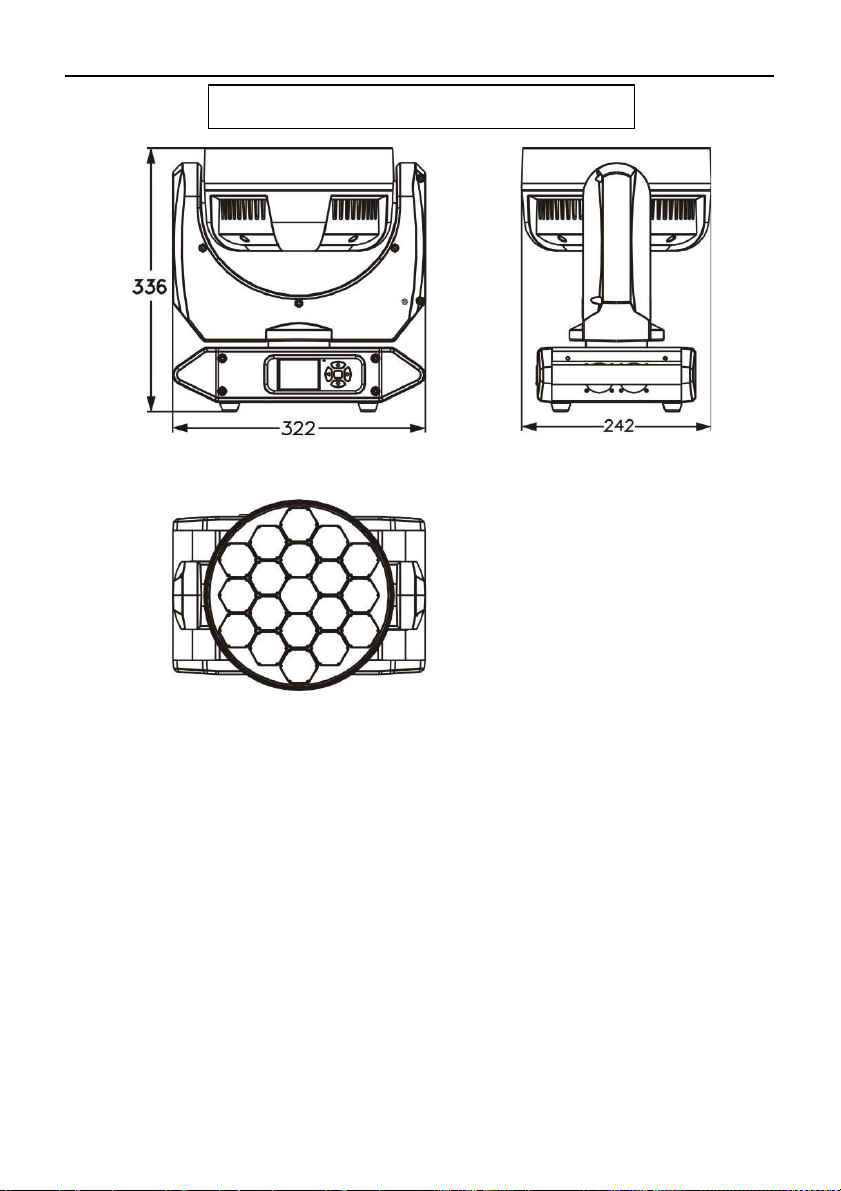
Carton size : 412×287×525MM.
N.W.: 8.5KG G.W.: 11.1KG
Light size:322×242×336MM
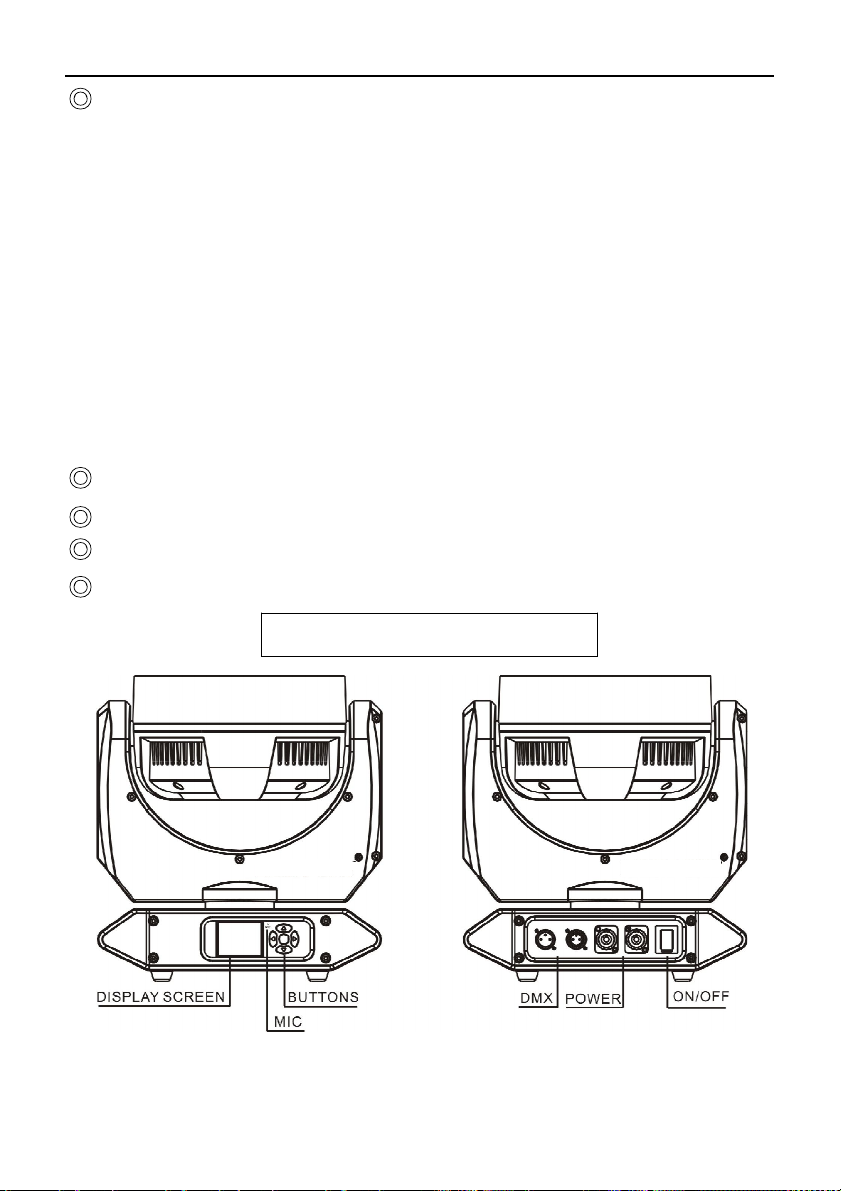
4. OPERATION
software by XRL cable.
P
AN
EL
5
GLG LIGHTING EQUIPMENT
www.goedlichtengeluid.nl
info@goedlichtengeluid.nl
5. DIMENSIONAL D
RAWIN
GS
6

GLG LIGHTING EQUIPMENT
www.goedlichtengeluid.nl
info@goedlichtengeluid.nl
6. PHOTOMETRIC DA
T
A
7
GLG LIGHTING EQUIPMENT
www.goedlichtengeluid.nl
info@goedlichtengeluid.nl
7
Cautions:
. MOUNTING AND
I
NSTA
LLATION
For added protection mount the xtures in areas outside walking
paths, seating areas, and away from areas were unauthorized personnel
might reach the xture. Before mounting the xture to any surface, make
sure that the installation area can hold a minimum point load of 10 times
the device's weight. Fixture installation must always be secured with a
secondary safety attach
ment, such as an appropriate safety cable. To
avoid injury, never stand directly below the device when mounting,
removing, or servicing the xture.
Mounting points:
Overhead mounting requires extensive experience, including
amongst others calculating working load limits, a fine knowledge of the
installation material being used, and periodic safety inspection of all
installation material and the xture. If you lack these qu
alications, do
not attempt the installation yourself. Improper installation can result in
bodily injury. Be sure to complete all rigging and installation procedures
before connecting the main power cord to the appropriate wall outlet.
Mountin
g
Our company is fully operational in any mounting position, hanging
upside-down, side mounted, or set on a at level surface, etc. Be sure this
xture is kept at least 0.5m (about 1.6feet) away from any ammable
materials (decoration etc.).
When clamp mounting; always use and install the supplied safety
cable as an added safety measure to prevent accidental damage in the event
of a clamp failure. See the ima
ge below.
8

GLG LIGHTING EQUIPMENT

GLG LIGHTING EQUIPMENT
10
8
1. Power s
. POWER SUPPLY AND SIGNAL
upp
ly
CONN
ECTIO
N
Use the professional plug to connect the projector and main power
supply. Please pay attention to the voltage, frequency the same as the
mentioned on the projector. Suggest each light has separately switched of
the power supply so that could turn on or turn o each projector
desultorily.
2. Signal c
onnection
Please use the round 3/5-pin XLR plugs &sockets oered
by menu
facture to connect the rst projector's output to the second projector'
input and connect the second projector's output to the third device's input.
And in the same way for the rest, eventually connect the last device's
output, all the devices are together as the following gure.
The devices’ control signal output or input by using the 3/5-pin XLR pug
and socket. If need to long then the communication cable,
please make
sure the both side of 3/5-pin plug is one to one. (one to one, two to two,
three to three). Otherwise, the communication cable will be interrupted.
The communicate cable is 2-pin shielded cable 75
Resistance with each core is at least a 0.5mm diameter. (Caution: All the
inside leading wire of 3/5-pin XLR plug couldn't touch each other or
plinth).
Recommend to use the DMX signal terminator for the installation to
avoid the electronic noise damage the digital control signal. Simply

GLG LIGHTING EQUIPMENT
ww.goedlichtengeluid.nl
info@goedlichtengeluid.nl
11
speaking, DMX terminator is an XLR connector with a 120 1/2w resistor
connected across pin 2 and 3.Which is then plugged into the output
socket on the last projector in the chain. Refer to the connection as
above:(Picture ).We suggest using the DMX signal distributor when the
distance of the lights over 15meter,In case of eect the light
communication because of the signal feeble.
3. Light power connection:
the items can't be more than 6pcs under series connection.
After doing the above operation and making sure all the devices had
been installed with natural operate, press the power switch to check
whether everything is working normally.

GLG LIGHTING EQUIPMENT
ww.goedlichtengeluid.nl
info@goedlichtengeluid.nl
12
SETTING
Menu
9
. DISPLAY
Exit
Menu
Menu
M
EN
U

GLG LIGHTING EQUIPMENT
www.goedlichtengeluid.nl
info@goedlichtengeluid.nl
Menu
INFO
Fixture times
Menu
Power on time ****H
Lamp on time ****H
Fixture
LAMP_TEM ***
temperatures
RDM UID 3888:********
DMX live
1. Dimmer 0-255
2. Dimmer ne 0-255
3. Shutter 0-255
4. Red-1 0-255
5. Green-1 0-255
6. Blue-1 0-255
7. White-1 0-255
8. Red-2 0-255
9. Green-2 0-255
10.Blue-2 0-255
11.White-2 0-255
12.Red-3 0-255
13.Green-3 0-255
14.Blue-3 0-255
15.White-3 0-255
16.Macro colour 0-255
17.Pan 0-255
18.Pan ne 0-255
19.Tilt 0-255
20.Tilt ne 0-255
21.Zoom 0-255
Menu
Remark
13

GLG LIGHTING EQUIPMENT
www.goedlichtengeluid.nl
info@goedlichtengeluid.nl
Menu
INFO
DMX live
Version info
Exit
Menu
22.Fixture control 0-255
23.Calibration 0-255
24.Slave ID 0-255
LED_XY_SOFT:V*.**
LED_DPY_SOFT:V*.**
Menu
Remark
14

GLG LIGHTING EQUIPMENT
www.goedlichtengeluid.nl
info@goedlichtengeluid.nl
PERSON
Menu
Pan/Tilt
Reset
Quick
closedown
P/T angle
limit
Program
on/o
Set P/T
angle
Menu
P/T swap
Pan invert
Tilt invert
Exit
System reset
Exit
Open
Close
Close
Open
Close
Open
Pan start
Pan end
Tilt start
Tilt end
Exit
Menu
Menu
Close Default
Open
Close Default
Open
Close Default
Open
Remark
15

GLG LIGHTING EQUIPMENT
www.goedlichtengeluid.nl
info@goedlichtengeluid.nl
PERSON
Menu
Menu
Display
Exit
Display
language
Display sleep
Display
intensity
Display
rotation
TFT calibration
Exit
Menu
Menu
English(
Chinese
Light always
2 minutes
4 minutes
6 minutes
10-100
Normal
Rotate 180
)
Default
)
Default
Default
Remark
16

GLG LIGHTING EQUIPMENT
www.goedlichtengeluid.nl
info@goedlichtengeluid.nl
MANUAL
Menu
1. Dimmer 0-255
2. Dimmer ne 0-255
3. Shutter 0-255
4. Red-1 0-255
5. Green-1 0-255
6. Blue-1 0-255
7. White-1 0-255
8. Red-2 0-255
9. Green-2 0-255
10.Blue-2 0-255
11.White-2 0-255
12.Red-3 0-255
13.Green-3 0-255
14.Blue-3 0-255
15.White-3 0-255
16.Macro 0-255
17.Pan 0-255
18.Pan ne 0-255
19.Tilt 0-255
20.Tilt ne 0-255
21.Zoom. 0-255
22.Fixture 0-255
23.CAL 0-255
24.Slave ID 0-255
Exit
Menu
Menu
Remark
17

GLG LIGHTING EQUIPMENT
www.goedlichtengeluid.nl
info@goedlichtengeluid.nl
PROGRAM
Menu
Menu
Edit
program
Edit
program 1
Menu
Menu
Scene 0-100
1. Dimmer 0-255
2. Dimmer ne 0-255
3. Shutter 0-255
4. Red-1 0-255
5. Green-1 0-255
6. Blue-1 0-255
7. White-1 0-255
8. Red-2 0-255
9. Green-2 0-255
10.Blue-2 0-255
11.White-2 0-255
12.Red-3 0-255
13.Green-3 0-255
14.Blue-3 0-255
15.White-3 0-255
16.Macro 0-255
17.Pan 0-255
18.Pan ne 0-255
19.Tilt 0-255
20.Tilt ne 0-255
21.Zoom 0-255
22.Fixture 0-255
23.CAL 0-255
24.Slave ID 0-255
Save scene
Exit
18

GLG LIGHTING EQUIPMENT
www.goedlichtengeluid.nl
info@goedlichtengeluid.nl
PROGRAM
Menu
Menu
Edit
program
Set
program
Run
Fixed
scene
Exit
Edit program 2
Edit program 3
Edit program 4
Edit program 5
Edit program 6
Edit program 7
Edit program 8
Exit
Set program 1
Menu
Menu
Same as Edit program1
Same as Edit program1
Same as Edit program1
Same as Edit program1
Same as Edit program1
Same as Edit program1
Same as Edit program1
Start step 0-100
End step 0-100
Step time 0-255
Save
Exit
Set program 2 Same as Set program 1
Set program 3 Same as Set program 1
Set program 4 Same as Set program 1
Set program 5 Same as Set program 1
Set program 6 Same as Set program 1
Set program 7 Same as Set program 1
Set program 8 Same as Set program 1
Exit
Running
program…
Scene 0-100
Save scene
Exit
19

GLG LIGHTING EQUIPMENT
www.goedlichtengeluid.nl
info@goedlichtengeluid.nl
SERVICE
Menu
Menu
Error list
Calibration
Factory
Updata
Exit
Menu
Pan
Tilt
Lens ±5.00%
Exit
Factory default ****
Calibration
default ****
Time clean ****
Developer ****
Machine sel ****
Exit
****
±5.00%
±5.00%
Menu
20

GLG LIGHTING EQUIPMENT
www.goedlichtengeluid.nl
info@goedlichtengeluid.nl
%
10 DMX TRAIT
Channel
1.
Dimmer
2.
Dimmer ne
3.
Shutter
4. Red-1 0-255 0-100
5.Green-1 0-255 0-100
6. Blue-1 0-255 0-100
7.White-1 0-255 0-100
8.Red-2 0-255 0-100
9.Green-2 0-255 0-100
10. Blue-2 0-255 0-100
11.White-2 0-255 0-100
12.Red-3 0-255 0-100
13.Green-3 0-255 0-100
14. Blue-3 0-255 0-100
15.White-3 0-255 0-100
DMX
values
0-255 0-100
0-255 0-100
0-9 0-3 No function
10-49 4-19
50-89 20-34
90-119 35-46
120-179 47-70
180-249 71-98
250-255 99-100 No function
S
Eect
Slow closing,Fast opening slow
Fast closing,Slow opening Slow
Slow closing,Slow open Slow
Random strobe,Slow
Synchronous strobe,slow
Fast
Fast
fast
fast
Fast
21

GLG LIGHTING EQUIPMENT
www.goedlichtengeluid.nl
info@goedlichtengeluid.nl
%
Channel
16.
Macro
colour
17.
Pan
18.
Pan ne
19.
Tilt
20.
Tilt ne
21.Zoom
22.
Fixture
control
DMX
values
Eect
0-1 0-1 No function
2-225 1-88 Colour gradient change
226-230 89-90 2700K
231-235 91-92 3200K
236-240 93-94 4200K
241-245 95-96 5600K
246-250 97-98 6500K
251-255 99-100 8000K
0-255 0-100
0-255 0-100
0-255 0-100
0-255 0-100
0-255
0-100
0-9 0-3 No function
10-14 4-5 System Reset
15-19 5-7 Open
20-24 7-9 Close
25-29 10-11 Quick open
30-34 12-13 Quick close
35-128 14-50 No function
129-133 51-52 Simple(11CH)
134-138 53-54 Standard(17CH)
139-143 55-56 Extended1(21CH)
144-148 57-58 Extended2(25CH)
22

GLG LIGHTING EQUIPMENT
www.goedlichtengeluid.nl
info@goedlichtengeluid.nl
%
22.
control
23.
24.
Channel
Fixture
Calibration
Slave ID
DMX
values
149-239 59-93 No function
240-244 94-95 Pan Calibration
245-249 96-97 Tilt Calibration
250-255 98-100 No function
0-255 0-100
0-2
0
All IDs are ecient lighting its own
ID to 0, the channel set to any value
is valid
3-5 1-2 ID:1 eective
6-8 2-3 ID:2 eective
... ...
192-194 75-76 ID:64 eective
195-197
198-200
201-203
76-77
77-78
78-79
ID is(2*n)+1 eective,(n=0-31)
3 5 7 9…63
1
ID is(2*n)+2 eective,(n=0-31)
4 6 8 10…64
2
ID is(3*n)+1 eective,(n=0-21)
4 7 10 13…64
1
Eect
204-206
207-209
210-212
213-215
216-218
80-81
81-82
82-83
83-84
84-85
ID is(3*n)+2 eective,(n=0-20)
5 8 11 14…62
2
ID is(3*n)+3 eective,(n=0-20)
6 9 12 15…63
3
ID is(4*n)+1 eective,(n=0-15)
5 9 13 17…61
1
ID is(4*n)+2 eective,(n=0-15)
6 10 14 18…62
2
ID is(4*n)+3 eective,(n=0-15)
7 11 15 19…63
3
23

GLG LIGHTING EQUIPMENT
www.goedlichtengeluid.nl
info@goedlichtengeluid.nl
%
Channel
24.
Slave ID
DMX
values
219-221
222-224
225-227
228-230
231-233
234-236
237-239
240-242
243-245
246-248
249-251
252-254
85-86
87-88
88-89
89-90
90-91
91-92
93-94
94-95
95-96
96-97
97-98
98-99
ID is(4*n)+4 eective,(n=0-15)
8 12 16 20…64
4
ID is(5*n)+1 eective,(n=0-12)
6 11 16 21…61
1
ID is(5*n)+2 eective,(n=0-12)
7 12 17 22…62
2
ID is(5*n)+3 eective,(n=0-12)
8 13 18 23…63
3
ID is(5*n)+4 eective,(n=0-12)
9 14 19 24…64
4
ID is(5*n)+5 eective,(n=0-11)
10 15 20 25…60
5
ID is(6*n)+1 eective,(n=0-10)
7 13 19 25…61
1
ID is(6*n)+2 eective,(n=0-10)
8 14 20 26…62
2
ID is(6*n)+3 eective,(n=0-10)
9 15 21 27…63
3
ID is(6*n)+4 eective,(n=0-10)
10 16 22 28…64
4
ID is(6*n)+5 eective,(n=0-9)
11 17 23 29…59
5
ID is(6*n)+6 eective,(n=0-9)
12 18 24 30…60
6
255 100 All IDs are valid
Eect
24

GLG LIGHTING EQUIPMENT
www.goedlichtengeluid.nl
info@goedlichtengeluid.nl
Si
mple
Standard Extended1 Extended2
Function
Dimmer
Dimmer ne
Shutter
Red /Red-1
Green /Green-1
Blue /Blue-1
White/White-1
Red-2
Green-2
Blue-2
White-2
Red-3
Green-3
Blue-3
White-3
Macro colour
Pan
Pan ne
Tilt
Tilt ne
Zoom
Fixture control
Calibration
Slave ID
25

GLG LIGHTING EQUIPMENT
www.goedlichtengeluid.nl
info@goedlichtengeluid.nl
11.
CIRCUIT CONNECTING D
IAGRAM
26

GLG LIGHTING EQUIPMENT
www.goedlichtengluid.nl
info@goedlichtengeluid.nl
12
. TROUBLE DISPOSE
It is recommended some solution for some normal trouble shooting.
Any inextricability problems should always be handling by the
professional person. Disconnect the power supply before maintenance
the light.
LED o
1. Please check if install the suitable voltage
2. Please check whether the led will reach the end of their life can
explode; please replace a same description led.
3. Please check if the power supply is enough.
4. Please check whether the DMX 512 controller pass the "turn on"
order.
Though the light is lighting, but it couldn't accept the control order:
1. Please check the start code address and the function option are
correct.
2. Please check whether the communicate control cable is on good
connection or the cable is too long or interrupt.
3. Please check the control system is not valid, check the signal
amplier of chain connected is valid.
4. Please check whether the communicate cable is too long or the
ot
her equipment is mutually conjugate.
5. Please arrange the wire well, shorter the signal cable, put the high
voltage cable and low voltage cable separately.
6. Add the signal amplify isolator.
7. Signal cable is used the excellent screening doublet (Resistance 75
OHM
8. The end of the light end and the end resistance.
The light can't move:
1. Please check if the power supply is suitable for the light voltage
data.
2. Please check the fuse of input voltage is defective.
3. Please check the light if they are deformation, inside parts is
broken, become wet etc will lead the loose contact.
27

GLG LIGHTING EQUIPMENT
www.goedlichtengluid.nl
info@goedlichtengeluid.nl
13
. CLEANING AND
MAINTE
NANCE
1. In order to ensure the projector could work normally. It should be
kept clean always .The lens should also be regularly cleaned to
maintain an optimum light output. Do not use any type of solvent on
lens. It will damage the projector.
2. Suggestion: The continue usage of the light don't exceed 4 hours. Or
it will shorter the usage of the lamp. Please use the alternative
operation to solve this problem.
3. Please disconnect the power supply when begin to maintenance take
down the light. Please let the parts cool down 10 minute at least
then begin to install.
4. Please inspect the lens or other moving parts timing and keep them
clear and static. If nd anything damaged or looseness must change
a lamp or x the lamp in order to avoid the accident.
14.DUTY EXONERATIVE
Any products broken that didn't according to the instruction is not
guarantee to keep it in good repair.
The commentary for all the instruction belongs to the supplier in nal.
No authorize can't copy.
AND
COPYRIGHT PROTECTION
28
 Loading...