

GLG Lighting products 1
Creator Picollo RGBWAuV
USER MANUAL
For y our own saf e t y, plea se read th is user ma nua l carefull y be fore your in it iall y
start -up!
CAU T I ON!
Keep th is devi ce a way fr om r ain a nd mo isture!
Unpl ug mai ns lea d bef o re op ening th e h ousing!
Every person involved with the installation, operation and maintenance of this device has to
- be qualified
- follow the instructions of this manual
- consider this manual to be part of the total product
- keep this manual for the entire service life of the product
- pass this manual on to every further owner or user of the product
- include every supplementary update with the original manual
Before your initial start-up, please make sure that there is no damage caused during shipment.
Should there be any, do not use the device and consult your supplier.
SAFETY INSTRUCTIONS
This device has left our premises in absolutely perfect condition. In order to maintain this
condition and to ensure a safe operation, it is absolutely necessary for the user to follow the safety
instructions and warning notes written in this user manual.
Important: Damages caused by the disregard of this user manual are not subject to warranty. The
dealer will not accept liability for any resulting defects or problems.

GLG Lighting products 2
Always plug in the power unit least.
Keep away from heaters and other heating sources! Keep away children and amateurs from the
device! Never leave the device running unattended!
If the device has been exposed to drastic temperature fluctuation (e. g. after transportation), do not
switch it on immediately. The arising condensation water might damage your device. Leave the
device switched off until it has reached room temperature.
Always disconnect from the mains, when the device is not in use or before cleaning it.
There are no serviceable parts inside the device. Maintenance and service operations are only to be
carried out by authorized dealers.
Please note that damages caused by manual modifications on the device or unauthorized operation
by unqualified persons are not subject to warranty.
OPERATING DETERMINATIONS
This device is an LED lighting device for color decoration in discotheques, on stages etc. It is
allowed to be operated with an AC of 200 - 250 V, and is designed for indoor use only.
This device is NOT designed to use at full output on all Led colors for a long time such as used in
fairs. It is a show light which normally will be used in show lighting with continually variation of
output and colors. The device can handle two colors in full output for a long time. Also flashing
with all outputs to full for short time will be no problem.
Do not shake the device. Avoid brute force when installing or operating.
When choosing the installation-spot, please make sure that the device is not exposed to extreme
heat, moisture or dust. There should not be any cables lying around. You endanger your own and
the safety of others!
Operate the device only after having familiarized with its functions. Do not permit operation by
persons not qualified for operating the device. Most damages are the result of unprofessional
operation!
Please use the original packaging if the device is to be transported.
Please consider that unauthorized modifications on the device are forbidden due to safety reasons!
If this device will be operated in any way different to the one described in this manual, it may
GLG Lighting products 3
suffer damages and the guarantee becomes void. Furthermore, any other operation may lead to
dangers like short-circuit, burns, electric shock, etc.
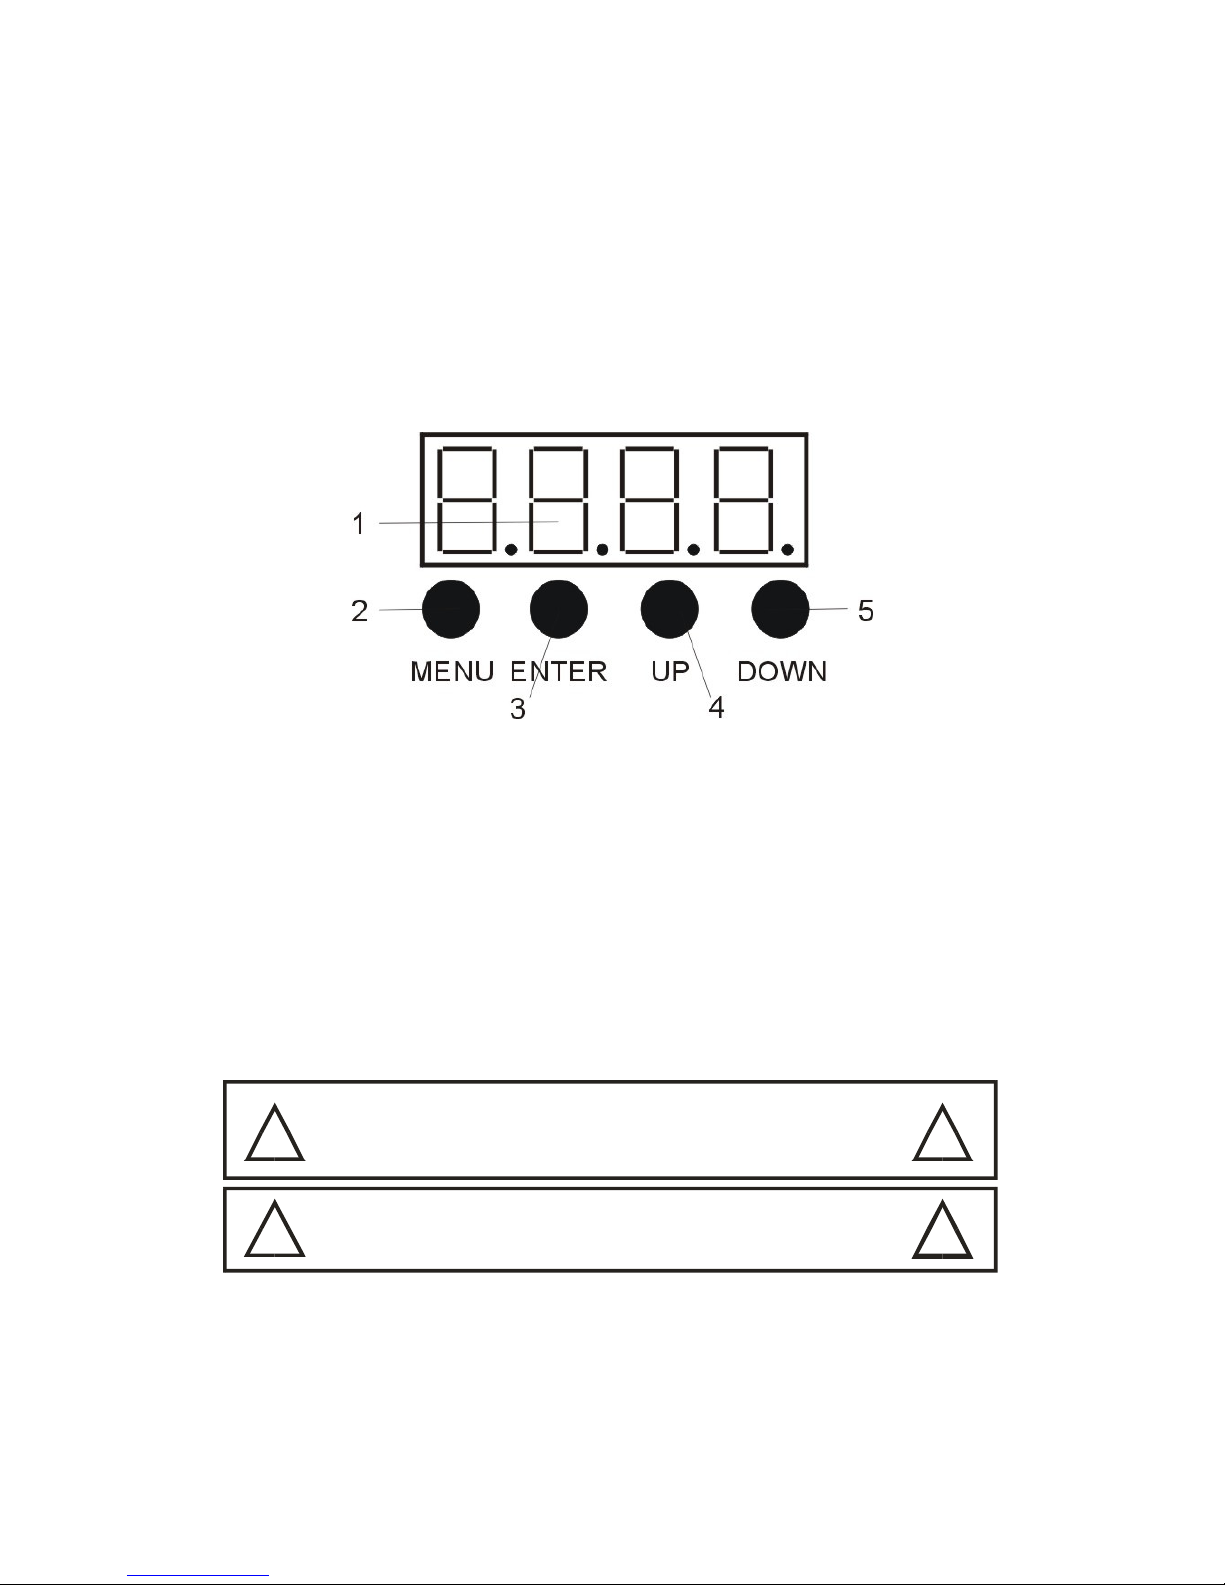
Display
CONTROL PANEL
1. LED DISPLAY
2. MENU BUTTON
3. ENTER BUTTON
4. UP BUTTON
5. DOWN BUTTON
SETUP
1. Rigging the device
DA NG ER O F FIR E!
M
ake sure there is no in f lammable material near by during
in stalling. Follow the i nstructions stated on the bo t to m of
the base of this de vice .
! !
!
WARN IN G !
U se 2 clam ps t o rig the fixtur e ont o a tru ss. Mak e sure it is
f ixed prop erly! Ens ure t he st ructur e (t russ) is secu re.
!
This device can be installed directly onto a truss, wall or stage floor in any orientation without
altering its operation characteristics.
Use proper bolts to mount the device via its brackets. The brackets should be attached to the
GLG Lighting products 4
device with proper bolts!
Always use a secondary safety rope that can hold at least 10 times the weight of the device.
The minimum distance between the device and illuminated surface is 1 meter. There should not be
any flammable materials 10 meters around the device!
2. Connection to mains
Connect the device to mains with the enclosed power plug. The occupation of the connection
cables is as below:
The earth has to be connected.
3. Master-slave / DMX 512 connection
The wires mus t not come into co ntact wi th each
oth er, other w i se the fixtu re s will not work at a ll,
or wil l not wor k properly.
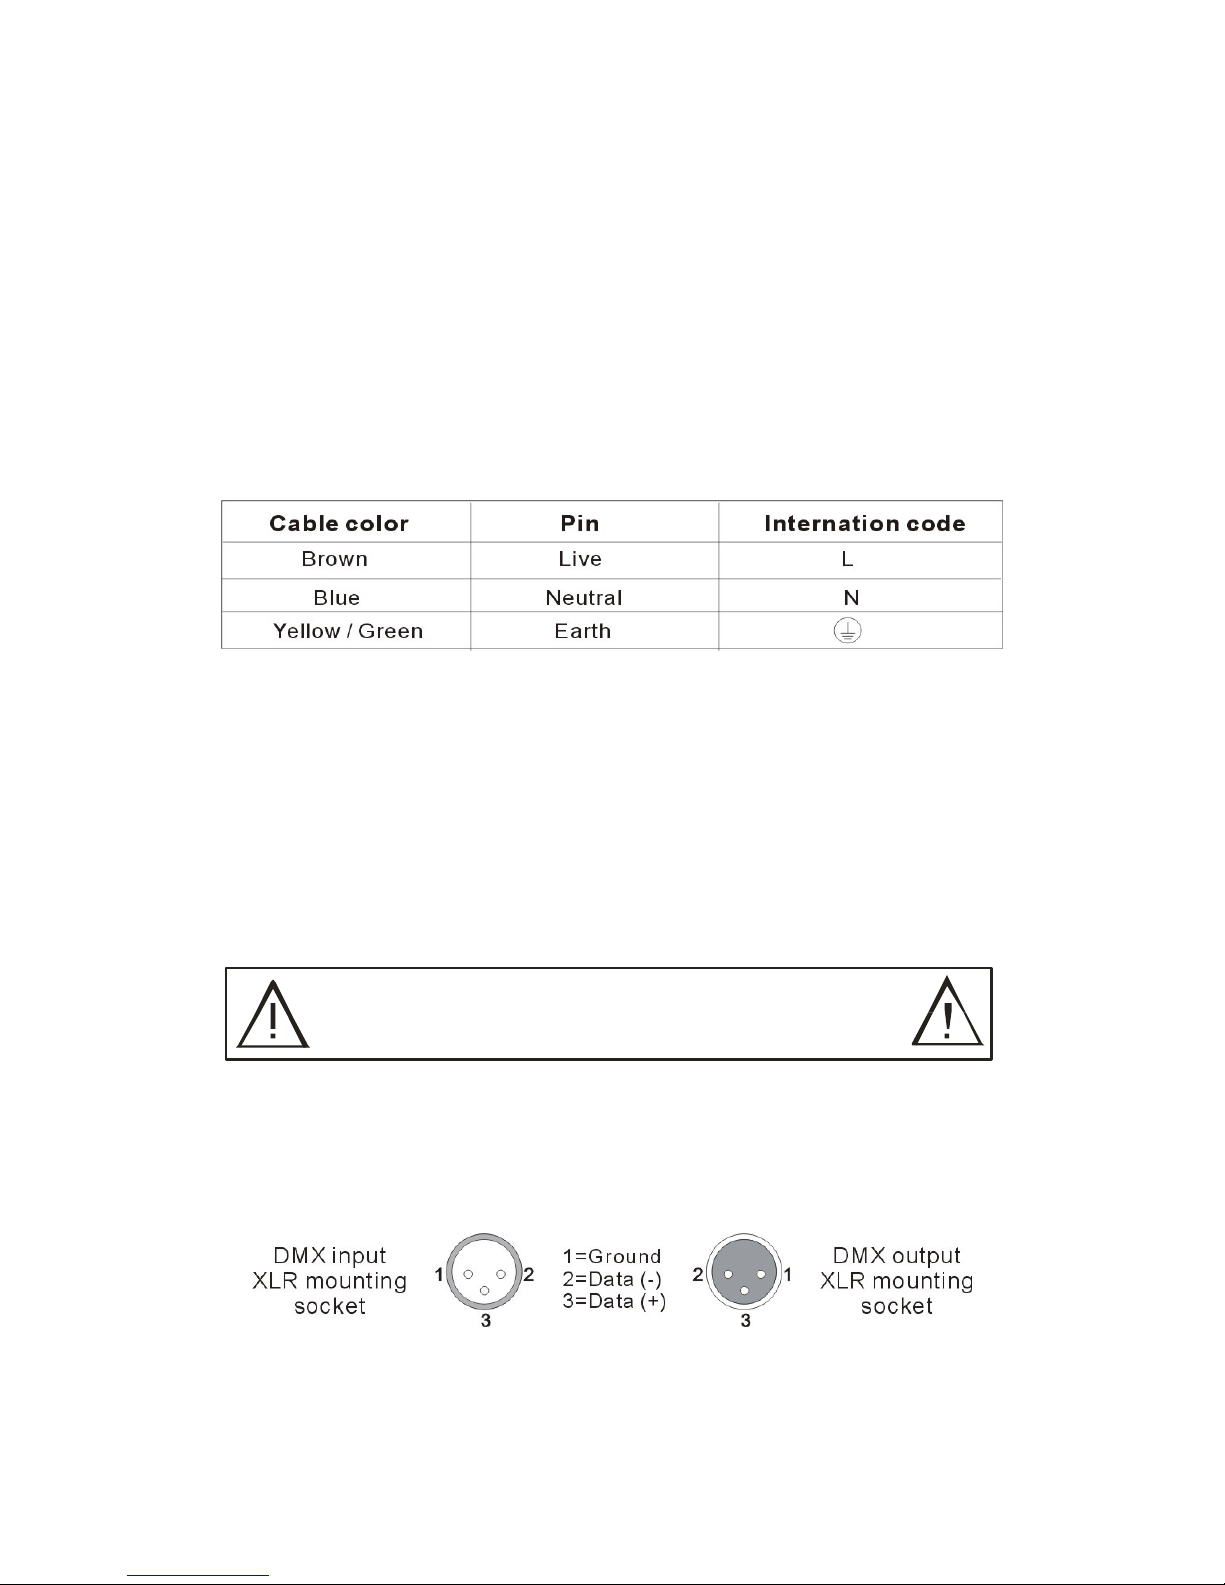
Only use a stereo shielded cable and 3-pin XLR-plugs and connectors in order to connect the
controller with the fixture or one fixture with another.
Occupation of the XLR-connection:
If you are using controllers with this occupation, you can connect the DMX-output of The
controller directly with the DMX-input of the 1st device in the DMX-chain. If you wish to connect
DMX-controllers with other XLR-outputs, you need to use adapter-cables.

GLG Lighting products 5
Building a serial Master-slave / DMX-chain:
For Master-slave connection, you need to set a device as the Master device. All other devices will
be the slave devices.
Connect the DMX-output of the first device (Master) in the chain with the DMX-input of the
second device (the first slave device). Connect the DMX-output of the second device (the first
slave device) with the DMX-input of the third device (the second slave device). Always connect
one output with the input of the next device until all devices are connected.
Caution: At the last fixture, the DMX-cable has to be terminated with a terminator. Solder a 120Ω
resistor between Signal (-) and Signal (+) into a 3-pin XLR-plug and plug it in the DMX-output of
the last fixture.
4. Control panel and display
The control panel on the device allows you to control the device, including DMX start address
setting, Automatic operation setting, Manuel dimmer, Rainbow effect setup, etc.
Display window
The device use a 4-digits red color LED display module for displaying your setting.
The module can display some simple letters and figures.

GLG Lighting products 6
Buttons for setup
MENU button: Prepare to select the menu or exit without saving
UP / DOWN: Select the menu or select your desired value
ENTER (SAVE): Enter main menu / Save your selected value
Menu extension
The LED display allows you to extend or abbriviate the menu.
Press the Menu button.
Press the Up or Down buttons until it shows -Menu- in the display.
Press Enter button to enter setting.
Press the Up or Down buttons to select -on- or -oFF-.
Then press the Enter button to save or press the Menu button to exit.
If you select -on-, then the menu is complete.
If you select -oFF-,then the menu is incomplete. The display will only show the -AXXX- for
DMX control mode and -Menu- for Menu extention.
Complete Main Menu
Press The Menu button, then press Up or Down button,
the display will show below:
1) [AXXX]. This is the DMX starting address. See page 10.
2) [Menu], This is the Menu extention setting. See above.
3) [ModX]. This is the mode setting of the spot. See page 9 & 10.
4) [C1--], [C2--], [C3--].….This is manual dimmer of the 5 colors. See page 8.
5) [ACC] or [FADE]. This is automatic operation. See below.
6) [Reset]. This is the loading of the factory default settings. See page 11.

GLG Lighting products 7
OPERATION
Auto operation
Press the Menu button. Press the Up or Down button until it shows one of the following:
- FADE: means fade in and fade out effect.
- ACCH-: means automatic color changing effect.
Press Enter button to enter.
Press Up or Down button to select one of them, the device will be operated automatically by the
built-in programs.
Press Enter button, the last two digits in the display will show 00-12. This is the speed or different
built-in programs.
The first two digits in the display will not change.
Press Up or Down button to select.
Press Enter button to save or press Menu button to exit.
Manual operation
Press the Menu button.
Press Up/Down button until it shows C1-C3 in the display. C1, C2, C3, C4, C5 means Red, Green,
Blue, White, Amber color respectively.
Press Enter button.
Press Up or Down button to select C1, C2, C3, C4 or C5.
Press the Enter button, the last 2 digits in the display will show 00-12. This is the level of the
manual dimmer. Press Enter button to save or press Menu button to exit.

GLG Lighting products 8
DMX operation
The GLG Creator DLX series gives you the possibility to set the spot in different user modes.
When you connect a DMX signal to the spots the display will indicate this with a dot on the
display.
Mode 1: 5 channels. First channel: Master dimmer (14 bit dimming)
Second channel: Macro of colors. See table on page 10
Third channel: White
Fourth channel: Amber
Fifth channel: Uv
Mode 2: 7 channels. First channel: Master dimmer
Second channel: Red
Third channel: Green
Fourth channel: Blue
Fifth channel: White
Sixt channel: Amber
Seventh channel: Uv
Mode 3: 12 channels. First channel: Master dimmer (14 bit dimming)
(Default) Second channel: Red
Third channel: Green
Fourth channel: Blue
Fifth channel: Strobe
Sixth channel: Chase
Seventh channel: Fade
Eight channel: Color scroll
Ninth channel: White
Tenth channel: Amber
Eleventh channel: Uv
Twelfth: Strobe white colors

GLG Lighting products 9
DMX channel Values in mode 3 (default/factory setting)
Channel Value Function
1 000-255 Master dimmr (0-100%)
2 000-255 Red color dimmer (0-100%)
3 000-255 Green color dimmer (0-100%)
4 000-255 Blue color dimmer (0-100%)
5 000-255 Strobe effect speed adjustable ( slow to fast )
6 000-255 Preset program
Automatic chase function
Speed adjustable ( slow to fast )
7 000-255 Preset program
Automatic fade function
Speed adjustable ( slow to fast )
8 000-255 Macro of colors
9 000-255 White color dimmer ( 0-100%)
10 000-255 Amber color dimmer ( 0-100%)
11 000-255 Uv color dimmer (0-100%)
12 000-255 Strobe effect White & Amber adjustable ( slow to fast)
DMX start address setting
This device has a maximum of 12 DMX channels in mode 3. If you set, for example, the DMX
start address to channel 1, the device will use the channels # 1st to 12th for control. The first
available channel for the next fixture will be the 12th. Please be sure that you do not have any
overlapping channels in order to control each device correctly and independently from any other
fixture on the DMX chain.
If two, three or more devices are addressed similarly, they will work similarly.
Press the Menu button.
Press the Up/Down button until it shows AXXX in the display.
XXX is the address you set last time.
Press Enter button. Press Up/Down button to select your desired address, e.g. A001.
Press Enter button to save or press Menu button to exit.

GLG Lighting products 10
Factory default setting
Press the Menu button. Press the Up/Down button until it shows [Reset] in the display.
Press the ENTER button. It will reset all functions.
The spot will go to mode 3 with start address A001.
Master-slave operation
More devices can work syncronizely when there is no DMX signal input.
For Master-slave operation, you need to use one device as the master. The master device can be
any one in a DMX (Master-slave) chain.
The Master device must be set to Auto, Sound, Rainbow or Manuel operation. The slave devices
must be set to work in DMX mode.
CLEANING AND MAINTENANCE
D A NGE R TO L I FE!
Di sc onnect fro m mains befo re startin g m a inten an c e operation !
The operator has to make sure that safety-relating and machine-technical installation are inspected
by
- an expert after every four years in the course of an acceptance test.
- a skilled person once a year.
1. All screws used for installing the devices or parts have to be tightly connected and must not be
corroded.
2. There must not be any deformations on the housing, fixations and installation spots (ceiling,
suspension, trussing, etc.)

GLG Lighting products 11
3. The electric power supply cables must not show any damages, material fatigue (e.g. porous
cables) or sediments. Furthur instructions depending on the installation spot and usage have to be
adhered by a skilled installer and any safety problems have to be removed.
The interior of the device need to be cleaned at least annually by an air-jet or a vacuum cleaner.
There are no serviceable parts inside the device except for the lamp and fuse. Maintenance and
service operation can be only carried by authorized dealers.
Should you need any spare parts, please use genuine parts.
Should you have further questions, please contact GLG.
TECHNICAL SPECIFICATIONS
Power supply: AC 200-250V, 50Hz ~
Power consumption: 80W max.
LED quantity: 6x12W RGBWAuV 6-in-1 LEDs
Service life: Exceed 30,000 hours
Working mode:
Auto programs / Manuel setting
DMX 512 control, 12 channels max.
Dimmension: mm
Net weight: 2,5
Gross weight: 3,5kgs
Please note: Every information is subject to change without prior notice.
GLG is a brand of Goed Licht en Geluid.
The Netherlands. www.goedlichtengeluid.nl
 Loading...