

Page 1

Belling BI 90 MF
Page 2

IMPORTANT NOTICE
Please note the cooling fan fitted to this appliance is an integral part of its safety
and functionality.
When the appliance is installed care must be taken that the cooling fans performance is not impeded by any objects coming into contact with it. (Installation
pipes, leads etc)
Care must also be taken that there is sufficient air flow at the rear of the appliance
for the cooling fan to run at its optimum efficiency. (Particularly Built In appliances)
See clearance dimensions in the installation section of the booklet.
During use the Appliance must never be disconnected from the Mains supply as
this will seriously affect the safety and performance of the appliance, particularly
in relation to surface temperatures becoming hot and gas operated parts not working efficiently.
The cooling fan is designed to run on after the control knob has been switched off
to keep the front of the appliance and the controls cool until the appliance has naturally cooled itself.
Page 3

CONTENTS
User’s Section . . . . . . . . . . . . . . . . . . . . . . . . . . . . . . . . . . . . . 2 - 19
Introduction . . . . . . . . . . . . . . . . . . . . . . . . . . . . . . . . . . . . . . . . . . . . . . . . . 2
Functions . . . . . . . . . . . . . . . . . . . . . . . . . . . . . . . . . . . . . . . . . . . . . . . . . . . 4
Be Safe - Not Sorry. . . . . . . . . . . . . . . . . . . . . . . . . . . . . . . . . . . . . . . . . . . . 5
Using the Grills. . . . . . . . . . . . . . . . . . . . . . . . . . . . . . . . . . . . . . . . . . . . . . . 6
Grilling in the top oven . . . . . . . . . . . . . . . . . . . . . . . . . . . . . . . . . . . . . . . . . 7
Grilling in the main oven . . . . . . . . . . . . . . . . . . . . . . . . . . . . . . . . . . . . . . . . 7
Using the Top Oven . . . . . . . . . . . . . . . . . . . . . . . . . . . . . . . . . . . . . . . . . . . 8
Using the Main Oven . . . . . . . . . . . . . . . . . . . . . . . . . . . . . . . . . . . . . . . . . . 9
Oven cooking . . . . . . . . . . . . . . . . . . . . . . . . . . . . . . . . . . . . . . . . . . . . . . 10
Conventional Oven . . . . . . . . . . . . . . . . . . . . . . . . . . . . . . . . . . . . . . . . . . . 11
Top Heat Only . . . . . . . . . . . . . . . . . . . . . . . . . . . . . . . . . . . . . . . . . . . . . . 11
Base Heat Only . . . . . . . . . . . . . . . . . . . . . . . . . . . . . . . . . . . . . . . . . . . . . 11
Fan Oven . . . . . . . . . . . . . . . . . . . . . . . . . . . . . . . . . . . . . . . . . . . . . . . . . 11
Fan & Base Heat Only . . . . . . . . . . . . . . . . . . . . . . . . . . . . . . . . . . . . . . . . 11
Intensive Bake . . . . . . . . . . . . . . . . . . . . . . . . . . . . . . . . . . . . . . . . . . . . . . 11
Defrosting and cooling . . . . . . . . . . . . . . . . . . . . . . . . . . . . . . . . . . . . . . . . 12
Slow cooking . . . . . . . . . . . . . . . . . . . . . . . . . . . . . . . . . . . . . . . . . . . . . . . 12
Programmer / Clock . . . . . . . . . . . . . . . . . . . . . . . . . . . . . . . . . . . . . . . . . . 13
Cleaning . . . . . . . . . . . . . . . . . . . . . . . . . . . . . . . . . . . . . . . . . . . . . . . . . 19
Installation Instructions . . . . . . . . . . . . . . . . . . . . . . . . . . . . . 21 - 23
Step 1: Prepare installation . . . . . . . . . . . . . . . . . . . . . . . . . . . . . . . . . 21 & 22
Step 2: Connect to electricity supply . . . . . . . . . . . . . . . . . . . . . . . . . . . . . . . 23
Step 3: Secure appliance to cabinetry. . . . . . . . . . . . . . . . . . . . . . . . . . . . . . 23
Technical Data . . . . . . . . . . . . . . . . . . . . . . . . . . . . . . . . . . . . . . . 24
Customer Care . . . . . . . . . . . . . . . . . . . . . . . . . . . . . . . . . Back Page
1
Page 4

INTRODUCTION
Thank you for choosing a
British built appliance by
Belling.
We hope the following information
will help you to quickly familiarise
yourself with the features of the
appliance, and to use it successfully
and safely.
Our policy is one of constant
development and improvement. Strict
accuracy of illustrations and specifications
is not guaranteed. Modification to
design and materials may be necessary
subsequent to publication.
Please read the instructions in this
handbook before using or installing
this appliance.
Your 1st year guarantee
To fulfil the conditions of your guarantee,
this appliance must be correctly
installed and operated, in accordance
with these instructions, and only be
used for normal domestic purposes.
Please note that the guarantee, and
Service availability, only apply to the
UK and Republic of Ireland.
Before using the appliance for
the first time, remove any protective
polythene film and wash the oven
shelves and furniture in hot soapy
water to remove their protective
covering of oil. Even so, when you
first turn on the oven or grill you may
notice a smell and some smoke.
Condensation
When hot and cold air meet,
condensation forms. The outer door is
air cooled and the inner door gets hot,
so some condensation might form; this
is normal and will disappear within 10
- 15 minutes.
Electrical connection
Please refer to installation instructions
for electrical connection.
In your own interest, and that of safety,
make sure that the installation is carried
out by a competent person.
Disconnection of electric appliances
should always be carried out by a
competent person.
Warning: This appliance must be
earthed.
In the event of a power cut
1. Switch off the electricity supply to the
appliance at the cooker control unit.
2. When the power returns, see the
‘Programmer / Clock’ section to
‘Set the time of day’.
2
Page 5

INTRODUCTION
To replace an oven light bulb
WARNING - switch off the electricity
supply to the appliance at the socket,
to avoid the risk of electric shock.
Wait until the oven is cool, then
remove the oven shelves.
The oven light is at the rear of the oven
cavity.
Unscrew the lens cover (turn anticlockwise). Unscrew the bulb and replace.
Replace lens cover.
Please note that the oven light bulb is
not covered by guarantee.
Environmental Protection
We are committed to protecting the
environment and operate an
Environmental Management System
which complies with BS EN ISO
14001:1996.
Disposal of packaging
• All our packaging materials are
recyclable and environmentally
friendly.
• Please help us to protect our
environment by disposing of all
packaging in an environmentally
friendly manner.
• Please contact your local authority
for the nearest recycling centre.
Caution: Packaging materials can
pose a risk of suffocation - keep away
from children.
The appliance is designed to fit into
a standard 600mm wide housing
unit with a minimum internal height of
880mm.
Cooling fan
The cooling fan helps to keep the
exterior cool during normal use.
When an element is operated, you
should heat the cooling fan switch on
automatically and be able to feel air
evacuating from the appliance vents
just below the fascia.
The cooling fan will continue to operate
for approximately 10 minutes after
turning off the elements. This is normal.
If there is no such indication that the
fan is operating, the appliance will
require servicing.
APPLIANCE UNTIL IT HAS BEEN SERVICED
Switch the appliance off at the mains
and contact Customer Support.
Glass panels
To meet the relevant Standards of
Domestic cooking appliances, all the
glass panels on this appliance are
toughened to meet the fragmentation
requirements of BS3193. This ensures
that, in the unlikely event that a panel
breaks, it does so into small fragments
to minimise the risk of injury.
Please take care when handling, using
or cleaning all glass panels as any
damage to the surfaces or edges may
result in the glass breaking without
warning or apparent cause at a later
date. Should any glass panel be
damaged, we strongly recommend
3
DO NOT USE THE
.
Page 6
FUNCTIONS
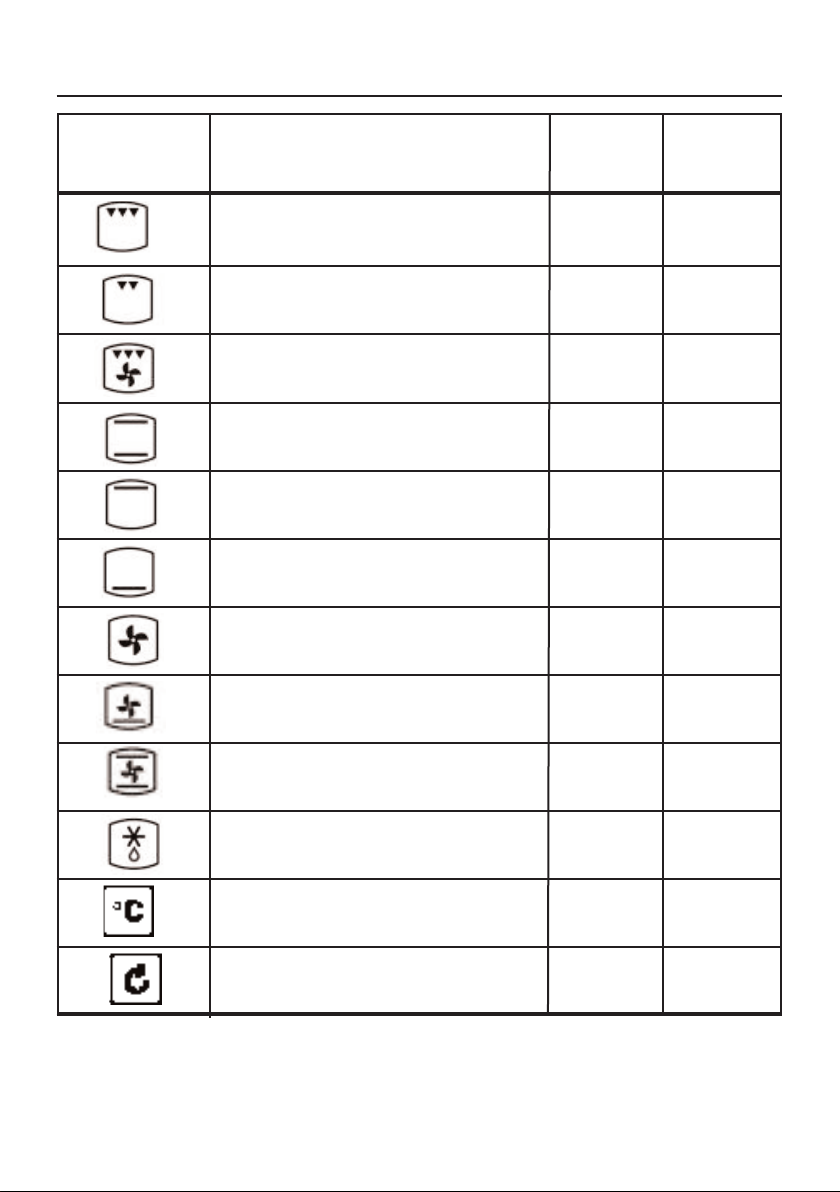
Symbol Function / Feature Top Main
Oven Oven
Conventional Grill page 7 page 7
Economy Grill page 7 -
Fanned Grill - page 7
Conventional Oven page 8 page 11
Top Heat Only page 8 page 11
Base Heat Only page 8 page 11
Fanned Oven - page 11
Fan and Base Heat Only - page 11
Intensive Bake - page 11
Defrosting and Cooling - page 12
Oven Temperature Control
Oven Selector Control -
4
Page 7

BE SAFE - NOT SORRY
When you are cooking, keep
children away from the vicinity
of appliance.
This product is designed as a domestic
cooking appliance for the preparation
and cooking of domestic food
products, and should not be used for
any other purpose.
• Remove all packaging from the
appliance before using for the
first time.
• Make sure you read and
understand the instructions before
using the appliance.
• Keep electrical leads short so they
do not drape over the appliance
or the edge of the worktop.
• Keep all flammable materials (such
as curtains, furnishings & clothing)
away from the appliance.
• Parts of the appliance may be hot
during or immediately after use.
Care should be taken to avoid
touching heating elements inside
the oven. Allow sufficient time for
the appliance to cool after
switching off.
• When opening the appliance
door, take care to avoid skin
contact with any steam which may
escape from the cooking.
• Do not use aluminium foil to cover
the grill pan, or put items wrapped
in foil under the grill, as this creates
a fire hazard. The high reflectivity
can also damage the element.
• Do not use the oven with the door
inner glass panel removed.
• Do not drape tea towels over the
flue vents or doors, as this creates
a fire hazard.
• Use oven gloves when removing
hot food / dishes from the oven or
grill. The oven / grill and utensils
will be very hot when in use.
• Do not use foil on oven shelves, or
allow it to block the oven flue, as
this creates a fire hazard, and
prevents heat circulation.
• When cooking heavy items - eg;
turkeys - do not pull the oven shelf
out with the item still on the shelf.
• Drop-down doors: Do not place
items on the door when open.
• Switch off the electricity supply
before replacing the oven light
bulb, to avoid the possibility of
electric shock.
• Never use the appliance for
heating a room.
All installation, servicing and
maintenance work should be carried
out by a competent person who will
comply with current Regulations,
Standards and Requirements.
Warning: This appliance must be
earthed.
When you have finished
cooking check that all controls
are in the off position.
5
Page 8
USING THE GRILLS
Caution: Accessible parts may
be hot when the grill is used,
young children should be kept
away.
Using the grills
The 900 has a grill in both oven cavities.
The top oven grill is a fully variable
dual grill.
The main oven features fixed rate
grilling - a single element conventional
grill, and a fanned grill function.
Follow the instructions given on the
next page when operating these grills.
Preheating
For best results, preheat the grill for
3 - 5 minutes.
Aluminium foil
Using aluminium foil to cover the grill
pan, or putting items wrapped in foil
under the grill can create a fire hazard,
and the high reflectivity can damage
the grill element.
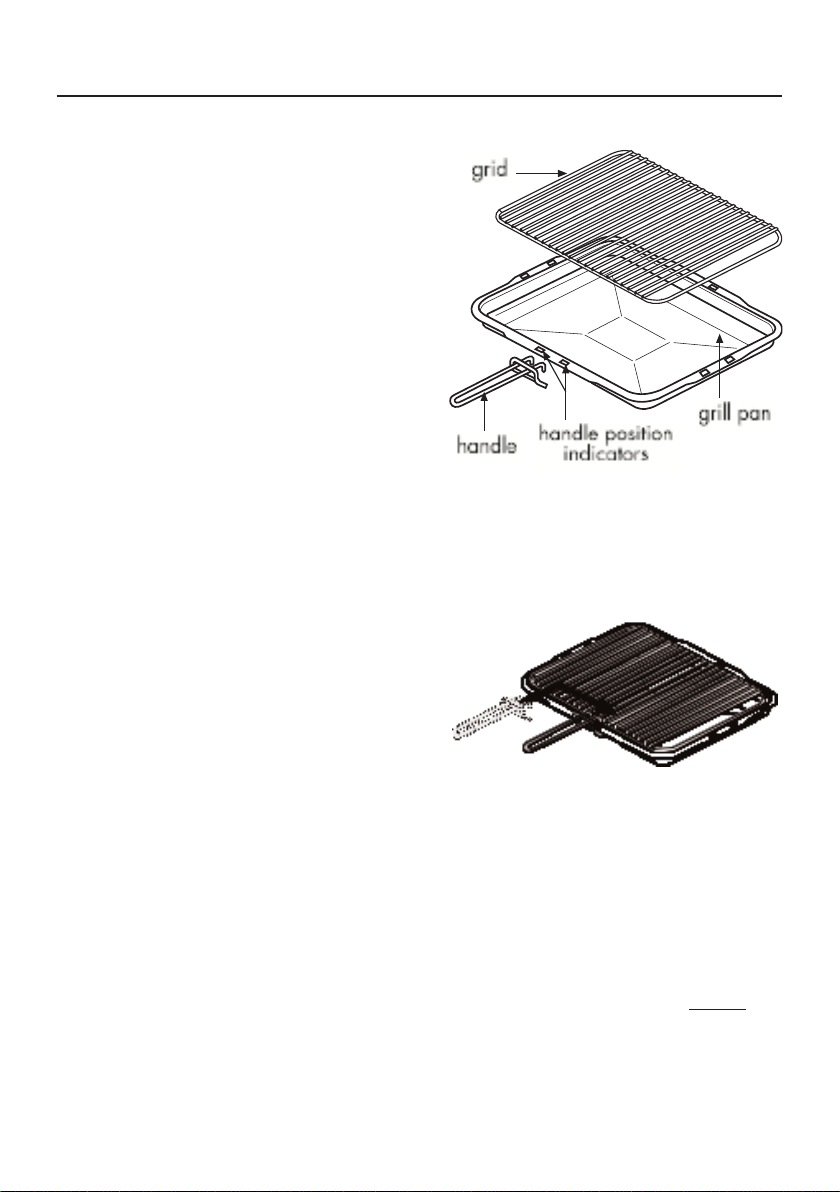
Detachable grill pan handle
Place the handle over the edge of the
grill pan, at the narrow side edges.
Slide the handle to the centre, and
locate between the handle position
indicators.
The handle should be removed from
the pan during grilling, to prevent
overheating.
The handle is designed for removing /
inserting the grill pan under the grill
when grilling.
If cleaning the grill pan when it is hot,
use oven gloves to move it. Do not
the handle to pour hot fats from the
grill pan.
Food for grilling should be positioned
centrally on the trivet.
use
6
Page 9
USING THE GRILLS
Grilling in the top oven
The top oven grill is a fully variable
dual grill.
To switch on the grill
Important: The top oven / grill door
must be kept open when the top oven
grill is used - either fully open or using
the door stop position - open the door
about 75mm and it will hold open. If
the grill door is closed whilst the grill is
in use, it will cause the grill door to
become hot.
Turn the oven control knob either
clockwise to use the full grill settings, or clockwise to the economy
grill settings, Then select 1 - 8 on the
grill control.
The economy grill settings only use the
inner element of the grill.
To switch off, return the control knob to
the “” off position.
Grilling in the main oven
The main oven grill & fanned grill are
fixed settings using the inner element only.
Make sure that the programmer is set
to manual before grilling.
Conventional grill
The door must be open when the grill
is used for conventional grilling - either
fully open or using the door stop
position - open the doot about 75mm
and it will hold open.
If the grill door is closed while the grill
is in use, the grill will cycle on and off
at a high temperature, causing the
door to become hot.
(i) Turn the selector control knob to
the conventional grill setting.
(ii) Turn the oven temperature control
knob to the full on setting.
Fanned grill
The door must be closed when the
fanned grill is used.
When opening the door, take care to
avoid skin contact with any steam
which may escape from the cooking.
(i) Turn the selector control knob to
the fan grill setting.
(ii) Turn the oven temperature control
knob to the desired temperaturesetting.
When the fanned grill is selected, only
the inner element will come on.
7
Page 10

USING THE TOP OVEN
Caution: Accessible parts may
be hot when the top oven is
used, young children should be
kept away.
The top oven is a conventional oven.
To switch on the top oven
Turn the top oven control knob to the
desired temperature setting.
The red thermostat indicator will come
on until the selected temperature is
reached and then go off; it will turn on
and off periodically as the thermostat
operates to maintain the selected
temperature.
To switch off, return the control to the
“” off position.
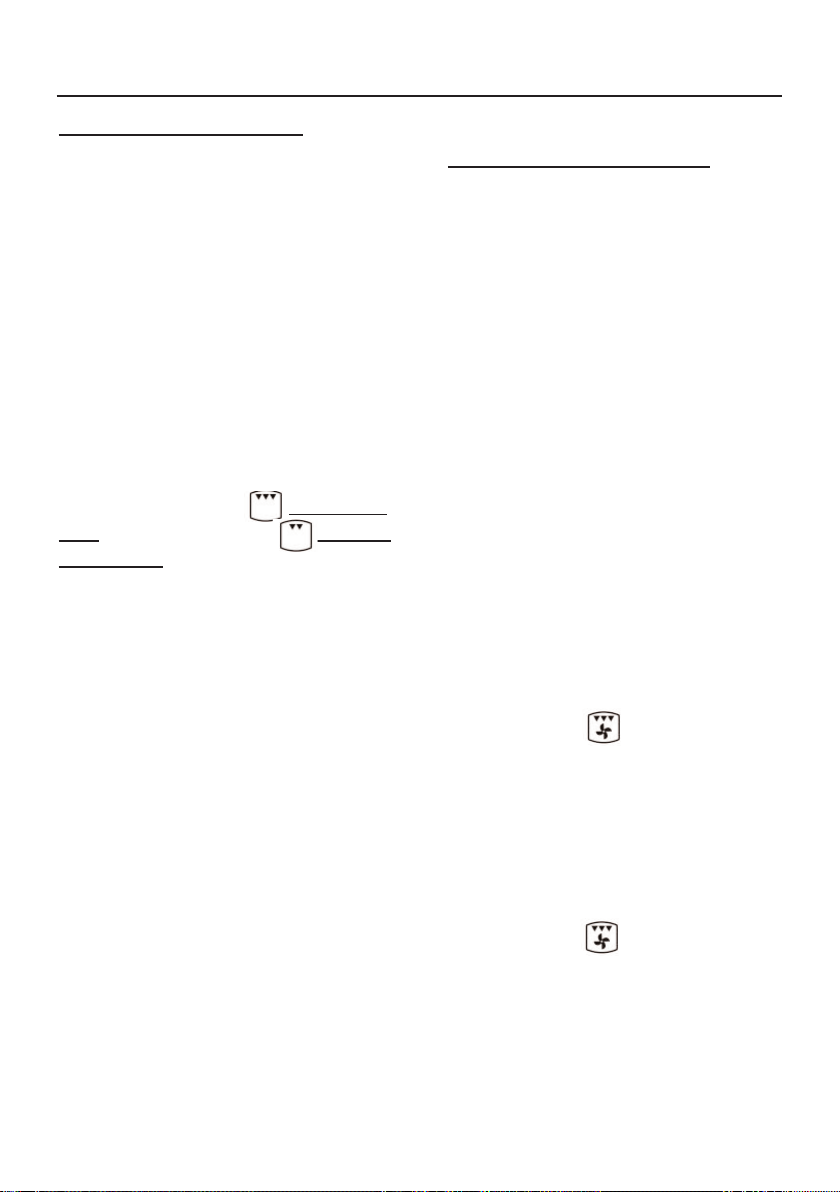
Top heat only
Turn the top oven control knob past the
oven temperature markings, until the
top heat symbol is in the window as
shown below.
Important notes
• Important: Never put items
directly on the base of the oven or
cover the oven base with foil, as
this may cause the element to
overheat.
8
Page 11

USING THE MAIN OVEN
Caution: Accessible parts may
be hot when the ovens are
used, young children should be
kept away.
The main oven is a multi-function oven,
and may be used as a conventional
oven or a fanned oven. It may also be
used as a grill, or with one of the other
oven functions.
Manual operation
The programmer must be set to manual
operation before the main oven or grill
functions can be used. If A (Auto) is
on the programmer display, return the
oven to manual operation by pressing
the two end buttons.
To turn on the main oven
Step 1 - Select the function
Turn the selector control knob in either
direction, until the function you require
appears in the window.
Step 2 - Set the main oven control
If you have selected an oven cooking
function, then simply turn the main
oven temperature control knob clockwise to the required temperature - this
brings on the neon indicator light,
which will stay on until the oven reaches the required temperature.To switch
off the main oven, return the control
knob to the “l” off position.
Automatic operation
See ‘Programmer / Clock’ section.
9
Page 12

USING THE MAIN OVEN
Using the main oven
Caution: Accessible parts may
be hot when the appliance is in
use - keep children away from
the vicinity of the oven.
Never put items directly on the base of
the oven or cover the oven base with
foil, as this can cause the base element
to overheat.
Manual operation
Set the programmer to manual operation.
See ‘Programmer / Clock’ section.
Turn the selector control knob to the
symbol for the desired oven function.
Turn the main oven temperature control knob to the desired temperature.
The red thermostat indicator neon will
come on and off until the selected
temperature is reached and then go
off; it will turn on and off periodically
as the thermostat operates to maintain
the selected temperature.
To switch off the main oven, return the
main oven control knob to the “l” off
position.
Automatic operation
See ‘Programmer / Clock section.
Preheating
Always use the fan oven setting for
preheating to save time and electricity.
After the oven has been preheated on
the fan oven setting, turn the selector
control knob to the oven setting you
require.
The oven must be preheated when
cooking frozen or chilled food, and we
recommend preheating for yeastmixtures,
batters, soufflés and whisked sponges,
otherwise preheating is not necessary
as a fan oven warms up quickly.
Preheat the oven until the indicator
neon switches off for the first time;
this will take between 5 - 15 minutes,
depending on the temperature selected.
To help the air circulate freely
• Position the shelves evenly within
the oven and maintain a clearance
from the oven roof and base.
• If more than one cooking dish or
baking tray is to be used on a shelf,
leave a gap of at least 25mm
between the items themselves and
the oven interior.
• Allow enough space between
shelves for food that will rise
during cooking.
• Do not
base as this will prevent air from
circulating freely.
place items on the oven
10
Page 13

USING THE MAIN OVEN
Main oven functions
Conventional oven
(i) Turn the selector control knob to
the conventional oven symbol.
(ii) Turn the main oven control knob to
the required temperature.
The temperature you select
corresponds to the temperature in the
middle of the oven.
The top heat comes from the outer
element of the grill, and the base heat
is under the oven base.
Top heat only
(i) Turn the selector control knob to
the top heat symbol.
(ii) Turn the main oven control to the
required temperature.
Base heat only
(i) Turn the selector control knob to
the base heat symbol.
(ii) Turn the main oven control knob to
the required temperature.
Fan oven
(i) Turn the selector control knob to
the fan oven symbol.
(ii) Turn the main oven control knob to
the required temperature.
The fan oven comes on when the oven
is switched on and circulates the air
around the oven to give a fairly even
temperature throughout the oven.
Fan and base heat only
(i) Turn the selector control to the fan
and base heat symbol.
(ii) Turn the main control to the
required temperature.
Intensive bake
(i) Turn the selector control to the
intensive bake symbol.
(ii) Turn the main oven control to the
required temperature.
11
Page 14

USING THE MAIN OVEN
Defrosting and cooling
(i) Turn the selector control knob to
defrost .
(ii) Turn the oven control to the light
symbol .
To defrost frozen foods, place food
in the centre of the oven and close
the door.
To cool foods after cooking prior to
refrigeration or freezing, place food
in the centre of the oven with the
door open.
Be safe
• Do not defrost stuffed poultry using
this method.
• Do not defrost larger joints of meat
or poultry over 2kg / 4lb using this
method.
• Never place uncooked food which
is to be defrosted next to cooked
food which is to be cooled, as this
can lead to cross contamination.
Please refer to the Cooking Guide for
more information on using the Defrost
function.
Slow cooking
Turn the selector control to either
conventional oven or fanned oven.
Do not try to slow cook using any of
the other oven functions.
For roasting joints of meat or poultry
and for pot roasts, preheat the oven to
190˚C - 200˚C and cook for 30 minutes,
then adjust the oven temperature control
to 110 - 120˚C for the remainder of
the cooking time.
• Always use the top half of the oven
when slow cooking with the
conventional oven function.
• Slow cooking times will be about
three times as long as conventional
cooking times.
• Make sure that frozen foods are
thoroughly thawed before cooking.
• Do not slow cook joints of meat or
1
poultry weighing more than 2
1
4
⁄2lb. Always use the top half of
⁄4kg /
the oven for slow cooking.
12
Page 15

Programmer / Clock
Programmer / Clock
Automatic cooking is only available in
the main oven.
The programmer buttons
down - reduce
up - increase
The ‘function’ button in the centre is
used for setting the minute minder and
setting up the automatic cooking. See
below for details.
Symbols on the LED display.
This Bell symbol appears when the
Minute Minder function has been
selected. While the Minute Minder is
being set, the Bell symbol flashes.
Once the length of time is set, the Bell
symbol remains lit until the time runs
down, or the function is cancelled.
This ‘A’ symbol appears when either a
semi, or fully automatic program is
selected. This symbol will flash while
a program is being set. Once a program is set the symbol will light up,
and remain lit until the alarm sounds,
or the program is cancelled
This message and ‘A’ symbol appear
when you are asked to set the length
of time you require the oven to cook
automatically for. Using the Up and
Down buttons adjusts this accordingly.
This message and ‘A’ symbol appear
when you are asked to enter in an end
time, or when you would like the oven
to switch itself off.
13
Page 16

Programmer / Clock
To set the time of day
Press the Up and Down buttons
together for a few seconds, and
release.
The ‘’ in between the numbers on
the LED Display will begin to flash.
While the ‘’ is flashing it is possi-
ble to adjust the time using the Up and
Down buttons. Once the time has
been set, allow approximately 30 seconds before using any of the other
timer functions. This ensures that the
time will remain correct.
To select an alarm tone
There are three tones to chose from.
Press and hold the down button to lis-
ten to the first tone.
Release the down button and press it
again to listen to the second tone etc.
Releasing the down button after the
tone has sounded will automatically
select that tone
Setting the minute minder
To set the Minute Minder, press the
Function button once. The bell symbol
will appear and start flashing. The
flashing only lasts for 5 seconds so the
time must be set within this time frame.
Use the Up and Down button to set
the length of time required. Once this
has been done, the Minute Minder is
set.
When the desired length of time has
counted down the alarm will sound.
To cancel the tone, press any of the
buttons.
To cancel the Minute Minder at any
time, press the function button and
then press the Up and Down buttons
together.
14
Page 17

Programmer / Clock
Semi-automatic cooking
There are two types of semi automatic
cooking available on this appliance.
The oven must be switched on, and in
use to use either of these functions
successfully.
The Duration method allows you to set
the oven for a specific length of time.
If a dish needed 2 hours to cook, then
it would be possible for you to set the
oven to turn off 2 hours later. This
allows you to be sure that your food
will be cooked for a set length of time
and no longer.
The End Time method allows you to
enter a specific time when you would
like the oven to switch off. If you wish
to leave the oven unattended, then it
offers peace of mind that the oven will
have turned itself off at the set time.
For the instructions on how to use both
of these functions, please see the following page.
Fully automatic cooking
This function incorporates both a duration and an end time and is meant to be
used when you wish to delay the start
time.
We recommend that the first few times
this function is used you are in the
house, this will familiarise you with your
oven and prevents food from being over
cooked or under cooked.
Care must be taken when selecting
foods for this function, it is not recommended for certain food items which
may spoil, or are sensitive to being left.
It is also advisable to set the end time to
be as close to your return as possible to
prevent food being left standing.
To cancel the semi automatic programs, press both the Plus and Minus
buttons together. This can be done at
any time during the cooking process.
Then if necessary, re program.
15
Page 18

Programmer / Clock
Programmer / Clock
Semi-automatic cooking
The Duration method
Press the Function button twice,(1)
which will skip past the Minute
Minder.
The LED display will flash the word
‘dur’, (2) and the ‘A’ will flash on the
left hand side of the display.
Use the Up and Down buttons to set
the length of time you want to cook
for.(3) This must be done within 5
seconds or the time of day will show
again.
Once this is done the oven will automatically switch off once the time has
elapsed, and the alarm will sound.
To switch off the alarm, press any
button. To view any remaining time
press the function button twice
1. The Duration method
2.
3.
4. The End Time method
The End Time method
Press the Function button three times,
which will skip past the Minute Minder
and the Duration programmer. (4)
The LED display will flash the word
‘End’ and the ‘A’ will flash on the left
hand side of the display. (5)
Use the Up and Down buttons to
select the time the oven is required to
turn off. (6)
Once this is done the oven will turn
itself off at the time you have selected.
To switch off the alarm, press any
button.
5.
6.
16
Page 19

Programmer / Clock
Programmer / Clock
Fully automatic cooking
(example)
This programming method is best suited for when a delayed start time is
required. Unlike the semi automatic
methods this requires both the duration and the end time to be entered.
The timer will work out the start time
and begin cooking.
Press the function button twice to
select the length of time your food will
need. (7)
The ‘A’ on the left hand side will
flash and the ‘dur’ message will flash
up. (8)
Using the Up and Down buttons set
the time you require within 5 seconds
of the ‘dur’ message. (9)
Press the function button three times
until the ‘A’ flashes again and the
‘End’ messages appears. (10) &
(11)
Using the Up and Down buttons, set
the time you would like the oven to
switch off. (12)
Set the temperature of the oven and
place the food inside.
While the automatic function is running, the ‘A’ will appear statically on
the display, with the time.
Try to keep the end time as close to
when you expect to return, this will
prevent cooked food from being left
standing in a warm oven.
The timer will calculate the appropriate start time.
7
8
9
10
11
12
To switch off the alarm, press any button
17
Page 20

Automatic cooking - hints
Automatic cooking
These notes below are to help you with
using the automatic cooking facility.
Please make sure that you read them
carefully before you start using the
automatic functions.
Do
• Familiarise yourself with the use of
the programmer.
• Select foods which are as fresh as
possible, and as cold as possible ie; preferably straight from the
refrigerator.
• Choose foods which are suitable
for cooking from a cold start, as
some dishes will be affected by
being left uncooked, at room temperature, perhaps for several
hours, especially when the weather is hot.
• Make sure that meat, poultry and
uncooked food are thoroughly
thawed before placing them in the
oven.
• Cover dishes with lids or foil, as
they may be left standing in the
oven for some time before cooking.
Do not
• Never place warm food in the
oven for delayed cooking - eg;
stews prepared by frying meat first
must be thoroughly cooled before
placing in the oven.
• Do not cook dishes containing left
over cooked meat or poultry, or
pastry dishes with wet fillings, as
they are not suitable for automatic
cooking.
• Do not put food items intended for
delayed cooking into a warm oven
- allow the oven to cool before setting for delayed cooking.
• Do not over-fill dishes containing
liquids, as they might boil over.
• Never leave food in the oven to
cool slowly after cooking, serve
immediately or refrigerate.
18
Page 21

CLEANING
Cautio n: Any cleaning agent
used incorrectly may damage
the appliance.
Always let the oven cool before
cleaning.
Some cooking operations generate
considerable amount of grease, this
combined with spillage can become a
hazard if allowed to accumulate on
the oven through lack of cleaning. In
extreme cases this may amount to
misuse of the appliance and could
invalidate your guarantee.
It is recommended that the appliance
is cleaned after open roasting.
Do not use caustic, corrosive or
abrasive cleaning products, products
containing bleach, coarse wire wool
or any hard implements, as they will
damage the surfaces.
All parts of the appliance can be
safely cleaned with a cloth wrung out
in hot soapy water.
Vitreous enamel parts
GRILL PAN, OVEN FLOOR
Use a mild cream cleaner - eg; “Cif”.
Stubborn marks may be removed with
a moistened “Brillo” pad.
The grill pan may be cleaned in a
dishwasher, or with a nylon brush in
hot soapy water.
Chrome plated parts
OVEN SHELVES & OVEN SHELF RUNNERS,
GRILL PAN TRIVET
Do not use abrasives or polishes, use a
moist soap pad - eg; “Brillo”. These items
may also be cleaned in a dishwasher.
Note: Oven shelf runners can be
removed for cleaning. Grasp the
runners, and slide out of the hanging
holes as shown.
Easy care surfaces
OVEN SIDES AND BACK
We recommend that the appliance is
cleaned after open roasting, and also
after roasting at temperatures higher
that 200˚C, to help pervent a build up
of fats. Use of a trivet in a roasting tin
when roasting will help reduce fat
splashing.
Caution: Most types of cleaning
agent will damage these surfaces.
Only use a few drops of washing up
liquid in hot water. Wipe the surfaces
with a clean cloth wrung out in hot soapy
water - if larger splashes of fat do not
readily disappear, scrub the area with
a nylon brush or nylon pan scourer
and hot soapy water. Rinse well and
heat the oven to dry the surfaces.
19
Page 22

CLEANING
Glass parts
FACIA PANEL & DOOR PANELS
Use a mild cream cleaner - eg; “Cif”.
Rinse thoroughly and dry with a soft
cloth. Do not use abrasive cleaners
or polishes.
To remove the glass panel for cleaning,
open the door to the door stop position
(about 30˚ open), hold the top and
bottom edges of the panel and slide
out. Note that if the door is opened
fully when removing the inner door
glass panel, the door may spring shut.
Important: if the inner door glass
panel is removed for cleaning, it must
be replaced the right way up as
shown, and pushed fully in to the
stop position.
Painted, plastic and metal finish
parts
DOOR FRAME & HANDLE, CONTROL KNOB
Only use a clean cloth wrung out in
hot soapy water.
Stainless Steel surfaces (stainless
steel finish models only)
FACIA PANEL, HANDLES, DOOR PANELS
Only use a clean cloth wrung out in hot
soapy water, and dry with a soft cloth.
Stubborn marks can be removed using
“Luneta”. We recommend that you
clean the whole of the stainless steel
area to maintain a uniform finish.
Supplies can be purchased from the
Customer Care Centre.
Do not use undiluted bleach or any
products containing chlorides as they
can permanently damage the steel.
Extra care should be taken when cooking
food in salted water. Some foods are
corrosive - eg; vinegar, fruit juices and
especially salt - they can mark or
damage stainless steel if they are left
on the surface. Turn off and wipe any
spillage immediately, taking care to
avoid skin contact with any hot surface
or spillage.
Sharp objects can mark the surface of
stainless steel, but marks will become
less noticeable with time.
To maintain the finish of the stainless
steel, or to remove any greasy marks,
wipe the stainless steel surface sparingly
with a minimum
amount of “Johnson’s
Baby Oil” and kitchen paper.
Do not use cooking oils, as these may
contain salt, which can damage the
stainless steel surface.
20
Page 23

INSTALLATION INSTRUCTIONS
Step 1: Prepare installation
Do not lift the oven by the door
handle.
Whilst every care is taken to eliminate
burrs and raw edges from this product,
please take care when handling - we
recommend the use of protective
gloves during installation.
Please note that the weight of this
appliance is approximately 47kg
(unpacked). Take care when lifting it
into the housing unit - always use an
appropriate method of lifting.
If this appliance is to be installed near
to a corner where the adjacent
cabinets run at right angles forward of
the appliance, there must be a gap of
at least 90mm between the appliance
and the cabinets, to prevent overheating
of the cabinets.
1. Remove the fixing screws from the
polythene bag on the top of the
appliance, but leave the appliance
in the base tray packaging until
you are ready to install it.
Note: When removing the
appliance from the base tray
packaging care should be taken to
ensure the outer frame trim is not
damaged.
2. (i) When installed in a typical
600mm deep built in housing
unit, the false back should be
removed from the housing unit,
to provide the necessary depth
for installation.
(ii) When the false back is
removed, it is normally the case
that the support shelf for the
appliance leaves a gap between
the back edge and the wall of
approximately 80mm.
(iii) If no gap occurs between the
back edge of the shelf and
the wall behind the unit, we
recommend that a gap of at
least 30mm is made by
shortening the shelf.
3. The appliance is designed to fit
into a standard 600mm wide
housing unit, with minimum internal
dimensions as shown on page 22.
Please note that all sizes are nominal,
some variation is to be expected.
21
Page 24

INSTALLATION INSTRUCTIONS
Installation diagram
min
560mm
547mm
885mm
595mm
20mm
888
mm
550mm
569
mm
550mm
min
30-80mm
12mm
gap in plinth
min
880
mm
min
6mm
min
890
mm
22
Page 25

Installation Instructions
Step 2: Connect to the electricity
supply
Warning: This appliance must be
earthed.
The appliance must be installed by a
competent electrician using a double
pole control unit of 30 ampere minimum
capacity with 3mm minimum contact
separation at all poles.
We recommend that the appliance is
connected by a qualified electrician
who is a member of the N.I.C.E.I.C.
and who will comply with the I.E.E.
and local regulation.
1. Access to the mains terminal is
gained by opening the terminal
block cover at the rear of the
appliance (use a small flat-bladed
screwdriver).
2. Connection should be made with
suitable twin and earth heat
resistant flexible cable, minimum
4mm2, which is suitable for use up
to 25 amps.
3. First strip the wires, then push the
cable through the cable clamp in
the terminal block cover.
4. Connect the cable to the terminal
block and tighten the cable clamp
cover.
5. Close the terminal box, ensuring
that the cover is engaged on the
locking tabs.
Step 3: Secure appliance into
housing unit
Insert appliance into cabinet.
Note: The unit housing the appliance
must be appropriately fixed.
To secure appliance to housing unit
Note: Ensure that the appliance is
centrally located.
Take care not to damage the appliance
or cabinet.
There are 6 securing screws.
• Open the grill / top oven door,
and screw 2 screws through the
top corner holes in the front frame.
• With the grill / top oven door still
open, screw 2 screws through the
holes in the front frame, located
under the grill compartment.
Close the grill / top oven door.
• Open the main oven door, and
screw the remaining 2 screws
through the bottom corner holes in
the front frame.
Close the main oven door.
23
Page 26

Electrical supply
220 - 240V ~ 50Hz
Load / Wattage
4280 W - 5095 W
TECHNICAL DATA
24
Page 27

08 27438
Page 28

Belling Customer Care
Please keep this handbook in a safe place as the information inside may be of
use should you sell, or pass on the appliance. Please fill in the model number
and serial number in the spaces provided below as they will assist us should you
need to call.
0844 815 3746
When you dial this number you will hear a recorded message and be given a
number of options. This indicates that your call has been accepted and is being
held in a queue. Calls are answered in strict rotation as our Customer Care
Representatives become available.
Enter appliance numbers here for future reference:
Model No
4 4 4
Serial No
These numbers can be found on your appliances data badge.
Outside the UK and Northern Ireland, refer to your local supplier.
08 27438 02 © 11.2010
Stoney Lane, Prescot, Merseyside, L35 2XW
 Loading...