

Glenayre @ctiveLink User Manual And Technical Information

Browsing this online guide
Drag the hand over the Contents page topics or
a page number reference inside the guide.
When the hand changes to a pointing finger,
click to jump to the topic or page.
To go back to where you started, click the arrow
in the toolbar.

Contents
Quick start . . . . . . . . . . . . . . . . . . . . . . . . . . . . . . . . . . . . . . 4
Using this guide . . . . . . . . . . . . . . . . . . . . . . . . . . . . . . . . . . 6
Arranging for two-way wireless service . . . . . . . . . . . . . . . . 6
Using the Handspring Visor Handheld Computer . . . . . . . . 6
Using @ctiveLink . . . . . . . . . . . . . . . . . . . . . . . . . . . . . . . . . 7
Installing the AAA batteries . . . . . . . . . . . . . . . . . . . . . . . . . . 8
Charging the backup battery . . . . . . . . . . . . . . . . . . . . . . . . . 9
Turning the module on . . . . . . . . . . . . . . . . . . . . . . . . . . . . . 10
Responding to message alerts . . . . . . . . . . . . . . . . . . . . . . . 11
Installing the module . . . . . . . . . . . . . . . . . . . . . . . . . . . . . . . 12
Synchronizing module and handheld computer time . . . . . . 14
Reading the module indicator lights . . . . . . . . . . . . . . . . . . . 14
Checking your network coverage status . . . . . . . . . . . . . . . . 15
Installing the two-way applications . . . . . . . . . . . . . . . . . . . . 16
Launching the @ctiveLink application . . . . . . . . . . . . . . . . . 16
Using the @ctiveLink screen . . . . . . . . . . . . . . . . . . . . . . . . 18
Setting up @ctiveLink . . . . . . . . . . . . . . . . . . . . . . . . . . . . . . 20
Setting up alerts . . . . . . . . . . . . . . . . . . . . . . . . . . . . . . . . . . 21
Setting up information services . . . . . . . . . . . . . . . . . . . . . . 22
Setting up quiet time . . . . . . . . . . . . . . . . . . . . . . . . . . . . . . . 23
Looking up module information . . . . . . . . . . . . . . . . . . . . . . 24
Deleting all waiting incoming or outgoing messages . . . . . . 26
Looking up technical support . . . . . . . . . . . . . . . . . . . . . . . . 27
Removing the module . . . . . . . . . . . . . . . . . . . . . . . . . . . . . . 28
Caring for the module . . . . . . . . . . . . . . . . . . . . . . . . . . . . . . 29
2

Turning the module off . . . . . . . . . . . . . . . . . . . . . . . . . . . . . 29
Getting started with BeamLink. . . . . . . . . . . . . . . . . . . . . . .30
Launching BeamLink . . . . . . . . . . . . . . . . . . . . . . . . . . . . . . 30
Reading a message . . . . . . . . . . . . . . . . . . . . . . . . . . . . . . . 31
Replying to a message . . . . . . . . . . . . . . . . . . . . . . . . . . . . . 32
Forwarding a message . . . . . . . . . . . . . . . . . . . . . . . . . . . . . 33
Viewing saved messages . . . . . . . . . . . . . . . . . . . . . . . . . . . 34
Deleting saved messages . . . . . . . . . . . . . . . . . . . . . . . . . . 35
Starting a new message . . . . . . . . . . . . . . . . . . . . . . . . . . . . 36
Adding another address . . . . . . . . . . . . . . . . . . . . . . . . . . . . 37
Composing a message . . . . . . . . . . . . . . . . . . . . . . . . . . . . . 38
Adding a canned message . . . . . . . . . . . . . . . . . . . . . . . . . . 39
Adding an attachment . . . . . . . . . . . . . . . . . . . . . . . . . . . . . . 40
Sending a message . . . . . . . . . . . . . . . . . . . . . . . . . . . . . . . 42
Getting started with InfoBeam . . . . . . . . . . . . . . . . . . . . . . .43
Registering to use InfoBeam . . . . . . . . . . . . . . . . . . . . . . . . 43
Viewing the InfoBeam services . . . . . . . . . . . . . . . . . . . . . . 44
Using the InfoBeam main menu . . . . . . . . . . . . . . . . . . . . . . 45
Questions and answers . . . . . . . . . . . . . . . . . . . . . . . . . . . .46
Popup, error, and warning messages . . . . . . . . . . . . . . . . .48
Application messages . . . . . . . . . . . . . . . . . . . . . . . . . . . . . . 48
Module messages . . . . . . . . . . . . . . . . . . . . . . . . . . . . . . . . 50
Connection messages . . . . . . . . . . . . . . . . . . . . . . . . . . . . . 51
Retrieval messages . . . . . . . . . . . . . . . . . . . . . . . . . . . . . . . 52
Sending messages . . . . . . . . . . . . . . . . . . . . . . . . . . . . . . . . 53
3

Quick start
Welcome to @ctiveLink two-way messaging. This section gives you an overview
of the steps you take to start using the @ctiveLink wireless messaging module.
If the Handspring Visor
familiarize yourself with it by reading the guides included in the box before you
begin using the @ctiveLink module. Become acquainted with the Handspring
Visor Handheld home screen, and with Handspring Visor Handheld features
such as the address book and Graffiti writing.
The diagram on the facing page shows the @ctiveLink module in the handheld
computer. The diagram identifies @ctiveLink features.
To get started with @ctiveLink
1 Install AAA batteries into the module (see page 8) and charge the @ctiveLink
module backup battery (see page 9).
2 Turn the module on (see page 10).
3 Insert the module into the handheld computer (see page 12). The module
automatically opens the @ctiveLink main screen and checks for stored
messages to transmit.
4 Use the stylus to tap the screen to perform actions such as opening your
two-way messages. Turn to page 7 for an introduction to handling two-way
messages.
Use the stylus to create messages. Refer to the handheld computer guides to
learn how to create text on the screen.
ä Handheld computer is new to you, be sure to
5 Tap the home icon to return to the handheld computer home screen.
4
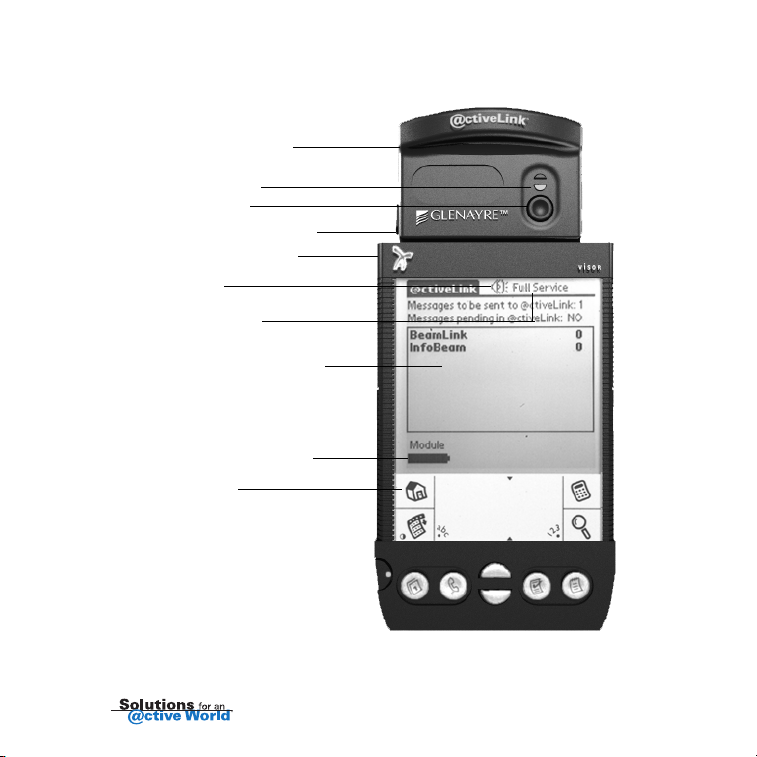
@ctiveLink module
Indicator lights
@ctiveButton
Module release button
Handheld computer
Alert icon
Network status
@ctiveLink main screen
Module battery status
Home icon
5

Using this guide
Use the information in this guide to set up your @ctiveLink module and get
acquainted with its features. Then use your new @ctiveLink module to stay in
touch with your office, your family and friends, and the Internet.
Check the @ctiveLink website at www.glenayre.net/@ctiveLink for updates to
this guide.
You can use your @ctiveLink module to:
• Launch the application manually (see page 16).
• Read and send messages (see pages 31 and 42).
• Check your network coverage (see page 15).
• Respond to message alerts (see page 11).
• Interpret the alerts and indicator lights (see pages11,14, and 15).
Arranging for two-way wireless service
To arrange for two-way wireless service, refer to the Activation Card that is
included in the @ctiveLink package.
Networks may restrict the number of characters they transmit in a message,
which can occasionally cause a message to be truncated. Ask your service
provider about message length restrictions.
Using the Handspring Visor Handheld
Computer
For information on using the Handspring Visor Handheld computer, refer to the
guides that are provided with it.
6

Using
An alert on the @ctiveLink module announces the arrival of new messages. The
alert can be a flashing green indicator light or a tone you can set (see page 21).
When the @ctiveLink module is out of the handheld computer, incoming
messages are stored in the module. The module can store up to 150,000
characters of message text. Outgoing messages are stored in the handheld
computer.
When you insert the module into the handheld computer, stored messages are
immediately and automatically transmitted.
When the module is resident in the handheld computer, incoming and outgoing
messages are immediately transmitted. As the module transmits incoming
messages, the @ctiveLink application routes each one to the associated
@ctiveLink registered application (registered applications are applications that
@ctiveLink recognizes). The @ctiveLink main screen lists each application and
the number of messages that are associated with it.
To view a message
• Tap an application name to open the application screen and see the list of
waiting messages.
• Tap a message to open it.
7
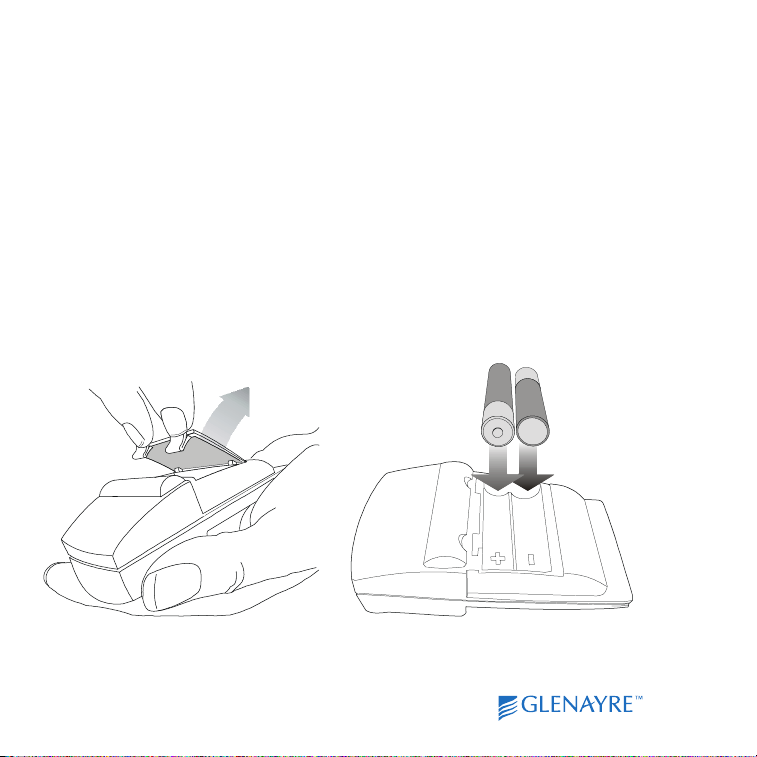
Installing the AAA batteries
1 Put your fingers on the two door latches and pull the door towards you, lifting
it off the module.
2 Put two AAA alkaline batteries into the battery compartment, aligning the +
and - symbols on the batteries with the symbols in the battery compartment.
3 Replace the door.
8

Charging the backup battery
Before you begin to use the @ctiveLink module, you must charge the backup
Ni-Cad battery inside the module.
The Ni-Cad battery maintains module power and protects stored messages if the
AAA batteries’ power becomes too low. The Ni-Cad battery also maintains
module power while you replace the AAA batteries.
To charge the backup battery
1 After you have installed the initial AAA batteries, turn the @ctiveLink module
on (see page 10).
2 Leave the module on for two hours to charge the Ni-Cad battery.
3 When the battery is charged, turn the module off (see page 29).
4 Replace the two AAA batteries with two new batteries.
5 Turn the module on.
The @ctiveLink module is now ready to use.
When the module is in the handheld computer, an AAA battery status icon
appears on the @ctiveLink main screen so that you can monitor AAA battery
power (see page 5).
Note To prolong the life of the battery in the handheld computer, remove the
@ctiveLink module when you are not using it.
Caution Remove the @ctiveLink module from the handheld computer before
you replace the batteries in the handheld. If you try to replace the
batteries with the module in, a “fatal error” occurs and you must reset
the handheld computer as described in the handheld documentation.
9
Turning the module on
We recommend that you always keep the module turned on whether or not it is
in the handheld computer.
• When the module is on, it receives and stores messages.
• When the module is on, inserted in the handheld computer, and within the
Full Service area (page 15), outgoing messages are automatically transmitted
to the wireless network, and incoming messages are transmitted to the
handheld computer.
• When the module is off, it doesn’t receive, send, or store messages. Incoming
messages are stored by your service provider until the module is turned on
again.
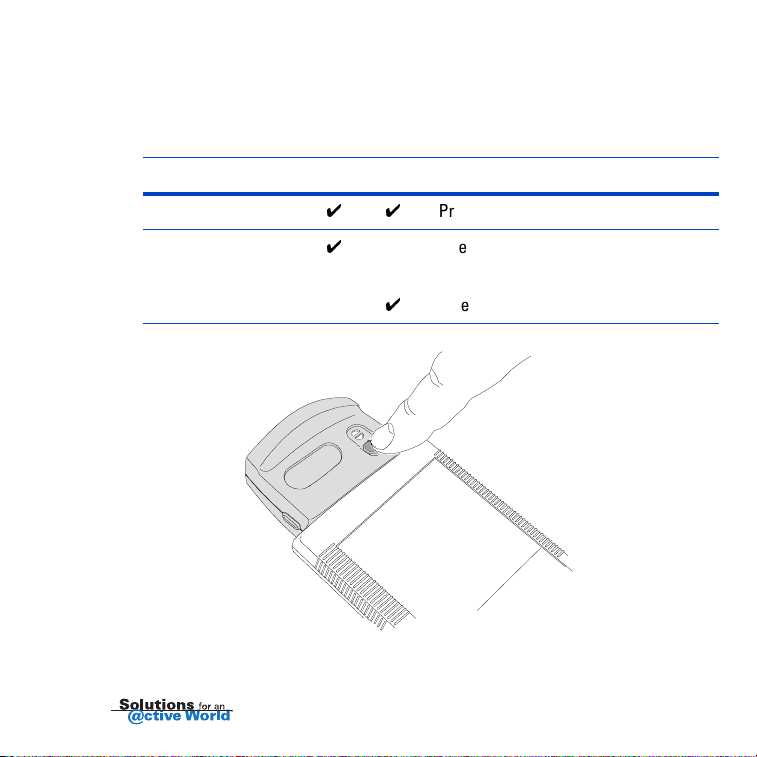
To turn the module on
• Slide the power switch down.
To turn the module
on, slide the switch
down.
10
Responding to message alerts
Once the module is turned on, it receives messages whether it’s in or out of the
handheld computer. When the module is out, it stores incoming messages until
you reinsert it. The following alerts notify you that a message has arrived.
Alert In Out To clear the alert
Sound
Flashing green
indicator light
Press the @ctiveButton.
Open the message on the @ctiveLink
screen.
Insert the module.
To clear audible alerts,
press the @ctiveButton.
11
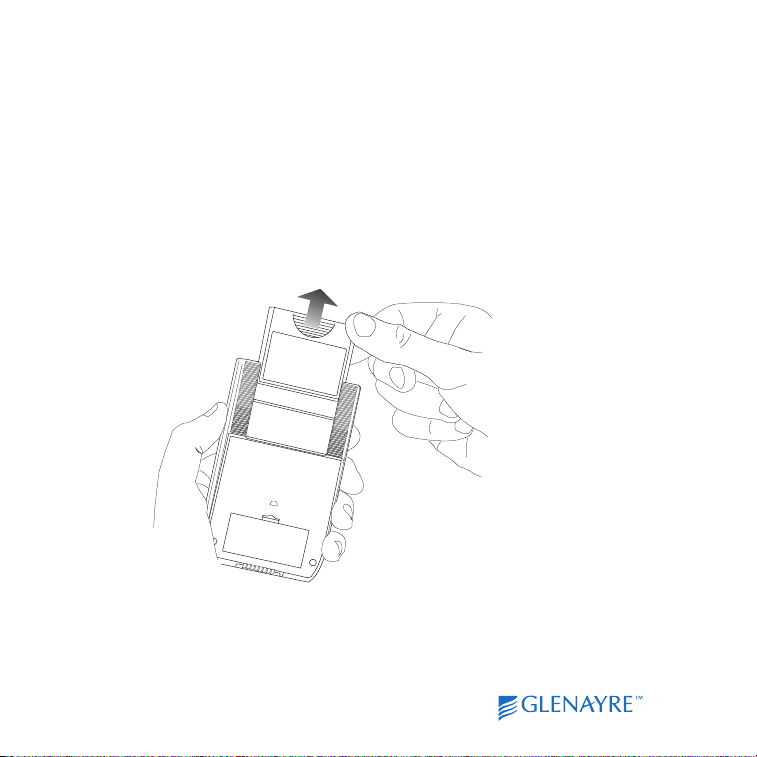
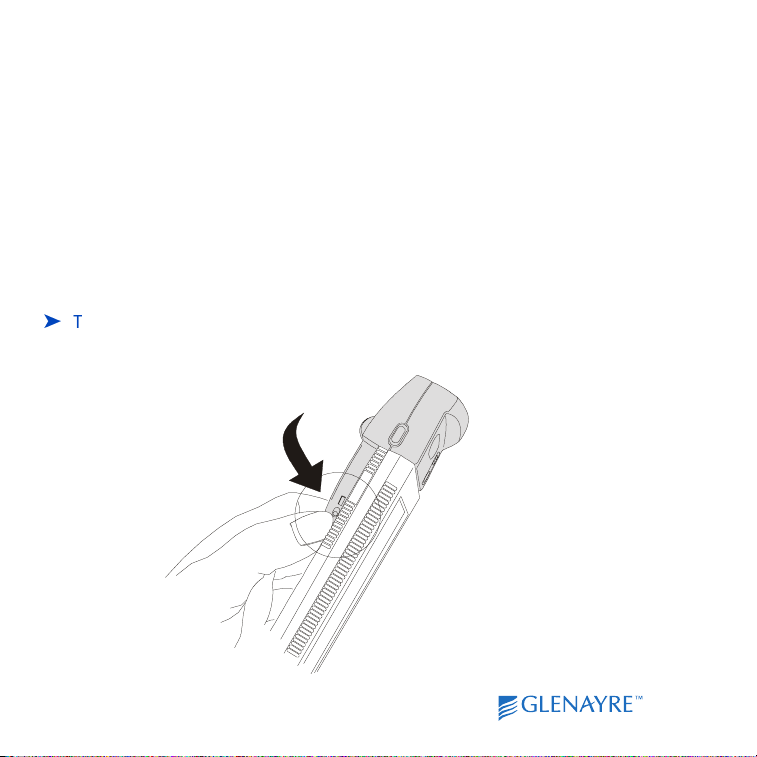
Installing the module
1 Remove the slot protector (or another module that you have been using) from
the handheld.
.
12
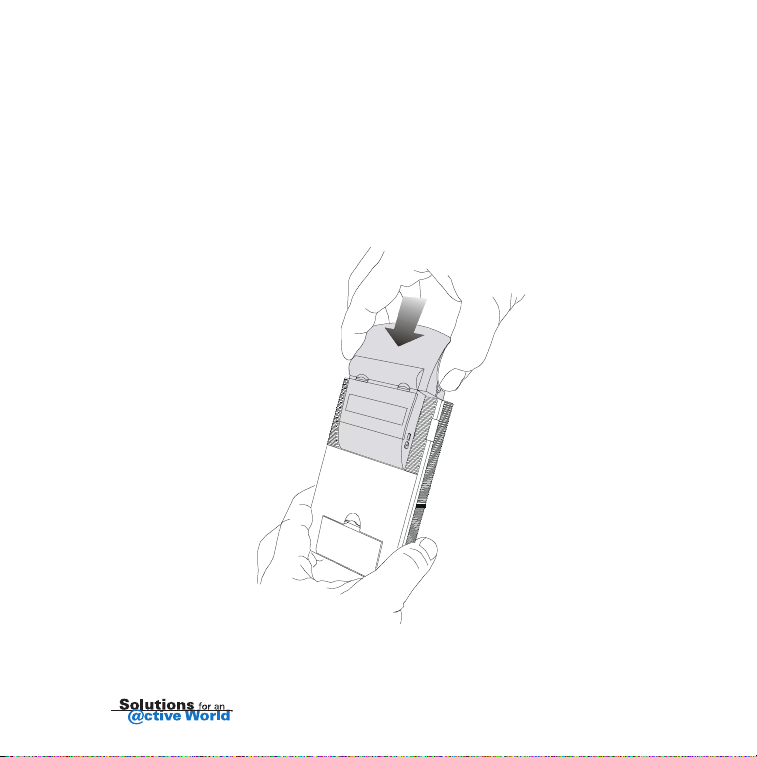
2 Insert the @ctiveLink module into the Springboardä expansion slot until the
connectors are secure. The @ctiveLink application opens automatically
when the module is securely installed.
Note Wait until the handheld computer has completed its initialization before
you insert the module for the first time. If you get a “fatal error” message
because you inserted the module too soon, reset the handheld computer
as described in the documentation that accompanies it.
13

Synchronizing module and handheld computer time
When you insert the @ctiveLink module into the handheld a window pops up
with the message “@ctiveLink and Visor times are different. Update @ctiveLink
time to hh:mm nm?”( n represents a or p as in am or pm) if the module time is
different from the handheld computer time by more than 15 minutes.
• Tap Yes to synchronize module time and handheld computer time.
• Tap No to maintain a different time in the module.
Reading the module indicator lights
The module displays the red and green indicator lights described in the following
table. Additional indicators advise you of the status of your network connection
when you press and hold the @ctiveButton (see pages 5 and 15).
Indicator light What it means
Short flashing green The module is on.
Fast flashing green A new message has arrived.
Flashing red There’s a problem; check for an error message on
the @ctiveLink screen.
14

Checking your network coverage status
The @ctiveLink module keeps you informed of the status of your connection to
your service provider’s network. The network coverage statuses are:
Full Service: You can send and receive messages.
Basic Service: You can receive messages, but not send them.
Storing: The network is not available, and messages are being stored.
To check your network coverage status with the module in the handheld
• Launch the @ctiveLink application, and then read the network status
message on the status bar at the top of the screen (see page 5).
To check your network coverage status with the module out of the handheld
• Press and hold the @ctiveButton to display the network coverage status
indicator lights. The following table defines the indicator lights:
Indicator light What it means
Steady green You have full network service. You can send and
receive messages.
Steady red and green You can only receive messages. Sending service is
temporarily interrupted.
Steady red You are out of network range. You cannot send or
receive communications. The network is storing
your incoming messages, and the @ctiveLink is
storing outgoing messages.
15

Installing the two-way applications
Installing the @ctiveLink module the first time automatically installs:
• @ctiveLink application. Use the @ctiveLink application to manage your
two-way messages. The @ctiveLink application remains in the handheld
computer when the module is removed.
Installing the @ctiveLink module also installs:
• BeamLink
messages. The BeamLink application also remains in the handheld computer
when the module is removed.
• InfoBeam
from the Internet about sports, the stock market, weather, and more. The
InfoBeam application is automatically removed from the handheld computer
when the @ctiveLink module is removed, and is reinstalled when the module
is reinserted.
ä application. Use BeamLink to compose, read, and send two-way
ä application. Use InfoBeam to request and receive information
Launching the application
The @ctiveLink application launches automatically when you insert the module
into the handheld computer.
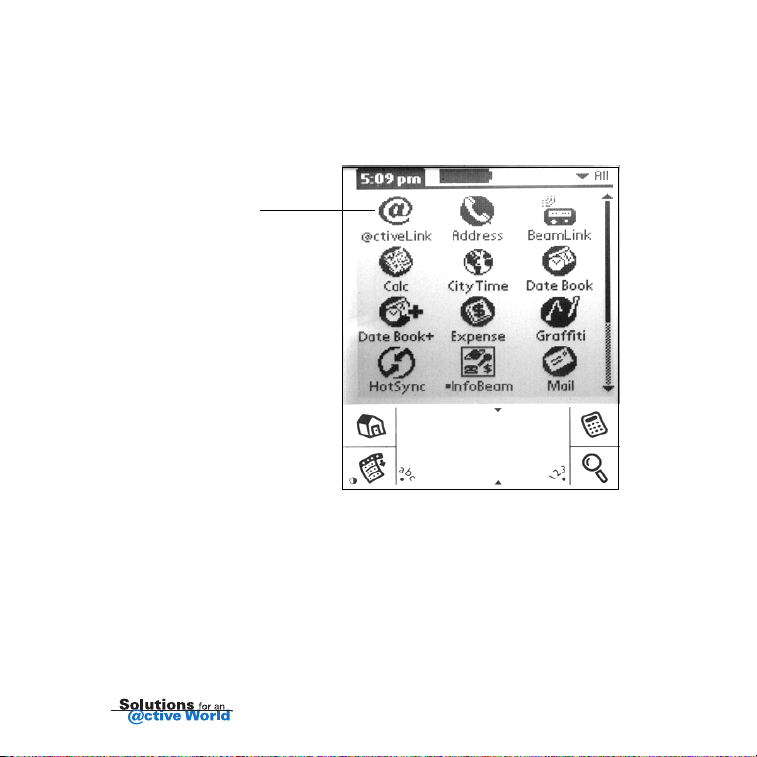
You can launch the @ctiveLink application manually by:
• Pressing the @ctiveButton when the module is in the handheld computer
(see page 5).
• Tapping the @ctiveLink icon on the home screen (see the facing page).
As @ctiveLink is launching, it checks for any unread messages in the module
and automatically lists them on the screen with their associated applications.
16
@ctiveLink also transfers any waiting outgoing messages to the module for
transmission to the network.
Handheld computer home screen
@ctiveLink icon
17
 Loading...