

Page 1
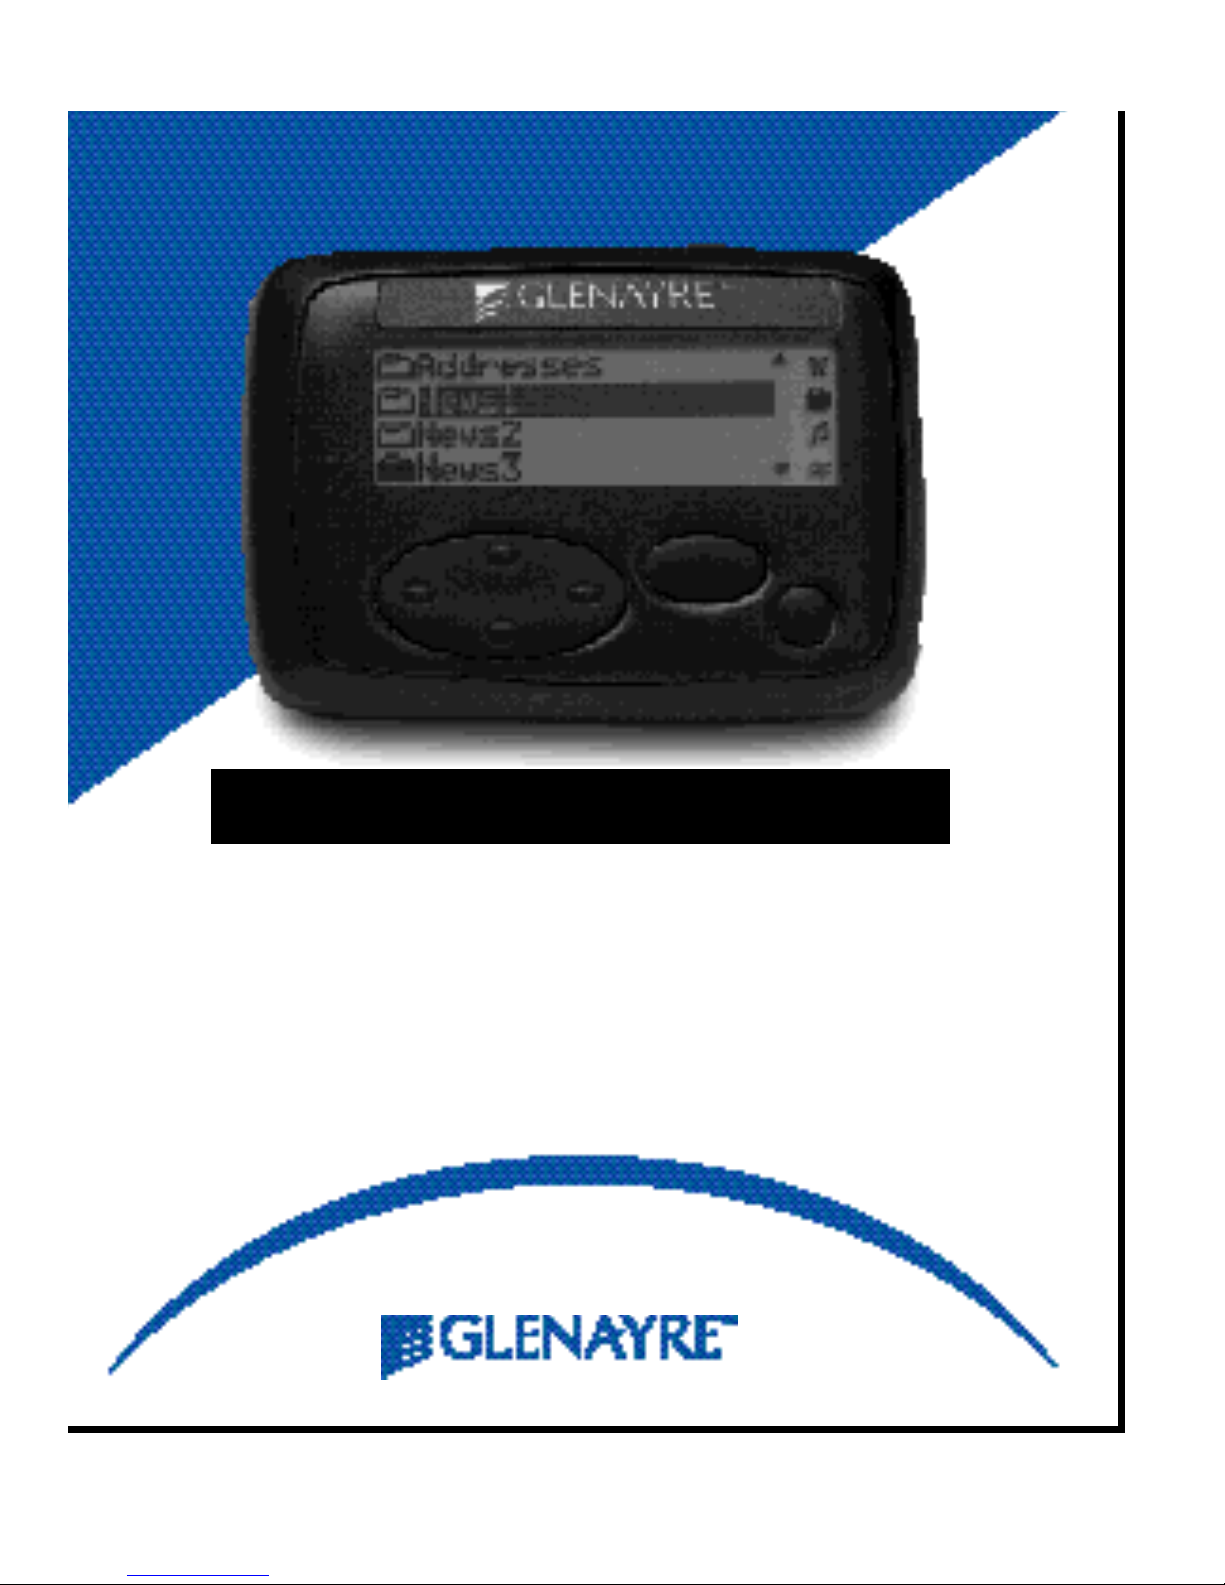
Using Your AccessLink II™ 2-Way Pager
Congratulations on your purchase of the Glenayre
AccessLink II advanced messaging, two-way pager!
The AccessLink II is simple to use and provides
exciting new messaging capabilities.
Page 2
Vi rtual Keyboard Quick Refere n c e
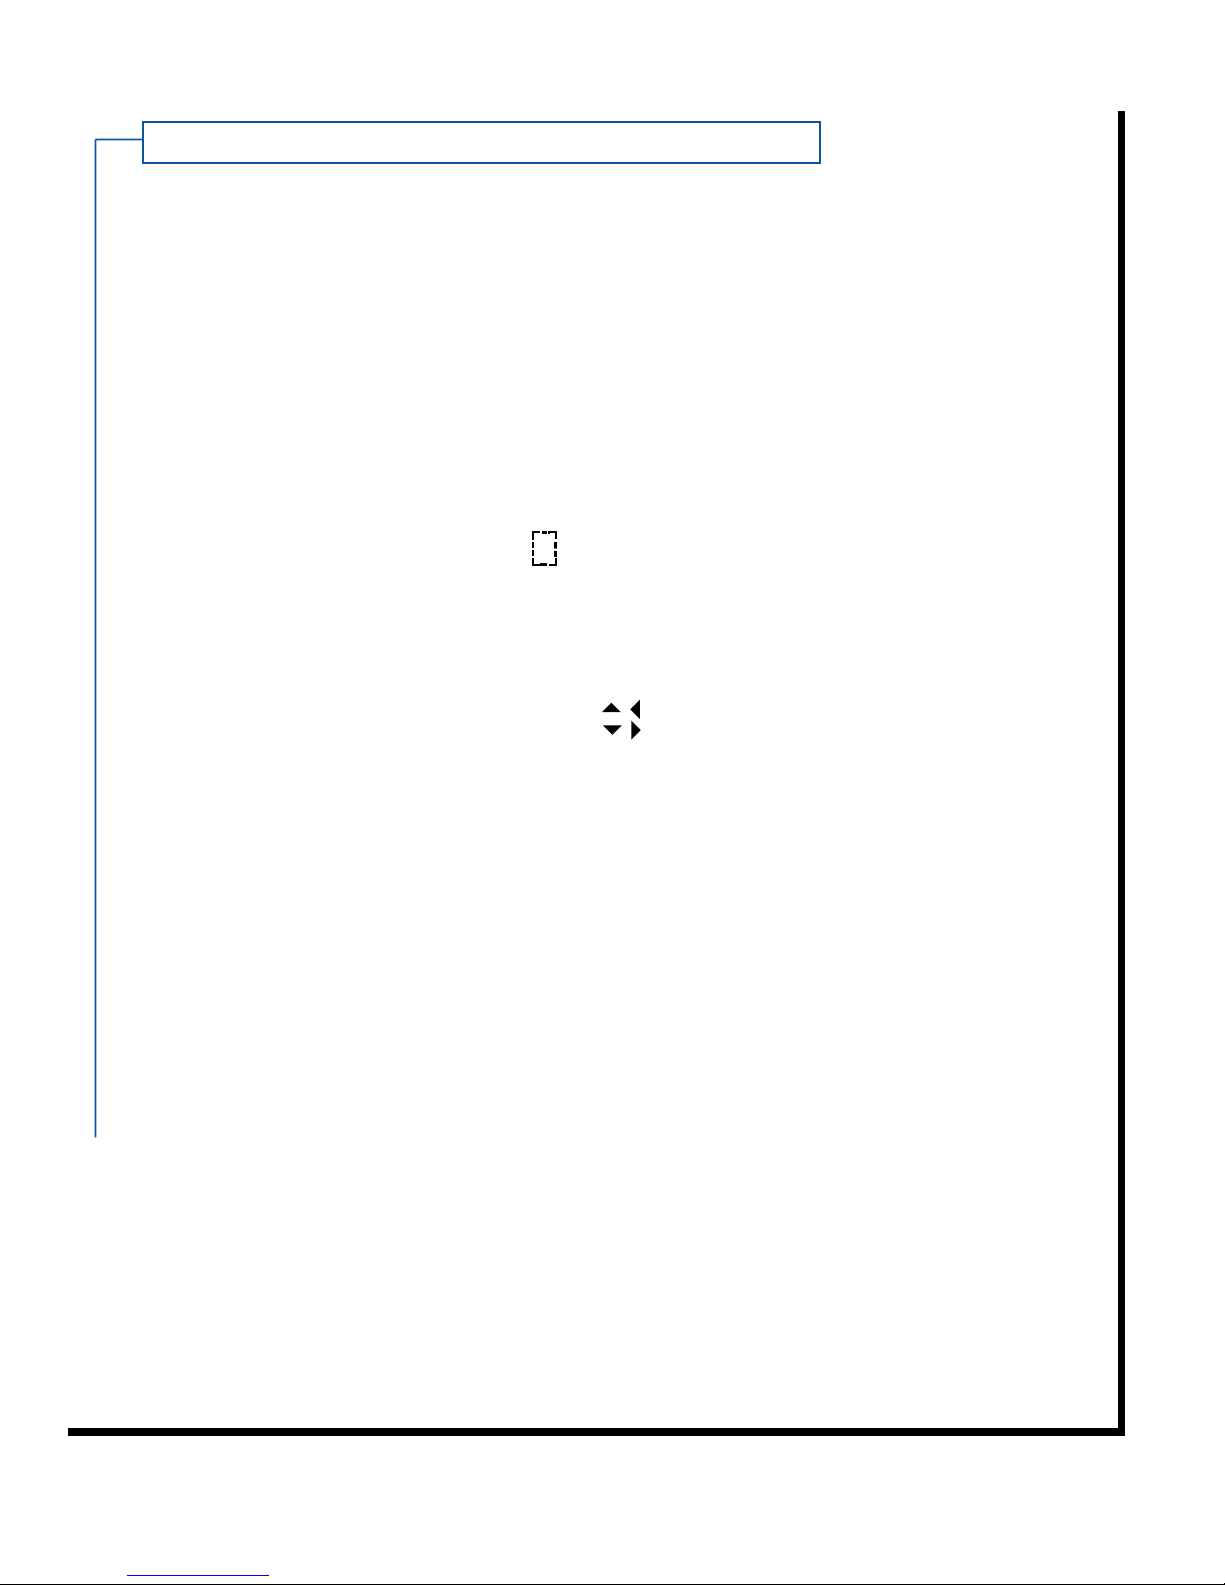
THE VIRTUAL KEYBOARD The AccessLink II has a virtual keyboard to allow you
to enter messages and other information. Since this keyboard is created
entirely in software, your two-way pager can be a small as a one-way pager.
You will use this keyboard often to enter messages or other information.
Refer to this page whenever you need a quick reminder about how to use
the virtual keyboard.
• To "type" letters, use the "Up/Down" and "Left/Right Scroll" buttons
to select the appropriate letter and then press the "Enter" button.
• To delete a character, select and press the "Enter" button.
• To type a space, select one of the blank characters, for example the one
before the "a" and press the "Enter" button.
• To back-up or skip forward, select and press the "Enter" button.
• To shift, scroll to the bottom of the display, select SHIFT, and press the
"Enter" button.
• To use all capitals, scroll to the bottom of the display, select CAPS, and
press the "Enter" button.
• Once you are finished entering a message or other type of information
scroll to the bottom of the page, select DONE, and press the "Enter"
button. You may exit the editor screen at any time by pressing the
"Exit/Backlight" button twice. Any work you have started will be saved
in the TOSEND folder when you exit the editor.
2
x
Page 3
3
AccessLink II Overv i e w
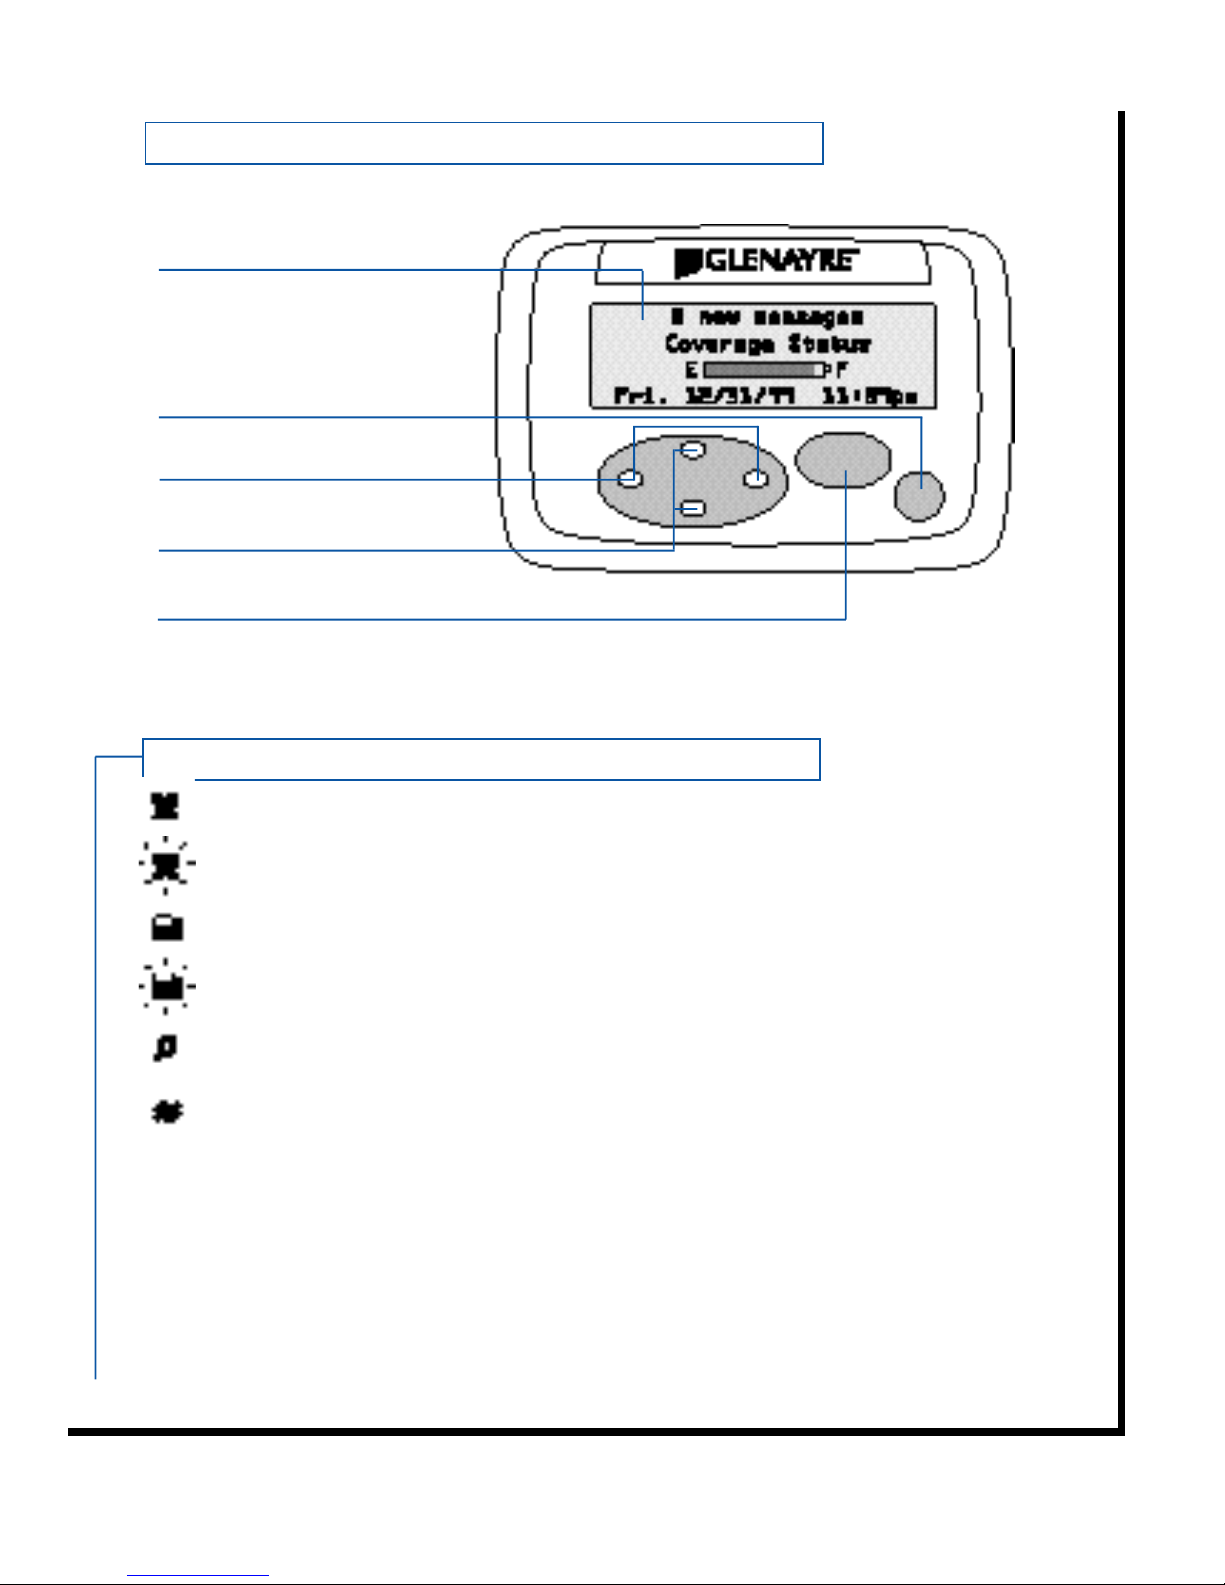
Home Screen
“Exit/Backlight” Button:
Use to Exit from
any screen
“Left/Right Scroll” Buttons
“Up/Down Scroll” Buttons
“Enter” Button
Alarm Clock enabled
Alarm sounded and still enabled
New Messages in Information Services Folders
New Messages in RECEIVED Folder
RECEIVED message audible alert enabled
RECEIVED message vibrate alert enabled
Message Icons
Unread message
Read message
Successful send or reply
Unsuccessful send or reply
Reply Pending
Icon Quick Reference Guide
Page 4

Virtual Keyboard Quick Reference . . . . . . . . . . . . . . . . . .2
AccessLink II Overview . . . . . . . . . . . . . . . . . . . . . . . . . . .3
Icon Guide . . . . . . . . . . . . . . . . . . . . . . . . . . . . . . . . . . . . .3
Pager Organization . . . . . . . . . . . . . . . . . . . . . . . . . . . . . .5
Quick Start . . . . . . . . . . . . . . . . . . . . . . . . . . . . . . . . . . . .6-7
Inserting/Replacing the Battery . . . . . . . . . . . . . . . . . . . .8
Receiving Messages . . . . . . . . . . . . . . . . . . . . . . . . . . . . .9
Reading Messages . . . . . . . . . . . . . . . . . . . . . . . . . . .10-12
Deleting Messages . . . . . . . . . . . . . . . . . . . . . . . . . . . . .13
Creating an Address . . . . . . . . . . . . . . . . . . . . . . . . . .14-15
Creating Messages . . . . . . . . . . . . . . . . . . . . . . . . . . . . .16
Sending Messages . . . . . . . . . . . . . . . . . . . . . . . . . . . . .17
Disabling Information Services . . . . . . . . . . . . . . . . . . .18
Setting Your Alerts . . . . . . . . . . . . . . . . . . . . . . . . . . .19-20
Getting a Good Night's Sleep . . . . . . . . . . . . . . . . . . . . .21
Waking Up (Setting Your Alarm Clock) . . . . . . . . . . . . .22
Miscellaneous Settings . . . . . . . . . . . . . . . . . . . . . . .23-27
Turning On the Backlight . . . . . . . . . . . . . . . . . . . . . . . .28
Operating in Hospitals and Planes . . . . . . . . . . . . . . . . .28
Communicating Using the IR Port . . . . . . . . . . . . . . . . .29
IR Port Diagram . . . . . . . . . . . . . . . . . . . . . . . . . . . . . . . .30
Viewing Status Information . . . . . . . . . . . . . . . . . . . . . . .31
Table of Contents
CONGRATULATIONS To get the most out of your new advanced messaging,
two-way pager, spend a little time reading this user guide and be sure to give
your pager's number to business colleagues and friends. Family members will
also appreciate being able to reach you easily. For information on available
services, please see the service instructions provided by your paging carrier.
Page 5
5
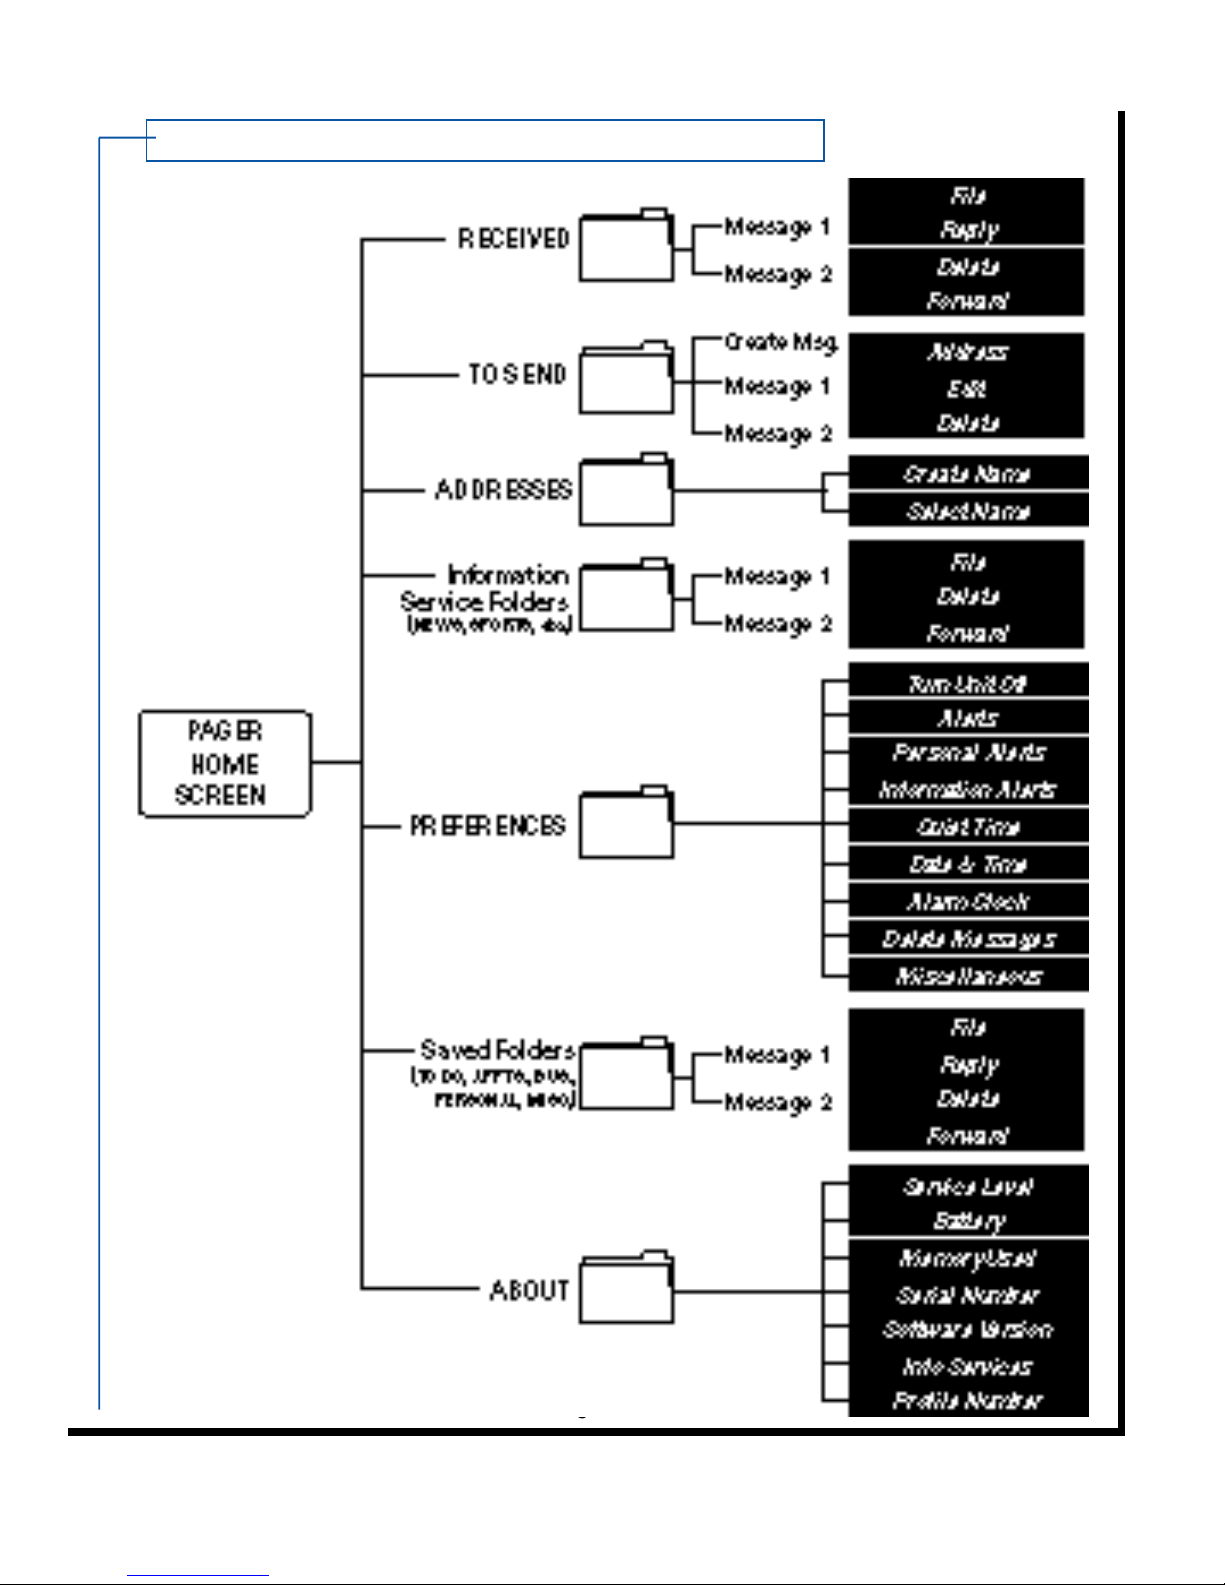
Pager Org a n i z a t i o n
Page 6
Quick Start
TURNON ACCESSLINK II PAGER
Your pager enters a “sleep” mode to conserve battery life when it is not
in use. It “wakes up” when you press the “Enter” button or receive a
new message. Turn on your pager by pressing the oval “Enter” button.
(If unit does not turn on, see “Inserting/Replacing Battery” section on page 8.)
SETTHE TIME AND DATE
• From the home screen, press the “Enter” button to enter the folder list.
• Scroll down to the PREFERENCES folder by pressing the “Down Scroll”
button. Press the “Enter” button to enter the folder.
• Scroll down to DATE & TIME and press the “Enter” button.
• Adjust the date by pressing the “Up/Down Scroll” buttons to change
the month, then pressing the “Right Scroll” button to set the day and
the year.
• Press the “Right Scroll” button to set the time and AM/PM, and then
press the “Enter” button to save your changes and exit the screen.
SET ALERTS
• Within the PREFERENCES folder, scroll to PERSONAL ALERTS and
press the “Enter” button.
• Set PERSONAL ALERTS options by scrolling to the item of interest and
using the “Enter” button to select your desired setting. For TONES,
you can sample each sound by pressing the “Enter” button.
• Press the “Exit” button to save your settings and exit the PERSONAL
ALERTS screen. For more detailed information on your alert options,
see the “Setting Your Alerts” section on page 19-20.
(Continued on next page.)
6
1
2
3
Page 7

Quick Start Cont.
SET UP YOUR SENDER ID
The Sender ID is a name or other text that will be attached to the end of every
message you send to identify you to the message recipient.
To set up your Sender ID:
• Within the PREFERENCES folder, scroll down to MISCELLANEOUS and
press the "Enter" button.
• Scroll down to SENDER ID and press the "Enter" button.
• Enter your desired Sender ID using the virtual keyboard. See the "Virtual
Keyboard Quick Reference" section on page 2 for further details.
• After you have entered your Sender ID, scroll down to DONE and press
the "Enter" button. Press the "Exit/Backlight" button to save your
changes and exit the MISCELLANEOUS folder.
Congratulations! You‘re now ready to start sending and receiving messages!
7
4
Page 8
8
I n s e rting/Replacing the Battery
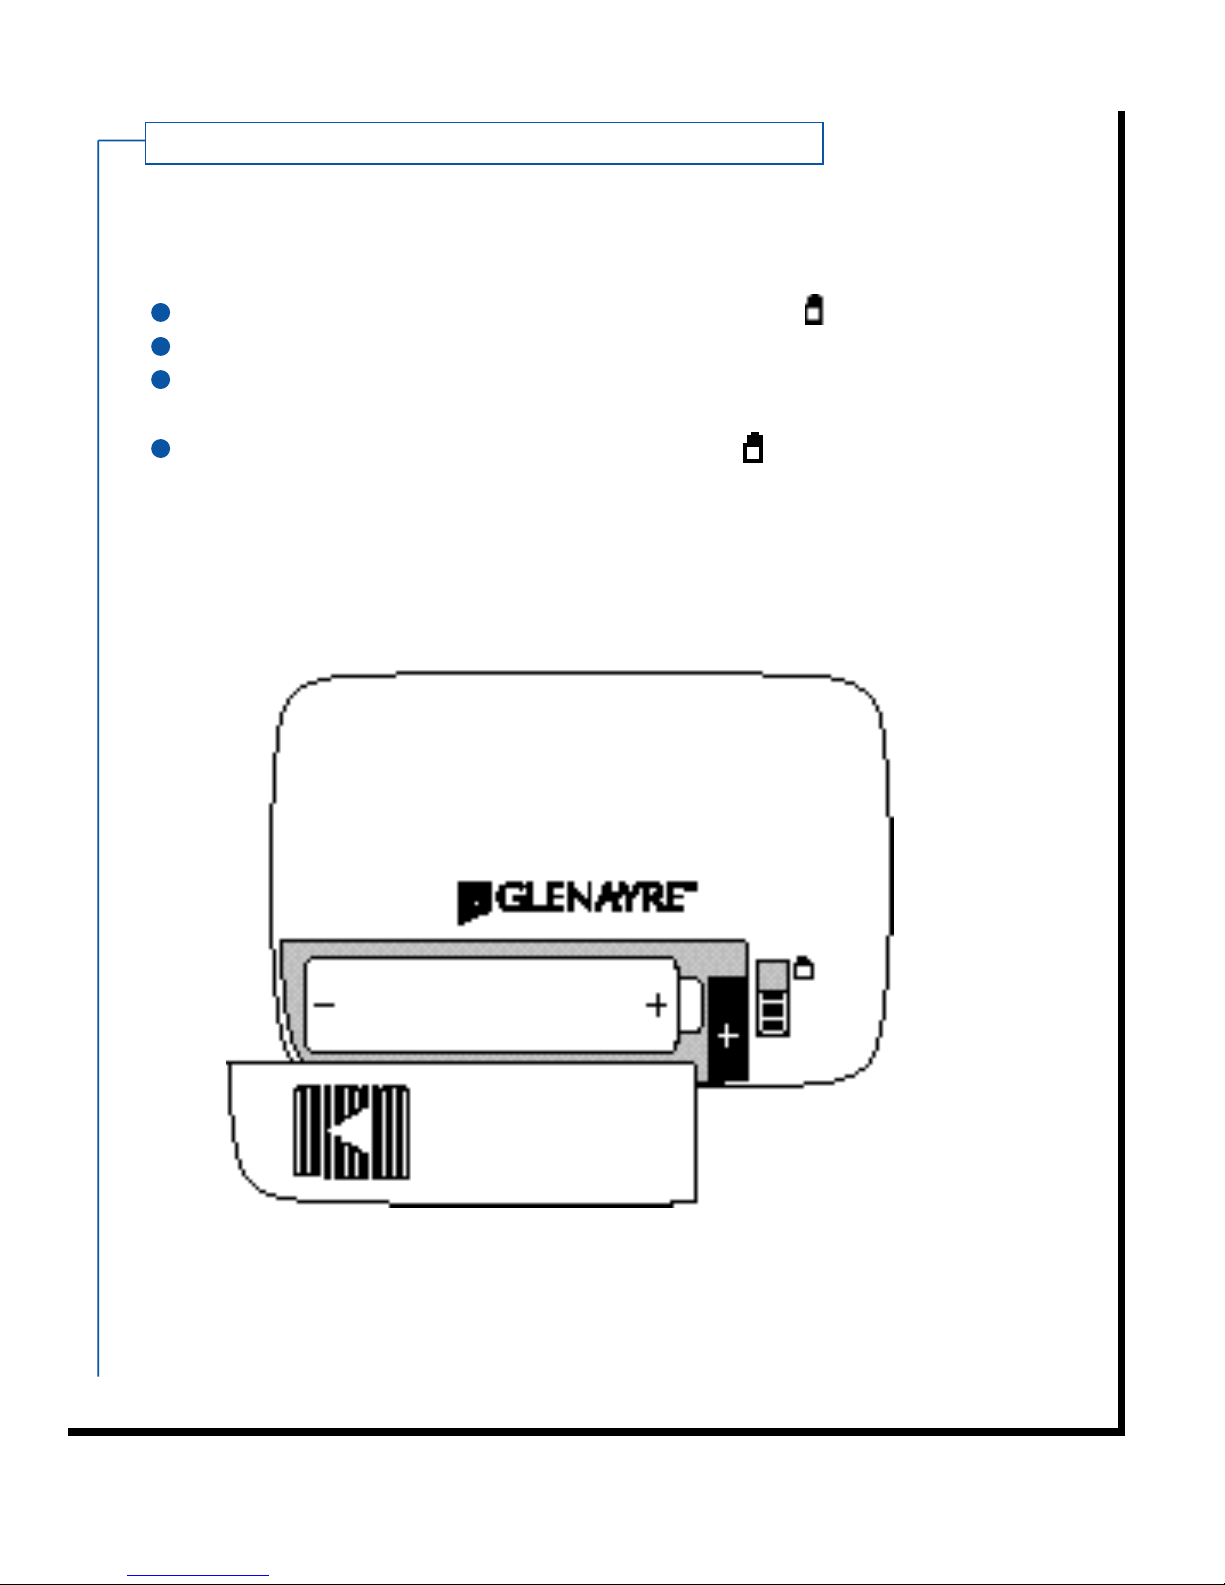
Your AccessLink II pager uses a single AA alkaline battery.
To insert or replace the battery:
Slide the lock on the back of the pager away from the symbol.
Slide the battery door to the left to open.
Insert a new battery being careful to align the + and - symbols on the
battery with the same symbols inside the battery compartment.
Replace the door and slide the lock towards the symbol to secure.
Note: If you have a lot of messages in your AccessLink II, you may
experience a short delay as the pager restarts itself after the
new battery has been inserted. The pager will beep once after it
is fully operational.
CAUTION: Be careful to align the + and - symbols on the battery with those
inside the battery compartment. Inserting the battery backwards will cause
the date and time setting in your AccessLink II pager to be lost. All messages
will be preserved, however.
1
2
3
4
Page 9

Receiving Messages
• Your AccessLink II pager helps you organize your communications by
placing messages directly into folders such as RECEIVED for personal
messages and information service folders (NEWS, SPORTS, etc.)
for news messages. Exact folder names may vary depending on
your service provider.
• When you receive a new message, your AccessLink II pager vibrates
and/or plays your selected tone.
• The icon is displayed whenever you receive a new message.
If it is solid, you have new information service messages. If it is
flashing, you have new personal messages.
• The top line of the home screen also displays the number of new
messages you have.
• Finally, your ability to receive messages varies depending on the
terrain, weather, building density, and interference around you.
Your pager home screen will report your current service level.
For a description of your service level, please see the service
instructions provided by your paging carrier.
9
Page 10
Reading Messages
TO READ A MESSAGE
From the home screen, view the folder list by pressing the “Enter” button.
Select the desired folder using the “Up/Down Scroll” buttons and open it
by pressing the “Enter” button.
Select the desired message using the “Up/Down Scroll” buttons and read
the message by pressing the “Enter” button. You can scroll through the
message using the “Up/Down Scroll” buttons or the “Enter” button.
While reading a message, you can quickly move to other messages in the
same folder.
• To jump to the beginning of the next message in the folder, press the
"Right Scroll" button.
• To jump to the beginning of the previous message in the folder, press
the "Left Scroll" button.
• You can also jump to the beginning of the next or previous message by
pressing the "Right/Left Scroll" buttons when the navigational symbol
(<<•>>) at the end of the message is highlighted.
Several message options appear at the end of each message. Use the “Enter”
button to select the desired option.
Note: If a given option appears with a line through it, that option is not
available for the message you are currently reading.
FILE
To file the message in another folder, select FILE from the message option list
and press the “Enter” button. Use the “Up/Down Scroll” buttons to select the
folder you wish to move the message to and press the “Enter” button. The
message will be stored in the folder you have chosen. Unlike messages in
the RECEIVED, TO SEND, and information service folders, messages filed in
the TO DO, APPTS, BUSINESS, PERSONAL, and MISC folders will never be
deleted by the pager to make room for new messages.
(Continued on next page.)
10
1
2
3
4
Page 11

To remove a message once it has been filed, you must read it and select the
DEL message option. You can also delete many saved messages at the same
time. See the “Deleting Messages” section on page 13 for details.
REPLY
You can reply to a message using a pre-programmed standard reply, a reply
you have previously sent or a fully custom reply.
To reply:
Select REPLY from the message option list and press the “Enter” button.
• To send a standard reply, select your desired reply from the list
and press the “Enter” button.
• To send a previously sent reply, scroll down the list of replies until you
find the reply you want. Press the “Enter” button to select the reply.
• To create a custom reply, select “Custom Reply” from the list. Create
your reply using the virtual keyboard. See the “Virtual Keyboard Quick
Reference” section on page 2 for details regarding how to use the
virtual keyboard. When you have finished entering your reply, scroll
down to DONE and press the “Enter” button.
The SEND option will now be highlighted. To send the reply, press the
“Enter” button. To edit the reply, select EDIT by first pressing the “Right
Scroll” button and then pressing the “Enter” button.
After you send your reply, the display will change to REPLYING as your reply is
transmitted. If other messages are currently being sent, your display will show
PENDING indicating your reply will be sent as soon as possible.
(Continued on next page.)
1
2
11
Reading Messages Cont.
Page 12
Reading Messages Cont.
DELETE
To delete a message:
Select DEL from the message option list and press the “Enter” button.
If your pager has been configured to confirm deletions, you will be asked
to confirm that you want to delete the message. Select OK and press the
“Enter” button. See the “Miscellaneous Settings, Confirm Deletes” section
on page 26 for more details about how to configure this option.
FORWARD
The AccessLink II allows you to forward a message to one or more people.
To forward a message:
Select FORWD from the message option list and press the “Enter” button.
You will be given the option to address the message, edit the message,
or cancel forwarding. Select the appropriate choice and press the
“Enter” button.
For details on addressing and sending the message, see the “Sending
Messages” section on page 17. For details on using the virtual keyboard
to edit the message, see the “Virtual Keyboard Quick Reference” section
on page 2.
12
1
2
1
2
Page 13
Deleting Messages
As explained in the “Reading Messages” section on page 10-12, you can
delete any individual message by reading it, selecting DEL, and pressing the
“Enter” button.
You may also delete all the messages in a given folder at one time.
To delete messages:
Select PREFERENCES from the main folder menu and press the
“Enter” button.
Scroll down to DELETE MESSAGES and press the “Enter” button.
Select the folder from which you want to delete messages and press the
“Enter” button.
Select your preferred option of DELETE READ MESSAGES or DELETE ALL
MESSAGES and press the “Enter” button.
IMPORTANT: Before you have completed step 4, you can always cancel the
delete operation by pressing the ”Exit/Backlight” button.
Messages inside the RECEIVED, TO SEND,and information service folders
will automatically be deleted to make room for new messages once the folder
is full. This saves you the trouble of having to individually delete information
service messages.
13
1
2
3
4
Page 14
C reating an Addre s s
CREATING AN ADDRESS
Your AccessLink II contains a personal address book for storing the names,
two-way PINs, phone numbers, etc of the people you need to contact.
To Create an Address:
Select ADDRESSES from the folder list and press the "Enter" button.
Select CREATE NAME and press the "Enter" button.
You will be prompted to enter the name of the person. Enter the name
using the virtual keyboard as described in the "Virtual Keyboard Quick
Reference"section on page 2.
When have finished typing the name of the person, scroll to the bottom of
the display, select DONE, and press the "Enter" button.
Select the address type you would like to enter for the person and press
the "Enter" button. Choices of address types may vary depending on your
service provider, but typically include 2-WAY PIN, 1-WAY PIN, EMAIL
ADDRESS, PHONE NUMBER, and FAX NUMBER.
Repeat steps 3 and 4 above to enter each desired address type. Note you
may enter multiple PINs and phone/fax numbers for a given individual.
When you have finished entering all required information, press
the "Exit/Backlight" button to save your information and exit the
ADDRESSES folder.
(Continued on next page.)
14
3
4
5
6
7
1
2
Page 15
EDITINGAN ADDRESS
To edit an address book entry:
Select ADDRESSES from the folder list and press the "Enter" button.
Select the address entry you would like to edit and press the "Enter" button.
Select the address type you would like to change and press the "Enter"
button. To edit the name of the person, press the "Up Scroll" button to
select the name and press the "Enter" button.
Select EDIT and press the "Enter" button.
Modify the entry as desired using the instructions found in the "Virtual
Keyboard Quick Reference" section on page 2.
When you have finished editing, scroll down to the bottom of the display,
select DONE, and press the "Enter" button.
DELETINGAN ADDRESS
To delete all or part of an address book entry:
Select ADDRESSES from the folder list and press the "Enter" button.
Select the entry you would like to fully or partially delete and press the
"Enter" button.
Select the address type you would like to delete and press the"Enter"
button. To delete the name and all associated address types, press the
"Up Scroll" button to select the name and press the "Enter" button.
Select DELETE and press the "Enter" button.
If you have enabled confirmation of deletions in the PREFERENCES folder,
you will be asked to confirm that you want to delete the information.
Select OK and press the "Enter" button.
C reating an Address Cont.
15
1
2
3
4
5
1
2
3
4
5
6
Page 16
C reating Messages
One of the most exciting features of the AccessLink II is your ability to create
custom messages right on the pager.
To create a message:
Select the TO SEND folder from the folder list and press the "Enter" button.
Select CREATE MESSAGE and press the "Enter" button.
Enter your message using the instructions found in the "Virtual Keyboard
Quick Reference" section on page 2.
When you have finished entering your message, scroll down to the bottom
of the display, select DONE, and press the "Enter" button.
You will be given the choice to either ADDRESS the message for sending,
EDIT the message further or DELETE the message. Select the appropriate
choice and press the "Enter" button.
Congratulations! You have now created a message right on your pager.
To address and send the message, please see the "Sending Messages"
section on page 17.
You also have the choice of sending previously sent messages or
pre-programmed standard messages. These messages all appear in the
TO SEND folder and can be sent directly or edited first and then sent.
16
1
2
3
4
5
Page 17
17
Sending Messages
You may send a message to one individual or to a group of up to 25 individuals.
To address and send your message:
After creating your message or re p l y, select ADDRESS and press the "Enter" button.
You will be presented with the list of names in your address book. If the
recipient of the message is not in your address book, select "CREATE NAME"
and press the "Enter" button. Enter the person's name and address using the
method described in the "Creating an Address" section on page 14-15.
Select the name of the person to whom you wish to send the message and
press the "Enter" button.
Select the address type where you want to send the message. This could be
a 1-way PIN, a 2-way PIN or an email address. Press the "Enter" button.
• To send the message to only this one individual, select SEND and press
the "Enter" button.
• To send the message to a group of people, select MORE and press the
"Enter" button to add names to list of recipients. Repeat this process
until the list contains the names of all the people you wish to receive
the message, then select SEND and press the "Enter" button to send
the message. You may add up to twenty-five people to the list.
• To delete a name from the list, select DEL and press the "Enter" button.
Select the name you wish to delete and press the“Enter” button.
• To cancel sending the message altogether, select CANCEL and press
the "Enter" button.
1
2
3
4
Page 18
Disabling Information Serv i c e s
Your AccessLink II may be programmed to receive one or more information
service feeds from your service provider. You may disable and re-enable
these services from your pager. Please note that if you receive multiple
services in a single folder, they will all be turned ON or OFF at the same time.
To disable or re-enable information service messages in a given folder:
Select PREFERENCES from the folder list and press the "Enter" button.
Select INFORMATION ALERTS and press the "Enter" button.
Select the name of the information service folder and press the
"Enter" button.
Select SERVICE and change the setting to DISABLED or ENABLED by
pressing the "Enter" button.
Press the "Exit/Backlight" button to save your changes and exit the screen.
Follow the steps above to enable or disable other information services
as desired.
18
1
2
3
4
5
Page 19
Setting Your Alert s
Your AccessLink II pager allows you to set different alerts for different types of
messages. You can also control all alerts with a single setting.
CONTROLLING ALL ALERTS
This setting allows you to quickly turn all alerts on, off, or to a setting called
”vibrate only.“ The “vibrate only” setting substitutes a vibrate alert for audible
personal and information service alerts.
To change this alert setting:
Select PREFERENCES from the folder list and press the “Enter” button.
Select ALERTS and press the “Enter” button to change the setting for
this option.
When your desired option is shown simply scroll down to a new option or
press the “Exit/Backlight” button to save your change and exit the screen.
Your new setting will be in effect immediately.
PERSONAL MESSAGE ALERTS
This setting allows you to choose a specific alert for your personal messages.
To choose your alert:
Select PREFERENCES from the folder list and press the “Enter” button.
Select PERSONAL ALERTS and press the “Enter” button.
Turn the vibrate alert ON or OFF by selecting VIBRATE and pressing the
“Enter” button to change the value.
Select the audible alert you prefer by selecting TONE and pressing the
“Enter” button. Make your choice by scrolling up and down the list of
possible alerts. You can sample each alert by pressing the “Enter” button.
To set your alert, highlight it and press the “Exit/Backlight” button.
(Continued on next page.)
19
2
3
1
2
3
4
1
Page 20
Setting Your Alerts Cont.
You can configure your AccessLink II to remind you when you have unread
messages. To set this reminder, first scroll down to RE-BEEP EVERY and
press the “Enter” button to set the interval of the reminder alert.
Next, scroll down to RE-BEEP and press the “Enter” button to set the
total number of realerts you want to receive.
If you want to be notified when you receive a corrected version of an old
message, select CORRECTIONALERT and press the “Enter” button. At the
prompt, select YES and press the “Enter” button.
Press the “Exit/Backlight” button to save your changes and return to the
PREFERENCES folder.
INFORMATION SERVICE ALERTS
Your AccessLink II pager also allows you to select a different alert for each
information service folder.
To do this:
Select PREFERENCES from the folder list and press the “Enter” button.
Select INFORMATION ALERTS and press the “Enter” button.
Select the name of the information service folder and press the
“Enter” button.
Follow steps 3 and 4 in the personal message alerts section above
to customize the alerts for the selected folder.
20
1
2
3
4
7
6
5
Page 21
21
Getting a Good Night’s Sleep
To make sure you can sleep through the night, your AccessLink II pager
allows you to set a period of time each day during which alerts will not sound.
This period is called Quiet Time. During Quiet Time you still receive messages
and your alarm clock still sounds, but message alerts are not played.
To set your Quiet Time:
Select the PREFERENCES folder from the folder list and press the
“Enter” button.
Select QUIET TIME and press the “Enter” button.
To set the quiet time interval select TIME and press the “Enter” button.
Use the “Up/Down Scroll” buttons to change the hours or minutes.
Press the “Right/Left Scroll” buttons after each selection. Press the
“Enter” button or the “Exit/Backlight” button to save your changes and
exit the screen.
To enable the Quiet Time feature select ENABLE and press the “Enter”
button. Select YES and press the “Enter” button to confirm.
Note: You will not be able to enable the Quiet Time feature if you
have not set up a time interval.
To have the pager notify you at the end of Quiet Time if it has received
new messages, select ALERT AT ON TIME and press the “Enter” button.
At the confirm screen select YES, ALERT and press the “Enter” button.
Press the “Exit/Backlight” button to save your changes and return to the
PREFERENCES folder.
1
2
3
4
5
6
Page 22
22
Waking Up (Setting Your Alarm Clock)
When enabled, the alarm clock will sound an alert at a specified time every
day. It also has a SNOOZE function that will re-alert you every ten minutes
for an hour or until you manually exit the SNOOZE mode by pressing the
“Enter” button.
To set your alarm clock:
Select PREFERENCES from the folder list and press the “Enter” button.
Select ALARM CLOCK and press the “Enter” button.
Enter your desired settings using the same method used to set options for
Quiet Time.
Press the “Exit/Backlight” button to save your settings and return to the
PREFERENCES folder.
1
2
3
4
Page 23
Miscellaneous Settings
The MISCELLANEOUS section within the PREFERENCES folder allows you to
customize many settings including display contrast, button response speed,
and a Sender ID that will be attached to all the messages you send.
Descriptions of all the available options are provided below.
To access any of the miscellaneous settings, navigate to the MISCELLANEOUS
folder using these steps:
Select PREFERENCES from the folder list and press the "Enter" button.
Scroll down to MISCELLANEOUS and press the "Enter" button.
CONTRAST
Contrast controls the darkness of the letters displayed.
To change the display contrast:
Select CONTRAST and use the "Right/Left Scroll" button or the "Enter"
button to increase or decrease the contrast.
Press the "Exit/Backlight" to save your changes and exit the
MISCELLANEOUS folder.
(Continued on next page.)
23
1
2
1
2
Page 24
Miscellaneous Settings Cont.
BUTTON REPEAT
Button Repeat controls the speed with which a button action is repeated
when the button is held down. To scroll more quickly, increase this setting.
To scroll more slowly, decrease this setting.
To change the button repeat setting:
Select BTN REPEAT and use the "Right/Left Scroll" buttons to increase or
decrease the setting shown on the gauge.
Press the "Exit/Backlight" to save your changes and exit the
MISCELLANEOUS folder.
REPEAT DELAY
Repeat Delay controls the time from pressing a button to when the repeat
action begins. To reduce the delay, decrease this setting. To increase the
delay, increase this setting.
To change the repeat delay setting:
Select REPEAT DELAY and use the "Right/Left Scroll" buttons to increase or
decrease the setting shown on the gauge.
Press the "Exit/Backlight" to save your changes and exit the
MISCELLANEOUS folder.
(Continued on next page.)
24
1
2
1
2
Page 25
Miscellaneous Settings Cont.
SENDER ID
Sender ID allows you to input a name or other text, which will be appended to
the end of all sent messages.
To enter a Sender ID:
Select SENDER ID and press the "Enter" button.
Enter the desired Sender ID using the virtual keyboard. See the "Virtual
Keyboard Quick Reference" section on page 2 for further details.
When you have entered the Sender ID, scroll down to DONE and press the
"Enter" button.
Press the "Exit/Backlight" button to save your changes and exit the
MISCELLANEOUS folder.
USER
User name allows you to input a name or other text, which will be shown on
the top line of the pager home screen to identify the unit. Note that if the unit
has received new messages or is in quiet time, these status indicators will be
displayed instead of the user name.
To enter a user name:
Select USER and press the "Enter" button.
Enter the desired user name using the virtual keyboard. See the "Virtual
Keyboard Quick Reference" section on page 2 for further details.
When you have entered the user name, scroll down to DONE and press
the "Enter" button.
Press the "Exit/Backlight" to save your changes and exit the
MISCELLANEOUS folder.
(Continued on next page.)
25
1
2
3
4
1
2
3
4
Page 26
Miscellaneous Settings Cont.
TIME DISPLAY
Time Display controls whether time will be shown based on a 12 or 24
hour clock.
To change the time display:
Select TIME DISPLAY and use the "Right/Left Scroll" button or the "Enter"
button to change the setting.
Press the "Exit/Backlight" to save your changes and exit the
MISCELLANEOUS folder.
CONFIRM DELETES
Confirm Deletes allows you to set whether or not you wish to be prompted
with an "Are you sure?" message every time you delete a message.
To change this setting:
Select CONFIRM DELETES and press the "Enter" button.
Select YES or NO and press the "Enter" button.
Press the "Exit/Backlight" to save your changes and exit the
MISCELLANEOUS folder.
(Continued on next page.)
26
1
2
1
2
3
Page 27
Miscellaneous Settings Cont.
INFRARED
The Infrared setting allows you to enable or disable the infrared port on your
pager. You must enable the port to communicate with any other infrared
enabled device. Disabling the port will increase the battery life of your pager.
To change this setting:
Select INFRARED and use the "Right/Left Scroll" button or the "Enter" button
to enable or disable the infrared port.
Press the "Exit/Backlight" to save your changes and exit the
MISCELLANEOUS folder.
IR ACCESSCODE
The IR AccessCode is a security password that prevents unwanted infrared
communications with your pager. The code can be up to six characters
in length.
To enter an IR AccessCode:
Select IR ACCESSCODE and press the "Enter" button.
Enter the desired IR AccessCode using the virtual keyboard. See the
"Virtual Keyboard Quick Reference" section on page 2 for further details.
After you have entered the code, scroll down to DONE and press the
"Enter" button.
Press the "Exit/Backlight" to save your changes and exit the
MISCELLANEOUS folder.
27
1
2
3
4
1
2
Page 28
Tu rning On the Backlight
Your AccessLink II is equipped with an electroluminescent backlight to make
it easy to read in low light conditions. To turn on the backlight from any
screen, press and hold the “Exit/Backlight” button for 1 second.
To turn the backlight off again, press the “Exit/Backlight” button for 1 second.
The light will also go off automatically when your AccessLink II pager enters
the sleep mode.
28
Operating in Hospitals and Planes
To prevent potential interference with aircraft radio communications and
navigation equipment you should turn your AccessLink II pager off while on
board of an aircraft. You should also turn your pager off inside hospitals to
prevent potential interference with sensitive medical equipment.
To turn your AccessLink II pager off:
Select the PREFERENCES folder from the folder list and press the
“Enter” button.
Select TURN PAGER OFF and press the “Enter” button.
Confirm that you want to turn your pager off by selecting YES and pressing
the “Enter” button.
To turn your AccessLink II pager back on, press and hold the “Enter” button.
1
2
3
Page 29
Communicating Using the IR Port
Your AccessLink II comes equipped with an IrDA compliant infrared
communications port. This port allows you to communicate with other
infrared enabled handheld devices and laptop computers as well as to
increase the functionality of your pager through simple software upgrades.
Communication with your AccessLink II requires an application which runs
on either a WinCE device, a personal digital assistant (PDA) or a personal
computer. Visit Glenayre's website at www.glenayre.com for details about
available applications.
To communicate using the infrared port:
Enable the port as described in the “Miscellaneous Settings, Infrared”
section on page 27.
Set up an IR AccessCode as described in the “Miscellaneous Settings, IR
AccessCode” section on page 27. This code prevents unauthorized
communication with your device. The application running on the secondary
device will need to supply this code to your pager to start communications.
Align the IR port on your AccessLink II to the IR port on the other device.
The devices must be aligned within 30 degrees and be within about
12 inches of each other to communicate properly.
Press any button on the AccessLink II to activate the pager. The IR port
looks for an IR signal when the display is active. If the display is asleep,
the pager will not search for an IR signal.
Look for IR communication status on the device with which the
AccessLink II is communicating. In Windows 95, status can be viewed
either from the specific communications application or from the IR Port
status window within the Control Panel.
You are now ready to exchange information between your second device
and your AccessLink II pager. See the user instructions provided with your
communication application for further details.
29
1
2
3
4
5
Page 30
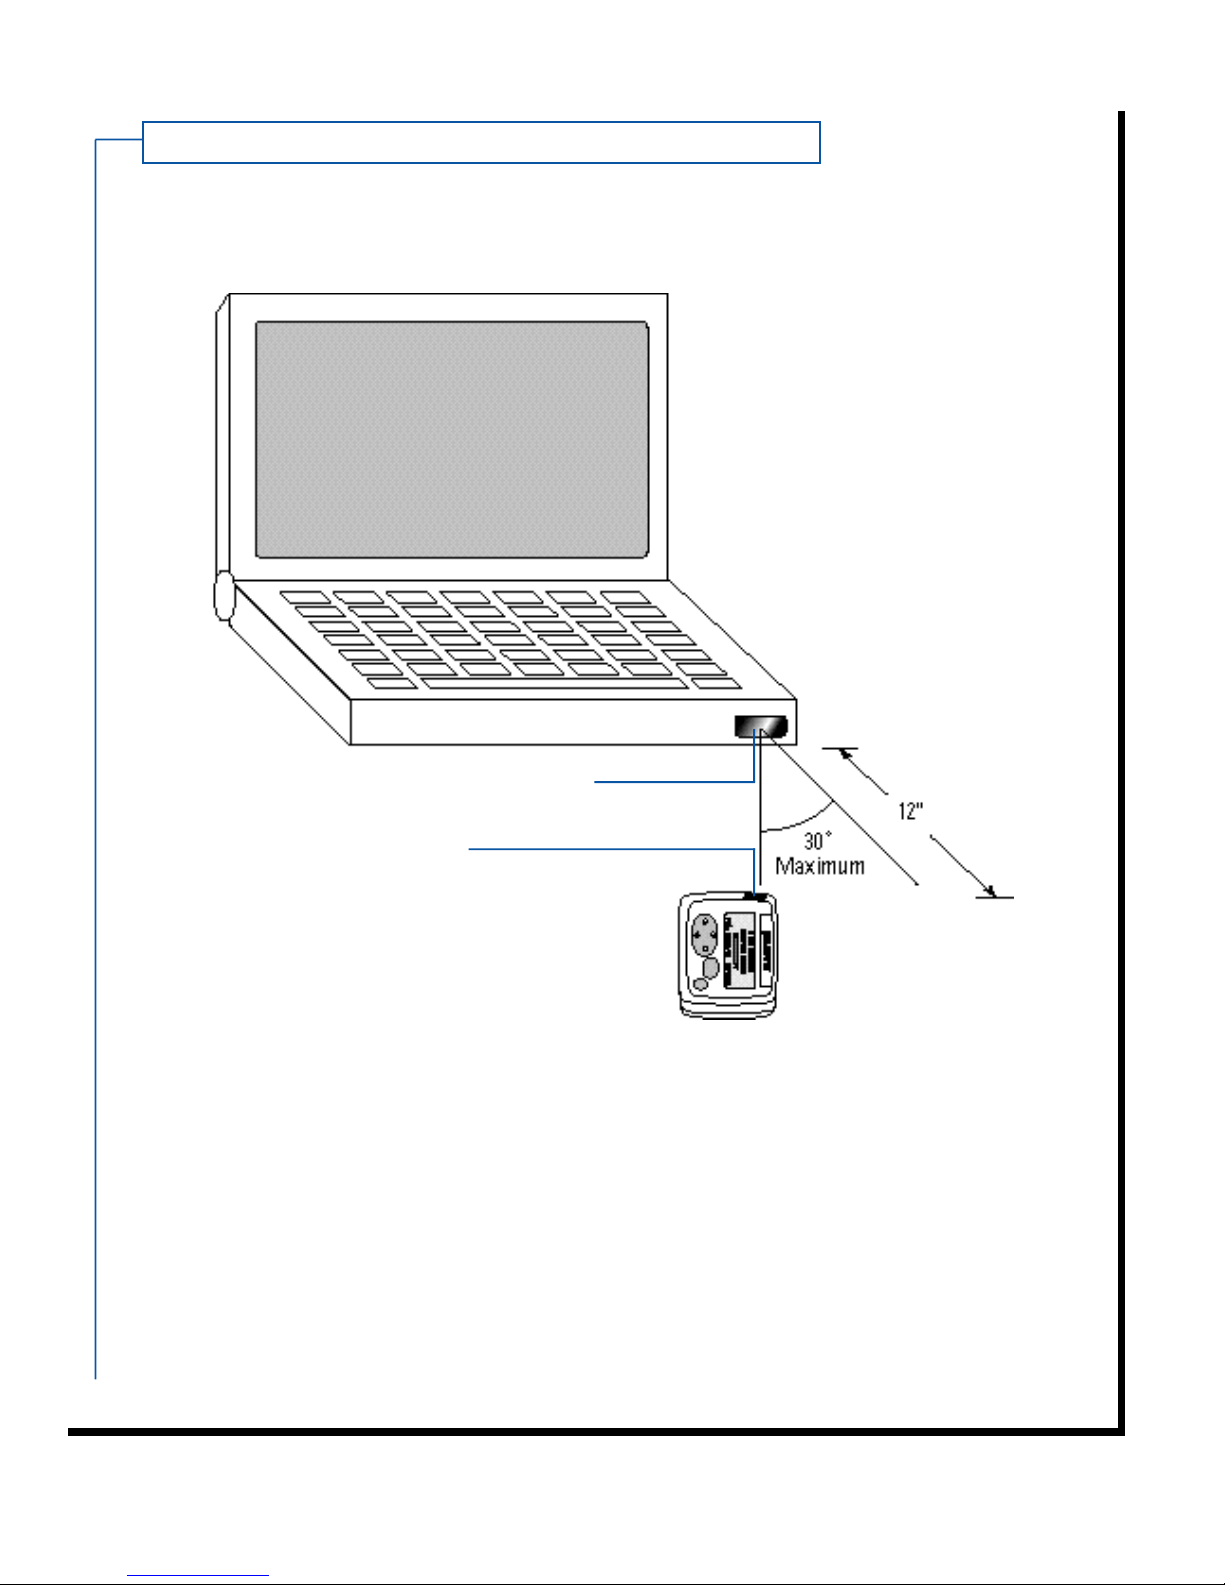
IR Port Diagram
30
PC IRPort
AccessLink II IRPort
Page 31

31
Viewing Status Inform a t i o n
To view detailed information about your pager, select the ABOUT folder from
the folder list and press the “Enter” button.
Inside ABOUT, you can see:
• COVERAGE: This option describes the coverage level you are currently
experiencing. For a description of your coverage level, please see the
service instructions provided by your paging carrier.
• BATTERY: This gauge shows percentage of your battery life remaining.
The home screen will also warn you about a low battery level a day before
your battery runs out.
• MEMORY USED: This gauge shows the percentage of pager memory which
has been used. When the pager’s memory is full, old messages will
automatically be deleted from the information service, RECEIVED, and
TOSEND folders to make room for new messages.
• PAGER ID INFORMATION: The serial number and software version of your
AccessLink II are provided for reference.
• CUSTOMER SUPPORT INFORMATION: A summary of your pager’s
information service configuration and user interface profile number is listed
for use by customer support. The voltage of the NiCd transmit battery is also
provided for use by customer support.
Page 32

FCC COMPLIANCE STATEMENT
This device complies with Part 15 of the FCC Rules. Operation is subject to the
following two conditions: (1) This device must not cause harmful interference
and (2) this devices must accept any interference received, including interference
that may cause undesired operation.
SAFETY
This equipment is Intrinsically Safe for use in Class I, II, and III Divisions
1 and 2 Hazardous Locations.
Warning: Substitution of components may impair intrinsic safety.
© 1998 Glenayre Technologies, Inc.
Glenayre and AccessLink II are registered trademarks of Glenayre Technologies, Inc.
All rights reserved. All other trademarks are the property of their respective owners.
Glenayre Technologies, Inc
Wireless Access Group
2101 Tasman Drive
Santa Clara, CA 95054
G l e n a y re Technologies, Inc. Part Number 5900-3071
 Loading...