

Page 1

OVEN TOASTER GRILLER
SA 5048
U S E R ' S G U I D E
Page 2
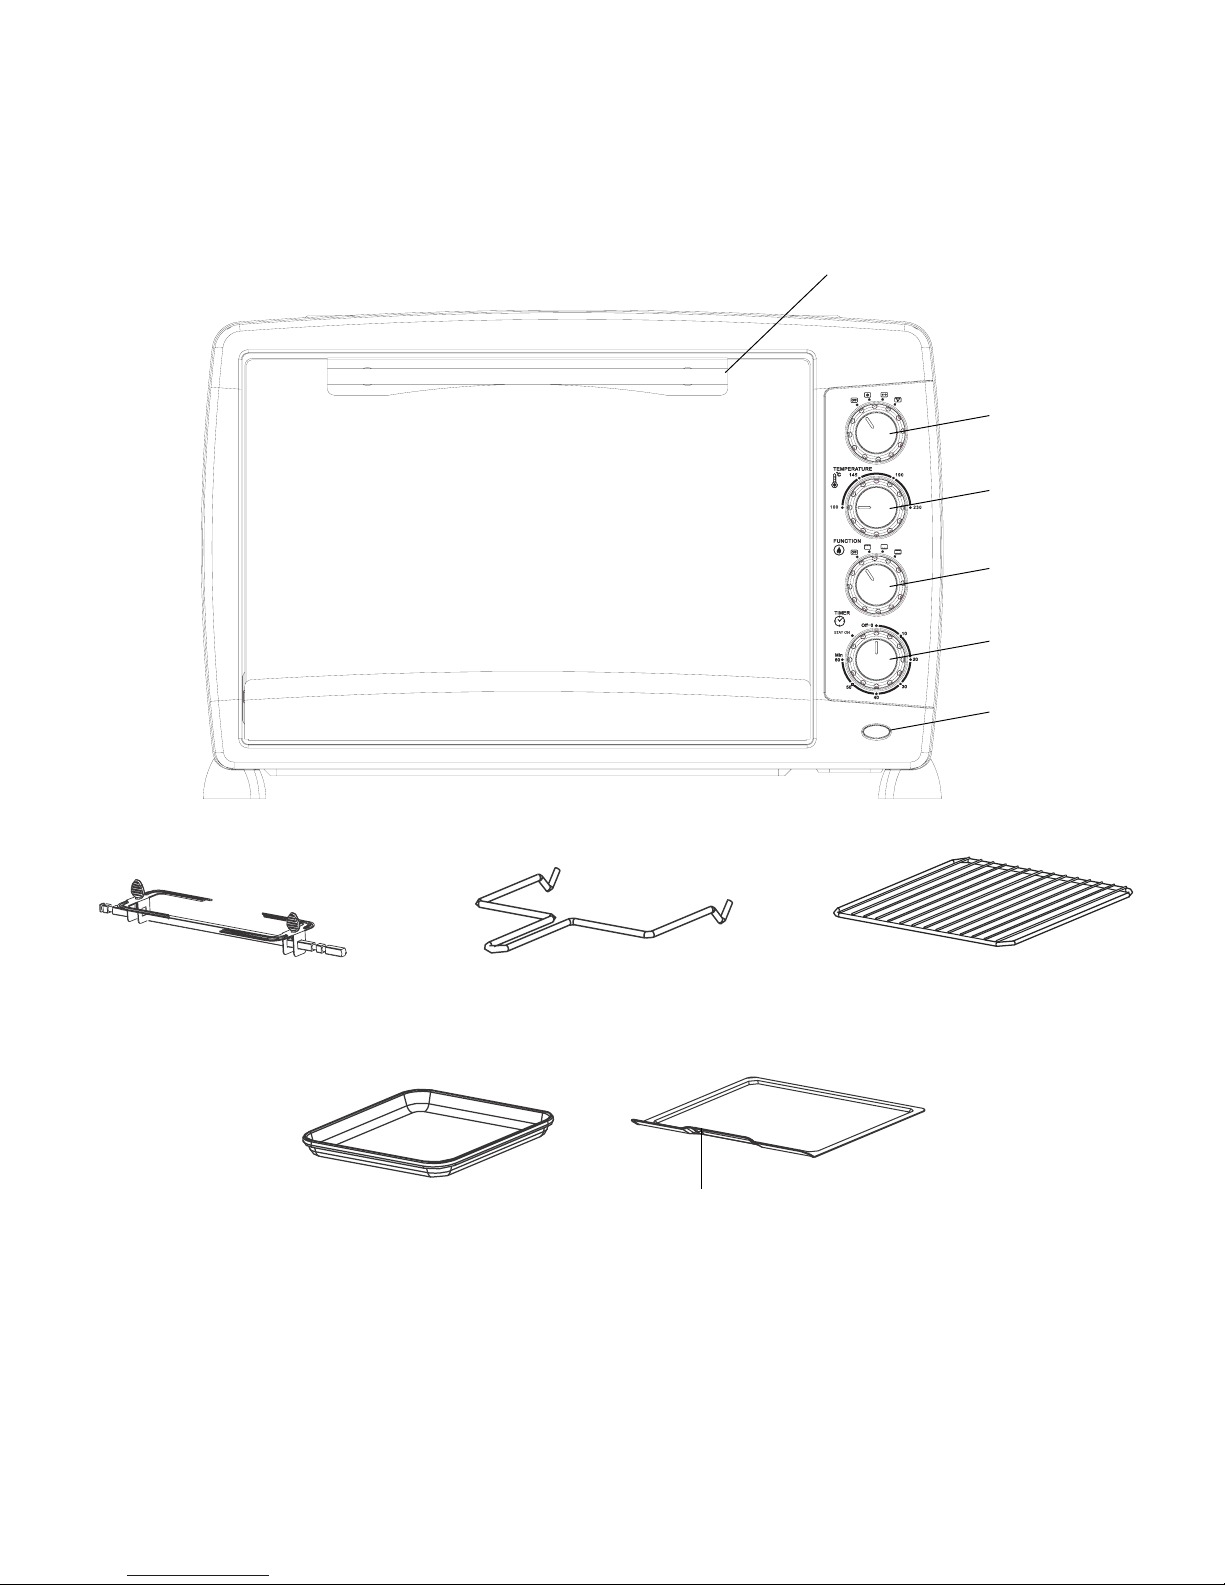
Identifying Your Oven Toaster Griller
Door Handle
Function Control
(Knob B)
Temperature Control
Function Control
(Knob A)
Timer
Indicator Light
Rotisserie Skewer
Bake Tray
Rotisserie Handle
Wire Rack
Crumb Tray
Page 3

Setting Up Your Oven Toaster Griller
Read all instructions included in this user's guide.
Check all the accessories in the carton and remove all racks and pans and wash in hot water or in dishwasher.
After re-assembling your oven, we recommend that you run it at MAX temperature for approximately 15 minutes to
eliminate any packing oil that may remain.
Important Safeguards
When using electric appliances, basic safety precautions should always be followed, including the following:
This electric oven is only for household use.
Keep the electric oven in a dry place with at least four inches of space on all sides of the oven to allow for adequate
air circulation.
Do not place near a gas or electric burner, keep away from curtains or any other inflammable material.
Do not cover the air inlets, the crumb tray or any part of the oven with metal foil.
Do not touch hot surfaces. Use handle or knobs.
Always use accessory handle or wear protective insulated oven mitts when operating the hot oven.
Close supervision is necessary when any appliance is used near children.
Do not let cord hang over edge of table or counter, or touch hot surfaces.
Do not immerse cord, plug, or any parts of the oven in water or other liquids.
Do not operate appliance with damaged cord or plug or after the appliance malfunctions, or has been damaged in
any manner. Refer to the nearest Authorized Service Center.
When not in use unplug the appliance to protect from any electric shock or fire accident.
Use of accessories or attachments not recommended by the manufacturer could cause safety hazards or injury.
Oversized foods or metal utensils should not be inserted in the OTG as they may cause fire or risk of electric shock.
Do not place cardboard, plastic, paper, or similar material in the oven.
When removing hot tray or disposing of hot liquids take extra care.
Do not put baking tray or any other things directly on the heating elements.
Do not place weight on the glass door.
Do not use outdoors. Do not use appliance for other than intended use.
Any malfunction should be solved by authorized or professional persons only.
This appliance has a tempered, safety glass door. The glass is stronger than ordinary glass and more resistant to
breakage.
The Oven Toaster Griller is to be used on 16 A amp. power supply socket.
Care and Cleaning
Always unplug oven and allow to cool before cleaning
Your oven features a Quick-Clean coating. If desired, wipe walls with damp sponge, cloth or nylon scouring pad, and
mild detergent. DO NOT USE STEEL WOOL SCOURING PADS OR ABRASIVE CLEANERS OR SCRAPE WALLS
WITH METAL UTENSILS, AS THIS MAY DAMAGE THE Quick-clean INTERIOR.
Wash all accessories in hot water or in a dishwasher. Wipe the door clean with a damp sponge and wipe dry with a
paper or cloth towel. Clean exterior with damp sponge. DO NOT USE AN ABRASIVE CLEANER OR STEEL WOOL
SCOURING PAD AS IT MAY DAMAGE THE EXTERIOR FINISH.
DRY ALL PARTS AND SURFACES THOROUGHLY PRIOR TO PLUGGING OVEN IN AND USING.
Page 4

Using Your Oven Toaster Griller
Function Selector Knob The OTG GL 5048 has two function selector knobs (A & B). The Knob A has
three possible positions (Top Heating, Bottom Heating and Both). The Knob B Can be used to operate
the Convection Oven, the Rotisserie or both together.
These can be used in different settings for a variety of cooking needs.
Position Application Position Application
Knob A Knob B Knob A Knob B
Baking, Roasting
Keep Food Warm
& Thawing
Grilling, Toasting,
Rotisserie Grilling
& RoastingRoasting
Baking Rotisserie Grilling
Convection Roasting,
Toasting and Cooking
Convection & Rotisserie
Convection
Grilled Cooking
0
Temperature Knob There are different temperature markings on the knob from 100
C to 2500C. Select
the desired temperature required for achieving the result.
Timer Knob The cooking operation is controlled by a 60 minute timer. Turn the control clockwise to
the desired position. The end of cooking cycle is indicated by a bell sound and the OTG is switched
OFF.
Turn control to the left (anti-clockwise) to bypass the timer.
When setting times of less than 10 minutes, turn the knob 1800, then set the desired time.
Power Indicator A light indicator stays illuminated whenever the oven is turned on.
Wire Rack For toasting, baking, and general cooking in casserole dishes and standard pans.
Bake Tray For use in broiling and roasting meat, poultry, fish, and various other foods.
Rotisserie Skewer For grilling, roasting operations, the OTG comes with a Rotisserie Skewer with
adjustable Forks. The rotisserie skewer is placed in the drive on the side wall of the OTG.
Page 5

Grilling or Toasting
Place the food to be grilled on the wire rack and slide the rack on a suitable level. Slide the food tray
on the lowest level
Turn the function selector knob A to Turn the temperature control knob to the desired position.
Turn the timer control knob to the desired time. Keep the door of the OTG, slightly open, to enable
fumes to escape. After the set time has elapsed a bell will ring and the OTG will be switched off.
Baking or Roasting
This function is ideal for cooking great pizzas, all types of fish, stuffed vegetable and cakes.
Turn the function selector knob A to or . Turn the temperature control knob to the desired
position. Turn the timer control knob to the desired time. Place the dish containing the food on the wire
rack (previously placed in the oven), or, if the food is in the bake tray, place the tray directly into
the oven. A bell will ring when the set time has elapsed and the OTG will be switched off.
Preferably, the oven should be pre-heated for 7-10 minutes, for better results. The food should be
covered with an aluminium foil if both the heating elements are being used.
Convection oven cooking
Convection cooking is the preferred method of cooking by many chefs. The oven contains a built-in
fan that circulates heated air around the food that is cooking. This heated airflow continually surrounds
the food, which helps to brown and seal in the juices of meats. Food is cooked more evenly in less time
than in conventional ovens. This function is ideal for cooking great savory pies, all type of meat-based
dishes, roast potatoes and cakes in general. It is also suitable for simultaneous cooking on two different
levels.
Turn the function selector knob A to position and the knob B to Turn the temperature
control knob to the desired position. Turn the timer control knob to the desired time. Place the dish
containing the food on the wire rack (previously placed in the oven) or, if the food is in the bake tray,
place the tray directly into the guide. A bell will ring when the set time has elapsed and the OTG will
be switched OFF automatically.
Defrosting
You can quickly thaw an assortment of food in your convection oven by using the convenient DEFROST
function.
Turn the function selector knob A to position and the knob B to .Turn the temperature
control knob to a low temperature. Turn the timer control knob to the desired time.
NOTE: Food that has been defrosted should not be left at a warm temperature for long periods of time
due to growth of harmful bacteria that can spoil food. Cook food immediately following defrosting. If
defrosting large quantities of food at a time, defrost in refrigerator and NOT in your convection oven.
Keep food warm
Place the food directly on the wire rack in the bottom rack support guide. This function is used to keep
the food warm until serving. The food should not be left in the oven too long (not more than 20-30
minutes), as it may become too dry (to avoid this, cover the pan with tinfoil or baking paper).
Page 6

Turn the function selector knob A to position and the Knob B to .Turn the thermostat
control knob to 600C. Turn the timer control knob to the desired time. A bell will ring when the set
time has elapsed; if the food kept warm is served before the end of the set time, manually turn the
timer control knob to position “0”.
Baking cookies and cakes
This function is ideal for cooking great pizzas, lasagna, all types of fish, stuffed vegetable and cakes.
Turn the function selector knob A to position and the Knob B to . Turn the temperature
control knob to the desired temperature. Turn the timer control knob to the time desired. Place the dish
containing the food on the wire rack (previously placed in the oven), or, if the food is in the bake tray,
place the tray directly into the guide. A bell will ring when the set time has elapsed and the OTG will be
switched OFF.
Rotisserie
Insert the fork on to the skewer. Slide towards square end of skewer and secure with thumbscrew.
Place food to be cooked on skewer by running the skewer directly through the centre of food. Place
the second fork on to the skewer. Check that food is centered on skewer. Insert pointed end of skewer
into drive socket, located on right-hand side of oven wall. Make sure the square end of skewer rests on
skewer support, located on left-hand side of oven wall. Insert the bake tray onto the lowest level guide.
Turn the function selector knob A to position and the Knob B to . Turn the temperature
control knob to high position. Turn the timer control knob to the desired time. A bell will ring when
the set time has elapsed and the OTG will be switched OFF. If the cooking time is longer than 60
minutes, remember to reset the timer control knob.
Convection & Rotisserie
Insert the fork on to the skewer. Slide towards square end of skewer and secure with thumbscrew.
Place food to be cooked on skewer by running the skewer directly through the centre of food. Place
the second fork on to the skewer. Check that food is centered on skewer. Insert pointed end of skewer
into drive socket, located on right-hand side of oven wall. Make sure the square end of skewer rests on
skewer support, located on left-hand side of oven wall. Insert the bake tray onto the lowest level guide.
Turn the function selector knob A to position and the Knob B to . Turn the temperature
control knob to high position. Turn the timer control knob to the desired time. A bell will ring when
the set time has elapsed and the OTG will be switched OFF. If the cooking time is longer than 60
minutes, remember to reset the timer control knob.
Storage
Unplug unit, allow to cool, and clean before storing. Store the OTG in its box in a clean, dry place.
Never store appliance while it is hot or still plugged in. Never wrap cord tightly around the appliance,
use the Cord Storage area on the back bottom of the oven. Do not put any stress on the cord where it
enters the unit, as it could cause the cord to fray and break.
Specifications
Input Voltage: 220-240V~50Hz AC
Power Consumption: 2000 W
Capacity: 48 Litres
Page 7

Guarantee
GLEN APPLIANCES PVT. LTD. Guarantees to get the Oven Toaster Griller or any part thereof repaired
free of charge for a period of two year from the date of purchase, should any defect develop due to
faulty or defective workmanship or material within the municipal limits of the city where the Authorized
Service Centre is there.
Terms to Guarantee
* The Bill/Cash Memo should be presented.
* No repair work should be carried out by any unauthorised person.
* The Oven Toaster G riller should be used as per the directions given in the user’s
guide. Any defects caused by improper or reckless use are not covered under
guarantee.
* No modification/alteration of any nature is made in the Oveno Taster Griller.
The company accepts no responsibility for any consequential losses arising out of misuse or
negligence on the part of the user.
PRODUCT : OVEN TOASTER GRILLER SA 5048
SERIAL NO.
DATE OF PURCHASE
NAME OF OWNER
ADDRESS
BILL NO. DATE
DEALER'S STAMP & SIGNATURE
Packing List
Basic Unit, Bake Tray, Crumb Tray, Rotisserie Skewer, Rotisserie Handle,
Wire Rack, User’s Guide
Page 8

Glen Appliances Pvt. Ltd.
I-34, DLF Ind. Area, Phase-I, Faridabad, India.
E-mail : info@glenindia.com Website : www.glenindia.com
Helpline : 0129-2254191
 Loading...