

Page 1
This GLEN Steam Cooker is fully warranted against any defect arising out of defective
materials or faulty workmanship for a period of one year from the date of purchase.
Should any defect develop in this product, the customer should bring the product to
the nearest authorised service centre, where the company undertakes to get the
product repaired free of charge.
This warranty is not valid if :
l The use and care instructions have not been followed.
l Defects are caused by accident, misuse, abuse or commercial use.
l The repair work is carried out by persons not authorised by the company.
l Any modification or alteration of any nature is made in the product.
l Normal wear & tear of the product is not covered under warranty
l The Bill/Cash memo and copy of warranty card is not presented.
Under no circumstances, whether based on limited warranty or otherwise shall the
company be liable for incidental, special or consequential damages. Use of product
indicates acceptance by you of the aforesaid terms and conditions.
WARRANTY
DEALER’S STAMP & SIGNATURE
PROD UCT NAME
:
STEA M COOKER GL 3051
SERI AL NO.
:
DATE OF PURCH ASE
:
STEAM COOKER
GL 3051
SPECIFICATIONS
Supply Voltage : 230VAC 50 Hz
Power : 825 W
DLF Industrial Area, Phase-I, Faridabad-121003 INDIA
info@glenindia.com www.glenindia.com
Glen Appliances Pvt. Ltd., I-34,
60
50
40
30
20
10
0
RECIPE BOOK
Page 2
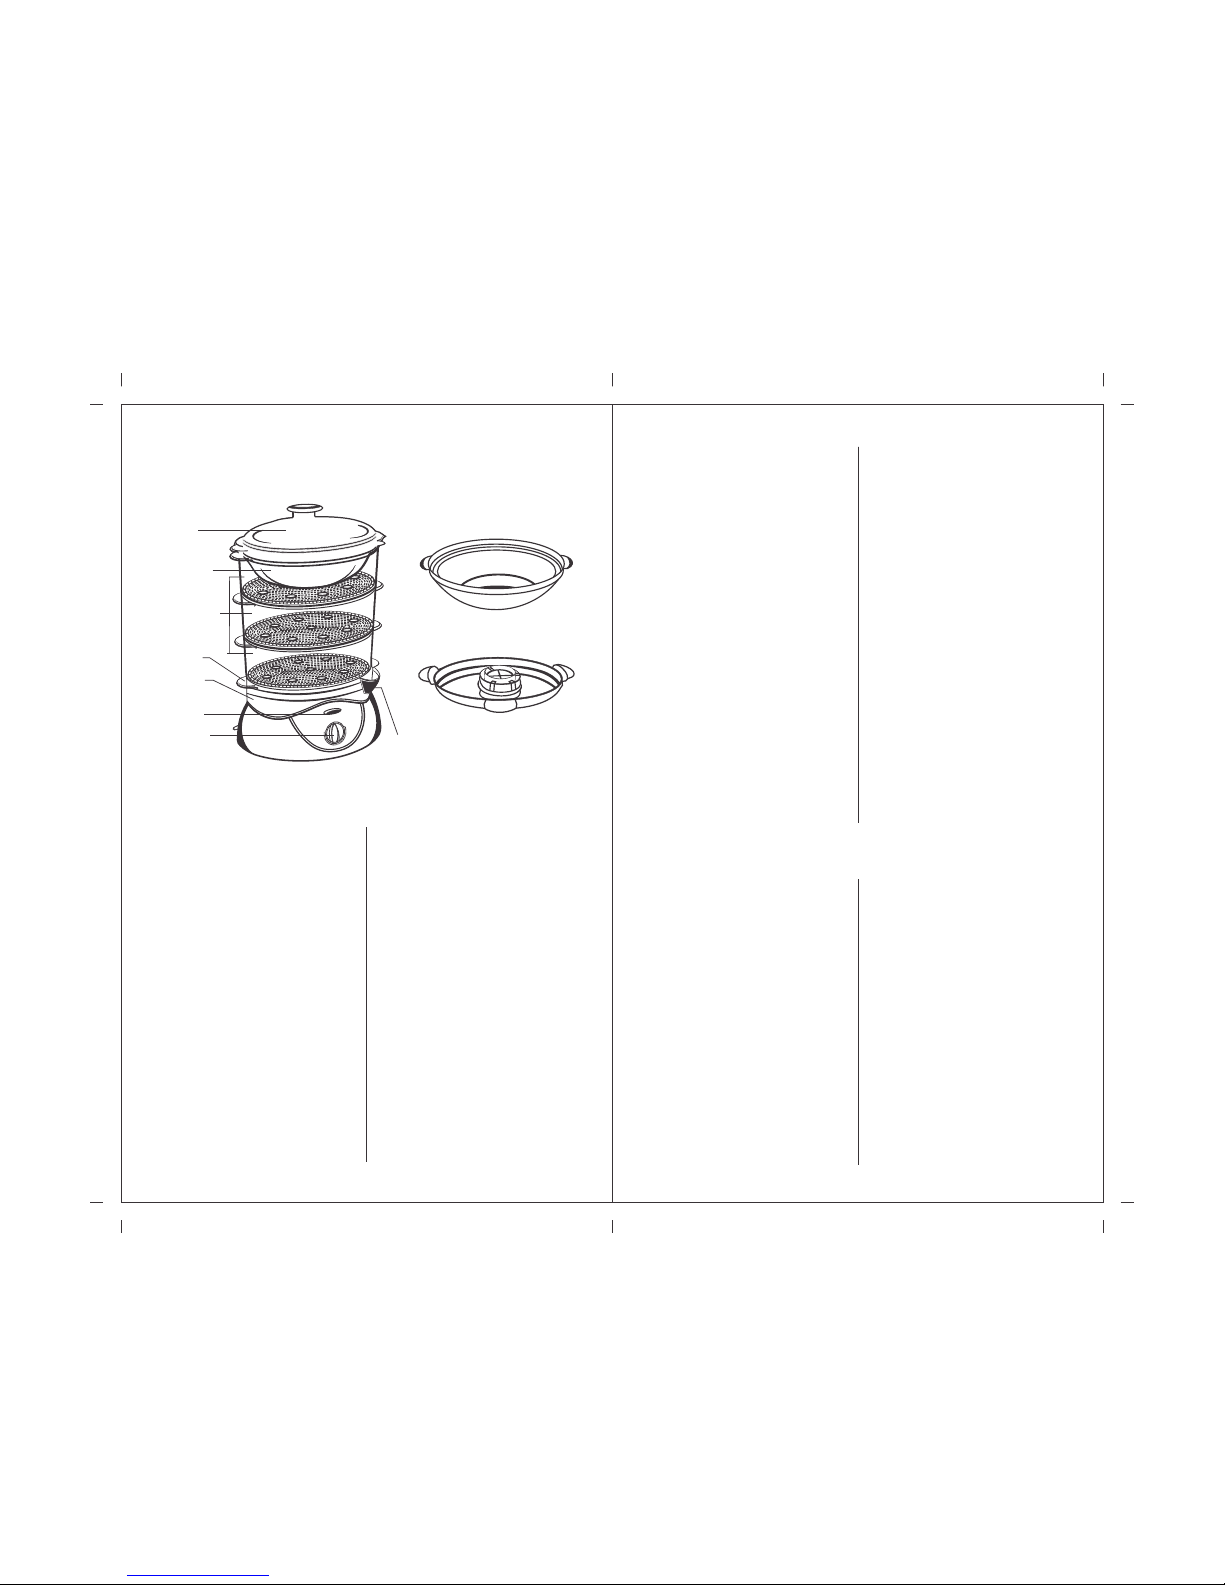
IDENTIFY YOUR STEAM COOKER GL 3051
USING YOUR STEAM COOKER
Timer with
alarm
Top Lid
60
50
40
30
20
10
0
Rice / Soup
Bowl
Three Steam
Compartments
Drip Tray
Reservoir
Power
Indicator
l
Before using the Steam Cooker for the
first time, check and remove any
sticker or protective covering.
l
Wash the top lid, rice bowl, steam
compartments, steam diffuser and
the drip tray in warm soapy water.
l
Rinse and dry thoroughly. Wipe the
reservoir with a damp cloth.
l
Place the appliance on a firm and
stable surface. Fill the reservoir with
tap water upto the MAX level.
l
Place the drip tray on the base, make
sure that it fits properly.
l
Place herbs or spices on the drip tray
centre mesh for additional flavour.
l
Place the food to be cooked inside the
three steam compartments, place the
la rg er f oods in t he b ot tom
compartment as they require longer
time to cook.
l
Stack the three compartments one on
top of the other above the drip tray and
ensure that they are stable.
l
Take care to place the compartment
marked 1 first, followed by the
compartment marked 2 and last the
compartment marked 3.
l
The steam cooker can also be used with
either one or two compartments for
steaming less quantity of food. When
using with one compartment, directly
place the compartment marked 1 above
the drip tray. When using with two
co mp art me nts fir st p lace the
compartment marked 2 followed by the
compartment marked 1.
l
Place the top lid to cover the top
compartment.
l
Connect the mains supply, the power
indicator glows.
l
Do not touch the surface of the
compartments or the top lid during
operation.
l
Always use mitt or padded gloves to
handle the bowls or the top lid.
l Do not allow children to use the
appliance or touch the appliance
when in use.
l
Lift and open the lid carefully allowing
steam to escape in the direction
opposite to you.
l
Keep a safe distance from the steam
vent in the top lid, allowing sufficient
space for the steam to escape, as
steam burns can be dangerous.
l
As sem ble ea ch co mpa rtme nt
correctly and ensure that they are
SAFETY PRECAUTIONS
stable and stack up securely.
l
Allow cooling before disassem-bling
the compartments.
l
Do not place on or near a hot gas or
electric burner or in a oven or
microwave.
l
Do not operate the appliance near a
cabinet or near curtains etc. to prevent
damage from steam.
l
Do not immerse the appliance, power
cord or the plug in water.
l
Do not use the appliance for other than
intended household use.
l
Do not operate the appliance without
steam diffuser, steam compartment or
top lid in place
l
A 60 minute timer has been provided
for convenient cooking. Turn the timer
knob to the desired position.
l
Steaming starts in about 30 seconds.
After the set time an alarm rings
marking the end of cooking time.
Switch Off the Steam Cooker.
l
With the help of a mitt or pot
holder remove the top lid. Take care
that the top lid first opens facing your
opposite side as this helps in safe
escape of the steam. Hold the lid
above the compartments to allow
condensations to drain into the steam
cooker.
l
For longer cooking durations, if the
water level in the reservoir gets low,
pour more water through the spout
online. The cooking process does not
need to be disturbed for this. Take
care that the water level does not go
below the MIN level or above the MAX
level indicated on the reservoir tank.
l
After removing all the compartments,
remove the drip tray and drain out the
left over water from the reservoir. Also
lift the base unit and empty out the left
over water from the reservoir tank by
turning it over in a sink. Take care as
the water would be boiling hot. This
operation can also be done after
allowing some time for the water to
cool down. Allow all the compartments, top lid, steam diffuser and the
drip tray to cool. Wash and dry before
storing for next use.
Flavour Enhancer
The drip tray of the steam cooker has a
special mesh though which steam
continously passes before going onto the
steam compartments. You can place
fre sh o r dr ie d her bs, spi ce s or
condiments on this mesh to impart
additional flavouring to the food being
cooked.
Rice Bowl
Drip Tray
Spout
(for online water filling)
Page 3

Cooking time for various foods
Food Time
Mins (Approx)
Tomatoes 10
Fish 8-12
Chicken 45
Rice 30
Vegetables 20-25
Corn 40-60
Eggs 20-25
Dhokla/Idli 25
Fresh Noodles 10-12
Tomatoes: can be blanched by
putti ng t hem who le i n GL EN
STEAMER for just 10 min.
Corn: Take out the Kernel by
removing the outer layer from the
cob, Break it into 3 pieces and put to
steam. It takes about 40-60 min to
cook, depending upon the hardness
of the corn
Eggs: Wash the eggs and place them
in the lowest bowl it takes about 2025 min depending upon the hardness
required.
Rice: Wash rice (100-150 gm) and
soak for 30min. put 150gm water in
100gm rice and place it in the Rice
Bowl. Steam for about 30min.
Steaming hot rice is ready to be
served.
Mix Vegetables: Chop vegetables
such as French beans, Carrots,
Cauliflower and Broccoli etc. into
even sized pieces and steam in any of
the bowls. It takes 20-25min to cook
depending upon the size of the
vegetable.
RECIPES
Sweet & Sour
Put 4-5 medium sized tomatoes in
any bowl of the steamer. Place
chopped vegetables like carrots,
beans, flowers of cauliflower,
broccoli in other bowl. Once
steamed, blend the tomatoes and
put the vegetables in it. Put salt,
black pepper, vinegar, Soya sauce
and sugar. Mix 1 teaspoon of
cornflower with water and pour the
mixture slowly in the vegetables,
boil for a min on gas.
Corn Spinach
Separate the leaves of Spinach
(Palak) from stem. Wash them
thoroughly, and put them in
steamer. Steam for 8-10min. steam
corn separately for 40-45min.
Blend the steamed Spinach. Add
steamed corn (separated kernels
from the cob). Add salt and red
chilies to taste. Corn Spinach is
ready.
Butter can be added to enhance the
taste.
One can add white sauce to the
above and bake it in an oven for 15
min or put in microwave for 1-2 min
to Baked Corn Spinach.
Noodles
Steam fresh noodles in the steamer
for about 8-10min. finely chop the
vegetables and steam for 10min.
add both the things together, add
salt and black pepper to taste with
aji-no-moto and 2teaspoon of olive
oil.
Noodles can also be substituted
with rice (it will take 20-25min).
Instant Idli
Mix 1 cup Rawa (suji) with 3
tablespoon of curd and a little water
to get a consistency of batter which
can be poured into a bowl. Once you
get the consistency, add a teaspoon
of ENO salt. Mix well and pour into
the Rice Bowl. Steam for about 20
min. Cut pieces into cubes and
serve with green/coconut chutney.
Dhokla
Mix 1cup besan, 1tablespoon suji, a
pinch of turmeric, sugar, salt and 510 drops of lemon juice with 3-4
tablespoon of curd. Make a batter of
thick consistency. Add a teaspoon
of ENO salt. Mix well and pour into
the Rice Bowl. Steam for 15-20
min, put some green chillies and
again steam for 5 min more. Boil a
cup of water and temper some black
mustard seed s and corian der
(dhania) leaves. Pour it over dhokla
and cut it into pieces. Dhokla is
ready to be served.
Mushroom Muttar
Requirements: Mushroom 1pkt,
Fresh Peas 2 cups, Tomatoes 3
medium sized, Onions 2 medium
sized, Gin ge r-garlic pa st e 1
teaspoon, salt, chillies, turmeric
Steam mushrooms and fresh peas
together in ste amer. Blanch
potatoes also in steamer.
In a pan, put 2 finely chopped
onions with ginger-garlic paste in
warm oil. When the onions are
golden brown, add the puree made
from blanched tomatoes. Add salt,
red chillies and turmeric and mix
well till the oil leaves the sides of
the pan. Now put the steamed
mushrooms and peas and mix well.
Add little water if required and
simmer for 2-3 min. Serve hot.
Chicken in Garlic Sauce
Requirements: Chicken 1 cut into 8
pieces, Garlic 1 pod peeled &
chopped, Tomato Ketchup 30ml,
Soya sauce 25ml, Chicken stock
200ml, Corn flour 1 teaspoon, Salt
& pepper to taste, Aji-no-moto a
pinch
Cut chicken into small pieces and
steam in the steamer. Chop the
garlic and sauté in a little oil. Add
tomato ketchup, salt and pepper,
soya sauce, aji-no-moto and
chicken stock. Bring to a boil and
thicken with corn flour. Mix the
chicken in the sauce and serve hot.
Page 4

Aloo Masala
Requ irem ents: Pota toe s 5- 6
medi um sized, Chana Dal 1
tablespoon, Split Urad Dal 1
tablespoon, Pomegranate seeds 1
teaspoon, Red chilli powder ½
teaspoon, Turmeric powder ½
teaspoon, Whole red chillies 2-3,
Mustard seeds 1 teaspoon, Salt as
per taste, Oil 2 teaspoon, Coriander
leaves & green chillie s for
garnishing.
Take equal sized potatoes. Put in
steamer and steam until done. In a
non-stick pan, warm oil, put
mustard seeds and whole red
chillies. When they start to splutter,
add channa dal and urad dal. Stir for
a minute. Add about half cup water,
when it reduces to half, add
blanched and chopped potatoes
along with other dry masalas. Mix
well, garnish with green chillies
and coriander leaves. Serve hot.
Khichri
Soak rice and yellow moong dal
(1cup+1/4 cup) for 30min. put
both together in the steamer with
150ml water. It takes 30min to
cook. Replace the contents to
another bowl, mix salt according to
tas t e . G rou n d s p i c es lik e
cardamom, cinnamon and cloves
can also be added to add to the
taste.
Egg Salad
Requirements: Eggs 6 nos, Lettuce
Leaves 100 gm
Fo r Dr e s s ing: O liv e Oi l 1
Tablespoon, Vinegar 2 tablespoon,
Mustard Powder ¼ teaspoon, Salt
& Black Pepper to taste
Steam eggs for 20 min. when cool,
peel off and cut each egg into 8
pieces. Wash Lettuce leaves well
and keep in chilled water. Chop and
mix with eggs. Add dressing and
toss well. Serve cold.
Vegetable Salad
Requirement s: Potatoes 2n os,
Cauliflower 1 cut into small pieces,
Carrots 2 cut into small pieces,
Peas 1 cup
For Dressing: Thick Curd 1cup
(water removed)
Fresh Cream 2 Tablespoon, Sugar
powder 1 Teaspoon, Salt to taste
Steam potatoes (whole). Also
steam chopped vegetables with
peas. When done, peel potatoes
an d ch op. Mi x wi th ot her
vegetables. In another bowl, mix
dres s in g i n g red i en t s , ad d
veg et ab le s and garnish with
coriander leaves.
Broccoli & Corn Rice
Requirements: Rice 2 cups soaked
for 30min, Broccoli 1 separated
into florets, Corn Kernel separated
and boiled, Cumin seeds (jeera) ¼
teaspoon, Refined oil 2 tablespoon,
Salt to taste
Steam the corn and broccoli. Steam
the rice separately. In a pan, put
cumin seeds along with oil. Once it
crackles, put rice along with corn &
broccoli florets (chopped). Add salt
and mix well. Broccoli & Corn Rice
is ready.
Gobi Masala
Requirements: Cauliflower 1 big
s i ze d ( f lo re ts s ep ar a te d)
Tomatoes 2-3, Onion 1 medium
sized, Ginger Garlic Paste, 1
teaspoon Salt & Red Chilly Powder
to taste, Turmeric powder 1/6
teaspoon
Steam cauliflower and tomatoes
separately in the steamer for about
15-20min. in a non-stick pan, warm
oil and put chopped onion in it.
Warm till golden brown, add gingergarlic paste. Blend the tomatoes to
make puree. Add puree to onions in
the pan and mix well. Add salt,
chilly powder and turmeric. Add
cauliflower and mix well. Simmer
for 2-4 min. transfer the complete
material to a serving dish and
garnish with split green chilies and
coriander leaves. Serve hot.
Egg Curry
Requirements: Eggs 6 Shelled,
peas 1 cup, Onions 2 small sized
finely chopped, Tomatoes 4nos,
Salt, chilly powder to taste,
Turmeric1/6 teaspoon, Oil
3 tablespoon
Steam eggs, peas and tomatoes
separately. In a pan, put oil and add
chopped onions. Warm till golden
brown. Puree the tomatoes and mix
with onions. Simmer till thick. Add
peas along with ½ cup water. Boil
and simmer for 5 min. add shelled
eggs cut into 2 pieces and mix.
Check the seasoning. Garnish with
coriander leaves and green chilies.
Serve hot.
 Loading...