

Page 1
AUTOMATIC BREAD MAKER
GL 3034
12 settings for different kinds of bread
Choice of 3 crust settings
1 Hour keep warm function
Memory function to help in power failure
Detachable baking pan
GL 3034 Bread Maker Manual.indd 1 8/17/2013 8:44:22 PM
Page 2
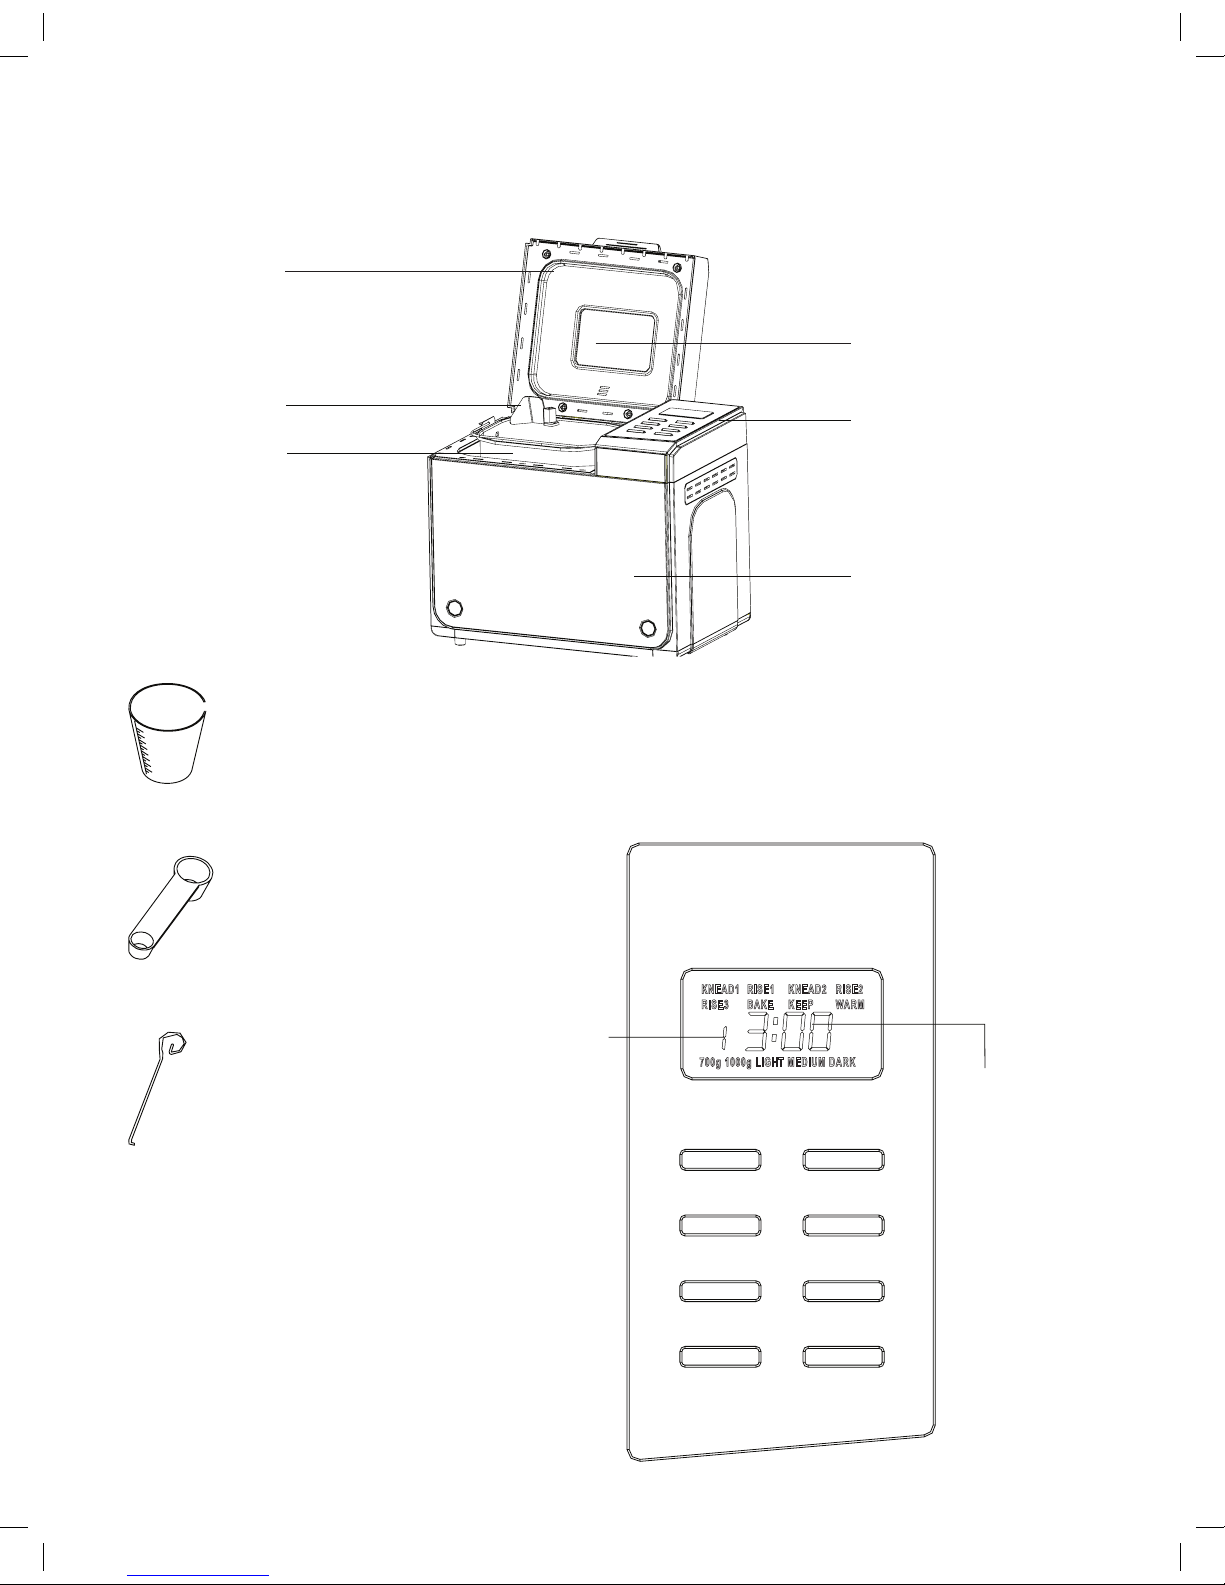
Identifying Your Bread Maker
Lid
Kneading Blade
Viewing Window
Control Panel
Housing
Measuring Cup
Measuring Spoon
Hook
Bread Pan
CONTROL PANEL
This indicates the
program you have
chosen
1. BASIC
2. WHOLE WHEAT
3. FRENCH
4. QUICK
5. SWEET
6. CAKE
7. JAM
8. DOUGH
9. ULTRA FAST
10. BAKE
11. DESERT
12. HOME MADE
The operation time
for each program
PAUSE CYCLE
TIME LIGHT
LOAF COLOR
MENU
START
STOP
GL 3034 Bread Maker Manual.indd 2 8/17/2013 8:44:22 PM
Page 3

USING YOUR BREAD MAKER
As soon as the bread maker is switched ON, a beep will be heard and “1 3:00 ” appears in the display. But the two dots
between the “3” and “00” don’t ash constantly. The “1” is the default program. 1000g and MEDIUM will appear on
LCD. They are the default setting.
Menu
It is used to select different programs. Each time it is pressed (accompanied by a short beep) the selected program
change.
Programs:
1. Basic: kneading, rise and baking normal bread. You may also add ingredients to increase avor.
2. Whole Wheat: kneading, rise and baking of whole wheat bread. It is not advised to use the delay function as this
can produce poor results.
3. French: kneading, rise and baking with a longer rise time. The bread baked in this menu will have a crisper crust
and loose texture.
4. Quick: kneading, rise and baking loaf within the time less than Basic bread. But the bread baked on this setting is
usually smaller with a dense texture.
5. Sweet: kneading, rise and baking sweet bread. You may also add ingredients to add avor.
6. Cake: kneading, rise and baking, but rise with soda or baking powder.
7. Jam: boiling jams and marmalades. Fruit or vegetables must be chopped before putting it into the bread pan.
8. Dough: kneading and rise, but without baking. Remove the dough and use for making bread rolls, pizza, steamed
bread, etc.
9. Ultra Fast: kneading, rise and baking loaf in a short time, bread with a dense texture.
10. Bake: only baking, no kneading and rise. Also used for increasing the baking time on selected settings.
11. Dessert: kneading, rise and baking dessert.
12. Home Made: Can be self-programmed by customer, to reset kneading, rise, baking & keep warm.
Under the menu of Home Made:
• Press CYCLE button once, KNEAD1 will appear on LCD, then press TIME button to adjust the minutes, and
press CYCLE to conrm the time for this step;
• Press CYCLE to enter the next step, RISE1 will appear on LCD, then press TIME button to adjust the inutes,
the number will increase rapidly if TIME button is holding. Further press CYCLE to conrm.
• In this way set the remaining steps. Upon nishing setting for all steps, press Start/stop button to exit the
setting.
• Press START/STOP button further to activate the operation.
The time range of each program:
• KNEAD1: 6-14 minutes • RISE1: 20-60 minutes
• KNEAD2: 5-20 minutes • RISE2: 5-120 minutes
• RISE3: 0-120 minutes • BAKE: 0-80 minutes
• KEEP WARM: 0-60 minutes
Start/Stop
To start a program, press the “START/STOP” button for approx. 1.5 seconds. A short beep will be heard and the two
dots in the time display begin to ash and the program starts. Any other button is inactivated except the START/STOP,
LIGHT, and PAUSE buttons after a program has begun.
To stop the program, press the “START/STOP” button for approx. 1.5 seconds, then a beep will be heard, it means that
the program has been switched off.
GL 3034 Bread Maker Manual.indd 3 8/17/2013 8:44:22 PM
Page 4

Color
With the button you can select LIGHT, MEDIUM or DARK color for the crust.
Loaf
Press this button to select the size of the bread. Please note the total operation time may vary with the different loaf
size.
Time
If you want that the appliance should not start working immediately, you can use the button to set the delay time.
The step of set delay function is as follows:
• Select your menu, color, loaf size.
• Set the delay time by pressing TIME button. The delay time should include the operation time of chose menu.
Suppose it is 8:30 pm now and you want the bread to be ready to serve at 7:00 am of next day, so the delay
time should be 10 hours and 30 minutes. Press TIME button continuously until 10:30 appear on the display. The
increment of each press is 10 minutes.
• Press the STOP/START button to activate this delay program. You can see the dot ashed and LCD will count
down to show the remaining time.
Please note the maximum delay time is 13 hours. And do not use any perishable ingredients such as eggs, fresh
milk, fruits, onions in the delayed menu.
Pause
After procedure starts up, you can press PAUSE button to interrupt at any time, the operation will be paused but the
setting will be memorized, the outstanding time will be ashed on the LCD. Press PAUSE button again, the program
will continue.
Light
Press the button once, the lighting lamp will be illuminated to expediently view the operation. Within 1minutes, if you
press the button again, the lighting lamp will be extinguished. After 1 minute, don’t need press the button, the lamp
will be extinguished automatically.
KEEP WARM
Bread can be automatically kept warm for 1 hour after baking. During keeping warm, if you would like to take the
bread out, switch the program off by pressing the START/STOP button.
MEMORY
If the power supply has been interrupted during the course of making bread, the process of making bread will be
continued automatically within 10 minutes, even without pressing “START/STOP” button. If the interruption time exceeds
10 minutes, the memory cannot be kept, you must discard the ingredients in the bread pan and add the ingredients into
bread pan again, and the bread maker must be restarted. But if the dough has not entered the rising phase when the
power supply breaks off, you can press the “START/STOP” directly to continue the program from the beginning.
ENVIRONMENT
The machine may work well in a wide range of temperature, but there may be difference in loaf size between a very
warm room and a very cold room. We suggest that the room temperature should be within temperature of 15 to 34.
WARNING DISPLAY
• If the display shows “H HH” after you have pressed START/STOP button, the temperature inside is still too high.
Then the program has to be stopped. Open the lid and let the machine cool down for 10 to 20 minutes.
• If the display shows “E E0” or “E E1”after you have pressed START/STOP button, the temperature sensor is
malfunction please check the sensor carefully by Authorized expert.
GL 3034 Bread Maker Manual.indd 4 8/17/2013 8:44:22 PM
Page 5

BEFORE THE FIRST USE
The appliance may emit a little smoke and a characteristic smell when you turn it on for the rst time. This is normal
and will soon stop. Make sure the appliance has sufcient ventilation.
• Please check whether all parts and accessories are complete and free of damage.
• Clean all the parts according to the section“CLEANING AND MAINTENANCE”.
• Set the bread maker on BAKE mode and bake empty for about 10 minutes. Then let it cool down and clean all the
detached parts again.
• Dry all parts thoroughly and assemble them, the appliance is ready for using.
HOW TO MAKE BREAD
• Place the bread pan in position, then turning it in clockwise until they click in correct position. Fix the kneading
blade onto the drive shaft. It is recommended to ll hole with heat-resisting margarine prior to place the kneading
blade to avoid the dough sticking the kneading blade, also this would make the kneading blade be removed from
bread easily.
• Place ingredients into the bread pan. Usually the water or liquid substance should be put rstly, then add sugar,
salt and our, always add yeast or baking powder as the last ingredient.
水或 液体
干的配料
酵母或苏打
Yeast or soda
Dry ingredients
Water or liquid
• Make a small indentation on the top of our with nger, add yeast into the indentation, make sure it does not
come into contact with the liquid or salt.
• Close the lid gently and plug the power cord into a wall outlet.
• Press the Menu button until your desired program is selected.
• Press the COLOR button to select the desired crust color.
• Press the LOAF button to select the desired size. (700g or 1000g)
• Set the delay time by pressing Time button. This step may be skipped if you want the bread maker to start working
immediately.
• Press the START/STOP button for approx. 1.5 seconds to start working.
• For the program of BASIC, WHOLE WHEAT, FRENCH, QUICK, SWEET, CAKE, ULTRA-FAST and HOME-MADE
beeps sound will be heard during operation.
This is to prompt you to add ingredients. Open the Lid and put in some ingredients. It is possible that steam will
escape through the vent in the lid during baking. This is normal.
• Once the process has been completed, 10 beeps will be heard. You can press START/STOP button for approx. 1.5
seconds to stop the process and take out the bread. Open the Lid and while using oven mitts, turn the bread pan
in anti-clockwise and take out the bread pan.
• Let the bread pan cool down before removing the bread. Then use non-stick spatula to gently loosen the sides of
the bread from the pan.
• Turn bread pan upside down onto a wire cooling rack or clean cooking surface and gently shake until bread falls
out.
• Let the bread cool for about 20 minutes before slicing. It is recommended to slice the bread with electric cutter or
dentate cutter and not with fruit knife or kitchen knife, otherwise the bread may be subject to deformation.
GL 3034 Bread Maker Manual.indd 5 8/17/2013 8:44:23 PM
Page 6

• If you are out of the room or have not pressed START/STOP button at the end of operation, the bread will be kept
warm automatically for 1 hour, when keep warm is nished, 1 beep will be heard.
• When not in use or complete operation, unplug the power cord.
Note: Before slicing the loaf, use the hook to remove out the Kneading blade hidden on the bottom of loaf. The
loaf is hot, never use the hand to remove the kneading blade.
Note: If bread has not been completely eaten up, advise you to store the remained bread in sealed plastic bag or
vessel. Bread can be stored for about three days during room temperature, if you need more days storage, pack it with
sealed plastic bag or vessel and then place it in the refrigerator, storage time is at most ten days. As bread made by
ourselves does not add preservative, generally storage time is no longer than that for bread in market.
Caution: the Bread pan and bread may be very hot! Always handle with care.
SPECIAL INTRODUCTION
For Quick program
• With Quick program, the bread maker can nish making a loaf within shorter period with baking powder or soda
in place of yeast. To obtain perfect quick bread, it is suggested that all liquid ingredients shall be placed at the
bottom of the bread pan and dry ingredients on the top, but during the initial kneading, some dry ingredients may
collect in the corners of the pan, so in order to avoid our clumps, you may use a rubber spatula to help to knead
dough.
For Ultra fast program
• With ultra fast program, the bread maker can nish making a loaf within shortest period, so the loaf may be a little
denser in texture. For Ultra fast bread, water temperature is very critical for fermentation performance, if water
temperature is too low, the loaf will not rise to the expected size; if water temperature is too high, yeast is likely to
lose activity so as to affect fermentation performance. Please note water temperature should be controlled in the
range of 48 - 500C, so before making Ultra fast bread, you must use a thermometer to measure water temperature.
CLEANING AND MAINTENANCE
Disconnect the machine from the power outlet and let it cool down before cleaning.
• Bread pan: remove the bread pan by turning it in anti-clockwise, then pulling the handle to remove it, wipe
inside and outside of pan with a damp clothes, do not use any sharp or abrasive agents for the consideration of
protecting the non-stick coating. The pan must be dried completely before installing.
Note: Insert the bread pan and turning it in clockwise until it xed in correct position. If it cannot be inserted,
adjust the pan lightly to make it is on the correct position then press it down.
• Kneading blade: If the kneading blade is difcult to remove from the bread, use the hook. Also wipe the blade
carefully with a cotton damp cloth. Both the bread pan and kneading blade are dishwashing safe components.
• Housing: gently wipe the outer surface of housing with a wet cloth. Do not use any abrasive cleaner for cleaning,
as this would degrade the high polish of the surface. Never immerse the housing into water for cleaning.
Note: It is suggested not disassembling the lid for cleaning.
• Before the bread maker is packed for storage, ensure that it has completely cooled down, clean and dry, and the
lid is closed.
INTRODUCTION OF BREAD INGREDIENTS
Bread our
• Bread our is a kind of high-gluten our, also called as high-protein our containing high protein, which has good
exibility and can prevent loaf from being sunken during rising. As typically the content of its gluten is higher than
that in plain our, it can be used for making loaf having large size and good inner ber texture. Bread our is the
most important ingredient to make loaf.
GL 3034 Bread Maker Manual.indd 6 8/17/2013 8:44:23 PM
Page 7

Plain our
• Plain our is a blend of rened soft and hard wheat, and especially applicable to make quick bread or cake.
Whole wheat our
• Whole wheat our, which is ground from whole wheat, contains bran and wheat germ. It is heavier and richer in
nutrition than plain our. Usually the bread made of whole wheat our is smaller in size, so in many recipes the
whole wheat our and bread our are combined in order to achieve best result.
Black wheat our
• Black wheat our, also named as “rough our”, is a kind of high ber our similar to whole wheat our. To obtain
the larger size of bread during rise, it shall be used in combination with high proportion of bread our.
Cake powder
• Cake powder, which is ground from soft wheat or low-protein wheat, is specially used for making cake.
Corn our and oatmeal our
• Corn our and oat our are ground from corn and oatmeal respectively, both of which are the additive ingredients
of making rough bread in order to enhance the avor and texture.
Sugar
• Sugar is very important for crust color and avor of bread. It also helps to ferment bread as nutriment. Usually
white sugar is used in most cases. Brown sugar, powder sugar or cotton sugar may be used for special purpose.
Yeast
• The purpose of yeast is to ferment dough by producing carbon dioxide which can expand bread and then soften
inner ber texture, however, fast breeding of yeast needs carbohydrate in sugar and our as nutriment. Usually
there are three types of yeast: fresh yeast, active dry yeast and instant yeast, wherein instant yeast is used more
frequently, traditional active dry yeast may be used to obtain better fermentation effect, but instant yeast operates
faster than active dry yeast. Conversion relation between instant yeast and active dry yeast is as follows:
1tsp. active dry yeast =3/4 tsp. instant yeast
1.5tsp. active dry yeast =1 tsp. instant yeast
2tsp. active dry yeast =1.5 tsp. instant yeast
Moreover, yeast shall be stored in refrigerator as it may be killed at high temperature, before using, ensure the
yeast is fresh by checking the expiry date of yeast. Store it back to the refrigerator as soon as possible after each
use. Usually bread or dough, which fails to rise, is due to stale yeast being used.
The ways described below will check whether your yeast is fresh and active or not.
• Pour 1/2 cup warm water (45-50
0
C) into a measuring cup
• Add 1 tsp. white sugar into the cup and stir, then sprinkle 2tsp. yeast over the water.
• Put the measuring cup in a warm place for about 10min. Do not stir the water.
• The froth generated by yeast shall come up to 1-cup mark, otherwise the yeast may be stale or inactive.
Salt
• Salt is necessary to improve bread avor and crust color. But too much salt can also restrain yeast from rising.
Never use too much salt in a recipe. But too little lets the dough rise so fast it may fall before baking is complete.
It also keeps bread from getting stale too quickly.
Egg
• Eggs add richness and a soft texture to bread dough and cake.
GL 3034 Bread Maker Manual.indd 7 8/17/2013 8:44:23 PM
Page 8

Grease, butter and vegetable oil
• Grease is helpful to make bread softer and prolong storage life. Butter should be chopped to small particles prior
to use so that it can be stirred evenly.
Baking powder
• Baking powder is a raising agent mainly used in making the Ultra Fast bread and cake. It does not require
fermentation time before baking as the chemical reaction works during baking process.
Soda
• The same as above, it can also be used in combination with baking powder.
Water and other liquids
• Water is indispensable ingredient for making bread. Generally, water temperature between 200C and 250C is
ideal. But for making Ultra Fast bread, the water temperature should be within 45-50
0
C in order to enhance
fermentation rate. The water may also be replaced by fresh milk, or water mixed with 2% milk powder, which
may enhance bread avor and improve crust color. Some recipes call for juices (such as apple juice, orange juice,
lemon juice and etc.) in order to add bread avor.
INGREDIENT MEASUREMENT
One most important step for making good bread is to measure ingredients accurately. It is strongly suggested using
measuring cup or measuring spoon to obtain accurate measurement, otherwise the bread will be largely inuenced.
Liquid ingredient measurement
• Water, fresh milk or similar liquids should be measured with measuring cup. When reading amount, the measuring
cup shall be placed on a horizontal at surface and keep your eyes level, the liquid level line must be aligned with
the mark of measurement. Before measuring oil or other ingredients, clean the measuring cup thoroughly.
Dry ingredient measurement
• Dry ingredient should be kept in natural loose condition and measured with measuring spoon or cup, dry
measuring shall be done by gently spooning ingredients into measuring cup, once lled, level off with knife to
ensure accurate measurement.
Add-ingredient sequence
• Usually ingredients shall be added according to the following sequence: liquid ingredients, eggs, salt and milk
powder etc. When adding our, it shall not be contacted by liquids completely and the yeast shall be placed on
the dry our. Pay special attention that yeast must not contact with salt. If the machine is provided with auto addingredient function, fruit ingredients shall be added only after beep sound is heard to prompt you. In addition,
when you use “ long-time” delay function, never add the perishable ingredients such as eggs or fruit ingredients.
IMPORTANT SAFEGUARDS:
Before using the electrical appliance, the following basic precautions should always be followed:
• Read all instructions
• Before use, check that the voltage of wall outlet corresponds to the one shown on the rating plate.
• Do not operate any appliance with a damaged cord or plug or after the appliance malfunctions, or is dropped
or damaged in any manner. Return the appliance to manufacturer or the nearest authorized service agent for
examination, repair, electrical or mechanical adjustment.
• Do not press hot surfaces. Use handles or knobs. As the handle is close to metallic decorative sheets, it is
recommended to open the lid with gloves or away from the metallic decorative sheets or when cooling down in
order to avoid a risk of scald.
• To protect against electric shock do not immerse cord, plugs, or housing in water or other liquid.
GL 3034 Bread Maker Manual.indd 8 8/17/2013 8:44:23 PM
Page 9

• Unplug from outlet when not in use, before putting on or taking off parts, and before cleaning.
• Do not let cord hang over edge of table or hot surface.
• The use of accessory attachments not recommended by the appliance manufacturer may cause injuries.
• The appliance can be used by children aged from 8 years and above and persons with reduced physical, sensory
or mental capabilities or lack of experience and knowledge if they have been given supervision or instruction
concerning use of the appliance in a safe way and understand the hazards involved. Children shall not play with
the appliance. Cleaning and user maintenance shall not be made by children unless they are older than 8 and
supervised.
• Keep the appliance and its cord out of reach of children less than 8 years.
• Do not place on or near a hot gas or electric burner, or in a heated oven.
• Extreme caution must be used when moving an appliance containing hot oil or other hot liquids.
• Do not press any moving or spinning parts of the machine when baking..
• Never switch on the appliance without properly placed bread pan lled with ingredients.
• Never beat the bread pan on the top or edge to remove the pan, this may damage the bread pan.
• Metal foils or other materials must not be inserted into the appliance as this can give rise to the risk of a re or
short circuit.
• Never cover the appliance with a towel or any other material, heat and steam must be able to escape freely. A re
can be caused if it is covered by, or comes into contact with combustible material.
• Always attach plug to appliance rst, then plug cord into the wall outlet. to disconnect, turn any control to OFF,
then remove plug from wall outlet.
• Do not operate the appliance for other than its intended use.
• Do not use outdoors.
• The appliance is not intended to be operated by means of an external timer or separate remote-control system.
• This appliance is intended to be used in household and similar applications such as:
– staff kitchen areas in shops, ofces and other working environments;
– farm houses;
– by clients in hotels, motels and other residential type environments;
– bed and breakfast type environments
• Do not operate the unit without bread pan placed in the chamber to avoid damaging the appliance.
• SAVE THESE INSTRUCTIONS
Packing List
Basic Unit, Measuring Cup, Measuring Spoon, Hook,
User’s Guide
Specications
Input Voltage : 230 V AC / 50 Hz
Power Consumption : 615 W
Capacity : 700 G - 1000 G
GL 3034 Bread Maker Manual.indd 9 8/17/2013 8:44:23 PM
Page 10

1. Liquid ingredient measurement
Water, fresh milk or similar liquids should be measured with measuring cup.
When reading amount, the measuring cup shall be placed on a horizontal flat surface
and keep your eyes level, the liquid level line must be aligned with the mark of
measurement.
Before measure oil or other ingredients, clean the measuring cup thoroughly.
2. Dry ingredient measurement
Dry ingredient should be kept in natural loose condition and measured with measuring
spoon or cup, dry measuring shall be done by gently spooning ingredients into
measuring cup, once filled, level off with knife to ensure accurate measurement.
3. Add-ingredient sequence
Usually ingredients shall be added according to the following sequence: liquid
ingredients, eggs, salt and milk powder etc. When adding flour, it shall not be contacted
by liquids completely and the yeast shall be placed on the dry flour. Pay special
attention that yeast must not contact with salt. If the machine is provided with auto
add-ingredient function, fruit ingredients shall be added only after beep sound is heard
to prompt you. In addition, when you use “ long-time” delay function, never add the
perishable ingredients such as eggs or fruit ingredients.
TROUBLE SHOOTING GUIDE
No.
Problem Cause Solution
1
Smoke from ventilation
hole when baking
Some ingredients adhere to the heat
element or nearby, for the first use, oil
remained on the surface of heat element
Unplug the bread maker and clean
the heat element, but be careful not
to burn you, during the first use, dry
operating and open the lid.
2
Bread bottom crust is too
thick
Keep bread warm and leave bread in the
bread pan for a long time so that water is
losing too much
Take bread out soon without
keeping it warm
3
It is very difficult to take
bread out
Kneader adheres tightly to the shaft in
bread pan
After taking bread out, put hot
water into bread pan and immerge
kneader for 10 minutes, then take it
out and clean.
1.selected program menu is improper Select the proper program menu
2.after operating, open cover several times
and bread is dry, no brown crust color
Don’t open cover at the last rise
4
Stir ingredients not evenly
and bake badly
3.Stir resistance is too large so that
kneader almost can’t rotate and stir
adequately
Check kneader hole, then take bread
pan out and operate without load, if
not normal, contact with the
authorized service facility.
5
Display “H:HH” after
pressing “start/stop”
button
The temperature in bread maker is too
high to make bread.
Press “start/stop” button and
unplug bread maker, then take bread
pan out and open cover until the
bread maker cools down
6
Hear the motor noises but
dough isn’t stirred
Bread pan is fixed improperly or dough is
too large to be stirred
Check whether bread pan is fixed
properly and dough is made
according to recipe and the
ingredients is weighed accurately
7
Bread size is so large as to
push cover
Yeast is too much or flour is excessive or
water is too much or environment
temperature is too high
Check the above factors, reduce
properly the amount according to
the true reasons
8 Bread size is too small or No yeast or the amount of yeast is not Check the amount and performance
bread has no rise enough, moreover, yeast may have a poor
activity as water temperature is too high
or yeast is mixed together with salt, or the
environment temperature is lower.
of yeast, increase the environment
temperature properly.
9
Dough is so large to
overflow bread pan
The amount of liquids is so much as to
make dough soft and yeast is also
excessive.
Reduce the amount of liquids and
improve dough rigidity
1.used flour is not strong powder and
can’t make dough rise
Use bread flour or strong powder.
2.yeast rate is too rapid or yeast
temperature is too high
Yeast is used under room
temperature
10
Bread collapses in the
middle parts when baking
dough
2.Excessive water makes dough too wet
and soft.
According to the ability of
absorbing water, adjust water on
recipe
1.too much flour or short of water Reduce flour or increase water
11
Bread weight is very large
and organization construct
is too dense
2.too many fruit ingredients or too much
whole wheat flour
Reduce the amount of
corresponding ingredients and
increase yeast
1. Excessive water or yeast or no salt
Reduce properly water or yeast and
check salt
12
Middle parts are hollow
after cutting bread
2.water temperature is too high Check water temperature
1.there is strong glutinosity ingredients in
bread such as butter and bananas etc.
Do not add strong glutinosity
ingredients into bread.
13
Bread surface is adhered
to dry powder
2.stir not adequately for short of water
Check water and mechanical
construct of bread maker
14
Crust is too thick and
baking color is too dark
when making cakes or
food with excessive sugar
Different recipes or ingredients have great
effect on making bread, baking color will
become very dark because of much sugar
If baking color is too dark for the
recipe with excessive sugar, press
start/stop to interrupt the program
ahead 5-10min of intended finishing
time. Before removing out the bread
you should keep the bread or cake
in bread pan for about 20 minutes
with cover closed
TROUBLE SHOOTING GUIDE
GL 3034 Bread Maker Manual.indd 10 8/17/2013 8:44:23 PM
Page 11

RECIPES
The following recipes are only for reference, you may adjust them depending on ingredients, own taste and experiments.
Basic Bread:
Material Quantity
Water 2/3 cup
Bread Flour 2 cups
Sugar 1-1/2 tablespoons
Salt 1/2 teaspoon
Butter 1 tablespoon
Active Dry Yeast 1 teaspoon
Whole Wheat Bread:
Material Quantity
Water 3/4 cup
Whole Wheat Flour 1-1/4 cups
Flour 1 cup
Sugar 2 tablespoons
Dry Milk 1 tablespoons
Salt 1/2 teaspoons
Butter 1 tablespoons
Active Dry Yeast 1 teaspoons
Garlic French Bread:
Material Quantity
Water 7/8 cup
Bread Flour 2 cups
All Purpose Flour 1/3 cup
Sugar 1/2 tablespoons
Salt 1 teaspoons
Active Dry Yeast 1 teaspoons
When beep Sound add:
Garlic Powder up to 1 teaspoons
Honey Bread:
Material Quantity
Water 7/8 cup
Bread Flour 2-1/3 cups
Honey 2-1/2 tablespoons
Dry Milk 1-1/2 tablespoons
Salt 1 teaspoons
Butter 1 tablespoons
Rapid Rice Yeast 1-1/2 teaspoons
Dough:
Material 700g 1000g
Water 270 ml 350 ml
Oil 2 tablespoons 3 tablespoons
Salt 1 teaspoon 2 teaspoon
Rened Flour 3 cups 4 1/3 cups
Sugar 2 1/2 tablespoon 2 1/2 tablespoon
Yeast 3/4 teaspoons 1 teaspoons
Ultra Fast Bread:
Material 700g 1000g
Water (48
0
C) 270 ml 350 ml
Oil 2 tablespoons 3 tablespoons
Salt 1 1 1/2
Rened Flour 3 cups 4 1/3 cups
Sugar 3 tablespoon 4 tablespoon
Yeast 2 teaspoons 3 teaspoons
Cake:
Material Quantity
Large Eggs,beaten lightly 2
Milk 1/4 cup
All Purpose Flour 1 cup
Baking Powder 1-1/2 teaspoons
Butter, melted 1/4 cup
Sugar 2/3 cup
Unsweetened Cocoa 4 tablespoons
Vanilla Extract 1 teaspoons
When beep sound add:
Chocolate Chips 1/4 cup
Strawberry Jam:
Material Quantity
Strawberries, crushed Net 300g
Sugar 2/3 cup
Lemon Juice 1 tablespoons
Blueberry Jam:
Material Quantity
Blueberries, crushed Net 300g
Sugar 2/3 cup
Lemon Juice 1 tablespoons
If using frozen blueberries, allow it to defrost at room
temperature.
Apple Jam:
Material Quantity
Apples(see preparation below) Net 300g
Sugar 2/3 cup
Lemon Juice 1 tablespoons
Preparation
Peel the apple and take out the core, then grate.
Raisin Bread:
Material Quantity
Water 2/3 cup
Bread Flour 2 cups
Sugar 1-1/2 tablespoons
Dry Milk 1-1/2 tablespoons
Salt 1/2 teaspoons
Butter 1 tablespoons
Cinnamon 1/2 teaspoons
Active Dry Yeast 1 teaspoons
When beep sound add:
Raisins 1/4 cup
Dessert:
Material Quantity
Slightly Beaten Eggs 3 pcs
Milk 1 3/4 cups
Cooked Rice 1 1/2 cups
Sugar 1/2 cup
Raisins (Optional) 1/2 cup
Vanilla 1 Tsp
Cinnamon 1 Tsp
GL 3034 Bread Maker Manual.indd 11 8/17/2013 8:44:23 PM
Page 12

GLEN APPLIANCES PVT. LTD.
I-34, DLF Ind. Area, Phase-I, Faridabad, India.
Helpline : 0129-2254191
E-mail : info@glenindia.com Website : www.glenindia.com
Warranty
GLEN APPLIANCES PVT. LTD. warrantees to get the
Oven Toaster Griller or any part thereof repaired free
of charge for a period of one year from the date of
purchase, should any defect develop due to faulty or
defective workmanship or material.
Terms to Warranty
• The Bill/Cash Memo should be presented.
• No repair work should be carried out by any
unauthorised person.
• The Oven Toaster Griller should be used as per
the directions given in the user’s guide. Any
defects caused by improper or reckless use are
not covered under warranty.
• No modication/alteration of any nature is made
in the Oven Toaster Griller.
• The company accepts no responsibility for any
consequential losses arising out of misuse or
negligence on the part of the user.
PRODUCT : BREAD MAKER GL 3034
SERIAL NO. _________________________________
DATE OF PURCHASE _________________________
NAME OF OWNER __________________________
ADDRESS ___________________________________
BILL NO. ____________ DATE _________________
+2 Years Extended Warranty
Here comes another Glen advantage !
Now you can register yourself for a free +2 Years
Extended Warranty on the appliance you just
purchased to get that enhanced peace of mind.
To avail this offer :
• Log on to www.glenindia.com and click on the
+2 Years Extended Warranty icon.
• An application form will pop up.
• Please ll the details, the product name, the
model number, the serial number, date of
purchase, Invoice number, dealer name and
your personal details.
• Please ensure that all details lled are correct
and match with the Invoice and the product
purchased.
• Press submit. A conrmation e-mail will be
sent on your e-mail ID. Keep a print of the
conrmation safely along with the original
Invoice to use the +2 Years Extended Warranty
anytime in future.
Note : The +2 Years Extended Warranty offer is
absolutely free. The offer is available only for 90 days
from the date of purchase of the appliance. In case
the same is not availed it lapses automatically.
As the offer is free of cost the company is not obliged
to refund or return any claims in lieu for the same.
DEALER’S STAMP & SIGNATURE
GL 3034 Bread Maker Manual.indd 12 8/17/2013 8:44:23 PM
 Loading...