

Page 1

Slot-in Electric Cooker
INSTALLATION AND USER INSTRUCTIONS
Model Number.
E297
Read these instructions prior to using the cooker and retain
them for future reference.
by belling
Page 2
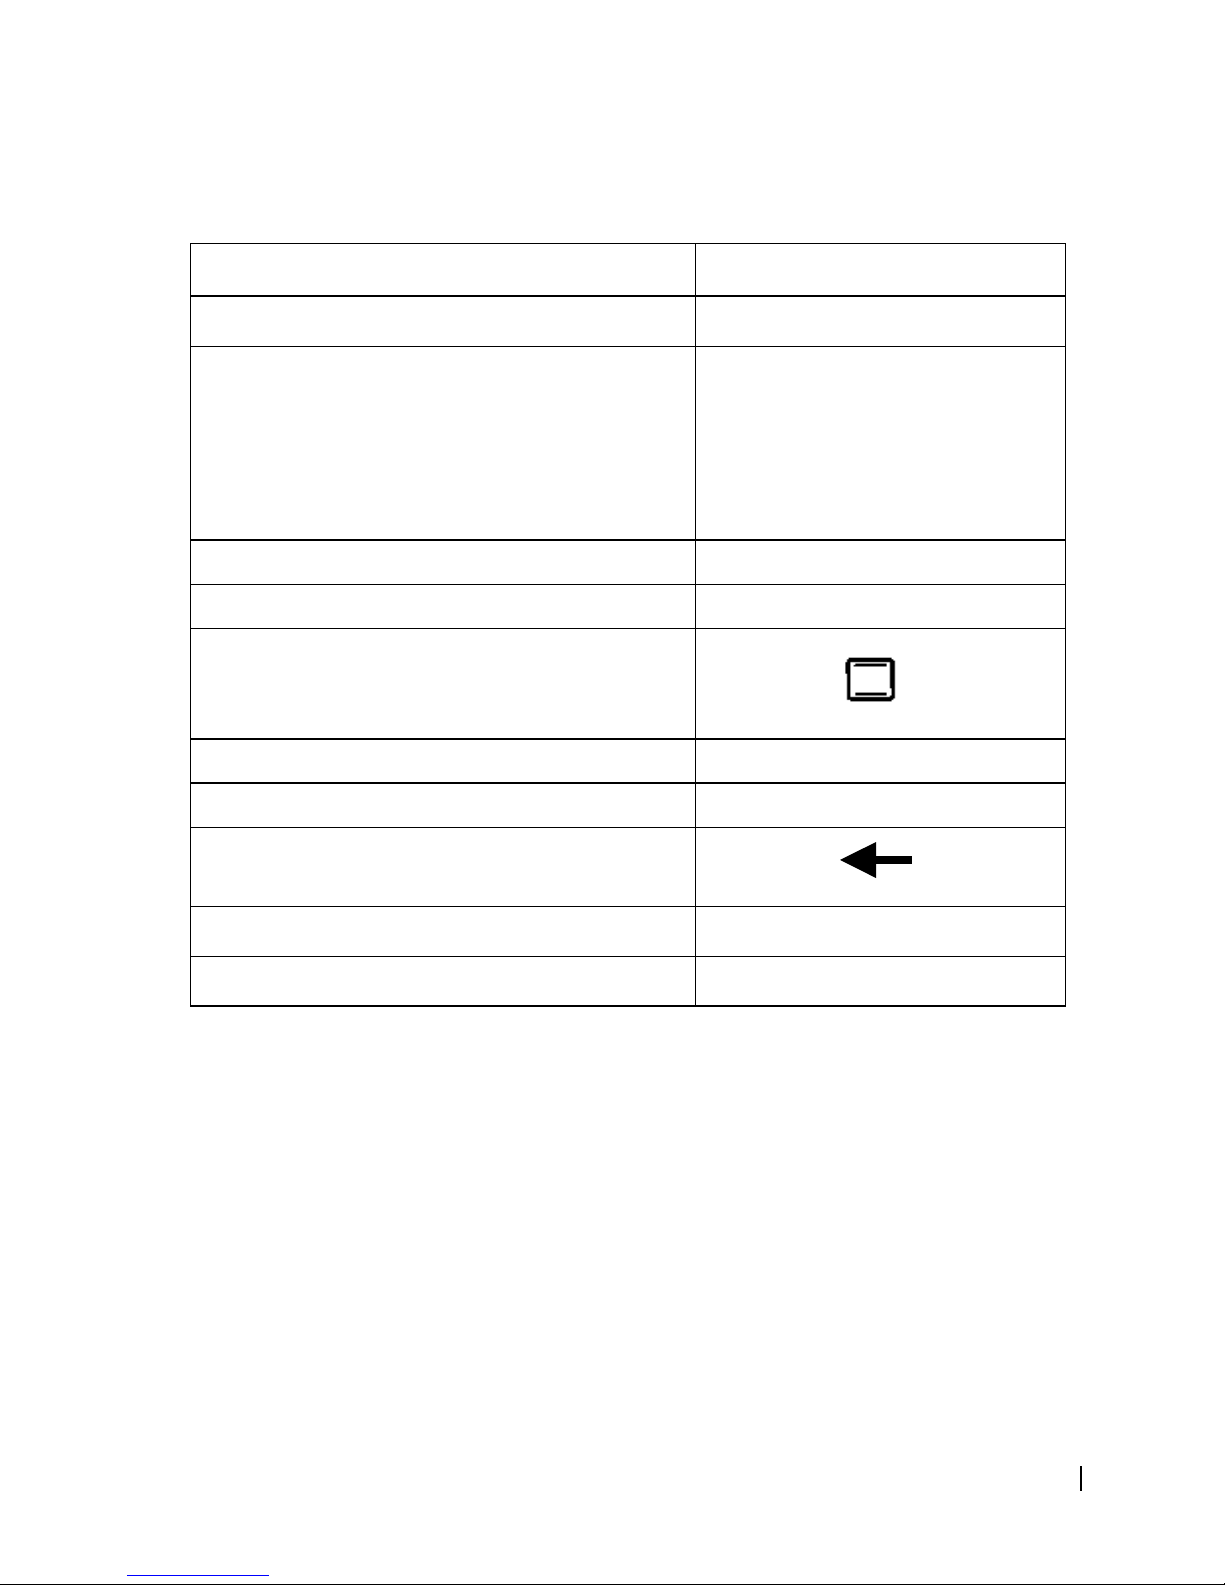
1
Brand
GLEN by belling
Model
E 297
A - More efficient
B
C
D
E
F
G - Less efficient
B
Energy consumption (KWh)
0,98
Time (min)
52,9
Conventional
Usable volume (litres)
49
Large
Medium
Small
The area of the largest baking sheet (cm2)
1 420
Page 3

2
The appliance was designed and made in accordance with the European
standards listed below:
• EN 60 335-1 and EN 60 335-2-6 (electrical) plus relative amendments
The appliance complies with the prescriptions of the European Directives as below:
• 73/23 + 93/68 EC concerning electrical safety (BT).
• 89/336 + 92/31 + 93/68 EC concerning electromagnetic compatibility (EMC)
Oven accessories that could come into contact with foodstuffs are made with
materials that comply with the provisions of the 89/109 EC directive dated
21/12/88.
Page 4

3
Contents
Introduction………………………………………………........... 3
Instructions for Installer..........................................………… 4-7
Technical Data...................................................……………. 8
For Your Safety............................................................... 9-10
Know your cooker........................................................…. 11-12
Using The Hob………………………………....................…… 13
Using The Hob – General Notes………………..............…. 14-15
Grilling.........................................................................…… 16
Using The Oven………………………………………........… 17-18
Cooking Guide……………………………………………….. 19
Cleaning and Maintenance ........................................….. 20-21
Is There Something Wrong With Your Cooker ? ............... 22
Service..........................................................................….. 23
Page 5

4
Introduction
Your Cooker
Thank you for purchasing a new Belling electric Cooker. Its stylish and practical
design will enhance your kitchen and make cooking a pleasure. It features a large
oven with a light, a grill and a hob with four sealed hotplates.
Even if you have used an electric cooker before, it is important that you read these
instructions thoroughly before starting to cook, as there may be many new features
not featured on your previous cooker. Pay particular attention to the installation and
safety instructions.
Getting Help
If you have any problems with installation, operating or cooking with your Belling
cooker please check through these instructions thoroughly to make sure that you
have not missed anything. If you still need help, then please contact (including a
daytime telephone number if possible):
Consumer Relations Department
Belling Appliances Ltd.,
Talbot Road,
Mexborough.
South Yorkshire.
S64 8AJ.
BELLING HELPLINE Tel: 01709 579902
Please quote the cooker model and serial number with your enquiries. This can be
found on the rating label, positioned on the rear panel of the cooker
WARNING! For your own safety, make sure that these instructions on
installation, use and maintenance are followed.
We advise you to keep these instructions in a safe place for future reference.
If you sell or transfer ownership of this product, please pass on these instructions to
the new owner.
Note: the pictures shown in the figures in this handbook are purely indicative.
Page 6

5
Instructions for the installer
TECHNICAL INFORMATION
• All installation and maintenance must only be carried out by qualified personnel.
The manufacturer cannot be held responsible for any damage to persons or
property resulting from an incorrect installation of the appliance.
• The appliance must only be used for its original purpose, that is, cooking for
domestic use.
• The manufacturer cannot be held responsible for any damage to persons or
property resulting from an incorrect installation, maintenance or use of the
appliance.
• The electrical safety of this appliance is only guaranteed if it is correctly
connected to a suitable earth system, as prescribed by the electrical safety
standards. The manufacturer disclaims all responsibility if these instructions are
not followed. Should you have any doubts, seek the assistance of a qualified
person.
• Before connecting the appliance ensure that the rating plate data corresponds to
that of electricity supply.
• The safety and automatic adjustment devices of the appliance may, during its life,
only be modified by the manufacturer or duly authorised supplier.
UNPACKING YOUR COOKER
• Remove all packaging before use and check to make sure that the appliance is in
perfect condition. If you have any doubts do not use the appliance and call your
supplier for advice.
• Do not move the appliance using the handle.
The packaging materials should carefully discarded and not left within easy reach of
children as they are a potential safety hazard.
Page 7
6
Instructions for the installer
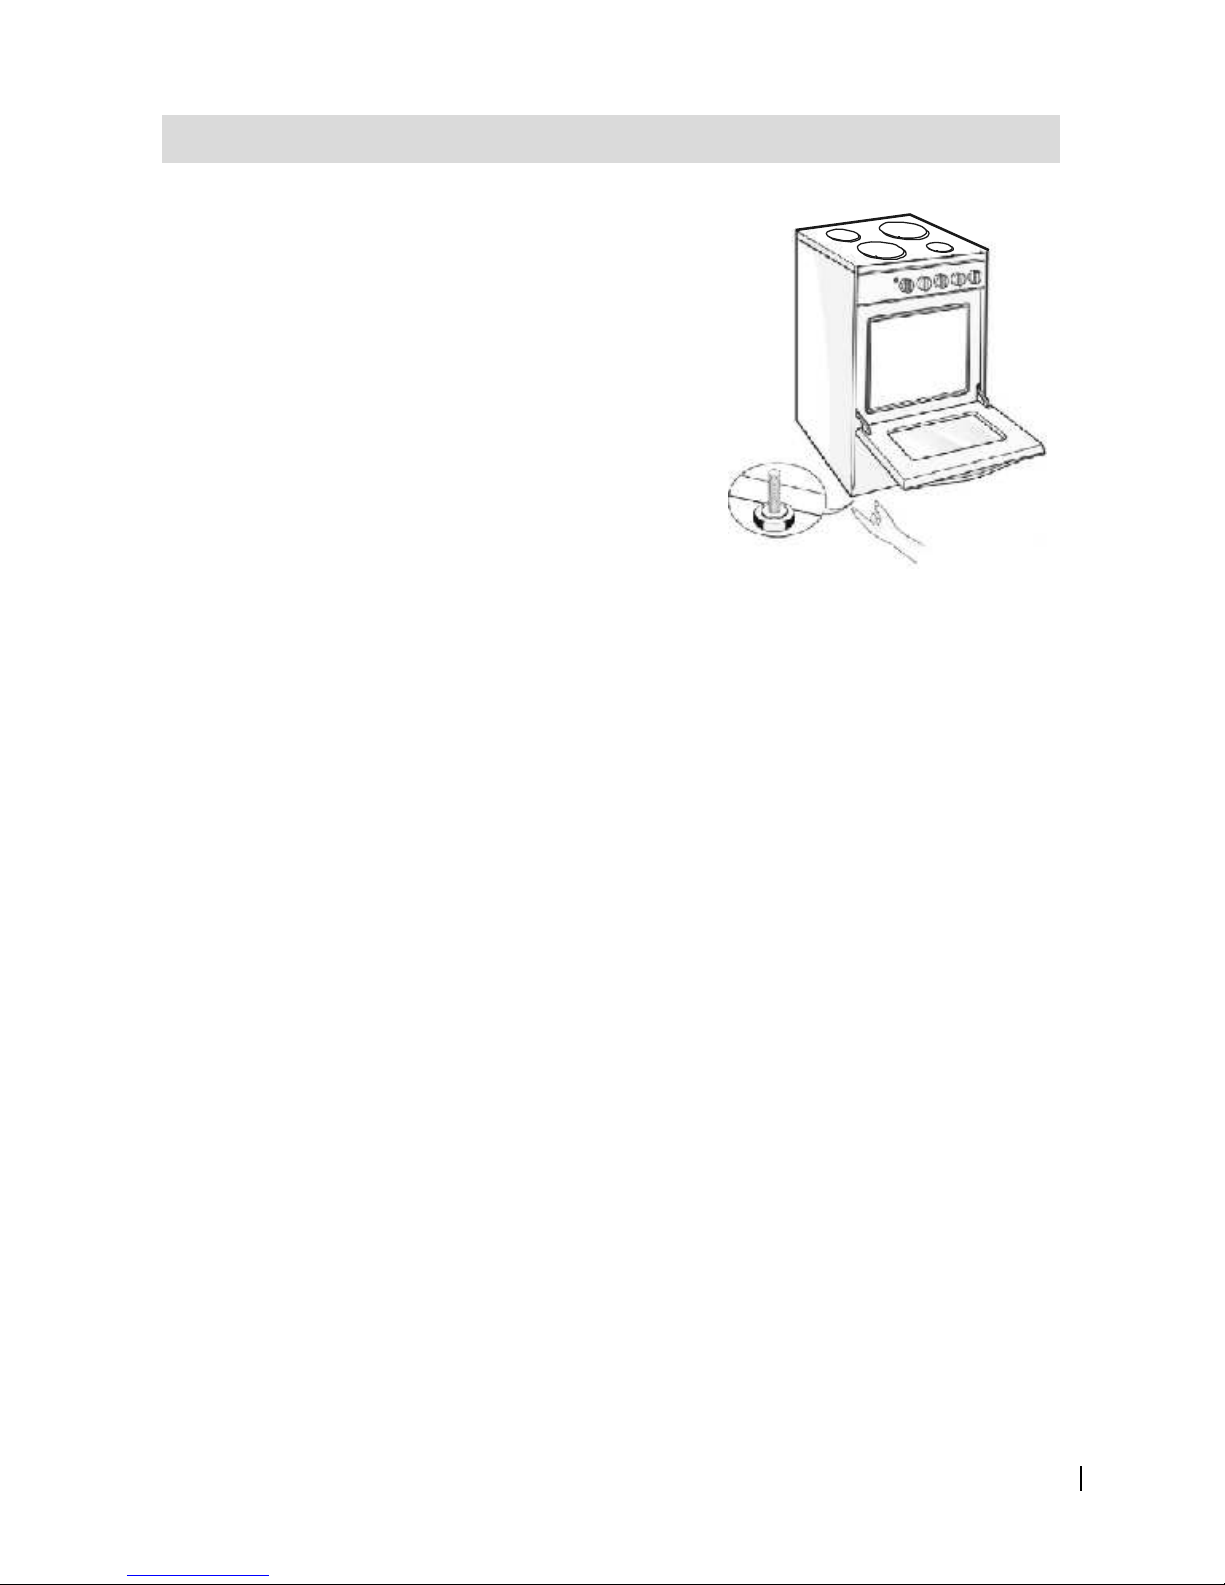
LEVELLING THE COOKER
The appliance is supplied with four plastic feet,
which must be screwed into the corners of the
oven base prior to installation. These feet are
used to level the oven and adjust its height in
relation to the surrounding cabinetry.
• It is important that the cooker is placed on a
firm level surface and that the feet, are
adjusted to ensure that the cooker is perfectly
level. An unleveled cooker can affect the
cooking results. To level the cooker, simply adjust the feet, screwing up or down
as required.
Electrical connection
WARNING! THIS APPLIANCE MUST BE EARTHED!
Your cooker should have been checked to ensure that the voltage corresponds with
your supply voltage, this is stated on the rating label behind the flap panel.
The cooker must be connected by a qualified electrician to a suitable double pole
control unit with a minimum rating of 32A with a minimum contact clearance of 3mm
in all poles, which should be fitted adjacent to (but not above) the cooker, in
accordance with IEE regulations. The power supply cable should conform to
BS6004. We recommend P.V.C insulated twin and earth cable with a conductor
size of 4mm2. The maximum size of cable that can be used is 10mm2.
The control unit should be easily accessible in the event of an emergency.
The appliance conforms to EN55014 regarding suppression of radio and television
interference.
Page 8
7
Instructions for the installer
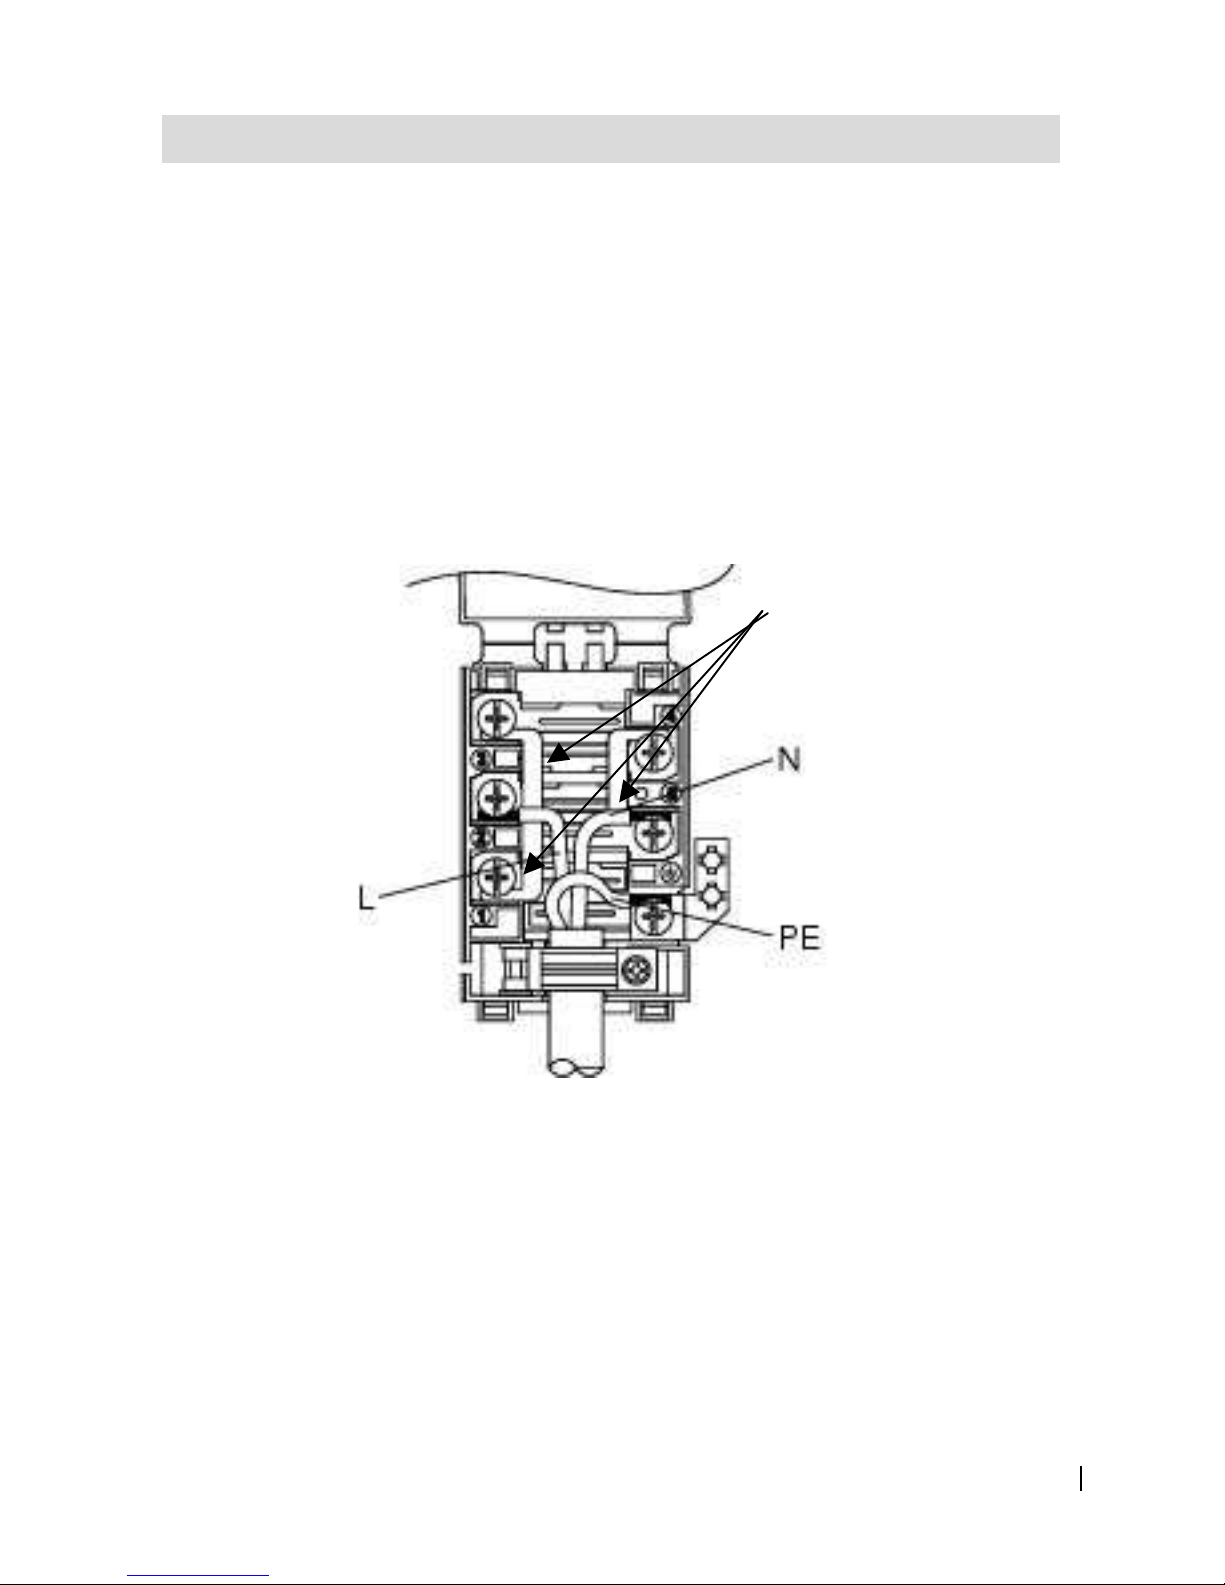
Connection
Using a screwdriver open the connector cover at the rear of the appliance. The
cover is released by releasing the two locks located at either side of the connector
bottom.
Pass the supply cable through the cable clamp and connect to the appropriate
terminals shown in the diagram below, checking that the terminal links are in the
correct position. Ensure all terminal screws are tight
Tighten the screws on the cable clamp and replace the cover.
TERMINAL LINKS
Page 9

8
Instructions for the installer
POSITION
Refer to the diagram below.
Allow sufficient cable length for the
cooker to be pulled out for cleaning, but
do not let it hang closer than 50mm (2”)
to the floor. The cable can be looped if
necessary, but make sure that it is not
kinked or trapped when the cooker is in
position.
BEFORE COOKING
Before you cook for the first time, we
recommend that you switch on each
element in turn to burn off any odours remaining from manufacture.
Simply operate each hob element and the grill on maximum for a few minutes, and
the oven for approximately 30 minutes. Ensure that the room is well ventilated (eg.
open a window or use an extractor fan) and that persons who may be sensitive to
the odour avoid any fumes.
It is suggested that any pets be removed from the room until the smell has ceased.
1
0
m
m
5
0
0
m
m
9
0
0
m
m
X
Page 10

9
Technical Data
DIMENSIONS
Height 900 - 915mm
Width 498mm
Depth 605mm (excluding handle and knobs)
GENERAL
Supply Voltage 230 - 240V A C ~ 50 Hz
Total Wattage 7.35 kW
HOB
Left Hand Front Hotplate Wattage (1) 2.0 kW
Left Hand Rear Hotplate Wattage (2) 1.0 kW
Right Hand Front Hotplate Wattage (4) 1.0 kW
Right Hand Rear Hotplate Wattage (3) 1.5 kW
OVEN (5)
Oven Wattage 1.85 kW
Grill Wattage 1.85 kW
SUPPLIED ACCESSORIES
Rod Shelf 2
Grill Pan 1
Grill Pan Grid 1
Grill Pan Handle 1
Adjustable Feet 4
3
2
1
4
5
Page 11

10
For Your Safety
When used properly your Belling cooker is completely safe, but as with any
electrical appliance there are some precautions you must take in its use.
ALWAYS
• ALWAYS make sure you understand the controls before using the cooker.
• ALWAYS check that all controls on the cooker are turned off after use.
• ALWAYS stand back when opening an oven door to allow heat to disperse.
• ALWAYS use dry, good quality oven gloves when removing items from the oven.
• Always remove spilt liquids from the lid before opening
• ALWAYS keep the oven door closed when the cooker is not in use.
• ALWAYS place pans centrally over the hotplates and position them so that the
handles cannot accidentally be caught or knocked or become heated by other
burners.
• ALWAYS keep the cooker clean, as a build up of grease or fat from cooking can
cause a fire.
• ALWAYS allow the cooker to cool before cleaning.
• ALWAYS follow the basic principles of food handling and hygiene to prevent the
possibility of bacterial growth.
• ALWAYS keep ventilation slots clear of obstructions.
Page 12

11
For Your Safety
NEVER
• NEVER allow anyone except an authorised Belling Service Agent to service or
repair your cooker.
• NEVER line the shelves, sides or floor of the oven with aluminium foil as
overheating and damage will result.
• NEVER leave children unsupervised where the cooker is installed as all surfaces
will get hot during and after use.
• NEVER allow anyone to sit or stand on any part of the cooker.
• NEVER store items that children may attempt to reach above the cooker.
• NEVER heat up unopened food containers as pressure can build up causing the
container to burst.
• NEVER store chemicals, food stuffs, pressurised containers in or on the cooker,
or in cabinet immediately above or next to the cooker.
• NEVER fill a deep fat frying pan more than 1/3 full of oil, or use a lid. DO NOT
LEAVE UNATTENDED WHILE COOKING.
• NEVER place flammable or plastic items on or near the hotplate.
• NEVER use proprietary spillage collectors on the hotplate.
• NEVER use the cooker as a room heater.
• NEVER dry clothes or place other items over or near to the hotplate or oven door.
• NEVER wear garments with long flowing sleeves whilst cooking.
Page 13

12
Know your cooker
Control Panel
1) Oven / grill thermostat
2) Oven function selector
3) Oven preheat neon
4) Cooker ‘on’ neon
5) Hotplate controls
Function Select
The cooking function is selected by turning the appropriate control (2) to
the desired position. Cooking functions available are as follows,
Variable
Grill
Conventional Oven (Top and Base heat)
Base heat only
Top heat only
1 3
2 45
Page 14

13
Know your cooker
Thermostat
The Thermostat (1) is used to set the desired cooking temperature, and is used in
conjunction with the function selector.
Temperature is set by turning the control clockwise to the desired setting, with a
range between 50ºC and approximately 250ºC being available
The oven indicator light (3) will immediately come on and remain on until the oven
reaches the set temperature. This light will then automatically go on and off during
cooking as the oven thermostat maintains the correct temperature.
Storage Compartment
Situated below the oven is a storage compartment which can be used to store
utensils or cookware when not in use. Never store combustible materials,
chemicals, food stuffs or pressurised containers in the storage compartment.
WARNING:
DURING USE THE APPLIANCE BECOMES HOT. CARE SHOULD BE TAKEN TO
AVOID TOUCHING HEATING ELEMENTS INSIDE THE OVEN.
Page 15

14
Using The Hob
The hob is equipped with four sealed hotplates, one of which is a rapid boil plate,
indicated by a red mark. The plates are controlled by a 7 - position switch (5).
Switch on the plates by turning the knob to the required position.
Use of Hotplates
Each control can be used to select one of six temperature settings from a minimum
at position 1 to a maximum at position 6. For normal cooking, after having placed
the pan on the required hob position, set the control knob to maximum (6); wait until
boiling point is reached, then set the knob to a lower position as required. Red spot
plates give faster boiling times. (See chart below for guide to control settings.)
Control Settings Guide
This table is provided only as a guide – settings also depend on the type of pan
used and the quantity of food.
Knob Position Type of Food
1 To melt butter, chocolate, etc.
1 or 2
To heat food gently.
To keep small amounts of water simmering.
To heat sauces, containing egg yolks and butter.
To simmer: stews, meat, fish, vegetables, fruit.
3 To heat solid and liquid foods.
Keep water boiling.
Thaw frozen foods.
Make 2-3 egg omelettes.
4 or 5 To cook foods, just above simmering.
To maintain 'rolling' boil for preserve making.
5 or 6 To seal meat and fry fish.
6 Frying potatoes.
Bringing water to the boil.
Deep fat frying.
Dissolve sugar for preserve making.
Page 16

15
Using The Hob – General Notes
SAFETY REQUIREMENTS FOR DEEP FAT FRYING
IMPORTANT – As with any cooking appliance there could be some fire risk
attached to the heating of oil, particularly for deep fat frying, cooking utensils
containing oil must not be left unattended on or in close proximity to the cooking
zones. To minimize the risks inherent with deep fat frying, we recommend the
following:
• Use a deep pan, large enough to completely cover the appropriate heating area.
• Never fill the pan more than one-third full of fat or oil.
• Never leave oil or fat unattended during the heating or cooking period.
• Do not try to fry too much food at a time, especially frozen food.
This only lowers the temperature of the oil or fat too much, resulting in greasy
food.
• Always dry food thoroughly before frying, and lower it slowly into the hot oil or fat.
Frozen foods, in particular, will cause frothing and spitting, if added too quickly.
• Never heat fat, or fry, with a lid on the pan.
• Keep the outside of the pan, clean and free from streaks of oil or fat.
In the unfortunate event of a chip pan fire
1. Switch Off the hotplate.
2. Smother flames with a fire blanket or damp cloth.
3. Leave the pan to cool for at least 60 minutes before moving.
Choosing your utensils
For best results we recommend the use of good quality saucepans with smooth flat
bases. Aluminium pans with coloured vitreous enamelled bases absorb heat and
are therefore more efficient in use. Almost equally as good are saucepans with a
thick machined aluminium base. If using enamelled steel or cast iron pans, ensure
that they have good smooth flat bases as otherwise the heat will not be distributed
evenly and damaging heat spots may be created. Never use recessed or ridged
base utensils. Ideally the base of saucepan should be approximately the same size
as the heating area, up to a maximum of 254mm (10").
Page 17

16
Using The Hob – General Notes
Remember…
1. Purchasing a new pan will not
necessarily mean it will have a flat
base, always check before buying.
2. Using the correct pans and utensils
will result in maximum contact with the
hob and maximum efficiency as with
any type of electric hob.
Page 18

17
Grilling
WARNING:
DURING USE THE APPLIANCE BECOMES HOT. CARE SHOULD BE TAKEN
TO AVOID TOUCHING HEATING ELEMENTS INSIDE THE OVEN.
IMPORTANT!
GRILLING MUST ALWAYS BE CARRIED OUT WITH THE OVEN DOOR
CLOSED
NEVER allow young children near the appliance when the grill is in use as the
surfaces get extremely hot.
DO NOT LINE THE GRILL PAN WITH ALUMINIUM FOIL.
GRILLING (1850 W)
Turn the top oven/grill function selector (2) to the symbol, and turn the
thermostat (1) to 250º to preheat, before reducing to desired cooking temperature.
The complete top element will come on and radiate heat directly onto the food.
Allow the grill to preheat for approximately 5 minutes before starting to cook.
When grilling, the shelf is placed in either the first or second runner position from
the top. The grill pan is placed centrally on the shelf, beneath the grill element.
Leave the control at 250º for toast, and for sealing and fast cooking of foods. For
thicker foods requiring longer cooking, turn the thermostat to a lower setting after
the initial sealing on both sides at 250º. The thicker the food, the lower the control
should be set.
Food which requires browning only should be placed under the hot grill on the
second runner from the top.
After use, always return controls to their off positions
Page 19

18
Using The Oven
The oven is controlled by first selecting a cooking function with the function selector
knob (2) then turning the thermostat (1) to the required temperature.
When operated an indicator light (3) will immediately come On, and will go out when
the desired temperature is reached, subsequently switching On and Off at intervals
to indicate that the correct temperature is being maintained.
Function Description
Upper and lower heat
Upper and lower heat selects both the upper and lower elements
and is used to keep the whole oven at a uniform temperature.
Lower heat only
Lower heat only selects the bottom element. This option is used for
browning the bottom of food i.e. pizzas, and is also suitable for
casseroles and cook-in sauces
Upper heat only
Upper heat only selects the upper element. This option is used for
browning the top of food.
Main Oven Cookery Notes
The charts included in this booklet are intended to be a guide only, giving
approximate cooking temperatures and times. To suit personal taste and
requirements, it may be necessary to increase or decrease temperatures. If large
quantities are being cooked it will be necessary to increase the cooking time
somewhat to compensate for the extra oven load.
It should be noted that at the end of a cooking period there may be a momentary
puff of steam when the oven door is opened, this will disperse in a few seconds and
is a perfectly normal characteristic of an oven with a good door seal.
Oven Utensils
To ensure even circulation do not use meat pans larger than
390 x 300mm (15ins x 12ins) and baking trays no larger than 330 x 255mm (13ins x
10ins), these should be positioned centrally on the oven shelf.
Food or cooking utensils should not be placed on the floor of the oven.
Page 20

19
Using The Oven
To prepare Meat and Poultry for Roasting in your Oven
(a) Wipe the meat or poultry, dry well and weigh it. Meat which has for been stored
in a refrigerator should be allowed to come to room temperature before
cooking, and frozen meat or poultry must be completely defrosted before
placing in the oven.
(b) The weight of any stuffing used should be added before calculating the cooking
time.
(c) Place meat/poultry in a meat pan of a suitable size. Small joints weighing less
than 1.75kg (31/2 lbs) should be roasted in a smaller meat pan/tin – or they
may be ‘pot roasted’ – a small joint or a large meat pan causes unnecessary
oven splashing and evaporation of meat juices.
(d) Additional fat should not be added, except for veal, very lean meat or poultry
which can either be ‘larded’ with fat bacon or brushed very sparingly with
cooking oil or melted fat.
(e) Beef, lamb, mutton and poultry may be dusted lightly with seasoned flour to
give a crisp outer surface. The skin of duck and goose should be pricked to
release excess fat during cooking, and the rind of pork should be scored,
brushed lightly with oil, and rubbed with salt to give crisp crackling.
(f) Meat and poultry wrapped in, or covered with a tent of aluminium foil will be
juicy and tender. Roasting bags offer the same advantages. Always follow the
manufacturer’s pack instructions.
(g) Potatoes for roasting only require to be brushed with cooking oil or melted fat.
Frozen Meat and Poultry
Joints of meat and whole birds should be defrosted slowly, preferably in a domestic
refrigerator (allowing 5-6 hours per 450g, 1 lb), or at room temperature (allowing 2-3
hours per 450g, 1 lb).
Frozen meat or poultry must be completely defrosted before placing in the oven. It
is
essential to wash thoroughly and cook meat and poultry immediately after
defrosting.
Always allow oven to preheat prior to use. For conventional mode (top and base
heat) allow 15 minutes, and 20 minutes for base heat only and top heat only.
Page 21

20
Cooking Guide
When cooking on one shelf only, generally use the shelf position 2 up and shelf
positions 1 and 3 when cooking on 2 shelves.
MEAT Preheat Thermostat
Setting (ºC)
Time (approximate)
Beef / Lamb
(slow roasting)
Yes 170 / 190 35 mins per 450g (1 lb)
+ 35 mins over
Beef / Lamb
(foil covered)
Yes 190 / 210 35-40 mins per 450g (1 lb)
Pork
(slow roasting)
Yes 170 / 190 40 mins per 450g (1 lb)
+ 40 mins over
Pork
(foil covered)
Yes 190 / 210 40 mins per 450g (1 lb)
Veal
(slow roasting)
Yes 170 / 190 40-45 mins per 450g (1 lb)
+ 40 mins over
Veal
(foil covered)
Yes 190 / 210 40-45 mins per 450g (1 lb)
Poultry / Game
(slow roasting)
Yes 170 / 190 25-30 mins per 450g (1 lb)
+ 25 mins over
Poultry / Game
(foil covered)
Yes 190 / 210 25-30 mins per 450g (1 lb)
Casserole Cooking Yes 150 2 - 2½ hrs
BAKING Preheat Thermostat
Setting (ºC)
Time (approximate)
in mins
Scones Yes 215 / 220 8 - 20
Small Cakes Yes 160 / 180 15 - 20
Victoria Sandwich Yes 150 / 160 30 - 35
Sponge Sandwich
(fatless)
Yes 190 / 200 23 - 28
Swiss Roll Yes 210 / 220 7 - 15
Semi-rich fruit cakes Yes 160 / 170 60 – 75 (7” tin)
Rich Fruit Cakes Yes 130 / 140 Time dependant on size
Shortcrust Pastry Yes 180 / 200 Time dependant on
recipe
Puff Pastry Yes 210 / 220 Time dependant on
recipe
Yorkshire Pudding Yes 195 / 215 30 - 40
Individual Yorkshire
Puddings
Yes 200 / 215 20 - 30
Milk Pudding Yes 140 / 150 90 - 120
Baked Custard Yes 140 / 160 40 - 50
Meringues Yes 80 - 100 150 - 210
Page 22

21
CLEANING AND MAINTENANCE
In the interests of both safety and hygiene your Belling electric cooker needs to be
kept clean. A build-up of grease or fat from cooking could cause a fire hazard.
WARNING! For your own safety, always switch off your cooker at the mains supply
and allow to cool before cleaning. Never use excessive amounts of water to clean
your cooker, and remember that your cooker is heavy – take care when pulling it
out for access.
The Hob
Clean the hob surround with a cloth wrung out in warm soapy water. Stubborn
stains can be removed with a cream, paste or liquid cleaner, or by gently rubbing
with liberally soaped, very fine steel wool pad.
The sealed hotplates may be cleaned using a soap filled pad following the grain of
the hotplate. This will ensure that any stubborn, burnt on spillages are removed.
Wipe over with a damp clean cloth, making sure that all the cleaner has been
removed.
IMPORTANT: After cleaning, dry the hotplates thoroughly by switching on to a low
setting for a few minutes, then smear with a little cooking oil to provide a protective
coating.
Belling Sealed Hotplate Conditioner is available from our spares department on
01709 579907 quoting part number BELLING026.
The stainless steel hotplate trim will discolour during normal use and can be
cleaned using a cream cleaner or a stainless steel cleaner.
The Oven
The oven should be cleaned after each use to remove cooking residuals and
grease which, if burnt on when the oven is used again, will form deposits or stains,
as well as unpleasant smells. Do not leave vinegar, coffee, milk, salty water or the
juice of lemon or tomato on enamelled surfaces for any length of time. Always wash
the accessories used.
The rod shelf and food support grid can be cleaned using household cream
cleanser with a nylon pad or sponge. Heavier soiling may require the use of a
proprietary oven cleaner or steel wool pad, but do not allow these to contact the
door seals or plastic parts of the cooker.
Only use oven cleaners which carry the Vitreous Enamel Development Council's
Approvals symbol, and always follow the manufacturers instructions for use. The
manufacturer cannot be held responsible for any damages caused by incorrect
cleaning. . Belling Oven Cleaner is available from our spares department on 01709
579907 quoting part number BELLING030.
Page 23

22
CLEANING AND MAINTENANCE
Cooker Exterior
Wipe over with a damp cloth wrung out in warm soapy water and polish with a dry
cloth.
Do not use cream cleaners, oven cleaners or abrasive powders for cleaning the
plastic knobs as damage may occur.
Oven Door Seal
The oven door seal guarantees the correct functioning of the oven. We recommend
you:
• clean it with warm soapy water, avoiding abrasive products.
• check its condition from time to time.
DISPOSAL OF YOUR PRODUCT
To minimise the risk of injury to children please dispose of your product carefully
and safely. Remove all doors and lids (where fitted). Remove the mains cable
(where fitted) by cutting off flush with the appliance and always ensure that no plug
is left in a condition where it could be connected to the electricity supply.
To help the environment, Local Authority instructions should be followed for the
disposal of your product.
Page 24

23
Is There Something Wrong With Your Cooker?
Before contacting your Service Centre or Installer, check the guide below, there
may be nothing wrong with your cooker.
Problem Check
Nothing works Is the main cooker wall switch turned on?
Selected function doesn’t Work Has a temperature been selected?
The oven doesn’t cook as
expected
Was the correct function selected?
Are cooking results not satisfactory?
Problem Check
Grilling
Uneven Cooking
front to back
Ensure that the grill is positioned centrally below the grill
element
Baking – General
Uneven rising of
cakes
Ensure that the oven shelf is level by using a spirit level on
the rod shelf and adjusting the feet. The oven should be
checked both left to right and front to back.
Sinking of cakes The following may cause cakes to sink:
1. Cooking at too high a temperature.
2. Using normal creaming method with soft margarine.
Over/Under cooking
Fast/Slow cooking
Refer to the cooking times and temperatures given in the
cooking charts provided, however, it may be necessary to
increase or decrease temperatures by 10º to suit personal
tastes. Do not use oven/meat tins greater than 56mm
(2¼”) in height.
Page 25

24
Service
Please check your guarantee card for who to contact for service. Remember that
service agents may charge for visits (even during the guarantee period) if nothing is
found to be wrong with the appliance, so always check the instructions to make
sure you have not missed anything.
Belling Appliances After Sales Division (Service)
Tel: 08457 454540 (all calls will be charged at local rate)
Before contacting a service agent, please note the following details about your
cooker:
Model Number ………………………………………
Serial Number ………………………………………
Date of Purchase ………………………………………
In order to provide a complete service history for your Belling product, please ask
the service engineer to record the appropriate details in the chart below.
Date Nature of fault Parts Replaced or
Repaired
Authorised Stamp
or Signature
IMPORTANT NOTICE:
In line with our continuing policy of research and development, we reserve the right
to alter models and specifications without prior notice.
This instruction manual is accurate at the date of printing but will be superceded
and should be disregarded if the specifications are changed.
Page 26

Belling Appliances Ltd., Mexborough, South Yorkshire S64 8AJ
ES E297 / 021107
by belling
 Loading...