

Page 1
USER’S GUIDE
BUILT-IN
DISHWASHER
DW 7721J
®
Page 2
To revie w th e se cti on o n tro uble shooti ng Tip s
wil l h elp you to solve some common pro blem s
by your self .
Dea r Cu sto mer,
Pl ease carefu ll y re ad th is m anu al bef ore us in g the
di shwa she r, it will h elp you t o us e an d ma inta in the
di shwa she r pro perl y.
Pa ss i t on t o any subseq uent owner o f the app lianc e.
This manual con tains se ctions on sa fe ty Instr u ctions,
Operating I nstr uctio ns, Inst all at ion I nstructions a nd
Troublesho otin g Tip s, etc.
The manufa cture r, fo llowi ng a p olicy of constant
deve lo pment and u pdat ing o f the produc t, ma y
make m odifications witho ut g iving prior n otic e .
Keep it as a re fer in the late r da ys.
If yo u can not solv e the pr oblem s by yourself ,
ple ase ask f or the help of prof e ssiona l te chn icia n s.
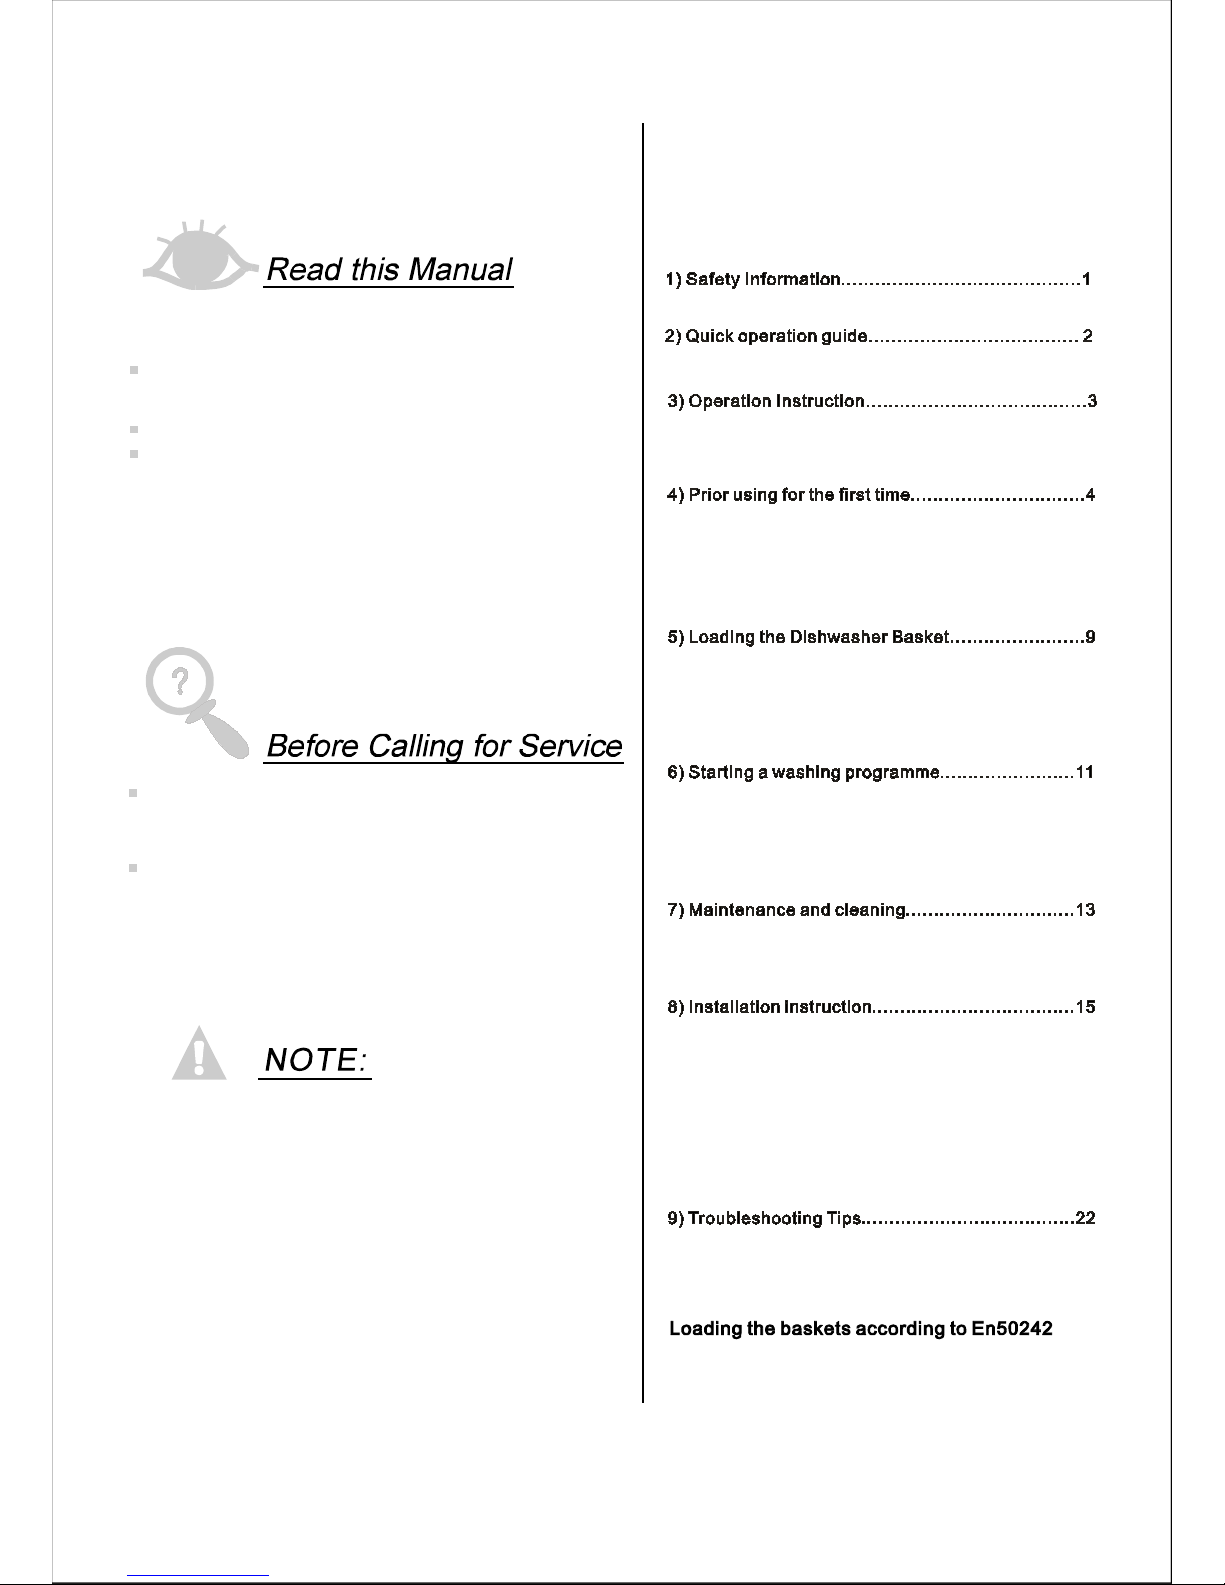
Dishwasher Fe at ures...... .. .. ..... ......... ....... .. ... ...3
A Wate r Soft en er...... .... .... . .... .... . ........ . ..... .. ...4、
Attent ion bef or e or afte r load ing the D is h was her
Ba sket s...... ....... ......... .. ....... .. ....... .. ....... .. .......9
Fil t erin g Syst e m.... ... ......... ........ . .... .... . .. ..... .. .. 13
Caring for the Di shwasher.. .. ....... ........ . . ... .... ..14.
B Load in g th e Sal t in to t he So ft ener.. .... .... ... ....5、
C Fill t he R inse Aid D is penser.... .... .. . .. .... .. . .. ...5、
D Funct i on of Detergent .. .. ....... ........ . ........ . .. .. 6、
Load ing the upp er .... ...........................10Bask et
Loading the Lower .. .. ....... ......... ......... ..10Bas ket
Was h Cycle Tabl e.. ... ..... ... . .... .... . .... ..... ...........11
Turni ng on th e Appl iance.................... ......... ...11
Change the Pr ogram me .... ......... . ...... . ........ . 12.. ..
At the e nd of the Wa sh Cycle... ... ...... ... ...... ... ...12
Be fore cal l in g for se rvi ce. ... .... .. ..... ....... .... . . ....22.
Error codes..... .... ..... .. ................ .. .. ... ...........23.
Tech nical infor mation... . ... ....... ....... ... .... .. .. ... 24..
Co nt ro l Pa nel... . .... ...... ..... ....... ...... ..... . ..... . ..... ..3
... . .. ......... .... ..... .... ..... . 15Ins t allati o n pr ep aration
...16Aest he tic panel's dimensi o ns and instal lation
... ..... .... ..18Tensi o n ad ju s tment of t he doo r sprin g
..... . .... ..... .... ..... ...... 18Conne c tion o f dr ain ho s es
..... . .... ..... .... ..... . 19Dishw asher i nstallation ste ps
About Electr i city Connecti n g. .. ......... .... ..... .... ..20
Cold Wate r C onnection.. .. .... ... ........ . .... ..... .... . 21
Page 3

This appliance is intended to be used in household
and similar applications such as:
-staff kitchen areas in shops, offices and other
working environments;
-farm ho uses;
-by clients in hotels, motels and other residential type
environments;
-bed and breakfast type environments.
This appliance can be used by children aged from 8
years and above and persons with reduced physical,
sensory or mental capabilities or lack of experience
and knowledge if they have been given supervision
or instruction concerning use of the appliance in a
safe way and understand the hazards involved.
Children shall not play with the appliance. Cleaning
and user maintenance shall not be made by children
without supervision. For EN60335-1
This appliance is not intended for use by persons
(including children )with reduced physical, sensory
or mental capabilities, or lack of experience and
knowledge ,unless they have been given supervision
or instruction concerning use of the appliance by a
person responsible for their safety. For IEC60335-1
This appliance is for indoor use only, for household
use only.
To protect against the risk of electrical shock, do not
immerse the unit, cord or plug in water or other liquid.
Please unplug before cleaning and maintenance the
appliance .
Use a soft cloth moisten with mild soap, and then use
a dry cloth to wipe it again.
( )
( )
When using your dishwasher,
follow the precautions listed below:
Page 4

This appliance must be earthed. In the event of a
malfunction or breakdown, earthing will reduce the risk
of anelectric shock by providing a path of least
resistance of electric current. This appliance is equipped
with a cord having an equipment-earthing conductor
and a grounding plug.
The plug must be plugged into an appropriate outlet that
is installed and earthed in accordance with all local
codes and ordinances.
Improper connection of the equipment-earthing
conductor can result in the risk of an electric shock.
Check with a qualified electrician or service
representative if you are in doubt whether the appliance
is properly grounded.
Do not modify the plug provided with the appliance;
If it does not fit the outlet.
Have a proper outlet installed by a qualified electrician.
Do not abuse, sit on, or stand on the door or dish rack of
the dishwasher.
Do not operate your dishwasher unless all enclosure
panels are properly in place.
Open the door very carefully if the dishwasher is
operating, there is a risk of water squirting out.
Do not place any heavy objects on or stand on the door
when it is open. The appliance could tip forward.
When loading items to be washed:
1) Locate sharp items so that they are not likely to
damage the door seal;
Page 5

2) Warning: Knives and other utensils with sharp points
must be loaded in the basket with their points down or
placed in a horizontal position.
Check that the detergent powder is empty after
completion of the wash cycle.
Do not wash plastic items unless they are marked
dishwasher safe or the equivalent.
For plastic items n
ot so marked,
check the manufacturer's
recommendations.
Use only detergent and rinse additives designed for
an automatic dishwasher.
Never use soap, laundry detergent, or hand washing
detergent in your dishwasher.
Children should be supervised to ensure that they do not
play with the appliance.
The door should not be left open, since this could increase
the risk of tripping.
If the supply cord is damaged, it must be replaced by the
manufacturer or its service agent or a similarly qualified
person in order to avoid a hazard.
During installation, the power supply must not be
excessively or dangerously bent or flattened.
Do not tamper with controls.
The appliance is to be connected to the water mains using
new hose sets and that old hose-sets should not be reused.
The 14.
The maximum permissible inlet water pressure is 1MPa.
The minimum permissible inlet water pressure is 0.04MPa.
Page 6
Dispose of the dishwasher packaging material
correctly.
All packaging materials can be recycled.
Plastic parts are marked with the standard
international abbreviations:
PE for polyethylene, e.g. sheet wrapping material
PS for polystyrene, e.g. padding material
POM polyoxymethylene, e.g. plastic clips
PP polypropylene, e.g. Salt filler
ABS Acrylonitrile Butadiene Styrene, e.g. Control
Panel .
Packaging material could be dangerous for children!
For disposing of package and the appliance please
go to a recycling centre. Therefore cut off the power
supply cable and make the door closing device
unusable.
Cardboard packaging is manufactured from recycled
paper and should be disposed in the waste paper
collection for recycling.
By ensuring this product is disposed of correctly, you
will help prevent potential negative consequences
for the environment and human health, which could
otherwise be caused by inappropriate waste handling
of this product.
For more detailed information about recycling of this
product, please contact you
r local city office and your
household waste disposal service.
DISPOSAL: Do not dispose this product as unsorted
municipal waste. Collection of such waste separately
for special treatment is necessary.
Page 7
2
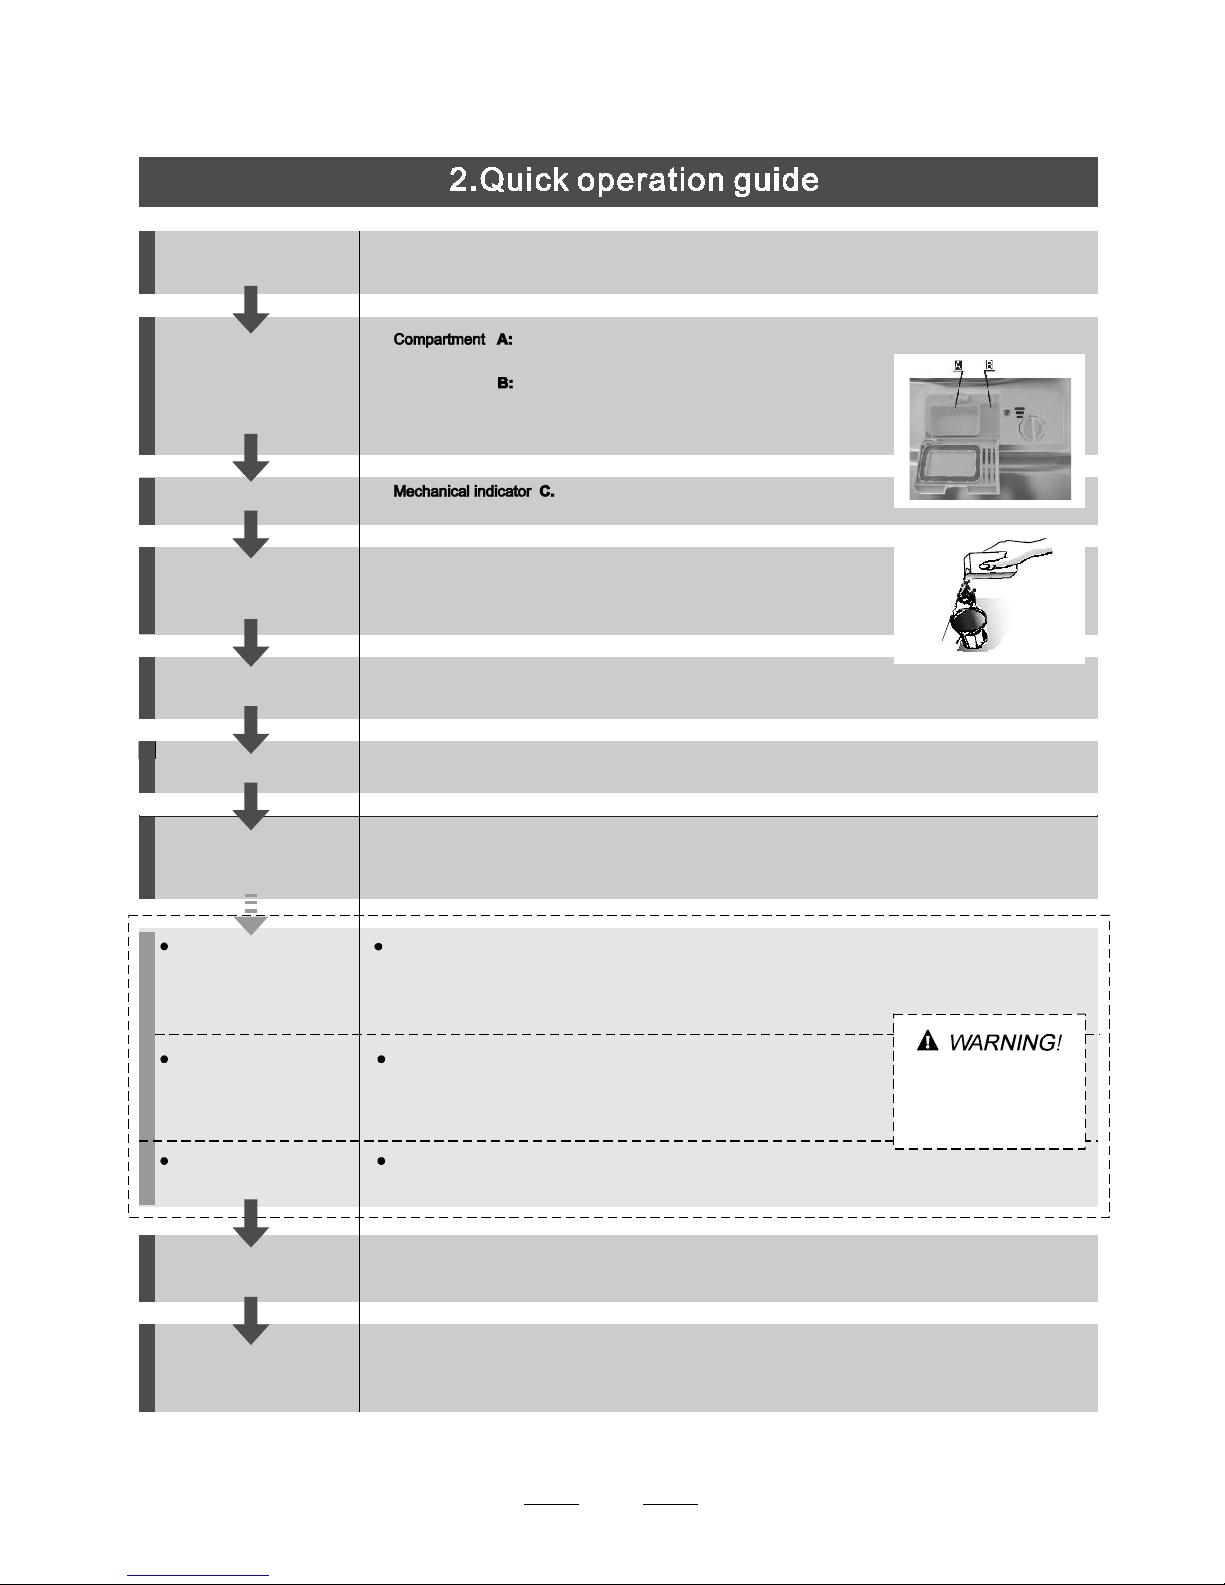
With each wash cycle.
Compartment
For programmes with pre-wash only.
(Follow the user instructions!)
Electric indicator on control panel (if provided).
Check the rinse aid level
(On models with water softener system only.)
Electric indicator on control panel (if provided).
If there is no salt warning light in the control panel
(for some models), you can estimate when to fill the salt into
the softener by the number of cycles the dishwasher has run.
Check the regeneration
salt level
Load the baskets
Select a programme
Turn on the water tap ,close the door . The machine will start working after about 1 seconds.
Running the dishwasher
Switch off the appliance
Turn off the water tap,
unload the baskets
Fill the detergent dispenser
Warning: wait a f ew minutes (about 15 minutes) before unloading the dishwasher to avoid handling
the dishes and utensils while they are still hot and more susceptible to break.
They will also dry better.Unload the appliance, starting from the lower basket.
Changing the programme
Add forgotten dishes in the
dishwasher.
Scrape off any large amount of leftover food. Soften remnants of burnt food in pans,
then load the baskets. Refer to the dishwasher loading instructions.
Press the Programme Button until the selected programme lights up.
( See the section entitled Ope ration instruction )“ ”
If the appliance is switched
off during a wash cycle.
Open the do o r carefully.
Hot st eam may esc ape
when t he do or is op ened!
If the appliance is switched off during a wash cycle, when switched
on again, please re-select the washing cycle and operate the dishwasher
according to the original Power-on state ).
Switch on the appliance Open the door,press the On/Off button to switch on the appliance .
1.Open the door a little to stop the dishwasher.
2.After the spray arms stop working, you can open the door completely.
3.Add the forgotten dishes.
4.Close the door, the dishwasher will start running again after 1 seconds.
For detaile d ope rating metho d r ead the correspon ding content on the ins truc tion manual.
1. A running cycle can only be modified if it has been running for a short time. Otherwise the detergent
may have already been released and the water already drained. If this is the case, the detergent
dispenser must be refilled.
2. Press the for more than 3 seconds to cancel the running programme.
3. Select a new programme.
4. Restart the dishwasher.
Programme Button
When the working cycle has finished, the buzzer of the dishwasher will sound 8 times, then stop.
Turn off the appliance using the On/Off Button.
Since the appliance is standing by, it will power off automaticly after 30 minutes without any operation.
Page 8
3
bef o re us i ng it for the first tim e.
To ge t the best performanc e fr om your dish was her, r ead all op erat i ng ins tru ction s
11
12
Ba ck View
1
2
3
4
5
7
8
9
10
Fr on t v i ew
Lower bask e t
Salt cont aine r
Dispe nser
Cup shel f
Spra y arm s
Fil ter a ssem bl y
Inl e t pi pe conne ct o r
Dr ai n pi pe
Uppe r bas ket
Cutl er y rack
Top spray ar m
1
Inne r pi p e
5
6
7
8
9
10
12
11
3
2
4
6
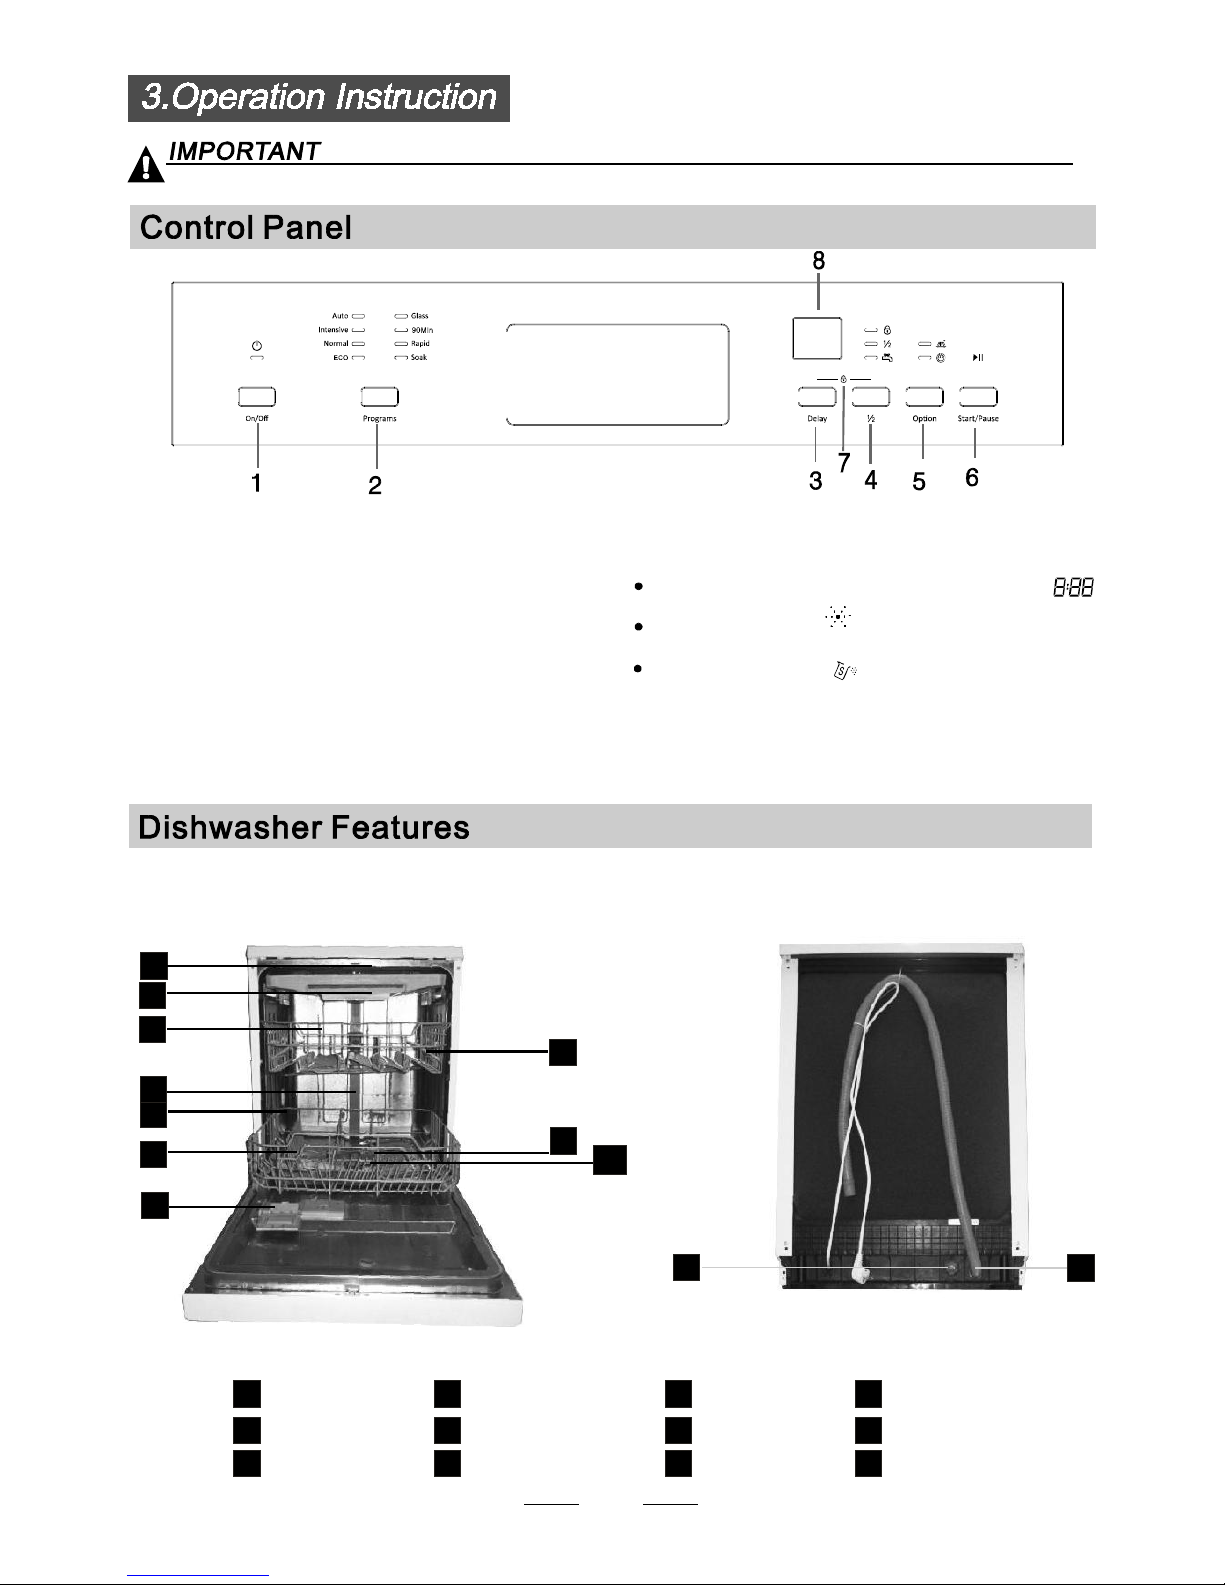
1. On/O ff B u tton : To tur n on /off t h e powe r sup ply.
3. De lay Button : Pre ss the button to a dd the delay time .
2.P r ogra m Butt o n : To Press t he but t on to select a
wash Prog ra m.
8. Di splay s cr een: to sho w the remin di ng time
and the state(r unning st at e, delay time e tc )
Rin se Aid indica tor:
Ind i cate s wh en th e dispenser nee ds to be refi lled.
Add salt i ndicat o r:
In di cate s wh e n th e dispenser nee d s to be refi lle d.
Del a y time ,Remai n ti me ,o r error codes indic ator :
4. Half load
Button: Pr ess th e button to s ele ct h alf load
fun ctio n, a fter m ai n p ro gram selected.
6. Start / Pa use b utto n: To start th e selected
was h ing p rogr am or paus e the was hin g pro gram
whe n the machin e is work ing.
7. Ch ild lock bu tton: pre ss t he two b ut ton s fo r 3 seconds
sim ultane ously to loc k the pro gr am.
5. Optio n Bu tton : To Pr e ss the butto n to sele c t a
fu nc tion,
and th e re spo nse indic at or will be ligh ted.
Page 9
4
The water soft en er must be set m anually, using the water hard ness dial.
The water soft en er is des igned to remove minera ls an d sa lts from the wate r, whic h would have
a detrim enta l or advers e effe ct on the ope ra tion of the applianc e.
The higher t he c on tent of t he se mine rals and salt s , the harder your wat er i s .
The soft ener sho uld be adjus ted ac cording to th e ha rdnes s of the wa te r in your are a. Your local Wa ter Au th orit y
can advi se y ou o n the hardne ss o f th e wa t er in your area.
Adjusting Salt Consumption
The dish washer is desig ne d to allow for adjus tm ent in the amount of salt co ns umed based o n the ha rdne ss of
the wate r us ed . This is inten ded to op timi se a nd customise the lev el o f salt consu m ptio n.
1. Open th e door ,Sw i tch on the ap pl ia nce;
2. Press t he Program butto n fo r mo re th an 5 s econ ds to st a rt t he water soft ener
set mo del within 60 seconds after the applia nce was switc he d on ( Th e Sal t an d
Ri nse aid warni ng lig ht s wi ll be on periodicall y wh en i t get in th e se t model ) ;
3. Press t he Program butto n to select the p roper set acc or ding to y our loca l e nviron m ent,
4. Press t he Pow er bu tton to end the set up mod el .
the sets w il l change in the follo w ing sequen c e: H1->H2-> H3 ->H4- >H5->H6;
WATER SO FTENER
The hardne ss o f th e wa ter var ies from place to plac e. If har d wa te r i s us ed i n the dis hw a sher, depos its will
for m on the dish es a nd uten si ls .
The appliance is eq uipp ed wit h a speci al so ft en er that u ses a salt cont ainer spe ci fi c ally des ign ed to elimi na te
lim e and minera ls from the wa ter.
Cont ac t you r l ocal w ater board f or info rmation on the hardness of y our water supply.
Ple a se f ollo w th e ste ps b el ow fo r adjustment in salt co nsu mption.
If your model does not have any water so ftener, you may s kip this secti on.
The manufa cto ry setting: H 3 (EN 502 42)
Before u sing y ou r dishw asher for the first ti me :
A. Se t t he wat e r softener
B. Add 1.5Kg dish w asher sa lt an d th en f ul l fil l th e sa lt container w ith water
C. Fi ll the rins e ai d dis pens er
D. Fi ll in deterg ent
Clar k: Britis h de gree
fH : French degr ee
dH: Ger m an d egree
dH =1 .25 Clar k=1.78 fH =0.178 mmol /l
1
dH
mm ol/l
0~90~ 5 0~ 0.94
H1
0
10-20
6- 11
1.0- 2.0
H2
9
21- 3012-1 7 2.1-3. 0
H3
12
H 4
20
fH
0~6
7- 14
15-21
Clark
WATER H AR DN ESS
Sel ecto r Positio n
Sa lt con su m ption
(gr am/c yc le)
18-22 31-40 22-2 8 3.1 -4 .0
41- 6023-3 4 4.1-6. 0 H5 30
H 6
60
29-42
35-55 61-98 43-6 9 6.1 -9 .8
Page 10
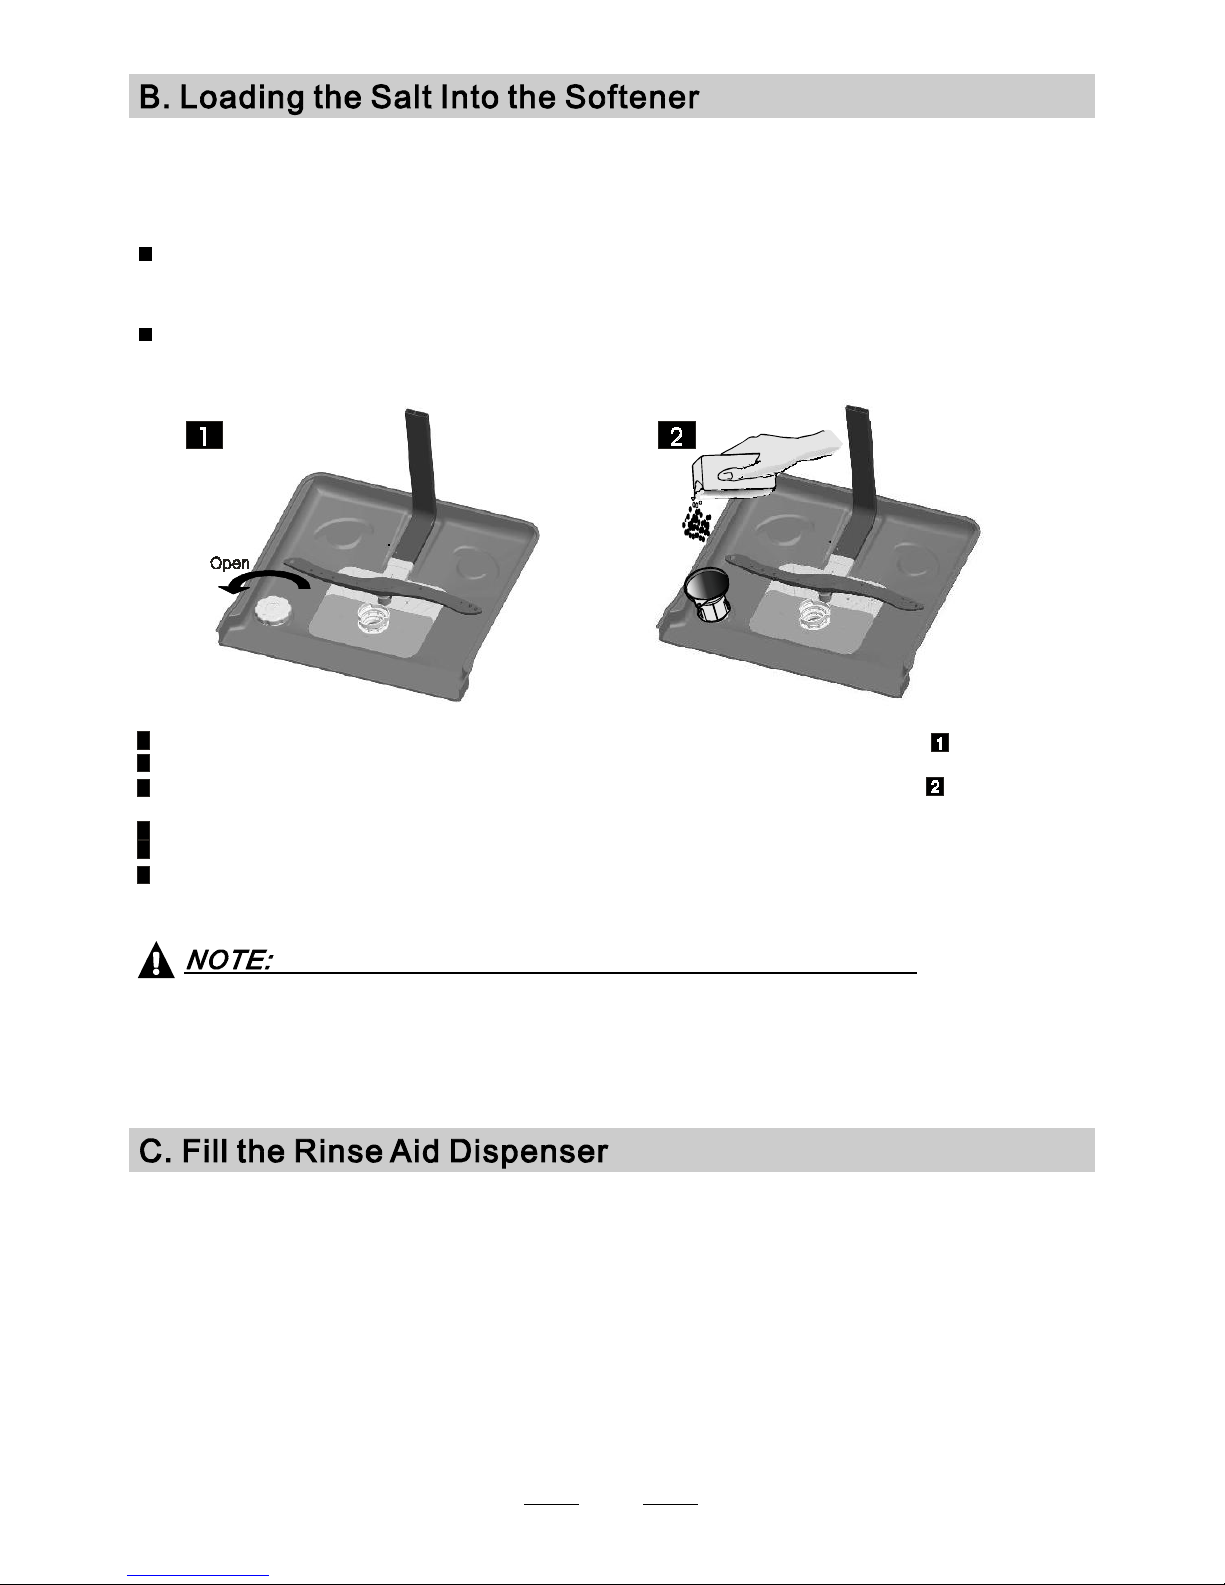
1. The salt con tai ne r mu st only be refil led when t he salt warni ng ligh t in t he cont rol panel c om es on.
Depe nd ing on how we ll the salt dis solve s, t h e sa lt warni n g light ma y stil l be on eve n tho ug h the
salt c ontainer is filled.
If the re is no salt w ar ning li ght in the c ontrol pa nel (fo r so me M ode ls), yo u c an e st im at e whe n to f il l
the salt i nto the softe ner by th e cycles that t he di shwashe r has ru n.
2. If the re are spills of the salt, a soa k or a rapid pr o gram s houl d be run to remove the exc essiv e sa lt .
Always u se the salt i nt ended for u se with dis hw asher.
The sa lt contain e r is located beneath the l ower bas ket a nd should be filled as exp la ined
in the f oll owing:
Attention!
Onl y use s alt spe cif i cally designe d for the u se i n dishw as hers! Every other type of
salt n ot speci f ical ly d esig ned fo r the use in a dishwa sher, espe cial ly table salt, will
damage t he w ate r soft ener. In c as e of d amages caus ed by t he use of uns ui table
salt t he manuf act urer doe s n ot g ive any wa rranty nor is liabl e for any da mag es cau s ed.
Onl y f il l wi th sa lt just before starting one of the comp lete washing progra ms.
Th is will pre vent any g rains of s a lt or sa lty water, which ma y have been s pi lled,
remainin g on the bo ttom o f th e m ac hi ne fo r any pe ri od of time, which may cause
corrosion.
5
Th e ri nse aid is rel e as ed during the final ri nse to pr event wa ter from formin g d roplet s o n yo ur dis hes, whic h can
leave spots and s treaks. It also imp roves dry ing by all o wing water to rol l o ff the dishe s. Your d ishw a sher i s
design ed to use li quid rins e ai d s. The r inse aid dispense r i s lo cated i nside the do o r next to the d et ergent dispense r.
To fi l l the di spen s er, ope n the cap and pour th e r inse aid into th e d ispe nser unti l the level indi cato r turns c ompletel y
black . The v ol ume of the ri nse aid contain er i s about 110m l.
Rinse Aid Dispenser
Function of Rinse Aid
Rinse aid is automaticall y added d uring the last ri ns e, ensu ring thor ou gh rinsing, and spot and st reak free dr ying.
Attention!
Onl y use brand ed rinse aid fo r di s hw asher. Never fill th e rin se aid dis penser wit h any other sub stances
(e.g. Di shwasher clea ning ag en t, liqu id d etergent). Th is would damage the app lian ce.
Full f il l the salt co ntainer w it h wa te r,It i s normal for a sm all amount of wat er to c om e out of the
sal t con ta iner.
A After the low er ba sket h as been removed, uns cr ew a nd remove the ca p from the s alt con ta in er.
B Pl ace th e en d of th e funn el (s upplied) into the h ole and intro duce abou t 1.5 kg o f di shwasher salt.
C
D After fil ling th e co nta in er , scr ew the cap tigh tly b ack clock wise.
E The salt warning ligh t wi ll stop being after th e sa lt co ntainer ha s be en fi ll ed wi t h sa lt .
F Imm ediat ely aft er fil ling t he salt in to th e salt co ntainer, a w ashi ng pr ogram should be sta rt ed
program O ther wise th e fi lt er system, p um p or other importa nt parts of t he machi ne may be dam age d
by salty water. Thi s is out o f warrant y.
(We su gges t to u se a short
).
Page 11

6
To ope n the di spens er, turn the cap to the "open" (left) arro w an d lift it o ut .
Po ur t he rinse ai d int o the dispenser, bei ng car efu l not to overfill .
Re pl ace the cap by in se rt ing it aligned w it h "open" arrow and tu rnin g it to t he closed (righ t) arrow.
Adjusting Rinse Aid Dispenser
Th e ri nse aid dispenser ha s si x or fou r s et ting s. Alw ay s st art with th e dispens er
set on " 4". If spot s and poor dr yi ng are a p roble m, i ncre ase t he a mo un t of rinse
ai d di sp ensed by removing th e di spe ns er l id and rotati ng the d ial to "5 ". If the
di sh es s til l ar e no t dryi ng prop erly or a re show spots , adjust the di al to the next
hi gh er leve r un til your dish es a re sp ot-f ree. The recom m en ded set ti ng is "4".
(Fac tory value is "4". )
Increase th e do se if the re are drop s of wate r or lime sp ots o n the di shes a fter was hing.
Re du ce it if th ere a re sti ck y whi tish sta ins on yo ur di sh es o r a bl uish film on glas s ware o r
kn ife blades.
1
2
3
As the rinse aid d i minish e s, the size o f the blac k do t
on the rin se a id l evel indi cator cha ng e s, as illu stra ted below.
Ful l
3 / 4 ful l
1 / 2 ful l
1 / 4 ful l - Sho uld refi ll to e limin ate sp otti ng
Emp t y
When to Refill the Rinse Aid Dispenser
If th e re is no ri nse- aid wa rning lig h t in t he contro l pa nel, you can estimate the am ount from the colo ur
of th e opt ical lev e l indica t or C located ne xt to th e cap. When th e rins e-aid conta iner is fu l l, the whole
indi cato r wi l l be dark .As the r in se -aid di minish e s, t he size of the dark dot de crea ses. You shou ld neve r let
the ri nse aid leve l fall 1 / 4 full.
duri ng t he ne x t w a sh. Do n't for ge t t o re plac e th e cap before you close dis hw a sher door.
Clea n up any r inse aid sp illed whi le du r ing fill ing wit h an ab sorbe nt cl oth to a v oid ex cess i ve f oaming
Det ergents w i th it s chemical ingredie nts are ne cessary to remov e di rt, c rus h dirt and transport it o ut of t he dishwas he r.
Mos t of th e co mmerci al qu ality dete rgents ar e su itable fo r th is p ur p os e.
" "
Pro per Use of De te rgent
Use only det erge nt spec ific ally made for the use in dishwa sh ers. Keep your det er gent f r esh and dr y.
Don't pu t po wd ered detergent int o th e di s penser u nti l you're re ad y to wash dis h es.
Attention!
Page 12

7
Amount of Detergent to Use
Base d on the ir c h em ical c om p osition, dete rgents can be split in two bas ic ty pes:
Dete rgent ta bl ets of different br ands diss o lve at diffe rent spee ds. F or t his reaso n so me
det ergen t ta blets canno t dissolv e an d de v el op the ir fu l l cleani ng po wer du r ing short
pro g rams. There fore ple ase use l ong pr ogra m s wh en u si n g de terg e nt t able t s, t o
ens u re t he complete r em ov al of d eterge nt residua ls.
The disp enser must be refilled bef or e the s tart of each wash cycle following the ins t ructions
pro vided in the w ash cycl e tab le . You r dis hwa she r use s le ss de terg en t an d ri nse aid t ha n
Conv ention a l dishwa sh er. Ge nerall y, only one ta blesp oon of d eterg ent is needed for
a normal was h lo ad. More he avily soi led items need more dete rgent. Alway s ad d the
det ergen t ju s t be fore star ting the dish was her, othe rw ise it coul d get damp and w ill not
dis s olve prop erly.
Concentrated Detergent
Detergent Tablets
Detergent Dispenser
co nv e ntio nal, alka line dete rgen ts w ith c aus tic comp onents
lo w al k alin e co nc e ntra t ed d etergen ts with natu ral enzym es
Norma lly new pulver ised dete rg ent is with ou t phospha t e. Thus the water so f tener fu nc tion of
pho s phate is not give n. I n th is case we re c ommend to fill sa lt i n th e sa lt container even w hen
the hard ne ss of w ater is only 6 d H. If deterge nts w itho ut p hosphat e ar e use d in the case of hard water
oft e n wh ite spots ap p ear on d i shes and glasse s. I n th is case pleas e ad d more deter gent to r each
bet t er resul ts. Deter gent s wit ho ut chlo ri ne d o on ly blea ch a litt le. Stro n g an d co loured s pots will not
be removed com pl ete ly. I n th is ca se p leas e choo s e a prog ram wit h a hi g her tempera ture .
°
Detergents
Ther e ar e 3 sorts of d ete r gent s
1.Wit h phos phat e and wit h ch l orin e
2.W it h phos ph ate and wit hout chlorin e
3.Wit hout phosph ate and without chl o rine
Al wa ys add th e de te rg ent j ust befo re st arting ea ch w as h cy cle.
Onl y u se bra n de d de terg ent aid for dish wa sher.
If the l id is cl ose d: press re le ase but to n. The lid will sprin g open.
Dishwasher detergent is corrosive !
Take care to keep it out of reach of children.
Page 13

Fi ll t he deter gent disp ens er with det er gent.
Th e mark ing indic ates the do sing le ve ls , as
illustrate d on the righ t:
The pla ce o f main w ash cyc le de terg en t pl aced.
The pla ce o f pr e- wash cycl e de t erge nt p l aced.
Pl ea se observ e th e manu facturers do sing and stor age
Rec o mm endatio ns as st a te d on the deter g ent packa gi ng.
Cl ose th e lid a nd p ress until it l ocks in place .
If the d is hes a re heavily so iled , pl a ce a n additiona l
detergen t do s e in the pre - wash deter g ent chambe r. Th is detergen t w ill ta ke effe ct dur in g the pr e-wash phas e .
A
B
Fill in Detergent
You fin d in formation about the amount o f det ergent for th e si ngle programme on the la st p age .
Plea s e aw are, tha t ac c ording to the lev e l soiling an d the spe c ific har dness of water differ ences are possible.
Plea s e ob serv e th e manuf actur er's rec omm end atio ns on th e de tergent pack a ging.
8
A
B
Page 14

Cutl er y wi th wooden, ho rn china or
mother -of-p earl han dl e s
Plast i c items tha t ar e no t heat resistant
Older cut l ery wit h glue d pa rts t hat are not
temper ature res istant
Bonded cut lery ite m s or dish es
Pewter or copp er items
Crystal gl ass
Steel it ems su bject t o ru st ing
Wooden pla tters
Items made from synth etic fi bres
Some types of glas ses c an b ec ome
dul l af ter a large number of washes
Sil ver and a luminum par ts have a
ten dency to di scol our durin g was hing
Gla zed pat te rn s may fad e if mac hine
washe d fre quent ly
Are not suitable
Are of limited suitability
Dishe s an d items o f cu tler y mus t no t lie ins id e on e anot h er, or co ver e ac h other.
To avoid da ma ge to gl asse s, th e y mu st not touc h.
Loa d la rg e items w hich are mo st diffi cu lt to c lea n into the lowe r ba sk et.
The upper b as ket is de signed to ho ld more delica te and li ghter dishware such as glass es , c offe e
and tea cups
Lon g bl ad ed knive s sto red i n an upright po sition are a potenti al h azard !
Lon g an d/ or sharp it em s of cut lery such as c arvi ng kniv es must be positi oned
horizon ta lly in the upper b aske t.
Pleas e do n ot ove rload yo ur dishwa sher. This is i mp ortan t for go od resu lt s and for
reaso nable co nsu mption of energy.
Load h ollo w it ems suc h as cups , gl asse s, pa ns etc. With the openi ng f ac ing dow nw ards so t ha t
water can no t collect in th e container or a de e p ba se .
Consid er buying u tens ils which are id en tifie d as d is hwasher-pro o f.
Use a mild det ergen t th at is des crib ed as 'kind t o dishes'. If necess ary, se ek furthe r
info rmatio n from th e deterge nt m an ufact ur ers.
For part ic ular it ems, select a p ro gr am with as lo w a tempe ra ture as possi ble.
To prevent d ama ge, do n ot take g la ss and cutl er y ou t of the di shwashe r imme diate ly
afte r th e programme has ended.
(F or b es t pe rform ance of the dishw asher, f ollo w the se l oading guid e lines.
Features and ap pear a nce of b aske ts and cutlery ba sket s may va ry fr om you r mo del.)
Sc ra pe off any larg e amounts o f le ft ov er fo od. Soften remn an ts of burnt food i n pa ns .
It i s no t necessary to rinse t he d is hes under running wa ter.
Pl ace ob jects i n the dis hwasher in foll owing way :
1.I tems su ch a s cu ps , glass es , po ts/pa ns, etc. are fa ce d do w nw ards .
2.Curved items, or ones wit h rece sses, should b e lo aded aslant s o th at wate r ca n run off.
3.All u te nsils a re st acked secu r ely and ca n no t tip over.
4.All u te nsils a re pl aced in t he wa y t hat the s pray arm s can rotat e fr eely during wa shin g.
Very s m all it em s sho uld not be was hed in the di shwas he r as th ey c ou ld e asily f al l out of the ba sket .
To pre vent water dr ip ping fr om t he uppe r ba sket into the lower ba sk et, we re commend tha t yo u
empt y th e l ower basket first and then the upp er bask et .
9
Page 15

10
Folding Spikes of Lower Basket
Fo r be tt er stac ki ng of pots and pa ns,
th e spi kes can be f ol ded down as
show in the picture righ t.
Adjusting the Upper Basket
The heig h t of t he upp e r ba sket can be adjus te d in or de r to
create mo re s pa ce for larg e ut en sil s bo th f or the upper
/l ow er basket . The he ight of the upper basket c an b e
adju sted by p laci ng t h e whe els on di fferent hei gh t of t he
rails. Long ite ms , se rving cut lery, salad se r vers and kni ve s
shou ld be placed on t h e sh elf so th at they do not ob stru ct
the ro ta tion of the spray ar ms..
Folding back the cup shelives
For bett er s tacki ng of pots and pa ns,
the spik es c an be fol de d do wn as
show in the picture rig ht.
The uppe r bas ket is de sign ed t o hol d more del icate
and lighter dis hware s uch as gl asse s, coffee and
te a cups and sauc e rs, as well as pl ates , sm all b owls
and shallow pans (as l ong as they are n ot too dirty).
Position th e dishe s an d co okw are so that th ey will
not ge t move d by the s pray of w ate r.
We su gges t tha t yo u pl a ce l arge ite m s an d the most
difficu l t to c lean ite m s ar e to be place d int o the lo wer
baske t : su ch as po ts, pans , lid s, se rvin g di shes and
bowls, as show n in the figu re be low. It is pre fera ble to
place serv ing dish e s an d li ds on the sid e of the ra ck s
in order to avoid bl o cking the ro tat ion of the top spra y
arm.
Pots , se r ving bowl s, e tc, must always be place d to p down .
Deep pots shoul d be slan ted to allow wate r to fl ow out .
Ple ase be remi n ded that:
The Botto m Bas k et featur es fo ldi n g sp ikes so t hat larg e r or more po t s an d pans can be loade d .
Cutl ery s houl d be pla ced in the cutlery rack separ a tely
from eac h oth er i n th e ap p ropr ia te positi ons, a n d do
make sure the ute nsils do not nest together, th is may
caus e bad perfo rmanc e.
For a top quality cleani ng, place th e si l verwa re i n th e ba sket
maki n g su re that:
They d o not nest toge ther.
Silv erware is pla ced wi th the ma le face up.
Long u te nsils in the middl e.
Do not let any item extend through the bottom.
Always load sharp utensils with the sharp
point down!
Page 16

11
*E N 50242 : T hi s pro gramme is t he te st c ycle. T he informa tion for co mp a ra bi li ty test
in accord ance with E N 50242 , as foll ows:
Capaci ty: 14 setti n g
Posit i on Upper ba sket: up p er w he els on rails
Rinse aid sett ing: 6
Pl:0 .4 9w; Po:0. 45 w.
Means: need to fill rins e in to th e Rinse-Aid Dispenser.
( )
St artin g a cycl e wa sh
Dr aw o ut the lowe r and upper b as k et, load the dish es a nd p us h th em back.
It is co mm ended t o load th e lo we r basket fi rst, then the uppe r on e (see th e sec tio n entitle d
Lo a ding the Dis hw ashe r ).
Pour in th e deter ge nt (see the sect ion en tit led Salt, Dete rgent and Rinse Aid ) .
Inse rt the pl ug into the socke t. The power supp ly is 220-240 VAC /5 0 HZ , the speci fic at io n
of the socket is 10A 2 50 VAC . Make sure that the wate r su pply is turned on to f ul l pressur e.
Close th e door, pr es s the On/ Off button to swi tch on the machin e.
Pr es s th e pro gram button , the wash progr am will b e ch an ged as foll ows di rection :
Auto
If a pro gram is selected, the resp onse ligh t wi ll ligh t on . Th en pr ess the Star t /Pau se b ut ton, th e
dish wa sher begins to sta rt.
“ ”
“ ”
-> ->90 Min ->SoakIntensi ve->Norm al->ECO-> Glass ->Rapid ;
1
2
3
4
5
ECO
Intens iv e
Nor mal
(*E N 50242)
(1 or2 pi eces)
5/ 30 g
(1 or2 pi eces)
5/ 30 g
(1or2 pi ec es)
5/ 30 g
Rapi d
Pre- wash(50 )
Was h (60 )
Rinse
Rinse
Rinse(70 )
Dryi ng
℃
℃
℃
Pre- wash( 45 )
Was h (55 )
Rinse
Rinse (6 5 )
Dryi ng
℃
℃
℃
Was h (45 )
Dryi ng
Pre- wash
Rinse(65 )℃℃
Was h (40 )
Ri nse
Ri nse (4 5 )℃℃
180
19 0
170
40
1. 3
0.93
1. 6
0.6
18 .5
15
11
10
90Mi n
90 12.5
1.35
35g
30g
A shorter wash for l ightly
soil ed loads th at do not
need d rying.
Auto sen sing wash, light ly,
norm al ly or heavil y so iled
cr ockery, with or with out
drie d-o n food
Pre - wa sh (4 5 )
Autowa sh(4 5 -5 5 )
Rin se
Rin se (65 )
Dry ing
℃
℃
℃
5/ 30g
150
11-1 50.9-1.3
Auto
Gl as s
Pre- wash
wash (4 0 )
Rinse
Rinse(60 )
Dryi ng
℃
℃
130
0. 9
14. 5
5/ 30g
For li ghtly soil ed c ro ckery
and g la ss .
To rinse d ishes that you plan
to w ash later th a t da y.
Pre- wash
15 0 .0 2 4
30
11
0. 75
25g
(1 pi ec e)
Ra pi d
Fo r lightly soi le d loads tha t
do not need excel le nt dryi ng
eff ici ency.
Was h (45 )
Rinse
Rinse (5 5 )℃℃
)℃(50
Was h(65 )
Rin se
Rin se (65 )
Dry ing
℃
℃
A short er wash for lig h tl y
soiled load s an d quic k wa s h.
For normall y so iled load s,
su ch a s , pl a tes,gla sses
and ligh tly soiled pans.
pots
For heav iest soil ed crocke ry,
and no rm ally soiled pots
pans d ishes etc w it h dried
on soi ling.
、
、
Th is is st an dard p ro gramme, it i s
suitable t o clea n norm al ly soiled
tablew are and it is t he m os t e ffi ci ent
progra mm e in t erms of its com bined
en ergy and wat er con su mption for
that t ype of table ware .
(1or 2 pi ec es )
(1 piec e)
Page 17

12
It is dangerous to open the door when washing,
because the hot water may scald you.
When the w o rki ng cy cle h as finis h ed, the buzzer o f the dis h washer will s oun d for 8 sec onds, the n sto p. Tu rn off
the appl iance usi ng th e ON/O FF but t on, sh ut off t h e wa te r supp ly an d open the door of the dishw as her.
Wai t fo r a few min ut es before unlo adin g th e dis hw a sher to av oid handl in g the dishes and ute ns ils while t h ey
are stil l h ot a nd m ore su scept ible to break ag e. The y will als o dr y be tter.
Switch Off th e Dishwasher
The program l ight is on but is n ot b linking, only in thi s ca se the prog ramme h as e nd ed.
1.Swi tc h of f the dishwas her by pressing the ON /OFF button .
2.Tu rn off the water ta p!
Open the door carefully.
Hot di sh es are se nsitive t o kn ocks. The dis hes sh ould ther efore be allo wed to cool d own ar ound 15 minutes
before removi ng f ro m the app li an ce.
Open t he dish washer's door, l eave it ajar and wait a few mi nutes bef or e removing th e dishes. In th is way they
will b e cool er an d the dr yin g wi ll b e improved.
Unloading th e dishwasher
It is norm al that t he d ishwa sh er is we t ins id e.
Empt y th e low er bas ket first a nd then the upp er one. Thi s will a void water dr ipping from the uppe r Ba sket on to
the di shes in the l ow er one.
If you o pen the door , t he machine wil l pause.
wi ll stop blinking a nd th e buzzer w ill mooing every m inute unless you
cl ose the doo r . A fter y ou clo se the door ,the m achine will keep on working afte r 1 seconds.
dur ing a wash cycle the LE D dis play
window“ ”
Pr emise :
A cycle that is un de rway can on ly be mod ified if it has o nly been runn ing fo r a short tim e. Otherw is e, the
detergen t m ay h av e alrea dy b een relea sed, and the ap pliance m ay have alrea dy draine d th e wash wa ter.
If t hi s is the case , th e deterge nt dispen ser must be r efille d ( see the section ent it led " Load ing t he
Det e rgent " ) .
Pres s th e Start/P ause button , the m ac hi ne will p au se, press the p rogr am button mor e th a n 3s t hen you
can ch ange the program t o the de sired c ycle setting (s ee the section entit le d " Starti ng a wash c ycle. . ." ).
The LE D display shows the state of the dis hwasher:
a) The LED sho ws H MM and not bli nki ng --- ---- -- ----- ---- -Being pa used or S ta nd by
b) The LED sho ws H MM and bli nking -- -- ------ - --------- ----- ---- -Runn ing
' : '
' : '
1
2
3
A forgotten dish can be added any time before the detergent cup opens.
Add forgotten dishes.
Close the door.
2
3
Open the door.
1 4
5
Press the Start/Pause Button to stop the washing.
Press the , the dishwasher will run
after 1 seconds.
Start/Pause Button
Wh en yo u press the Start /Pause button to paus e dur ing was hing, the LED d is play window
“ ”
wi ll stop blinking a nd th e dishw a sh er will mooing every min ute unle ss you press the
Start/ Paus e button to sta r t.
Your model has broken remember functi o n, the mac h ine w ill go on to fi nish the selec ted
pr o gram .after the power cut
Page 18

The fil ter prev en t s larger remn ants of food or o ther objects from getting inside th e .
The resi d ues ma y bl o ck the filt er, in th is case they must be r em oved .
pump
The fi lter syst em c on sists of a co ar se fi lter,a flat (M ain filt er)
And a mi c ro filt er(Fi ne fi lter ).
Fo od and soil par t icles trapped in this fi lter ar e pulv eriz e d by a
sp ecial jet on the l ower spr a y ar m and wash e d down to d rain .
La rge r items, such as piece s of bon e s or gla ss, that could blo ck
th e dr a in a re trappe d in the coa r se filter. To re mo ve the items
ca ugh t by t he filter, gen t ly s queeze the tap on the top of t his
filte r an d lift out.
This fil ter holds soil an d f oo d re sidue s in the sum p area a nd
pr eve nts it fro m being r edeposi t on t he dish es d urin g wash cycle.
Main filter
1
Co arse filter
2
Fin e filter
3
2
3
1
Filter assembly
The fil ter eff i cien tly
For best perf ormance and resu lts, the filter must be cleane d re gul arly. this reaso n, it is a goo d ide a to
remo ve th e la rger food particl e s tr apped in the filt er after each was h cycle by rin sing the semici rcula r f ilte r an d
cup under run ning water. To remov e th e filter de vice, pul l th e cu p hand le in t he up wa rd direc t ion.
re mo ves food part i cle s fro m the wash water, all owing it to be recycl e d du ring the cycl e .
For
Th e di s hwash er mu st never be used with out the fil ters.
Im proper rep lacement of the filter may redu ce the pe rfo rmanc e leve l of t h e
ap plian c e and damage d i shes a nd utensi ls.
Step 1 Turn the fi lter in ant i- clo ckwise direct io n,:
St ep 2 l if t the filte r ass y up:
When following th is procedure from step1 to step 2, the filter system will be removed;
when following it from Step 2 to Step 1, the filter system will be installed.
13
1
2
Page 19

The cont ro l pane l can b e cl eaned by u sing a lig ht ly dampen ed clo th.
Aft e r cleani ng, m ake sure to dry it thorou g hly.
For t he ext erior, use a go od a pp lia nce po l ish wax.
Never u se shar p objects , sc ouring pa ds o r har sh c leaner s on any p art of the dishw a sher.
Protect Against Freezing
1.Cut off the electr ical po we r to the di shwasher.
2.Tur n of f th e water sup pl y and d isco nn ect the water inle t pi pe from the w ater val ve.
3.Drai n th e water from the inlet p ipe an d wat er valve . (U se a pan to gather the w at er)
4.Reco nnect the wat er i nl et pipe to the water val ve.
5.Remo ve t he filter at the bot to m of the tu b an d use a spong e to soak up wate r in the sump .
please take fros t pr otect ion me asure s on the dish wa sher in winte r. Ev ery fter washin g cycl es,
please op erate as foll ows
time a
:
Cleaning the Filter
Cleaning The Door
To cl e an the coar se filter a nd the f ine fil ter, use a clean ing brush . Reassemb le the fi l ter part s as show n in the figu res
on the las t pa ge a nd rein sert the enti re assembly in the dis h wa sher, posi tio ning i t in i ts seat a nd p ressin g do w nw ards .
When cle a ning the fil ters , don't k nock on the m. O t herwi se, the filters could b e
contor ted and the performance of the dishw asher cou l d be d ecreased.
To clean the edge around th e door, you shou ld use on ly a soft warm, d amp cl oth.
To avoid pene tration of wate r in to the door loc k and elect rica l com po ne nts , do no t
use a sp ra y cl eaner of any kind.
Never u se a sp ray c lean er to cle an t he door pan el as it may damage the door lock
and elect r ic al comp on ents.
Abrasive agent s or some paper towels s ho u ld not b e us e d because of th e risk of
scr atching o r leav ing spots on the stainl ess steel sur face.
Cleaning the Spray Arms
If yo ur dishwa sher cannot work beca us e of the ice,
pl ease co nta ct profes si ona l service p erso ns.
It is nece s sary to clean the spra y arms re gula rly fo r ha r d
wate r che mica ls will clo g th e sp ray arm jets a nd beari ngs.
- Ins p ec t the filt e rs for blo ck ing after e ver y ti me th e di s hwa she r has been used.
- By uns crew ing t he c oarse fi l ter, you can r em ove the filter system . Remov e any foo d re mn a nts and
cle a n th e fi lter s und e r ru nning wate r.
Remarks:
The entire filter assembly should be cleaned once a week.
To remov e th e lower s pray a rm, pull ou t th e spr ay a rm u pwa rd .
To remov e th e up per s pra y arm, hol d the nut, rotate the arm
cloc kwise to remo ve it.
Wash the arm s in soapy an d wa rm water an d use a soft brus h to
cl ean the jets. R ep lace th em after ri nsin g the m th or oughly.
14
Page 20

It is reco mm end t hat you run a wa s h cy cle wi th the
dis h wash er empt y an d th e n re move the plug fro m th e
soc k et, turn o ff t he wa ter supp ly and le av e the door of
the applianc e slightl y op e n. This will h elp the d oor
sea l s to l ast long er an d pr ev ent odour s fr o m fo rmin g
wit hin the appli ance.
If the appliance must be mo v ed, try to keep i t in t he
vert ic al posi tion . If ab solutely ne cess ar y, it can be
posi tione d on its back .
One of the fac to rs that cau se odou rs to fo rm in t he
dis h wash er is foo d th at remain s tr apped in the seals .
Periodic cle a ning with a d amp sponge will p revent this
from oc c urri n g.
Befo re c leani ng o r performin g ma intenan ce, alway s
remo ve the plug f ro m the socket.
To cle an th e exte rior a nd rubbe r parts of the di shwash er,
do not use so lven t s or ab r asiv e cle aning prod u cts.
Only use a cloth w ith warm so apy wate r.
To rem ov e spo ts o r st ains from the surfac e of t h e
in teri o r, us e a cloth dampe ned wit h wa ter a n a li ttle
vine gar, or a clea ning product ma d e sp ecifi cally fo r
dish w ashe rs.
Remove t he Plu g
No Solvents or Abrasive Cleaning
Moving t he Appliance
Seals
Aft er every wash, tu rn off the wa ter suppl y to the
applian ce and lea v e th e do o r slight ly op en so th at
moisture and odou r s are no t tr a pped inside .
After Every Wash
When not in Use for a LongTime
15
Th e in st allation of the pipe s
an d el ec trica l e quip ments
sh ou ld b e do n e by p ro fessionals .
Electrical Shock Hazard
Disconnect electrical power
before installing dishwas her.
Failure to do so can result in
death or electrical shock .
The inst a llation posi tion of dish wa sher should b e ne ar the existing in let a nd d rain hoses and
powe r cor d.
One side of the cabin e t sink shoul d be chos en t o fa cilit ate the conne ctio n of drai n ho s es o f
the dishw asher.
Installation preparation
Note: pl ea se check the accomp a nying ins tallation acc essori e s(hook fo r ae sthetic p anel, screw)
●
Page 21

16
Please carefully read the installation instruction.
● I llustr atio ns of cabinet dimension s a nd ins tallation posit ion of the dish washe r
Preparatio ns should be m ade befo r e moving the dishw ashe r to the install ation plac e.
Choose a p lace near the sink to faci litate the instal lat ion of inlet and drain hos e s
(see figure 1).
If dishwas her is inst alled at the cor ner of the cab inet, there sho uld be som e spac e
(illustrated in figu re 2) when t he door is opened.
2
1
Mi nimum space when
th e door is open ed
【Figure2】
Cabinet dimensions
【Figure1】
Cabinet
Dis hwa she r
Doo r of
dis hwa sher
Minimum spaceo f 50mm
1
The ae sthe tic wooden panel could be proce ssed according to the Fig ure 3.
Th e aesthetic pane l should
be processed in accordance
wi th the illust rated dimensions
【Figure3
】
●
Aesthetic panel's dimensions and installation
Less than 5mm
between th e top
of dishwash er and
cabinet and the
outer door aligned
to cab inet.
90 °
90 °
600 mm
820mm
100
580mm
80
Space between cabinet
bottom and floor
Electrical, drain and
water supply line
entrances
(Unit: m m)
Page 22

17
Installation of aesthetic panel
【 】Figure 4a
2
ma gi cal paster A and mag ical p aster B be disjoinedo n ,magical paster A on th e aest he tic woode n pa nel and
fe lt ed magical pa ster B of th e ou te r door of dishw as her(s ee f igure 4a). Aft er po sitioning of the panel , fix the pan el
onto the outer door by s cr ew s an d bo lts(S ee figure 4 b)
Installation of aesthetic
wo oden panel
【 】Fig ure4b
. take away the four
short scr ews
. pin up the fo ur long
scr ews
1
2
Page 23

Tension adjustment
of the door spring
【 】Figure5
Tension adjustment of the door spring
●
Connection of drain hoses
●
The door springs are set at the factor y to the proper tension for the outer door.
If aesthetic wooden panel are installe d, you will have to adjust the door spring tension.
Rotate the adjust ing screw to drive the adjustor to strain or relax the steel cable
(see figure 5).
Door spring tension is correct when
the door remain s hor izon t al in the
ful ly opened po sit io n y et rises
to a cl ose with the slight lift of a
finger.
,
18
In se rt the drai n hose into a dra in pipe with a minim um diamete r o f 40 mm , or let i t run int o t he s ink, making sur e to
avo i d be ndin g or crim ping it. The to p of the ho se must be less than 1000mm.
A
Counter
Front
Drain pipe
NOTE
The top of the hose
must be less than
1000mm.
φ 40m m
B
Page 24

19
Dishwasher installat ion steps
●
1
2
.
3 .
4 .
5 .
6
7
8
Instal l t he furnit ure d oor t o th e ou t er door of the dishwasher using the brackets prov i ded. Re fer
to the template for positi on ing of the br a ckets.
Adj u st the te ns io n of the door springs by u sing an Allen key tu rning in a cloc kwis e mo tion to
tighten the left and righ t do or sp ring s. F ailur e to do this c ould cause d amage t o yo u r dishw asher
(I llustratio n 2)
Connec t the i nlet hose to t he cold wat er su ppl y
Connec t the drai n ho se. Refer to diag ram (F igure 6)
Connec t the pow er cord
Aff ix the con densati o n st r ip under the wor k su r face of cab i net. Pl ease e nsure the co ndensat ion
strip is flus h wi th ed ge of work surfa ce.
Place th e dis hwa sher into positi o n.(I l lustr at ion 4)
Lev el the dis hwa she r. Th e re ar fo od can be ad just ed from the f ront of th e di s hw asher by t urning
th e Allen screw in t he middl e of the base of d ishwasher use an All en key (Illus trati on 5A ). To ad just
th e fro nt feet, use a flat screw driver an d tur n the front feet u ntil the dish w asher is level (Ill ustrati on 5B ).
9 The dish washer must be secu red in place. The re are two ways to do thi s:
A. Normal work sur face:Put the installation hook into the slot of the s ide p lane and se c ure it to the
work sur face wit h the wood screw s (Illustratio n 6) .
B. Marble or gr anit e work top:Fix the sid e wi th S crew. (Ill ustr ation 7).
【Figure 7】
Page 25

Dishwa sher must be level for proper dish rack operation and wash performance.
Place a spirit level o n door and rack track inside the tub as s hown to check that the
dishwasher is leve l.
level the dishwasher by adjusting the thr ee levelling leg s individu ally.
Wh en level the dishwasher, please p ay attention not to let the dish washer tip over.
1
2
3
Illus tration of feet adjus tm ent
【 】Figure 8
NO TE:
The maximum adjustment
height o f the feet is 50 mm.
20
Ch eck l eve l si de to si de
Spi rit l eve l
Chec k l eve l Fro nt to Bac k
Ensu r e th e vo lt age and fr equency of the power be ing c orres p onds to
th os e on the ratin g pl at e. On ly insert the plug into an el ectri cal socket which is earthe d
prop e rly. If the el ectr i cal sock et to w hich the appli anc e must b e co nne ct ed is no t
appr o pria te for th e plug , replace the sock et , rat her than using a a da ptors or the l ike a s
th ey coul d ca us e overheatin g and b urns .
Plea se lo ok at the rating l abel to kn ow th e ra ting volt a ge a nd c onn ect the d ishwas h er to th e app ro priat e po wer s up p ly.
Use th e r equire d fus e 10 amp, time delay fuse or c ircu it breaker rec om men ded an d pr o vide sepa ra te circ ui t s er ving
only this appl ianc e.
For personal safety:
Do not use an extension cord or an adapter plug
with this appliance.
Do not, under any circumstances, cut or remove the
earthing
Connection from the power cord.
Page 26

21
Positioning the Appliance
How to Drain Excess Water From Hoses
If th e sink is 100 0 higher fro m the fl oor, t he excess water i n hoses can no t be draine d dir ectl y
in to t he sink . It will be ne cessary to drain exces s wa ter fro m hose s in to a bowl o r suitabl e
con tainer th at is held out si de and lo wer than the sink .
Water Outlet
Conne c t th e wa t er d rain hos e . Th e dr ain hose must be co rrec tly fitt ed to av oid w ate r leaks .
Ensur e tha t the wa ter inl et h o se i s no t ki n ked or s quas hed .
The following things should be chec ked before starting the dishwas her.
Syphon Connection
Ins e rt the drain hose int o a d rain pip e wi th a minim um di amete r of 40m m, or let it run int o th e si n k, m ak in g su r e to
avo i d be ndin g o r crimpi ng it. The top of the ho se m ust be les s t han 1000mm.
The content of this manual is very help ful to the user s.
After installation, plea se make sure to keep this manu al.
Extension Hose
If you need a dr a in h ose ext ensi o n, m ak e su re to use a similar dra i n ho se .
It m ust be no lo n ge r than 4 metr es; other wise the cleanin g effect of the dish was her co u ld be re duced.
1 The dishwasher is level and fixed properly
2 The inlet valve is open
3 There is a leakage at the conn ections of the conducts
4 The wires are tightly conn ected
5 The po wer is switched on
6 The inlet and d rain hoses ar e knott ed
7 All packing mat erials and printings should be ta ken out from the dishwasher
Po s ition the ap pliance i n th e de sired l ocation . The ba ck should r es t ag a inst the wall behind it, and the sides ,
al ong the adjac ent cabin et s or walls. The dis hwa sher i s equippe d with water su pp ly and dr ai n hoses tha t ca n
be pos ition ed eithe r to th e right or the le ft s ide s to fac ilitate pro per insta llati on.
Con n ec t the cold wate r su pply hose to a t hr eaded 3/4 (inc h) conn ecto r and ma ke su re
th at i t is f aste n ed t ightly in p la ce.
If th e wat er pipes are new or have not been used for an extend ed p eriod of time , le t the
wat e r ru n to mak e sur e th at the wate r is cle a r. This pre ca ution i s need e d to av o id the
risk o f th e wa ter inlet to be bloc ked and d am age the a ppliance.
Plea se cl ose the hydra n t after using.
Page 27

22
Fuse blown, or the
circuit breaker acted
Replace fuse or reset circuit breaker. Remove any other
appliances sharing the same circuit with the dishwasher
Spilled rinse-aid
Always wipe up rinse-aid spills immediately.
Hard water minerals
The affected items are
not corrosion resistant.
The lid of the softer
is loose
A sp ay arm is
knocking against
an item in a basket
r
Items of crockery
are loose in the
wash cabinet
This may be caused
by on-site installation
or the cross-section of
the piping.
A program me was not
run after dishwasher
salt was added.
Traces of salt have
gotten into the wash cycle.
To clean the interior, use a damp sponge with
dishwasher detergent and wear rubber gloves.
Never use any other cleaner than dishwasher
detergent for the risk of foaming or suds.
Always run the quick wash programme .
without any crockery in the dishwasher and
without selecting the Turbo function (if present),
after adding dishwasher salt.
Check the lip .Ensure the fix is fine.
Interrupt the programme, and rearrange the items
which are obstructing the sp ay arm.r
Interrupt the programme,
and rearrange the items of crockery.
This has no influence on the dishwasher function.
if in doubt, contact a suitably qualified plumber.
Detergent with
colourant was used
Make sure that the detergent is the one without
colourant.
Improper detergent
Make sure the dishwasher is turned on and the door is
closed securely.
Check that the water supply is connected properly and
the water is turned on.
Make sure to close the door properly and latch it.
Make sure the power cord is properly plugged into the
wall socket.
Power supply is not
turned on
Water pressure is low
Door of dishwasher
not properly closed.
Kink in drain hose
Filter clogged
Kitchen sink clogged
Check drain hose.
Check coarse the filter
(see section titled )" Cleaning The Filter "
Check the kitchen sink to make sure it is draining well.
If the problem is the kitchen sink not draining ,you may
need a plumber rather than a serviceman for dishwashers.
Use only the special dishwasher detergent to avoid suds.
If this occurs, open the dishwasher and let suds evaporate.
Add 1 gallon of cold water to the tub. Close and latch the
dishwasher, then select any cycle. Dishwasher will drain
out the water at the first step.Open the door after draining
is stop and check if the suds is disappeared.
Repeat if necessary.
Page 28

23
The dishes were not
loaded correctly.
See notes in " Loading the Dishwasher Baskets ".
Select a more intensive programme.
See" Wash Cycle Table ."
Use more detergent, or change your detergent.
Rearrange the items so that the sp ay can rotate freely.r
Clean and/or fit the filter combination correctly.
Clean the sp ay arm jets. See "Cleaning the Spray
Arms".
r
Use less detergent if you have soft water and select
a shortest cycle to wash the glassware and to get
them clean.
Use a mild abrasive cleaner to eliminate those marks.
Re-loading the dishes properly.
Load the dishwasher as suggested in the directions.
Increase the amount of rinse-aid/refill the rinse-aid
dispenser.
Do not empty your dishwasher immediately after
washing. Open the door slightly so that the steam can
escape. Begin unloading the dishwasher only once t
he dishes are barely warm to the touch. Empty the low
basket first. This prevents water form dropping off
dishes in the upper basket.
In short program the washing temperature is lower.
This also lowers cleaning performance. Choose
a program with a long washing time.
Water drainage is more difficult with these items.
Cutlery or dishes of this type are not suitable for
washing in the dishwasher.
The programme was
not powerful enough.
Not enough detergent
was dispensed.
Items are blocking
the path of sp ay arms.r
The filter combination
in the base of wash
cabinet is not clean or
is not correctly fitted.
This may cause
the sp ay arm jets
to get blocked.
r
Combination of soft
water and too much
detergent.
Aluminum utensils
have rubbed against
dishes.
Dishes block
detergent cups.
Improper loading
Too little rinse-aid
Dishes are removed
too soon
Wrong program
has been selected
Use of cutlery with
a low-quality coating
If overflow occurs, turn off the main water supply before calling a service.
If there is water in the base pan because of an overfill or small leak,
the water should be removed before restarting the dishwasher.
Overflow.
When some malfunctions come on, the appliance will display error codes to warn you:
Longer inlet time.
Faucets is not opened, or water intake is
restricted,or water pressure is too low.
Some element of dishwasher leaks .
E1
E4
Page 29

24
Height : 815mm
Width : 598 mm
Depth : 570mm
( )
with th e d oor c losed
Water pressure: 0.04-1.0MPa
Power supply: see rating label
Capacity: 14 place settings
Page 30

Page 31

WARRANTY
This Built-in Dishwasher is fully warranted against any defect arising out of defective materials or faulty
workmanship for a period of one year from the date of purchase. Should any defect develop in this
product, the customer should bring the product to the nearest authorised service centre, where the
company undertakes to get the product repaired free of charge.
This warranty is not valid if :
• The use and care instructions have not been followed.
• Defects are caused by accident, misuse, abuse or commercial use.
• The repair work is carried out by persons not authorised by the company.
• Any modification or alteration of any nature is made in the product.
• Normal wear & tear of the product is not covered under warranty
• The Bill/Cash memo and copy of warranty card is not presented.
Under no circumstances, whether based on limited warranty or otherwise shall the company be liable for
incidental, special or consequential damages. Use of product indicates acceptance by you of the
aforesaid terms and conditions.
PRODUCT NAME : BUILT-IN DISHWASHER
MODEL NO.:
SERIAL NO.:
BILL NO. & DATE:
NAME OF OWNER:
ADDRESS:
Imported & Marketed by / in case of Customer complaints
Glen Appliances Pvt. Ltd.
I-34, DLF Ind. Area, Phase-I, Faridabad, India. Phone 0129-2254191
E-mail : service@glenindia.com, info@glenindia.com Website : www.glenindia.com
®
 Loading...