

Page 1
Capella guarantees to get the Chimney Hood or any part thereof repaired free of charge for
a p e r i o d o f o n e y e a r f rom the date of purc ha se, should any
defect develop due to faulty or defective workmanship or material. However, the
plastic breakable parts, lamps, push buttons, filter locks, and items subject to normal
wear and tear due to operation are not covered under guarantee.
Terms to Guarantee
* The Bill/Cash Memo should be presented.
* No repair work should be carried out by any unauthorised person.
* Chimney Hood should be used as per the directions given in the user’s guide.
* Any defects caused by improper or reckless use are not covered under guarantee.
* The Serial no. has not been tampered with.
* No modification/alteration of any nature is made in the Chimney Hood.
The company accepts no responsibility for any consequential losses arising out of
misuse or negligence on the part of the user.
Packing List : Main unit, spigot, plastic wall plugs, screws
CHIMNEY
SERIAL NO BILL NO DATE OF PURCHASE
NAME OF OWNER
ADDRESS
SPECIFICATIONS
GUARANTEE
DEALER’S STAMP & SIGNATURE
1000 M³
155W
BF Stainless Steel Baffle Filter
TC (3 Speed Touch Control with Timer)
1250 M³
260W
LED
1.5W
Air Flow
Lamps
Speed Controls
Motor Wattage
Wattage (each)
Filters
FRP Flame Retardant Plastic
Housing
PDCA Pressure Die-casted Aluminium
Features may vary with individual models. See product brochure for more details.
USER’S GUIDE
CHIMNEY HOOD
PDCA
Motor Housing
Thermal
Overload
Protector
Next Generation
BAFFLE
FILTER
Powerful
Suction
Marketed by
Glen Appliances Pvt. Ltd.
EPIP, Phase-II, Thana Baddi, Tehsil Nalagarh, Distt. Solan (H.P.)
Customer Care & H.O.
I-34, DLF Indl. Area, Phase 1, Faridabad (Haryana), INDIA.
Phone : 0129-2254191, 9266678916 Fax : 0129-2274344
E-mail : info@capellaindia.com Website : www.capellaindia.com
Page 2
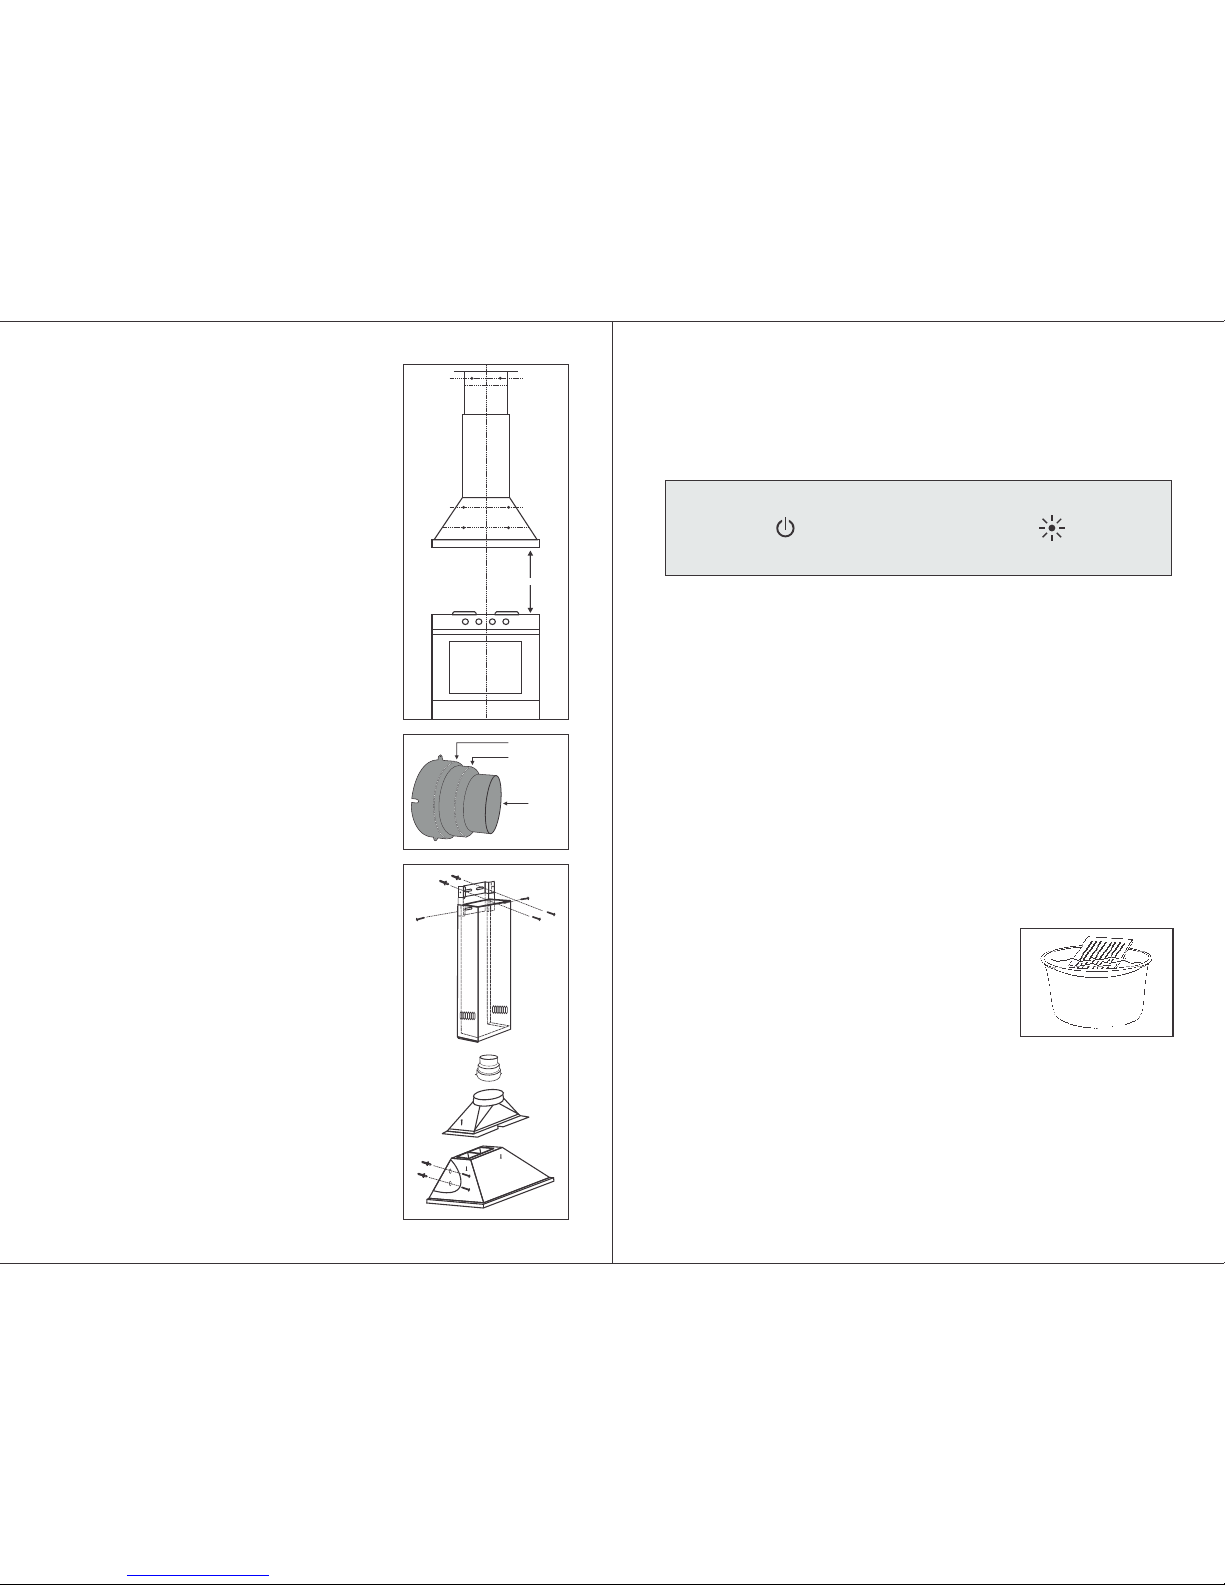
INSTALLATION
The Chimney must be mounted over the center of the
cooking area. The minimum distance between the cooktop
and the bottom of the chimney must be 750 mm.
Please ensure that the wall on which the chimney is
being installed is level properly, if not either get it leveled
or install the chimney on leveled ½ plywood.
Attach the spigot to the hood using the four screws. In a
few models spigot may already be mounted.
Fastening the Chimney to the Wall
Mark the position of the holes on the wall. Before drilling
make sure that no wiring and tube will be damaged. Drill
two fastening holes, drive in the wall plugs and screw in
the screw until their heads are about 6 mm from wall.
Place the chimney to the wall in order to check that it seats
properly. Then mark the position of the two holes. Take it off
from the wall now, drill the holes and fit the plugs. Place the
hood once again to the wall, and introduce the screw from
the inside of the appliance.
Exhaust mode
The chimney must be connected by the spigot (supplied as
part of the hood) to a duct to vent all the exhausted air
outside the kitchen. Over horizontal areas, if any, the
duct must be slanted about 10% downwards. The
maximum recommended length of ducting is 10 feet
With a maximum of two bends, the suction power of the
chimney considerably decreases In case the length of the
ducts and number of bends increase further.
Note : it is recommended to use a 4’’ dia pipe for chimneys
with airflow 890m³/hr and A 6’’ dia for chimneys with
airflow 1250m³/hr airflow.
Installing the duct covers
Fix the bracket with two plugs and screws at the required
height for the duct cover. Screw the short duct with two
screws on the bracket. Insert the two nuts in the holes on
the lower part of the Long duct. Put the long pipe over the
short one by pulling apart the laterals of the duct. Insert
the nuts supplied, and working from the inside of the
chimney, using the two screws fix the long duct . In a few
models the long duct can be fixed by using two screws
which must be inserted into the holes at the bottom of
the duct.
Electric connection
Make sure that the supply voltage rating correspond with
the specifications provided in the User’s guide.
750 mm750 mm750 mm
UNIVERSAL SPIGOT
Opening dia. 5’’
Cut at this point
Opening dia. 6’’
Cut at this point
Opening Dia. 4’’Opening Dia. 4’’
No Cutting No Cutting
RequiredRequired
Opening Dia. 4’’
No Cutting
Required
MAINTENANCE
The baffle/aluminium cassette filter can be removed easily by unlocking. Dip the filter for
10-15 minutes into a boiling hot soap solution and then wash in running water. Dry and
reinstall the filters.
The chimney surface should be cleaned with a damp cloth. No abrasive chemicals
should be used.
Safety Rules : Don’t do any flammable cooking underneath the hood. When frying never
leave the pan unattended because the cooking oil could flair up. Clean all the surface
frequently at least once a week to avoid danger of fire.
When performing maintenance operations, disconnect the
plug from the socket.
The efficiency of the chimney depends on the condition of
the filters. The filters should be washed as often as possible
but at least once in 10 to 15 days in normal operating
conditions.
USING YOUR CHIMNEY
Before using the chimney please ensure that all plastic films on the filter and stainless
steel body are removed.
LED lamps : The chimney is provided with energy efficient LED lamps. They consume
only a fraction of electricity as compared to any other lighting and last about ten times
longer. LEDs contain no mercury and are environmentally safe. They also remain cool to
the touch.
The touch control switch is electronic and may malfunction or stop working due to
sudden surge of voltage. It should not be used on inverter or generator power.
The chimney is provided with a touch control panel.
Switch on the power with On/Off switch. select the fan speed by touching the fan button
1, 2 & 3 .
TOUCH CONTROL PANEL
1
2 3
 Loading...