

Page 1

Instruction Manual / Installation Manual
MODEL: GLCER64
Page 2

2
Congratulations on the purchase of your new C eramic Hob.
We recommend t hat you spend som e time to read this Instruction/Installation
Manual in order to ful l y understand ho w to install co r rectly and operate it.
For installation, please read the installation section.
Read all t he safety instructi ons carefu lly before use a n d k eep this Instructi o n /
Installation Manual for fut u re reference.
Safety Wa rnings
Cut Hazard
• Take care - panel edges are sharp.
• Failure to use caution could result in injury or cuts.
INSTALLATION - Important safety instructions
• Read these instructions carefully before installing or using this appliance.
• No combusti ble material or products should be placed on this appliance at any time.
• Please make this information available to the person responsible for installing the appliance
as it could reduce your installation costs.
• In order to avoid a hazard, this appliance must be installed according to these instructions.
• This appliance is to be properly installed and earthed only by a suitably qualified person.
• This appliance should be connected to a circuit which incorporates an isolating switch providing
full disconnection from the power supply.
• Failure to install the appliance correctly could invalidate any warranty or liability claims.
Operation and maintenance
Electrical Shoc k Hazar d
• Do not cook on a broken or cracked cooktop. If the cooktop surface should break or crack,
switch the appliance off immediately at the mains power supply (wall switch) and contact
a qualified technician.
• Switch the cooktop off at the wall before cleaning or maintenance.
• Failure to follow this advice may result in electrical shock or death.
Health Hazard
• This appliance complies with electromagnetic safety standards.
• However, persons with cardiac pacemakers or other electrical implants (such as insulin pumps)
must consult with their doctor or implant manufacture r befo re using t his appliance to make sure
that their implants will not be affected by the electromagnetic field.
• Failure to follow this advice may result in death.
Hot Surface Hazard
• During use, accessible parts of this appliance will become hot enough to cause burns.
• Do not let your body, clothing or any item other than suitable cookware contact the glass until
the surface is cool.
• Never leave metal objects (such as kitchen utensils) or empty pans on the cooktop as they can
become hot ve ry qui ckl y.
• Keep children away.
• Handles of saucepans may be hot to touch. Check saucepan handles do not overhang other
cooking zones that are on. Keep handles out of reach of children.
• Failure to follow this advice could result in burns and scalds.
Page 3

3
Cut Hazard
• The razor-sharp blade of a cooktop scraper is expos ed when the safety co ver is retracted.
Use with extreme care and always store safely and out of reach of children.
• Failure to use caution could result in injury or cuts.
Important safety instructions
• Never leave the appliance unattended when in use. Boil over causes smoking and greasy
spillovers that may ignite.
• Never use your appliance as a work or storage surface.
• Never leave any objects or utensils on the appliance.
• We recommend using plastic or wooden kitchen utensils for cooking with your
ceramic cooktop.
• Never use your appliance for warming or heating the room.
• After use, always turn off the cooking zones and the cooktop as described in this manual
(i.e. by using the touch controls)
• Do not allow children to play with the appliance or sit, stand, or climb on it.
• Do not store items of interest to children in cabinets above the appliance. Children
climbing on the cooktop could be seriously injured.
• Do not leave children alone or unattended in the area where the appliance is in use.
• Children or persons with a disability which limits their ability to use the appliance should
have a responsible and competent person to instruct them in its use. The instruc tor should
be satis fied that they c an use the appliance w ithout d anger t o themselve s or the ir surroundings.
• Do not repair or replace any part of the appliance unless specifically recommended in
the manual. All other servicing should be done by a qualified technician.
• Do not use a steam cleaner to clean your cooktop.
• Do not place or drop heavy objects on your cooktop.
• Do not stand on your cooktop.
• Do not use pans with jagged edges or drag pans across the glass surface as this
can scratch the glass.
• Do not use sco urers or any ot her harsh abrasive c leaning ag ents to cle an your cooktop, as these
can scratch the Induction glass.
• If the power sup ply cable is damaged, it must only be replaced by a qualified technician.
• Do not operate your cooktop by means of an external timer or separate remote-control system.
•This appliance is intended to be used in household and similar applications.
THIS APPLIANCE IS NOT INTENDED FOR USE IN COMMERCIAL APPLICATIONS.
Page 4
4
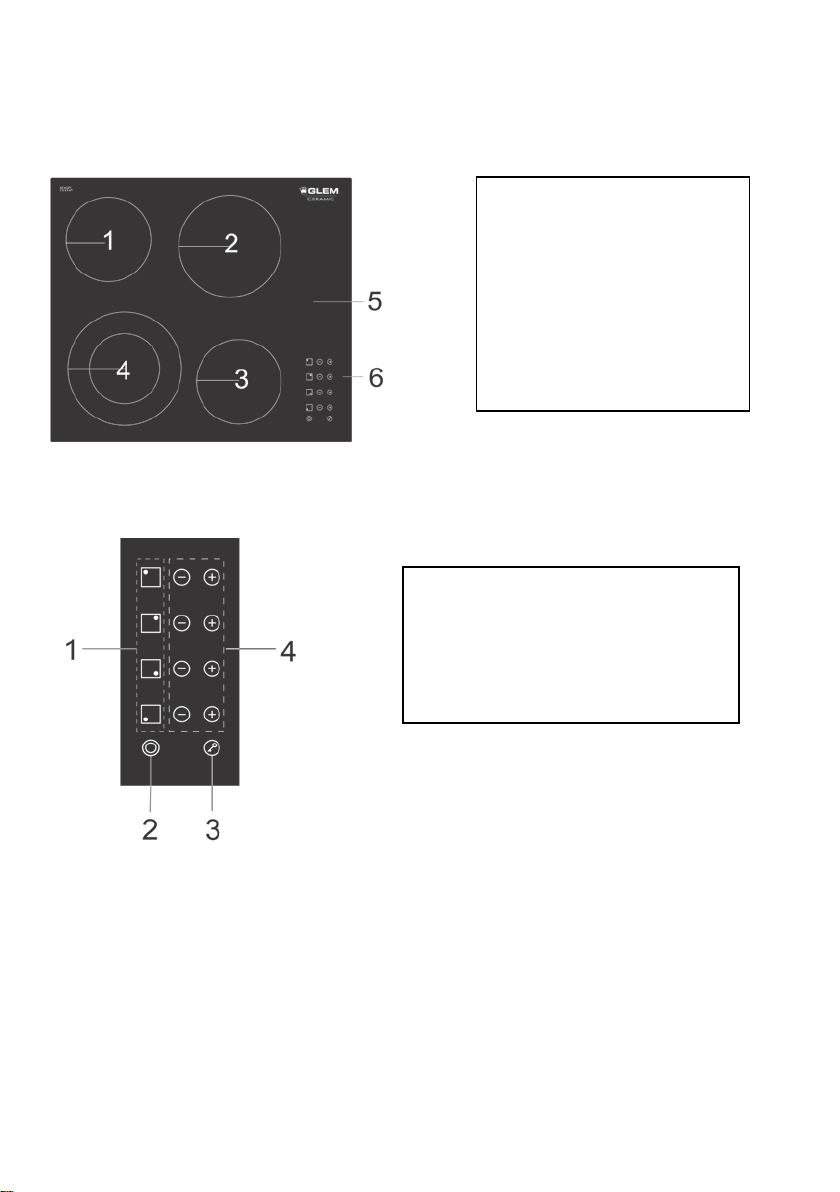
Product Overview
Top View
Control Panel
1. max. 1200 W zone
2. max. 1800 W zone
3. max. 1200 W zone
4. max. 1000/2200 W zone
5. Glass plate
6. Control panel
1. ON/OFF control
2. Dual zone control
3. Power regulating controls
4. keylock control
Product Information
The micr o comput er ceramic cooker ho b can meet different kind s of cuisin e
demands using resistance w ire heati ng, micr o -computerized control and
multi-power selection.
Before using your New Ceramic Hob
• Read this guide, t aking special note of the ‘Safety Warnings’ section.
• Remove any protective film that may still be on your ceramic hob.
Page 5
5
Using the Touch Controls
• The controls re spo nd to touch, so you don’ t need to apply any pressure.
• Use the ball of your finger, not the tip.
• You will hear a beep each time a touch is regist ered.
• Mak e sure the c ontrol s are alwa ys clean , dry, an d that ther e is no obje ct (e.g. a
utensil or a cloth) covering them. Even a thin film of water may make th e
control s di fficult to operat e.
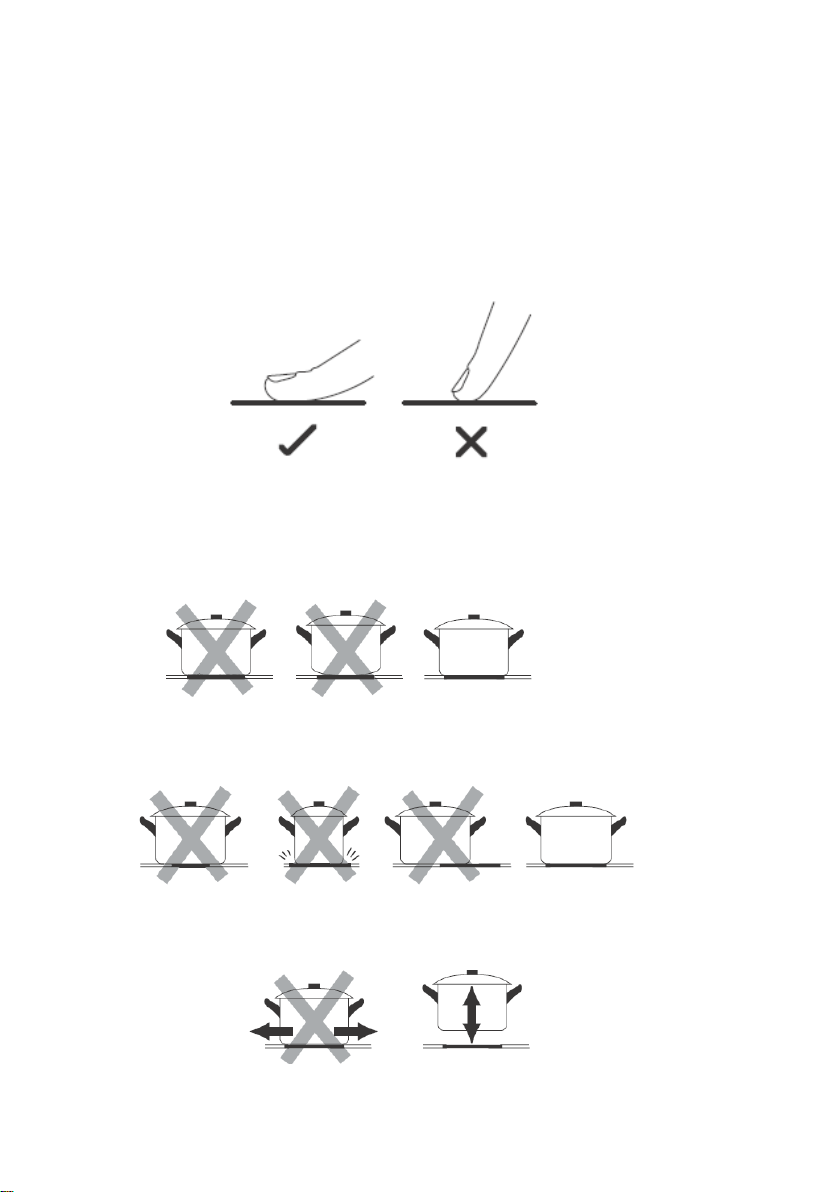
Choosing the right Cookware
Do not use cookware with jagged edges or a curved base.
Make sure that the base of your pan is s mooth, sits fl a t against the glass , and is
the same size as the cooking zon e. Always centre yo ur pan on the cook ing zone.
Always li ft pan s off t he c era mi c h ob – do n ot sl id e, or t hey m ay scr atch t he glas s.
Page 6
6
Using y our Ceramic Hob
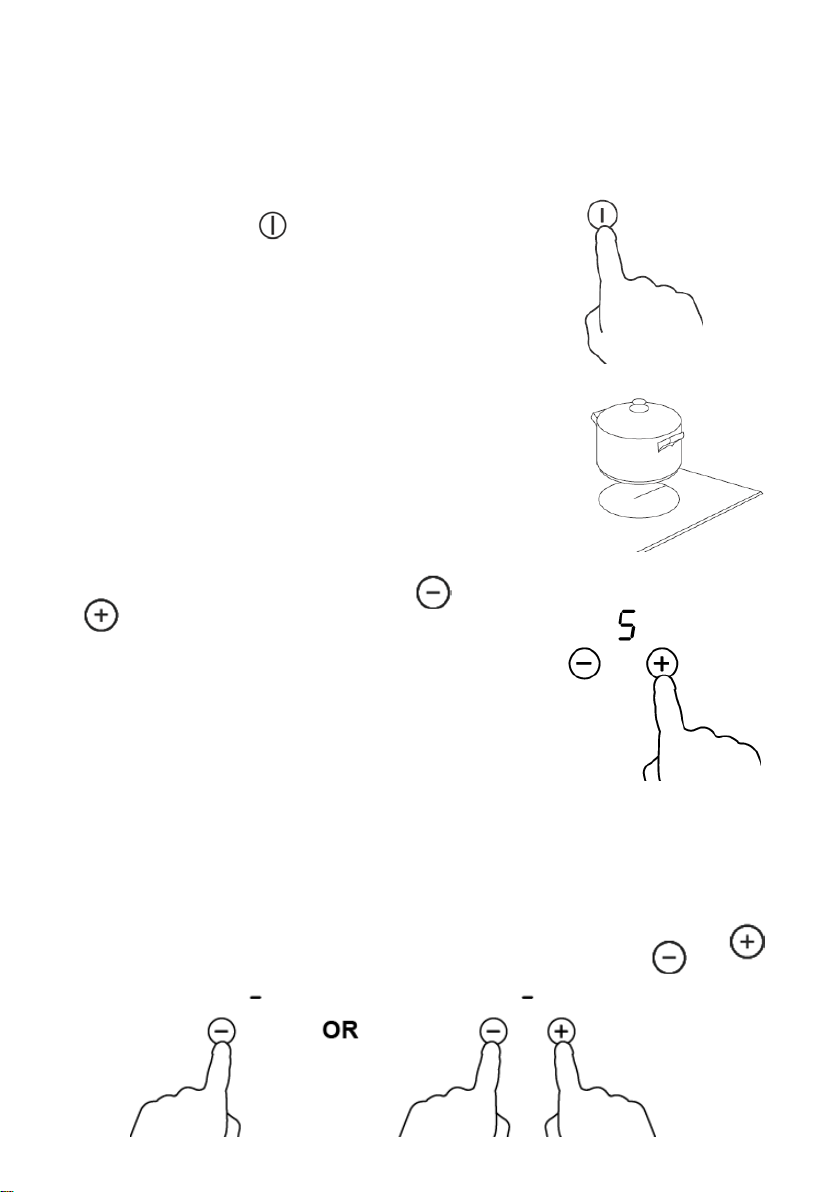
To start cooking
1. Touch the ON/OFF control.
• After power on, the buzzer beeps once, all
the indicators light up for 1 second then go
out, indicating that the ceramic hob has
entered the state of standby mo de.
2. Place a suitable pan on the cooking zo ne that
you wish to use.
• Make sur e the bottom of the pan and the surface
Of the cooking zone are clean and dry.
3. Select a heat setti ng by touching the or
control.
• If you don’t choose a heat setting withi n 1
minute, the ceramic hob will automatically
switch off. You will need to start again at
step 1.
• You can modi f y the heat setting at any time
during cooking.
• By holding down either of these butto ns, the
value will adjust up or down.
When you have finished cooking
1a. Turn the cooking zone off by scrolling down to “-“ or touching and
control tog ether.
Page 7

7
1b. Turn the whole cooktop off by touching the ON/OFF control.
2. Beware of hot surf aces
will show which cooking zone is hot to touch. It will disappear
when th e su r f ace has co o led dow n t o a safe tem peratu r e. It can also be
used as an energy saving fun ct i on if y o u w an t to heat further pans, use
the hotplate t hat i s still hot.
Using the Dual zone function
• The function onl y works in 4# cooking zone
• The du al co oki ng zon e h as tw o cooki ng ar eas t hat y ou c an u se a cen tr al s ection
and an outer section. You can use the central section (A) independently or both
sections (B) at o nce.
Active the Dual zone
1. Select a heat set ti ng by touching the
Or control.
Page 8

8
2. Adjust the heating setting between power
levels 1 and 9 (e.g. 6)
3. The central section of the dual cooking zone will
switch on.
4. Touching th e dual zone control , you
will activate th e outer section as well.
5. A neon next the dual cooking zone control will light.
6. The cooking zone indicator shows “ “ and “ ” alternately
Page 9

9
Deactive the Dual zone
1. Touch the dual zone control again. The dual
zone function will deactivate.
2. The cooking zon e indicator shows
Locking the Controls
• You can lock the co ntr ol s to prevent unint ended use (for exam ple c hi l dren
accidentally turning the cooking zones on).
• When the controls are locked, all t he controls except the ON/O FF control are
disabled.
To lock the controls
Touch the keylock control. The lock indicator next
to the keylock will light up
To unlock the controls
1. Make sure the cerami c hob is turned on.
2. Touch and hold the keylock control for 2 seconds.
3. You can now start usi ng your ceramic hob.
When the hob is in th e lock mod e , a ll th e controls are disabled except the
ON/OFF
control in an emergency , but y ou shall unlock the hob first in the next
operation
, you can alway s turn the ceramic hob off with the ON/OFF
Over-Temperature Protection
A temperature se nsor inside the ceramic hob will stop the ceramic h ob operation
automatically.
Page 10

10
Residual Heat Warning
Power level
1 2 3 4 5 6 7 8 9
Default working timer (hour)
8 8 8 4 4 4 2 2 2
When the hob has been op erati ng for some ti me, there will be some residual
heat. The letter “ ” appears to wa r n you to keep away from it .
Auto Shutdown
Another safety f eat ur e of the hob is auto shutdown. Thi s occ urs whenever you
forget to switch off a cooki ng zone. The default shutdown times are shown in
the table bel o w:
Cooking Guidelines
Take car e when fry ing as the oil an d fat he at up ver y quickl y. At extremely
high temperatur es oil and fat will ignite spontane ously and this present s a
serious fire risk.
Cooking Tips
• When food comes to t he boil , reduce the temperatur e setting.
• Using a lid will reduce cooking times and save energy by retaining the heat.
• Minimise the amount of liquid or fat to reduce cooking times.
• Start cooking on a high setting and reduc e the setting when the food has heated
through.
Simmering, cookin g rice
• Simmering occurs below boiling point, at around 85˚C, when bubbles ar e ju st
rising occasionally to the surface of the cooking liquid. It is the key to delicious
soups and tender stews because th e f lavours develop wi t h out ov ercook ing the
food. You should also cook egg-ba se d an d f lo ur thicke ne d sauce s below boiling
point.
• Some tasks, inclu ding cooki ng rice by th e absor pti on method, may require a
setting higher tha n the lowest setting to en sure the food is cooked properly in
the time recommended.
Searing steak
To cook juicy flavo ursome steaks:
1. Stand the m eat at room temperature for about 20 mi nutes before co oking.
2. Heat up a heavy-based fry in g pan .
3. Brush both sides of the steak with oil. Drizzle a small amount of oil into the hot
pan and then lower the meat onto the hot pan.
Page 11

11
4. Turn the steak only once during cooking. The exact cooking time will depend on
Heat setting
Suitability
1 - 2
• slow warming
3 - 4
• cooking rice
5 - 6
• pancakes
7 - 8
• cooking pasta
9
• boiling water
the thickness of the steak and how co o ke d you w an t it . Ti mes may v ary fro m
about 2 – 8 minutes per si de. Pre ss the steak to gauge ho w co ok ed i t is – the
firmer it feels the more ‘well done’ it will be.
5. Leave the steak t o r est on a warm plate fo r a few minutes to al low it to relax
and beco me t en der befor e serving.
For stir-frying
1. Choose an induction compatible flat-base d wok or a large frying pan.
2. Have all the ingredients and equipment ready. Stir-frying should be q ui ck . If
cooking large quantities, cook the food in several smaller batches.
3. Prehe at the pan briefly and add two ta bl espoons of oil.
4. Cook any meat fir st. Put it aside and keep warm.
5. Stir-fry the vegetables . When they are hot but still crisp, turn the cooki ng zone
to a lower setting, return the meat to the pan and add y our sauce.
6. Stir the ingredients gently to make sure they are hea te d through.
7. Serve immediately.
Heat Settings
The settings below are guidelines only. The exact setting will depend on several
factors, i n cludin g your cookware and the amount you are cooking. Experiment
with the cookt o p to f i nd the settin gs that best sui t y ou.
• delicate warming for small amounts of food
• meltin g choc ol at e, butt er , and f oods th at bur n quick l y
• gentle simmerin g
• reheating
• rapid simmering
• sautéing
• stir-frying
• searing
• brin ging soup to the boil
Page 12

12
Care and Cleaning
What?
How?
Important!
stained.
Boilove rs, m elt s, and
Remove these immediately with
above.
• Remove stains left by melts and
cooktop back on.
Everyday soiling on
glass (fingerprints,
marks, stai ns left by
food or non-sugary
spillovers on the
glass)
hot sugary spills on
the glass
1. Switch the power to the
cooktop off.
2. Apply a c ooktop cle aner while
the glass is still warm (but
not hot!)
3. Rinse and wipe dry with a
clean cloth or paper towel.
4. Switch the power to the
cooktop back on.
a fish slice , palet te knife or razor
blade scraper suitable for
ceramic gla ss cooktops, but
beware of hot cooking zone
surfaces:
1. Switch the power to the
cooktop off at the wall.
2. Hold the blade or utensil at a
30° angle and scrape the
soiling or spill to a cool area
of the cooktop.
3. Clean the soiling or spill up
with a dish cloth or paper
towel.
4. Follow steps 2 to 4 for
‘Everyday soiling on glass’
• When the power to the cooktop is
switched off, there will be no ‘hot
surface’ indication but the cooking
zone ma y still be hot! Take extreme
care.
• Heavy-duty scourers, some nylon
scourers and harsh/abrasive
cleaning agents may scratch the
glass. Always read the label to check
if your cle ane r or s coure r is s uitab le.
• Never leave cleaning residue on the
cooktop: the glass may become
sugary food or spillovers a s soon
as possible. If left to cool on the
glass, they may be difficult to
remove or even permanently
damage the glass surface.
• Cut hazard: when the safety cover
is retracted, the blade in a scra per
is razor-sharp. Us e with extreme
care and always store safely and
out of reach of children.
Spillovers on the
touch controls
1. Switch the power to the
cooktop off.
2. Soak up the spill
3. Wipe the touch control area
with a clean damp sponge or
cloth.
4. Wipe the area completely dry
with a paper towel.
5. Switch the power to the
• The cooktop may beep and turn
itself off, and the touch controls
may not function while there is
liquid on them. Make sure you wipe
the touch control area dry before
turning the cooktop back on.
Page 13

13
Hints and Tips
Problem
Possible causes
What to do
The cooktop cannot
No power.
Make sure the cooktop is connected
technician.
The touch c ont ro ls ar e
The controls are locked.
Unlock the controls. See section
instructions.
controls.
The glass is b eing
Rough-edged cookware.
cleaning products being used.
Use cookware with flat and smooth
Some pans make
This may be caused by the
vibrating differently).
This is normal for cookware and
Cooking H ob
GLCER64
Cooking Z one s
4 Zones
Supply Voltage
220-24 0V~ 50/6 0Hz
Installed Electric Power
6000-7000W
Product SizeD×W×H(mm)
590X520X50
Building-in Dimensions
A×B (mm)
560X490
Be turned on.
unresponsive.
The touch c ont ro ls ar e
difficult to operate.
scratched.
crackling or clicking
noises.
There may be a slight film of
water over the control s or you
may be using the tip of your
finger when touching the
Unsuitable, abrasive scourer or
construction of your cookware
(layers of different metals
Technical Specification
to the power supply and that it is
switched on.
Check whether there is a power
outage in your home or area. If
you’ve checked everything and the
problem persists, call a qualified
‘Using your indu c t ion cooktop’ for
Make sure the touch control area is
dry and use the ball of your finger
when touching the controls.
bases. See ‘Choosing the right
cookware’.
See ‘Care and cleaning’.
does not indicate a fault.
Weight and Dimensi o ns are approximate. Because we cont i n ually strive to
improve our products we may change speci fication s and desi gns without prior
notice.
Page 14

14
Installation
L(mm)
W(mm)
H(mm)
D(mm)
A(mm)
B(mm)
X(mm)
590
520
50
46
560
490
50 mini
Selection of installation equipment
Cut out the work surf ace according to th e sizes shown in the drawing.
For the purpose of installation and use, a mini mum of 5 cm space sh all be
preserved around the hole.
Be sure th e th ickness of the w o r k surface i s at least 30mm. Please select
heat-resistant work surface material t o avoid larger d ef o r mation caused by the
heat radiation f r om the hotplate. As shown belo w :
Under any circu mst an ce s, make sur e the ceramic cooker hob is well ventilated
and the ai r inlet and o utlet are not blo cked. Ensure the ceramic cooker hob is i n
good work state. As shown bel ow
Note: T he safety di s t ance betwe en t he hotplate an d t he cup boa r d abov e
the hotplate should be at lea st 760mm.
Page 15

15
A(mm)
B(mm)
C(mm)
D E 760
50 mini
20 mini
Air exit 5m m
Air i ntake
A B C D screw
bracket
Screw hole
base
Before locating the fixing brackets
The unit shoul d be placed on a stable, sm ooth surface (use th e packaging). Do no t
apply force onto the controls protrudin g from the hob.
Fix the hob on the work surfac e by screw four brack ets on the bottom of h ob (see
picture) after installation.
Adjust the bracket position to sui t f o r different work surface’s thi ck n ess.
Cautions
1. The cera mic cook er hob mus t be installe d by quali fied perso nnel or te chnician s.
We have professionals at y our service. Ple ase never conduct the operation by
yourself.
2. The ceramic cooker hob shall not be mounted to cooling equipment,
dishwas h ers and rotary dryers.
3. The wall and induced heating zone above the work surface shall withstand heat.
4. To avoid any damage, the sandwic h layer and a dhesive must be r esistant to
heat.
5. A steam cleaner is not to b e used.
Connecting the hob to the mains power supply
The power supply shoul d be con nect ed in compli ance with the r elevant st andar d,
or a singl e-pole circuit breaker. The method of connection is shown below.
Page 16

16
1. If the cable is damaged or needs replacing, this shou l d be done by an
after-sales technician using the proper t oo ls, so as to avoid any accidents.
2. If the appliance i s being c on nected directly to the mains supply, an omni polar
circuit breaker m u st be installed with a minimum gap of 3mm between the
contacts.
3. The inst all er m ust ensu r e th at t he co rr ect el ectric al co nn ecti on h as been m ad e
and that it complies with safety regulations.
4. The cable must not be bent or compressed.
5. The c a ble must be ch ecked regularly an d only replaced by a properly qualif i ed
person.
Page 17

17
GLEM GAS AUSTRALASIA PTY. LTD. PO BOX 63 BLAXCELL PO,SOUT H
Thank you for choosing an Emilia Glem Appliance, the purchase of this appliance is an important
invest m ent in your home an d s o to protect you r in ves tment we ur g e y ou t o com plete th e
registration card attached, please return it immediately.
The benefits conferred by this warranty are in addition to all other conditions and w
respect of this product which the consumer may have under the Trade Practices Act 1874 of the
Commonwealth of Australia and/or similar State or Territory Laws. Glem Gas
warrants , t h is appl i ance to be fr ee fr om d efects in work
Where th e ap pli ance is inten ded to be us ed an d is us ed for DOMESTIC USE
FROM DATE OF DELIVERY TO THE ORIGINAL PURCHASER.
Where th e ap pli ance is inten ded to be us ed an d is us ed for COMME R C IAL U SE
FROM DATE OF DELIVERY TO THE ORIGINAL PURCHASER
Glem Gas Australasia P/L., during the pe riod of warranty, will at its option, and su bject to the
terms and c on ditions st ated below, r ep air or replace fr ee of ch ar g e th i s appl i ance or any
component par t, which upon examination by Glem Australasia P/L. is found to be defective.
This Warranty shall not apply
If the appliance has been installed, op er at ed or m ain t ained c ontr ar y to th e inst r uc t i ons
Austr ali an Capital City, to fr eig ht or tr avel costs b eyond that r adius.
10. This warr anty does not c ov er an y gl ass damage or replacem ent of lig ht bu lbs .
Glem Gas Australasia P/L. accepts no liability pursuant to this Warranty for any co
consequential damage or economic loss whether direct or indirect, to any person or property,
arising from breakdown or failure of this appliance or any part thereof, and no responsibility is to
be implied or accepted over and above the replacement va
Parts covered under warranty that need replacing i.e.: seals, knobs and burner caps. These can
be posted to customer to put on at their discretion.
Austr al asi a Pty Ltd. and n o other pers on or org anisati on is aut h or ised to vary its provis i ons an d
conditions.
GRANVILLE NSW 2142 Tel. 02 9721 2755 Fax: 9721 2766
W:www.emiliaglem.com.au E: info@glemgas.com.au
PRODUCT WARRANTY
manship and m at erials for a per i od of:
:
1. If the rating plate has been removed or the serial number or other details on it have
been removed or rendered illegible.
2. If the appliance is connected to any of voltage other than shown on rating plate.
3. If the appliance has been subjected to mis use, abus e acc i d ent or w a nt of c are.
4.
supplied by Glem Gas Australasia P/L.
5. If the appliance has been installed by anyone other than a licensed electrician.
Proof of authorised installation is required when making a claim on Warranty.
6. If any defect or failure is due to connection to an inadequate or faulty power supply.
7. If damage is caused by foreign objects on the appliance or by reason of its use for
purposes other than that for which it was delivered.
8. If a repair h as b een m ad e or att empted b y th e pur c h as er.
9. Where th e ap pli ance is inst alled outs i d e an 80 km . r adi us from the G.P.O. of any
arranties in
Australasia P/L.
– 24 MONTHS
– 90 DAYS
st or
This Warranty is given by Glem Gas
lue of the product.
Page 18

18
Complete this section and keep for your own record.
ApplianceType.......................................................................
Model No...............................................................................
Serial No.........................................................................
Purchased From............................................................
Date of purchase..........I..........I.........
Please complet e the section below and return to:
Glem Gas Australasia Pt y Ltd, P.O. Box 63 Blaxcell PO, South Granville
NSW, 2142 Or fax: 02 9721 2766
Appliance Type.........................................Model No..............................
Serial No.......................................................................
Purchased from................................................................
Date of purchase...............................................................
Customer name....................................................................
Address......................................................................Post Code ...............
Installers signature…………………………..……..…….......................
Installer License……………………………..……..……..........................
Installers compliance number……………………………………………..
 Loading...