

GLD Products Orion Dartboard Replacement Parts

Orion Dartboard
Item 42-1036
ORION
ELECTRONIC DARTBOARD
Viper® LaserLite
Compatible!
Replacement Parts
Order direct at www.gldproducts.com
or call our Customer Service department at
(800) 225-7593
8 am to 4:30 pm Central Standard Time
Publication 42-1036 Rev E
January 2017 UPC Code 7-19265-54414-2

GLD Products Orion Dartboard
Item 42-1036
Staple your receipt here.
Important: A copy of your receipt will be needed to activate your warranty (see page 39).
GLD Products Orion Dartboard
Item 42-1036
Congratulations and THANK YOU for purchasing the
Orion Dartboard. You have chosen a product that
should provide years of entertainment. To assist you
with customer service and warranty claims, staple
your receipt to the inside cover, then keep this manual
in a safe place for future reference.
GLD Products
S84 W19093 Enterprise Drive
Muskego, WI 53150 USA
1-800-225-7593
Fax: 1-800-841-6944
Email: gld@gldmfg.com
Web: www.gldproducts.com
Es un Manual de Español por favor visite GLD sitio web para descargar.
This manual may have been updated. For the latest manual or a manual in Spanish, visit
the GLD products website.
Place your package near the location where it will be used. Carefully unpack
all components and verify you have all the correct pieces.
If you notice missing or defective parts, please call us at:
1-800-225-7593
Please read and understand all instructions before beginning assembly.
This assembly will require 2 adults.
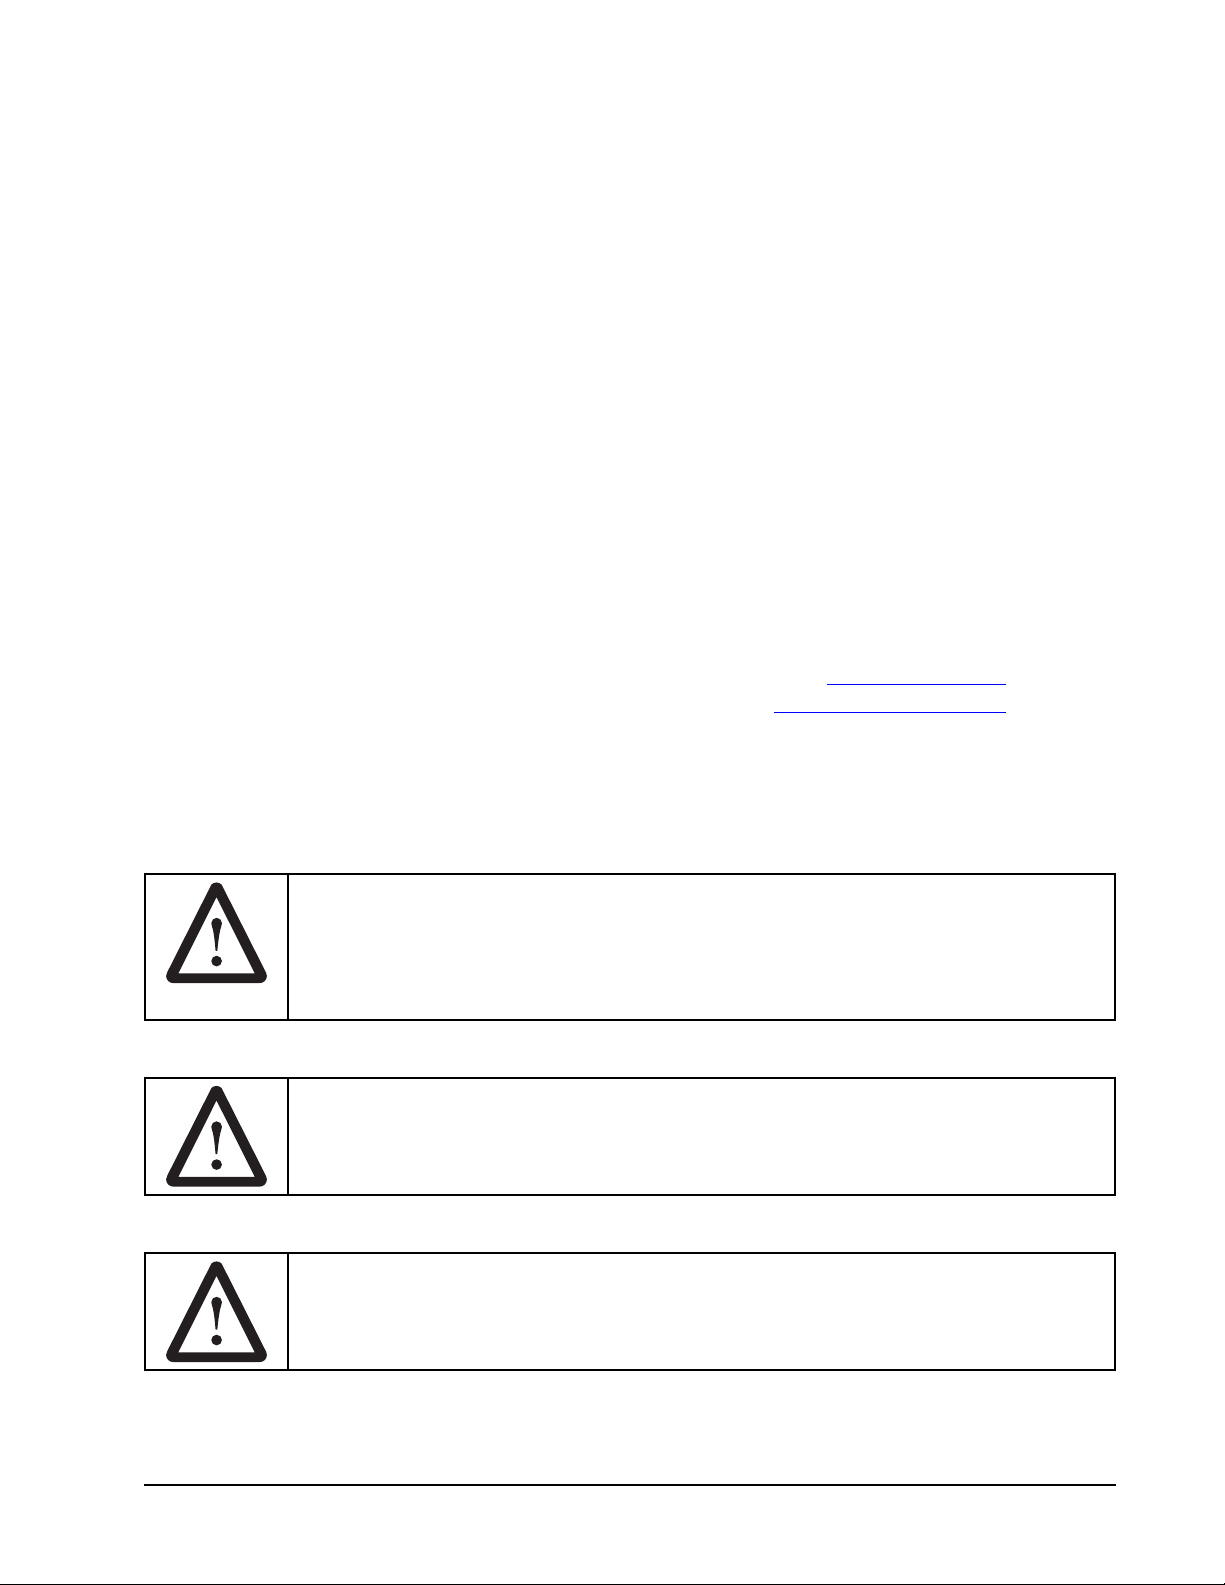
Choking Hazard
This game has small parts that may break free and present a choking
hazard. Children should be supervised by an adult when playing this game.
3 1-800-225-7593
www.gldproducts.com
GLD Products Orion Dartboard
Item 42-1036
IF YOU HAVE A WARRANTY CLAIM, CALL US FIRST:
Please refer to page 39.
GLD Products
Available 8 am to 4:30 pm Central Standard Time
S84 W19093 Enterprise Drive
Muskego, WI 53150 USA
1-800-225-7593
Fax: 1-800-841-6944
Email: gld@gldmfg.com
Web: www.gldproducts.com
For all claims, please have your receipt and item number when you call. The product
item number can be found on the front cover.
If you are instructed to return the product for service, you are responsible for
shipping the unit at your expense.
PRODUCT REGISTRATION
Important: The product registration form on page 41 and a copy of your receipt
must be completed and returned within 10 days of purchase to validate your
warranty.
Online registration is also available. Go to http://gldproducts.com/warranty-information or
click on this link. Follow the online instructions.
WARNING: Parents - Please read instructions carefully. Not for
use by children without adult supervision.
Thank you for purchasing the Orion Dartboard. The computerized scoring system makes
game playing easy and enjoyable. With 43 games and 320 options/variations to choose
from, beginners and more advanced players will ! nd challenging games to suit them.
TOOLS REQUIRED
• Tape measure
• Nail or marker
• Phillips screwdriver
• Level
• Mounting hardware (provided)
www.gldproducts.com
41-800-225-7593
GLD Products Orion Dartboard
Item 42-1036
UNPACKING THE GAME
After unpacking the game, it is important to save the original box, all packing material, and
the receipt. These items will be needed if it ever proves necessary to return the game for
service.
MOUNTING (PHYSICAL INSTALLATION)
Two methods for mounting the dartboard are available.
1. Use the keyhole slots on the backside of the dartboard. Follow the illustration and mount
the dartboard. The two screws are screwed into the wall until the screw head is 3/8"
away from the wall. The dartboard is positioned so the two screw heads are inside the
keyhole. Slide the dartboard down to secure. The head of the screw that is used must
be larger than 1/4" and smaller than 3/8".
2. Four equally spaced holes are accessible from the front to drive in screws. With the
dartboard held in place, four screws are driven in from the front, through the existing
holes. Use 1/8" diameter screws. The head of the screw must ! t inside the pocket.
Wall Anchors
A wall with studs is the most common type of wall to mount the dartboard.
1. Locate a stud and use wood screws or sheet metal type screws to secure the dartboard.
2. If a stud cannot be located or is not in the proper location, use an anchor that is suitable
for the type of wall.
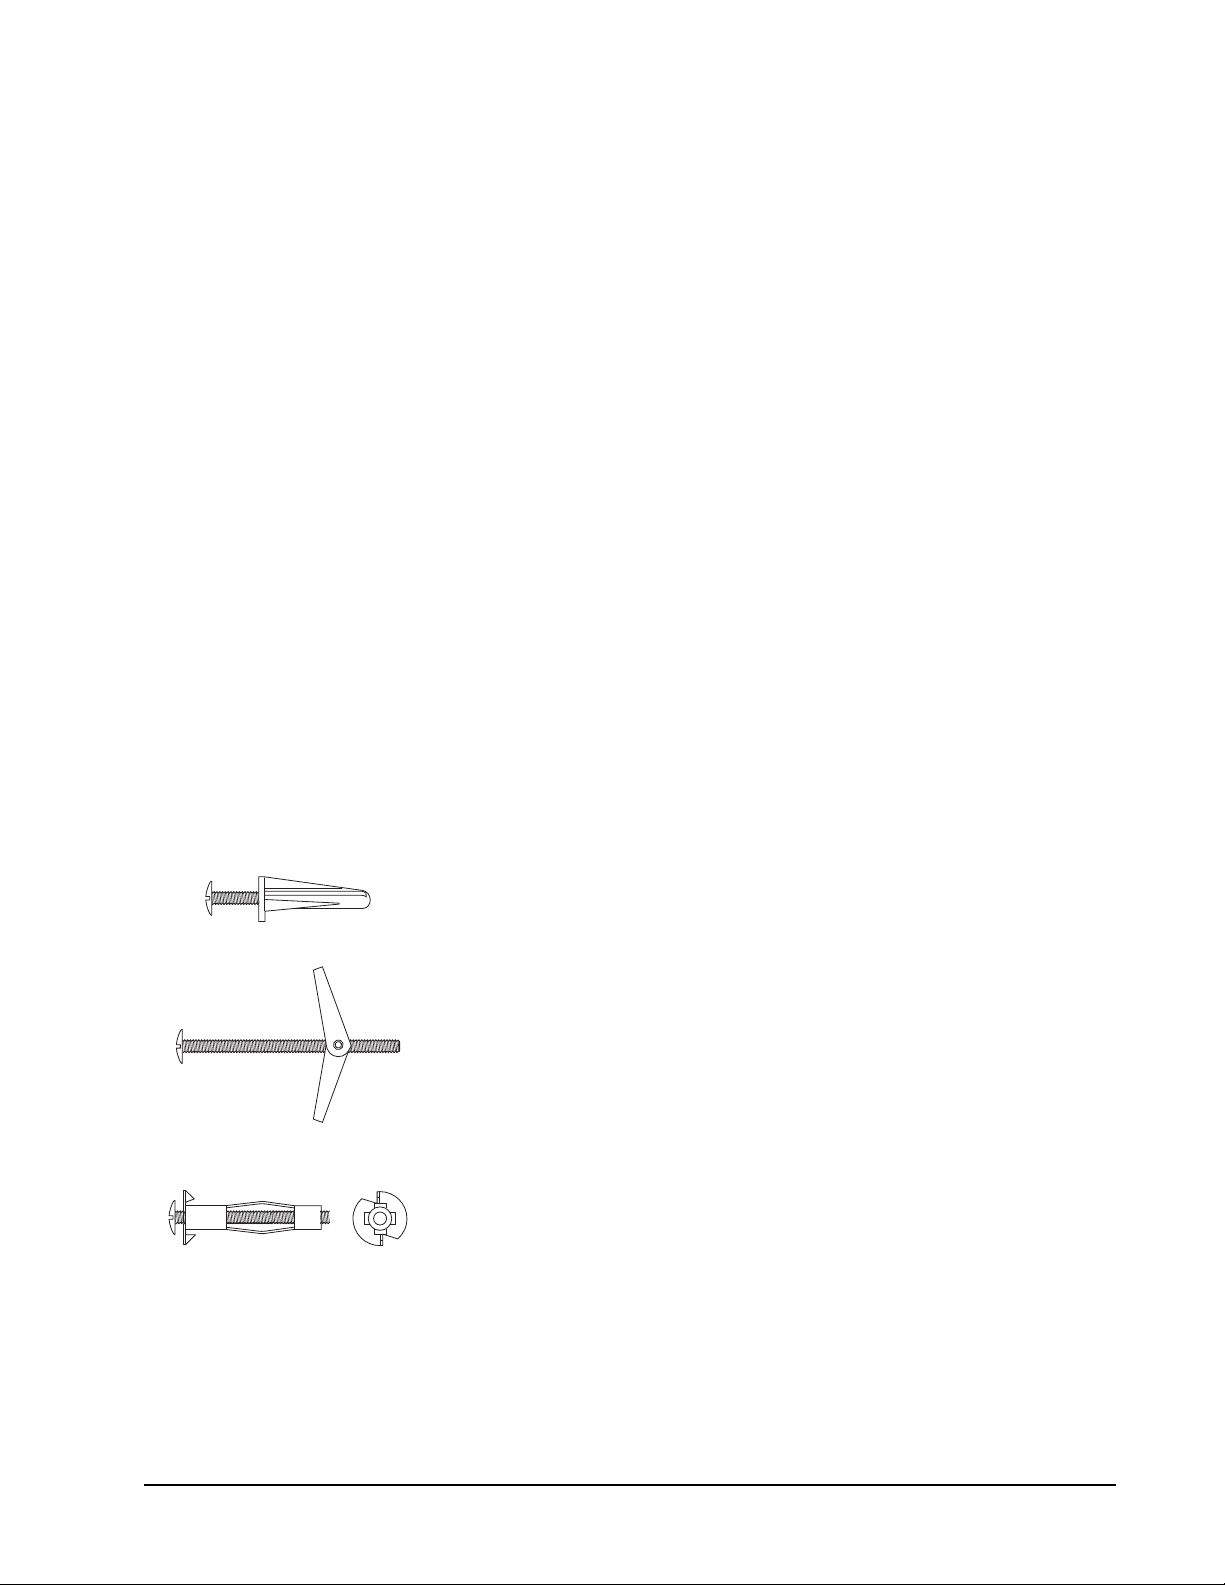
Some common anchors are:
Plastic - Drill a snug hole in drywall and push the anchor in up
to the head. When the screw is screwed into the anchor, the
plastic will expand, locking the anchor in place. Do not use on
thin panelling.
Toggle Bolt - Drill hole through wall. Hole must be large
enough for the wings to pass through. Insert screw through the
holes in the dartboard and thread the toggle wings just onto
the screw. Fold the wings back and push through the hole until
the wings spring open. Pull back on the screw to hold wings
against the inside of the wall and tighten screw.
Hollow wall anchor - Drill a snug hole through the wall. Tap
anchor into the hole until the prongs on the underside of the
head are seated securely into the wall. Turn screw in and
apply pressure to keep the anchor head from turning. Tighten
screw until resistance is felt. Do not over tighten. Turn screw
out to remove. Anchor will stay and screw can be replaced.
Other methods are available. Consult a hardware store if questions arise.
5 1-800-225-7593
www.gldproducts.com

GLD Products Orion Dartboard
Item 42-1036
Mounting Using the Keyhole Slots
Refer to the illustrations on the following pages.
1. Choose a location that is near an electrical outlet and has at least 10 feet of open ! oor
space in front of the board. Locate and use a wall stud for mounting whenever possible.
2. Locate studs and use wood screws or sheet metal screws to secure the dartboard if the
mark is on the stud. The head of the screw must be smaller than 3/8" and larger than 1/4".
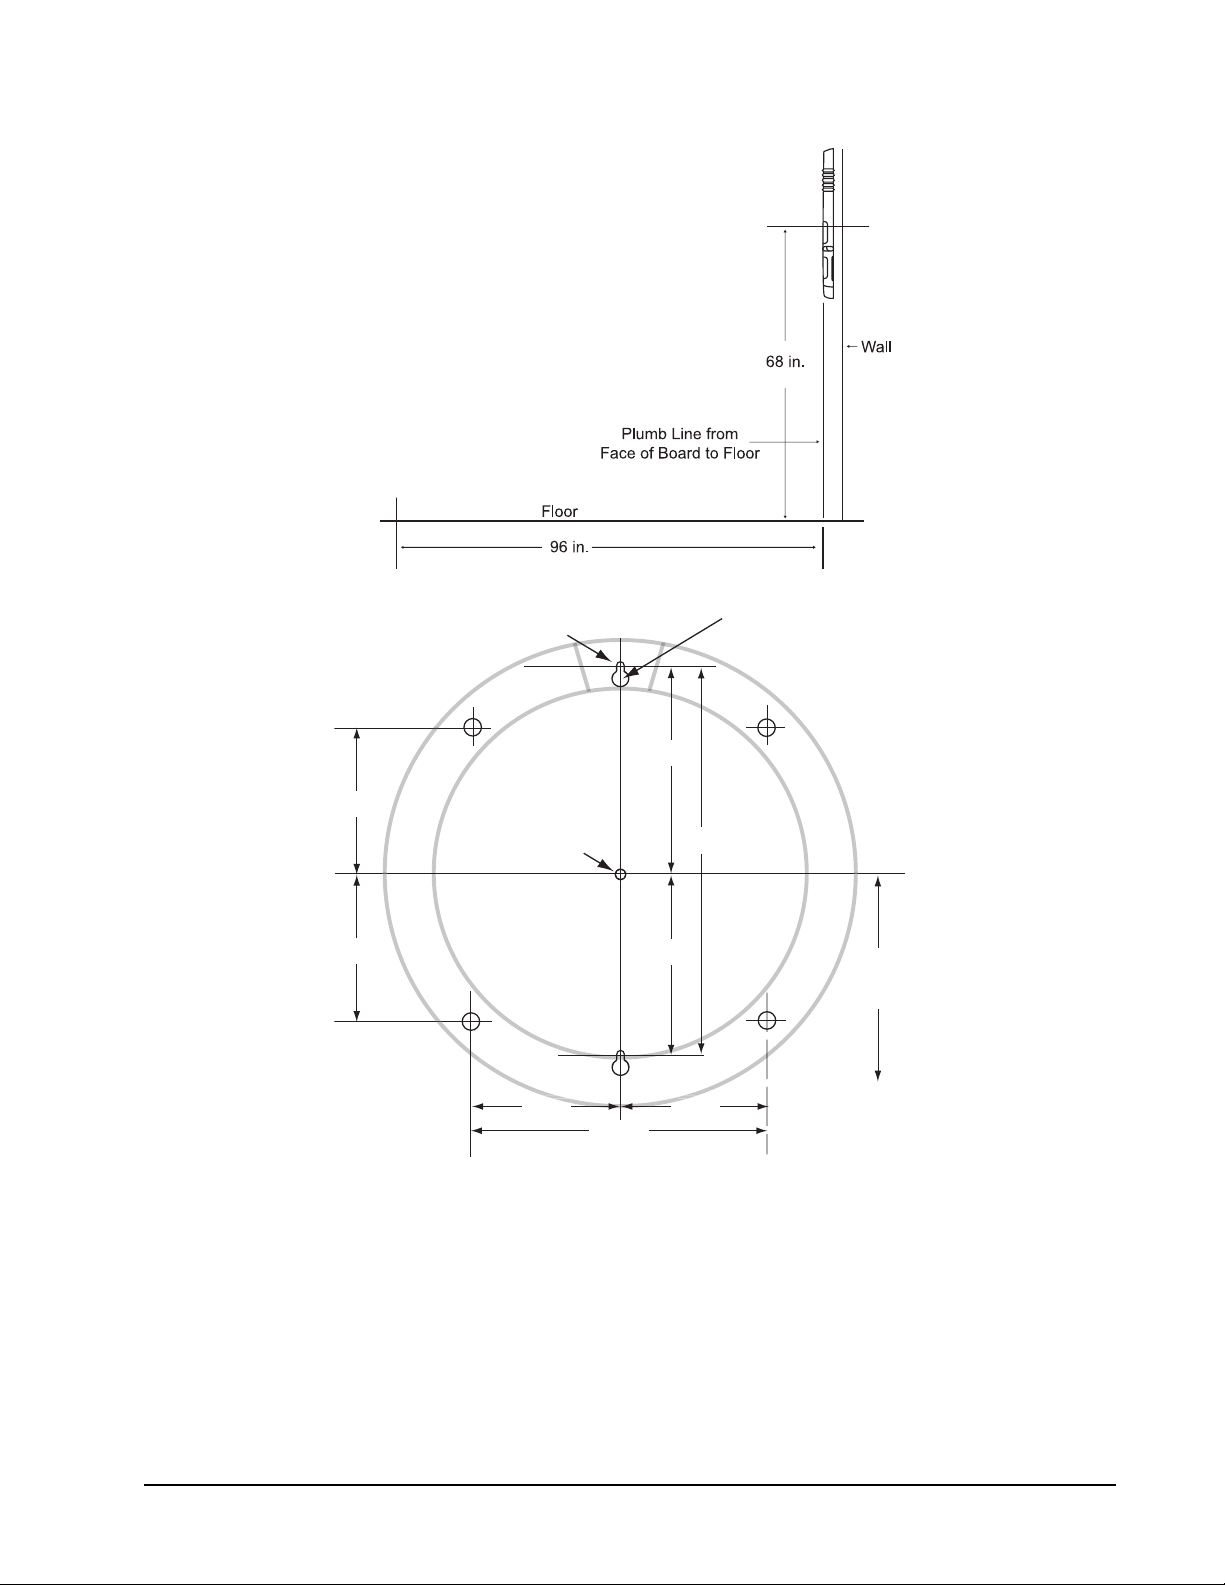
3. Determine the location for the dartboard. Place a mark on the wall 68 inches (172.7 cm)
from the ! oor. This mark is the # nal position of the center of the dartboard (bullseye).
4. If the mark is not over a stud, use the mounting hardware that came with your
dartboard.
5. Measure 8-5/8" (21.9 cm) directly up from the bullseye mark and place a mark on the
wall. Then measure down 8-5/8" (21.9 cm) from the bullseye mark and place a mark on
the wall. Use a level to check that all marks are vertical.
6. Drill pilot holes at the two marks. These are for the mounting screws.
7. If using wall anchors, follow the instructions under Wall Anchors on page 5.
8. Insert screws into anchors until a 1/4" (6.5 mm) gap is left between the wall and the
screw head.
9. Hold the dartboard so the two screw heads # t into the lower part of the keyholes. The
dartboard should slide down 1/2 inch and the screw heads will hold it on the wall.
10. Screws can be tightened or loosened to provide a secure mounting.
Mounting Using the Four Holes From the Front
Refer to the illustrations on the following pages.
1. Choose a location that is near an electrical outlet and has at least 10 feet of open ! oor
space in front of the board. Locate and use a wall stud for mounting whenever possible.
2. Two people are needed for this step. Hold board on the wall. Position center of bullseye
68" from the ! oor. Level the board. Hold in place.
3. Locate the four mounting holes on the front of the board. Use a marker or nail to mark
the position of the board through the four mounting holes onto the wall. Remove the
board.
4. Drill four pilot holes on the marks created in Step 3.
5. If using plastic anchors: drill the holes so the anchors # t snugly. Push anchors into
place.
6. Line up dartboard over anchors. Screw board into place. The screws will expand the
anchors.
61-800-225-7593
www.gldproducts.com
GLD Products Orion Dartboard
Center of Bullseye
Throwing or
Toe Line
12.5"
6.25" 6.25"
6.25"
6.25"
8.625"
8.625"
17.25"
68"
To Floor
Bullseye
Keyhole Slots
Screw head diameter
must be larger than 1/4"
and smaller than 3/8"
Mounting holes viewed from back
Item 42-1036
7 1-800-225-7593
www.gldproducts.com
GLD Products Orion Dartboard
Item 42-1036
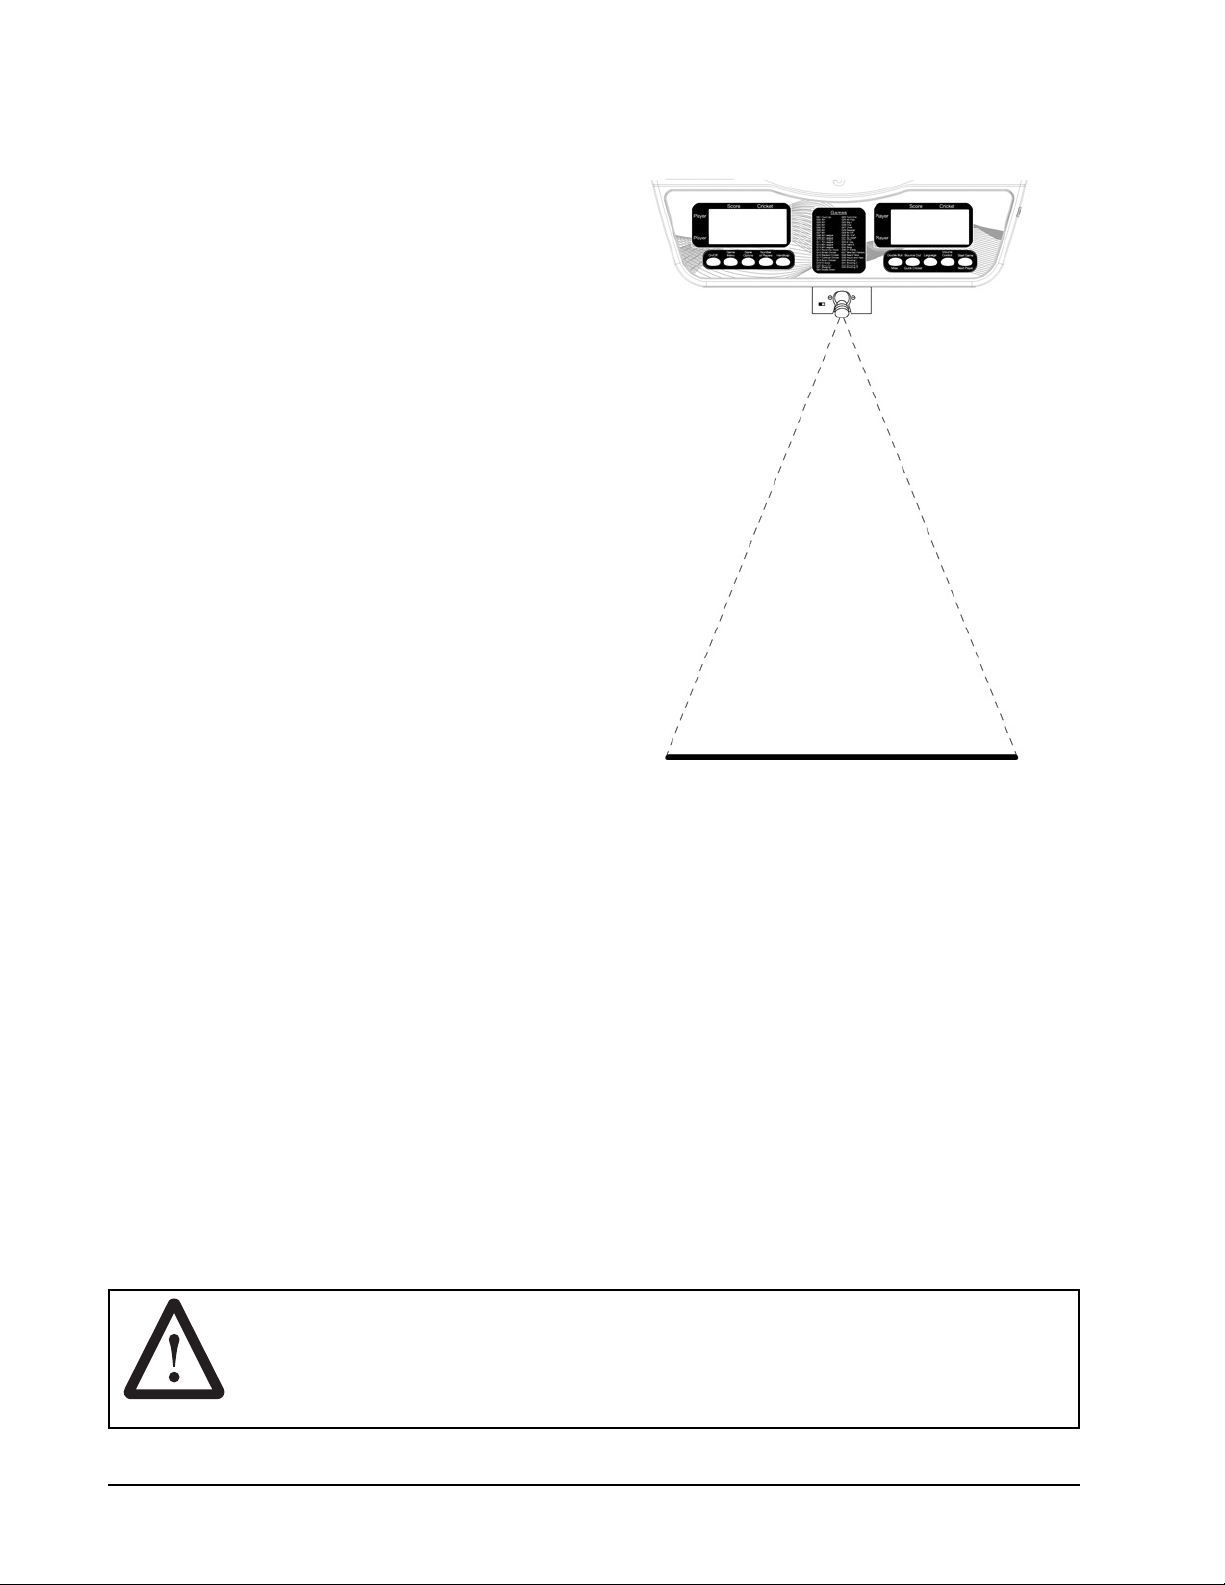
Create the Toe Line
Place a toe line 96" from the face of the board
for the throwing distance. Adhesive tape or
masking tape, 2' long by 2-1/2" wide, may be
used.
This dartboard is compatible with the Viper
LaserLite mini-laser throw line (not included),
an absolute essential for all dart players. No
need to tape a line to the ! oor; just plug the
LaserLite into your dartboard and you have a
crystal-clear throwing line that's there when
you need it and gone when you don't. Ordering
information is included on page 43.
GLD products also offers a Viper Throwing Line
and a Dart Mat for this purpose.
POWER INSTALLATION
The dartboard is designed to be powered by an AC to 5V DC, 1000 milliamp (minimum)
adapter, with the DC plug polarity con# gured as positive (+) outside, and negative (-)
center. To connect the adapter, plug the DC plug into the DC power jack on the dartboard
and the AC plug into an electrical outlet.
1. The board is not intended for children under the age of 9 years old.
2. The board must only be used with the recommended transformer.
3. The transformer is not a toy.
4. Disconnect the dartboard from the transformer before cleaning.
PROTECTIVE FILM
This electronic dartboard has a clear protective # lm over the entire display and button
area to prevent scratching during shipping. It is recommended that you remove this # lm for
easier reading of the display. To remove, simply lift edge, peel off and discard.
WARNING: Not for use by children without adult supervision.
Darts are not toys and may cause injury if used
improperly. Everyone must stand behind the dart
thrower.
www.gldproducts.com
81-800-225-7593

GLD Products Orion Dartboard
Item 42-1036
IMPORTANT NOTES
1. During shipping or in the course of normal play, it is possible for scoring segments of this
board to become temporarily jammed, resulting in a “frozen” board. If this occurs, the builtin Self Diagnostic Function of the e-BOARD Computer will be activated automatically.
Your dartboard will run a self-test routine to determine which segment is stuck. An error
message will ! ash on the display together with the number for the “Frozen” segment.
Error Code Malfunction
E 30 Stuck GAME MENU Button
E 31 Stuck GAME OPTIONS Button
E 32 Stuck NUMBER OF PLAYERS Button
E 33 Stuck HANDICAP Button
E 34 Stuck DOUBLE BULL/MISS Button
E 35 Stuck ON/OFF Button
E 36 Stuck BOUNCE OUT/QUICK CRICKET Button
E 37 Stuck VOLUME CONTROL Button
E 38 Stuck LANGUAGE Button
E 39 Stuck START GAME/NEXT PLAYER button
XX A segment is stuck, the indicates a triple and XX
E
indicates the number of the segment.
E
XX A segment is stuck, the indicates a double and XX
indicates the number of the segment.
E XX A single segment is stuck, XX indicates the number
of the segment.
a. Find the “frozen” segment according to the display.
b. Press " rmly down on the “frozen” segment until it breaks free and the loose " t is
restored. Once the “frozen” segments are loosened, the error message should be
gone and the board will continue to operate normally.
2. This game is designed for use with 1# maximum length soft-tip darts only$ Never use metal
tipped darts or longer soft-tip darts on this dartboard$ Metal tipped darts will seriously
damage the circuitry, the e-BOARD computer, and electronic operation of the dartboard.
3. Electronic and mechanical reaction time is required between shots. If two shots occur
too close together, pull out second dart and rethrow to properly record your score.
4. If using an AC adapter, it must be 5V DC 1000 milliamp. The plug polarity is con" gured
as positive (+) outside, and negative (-) center. Using the wrong adapter may cause
electrical shock and damage to the unit.
5. Do not use excessive force when throwing darts. Throwing a dart too hard will cause
frequent tip breakage and cause excessive wear on the board.
6. Do not spill liquids on the dartboard. Do not use spray cleaners that contain ammonia or
other harsh chemicals, as they may damage the dartboard. Instead, we suggest regular
dusting with a damp cloth. Make sure the game is unplugged and use a mild detergent
and a damp cloth for more vigorous cleaning.
9 1-800-225-7593
www.gldproducts.com
GLD Products Orion Dartboard
Player
Score Cricket
Player
Number
of Players
Handicap
Game
Options
Game
Menu
On/Off
Player
Score Cricket
Player
Volume
Control
Start Game
LanguageBounce OutDouble Bull
Miss Quick Cricket Next Player
Games
IN OUT IN OUT
Double
Outer Single
Triple
Inner Single
Single Bullseye
Double Bullseye
Item 42-1036
7. This game is for indoor use only.
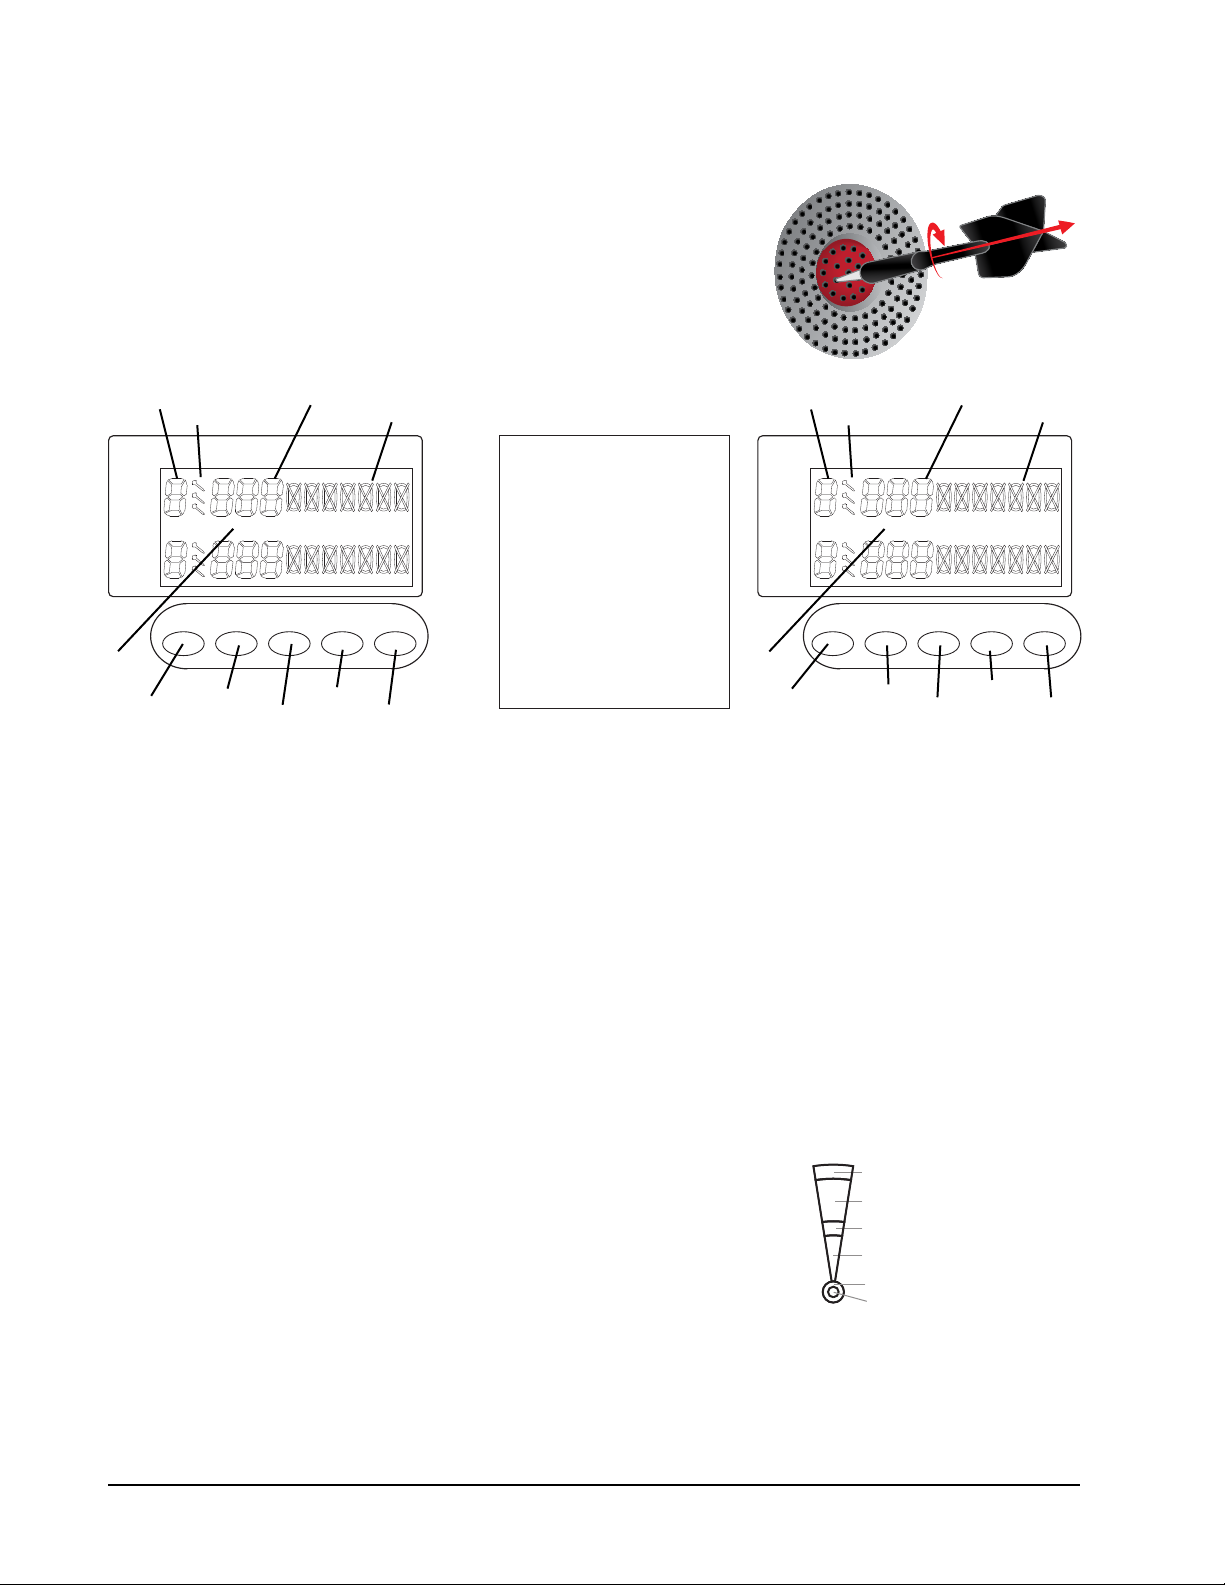
Helpful Tip: To prevent dart tips from loosening, twist the
dart to the right (clockwise when pulling it from the board).
This motion will make dart removal easier and will prolong
the life of your dart tips.
15
14
1
13
2
12
11
4
3
5
1. On/Off Button
2. Game Menu Button
3. Game Options Button
4. Number of Players Button
5. Handicap Button
14
12
13
15
6
7
8
9. Volume Control Button
10. Start Game/Next Player Button
11. Standard Cricket Display
12. Score Display
13. Dart Display
11
9
10
6. Double Bull/Miss Button
7. Bounce Out/Quick Cricket Button
14. Player Number
15. Double In/Double Out Indicator
8. Language Button
Segment Scoring Scoring Rules
Single scoring segment score times 1
Double scoring segment score times 2
Triple scoring segment score times 3
Outer bullseye 25 times 1
Center bullseye 25 times 2
www.gldproducts.com
101-800-225-7593

GLD Products Orion Dartboard
Item 42-1036
QUICK START - IF YOU JUST WANT TO START THROWING DARTS
1. Turn game on by pressing the ON/OFF button. Game G01 Count Up is displayed.
Note: The default game is G01 Count Up with 2 players, and single bull. The winning score
is 100.
2. Use the NUMBER OF PLAYERS button if you would like to change the number of
players.
3. Press the GAME OPTIONS button if you want to change the winning score.
4. Press the START GAME button to start the game.
5. Take turns throwing darts. When a players score is higher than the winning score they
are the winner.
DARTBOARD GAME MENU
Game Name Options Players
G01 Count Up 9/18 1-8
G02 301 4/8 1-8
G03 501 4/8 1-8
G04 601 4/8 1-8
G05 701 4/8 1-8
G06 801 4/8 1-8
G07 901 4/8 1-8
G08 301 League 4/8 4
G09 501 League 4/8 4
G10 601 League 4/8 4
G11 701 League 4/8 4
G12 801 League 4/8 4
G13 901 League 4/8 4
G14 Round The Clock 12/24 1-8
G15 Simple Cricket 3/6 1-8
G16 Standard Cricket 3/6 1-8
G17 Cut Throat Cricket 3/6 1-8
G18 Scram Cricket 1/2 2
G19 Hi Score 10/20 1-8
G20 Shoot Out 10 1-8
G21 Shanghai 12 1-8
G22 Double Down 1/2 1-8
G23 Forty-One 1/2 1-8
G24 All Fives 5/10 1-8
11 1-800-225-7593
www.gldproducts.com
GLD Products Orion Dartboard
Item 42-1036
Game Name Options Players
G25 Big 6 5 2-8
G26 Over 3/6 2-8
G27 Under 3/6 2-8
G28 Baseball 3 1-8
G29 By 5's© 1 1-8
G30 By 10's© 1 1-8
G31 By Odd's© 1 1-8
G32 Killer 30 2-8
G33 9 lives 7 2-8
G34 Halve-It 1 1-8
G35 Bingo 4 1-8
G36 21 Points 7 1-8
G37 Nine Dart Century 3/6 1-8
G38 Best of Nine 5/10 1-8
G39 Hound and Hare 5/10 2
G40 Shooting I 1/2 1-8
G41 Shooting II 1/2 1-8
G42 Shooting III 1/2 1-8
G43 Shooting IV 1/2 1-8
Total 320
www.gldproducts.com
121-800-225-7593
GLD Products Orion Dartboard
Player
Score Cricket
Player
Number
of Players
Handicap
Game
Options
Game
Menu
On/Off
Player
Score Cricket
Player
Volume
Control
Start Game
LanguageBounce OutDouble Bull
Miss Quick Cricket Next Player
Games
IN OUT IN OUT
Item 42-1036
READ FIRST - OPERATION
The dartboard is powered by an external power supply. An external 5 VDC, 1000 milliamp
power supply is included with the dartboard. To use, plug the power supply into the jack on
the side of the dartboard.
Step 5 Step 2
Step 1, 2
Step 1, 4
Step 8
Single Bull
Step 8
Double Bull
Step 1
Step 2
Step 6
Step 3Step 4
Step 2
1. Press the ON/OFF button to turn on the game. When the power is turned ON, the
displays will light up with a welcoming melody. When the sound stops, the left Score
display will show 2 G01 and 2 100 (Game 01, 2 players, winning score of 100).
2. Press the GAME MENU button to scroll through the games. The selection is shown
on the left Score display. Then press START GAME/NEXT PLAYER button to begin
the game. The game choices are printed on the dartboard. The number of the game is
shown at the Score display.
Note: Before pressing the START GAME/NEXT PLAYER button there are several options
that may be selected, see below.
3. The BOUNCE OUT/QUICK CRICKET button may be pressed to jump to G16 Cricket.
4. The GAME OPTIONS button may be pressed to select one of the available options for
each game. This selection will apply to all the players.
5. For games G02 to G13 games (301 to 901 and 301 League to 901 League), press the
GAME OPTIONS button to select the Double In/Double Out options.
IF SELECTING OPTION THEN
No icons are lit up Single In/Single Out
IN icon lit up Double In/Single Out
OUT icon lit up Single In/Double Out
IN and OUT icons lit up Double In/Double Out
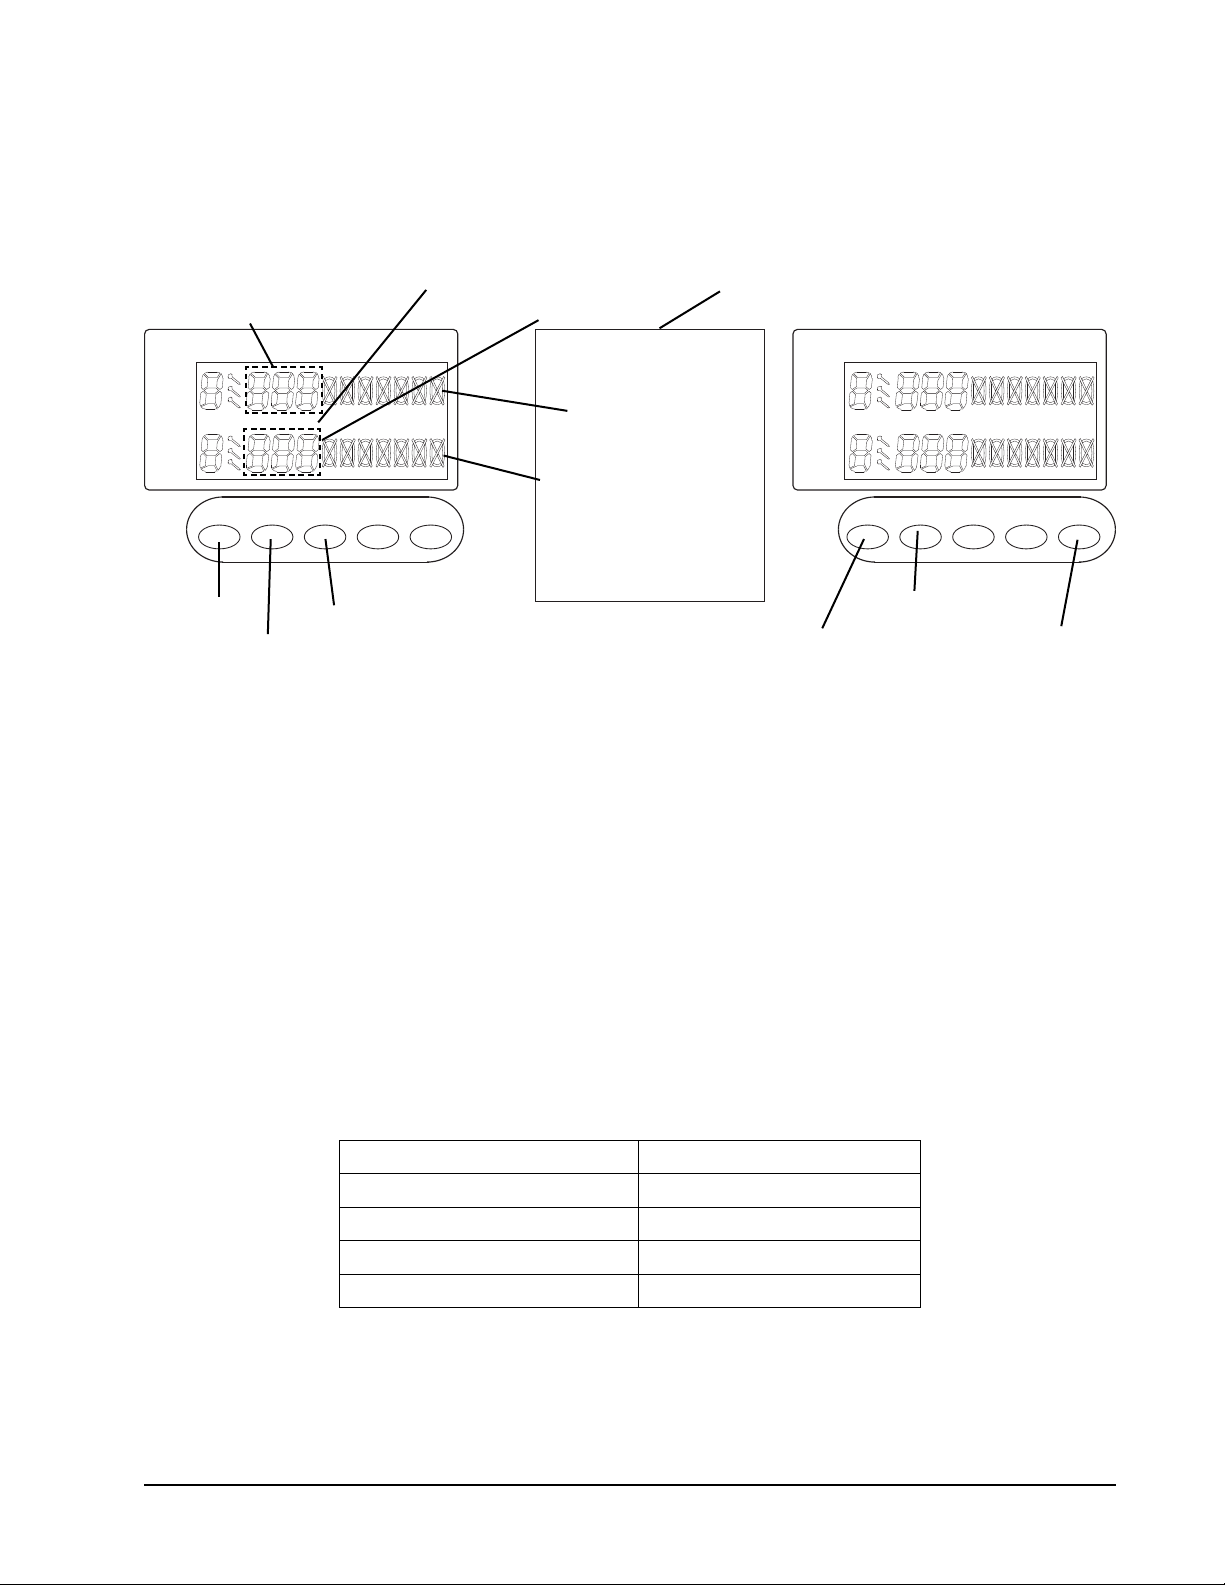
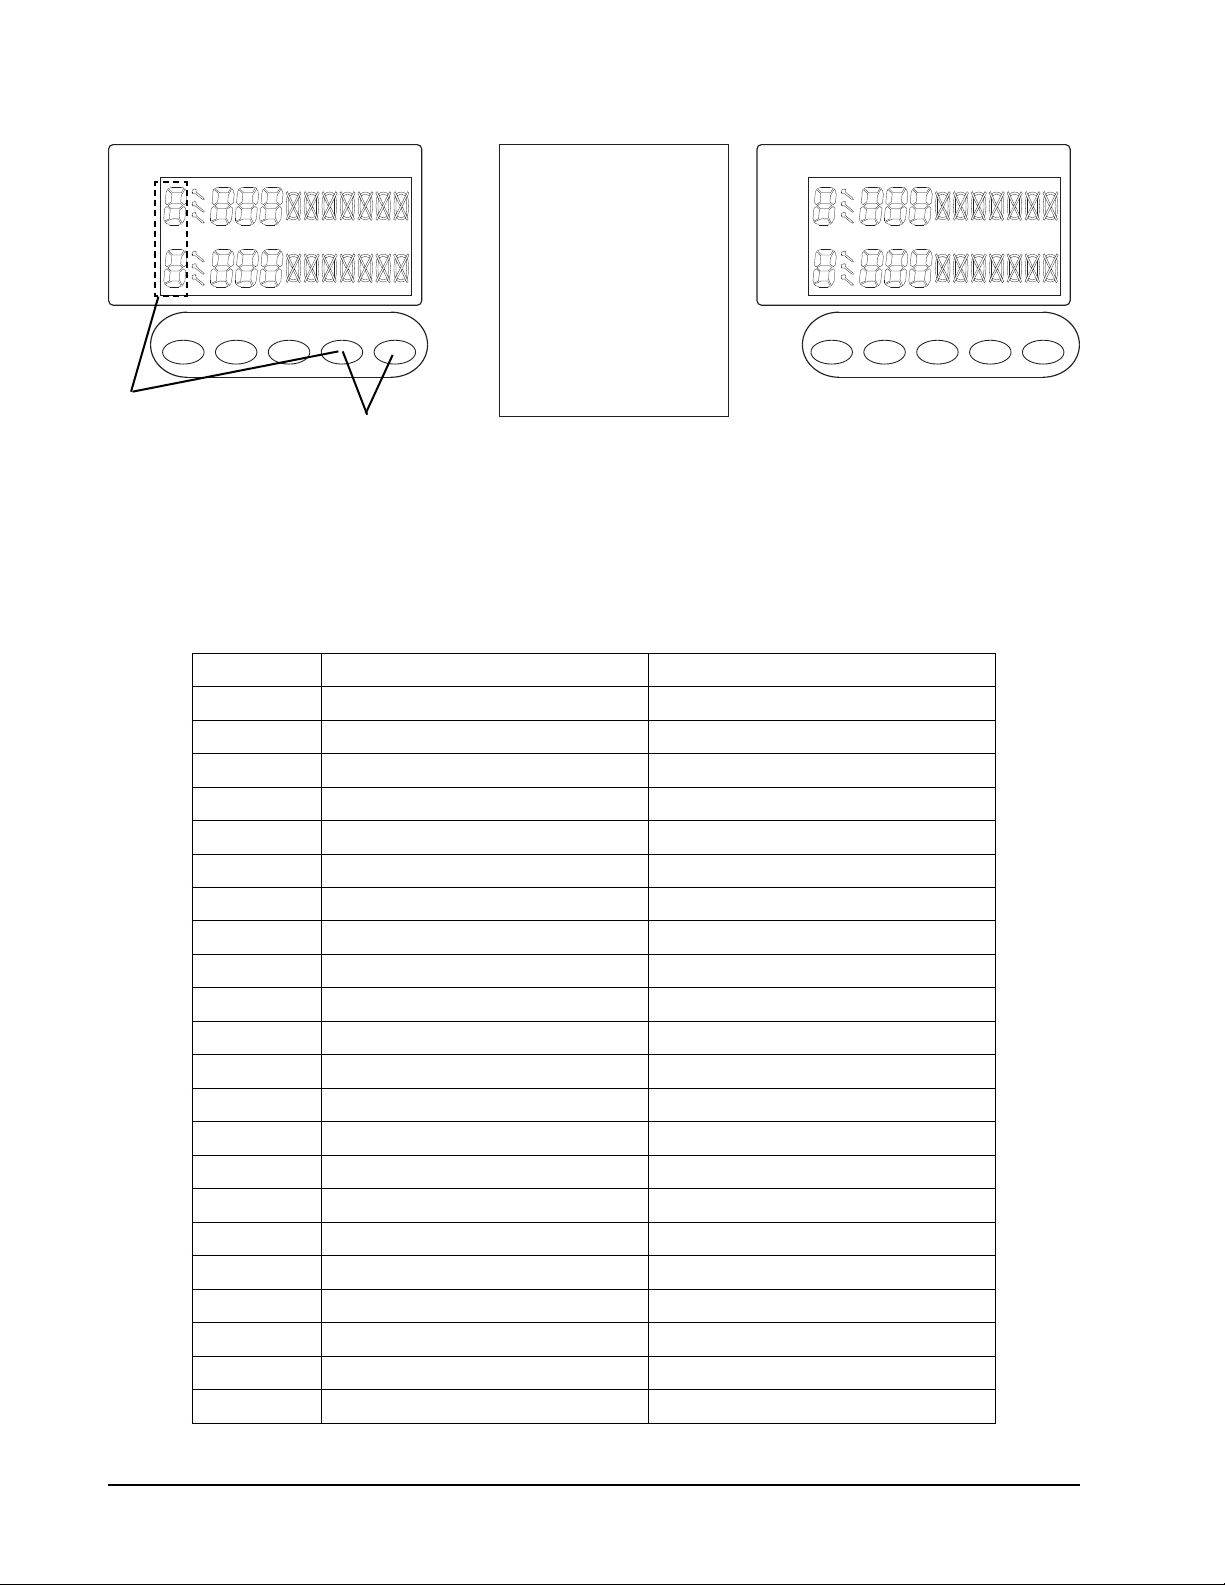
6. The DOUBLE BULL/MISS button may be pressed to select 25/50 (single) or 50/50
(double) bull. When single bull is chosen, the last mark location in Player 1 Cricket
display will show an "X" with a circle. When the double bull is chosen the Player 2
Cricket display will show an "X" with a circle.
13 1-800-225-7593
www.gldproducts.com
Player
Score Cricket
Player
Number
of Players
Handicap
Game
Options
Game
Menu
On/Off
Player
Score Cricket
Player
Volume
Control
Start Game
LanguageBounce OutDouble Bull
Miss Quick Cricket Next Player
Games
IN OUT IN OUT
GLD Products Orion Dartboard
Item 42-1036
Step 7
Step 8
7. Press the NUMBER OF PLAYERS button to select the number of players in the game.
Maximum selection is 8.
8. For some games, handicaps can be selected. Press the HANDICAP button to enter
handicap selection mode. Then press the NUMBER OF PLAYERS button to select the
handicap option. Press the HANDICAP button again to jump to the next player. The
games that use handicap mode are listed below.
Game Name Handicap Options
G01 Count Up +20, +40, +60, +80 Scores
G02 301 -20, -40, -60, -80 Scores
G03 501 -20, -40, -60, -80 Scores
G04 601 -20, -40, -60, -80 Scores
G05 701 -20, -40, -60, -80 Scores
G06 801 -20, -40, -60, -80 Scores
G07 901 -20, -40, -60, -80 Scores
G08 301 League -20, -40, -60, -80 Scores
G09 501 League -20, -40, -60, -80 Scores
G10 601 League -20, -40, -60, -80 Scores
G11 701 League -20, -40, -60, -80 Scores
G12 801 League -20, -40, -60, -80 Scores
G13 901 League -20, -40, -60, -80 Scores
G15 Simple Cricket L1, L2, L3, L4
G16 Standard Cricket L1, L2, L3, L4
G17 Cut Throat Cricket L1, L2, L3, L4
G19 Hi Score +20, +40, +60, +80 Scores
G20 Shoot Out +1, +2, +3, +4 Scores
G21 Shanghai +20, +40, +60, +80 Scores
G22 Double Down +20, +40, +60, +80 Scores
G23 Forty-One +20, +40, +60, +80 Scores
G25* Big 6 -1, -2, -3, -4 Lives
www.gldproducts.com
141-800-225-7593
GLD Products Orion Dartboard
Item 42-1036
Game Name Handicap Options
G26* Over -1, -2, -3, -4 Lives
G27* Under -1, -2, -3, -4 Lives
G32* Killer -1, -2, -3, -4 Lives
G33* 9 lives -1, -2, -3, -4 Lives
G34 Halve-It +20, +40, +60, +80 Scores
G36 21 Points +1, +2, +3, +4 Scores
*The minimum lives selection must be -3 for these games.
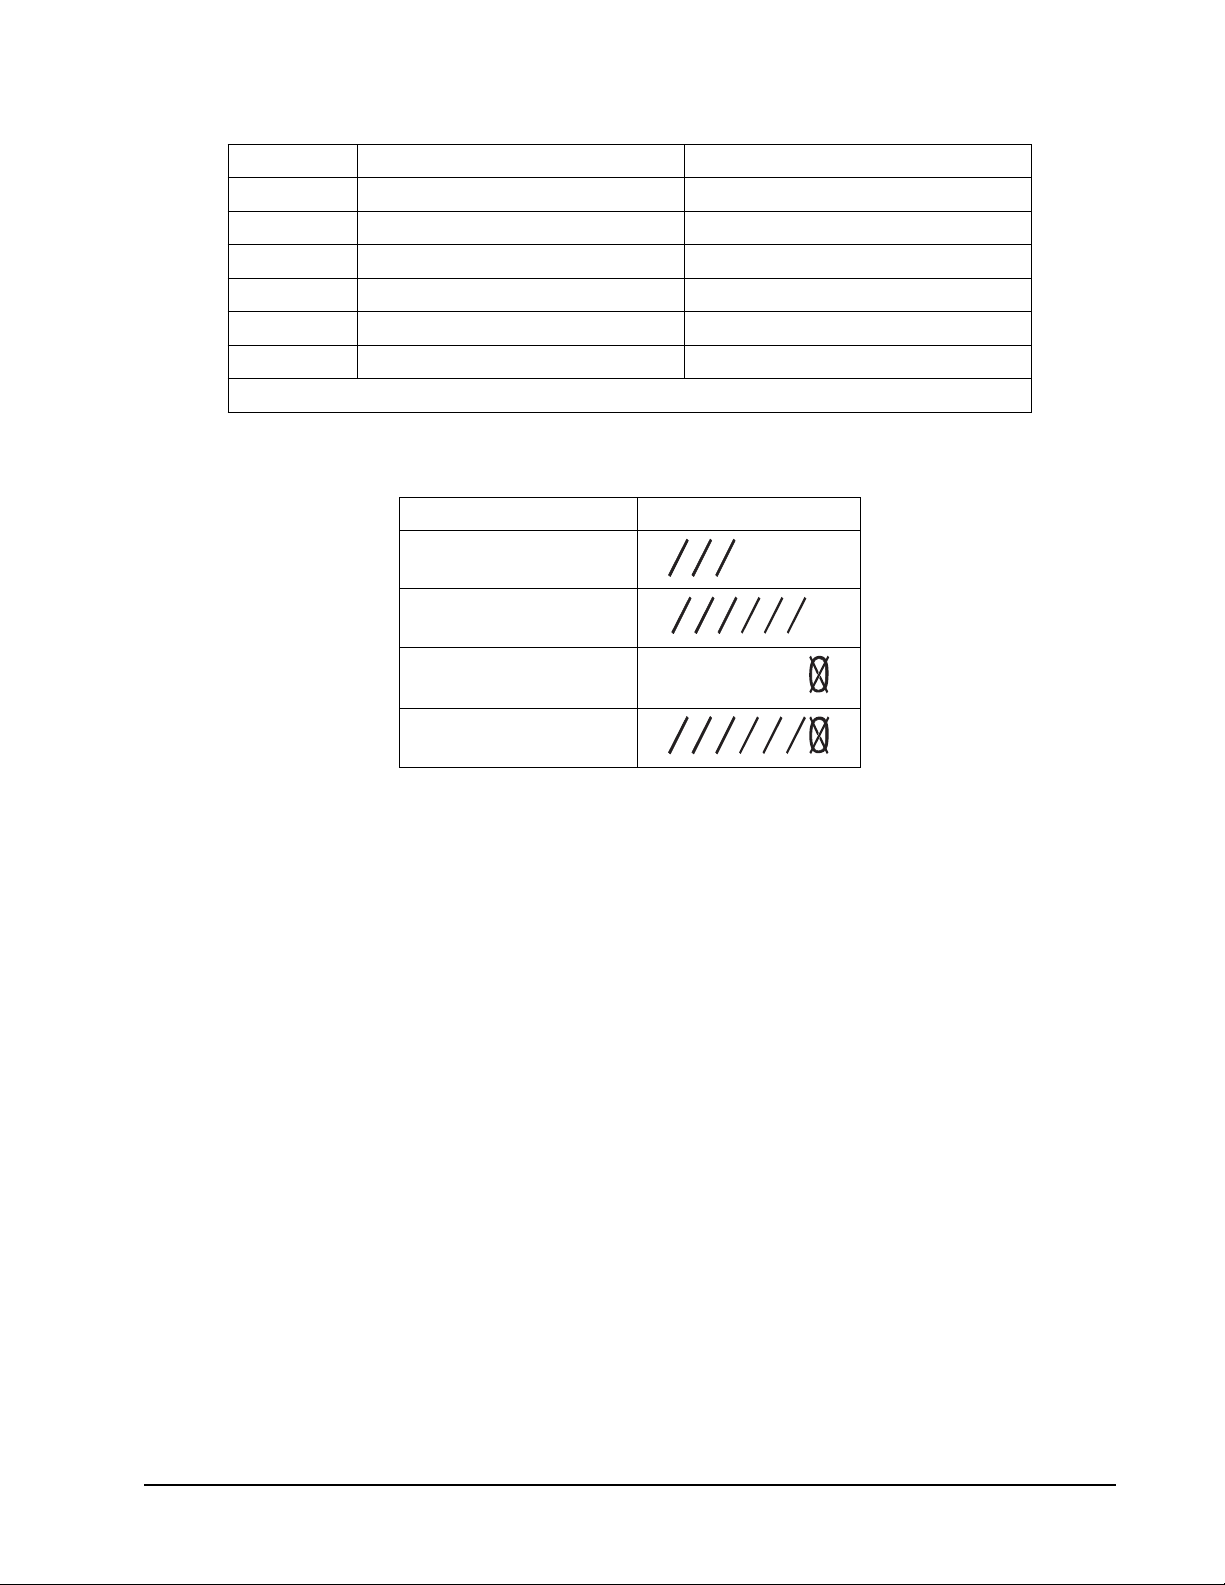
Handicap options L1, L2, L3 and L4 are used in the cricket games to give that player a
head start. The options give marks to a player as if they have already hit the number. The
chart below shows the marks a player starts with for the selected handicap.
Handicap Options Starting Display
L1
L2
L3
L4
15 1-800-225-7593
www.gldproducts.com
 Loading...