

Glaziar VESUBIO 2000W, VESUBIO i 2000W, VESUBIO 2500W, VESUBIO i 2500W Service Manual
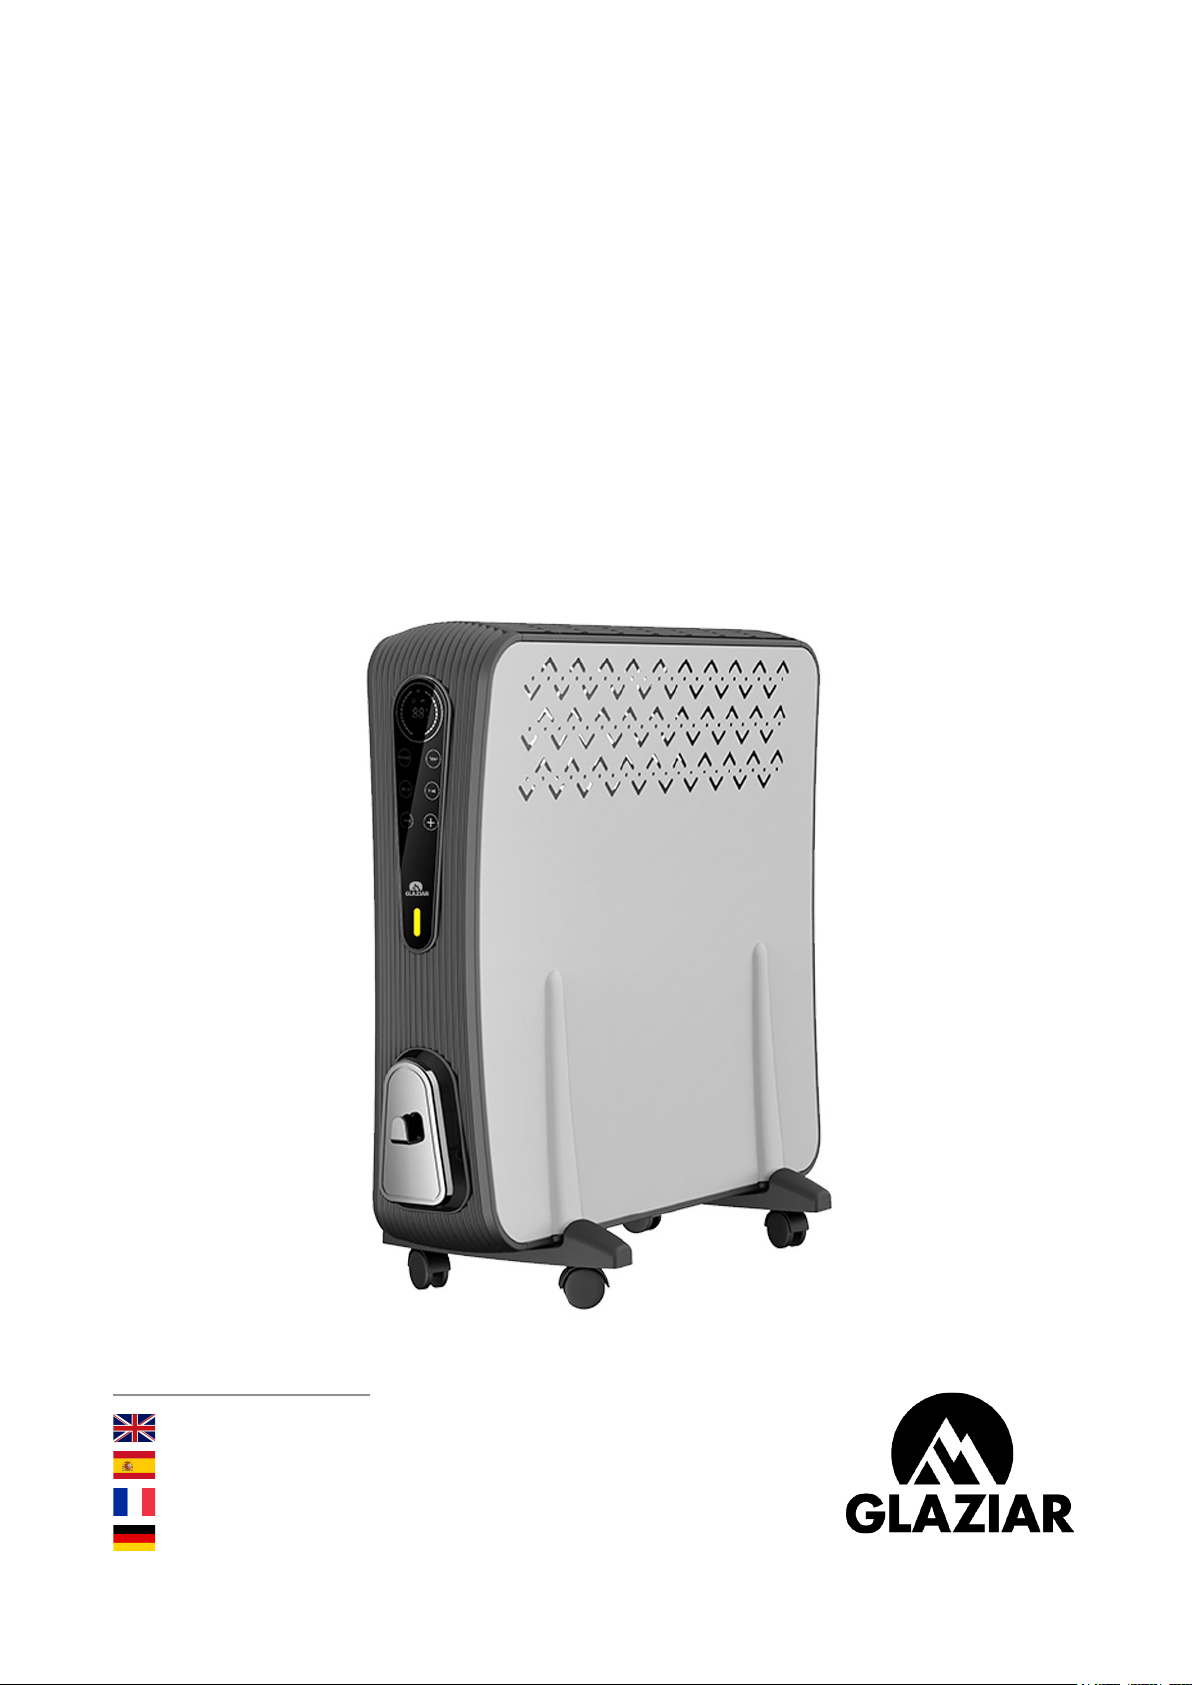
VESUBIO 2000W - 2500W
VESUBIO i 2000W -2500W
Infrared Heater / Calentador infrarrojo
Chauage infrarouge / Infrarot-Heizung
750W-2000W // 1000W-2500W
Service Manual
Manual de servicio
Service manuel
Betriebsanleitung
www.glaziar.com

Please read the manual carefully prior to use
SERVICE MANUAL
The functional characteristics:
1. Anti-dump switch power function.
2. High-quality Resistance wire heating device, heating quickly.
3. Three power options, heat adjustable.
4. Double overheating protection device, the use of security.
5. Large casters designed to move easily.
!
6. Convection heating. Heating eect is superb.
The main technical parameters:
1. Rated voltage: 230V ~
2. Rated frequency: 50/60Hz
3. Rated power: high-grade, mid-grade, low-grade.
Safety Instructions:
1. Open the package, take out the body, check whether the supplied accesso-
ries and the body are complete and intact.
2. Power on (plug such as electrical outlet) after the equipment is installed in
place according to installation instructions and requirements. Requirements
for power outlet and power: AC 230V, frequency 50/60Hz.
3. Read the service manual before you use the electric heater. Keep the manual
and have it attached with the heater in case you oer the heater to others as a
gift.
2

4. The heater is only suitable for indoor use. Do not use it outdoors!
5. Do not leave the heater unattended during use. Keep the heater out of the
reach of children. Do not use automatic switch device on the heater (for
example, time switch), otherwise automatic operation of the electric heater
which is left unattended may be caused.
6. Maintain a sucient safe distance from inammables and explosives to avoid
risks of res and explosions.
7. Inserting other items into the shell or protection grid of the electric heater is
strictly prohibited, or electric leakage and shock may be caused.
8. Do not touch the metal housing as it will get hot during the running of the
electric heater, and keep the heater away from children to avoid risk of burns.
Set aside some time to let the heater cool before you turn it o and store it.
9. If the electric heater has been idle for a long time, plug the power plug from
the outlet.
10. l Prior to the use of the electric heater, make sure that the heater is in a good
condition and intact. In case the heater shell, wire or plug is damaged, the
heater may not be connected to power.
11. The heating unit of the heater (the heating lm at the back of the protection
grid of the heater) may be damaged from fall. Please conrm the heating unit
is not damaged prior to each use. Do not use the electric heater if the heating
element is broken.
12. Disconnect the power plug when moving or cleaning this appliance. When
disconnecting the appliance connection, rst turn o the switch, then unplug
the plug. Do not yank the power cable.
13. Demolition of the electric heater with authorization is strictly prohibited. Plea-
se look for professional service personnel if the heater is damaged.
14. The product is limited to home use.
15. l During normal use, do not let bare skin touch the surface of the appliance,
so as not to be burnt.
16. Avoid the use of the heater if children, animals or the disabled and those who
lack self control are present while nobody else is taking care of them.
17. This appliance can be used by children aged from 8 years and above and
3

persons with reduced physical, sensory or mental capabilities or lack of
experience and knowledge if they have been given supervision or instruction
concerning use of the appliance in a safe way and understand the hazards
involved. Children shall not play with the appliance. Cleaning and user
maintenance shall not be made by children without supervision.
18. Do not share the socket with other electrical appliances to avoid current
overload, or re risks may be caused by excessive load.
19. CAUTION: covering of the cooling device is prohibited to avoid overheating,
or dangerous accidents may be caused.
20. In order to avoid overheating do not cover the heater.
21. The heater must not be located immediately below an electrical
socket-outlet.
22. If the supply cord is damaged, it must be replaced by the manufacturer, its
service agent or a similarly qualied person in order to avoid a hazard.
23. Avoid the use of an extension cord as this may overheat and cause a risk of
re.
24. This heater is not intended for use in bathrooms, laundry areas or similar
indoor locations where there may be moisture. Never place heater where it
may fall into a bathtub or other water receptacle.
25. Do not use this heater in the immediate surroundings of a bath, a shower or a
swimming pool.
26. Children of less than 3 years should be kept away unless continuously
supervised.
27. Children aged from 3 years and less than 8 years shall only switch on/o the
appliance provided that it has been placed or installed in its intended normal operating position and they have been given supervision or instruction
concerning use of the appliance in a safe way and understand the hazards
involved. Children aged from 3 years and less than 8 years shall not plug in,
regulate and clean the appliance or perform user maintenance.
28. CAUTION: Some parts of this product can become very hot and cause burns.
Particular attention has to be given where children and vulnerable people are
present.
4

29. WARNING: This heater is not equipped with a device to control the room
temperature. Do not use this heater in small rooms when they are occupied
by persons not capable of leaving the room on their own, unless constant
supervision is provided.
Footboard installation instructions:
Remove the feet with casters and heater body, the heater body on the soft cloth
or other soft material above, and then put the foot on the side of the bottom of
the body, with the screws in the package tighten.
Instructions:
1. Power Select
Represents low gear.
Represents mid gear.
and Also shown as high gear.
Represents temperature setup, adjustable range: from 15℃ to 35℃.
°C
Represents timer setup, which oers power-on and power-o timer function
with a time period from 1 hour to 24 hours.
2. Temperature Setup Function
Every time when the heater is switched on, it displays indoor ambient temperature. During the heating state, the working temperature can be set. When the
ambient temperature reaches the preset value, the heater stops working, and
will not resume work until the ambient temperature drops below the pre-set
value. The working temperature ranges from -9℃ to 35℃ and temperature setup
scope is from 15℃ to 35℃.
3. Auto Power-on and Shut-down Timer Function
Auto power-on and shut-down timer function is available. The setting time ranges from 1h to 24h. The setting can be in cycle with an increment of 1h. When
the heater is in the working state, auto shut-down timer can be set. When the
heater is in the standby state, auto power-on timer can be set. In the timer state,
the icon glitters and the number on its right side displays the remaining time.
4. Memory Function
Every time the heater is switched on (provided that the power has not been disconnected), the heater can recall the last set temperature and work according
to the setting value. If disconnecting with the power supply, the heater’s setup
values will be reset to ex-works setting when switched on next time.
5

Operation Instructions:
The remote control is infra-red controller
1. Please refer to Safety Precautions and Installation Instruction. Mount the hea-
ter in position. After xing the heater and ensuring the correctness of the connection, connect the heater with power. Input rated current of heater supplied
by the power outlet shall be above 10A.
2. Heater Functions
Function keys on the panel
1. ON/OFF
2. Power I/II/III
3. + Key
4. Temperature setting
5. Timing settings
6. - Key
• Working temperature: -9℃—35℃, setup scope: 15℃—35℃, LED display; When in use,
LED display for gear, heating indicator, temperature and timer.
• Set the three-gear heating mode: high heat power mode, mid heat power
mode, low heat power mode and shut-down mode in a cycle.
• Auto shut-down timer function: hourly increment or decrement, maximum 24
hours.
• Heating temperature select from 15℃ to 35℃: automatic heating and automatic
temperature control function is activated after the selection of temperature.
• If there’s no operation after the selection of function, LED dims out after 10
seconds.
3. Working Process of the Heater
• Switch on: Turn on the mechanical power-on switch on the side of the panel.
The temperature icon °C will be shown on the display panel. The number on
the right side of the temperature icon represents the current ambient temperature. Under such condition, the heater enters standby state.
• First pressing on the (ON/OFF) key to start the heater. Meanwhile, the heater
enters operation mode and the low heat power icon are on, which indica-
tes that the heater is operating in low heat gear; press the Power key again
6
to select mid heat power mode. The mid heat power icon are on, which
indicates that the heater is operating in mid heat gear; press the Power key
again to select high heat power mode. The high heat power icon and icon
are on, continuous press the power button can be in the low, mid-range and
high-grade switch between power.
• Press the timer key, and the number on the right side of the timer indicator
icon will glitter. Then press the “+” key or “-” key to select timing range (1
to 24 hours). After the number glitters for 5 times, the remaining time for this
timer will be displayed and the indicator icon °C will glitter (timer state).
• Press the temperature key again, and the number on the right side of the
temperature indicator icon will glitter. Then press the “+” key or “-” key to se-
lect temperature range (15℃—35℃). After the temperature value is selected and
the number glitters for ve times, the heater will enter default (indoor tempe-
rature) state. (Note: If the pre-set temperature is lower than the ambient temperature, the will stop working.)
• Power-o: Press the (ON/OFF) key, LED display of icon , will be o. But
temperature indicator icon °C and characters are still lit. The heater stops
working.
Technical Data:
Type Voltage Frequency Power Category
Vesubio 230V 50/60Hz 2000W-2500W I
Vesubio i 230V 50/60Hz 2000W-2500W I
The product is for household use only.
Correct Disposal of this product
This marking indicates that this product should not be disposed
with other household wastes throughout the EU. To prevent possible harm to the environment or human health from uncontrolled
waste disposal, recycle it responsibly to promote the sustainable
reuse of material resources. To return your used device, please use the return and collection systems or contact the retailer
where the product was purchased. They can take this product for
environmental safe recycling.
7

Warranty Information
The manufacturer provides warranty in accordance with the legislation of the
customer’s own country of residence, with a minimum of 1 year (Germany: 2 years), starting from the date on which the appliance is sold to the end user.
The warranty only covers defects in material or workmanship.
The repairs under warranty may only be carried out by an authorized service
centre. When making a claim under the warranty, the original bill of purchase
(with purchase date) must be submitted.
The warranty will not apply in cases of:
- Normal wear and tear
- Incorrect use, e.g. overloading of the appliance, use of non-approved
accessories
- Use of force, damage caused by external inuences
- Damage caused by non-observance of the user manual, e.g. connection to an
unsuitable mains supply or non-compliance with the installation instructions
- Partially or completely dismantled appliances
8

Por favor, lea el manual cuidadosamente antes de usar.
!
MANUAL DE SERVICIO
Las características funcionales:
1. Función de encendido del interruptor anti-descarga.
2. Dispositivo de calentamiento por hilo de resistencia de alta calidad, calentan-
do rápidamente.
3. Tres opciones de energía, calor ajustable.
4. Doble dispositivo de protección contra sobrecalentamiento, el uso de
la seguridad.
5. Grandes ruedas diseñadas para moverse con facilidad.
6. Calefacción por convección; efecto de calentamiento es excelente.
Los principales parámetros técnicos:
1. Voltaje nominal: 230V ~
2. Frecuencia clasicada: 50 / 60Hz
3. Potencia nominal: de alto grado, de grado medio, de bajo grado.
Instrucciones de seguridad:
1. Abra el paquete, extraiga el cuerpo, verique si los accesorios suministrados
y el cuerpo están completos e intactos.
2. Encendido (enchufe como una toma de corriente) después de instalar el
equipo en su lugar de acuerdo con las instrucciones y requisitos de instalación. Requisitos para la toma de corriente y alimentación: CA 230V, frecuencia
50 / 60Hz
9

3. Lea el manual de servicio antes de usar el calentador eléctrico. Guarde el
manual y adjúntelo con el calentador en caso de que ofrezca el calentador a
otros como un regalo.
4. El calentador solo es adecuado para uso en interiores. ¡No lo use al aire libre!
5. No deje el calentador desatendido durante el uso. Mantenga el calentador
fuera del alcance de los niños. No utilice un dispositivo de conmutación automático en el calentador (por ejemplo, interruptor de tiempo), de lo contrario, podría producirse el funcionamiento automático del calentador eléctrico
sin supervisión.
6. Mantenga una distancia de seguridad suciente contra inamables y explosi-
vos para evitar riesgos de incendios y explosiones.
7. Está estrictamente prohibido insertar otros artículos en el armazón o rejilla de
protección del calentador eléctrico, o pueden producirse fugas y descargas
eléctricas.
8. No toque la carcasa de metal ya que se calentará durante el funcionamiento
del calentador eléctrico y mantenga el calentador alejado de los niños para
evitar el riesgo de quemaduras. Dedique algo de tiempo para que el calentador se enfríe antes de apagarlo y almacenarlo.
9. Si el calentador eléctrico ha estado inactivo por un tiempo prolongado, de-
senchufe el enchufe de la toma de corriente.
10. Antes de usar el calentador eléctrico, asegúrese de que el calentador esté en
buenas condiciones e intacto. En caso de que la cubierta del calentador, el
cable o el enchufe estén dañados, no debe conectar el calentador a la corriente.
11. La unidad de calentamiento del calentador (la película de calentamiento en
la parte posterior de la rejilla de protección del calentador) puede dañarse
por la caída. Conrme que la unidad de calentamiento no está dañada antes
de cada uso. No use el calentador eléctrico si el elemento calefactor está
roto.
12. Desconecte el enchufe de alimentación cuando mueva o limpie este electro-
doméstico. Al desconectar la conexión del dispositivo, primero apague el
interruptor, luego desenchufe el enchufe. No tire del cable de alimentación.
13. La demolición del calentador eléctrico con autorización está estrictamente
10
 Loading...