

Glaziar Siroco User Manual
Siroco
Portable Room Fan Heater /Calefactor y Ventilador Portátil
Chaue-Ventilateur Portable / Tragbarer Fan-Heizer
1500W
230V 50Hz
User manual
Manual de usuario
Manuel utilisateur
Benutzerhandbuch
www.glaziar.com

Caution: read and save this manual for proper usage and correct operating procedures!
WARNING: when using electrical appliances, basic precautions should always be fol-
lowed to reduce risk of re, electric shock, and injury to persons including the following
!
IMPORTANT INSTRUCTIONS
1. Read all instructions before using this appliance.
2. The heater is hot when in use, to avoid burns. Do not place any object such as
furniture, papers,clothes, and curtains closer than 3 feet (0,9 m) to the front of
the heater and keep them away from the sides and near the heater is plugged in.
3. Extreme caution should be taken when using any appliance around children,
elderly or disabled persons, or whenever the heater is operating unattended.
4. Always unplug heater when not in use.
5. Do no operate heater with a damage cord or plug. After the heater malfun-
ctions or if the heater has been dropped or damaged in any manner, discard
heater or return to an authorized service facility for examination and/or repair.
6. Do not use outdoor.
7. This heater is not intended for use in bathrooms, laundry areas and similar
indoor locations. Never locate appliance where ir may fall into a bathtub or
other water container.
8. Do not run cord under carpeting. Do not cover cord with throw rugs, runners
or simikkar coverings. Do not route cord under furrniture or aplliances. Arrange cord away from trac areas and where it will not be tripped over.
9. To disconnect the appliance, turn controls to o, then remove plug from
outlet.
10. Connect to properly plolarized outlets only.
11. Do not insert or allow foreign object to enter any ventilation opening as this
may cause an electric shock, re or damage the appliance.
12. To prevent a possible re, do not block air intakes or exhaust in any man-
ner. Do not use on soft surfaces, like a bed, where openings may become
2

blocked.
13. The heater has hot parts and sparking parts inside. Do not use in areas where
gasoline, paint, or ammable liquids are used or stored.
14. Use this appliance only as described in this manual. Any use not recommen-
ded by the manufacturer may cause re, electric shock,or injury to persons.
15. Always plug heaters directly into a wall outlet/ receptacle. If you have to use
an extension cord, the cord should be no less than 14 AWG minimun size and
rated no less than 1500 wats.
16. To prevent overload and blown fuses, be sure that no other appliances is
plugged into the same outlet (receptacle) or into another outlet ( receptacle)
wired into the same circuit.
17. It is normal for the heater´s plug and cord to feel warm to the touch. A plug or
cord which becomes hot to the touch or becomes distorted in shape may be
a result of a warm electrical outlet ( receptacle). Worn outlets or receptacles
should be replaced prior to further use of the heater. Plugging this heater into
a worn outlet (receptacle) may result in overheating of the power cord or re.
18. Be sure that the plug is fully inserted into an appropriate receptacle. Please
remember that receptacles also deteriorate due to aging and continuous use:
check periodically for signs of overheating or deformations of the plug. If any
overheating or deformation is present, immediately discontinue using the
receptacle and contact a qualied electrician.
19. CAUTION. To prevent electric shock, match wide blade of plug to wide lot of
receptacle and insert completely.
20. Do not cover the appliance while it is functioning in order to avoid overhea-
ting and / or risk of re.
21. Do not place the heater near a bed because objects such as pillows or blan-
kets can fall o the bed and be ignited by the heater.
22. Check your heater cord and plug connections.
a) Faulty wall outlet connections or loose plugs can cause the outlet or plug
to overheat. Be sure the plug ts tight in outlet.
b)Heaters draw more current than small appliances. Overheating of the outlet
may occur even if it has not occurred with the use of other appliances.
c) During use, check frequently to determine if your plug outlet or faceplate is
3
HOT!
d) If so, discontinue ue of the heater and have a qualifed electrician check
and/or replace faulty outlet (s).
23. Do not locate against walls or behimnd drapes or furniture.
SAVE THESE INSTRUCTIONS
CAUTION: risk of electrical shock / do not open / no user-serviceable parts inside
!
SPECIFICATIONS
Electrical:
• Voltage: 220V-50Hz
• Power consumption: up to 1500 Watts
• Heat output: rated at 5000 BTU
• Heating Element: PTC heater, up to 40% more energy ecient than most tra-
ditional heaters
• Expected life cycle: over 80.000 hours
Coverage:
• Coverage: up to 1000 ft2
Warranty:
• Units come with a standar 1 year limited warranty
Safety Protection:
• Tip-over safety switch
Other Features:
• Remote control
When not in use, unit should be stored in a clean / dry environment ( 60-80F //
15-27C) and 50-60% RH
4
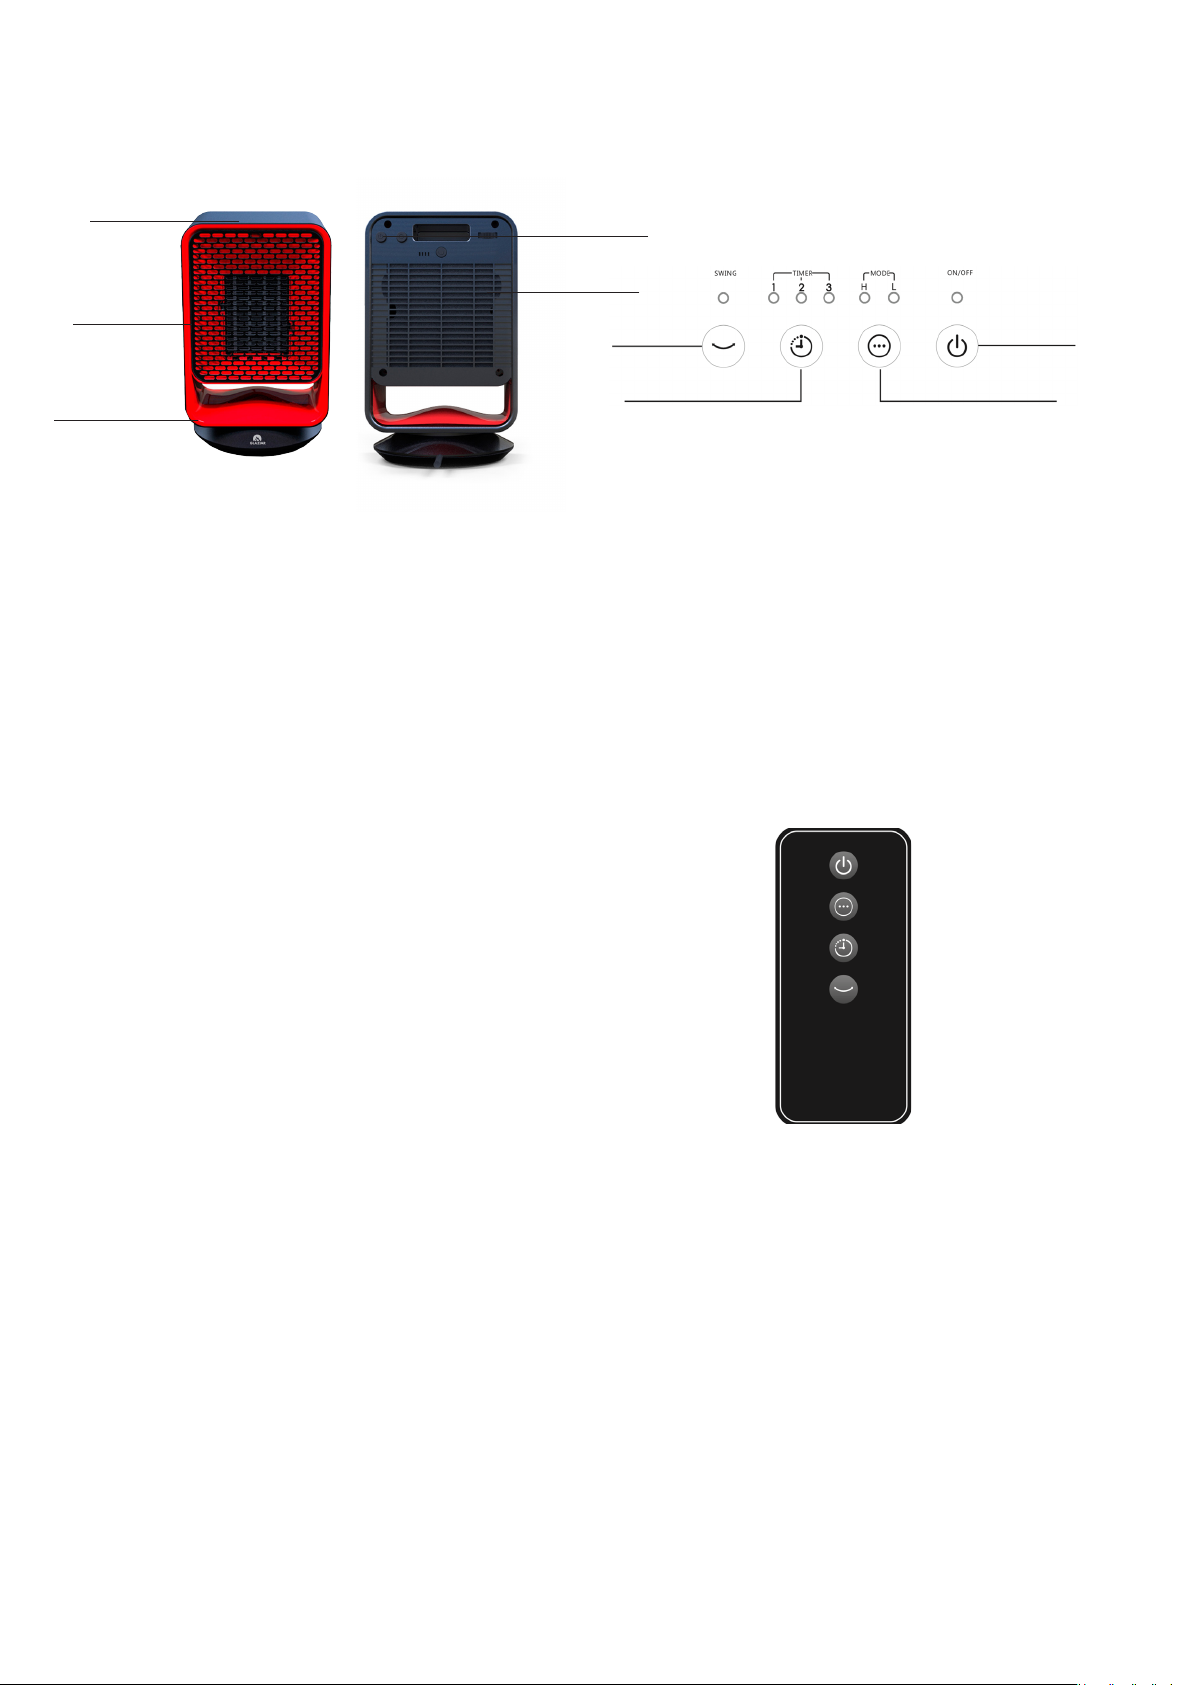
MAIN FEATURES AND CONTROL PANEL
Control Panel
Outlet
Swing base
Power Switch Turns the power to on (|)
or o (O ) (switch is located on the back
of the unit).
Led Indicator Display the condition of
power on o and the other settings.
Control Panel The control panel contains the operating controls for the
heater. All control buttons are touch-switch.
Power Button The POWER Button switches the unit between on and standby. Press the POWER Button, the unit
will be on. The fan and heating elements will be ready for operating.
Mode Button Mode setting button,
press it to change the dierent working
mode, H,M,L heating mode and cool
mode.
Power switch
Fan Motor
Swing button
Timer Button Press the TIMER BUT-
TON to set the turn o time 1-6 hours
Swing Button Press the SWING BUTTON to set the rotation function
Timer button
Power button
Mode button
USING REMOTE CONTROL
1. The buttons on the remote control
function in the same manner as the
button on the control panel.
2. The remote control is powered by a
CR2015 battery
5

Operation
1. Place the heater on a at level surface and ensure that the air intake and air
outlet are clear of obstruction.
2. Insert the plug into a 220V-50Hz power outlet.
3. Move the ON/OFF SWITCH at the rear of the unit to the on (I) position.
4. Press the POWER button on the control panel to turn the heater on.
5. Press the MODE button to adjust the work mode. It default to H for 1500 W,
press it to change to L for 1200 W. The LED lamps show in Red.
6. The PTC will stop working when the thermostat temperature setting(28 °C for
H MODE and 20°C for L MODE) is reached. It will come back for working when
the room temperature is below the thermostat setting.
7. Press SWING button to turn on/o oscillation.
8. Press the TIMER button to set up the timer hours as below:
1hour, lamp 1
2 hours, lamp 2 on
3 hours, lamp 3 on
4 hours, lamp 1 and lamp 3 on
5 hours, lamp 2 and lamp 3 on
6 hours, lamp1, 2 and lamp 3 on.
9. Press the MODE button again in L mode of heat mode to activate FAN MODE,
then the H LED lamp will be on and show in blue. Press mode button once
again to set the fan model to be in M and L mode.
10. Move the ON/OFF SWITCH at the rear of the unit to the o position (O). Turn
the power o and disconnect the plug from the power outlet when not in use.
Care and cleaning
CAUTION: Disconnect power cord before servicing.
1. Ensure that the heater is turned o (the switch on the back of the unit should
be in the oposition) .Unplug the power cord from the wall outlet before cleaning.
2. Carefully wipe the exterior of the heater with a soft, damp (not wet) cloth and
6

dry thoroughly with a soft, dry cloth.
3. Over time dust may accumulate on the front vent of the heater. This can be
removed by wiping with a damp cloth, or carefully cleaning using a vacuum
cleaner brush attachment.
4. Do not use harsh or abrasive cleaners to clean your heater, as these will da-
mage the surface.
Warranty information
To the original purchaser, depending on model, to be free from defect in materials and workmanship for a limited time.
Length of warranty will vaery depending on model. See warranty card for speci-
c details. If you have any questions concerning your heater, please contact your
local dealer.
7

ADVERTENCIA: al usar electrodomésticos, las precauciones básicas deben seguirse
siempre para reducir el riesgo de incendio, descargas eléctricas y lesiones personales,
incluidos los siguientes
!
INSTRUCCIONES IMPORTANTES
1. Lea todas las instrucciones antes de usar este aparato.
2. El calentador está caliente cuando está en uso, evite quemaduras. No colo-
que ningún objeto, como muebles, papeles, ropa y cortinas, a menos de 3
pies (0,9 m) de la parte delantera del calentador y manténgalos alejados de
los costados y del calentador enchufado.
3. Se debe tener extrema precaución cuando se usa un electrodoméstico cerca
de niños, personas mayores o discapacitadas, o siempre que el calentador
esté funcionando sin supervisión.
4. Desconecte siempre el calentador cuando no esté en uso.
5. No haga funcionar el calentador con un cable o enchufe de daños. Después
de que el calefactor no funciona o si el calefactor se ha caído o dañado de
alguna manera, deseche el calefactor o regréselo a un centro de servicio autorizado para que lo examinen y / o reparen.
6. No usar al aire libre.
7. Este calentador no debe usarse en baños, áreas de lavado y lugares interio-
res similares. Nunca coloque el aparato donde pueda caerse en una bañera u
otro recipiente de agua.
8. No pase el cable debajo de las alfombras. No cubra el cable con tapetes o
cubiertas similares. No coloque el cable debajo de muebles o accesorios.
Coloque el cable lejos de las áreas de paso y donde no se pueda tropezar.
9. Para desconectar el aparato, apague los controles y luego retire el enchufe
de la toma de corriente.
10. Conéctelo solo a salidas correctamente polarizadas.
11. No inserte ni permita la entrada de objetos extraños a ninguna abertura de
ventilación, ya que podría provocar una descarga eléctrica, un incendio o
daños en el aparato.
8
 Loading...