

Glaziar SANTORINI DF-100P7-5, SANTORINI DF-150P7-7, SANTORINI DF-200 P7-9 Service Manual
Santorini
Oil Heater / Calentador de aceite
Radiateur d’huile / Ölheizung
1000W / 1500W / 2000W
Model: DF-100P7-5 / DF-150P7-7 / DF-200 P7-9
230V 50/60Hz
Service Manual
Manual de servicio
Service manuel
Betriebsanleitung
www.glaziar.com
2
SERVICE MANUAL
Product Prole:
The SANTORINI oil heater is the one meticulously designed and manufactured by us by adopting international advanced techniques and applying nearly a
dozen of years of production experiences. This product employs electric heating
pipes manufactured with imported special equipment and special heat conducting oil as heat source and generates heat through cross ventilation of radia-
ting ns to rapidly increase the temperature in the room. It is characterized by
unique design shape and artistic new types. The temperature adjusting function
is installed and heating at dierent three levels can be switched. The temperature control device with high sensitivity can control the temperature and room
temperature of the oil heater and can automatically control the temperature.
The foot plate is equipped with trundles and can move in any direction; Double
safety protections, anti-overheat protection device (which can restore the patch temperature controller), electronic temperature limiting device (which can
control indoor temperature) and thermal melting protector (which can prevent
the device from safe protection in the non-normal status) are safe and reliable
to use, still and free from noises and free from environment, can ensure that the
indoor environment is clear, moisture and comfortable, so it is the ideal heating
appliance of medical institutions, schools, scientic research institutions, etc.
2. Product Structure and Performance Characteristics:
Dear users. Please carefully read this user manual before using this product for you
correct, safe and eective use of this product.
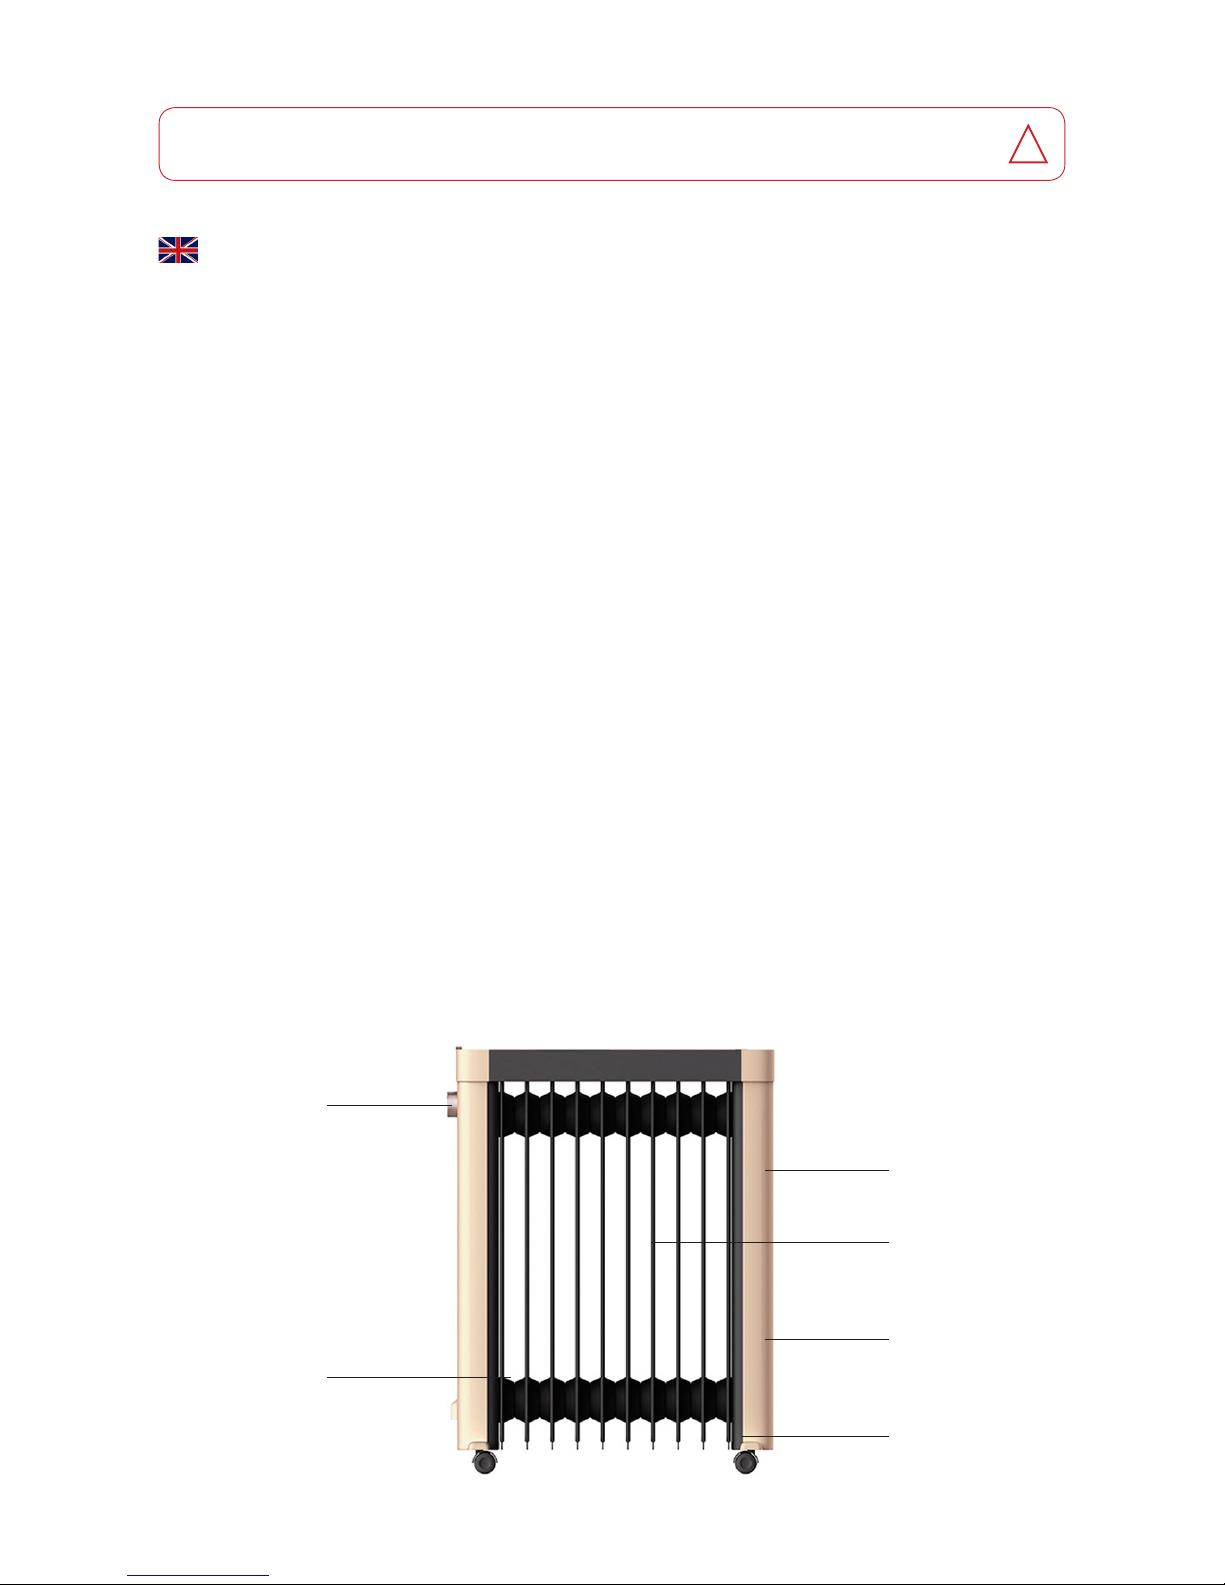
!
Temperature
control knob
Wire storage
case
Lifting yoke
Radiating n
Humidifying
case
Foot stool and
castor

3
Technical Data:
Model Power Voltage/Frequency Number of Fins
DF-100P7-5 1000W 230V 50Hz 5 Fins
DF-150P7-7 1500W 230V 50Hz 7 Fins
DF-200 P7-9 2000W 230V 50Hz 9 Fins
Instructions for Use
• Open the packaging case, remove the machine body, check whether parts
on the list are complete and in good and complete condition.
• Installation diagram.
Installation Method
1. Place the back of the box on the oor which should be bottom up. If you hear
uid owing in the vehicle, this is normal.
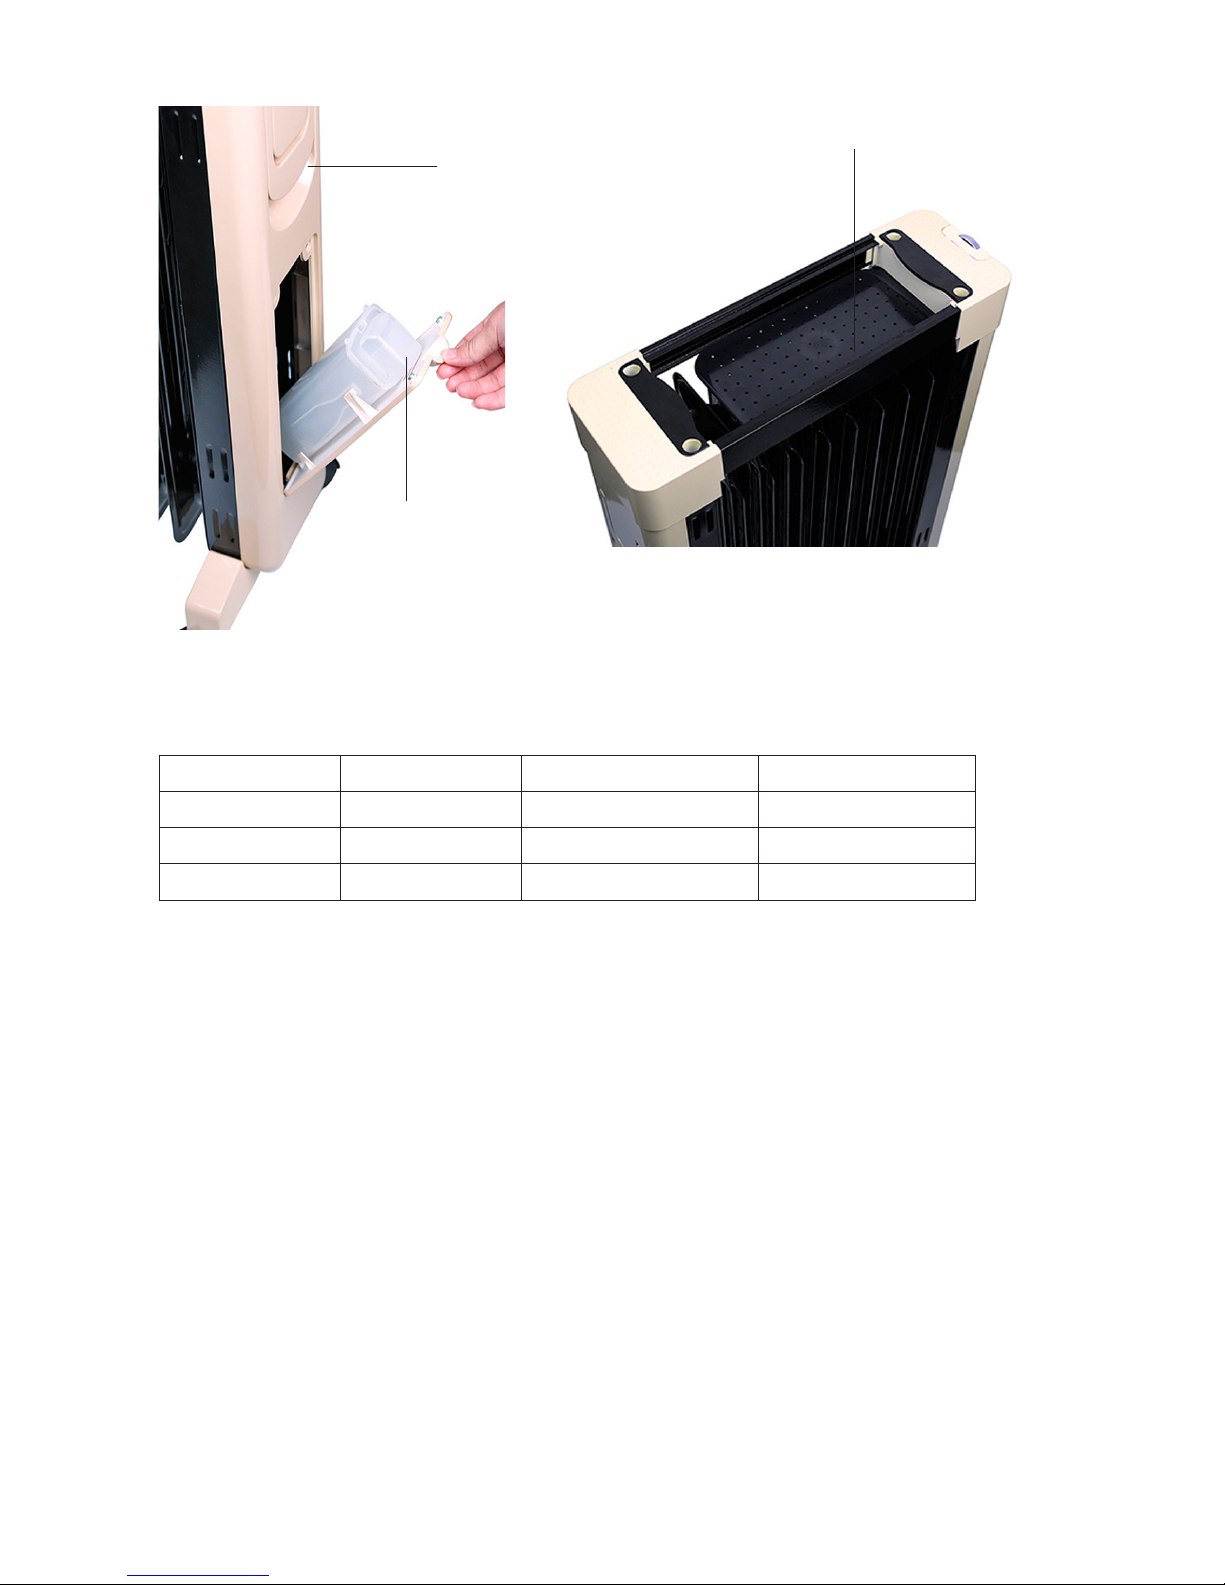
2. Referring to the installation diagram, x the foot stool installed by using the
screw rod forming a complete set in the accessory package to the corresponding position of the front and back covers and tighten the screw rod.
Yoke
Humidication
case
Saucer

4
3. Correctly place the product foot stool of the product required to be xed
onto the horizontal oor, then place for more than 10min and turn on the
power after the oil ow is balanced.
4. This machine has a natural vaporization and humidication function. After
the heater is horizontally placed, add an appropriate amount of water into the
humidication case and install in place (when water level is lower than water
level line, immediately add water).
Startup
1. Before use, determine that power sockets are of the 250V 50HZ and
withstand current is ≥15A.
2. Plug the power supply. At this time, the electric heater is in the standby
status.
Functional Adjustment
1. .After the knob for temperature control is turned to its maximum position, turn
the power switch knob, the electric heater starts to work, the work indicator is
synchronously illuminated, the knob indication corresponds to Level 1 which is the heating at low level, Level 2 which is the medium level heating and
Level 3 which is the high level heating.
2. Increase or decrease room temperature and you can adjust the degree of
temperature controller knob to realize the appropriate temperature that you
need. When the room temperature reaches the temperature needed by you
and is maintained at such point, the adjustment temperature controller is
automatically switched o and the heater automatically stops heating. When
the temperature around the temperature controller is decreased, the temperature controller is automatically restored and the heater continues to heat.
Power-o
Turn the switch knob to the corresponding O position. At this time, the opera-
ting indicator goes o, the heater stops heating and then turn the temperature
control knob indication to the minimum position. At this time, the sound of temperature control disengagement can be heard. At this time, the heater is in the
power-o status. If you do not use it, please unplug the power socket.

5
Instructions for Safe Use
Caution: please read this manual before use and make sure to use this product following the
instructions
1. Open the package box, remove the machine body and check whether atta-
ched accessories are complete and machine body are in good and complete
status.
2. After the appliance is installed in position in compliance with instructions for
use and requirements, connect power supply (socket such as power socket)
and power socket and follow power requirements. AC current 230V, 50Hz and
current ≥15A.
3. During normal use, do not have naked skin contact the surface of the ap-
pliance to avoid heating.
4. When children, animals or people disabled and lacking of self-control capa-
bility are present at the site and no personnel watch the site, avoid using this
appliance.
5. This appliance is not suitable for being used by the following populations (in-
cluding children): those who have physical, feeling or mental defects or lack
experiences or knowledge, unless they obtain the guardian or instruction on
the use of this product from the person responsible for the safety of the appliance.
6. Children should be supervised to ensure that it will not play with this
appliance.
7. The power socket must be equipped with a secure grounding device.
8. During operation, please do not place the power cord on the surface of ma-
chine body heating. Do not depress heavy objects on the power cord of the
appliance.
9. Please do not use the nned radiator for air drying clothes.
10. It is strictly prohibited to cover any clothes on such nned radiator, container
or any other objects and you must not place them below the cabinet or fra-
me. It is strictly prohibited to place any obstacles between the nned radiator
and ventilating air.

6
11. This appliance should be far away from all combustible objects and do not
have children or handicapped persons approach this appliance.
12. Please do not install the appliance below the power socket.
13. It is prohibited to use this appliance outdoors.
14. Do not install this appliance anywhere water may be splashed, such as ba-
thtub, water pool, etc.
15. If the product malfunctions, please contact the after-sale service point for
overhaul. It is strictly prohibited to disassemble this product or replace ttings
not meeting safety requirements.
16. If power cords of this product are damaged, only specially appointed person-
nel from the technical service center can replace them to ensure safety.
17. There is a certain amount of special oil inside the device. If the oil case needs
to be opened, the manufacturer or after-sale service department should perform. If it is found that oil ows out, immediately notify the service center.
18. You must observe regulations for removal of oil after this product is abando-
ned.
19. In accordance with safety regulations, the minimum distance between the
device and ground and wall is 150mm.
Special warning: if the power you selected is higher than 2000W (namely
2500W-3000W), before using this heater, you must ensure that the power supply and line of this heater that you use must be able to withstand 250V and more
than 15A current. To avoid a re, do not use the heater with a power of higher
than 2000W (2500W-3000W) on the 250V 10A power supply.
7
MANUAL DE SERVICIO
Perl del producto:
El calentador de aceite SANTORINI está meticulosamente diseñado y fabricado
mediante la adopción de técnicas avanzadas internacionales y la aplicación de
casi una docena de años de experiencias de producción. Este producto emplea
tubos de calefacción eléctricos fabricados con equipo especial y aceite especial conductor de calor como fuente de calor y genera calor a través de la ventilación cruzada de las aletas radiantes para aumentar rápidamente la temperatura en la habitación. Se caracteriza por una forma de diseño única y nuevos tipos
artísticos. La función de ajuste de la temperatura está instalada y la calefacción
se puede cambiar en diferentes niveles. El dispositivo de control de temperatura
con alta sensibilidad puede controlar la temperatura y la temperatura ambiente del calentador de aceite. La placa de pie está equipada con rodillos y puede
moverse en cualquier dirección; Doble protección de seguridad, dispositivo de
protección contra sobrecalentamiento (que puede restablecer el controlador de
temperatura ), dispositivo electrónico de limitación de temperatura (que puede
controlar la temperatura interior) y protector térmico de fusión (protege al apara-
to en un estado no normal) son seguros y conables de usar, quietos y libres de
ruidos , pueden garantizar que el ambiente interior sea transparente, húmedo y
confortable, por lo que es el dispositivo de calefacción ideal para instituciones
médicas, escuelas, instituciones de investigación cientíca, etc.
Estructura del producto y características de rendimiento
Estimados usuarios. Lea atentamente este manual del usuario antes de utilizar este
producto para un uso correcto, seguro y ecaz de este producto.
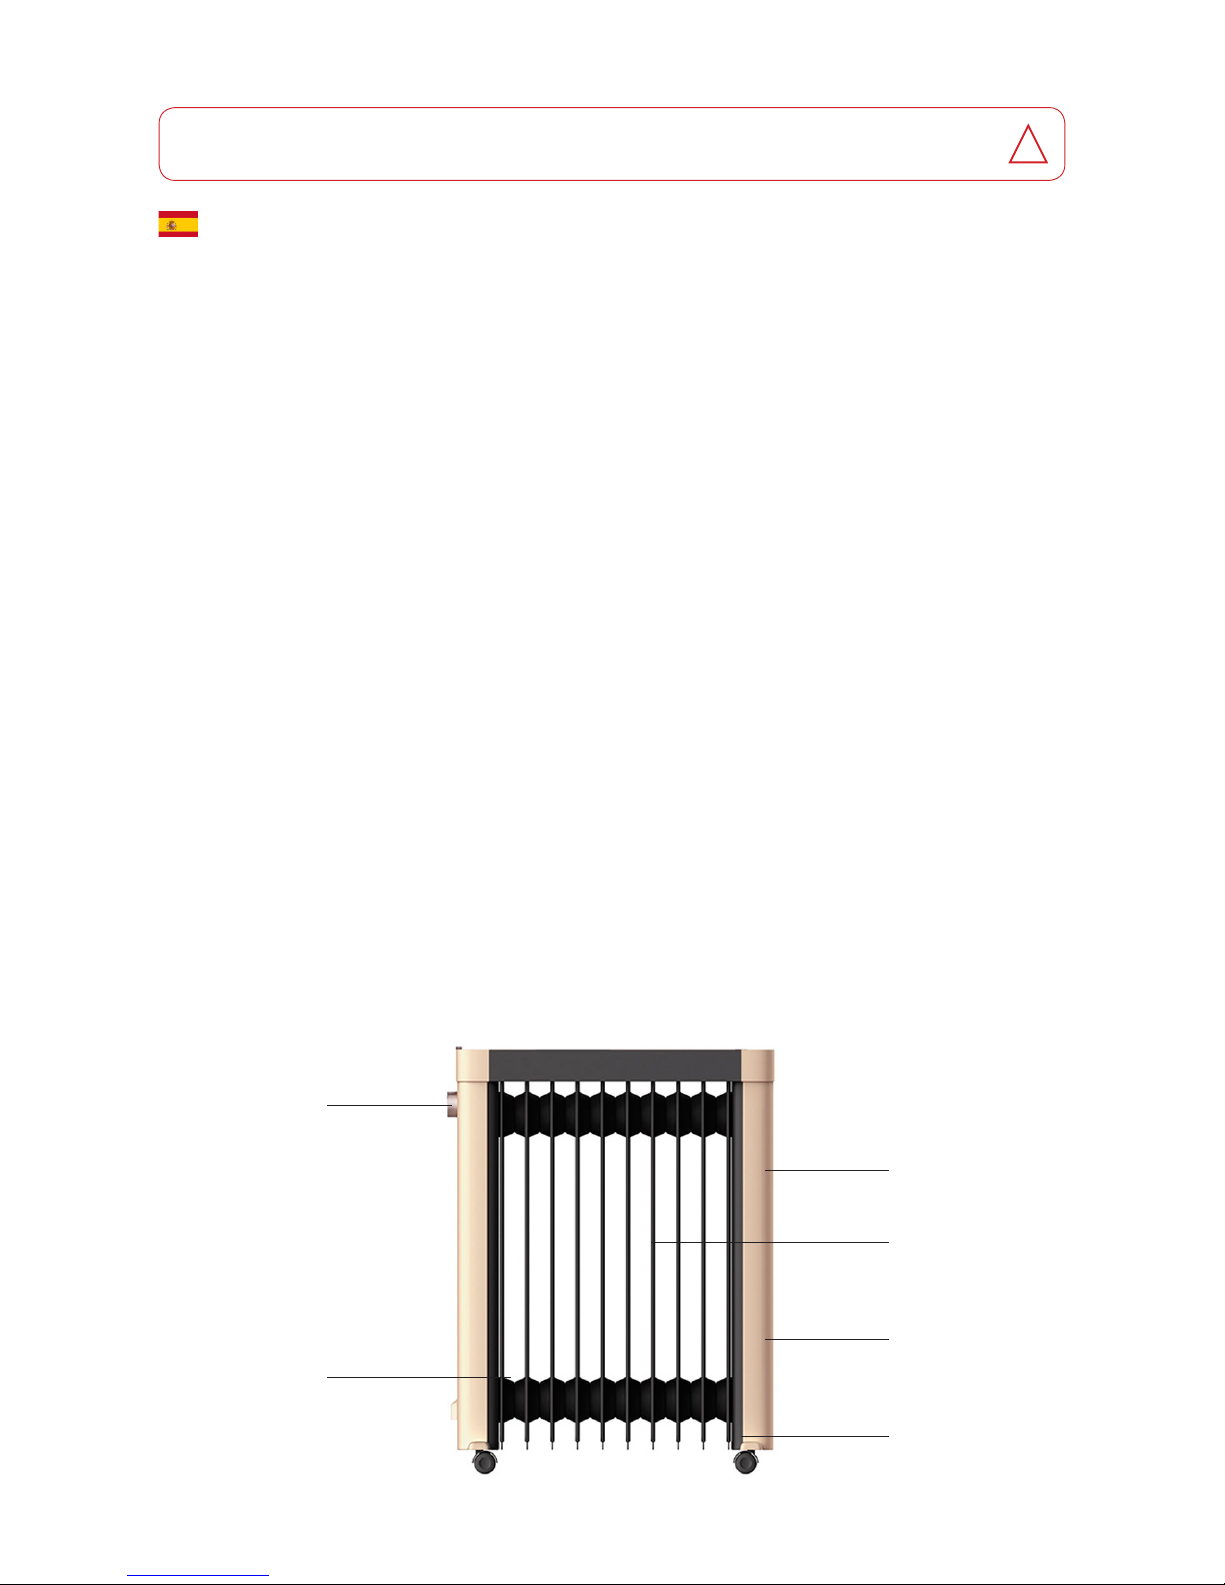
!
Perilla de control
de temperatura
Estuche de
almacenamiento
de alambre
Yugo de elevación
Aleta radiante
Estuche de
humidicación
Taburete y
ruedas
8
Datos técnicos
Modelo Potencia Voltaje/Frecuencia Número de Aletas
DF-100P7-5 1000W 230V 50Hz 5 Fins
DF-150P7-7 1500W 230V 50Hz 7 Fins
DF-200 P7-9 2000W 230V 50Hz 9 Fins
Instrucciones de uso
1. Abra la caja de embalaje, retire el cuerpo de la máquina, compruebe si las
piezas de la lista están completas y en buenas condiciones.
2. Diagrama de instalación
Método de instalación
1. La parte posterior de la caja, debe estar abajo, colóquela en el suelo.
Si escucha uido uyendo en el vehículo, esto es normal.
2. Con respecto al diagrama de instalación, je el taburete para pies instalado,
(utilizando la varilla roscada que forma un juego completo en el paquete de
accesorios) a la posición correspondiente de las cubiertas frontal y posterior y
apriete la varilla roscada.
Yugo
Estuche de
humidicación
Platillo
 Loading...