

Page 1
Operation Manual and Parts Directory
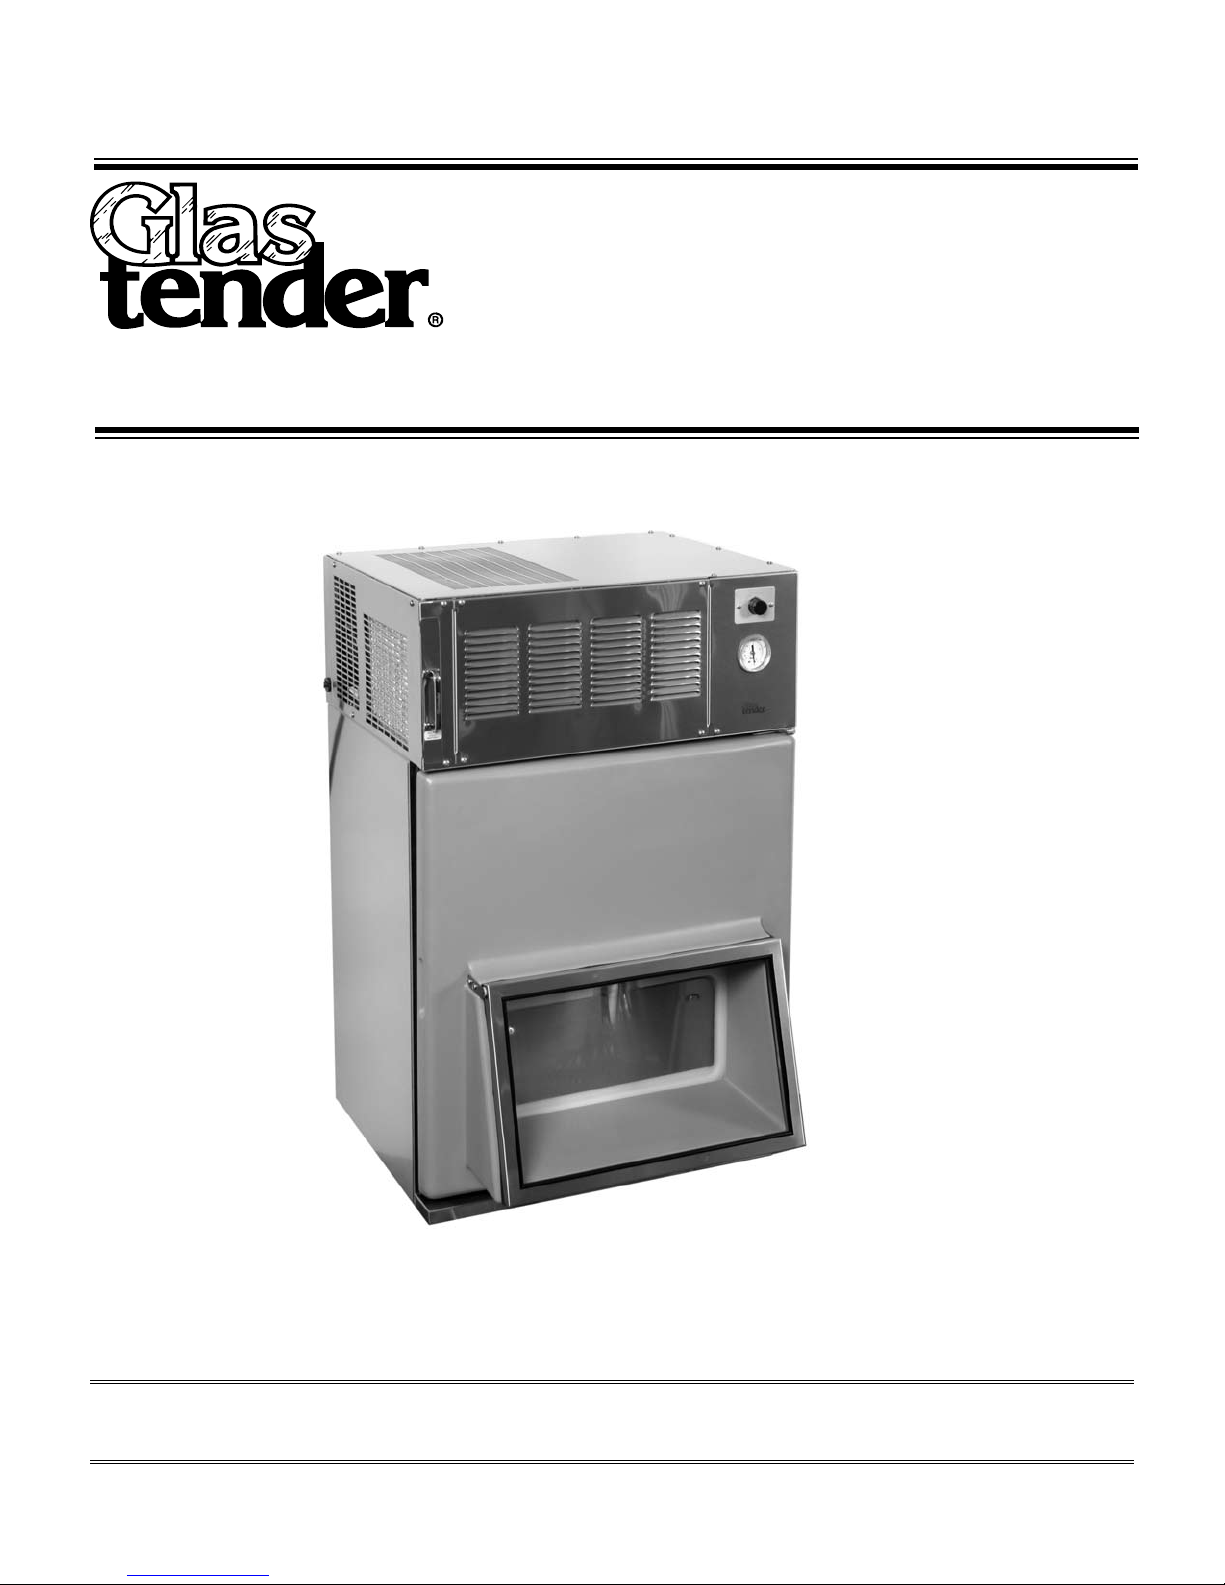
Lettuce crisper
Glastender, Inc. · 5400 North Michigan Road · Saginaw, MI · 48604-9780
800.748.0423 · 989.752.4275 · Fax 800.838.0888 / 989.752.4444 · www.glastender.com
Rev. 08-26-08
LC
© 2007 Glastender, Inc.
Page 2

index
Topic Page
Utility Requirements and Connections ........................................................... 1
Uncrating and Start-up Instructions ................................................................1
Operation .........................................................................................................1
Cleaning Instructions ...................................................................................... 1
Wall Mounting Instructions ............................................................................2
Electrical and Refrigeration Specifications ....................................................3
Electrical Diagram .......................................................................................... 3
Replacement Parts ........................................................................................4-7
Replacement Parts for Models Prior to 3/1/00 ............................................... 8
Terms and Conditions ....................................................................................9
Warranty .......................................................................................................... 9
IMPORTANT !!
Attention Service Companies
Please review the important warranty information on
page 9. If you believe a service call should be covered
by the factory, please call the factory for authorization between
8AM and 5PM EST, Monday through Friday.
Glastender, Inc. • 5400 North Michigan Road • Saginaw, MI • 48604-9780
800.748.0423 • 989.752.4275 • Fax 800.838.0888 / 989.752.4444 • www.glastender.com
Page 3

introduction
This manual describes the operation features of the Lettuce Crisper. Please review this information before
attempting installation and operation. Long term, trouble-free operation will follow if good housekeeping and
maintenance procedures are followed. Thank you for selecting Glastender, Inc. products.
UTILITY REQUIREMENTS AND CONNECTIONS
Electrical: 115 Volt AC, 1 Phase, 60 Hz, 6.64 full load amps. A separate 15 amp circuit is
required. A 10-foot grounded cord is included.
Plumbing: Automatic condensate evaporator. No drain connection required.
UNCRATING AND START-UP INSTRUCTIONS
All models are shipped in one carton. These steps should be followed:
1. If legs are included, bolt them to the base with bolts provided.
2. For wall mounting instructions, see page 2.
3. Position unit. It must be level and plumb.
4. Plug into 115 volt AC outlet.
5. Your Glastender equipment is now ready for use.
OPERATION
The operating temperature range is 35°F (2°C) to 42°F (5°C).
Lettuce Crisper models include an automatic defrost system. The Lettuce Crisper will defrost every six hours
for approximately 20 minutes. During the defrost, the evaporator fan will remain on and the refrigeration system will turn off.
CLEANING INSTRUCTIONS
ESTIMATED CLEANING TIME: 5 to 10 minutes per unit daily, 20 minutes weekly
FREQUENCY: Daily cleaning of exterior & door gaskets. Weekly cleaning of interior.
PROCEDURE:
1. A non-chlorine based cleaner or mild detergent and warm water applied with a soft cloth or sponge to all contact surfaces.
2. Immediately rinse off cleaning agent(s), using clean warm water, clean soft cloth or sponge.
3. Dry with a soft clean cloth, removing standing water as soon as possible.
4. A more thorough cleaning of the interior should be done weekly (more frequently as necessary).
5. The condensing unit air filter (front top left) should be removed and thoroughly rinsed in hot clean water at
least once per quarter.
NOTES:
1. Never use hydrochloric acid, wire brushes, steel wool, scrapers, or chlorine based cleaners on stainless steel
surfaces, since they will break down the passivity layer and allow corrosion to occur.
2. On stainless steel surfaces, you may use a soft bristle brush or Scotch-Brite® pad for more stubborn stains.
Always scrub with the direction of the grain. Follow with a thorough cleaning as described above.
3. Deposits from food preparation must be properly removed. Even hard water deposits will rust stainless steel,
if not removed.
4. Door gaskets are most often overlooked when cleaning. Failure to clean them regularly will lead to premature
failure, since alcohol and moisture build-up breaks down the gasket material.
Glastender, Inc. • 5400 North Michigan Road • Saginaw, MI • 48604-9780
800.748.0423 • 989.752.4275 • Fax 800.838.0888 / 989.752.4444 • www.glastender.com
1
Page 4

C
L
OF HOLES
WALL MOUNT BRACKET
BOTTOM OF LETTUCE CRISPER
BOTTOM BRACKET
24 ¾"
16"
16"
C
L
C
L
STUDS IN WALL
WALL MOUNT
BRACKET
BOTTOM
BRACKET
WaLL Mounting instructions
MUST BE INSTALLED
VERTICALLY PLUMB
MUST BE INSTALLED
HORIZONTALLY LEVEL
INSTRUCTIONS:
1. Mark a level line at the bottom of the
lettuce crisper.
2. From this line measure up 24¾” and
mark another level line.
3. On this line drill holes to match the
holes in the wall mount bracket.
4. Install wall mount bracket.
5. Attach lettuce crisper.
6. If lettuce crisper is not on an existing
shelf, secure with bottom bracket.
NOTE: At least two (2) of the mounting
holes in the bracket should line up
with studs in the wall for safe, secure
mounting.
Glastender, Inc. • 5400 North Michigan Road • Saginaw, MI • 48604-9780
2
800.748.0423 • 989.752.4275 • Fax 800.838.0888 / 989.752.4444 • www.glastender.com
Page 5

B
M
1
W
B
OR
GR.
115 VOLT
15 AMP. SERVICE
RECOMMENDED
-
+
5
4
3
2
M
OR
B
W
W
B
eLectricaL and refrigeration specifications
The following electrical and refrigeration specifications apply:
design
refrigerant pressure
ModeL eLectricaL type charge high LoW
R134a LC 115V, 1 Ph., 60 Hz., 6.64 AMP R134a 8.0 oz. 232 88
R22 LC 115V, 1 Ph., 60 Hz., 8.39 AMP R22 6.75 oz. 285 144
ELECTRICAL DIAGRAM
ITEM DESCRIPTION
1 Evaporator Fan Motor
2 Condenser Fan Motor
3 Compressor
4 Thermostat
5 Defrost Cycle Control
ELECTRICAL RATINGS
R134a Compressor 115 VOLT 5.0 AMPS
Evaporator Fan Motor 115 VOLT .82 AMPS
Condenser Fan Motor 115 VOLT .82 AMPS
TOTAL AMPS 6.64 AMPS
ELECTRICAL RATINGS
R22 Compressor 115 VOLT 6.75 AMPS
Evaporator Fan Motor 115 VOLT .82 AMPS
Condenser Fan Motor 115 VOLT .82 AMPS
TOTAL AMPS 8.39 AMPS
LEGEND
B = Black
W = White
OR = Orange
Glastender, Inc. • 5400 North Michigan Road • Saginaw, MI • 48604-9780
800.748.0423 • 989.752.4275 • Fax 800.838.0888 / 989.752.4444 • www.glastender.com
3
Page 6

repLaceMent parts
2
1
18
9
11
8
7
14
5
3
13
10
16
15
Glastender, Inc. • 5400 North Michigan Road • Saginaw, MI • 48604-9780
4
800.748.0423 • 989.752.4275 • Fax 800.838.0888 / 989.752.4444 • www.glastender.com
17
Page 7

repLaceMent parts
Model old Part No. descriPtioN list
1. 11000087 GT-036151 Front cover, refrigeration compartment $50.00
2. 11000088 GT-036152 Left cover, refrigeration compartment 72.00
3. 11000090 GT-036154 Top cover, refrigeration compartment 150.00
4. 11000093 GT-036264 Plexi-glass door, complete (prior to 01-06-06) 60.00
11000138 Plexi-glass door, complete (after 01-06-06) 94.00
5. 11000075 GT-032113 Door hinge set, plexi-glass door (prior to 01-06-06) 25.00
11000139 Door hinge set, plexi-glass door (after 01-06-06) 25.00
6. 11000069 GT-031322 Door gasket, plexi-glass, 18-½” x 10-¼” (prior to 9-05) 21.00
11000124 Door gasket, plexi-glass, 18-11/16” x 11-⅞” (after 9-05) 21.00
7. 11000070 GT-031326 Chute gasket, 5 feet 20.00
8. 11000131 Main door 175.00
9. 11000068 GT-031321 Gasket, main door, 22-7/16” x 24” 42.00
10. 11000076 GT-032114 Door hinge set, main door (prior to 01-06-06) 25.00
11000201 Door hinge set, main door, left swing (after 01-06-06) 35.00
11000202 Door hinge set, main door right swing (after 01-06-06) 35.00
11. 11000106 GT-041307 Bin, standard at 21” high 175.00
12. 11000108 LC-BDIV Bin divider 70.00
13. 11000092 GT-036254 Bin door, stainless steel 36.00
14. 11000095 GT-036610 Bin door latch 23.00
15. 06001405 GT-033202 Thermostat with knob 50.00
16. 06001632 GT-038419 Knob, thermostat 3.00
17. 11000085 GT-035305 Temperature gauge w/probe 42.00
18. 06001314 GT-031401 Exterior power cord 35.00
11000149 Main door and plexi-glass assembly 418.00
8
NOTE: To replace door
on units manufactured
prior to 01-06-06, you
must order a complete
assembly part #11000149
4
6
12
eLectricaL coMponents
part no. description price
06006121 Replacement powercord assembly, includes (06001572 06001314) $40.00
Glastender, Inc. • 5400 North Michigan Road • Saginaw, MI • 48604-9780
800.748.0423 • 989.752.4275 • Fax 800.838.0888 / 989.752.4444 • www.glastender.com
5
Page 8

15
condenser and reLated parts
5
14
13
16
17
11
10
9
12
22
21
20
Glastender, Inc. • 5400 North Michigan Road • Saginaw, MI • 48604-9780
6
800.748.0423 • 989.752.4275 • Fax 800.838.0888 / 989.752.4444 • www.glastender.com
Page 9

condenser and reLated parts
Model old Part No. descriPtioN list
1. 11000079 GT-032616 Evaporator coil $215.00
2. 06001449 GT-035114 Evaporator fan motor, 6 watt 95.00
3. 07000155 GT-032803 Evaporator fan motor blade 10.00
4. 11000071 GT-031544 Evaporator fan motor mounting bracket 6.00
5. 11000164 Evaporator housing 127.00
11000167 Evaporator housing, condenser drain pan, evaporator drain pan 168.00
6. 11000072 GT-031545 Brackets, evaporator coil (2 req’d) 11.00
7. 11000163 Evaporator fan shroud, Lettuce Crisper 20.00
8. 11000084 GT-035029 1/4 HP Tecumseh compressor, R134a (Units after 9/04) 390.00
06001444 GT-035027 1/5 HP Tecumseh compressor, R22 (Units 3/00 to 9/04) 490.00
9. 06001382 GT-032211 Start capacitor for Tecumseh compressor 15.00
10. 06001415 GT-034117 Relay for Tecumseh compressor 19.00
11. 06001303 GT-031212 Overload for Tecumseh compressor 9.00
12. 11000080 GT-032617 Condenser coil 225.00
13. 06001449 GT-035114 Condenser fan motor 95.00
14. 11000071 GT-031544 Condenser fan motor bracket 6.00
15. 11000078 GT-032309 Condenser fan shroud 20.00
16. 07000155 GT-032803 Condenser fan motor blade 10.00
17. 11000096 GT-037021 Condenser filter with handle 78.00
18. 11000102 GT-038208 Wicking material, (20 pieces 2½” x 3”) 24.00
11000165 Evaporator Drain Pan 20.00
19. 11000200 Condenser Drain Pan Replacement Kit 30.00
20. 06001397 GT-033000 Defrost timer, automatic, 6 hour 32.00
21. 07000138 GT-031542 Bracket, defrost timer 3.00
22. 06004028 Filter dryer with service port 25.00
11000120 GT-031717 Cap tube, Tecumseh 1/5 HP R22 (.036 x 60”) 20.00
11000121 GT-031720 Cap tube, Tecumseh 1/4 HP R134a (.036 x 48”) 20.00
2
4
3
8
9
7
1
6
5
NOTE: To replace an evaporator housing on units manufactured prior to 05-18-06,
12
18
19
you must order #11000167
Glastender, Inc. • 5400 North Michigan Road • Saginaw, MI • 48604-9780
800.748.0423 • 989.752.4275 • Fax 800.838.0888 / 989.752.4444 • www.glastender.com
7
Page 10

Lettuce crisper repLaceMent parts prior to 3/1/00
Model old Part No. descriPtioN list
1. 11000079 GT-032616 Evaporator coil $215.00
2. 11000101 GT-038025 Evaporator drain pan, Lettuce Crisper 36.00
3. 06001449 GT-035114 Evaporator fan motor, 6 watt 95.00
4. 07000155 GT-032803 Blade, evaporator fan motor 10.00
5. 11000050 GT-031544 Bracket, evaporator fan motor 6.00
6. 11000119 GT-032310 Evaporator fan shroud 20.00
7. 11000100 GT-038017 Condensate unit drain pan, Lettuce Crisper 36.00
8. 11000122 Wicking material, (10 pieces 5¼” x 1”) 15.00
9. 06004028 Filter dryer with service port 25.00
10. 11000082 GT-035005 1/5 HP Aspera compressor, R22 535.00
11. 06001379 GT-032201 Start capacitor for 1/5 HP R22 compressor 20.00
12. 08000083 GT-034107 Relay for 1/5 HP R22 compressor 15.00
13. 08000069 GT-031204 Overload for 1/5 HP R22 compressor 15.00
14. 11000080 GT-032617 Condenser coil 225.00
15. 06001449 GT-035114 Condenser fan motor 95.00
08000081 GT-032801 Condenser fan motor blade assembly 13.00
16. 11000071 GT-031544 Bracket, condenser fan motor 6.00
17. 11000078 GT-032309 Condenser fan shroud 20.00
18. 11000096 GT-037021 Condenser filter with handle 78.00
19. 06001397 GT-033000 Defrost timer, automatic, 6 hour 32.00
20. 07000138 GT-031542 Bracket, defrost timer 3.00
21. 06001405 GT-033202 Thermostat with knob 50.00
22. 06001632 GT-038419 Knob only 3.00
23. 11000085 GT-035305 Temperature gauge with probe 42.00
11000120 GT-031717 Cap tube, (.036 x 60”) 20.00
6
4
8
3
5
22
18
Glastender, Inc. • 5400 North Michigan Road • Saginaw, MI • 48604-9780
800.748.0423 • 989.752.4275 • Fax 800.838.0888 / 989.752.4444 • www.glastender.com
21
1
13
9
(Old Style)
9
23
20
12
19
10
11
17
16
14
2
15
8
7
Page 11

terMs and conditions
prices:
All prices are LIST. Applicable taxes will be added.
uotations:
Q
Unless otherwise stated, quotations are effective for 30 days only.
cceptance:
a
All orders are subject to acceptance by Glastender, Inc.’s headquarters
in Saginaw, Michigan. Possession of the Parts Directory and Price List
is not an offer to sell.
hipMents:
s
F.O.B. factory in Saginaw, Michigan. Partial shipments will be made
unless otherwise specified by the customer. Orders are shipped via UPS
or DHL unless otherwise specified.
ayMent terMs:
p
Cash should be included with all orders unless credit terms have been
arranged. To establish credit, banking and trade references are required.
A convenient credit application is available upon request. Visa and
Mastercard are also accepted.
Warranty stateMent
deLivery:
Varies according to prior production commitments, but parts orders
generally ship within two working days.
eturns:
r
A Return Authorization (RA) number must be issued by the factory in
advance for any items that are returnable. The RA number MUST be
noted on the outside of the returned package. Returns must be received
within 90 days of the RA issue date. Shipping charges must be prepaid.
A 20% handling charge will be applied to all authorized returns if
received in new, unused condition in the original packaging.
oss or daMage:
L
Glastender, Inc. is not responsible for any loss, damage, or delay of
merchandise during shipment. Such transit claims must be filed with
the carrier. Merchandise must be examined on arrival. If shortages
occur, Glastender, Inc. must be notified in writing within five (5) days
of delivery to honor any shortage claim.
NOTE: Glastender, Inc.’s policy of constant quality improvement means
that prices, specifications, and policies are subject to change without
notice.
LABOR: Glastender, Inc. warrants all products to be free of defects in
material and workmanship. In established areas, a start-up and a 90day labor warranty are included with glasswasher models GT-24 and
GT-30. The GT-18 series glasswashers include a 90-day labor warranty.
Self-contained refrigeration models, except beer line chillers, include a
1-year labor warranty, for the duration of one year from date of installation or up to 18 months from date of factory shipment, whichever
occurs sooner. For warranty labor claims beyond 15 months from the
date of factory shipment, proof of date of installation or occupancy must
be provided. Authorization for labor must be obtained from Glastender
within the warranty period and prior to the service being performed.
Labor warranty applies to the United States and Canada only.
PARTS: Within one year from date of installation, or 15 months from
date of factory shipment, whichever occurs sooner, Glastender, Inc.
will replace any part or assembly found defective under normal use and
service. Field replacement parts include a warranty of 90 days from date
of installation. All self-contained refrigeration models include a 5-year
compressor warranty.
A warranty claim form MUST accompany all returned defective parts or
assemblies. This form MUST be completed in full. Failure to do so may
result in delay or denial of credit. Any defective part or assembly must
be returned to Glastender, Inc., Saginaw, Michigan, with all transportation and delivery charges prepaid. Warranty repairs or replacements will
be shipped FOB factory in Saginaw, Michigan.
The warranty does not cover equipment subjected to accidents, freight
damage, alterations, improper power and/or plumbing hookups, improper chemical use, general misuse, or lack of routine required maintenance
as determined by Glastender, Inc.
No representative, distributor, dealer, or any other person is authorized
to modify this warranty. This warranty replaces all other written or
verbal warranties.
NOTE: Glastender, Inc.’s policy of constant quality improvement
means that prices, specifications, and policies are subject to change
without notice. Questions regarding this warranty should be directed to
Glastender’s Customer Service Representative.
03/01/07
IMPORTANT!!
Attention Refrigeration Service Companies
Please review the important warranty information on this page. If you believe a
service call should be covered by the factory, please call the factory for authorization
between 8AM and 5PM EST, Monday through Friday.
Glastender, Inc. • 5400 North Michigan Road • Saginaw, MI • 48604-9780
800.748.0423 • 989.752.4275 • Fax 800.838.0888 / 989.752.4444 • www.glastender.com
9
Page 12

 Loading...