

Gladius G1220 User Manual

I
P/N: 4012122000100P
2013.03
Gladius G1220
12.1" Rugged Tablet PC with
Intel® Atom™ N2600
User's Manual
Version 1.0

- II -
This page is intentionally left blank.

- i -
Revision History
Version Release Time Description
1.0 March 2013 Initial release

- ii -
Contents
Revision History ............................................................................................i
Contents ........................................................................................................ ii
Preface...........................................................................................................v
Copyright Notice...................................................................................................v
Declaration of Conformity.....................................................................................v
CE ................................................................................................................v
FCC Class B ................................................................................................v
RoHS ...........................................................................................................vi
SVHC / REACH ...........................................................................................vi
Important Safety Instructions ............................................................................. vii
Symbols Description ......................................................................................... viii
Warning ............................................................................................................. viii
Introducing the Rechargeable Battery Pack........................................................ix
General Cleaning Tips.........................................................................................ix
Cleaning Tools ......................................................................................................x
Disposing of the Computer..................................................................................xi
Additional Information & Technical Support ........................................................xi
Warranty .............................................................................................................xii
Chapter 1 - Introduction ............................................................................... 1
1.1. The Computer ...............................................................................................2
1.2. About this Manual..........................................................................................2
1.3. Specications ................................................................................................3
1.4. Scope of Delivery ..........................................................................................5
1.5. Ordering Information .....................................................................................6
1.5.1. Optional Accessories..........................................................................6
1.5.2. Congure-to-Order Service ................................................................7
Chapter 2. Getting Started ........................................................................... 9
2.1. System Overview ........................................................................................10
2.1.1. Dimensions ......................................................................................10
2.1.2. Tour the Computer ...........................................................................11
2.2. Desktop Stand.............................................................................................16
2.2.1. Install Desktop Stand .......................................................................16
2.3. Hand Strap ..................................................................................................18
2.3.1. Install Hand Strap.............................................................................18
2.4. Batteries ......................................................................................................20
2.4.1. Extend Battery Lifespan ...................................................................20
2.4.2. Optimize Battery Life ........................................................................20
2.4.3. Install Batteries.................................................................................21
2.4.4. Replace Batteries .............................................................................22
2.4.5. Charge the Batteries for the 1st Time ..............................................23
2.4.6. Re-Charge the Batteries ..................................................................24
2.5. Driver Installation ........................................................................................26
2.5.1. Installation Sequence .......................................................................26
2.5.2. Start to Install ...................................................................................26
Contents

- iii -
Contents
2.5.3. Install Chipset Driver ........................................................................29
2.5.4. Install Graphics Driver ......................................................................30
2.5.5. Install Audio Driver ...........................................................................30
2.5.6. Install LAN Driver .............................................................................31
2.5.7. Install Touch Screen Driver ..............................................................32
2.5.8. Install WiFi Driver .............................................................................33
2.5.9. Install Function-Keys Driver .............................................................34
2.5.10. Install Bluetooth Driver ...................................................................35
2.5.11. Install RS-232 Driver ......................................................................36
2.5.12. Install SATA Driver .........................................................................36
2.5.13. Install Camera Driver .....................................................................37
2.5.14. Install Cradle LAN Driver................................................................38
Chapter 3. Use the Computer .................................................................... 41
3.1. Use Touch Screen .......................................................................................42
3.1.1. Text Input ..........................................................................................42
3.2. Use (Physical) Function Keys .....................................................................46
3.3. Use Wi-Fi ....................................................................................................47
3.4. Use Bluetooth..............................................................................................49
3.4.1. Bluetooth Device Name ...................................................................49
3.4.2. Hide/Expose Computer ....................................................................50
3.4.3. Pair/Connect with Other Bluetooth Devices .....................................51
3.4.4. Use BlueSoleil ..................................................................................53
3.5. Use Camera (Congure-to-Order) ..............................................................54
3.5.1. Launch Camera................................................................................54
3.5.2. Take A Picture ..................................................................................55
3.5.3. Shoot A Video ...................................................................................55
3.6. Use Desktop Stand .....................................................................................56
3.7. Use Desktop Cradle (Optional) ...................................................................57
3.7.1. Status LED ......................................................................................58
3.7.2. Seat/Dismount the Computer ...........................................................58
3.7.3. Charge Batteries ..............................................................................60
3.7.4. Charge A Spare Battery ...................................................................61
3.7.5. Network with Other Devices .............................................................62
Chapter 4 - Utilities ..................................................................................... 63
4.1. ARBOR System Suite .................................................................................64
4.1.1. Launch ARBOR System Suite..........................................................64
4.1.2. User Interface...................................................................................65
4.1.3. Customize Function Keys ................................................................67
4.2. PenMount Utilities .......................................................................................68
4.2.1. PenMount Control Panel ..................................................................68
4.2.2. PenMount Gesture ...........................................................................79

- iv -
Contents
Chapter 5 - BIOS ......................................................................................... 83
5.1. Main ............................................................................................................86
5.2. Advanced ....................................................................................................87
5.2.1. CPU Conguration ...........................................................................89
5.2.2. Thermal Conguration ......................................................................90
5.3. Chipset ........................................................................................................92
5.4. Boot .............................................................................................................93
5.5. Security .......................................................................................................95
5.6. Save & Exit..................................................................................................97

- v -
Preface
Copyright Notice
All Rights Reserved.
The information in this document is subject to change without prior notice in order to
improve the reliability, design and function. It does not represent a commitment on the
part of the manufacturer.
Under no circumstances will the manufacturer be liable for any direct, indirect, special,
incidental, or consequential damages arising from the use or inability to use the product
or documentation, even if advised of the possibility of such damages.
This document contains proprietary information protected by copyright. All rights are
reserved. No part of this manual may be reproduced by any mechanical, electronic, or
other means in any form without prior written permission of the manufacturer.
Declaration of Conformity
CE
The CE symbol on your product indicates that it is in compliance with the directives of the
Union European (EU). A Certicate of Compliance is available by contacting Technical
Support.
This product has passed the CE test for environmental specications when shielded
cables are used for external wiring. We recommend the use of shielded cables. This
kind of cable is available from ARBOR. Please contact your local supplier for ordering
information.
FCC Class B
This device complies with Part 15 of the FCC Rules. Operation is subject to the following
two conditions:
(1) This device may not cause harmful interference, and
(2) This device must accept any interference received, including interference that may
cause undesired operation.
NOTE:
This equipment has been tested and found to comply with the limits for a Class B digital
device, pursuant to Part 15 of the FCC Rules. These limits are designed to provide
reasonable protection against harmful interference in a residential installation. This
equipment generates, uses and can radiate radio frequency energy and, if not installed
and used in accordance with the instructions, may cause harmful interference to radio
communications.
Preface

- vi -
Preface
However, there is no guarantee that interference will not occur in a particular installation.
If this equipment does cause harmful interference to radio or television reception, which
can be determined by turning the equipment off and on, the user is encouraged to try to
correct the interference by one or more of the following measures:
-- Reorient or relocate the receiving antenna.
-- Increase the separation between the equipment and receiver.
-- Connect the equipment into an outlet on a circuit different from that to which the
receiver is connected.
-- Consult the dealer or an experienced radio/TV technician for help.
RoHS
ARBOR Technology Corp. certies that all components in its products are in compliance
and conform to the European Union’s Restriction of Use of Hazardous Substances in
Electrical and Electronic Equipment (RoHS) Directive 2002/95/EC.
The above mentioned directive was published on 2/13/2003. The main purpose of
the directive is to prohibit the use of lead, mercury, cadmium, hexavalent chromium,
polybrominated biphenyls (PBB), and polybrominated diphenyl ethers (PBDE) in electrical
and electronic products. Member states of the EU are to enforce by 7/1/2006.
ARBOR Technology Corp. hereby states that the listed products do not contain
unintentional additions of lead, mercury, hex chrome, PBB or PBDB that exceed a
maximum concentration value of 0.1% by weight or for cadmium exceed 0.01% by
weight, per homogenous material. Homogenous material is dened as a substance or
mixture of substances with uniform composition (such as solders, resins, plating, etc.).
Lead-free solder is used for all terminations (Sn(96-96.5%), Ag(3.0-3.5%) and Cu(0.5%)).
SVHC / REACH
To minimize the environmental impact and take more responsibility to the earth we live,
Arbor hereby conrms all products comply with the restriction of SVHC (Substances of
Very High Concern) in (EC) 1907/2006 (REACH --Registration, Evaluation, Authorization,
and Restriction of Chemicals) regulated by the European Union.
All substances listed in SVHC < 0.1 % by weight (1000 ppm)

- vii -
Preface
Important Safety Instructions
Read these safety instructions carefully:
1. Read all cautions and warnings on the equipment.
2. Place this equipment on a reliable surface when installing. Dropping it or letting it fall
may cause damage
3. Make sure the correct voltage is connected to the equipment.
4. For pluggable equipment, the socket outlet should be near the equipment and should
be easily accessible.
5. Keep this equipment away from humidity.
6. Disconnect this equipment from the A/C outlet before cleaning it. Use a moist cloth.
Do not use liquid or sprayed detergent for cleaning.
7. To fully disengage the power to the unit, please disconnect the power from the AC
outlet.
8. Do not scratch or rub the screen with a hard object.
9. Never use any of the solvents, such as Thinner Spray-type cleaner, Wax, Benzene,
Abrasive cleaner, Acid or Alkaline solvent, on the display. Harsh chemicals may
cause damage to the cabinet and the touch sensor.
10. Remove dirt with a lightly moistened cloth and a mild solvent detergent. Then wipe
the cabinet with a soft dry cloth.
11. The openings on the enclosure are for air convection and protect the equipment from
overheating. DO NOT COVER THE OPENINGS.
12. Position the power cord so that people cannot step on it. Do not place anything over
the power cord.
13. If the equipment will not be used for a long time, disconnect it from the power source
to avoid damage by transient overvoltage.
14. Never pour any liquid into openings. This may cause re or electrical shock.
15. Never open the equipment. For safety reasons, the equipment should be opened
only by qualied service personnel.
16. If one of the following situations arises, get the equipment checked by service
personnel:
a. The power cord or plug is damaged.
b. Liquid has penetrated into the equipment.
c. The equipment has been exposed to moisture.

- viii -
Preface
d. The equipment does not work well, or you cannot get it to work according to
the user’s manual.
e. The equipment has been dropped or damaged.
f. The equipment has obvious signs of breakage.
17. The sound pressure level at the operator’s position, according to IEC 704-1:1982, is
no more than 70dB(A).
18. Keep this User’s Manual for later reference.
19. DO NOT LEAVE THIS EQUIPMENT IN AN UNCONTROLLED ENVIRONMENT
WHERE THE STORAGE TEMPERATURE IS BELOW -20° C (-4° F) OR ABOVE
60° C (140° F). THIS MAY DAMAGE THE EQUIPMENT.
Symbols Description
This symbol of “CAUTION” indicates that there is a danger of injury to
the user or a risk of damage to the product, should
warning notices be disregarded.
Battery Recycle
This symbol indicates electrical warning.
Change of electric current:
Internal: positive current
External: negative current
Warning
Any changes or modications not expressly approved by the guarantee of this device
could void the user’s authority to operate the equipment.

- ix -
Preface
Introducing the Rechargeable Battery Pack
With very little care, you can optimize the battery life and maximize the lifespan of the
battery. Most importantly, use only the computer in its ideal operating temperature (as
described in 1.3. Specifications on page 3) – do not leave it in a hot trunk during the
summer.
• Important Terms to Understand
“Battery life” means the time the computer will run before it must be recharged
(sometimes this is also called “playtime” or “runtime”).
“Battery lifespan” means the total amount of time your battery will last before it must
be replaced.
• Using the Computer for the First Time
Be sure to fully charge (approx. 4 hours) the computer when charging the computer
for the rst time.
• Long-Term Storage & Maintenance
If you are putting away the battery for more than three months, it is recommended that
the battery should be stored separately and fully charged, and get recharged every
three months. If you store an uncharged battery, it could fall into a deep worn-out
state which would render it incapable of holding any charge. Be sure to store your the
computer and battery at the proper temperature (as described in 1.3. Specifications
on page 3).
• Battery Lifespan
The removable batteries for the computer are designed to retain up to 80% of their
original capacity after 300 charging and recharging cycles when properly maintained.
You may choose to purchase new battery when it no longer holds the sufcient
charge that meets your needs.
General Cleaning Tips
You may need the following precautions before you begin to clean the device. When you
clean any single part or component for the device, please thoroughly read and understand
the details below.
1. We strongly recommended that you should shut down the system before you start to
clean any single components.
2. When you need to clean the device, please rub it with a piece of dry cloth.
3. Be cautious of the tiny removable components when you use a vacuum cleaner to
absorb the dirt on the oor.
4. Never drop the components inside the device or get circuit board damp or wet.

- x -
Preface
5. Be cautious of all kinds of cleaning solvents or chemicals when you use it for the sake
of cleaning. Some individuals may be allergic to the ingredients.
6. Try not to put any food, drink or cigarette around the device.
Cleaning Tools
Although many companies have created products to help improve the process of cleaning
your devices and peripherals, users can also use household items to clean their devices
and peripherals. Below is a listing of items you may need or want to use while cleaning
your devices or peripherals. Keep in mind that some components in your device may only
be able to be cleaned using a product designed for cleaning that component, if this is the
case it will be mentioned in the cleaning.
• Cloth:
A piece of cloth is the best tool to use when rubbing up a component.
Although paper towels or tissues can be used on most hardware
as well, we still recommend you to rub it with a piece of cloth.
• Water or rubbing alcohol: You may moisten a piece of cloth a
bit with some water or rubbing alcohol and rub it on the device.
Unknown solvents may be harmful to the plastics parts.
• Vacuum cleaner: Absorb the dust, dirt, hair, cigarette particles, and other
particles out of the device can be one of the best cleaning methods. Over
time, these items can restrict the airow in a device and cause circuitry to
corrode.
• Cotton swabs: Cotton swaps moistened with rubbing alcohol or water are
excellent tools for wiping hard to reach areas in your keyboard, mouse,
and other locations.
• Foam swabs: Whenever possible, it is better to use lint-free swabs such
as foam swabs.
Recommended Cleaning Procedures:
1. Close all application programs
2. Close operating software
3. Turn off the computer
4. Remove all peripherals
5. Disconnect the power cable
6. Proceed to clean.

- xi -
Preface
Disposing of the Computer
• Within the European Union
EU-wide legislation, as implemented in each Member State,
requires that waste electrical and electronic products carrying the mark (left) must be
disposed of separately from normal household waste.
This includes monitors and electrical accessories, such as signal cables or
power cords. When you need to dispose of your display products, please
follow the guidance of your local authority, or ask the shop where you
purchased the product, or if applicable, follow any agreements made between
yourself. The mark on electrical and electronic products only applies to the current
European Union Member States.
• Outside the European Union
If you wish to dispose of used electrical and electronic products outside the European
Union, please contact your local authority so as to comply with the correct disposal
method.
Additional Information & Technical Support
You can download the related technical documents such as datasheet and user’s manual
as well as driver on our website.
Please do not hesitate to call or e-mail our customer service when you still cannot get the
information you need.
http://www.arbor.com.tw
E-mail: info@arbor.com.tw

- xii -
Preface
Warranty
This product is warranted to be in good working order for a period of one year from the
date of purchase. Should this product fail to be in good working order at any time during
this period, we will, at our option, replace or repair it at no additional charge except as set
forth in the following terms. This warranty does not apply to products damaged by misuse,
modications, accident or disaster.
Vendor assumes no liability for any damages, lost prots, lost savings or any other
incidental or consequential damage resulting from the use, misuse of, or inability to use
this product. Vendor will not be liable for any claim made by any other related party.
Vendors disclaim all other warranties, either expressed or implied, including but not limited
to implied warranties of merchantability and tness for a particular purpose, with respect
to the hardware, the accompanying product’s manual(s) and written materials, and any
accompanying hardware. This limited warranty gives you specic legal rights.
Return authorization must be obtained from the vendor before returned merchandise will
be accepted. Authorization can be obtained by calling or faxing the vendor and requesting
a Return Merchandise Authorization (RMA) number. Returned goods should always be
accompanied by a clear problem description.

- xiii -
This page is intentionally left blank.

- xiv -
This page is intentionally left blank.

- 1 -
1Chapter 1
Introduction
Chapter 1 - Introduction
- 2 -
Introduction
1.1. The Computer
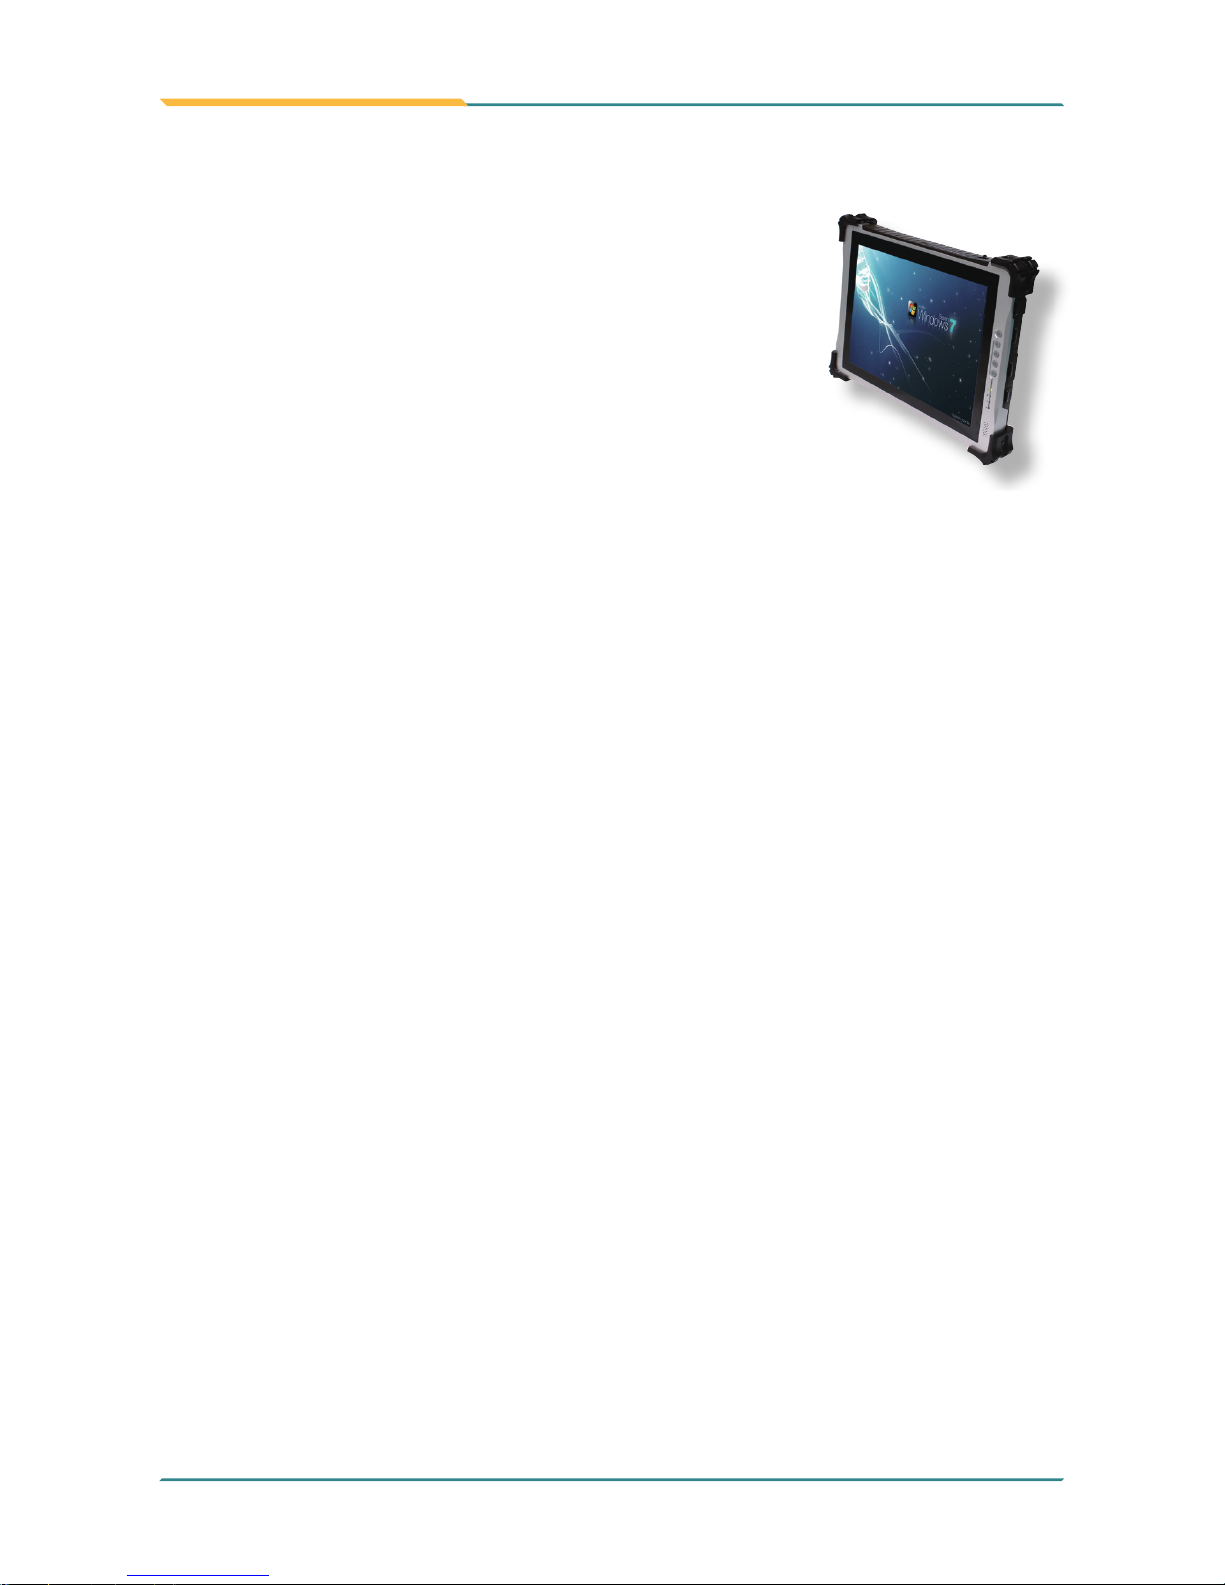
The G1220 is a powerful mobile computer made for retail
activities including sophisticated mobile POS application.
The computer packs a Wi-Fi module to deliver efcient data
connection. The G1220 is a productivity enhancer for store
associates by supporting a variety of applications from stock,
price check, article mark-downs to line busting.
Product Highlights
• 12.1” TFT active matrix with resistive touch
• Ultra low power consumption for 6-hour battery life
• Fully rugged for mobile POS or warehousing application
• Meeting MIL-STD-810F, IP54, 3ft. drop resistance
• Good mobility with multiple data connections (Bluetooth/Wi-Fi)
• Hot-swappable dual batteries design
1.2. About this Manual
This user’s manual provides the general information and installation instructions for the
computer. The manual is meant for the experienced users and integrators with hardware
knowledge of personal computers. If you are not sure about any description in this manual,
consult your vendor before further handling.
We recommend that you keep one copy of this manual for the quick reference for any
necessary maintenance in the future. Thank you for choosing ARBOR products.
- 3 -
Introduction
1.3. Specications
System
CPU Intel
®
Atom™ N2600 1.6GHz processor
Chipset Intel
®
NM10
Graphics Controller Intel
®
GMA3600 integrated
Memory 2GB 1333MHz DDR3 SDRAM installed
BIOS AMI Aptio
®
UEFI BIOS
Storage
1 x 32GB MLC SSD (installed)
1 x 2.5” HDD/SSD drive (optional)
Audio
1 x Integrated microphone
2 x Integrated 2W speakers
1 x Headphone jack
1 x Microphone jack
OS support
Windows 7 Embedded / Windows 7 Professional
Ubuntu and Fedora Linux compliant
Peripherals & Devices
Camera 1 x 5.0 megapixels Auto Focus COMS camera w/o LED (optional)
NFC 1 x 13.56MHz ISO15963/14443A/14443B NFC Reader (optional)
Wi-Fi 1 x 802.11 a/b/g/n wireless module integrated
Bluetooth 1 x Bluetooth 4.0 BLE integrated
Hand Strap 1 x Gray elastic hand strap
I/O interface
USB Port 4 x USB 2.0 ports
SD Card 1 x SDHC/SD card slot
Expansion
1 x 35-pin pogo contact port for the connection with a desktop cradle
1 x 20-pin proprietary connector for two RS-232 ports
Ethernet 1 x RJ45 GbE LAN
Button & Indicator
Function Key 4 x Function keys
Power Button 1 x Power on/off button
LED Indicator
2 x Battery status LED
1 x HDD/SSD activity LED

- 4 -
Introduction
LCD Display
Size/Type 12.1” TFT Active Matrix Panel
Max. Resolution 1024 x 768 (XGA) with 16.2M colors
Luminance 500 cd/m² (typ.)
Contrast Ratio 700:1
Viewing Angle 80° (R), 80° (L), 70° (U), 70° (D)
Backlight Type LED
Touch Screen
Type Analog resistive single-touch
Light Transparency 80% (typ.)
Controller Interface USB interface
Power Requirement
Adapter Input 100 ~ 240 VAC (Full Range)
Adapter Output 19VDC, 4.74A, 90W (Max.)
Battery Type Li-battery pack
Battery Capacity 2 x 1880 mAh 4-cell external battery pack
Battery Operating Time 6 hours
Environmental & Mechanical
Operating Temp. -20 ~ 40°C (-4 ~ 104°F)
Charging Temp. 0 ~ 40°C (32 ~ 104°F)
Storage Temperature -20 ~ 60°C (-4 ~ 140°F)
Storage Humidity 10 ~ 80% (non-condensing)
Dimensions (W x D x H) 320 x 246 x 29.5 mm (12.60” x 9.96” x 1.16”)
Gross Weight 1.9 kg (4.19 lb) (with one battery)
Vibration 3 Grms/ 5~500Hz/ random operation
Shock 40G peak acceleration (11ms duration)
Transit Drop 3 feet, except the front side, with analoge resistive single-touch
Regulation CE, FCC Class B, VCCI, PSE and TELEC
IP Rating (Whole unit) IP54
- 5 -
Introduction
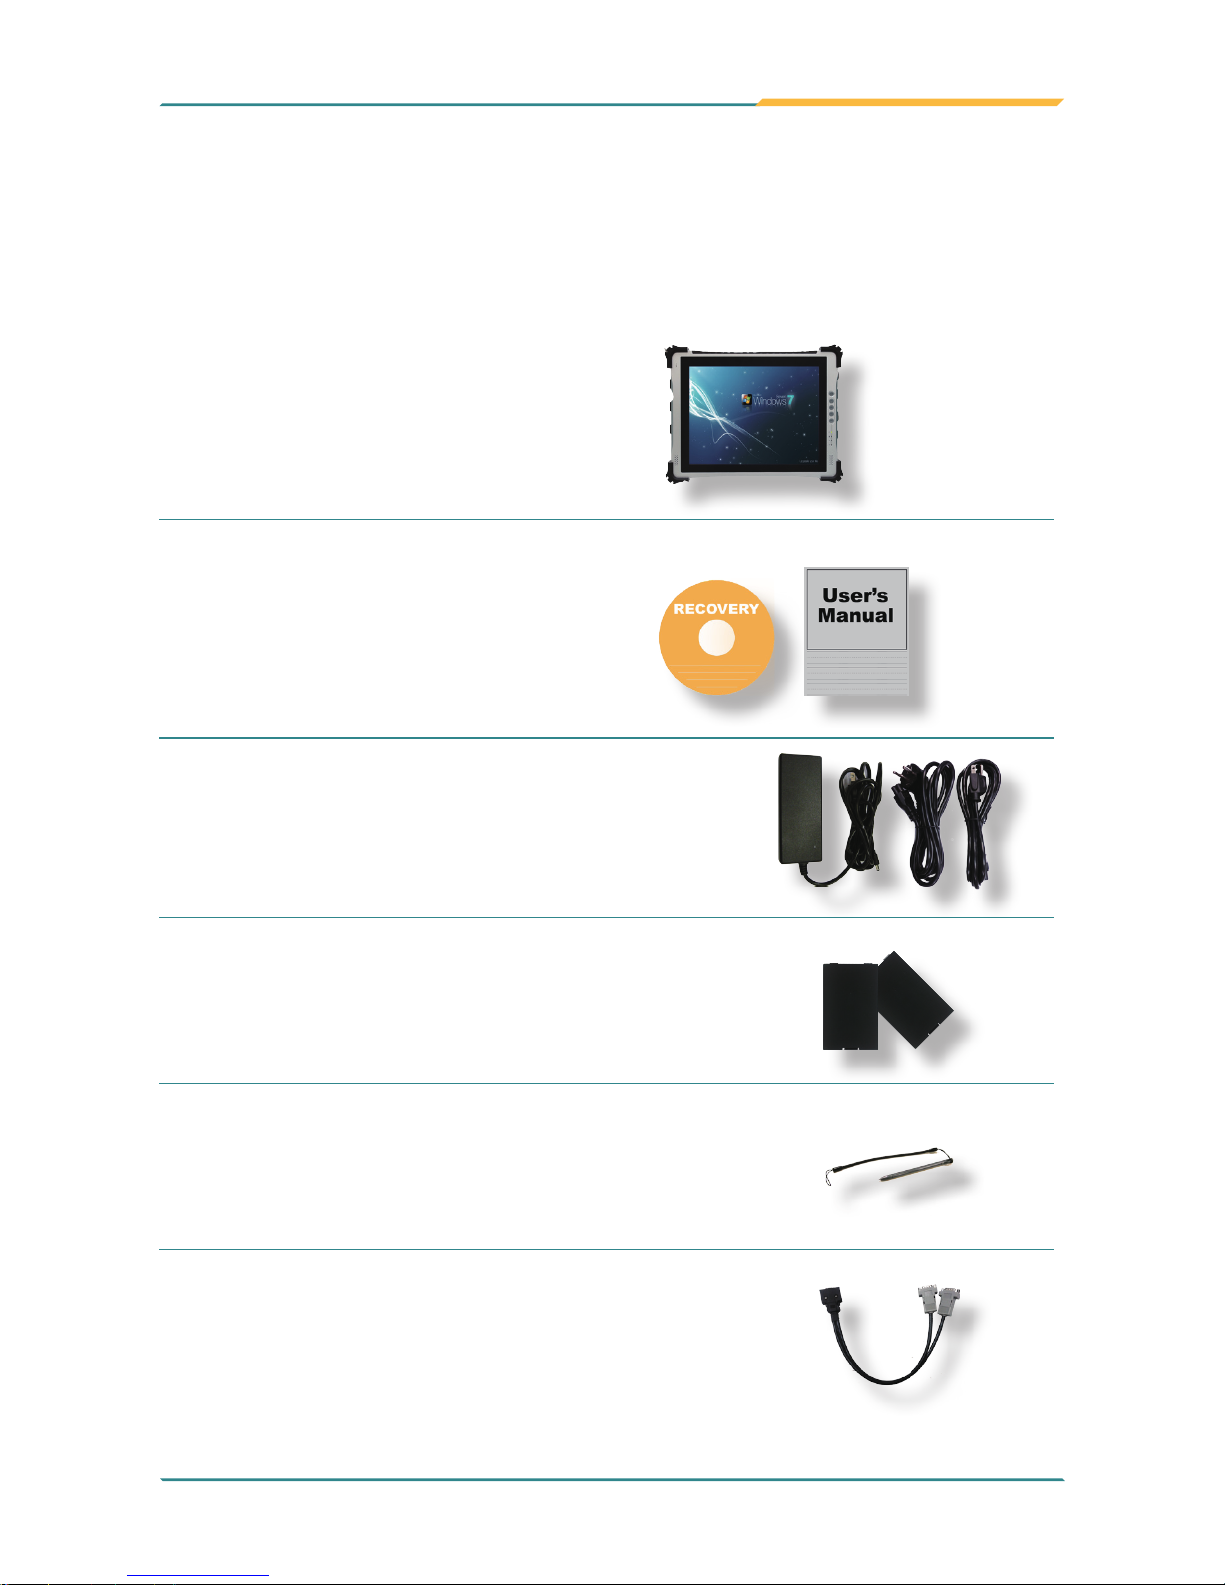
1.4. Scope of Delivery
Upon opening the package, carefully inspect the contents. If any of the items is missing
or appears damaged, contact your local dealer or distributor. The package should contain
the following items:
1 x G1220 Rugged Tablet PC
1 x User’s Manual
1 x Driver CD
PAC-G090W
20VDC, 4.5A, 90W
AC/DC Adapter Kit
BAT-G1220
2 x Gray 1880mAh
External Battery Kit
Stylus
Touch Screen Stylus
(with rope)
RS232 COM Cable
1-to-2 RS232 Cable
- 6 -
Introduction
1.5. Ordering Information
G1220R
12.1” Intel® Cedar Trail N2600 Rugged Tablet PC with dual
external battery packs, Bluetooth, Wi-Fi, and resistive touch
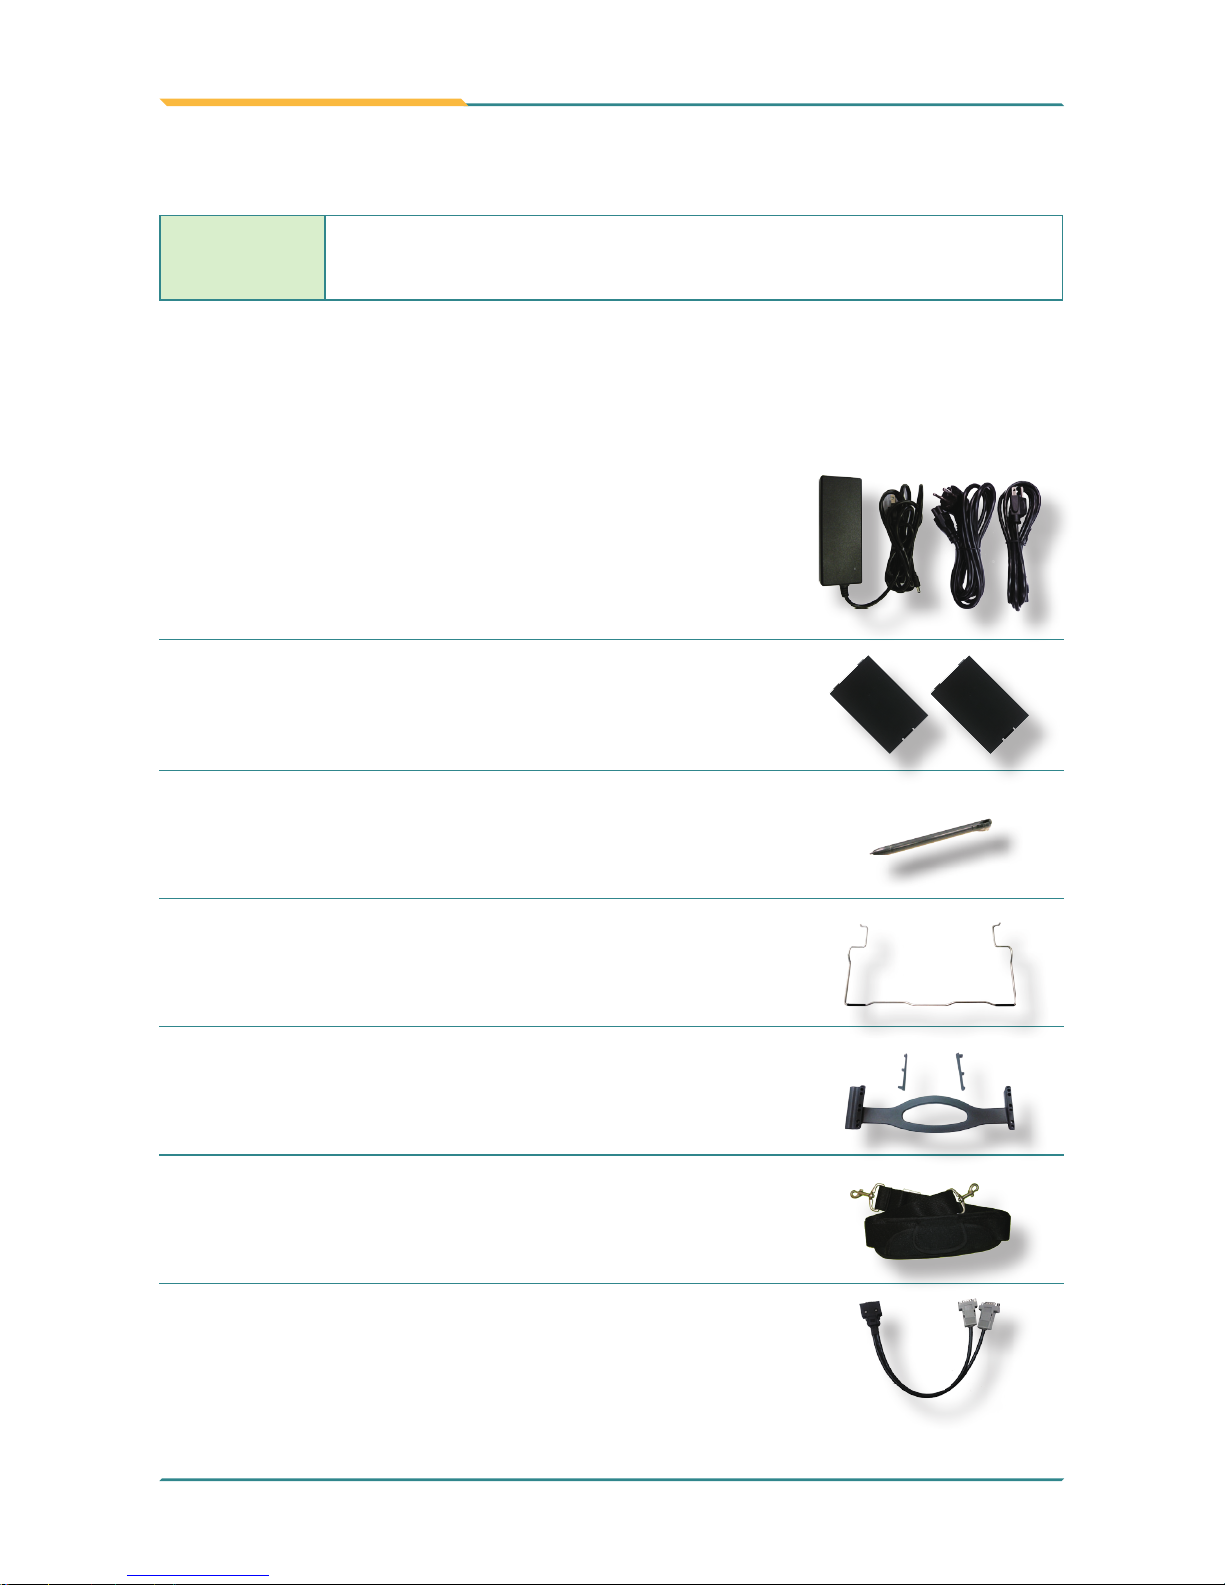
1.5.1. Optional Accessories
The following items are normally optional, but some vendors may include them as a
standard package, or some vendors may not carry all the items.
PAC-G090W
20VDC, 4.5A, 90W AC/DC
Adapter Kit
eBAT-1220
Battery Kit for G1220 (2 packs)
Stylus
Touch Screen Stylus
Stand-1220
Desktop Stand
HST-1220
For one-handed hold of the
computer
SST-1220
Shoulder Strap, 128 x 3.7cm
RS232 COM Cable
1-to-2 RS232 Cable
- 7 -
1.5.2. Congure-to-Order Service
Make the computer more tailored to your needs by selecting one or more components
from the list below to be fabricated to the computer.
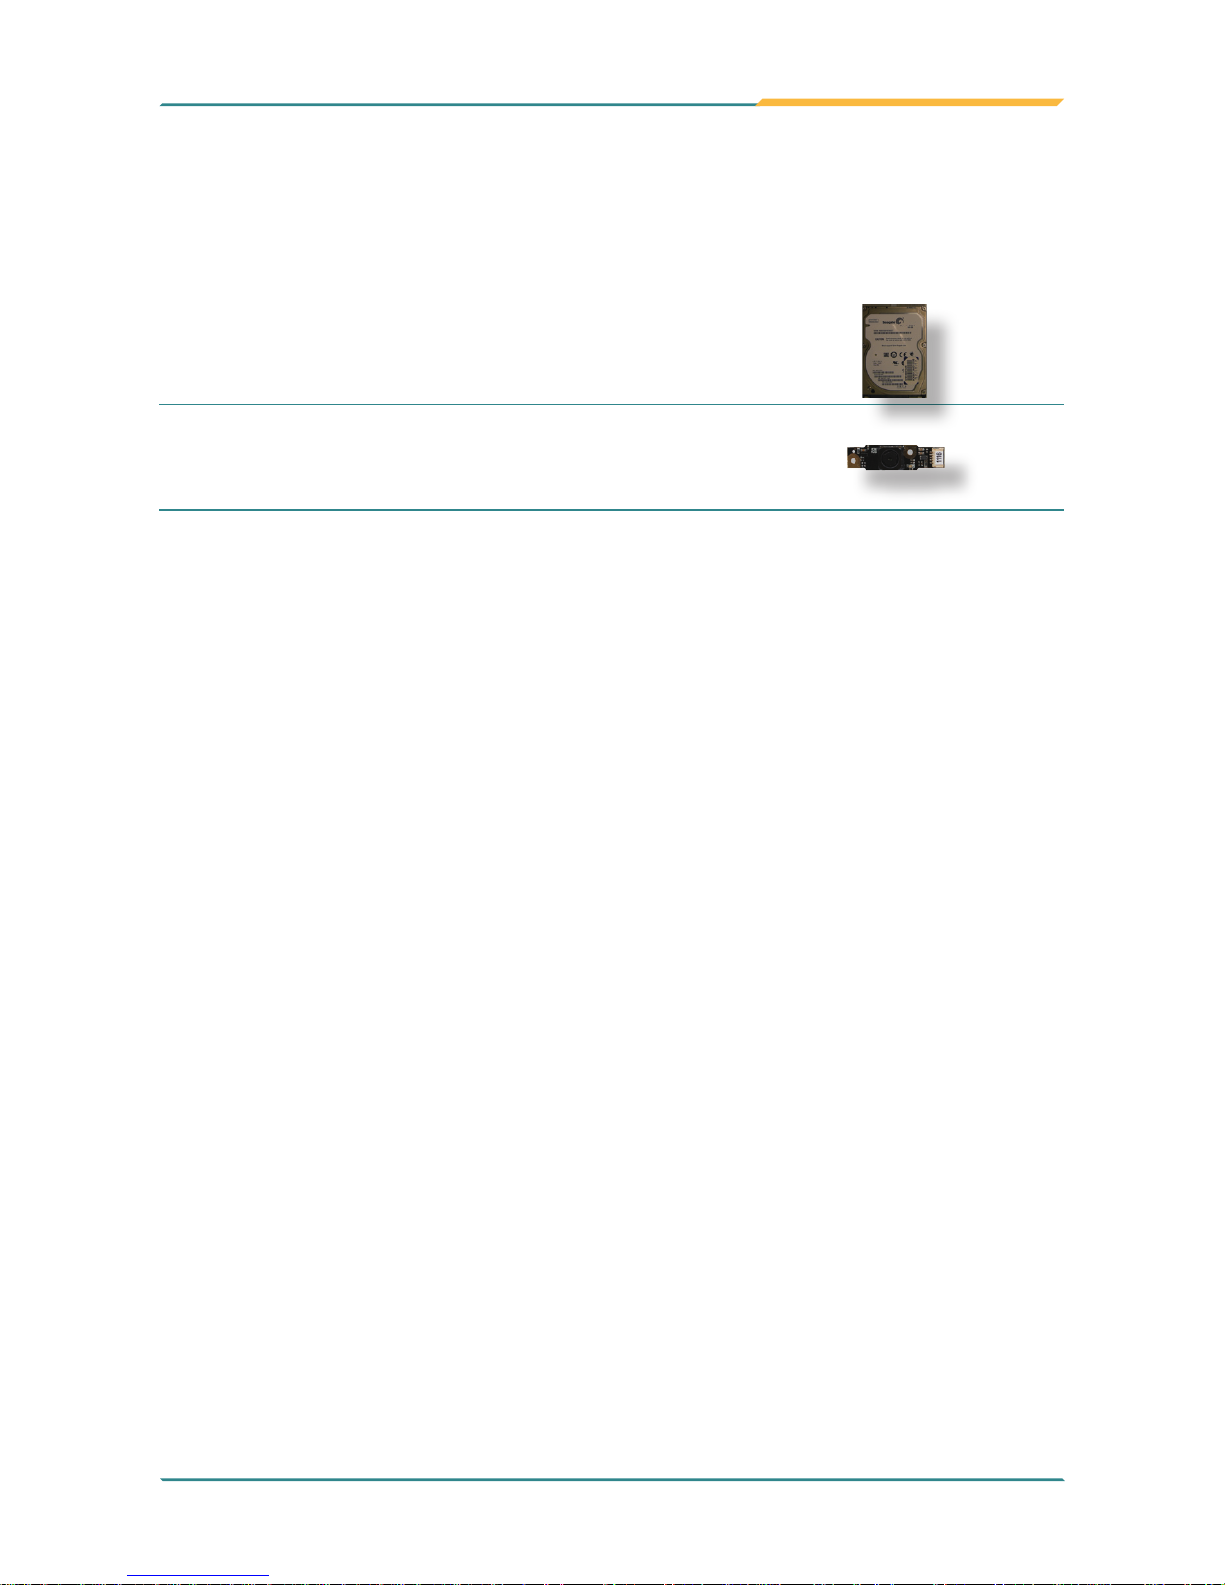
HDD320G-1220
320GB HDD Kit
CAM-1220
5.0M Rear CMOS Camera Kit

- 8 -
This page is intentionally left blank.

- 9 -
2Chapter 2
Getting Started
Chapter 2. Getting Started
- 10 -
Getting Started
2.1. System Overview
Understanding the computer help you jump seamlessly from component to
component when using the computer. This section will quickly familiarize you
with the computer.
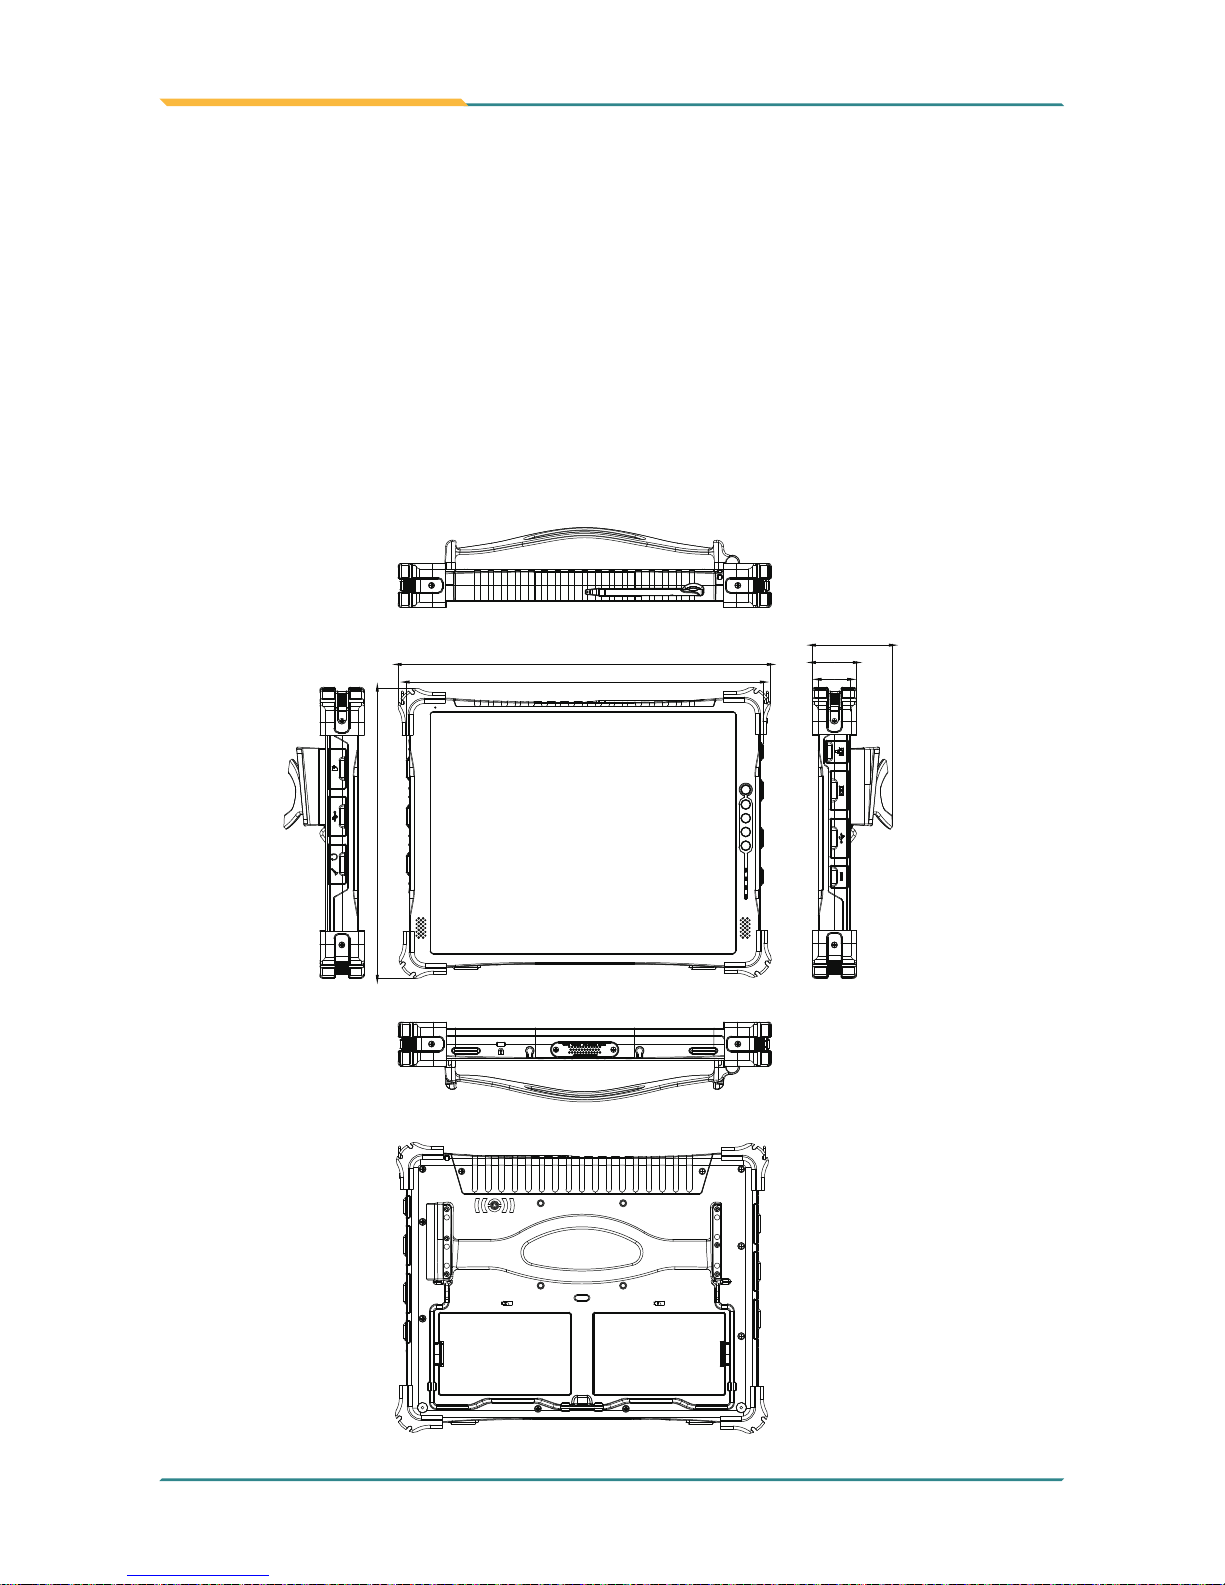
2.1.1. Dimensions
The following illustration shows the dimensions of the G1220, with the
measurements of width, depth, and height called out.
338.646
325
40
29.5
72.695
263.946
Unit: mm
- 11 -
Getting Started
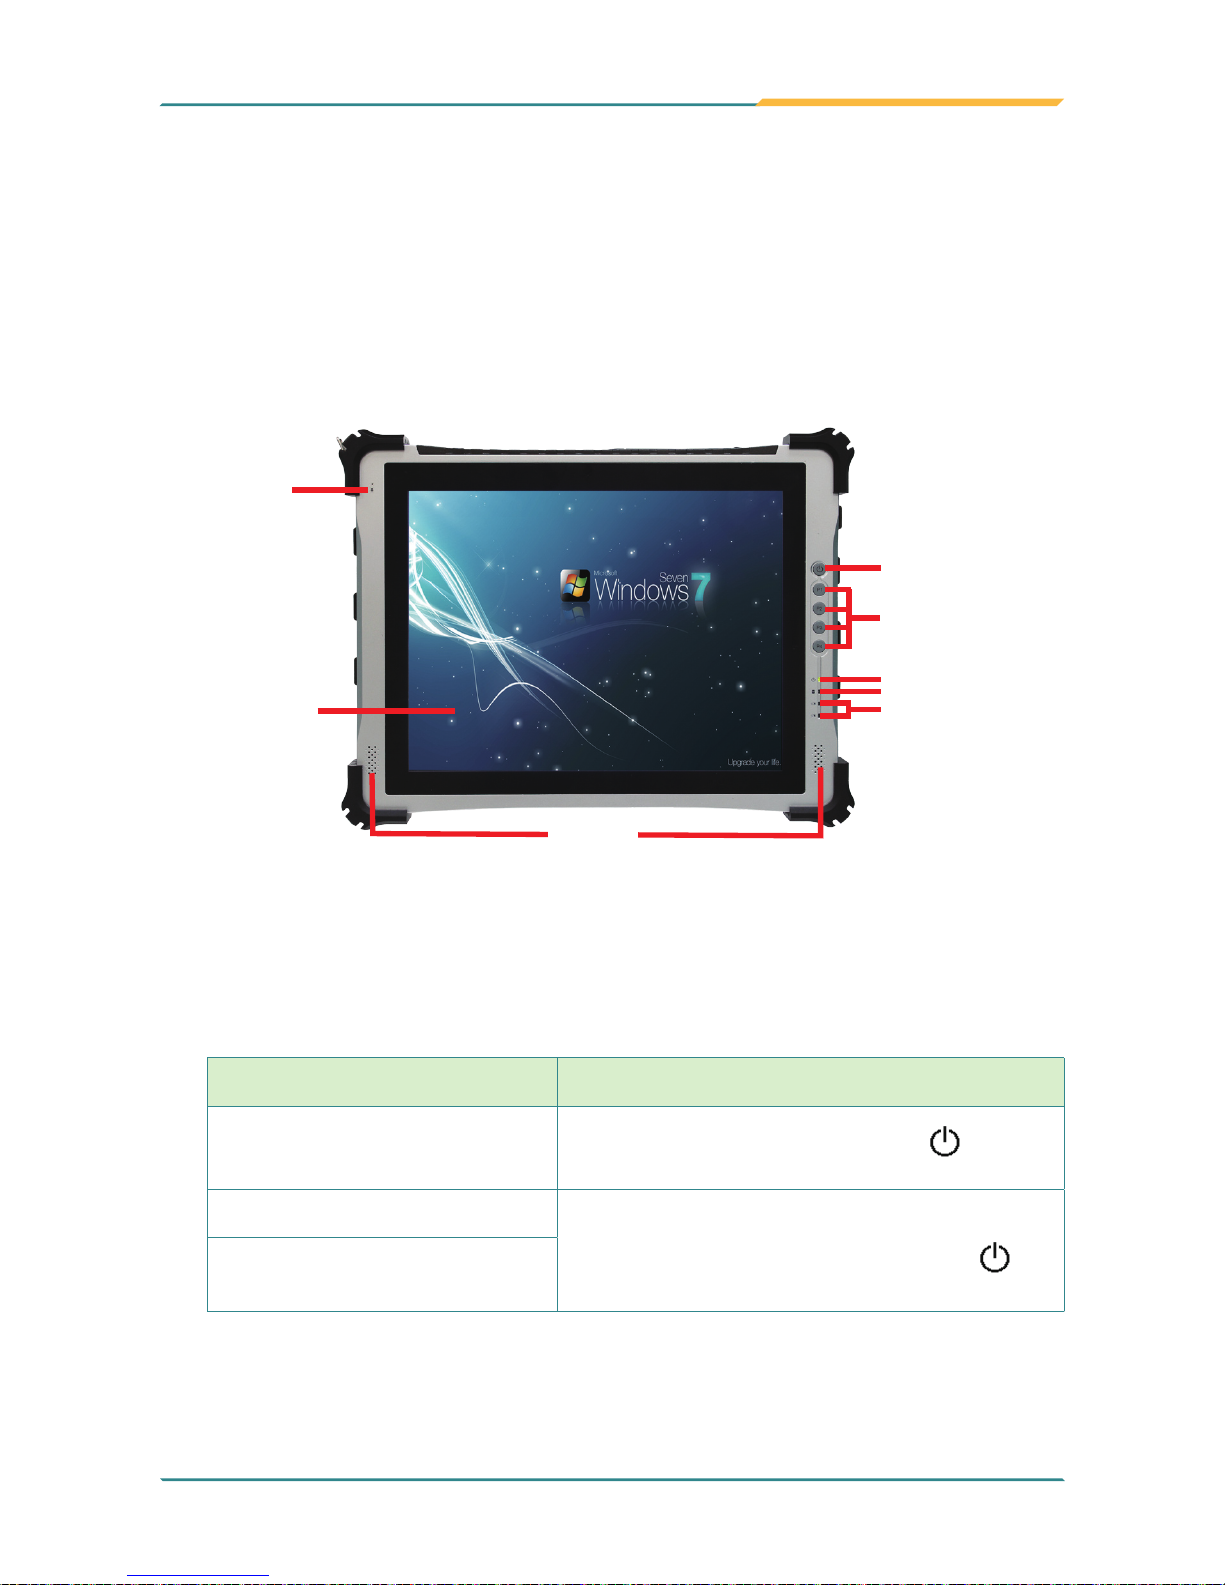
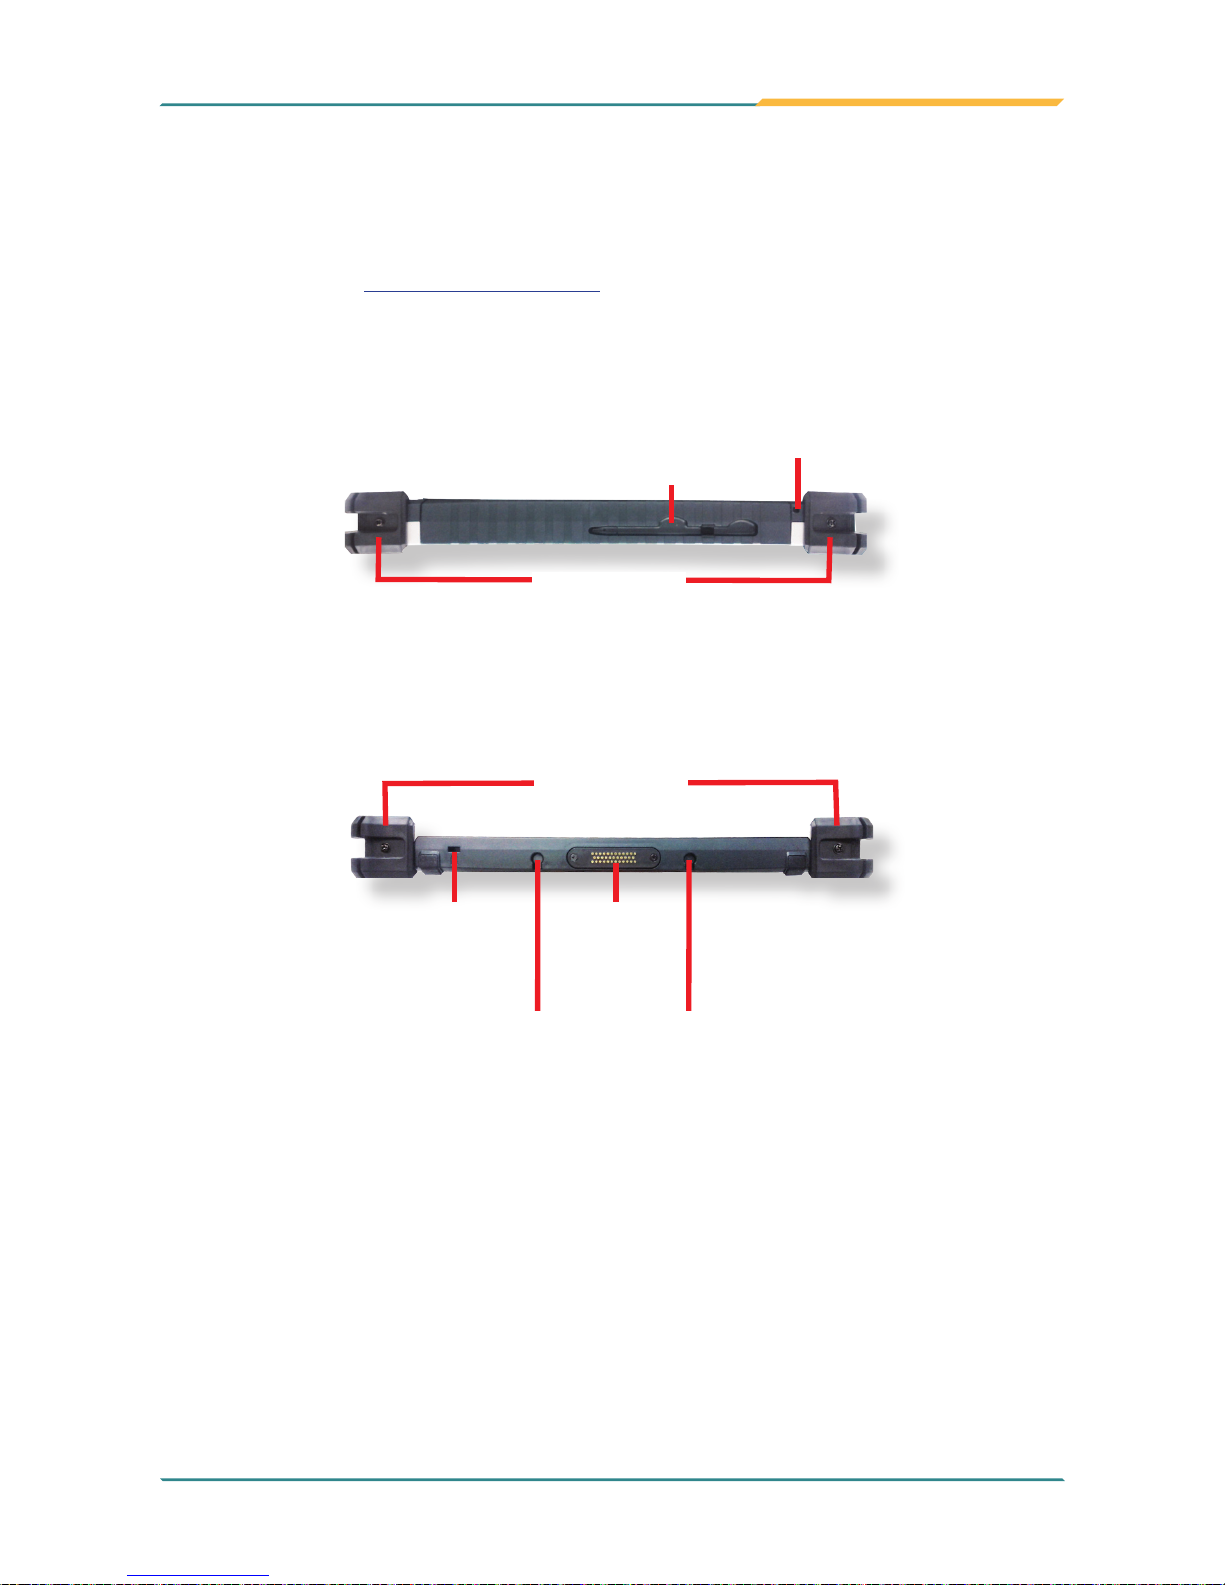
2.1.2. Tour the Computer
The computer has some controls, I/O ports, mechanical parts and status LED lights on
its enclosure. The following illustration shows the computer in different views, with all the
said components called out.
2.1.2.1. Front Side
Power status LED
Power button
Mic
Speakers
Battery status LED
HDD/SSD status LED
Physical function keys
Resistive
touch
screen
• Power Button
Use the Power Button to power on the computer, or to put the computer to Sleep
or Hibernate mode. Take the following actions to take the said controls:
Control Action Required
To power on the computer
Press-and-hold the
Power Button until the
LED lights green.
To enter the computer to Sleep
Press (without holding) the
Power Button .
To resume the computer from
Sleep or Hibernate
- 12 -
Getting Started
• (Physical) Function Keys
By default, the four function keys are set to turn on/off some features of the computer.
However, users can re-dene them to launch some other application programs
installed on the computer. See 4.1.3. Customize Function Keys on page 67.
• Status LED
Four status LED lights are recessed on the front side of the computer to draw users'
prompt awareness of the computer’s contiguous events such as power charging,
storage activity and so on.
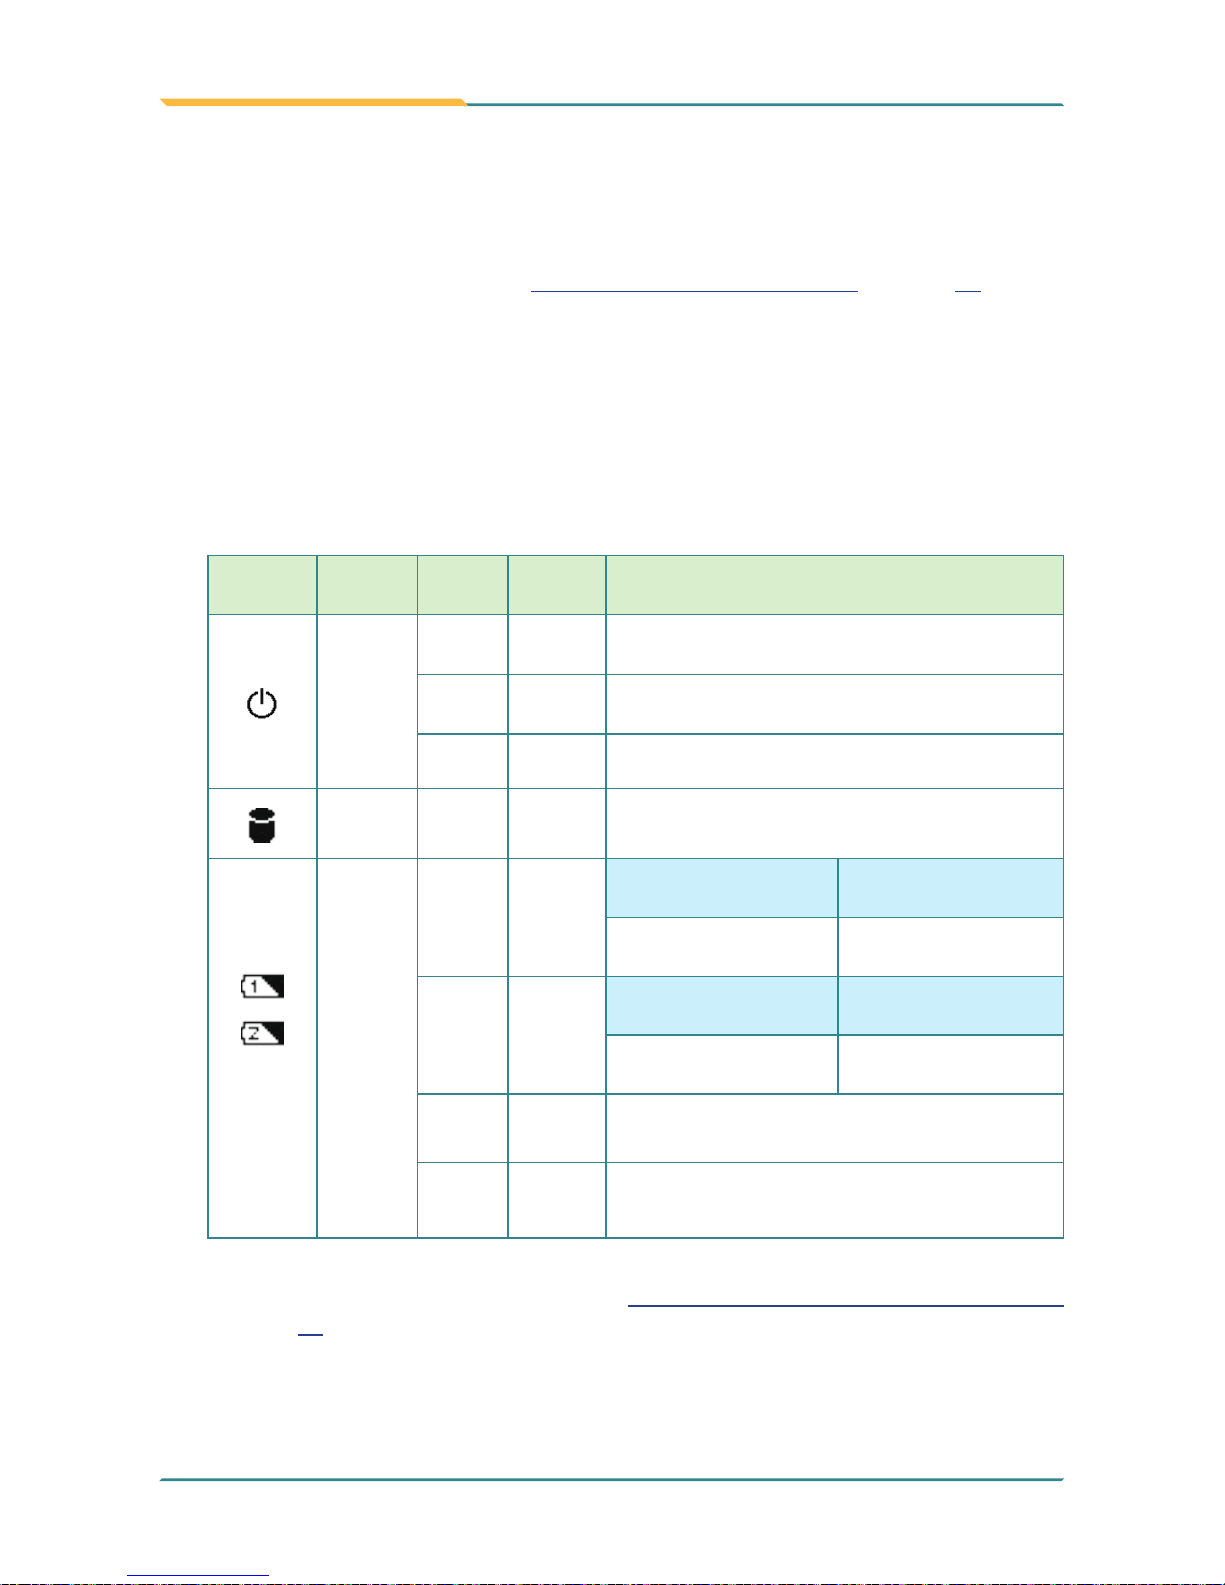
The status LED lights and the notications delivered are summarized as below:
Printed
Graphic
Matter State Color Description
Power
status
on green
The computer is powered on
.
blinking green The computer is in Sleep.
off N/A The computer is powered off or in Hibernate.
Storage
activity
blinking green The storage is being accessed.
Battery
One /
Two
Battery
charging
off N/A
When battery is being
charged
When battery is
discharging
Charging stops for
battery protection.
The battery drains
between 15%~99%.
on orange
When battery is being
charged
When battery is
discharging
The battery is charging
from external power.
N/A
on green The battery is fully charged.
blinking orange
The battery level drops under 15% and needs
immediate charging .
To know how to charge the batteries, see 2.4.5. Charge the Batteries for the 1st Time
on page 23.
- 13 -
Getting Started
• Touch Screen
The computer comes with a resistive touch screen to register the touch of a ngertip
or stylus for input. It allows a user to interact with the computer without a mouse or
keyboard. See 3.1. Use Touch Screen to know how to do the touch control and text
input on a touch screen.
2.1.2.2. Top Side
Corner bumpers
Stylus channel
Stylus string hole
2.1.2.3. Bottom Side
Corner bumpers
35-pin pogo
contacts for
the desktop
cradle
Docking holes for
the desktop cradle
Kensington
security slot
- 14 -
Getting Started
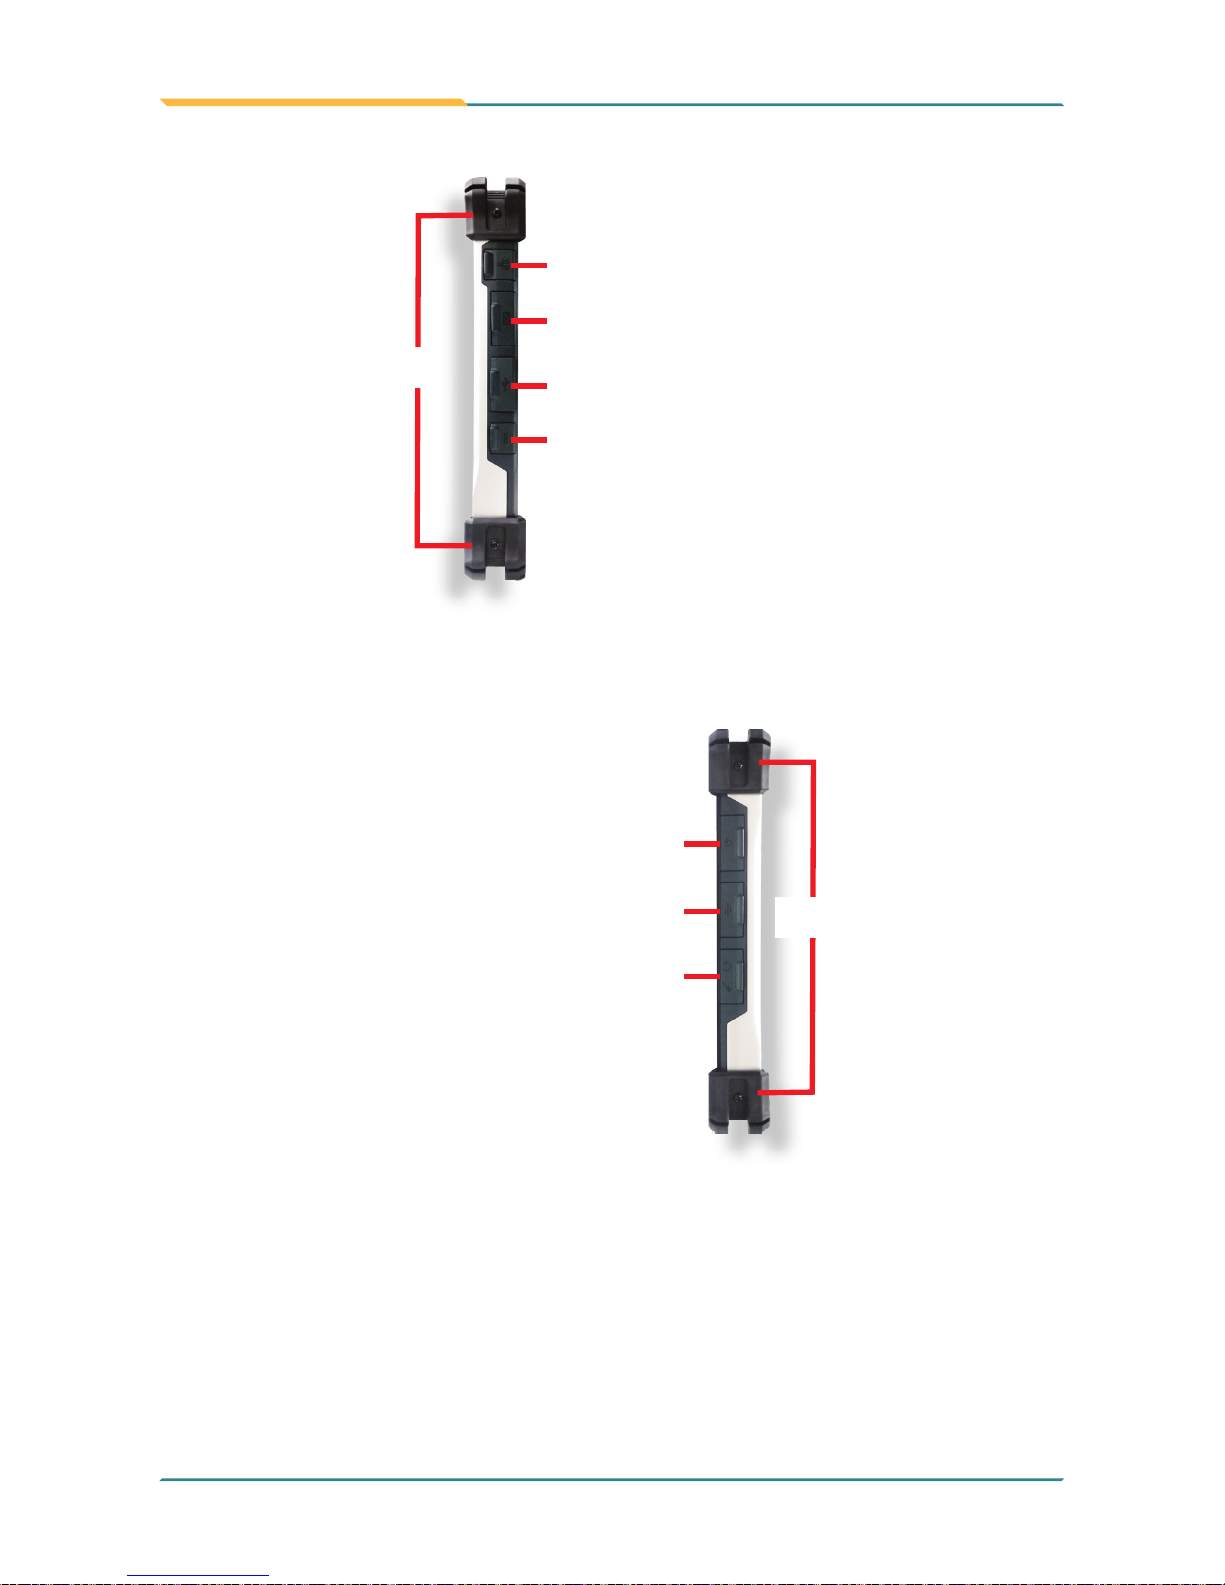
2.1.2.4. Right Side
Corner
bumpers
DC-in Power Jack
(sealed in hinged cover)
Two USB 2.0 ports
(sealed in hinged cover)
One connector for two RS-232 ports
(sealed in hinged cover)
One RJ-45 Ethernet port
(sealed in hinged cover)
2.1.2.5. Left Side
Corner
bumpers
One SDHC/SD card slot
(sealed in hinged cover)
Two USB 2.0 ports
(sealed in hinged cover)
One headset jack and one mic jack
(sealed in hinged cover)
 Loading...