

Page 1
CASTER
RUEDECILLA
II"_iSlVIOCO0@S CJ@I"_IC_C 01"
ROULETTE
TABLEOF CONTENTS/INDICE/TABLEDESMATIERES
CASTER SAFETY .......................................... 1
INSTALLATION INSTRUCTIONS ................. 2
Tools and Parts ........................................... 2
Unpack Casters .......................................... 2
Install Casters .............................................. 2
Complete the Installation ............................ 3
SEGURIDAD DE LA RUEDECILLA ............... 4
INSTRUCCIONES DE INSTALACION ........... 4
Piezas y Herramientas ................................. 4
Desempaque las ruedecillas ....................... 4
Instale las ruedecillas ................................... 4
Complete el instalaci6n ............................... 5
SI_CURITI_DE LA ROULETTE ...................... 6
INSTRUCTIONS D'INSTALLATION ..............6
Outillage et pieces ....................................... 6
Deballage des roulettes ............................... 6
Installationdes roulettes .............................6
Achever I'installation....................................8
CASTERSAFETY
Your safety and the safety of others are very important.
We have provided many important safety messages in this manual and on your appliance. Always read and obey all safety
messages.
This is the safety alert symbol.
This symbol alerts you to potential hazards that can kill or hurt you and others.
All safety messages will follow the safety alert symbol and either the word "DANGER" or "WARNING."
These words mean:
You can be killed or seriously injured if you don't immediately
follow instructions.
You can be killed or seriously injured if you don't follow
instructions.
All safety messages will tell you what the potential hazard is, tell you how to reduce the chance of injury, and tell you what can
happen if the instructions are not followed.
THE BEST GARAGE ON THE BLOCK TM
EL MEJOR GARAGE DE LA CUADRA TM
LE MEILLEUR GARAGE DU QUARTIER TM
Page 2
INSTALLATIONINSTRUCTIONS
Gather the required tools and parts before starting installation.
Tools Needed:
• 1/2"Socket wrench or nut • 3/8"Socket wrench or nut
driver driver
• 1/2"Wrench
Parts Supplied:
• Rigid casters (2)
• Swivel casters (2)
• _A6-18 Self-locking
hex-nuts (16)
• _6-18X%"
Hex-head bolts (16)
• 1A-20 X 1 1/4"Hex-head
bolts (4)
Depending on your model, the casters may be packed in either the
upper or lower compartment. Remove the box containing the
casters.
Excessive Weight Hazard
Use two or more people to move and install
refrigerator/freezer.
Failure to do so can result in back or other injury.
NOTE: Install the casters before you install any of the FeaturePak
items.
1. Open the lower compartment door and remove the base grille.
Remove the grille by grasping the grille with both hands, lifting up
and pulling bottom of the grille toward you.
2. Place the plastic skids (shipped with the refrigerator/freezer) on
the floor at least 3 ft (91.44 cm) apart. Lay a piece of cardboard
or other protective material over the skids. This will elevate the
refrigerator/freezer to allow for easier caster installation and also
protect it from scratches.
NOTE: If the skids have been discarded or are not available,
2" x 4" boards may be used.
• 1/4-20 x 1 1/4"Lock
washers (4)
• Caster brackets (located in
FeaturePak) (2)
• Plastic skids (shipped with
the refrigerator/freezer)
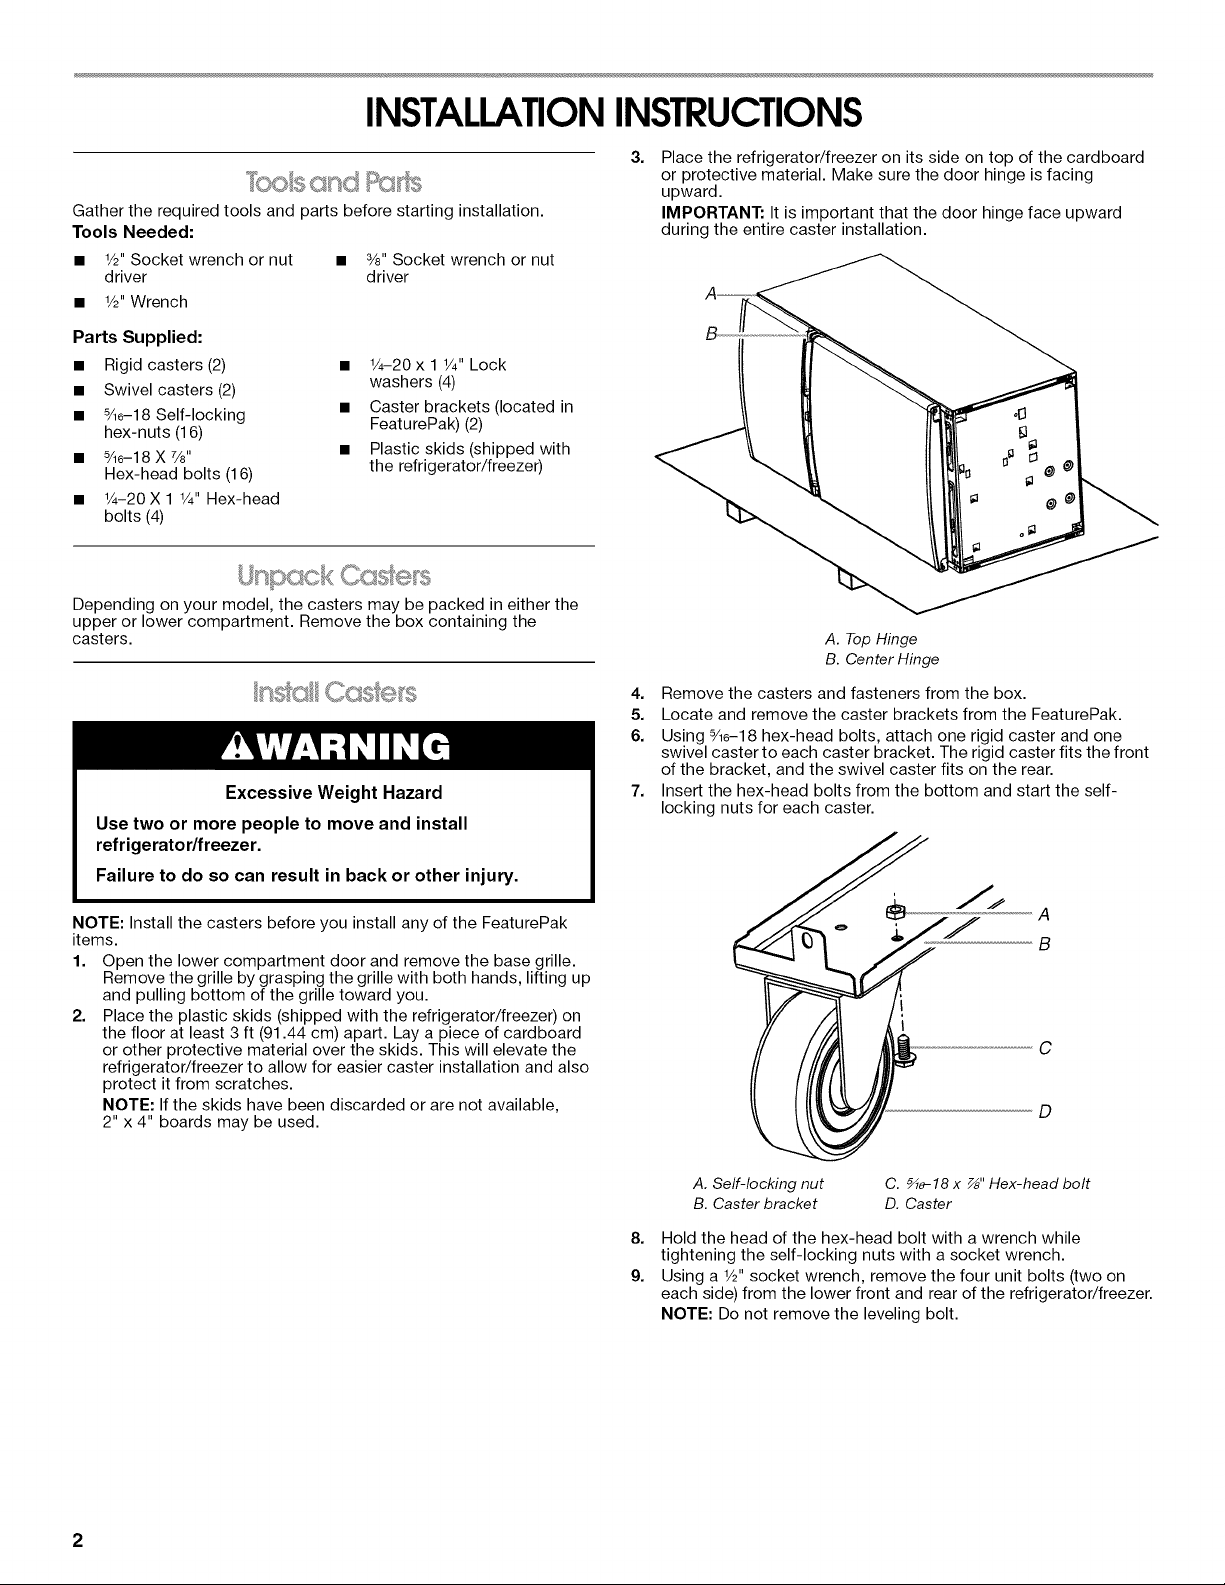
3.
Place the refrigerator/freezer on its side on top of the cardboard
or protective material. Make sure the door hinge is facing
upward.
IMPORTANT: It is important that the door hinge face upward
during the entire caster installation.
B
A. Top Hinge
B. Center Hinge
4. Remove the casters and fasteners from the box.
5. Locate and remove the caster brackets from the FeaturePak.
6. Using _/16-18 hex-head bolts, attach one rigid caster and one
swivel caster to each caster bracket. The rigid caster fits the front
of the bracket, and the swivel caster fits on the rear.
7. Insert the hex-head bolts from the bottom and start the self-
locking nuts for each caster.
J_
I
A
B
C
D
A. Self-locking nut
B. Caster bracket
8. Hold the head of the hex-head bolt with a wrench while
tightening the self-locking nuts with a socket wrench.
9. Using a 1/2"socket wrench, remove the four unit bolts (two on
each side) from the lower front and rear of the refrigerator/freezer.
NOTE: Do not remove the leveling bolt.
C. _8-18 x _" Hex-head bolt
D. Caster
2
Page 3
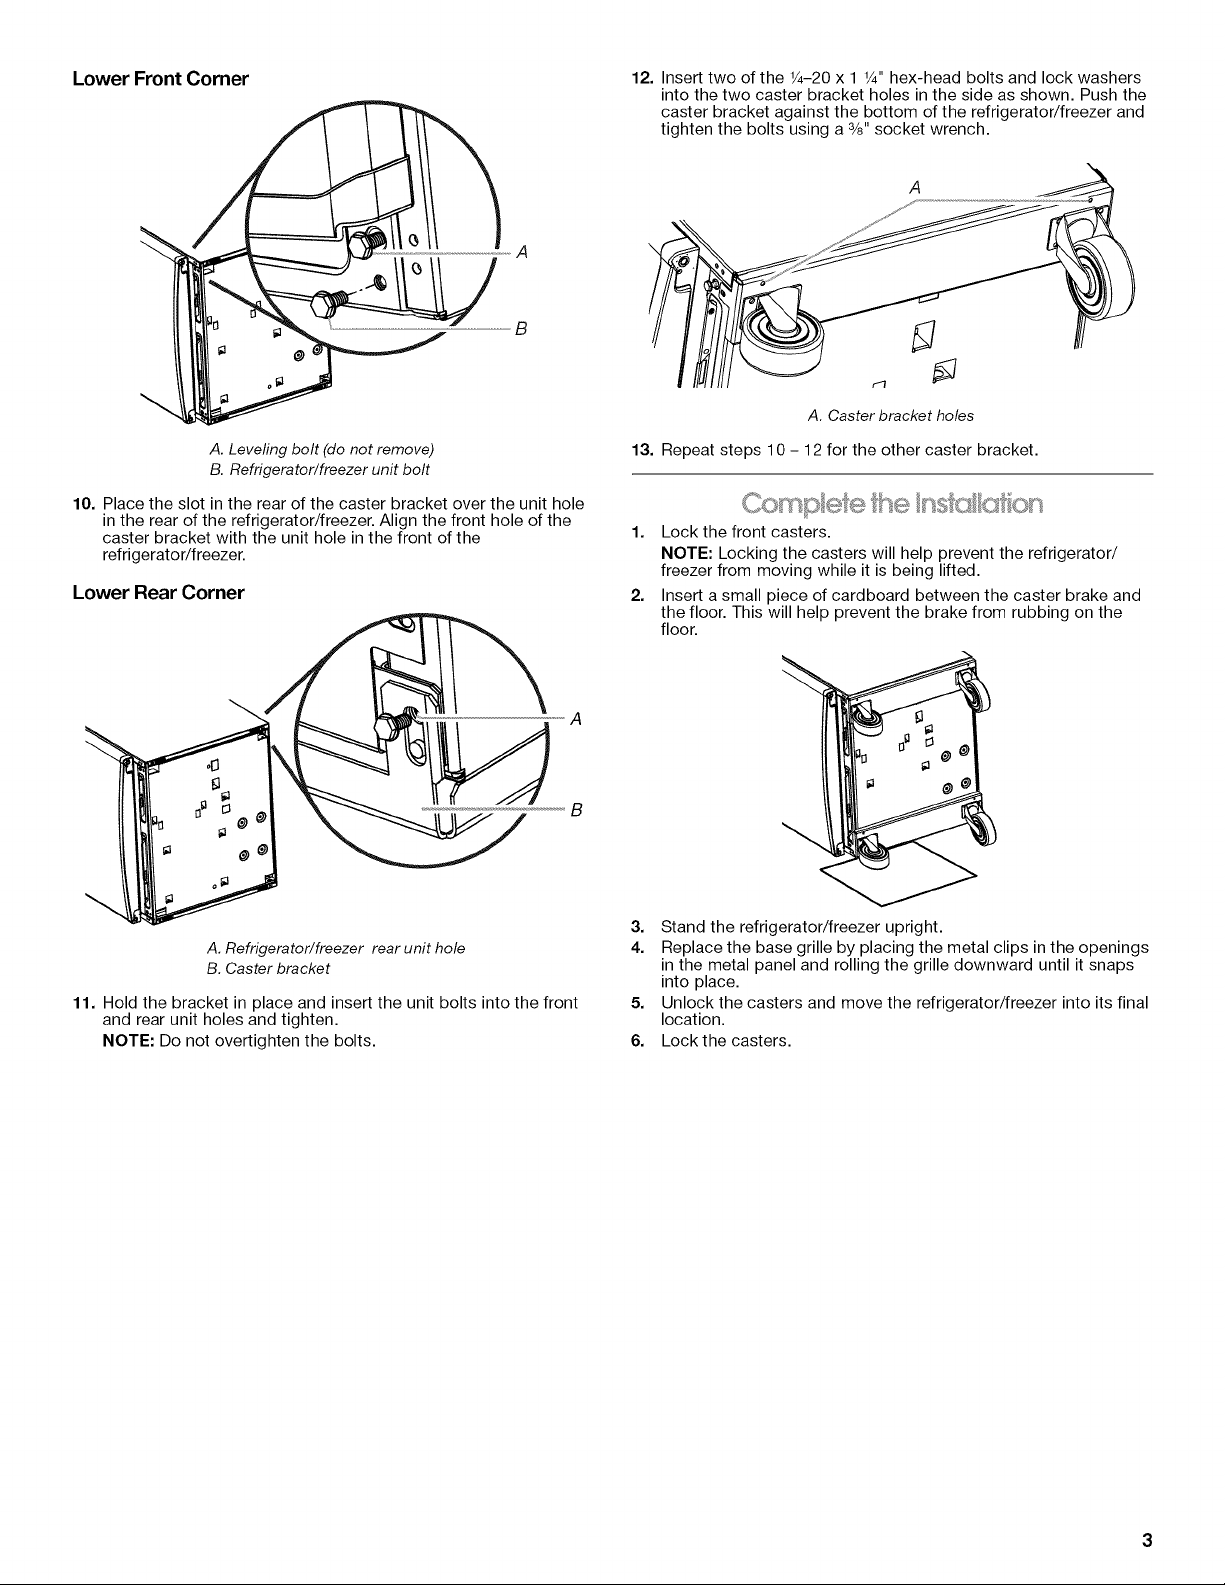
Lower Front Corner
12. Insert two of the 1/4-20 x 1 W' hex-head bolts and lock washers
into the two caster bracket holes in the side as shown. Push the
caster bracket against the bottom of the refrigerator/freezer and
tighten the bolts using a %" socket wrench.
A
A
B
A. Caster bracket holes
A. Leveling bolt (do not remove)
B. Refrigerator/freezer unit bolt
10. Place the slot in the rear of the caster bracket over the unit hole
in the rear of the refrigerator/freezer. Align the front hole of the
caster bracket with the unit hole in the front of the
refrigerator/freezer.
Lower Rear Corner
A. Refrigerator/freezer rear unit hole
B. Caster bracket
11. Hold the bracket in place and insert the unit bolts into the front
and rear unit holes and tighten.
NOTE: Do not overtighten the bolts.
13. Repeat steps 10 - 12 for the other caster bracket.
I I l*+dl l,>jl I 1%J411 J, I
1. Lock the front casters.
NOTE: Locking the casters will help prevent the refrigerator/
freezer from moving while it is being lifted.
2. Insert a small piece of cardboard between the caster brake and
the floor. This will help prevent the brake from rubbing on the
floor.
A
B
3. Stand the refrigerator/freezer upright.
4. Replace the base grille by placing the metal clips in the openings
in the metal panel and rolling the grille downward until it snaps
into place.
5. Unlock the casters and move the refrigerator/freezer into its final
location.
6. Lock the casters.
Page 4

SEGURIDADDELARUEDECILLA
Su seguridad y la seguridad de los demas es muy importante.
Hemos incluido muchos mensajes importantes de seguridad en este manual yen su electrodom_stico. Lea y obedezca siempre
todos los mensajes de seguridad.
Este simbolo le llama la atenci6n sobre peligros potenciales que pueden ocasionar la muerte o una lesi6n a
usted y a los demas.
Este es el simbolo de advertencia de seguridad.
Todos los mensajes de seguridad ir_ma continuaci6n del simbolo de advertencia de seguridad y de la palabra
"PELIGRO" o "ADVERTENCIA". Estas palabras significan:
Si no sigue las instrucciones de inmediato, usted puede
morir o sufrir una lesi6n grave.
Si no sigue las instrucciones, usted puede morir o sufrir
una lesi6n grave.
Todos los mensajes de seguridad le diran el peligro potencial, le diran c6mo reducir las posibilidades de sufrir una lesi6n y Io que
puede suceder si no se siguen las instrucciones.
INSTRUCCIONESDEINSTALACION
1. Abra la puerta del compartimiento inferior y quite la rejilla de la
base. Quite la rejilla sujetando la misma con ambas manos,
levantando y tirando de la parte inferior de la rejilla hacia usted.
Re@na las herramientas y piezas necesarias antes de comenzar la
instalaci6n.
Herramientas necesarias:
• Llave de cubo o lave para • Llave de cubo o lave para
tuercas de 1/2" tuercas de 3/=.
• Llave de tuercas de 1/2"
Piezas suministradas:
• Ruedecillas rigidas (2) •
• Ruedecillas giratorias (2)
• Contratuercas hexagonales de •
%6-18 (16)
• Pernos hexagonales de
%6-18 x %" (16) •
• Pernos hexagonales de
1A-20 x 1 1A" (4)
Arandelas de seguridad de
1A-20 x 1 W' (4)
Soportes de ruedecillas
(ubicados en el paquete de
piezas) (2)
Correderas de plastico
(enviadas con el refrigerador/
congelador)
2. Coloque las correderas de pl_.stico en el piso (enviadas con el
refrigerador/congelador) dejando por Io menos 3 pies (91,44 cm)
entre ellos. Coloque un trozo de cart6n u otro material protector
sobre las correderas. Esto elevar_, el refrigerador/congelador
para permitir una instalaci6n m_.s f_.cil y tambien para protegerlo
contra rayones.
NOTA: Si las correderas se han desechado o no est_.n
disponibles, se pueden usar tablas de 2" x 4".
3. Coloque el refrigerador de costado encima del cart6n o de un
material protector. Cerci6rese de que la bisagra de la puerta este
mirando hacia arriba.
IMPORTANTE: Es importante que la bisagra de la puerta mire
hacia arriba durante toda la instalaci6n de las ruedecillas.
B
Dependiendo de su modelo, las ruedecillas pueden estar empacadas
en el compartimiento superior o en el inferior. Saque la caja que
contiene las ruedecillas.
ifssk)4®tc sR ®deciltcs
Peligro de Peso Excesivo
Use dos o mas personas para mover e instalar
el refrigerador/congelador.
No seguir esta instruccibn puede ocasionar una
lesi6n en la espalda u otro tipo de lesiones.
NOTA: Instale las ruedecillas antes de instalar los articulos del
paquete de piezas.
A. Bisagra superior
B. Bisagra del central
4. Quite de la caja las ruedecillas y los ajustadores.
5. Localice y quite los soportes de las ruedecillas paquete de
piezas.
Page 5

6. Usandolospernosdecabezahexagonalde%0-18fijeuna
ruedecillarigidayunagiratoriaencadasoportederuedecilla.La
ruedecillarigidaencajaenlapartefrontaldelsoporteyla
giratoriaenlapartetrasera.
7. Insertelospernoshexagonaldesdeabajoycomiencelas
contratuercasdecadaruedecilla.
Esquina inferior trasera
A
A
B
C
D
A. Contratuerca
B. Soporte de ruedecilla
8. Sostenga la cabeza del perno de cabeza hexagonal con una
Ilave para tuercas mientras aprieta las contratuercas con una
Ilave de cubo.
9. Usando una Ilave de tubo de 1/2", quite los cuatro pernos de la
unidad (dos en cada lado) de la parte inferior frontal y trasera del
refrigerador/congelador.
NOTA: No quite el perno nivelador.
C. Perno de cabeza
hexagonal de %6-18 x 7/8"
D. Ruedecifla
Esquina inferior frontal
B
A. Orificio trasero de la unidad
del refrigerador/congelador
B. Soporte de ruedecilla
11. Sostenga la ruedecilla en su lugar e inserte los pernos de la
unidad en los orificios frontal y trasero de la unidad y aprietelos.
NOTA: No apriete demasiado los pernos.
12. Inserte dos de los pernos de cabeza hexagonal de 1_-20 x 1 1¼,,y
las contratuercas en los dos orificios del lado del soporte de
ruedecilla, como se muestra. Empuje el soporte de ruedecilla
contra el fondo del refrigerador/congelador y apriete los pernos
usando una Ilave de tubo de 3/8".
A
A
B
A. Perno nivelador (no Io quite)
B. Perno de la unidad del refrigerador/congelador
10. Coloque la ranura en la parte posterior del soporte de ruedecilla
sobre el orificio en la parte posterior del refrigerador/congelador.
Alinee el orificio del frente del soporte de ruedecilla con el orificio
del frente del refrigerador/congelador.
A. Orificios del soporte de ruedecilla
13. Repita los pasos 10 al 12 para el segundo soporte de ruedecilla.
1, Trabe la ruedecilla frontal.
NOTA: El trabar las ruedecillas ayudara a prevenir que el
refrigerador/congelador se mueva mientras se Io levanta.
2, Inserte un pequeNo trozo de cart6n entre el freno de la ruedecilla
y el piso. Esto ayudara a prevenir que el freno frote contra el
piso.
3. Coloque el refrigerador/congelador verticalmente.
4. Vuelva a colocar la rejilla de la base colocando los ganchos de
metal en las aberturas del panel de metal y deslizando la rejilla
hacia abajo hasta que calce en su lugar.
5. Desbloquee las ruedecillas y mueva el refrigerador/congelador
hacia el lugar deseado.
6. Trabe las ruedecillas.
Page 6

SECURITEDELAROULETTE
Votre securite et celle des autres est tres importante.
Nous donnons de nombreux messages de s_curit_ importants dans ce manuel et sur votre appareil m_nager. Assurez-vous de
toujours lire tousles messages de s_curit_ et de vous y conformer.
Ce symbole d'alerte de s_curit_ vous signale les dangers potentiels de d_c_s et de blessures graves & vous
et & d'autres.
Voici le symbole d'alerte de s_curit&
Tous les messages de s_curit_ suivront le symbole d'alerte de s_curit_ et le mot "DANGER" ou
"AVERTISSEMENT". Ces mots signifient •
Risque possible de d_cbs ou de blessure grave si vous ne
suivez pas imm_diatement les instructions.
Risque possible de d_cbs ou de blessure grave si vous
ne suivez pas les instructions.
Tousles messages de s_curit_ vous diront quel est le danger potentiel et vous disent comment r_duire le risque de blessure et
ce qui peut se produire en cas de non-respect des instructions.
INSTRUCTIONSD'INSTALLATION
Rassembler les outils et pieces necessaires avant de commencer
I'installation.
Outillage necessaires •
• Tourne-ecrou ou cle & douille • Tourne-ecrou ou cle & douille
de _/2" de %"
• Cle de_/2"
Pi_ces fournies :
• Roulettes non orientables (2) • Rondelles-freins
• Roulettes pivotantes (2) _A-20 x 1 W' (4)
• Ftcrous indesserrables • Brides de roulette (dans un
%0-18 (16)
• Visa t_te hexagonale • Barres d'appui de plastique
%6-18 x %" (16) refrig@ateur/congelateur)
• Visa t_te hexagonale
_A-20 x 1 _A" (4)
Selon le modele, les roulettes peuvent _tre emballees soit dans le
compartiment sup@ieur, soit dans le compartiment inf@ieur. Retirer
la bofte contenant les roulettes.
sachet separ6) (2)
(expedi6es avec le
cs "on des sex
Risque du poids excessif
Utiliser deux ou plus de personnes pour d_placer et
installer le r_frig_rateur/cong_lateur.
Le non-respect de cette instruction peut causer
une blessure au dos ou d'autre blessure.
REMARQUE : Installer les roulettes avant d'installer toute piece du
sachet separe.
1. Ouvrir la porte du compartiment inf@ieur et retirer la grille de la
base : saisir la grille avec les deux mains, soulever et tirer le bas
de la grille vers I'avant.
2. Placer les barres d'appui de plastique (expediees avec le
refrig@ateur/congelateur) sur le sol avec un espacement d'au
moins 3 pieds (91,44 cm). Placer par-dessus les barres d'appui
une feuille de carton ou autre mat@iau protecteur; le
refrig@ateur/congelateur sera ainsi plus haut, ce qui facilitera
I'installation des roulettes et le protegera contre les @aflures.
REMARQUE : Si les barres d'appui ont ete jetees ou ne sont pas
disponibles, on peut utiliser des trongons de poteau de bois
2" x 4".
6
Page 7

3.
Placer le refrig@ateur/cong61ateur en appui sur son c6te, par-
dessus la feuille de carton ou autre mat@iau de protection. Veiller
& ce que la charni@e de porte soit orientee vers le haut.
IMPORTANT • II est important que la charniere de porte soit
orientee vers le haut durant tout le processus d'installation des
roulettes.
Angle inf_rieur/avant
B
A. Charniere sup_rieure
B. Charniere centrale
4. Retirer de la bofte les roulettes et les organes de fixation.
5. Retirer du sachet s6pare les brides de roulette.
6. Utiliser des visa t_te hexagonale %6-18 pour fixer une roulette
non orientable et une roulette pivotante sur chaque bride de
roulette. La roulette non orientable doit _tre placee a I'avant de la
bride, et la roulette pivotante doit _tre placee a I'arriere.
7. Ins@er les visa t_te hexagonale par le dessous et visser les
ecrous sur les vis de fixation de chaque roulette.
A
B
A. Vis de r_glage de I'aplomb (ne
pas enlever)
B. Vis du r_frig_rateur/cong_lateur
10. Positionner la bride de roulette pour que la fente & I'arri@e soit
alignee avec le trou & I'arriere du refrig@ateur/cong61ateur.
Aligner le trou de I'avant de la bride de roulette avec le trou de
I'avant du refrig@ateur/cong61ateur.
Angle inf_rieur/arri_re
A
A
B
C
D
A. E-crou C.Visa t_te hexagonale
indesserrable %6-18 x 7/8"
B. Bride de roulette D. Roulette
8.
Pour le serrage final des ecrous indesserrables avec une cle
douille, immobiliser la vis avec une cl&
9.
/_,I'aide d'une cle a douille de V2", enlever les quatre vis (deux de
chaque c6te) a I'avant eta I'arriere du refrig@ateur/cong61ateur
(partie inf@ieure).
REMARQUE • Ne pas enlever la vis de reglage de I'aplomb.
1
B
A. Trou arriere du r_frig_rateur/cong_lateur
B. Bride de roulette
Page 8

11. Maintenir la bride en place, et ins@er les vis dans les trous avant
et arri@e puis serrer.
REMARQUE • Ne pas serrer excessivement.
12. Dans les deux trous sur le c6t6 de la bride de roulette, ins@er
deux vis &t6te hexagonale 1A- 20 x 1 W' munies de leur
rondelle-frein, comme illustr& Pousser la bride de roulette contre
le fond du r6frig@ateur/cong61ateur, et serrer les vis avec une cle
& douille de 3/8".
A
A. Trous pour bride de roulette
13. Rep6ter les etapes 10 & 12 pour la seconde bride de roulette.
1. Bloquer les roulettes avant.
REMARQUE : Bloquer les roulettes evitera que le r6frig@ateur/
congelateur bouge Iorsqu'on le soulevera.
2. Ins@er un petit morceau de carton entre le frein de roulette et le
sol; ceci emp6chera le frein de frotter sur le sol.
3. Remettre le r6frig@ateur/cong61ateur & la position verticale.
4. Reinstaller la grille de plinthe : ins@er les agrafes metalliques
dans les ouvertures du panneau metallique, et faire pivoter la
grille vers le bas jusqu'& I'emboftement.
5. Debloquer les roulettes et pousser le r6frig@ateur/cong61ateur
jusqu'& sa position de service.
6. Bloquer les roulettes.
2254108
© 2004Whirlpool Corporation. 9/04
All rightsreserved. ® Registered Trademark/TMTrademark of Whirlpool, U.S.A.,Whirlpool CanadaInc. Licensee inCanada Printed in U.S.A.
Todos losderechos reservados.® Marcaregistrada/TM Marcade comercio de Whirlpool, EE.UU.,usada bajo licenciade WhirlpoolCanada Inc.en Canada Impresoen EE.UU.
Tousdroits reserves. ® MarquedeposeefTM Marquede commerce de Whirlpool,U.S.A.,Emploi licenciepar Whirlpool CanadaInc. au Canada Imprime aux E.-U.
 Loading...