

Page 1

WELDED-STEEL
TALL GEARBOX &
GEARLOCKER BRACKET KIT
Installation Instructions
JUEGO DE SOPORTE PARA PARED DE ACERO FUNDIDO
PARA ARMARIO ALTO Y ARMARIO PARA HERRAMIENTAS
Instrucciones de instalación
ENSEMBLE DE SUPPORTS MURAUX POUR GRANDE
ARMOIRE À OUTILS EN ACIER SOUDÉ
Instructions d'installation
TABLE OF CONTENTS/ÍNDICE/TABLE DES MATIÈRES
MOUNTING BRACKET SAFETY .................2
INSTALLATION INSTRUCTIONS ................2
Tools and Parts ..........................................2
Bracket Use Requirements ........................2
Unpack Brackets........................................2
Attach Mounting Brackets .........................2
Mount the Cabinet to GearWall
or GearTrack® Channels.............................3
®
Panels
SEGURIDAD DEL SOPORTE
DE MONTAJE ..............................................4
INSTRUCCIONES DE INSTALACIÓN.........4
Piezas y herramientas................................4
Requisitos para el uso de los soportes .....4
Desempaque los soportes......................... 4
Fije los soportes de montaje .....................4
Instale el armario en los paneles
GearWall
®
o los canales GearTrack®.........5
SÉCURITÉ DE LA TRINGLE
DE MONTAGE .............................................. 6
INSTRUCTIONS D'INSTALLATION............ 6
Outillage et pièces..................................... 6
Spécifications d'utilisation des brides ...... 6
Déballage des brides................................. 6
Fixation des brides de montage................ 6
Montage de l’armoire sur les panneaux
GearWall
®
ou profilés GearTrack®.............. 7
ES TIEMPO DE VOLVER A PENSAR EN EL GARAGE.™
W10212350A
IT'S TIME TO RETHINK THE GARAGE.™
LE GARAGE REPENSÉ.™
Page 2
MOUNTING BRACKET SAFETY
Your safety and the safety of others are very important.
We have provided many important safety messages in this manual and on your appliance. Always read and obey all safety
messages.
This is the safety alert symbol.
This symbol alerts you to potential hazards that can kill or hurt you and others.
All safety messages will follow the safety alert symbol and either the word “DANGER” or “WARNING.”
These words mean:
You can be killed or seriously injured if you don't immediately
DANGER
WARNING
All safety messages will tell you what the potential hazard is, tell you how to reduce the chance of injury, and tell you what can
happen if the instructions are not followed.
follow instructions.
can be killed or seriously injured if you don't
You
instructions.
follow
INSTALLATION INSTRUCTIONS
Tools and Parts
Gather the required tools and parts before starting installation.
Tools Needed:
■ ¹⁄₂" Wrench
Parts Supplied:
■ Mounting brackets (3)
■ Hex nuts (6)
■ ¹⁄₄" x ¹⁄₂" Carriage bolts (6)
■ Washers (6)
Bracket Use Requirements
■ Intended for use with Gladiator
GearLocker cabinets only.
NOTE: These brackets are not designed to be installed on
cabinet models: GATGB000LG0 and GATGBL00LG0.
■ Intended to be used for mounting on Gladiator GearWall
or GearTrack
■ Brackets will support a cabinet with a maximum weight limit of
300 lbs (136 kg).
®
channels.
®
Welded-Steel Tall GearBox &
®
panels
Unpack Brackets
1. Verify contents. See “Parts Supplied.”
2. Dispose of/recycle all packaging materials.
Attach Mounting Brackets
IMPORTANT: There are three groups of four slots in the back panel
of the tall cabinet. The mounting brackets must be attached to the
top pair of slots in each group.
2
Page 3
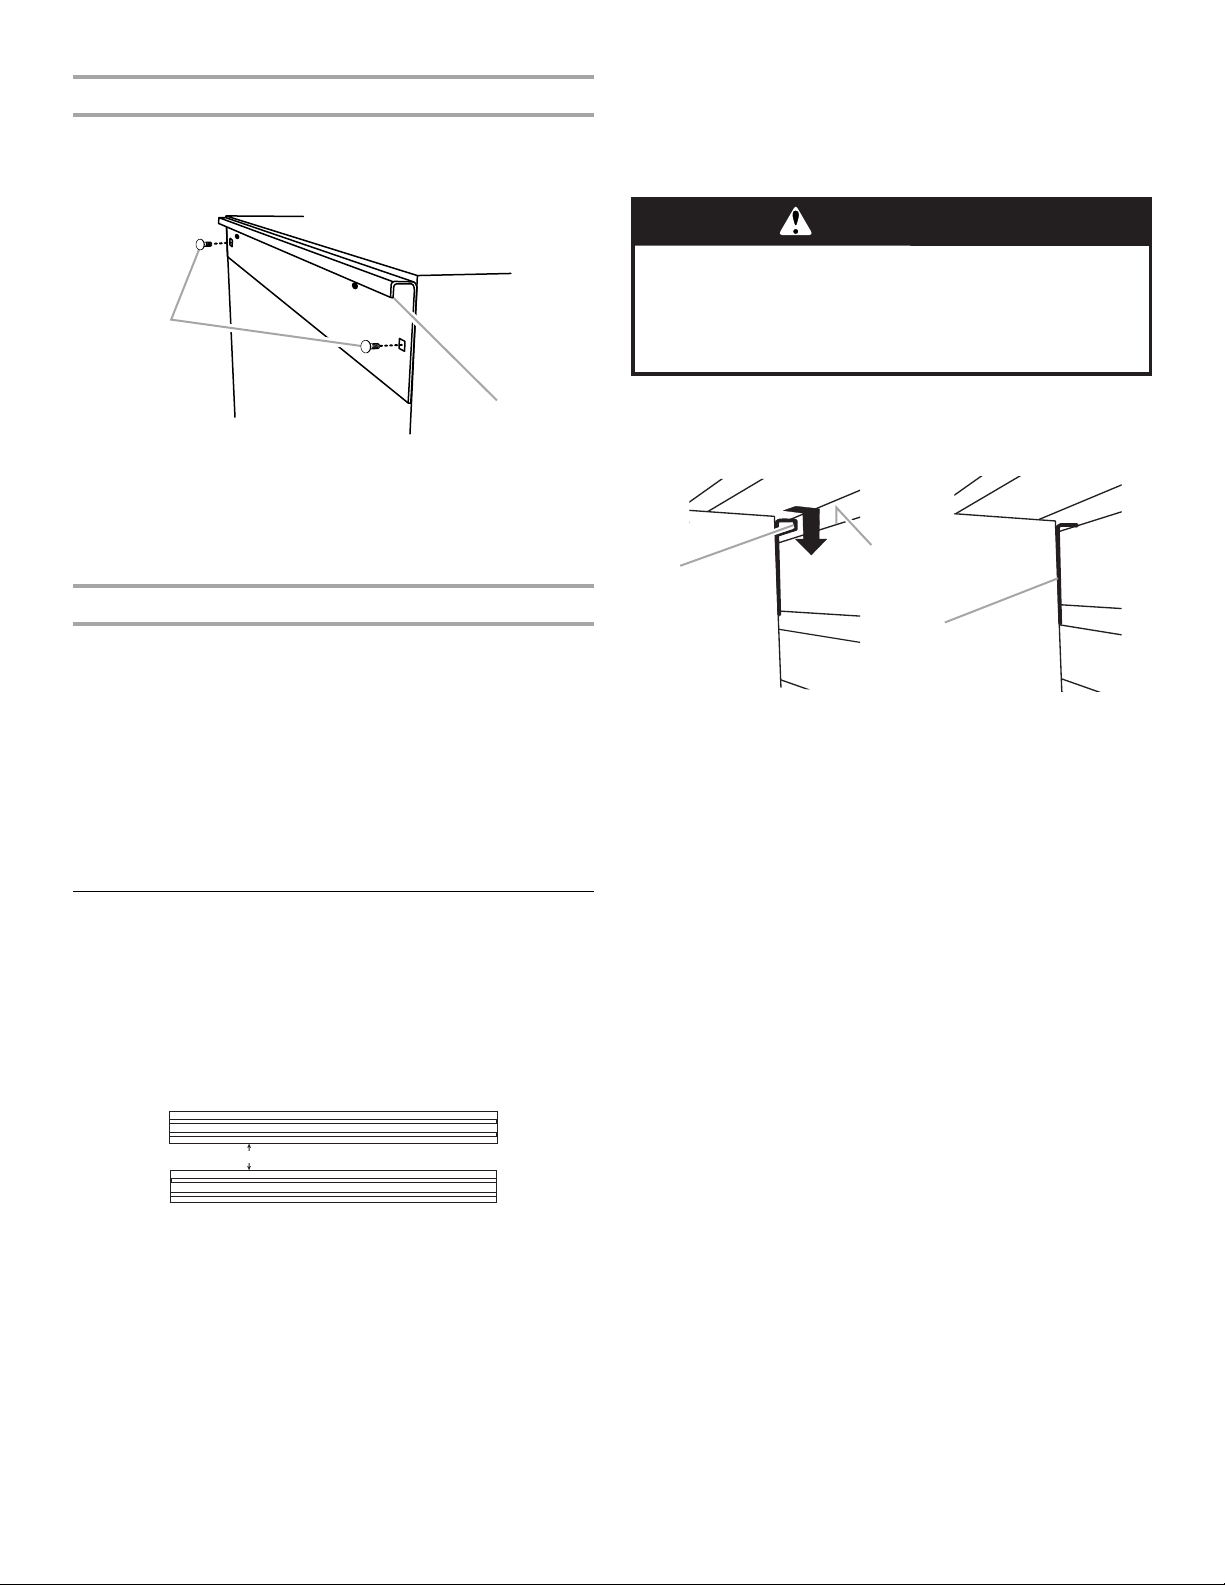
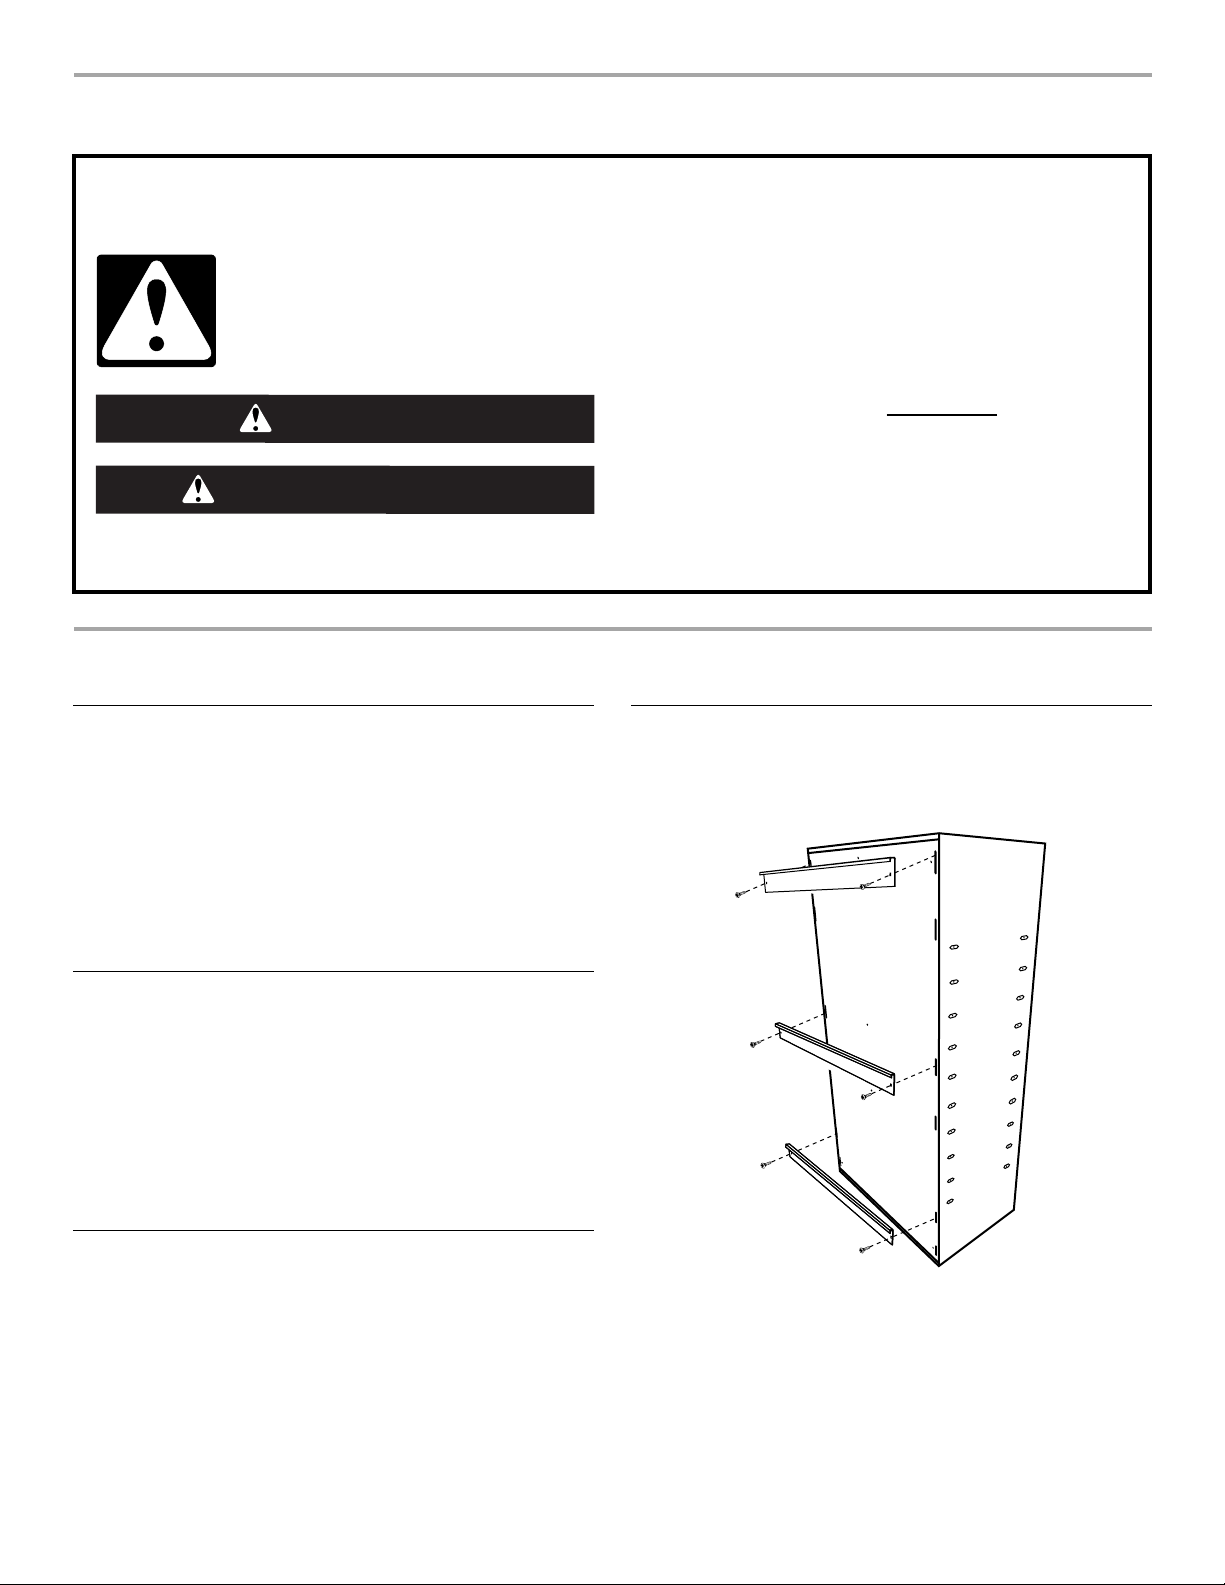
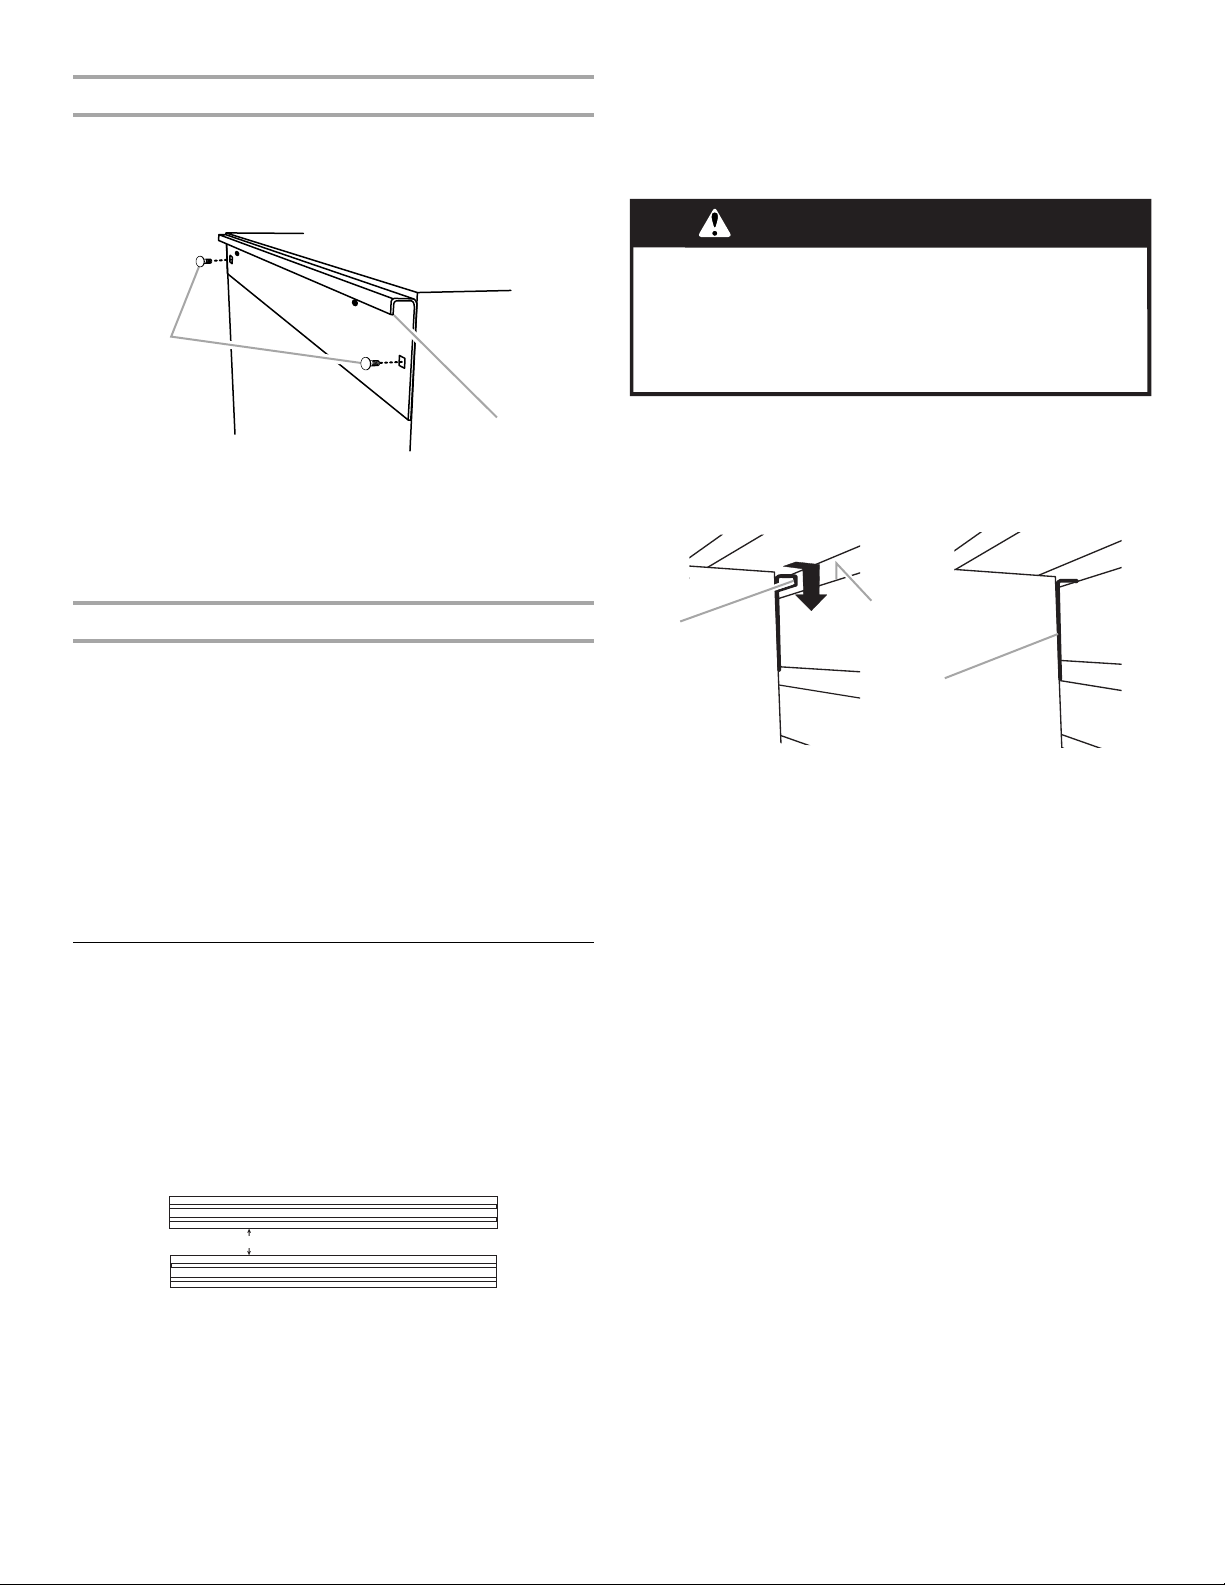
Attach Top Mounting Bracket
B
1. With the rim of a mounting bracket pointing down, align the holes
in the bracket with the top pair of slots in the back panel.
2. Working from the back, insert two carriage bolts through the
bracket and back panel as shown.
A
A. Carriage bolts
B. Bracket rim
3. Working from the cabinet interior, fasten each bolt with a washer
and a hex nut.
4. Slide the bracket to the very top of the slot and fully tighten the
nuts.
NOTE: The two nuts on the middle and bottom mounting brackets
must be loose enough to allow the brackets to move in the slots on
the cabinet.
1. Close the cabinet doors.
2. Determine cabinet mounting location on GearWall
GearTrack
®
channels.
®
panels or
WARNING
Excessive Weight Hazard
Use two or more people to move, assemble or install
cabinet or locker.
Failure to do so can result in back or other injury.
3. Using two or more people, engage the top bracket into the slot
by lifting up, pushing toward the wall and lowering the bracket
rim into the slot as shown.
4. Make sure the top bracket is fully engaged in the slot as shown.
A
B
Attach the Middle and Bottom Mounting Brackets
1. With the rim of a mounting bracket pointing down, align the holes
in the bracket with the top pair of slots located in the middle
section of the back panel.
2. Working from the back, insert two carriage bolts through the
bracket and back panel.
3. Working from the cabinet interior, fasten each bolt with a washer
and a hex nut. Hand tighten only, as this bracket will need to be
adjusted to mount the cabinet on the wall.
4. Repeat above steps to attach bottom mounting bracket to the
lower section of the back panel.
IMPORTANT: Fully tighten the nuts on the middle and bottom
brackets after mounting the cabinet to the wall, See “Mount the
Cabinet to GearWall
®
Panels or GearTrack® Channels.”
Mount the Cabinet to GearWall® Panels or
GearTrack® Channels
IMPORTANT:
■ Be sure the GearWall
installed with mounting screws in every slot and at every stud
location with a maximum of 24" (60.96 cm) horizontally between
screws.
■ If GearTrack
®
channels will be used to support the Gladiator® Tall
GearBox cabinet, they must be installed 18" (46 cm) apart.
®
panels or GearTrack® channels are
18" (46 cm)
C
A. Bracket rim
B. Slot
5. Open the cabinet doors.
6. From inside the cabinet, grasp the bolts in the middle bracket
and adjust the bracket until it aligns with the slot in the GearWall
panel or GearTrack
®
channel.
7. Push the cabinet toward the wall and lower the middle mounting
bracket into the slot.
8. Make sure the middle bracket is fully engaged in the slot as
shown.
9. Repeat for the bottom bracket.
10. Using a ¹⁄₂" wrench, fully tighten the nuts attaching the middle
and bottom mounting brackets.
C. Bracket fully
engaged
®
3
Page 4
SEGURIDAD DEL SOPORTE DE MONTAJE
Su seguridad y la seguridad de los demás es muy importante.
Hemos incluido muchos mensajes importantes de seguridad en este manual y en su electrodoméstico. Lea y obedezca siempre
todos los mensajes de seguridad.
Este es el símbolo de advertencia de seguridad.
Este símbolo le llama la atención sobre peligros potenciales que pueden ocasionar la muerte o una lesión a
usted y a los demás.
Todos los mensajes de seguridad irán a continuación del símbolo de advertencia de seguridad y de la palabra
“PELIGRO” o “ADVERTENCIA”. Estas palabras significan:
PELIGRO
ADVERTENCIA
Todos los mensajes de seguridad le dirán el peligro potencial, le dirán cómo reducir las posibilidades de sufrir una lesión y lo que
puede suceder si no se siguen las instrucciones.
Si no sigue las instrucciones de inmediato, usted puede
morir o sufrir una lesión grave.
Si no sigue las instrucciones, usted puede morir o sufrir
una lesión grave.
INSTRUCCIONES DE INSTALACIÓN
Piezas y herramientas
Reúna las herramientas y piezas necesarias antes de comenzar la
instalación.
Herramientas necesarias:
■ Llave de tuercas de ¹⁄₂"
Piezas suministradas:
■ Soportes de montaje (3)
■ Tuercas hexagonales (6)
■ Pernos de carruaje de ¹⁄₄"x¹⁄₂"
(6)
■ Arandelas (6)
IMPORTANTE: Hay tres grupos de cuatro ranuras en el panel
posterior del armario alto. Los soportes de montaje deben fijarse al
par superior de ranuras en cada grupo.
Fije los soportes de montaje
Requisitos para el uso de los soportes
■ Diseñados para ser usados únicamente con los armarios altos y
los armarios con gancho de acero fundido para herramientas
Gladiator
NOTA: Estos soportes no han sido diseñados para ser instalados
en los siguientes modelos de armarios: GATGB000LG0 y
GATGBL00LG0.
■ Diseñados para ser montados en los paneles GearWall
canales GearTrack® de Gladiator.
■ Los soportes podrán sostener un armario con un peso máximo
de 300 lbs (136 kg).
®
.
®
o los
Desempaque los soportes
1. Verifique el contenido. Vea “Piezas suministradas”.
2. Deshágase de todos los materiales de embalaje o recíclelos.
4
Page 5
Fije el soporte superior de montaje
B
1. Con el borde de un soporte de montaje mirando hacia abajo,
alinee los orificios en el soporte con el par superior de ranuras en
el panel posterior.
2. Trabajando desde la parte posterior, inserte dos pernos de
carruaje a través del soporte y del panel posterior, como se
muestra.
A
A. Pernos de carruaje
B. Borde del soporte
3. Trabajando desde el interior del armario, ajuste cada perno con
una arandela y una tuerca hexagonal.
4. Deslice el soporte en la parte más superior de la ranura y apriete
las tuercas por completo.
Fije los soportes de montaje central e inferior
NOTA: Las dos tuercas en los soportes de montaje central e inferior
deben estar lo suficientemente sueltas para permitir que los soportes
se muevan en las ranuras del armario.
1. Cierre las puertas del armario.
2. Determine la ubicación para el montaje del armario en los
paneles GearWall
®
o los canales GearTrack®.
ADVERTENCIA
Peligro de Peso Excesivo
Use dos o más personas para mover, ensamblar o
instalar el armario.
No seguir esta instrucción puede ocasionar una
lesión en la espalda u otro tipo de lesiones.
3. Con la ayuda de dos o más personas, acople el soporte de
montaje superior en la ranura de la pared levantando y
empujando hacia la pared y bajando el borde de montaje dentro
de la ranura, como se muestra.
4. Asegúrese de que el soporte superior esté completamente
acoplado en la ranura, como se muestra.
A
B
1. Con el borde de un soporte de montaje mirando hacia abajo,
alinee los orificios en el soporte con el par superior de ranuras en
la sección central del panel posterior.
2. Trabajando desde la parte posterior, inserte dos pernos de
carruaje a través del soporte y del panel posterior.
3. Trabajando desde el interior del armario, ajuste cada perno con
una arandela y una tuerca hexagonal. Apriételos a mano
solamente, ya que este soporte deberá ajustarse para montar el
armario en la pared.
4. Repita los pasos anteriores para fijar el soporte de montaje
inferior a la sección inferior del panel posterior.
IMPORTANTE: Apriete por completo las tuercas que están en los
soportes central e inferior, después de instalar el armario en la pared.
Vea “Instale el armario en los paneles GearWall
GearTrack
®
”.
®
o los canales
Instale el armario en los paneles GearWall®
o los canales GearTrack
IMPORTANTE:
■ Asegúrese de que los paneles GearWall
GearTrack
®
estén instalados con tornillos de montaje en cada
ranura y en cada ubicación de los pies derechos, con un máximo
de 24" (60,96 cm) horizontalmente entre los tornillos.
■ Si se van a utilizar los canales GearTrack
armario alto para herramientas de Gladiator
a una distancia de 18" (46 cm).
18" (46 cm)
®
o los canales
®
®
para soportar el
®
, deberán instalarse
C
A. Borde del soporte
B. Ranura
5. Abra las puertas del armario.
6. Desde el interior del armario, agarre los pernos en el soporte
central y ajuste el soporte hasta que se alinee con la ranura en el
panel GearWall
®
o el canal GearTrack®.
7. Empuje el armario hacia la pared y baje el soporte de montaje
central dentro de la ranura.
8. Asegúrese de que el soporte central esté completamente
acoplado en la ranura, como se muestra.
9. Repita el procedimiento para el soporte inferior.
10. Con una llave de ½", apriete completamente las tuercas que
ajustan los soportes central e inferior.
C.Soporte de montaje
completamente acoplado
5
Page 6

SÉCURITÉ DE LA TRINGLE DE MONTAGE
Votre sécurité et celle des autres est très importante.
Nous donnons de nombreux messages de sécurité importants dans ce manuel et sur votre appareil ménager. Assurez-vous de
toujours lire tous les messages de sécurité et de vous y conformer.
Voici le symbole d’alerte de sécurité.
Ce symbole d’alerte de sécurité vous signale les dangers potentiels de décès et de blessures graves à vous
et à d’autres.
Tous les messages de sécurité suivront le symbole d’alerte de sécurité et le mot “DANGER” ou
“AVERTISSEMENT”. Ces mots signifient :
Risque possible de décès ou de blessure grave si vous ne
DANGER
AVERTISSEMENT
Tous les messages de sécurité vous diront quel est le danger potentiel et vous disent comment réduire le risque de blessure et
ce qui peut se produire en cas de non-respect des instructions.
suivez pas immédiatement les instructions.
Risque possible de décès ou de blessure grave si vous
ne suivez pas les instructions.
INSTRUCTIONS D'INSTALLATION
Outillage et pièces
Rassembler les outils et pièces nécessaires avant de commencer
l’installation.
Outillage nécessaire :
■ Clé de ¹⁄₂"
Pièces fournies:
■ Brides de montage (3)
■ Écrous hexagonaux (6)
■ Boulons de carrosserie de ¼"
x ½" (6)
■ Rondelles (6)
Spécifications d'utilisation des brides
■ Conçues uniquement pour l'utilisation sur grandes armoires à
outils et caisses à outils en acier soudé Gladiator
REMARQUE : Ces brides ne sont pas conçues pour l'installation
sur les modèles suivants : GATGB000LG0 et GATGBL00LG0.
■ Conçues pour le montage sur des panneaux Gladiator GearWall
ou profilés GearTrack
■ Les brides pourront supporter une armoire d'un poids maximum
de 300 lb (136 kg).
®
.
®
.
Déballage des brides
1. Vérifier le contenu. Voir “Pièces fournies”.
2. Jeter ou recycler tous les matériaux d'emballage.
Fixation des brides de montage
IMPORTANT : Sur le panneau arrière de chaque grande armoire, il y
a trois groupes de quatre rainures. Pour l'installation des brides de
montage, on doit utiliser la paire de rainures supérieure de chaque
groupe.
®
6
Page 7
Fixation de la bride de montage supérieure
B
1. Avec la rive de la bride de montage pointant vers le bas, aligner
les trous de la bride avec la paire de rainures supérieure du
panneau arrière.
2. En partant de l'arrière, insérer deux boulons de carrosserie à
travers la bride et le panneau arrière, tel qu'illustré.
A
A. Boulons de carrosserie
B. Rive de la bride
3. En partant de l'intérieur de l'armoire, placer sur chaque boulon
une rondelle et un écrou hexagonal.
4. Faire glisser la bride vers le haut, le plus haut qu'elle peut aller
dans la rainure et serrer complètement les écrous.
Fixation des brides de montage centrale et inférieure
REMARQUE : Les deux écrous de montage sur les brides de
montage centrale et inférieure doivent être suffisamment lâches pour
permettre aux brides de bouger dans les rainures.
1. Fermer les portes de l'armoire.
2. Déterminer la position de montage de l’armoire sur les panneaux
GearWall
®
ou profilé GearTrack®.
AVERTISSEMENT
Risque du poids excessif
Utiliser deux ou plus de personnes pour déplacer,
assembler, ou installer l’armoire.
Le non-respect de cette instruction peut causer
une blessure au dos ou d'autre blessure.
3. Avec la participation de deux personnes ou plus, engager la
bride de montage supérieure dans la rainure murale - soulever et
pousser vers le mur, puis abaisser pour engager la rive dans la
rainure tel qu’illustré.
4. Vérifier que la bride de montage supérieure est parfaitement
engagée dans la rainure tel qu’illustré.
A
B
1. Avec la rive de la bride de montage pointant vers le bas, aligner
les trous de la bride situés sur les deux rainures supérieures de la
partie centrale du panneau arrière.
2. En partant de l'arrière, insérer deux boulons de carrosserie à
travers la bride et le panneau arrière, tel qu'illustré.
3. En partant de l'intérieur de l'armoire, fixer chaque boulon avec
une rondelle et un écrou hexagonal. Serrer à la main uniquement,
car cette bride devra être ajustée pour l'installation de l'armoire
sur le mur.
4. Répéter les étapes ci-dessus pour fixer la bride de montage
inférieure du panneau arrière.
IMPORTANT : Serrer complètement les écrous de fixation des brides
centrale et inférieure après avoir installé l'armoire sur le mur; voir la
section “Montage de l'armoire sur les panneaux GearWall
profilés GearTrack
®
”
®
ou
Montage de l’armoire sur les panneaux
GearWall
IMPORTANT :
■ Vérifier que les panneaux GearWall
®
ou profilés GearTrack
®
ou profilés GearTrack® sont
correctement installés - avec vis de montage dans chaque
rainure et au niveau de chaque poteau de colombage mural,
avec espacement maximum de 24" (60,96 cm) horizontalement
entre les vis.
■ Si des profilés GearTrack
armoire à outils Gladiator
®
sont utilisés pour supporter la grande
®
, ils doivent être installés à 18" (46 cm)
l'un de l'autre.
18" (46 cm)
®
C
A. Rive de la bride
B. Rainure
5. Ouvrir les portes de l'armoire.
6. De l'intérieur de l'armoire, saisir les boulons sur la bride centrale
et ajuster sa position pour l'aligner avec la rainure du panneau
GearWall
®
ou profilé GearTrack®.
7. Pousser l'armoire vers le mur et abaisser la bride de montage
centrale dans la rainure.
8. Vérifier que la bride de montage centrale est parfaitement
engagée dans la rainure (voir illustration).
9. Répéter l'opération pour la bride inférieure.
10. À l'aide d'une clé de ½", serrer complètement les écrous de
fixation des brides centrale et inférieure.
C. Bride de montage
parfaitement engagée
7
Page 8

W10212350A
© 2008 Whirlpool Corporation.
All rights reserved.
Todos los derechos reservados.
Tous droits réservés.
® Registered Trademark/TM Trademark of Whirlpool, U.S.A., Whirlpool Canada LP Licensee in Canada
® Marca registrada/TM Marca de comercio de Whirlpool, U.S.A., usada bajo licencia de Whirlpool Canada LP en Canadá
® Marque déposée/TM Marque de commerce de Whirlpool, U.S.A., emploi sous licence par Whirlpool Canada LP au Canada
Printed in U.S.A.
Impreso en EE.UU.
Imprimé aux É.-U.
7/08
 Loading...