

Page 1
CHILLERATORTMGARAGE REFRIGERATOR
REFRIGERADORPARAGARAGE CHILLERATORTM
REFRIGERATEURDEGARAGE CHILLERATORTM
i
Table of Contents/lndice/Table des matieres ............ 2
IT'S TIME TO RETHINK THE GARAGE. ®
ES TIEMPO DE VOLVER A PENSAR EN EL GARAGE. TM
LE GARAGE REPENSE. TM
Page 2
TABLEOF CONTENTS
REFRIGERATOR SAFETY .................................................................... 3
Proper Disposal of Your Old Refrigerator .......................................... 3
INSTALLATION INSTRUCTIONS ........................................................ 4
Unpack the Refrigerator ..................................................................... 4
Location Requirements ...................................................................... 4
Electrical Requirements ..................................................................... 5
Refrigerator Doors .............................................................................. 5
Adjust the Doors ................................................................................ 7
Caster Installation ............................................................................... 7
REFRIGERATOR USE .......................................................................... 9
Using the Controls ............................................................................. 9
INDICE
SEGURIDAD DEL REFRIGERADOR ................................................. 14
C6mo deshacerse adecuadamente de su refrigerador viejo .......... 14
INSTRUCClONES DE INSTALAClON ............................................... 15
Desempaque el Refrigerador ........................................................... 15
Requisites de ubicaci6n ................................................................... 15
Requisitos el6ctricos ........................................................................ 16
Puertas del refrigerador ................................................................... 16
Ajuste las puertas ............................................................................. 19
Instalaci6n de las ruedecillas ........................................................... 19
USO DE SU REFRIGERADOR ........................................................... 21
Uso de los controles ........................................................................ 21
REFRIGERATOR CARE ....................................................................... 9
Cleaning ............................................................................................. 9
Changing the Light Bulbs .................................................................. 9
TROUBLESHOOTING ........................................................................ 10
Refrigerator Operation ..................................................................... 10
Temperature and Moisture .............................................................. 10
ASSISTANCE OR SERVICE .............................................................. 11
In the U.S.A ...................................................................................... 11
In Canada ......................................................................................... 11
WARRANTY ........................................................................................ 12
CUIDADO DE SU REFRIGERADOR ................................................. 21
Limpieza ........................................................................................... 21
C6mo cambiar los focos ................................................................. 22
SOLUCION DE PROBLEMAS ........................................................... 22
Funcionamiento del refrigerador ..................................................... 22
Temperatura y humedad ................................................................. 23
AYUDA O SERVICIO TI_CNICO ........................................................ 23
En los EE.UU ................................................................................... 23
En Canada ....................................................................................... 23
GARANTJA .......................................................................................... 24
TABLEDESMATIERES
SI_CURITle DU RI_FRIGleRATEUR .................................................... 25
Mise au rebut de votre vieux r6frig@ateur ....................................... 25
INSTRUCTIONS D'INSTALLATION .................................................. 26
D6ballage du r6frig6rateur ............................................................... 26
Exigences d'emplacement ............................................................... 26
Sp6cifications 61ectriques ................................................................ 27
Portes du r6frig@ateur ..................................................................... 27
Ajustement des portes ..................................................................... 30
Installation des roulettes .................................................................. 30
UTILISATION DU RI_FRIGE_RATEUR ............................................... 32
Utilisation des commandes ............................................................. 32
ENTRETIEN DU RI_FRIGE_RATEUR .................................................. 32
Nettoyage ........................................................................................ 32
Remplacement des ampoules d'6clairage ...................................... 33
DI_PANNAGE ...................................................................................... 33
Fonctionnement du r6frig@ateur ..................................................... 33
Temp&rature et humidit6 ................................................................. 34
ASSISTANCE OU SERVICE .............................................................. 34
GARANTIE .......................................................................................... 35
Page 3
REFRIGERATORSAFETY
Your safety and the safety of others are very important.
We have provided many important safety messages in this manual and on your appliance. Always read and obey all safety
messages.
This is the safety alert symbol.
This symbol alerts you to potential hazards that can kill or hurt you and others.
All safety messages will follow the safety alert symbol and either the word "DANGER" or "WARNING."
These words mean:
You can be killed or seriously injured if you don't immediately
follow instructions.
You can be killed or seriously injured if you don't follow
instructions.
All safety messages will tell you what the potential hazard is, tell you how to reduce the chance of injury, and tell you what can
happen if the instructions are not followed.
IMPORTANT SAFETY INSTRUCTIONS
WARNING: To reduce the risk of fire, electric shock, or injury when using your refrigerator, follow these basic precautions:
• Plug into a grounded 3 prong outlet.
• Do not remove ground prong.
• Do not use an adapter.
• Do not use an extension cord.
• Disconnect power before servicing.
• Replace all parts and panels before operating.
SAVE THESE INSTRUCTIONS
• Remove doors from your old refrigerator.
• Use nonflammable cleaner.
• Keep flammable materials and vapors, such as gasoline,
away from refrigerator.
• Use two or more people to move and install refrigerator.
ProperDisposalofYourOld Refrigerator
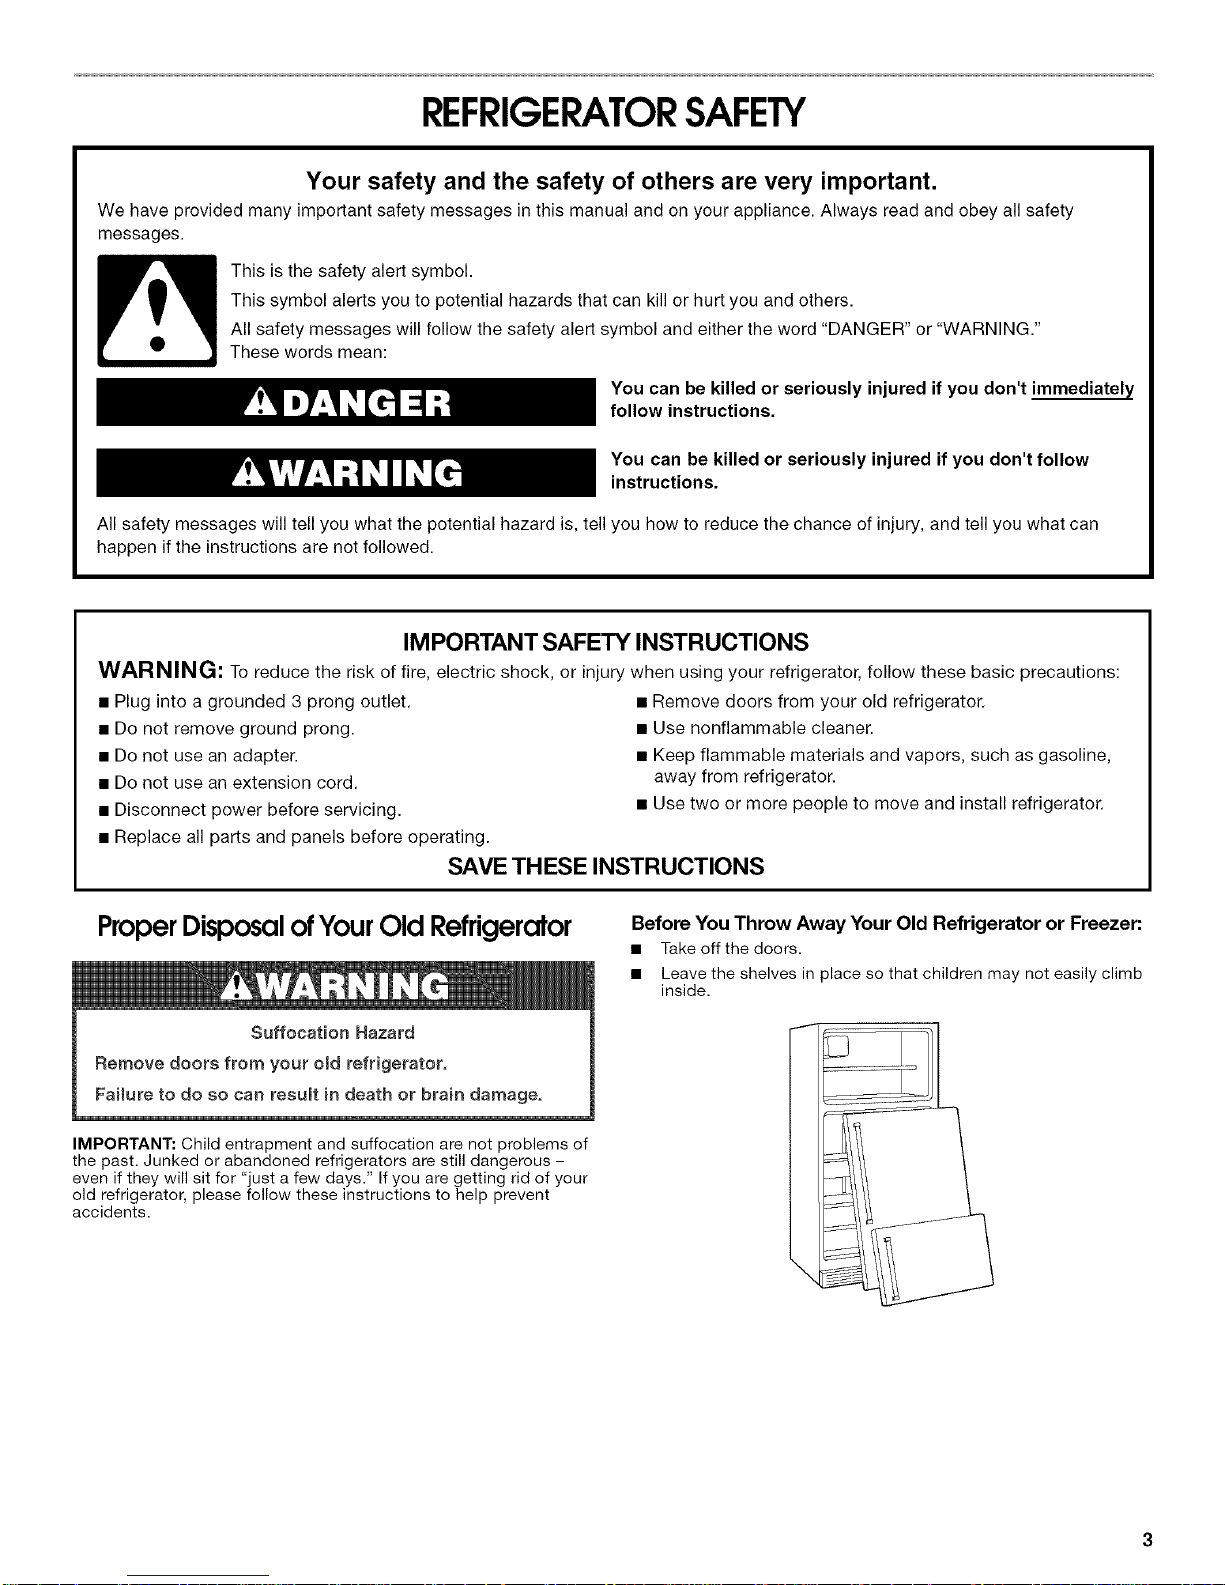
IMPORTANT: Child entrapment and suffocation are not problems of
the past. Junked or abandoned refrigerators are still dangerous -
even if they will sit for "just a few days." If you are getting rid of your
old refrigerator, please follow these instructions to help prevent
accidents.
Before You Throw Away Your Old Refrigerator or Freezer:
• Take off the doors.
• Leave the shelves in place so that children may not easily climb
inside.
/
J
J
Page 4
INSTALLATIONINSTRUCTIONS
Excessive Weight Hazard
Use two or more people to move and install
refrigerator.
Failure to do so can result in back or other injury.
Remove the Packaging
• Remove tape and glue residue from surfaces before turning on
the refrigerator. Rub a small amount of liquid dish soap over the
adhesive with your fingers. Wipe with warm water and dry.
• Do not use sharp instruments, rubbing alcohol, flammable fluids,
or abrasive cleaners to remove tape or glue. These products can
damage the surface of your refrigerator. For more information,
see "Refrigerator Safety."
IMPORTANT: Do not remove the white foam air return insert from
behind the control panel on the ceiling of the refrigerator. If the insert
is removed, ice may migrate down from the freezer and cause icicles
to form.
When Moving Your refrigerator:
Your refrigerator is heavy. When moving the refrigerator for
cleaning or service, be sure to protect the floor= Always pull
the refrigerator straight out when moving it=Do not wiggle
or "walk" the refrigerator when trying to move it, as floor
damage could occur.
NOTE: If casters are installed, unlock the casters before
trying to move your refrigerator=
Explosion Hazard
Keep flammable materials and vapors, such as
gasoline, away from refrigerator,
Failure to do so can result in death, explosion, or fire,
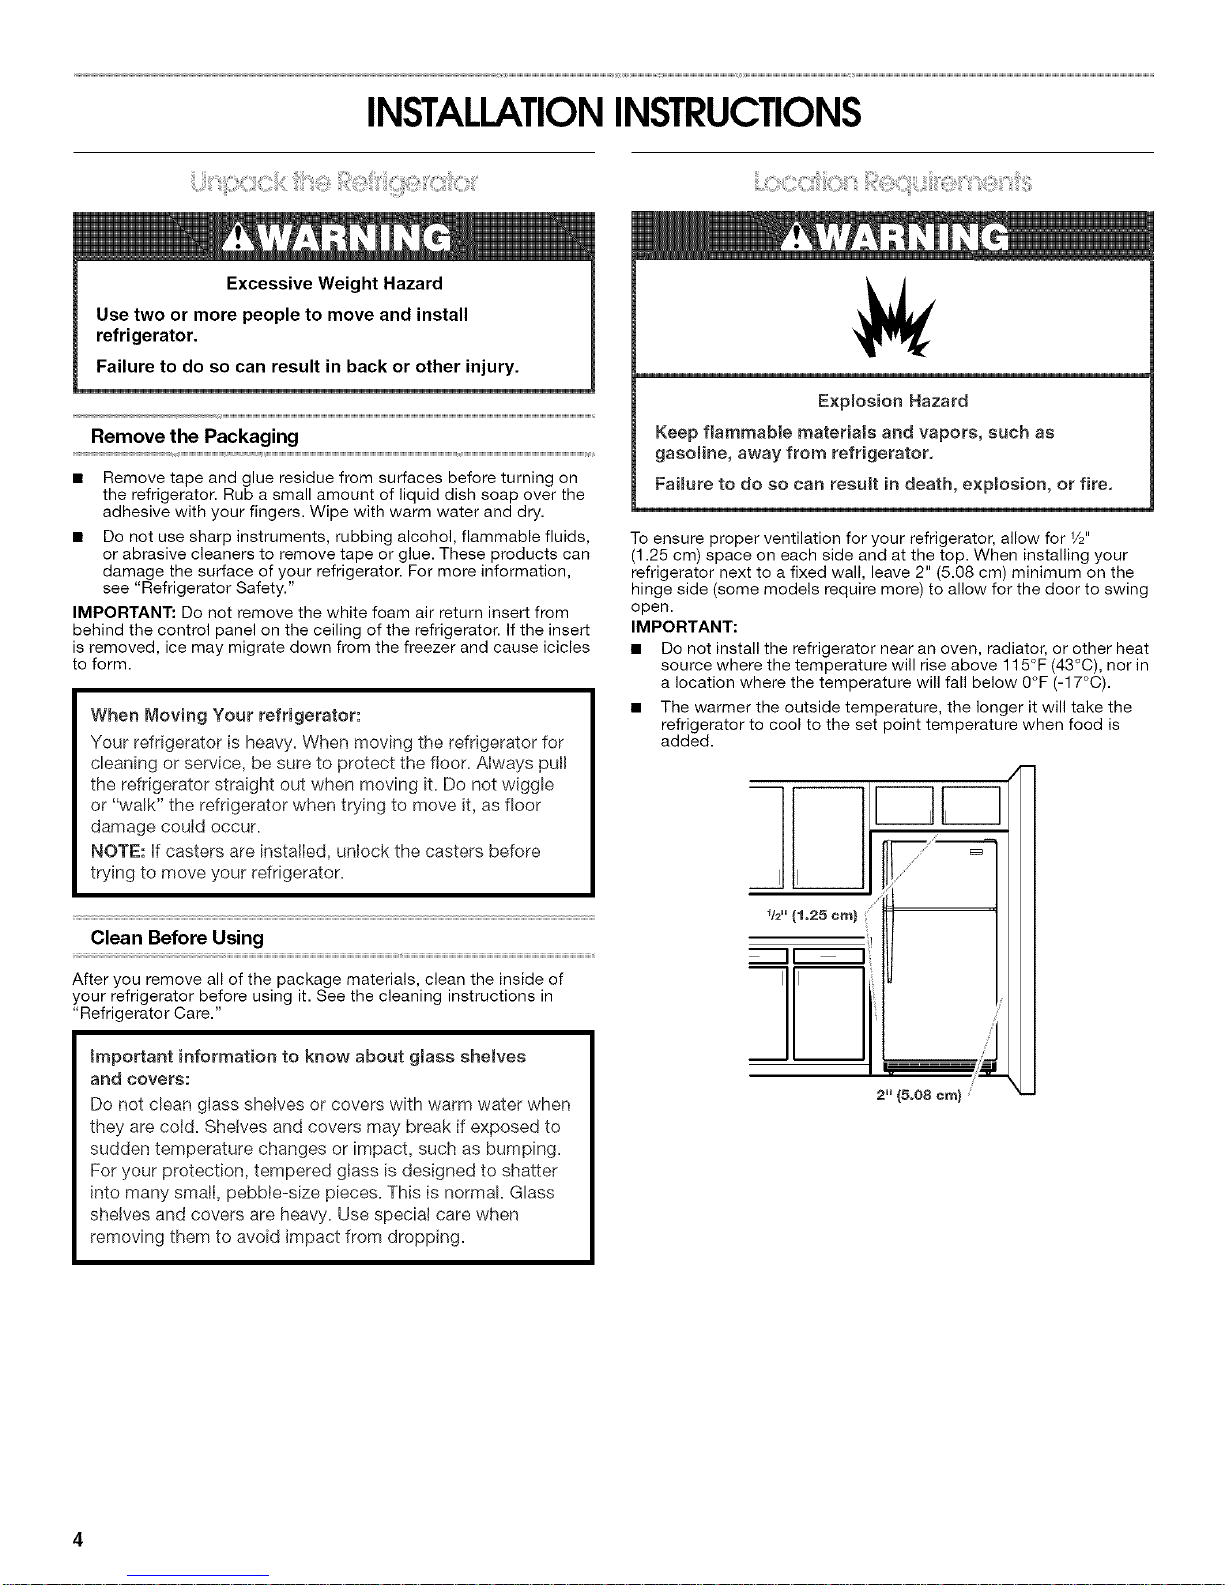
To ensure proper ventilation for your refrigerator, allow for V2"
(1.25 cm) space on each side and at the top. When installing your
refrigerator next to a fixed wall, leave 2" (5.08 cm) minimum on the
hinge side (some models require more) to allow for the door to swing
open.
IMPORTANT:
• Do not install the refrigerator near an oven, radiator, or other heat
source where the temperature will rise above 115°F (43°0), nor in
a location where the temperature will fall below 0°F (-17°C).
• The warmer the outside temperature, the longer it will take the
refrigerator to cool to the set point temperature when food is
added.
F-qF-q
mi
II
_Y
Clean Before Using
After you remove all of the package materials, clean the inside of
your refrigerator before using it. See the cleaning instructions in
"Refrigerator Care."
_mportant information to know about glass shelves
and covers:
Do not clean glass shelves or covers with warm water when
they are cold. Shelves and covers may break if exposed to
sudden temperature changes or impact, such as bumping.
For your protection, tempered glass is designed to shatter
into many small, pebble-size pieces= This is normal. Glass
shelves and covers are heavy= Use special care when
removing them to avoid impact from dropping=
II
2" (5°08c_}
Page 5
_iii}}
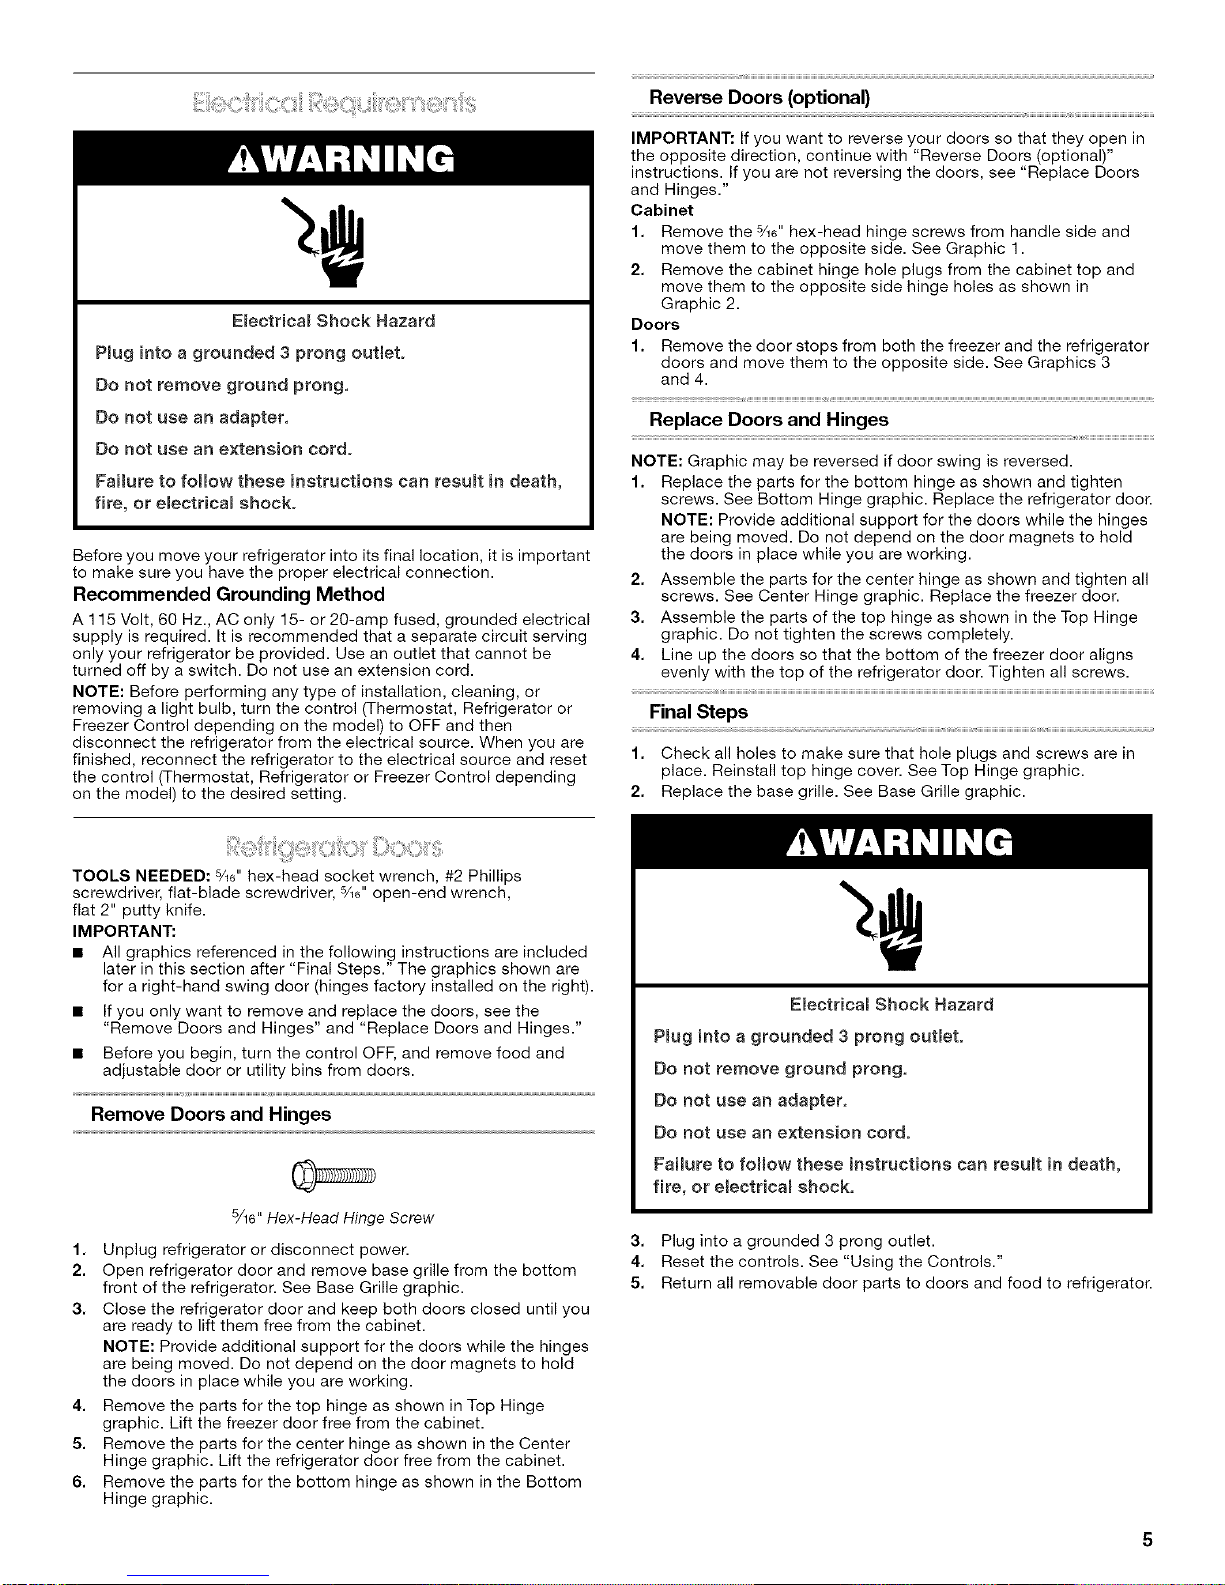
Center Hinge
................. A
A. Center Hinge
B. %_" Hex-Head Hinge Screws
Bottom Hinge
I
!
#
I
I
I
I
I
iii
RemovalofDoorStops
B
A DoorStop
g. OoorStopScrew
Reinstallation of Door Stops
A. Bottom Hinge
B. %_" Hex-Head Hinge Screws
©
A. Door Stop
EL Door Stop Screw
Page 7
NOTE: If you have the casters installed on your refrigerator, the
leveling screws will not work. Shims can be placed under the casters
to level a refrigerator that has casters installed.
Door Closing
Your refrigerator has two front adjustable rollers - one on the right
and one on the left. If your refrigerator seems unsteady or you want
the doors to close easier, adjust the refrigerator's tilt using the
instructions below:
1. Remove the base grille. See Base Grille graphic. The two leveling
screws are part of the front roller assemblies which are at the
base of the refrigerator on either side.
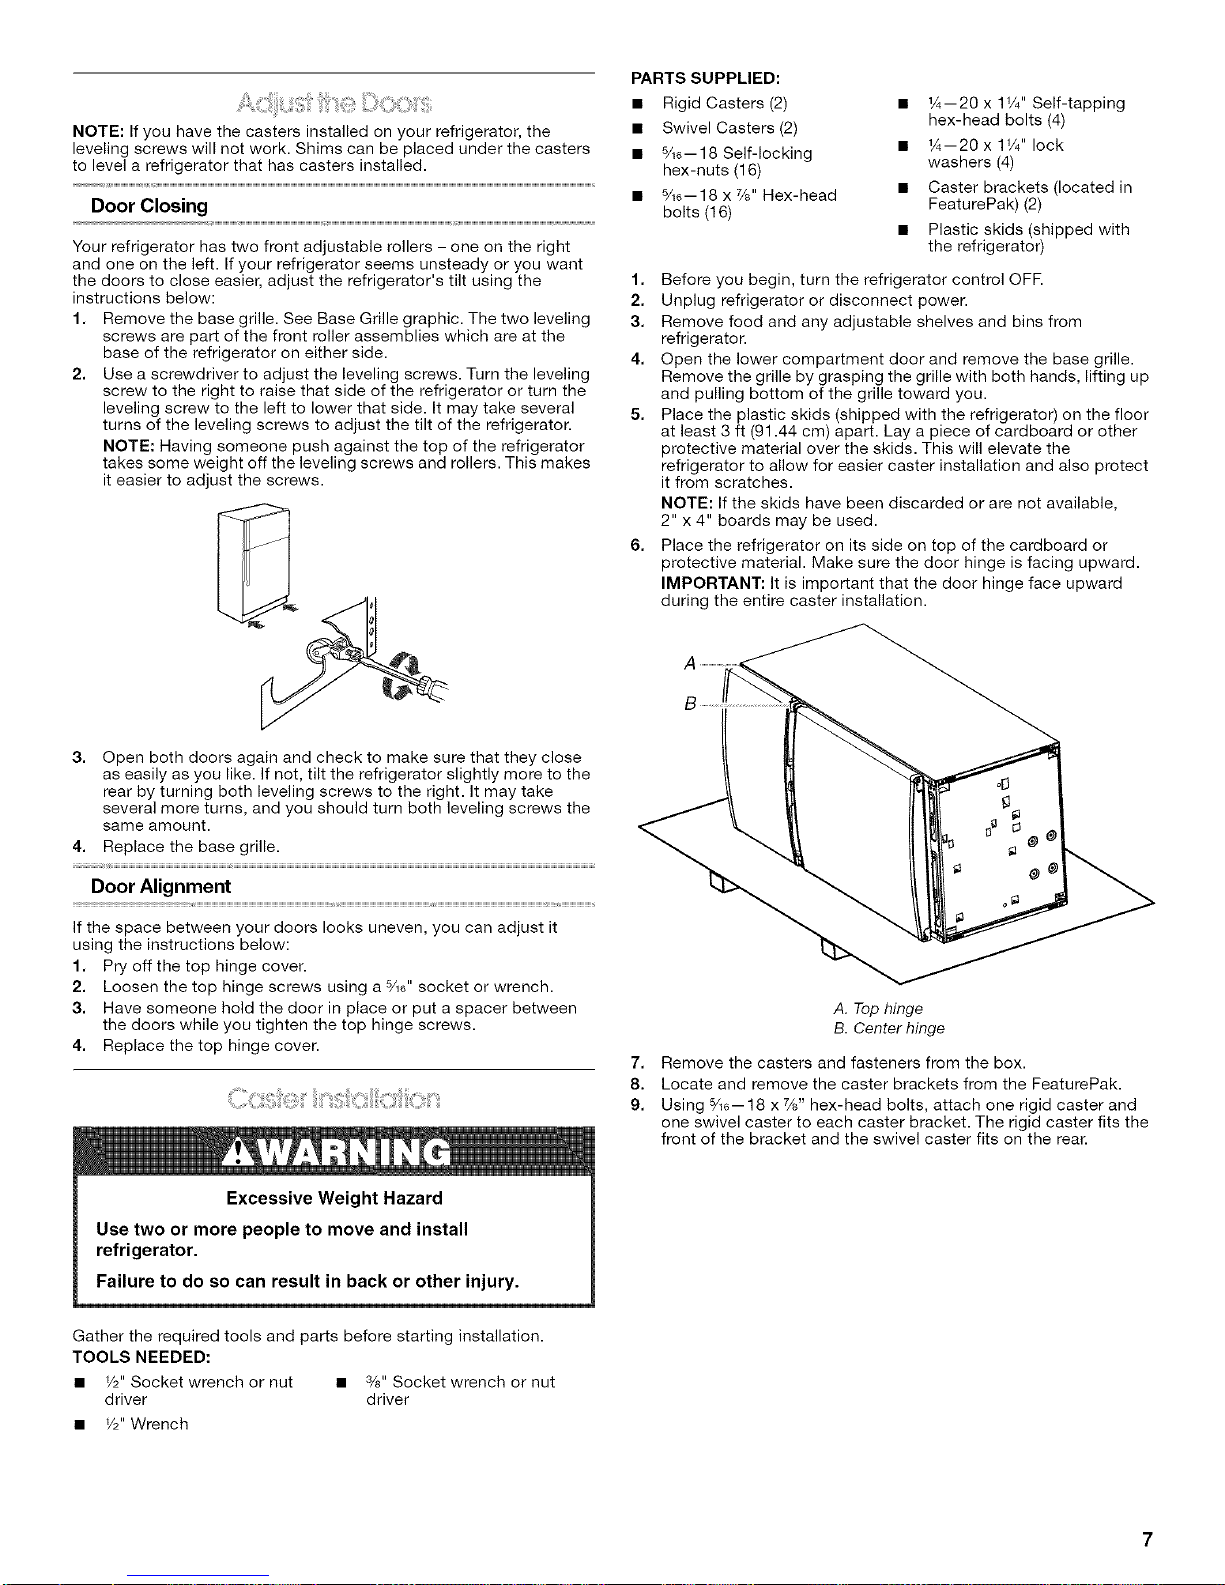
2. Use a screwdriver to adjust the leveling screws. Turn the leveling
screw to the right to raise that side of the refrigerator or turn the
leveling screw to the left to lower that side. It may take several
turns of the leveling screws to adjust the tilt of the refrigerator.
NOTE: Having someone push against the top of the refrigerator
takes some weight off the leveling screws and rollers. This makes
it easier to adjust the screws.
PARTS SUPPLIED:
• Rigid Casters (2)
• Swivel Casters (2)
• 5/16--18 Self-locking
hex-nuts (16)
• 5/16--18 x %" Hex-head
bolts (16)
1. Before you begin, turn the refrigerator control OFR
2. Unplug refrigerator or disconnect power.
3. Remove food and any adjustable shelves and bins from
refrigerator.
4. Open the lower compartment door and remove the base grille.
Remove the grille by grasping the grille with both hands, lifting up
and pulling bottom of the grille toward you.
5. Place the plastic skids (shipped with the refrigerator) on the floor
at least 3 ft (91.44 cm) apart. Lay a piece of cardboard or other
protective material over the skids. This will elevate the
refrigerator to allow for easier caster installation and also protect
it from scratches.
NOTE: If the skids have been discarded or are not available,
2" x 4" boards may be used.
6. Place the refrigerator on its side on top of the cardboard or
protective material. Make sure the door hinge is facing upward.
IMPORTANT: It is important that the door hinge face upward
during the entire caster installation.
• 1¼--20 x 1V4" Self-tapping
hex-head bolts (4)
• 1A--20 x 1V4" lock
washers (4)
• Caster brackets (located in
FeaturePak) (2)
• Plastic skids (shipped with
the refrigerator)
3. Open both doors again and check to make sure that they close
as easily as you like. If not, tilt the refrigerator slightly more to the
rear by turning both leveling screws to the right. It may take
several more turns, and you should turn both leveling screws the
same amount.
4. Replace the base grille.
Door Alignment
If the space between your doors looks uneven, you can adjust it
using the instructions below:
1. Pry off the top hinge cover.
2. Loosen the top hinge screws using a 5/16"socket or wrench.
3. Have someone hold the door in place or put a spacer between
the doors while you tighten the top hinge screws.
4. Replace the top hinge cover.
Excessive Weight Hazard
Use two or more people to move and install
refrigerator.
Failure to do so can result in back or other injury.
Gather the required tools and parts before starting installation.
TOOLS NEEDED:
• V2" Socket wrench or nut • 3/8" Socket wrench or nut
driver driver
• W' Wrench
A. Top hinge
B. Center hinge
7. Remove the casters and fasteners from the box.
8. Locate and remove the caster brackets from the FeaturePak.
9. Using 5/16--18 x %" hex-head bolts, attach one rigid caster and
one swivel caster to each caster bracket. The rigid caster fits the
front of the bracket and the swivel caster fits on the rear.
Page 8
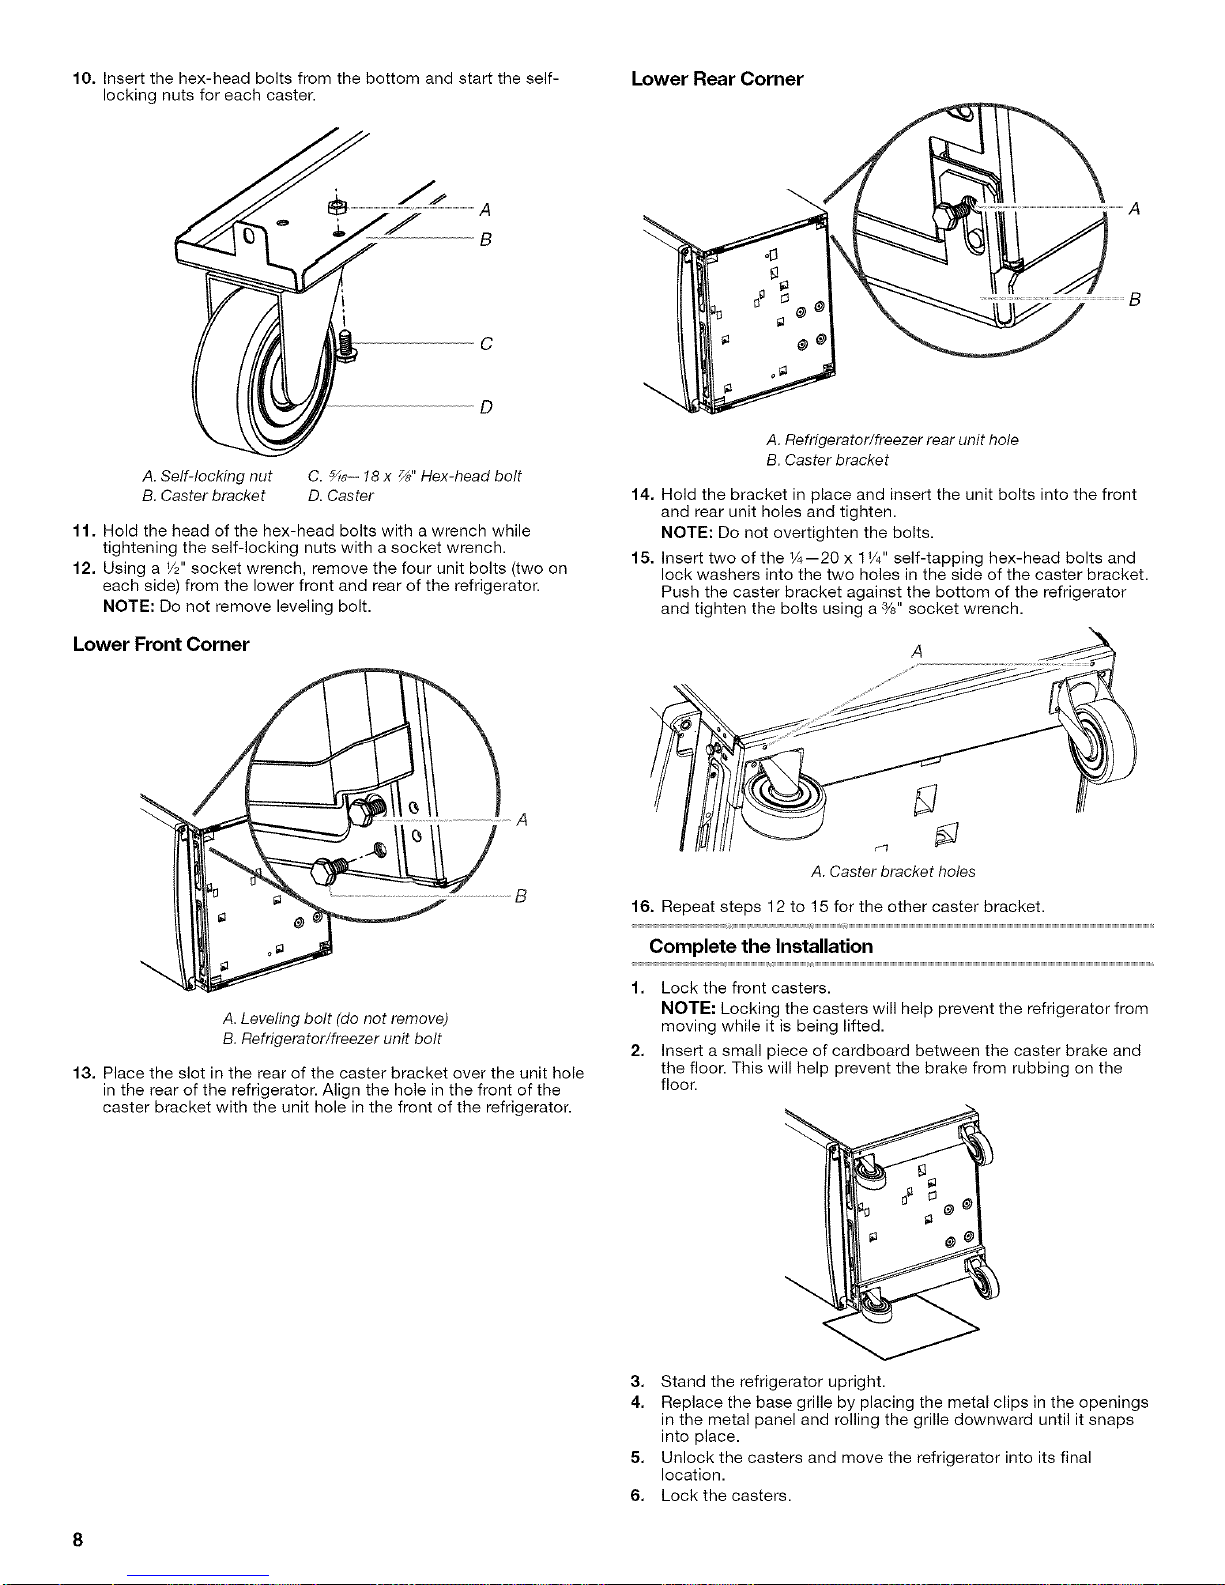
10. Insert the hex-head bolts from the bottom and start the self- Lower Rear Corner
locking nuts for each caster.
B
A. Refrigerator/freezer rear unit hole
B. Caster bracket
A. Self-locking nut C. _6-- 18 x _" Hex-head bolt
B. Caster bracket D. Caster
11. Hold the head of the hex-head bolts with a wrench while
tightening the self-locking nuts with a socket wrench.
12. Using a W' socket wrench, remove the four unit bolts (two on
each side) from the lower front and rear of the refrigerator.
NOTE: Do not remove leveling bolt.
14. Hold the bracket in place and insert the unit bolts into the front
and rear unit holes and tighten.
NOTE: Do not overtighten the bolts.
15. Insert two of the 1A--20 x 1V4" self-tapping hex-head bolts and
lock washers into the two holes in the side of the caster bracket.
Push the caster bracket against the bottom of the refrigerator
and tighten the bolts using a 3/8"socket wrench.
Lower Front Corner
A
A. Leveling bolt (do not remove)
B. Refrigerator/freezer unit bolt
13. Place the slot in the rear of the caster bracket over the unit hole
in the rear of the refrigerator. Align the hole in the front of the
caster bracket with the unit hole in the front of the refrigerator.
A. Caster bracket holes
16. Repeat steps 12 to 15 for the other caster bracket.
Complete the Installation
1. Lock the front casters.
NOTE: Locking the casters will help prevent the refrigerator from
moving while it is being lifted.
2. Insert a small piece of cardboard between the caster brake and
the floor. This will help prevent the brake from rubbing on the
floor.
3,
Stand the refrigerator upright.
4.
Replace the base grille by placing the metal clips in the openings
in the metal panel and rolling the grille downward until it snaps
into place.
5,
Unlock the casters and move the refrigerator into its final
location.
6.
Lock the casters.
Page 9
REFRIGERATORUSE REFRIGERATORCARE
!iI:!ii,:]iii:
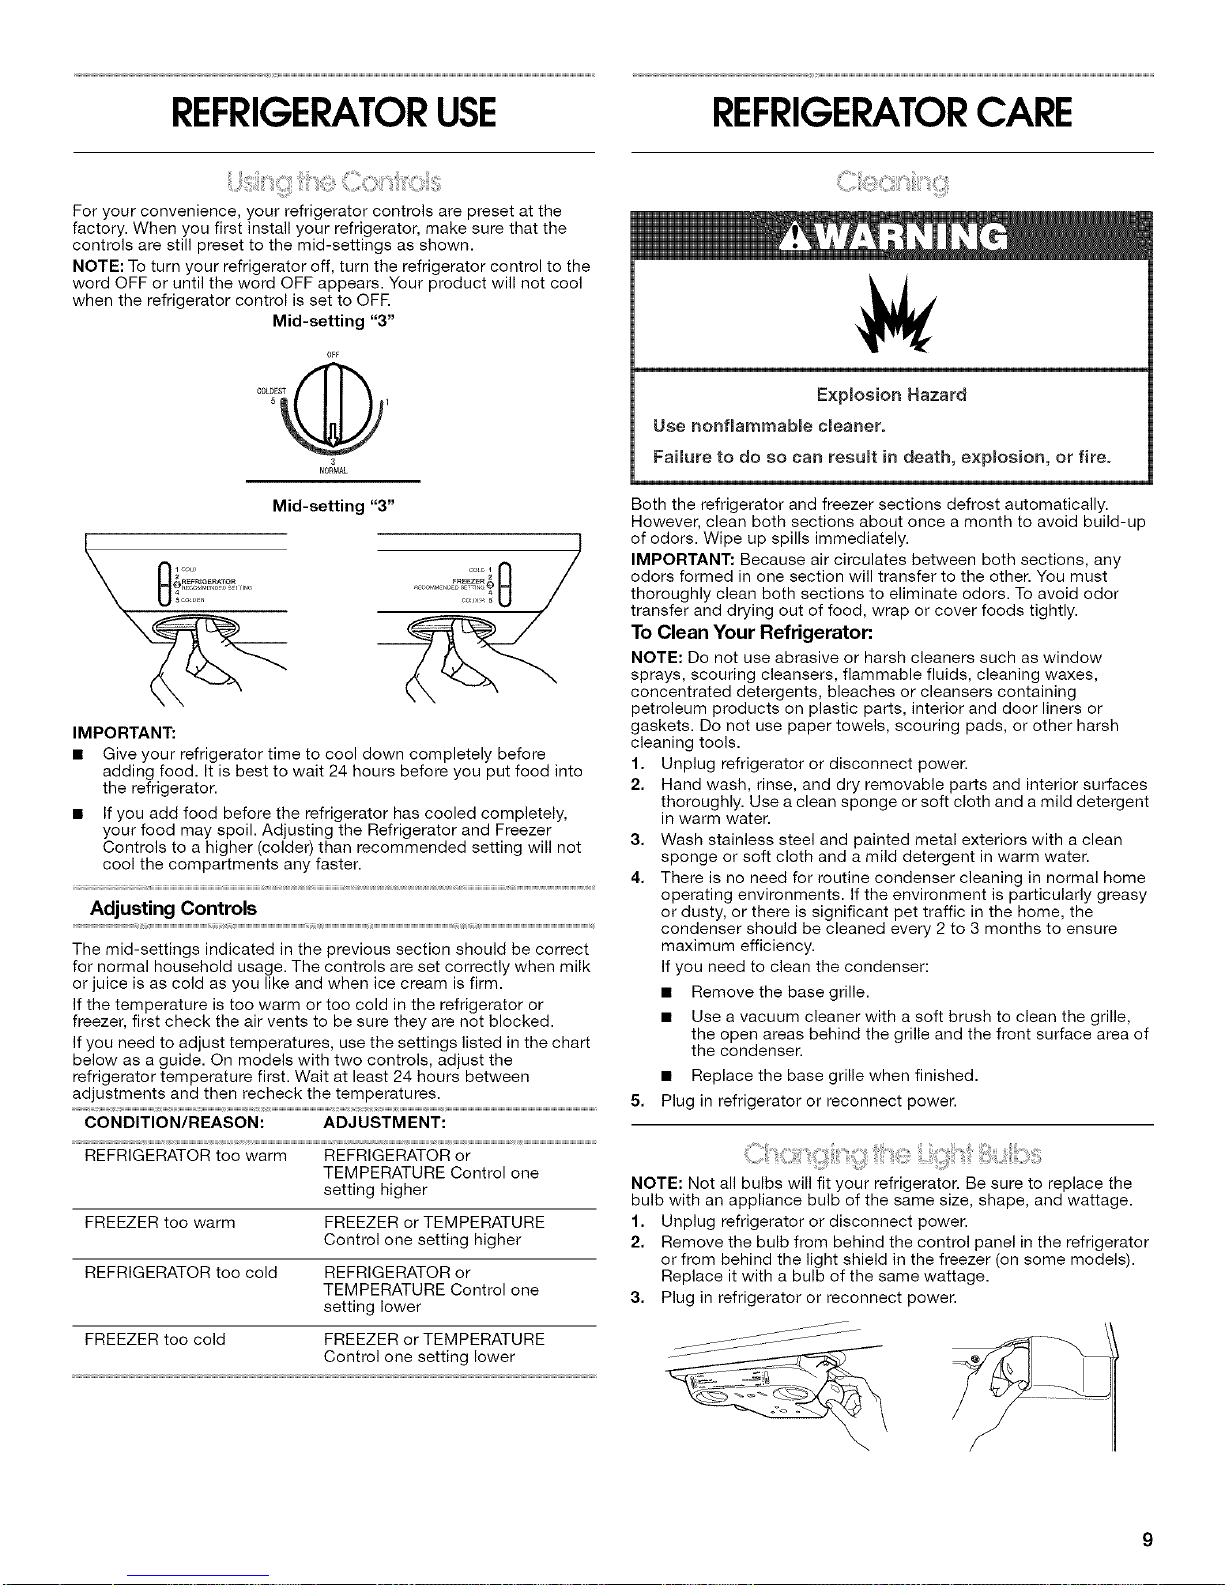
For your convenience, your refrigerator controls are preset at the
factory. When you first install your refrigerator, make sure that the
controls are still preset to the mid-settings as shown.
NOTE: To turn your refrigerator off, turn the refrigerator control to the
word OFF or until the word OFF appears. Your product will not cool
when the refrigerator control is set to OFR
Mid-setting "3"
OFF
5 1
COLIESQ
3
NORM_
Mid-setting "3"
IMPORTANT:
• Give your refrigerator time to cool down completely before
adding food. It is best to wait 24 hours before you put food into
the refrigerator.
• If you add food before the refrigerator has cooled completely,
your food may spoil. Adjusting the Refrigerator and Freezer
Controls to a higher (colder) than recommended setting will not
cool the compartments any faster.
Adjusting Controls
The mid-settings indicated in the previous section should be correct
for normal household usage. The controls are set correctly when milk
or juice is as cold as you like and when ice cream is firm.
If the temperature is too warm or too cold in the refrigerator or
freezer, first check the air vents to be sure they are not blocked.
If you need to adjust temperatures, use the settings listed in the chart
below as a guide. On models with two controls, adjust the
refrigerator temperature first. Wait at least 24 hours between
adjustments and then recheck the temperatures.
CONDITION/REASON: ADJUSTMENT:
REFRIGERATOR too warm REFRIGERATOR or
FREEZER too warm FREEZER or TEMPERATURE
REFRIGERATOR too cold REFRIGERATOR or
FREEZER too cold FREEZER or TEMPERATURE
TEMPERATURE Control one
setting higher
Control one setting higher
TEMPERATURE Control one
setting lower
Control one setting lower
E×p(osion Hazard
Use nonflammab(e c(eaner.
Failure to do so can result in death, explosion, or fire.
Both the refrigerator and freezer sections defrost automatically.
However, clean both sections about once a month to avoid build-up
of odors. Wipe up spills immediately.
IMPORTANT: Because air circulates between both sections, any
odors formed in one section will transfer to the other. You must
thoroughly clean both sections to eliminate odors. To avoid odor
transfer and drying out of food, wrap or cover foods tightly.
To Clean Your Refrigerator:
NOTE: Do not use abrasive or harsh cleaners such as window
sprays, scouring cleansers, flammable fluids, cleaning waxes,
concentrated detergents, bleaches or cleansers containing
petroleum products on plastic parts, interior and door liners or
gaskets. Do not use paper towels, scouring pads, or other harsh
cleaning tools.
1. Unplug refrigerator or disconnect power.
2. Hand wash, rinse, and dry removable parts and interior surfaces
thoroughly. Use a clean sponge or soft cloth and a mild detergent
in warm water.
3. Wash stainless steel and painted metal exteriors with a clean
sponge or soft cloth and a mild detergent in warm water.
4. There is no need for routine condenser cleaning in normal home
operating environments. If the environment is particularly greasy
or dusty, or there is significant pet traffic in the home, the
condenser should be cleaned every 2 to 3 months to ensure
maximum efficiency.
If you need to clean the condenser:
• Remove the base grille.
• Use a vacuum cleaner with a soft brush to clean the grille,
the open areas behind the grille and the front surface area of
the condenser.
• Replace the base grille when finished.
5. Plug in refrigerator or reconnect power.
ii: i0iI!i iiii::::
NOTE: Not all bulbs will fit your refrigerator. Be sure to replace the
bulb with an appliance bulb of the same size, shape, and wattage.
1. Unplug refrigerator or disconnect power.
2. Remove the bulb from behind the control panel in the refrigerator
or from behind the light shield in the freezer (on some models).
Replace it with a bulb of the same wattage.
3. Plug in refrigerator or reconnect power.
Page 10
TROUBLESHOOTING
Trythe solutions suggested here first in order to avoid the cost of an unnecessary service call.
The door will not close completely
The refrigerator will not operate
Electrical Shock Hazard
Plug into a grounded 3 prong outlet.
Do not remove ground prong,
Do not use an adapter,
Do not use an extension cord.
Failure to follow these instructions can result in death,
fire, or electrical shock.
• Power cord unplugged? Plug into a grounded 3 prong outlet.
• Is outlet working? Plug in a lamp to see if the outlet is working.
• Household fuse blown or circuit breaker tripped? Replace the
fuse or reset the circuit breaker. If the problem continues, call an
electrician.
• Is control on? Make sure the refrigerator control is on. See
"Using the Control."
• New installation? Allow 24 hours following installation for the
refrigerator to cool completely.
NOTE: Adjusting the temperature control to coldest setting will
not cool the refrigerator more quickly.
The motor seems to runtoo much
Your new refrigerator may run longer than your old one due to its
high-efficiency compressor and fans. The unit may run even longer if
the room is warm, a large food load is added, the door is opened
often, or if the door has been left open.
• Door blocked open? Move food packages away from door.
• Bin or shelf in the way? Push bin or shelf back in the correct
position.
• Crisper cover in the way? Make sure the crisper cover is fully
pushed in, so that the back rests on the supports.
The door isdifficult to open
Exp}osion Hazard
Use nonflammable c_eaner.
Failure to do so can result in death, explosion, or fire.
• Gaskets dirty or sticky? Clean gaskets and contact surfaces
with mild soap and warm water. Rinse and dry with soft cloth.
::11 1 ::11
Temperature is too warm
• New installation? Allow 24 hours following installation for the
refrigerator to cool completely.
• Door opened often or left open? Allows warm air to enter
refrigerator. Minimize door openings and keep door fully closed.
• Large load of food added? Allow several hours for refrigerator
to return to normal temperature.
• Control set correctly for the surrounding conditions? Adjust
the control a setting colder. Check temperature in 24 hours. See
"Using the Control."
There is interior moisture buildup
The refrigerator seems noisy
Refrigerator noise has been reduced over the years. Due to this •
reduction, you may hear intermittent noises from your new
refrigerator that you did not notice from your old model. Below are
listed some normal sounds with explanations.
• Pulsating - fans/compressor adjusting to optimize performance.
• Hissing/Rattling - flow of refrigerant, movement of water lines,
or from items placed on top of the refrigerator.
• Popping - contraction/expansion of inside walls, especially
during initial cool-down.
• Water running/dripping - may be heard when water melts
during defrosting and runs into the drain pan.
10
NOTE: Some moisture build-up is normal.
Humid room? Contributes to moisture build-up.
Door opened often or left open? Allows humid air to enter
refrigerator. Minimize door openings and keep door fully closed.
Page 11

ASSISTANCEORSERVICE
Before calling for assistance or service, please check
"Troubleshooting." It may save you the cost of a service call. If you
still need help, follow the instructions below.
When calling, please know the purchase date and the complete
model and serial number of your appliance. This information will help
us to better respond to your request.
If You Need Replacement Parts
If you need to order replacement parts, we recommend that you only
use factory specified replacement parts. Factory specified
replacement parts will fit right and work right because they are made
with the same precision used to build every new Gladiato¢ _
GarageWorks appliance.
To locate factory specified replacement parts in your area, call us or
your nearest designated service center.
Call the Gladiator _ GarageWorks Customer eXperience Center
toll free: 1-866-342-4089.
Our consultants provide assistance with:
• Features and specifications on our full line of products.
• Installation information.
• Use and maintenance procedures.
• Accessory and repair parts sales.
• Specialized customer assistance (Spanish speaking, hearing
impaired, limited vision, etc.).
• Referrals to local dealers, repair parts distributors, and service
companies. Gladiator _ GarageWorks designated service
technicians are trained to fulfill the product warranty and provide
after-warranty service, anywhere in the United States.
To locate the Gladiator _"GarageWorks designated service
company in your area, you can also look in your telephone
directory Yellow Pages.
For Further Assistance
If you need further assistance, you can write to Gladiator '_
GarageWorks with any questions or concerns at:
Gladiator *_GarageWorks
Customer eXperience Center
553 Benson Road
Benton Harbor, MI 49022-2692
Please include a daytime phone number in your correspondence.
For assistance, installation or service, call us at 1-800-807-6777.
Our consultants provide assistance with:
• Features and specifications on our full line of appliances.
• Use and maintainence procedures.
• Accessory and repair parts sales.
• Referrals to local dealers, repair parts distributors, and service
companies. Gladiator '_GarageWorks designated service
technicians are trained to fulfill the product warranty and provide
after-warranty service, anywhere in Canada.
For Further Assistance
If you need further assistance, you can write to Whirlpool Canada LP
with any questions or concerns at:
Whirlpool Canada LP
Customer Interaction Centre
1901 Minnesota Court
Mississauga, Ontario L5N 3A7
Please include a daytime phone number in your correspondence.
11
Page 12

GLADIATOR GARAGEWORKSMAJOR APPLIANCEWARRANTY
ONE YEAR LIMITED WARRANTY
For one year from the date of purchase, when this major appliance is operated and maintained according to instructions attached to or
furnished with the product, Whirlpool Corporation or Whirlpool Canada LP (hereafter "Gladiato¢ _ GarageWorks') will pay for FSP°
replacement parts and repair labor to correct defects in materials or workmanship. Service must be provided by a Whirlpool designated
service company.
ITEMS GLADIATOR ®GARAGEWORKS WILL NOT PAY FOR
1. Service calls to correct the installation of your major appliance, to instruct you how to use your major appliance, to replace or repair
house fuses or to correct house wiring or plumbing.
2. Service calls to repair or replace appliance light bulbs, air filters or water filters. Those consumable parts are excluded from warranty
coverage.
3. Repairs when your major appliance is used for other than normal, single-family household use.
4. Damage resulting from accident, alteration, misuse, abuse, fire, flood, acts of God, improper installation, installation not in
accordance with electrical or plumbing codes, or use of products not approved by Gladiator ° GarageWorks.
5. Any food loss due to refrigerator or freezer product failures.
6. Replacement parts or repair labor costs for units operated outside the United States or Canada.
7. Pickup and delivery. This major appliance is designed to be repaired in the home.
8. Repairs to parts or systems resulting from unauthorized modifications made to the appliance.
g. Expenses for travel and transportation for product service in remote locations.
10. The removal and reinstallation of your appliance if it is installed in an inaccessible location or is not installed in accordance with
published installation instructions.
DISCLAIMER OF IMPLIED WARRANTIES; LIMITATION OF REMEDIES
CUSTOMER'S SOLE AND EXCLUSIVE REMEDY UNDER THIS LIMITED WARRANTY SHALL BE PRODUCT REPAIR AS PROVIDED
HEREIN. IMPLIED WARRANTIES, INCLUDING WARRANTIES OF MERCHANTABILITY OR FITNESS FOR A PARTICULAR PURPOSE,
ARE LIMITED TO ONE YEAR OR THE SHORTEST PERIOD ALLOWED BY LAW. WHIRLPOOL SHALL NOT BE LIABLE FOR
INCIDENTAL OR CONSEQUENTIAL DAMAGES. SOME STATES AND PROVINCES DO NOT ALLOW THE EXCLUSION OR LIMITATION
OF INCIDENTAL OR CONSEQUENTIAL DAMAGES, OR LIMITATIONS ON THE DURATION OF IMPLIED WARRANTIES OF
MERCHANTABILITY OR FITNESS, SO THESE EXCLUSIONS OR LIMITATIONS MAY NOT APPLY TO YOU. THIS WARRANTY GIVES
YOU SPECIFIC LEGAL RIGHTS AND YOU MAY ALSO HAVE OTHER RIGHTS, WHICH VARY FROM STATETO STATE OR PROVINCE
TO PROVINCE.
Outside the 50 United States and Canada, this warranty does not apply. Contact your authorized GladiatoF _GarageWorks dealer to
determine if another warranty applies.
If you need service, first see the "Troubleshooting" section of the Use & Care Guide. After checking "Troubleshooting," additional help
can be found by checking the "Assistance or Service" section or by calling Gladiato¢ _GarageWorks. In the U.S.A., call
1-866-342-4089. In Canada, call 1-800-807-6777. 8/o5
Keep this book and your sales slip together for future
reference. You must provide proof of purchase or installation
date for in-warranty service.
Write down the following information about your major appliance
to better help you obtain assistance or service if you ever need it.
You will need to know your complete model number and serial
number. You can find this information on the model and serial
number label located on the product.
Dealer name
Address
Phone number
Model number
Serial number
Purchase date
12
Page 13

13
Page 14

SEGURIDADDELREFRIGERADOR
Su seguridad y la seguridad de los demos es muy importante.
Hemos incluido muchos mensajes importantes de seguridad en este manual yen su electrodomestico. Lea y obedezca siempre
todos los mensajes de seguridad=
Este sfmbolo le llama la atencion sobre peligros potenciales que pueden ocasionar la muerte o una lesidn a
usted y a los dem_.s.
Este es el sfmbolo de advertencia de seguridad.
Todos los mensajes de seguridad iran a continuacidn del simbolo de advertencia de seguridad y de la palabra
"PELIGRO" o "ADVERTENCIA". Estas palabras significan:
Si no sigue las instrucciones de inmediato, usted puede
morir o sufrir una lesion grave.
Si no sigue las instrucciones, usted puede morir o sufrir
una lesion grave.
Todos los mensajes de seguridad le diran el peligro potencial, le diran cdmo reducir las posibilidades de sufrir una lesidn y Io que
puede suceder si no se siguen las instrucciones.
mNSTRUCCmONES mMPORTANTES DE SEGURmDAD
A[}VER'_ENO_,'_: Para reducir el riesgo de incendio, choque electrico, o lesiones personales al usar su refrigerador siga
estas precauciones basicas:
mNo quite la terminal de conexi6n a tierra=
mNo use un cable electrico de extensi6n=
mDesconecte el suministro de energfa antes de darle servicio=
mVuelva a colocar todos los componentes y paneles antes de
hacerio funcionar=
mRemueva Ias puertas de su refrigerador vie]o=
mUse un limpiador no inflamable=
mNo use un adaptador=
mMantenga los materiales y vapores infiamabIes, tales como
gasolina, alejados del refrigerador=
mUse dos o mas personas para mover e instalar el
refrigerador=
mConecte a un contacto de pared de conexi6n a tierra de
3 terminales=
CONSERVAR ESTAS mNSTRUCCmONES
Cbmo deshacerse adecuadamente de su
refrigeradorviejo
Peligro de Asfi×ia
Remueva maspuertas de su refrigerador viejoo
No seguir esta instrucci6n puede ocasionar la rnuerte
o daSo amcerebroo
IMPORTANTE: El atrapamiento y asfixia de niSos no es un problema
del pasado. Los refrigeradores tirados y abandonados son un
peligro, aQn si van a quedar ahi "por unos pocos dias". Si Ud. estA
por deshacerse de su refrigerador viejo, por favor siga las
instrucciones que se dan a continuaci6n para prevenir accidentes.
Antes de tirar su viejo refrigerador o congelador:
• Saque las puertas.
• Deje los estantes en su lugar para que los niSos no puedan
meterse con facilidad.
14
Page 15

INSTRUCCIONESDEINSTALACION
PeHgro de Peso E×cesivo
Use dos o mas personas para mover e insta_ar
el refrigerador.
No seguir esta instrucci6n puede ocasionar una
_esiSn en _a espalda u otto tipo de les}ones.
Ouitar los materiales de empaque
• Quite los residues de cinta y goma de las superficies antes de
encender el refrigerador. Frote un poco de detergente liquido
para vajillas sobre la cinta adhesiva con los dedos. Limpie con
agua tibia y seque.
• No use instrumentos filosos, alcohol para fricciones, liquidos
inflamables, o productos de limpieza abrasives para eliminar los
restos de cinta o goma. Estos productos pueden da6ar la
superficie de su refrigerador. Para m&s informaci6n, vea la
secci6n "Seguridad del refrigerador".
IMPORTANTE: No quite el inserto de espuma blanca que est&
ubicado detr&s del panel de control en el techo del refrigerador. Si se
quita el inserto, el hielo puede bajar del congelador y hacer que se
formen gotas de hielo.
C6mo mover su refrigerador:
Su refrigerador es muy pesado. Cuando mueva su
refrigerador para limpiarlo o dade servicio, proteja eI piso.
AI mover at refrigerador, siempre tire directamente hacia
afuera. No menee el refrigerador de lado a Iade ni Io haga
"caminar" cuando Io trate de mover ya que podria daSar el
piso.
NOTA: Si Ias ruedecillas estan instaladas, quite la traba de
las mismas antes de intentar mover su refrigerador.
Peiigro de Explosi6n
Mantenga los materiales y vapores inflamab_es,
ta_es como gaso_ina, alejados det refrigerador°
No seguir esta instrucci6n puede ocasionar la muerte,
explosi6n, o incendio.
Para asegurar la adecuada ventilaci6n para su refrigerador, deje un
espacio de V2" (1,25 cm) a cada lado y por encima. Si Ud. instala el
refrigerador pr6ximo a una pared fija, deje come minimo 2" (5,08 cm)
en el lado de la bisagra (algunos modelos necesitan m&s espacio)
para permitir que la puerta abra bien.
IMPORTANTE:
• No instale el refrigerador cerca de un homo, radiador u otra
fuente de calor en donde la temperatura aumentar& por encima
de los 115°F (43°C), ni en un lugar en donde la temperatura baje
a menos de 0°F (-17°O).
• Cuanto m&s elevada sea la temperatura externa, m&s demorar&
el refrigerador en enfriarse hasta Ilegar al punto fijo de
temperatura cuando se agreguen alimentos.
F-1F-1
II
//
_/2"{1,25 ore} ......
Limpiar su refrigerador antes de usarlo
Una vez que usted haya quitado todos los materiales de empaque,
limpie el interior de su refrigerador antes de usarlo. Vea las
instrucciones de limpieza en la secci6n "Cuidado de su refrigerador".
_nformaci6n importante para saber acerca de los estantes
y tapas de vidrio:
No Iimpie Ios estantes y tapas de vidrio con agua caliente
mientras est&n fr[os. Los estantes y tapas pueden romperse
si se exponen a cambios bruscos de temperatura o impacto,
como ser[a un golpe brusco. Para su protecci6n, el vidrio
templado se ha diseSado para hacerse aSicos. Esto es normal.
Los estantes y tapas de vidrio son muy pesados. Tenga
touche cuidado al sacarlos para evitar que se da_en aI caer.
II
15
Page 16

Peiigvo de Cheque Em6ctrico
Conecte a un centacte de pared de conexi6n a tierra de
3 terminameso
No quite Jaterminal de conexi6n a tierrao
No use un adaptader.
No use un cable el6ctHce de extensi6n.
No aeguir estas instrucciones puede ocasionar
mamuerte, incendio e cheque el6ctvico.
Antes de mover el refrigerador a su ubicaci6n final, es importante
asegurarse de que tiene la conexi6n el6ctrica adecuada.
M6todo de conexibn a tierra recomendado
Se requiere una fuente de energia el6ctrica de 115 Voltios, 60 Hz.,
CA solamente y con fusibles de 15 6 20 amperios, debidamente
conectada a tierra. Se recomienda que use un circuito separado s61o
para su refrigerador. Use un tomacorriente que no se pueda apagar
con un interruptor. No use un cable el6ctrico de extensi6n.
NOTA: Antes de realizar cualquier tipo de instalaci6n, limpieza o de
quitar un foco de luz, ponga el control (del termostato, del
refrigerador o del congelador dependiendo del modelo) en la
posici6n OFF (Apagado) y luego desconecte el refrigerador de la
fuente de energia. Cuando haya terminado, reconecte el refrigerador
a la fuente de energia el6ctrica y vuelva a poner el control (del
termostato, del refrigerador o del congelador dependiendo del
modelo) en la posici6n deseada.
HERRAMIENTAS NECESARIAS: Ilave de cube de cabeza
hexagonal de 5/lO", destornillador Phillips No. 2, destornillador de
hoja plana, Ilave de boca de 5/16",cuchillo piano para masilla de 2".
IMPORTANTE:
• Todas las ilustraciones a que se hace referenoia en las
instrucciones siguientes est&n incluidas m&s adelante en esta
secci6n despu6s de "Pasos finales." Las ilustraciones muestran
una puerta con sentido de apertura hacia la derecha (bisagras
instaladas en f&brica a la derecha).
• Si usted s61o desea quitar y volver a colocar las puertas, vea las
secciones "C6mo quitar las puertas y las bisagras" y "C6mo
volver a porter las puertas y las bisagras en su lugar".
• Antes de empezar, gire el control a OFF (apagado) y quite todos
los alimentos y cualquier recipiente ajustable o de uso mOltiple
de las puertas.
Cbmo quitar las puertas y las bisagras
Tomillo de bisagra de cabeza hexagonal de _G"
1. Desenchufe el refrigerador o desconecte el suministro de
energia.
2. Abra la puerta del refrigerador y quite la rejilla de la base del
frente inferior del refrigerador. Vea la gr&fica Rejilla de la base.
3. Cierre la puerta del refrigerador y mantenga las dos puertas
cerradas hasta que est6 listo para separarlas del gabinete.
NOTA: Mientras quita las bisagras disponga de un soporte
adicional para las puertas. No se confie en que los imanes de las
puertas van a sosten er6stas mientras trabaja.
4. Quite los componentes de la bisagra superior como se muestra
en la ilustraci6n Bisagra superior. Levante y quite la puerta del
congelador del gabinete.
5, Quite los componentes de la bisagra central como se muestra en
la ilustraci6n de la Bisagra central. Levante y quite la puerta del
refrigerador del gabinete.
6. Quite los componentes de la bisagra inferior como se muestra en
la ilustraci6n Bisagra inferior.
16
Page 17

Cambio del sentido de apertura de las puertas (opcional)
Pasos finales
IMPORTANTE" Si usted desea cambiar el sentido de apertura de las
puertas para que se abran en el sentido opuesto, siga las
instrucciones en "Cambio del sentido de apertura de las puertas
(opcional)". Si usted no va a cambiar el sentido de apertura de las
puertas, yea la seeci6n "C6mo volver a poner la puerta y las bisagras
en su lugar".
Gabinete
1, Quite los tornilles de cabeza hexagonal para bisagra de 5/le" del
lade de la manija y col6queles del lade opuesto. Vea la
ilustraci6n 1.
2. Quite los tapenes de los agujeros de las bisagras de la parte
superior del gabinete y col6quelos en los agujeros de la bisagra
del lade epuesto come se muestra en la ilustraci6n 2.
Puertas
1. Quite los retenes de la puerta del congelador y del refrigerador y
p6ngalos en el lade epuesto. Vea las ilustracienes 3 y 4.
Cbmo volver a poner las puertas y las bisagras en su
lugar
NOTA: Si se cambia el sentido de apertura de la puerta, la imagen de
la puerta pudiera quedar invertida.
1, Vuelva a poner los compenentes de la bisagra inferior en su sitie
come se indica y apriete los tornillos. Vea la ilustraci6n Bisagra
inferior. Vuelva a poner en su lugar la puerta del refrigerador.
NOTA: Mientras quita las bisagras siempre disponga de un
soperte adicional para las puertas. No se confie en que los
imanes de las puertas van a sostener las puertas mientras
trabaja.
2. Ensamble los componentes de la bisagra central come se indica
y apriete todos los tornillos. Vea la ilustraci6n Bisagra central.
Vuelva a poner en su lugar la puerta del congelador.
3. Ensamble los compenentes de la bisagra superior come se
indica en la ilustraci6n Bisagra superior. No apriete
cempletamente los tornillos.
4. Alinee las puertas de tal manera que la parte inferior de la puerta
del congelader est6 alineada uniformemente con la parte
superior de la puerta del refrigerador. Apriete todos los tornillos.
1. Revise tedos los agujeres para cerciorarse que los tapones de
los agujeros y los tornilles est_n en su lugar. Vuelva a colocar en
su lug.ar la tapa de la bisagra superior. Vea la ilustraci6n Bisagra
superior.
2. Coloque en su lugar la rejilla de la base. Vea ilustraci6n Rejilla de
la base.
Pe_igro de Cheque Electdco
Conecte a un contacto de pared de cone×i6n a tierra de
3 terminates.
No quite la termina_ de conexi6n a tierra,
No use un adaptador,
No use un cable electrico de extensi6_°
No eeguir estas instrucciones puede ocasmonar
la muerte, incendio o cheque eiectricoo
3. Conecte a un contacte de pared de conexi6n a tierra de
3 terminales.
4. Restaure los controles. Vea "Use de los controles".
5, Regrese tedas las partes mevibles alas puertas y la comida al
refrigerador.
17
Page 18

Rejilia de la base
Bisagra superior
o.°'°t" ) °°°
/ _|\T .....................................................................A
A. Terni/Ios de bisagra de cabeza
hexagonal de _6"
_ A
A. Tapa de/a bisagra superior
B. Tomi//os de cabeza
hexagonal de la bisagra de _8"
C. Bisagra superior
Bisagra central
A. Bisagra central
B. Tomi//os de cabeza
hexagonal de/a bisagra de 5h_"
Bisagra inferior
A. Tapones de los orificios
de las bisagras del gabinete
C6mo quitar los retenes de
las puertas
B
A. Reten de la puerta
B. Tornillo del reten de la puerta
C6mo volver a instalar
los retenes de la puerta
©
A
A. Reten de la puerta
B. Tornillo del reten de la puerta
A. Bisagra inferior
B. Tomi//os de cabeza
hexagona! de la bisagra de _8"
18
Page 19

NOTA: Si tiene ruedecillas instaladas en su refrigerador, los tornillos
niveladeres no funcienar&n. Se pueden celocar calzas debajo de las
ruedecillas para nivelar un refrigerador que tenga las ruedecillas
instaladas.
Cierre de la puerta
Su refrigerador tiene dos rodillos frontales regulables - uno a la
derecha y otro a la izquierda. Si su refrigerador parece inestable o
usted quiere que las puertas se cierren con mayor facilidad, ajuste la
inclinaci6n del refrigerador usando las instrucciones siguientes:
1. Quite la rejilla de la base. Vea la ilustraci6n de la Rejilla de la
base. Los dos tornillos reguladores son parte de las piezas de
montaje del rodillo frontal, que est_tn en la base del refrigerador a
cada lado.
2. Use un destornillador para ajustar los tornillos reguladores. Gire
el tornillo regulador hacia la derecha para levantar ese lado del
refrigerador o gire el tornillo regulador hacia la izquierda para
bajar ese lado. Puede precisar darle varias vueltas a los tornillos
reguladores para ajustar la inclinaci6n del refrigerador.
NOTA: Haga que alguien empuje la parte superior del
refrigerador, le cual quita algo de peso de los tornilles
reguladores y los redillos. Esto facilita el ajuste de los tornilles.
3. Abra ambas puertas nuevamente y verifique para asegurarse que
se cierran con la facilidad que usted desea. De Io contrario,
incline el refrigerador ligeramente m_ts hacia la parte posterior,
girando ambos tornillos reguladores hacia la derecha. Puede
tomar varias vueltas mAs, y usted deberA girar ambos tornillos
reguladores la misma cantidad de veces.
4. Vuelva a colocar la rejilla de la base.
.........................................................................................................i
Alineamiento de la puerta
Peligro de Peso E×cesivo
Use dos o mac personas para mover e instamar
emrefrigerador.
No seguir esta instrucci6n puede ocasionar una
mesi6n en maespamda u otto tipo de mesiones.
ReOna las herramientas y piezas necesarias antes de comenzar la
instalaci6n.
Herramientae neceeariae:
• Llave de cube o Ilave para • Llave de cube o Ilave para
tuercas de 1/2" tuercas de 3/8"
• Llave de tuercas de 1/2"
Piezae euministradas:
• Ruedecillas rigidas (2) •
• Ruedecillas giratorias (2)
• Contratuercas hexagonales •
de 5J16-- 18 (16)
• Pernos de cabeza hexagonal •
de 5/16--18 X 7/8" (16)
• Pernos autorroscantes de
cabeza hexagonal
de 1A--20 x 11A'' (4)
1. Antes de comenzar, fije el control del refrigerador a OFF
(Apagado).
2. Desenchufe el refrigerador o desconecte el suministro de
energia.
3. Quite todos los alimentos y los estantes ajustables y los
recipientes del refrigerador.
4. Abra la puerta del compartimiento inferior y quite la rejilla de la
base. Quite la rejilla sujetando la misma con ambas manes,
levantando y tirando de la parte inferior de la rejilla hacia usted.
5. Coloque las correderas de pl&stico (enviadas con el refrigerador)
en el piso, dejando per Io menos 3 pies (91,44 cm) entre ellos.
Coloque un trozo de cart6n u otro material protector sobre las
correderas. Esto elevar& el refrigerador para permitir una
instalaciSn m&s f&cil y tambi6n para protegerlo contra rayones.
NOTA: Si las correderas se han desechado o no est&n
disponibles, se pueden usar tablas de 2" x 4".
Arandelas de seguridad
de 1A--20 x 11A'' (4)
Soportes de ruedecillas
(ubicados en el paquete de
piezas) (2)
Correderas de pl&stico
(enviadas con el refrigerador)
Si el espacio entre sus puertas parece desigual, puede ajustarlo
usando las instrucciones siguientes:
1. Quite la cubierta de la bisagra superior.
2. Afloje los tornillos de la bisagra superior usando una Ilave de
cube o de boca de 5/16".
3. Ponga una persona para sostener la puerta en su lugar o
coloque entre las puertas algo que mantenga el espacio mientras
usted ajusta los tornillos de la bisagra superior.
4. Vuelva a colocar la cubierta de la bisagra superior.
19
Page 20

6,
Coloque el refrigerador de costado encima del cart6n o material
protector. Cerci6rese de que la bisagra de la puerta est& mirando
hacia arriba.
IMPORTANT: Es importante que la bisagra de la puerta mire
hacia arriba durante toda la instalaci6n de las ruedecillas.
B
A. Bisagra superior
B. Bisagra central
7. Quite de la caja las ruedecillas y los ajustadores.
8. Localice y quite los soportes de las ruedecillas del paquete de
piezas.
9. Usando los pernos de cabeza hexagonal de 5/16--18 x %" fije una
ruedecilla rigida y una giratoria en cada soporte de ruedecilla. La
ruedecilla rigida encaja en la parte frontal del soporte y la
giratoria en la parte trasera.
10. Inserte los pernos de cabeza hexagonal desde abajo y comience
a apretar las contratuercas de cada ruedecilla.
Esquina inferior frontal
A. Perno nivelador (no Io quite)
B. Perno de la unidad del refrigerador/congelador
13. Coloque la ranura en la parte posterior del soporte de ruedecilla
sobre el orificio en la parte posterior del refrigerador. Alinee el
orificio del frente en el soporte de ruedecilla con el orificio en el
frente del refrigerador.
Esquina inferior trasera
A
A. Contratuerca C. Pemo de cabeza
B, Soporte de ruedecilla hexagonal de sAe-- !8 x 7/8"
11. Sostenga la cabeza de los pernos de cabeza hexagonal con una
Ilave para tuercas mientras aprieta las contratuercas con una
Ilave de cube.
12. Usando una Ilave de tubo de 1/2",quite los cuatro pernos de la
unidad de la parte inferior frontal y de la trasera del refrigerador
(dos en cada lado).
NOTA: No quite el perno nivelador.
D, Ruedecilla
A. Orificie trasero del refrigerador/congelador
B. Soporte de ruedecilla
14. Sostenga el soporte en su lugar e inserte los pemos de la unidad
en los orificios frontales y posteriores de la unidad y apri&telos.
NOTA: No apriete demasiado los pernos.
15. Inserte dos de los pernos autorroscantes de cabeza hexagonal
de 1¼--20 x 11A'' y las contratuercas en los dos orificios del lado
del soporte de ruedecilla. Empuje el soporte de ruedecilla contra
el fondo del refrigerador y apriete los pernos usando una Ilave de
cubo de %".
A. Orificios del soporte de ruedecilla
16. Repita los pasos 12 a115 para el segundo soporte de ruedecilla.
20
Page 21

Cbmo ajustar los controlesComplete la instalacibn
1. Tranque las ruedecillas frontales.
NOTA: El trabar las ruedecillas ayudar_, a prevenir que el
refrigerador se mueva mientras se Io levanta.
2. Inserte un peque6o trozo de cart6n entre el freno de la ruedecilla
y el piso. Esto ayudarA a evitar que el freno frote contra el piso.
3. Coloque el refrigerador verticalmente.
4. Vuelva a colocar la rejilla de la base colocando los ganchos de
metal en las aberturas del panel de metal y deslizando la rejilla
hacia abajo hasta que calce en su lugar.
5, Desbloquee las ruedecillas y mueva el refrigerador hacia su
ubicaci6n final.
6. Trabe las ruedecillas.
USODESUREFRIGERADOR
Los ajustes medios indicados en la secci6n previa deben ser los
correctos para el uso normal de un refrigerador familiar. Los
controles est_.n ajustados correctamente cuando la leche o los jugos
estan tan frios como Ud. desea y cuando el helado tiene
consistencia firme.
Si la temperatura est,. demasiado caliente o demasiado fria en el
refrigerador o en el congelador, primero a evitar los conductos de
ventilaci6n para asegurarse de que no estan bloqueados.
Si necesita regular las temperaturas, utilice como guia los ajustes
que se enumeran en la tabla siguiente. Para modelos con dos
controles, ajuste primero la temperatura del refrigerador. Espere pot
Io menos 24 horas entre un ajuste y otro, y despu6s vuelva a verificar
las temperaturas.
CONDICION/MOTIVO: AJUSTE:
REFRIGERADOR Control del REFRIGERADOR o de
demasiado caliente la TEMPERATURA un ajuste mAs
CONGELADOR demasiado Control del CONGELADOR o de la
caliente TEMPERATURA un ajuste mAs
REFRIGERADOR Control del REFRIGERADOR o de
demasiado frio la TEMPERATURA un ajuste mAs
CONGELADOR demasiado Control del CONGELADOR o de la
frio TEMPERATURA un ajuste m_.s
i
alto
alto
bajo
bajo
CUIDADO DESU
Para su conveniencia, los controles del refrigerador vienen
programados desde la fabrica. AI instalar su refrigerador pot primera
vez, cerci6rese de que los controles aOn est6n prefijados en los
ajustes medios, como se ilustra.
NOTA: Para apagar su refrigerador, gire el control del refrigerador
hacia la palabra Apagado (OFF) o hasta que aparezca la palabra OFR
Su electrodom&stico no se enfriar_, mientras el control del
refrigerador est& en OFR
Ajuste rnedio "3"
O_F
COLDESG
3
NORM_
IMPORTANTE:
• Deje que su refrigerador se enfrie por completo antes de agregar
alimentos. Es mejor esperar 24 horas antes de poner alimentos
en el refrigerador.
• Si agrega alimentos antes de que el refrigerador se haya enfriado
pot completo, sus alimentos podrian echarse a perder. Girar los
controles del refrigerador o congelador a un ajuste m_.s alto (mAs
fifo) que el recomendado no enfriar_, los compartimientos con
mayor rapidez.
REFRIGERADOR
Peligro de E×plosi6n
Use un lirnpiador no inflamableo
No seguir esta instrucci6n puede ocasionar _arnuerte,
e×plosi6n o incendio.
Tanto la secci6n del refrigerador como la del congelador se
descongelan autom&ticamente. No obstante, limpie ambas
secciones m_.s o menos una vez al mes para evitar la acumulaci6n
de olores. Limpie los derrames de inmediato.
IMPORTANTE: Debido a que el aire circula entre ambas secciones,
los olores que se formen en una secci6n pasar_.n a la otra. Para
eliminar los olores, limpie completamente ambas secciones. Para
evitar la transferencia de olores y la deshidrataci6n de los alimentos,
envuelva o tape bien los alimentos.
Para limpiar su refrigerador:
NOTA: No use productos de limpieza abrasivos o _.speros, como
aerosoles para ventanas, productos de limpieza para fregar, liquidos
inflamables, ceras para limpieza, detergentes concentrados,
blanqueadores o productos de limpieza que contengan productos
derivados del petr61eo en las partes de pl&stico, en el interior yen los
revestimientos o juntas de la puerta. No use toallas de papel,
estropajos para fregar u otros utensilios de limpieza &speros.
1, Desenchufe el refrigerador o desconecte el suministro de
energia.
21
Page 22

2. Lave a mano, enjuague y seque todas las partes desmontables y
las superficies interiores meticulosamente. Use una esponja
limpia o un patio liso y un detergente suave en agua tibia.
3. Lave las superficies externas metAlicas pintadas y de acero
inoxidable con una esponja limpia o un pare liso y detergente
suave con agua tibia.
4. No es necesaria una limpieza rutinaria del condensador en
ambientes de funcionamiento normal en el hogar. Si el ambiente
es particularmente grasoso o polvoriento, o si hay bastante
tr_nsito de mascotas en el hogar, el condensador deber_
limpiarse cada dos o tres meses para asegurar la maxima
eficacia.
Si necesita limpiar el condensador:
• Quite la rejilla de la base.
• Use una aspiradora con un cepillo suave para limpiar la
rejilla, las Areas abiertas detr_ts de la rejilla y el Area de la
superficie frontal del condensador.
• Vuelva a colocar la rejilla de la base cuando termine.
5. Enchufe el refrigerador o reconecte el suministro de energia.
SOLUCION DEPROBLEMAS
Primero pruebe las soluciones sugeridas aqui para evitar el costo innecesario de una Ilamada de servicio.
NOTA: No todos los focos son adecuados para su refrigerador.
AsegQrese de reemplazar el foco con otto foco para
electrodom&sticos del mismo tamaRo, forma y vataje.
1. Desenchufe el refrigerador o desconecte el suministro de
energia.
2. Quite el foco que se encuentra detr_s del panel de control en el
refrigerador o detr_ts de la cubierta de la luz en el congelador (en
algunos modelos). Reemplace el foco con un foco del mismo
vatiaje.
3. Enchufe el refrigerador o reconecte el suministro de energia.
El refrigerador no funciona
Peligro de Choque E_ectrico
Conecte a un contacto de pared de co_e×i6_ a tierra de
3 terminates.
No quite la terminat de cone×i6n a tierra.
No use u_ adaptador,
No use un cable e_ectrico de extensi6n,
No seguir estas instrucciones puede ocasio_ar
_amuerte, incendio o choque e_ectrico,
• &Eeta desenchufado el cable el_ctrico? Conecte a un
contacto de pared de conexi6n a tierra de 3 terminales.
• &Funciona el contacto? Enchufe una IAmpara para vet si
funciona el contacto.
• &Hay un fusible de la casa fundido o ee diepar6 el
cortacircuitoe? Reemplace el fusible o reposicione el
cortacircuitos. Si el problema contintJa, Ilame a un electricista.
• &Eeta encendido el control? AsegOrese de que el control del
refrigerador est_ encendido. Vea "Use del control".
• &Es nueva la inetalaci6n? Deje transcurrir 24 horas despues de
la instalaci6n para que el refrigerador se enfrie per complete.
NOTA: El ajustar el control de temperatura en la posici6n m_ts
fria no enfria el refrigerador mdis r_tpido.
Parece que el motor funciona excesivamente
Es posible que su nuevo refrigerador funcione pot periodos m_ts
largos que su refrigerador anterior debido al compresor y los
ventiladores de alto rendimiento. Es posible que la unidad funcione
pot m5s tiempo si la habitaci6n ester caliente, si se ha agregado una
gran cantidad de alimentos, si se abre la puerta con frecuencia o si
se ha dejado la misma abierta.
Parece que el refrigerador es ruidoso
El ruido del refrigerador se ha ido reduciendo a Io largo de los aRos.
Debido a esta reducci6n, es posible que escuche ruidos
intermitentes en su nuevo refrigerador que no habia notado en el
modelo viejo. A continuaci6n se enumeran algunos sonidos
normales con explicaciones.
• Sonido pulsante - los ventiladores/el compresor se est5n
ajustando para obtener el mAximo desempeRo.
• Sonido eibilante/vibracionee - flujo de liquido refrigerante,
movimiento de la tuberia de agua o articulos guardados arriba
del refrigerador.
• Estallido - contracci6n/expansi6n de la paredes interiores,
especialmente durante el enfriamiento inicial.
• Agua corriendo/goteando - puede escucharse cuando el hielo
se derrite durante la descongelaci6n y corre hacia la bandeja
recolectora.
La puerta no cierra completamente
• &Esta bloqueada la puerta? Mueva los paquetes de alimentos
lejos de la puerta.
• &Hay un recipiente o un estante bloqueando el paso? Empuje
el recipiente o el estante nuevamente a la posici6n correcta.
• &Est_ obetruyendo la tapa del compartimiento para
verdurae? Asegt_rese de empujar bien la tapa del
compartimiento para verduras, de manera que la parte posterior
descanse sobre los soportes.
22
Page 23

Esdificilabrirlapuerta
Peligro de E×plosi6n
Use un limpiador no inflamab(e.
No seguir esta instrucciSn p_ede ocasionar (a muerte,
e×plosiSn o incendio.
La temperatura est& demasiado caliente
&Es una nueva instalaci6n? Deje transcurrir 24 horas despu6s
de la instalaciSn para que el refrigerador se enfrie per complete.
&Se abre o se deja la puerta abierta a menudo? Esto hace que
entre aire tibio al refrigerador. Reduzca al minimo el nQmero de
veces que abre la puerta y mantenga la puerta completamente
cerrada.
• &Se ha agregado una gran cantidad de alimentos? Deje que
transcurran vanas horas para que el refrigerador vuelva a la
temperatura normal.
• &Se ha ajustado el control correctamente de acuerdo con las
condiciones circundantes? Ajuste el control un ajuste m&s frio.
Fijese en la temperatura en 24 horas. Vea "Use del control".
• &Est&n las empaquetaduras sucias o pegajosas? Limpie las
empaquetaduras y las superficies de contacto con jab6n suave y
agua tibia. Enjuague y seque con un patio suave.
AYUDA O SERVICIOTECNICO
Antes de solicitar ayuda o servicio t&cnico, per favor consulte la
secci6n "Soluci6n de Problemas". Esto le podria ahorrar el costo de
una visita de servicio t&cnico. Si considera que aOn necesita ayuda,
siga las instrucciones que aparecen a continuaci6n.
Cuando Ilame, tenga a mane la fecha de compra y el nOmero
complete del modelo y de la serie de su electrodom_stico. Esta
informaci6n nos ayudarA a atender mejor a su pedido.
Si necesita piezas de repuesto
Si necesita pedir refacciones, recomendamos que use _nicamente
piezas de repuesto especificadas de fAbrica. Las piezas de repuesto
especificadas de fAbrica encajarAn bien y funcionarAn bien ya que
estAn confeccionadas con la misma precisiSn empleada en la
fabricaci6n de cada electrodom&stico nuevo de Gladiator '_
Garag eWe rks.
Para encontrar piezas de repuesto especificadas de fAbrica en su
Iocalidad, Ilamenos o Ilame al centro de servicio designado mAs
cercano a su Iocalidad.
Llame al Centre para la eXperiencia del cliente de Gladiator _
GarageWorks sin costo alguno ah 1-866-842-4089.
Nuestros consultores ofrecen ayuda para:
• Caracteristicas y especificaciones de nuestra linea completa de
productos.
• Informaci6n sobre la instalaci6n.
Procedimiento para el uso y mantenimiento.
Venta de accesorios y partes para reparaci6n.
Asistencia especializada para el consumidor (habla hispana,
problemas de audici6n, visi6n limitada, etc.).
Recomendaciones con distribuidores locales, compa5ias que
dan servicio y distribuidores de partes para reparaci6n. Los
t6cnicos de servicio designados por Gladiator _"GarageWorks
estAn capacitados para cumplir con la garantia de producto y
ofrecer servicio una vez que la garantia termine, en cualquier
lugar de los Estados Unidos.
Para Iocalizar a una compa5fa de servicio designada pot
Gladiator ®GarageWorks en su Area, tambi&n puede consultar la
secci6n amarilla de su guia telef6nica.
Hay acumulacibn de humedad en el interior
NOTA: Es normal que se acumule un poco de humedad.
• &EetA ht_meda la habitaciSn? Esto contribuye a la acumulaciSn
de humedad.
• &Se abre o se deja la puerta abierta a menudo? Esto hace que
entre aire tibio al refrigerador. Reduzca al minimo el nOmero de
veces que abre la puerta y mantenga la puerta completamente
cerrada.
Para obtener asistencia adicional
Si necesita asistencia adicional, puede escribir a Gladiator _
GarageWorks con sus preguntas o dudas a:
Gladiato¢ _GarageWorks
Customer eXperience Center
553 Benson Road
Benton Harbor, MI 49022-2692
Por favor incluya en su correspondencia un nQmero de tel&fono en el
que se le pueda Iocalizar durante el dia.
)
Para obtener asistencia, instalaci6n o servicio t_cnico, IIAmenos
al 1-800-807-6777.
Nuestros consultores ofrecen ayuda para:
• Caracteristicas y especificaciones de nuestra linea completa de
electrodom6sticos.
• Procedimientos para el use y mantenimiento.
• Venta de accesories y partes para reparaciSn.
• Recomendaciones con distribuidores locales, compa5ias que
dan servicio y distribuidores de partes para reparaci6n. Los
t_cnicos de servicio designados per Gladiato¢ _GarageWorks
estAn capacitados para cumplir con la garantia del producto y
ofrecer servicio una vez que la garantia termine, en cualquier
lugar en CanadA.
Para obtener asistencia adicional
Si necesita asistencia adicional, puede escribir a
Whirlpool Canada LP con sus preguntas o dudas a:
Whirlpool Canada LP
Customer Interaction Centre
1901 Minnesota Court
Mississauga, Ontario L5N 3A7
Por favor incluya en su correspondencia un nQmero de tel&fono en el
que se le pueda Iocalizar durante el dia.
23
Page 24

GARANTIADELOSELECTRODOMESTICOSPRINCIPALESDE
GLADIATOR=GARAGEWORKS
GARANTiA LIMITADA DE UN AI_IO
Durante un a_o a partir de la fecha de compra, siempre y cuando se de a este electrodomestico principal un uso y mantenimiento de
conformidad con las instrucciones adjuntas o provistas con el producto, Whirlpool Corporation o Whirlpool Canada LP (en Io sucesivo
denominado "Gladiator ®GarageWorks") se hara cargo del costo de las piezas de repuesto FSP®y del trabajo de reparaci6n para
corregir defectos en los materiales o en la mano de obra. El servicio debera ser suministrado por una compaSia de servicio designada
por Whirlpool.
GLADIATOR ®GARAGEWORKS NO PAGAR.&.POR LOS SIGUIENTES ARTJCULOS
1. Visitas de servicio tecnico para corregir la instalaci6n de su electrodomestico principal, para ense_arle a usar su electrodomestico
principal, para cambiar o reparar fusibles domesticos o para corregir la instalaci6n electrica o de la tuberia de la casa.
2. Visitas de servicio tecnico para reparar o reemplazar focos para electrodomesticos, filtros de aire o filtros de agua. Esos insumos
estan excluidos de la cobertura de la garantia.
3. Reparaciones cuando su electrodomestico principal se use de un modo diferente al domestico normal de una familia.
4. DaSos causados por accidente, alteraci6n, uso indebido, abuso, incendio, inundaci6n, actos fortuitos, instalaci6n incorrecta,
instalaci6n que no este de acuerdo con los c6digos electricos o de plomeria, o el empleo de productos no aprobados por
Gladiator _ GarageWorks.
5. Cualquier perdida de comida debido a fallas del refrigerador o del congelador.
6. Piezas de repuesto o gastos de reparaci6n para electrodomesticos que se empleen fuera de los Estados Unidos o CanadA.
7. Recogida y entrega. Este electrodomestico principal esta diseSado para ser reparado en el hogar.
8. Reparaciones de piezas o sistemas como resultado de modificaciones no autorizadas que se hayan efectuado en el
electrodomestico.
9. Gastos de viaje y transporte para obtener servicio del producto en lugares remotos.
10. La remoci6n e instalaci6n de su electrodomestico si estuviera instalado en un lugar inaccesible o si no estuviera instalado de
conformidad con las instrucciones de instalaci6n publicadas.
EXCLUSION DE GARANTJAS IMPLJCITAS; LIMITACION DE RECURSOS
EL 0NICO Y EXCLUSIVO RECURSO DEL CLIENTE SEGON LOS TC:RMINOS DE ESTA GARAHTiA LIMITADA SERA EL DE REPARAR
EL PRODUCTO SEGUN SE ESTIPULA EN LA PRESENTE. LAS GARANTiAS IMPLiC.ITAS, INCLUYENDO LAS GARANTiAS DE
COMERCIABILIDAD O DE CAPACIDAD PARA UN PROPOSITO PARTICU.LAR, SERAN LIMITADAS A UN ANO O AL PERIODO MAS
CORTO PERMITIDO POR LEY. WHIRLPOOL NO SE RESPONSABILIZARA POR DANOS INCIDENTALES O CONSECUENTES.
ALGUNOS ESTADOS Y PROVINCIAS NO PERMITEN LAS EXCLUSIONES O LIMITACIONES POR DANOS INCIDENTALES O
CONSECUENTES, O LIMITACIONES ACERCA DECUANTO DEBE DURAR UNA GARANTiA IMPLiCITA DE COMERCIABILIDAD O
CAPACIDAD, D.EMODO QUE LAS LIMITACIONES O EXCLUSI.ONES ARRIBA MENCIONADAS PUEDEN NO APLICARSE EN SU CASO.
ESTA GARANTIA LE OTORGA DERECHOS LEGALES ESPECIFICOS Y ES POSIBLE QUE USTED TENGA TAMBII2N OTROS
DERECHOS QUE PUEDEN VARIAR DE UN ESTADO A OTRO O DE UNA PROVINCIA A OTRA.
Esta garantia no tiene vigor fuera de los cincuenta Estados Unidos y CanadA. P6ngase en contacto con el distribuidor autorizado de
Gladiator ®GarageWorks para determinar si corresponde otra garantia.
Si necesita servicio, consulte primero la secci6n "Soluci6n de problemas" del Manual de uso y cuidado. Despues de consultar la
secci6n "Soluci6n de problemas", puede encontrar ayuda adicional en la secci6n "Ayuda o servicio tecnico", o Ilamando a Gladiator _
GarageWorks. En E.U.A., Ilame al 1-866-342-4089. En CanadA, Ilame al 1-800-807-6777. 8/05
Guarde este libro y su comprobante de compra juntos para
referencia futura. Usted debera proporcionar el comprobante
de la compra o una fecha de instalaci6n para obtener
servicio bajo la garantia.
Escriba la siguiente informaci6n acerca de su electrodomestico
principal para ayudarle mejor a obtener asistencia o servicio
tecnico si alguna vez Ilegara a necesitarlo. Debera tener a mano
el nQmero completo del modelo y de la serie. Usted puede
encontrar esta informaci6n en la etiqueta con el nQmero de
modelo y de serie ubicada en el producto.
Nombre del distribuidor
Direcci6n
Nt_mero de tel_fono
Nt_mero de modelo
Nt_mero de serie
Fecha de compra
24
Page 25

SECURITEDUREFRIGERATEUR
Votre s_curit_ et celle des autres est tr_s importante.
Nous donnons de nombreux messages de securite importants dans ce manuel et sur votre appareil menager. Assurez-vous de
toujours lire tousles messages de securite et de veus y conformer.
Ce symbole cl'alerte de securite vous signale les dangers potentiels de deces et de blessures graves & vous
eta d'autres.
Veici le symbole d'alerte de securite.
Tousles messages de securite suivront le symbole d'alerte de securite et le mot "DANGER" ou
"AVERTISSEMENT". Ces mote signifient :
Risque possible de deces ou de blessure grave si vous ne
suivez pas immediatement lee instructions.
Risque possible de deces ou de blessure grave si vous
ne euivez pas lee instructions.
Teus les messages de securite vous diront quel est le danger potentiel et vous clisent comment recluire le risque de blessure et
ce qui peut se produire en cas de non-respect des instructions.
IMPORTANTES INSTRUCTIONS DE SECURITE
AVERTISSEMENT : Pour reduire les risques d'incendie, de choc electrique ou des blessures lots de I'utilisation du
refrigerateur, prendre quelques precautions fondamentales, y compris les suivantes :
• Brancher I'appareil sur une prise &3 alveoles reliee a la terre.
• Ne pas enlever la broche de liaison a la terre.
• Ne pas utiliser un adaptateur.
• Ne pas utiliser un c&ble de rallonge.
• Utiliser deux ou plus de personnes pour deplacer et installer
le refrigerateur.
• Debrancher la source de courant electrique avant I'entretien.
• Replacer pi_ces et panneaux avant de faire la remise en
marche=
• Utiliser un produit de nettoyage ininflammable.
• Garder les materiaux et les vapeurs inflammables, telle que
I'essence, loin du refrigerateur.
• Enlever les portes de votre vieux refrigerateur.
CONSERVEZ CES INSTRUCTIONS
Miseau rebutde votre vieux r( frig rateur
IMPORTANT : L'emprisonnement et 1'6touffement des enfants ne
sont pas un probl_me du pass&. Lee r_frig_rateurs jet,s ou
abandonn&s sont encore dangereux, m_me s'ils sont laiss_s
abandonn&s pendant "quelques jours seulement". Si vous vous
d_barrassez de votre vieux r_frig_rateur, veuillez suivre les
instructions suivantes pour aider & &viter les accidents.
Avant de jeter votre vieux r_frig_rateur ou cong_lateur :
• Enlever les portes.
• Laisser les tablettes en place de sorte que les enfants ne
puissent pas y p6n&trer facilement.
25
Page 26

INSTRUCTIONSD'INSTALLATION
Risque du poids excessif
Utiliser deux ou plus de persor_r_es pour deplacer et
installer le refrigerateur.
Le r_on-respect de cette instruction peut causer
une blessure au dos ou d'autre blessure,
Enl_vement des mat_riaux d'emballage
• Enlever le ruban adh_sif et la cole des surfaces du r_frig_rateur
avant de le brancher. Frotter une petite quantit& de savon liquide
pour la vaisselle sur I'adh_sif avec les doigts. Rincer A I'eau tilde
et essuyer.
• Ne pas utiliser d'instruments coupants, d'alcool & friction, de
liquides inflammables ou de nettoyants abrasifs pour enlever le
ruban adh_sif ou la cole. Ces produits peuvent endommager la
surface de votre r_frig_rateur. Pour plus de renseignements, voir
la section "S_curit_ du r_frig_rateur".
IMPORTANT : Ne pas enlever le dispositif de refoulement de I'air en
mousse blanche de derriere le panneau de commande sur le plafond
du r_frig_rateur. Si le dispositif est enlev_, de la glace peut se former
en provenance du cong_lateur et causer la formation de glagons.
D_placement de votre refrigerateur :
Votre refrigerateur est Iourd. Lors du deplacement du
refrigerateur pour le nettoyage ou le service, vei/er &
proteger Ie ptancher. Toujours tirer Ie r&frigerateur tout droit
Iors du deplacement. Ne pas incliner Ie refrigerateur d'un
c6te ou de I'autre nile "faire marcher" en essayant de le
deplacer car le plancher pourrait 6tre endommag&
REMARQUE : Si des roulettes sont insta/ees, deverroui/er
les roulettes avant d'essayer de d_placer votre
refrigerateur.
iiii_]<ii{ilSi@i!!_'!lOiS_,8;(:i):!'_,{i!_,!i_y_i_!!])il(]]iOi%!Gi'i,8_f_'lii¸¸
Risque d'explosion
Garder les materiau× et les vapeurs inflammables, tele
que I'essence, loin du refrigerateuro
Le non-respect de cette instruction peut causer
un deces, u_e explosio_ ou u_ ince_die.
Pour obtenir une a_ration appropri_e pour votre r_frig_rateur, laisser
un espace de W' (1,25 cm) de chaque c6t_ et au sommet. Si vous
installez votre r&frig_rateur pros d'un mur fixe, laisser un minimum de
2" (5,08 cm) du c6t_ des charnieres (certains modeles necessitent
davantage d'espace) pour permettre & la porte de s'ouvrir sans
obstruction.
IMPORTANT :
• Ne pas installer le r_frig_rateur pros d'un four, d'un radiateur ou
d'une autre source de chaleur, ni darts un endroit oQ la
temperature montera au-dessus de 115°F (43°C), ou baissera
au-dessous de 0°F (-17°O).
• Plus la temperature ext_rieure est &levee, plus il faut de temps au
r&frig&rateur pour revenir aux points de r&glage de la temp6rature
lots d'ajout d'aliments.
Nettoyage avant I utilisation
Apr_s avoir enlev_ tousles mat&riaux d'emballage, nettoyer
I'int&rieur du r_frig_rateur avant de I'utiliser. Voir les instructions de
nettoyage dans la section "Entretien du r_frig&rateur".
_mportants renseignements a savoir au sujet des tablettes
et des couvercles en verre :
Ne pas nettoyer ies tabiettes ou couvercles en verre avec de
Feau l_de quand/s sont froids. Les tabbttes et Ies
couvercles peuvent se briser s'/s sont exposes & des
changements soudains de temperature ou bun impact teI
que coup brusque. Pour votre protection, le verre trempe est
congu pour eclater en d'innombrables pieces minuscules.
Ceci est normal. Les tabbttes et les couvercles en verre sont
Iourds. Un soin special s'impose Iors de leur deplacement
pour 6viter I'impact d'une chute.
26
II I
2"(5,08cm)
Page 27

Risque de choc electrique
Brancher sur un÷ prise a 3 alveom÷s relie÷ a Jaterre°
Ne pas enmever Ja broche de Jiaison a materre°
Ne pas utH}ser un adaptateur.
Ne pas utiliser un c_ble de rallonge,
L÷ non-respect de ces instructions peut causer
un deces_ un incendie ou un choc eiectriqueo
Avant de placer le r6frig6rateur & son emplacement final, il est
important de vous assurer d'avoir la connexion 61ectrique
appropri6e.
M_thode recommand_e de raise _ la terre
Une source d'alimentation de 115 volts, 60 Hz, type 15 ou
20 amperes CA seulement, prot6g6e par fusible et ad6quatement
mise & la terre, est n6cessaire. II est recommand6 d'utiliser un circuit
distinct pour alimenter uniquement votre r6frig6rateur. Utiliser une
prise murale qui ne peut pas _tre mise hors circuit & I'aide d'un
commutateur. Ne pas utiliser un c&ble de rallonge.
REMARQUE :Avant d'ex6cuter tout type d'installation, nettoyage ou
remplacement d'une ampoule d'6clairage, tourner la commande
(r6glage du thermostat, du r6frig6rateur ou du cong61ateur selon le
mod61e) & OFF (arr_t) et d6connecter ensuite le r6frig6rateur de la
source d'alimentation 61ectrique. Lorsque vous avez termin6,
reconnecter le r6frig6rateur & la source d'alimentation 61ectrique et
tourner de nouveau la commande (r6glage du thermostat, du
r6frig6rateur ou du cong61ateur selon le module) au r6glage d6sir6.
OUTILLAGE NleCESSAIRE : CI6 & douille & t_te hexagonale de 5/16",
tournevis Phillips n° 2, tournevis & lame plate, cl6 plate de 5/16",
couteau & mastic de 2".
IMPORTANT :
• Toutes les illustrations mentionn6es dans les instructions
suivantes sent incluses plus loin dans cette section apr6s
"t_tapes finales". Les illustrations correspondent & un
r_frig_rateur avec porte s'ouvrant &dreite (charni_res install_es &
droite & I'usine).
• Si on ne fait qu'enlever et r_installer les portes, voir "D_montage
- Portes et charni6res" et "R_installation - Pertes et charnieres".
• Avant de commencer, tourner la commande & OFF (arr_t), et
retirer les aliments et tout balconnet r_glable ou compartiment
utilitaire des pertes.
D_montage - Portes et charni_res
Vis de charniere a t_te hexagonale de %6"
1. D_brancher le r_frig6rateur ou d_connecter la source de courant
_lectrique.
2. Ouvrir la porte du r_frig_rateur; enlever la grille de la base en bas
I'avant du r_frig_rateur. Veir I'illustration de la grille de la base.
3. Fermer la porte du r_frig6rateur; maintenir les deux portes
ferm_es jusqu'au moment oQ on est pr_t & les s_parer de la
caisse de I'appareil.
REMARQUE : Pr_voir un support additionnel des pertes
pendant la r_installation des charni_res. La force d'attraction des
aimants des portes ne suffit pas & les maintenir en place.
4. Enlever les pieces de la charniere sup_rieure - veir I'illustration de
la charni_re sup_rieure. Seulever la porte du compartiment de
cong_lation pour la s_parer de la caisse.
5. Enlever les pi_ces de la charni6re centrale - voir I'illustration de la
charni_re centrale. Soulever la porte du r_frig_rateur pour la
s_parer de la caisse.
6. Enlever les pi_ces de la charni_re inf_rieure - voir I'illustratien de
la charni_re inf_rieure.
27
Page 28

Inversion des portes (facultatif)
Etapes finales
IMPORTANT : Si on souhaite inverser la position des portes pour
pouvoir les ouvrir dans la direction oppos6e, voir les instructions
dans "Inversion des portes (facultatif)". S'il n'est pas n6cessaire de
changer I'orientation des portes, voir la section
"R6installation - Portes et charni_res".
Caisse
1. Enlever les vis & t_te hexagonale de 5/16"de la charni_re (c6t6
poign6e); transf@er ces pi_ces du c6t& oppos& Voir
I'illustration 1.
2. Enlever les bouchons d'obturation des trous au sommet de la
caisse; transf@er ceux-ci dans les trous de charniere du c6t6
oppos& Voir I'illustration 2.
Pontes
1. Enlever les but6es de porte du r6frig6rateur et du cong61ateur et
les transf@er du c6t& oppos&. Voir les illustrations 3 et 4.
R_installation - Portes et charni_res
REMARQUE : Si on inverse le sens d'ouverture des portes,
consid&rer I'image sym&trique.
1, Replacer les pieces de la charni_re inf@ieure tel qu'illustr& et
resserrer les vis. Voir I'illustration de la charni_re inf&rieure.
Replacer la porte du r_frig@ateur.
REMARQUE : Pr_voir un support additionnel des portes
pendant la r&installation des charni_res. La force d'attraction des
aimants des portes ne suffit pas &les maintenir en place.
2. Assembler les pi_ces de la charni_re centrale. Voir I'illustration.
Serrer toutes les vis. Voir I'illustration de la charni_re centrale.
Replacer la porte du compartiment de cong_lation.
3. Assembler les pieces de la charniere sup@ieure. Voir I'illustration
de la charniere sup@ieure. Ne pas compl@ement serrer les vis.
4. Aligner correctement les portes au niveau du bas de la porte du
compartiment de cong_lation et du sommet de la porte du
r&frig@ateur. Serrer toutes les vis.
1. Inspecter tous les trous. V@ifier que tousles bouchons
obturateurs et vis sont en place. R_installer le couvercle de la
charni_re sup@ieure. Voir I'illustration - charni_re sup_rieure.
2. R_installer la grille de la base. Voir I'illustration - grille de la base.
Risque de choc electrique
Brancher sur une prise a 3 a_veo_es retiee a la terre.
Ne pas en_ever la broche de _iaiso_ a _aterre.
Ne pas utiliser un adaptateur.
Ne pas utiliser un cSble de raHo_ge.
Le _omrespect de ces instructions peut causer
u_ deces, un i_cendie ou un choc eiectrique.
3. Brancher sur une prise & 3 alv_oles reli_e & la terre.
4. Effectuer les r_glages n&cessaires. Voir "Utilisation des
commandes".
5. R_installer les balconnets et autres pieces amovibles; r_partir les
aliments sur les balconnets.
28
Page 29

Grille de la base
o ' .... ooo
A, Vis de chamiere _ _'#te hexagonale
de _/_"
Chamiere sup6rieure
A. Couvercle de charnibre superieure
B. Vis de charni#re _ t#te hexagonale
de _/_"
C. Chami_re superieure
Chamiere centraie
A. Charni#re centrale
B. V/s de charni#re a t6te hexagonaJe
de %_"
A ...................
A. Bouchons obturateurs de charni&re de la caisse
Enlevement des butees de porte
A
0
A
B
Reinstallation des but6es de porte
A. Charniere inferieure
B. Vis de charni&re a t_te hexagonale
de _/_"
<l,ll,.
o
A. Butee de porte
B. Vis de butte de porte
29
Page 30

i!_i_iilfUdi'_{W'i%W'ii__<tiiii_;!>Sii:ii_O_!qi,_ii:>:_i:ii:,i
REMARQUE : Si votre r6frig6rateur est muni de roulettes, les vis de
nivellement ne fonctionneront pas. Dans ce cas, il est possible de
placer des cales sous les roulettes pour niveler le r6frig6rateur.
Fermeture des portes
Votre r&frig6rateur pr_sente deux roulettes r&glables _ I'avant - I'une
du c6t& droit et I'autre du c6t_ gauche. Si votre r&frig6rateur semble
instable ou si vous d_sirez que les portes se ferment plus facilement,
faire le r&glage de I'inclinaison du r_frig&rateur en suivant les
instructions ci-dessous :
1. Enlever la grille de la base. Voir I'illustration - Grille de la base.
Les deux vis de nivellement font partie des montages de
roulettes avant qui sont _ la base du r&frig&rateur d'un c6t& et de
I'autre.
2. Utiliser un tournevis pour ajuster les vis de nivellement. Tourner la
vis de nivellement vers la droite pour soulever ce c6t_ du
r&frig6rateur ou tourner la vis de nivellement vers la gauche pour
abaisser ce c6t& Plusieurs tours des vis de nivellement peuvent
_tre n_cessaires pour r&gler I'inclinaison du r6frig_rateur.
REMARQUE : Si une autre personne pousse le haut du
r_frig_rateur, le poids devient moins Iourd sur les vis de
nivellement et les roulettes, ce qui rend plus facile I'ajustement
des vis.
3. Ouvrir les deux portes de nouveau et s'assurer qu'elles se
ferment aussi facilement que vous le d_sirez. Sinon, incliner le
r&frig_rateur un peu plus vers I'arri_re en tournant les deux vis de
nivellement vers la droite. Plusieurs tours peuvent _tre
n&cessaires et vous devez tourner les deux vis de nivellement
d'un espace 6gal.
4. R_installer la grille de la base.
Alignement des portes
Si I'espace entre les portes semble in_gal, on peut faire le r&glage en
suivant les instructions ci-dessous :
1. Soulever et enlever le couvercle de la charni_re sup6rieure.
2. D6gager les vis de la charni6re sup_rieure en utilisant une douille
de 5/16"ou une cl&.
3. Demander _ une personne de tenir la porte en place ou placer un
espaceur entre les portes pendant que vous serrez les vis de la
charni_re sup_rieure.
4. R_installer le couvercle de la charniere sup6rieure.
Risque du poids excessif
Utiliser deux ou plus de personnes pour deplacer et
installer le refrigerateur.
Le non-respect de cette instruction peut causer
une blessure au dos ou d'autre blessure.
Rassembler les outils et pi_ces n_cessaires avant de commencer
I'installation.
OUTILS NI_CESSAIRES :
• Tourne-_crou ou cl_ & douille • Tourne-_crou ou cl6 & douille
de 1/2" de 3/8"
• CI_ de 1/2"
PIECES FOURNIES :
• Roulettes non orientables (2) • Rondelles-freins
• Roulettes pivotantes (2) 1¼_20 x 11A" (4)
• t_crous indesserrables • Brides de roulette (dans le
5/16--18 (16)
• Vis & t_te hexagonale • Barres d'appui de plastique
5/16--18 x 7/8"(16) r&frig6rateur)
• Boulons & t_te hexagonale
autotaraudants 1A--20 x 11A" (4)
1. Avant d'entreprendre I'installation, placer la commande du
r&frig&rateur a la position d'arr_t.
2. D6brancher le r&frig_rateur ou d_connecter la source de courant
_lectrique.
3. Retirer du r_frig_rateur tousles aliments et les 6tag_res et bacs
qui s'y trouvent.
4. Ouvrir la porte du compartiment inf_rieur et retirer la grille de la
base : saisir la grille avec les deux mains, soulever et tirer le bas
de la grille vers I'avant.
5. Placer les barres d'appui de plastique (exp&di&es avec le
r&frig_rateur) sur le sol (espacement d'au moins 3 pi (91,44 cm).
Placer par-dessus les barres d'appui une feuille de carton ou
autre mat_riau protecteur; le r_frig6rateur sera ainsi plus haut, ce
qui facilitera I'installation des roulettes et le prot_gera contre les
_raflures.
REMARQUE : Si les barres d'appui ont _t_ jet_es ou ne sont pas
disponibles, on peut utiliser des trongons de poteau de
bois 2" x 4".
sachet de pieces) (2)
(exp&di6es avec le
30
Page 31

6.
Placer le r6frig@ateur en appui sur son c6t6, par-dessus la feuille
de carton ou autre mat&riau de protection. Veiller & ce que la
charni@e de porte soit orient&e vers le haut.
IMPORTANT : II est important que la charni&re de porte soit
erient&e vers le haut durant tout le precessus d'installation des
roulettes.
Angle inf_rieur/avant
A
.[3
A. Charniere sup#rieure
B. Charniere centrale
7. Retirer de la bofte les roulettes et les organes de fixation.
8. Retirer du sachet de pi&ces les brides de roulette.
9. Utiliser des visa t&te hexagonale 5/16--18 x 7/s"pour fixer une
roulette non orientable et une roulette pivotante sur chaque bride
de roulette. La roulette non orientable dolt &tre plac6e _ I'avant
de la bride, et la roulette pivotante dolt &tre plac6e & I'arri&re.
10. Ins@er les vis par le dessous et visser les 6crous sur les vis de
fixation de chaque roulette.
B
A. Vis de r_glage de I'aplomb (nepas enlever)
B. Vis du r_frig_rateur/cong_lateur
13. Positionner la bride de roulette pour que la fente & I'arri&re soit
align6e avec le trou _ I'arri&re du r6frig@ateur. Aligner le trou de
I'avant de la bride de roulette avec le trou de I'avant du
r&frig@ateur.
Angle inf_rieur/arri_re
A. Ecrou indesserrable C. Visa t_te hexagonale sAei 18 x %"
B. Bride de roulette D. Roulette
11. Pour le serrage final des &crous indesserrables avec une cl6
douille, immobiliser la vis avec une cl&
12. A I'aide d'une cl& & douille de 1/2",enlever les quatre vis (deux de
chaque c6t6) a I'avant et _ I'arri@e du r&frig@ateur (partie
inf&rieure).
REMARQUI= : Ne pas enlever la vis de r&glage de I'aplomb.
A. Trou arriere du r_frig_rateur/cong_lateur
B. Bride de roulette
14. Maintenir la bride en place, et ins@er les vis dans les trous
I'avant et _ I'arri&re du r6frig@ateur; visser et serrer les vis.
REMARQUE : Ne pas serrer excessivement.
15. Dans les deux trous sur le c6t6 de la bride de roulette, ins@er
deux boulons _ t&te hexagonale autotaraudants 1¼--20 x 11A''
munis de leur rondelle-frein. Pousser la bride de roulette contre le
fond du r&frig&rateur, et serrer les vis avec une cl6 a douille
de %".
A. Trous pour bride de roulette
16. R&p6ter les &tapes 12 _ 15 pour la seconde bride de roulette.
31
Page 32

AcheverI'installation
Ajustement des r_glages de commandes
1. Bloquer les roulettes avant.
REMARQUE : Le blocage des roulettes aide & emp&cher le
r&frig&rateur de bouger au moment de le soulever.
2. Ins&rer un petit morceau de carton entre le frein de roulette et le
sol; ceci emp&chera le frein de frotter sur le sol.
3. Remettre le r&frig&rateur & la position verticale.
4. R&installer la grille de la base : ins&rer les agrafes m&talliques
dans les ouvertures du panneau m&tallique, et faire pivoter ]a
grille vers le bas jusqu'& I'emboftement.
5. D&bloquer les roulettes et pousser le r&frig&rateur jusqu'& sa
position de service.
6. Bloquer les roulettes.
U]'ILISAI ION
DU REFRIGERATEUR
Les r&glages moyens indiqu&s & la section pr&c&dente devraient &tre
corrects pour ]'utilisation normale du r&frig&rateur domestique. Les
r&glages sont faits correctement Iorsque le lait ou le jus est aussi
froid que vous I'aimez et Iorsque la cr&me glac&e est ferme.
Si la temp&rature est trop ti&de ou trop froide dans le r&frig&rateur ou
le cong&lateur, v&rifier d'abord les &vents pour vous assurer qu'ils ne
sont pas bloqu&s.
S'i] est n&cessaire d'ajuster les temp&ratures, utiliser les r&glages
indiqu&s au tableau ci-dessous comme guide. Sur les mod&les
deux commandes, ajuster d'abord la temp&rature du r&frig&rateur.
Attendre au moins 24 heures entre les ajustements, puis rev&rifier les
temp&ratures.
_ON DiTioN/RAiSON i AJ USTEMENT i
REFRIGERATEUR trop R_.gler la commande du
ti&de REFRIGERATEUR ou de la
CONGt_LATEUR trop R&gler !a commande du
ti&de CONGELATEUR ou de la
REFRIGt_RATEUR trop R_.gler la commande du
froid REFRIGERATEUR ou de la
CONGt_LATEUR trop R&gler !a commande du
froid CONGELATEUR ou de la
TEMPt_RATURE & un degr& plus haut
TEMPt_RATURE & un degr& plus haut
TEMPt_RATURE & un degr& plus bas
TEMPt_RATURE a un degr& plus bas
ENTRETIENDU REFRIGERATEUR
Pour vous accommoder, les commandes du r&frig&rateur ont &t&
pr&r&gl&es a I'usine. Au moment de I'installation initiale du
r&frig&rateur, s'assurer que les commandes sent encore pr&r&gl&es
aux r&glages moyens tel qu'illustr&.
REMARQUE : Pour &teindre le r&frig&rateur, tourner le r&glage au
mot OFF ou jusqu'& ce que le mot OFF (arr&t) apparaisse. Votre
appareil ne se refroidira pas Iorsque la commande du r&frig&rateur
est r&gl&e & OFF (arr&t).
R_glage rnoyen "3"
5 1
COLDES0
3
NORMAL
R_glage moyen "3"
IMPORTANT :
Donner au r&frig&rateur le temps de se refroidir compl&tement
avant d'y ajouter des aliments. 11vaut mieux attendre 24 heures
avant de placer des aliments dans le r&frig&rateur.
Si vous ajoutez des aliments avant que le r&frig&rateur n'ait
compl&tement refroidi, vos aliments peuvent se g&ter. Tourner les
r&glages du r&frig&rateur et du cong&lateur & un niveau plus
&lev& (plus freid) que les r&glages recemmand&s ne refroidira pas
les compartiments plus vite.
Risque d'explosion
Utiliser un produit de nettoyage inirfflamrnable.
Le non=respect de cette instruction peut causer un deces,
u_e explosion ou un i_ce_die.
Les sections de r&frig&ration et de cong&lation se d&givrent
automatiquement. Toutefois, nettoyer les deux sections environ une
fois par mois pour &viter une accumulation d'odeurs. Essuyer les
renversements imm&diatement.
IMPORTANT : Comme I'air circule entre ]es deux sections, toutes les
odeurs form&es dans une section seront transf&r&es a I'autre. Vous
devez nettoyer & fond les deux sections pour &liminer les odeurs.
Pour &viter le transfert d'odeurs et I'ass&chement des aliments,
envelopper ou recouvrir herm&tiquement les aliments.
Nettoyage de votre r_frig_rateur :
REMARQUE : Ne pas utiliser des nettoyants abrasifs tels que les
nettoyants & vitre en atomiseurs, nettoyants & r&curer, liquides
inflammables, cites nettoyantes, d&tergents concentr&s, eau de Javel
ou nettoyants contenant du p&trole sur les pi&ces en piastique, les
garnitures int&rieures et de portes ou les joints de portes. Ne pas
utiliser d'essuie-tout, tampons & r&curer ou autres outils de
nettoyage abrasifs.
1. D&brancher le r&frig&rateur ou d&connecter la source de courant
&lectrique.
2. Laver & la main, rincer et s&cher les pi&ces amovibles et les
surfaces internes & fond. Utiliser une &ponge propre ou un linge
doux et un d&tergent doux dans de I'eau ti&de.
32
Page 33

3.
Laver les surfaces ext@ieures en acier inoxydable ou en m6tal
peint avec une &ponge propre ou un linge doux et un d&tergent
doux dans de I'eau tiede.
4.
Le condenseur n'a pas besoin d'etre nettoy6 souvent dans des
conditions de fonctionnement normales. Si I'environnement est
particuli_rement graisseux, poussi@eux, ou s'il y a des animaux
domestiques dans la maison, le condenseur devrait _tre nettoy&
tousles deux ou trois mois pour assurer une efficacit6 maximum.
Si vous avez besoin de nettoyer le condenseur :
• Retirer la grille de la base.
• Utiliser un aspirateur & brosse douce pour nettoyer la grille,
les endroits ouverts derriere la grille et la surface & I'avant du
condenseuK
• Replacer la grille de la base Iorsqu'on a termin&
5,
Brancher le r6frig@ateur ou reconnecter la source de courant
61ectrique.
DI PANNAGE
Essayer les solutions sugg_r_es ici d'abord afin d'_viter le coOt d'une visite de service non n_cessaire.
REMARQUE : Toutes les ampoules ne s'adaptent pas forc&ment &
votre r6frig@ateur. S'assurer de remplacer I'ampoule par une
ampoule pour appareils m6nagers de m_me taille, forme et
puissance.
1. D6brancher le r&frig@ateur ou d6connecter la source de courant
61ectrique.
2. Saisir I'ampoule situ6e derri@e le tableau de commande dans le
r6frig@ateur ou derriere le protege-ampoule dans le cong61ateur
(sur certains modules) et la d6visser. Remplacer I'ampoule par
une ampoule de m_me puissance.
3. Brancher le r6frig6rateur ou reconnecter la source de courant
61ectrique.
Le r_frig_rateur ne fonctionne pas Le moteur semble trop tourner
II se peut que votre nouveau r_frig_rateur fonctionne plus Iongtemps
que I'ancien gr&ce a son compresseur b. haute efficacit_ et ses
ventilateurs. L'appareil peut fonctionner plus Iongtemps encore si la
temp@ature de la piece est chaude, si une importante quantit6 de
nourriture y est ajout_e, si la porte est fr&quemment ouverte ou si elle
a &t& laiss_e ouverte.
Le r_frig_rateur semble bruyant
Le bruit des r&frig&rateurs a &t& r_duit au cours des ann_es. Du fait
Risque de choc electrique
Brancher sur une prise a 3 aJveomesreliee a la terre.
Ne pas enlever la broche de liaison ama terre.
Ne pas utiliser un adaptateur.
Ne pas utiliser un cSbmede rallongeo
Le norPrespect de ces instructions peut causer
un d6ces, un incendie ou un choc 61ectrique.
• Le cordon d'alimentation _lectrique est-il d_branch_?
Brancher sur une prise _ 3 alv6oles reli6e _ la terre.
• La prise _lectrique fonctionne-t-elle? Brancher une lampe
pour voir si la prise fonctionne.
• Un fusible est-il grill_ ou un disjoncteur s'est-il ouvert?
Remplacer le fusible ou r6enclencher le disjoncteur. Si le
probleme persiste, appeler un &lectricien.
• La commande est-elle en marche? S'assurer que la
commande du r_frig&rateur est bien en marche. Voir "Utilisation
de la commande".
• S'agit-il d'une nouvelle installation? Accorder 24 heures apr_s
I'installation pour que le r_frig@ateur se refroidisse
compl_tement.
REMARQUE : R&gler la commande de temp@ature sur la
position la plus froide ne fera pas refroidir le r&frig&rateur plus
rapidement.
de cette r_duction, il est possible d'entendre des bruits intermittents
venant de votre nouveau r_frig&rateur qui n'avaient pas _t_ d&cel&s
avec votre ancien module. Voici une liste des sons normaux
accompagn&s d'explications.
• Pulsation - les ventilateurs/le compresseur se r_glent afin
d'optimiser la performance.
• Sifflement/cliquetis - _coulement de liquide r_frig@ant,
mouvement des conduites d'eau ou d'objets pos_s sur le dessus
du r_frig@ateur.
• Bruit d'_claternent - contraction/expansion des parois internes,
particuli_rement Iors du refroidissement initial.
• Bruit d'_coulement d'eau - peut _tre entendu Iorsque la glace
fond Iors du programme de d_givrage et que I'eau s'_coule dans
le plateau de d&givrage.
La porte ne se ferme pas compl_tement
• La porte est-elle bloqu_e en position ouverte? D&placer les
emballages d'aliments pour lib@er la porte.
• Un compartiment ou une tablette bloquent-ils le passage?
Replacer le compartiment ou la tablette en position correcte.
• Le couvercle du bac a I_gumes fait-il obstruction? V&rifier que
le couvercle du bac & I_gumes est enfonc_ completement de
sorte que I'arri@e repose sur les supports.
33
Page 34

Laporteestdifflcile& ouvrir
Risque d"e×pJosion
Utiliser un produit de nettoyage ininflamrnable.
Le nomrespect de cette instruction peut causer un deces,
une e×pmosion ou un incendie°
• Les joints d _tanch_it_ sont-ils sales ou collants? Nettoyer les
joints et les surfaces de contact au savon doux et & I'eau tilde.
Rincer et s6cher avec un linge doux.
i
¸¸
La temperature est trop _lev_e
• S'agit-il d'une nouvelle installation? Accorder 24 heures apr6s
I'installation pour que le r6frig6rateur se refroidisse
compl_tement.
• La porte est ouverte fr_quemment ou a _t_ laiss_e ouverte?
Ceci permet & I'air chaud de p&n6trer dans le r&frig6rateur.
R6duire le nombre d'ouvertures de la porte et la maintenir
compl_tement ferm6e.
• Une importante quantit_ d'aliments a-t-elle _t_ ajout_e?
Accorder quelques heures pour que le r6frig6rateur revienne & sa
temp&rature normale.
• Les r_glages sont-ils corrects pour les conditions
existantes? Ajuster les commandes & un r_glage plus froid.
V6rifier la temp6rature au bout de 24 heures. Voir "Utilisation de
la commande".
II y a une accumulation d'humidit_ & rint_rieur
REMARQUE : Une certaine accumulation d'humidit_ est normale.
• La piece est-elle hurnide? Ceci contribue & I'accumulation de
I'humidit_.
La porte est ouverte fr_quemment ou a _t_ laiss_e ouverte?
Ceci permet b.I'air humide de p&n_trer dans le r6frig_rateur.
R_duire le hombre d'ouvertures de la porte et la maintenir
compl_tement ferm&e.
ASSISTANCEOU SERVICE
Avant de faire un appel pour assistance ou service, veuillez verifier
"D_pannage". Cette v_rification peut vous faire _conomiser le coot
d'une visite de service. Si vous avez encore besoin d'aide, suivre les
instructions ci-dessous.
Lots d'un appel, veuillez connaftre la date d'achat et les num&ros au
complet de module et de s_rie de votre appareil. Ces
renseignements nous aideront & mieux r_pondre & votre demande.
Si vous avez besoin de pi_ces de rechange
Si vous avez besoin de commander des pi_ces de rechange, nous
vous recommandons d'utiliser des pi_ces de rechange sp_cifi_es par
I'usine. Les pi_ces de rechange sp_cifi_es par I'usine conviendront et
fonctionneront bien parce qu'elles sont fabriqu6es avec la m_me
pr&cision utilis_e pour fabriquer chaque nouvel appareil Gladiator _
GarageWorks.
Pour Iocaliser des pi_ces de rechange sp_cifi_es par I'usine darts
votre r&gion, nous appeler ou t_l&phoner au centre de service
d_sign& le plus proche.
Pour assistance, installation ou service, nous appeler au
1-800-807-6777.
Nos consultants fournissent de I assistance pour :
• Caract_ristiques et specifications de notre gamme complete
d'appareils m&nagers.
• Proc_d&s d'utilisation et d'entretien.
• Vente d'accessoires et de pi_ces de rechange.
• Les r&f_rences aux concessionnaires, compagnies de service de
r¶tion et distributeurs de pieces de rechange Iocaux. Les
techniciens de service d&sign_s par Gladiator ®GarageWorks
sont form,s pour remplir la garantie des produits et fournir un
service apr_s garantie partout au Canada.
Pour plus d'assistance
si vous avez besoin de plus d'assistance, vous pouvez _crire &
Whirlpool Canada LP en soumettant toute question ou probl_me & :
Whirlpool Canada LP
Customer Interaction Centre
1901 Minnesota Court
Mississauga, Ontario L5N 3A7
Dans votre correspondance, veuillez indiquer un num&ro de
t&16phone o_ I'on peut vous joindre dans la joum&e.
I
34
Page 35

GARANTIEDESGROS APPAREILSMENAGERS
GLADIATOR=GARAGEWORKS
GARANTIE LIMITC:E DE UN AN
Pendant un an a compter de la date d'achat, Iorsque ce gros appareil menager est utilise et entretenu conformement aux instructions
jointes a ou fournies avec le produit, Whirlpool Corporation ou Whirlpool Canada LP (ci-apres designees "Gladiator ° GarageWorks")
paiera pour les pieces de rechange FSP° et la main-d'oeuvre pour corriger les vices de materiaux ou de fabrication. Le service dolt _tre
fourni par une compagnie de service designee par Whirlpool.
GLADIATOR ®GARAGEWORKS NE PRENDRA PAS EN CHARGE
1. Les visites de service pour rectifier I'installation du gros appareil menager, montrer a I'utilisateur comment utiliser I'appareil,
remplacer ou reparer des fusibles ou rectifier le c&blage ou la plomberie du domicile.
2. Les visites de service pour reparer ou remplacer les ampoules electriques de I'appareil, les filtres a air ou les filtres a eau. Ces
pieces consomptibles ne sent pas couvertes par la garantie.
3. Les reparations Iorsque le gros appareil menager est utilise a des fins autres que I'usage unifamilial normal.
4. Les dommages imputables a : accident, modification, usage impropre ou abusif, incendie, inondation, actes de Dieu, installation
fautive ou installation non conforme aux codes d'61ectricite ou de plomberie, ou I'utilisation de produits non approuves par
Gladiator _ GarageWorks.
5. Toute perte d'aliments due a une defaillance du refrig6rateur ou du congelateur.
6. Le coot des pieces de rechange et de la main-d'oeuvre pour les appareils utilises hors des Ctats-Unis ou du Canada.
7. Le ramassage et la livraison. Ce gros appareil menager est congu pour _tre repare a domicile.
8. Les reparations aux pieces ou systemes resultant d'une modification non autorisee faite a I'appareil.
g. Les frais de transport pour le service d'un produit dans les regions eloign6es.
10. La depose et la reinstallation de votre appareil si celui-ci est installe dans un endroit inaccessible ou n'est pas installe
conformement aux instructions d'installation fournies.
CLAUSE D'EXONI:!:RATION DE RESPONSABILIT¢ AU TITRE DES GARANTIES IMPLICITES; LIMITATION DES RECOURS
LE SEUL ET EXCLUSIF RECOURS DU CLIENT DANS LE CADRE DE LA PRESENTE GARANTIE LIMITEE CONSlSTE EN LA
REPARATION PRC:VUE CI-DESS, US. LES GARANTIES IMPLICITES, Y COMPR,IS LES GARA,NTIES APPLICABLES DE QUALIT¢
MARCHANDE ET D'APTITUDE A UN USAGE PARTICULIER, SONT LIMITEES A UN AN OU A LA PLUS COURTE PERIODE AUTORISC:E
PAR LA LOI. WHIRLPOOL N'ASSUME AUCUNE RESPONSABILITE POUR LES DOMMAGES FORTUITS OU INDIRECTS. CERTAINES
JURIDICTIONS NE PERMETTENT PAS L'EXCLUSION OU LA LIMITATION DES DOMMAGES FORTUITS OU INDIRECTS, OU LES
LIMITATIONS DE LA DURC:EDES GARANTIES IMPLICITES DE QUALIT¢: MARCHANDE OU D'APTITUDE ,&,UN USAGE PARTICULIER,
DE SORTE QUE CES EXCLUSIONS OU LIMITATIONS PEUVENT NE PAS S'APPLIQUER DANS VOTRE CAS. CETTE GARANTIE VOUS
CONFERE DES DROITS JURIDIQUES SPI2CIFIQUES ET VOUS POUVEZ 12GALEMENT JOUIR D'AUTRES DROITS QUI PEUVENT
VARIER D'UNE JURIDICTION A UNE AUTRE.
/_,I'exterieur du Canada et des 50 12tatsdes 12tats-Unis, cette garantie ne s'applique pas. Contacter votre marchand GladiatoF _
GarageWorks autorise pour determiner si une autre garantie s'applique.
Si vous avez besoin de service, voir d'abord la section "Depannage" du Guide d'utilisation et d'entretien. Apr_s avoir verifie la section
"Depannage", de I'aide supplementaire peut _tre trouvee en verifiant la section "Assistance ou service" ou en appelant Gladiator c_
GarageWorks. Aux Ctats-Unis, composer le 1-866-342-4089. Au Canada, composer le 1-800-807-6777. 8/05
Conservez ce manuel et votre regu de vente ensemble pour
r_f_rence ulterieure. Pour le service sous garantie, vous
devez presenter un document prouvant la date d'achat ou
d'installation.
Inscrivez les renseignements suivants au sujet de votre gros
appareil menager pour mieux vous aider a obtenir assistance ou
service en cas de besoin. Vous devrez connaftre le num_ro de
modele et le numero de serie au complet. Vous trouverez ces
renseignements sur la plaque signaletique situee sur le produit.
Nora du marchand
Adresse
Num_ro de tdl_phone
Num_ro de module
Num_ro de s_rie
Date d'achat
35
Page 36

2314467B
© 2006 Whirlpool Corporation.
All rights reserved. ® Registered Trademark/TM Trademark of Whirlpool, U,S,A., Whirlpool Canada LP Licensee in Canada
Todos los derechos reservados. ® Marca registrada/TM Marca de comercio de Whirlpool, U,S.A,, usada bajo licencia de Whirlpool Canada LP en Canada
Tous droits r6serv_s. ® Marque depos6e/TM Marque de commerce de Whirlpool, U,S.A., emploi licenci_ par Whirlpool Canada LP au Canada
Printed in U,S,A.
Impreso en EE_UU.
Imprim_ aux E,-U.
10/06
 Loading...