

Page 1
8LCH-KK-SC-SSF © 2014 Electrotemp Technologies Inc. PN: 5M010303XX03-E
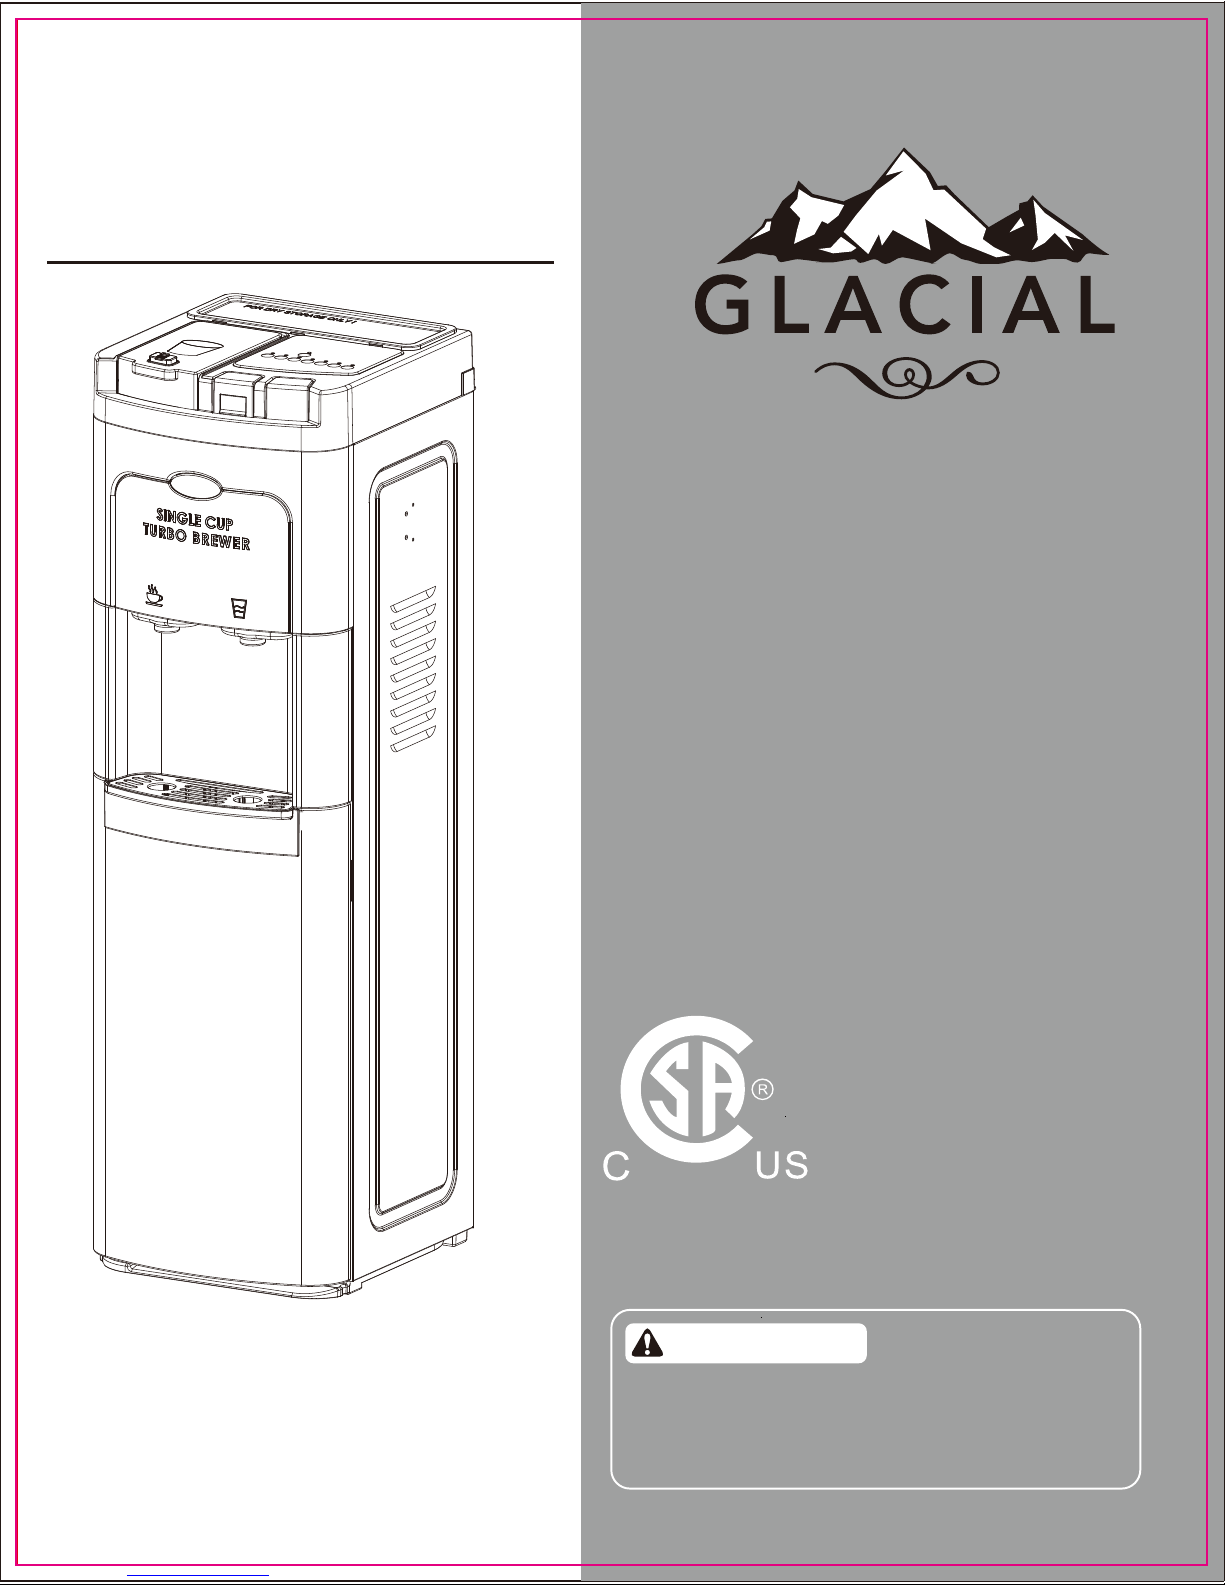
Model No.: 8LCH-KK-SC-SSF-40
USER MANUAL
PN: 5M011114XX00(E+F)
SAVE THIS MANUAL FOR FUTURE USE
WARNING:
TO REDUCE THE RISK OF INJURY, USER
MUST READ INSTRUCTION MANUAL
BEFORE OPERATING PRODUCT.
The product in this manual may differ slightly
from that pictured.
SELF CLEAN hot and cold
water cooler and
SINGLE CUP COFFEE BREWER
Combination Unit
Important:
Follow descaling procedure
on page 13
Page 2
2
FEATURES
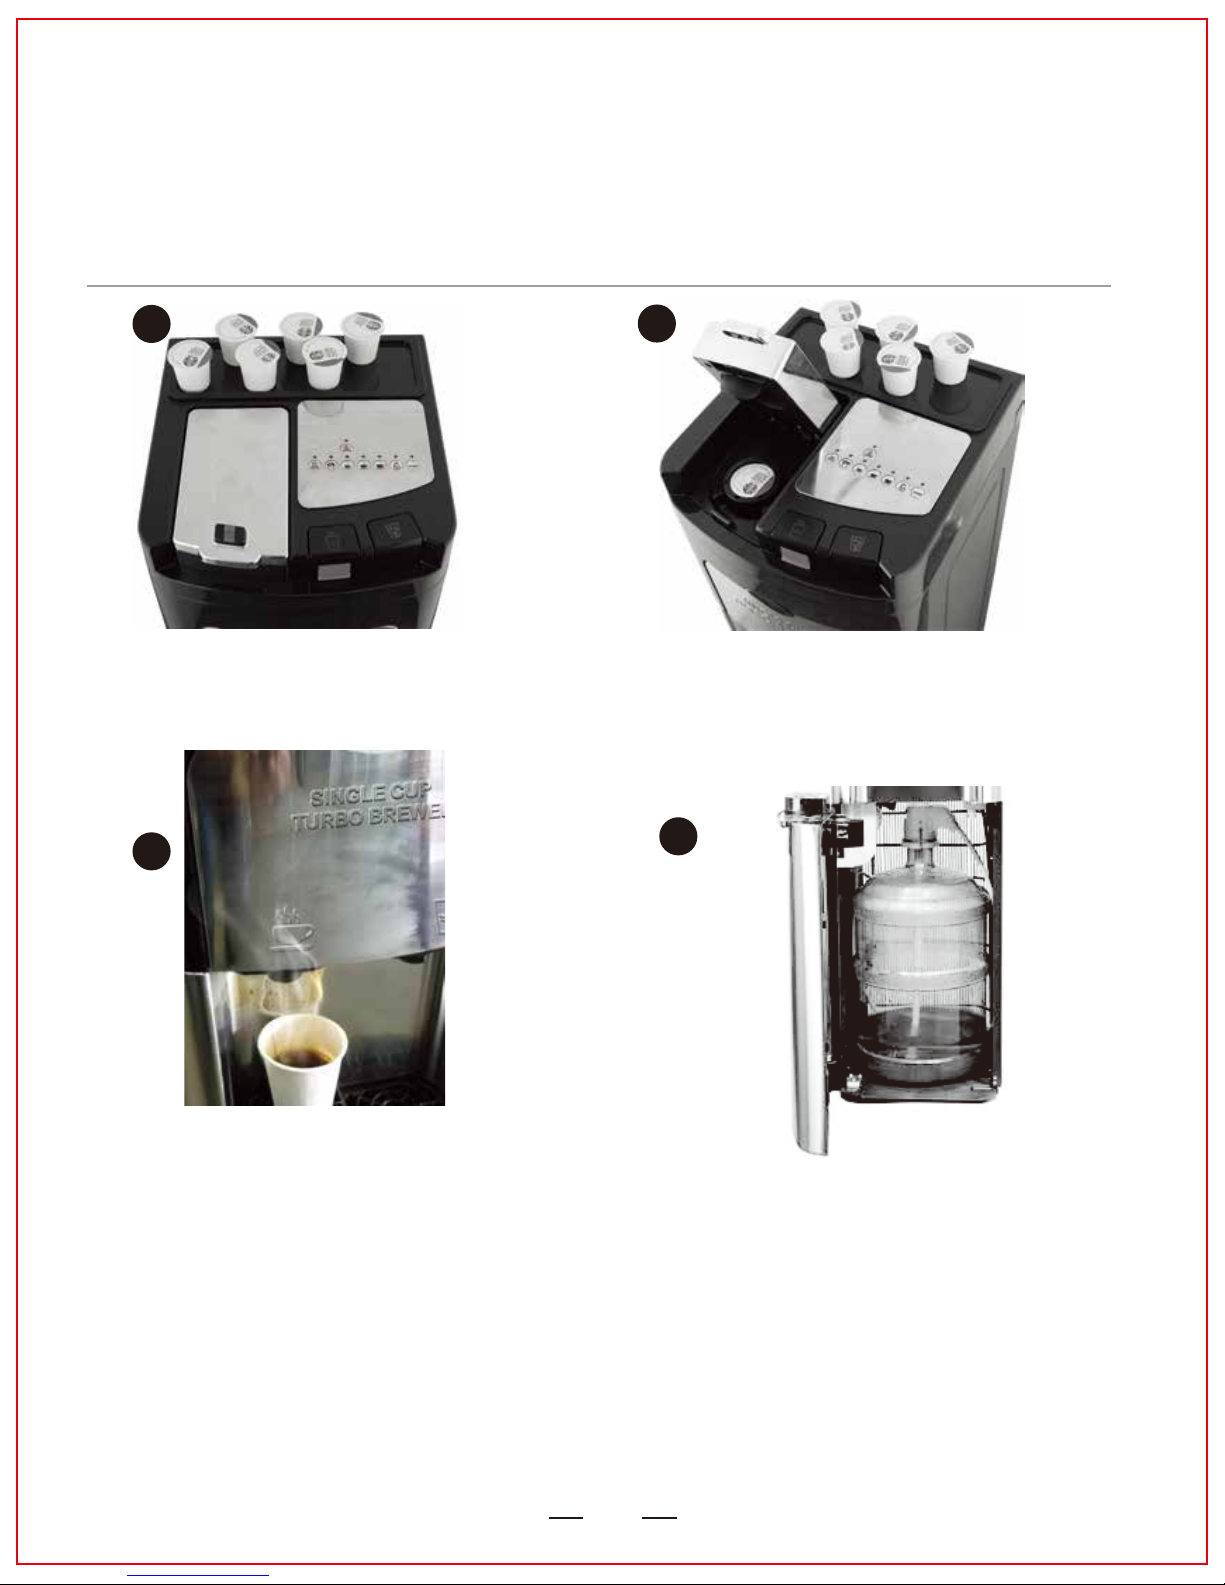
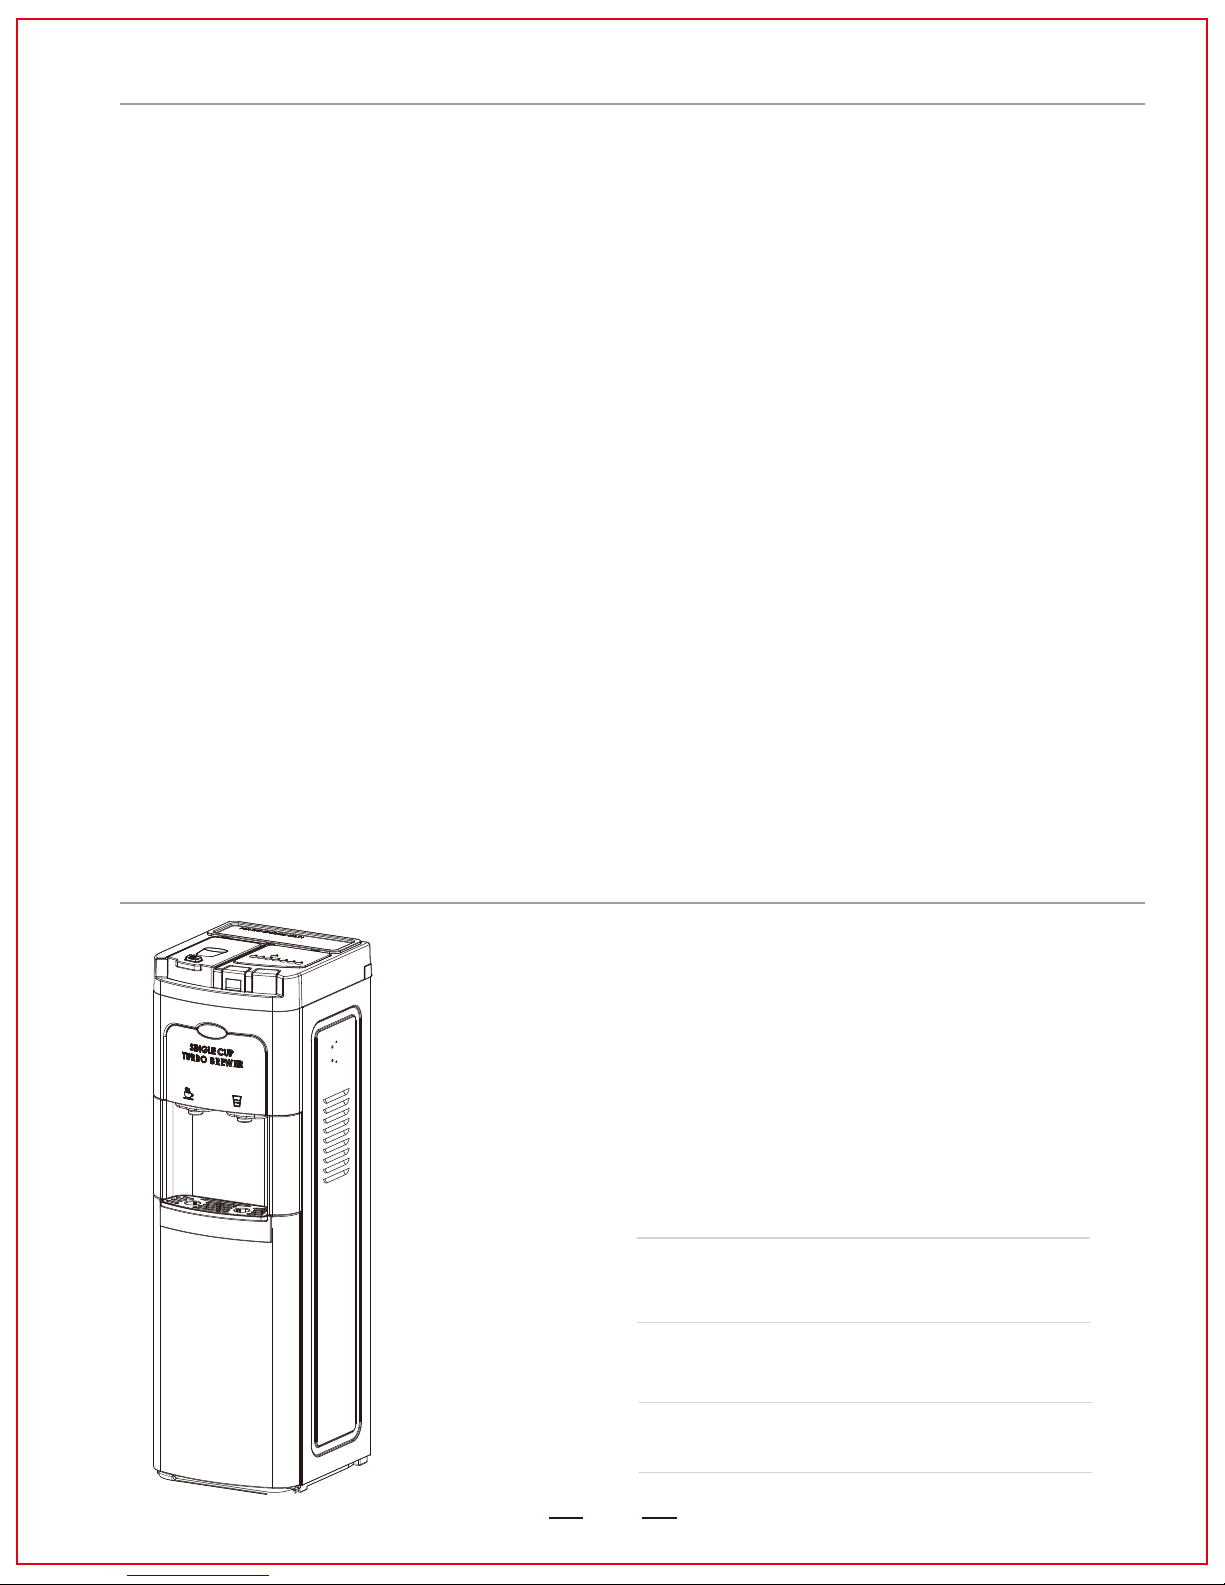
Getting to know your Single Serve Turbo Brewer with
Self Cleaning Water Cooler for use with Coffee Capsule or
equivalently Pre-Packaged Coffee.
4
3
4. Turbo Heater provides plenty of hot
water. No waiting time between cups
of coffee. Direct supply of water from
bottle means no refilling of the
coffee water tank. Combines the
benefits of premium quality water
with gourmet coffee to make a delicious cup of coffee.
2. High temperature, preheated hot
water is ready to pour through your
Coffee Capsule, making a very fast,
yet fully developed cup.
3. No more thin, watery cups of
coffee. Brews at 201
0
F, a tem-
perature experts recommend for
full bodied, robust flavor extraction. A full 9
0
F hotter than other
Single Cup Coffee Makers.
1
1. 2 in1 appliance saves on
valuable counter space.
2
Page 3
3
5. Sophisticated Advanced Technology
System keeps water HOT and Energy
consumption down.
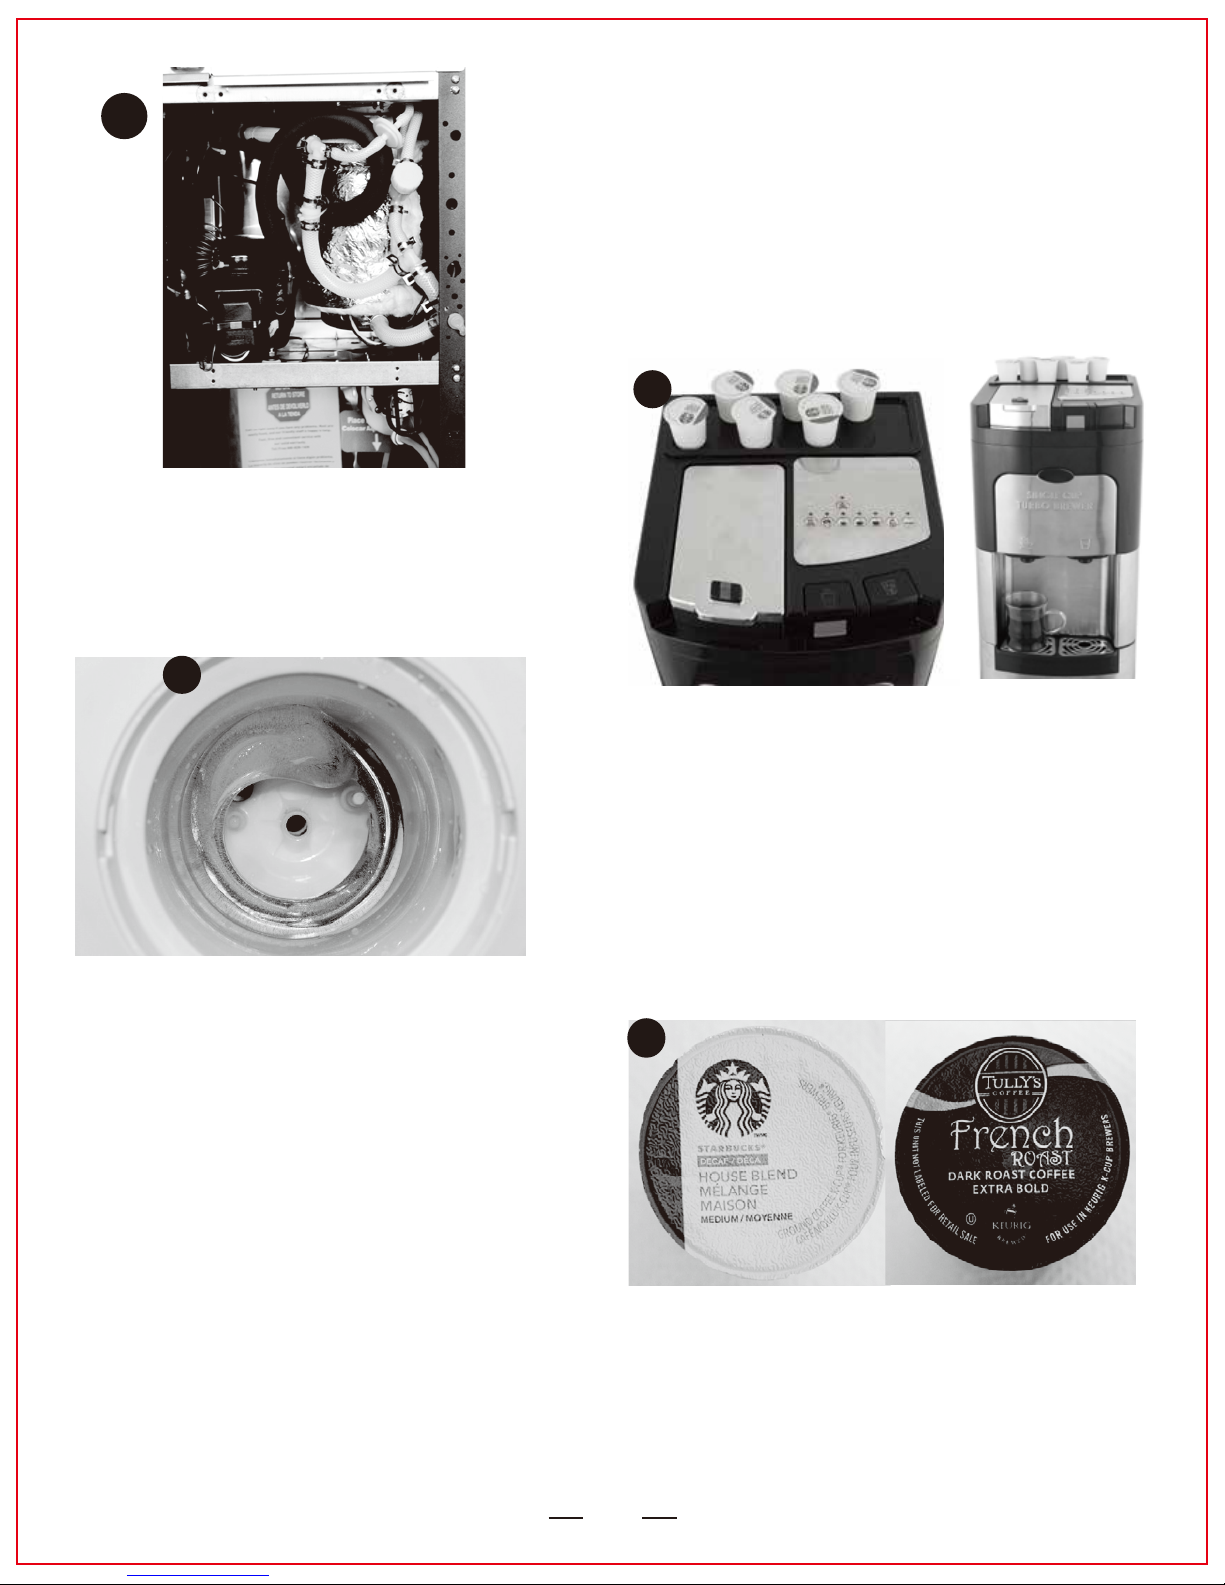
9. Steaming hot water makes rich, full flavored coffee out of regular Coffee Capsule
with your choice of bottled water.
7
8
7. Efficient refrigeration provides up to 1.6 gallon
of X-cold water per hour, while making an ice
bank for more and colder water. X-Cold technology uses ice to chill the water to the lowest
average temperature in the industry.
6. Continuous dispensing for 6cups of coffee,
no waiting time for heating water. Easy to
use intuitive prompt menu.
8. Dispenses water for 3 cup sizes, 6
oz, 8 oz and 10 oz. Coffee Capsule
conveniently stored. Properly hot
water allows to make an America
favorite Medium Roasted Coffee for
Smooth and Rich Flavour. Other
Brewers with lower water temperature rely on dark roast for more
flavour.
5
6
Page 4
4
10
12
11
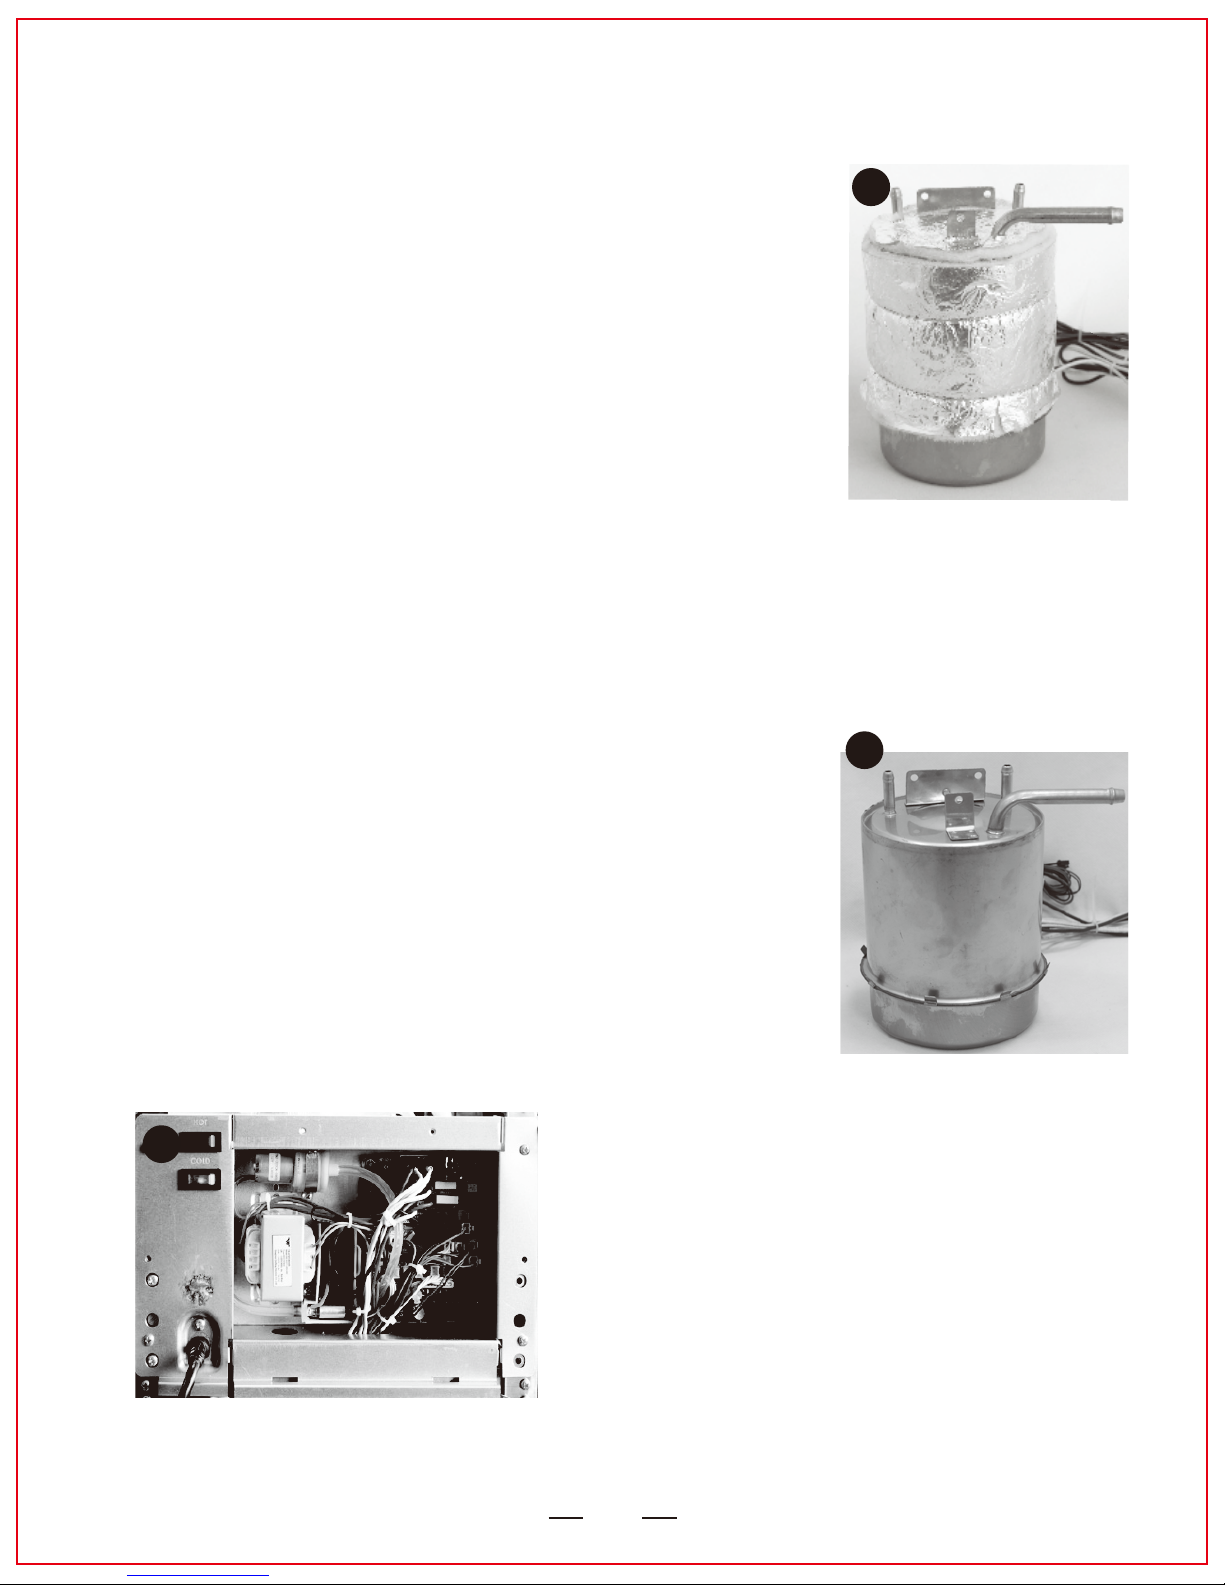
10. Exceptional hot tank performance and safety efficient, produce hotter
water at all times, has a great insulation, triple safety, good for mineral
water use.
a. Our patented design maintain steady 201°F
temperature of hot water.
b. Superior Mineral based insulation keeps heat
where it belongs.
c. Hot Tank Triple safety includes temperature
regulating and high temperature thermostats plus
fusible link, that melts when overheated.
d. External heater allows use of mineral water without
causing heating element failure due to calcification,
as it is common in the hot tank with the internal heaters
Decalcification required once per year only when used with tap or
Spring/mineral water.
e. Patent Pending design of Turbo Heating makes more and hotter
water in the shortest time.
12. Self Cleaning Function of water cooler.
Prevents slime build up in your water
cooler. Low voltage DC12V Ozonanator
is operated by control board. Ozone
emission into an ambient air meets
UL/CSA/OSHA regulations (<50ppb per
24 hours). Electrical control panel easily
accessible from the rear of the cabinet.
11. Superior technology
Patented technology allows for the water tempera-
ture to be controlled within 1°F while on standby.
20 years designed life time. External heater makes
it ideal for use with mineral water.
Page 5

5
SELF-CLEANING
Congratulations! You have acquired state-of-the-art combination unit with water
cooler with Self-Cleaning Capabilities. It is designed to preserve an original bottled
water quality and to eliminate slime build up in the cold water tank, 5 gallon bottle
and internal water passageways.
THIS FEATURE IS NOT MEANT TO FILTER OR TO PURIFY DIRTY OR TAP
WATER.
Areas of the cooler that are sanitized by the Self-Cleaning feature include the cold
water tank, cold tank cover with water level controls, cold water faucet up to the
dispensing nozzle and surrounding connectors. Includes 5 gallon bottle and probe
for drawing water out of the bottle. Hot water tank and its passageways to the dispensing faucet are self cleaning itself by water heated to 201°F.
These parts of your cooler are automatically treated with metered amounts of ozone
every 4 hours to eliminate bacteria growth. This process is an exclusive to Electrotemp Technologies Inc. and is covered by numerous patents.
Ozone (O3) could be called a miracle substance, since it is a naturally occurring
disinfectant.
A common example is the ozone created by lightning strikes. The electric charge in
lightning reacts with the oxygen in the air and creates ozone. The fresh smell in the
air after a storm is the odor of ozone. Ozone molecules are very unstable and in
short time they changes into one molecule of air (O2) and water (H2O) becoming
completely harmless. The ozone emissions of this water cooler into ambient air are
controlled to below 50 pbb(so parts per billion) level in accordance with OSHA and
USA and Candaian requirements.
Ozone has good sanitizing capabilities and does not require additions of any other
substances to assist in the cleaning process. Reliable construction assures longevity
of the Self-Cleaning system.
However, there are some parts of the cooler that the Self-Clean feature does not
sanitize. Components such as the outside of nozzles of the faucets are not sanitized
by this feature and thus require periodic cleaning. For instructions on how to clean
these components, please refer to page 16 of this manual.
Page 6

6
SOUND’S YOU MIGHT HEAR
Although all functions are very quiet, you might hear following sound’s:
1. When without display cooler plugged in, air pump for an ozone start to work and last for 12
seconds.
After start up it will work every 4 hours for same period of time.
Coolers with display are programmed to have ozone delivery pump to work every 4 hours starting
from 12 o’clock. Very low humming sound.
2. Water Filtration system delivers water to cold tank. Running water into cold tank can be heard also,
like a miniature water fall, or a fish aquarium. Very low sound.
Water pump sound is greater when filter is used, due to the added load.
If you need assistance call
1-844-452-2425
.
There are two water level control devices. An Electronic sensor and mechanical float valve.
Electronic sensor activates solenoid shut off valve silently.
Mechanical float valve is similar to toilet bowl float valve. As water level nearing to be full, near
closing the valve higher pitch noise might be heard from the float valve.
This noise will last until cold water tank is full.
3. Hot tank water heater.
During the periods of maintaining steady temperature hot tank operates in silent mode.
When water is dispensed or pre-heat button is activated Turbo function will emit “kettle” like
moderate sound few minutes before it reaches the required temperature.
4. Refrigeration compressor works when water needs to be cooled. It has very low pitch humming
noise like your refrigerator
5. In some cases sound resulting from installation on hard flooring is present. Place Sound absorbing
mat under your cooler to eliminate this noise. Mat is supplied with your cooler.
ATTENTION
To avoid damage, malfunctioning and plugging up top piercing needle.
Do not switch RED Hot Power switch at the back until machine is filled with water.
Do Not Use same coffee pod or an equivalently packed Single Serve coffee pod twice, Do not use
Nespresso cups, use only coffee pod or an equivalently packed Single Serve coffee pods made for drip
coffee use only.
If flow and amount of dispensed water deteriorates, use paper clip to clean top piercing needle, as
described in the manual. To wash the brewing pot dispense hot water without placing coffee pod or
equivalent Single Serve coffee pod.
It is recommended to use purified water made by Reverse Osmosis, or Distilled, without mineralization.
This way internal valves and hot tank will not clog up with calcium deposits and help to keep your
machine trouble free without any need for descaling.
Please place water bottle and plug power cord into electrical outlet.
Wait until water is fully filled. Check for hot water faucet dispensing water.
Turn hot tank power switch on.
To fill bottle door must close and activate door switch.
If door got distorted during shipping, please twist it back into position.
Page 7
7
WARNING
SAFETY PRECAUTIONS
To reduce risk of injury and property damage, user must read this entire manual before
assembling, installing & operating combination unit providing coffee brewer and water
dispenser.
Failure to execute the instructions in this manual can cause personal injury or property
damage.
This product dispenses water at very high temperatures. Failure to use properly can cause
personal injury.
When operating this coffee brewer/water dispenser, always exercise basic safety precautions, including the following unit:
• Prior to use, this unit must be properly assembled and installed in accordance with this manual.
• This unit is intended for coffee brewing and water dispensing only. Do NOT use with other
liquids. Do NOT use for other purposes. Never use any other liquid in the dispenser other than
known and microbiologically safe bottled water. Warranty is void if water cooler portion is used
for any other liquids including coffee, tea, juices, beer or wine. some fluids like juices may
develop harmful bacteria.
• For indoor use only. Keep unit in a dry place away from direct sunlight. Do NOT use outdoors.
• Install and use only on a hard, flat and level surface.
• Do NOT place dispenser into an enclosed space or cabinet.
• Do NOT operate dispenser in the presence of explosive fumes.
• Position back of dispenser no closer than 4 inches from wall and permit free airflow between
wall and dispenser. There must be at least 4 inches clearance on the sides of the dispenser to
permit airflow.
• Use only properly wired and grounded outlets.
• Do not use an extension cord with this unit.
• Use dedicated electrical outlet. Connected load is 14 amps.
• Always grasp plug and pull straight out from outlet lugs bent. Never unplug by pulling on power
cord.
• Do NOT use this unit if cord becomes frayed,or otherwise damaged.
• To protect against electric shock, Do NOT immerse cord, plug, or any other part of cooler in
water or other liquids.
• Ensure this unit is unplugged prior to cleaning.
• Never allow small children to dispense coffee or hot water without proper and direct
supervision. Unplug unit to prevent unsupervised use by small children.
• Service should be performed only by a certified technician. Please contact us at 1-844-4522425 for assistance, between 9 AM and 5 PM Monday to Friday eastern time.
Page 8

8
WARNING
WARNING
SAFETY PRECAUTIONS - Electrical Requirements
Electrical Shock Hazard
GROUNDING INSTRUCTIONS
For a grounded, cord-connected water cooler:
This water cooler must be properly wired for correct polarity and grounded. In the event of a malfunction or breakdown, grounding will reduce the risk of electrical shock by providing a path of least
resistance for electric current. This water cooler is equipped with a cord having an equipmentgrounding conductor and a grounding plug. The plug must be plugged into an appropriate outlet that
is properly installed and grounded in accordance with all local codes and ordinances.
Improper connection of the equipment-grounding conductor can result in a risk of
electric shock. Check with a qualified electrician or serviceman if you are in doubt as to whether the
appliance is properly wired or grounded.
Do not modify the plug provided with the appliance, if it will not fit the outlet, have a proper outlet
installed by a qualified electrician. Do not bend or remove prongs.
“Please make sure that ELECTRICAL OUTLET IS PROPERLY WIRED
TO CORRECT SIZED CIRCUIT BREAKER OR FUSE AND PROPERLY
GROUNDED. MUST BE WIRED TO HAVE CORRECT POLARITY.”
Plug into a grounded 3 prong outlet. Make sure power prongs(lugs) and ground prong are in good
condition, hot bent or altered in any ways. Do not remove ground prong. Do not use an adapter. Do
not use an extension cord.
Failure to follow these instructions can result in death, fire, or electrical shock.
Dedicated power outlet 115/120 volt, 60 Hz., AC only, 15- amp, fused electrical supply is required. A
time-delay fuse or circuit breaker is recommended. Do not overload the circuit, provide separate
circuit, to serve only this appliance.
This water cooler is equipped with a power supply cord having a 3 prong grounding plug.
To minimize possible shock hazard, the cord must be plugged into a mating, 3 prong, grounding-type
outlet, grounded and wired in accordance with local codes and ordinances. If a mating outlet is not
available user is responsible to have properly grounded outlet installed by a qualified electrician.
If codes permit and a separate ground wire is used, it is recommended that a qualified electrician
determine that the ground path is adequate.
Do not ground to a gas pipe.
Check with a qualified electrician if you are not sure the water cooler is properly wired and grounded.
Do not use a fuse in the neutral or ground circuit. It must be installed in the power line only.
This appliance is not intended for use by persons (including children)with reduced physical, sensory
or mental capabilities, or lack of experience and knowledge, unless they have been given supervision or instruction concerning use of the appliance by a person responsible for their safety.
Children should be supervised to ensure that they do not play with the appliance.
If the supply cord is damaged, it must be replaced by the manufacturer, its service agent or similarly
qualified persons in order to avoid a hazard.
Page 9
9
TABLE OF CONTENTS
KEY INFORMATION FOR FUTURE USE
For future support please record your serial number (located on
label on back of the unit) and date purchased. Staple your
receipt to manual.
You will need this information to obtain warranty service.
Product:
Model Number :
Serial ID Number:
Date of Purchase:
Store:
SELF CLEAN hot and cold water cooler and SINGLE
CUP COFFEE BREWER Combination Unit
8LCH-KK-SC-SSF-40
Features ......................................................................................................
Self-Cleaning...................................................................................................
Sound’s You Might Hear ................................................................................
Attention .........................................................................................................
Safety Precautions .........................................................................................
Safety Precautions-Electrical Requirements..................................................
Key Information for Future Use ......................................................................
Specifications ..............................................................................................
Parts & Features .........................................................................................
Assembly .......................................................................................................
Installation ..................................................................................................
Dispensing Coffee .........................................................................................
Descaling Your Coffee Brewer/Water Cooler.................................................
Operation .......................................................................................................
Proper Care & Cleaning ................................................................................
How to Adjust Water Temperature for High Altitude to Avoid Boiling ............
How to Adjust Water Filling Amount ..............................................................
How to cancel blow off to dry cups ................................................................
Troubleshooting ............................................................................................
correct upper needle seal installation............................................................
how to reset hot tank safety switch.................................................................
Open Inspection Porthole ..............................................................................
Cleaning Under Control Board in Case of Severe Spill of Liquids..................
How to Open Control Board Enclosure for an Inspection...............................
2
5
6
6
7
8
9
10
10
11
11
12
13
14
16
17
17
17
18
24
25
26
26
27
Page 10
10
SPECIFICATIONS
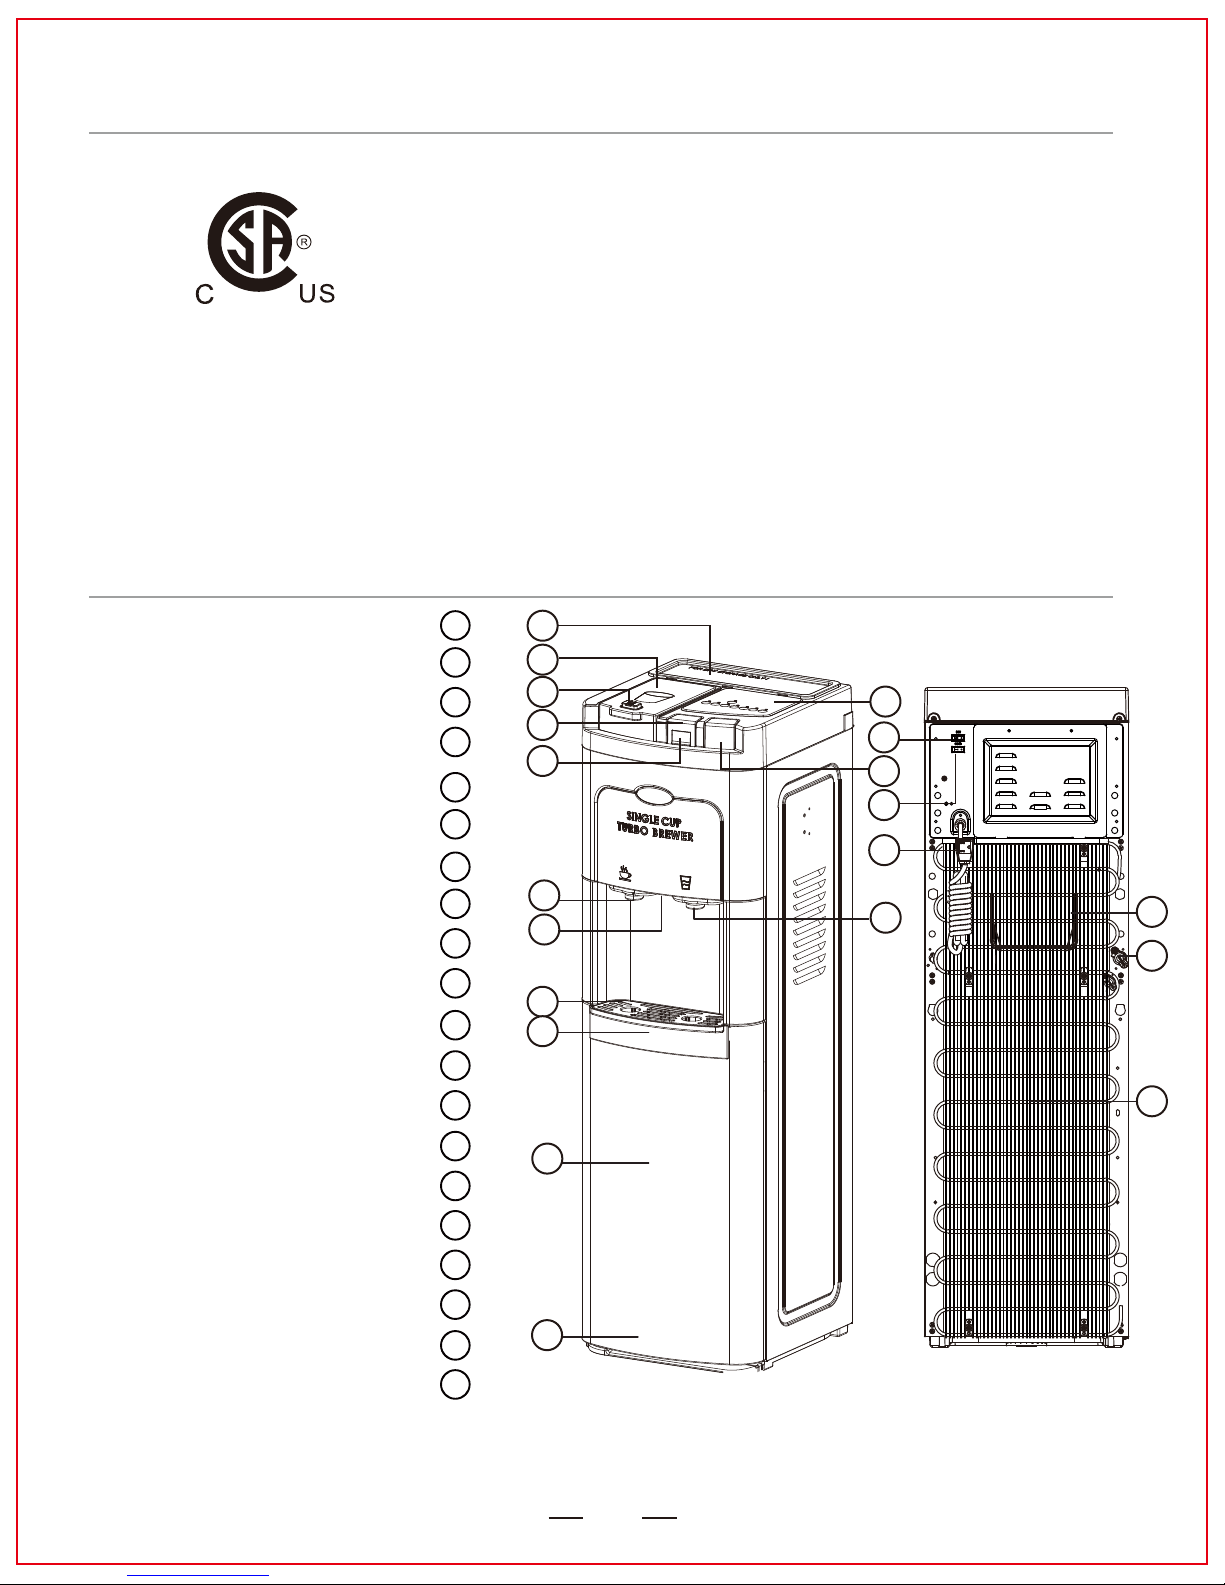
PARTS & FEATURES
Power Supply
Refrigerant Type
Max Cold Water Power
Cold Capacity / Hour
Cold Temp Range
Hot Water Power
Hot Capacity / Hour
Hot Temp Range
Product Dimensions
Net Weight
Cover Tray
Lid of the Coffee Brewer
Coffee Brewer Control panel
Child safety button
Control: Hot Water
Toddlers Safety Latch
Control: Cold Water
Faucet Nozzle For Coffee
Faucet Nozzle For Cold/Hot Water
LED Night Light
Drip Tray For Coffee
Drip Tray
Door
Bottle Tray
Power Cord
Hot Water Switch
Cold Energy Saving Switch
Carry Handle
Drain Plug
Condenser
1
2
3
4
5
6
7
8
9
10
11
12
13
14
15
16
17
18
19
20
20
19
18
9
15
17
7
3
16
1
2
5
6
8
10
11
12
13
14
4
AC 120V~/60Hz / 12 Amp
R-134A
100W
6 L/H
3°C – 10°C / 37.4°F – 50°F
1400W
9 L/H
89°C – 94°C / 192°F – 201°F
32 W x 38.2 D x 105.6 H (cm)
12.6 W x 15 D × 41.6 H (inch)
19.6 kg / 43.2 Ibs
Page 11
11
ASSEMBLY
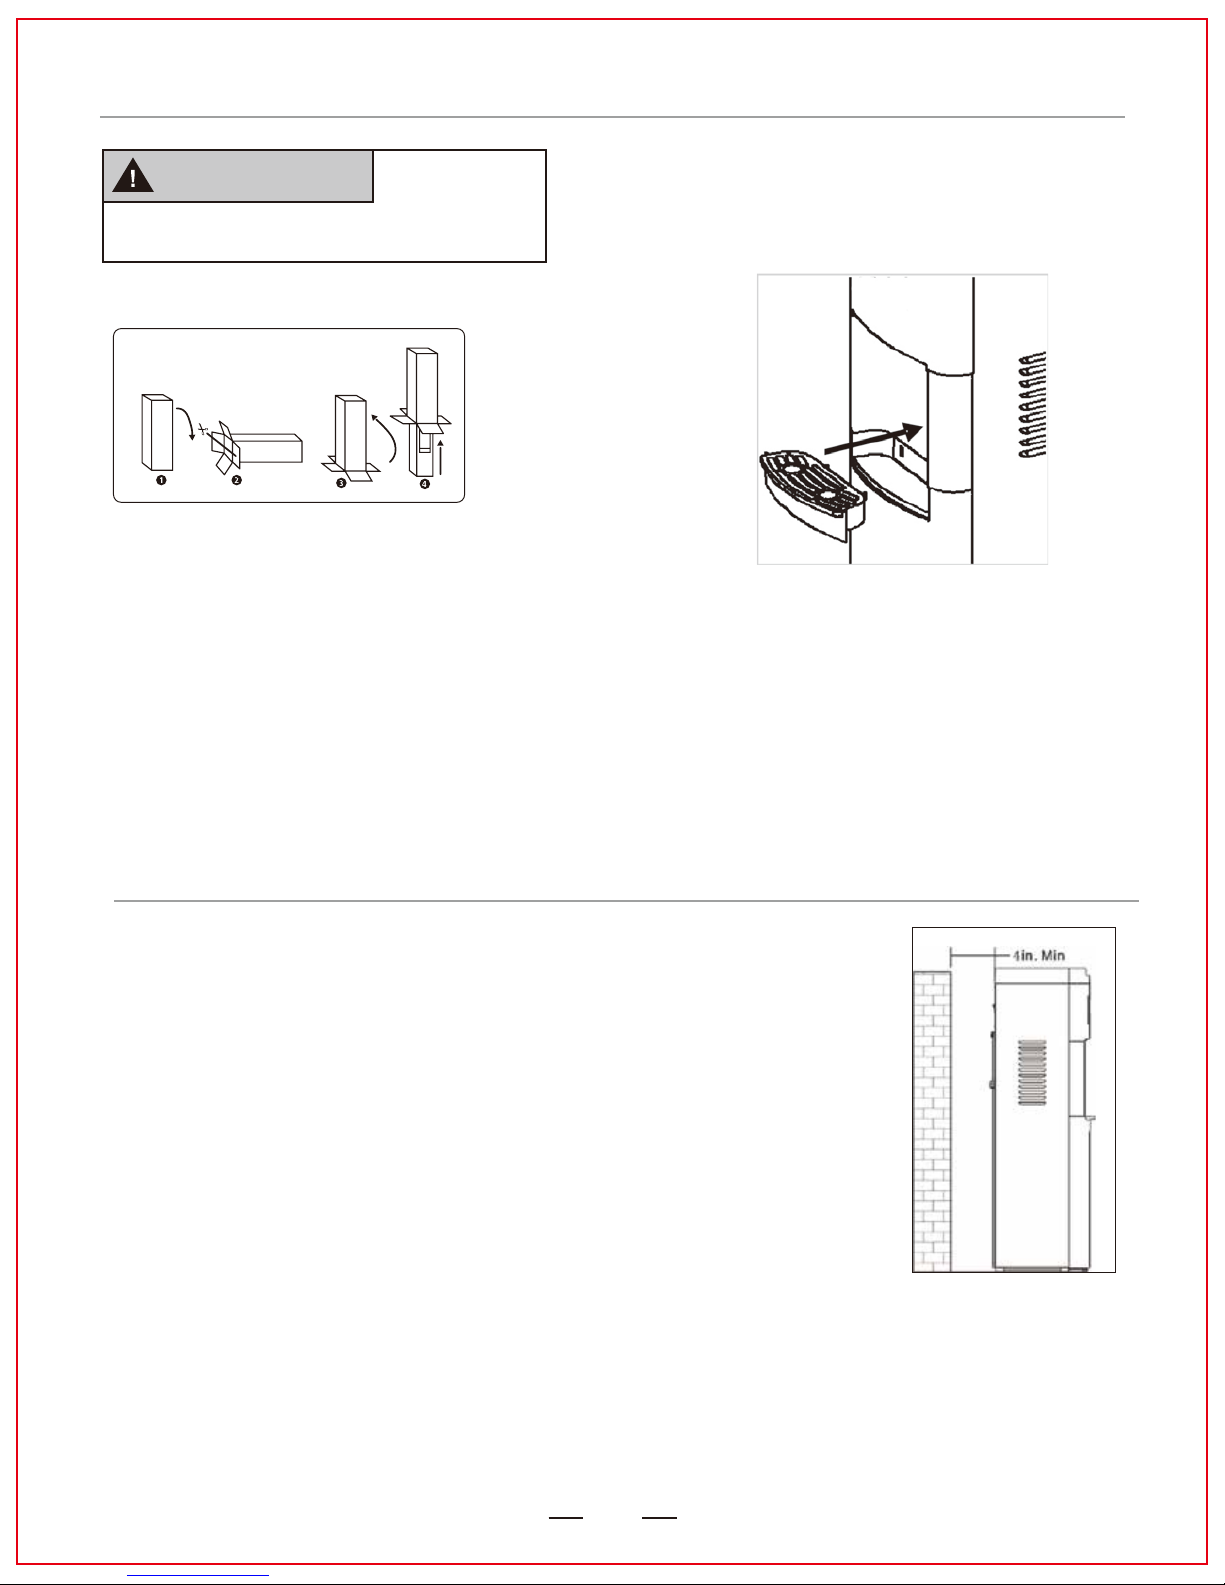
1. Place water cooler upright.
2. Locate water cooler on a hard and level surface in a cool shaded location
near a grounded wall outlet.
Notice: Do NOT plug in power cord yet.
3. Position water cooler so the back is at least 4 inches from wall and there
are at least 4 inches of clearance on both sides.
4. To minimize vibration and noise, make sure dispenser is level.
Notice: Do NOT plug in power cord yet.
INSTALLATION
WARNING
Keep plastic bags away from children.
Remove the dispenser from packaging:
1. Lay dispenser on its side.
2. Open bottom flaps of the cardboard box.
3. Stand cooler up with flaps unfolded.
4. Pull box straight up.
5. Unpack the drip tray and insert it into the dispenser.
6. Keep original packing for the duration of warranty.
TO OPEN:
TOP
TOP
TOP
TOP
Page 12
12
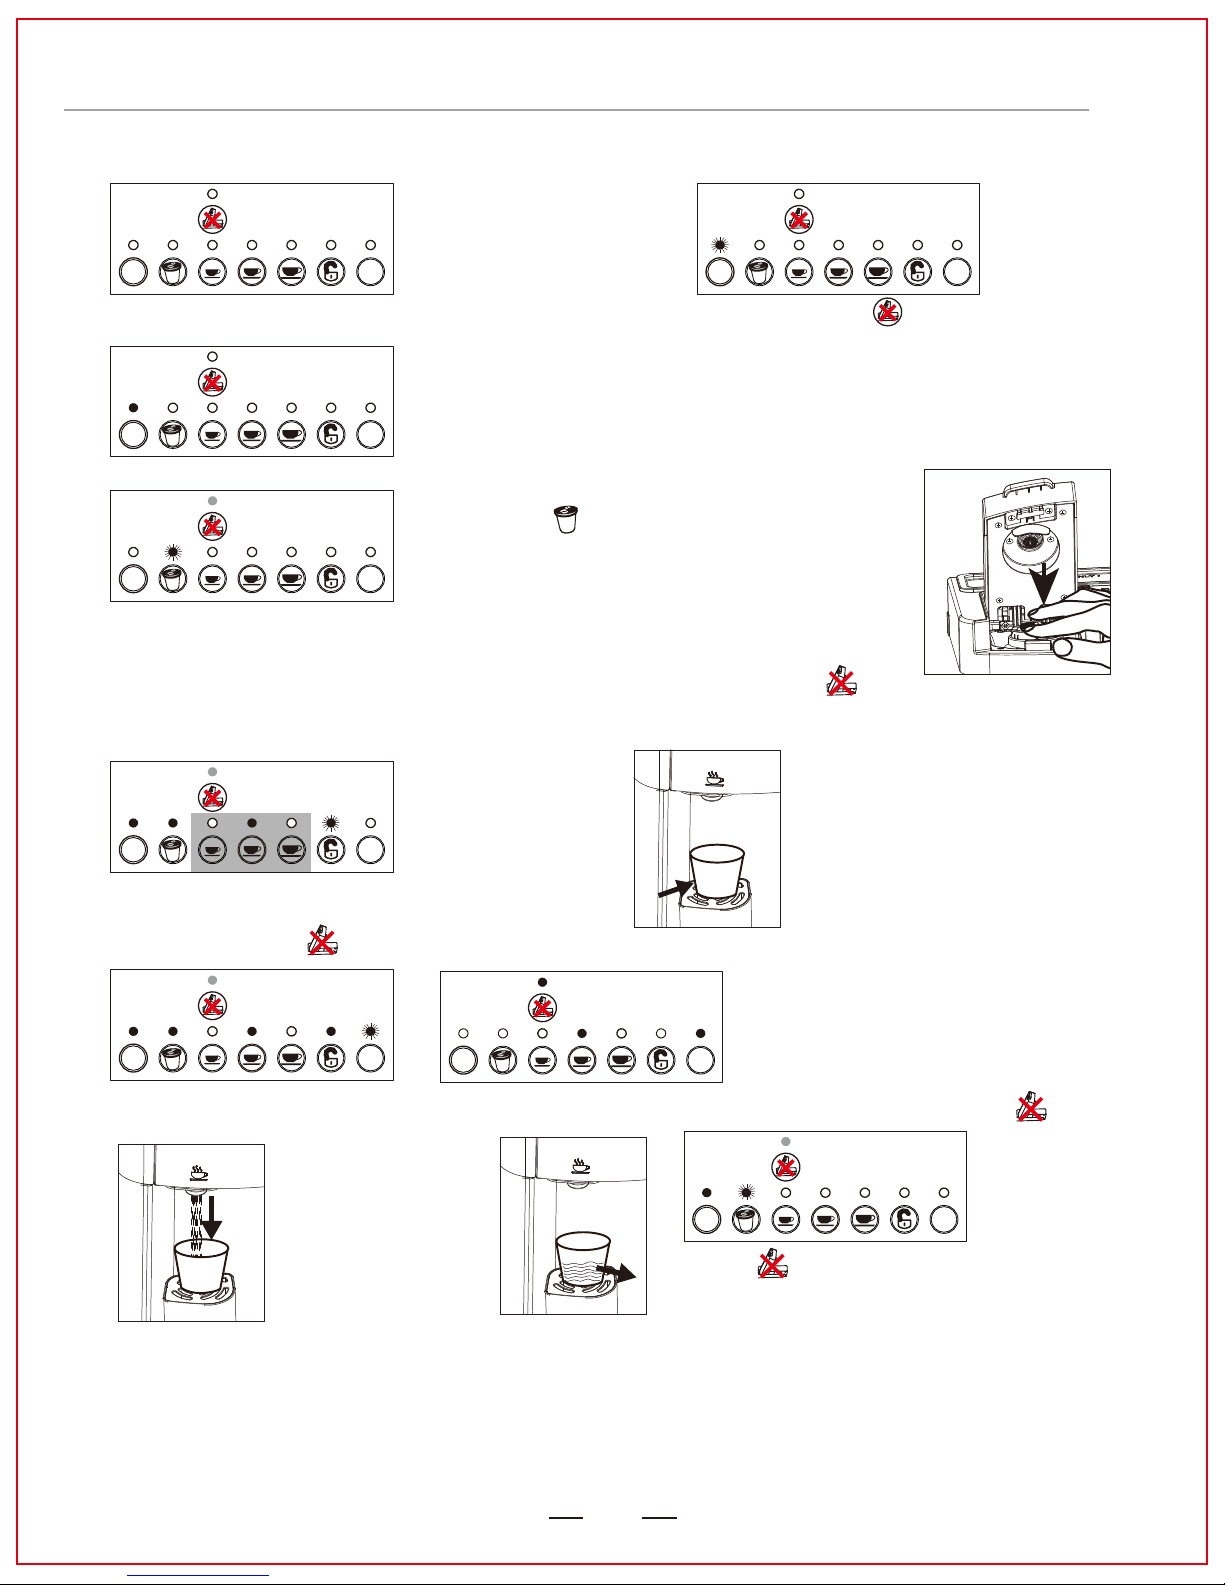
DISPENSING COFFEE
6.
2.
3.
Touch “PRE-HEAT”button. If “READY” light is not ON.
Do not open lid when red light is ON
“Ready ” light will go on only when hot water temperature is
201
0
F. Water temperature goes down to 1950F if Brewer was
not used for 3 hours. “Ready” light might keep on blinking if
water level is low. Please check the bottle.
4.
a. Open lid and place a COFFEE CAPSULE when “ ” LED is blinking.
b. Press coffee capsule down by your hand
to pierce bottom of the capsule.
c. If Brewer was switched off, wait up to 10 minutes until the “Ready” light is
ON. If “READY” light is blinking, it indicates there is not enough water in
storage tank. Wait until water is pumped up. Check if bottle has water.
LED is green.
7.
5.
By default 8 oz, middle cup is pre selected
for you. If you wish to have different size cup,
touch your choice. LED is green.
Unlock button will be blinking. Touch UNLOCK and touch “START” button within 2 seconds. LED is red.
Place a coffee cup on top
of brewers drip tray.
8.
10. To fill next cup repeat procedures from 3 to 7, after “ready” light is ON.
Wait few seconds
for coffee to start
pouring.
9.
Wait until red light changes into
green then open lid
START
READY
PRE-
HEAT/
START
READY
PRE-
HEAT/
START
READY
PRE-
HEAT/
START
READY
PRE-
HEAT/
START
READY
PRE-
HEAT/
START
READY
PRE-
HEAT/
START
READY
PRE-
HEAT/
11. PRE-Heat
If coffee brewer was not in use for 3 hours temperature would go back to stand by 90
0
C/1940F to make coffee requite
to touch PRE-heat button again.
Operating Instructions:
1. Make sure you have turned on RED hot water switch at the back. See No. 16 on page 10.
START
READY
PRE-
HEAT/
Page 13

13
Your brewer and water cooler share a low watt density, external hot water tank heater. If has a larger
area to spread heat comparing to ordinary internal water heating elements. You may experience a
buildup of mineral scale or calcium deposits, depending on mineral content of the water. Still, build up
occurs at a much slower rate than with an internal heaters. Mineral scale is non-toxic, however it can
affect the brewer's performance by interfering with internal valves. Descaling your brewer helps main-
tain clean internal parts that come in contact with water.
If you are using mineral or filtered water, the brewer should be descaled every year to ensure optimal
performance or whenever there are white deposits in the hot water tank. It is possible for calcium
deposits to build up faster, making it necessary to descale more often. If you use distilled or RO water
descaling is not required.
This is how to descale your hot water tank:
Step 1. Make sure you have one gallon of undiluted white vinegar on hand.
Step 2. Switch off the cooler by unplugging power cord. Remove the 5 gallon bottle. Drain all the
water out through the drain at the back. Replace the drain plug.
Step 3. Place the probe into the container with undiluted vinegar.
Step 4. Plug the power cord into an outlet. Hold the reset switch for the door to start the cooler and
get the pump working. Fill the cooler with vinegar.
Step 5. Check if hot tank is full of vinegar by dispensing it from hot water faucet.
Step 6. If you cannot close the door with vinegar container inside, then remove container and close
the door.
Step 7. Turn on the Hot Water Switch (see #15 on page 10) and allow it to sit for at least 30 minutes.
Step 8. Dispense small cup of vinegar from coffee dispensing nozzle and 1/2 of small cup from Hot
and Cold water faucets every 10 minutes for 1/2 an hour.
Step 9. After the prescribed period of time, unplug the cooler, drain the vinegar through the drain on
the back.
Step 10. Rinse by closing the drain and placing a 5 gallon bottle or other container with tap water
inside of the compartment with the probe inserted into it. Plug the cooler back in to fill the hot
and cold tank with tap water.
Step 11. Rinse with tap water until smell goes away .
Step 12. Turn on the Hot Water Switch (see #15 on page 10) and allow it to sit for at least 30 minutes.
Step 13. Drain the water through the back drain again by following previous instructions.
Step 14. Repeat rinsing until the vinegar smell is gone and there is no sign of calcium deposits left
(they may get dissolved or show up as small white crystals).
Step 15. Place the 5 gallon bottle back and enjoy your brewer/water cooler once again.
DESCALING YOUR COFFEE BREWER / WATER COOLER
Page 14
14
CAUTION
This water cooler part of combination unit is intended for water cooling only, Do NOT use other
liquids. Do NOT use for other purposes. Warranty is void if used for any other liquids including
coffee, tea, juices, beer or wine. Using other liquids can be dangerous to your health.
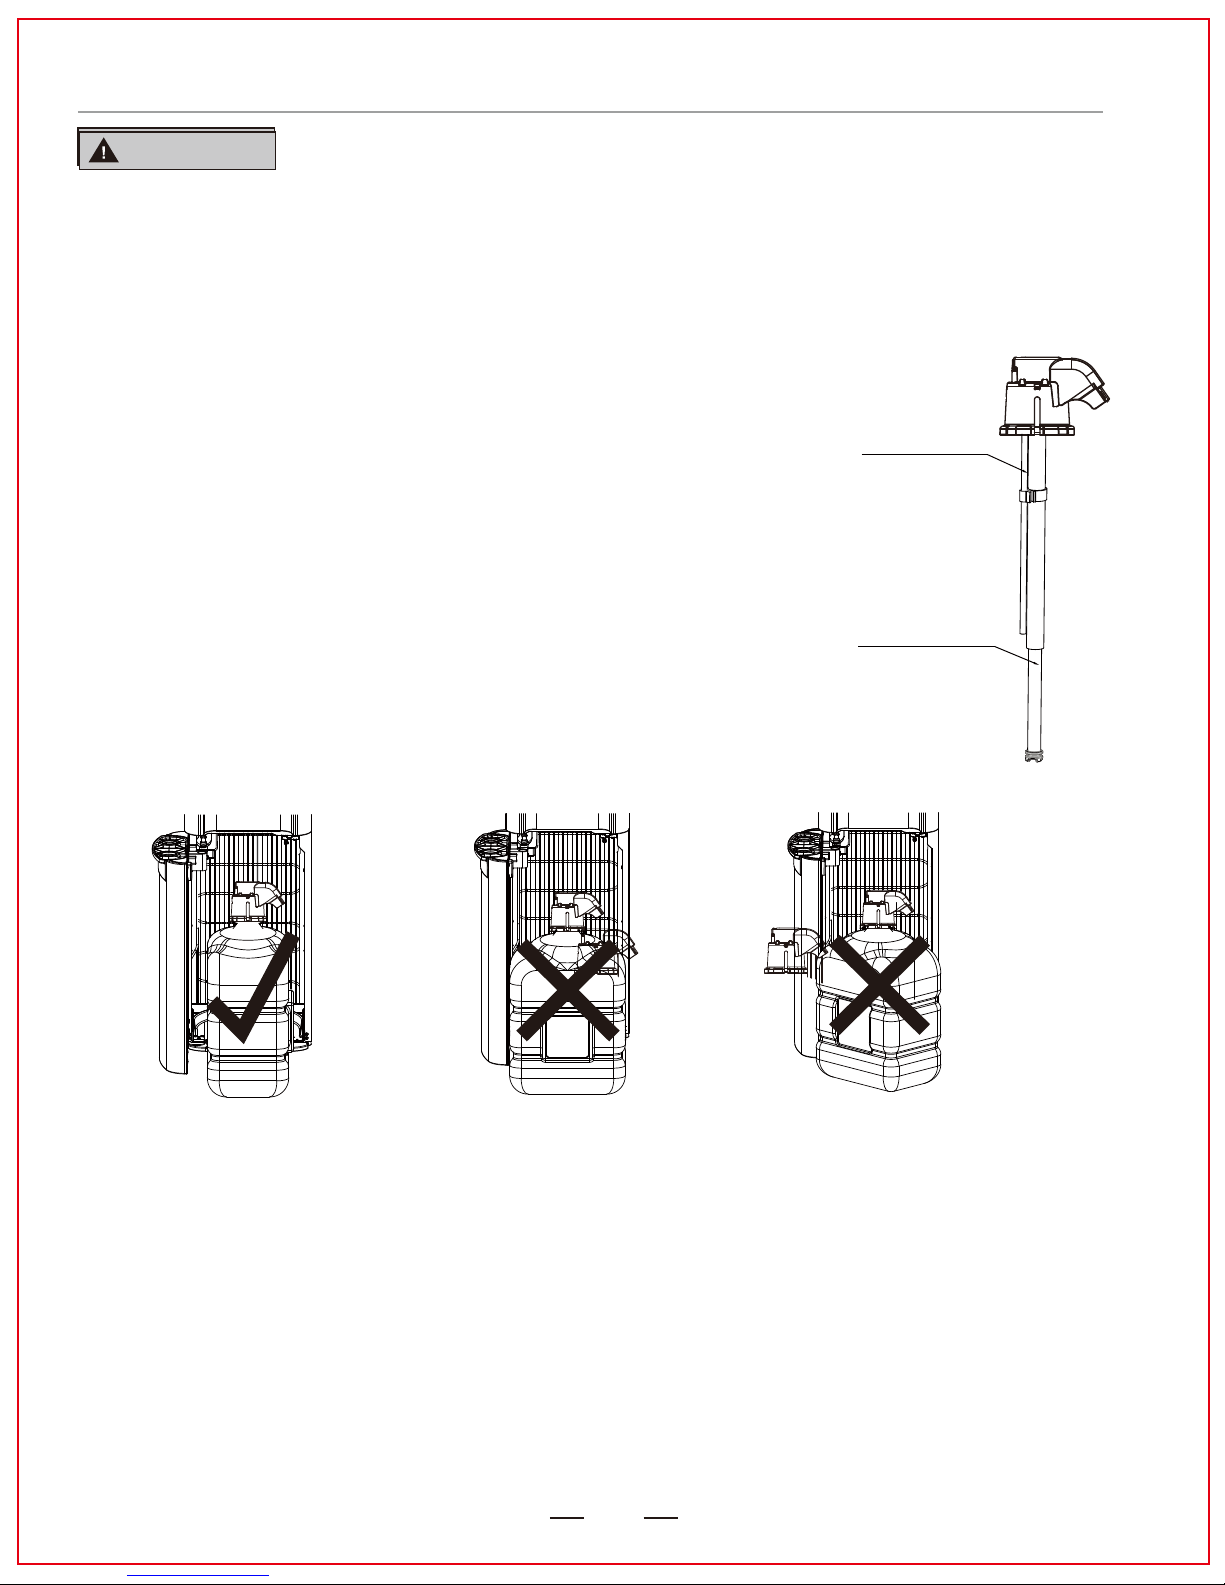
This water cooler has been designed to fit standard water bottles with a 3, 5 or 5.2 gallon
capacity. Do NOT use alternative bottles. Avoid using disposable bottles, since they lack
rigidity.
Initial Set Up
Do NOT plug in until instructed to do so below.
1. Allow unit to sit upright for 4 hours.
2. This model uses a pump to pull water from the bottle to the reservoirs.
a. Please do the following:
• Open door and place fresh bottle in front of tray.
• Clean bottle cap and neck. Use soft cloth soaked in bleach solation.
• Remove entire plastic cap from bottle.
• Push down on probe head until it is seated.
• Push bottle inside of compartment.
• Close the door gently.
CAUTION
NOTICE: When using a 5 gallon rectangular bottle, slide into place as shown in illustration below.
3. Plug cord into a properly wired and grounded dedicated wall outlet.
a. Water will be pumped into the hot and cold water reservoirs from the bottle.
4. Turn ON hot and cold water power switches at the back of the unit.
Notice:
• At initial start-up it will take about 3 minutes for the reservoirs to fill.
• Door must be closed to operate water pump.
• If the lights continue to flash, your bottle may be empty. If problems persist, Call 1-844-452-2425 for
assistance.
OPERATION
Stainless Steel
tube for Self - Clean
function
Expandable telescopic
tube for drawing water
from the bottle
Page 15
15
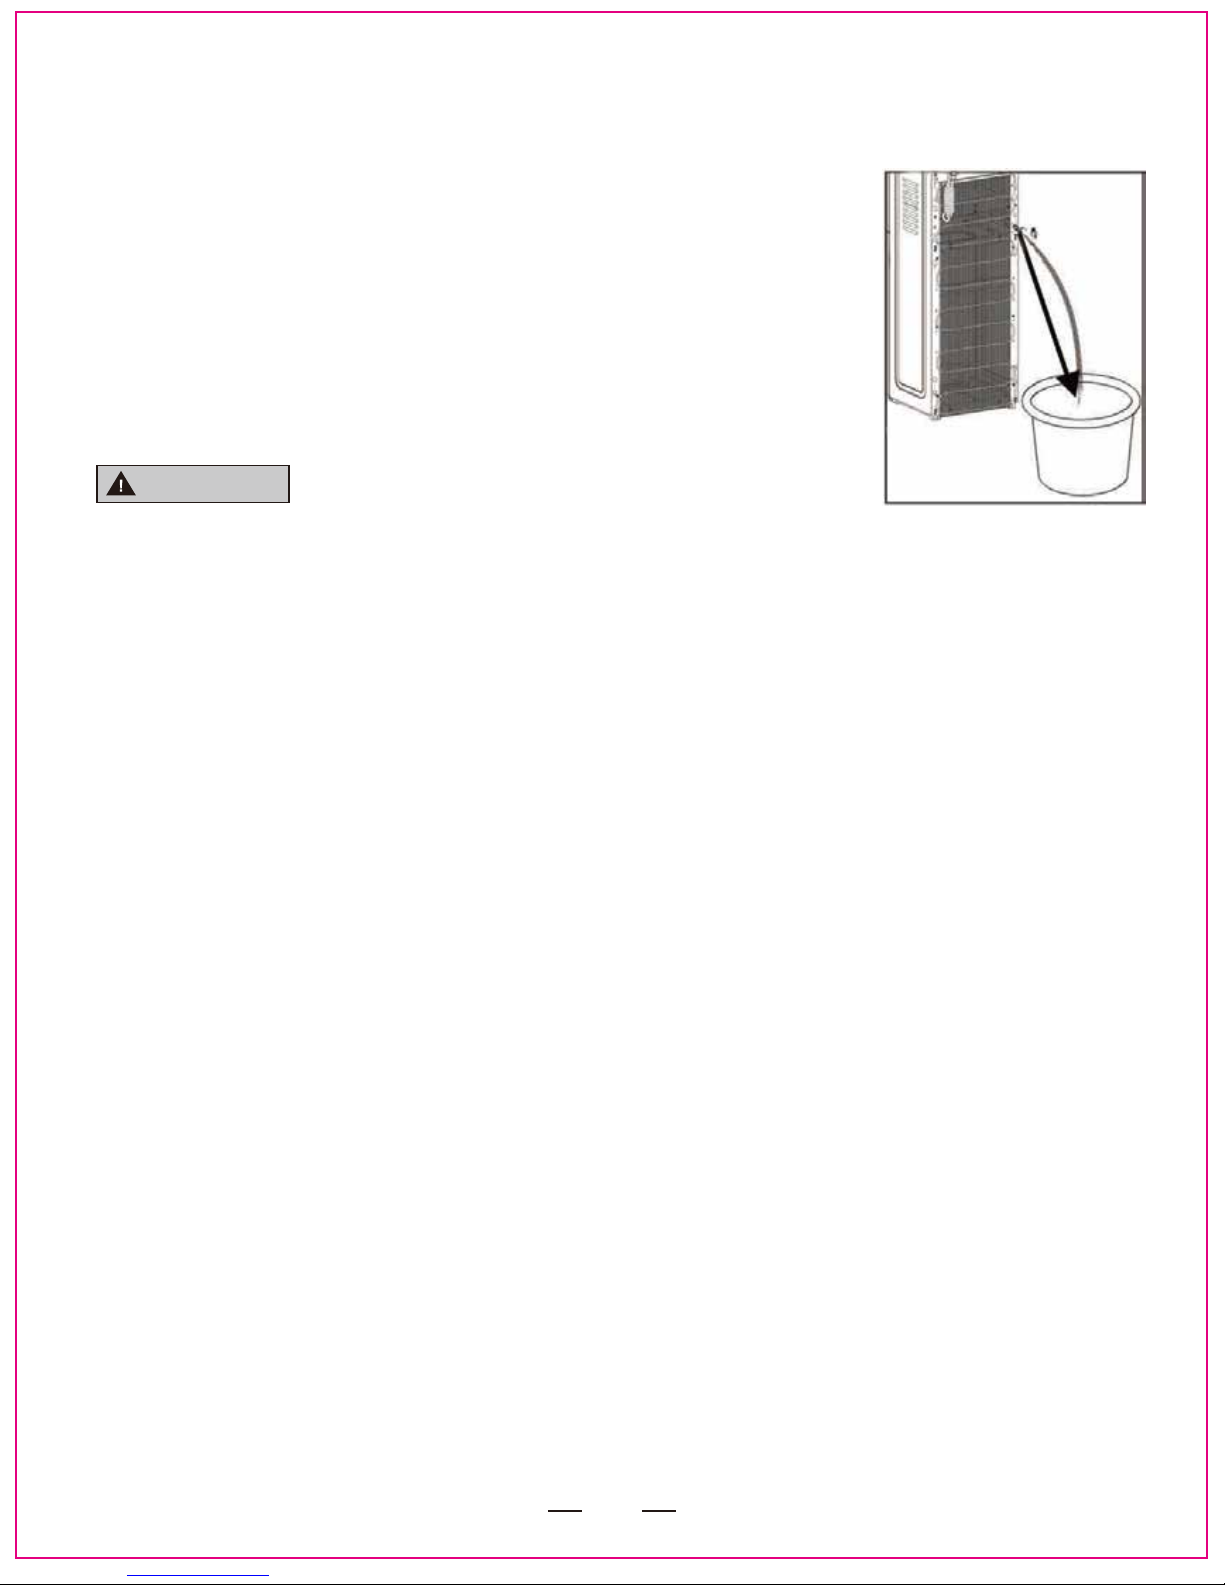
Dispense Hot Water
This unit dispenses hot water at temperature that can severe burns. Avoid direct contact
with hot water. Keep small children and pets away from unit while dispensing. Never allow
small children to dispense hot water without proper and direct supervision.
Note: After setup, hot water will be available in 15-20 minutes.
1. Position suitabe cup securely below hot water tap.
a. The left arrow below the hot water control indicates the location of the hot water tap.
b. The target holes in the grill help to align water stream. This unit dispenses water at a fast rate.
To avoid splashes, hold cup as close to the tap as possible.
2. Push hot water release button (red) inward and depress control downward to start flow.
3. Release control once desired fill level is achieved.
4. For dispensing coffee see instructions for “how to brew coffee”.
Replace an Empty Bottle
Notice: When your bottle is empty the water cooler will beep intermittently.
You may also hear a sucking sound when the bottle empties. This is normal and is another way to
be alerted that your bottle is empty.
Replace empty bottle as soon as you notice it is empty. If unavailable, leave door ajar or unplug
cooler to stop beeping noise and flashing lights.
There may be a small amount of water left in the bottle. This is normal.
1. Open door and slide bottle out.
2. Remove probe from bottle:
• Pull probe straight up until completely out of bottle.
• Hang probe on the door to prevent contamination.
3. Install fresh bottle:
• Place fresh bottle in front of bottle compartment.
• Clean fresh bottle with a soft cloth and warm soapy water or bleach solution then wipe with clean
wet cloth.
• Remove entire plastic cap from top of bottle.
• Insert probe into bottle.
• Push down on probe until it is seated.
• Slide bottle onto bottle compartment.
• Gently close the door.
CAUTION
HOT WATER
Dispense Cold Water
Note: After set up it will take up to 1 hour to form an ice bank. During this time compressor may run
continuously. This is normal.
1. Position bottle, glass, pitcher or cooking pot securely below cold water tap.
a. The right arrow below the cold water control indicates the location of
the cold water tap.
b. The target holes in the grill help to align water stream. This unit
dispenses water at a fast rate. To avoid splashes, hold cup as close to
the tap as possible.
2. Depress right control downward to start flow.
3. Release control once desired fill level is achieved.
Page 16
16
Note: The Self-clean function sanitizes internal waterways. It does not sanitize outside of the faucets
and other external parts of the cooler.
General Cleaning
Perform: As needed (every 6 months under normal conditions)
Time Required: 5 minutes.
Note: Do NOT use abrasive materials or chemical cleaners.
1. Unplug power cord from wall outlet.
2. Clean cabinet surfaces with a soft cloth and warm soapy water.
3. Wipe dust from back of dispenser to improve efficiency.
4. Remove drip tray assembly by sliding it forward. Remove cover. Wash drip tray and grice by hand
with soapy water.
5. Wipe stainless steel parts of the cabinet with unscented Baby oil (mineral oil).
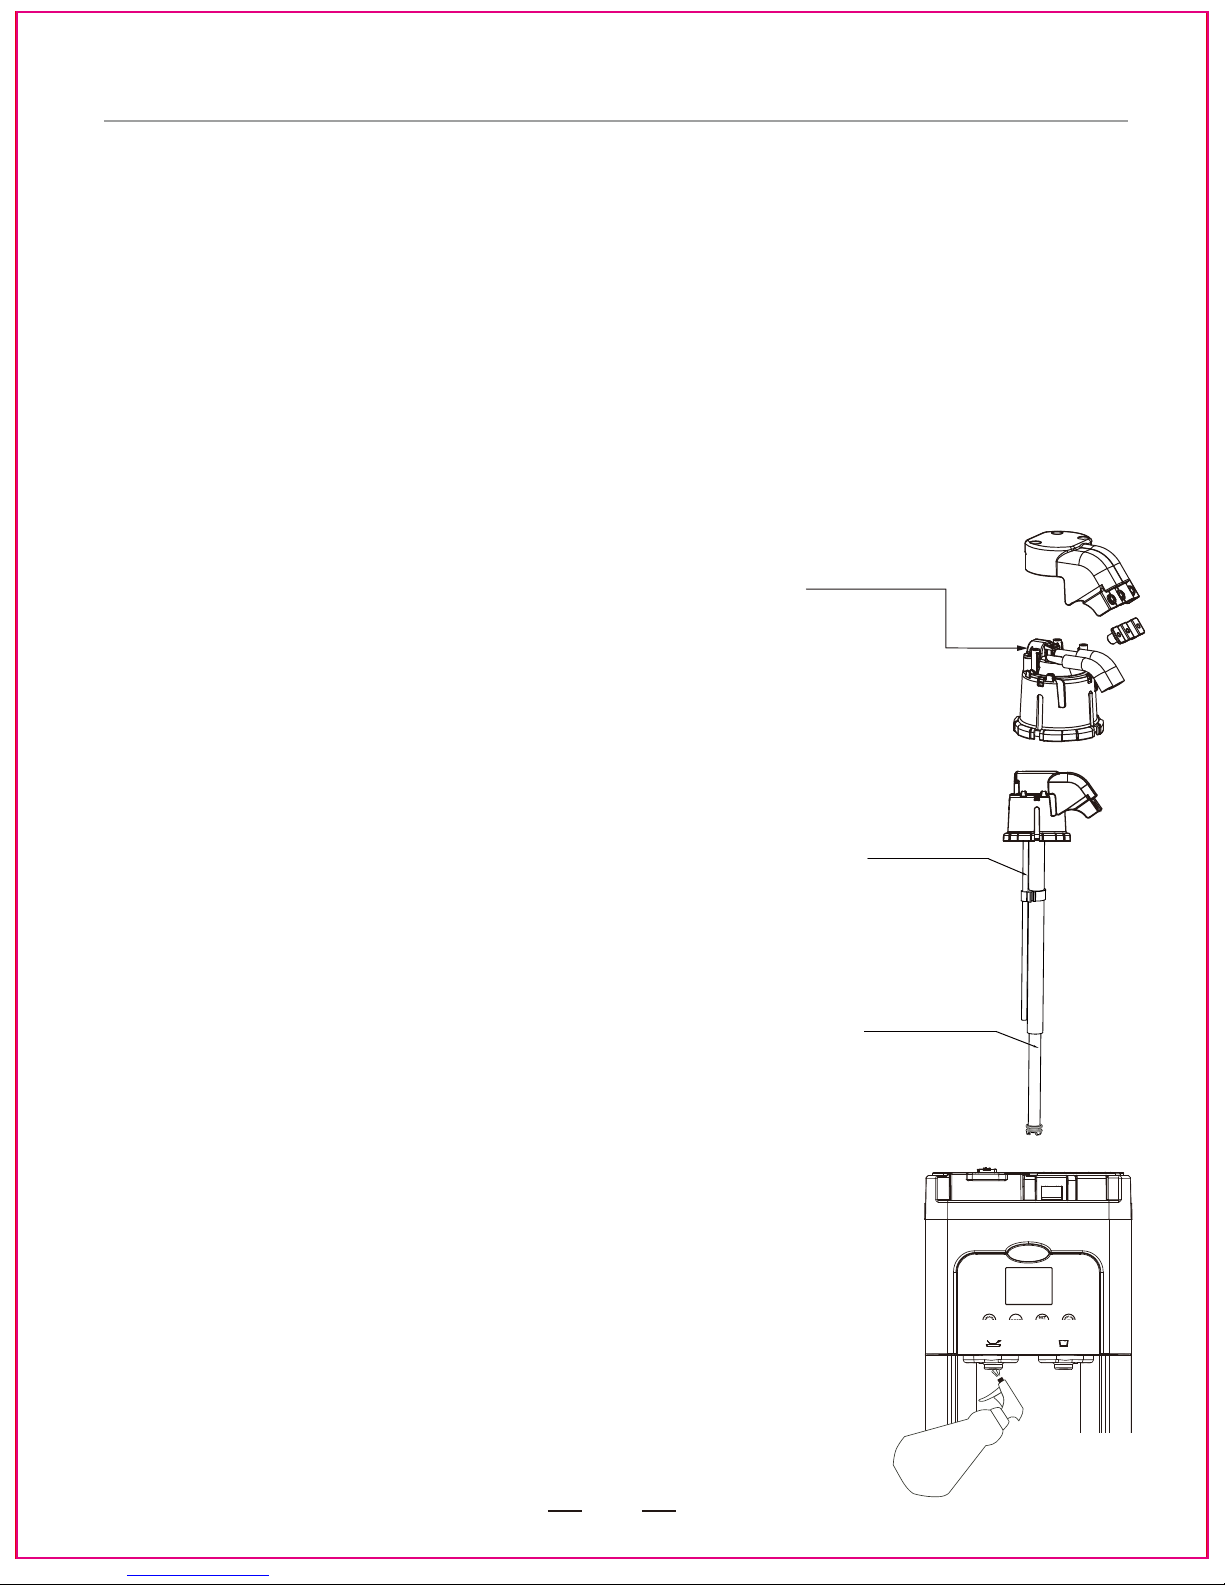
Sanitizing
Probe assembly can be contaminated by touching. please clean
it using procedure described below:
Perform: Half Yearly if required.
Time Required: 15 minutes.
Note: Do it prior to loading a fresh bottle.
1. To clean the probe assembly, unplug power cord from wall outlet.
2. Move combination unit away from wall and turn it 90 degrees in
either direction.
3. Turn power switches to OFF.
4. Remove water bottle and probe from water bottle.
5. Place a 2 gallon or larger bucket under the probe assembly.
6. Remove air filter and wash in soapy water, or use cleaning
solution by dissolving one tablespoon of unscented household
bleach in one gallon of water.
7. Submerge probe in water and wash by hand if dirty. Rinse
properly by submerging in water.
8. Use a spray bottle to spray dispensing nozzles of water faucets
with a chlorine solution.
9. After 1 minute, rinse by spraying the nozzles with tap water.
10. Place probe into bottle filled with tap water. Install in cooler and
close door.
11. Dispense 1 Gallon of water from both faucets.
12. Remove bottle with tap water.
13. Install bottle with fresh water.
14. Dispense 1 gallon of water from both faucets.
15. If bleach smell still present repeat rinsing cycle.
16. Drain an water through drain plug at the back as deseribed.
17. Replace plug.
18. Place bottle with bottled water. Place probe into bottle.
19. Close the door and plug power cord into well outlet.
PROPER CARE & CLEANING
Air Filer
Stainless Steel
tube for Self - Clean
function
Expandable telescopic
tube for drawing water
from the bottle
Page 17

17
HOW TO ADJUST WATER FILLING AMOUNT
In order to extract most of flavor from your Single Serve Cup your Brewer works at 201 0F. It is
good for elevations under 3500 feet.
- Immediately after power cord is plugged into the electrical outlet, you will hear an audible signal.
- At the same time , touch buttons “PREHEAT/READY” and “START” for 1 second, to enter into
SET mode. You will see all three (3) cup sizes' LED icons flashing.
- For altitude under 2800 Feet, you should touch button for “Small cup” for 1 second, until “Small
cup” LED will flash. Then touch START button to SET.
- For altitude under 5000 Feet , you should touch “Middle Cup” button for 1 second, until “Middle
cup” LED will flash. Then touch START button to SET.
- For altitude under 7000 Feet elevation, you should touch “Big cup” button for 1 second, until “Big
cup” LED will flash, then touch START button to SET.
- Immediately after power cord is plugged into the electrical outlet, you will hear an audible signal.
- At the same time , touch together buttons for “Middle Cup” and “START” for 1 second, water will
start dispensing from the Brewer. When water reaches required level desired for middle cup
setting touch “START” button to stop dispensing. Setting for middle cup is completed. Output
settings for “Small Cup” and “Big Cup” will be adjusted accordingly.
HOW TO CANCEL BLOW OFF TO DRY CUPS
(Suitable in case of open bottom cups or weakly glued lids. )
- Immediately after power cord is plugged into the electrical outlet, you will hear an audible signal.
- At the same time, touch together buttons for “PREHEAT/READY” and “Small Cup” for 1 second,
to enter into SET mode. My Cup light starts flashing.
- Touch “START” button to cancel Blow Off function. LED light for coffee pod picture will turn OFF.
NOTE:
This model has memory chip to retain your settings. To return to factory settings
unplug the power cord and plug back again after 3 seconds, Hold “PRE-HEAT” and
“unlock” at the same time.
IMPORTANT NOTE: Please touch "Small cup + Middle cup + Big cup"
simultaneously If you want to set the addtional setting when unit is already
plugged in.
HOW TO ADJUST WATER TEMPERATURE FOR HIGH ALTITUDE TO AVOID BOILING
Page 18

18
TROUBLESHOOTING
Attention:
Wet out of the Box:
Your machine was functionally tested using reverse osmosis filtered water, the same as used by 5
gallons water bottlers.
A small quantity of water may be left after testing.
If during car transportation some water had leaked out, it will not affect the workings of the machine.
Please wipe water off of the cooler and let it sit overnight before plugging in.
If you are using this Single Serve Coffee Brewer at the altitude in exc-ess if 2500 feet, you migh
observe water dripping from the coffee dispensing nozzle.
Please follow instructions in the manual for Altitude correction.
Your Brewer works at higher water temperature. At higher elevation it may pre-boil, or boil causing
water spill.
Hot water spills occasionally from the coffee dispensing nozzle.
Reason: - If machine is located at the altitude higher then 1500 Feet elevation over sea level, water
may become agitated or boil at lower temperature and cause spill over.
Correction: Follow instructions to make correct settings:
- Immediately after power cord is plugged into the electrical outlet, you will hear an audible signal.
- At the same time , touch buttons “PREHEAT/READY” and “START” for 1 second, to enter into SET
mode. You will see all three (3) cup sizes' LED icons flashing.
- For altitude under 2800 Feet, you should touch button for “Small cup” for 1 second, until “Small
cup” LED will flash. Then touch Start button to SET.
- For altitude under 5000 Feet , you should touch “Middle Cup” button for 1 second, until “Middle
cup” LED will flash. Then touch Start button to SET.
- For altitude under 7000 Feet elevation, you should touch “Big cup” button for 1 second, until “Big
cup” LED will flash, then touch Start button to SET.
Lids are blown off from coffee pods.
Reason:
- Some coffee pods have problems maintaing consistent quality and may fail. Try to use
coffee pods from other production batch.
Correction: - To remove blow dry function follow procedure described on page 19, called "How to
cancel blow off to dry cups".
Page 19

19
No hot water. Preheat LED light just blinks, cold is fine, no hot.
Reason:
- Possibly high limit thermal fuse had blown.
Correction: - Check if Hot Water Switch at the back is in ON position. Check if bottle has water.
If problem persist call service center at 1-844-452-2425 and report the problem.
If required, replacement unit will be shipped to you. Please drain water as per manual and pack
cooler into original packing material and call service center to arrange pick up of returned unit.
No Hot Water:
After the weekend or long absence water level in the hot tank might be lower slow due to evaporation.
Just hold Hot Water dispensing button longer until cold water fills the hot hot tank and allow hot water to
flow.
Problems: -Water flow slowed down.
- Hot water faucet started leaking.
- Does not stop dispensing coffee.
Reason: Minerals build up in hot tank and water ways. small mineral particle blocked faucets, sole-
noid valves and flow meter.
Correction: - Descale as described on page 13. Use distilled water, avoid mineral water if mineral w
ater used descale evey 6 months for average family usage. Descale every 3 months for office usage.
Water cooler does not operate
• Make sure the power cord is properly connected to a dedicated working outlet.
• Make sure energy savings switches are turned on. Make sure the cooler is plugged in and the circuit
breaker is not tripped. If needed, use another receptacle and confirm there is electricity going to the
cooler.
• Please test carefully.
No water is coming from the taps
• Check the hose connections from the water pump to the probe in the bottle, they must be well
connected to avoid air leaks.
• Check the hose connections from water pump to the dispensing probe.
• Check if leak valve is wet and has shut off water supply.
Page 20
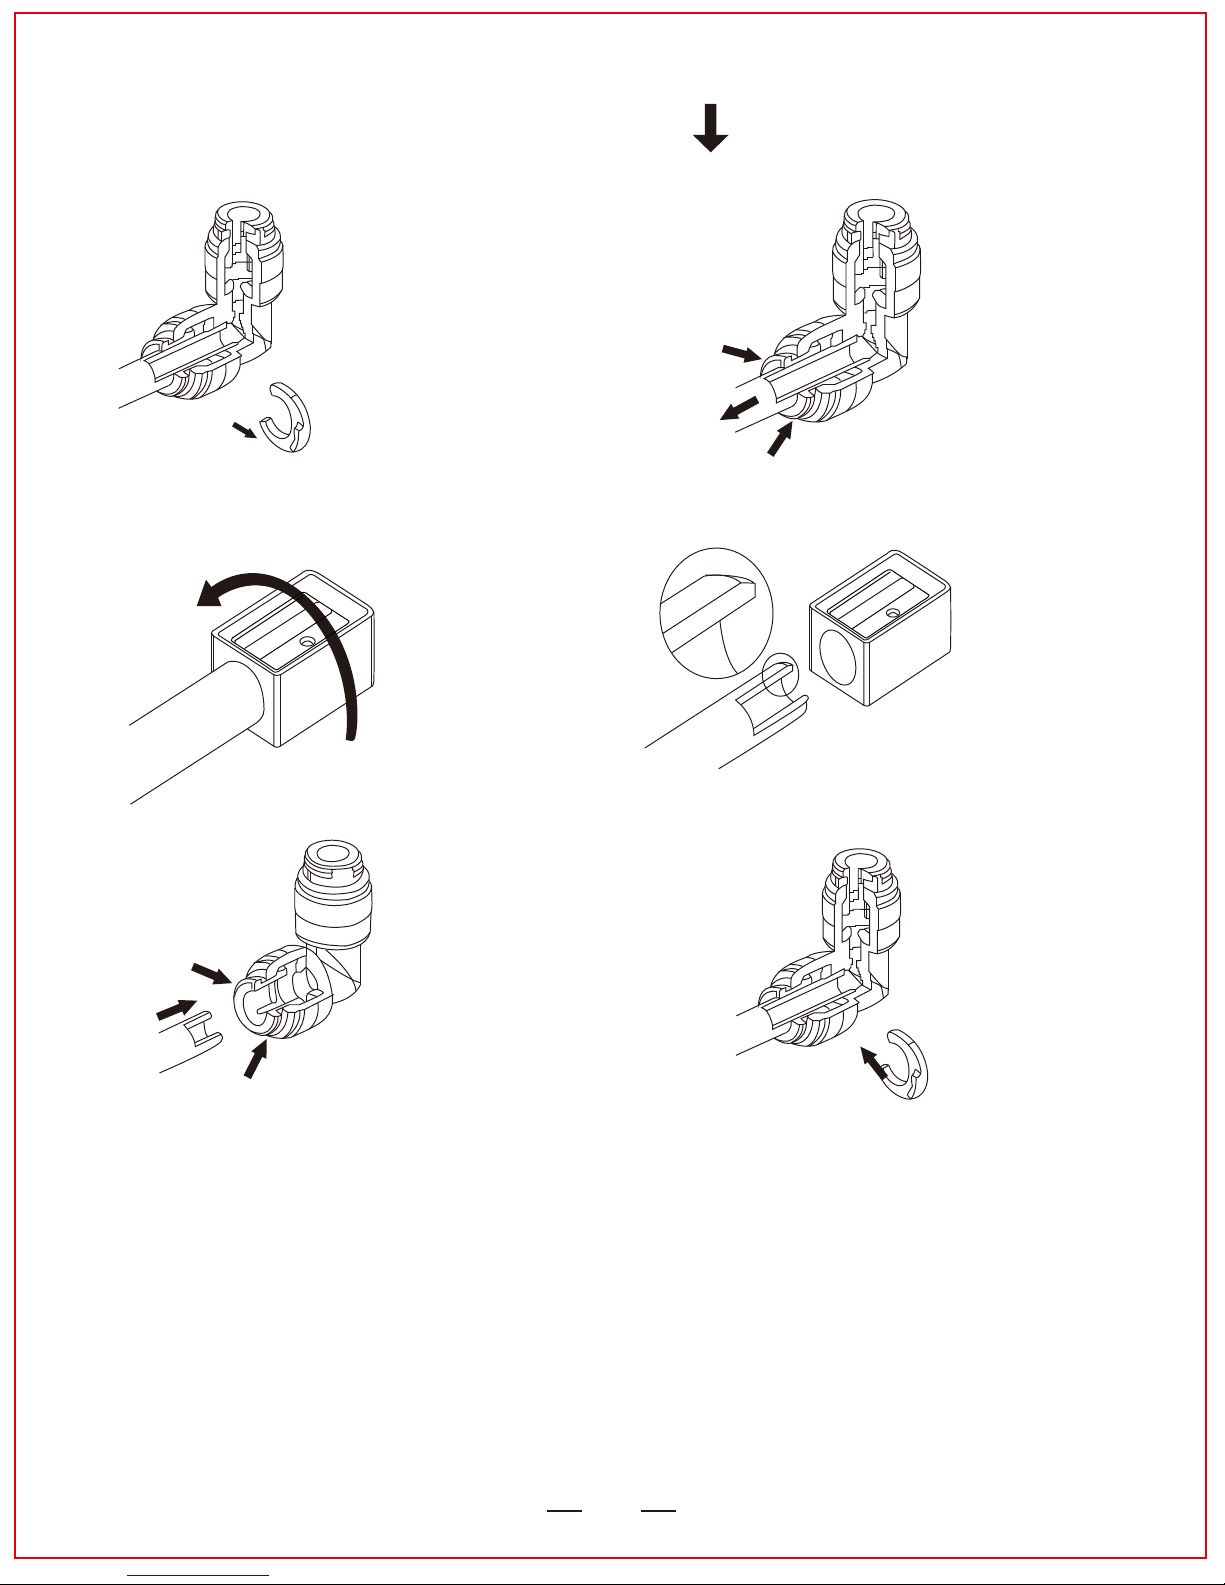
20
Water is leaking
• If leak remains, remove the probe from the bottle and call 1-844-452-2425 for assistance.
Push buttons are stuck and/or faucets are leaking
• Apply mineral oil (baby oil) to button slides to reduce friction.
Cold water is not cold
• It takes up to 1 hour after setup to cool water fully.
• Make sure the back of the dispenser is at least 4 inches from a wall and there is free airflow on all 4
sides of the dispenser.
• Make sure energy saving switch is ON.
1. Remove U-shaped lock. 2. Press collet and pull
tubing out.
3. If end has burrs, clean it up with pencil sharpener, do not make
chamfer large, it will cause leak.
4. Push tubing in all the way. 5. Reinstall U-shaped lock.
Page 21

21
Hot water is not hot
• It takes 15 minutes after setup to dispense hot water.
• Make sure the power cord is properly connected to a dedicated working outlet.
• Make sure Hot Water Power Switch is "ALWAYS ON" and the "Hot Cup" icon is illuminated. That
indicates the heating system is turning on.
The LED night lights are flashing and the dispenser is beeping
• Replace the empty bottle. If a replacement is unavailable, leave the door ajar or unplug the cooler to
stop the beeping and flashing lights.
• There may be an air leak. Check the hose connections from the water pump to the probe in the
coffee.
Dispenser is noisy
• Make sure dispenser is positioned on a level surface. Place mat provided under the cooler.
Water tastes bad
• Drain the water from the reservoirs and replace the bottle with a fresh one.
• Clean the dispenser as per “Proper Care & Cleaning” instructions.
The buttons on the control panel do not work or unresponsive
• The hot tank may be empty. Please check to see if the bottle is empty. If it is, please replace it. If it
isn't adjust the probe to an appropriate length.
• Please check if a coffee capsule is in the coffee machine. If there isn't, please add one. If there is
one, please open and close the lid. Settings will expire after being on hold for a while.
• Please check if the LED is working on the control board. If it isn't, perhaps the wires are loose or are
making poor contact. See flow to open porthole and outer cabinet.
Can't close the lid
• The cup holder may be mounted incorrectly. Please make sure the triangular arrow is facing up.
• Check if the spring in the lid is blocked by debris.
Noisy ozone and water pumps
Reasonable noise is normal. Ozone is distributed by an air pump. Water is delivered by water pump.
Touch keys on the sensor touch control board not responsive
• Check to see if you touched two or more keys at the same time. If so, please move your hands away
for awhile and try again. Wipe keys clean and dry. If not, perhaps your finger is too dry. Try
moistening your finger and try again.
Because the coffee machine may have sat for a long time prior to purchase, please dispense
a little hot water before brewing the first cup of coffee.
Page 22
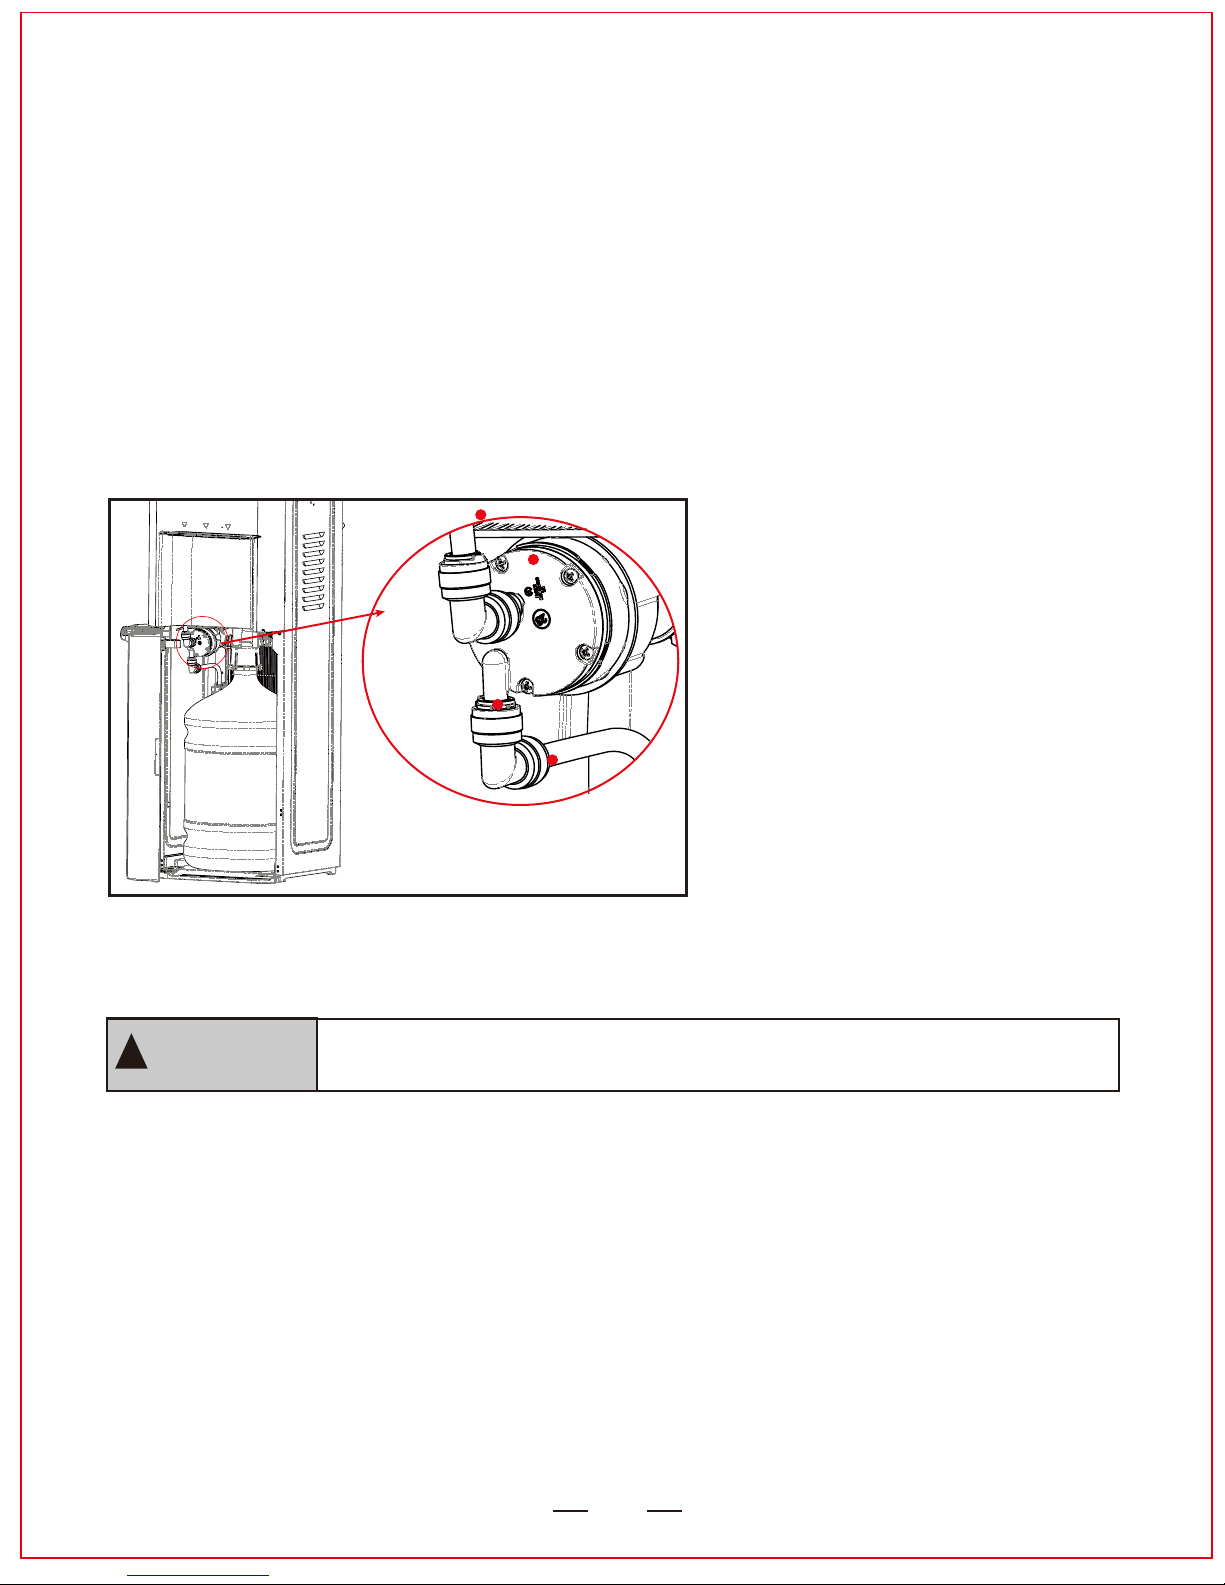
22
2
1
3
4
Dosage of water per coffee cup:
• The variation of 0.5OZ is normal for a same setting.
Coffee capsule not punctured by needle
• Please check if the Coffee Capsule is placed properly.
If your pump is not pumping water into cooler.
• Please check if tubing is properly inserted into quick connector at the top of the probe head ( show
pictures of parts referred to (See below) and how to remove tubing and release quick connector on
page21)
quick connectors have u-shaped Locks. cocks remove lock.push tubihg in unfil if
stops. place lock back.
WARNING
If COFFEE CAPSULE is pierced more than once, upper needle may get
blocked by coee grinds. Please use unfolded paper clip to clean it out.
Blockage of passageways.
When brewer is operated properly, it will not get blocked. If same coffee capsule is used more than
once it may create blockage. To prevent passageway blockage please use coffee capsule once only.
Open lid few seconds after last drop had run out. Do not open lid prematurely. Coffee cartridge with
piercing needle must be maintained clean and without the dirt. Container below the cartridge must be
periodically cleaned from dried up coffee.
Page 23
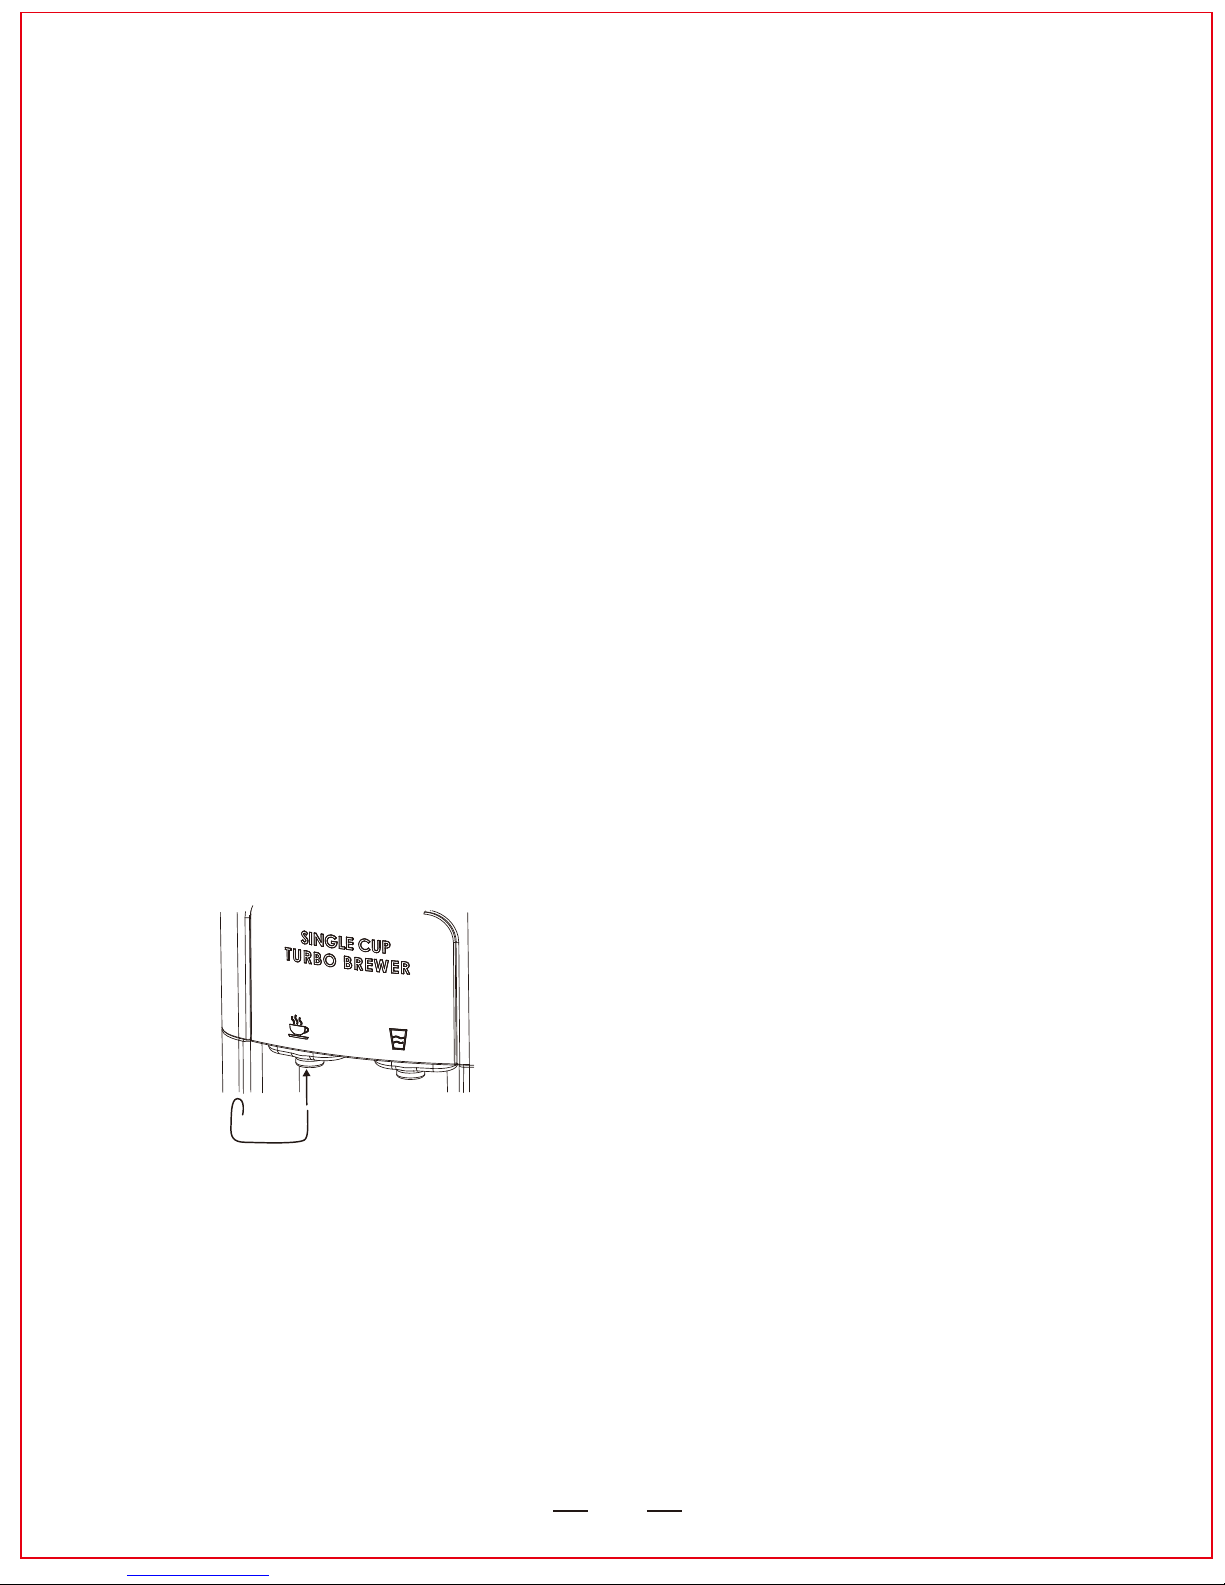
23
Be careful not to enter paper clip too deep in to passageway. IT is not straight and
food grade silicone tube can be damaged.
Call service center 1-844-452-2425 for an assistance. Pneumatic pump will be
shipped to you for cleaning the blockage.
Use paper ceip to clean dispensing
nozzle as shown
Your Brewer has two capsule piercing needles. One on top, called inlet needle and one at the
bottom, called outlet needle. It also has long passageway from the brewer to the exit nozzle. If block-
age occurs in the exit nozzle, use unfolded paper clip to clean it out. To maintain proper operation
make sure the both needles and exit nozzle are kept clean.
Lower needle is not of tubular construction and does not go all the way through. It has U-shaped
configuration with slot on its side. This proprietary design makes clogging up this needle more difficult
compared to conventional design. If lower needle is blocked, wash cartridge under running water and
use unfolded paper clip to clean inside of the needle. It is not open all the way through. It has sealed
end.
Coffee runs out of the coffee capsule through the slot in the needle and then into the inside of the
coffee capsule using same slot. This way blockages are minimized and coffee runs out of the machine
at lower temperature. During the brew process water is very hot.
If upper, inlet nozzle get blocked use paper clip to clean. Needle has 3 openings around the central
spike. Check if the silicone seal on the upper piercing needle is properly installed.
Dispense few cups of water to rinse well. Clean with unfolded paper clip well. To dispense water
only you will need to open and close lid in order to send signal via sensor to control board. Never leave
blocked needle for more then 5 minutes, since blocked coffee will dry up and make it more difficult to
remove.
Page 24
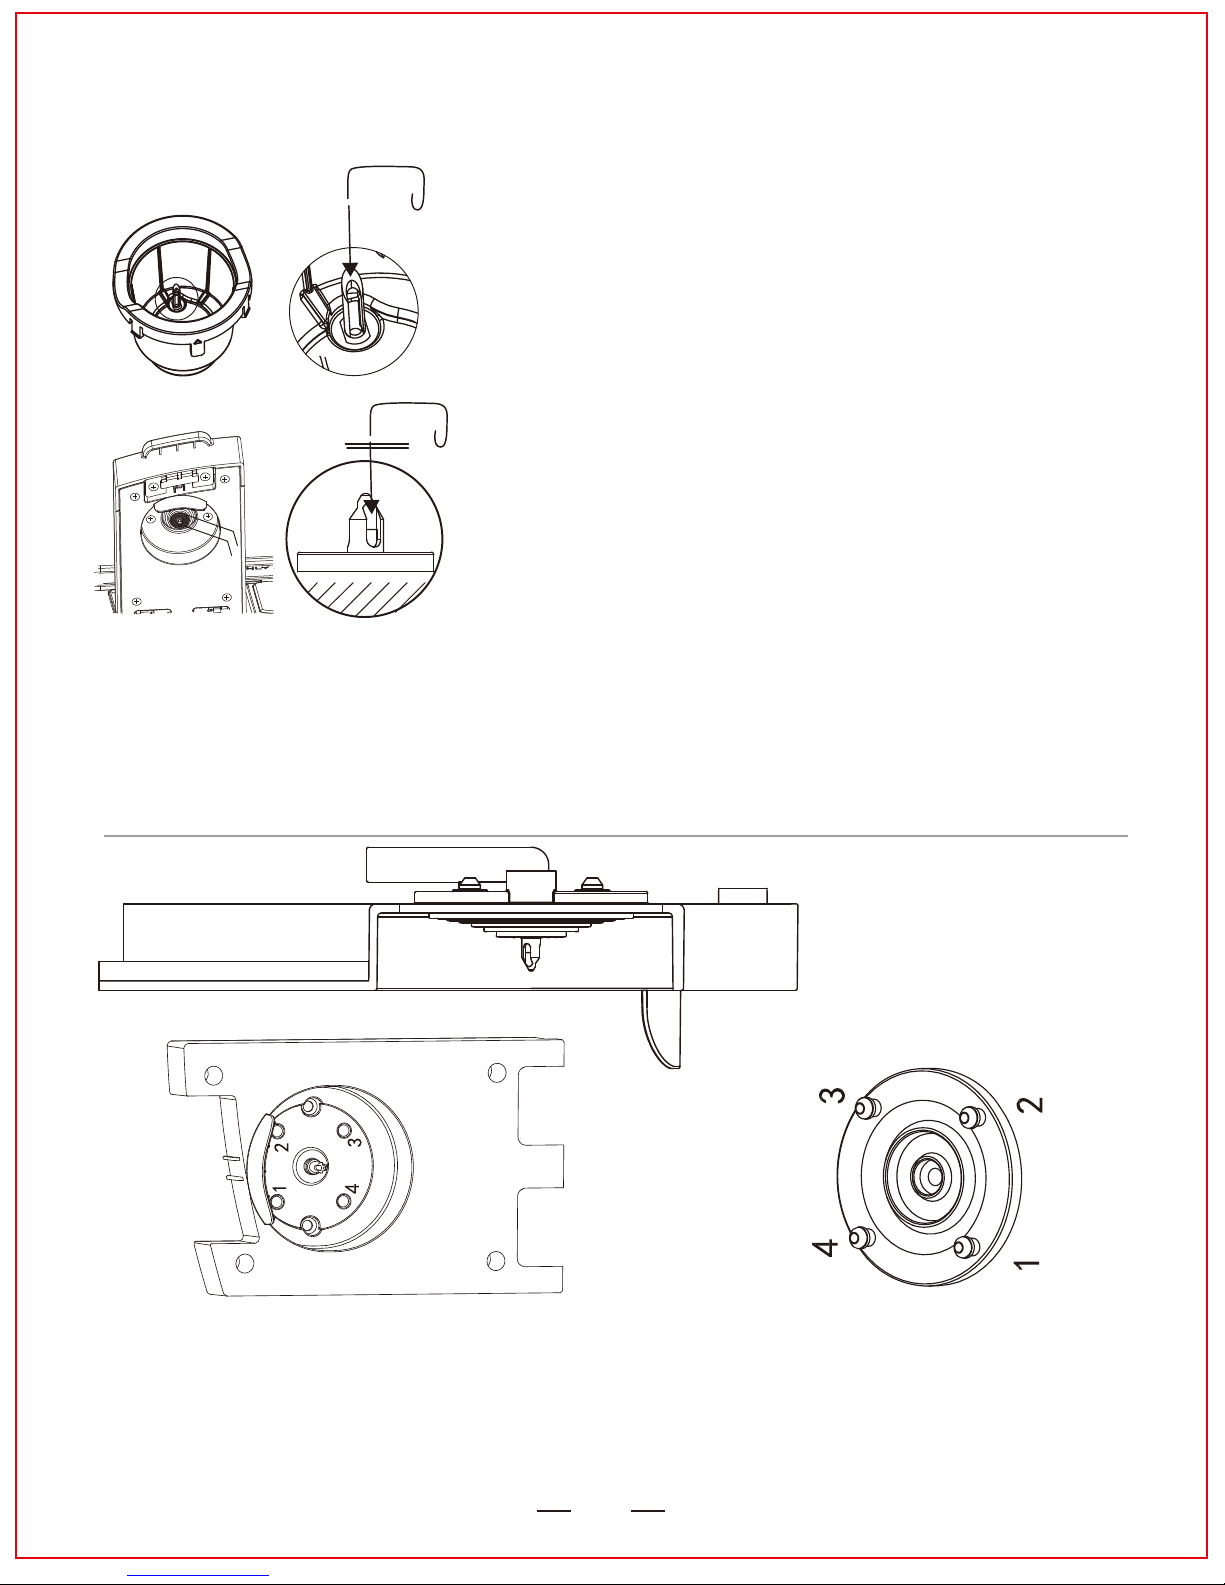
24
B
A
If upper, inlet nozzle get blocked use paper
clip to clean. Needle has 3 openings around
the central spike. Check if the silicone seal
on the upper piercing needle is properly
installed.
Lower needle is not of tubular construction and
does not go all the way through. It has U-shaped
configuration with slot on its side.It has sealed
end. Coffee runs out out of the coffee capsule
through the slot in the needle and then into the
inside of the coffee capsule using same slot.
CORRECT UPPER NEEDLE SEAL INSTALLATION
NOTE: This seal is not meant to be removed or reinstalled however if seal was removed
for any reason please reinstall correctly. Seal has 4 lugs for securing to the LID.
please insert lugs into corresponding holes and push in to lock.
A
B
Page 25
25
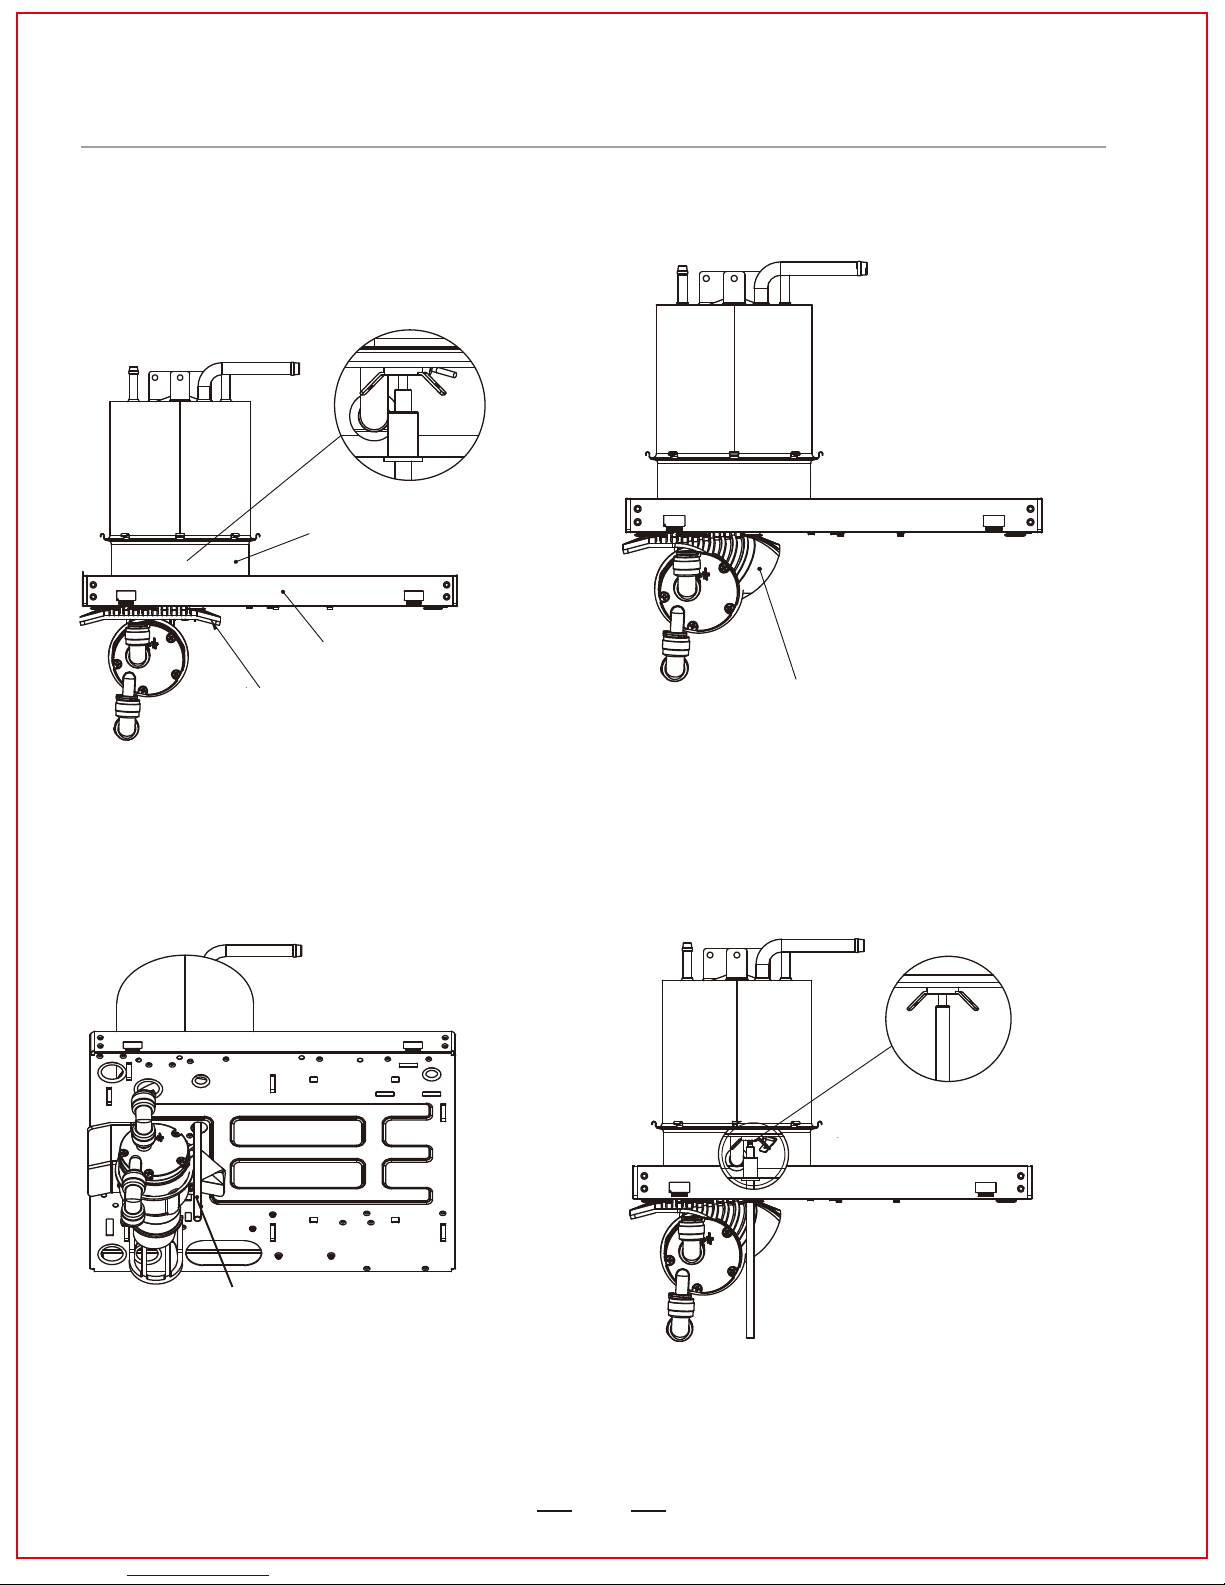
HOW TO RESET HOT TANK SAFETY SWITCH
If hot tank safety switch trips, reset as per instructions below.
compressor shelf
pump mount
hot tank bottom cover
Deflect pump mount to expose acess hole
Use wooden stick to reset switch
To reset push stick gently
1/4” access hole
Safety switch
A
Pic 1 Pic 2
Pic 3 Pic 4
Page 26
26
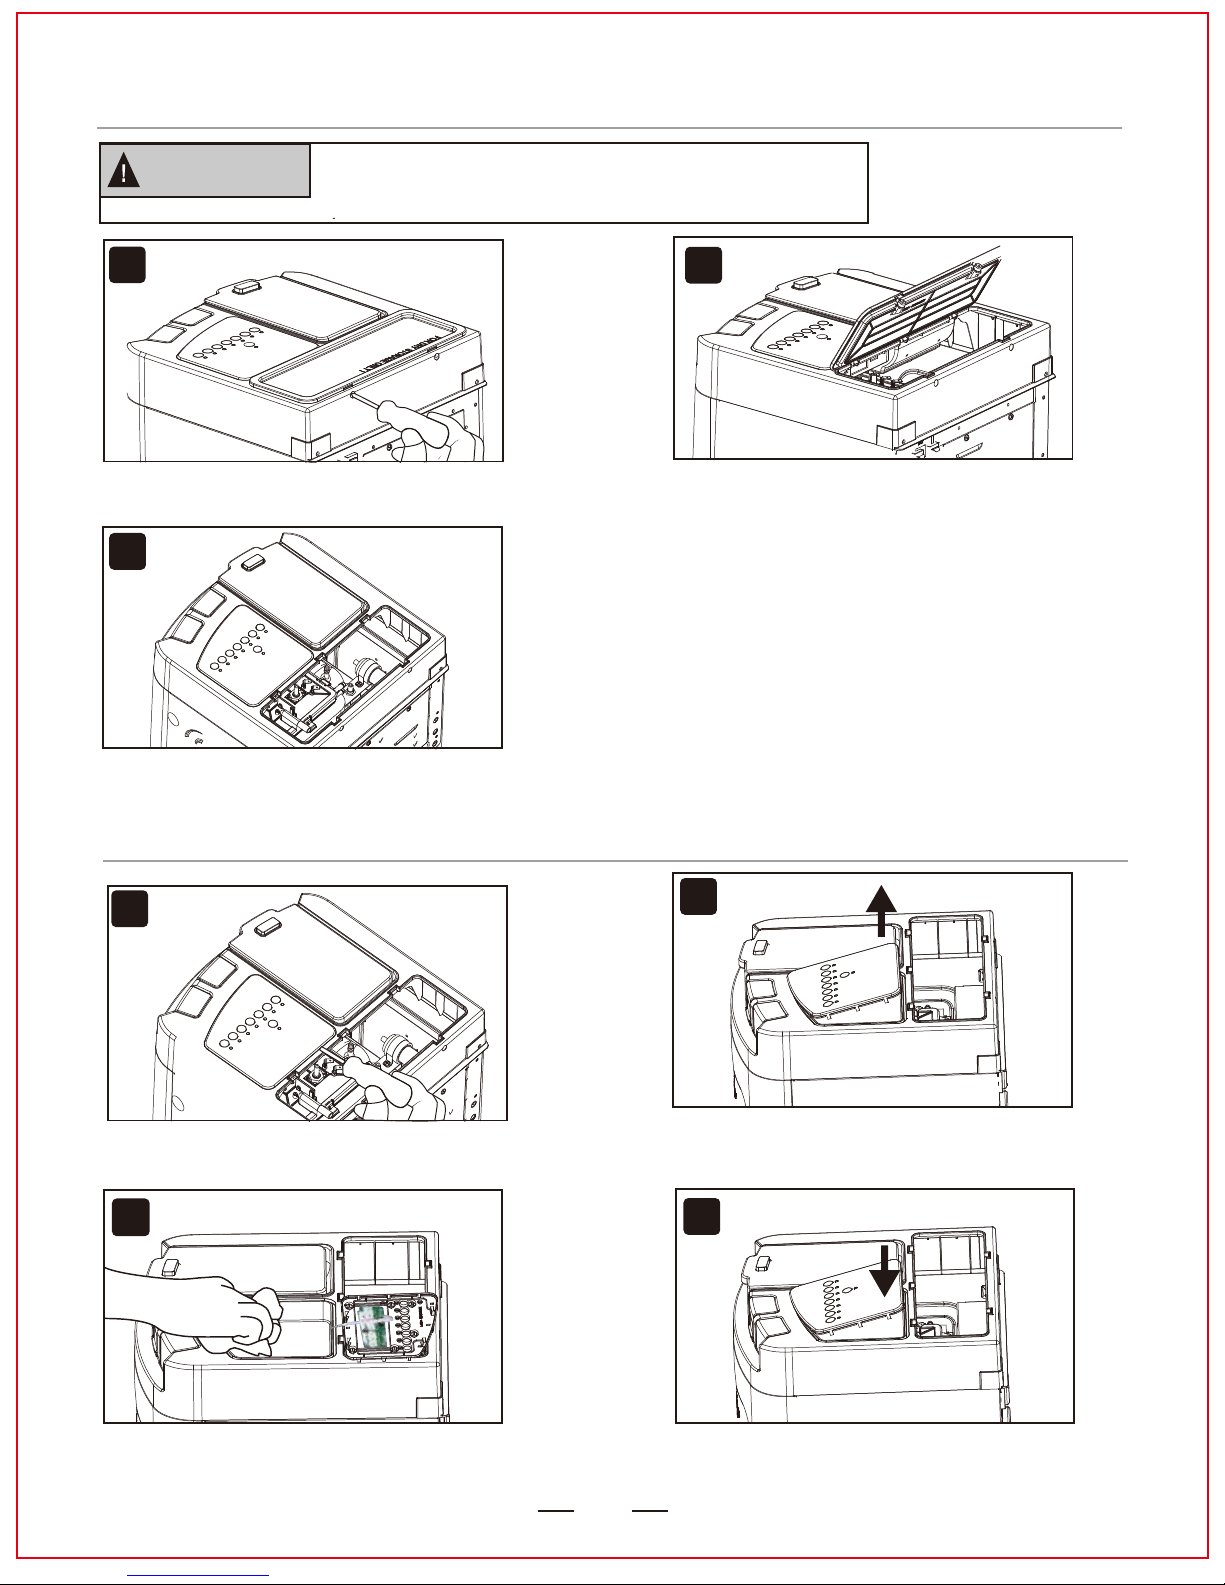
CLEANING UNDER CONTROL BOARD IN CASE OF SEVERE SPILL OF LIQUIDS.
Unscrew two holding screws from the
back as shown.
Lift Coffee Capsule storage tray.
Beware of hot water.
Report observations to service toll
phone 1-844-452-2425.
1
3
2
Using flat screwdriver. Push lock tabs
to release control board assembly.
Lift controe board assembly.
If water present soak it up with paper
towel.
Close lid and press down.
1
4
3
2
OPENING INSPECTION PORTHOLE
WARNING
To be performed by qualied person only.
Unplug unit by disconnecting power cord.
Page 27
27
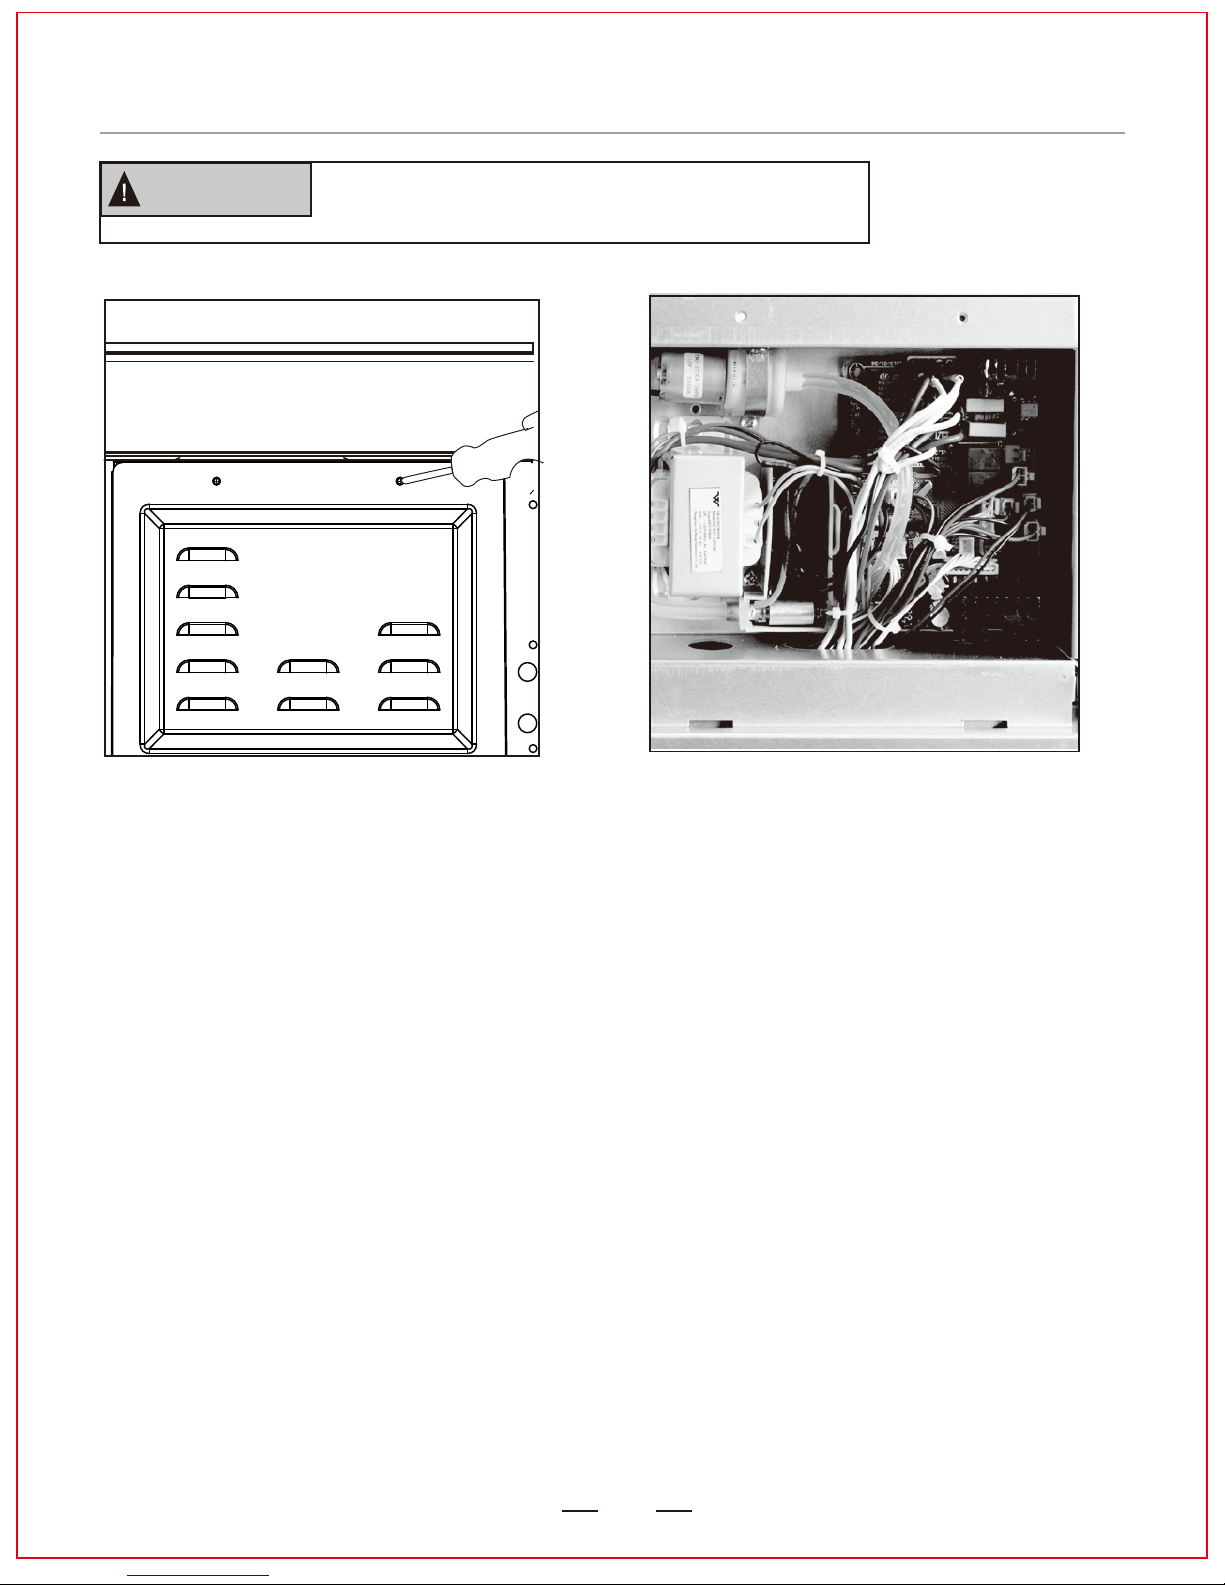
Report observations to service toll phone
1-844-452-2425.
HOW TO OPEN CONTROL BOARD ENCLOSURE FOR AN INSPECTION
WARNING
To be performed by qualied person only.
Unplug unit by disconnecting power cord.
Unscrew two holding screws from the
back as shown.
Notice!
"Keurig ® and K-Cup ® are registered trademarks of Keurig,
Inc. a subsidiary of Green Mountain Coffee Roasters, Inc.,
Electrotemp Technologies Inc. is not affiliated with Green
Mountain Coffee Roasters or Keurig."
Electrotemp Technologies Inc.
406 Watline Avenue
Mississauga, Ontario, L4Z-1X2,Canada
Toll free
1-844-452-2425
www.electrotemp.com
 Loading...