

Page 1

DIGITAL AUTOMATIC
BLOOD PRESSURE MONITOR
INSTRUCTION MANUAL
MODEL No.: MD4120/MD4140/MD4180
Version: 1
TABLE OF CONTENTS
INTRODUCTION...............................................................................1
COMPLIANCE...................................................................................1
SYMBOLS........................................................................................2
IMPORTANT NOTES.....................................................................2-4
DEVICE DESCRIPTION.................................................................5-6
BATTERY INSTALLATION.................................................................7
USE THE OPTIONAL AC ADAPTER .................................................8
SETTING DATE AND TIME................................................................9
SETTING ALARM CLOCK.................................................................10
BEFORE TAKING A MEASUREMENT...............................................11
APPLYING ARM CUFF.....................................................................11
PERFORMING BLOOD PRESSURE MEASUREMENT......................12
RECALL AVERAGE AND PREVIOUS MEASUREMENT DATA...........13
DELETE MEASUREMENT DATA......................................................13
PRESSURE BAR INDICATOR..........................................................14
WHO CLASSIFICATION INDICATOR............................................... 14
ABOUT IRREGULAR HEARTBEAT ...................................................15
ABOUT BLOOD PRESSURE............................................................15
TROUBLESHOOTING......................................................................16
TECHNICAL SPECIFICATION..........................................................17
APPENDIX I...............................................................................18-19
APPENDIX II..............................................................................20-21
APPENDIX III..................................................................................22
APPENDIX IV..................................................................................23
Page 2

INTRODUCTION
Thank you for purchasing the G.LAB MD4120/MD4140/MD4180
Blood Pressure Monitor.
The device is easy-to-use and good for home users and healthcare
professionals. It applies non-invasive oscillometric method which
can measure your blood pressure and pulse rate quickly and easily,
and it saves the data automatically to let you review the average and
measured data at any time.
Indication for use
This device is for use by medical professional or home users. It is
intended to measure the systolic and diastolic blood pressure on an
adult individual by using a non-invasive technique, in which an
inflatable cuff is wrapped around the upper arm.
COMPLIANCE
This device conforms to European Medical Device Directive
93/42/EEC.
This device complies with:
• EN ISO 81060 standard relating to non-invasive sphygmomanom eters
Part 1: Requirements and test methods for non-automated
measurement types and EN 1060 standard relating to non-invasive
sphygmomanometers.
Part 3: Supplementary requirements for electro-mechanical blood
pressure measuring systems.
• EN 60601 standard relating to medical electrical equipment
Part 1-2: General requirements for basic safety and essential
performance and essential performance – Collateral standard:
Electromagnetic compatibility – Requirements and tests.
• EN 1060-4:2004 standard relating to non-invasive sphygmoma nometers
Part 4: Test procedures to determine the overall system accuracy
of automated non-invasive sphygmomanometers.
• ISO 81060-2:2013 standard relating to non-Invasive sphygmoma nometers
Part 2: Clinical validation of automated measurement type.
• IEC 80601-2-30:2009+A1:2013 standard relating to medical
electrical equipment
Part 2-30: Particular requirements for the basic safety and
essential performance of automated type non-invasive
sphygmomanometers.
- 1 -
Page 3

SYMBOLS
The following symbols are used in this instruction manual, or
appear on the device, accessories and packaging.
To assure correct use of the device, basic safety measures should
always be followed including the warnings and cautions listed in
this instruction manual.
Symbols Function / Meaning
WARNING / ATTENTION
Indicates a potentially hazardous situation which, if
not avoided, could result in death or serious injury.
PRECAUTION / IMPORTANT INFORMATION
SN Serial Number
Manufacturer
Type BF: Device, cuff and tubing are designed to
provide special protection against electrical shocks.
SYS Systolic Blood Pressure in mmHg
DIA Diastolic Blood Pressure in mmHg
PUL Pulse
EC Directive Medical Device Label
WEEE Label
Refer to instruction manual / booklet
Keep dry
IMPORTANT NOTES
DO NOT use this device on newborns, infants, children,
toddlers or persons who cannot express their intentions. The
device is designed for use on adults only.
DO NOT self-diagnosis from the measurement results and
start treatment by yourself.
DO NOT adjust medication based on the measurement results.
Consult your physician for specific information about your
blood pressure.
The Irregular Heartbeat detection function may help to detect
potential cardiac arrhythmia at an early stage but it is not
intended to replace cardiac examination.
The “WHO Blood Pressure Classification” chart is a guide for
reference and is not intended to replace medical diagnosis.
Use the device only as intended. Do not use the device for
any other purpose.
Do not apply the device on an arm with an unhealed wound or
under medical treatment.
Do not take measurements more than necessary. High
measurement repetition rates may cause pain, numbness,
temporary red marks or bruising to the arm due to blood flow
interference.
- 2 -
Page 4

IMPORTANT NOTES
If you have any of the following medical conditions, you may
get an inaccurate reading with the device. Please consult your
physician before using the device.
• Patients in shock
• Cardiac arrhythmias
• Atrial or ventricular premature beats
• Atrial fibrillation
• Arterial sclerosis
• Poor perfusion
• Vessel anomalies
• Very low blood pressure
• Pregnancy
• Diabetes
• Pre-eclampsia
• Renal diseases
• Underwent breast or axillary lymph node removal operation
• With an arteriovenous shunt.
• With an intravenous drip or blood transfusion.
• With implanted electrical device such as cardiac pacemaker
• With other medical electrical equipment attached
• With condition that may compromise circulation
• Severe blood flow problems or blood disorders, as cuff
inflation can cause bruising.
• Trembling or shivering
Do not use the device with other medical electrical equipment
simultaneously.
Do not use the device where high frequency surgical
equipment, magnetic resonance imaging (MRI), computerized
tomography (CT) scanner or X-ray machine is operating.
Do not use the device near electromagnetic fields emission
equipment such as cellular phones, microwave ovens or
televisions.
IMPORTANT NOTES
Do not use the device where flammable gases (e.g. anesthetics
gas, oxygen and hydrogen) or flammable liquids (e.g. alcohol)
are present.
Do not use the device in a moving vehicle such as car or airplane.
Do not use the device outside the specified environment. It may
cause an inaccurate reading.
The product contains small parts that may cause a choking
hazard to infants and children. Keep the device and its parts out
of reach of infants and children.
Do not attempt to open, disassemble, repair, modify or adjust the
device by yourself. It may cause accident, damage the device,
cause inaccurate measurement and void the user warranty.
Do not subject the device to strong knocks (e.g. dropping the
unit on the floor), extreme in temperature, high humidity, direct
sunlight, dust or chemicals. This may damage the device.
The device is not water resistant. Avoid water, rain or sweat from
infiltrating the device.
Clean the device and cuff carefully with a dry, soft cloth or a cloth
dampened with water. Do not use aggressive solvents such as
alcohol, benzene, thinner or other strong chemicals to clean the
device.
Do not fold the cuff tightly for a long period. Such condition may
shorten the life of the part.
Dispose used equipment, parts, batteries and optional
accessories according to applicable local regulations. Unlawful
disposal may cause environmental pollution.
- 3 -
Page 5

Do not wrap the cuff around body parts other than your upper
left arm. Misuse represents a risk to your health.
Packaging materials are a deadly hazard for children and can
cause suffocation. Remove all packaging materials immediately
and keep them away from children at all times.
Proper cuff size is important for accurate measurements. Only
use the device on adults who have the right
upper arm circumference for this unit. See “TECHNICAL
SPECIFICATION” for suitable arm circumferences.
Batteries should not be charged or reactivated by any other
means. The batteries may explode.
Take extra precaution to keep a leaking battery away from fire as
there is a risk of ignition or explosion.
Do not use any cuffs and accessories other than those explicitly
recommended by the manufacturer for use with this product.
Cuffs and accessories not approved for use with this device may
cause damage to your health and to the product.
The tubing presents a strangulation hazard. Keep this product
away from children and those who require close supervision,
e.g. people with mental disorders.
Do not drape tube around neck. This presents a strangulation
hazard.
Remove any kind of arm jewellery or the like before taking a
measurement. This could cause bruises.
When storing the device, make sure that no heavy objects are
placed on top of it.
IMPORTANT NOTESIMPORTANT NOTES
Do not place the arm cuff over heavy clothing (e.g. a jacket or
sweater sleeve) as the blood pressure monitor will not be able to
take a proper measurement and there is an elevated danger of
acquiring hematoma or skin marks during the course of the
measurement.
In case the cuff does not stop inflating, interrupt the
measurement by pressing the ON/OFF button and open the cuff
at once.
When applying the cuff, make sure there are no wrinkles in the
cuff as this could cause bruises.
Blood pressure measurements can lead to temporary marks on
the skin at the site of the cuff placement. This is especially the
case in high repetition rates, in hypertonic patients and in
patients with weak heart rates. In rare cases a mark may persist
for couple of days. Please contact your physician about these
specific risks of cuff pressure in your specific case.
Do not exert any kind of pressure on the hose during
measurement, e.g. laying your arms or any other object on
the hose. This could cause incorrect measurements.
The device is designed and manufactured for a long service life.
However it is generally recommended to have the monitor
inspected every 2 years to ensure proper functioning and
accuracy. Please contact your dealer for maintenance.
Do not drop or insert any object into any openings or hoses. This
may damage the unit.
Do not press the buttons with excessive force or with pointed
objects.
- 4 -
Page 6

DEVICE DESCRIPTION
Main Unit
Display
Air Jack
Arm Cuff
Left Key
Memory Key
Air Tube
Start/Stop Key
DC Jack
Right Key
Air Plug
Battery Cover
- 5 -
Page 7

DEVICE DESCRIPTION
Information on the Display :
Severe Hypertension
Alarm 1
Alarm 2
Moderate Hypertension
Mild Hypertension
User
High Normal
Pressurizing
Releasing Air
Pressure Bar
Normal
Optimal
Pulse Rate
- 6 -
Irregular Heartbeat
Indicator
Heart Mark
Systolic Pressure
Battery Indicator
Date
Time
Average Data
Memory Record
Number and Data
Diastolic Pressure
Page 8

BATTERY INSTALLATION
1. Remove the battery cover.
2. Remove the used batteries and insert new batteries.
Use LR03 / AAA alkaline batteries.
Make sure the battery polarities (+) and (-) match the markings
on the battery compartment.
3. Close the battery cover.
Battery Level Indicator
symbol on the display indicates that battery level is normal.
When battery level is getting low, symbol and “E6” will appear
on the display. Replace all used batteries with new batteries.
NOTE:
Batteries may cause a choking hazard to children. Store the
batteries out of the reach of children.
In case battery fluid leaks, do not touch the battery fluid. Avoid
skin contact (e.g. put on protective gloves) and clean the battery
compartment with dry cloth.
Remove the batteries from the battery compartment if the device
will not be used for a long period.
Use only 1.5V alkaline batteries. Do not use other types of
battery such as rechargeable battery. This may damage the
device.
Replace all batteries at the same time. Do not mix used and new
batteries. Use same brand and model of batteries is
recommended.
Battery life may vary with ambient temperature and may be
shorter at low temperature.
- 7 -
Page 9
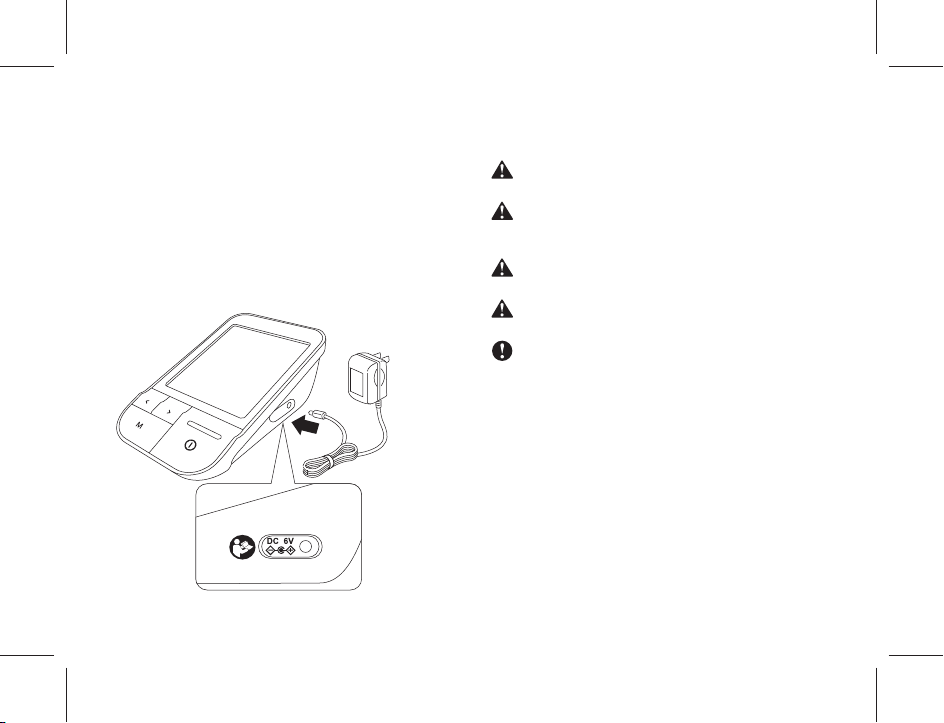
USE THE OPTIONAL AC ADAPTER
(The AC Adapter 6VDC@600mA is an optional accessory and is
sold separately)
(A) Connecting the AC adapter to the device
1. Insert the AC adapter output plug into the DC jack on the right
side of the main unit.
2. Plug the AC adapter into an AC outlet.
3. The device will turn on and enter date and time setting mode.
(B) Disconnecting the AC adapter from the device
1. Unplug the AC adapter from the AC outlet.
2. Remove the AC adapter output plug from the DC jack of the
main unit.
NOTE:
Use AC adapter which complies with the requirement of IEC
60601-1 standard.
Only use the authorized AC adapter specified by dealers.
Other AC adapter may vary in output voltage and polarities,
and may harmful to the user and damage the device.
Make sure the AC adapter input voltage and plug type is
matching the outlet voltage and type before connecting.
Do not plug or unplug the AC adapter to the electrical outlet
with wet hands.
When the AC adapter is in use, the main unit does not draw
power from batteries.
- 8 -
Page 10
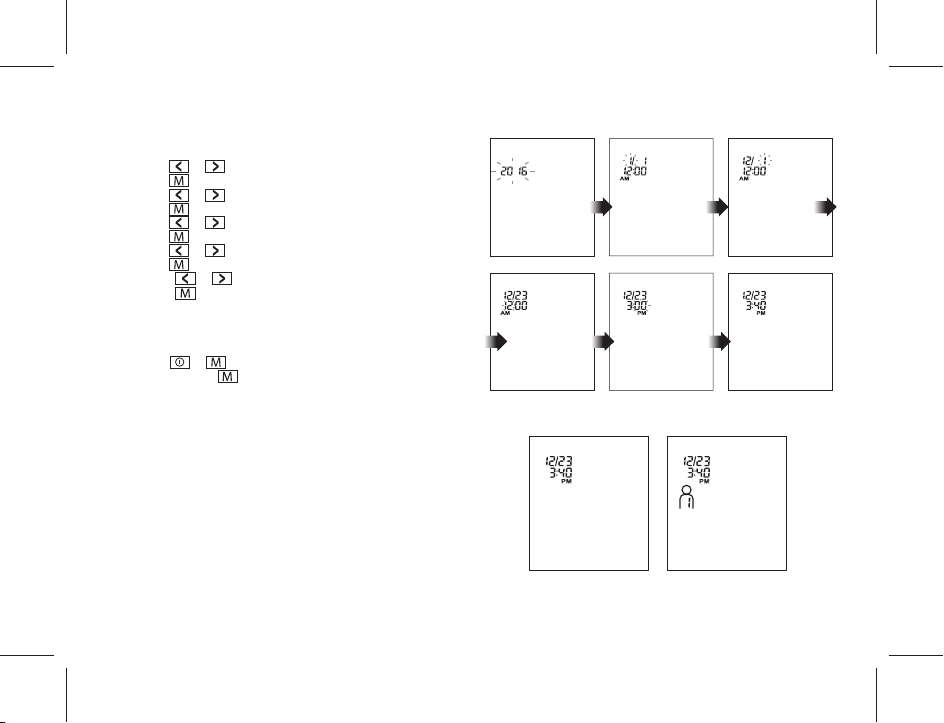
SETTING DATE AND TIME
(A) When new batteries are installed
1. “YEAR” will blink on the display.
2. Press or key to set the current Year.
3. Press key to confirm and then "MONTH" will start to blink.
4. Press or key to set the current Month.
5. Press key to confirm and then "DAY" will start to blink.
6. Press or key to set the current Day.
7. Press key to confirm and then "HOUR" will start to blink.
8. Press or key to set the current Hour.
9. Press key to confirm and then "MINUTE" will start to blink.
10. Press or key to set the current Minute.
11. Press key to confirm. Date and time setting is completed.
12. The device returns to Clock mode. Date and time appear on
the display.
(B) When device is in Clock Mode
1. Press or key to Standby Mode.
2. Press and hold key for about 5 seconds until "YEAR" blinks
on the display.
3. Follow the same procedure above to set the date and time.
Clock Mode Standby Mode
- 9 -
Page 11
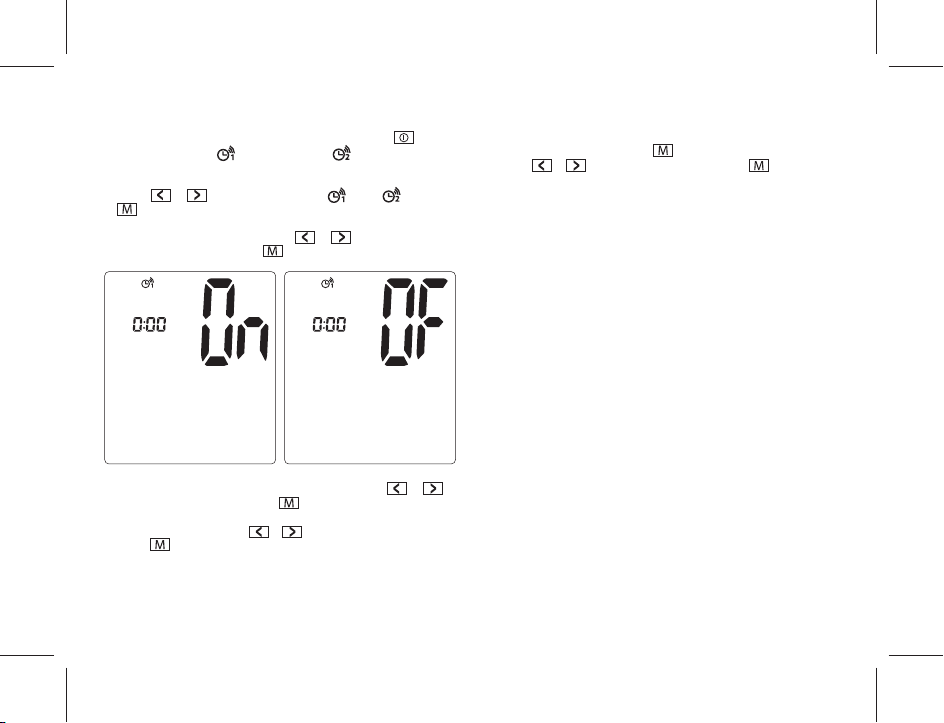
SETTING ALARM CLOCK
1. To enter the alarm clock setting mode, press and hold key
until Alarm 1 icon “ ” or Alarm 2 icon “ ” is flashing on the
display.
2. Press or key to select between “ ” and “ ”. Press
key to confirm your selection.
3. “On” or “OF” icon will blink, press or key to switch
between ON and OFF. Press key to confirm.
4. When “On” icon is selected, “Hour” will blink. Press or key
to adjust to desired hour. Press key to confirm.
5. “Minute” will blink. Press or key to adjust to desired minute.
Press key to confirm and settings are done. The alarm icon is
turned on on the display.
6. To turn off the alarm, enter the alarm clock setting mode and select
the desired alarm icon. Press key to confirm your selection.
Press or key to switch to “OF” and press key to confirm.
The alarm is turned off.
- 10 -
Page 12
BEFORE TAKING A MEASUREMENT
• Before using the device, check your upper arm circumference and
make sure it matches the cuff circumference range.
• Keep record of your blood pressure and pulse rate. A single
measurement does not provide an accurate indication of your true
blood pressure.
• To ensure comparable data, measure your blood pressure at the
same time of the day for consistency.
• Measurement should be taken in a quiet and comfortable indoor
environment.
• To ensure a reliable measurement, follow these recommendations:
- Avoid eating, drinking alcohol or caffeinated beverages,
smoking, exercising, or bathing for 30 minutes before taking a
measurement.
- Rest for at least 5 minutes before taking each measurement.
- Stress raises blood pressure. Avoid taking measurements
during stressful conditions.
- Avoid taking measurement while you are physically tired or
exhausted.
- Remain still and do not talk during the measurement.
- Position the cuff at heart level throughout the measurement.
• Relax and sit comfortably on a chair. Lay your feet flat on the
floor. Do not cross your feet. Keep your back straight.
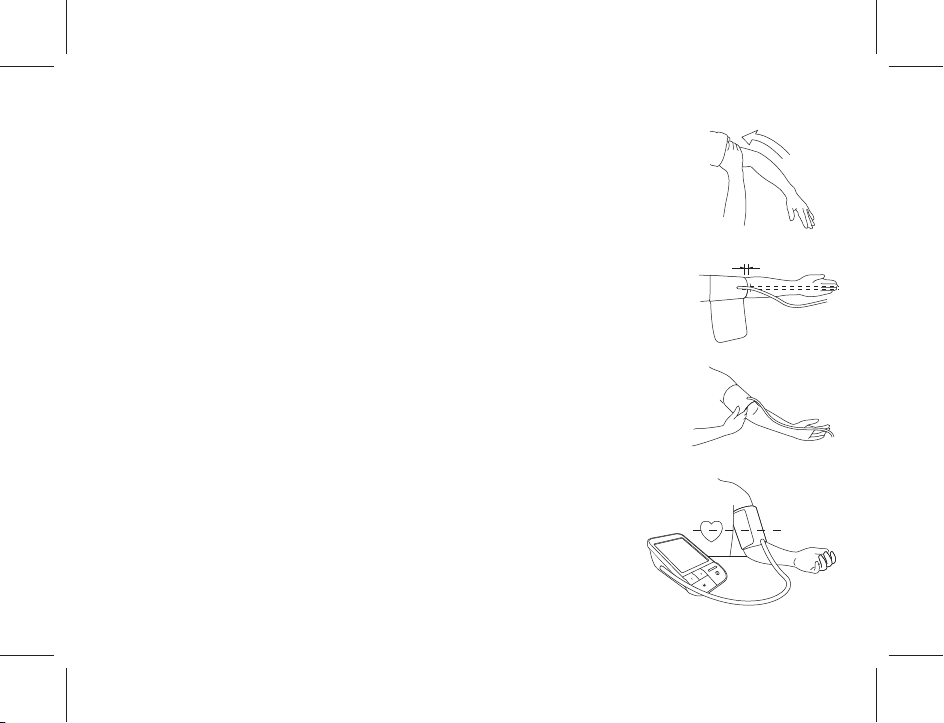
APPLYING ARM CUFF
1. Bare your left upper arm. Make
sure that the blood circulation in
your arm in not constricted by any
clothing that is too tight.
2. Put your left arm through the cuff
loop. Turn your palm upward.
Position the cuff approximately
1/2 inch or 1-2cm above your elbow.
The air tube runs down the inside
of the arm and aligns with the
middle finger. Do not place the
arm cuff over any clothing such as
sleeve.
3. Pull the end of the cuff and fasten
the Velcro. Make sure the cuff is
wrapped firmly around your upper
arm but should not constrict blood
circulation.
4. Place your elbow steadily on a
table or at a position so that the
cuff is level with your heart.
5. Insert the cuff air plug into the air
jack of the main unit. Make sure
the air plug is securely inserted.
- 11 -
1-2cm or 1/2”
Page 13
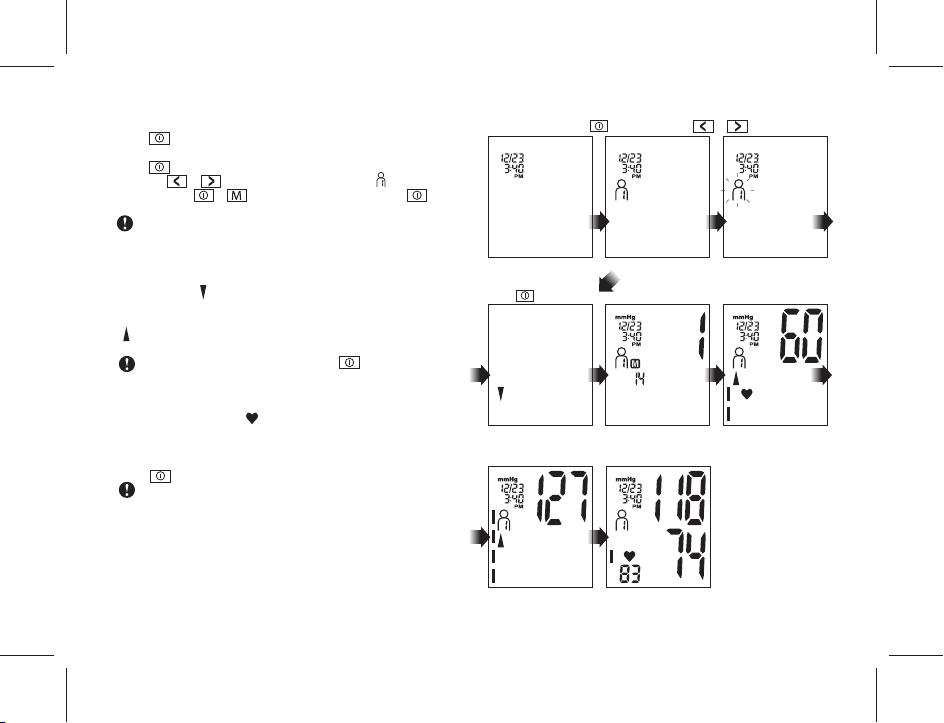
PERFORMING BLOOD PRESSURE MEASUREMENT
1. Press key to turn the device from Clock Mode to Standby
Mode.
2. Press key again to start the blood pressure measurement.
OR Press or key to select User 1,2,3 or 4. blinks on the
display. Press or key to confirm selection. Press key
again to start the blood pressure measurement.
The device has a memory capability to store the measurement
data for 4 users - User 1,2,3 and 4. Every time you complete
the measurement, the device automatically stores the
measurement result.
3. The cuff deflates to remove residue air before starting
measurement. Releasing air indicator blinks on the display.
4. User number and memory record number appear on the display.
5. The cuff starts to inflate. It is normal for the cuff to feel tight.
Pressurize indicator, the corresponding pressure bar indicator
and the current cuff pressure appear on the display.
If you want to stop cuff inflation, press key to turn off the
device and the cuff will deflate.
6. The monitor automatically determines your ideal inflation level
and will stop inflation automatically. As soon as a pulse is
detected, the Heart Mark flashes at every heartbeat.
7. When the measurement is completed, the systolic pressure, the
diastolic pressure and pulse rate are displayed and are stored to
memory. The cuff deflates to remove residue air automatically.
8. Press key to turn off the device.
The device will automatically return to Clock Mode after 1
minutes of inactivity.
Press Key
Clock Mode
Press Key to start
Deflation before
measurement
Press or Key
Standby Mode User icon blinking
Display User No. and
Memory Record No.
Inflation in Progress
- 12 -
Inflation Stop
Measurement completed,
display with data
Page 14
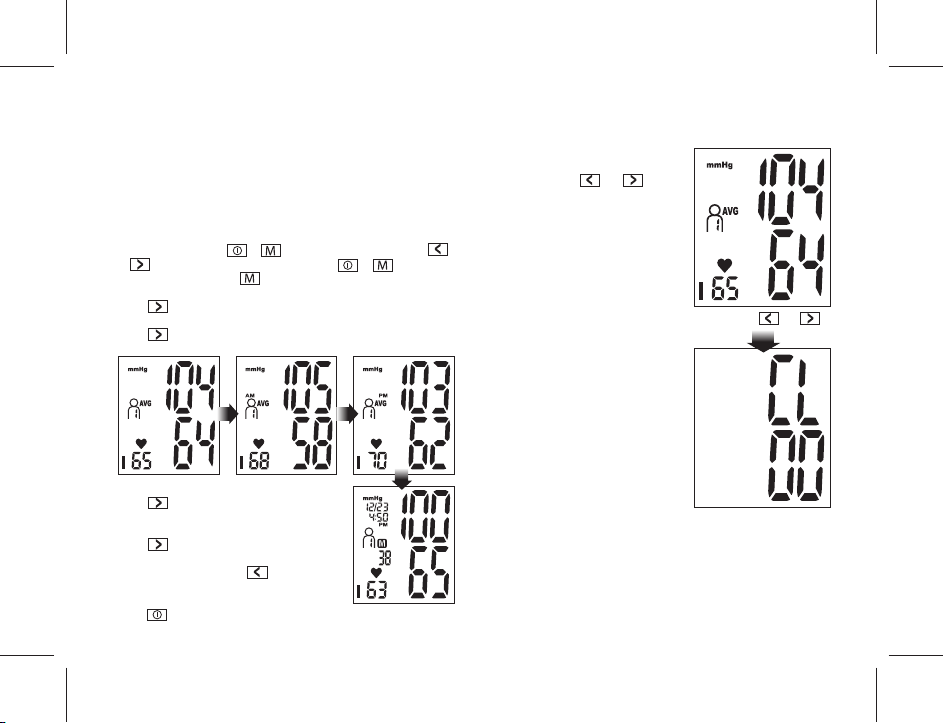
RECALL AVERAGE AND PREVIOUS MEASUREMENT DATA
The device has a memory capability to store the measurement data
for 4 users – User 1,2,3 and 4. Every time you complete the
measurement, the device automatically stores the measurement
result. You can view the average data of all previous measurement
data in the memory, and the AM/PM average data of the
measurement data from the last 7 days.
View average measurement data
1. In Clock Mode, press or key to Standby Mode. Press
or key to select user number and press or to confirm.
2. In Standby Mode, press key to Memory Mode and view the
average data of all previous measurement records in the memory.
3. Press key to view AM average data of last 7 days AM
measurement data (5:00 - 9:00 am).
4. Press key to view PM average data of last 7 days PM
measurement data (6:00 - 8:00 pm).
View previous measurement data.
5. Press key to view previous measurement
data. Corresponding memory record number
and time of measurement appear on the display.
6. Press key again to display the
measurement data from most recent data to
older data in order. Press key to display
the measurement data from older data to
newer data in order.
7. Press key return to Standby.
DELETE MEASUREMENT DATA
1. While you are viewing the average
or previous measurement data
of the selected user.
2. Press and hold and keys
for about 5 seconds until 'CL' and
'00' appear on the display. All
measurement data memories
of the selected user are deleted.
3. The device returns to Clock Mode.
- 13 -
Average Measurement Data
Press and hold and keys
All memories are deleted
Page 15
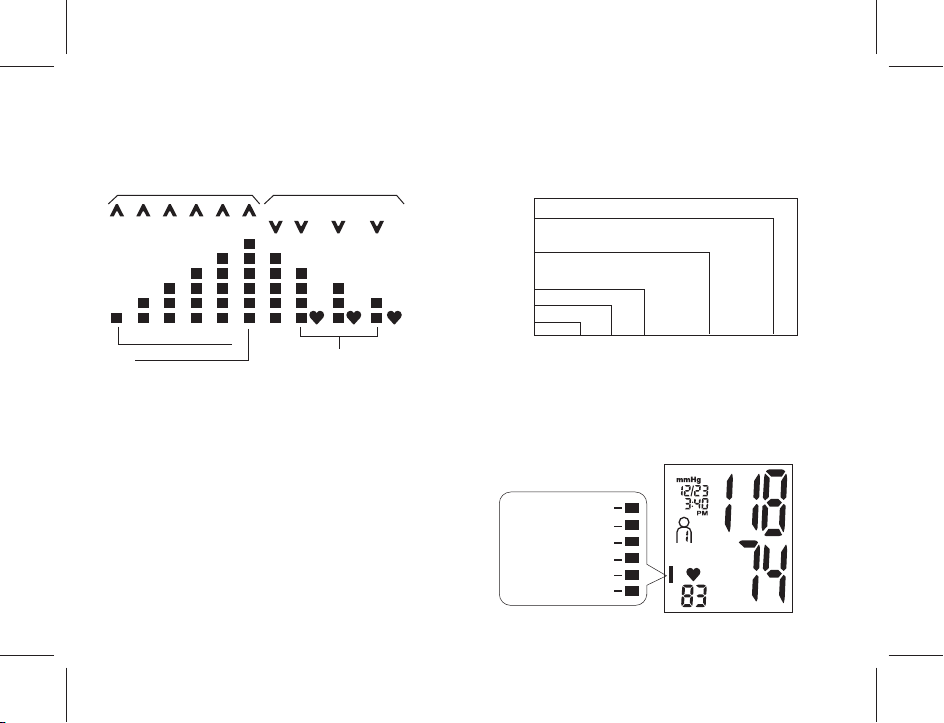
PRESSURE BAR INDICATOR
During the blood pressure and pulse rate measurement, the
Pressure Bar Indicator illustrates the cuff pressure condition.
Pressurizing Releasing Air
Inflation in progress
Inflation complete
Measurement in progress
WHO CLASSIFICATION INDICATOR
The World Health Organization (WHO) has established the following
chart as a standard to assess high blood pressure, regardless of the age.
Reference Material: Journal of Hypertension 1999, Vol 17 No.2
mmHg
110
105
100
95
90
85
80
Diastolic blood pressure
Optimal
The WHO Classification Indicator is a feature which provides a
snapshot of your blood pressure classification based on your
measurements. This will help you to understand what your blood
pressure values mean. Each segment of the bar indicator
corresponds to the WHO blood pressure classification.
Grade 3 hypertension (severe)
Grade 2 hypertension (moderate)
Grade 1 hypertension (mild)
High-normal
Normal
120 130 140 150 160 170 180
Systolic blood pressure mmHg
Severe Hypertension
Moderate Hypertension
Mild Hypertension
High Normal
Normal
Optimal
- 14 -
Page 16

ABOUT IRREGULAR HEARTBEAT [IHB]
An irregular heartbeat is defined as a heartbeat that varies by 25%
from the average of all heartbeats during the blood pressure
measurement. When the device detects an irregular heartbeat two
or more times during the measurement, the Irregular Heartbeat
indicator will appear on the display.
It is important that you are sitting relax, steadily and stay quite
during the measurement.
If the irregular heartbeat indicator displays frequently after
the measurement, you are recommended to consult your
physician.
ABOUT BLOOD PRESSURE
What Is Blood Pressure?
Blood pressure is the force exerted by blood against the walls of the
arteries. Systolic pressure occurs when the heart contracts.
Diastolic pressure occurs when the heart expands. Blood pressure
is measured in millimeters of mercury (mmHg). One’s natural blood
pressure is represented by the fundamental pressure, which is
measured first thing in the morning while one is still at rest and
before eating.
What Is Hypertension And How Is It Controlled?
Hypertension, an abnormally high arterial blood pressure, if left
unattended, can cause many health problems including stroke and
heart attack. Hypertension can be controlled by altering one’s
lifestyle, avoiding stress, and with medication under a doctor’s
supervision. To prevent hypertension or to keep it under control:
• Do not smoke
• Exercise regularly
• Reduce salt and fat intake
• Have regular physical checkups
• Maintain proper weight
- 15 -
Page 17
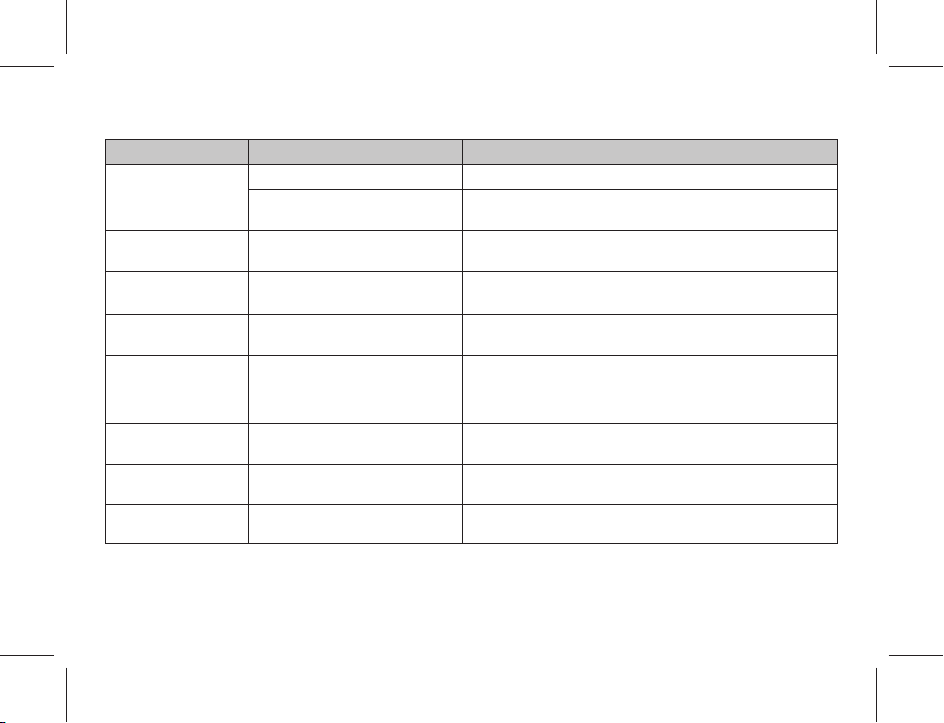
TROUBLESHOOTING
Problem Probable Cause Correction
Nothing appears on the
display, even when the
power is turned on.
ERROR code 1 (E1)
appears
ERROR code 2 (E2)
appears
ERROR code 3 (E3)
appears
ERROR code 4 (E4)
appears
ERROR code 5 (E5)
appears
ERROR code 6 (E6)
appears
The monitor keeps
re-inflating
Batteries are drained. Replace all used batteries with new batteries.
Batteries are not installed in correct
polarities.
No pulse signal is detected. The
cuff may not apply correctly.
Noise is detected. Your arm or body
is moving during the measurement.
No pressure is detected. The cuff
may not fasten properly or too loose.
The device cannot measure the blood
pressure correctly.
The cuff is over inflated.
Blood pressure over 300 mmHg.
Re-install the batteries with their polarities (“+” and “-“) match the
polarity marking in the battery compartment.
Reapply the cuff and fasten the cuff correctly. Position the cuff at
heart level.
Remain still and do not talk during the measurement.
Reapply the cuff and fasten the cuff correctly.
If the heartbeat is very weak or irregular, the device may not able to
measure the blood pressure.
Reapply the cuff and fasten the cuff correctly. Sit comfortably and
remain still during the measurement.
It is recommended to consult your physician immediately.
Low battery level. Replace all used batteries with new batteries.
System lockup. Restart the device: remove the batteries, wait for 1 minute, and then
re-install the batteries.
- 16 -
Page 18
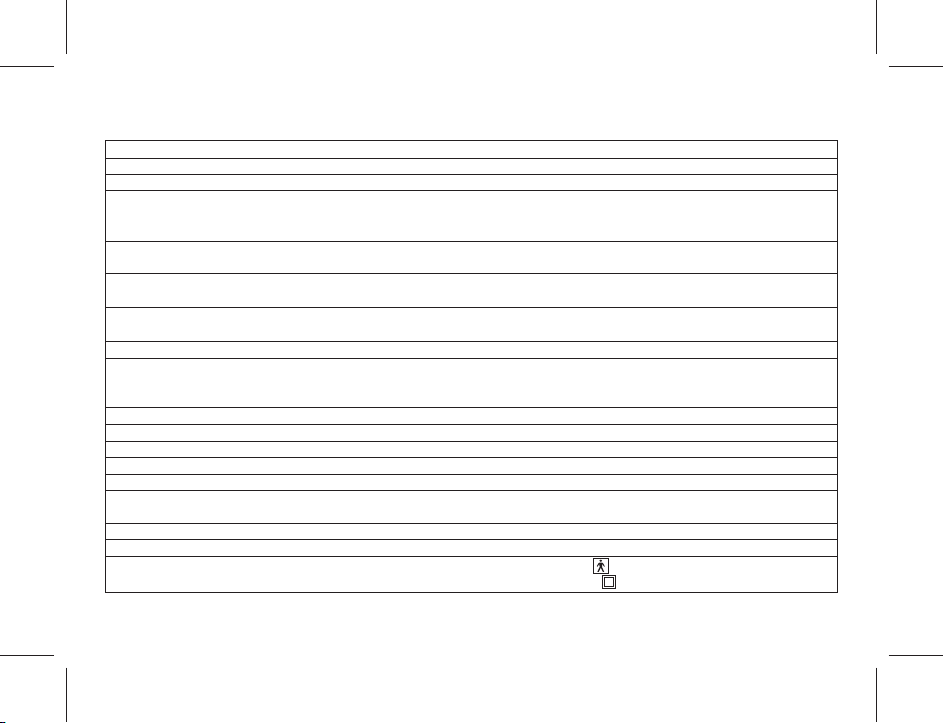
TECHNICAL SPECIFICATION
Model No. : MD4120/MD4140/MD4180
Display : LCD Display
Measurement Method : Non-invasive, Oscillometric method
Measurement Range : Systolic Blood Pressure: 50-250 mmHg
Diastolic Blood Pressure: 30-200 mmHg
Pulse Rate : 40-180 beats/minute
Accuracy : Pressure : +/-3 mmHg
Pulse Rate : +/-5% of reading
Resolution : Pressure : 1 mmHg
Pulse Rate : 1 beat / minute
Memory : 480 (120 x 4 users) - MD4120
960 (240 x 4 users) - MD4140/MD4180
Dimensions : Approx. 3.9” x 6.5” x 1.8” (99 x 164 x 46mm)
Cuff Size / Arm Circumference Range : Standard: 9”-14” (22cm-36cm)
Large: 14”-17” (35cm-44cm)
Full Range: 9”-17” (22cm-44cm)
Operating Temperature : 41˚F to 104˚F (5˚C to 40˚C)
Operating Humidity : 15 to 93% RH
Storage Temperature : -13˚F to 158˚F (-25˚C to 70˚C)
Storage Humidity : up to 93% RH
Operation, storage and transport atmospheric pressure : 700hPa to 1060hPa
Power Source : 4 x 1.5V AAA alkaline batteries
(Optional AC Adapter 6VDC@600mA)
Accessories : Cuff (Standard), Instruction Manual, Storage Pouch, Batteries
Classification : Application part Type BF
Key to symbols : Application part Type BF
Class II equipment symbol
- 17 -
Page 19
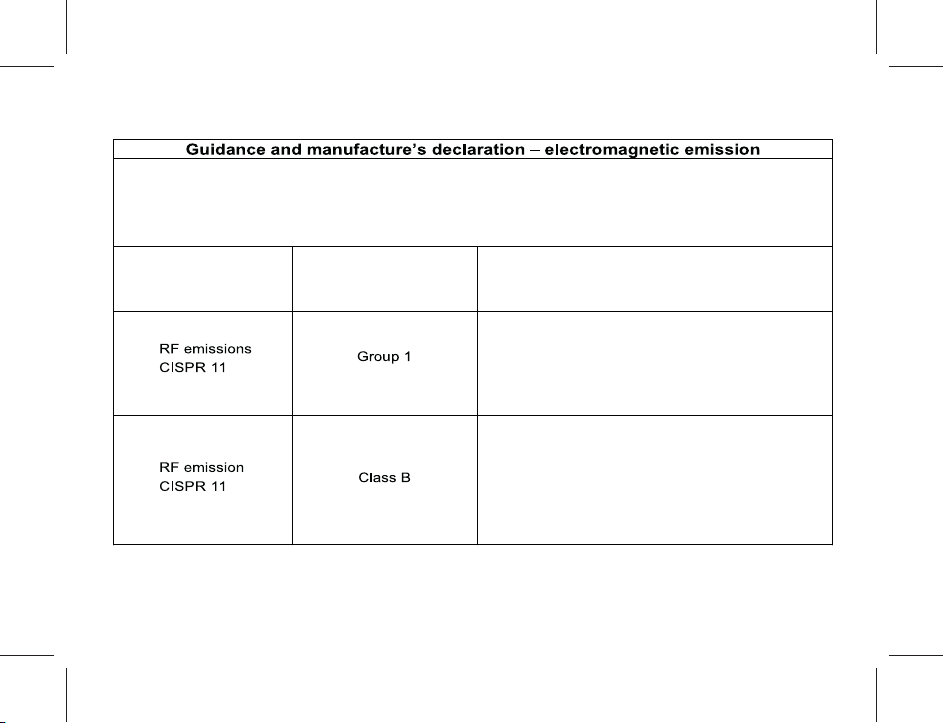
APPENDIX I
The Sphygmomanometer (MD4120/MD4140/MD4180) is intended for use in the electromagnetic environment
specified below. The customer or the user of the Sphygmomanometer (
assure that it is used in such an environment.
Conducted and
radiated RF
EMISSIONS
Compliance Electromagnetic environment - guidance
MD4120/MD4140/MD4180) should
The Sphygmomanometer
(MD4120/MD4140/MD4180)
uses RF energy only for
its internal function. Therefore, its RF emissions are
very low and are not likely to cause any interference
in nearby electronic equipment.
The Sphygmomanometer
(MD4120/MD4140/MD4180)
is suitable for use in all establishments, including
domestic establishments and those directly connected
to the public low-voltage power supply network that
supplies buildings used for domestic purposes.
- 18 -
Page 20
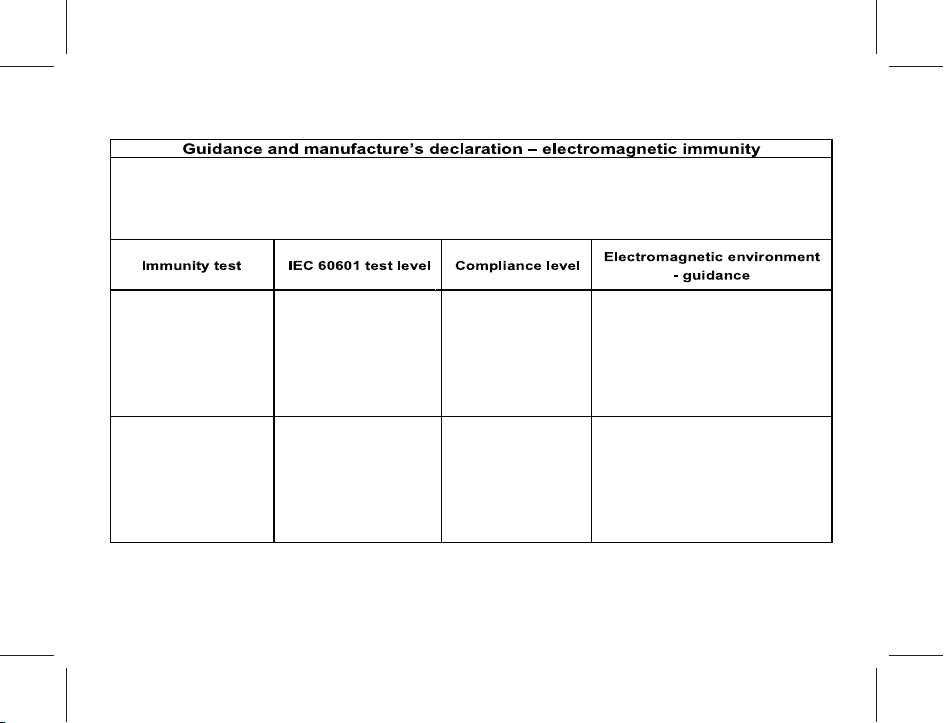
The Sphygmomanometer
(MD4120/MD4140/MD4180)
is intended for use in the electromagnetic
environment specified below. The customer of the user of Sphygmomanometer
should assure that it is used in such an environment.
(MD4120/MD4140/MD4180)
Electrostatic discharge
IEC 61000-4-2
Rated power frequency
magnetic fields
IEC 61000-4-8
± 8 kV contact
± 15 kV air
50 Hz: 30 A/m
60 Hz: 30 A/m
± 8 kV contact
± 15 kV air
50 Hz: 30 A/m
60 Hz: 30 A/m
- 19 -
Floors should be wood, concrete or
ceramic tile. If floors are covered
with synthetic material, the relative
humidity should be at least 30 %.
Power frequency magnetic fields
should be at levels characteristic of
a typical location in a typical
commercial or hospital
environment.
Page 21
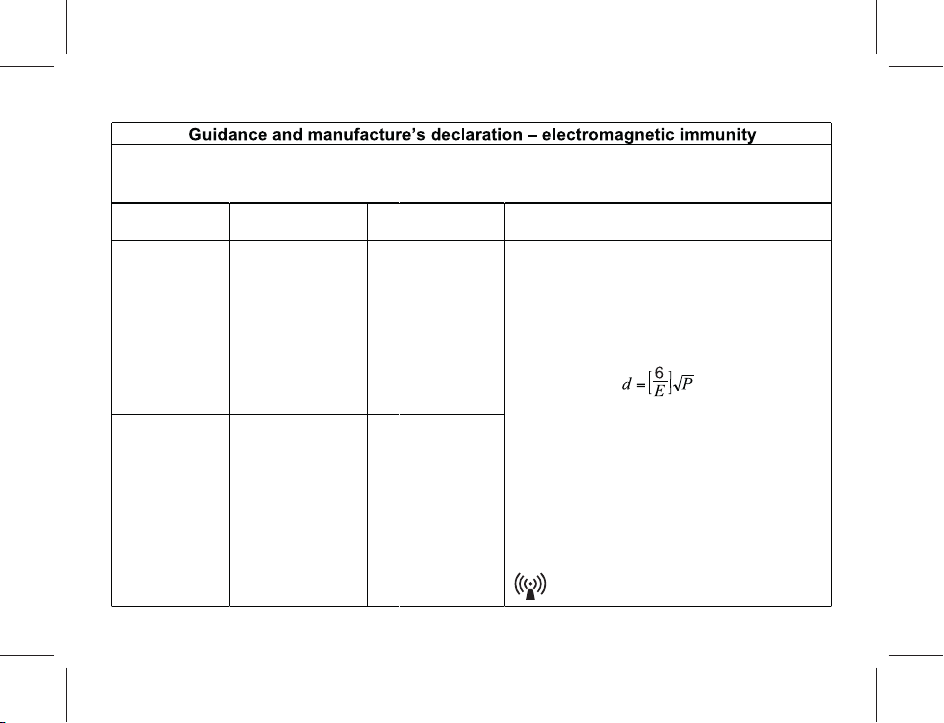
APPENDIX II
The Sphygmomanometer
environment specified below. The customer of the user of Sphygmomanometer
should assure that it is used in such an environment.
Immunity test Compliance level Electromagnetic environment - guidance
Conducted
disturbances
induced by RF
fields
IEC 61000-4-6
Radiated RF EM
fields
IEC 61000-4-3
(MD4120/MD4140/MD4180)
IEC 60601
test level
a
rms
3 V
0.15 MHz - 80 MHz
a
rms
in ISM and
6 V
amateur radio
bands between
0,15 MHz and 80
b
MHz
80% AM at 1 kHz
c
10 V/m
80 MHz - 2.7 GHz
80% AM at 1 kHz
a
3 V
rms
0.15 MHz - 80 MHz
a
rms
6 V
amateur radio
bands between
0,15 MHz and 80
b
MHz
80% AM at 1 kHz
10 V/m
80 MHz - 2.7 GHz
80% AM at 1 kHz
is intended for use in the electromagnetic
Portable and mobile RF communications equipment
should be used no closer to any part of the
Sphygmomanometer (
in ISM and
c
including cables, than the recommended separation
distance calculated from the equation applicable to
the frequency of the transmitter.
Recommended separation distance
where P is the maximum output power rating of the
transmitter in Watts (W), d is the minimum
recommended separation distance in meters (m), and
E is the immunity test level in V/m.
Field strengths from fixed RF transmitters, as
determined by an electromagnetic site survey,
should be less than the compliance level in each
frequency range.
Interference may occur in the vicinity of equipment
marked with the following symbol:
- 20 -
(MD4120/MD4140/MD4180)
MD4120/MD4140/MD4180
),
a
Page 22

NOTE These guidelines may not apply in all situations. Electromagnetic propagation is affected by absorption
and reflection from structures, objects and people.
a
r.m.s., before modulation is applied.
b
The ISM (industrial, scientific and medical) bands between 0,15 MHz and 80 MHz are 6,765 MHz to 6,795
MHz; 13,553 MHz to 13,567 MHz; 26,957 MHz to 27,283 MHz; and 40,66 MHz to 40,70 MHz. The amateur
radio bands between 0,15 MHz and 80 MHz are 1,8 MHz to 2,0 MHz, 3,5 MHz to 4,0 MHz, 5,3 MHz to 5,4
MHz, 7 MHz to 7,3 MHz, 10,1 MHz to 10,15 MHz, 14 MHz to 14,2 MHz, 18,07 MHz to 18,17 MHz, 21,0 MHz
to 21,4 MHz to 24,99 MHz, 28,0 MHz to 29,7 MHz and 50,0 MHz to 54,0 MHz.
c
Before modulation is applied.
- 21 -
Page 23
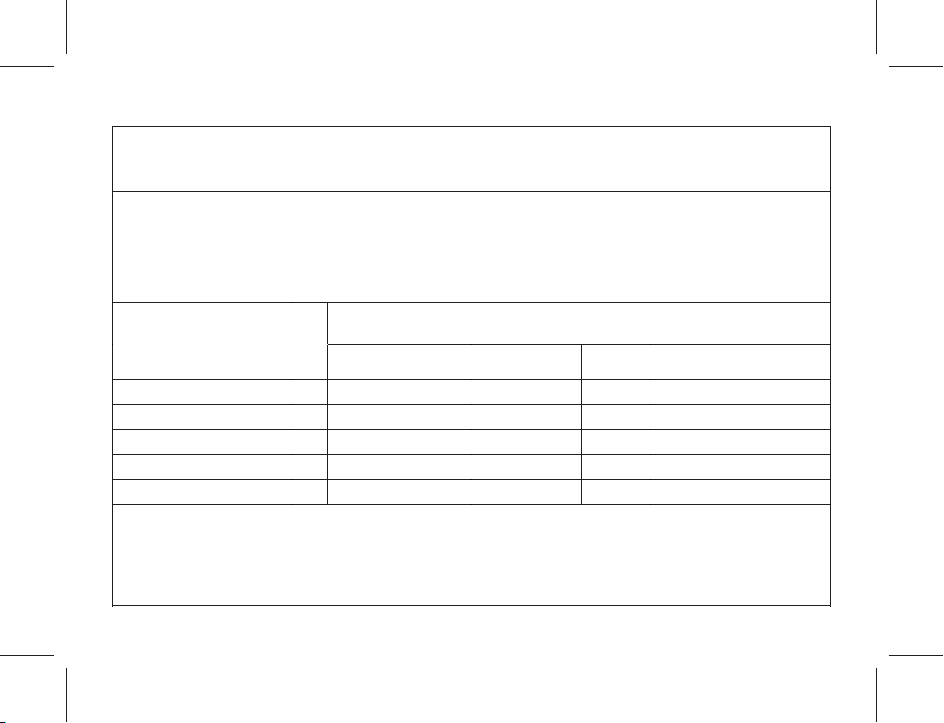
APPENDIX III
Recommended separation distances between
portable and mobile RF communications equipment and the Sphygmomanometer
(MD4120/MD4140/MD4180)
The Sphygmomanometer (MD4120/MD4140/MD4180) is intended for use in an electromagnetic environment in which
radiated RF disturbances are controlled. The customer or the user of the Sphygmomanometer
MD4120/MD4140/MD4180) can help prevent electromagnetic interference by maintaining a minimum distance
(
between portable and mobile RF communications equipment (transmitters) and the Sphygmomanometer
MD4120/MD4140/MD4180) as recommended below, according to the maximum output power of the communications
(
equipment.
Rated maximum output power of
transmitter (W)
0.01
0.1
1
10
100
For transmitters rated at a maximum output power not listed above, the recommended separation distance d in meters (m)
can be estimated using the equation applicable to the frequency of the transmitter, where P is the maximum output power
rating of the transmitter in watts (W) according to the transmitter manufacturer.
NOTE These guidelines may not apply in all situations. Electromagnetic propagation is affected by absorption and
reflection from structures, objects and people.
Separation distance according to frequency of transmitter (m)
3 Vrms
0.200
0.632
2.000
6.33
20.0
- 22 -
10 V/m
0.060
0.190
0.600
1.90
6.00
Page 24

APPENDIX IV
This equipment has been tested and found to comply with the limits for a Class B digital device, pursuant to part 15 of the FCC Rules. These
limits are designed to provide reasonable protection against harmful interference in a residential installation. This equipment generates,
uses, and can radiate radio frequency energy and, if not installed and used in accordance with the instructions, may cause harmful
interference to radio communications. However, there is no guarantee that interference will not occur in a particular installation. If this
equipment does cause harmful interference to radio or television reception, which can be determined by turning the equipment off and on,
the user is encouraged to try to correct the interference by one or more of the following measures:
- Reorient or relocate the receiving antenna.
- Increase the separation between the equipment and receiver.
- Connect the equipment into an outlet on a circuit different from that to which the receiver is connected.
- Consult the dealer or an experienced technician for help.
WARNING
• To comply with the limits of the Class B digital device, pursuant to Part 15 of the FCC Rules, this device is
comply with Class B limits. All peripherals must be shielded and grounded. Operation with non-certified
peripherals or non-shielded cables may results in interference to radio or reception.
• Any changes or modifications not expressly approved by the grantee of this device could void the user's
authority to operate the device.
- 23 -
Page 25

5-YEAR LIMITED WARRANTY
Symbol for the marking of electrical and electronics devices according to Directive 2002/96/EC.
The device, accessories and the packaging have to be disposed of waste correctly at the end of the
usage. Please follow Local Ordinances or Regulations for disposal.
Thank you for your recent purchase of the G.LAB® Blood Pressure
Monitor. It is our goal to provide you with a high quality product
that will meet and exceed your expectations.
G.LAB warrants this product, excluding batteries and accessories,
to be free from defects in materials and workmanship for a period
of five (5) years from the original date of purchase at retail. We will
replace any defective product that is covered by the above
warranty at no cost.
This warranty does not apply to damage resulting from normal
wear, misuse and/or not used in accordance with the instructions
in the user manual.
G.LAB limits all implied warranties (including, but not limited to
fitness and merchantability) to five (5) years from the original date
of purchase at retail.
This warranty extends only to the original retail purchaser, and is
not transferable.
G.LAB’s sole liability from this warranty is limited to replacement
of defective product. Under no circumstances shall G.LAB be held
liable for death or injuries to persons, damage to property, loss of
use or any other special, incidental, contingent or consequential
damages, indirect costs or expenses arising from the use of G.LAB
products.
Replacement products under this warranty are warrantied only
for the remainder of the original warranty period.
To obtain warranty service, please contact Aceso Healthcare
Products Customer Service by sending email to
[email protected].
When sending defective product for warranty service, please
enclose the Proof of Purchase, a paper with your name, address,
phone number, and description of the specific problem. Pack the
product carefully to prevent damage in transit.
FOR CUSTOMER SERVICE
Email: [email protected]
Call: 1-510-771-7883
Visit: www.aceso-healthcare-products.com
Aceso Healthcare Products, Inc. is authorized
distributor in America.
0123
P/N: 83-M4180-CEN02A-R
MADE IN CHINA
 Loading...