

Page 1
DIGITAL TIMER INSTRUCTIONS (T5)
1. CONNECT POWER
2. SETTING THE TIME
•
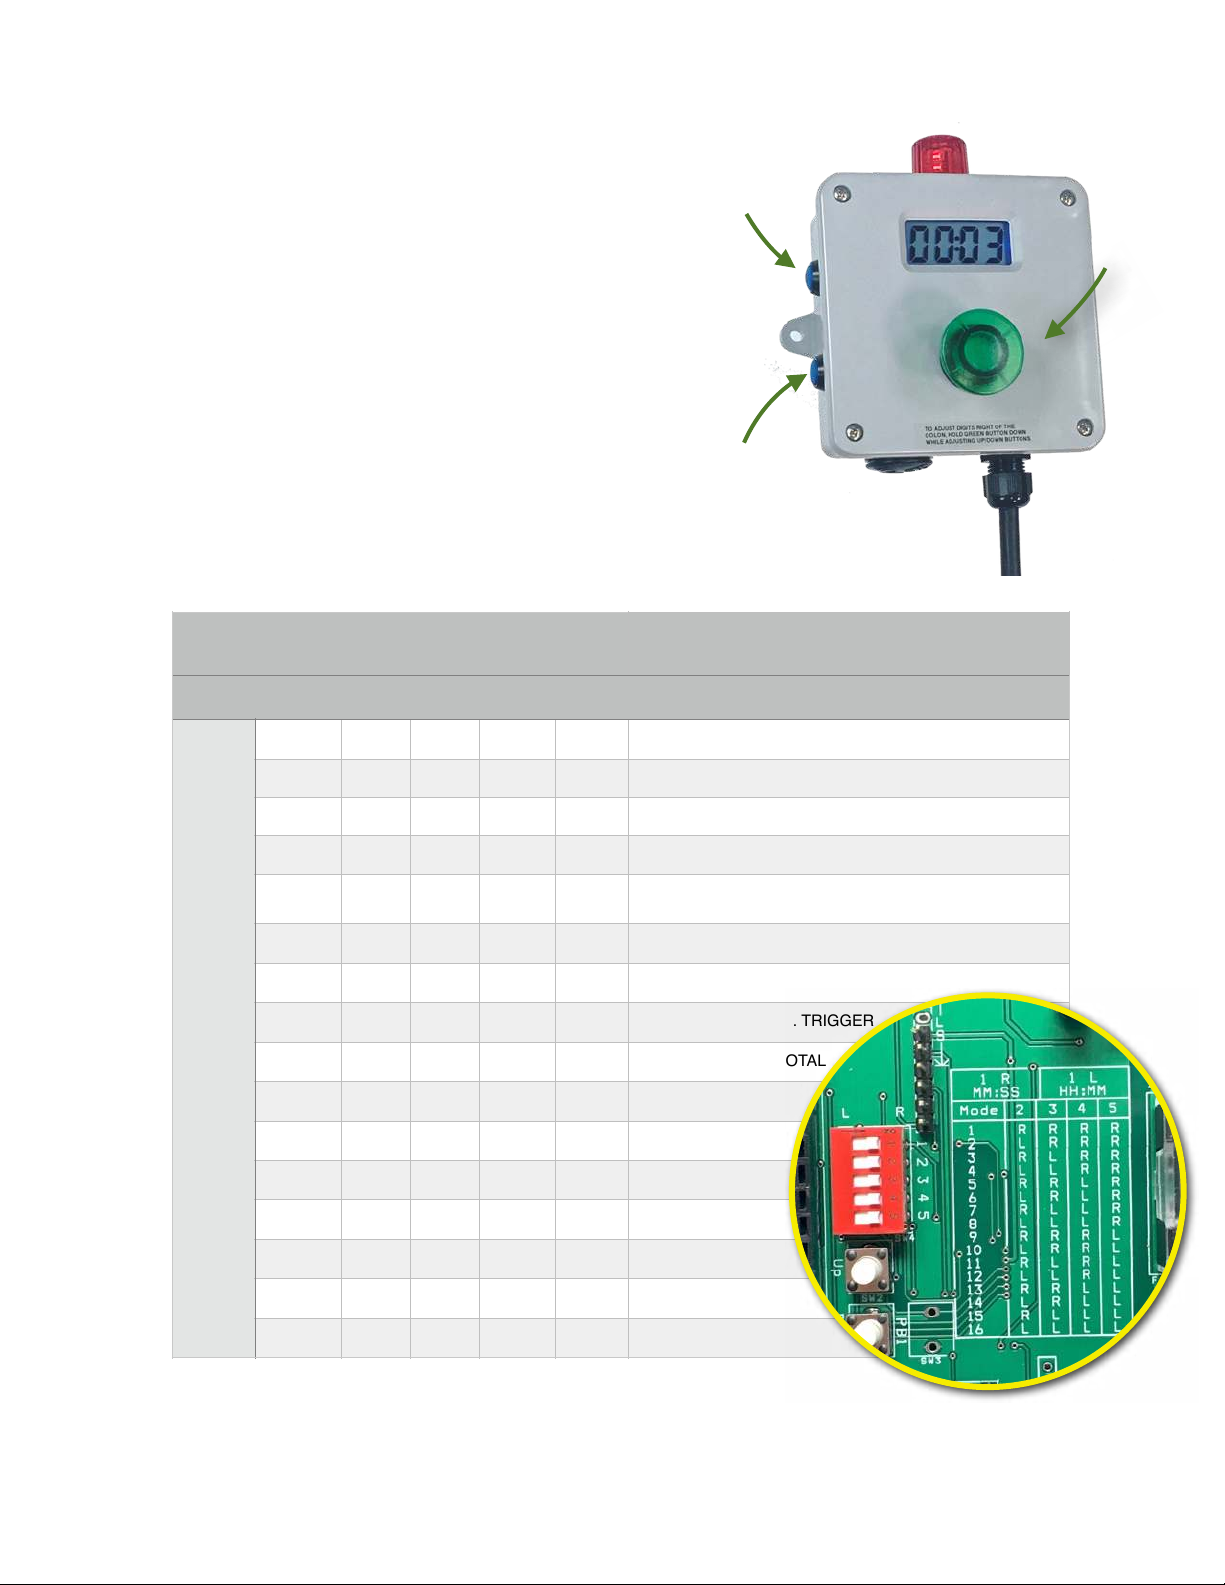
The blue buttons on the side adjust the time up and
down left of the colon.
•
To program the digits right-of the colon, (usually
seconds) hold down the green “stop/start” button
then adjust the blue buttons.
3.
SELECTING PROGRAM
•
Switch #1 selects minutes /seconds in every case.
For minutes/seconds the switch will be to the RIGHT.
•
Switches 2,3,4,5, select other behaviors according the
this table below. See detailed “mode chart” on our
website for further detail on the behaviors.
Page ! of !1 2
SWITCHES FOR SELECTING MODES
FIRMWARE V. 51_510_01X
MODE
SWITCH POSITION
DESCRIPTION
12345
1
L / RRRRR
EARLY WARNING ON LED1 (DEFAULT)
2
L / RLRRR
MANUAL STOP - CANNOT CANCEL CYCLE
3
L / RRLRR
MECHANICAL TRIGGER WITH EARLY WARNING
4
L / RLLRR
PAUSING (ACCUMULATES TIME AFTER STOPPING)
5
L / RRRLR
AUTOMATIC CYCLE STOP (WITH CANCEL)
6
L / RLRLR
EARLY WARNING ON LED2
7
L / RRLLR
GUARD DUTY
8
L / RLLLR
SRAY RINSE - MECH. TRIGGER
9
L / RRRRL
MACHINE HOURS TOTAL
10
L / RLRRL
ON-DELAY
11
L / RRLRL
REPEAT
12
L / RLLRL
FUTURE USE
13
L / RRRLL
FUTURE USE
14
L / RLRLL
FUTURE USE
15
L / RRLLL
FUTURE USE
16
L / RLLLL
FUTURE USE
MODEL T5
START / STOP
DOWN
UP
Page 2

DIGITAL TIMER INSTRUCTIONS (T5)
4.
EARLY WARNING FEATURE
•
Modes 1,3,8 have an “early waring” whereby one of the LEDs illuminates before the end of the
countdown. To activate this feature, press all 3 buttons simultaneously and wait for the time to flash.
(should take 5 seconds)
•
When flashing, program the desired early warning time. (if setting seconds then you will hold down the
front button and the UP button simultaneously)
•
When you have the desired “early warning” time, let the buttons go and wait for 3 seconds. The display
will flash to lets you know you have exited the “early warning” setting mode.
•
Time is now ready to set the
cycle time, or run a cycle.
5.
REPEAT CYCLE
•
Mode 11 you set the interval
time by holding all 3 buttons
simultaneously.
6.
OTHER NOTES
•
Settings will be kept in
memory when power turned
off.
•
Pressing both blue buttons
resets display to zero time.
•
Holding down blue buttons
for a few seconds advances
the time quickly.
•
Relay output is set to N.O.
Can be changed to N.C. by
landing the “HOT” wire on
the N.C. terminal. (see
diagram)
Page ! of !2 2
Dec 11, 2018
Gizmo
Engineering
2257 County Rd. 4, building #3, Stanley, NY 14561 585-301-0970
HOT
NEUTRAL
N.O.
N.C.
 Loading...