

INSTALLATION & USER MANUAL
Version 2.0.450

Gizmo manual v2
INSTALLATION & USER MANUAL
Version 2.0. 401
Introduction
Gizmo Features
Owner
Employee
Customer
System Requirements
Hardware Requirements
Software Requirements
Installing Gizmo Suite
1. Choose and install a database
2. Install Gizmo Service
3. Install Gizmo Manager
4. Install Gizmo Client
Gizmo Manager
Login screen
Configure a new connection
Devices
Settings
Main Menu
Customer orders
Computers Module
Sales Module
Sales
Invoices
Stock Management
Deposit Transactions
Stock Transactions
Pay In/Out
Users Module
User Profile
Purchases
Time Products
Sessions
Deposits
Profile
Assets
2

Gizmo manual v2
Notes
Stats
Reservations
Reservation Details
Waiting Lines
Manage Module
Processes
Files
Tasks
Deployment Module
Monitoring Module
Reports Module
Summary
Applications
Shifts
Sales
Login Sessions
Web Reports
Log Module
Setup
News & Feeds
Configure
General
Subscription
Variables
Attributes
Plugins
WEB
Business
Reservations
Server
Network
Database
Backup
File System
Misc
Client
Shell
Client Settings
3

Gizmo manual v2
Tasks
Misc
Financial
Products
Payment Methods
Assets
Priority
Product Groups
Registers
Tax
Monetary Units (not implemented yet)
Billing Profiles
Presets
Profiles & Groups
Hosts
Host Groups
Waiting Lines
User Groups
App Groups
Security Profiles
Layout Groups
Operators
Applications
Main Menu
Links
Executables
Personal User Files
Managing Personal User Files
Deployment Profiles
Managing Deployment Profiles
License Profiles
Managing License Profiles
Virtual CD Images
Tasks
Tools
License Reservations
Asset Checkouts
Shifts
Start shift
End shift
Manage shifts
Pay In / Out
4

Gizmo manual v2
Gizmo Service Configuration Wizard
GIZMO v2 Importer Tool
Gizmo Terms & Definitions
SOFTWARE
Gizmo Service
Gizmo Manager
Gizmo Client
Gizmo Database
ENTITIES
User
Guest
Operator
Endpoint
Host
GROUPS & PROFILES
User group
Host group
Application group
Layout group
Billing profile
Security profile
SESSIONS
User session
Usage session
FINANCIAL
Invoice
Product
Time offer
Bundle
Fixed time
“Billing rate” charge
Deposits
VAT
Loyalty Points
User Balance
Time available from deposits
User time/game time
Close balance
Payment Method
Void invoice
Refund
Delete product
5

Gizmo manual v2
Pay later
Allow credit
Start shift
End shift
PROCEDURES
Billing
Billing priority
How deposits affect available game time
Environment Variables
File System Mappings
6

Gizmo manual v2
Introduction
Welcome to Gizmo! Gizmo is a unique combination of POS / Internet Cafe timekeeping / PC
management software that will help you manage your business in ways you have only
dreamed of until now. With Gizmo Suite you will be able to provide your customers with the
best user experience, manage and organize your game library, deploy software to client
computers, distribute and keep track of your software licenses and much, much more. The
purpose of this manual is to detail all Gizmo features and explain how to use them in full.
Gizmo Suite comprises 3 separate applications:
● Server Module
● Manager Module
● Client Module
Server
Server Module is the brain of the system. It communicates with all the Clients and Managers,
stores and retrieves data, deploys profiles, tracks charges etc. In order for Gizmo Suite to
work, the server must be running at all times. The Server Module does not have a user
interface. You will use the installation wizard to configure basic settings such as Database
type and license info. After the initial setup, configuration is performed using the Manager
Module.
Manager
Manager Module is the control of the system. It is used to configure all settings and
products, as a POS as well as computer maintenance interface. Via the Manager module
you add/edit Applications, create users, view reports etc. Multiple Manager Modules may be
running at any given time, although each operator may have an active shift on only one.
Client
Client Module is installed on every client computer and provides an enhanced interface for
the customer. It handles login, the application interface, and sales module. Client module
works in conjunction with the windows interface.
7

Gizmo manual v2
Gizmo Features
Owner
- Application Deployment and Maintenance
- System Management and Automation
- In House Accounts License Management
- Time-Based Billing Profiles
- Financial Reports
- Application Statistics
- Inventory tracking
- Skinning Support
- House Accounts and Invoicing
- Loyalty Points Tracking & Integration
- Physical Inventory Collection System for Inventory and Sales
- Server/Client software architecture
Employee
- Intuitive POS
- Open Orders/Deposit Tracking
- Split payment media
- Waiting line
- Granular Security Levels
- Clerk Login and Transaction Tracking
Customer
- User Profile Personalization (Saves / Settings / Preferences)
- Gamer Oriented Interface (Gizmo Shell)
- Ordering system
- Full Customer Detail Tracking
- Customer Photo / ID
- Age Verification
- Store Credit
- Reward system
8
Gizmo manual v2
System Requirements
Hardware Requirements
✽ System requirements are minimum recommended and should be used as a guide only.
Software Requirements
Note : Gizmo client requires debugging permissions. Certain software such as Deep Freeze
can disable such permissions, causing Gizmo not to work properly. You need to disable
these restrictions in any and all software. To Disable this in Deep Freeze Enterprise,
uncheck "Enable Deep Freeze Local Policies" under Configuration - Miscellaneous when
creating a Workstation Installation program.
9
CPU
Quad-core from Intel or AMD at 2.6 GHz
Graphics Card
Any
Memory
4 GB
Hard Disk Space
8 GB
Internet Connection
Any. Required for license validation during service startup
Service
Manager
Client
OS
Server 2012 or later
or
Windows 8 or later
Windows 8 or later
Resolution 1280x1024
Redistributables
.NET Framework 4.7.2 Download Link
Gizmo manual v2
Installing Gizmo Suite
1. Choose and install a database
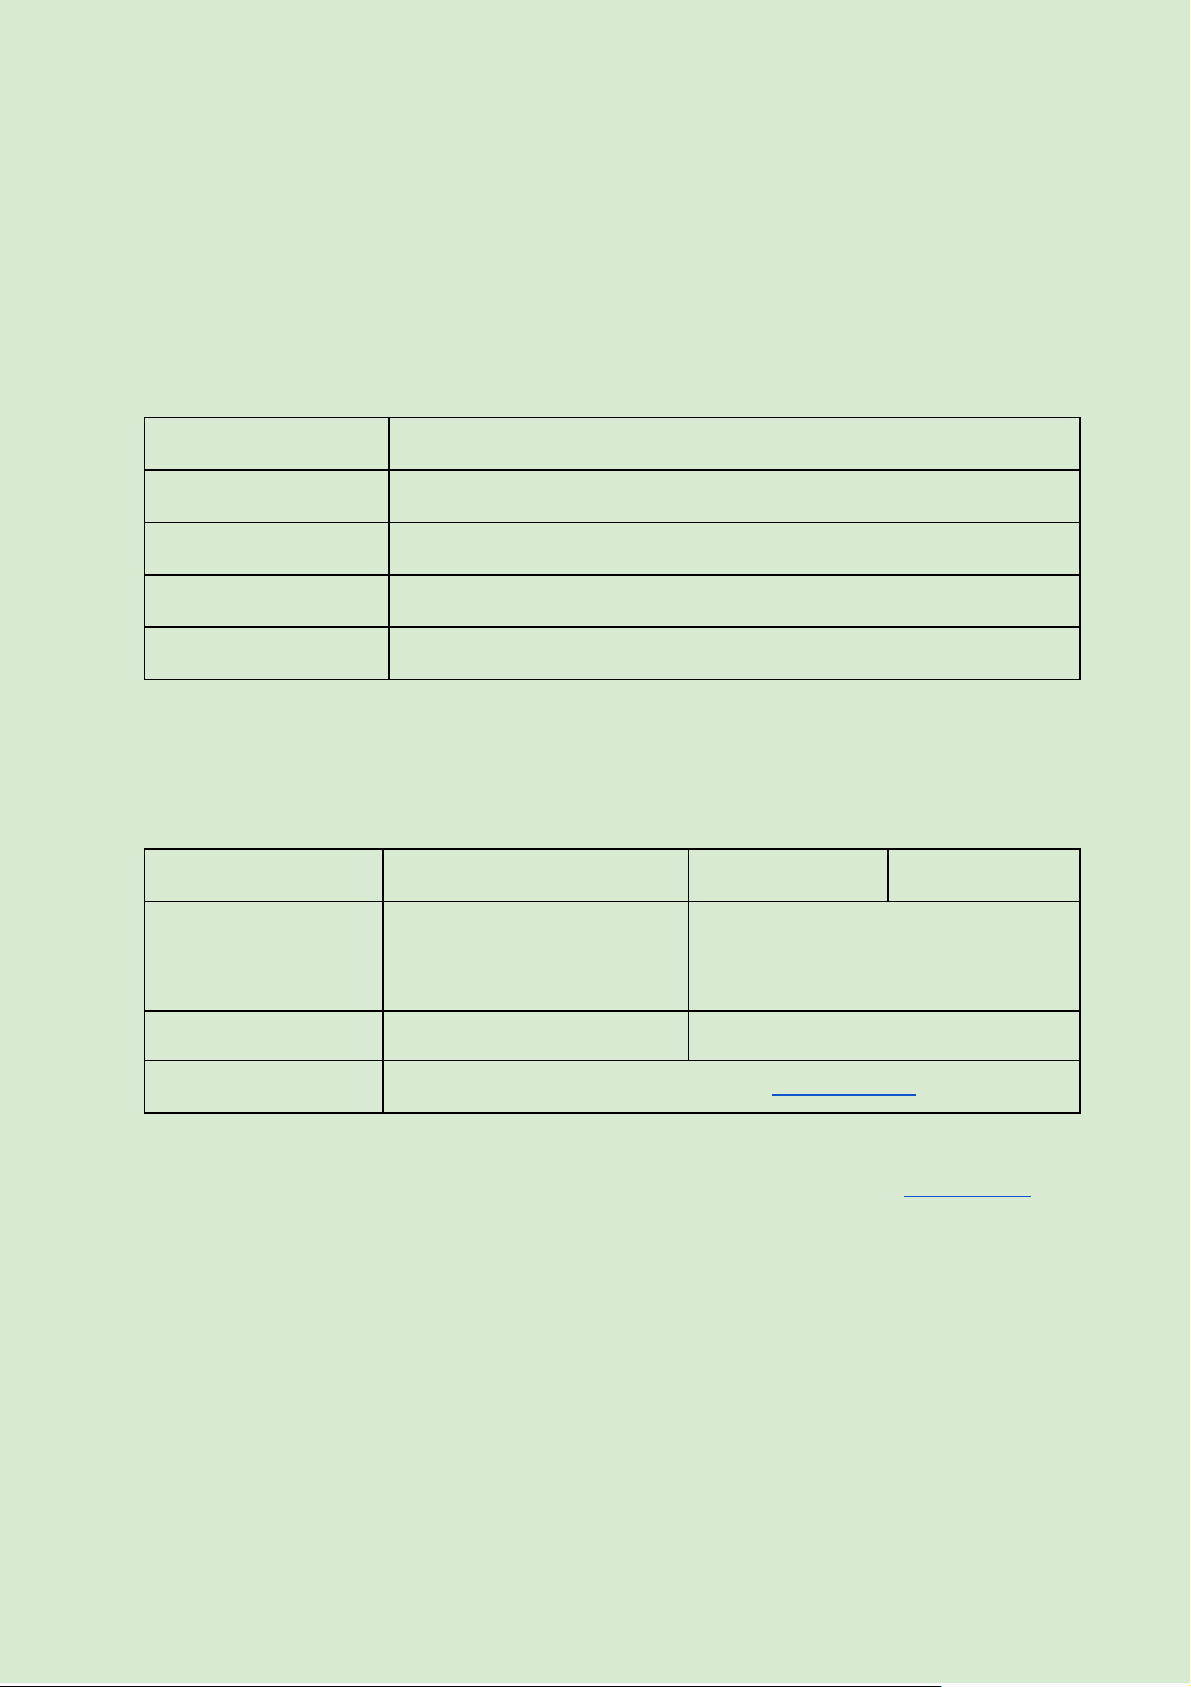
Gizmo Suite supports the following SQL databases:
★ Gizmo recommends using Microsoft SQL Express.
● Do not manually create a Database after installing SQL Server
● If you are moving from Gizmo v1 and/or Smartlaunch, use the Importer tool before
launching Configuration tool.
2. Install Gizmo Service
● Download latest Gizmo Service installer from downloads section
● Run setup and follow the onscreen prompts to complete install.
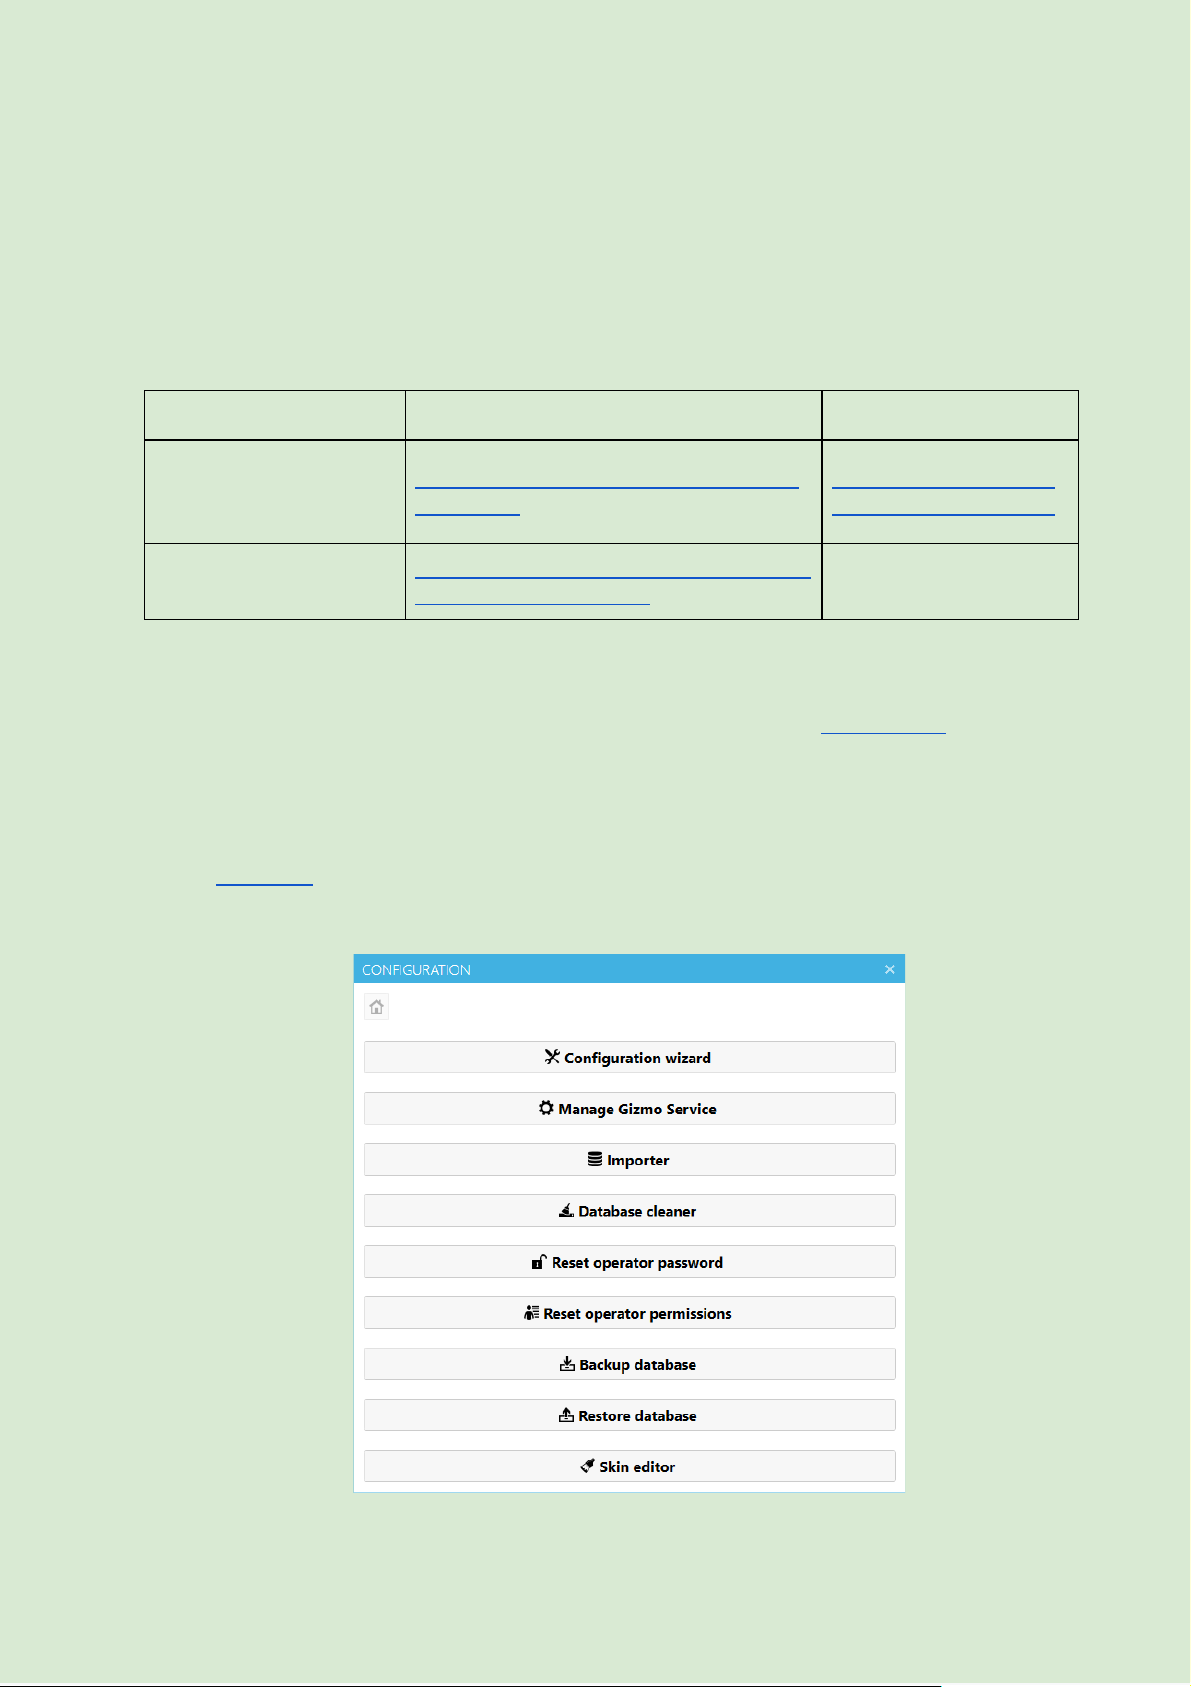
● Launch Configuration tool from desktop and select “ Configuration wizard ”
10
Database Type
Download Link
Installation tutorial
Microsoft SQL Express
(SQLEXPR) 2014 or
newer
https://www.gizmopowered.net/support/
downloads
MS SQL 2014 Express
MS SQL 2017 Express
Microsoft SQL 2014 or
newer
http://www.microsoft.com/en-us/server-cl
oud/products/sql-server/
Gizmo manual v2
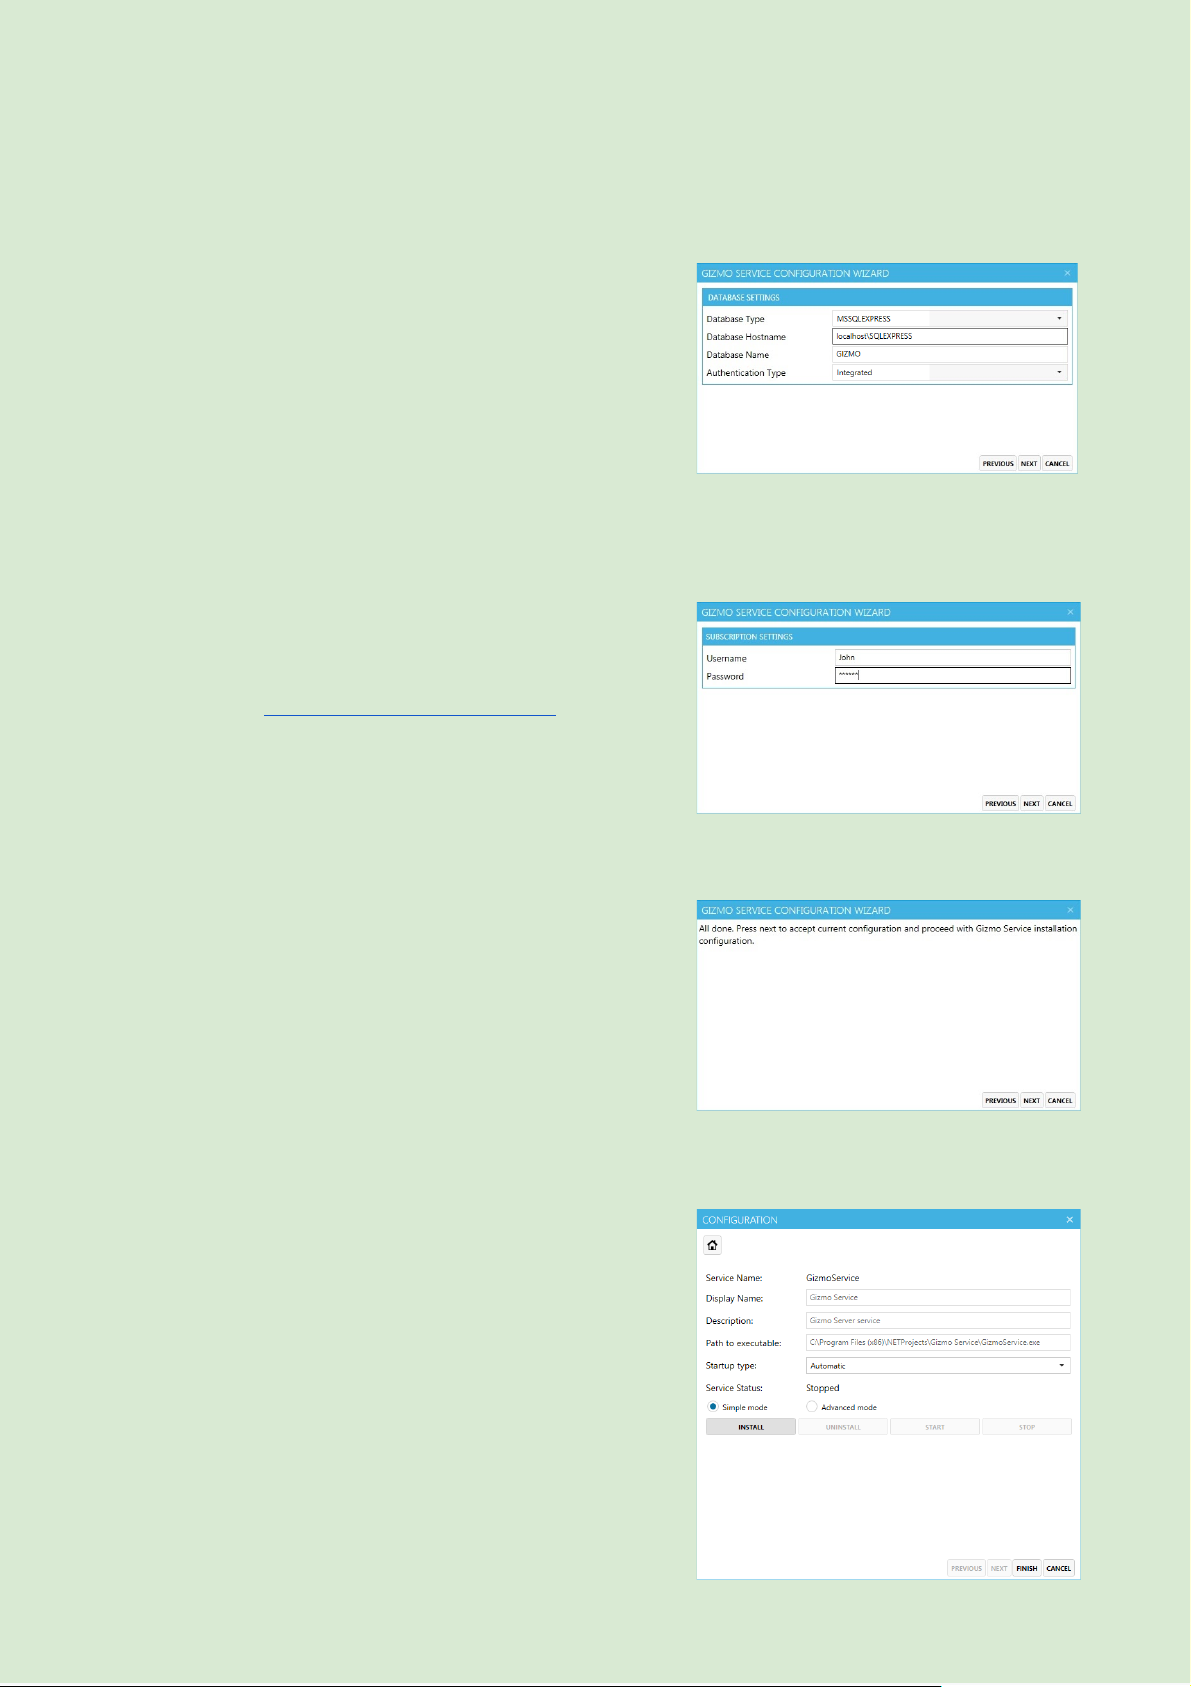
Configuration wizard
● Step 1: Select a name for your Gizmo DB. All
other settings should be already pre-filled. If
you have imported data using Gizmo v2
importer, enter the same DB name you used
during import.
● Step 2: Enter your Gizmo account credentials.
Visit http://www.gizmopowered.net/ to create an
account.
● Step 3: Commit settings and proceed to
Service installation by clicking “ next ”.
● Step 4 : Service installation
Gizmo Server can run as a Windows Service
(recommended) or as a desktop application. As
service, gizmo server will start automatically
with windows, no user intervention required.
○ Easy mode - Gizmo automatically
creates a windows account and installs
as a service under this account.
○ Advanced mode - select the user to
install the service under.
○ As an application, you will have to
manually launch Gizmo Server using
the "Console Mode" desktop shortcut.
11
Gizmo manual v2
To install Gizmo as Service, click " INSTALL ", then " START " to start the service, and finally
finish .
To launch Gizmo manually as an Application, simply click finish . Next, launch Gizmo
Service from the "Console Mode" desktop shortcut.
3. Install Gizmo Manager
● Install Point of Service for .NET
● * Download latest Gizmo Manager installer from downloads section
● Run setup on Server PC and follow onscreen prompts
4. Install Gizmo Client
● * Download latest Gizmo Client installer from the downloads section
● Run setup on each client PC and follow the onscreen prompts
● Restart client to finish installation
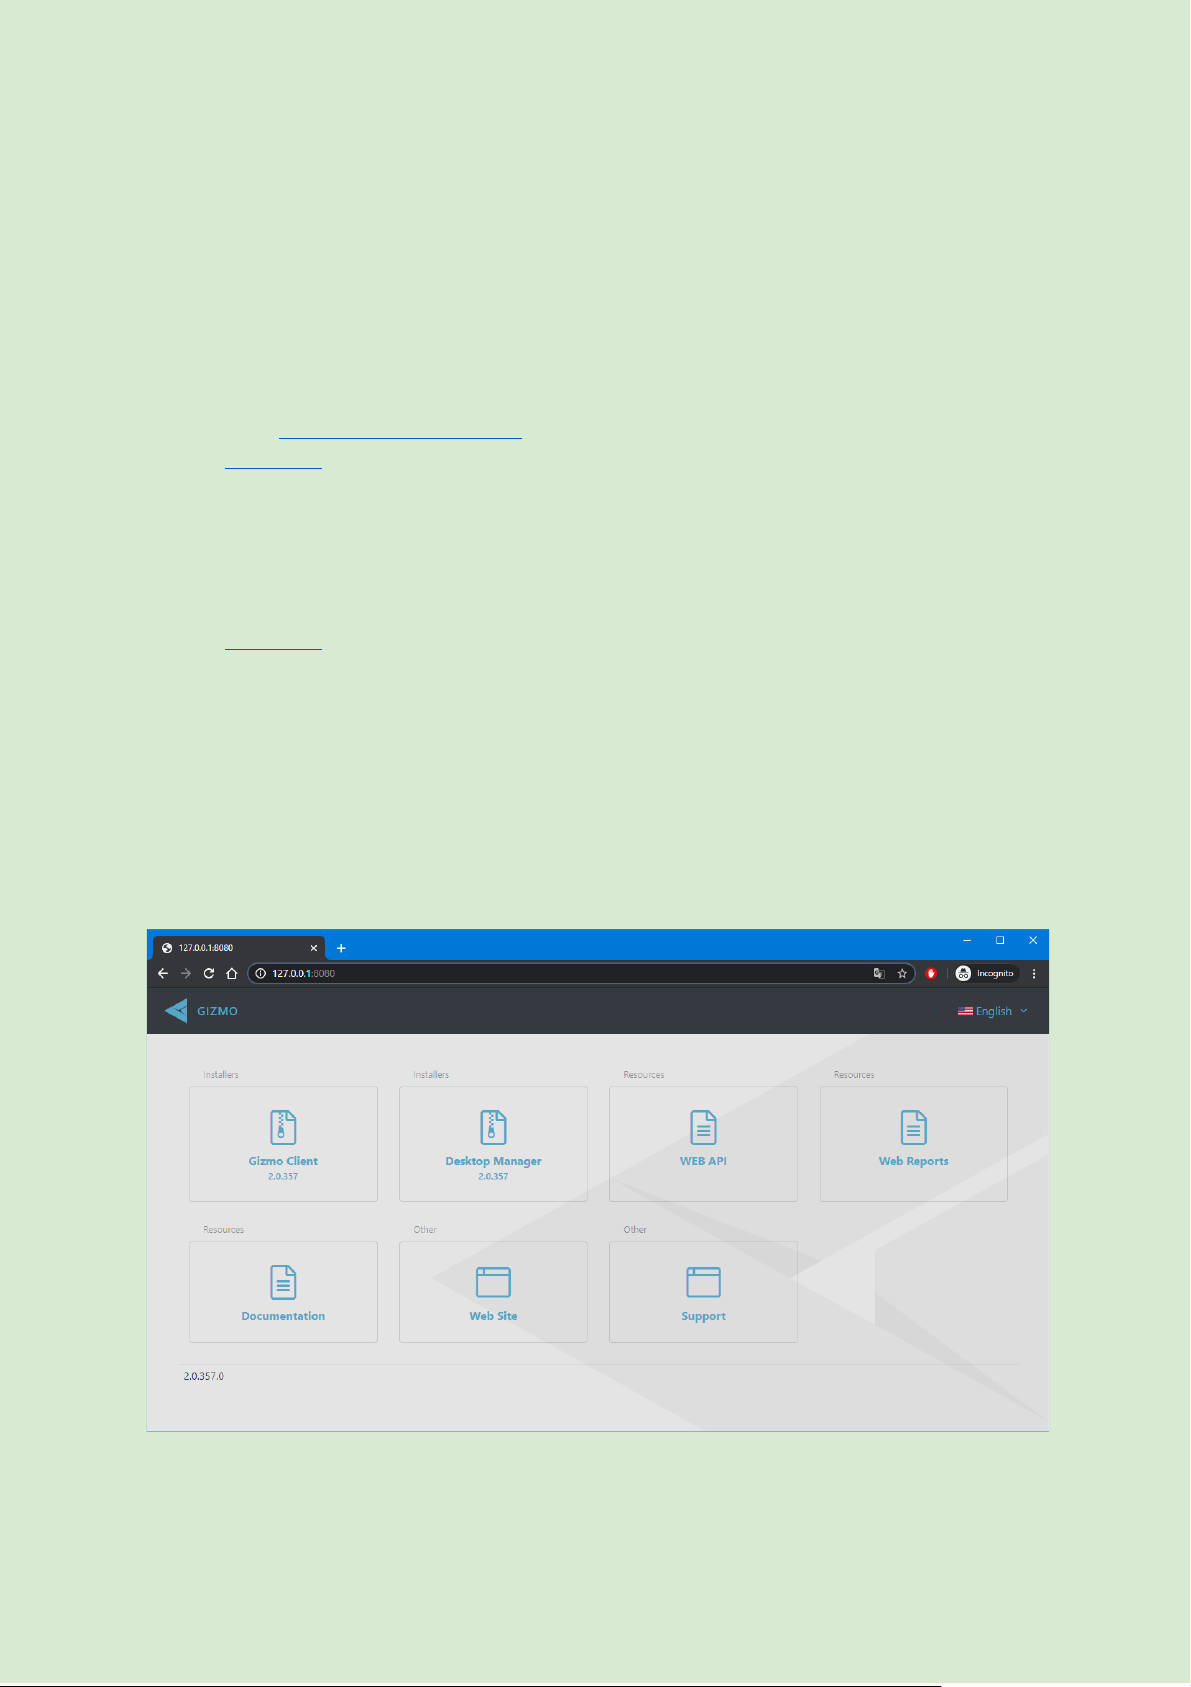
* Gizmo Manager & Client Installers can also be found:
● Inside Gizmo server (c:\Program Files (x86)\NETProjects\Gizmo Service\Installers\)
● Through Gizmo Service web portal. While Gizmo server is running, open a Web
browser and navigate to your gizmo server IP address or hostname (e.g.
http://192.168.0.100)
12
Gizmo manual v2
Gizmo Manager
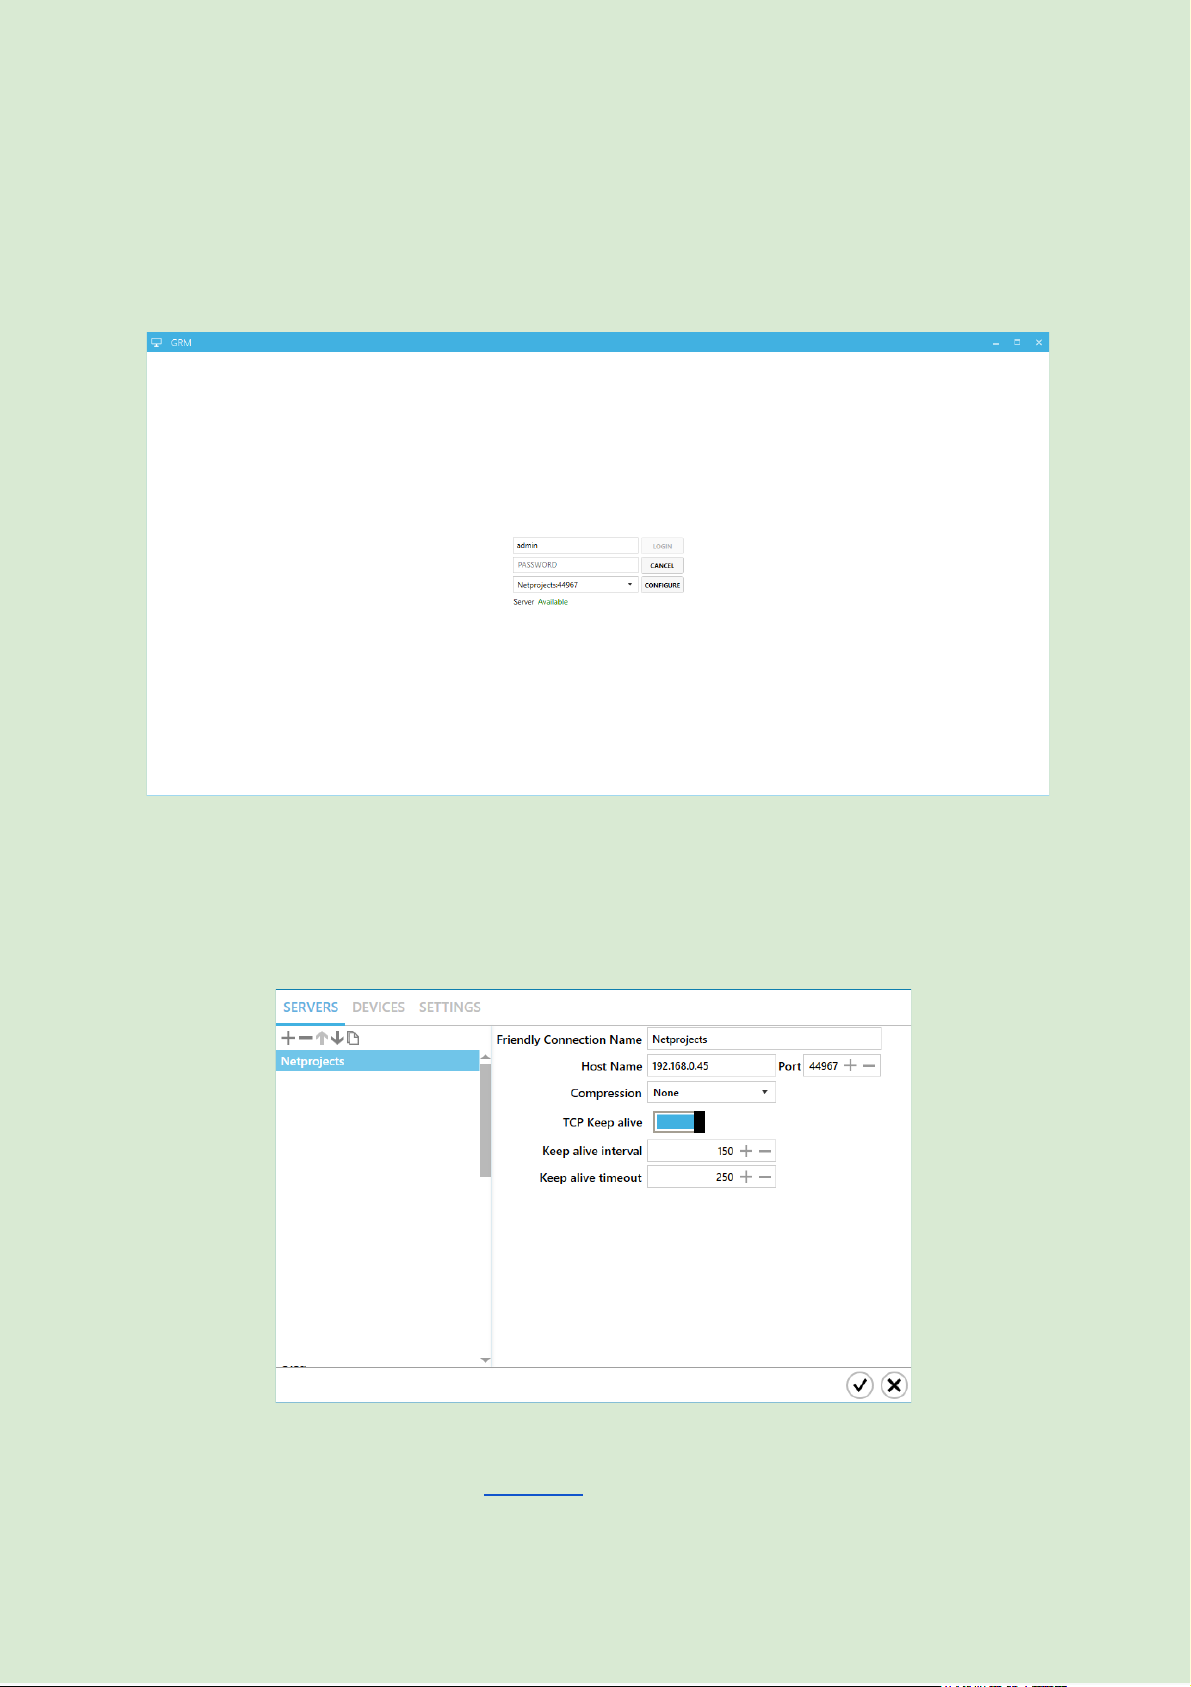
Login screen
Configure a new connection
● Click “ Configure ” to add a Gizmo Service to the connection list. Enter a friendly
name and the Gizmo Service IP address or hostname . If Gizmo Service is installed
on the same computer, use " 127.0.0.1 ". The default Gizmo Service port is 44967.
● Login using default Operator Credentials ( admin / admin )
Tip: Add or edit operators from the Operators section
13
Gizmo manual v2
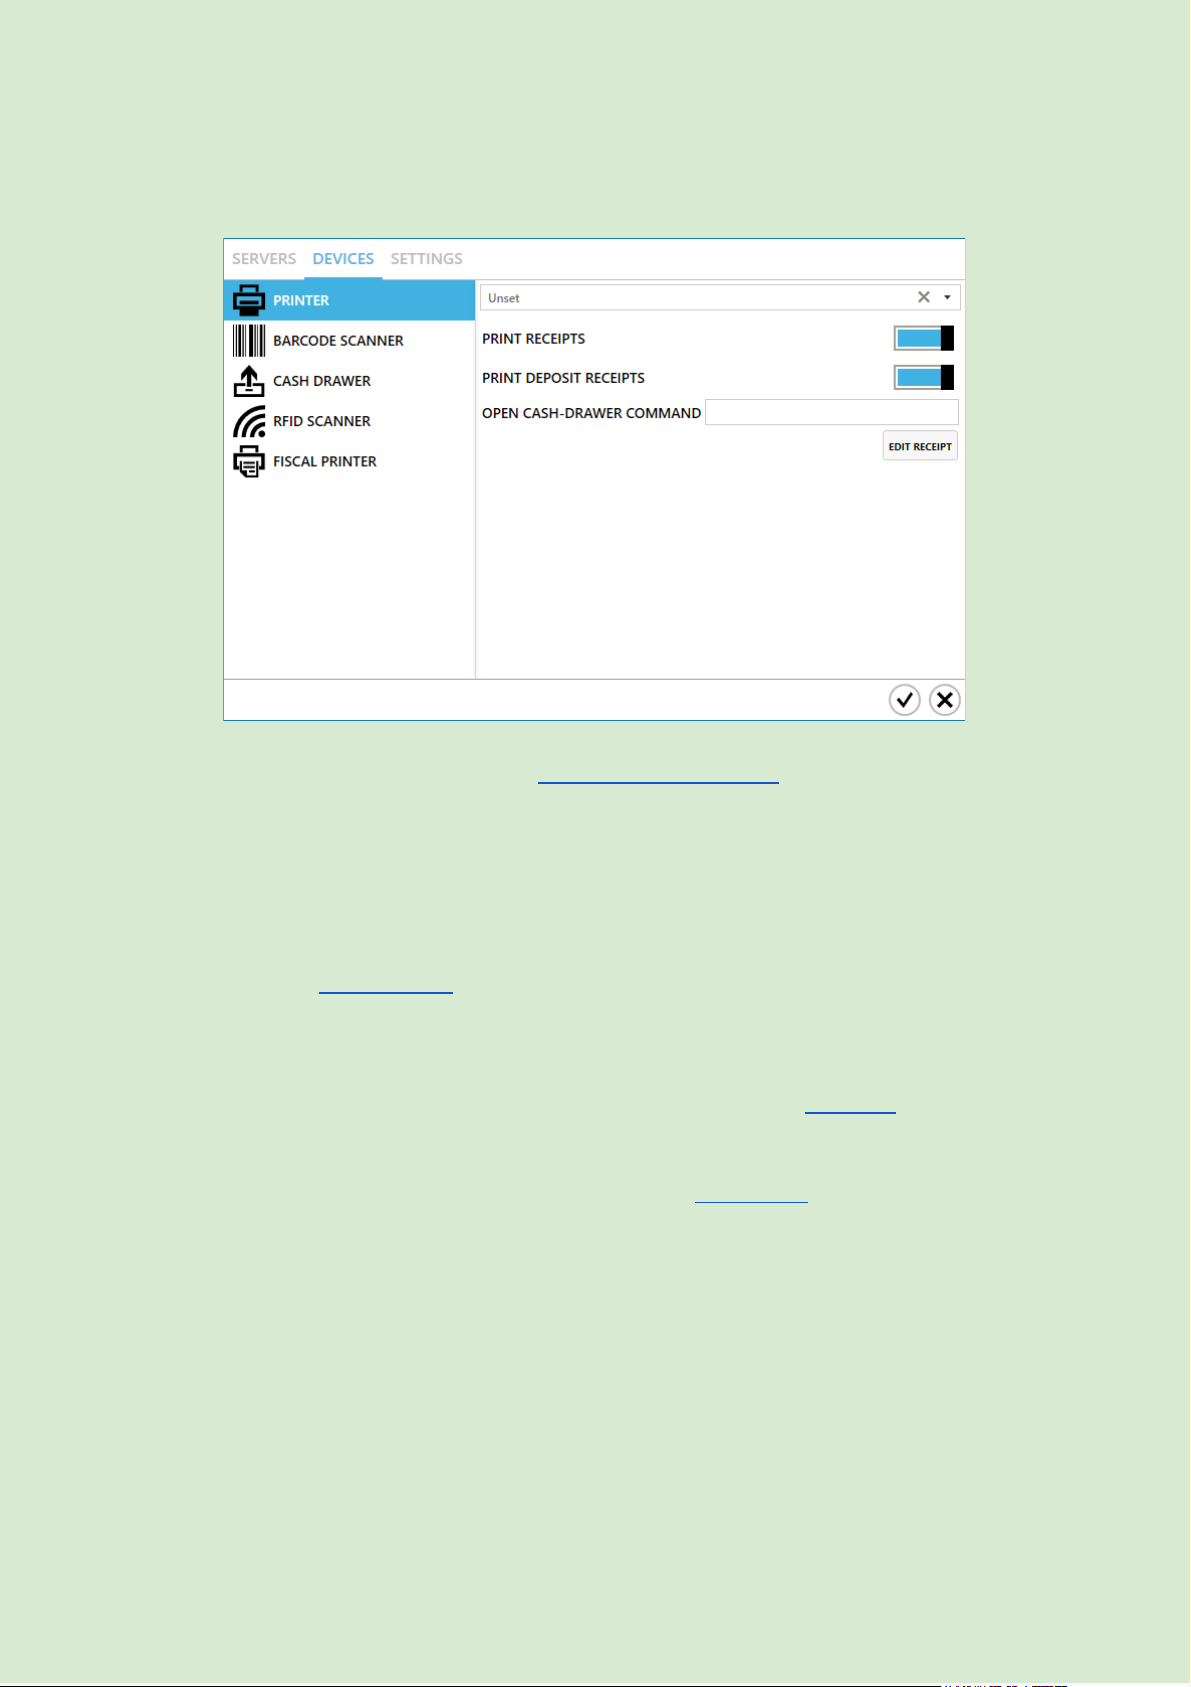
Devices
To use POS devices, you need to install Point of Service for .NET on each Gizmo Manager
installation
Printer
Select your receipt printer from the list. If you have a cash drawer attached to the printer,
optionally enter the command to eject the cash drawer after each sale. Print receipt option
allows you to select if a receipt is printed after each sale. This option can be overridden
temporarily in the Sales window .
Barcode Scanner
Select your barcode scanner from the list. Gizmo supports Scanners that use the OPOS
protocol. Be sure to install the correct OPOS drivers for your device More info
Cash Drawer
Select your standalone cash drawer device from the list. Commands
Rfid Scanner
Select your RFID device from the list. Rfid device driver must be already installed
Fiscal Printer
Select your fiscal printer. Currently supported fiscal printers:
1. АТОЛ 30Ф
14
Gizmo manual v2
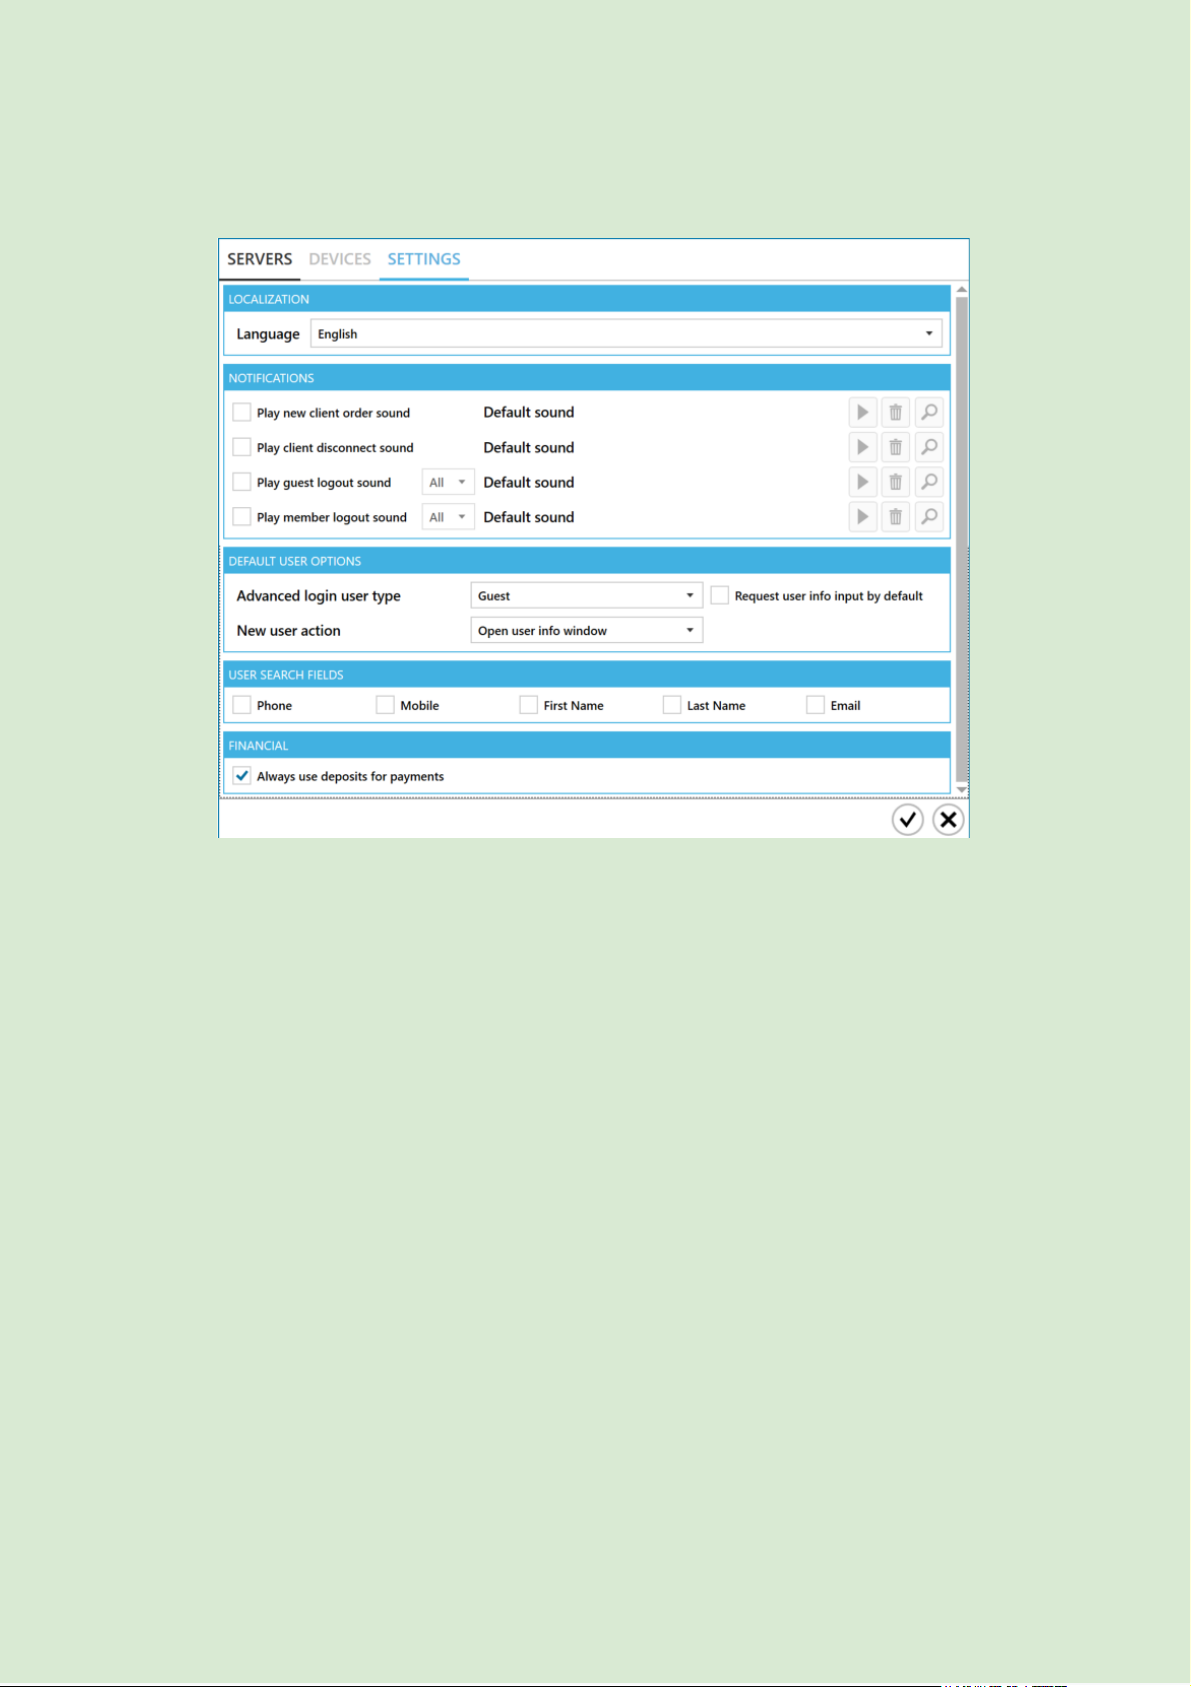
Settings
Localization
Select Gizmo manager language and localisation settings (currency symbol, format etc).
Select [System] to use windows regional settings.
Notifications
Enable notification sounds for incoming orders, customer logouts and client pc disconnects
Default user options
Select member search or guest login as default state for the “advanced” host window
Select if “request user info” is checked by default when creating a new user account
Select default action after creating a new user
User search fields
Select the user searchable fields when searching for a user
Financial
Always use deposits for payments: When paying/closing balance, manager will select
custom payment method and autofill with deposits & first available payment method
(Cash-Credit-Custom payment)
15
Gizmo manual v2
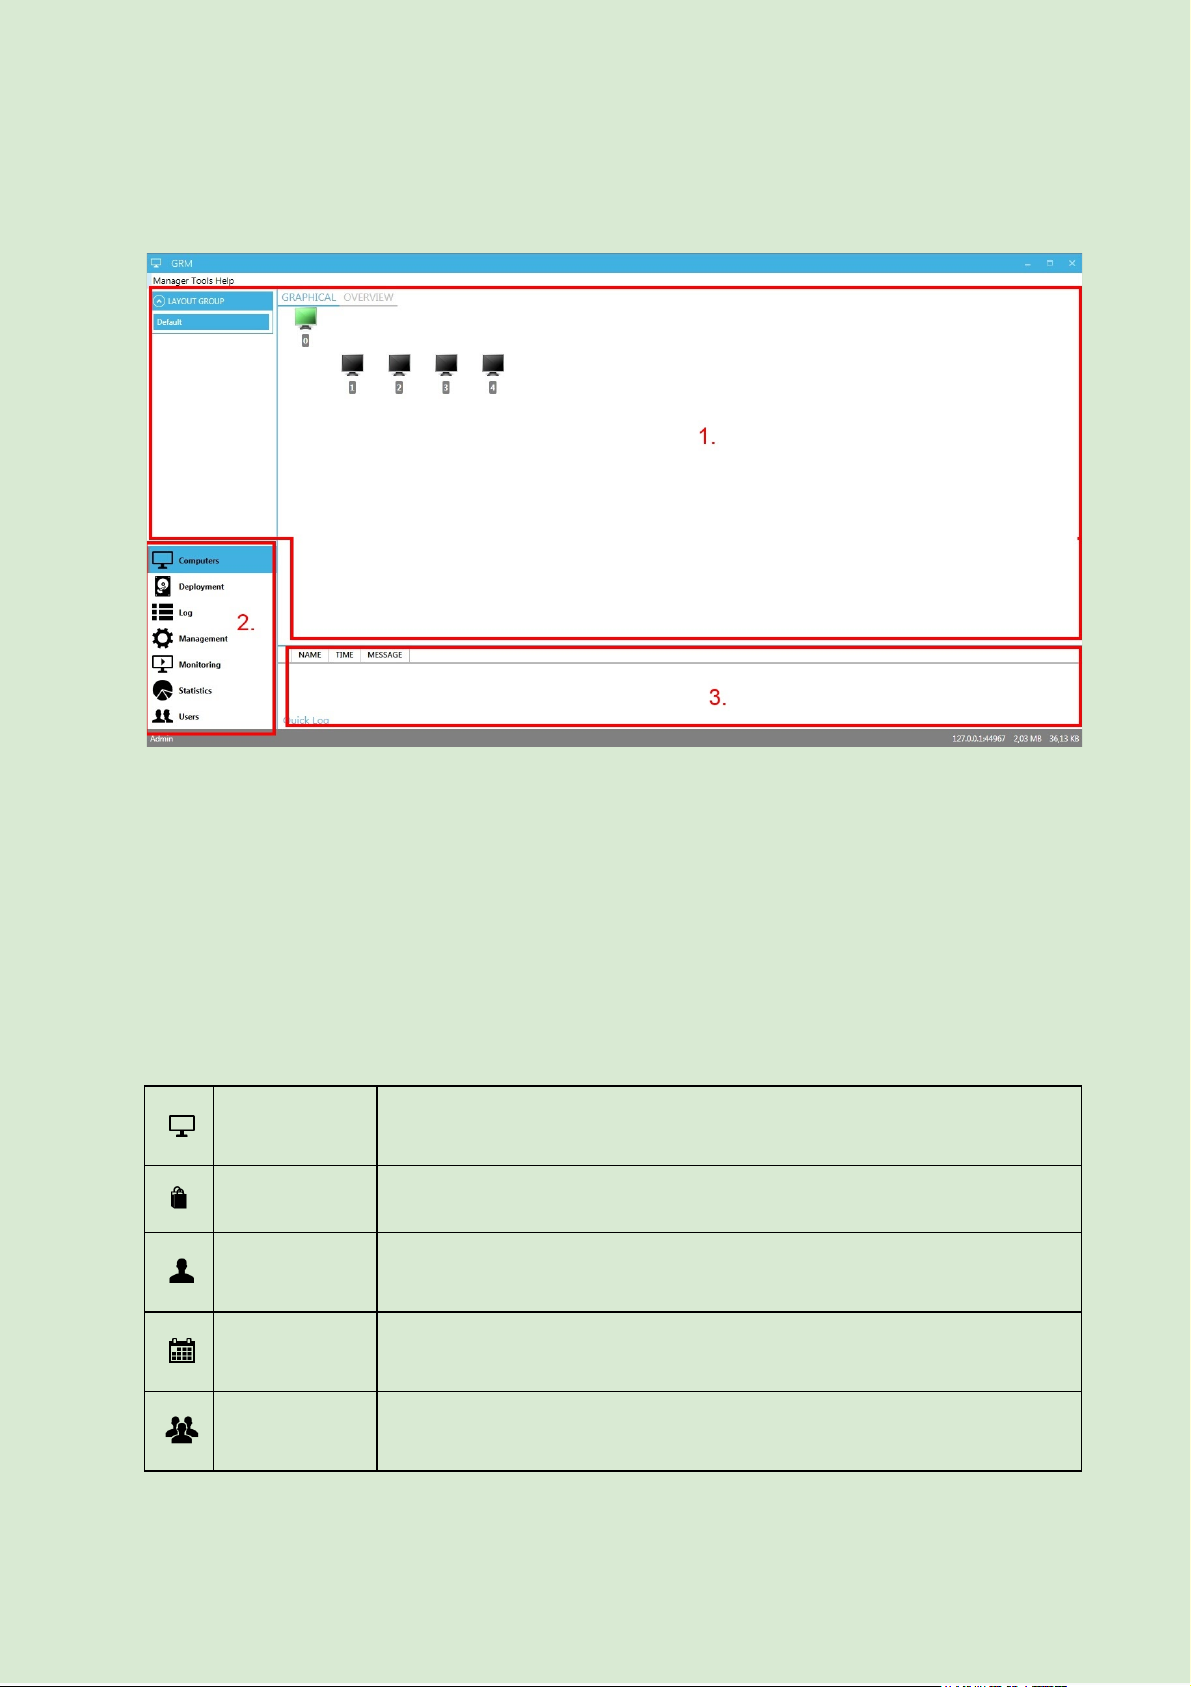
Main Menu
The Manager’s main screen has 3 partitions:
1. Display of various information depending on the currently selected module.
2. List of available modules for use.
3. Customer Orders/Logouts/Quick log. Displays latest customers orders, user logouts
& notifications
Modules
Some modules are automatically hidden depending on the operator’s permissions
16
Computers
Host Management main window (Turn on/off, login user, security etc)
Sales
Product sales
Users
User accounts management
Reservations
Host reservations
Waiting Lines
Customer queuing system
Gizmo manual v2
17
Manage
Client Computer system monitoring/maintenance
Deployment
Manual file deployment & sync to clients
Monitoring
Client screen monitoring
Reports
Financial / user / application usage statistics
Log
System warning/error messages
Gizmo manual v2
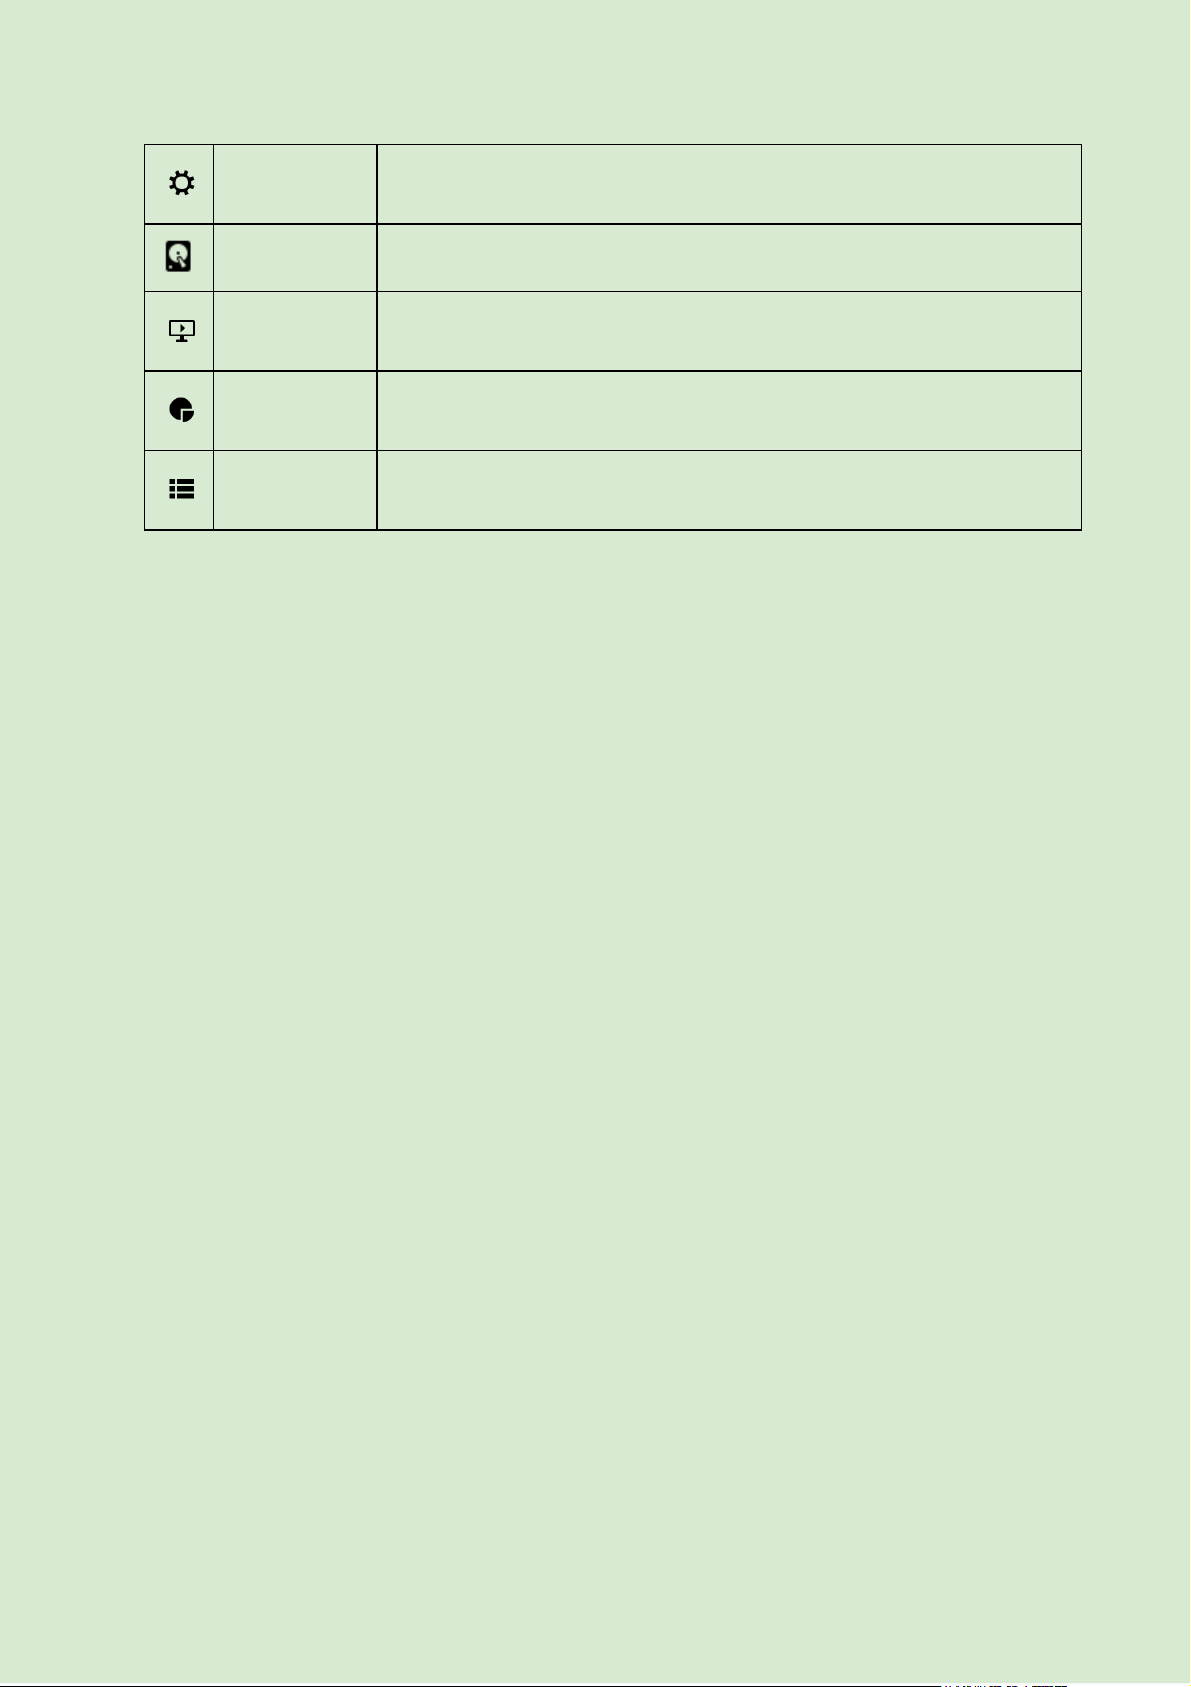
Customer orders
Orders Pane displays customer orders submitted through the Client sales interface.
Orders submitted by the customer must be initially accepted or rejected by an operator.
Once the order has been accepted, time offers are immediately delivered to the customer.
Columns
➢ Status Status of order
➢ Note Customer order notes
➢ Order ID Host user occupied at invoice creation time
➢ User Username of customer
➢ Host name Name of host where customer is currently logged in
➢ Product Name of product ordered
➢ Quantity Total number of items orders
➢ Total Total cost of order
➢ Outstanding Remaining debt on order
➢ Time Time of order submission
➢ Payment Method Payment method selected by customer at order time
Action Buttons
➢ Accept/Pay Accept order / Pay order
➢ Cancel/Void Cancel order (before accepting) or void order & invoice
➢ View View order and mark/unmark items as delivered
➢ Complete Marks the order completed and all items delivered
18
Gizmo manual v2
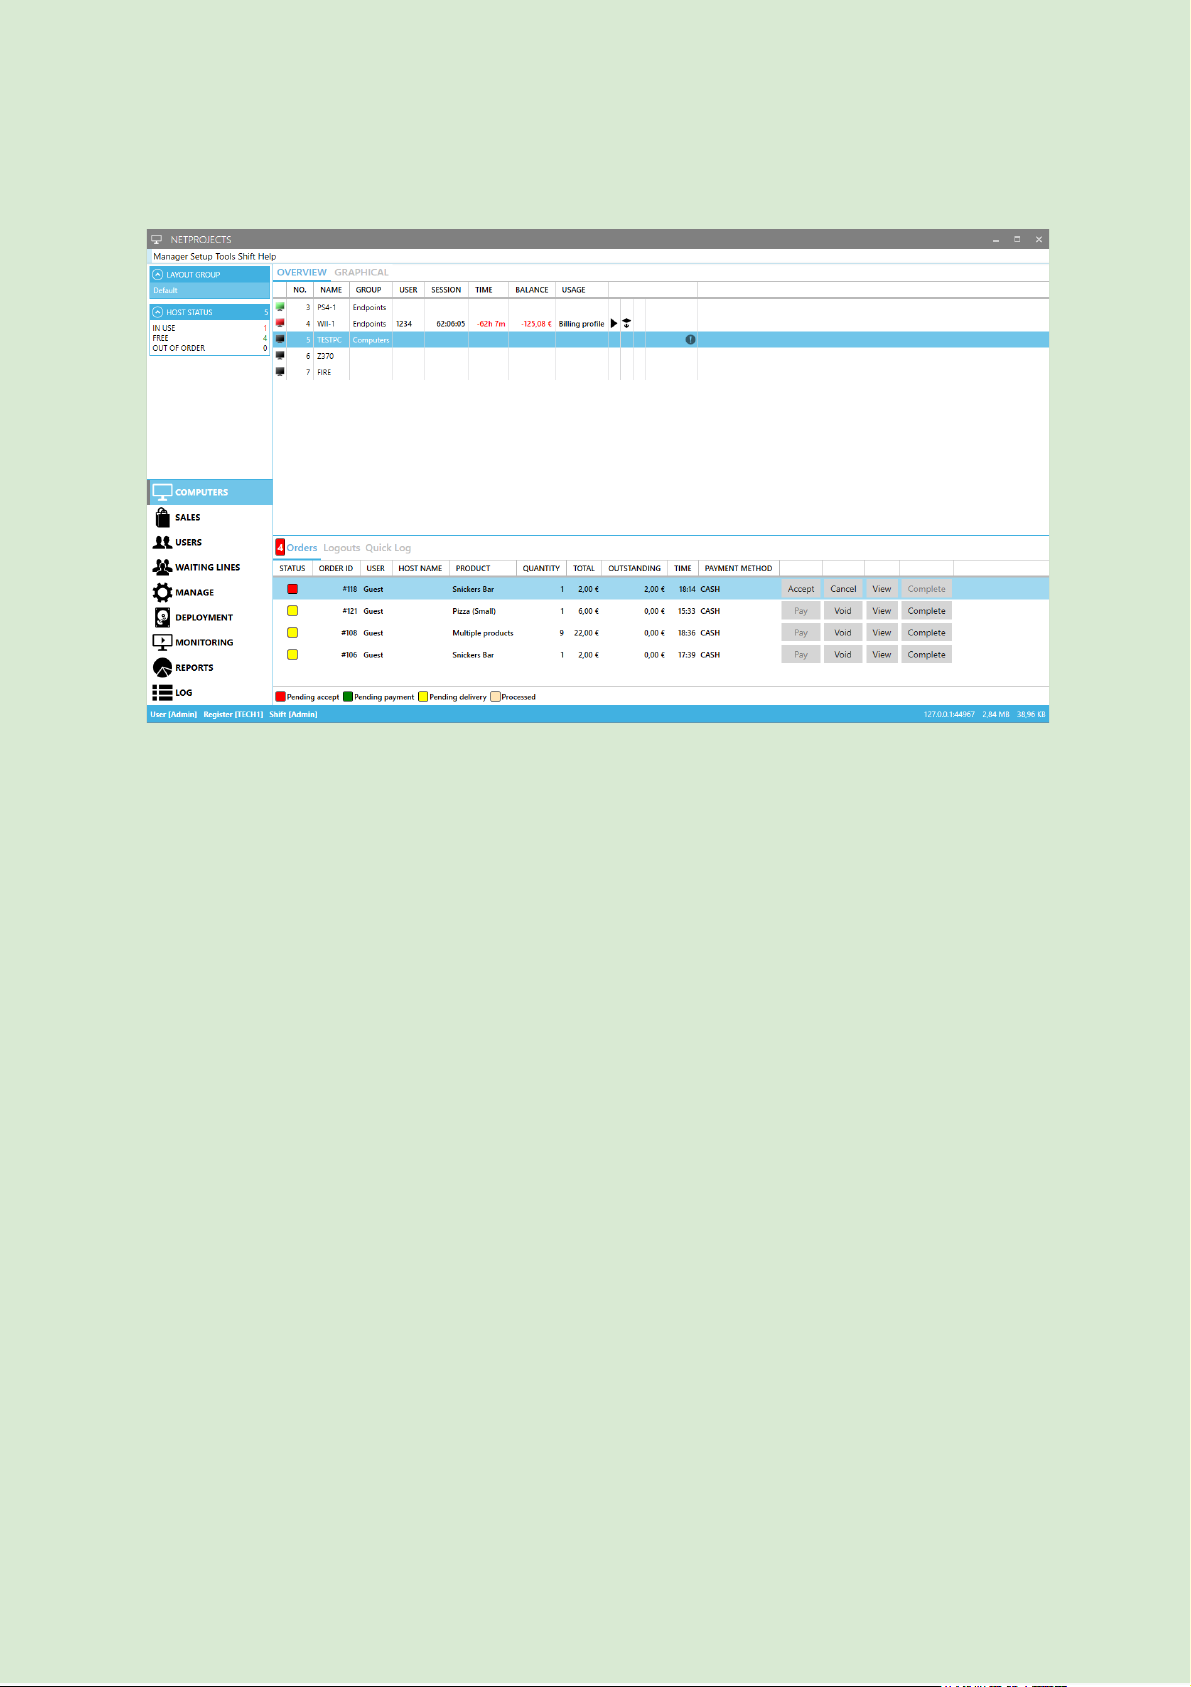
Computers Module
The Computers module displays an overview of all client computers as well as other
endpoints (consoles, pool tables etc). You can switch between host list and top-down view
by clicking the "Overview" & “Graphical” buttons. You can filter hosts by selecting a different
" Layout Group " from the left.
Columns
➢ Status (icon) Endpoint status (on,off, in use)
➢ Number Endpoint Number
➢ Name Endpoint Name
➢ Group Endpoint Host Group
➢ User User(s) currently logged in
➢ Session User session duration
➢ Time Time until logout
➢ Balance User Balance
➢ Session state (icon) User Session Status
➢ Allow credit status (icon) Allow credit
➢ Lock state (icon) Keyboard/mouse lock
➢ Security state (icon) Security Profile status
➢ Out of order state (icon) Maintenance mode
Tip: Add new hosts in Hosts setup
19
Gizmo manual v2
Right clicking a host brings up the contextual menu with the following options.
20
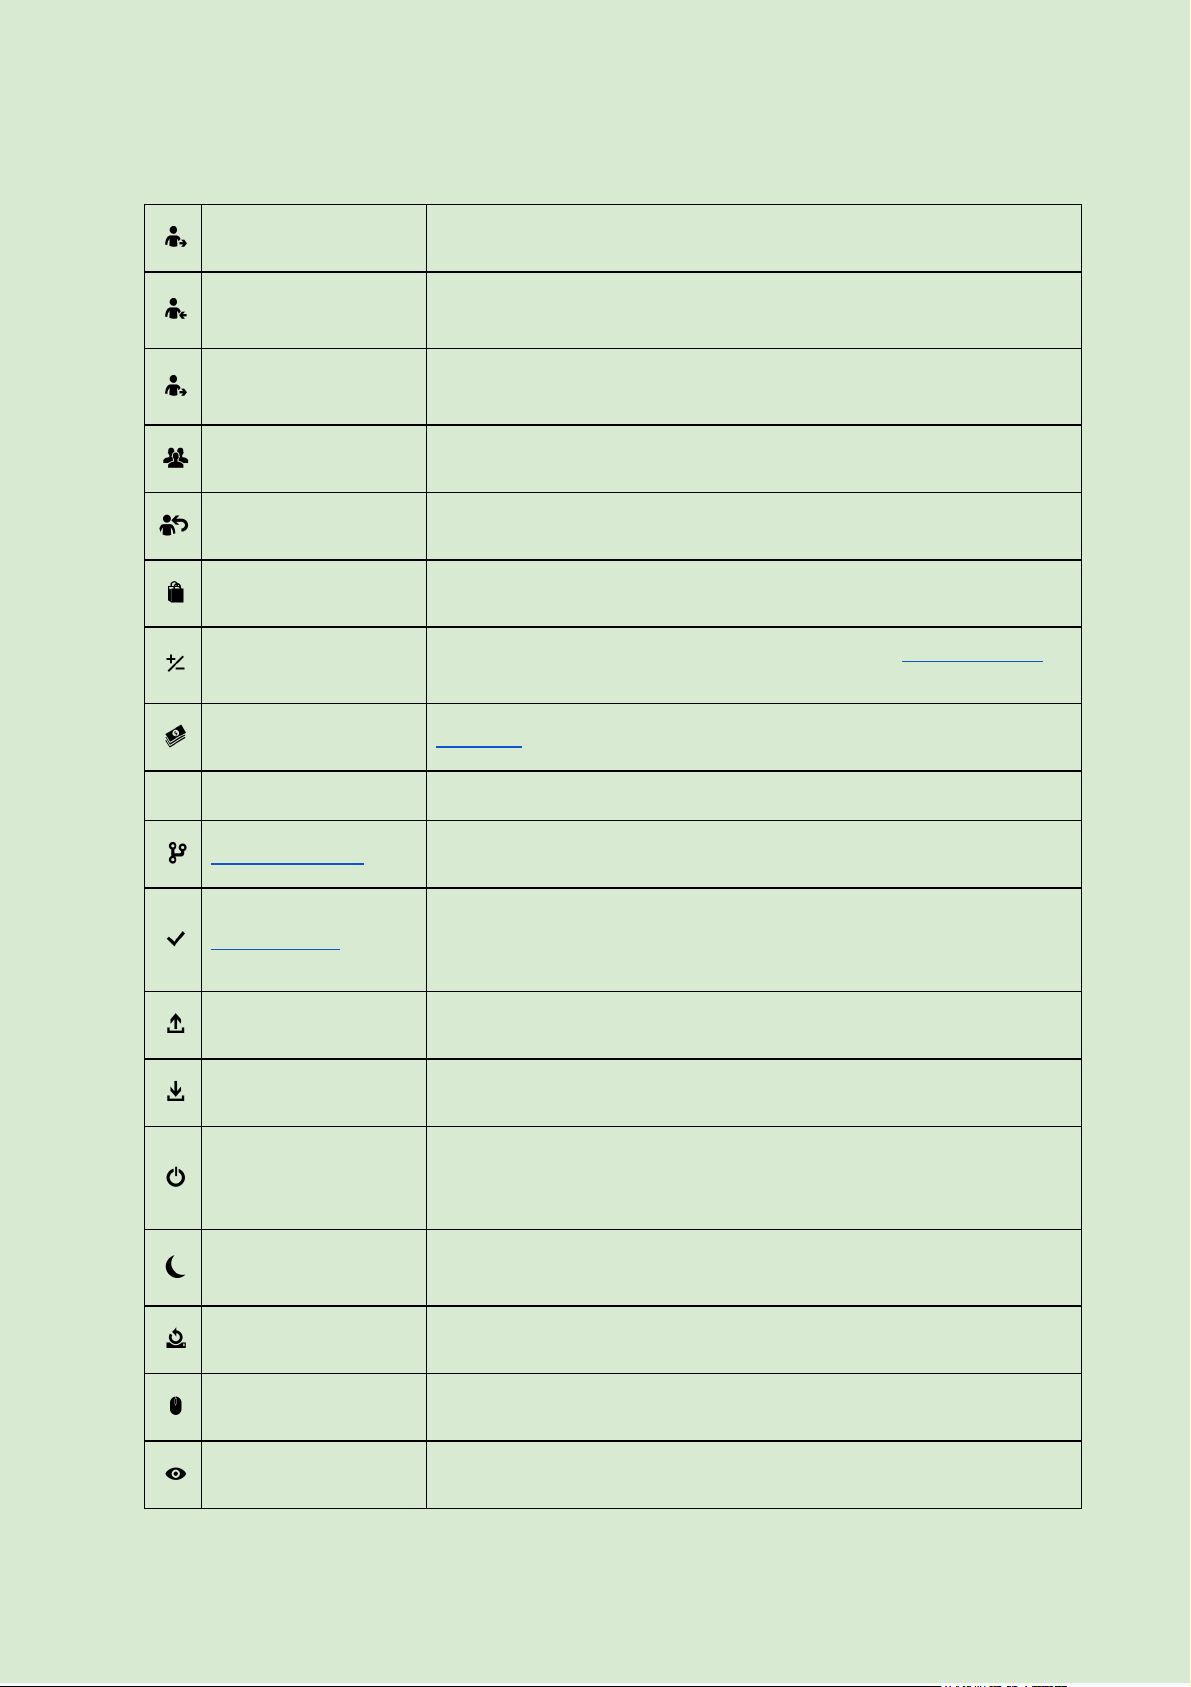
Login
Manually login a User
Logout
Log out current User. On hosts with multiple logged in users you
will be asked to select which one(s) to logout.
Guest
Guests (multiple)
Quick login guest customer
Advanced
Open host’s advanced slot window.
Move
Move customer to different host
Sell
Opens the sales window.
Close Balance
Opens the Close Balance window and initiates “ Close Balance ”
Action.
Deposit
Deposits money to user account
Withdraw
Withdraws money from user account
Billing options
Modify use of offers/fixed time/deposits
Allow Credit
Allow user to start/continue using the host with no active
offers/products. Status is reset to Usergroup’s default setting
after logout.
Check out
Check out an asset to the customer
Check in
Check in an asset of the customer
Turn on
Turn on (power on) client computer. In order for this feature to
work, bios and NIC settings (under windows) must be properly
configured
Turn off
Turn off (shutdown) client computer. Note: Gizmo uses force
shutdown
Restart
Restart client computer. Note: Gizmo uses force restart
Control
Remote control host PC
View
Remote view only host PC
Gizmo manual v2
21
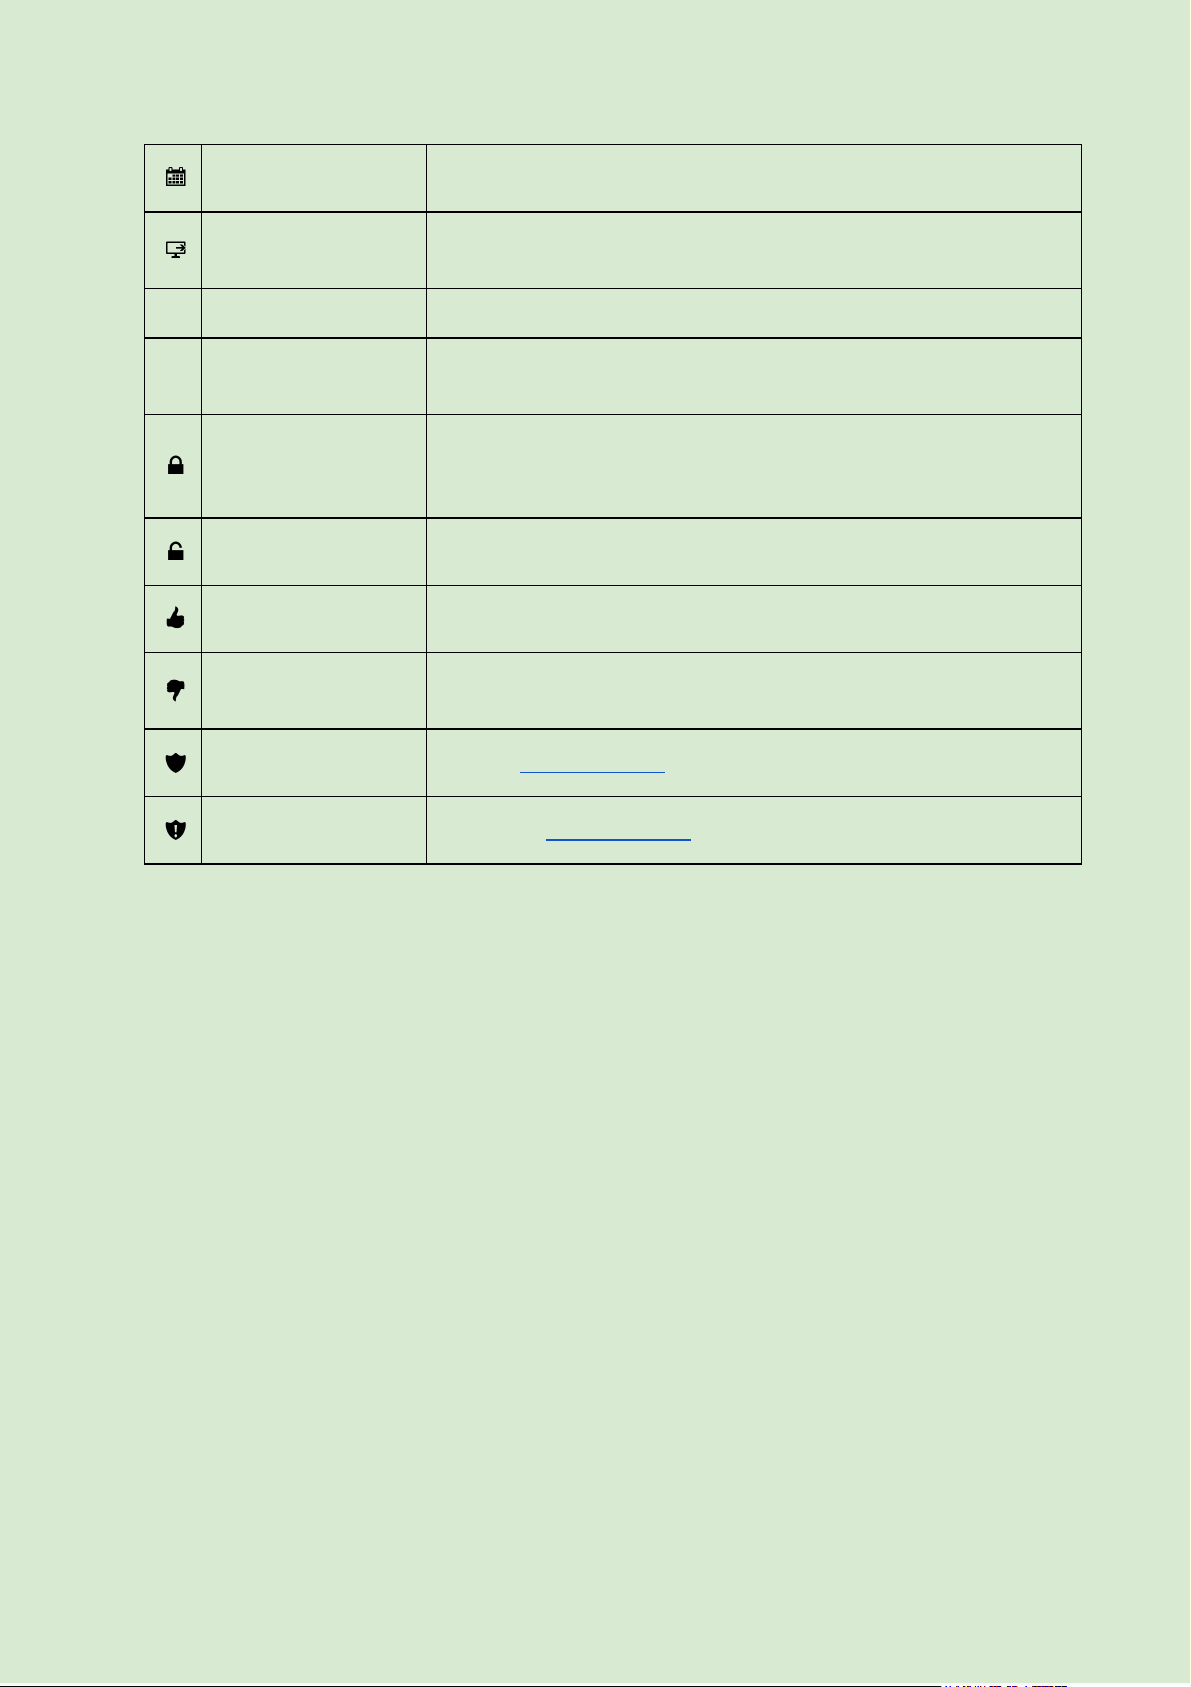
Reserve
Create a new reservation for the selected hosts
Module –
maintenance
Enter/exit Maintenance mode. Provides unrestricted access to
client OS and hides gizmo interface
Module – restart
Terminate and relaunch client application
Module – terminate
Terminate (exit) client side application. Restore windows
interface until reboot
System – Lock
Lock keyboard and mouse on client computer. Client monitor will
display a message informing of the locked state. The computer
can be accessed remotely and responds to remote commands
System – Unlock
Unlock keyboard and mouse on the client computer
System – In Order
Reset out-of-order State
System – Out of
Order
Mark host as out-of-order. Disables login of users
Security – Enable
Activate Security profile
Security – Disable
Deactivate Security profile

Gizmo manual v2
Sales Module
Sales module hosts the POS interface along with other tabs used for managing transactions
and stock
22
Sales
Product Sales POS Tab
Invoices
Invoices history Tab
Stock Management
Stock Management Tab
Deposit Transactions
Customer Balance Transactions Tab
Stock Transactions
Product stock Transaction history Tab
Gizmo manual v2
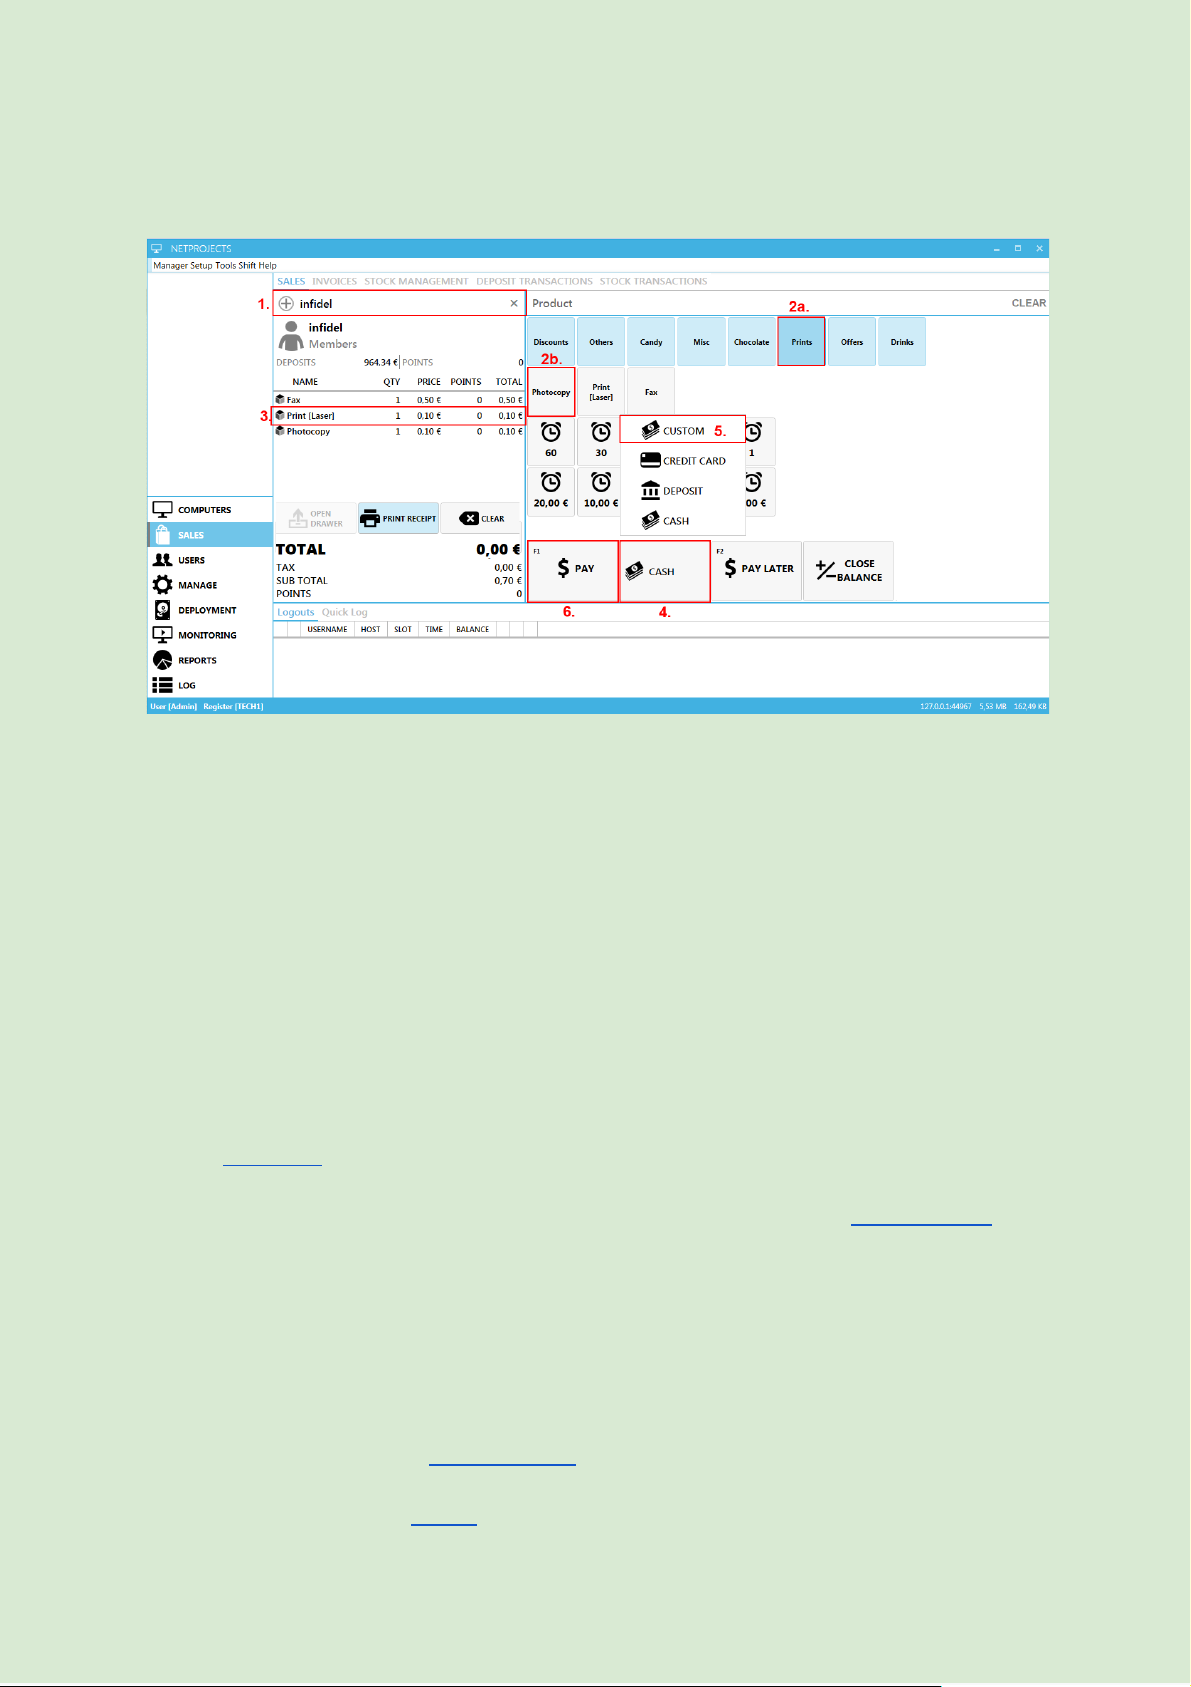
Sales
Sales Tab is used to add game time, sell products and offers to clients.
1. Find the customer using search on the top left. For a walk in guest sale, leave field
empty (products only)
2. Add products by clicking the product category (2a) and then the product (2b).
3. Click on a product in the cart to modify quantity, switch to points payment * or remove
from order.
4. Select prefered payment method. **
5. If a customer wishes to pay with multiple methods, select “custom” as payment
method and enter amount for each payment method using the on-screen numpad.
6. Click " Pay " to finalise the sale.
● " Pay " completes the sale with selected payment method
● " Pay Later " invoices the order but creates no payments. The points deduction of the
payment is executed immediately.
● " Close balance " Opens the Close Balance window and initiates “ Close Balance ”
Action.
● “ Print receipt ” disables/enables the printing of the receipt for this order
● " Clear " removes all items from cart
* Purchases with points do not award points
** Custom payment method is used to partially pay or pay with multiple payment methods.
Tip : Add new products in the Products setup
Tip : Create new user by clicking ➕ next to customer search field
Tip : How to sell with points tutorial
23
Gizmo manual v2
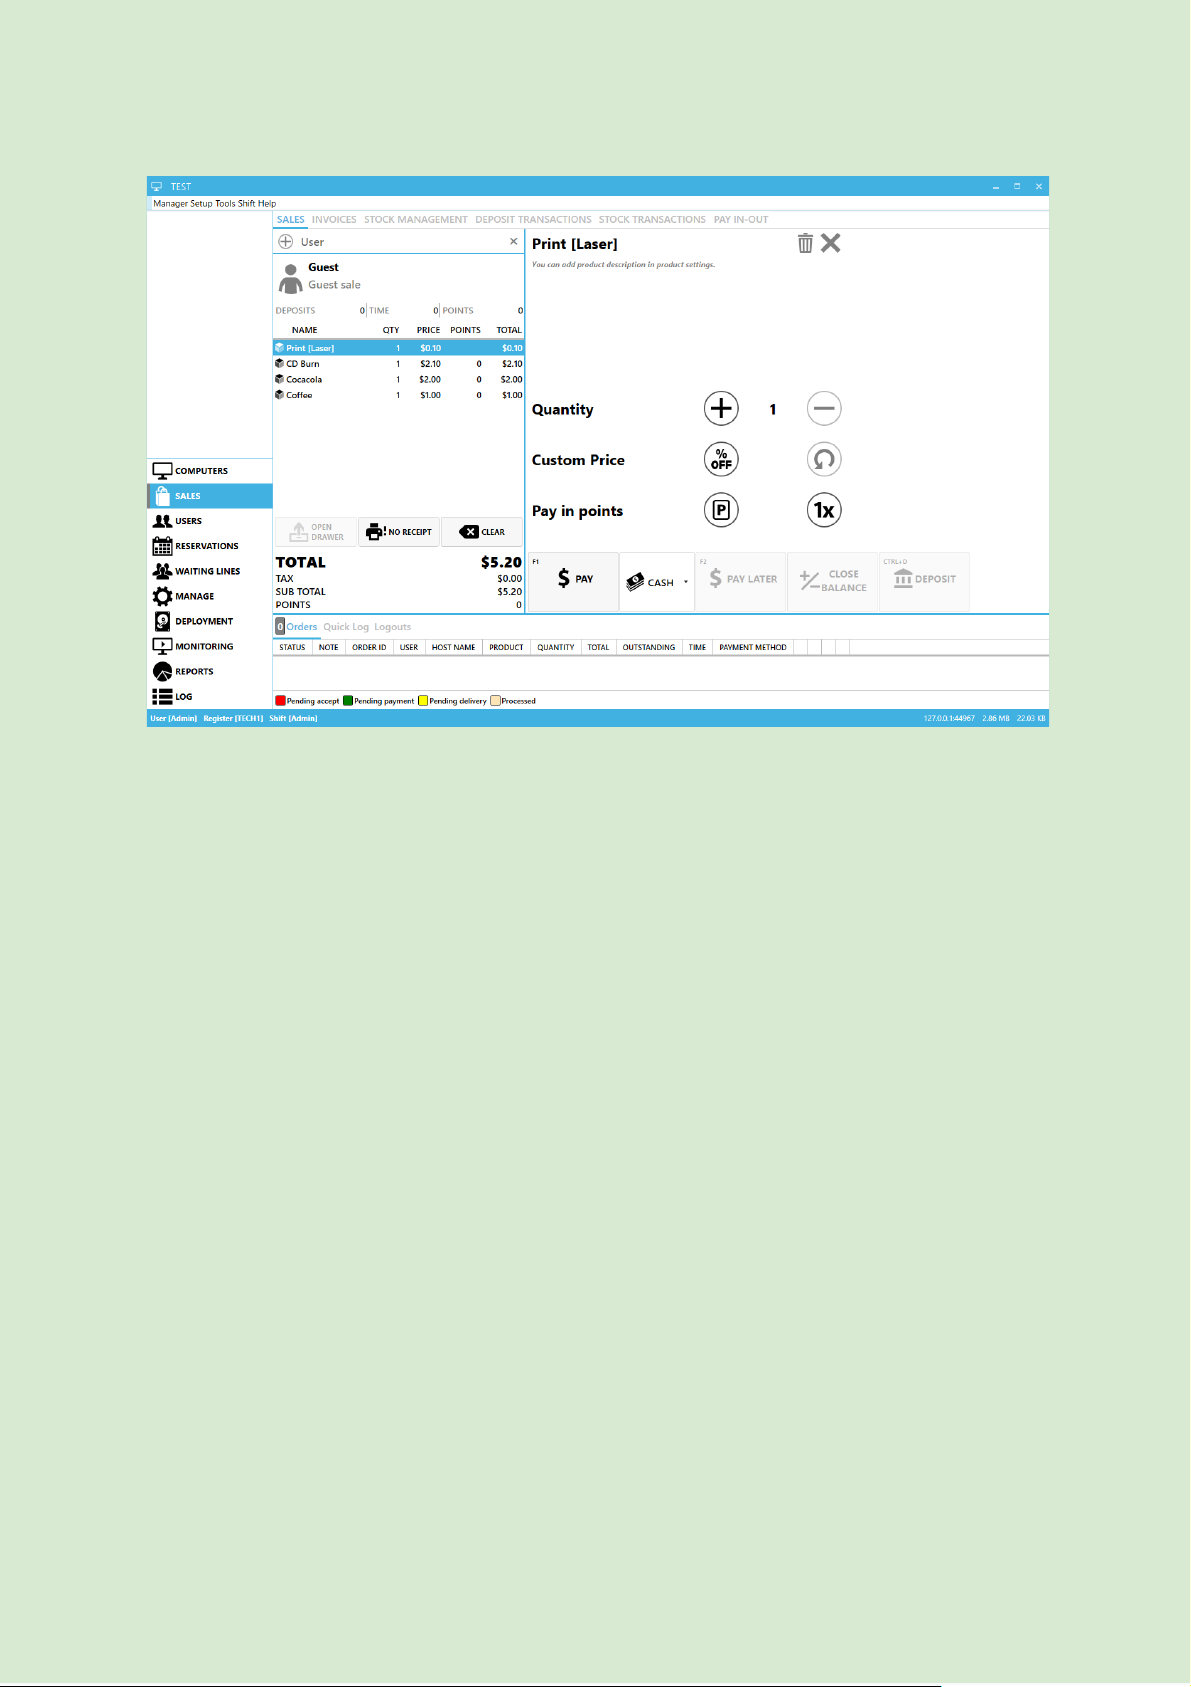
Selecting a product from the order list brings up extra options:
1. Quantity: Click + and - to increase or decrease the item quantity
2. Custom price: Click % icon to set a custom price for the product.
3. Pay in points: If the product can be paid in points, click the P icon to switch total
quantity to points payments. 1x switches only 1 item to payment in points.
4. Bin icon: Removes item from order
5. X icon: Dismisses product details
24
Gizmo manual v2
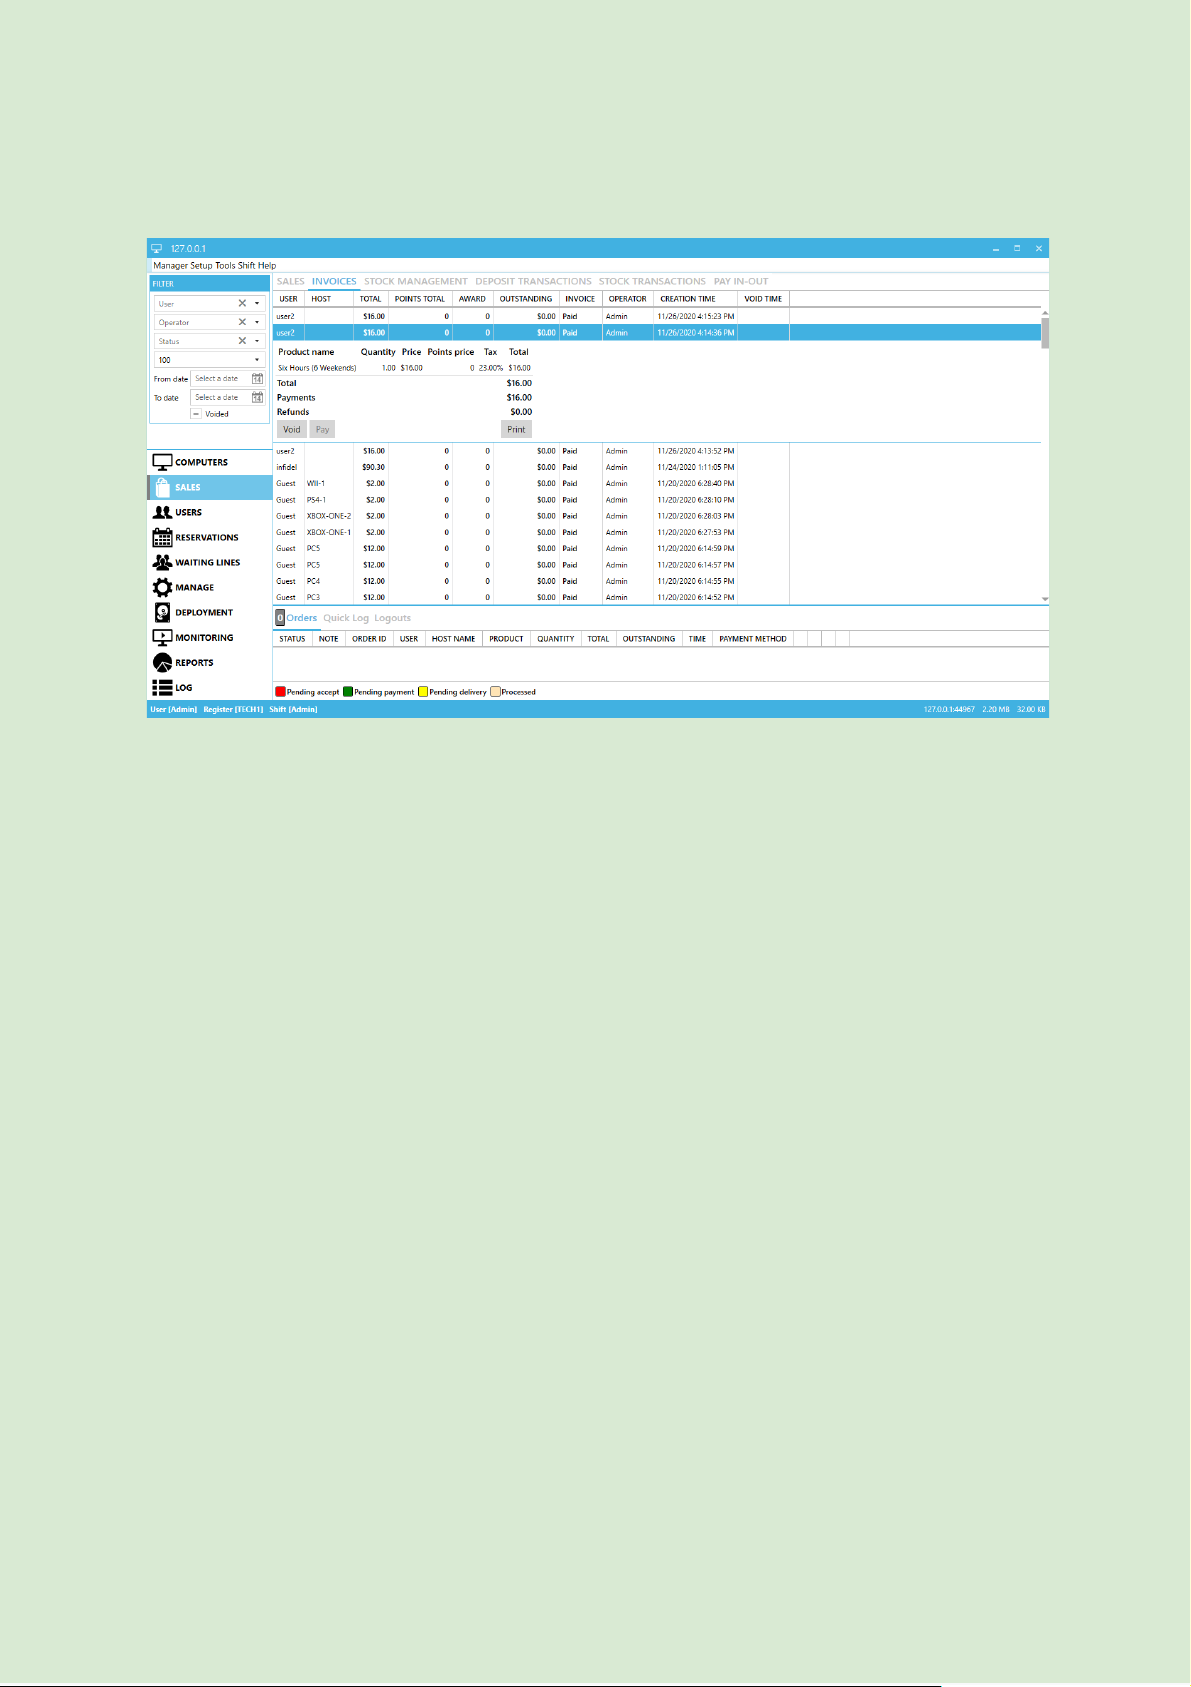
Invoices
Invoices Tab lists all issued invoices that match filter criteria.
Actions
➢ Void Void invoice with optional refund
➢ Pay Pay unpaid invoice, partially or in full
➢ Print Prints/reprints invoice
Columns
➢ User Customer username
➢ Host Host user occupied at invoice creation time
➢ Total Invoice value (money)
➢ Points Total Invoice value (points)
➢ Award Points awarded for purchase
➢ Outstanding Unpaid amount of invoice
➢ Invoice Invoice status
➢ Operator Last Employee who handled invoice
➢ Creation Time Date and time of invoice
➢ Void Time Date and time of invoice void
Filters
● "User" filters specific user orders
● "Operator" filters based on employee orders
● "Status" filters invoice payment state
● “Returned results” sets the maximum number of returned results
● From" - "To" filters order creation date
● "Voided" hides/unhides voided invoices
25
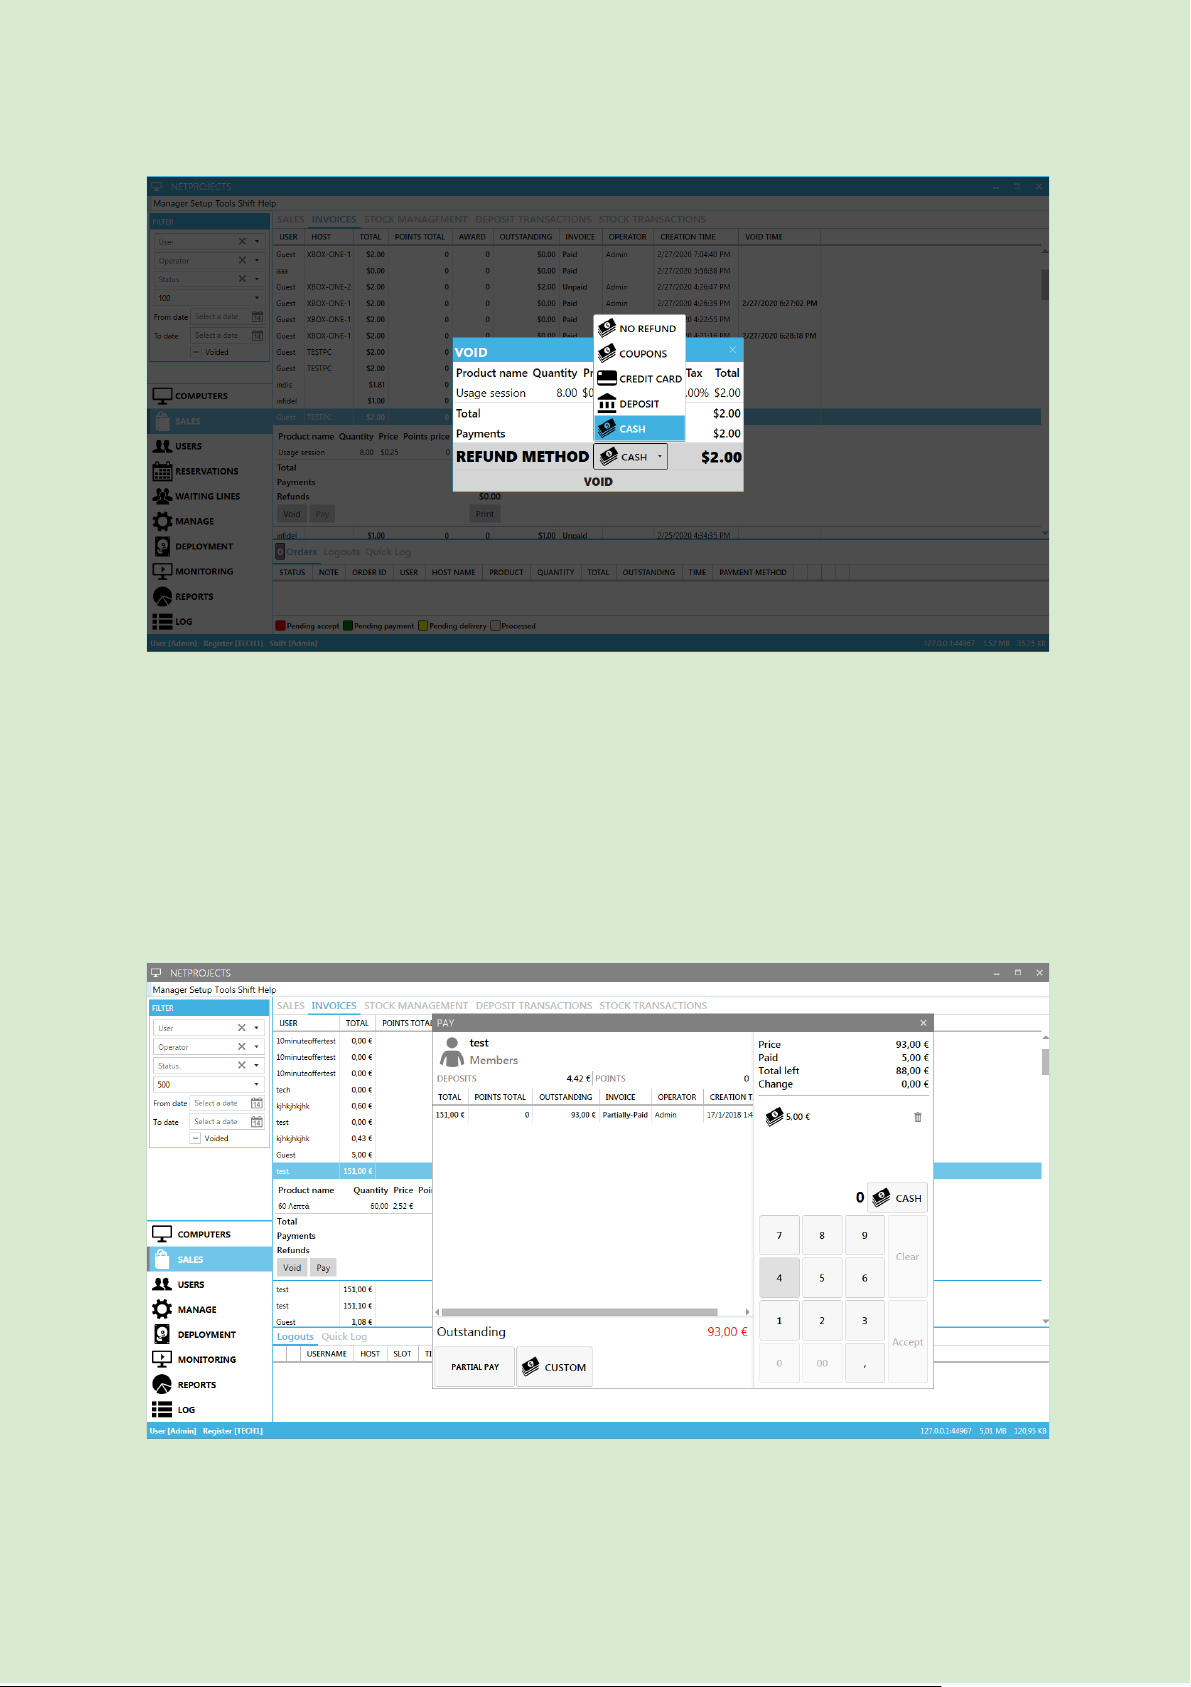
Gizmo manual v2
Void with optional refund
Refund Methods:
Cash,Credit Card etc Refund customer in selected method
Deposit (credit account) Credit amount to customers account (not available to guests)
No refund Do not refund customer
Tip: Voiding an invoice always refunds points and deducts awarded points
Partial Pay by use of “custom” payment method
Tip: Partial pay is available only when paying a single invoice
26
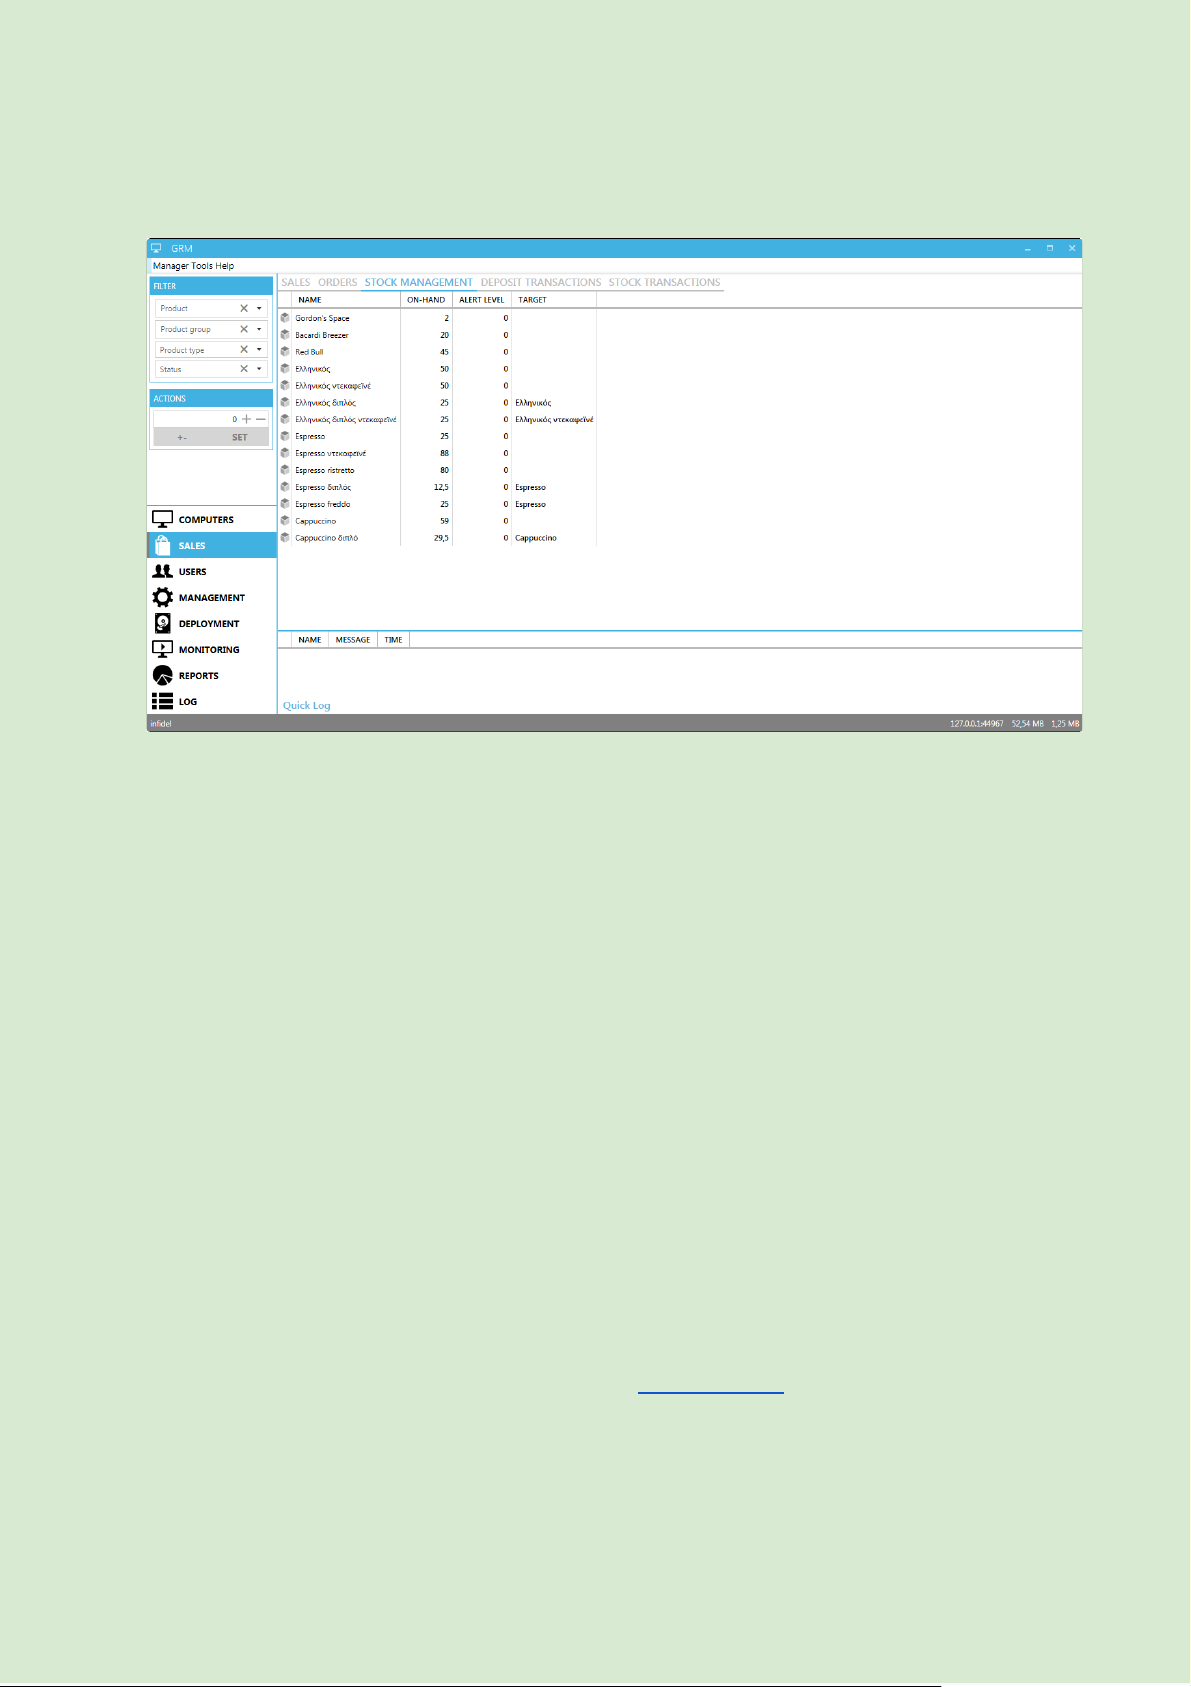
Gizmo manual v2
Stock Management
Stock management Tab lists all products’ stock status. You can add/subtract to the stock, or
set stock to a specific level.
Actions
➢ ∓ Add or subtract the amount from the current stock
➢ SET Reset the product's stock to the specified amount
Columns
➢ Name Product name
➢ On Hand Current product stock level
➢ Alert level Minimum stock level for issuing stock alerts
➢ Target Product used to determine stock level. When stock is
calculated based on another product's stock.
Filters
● "Product" filters specific user orders
● "Product Group" filters based on employee orders
● "Product Type” filters based on employee orders
● "Status" filters invoice payment state
Tip : Enable/disable tracking of a product's stock in Products setup
27
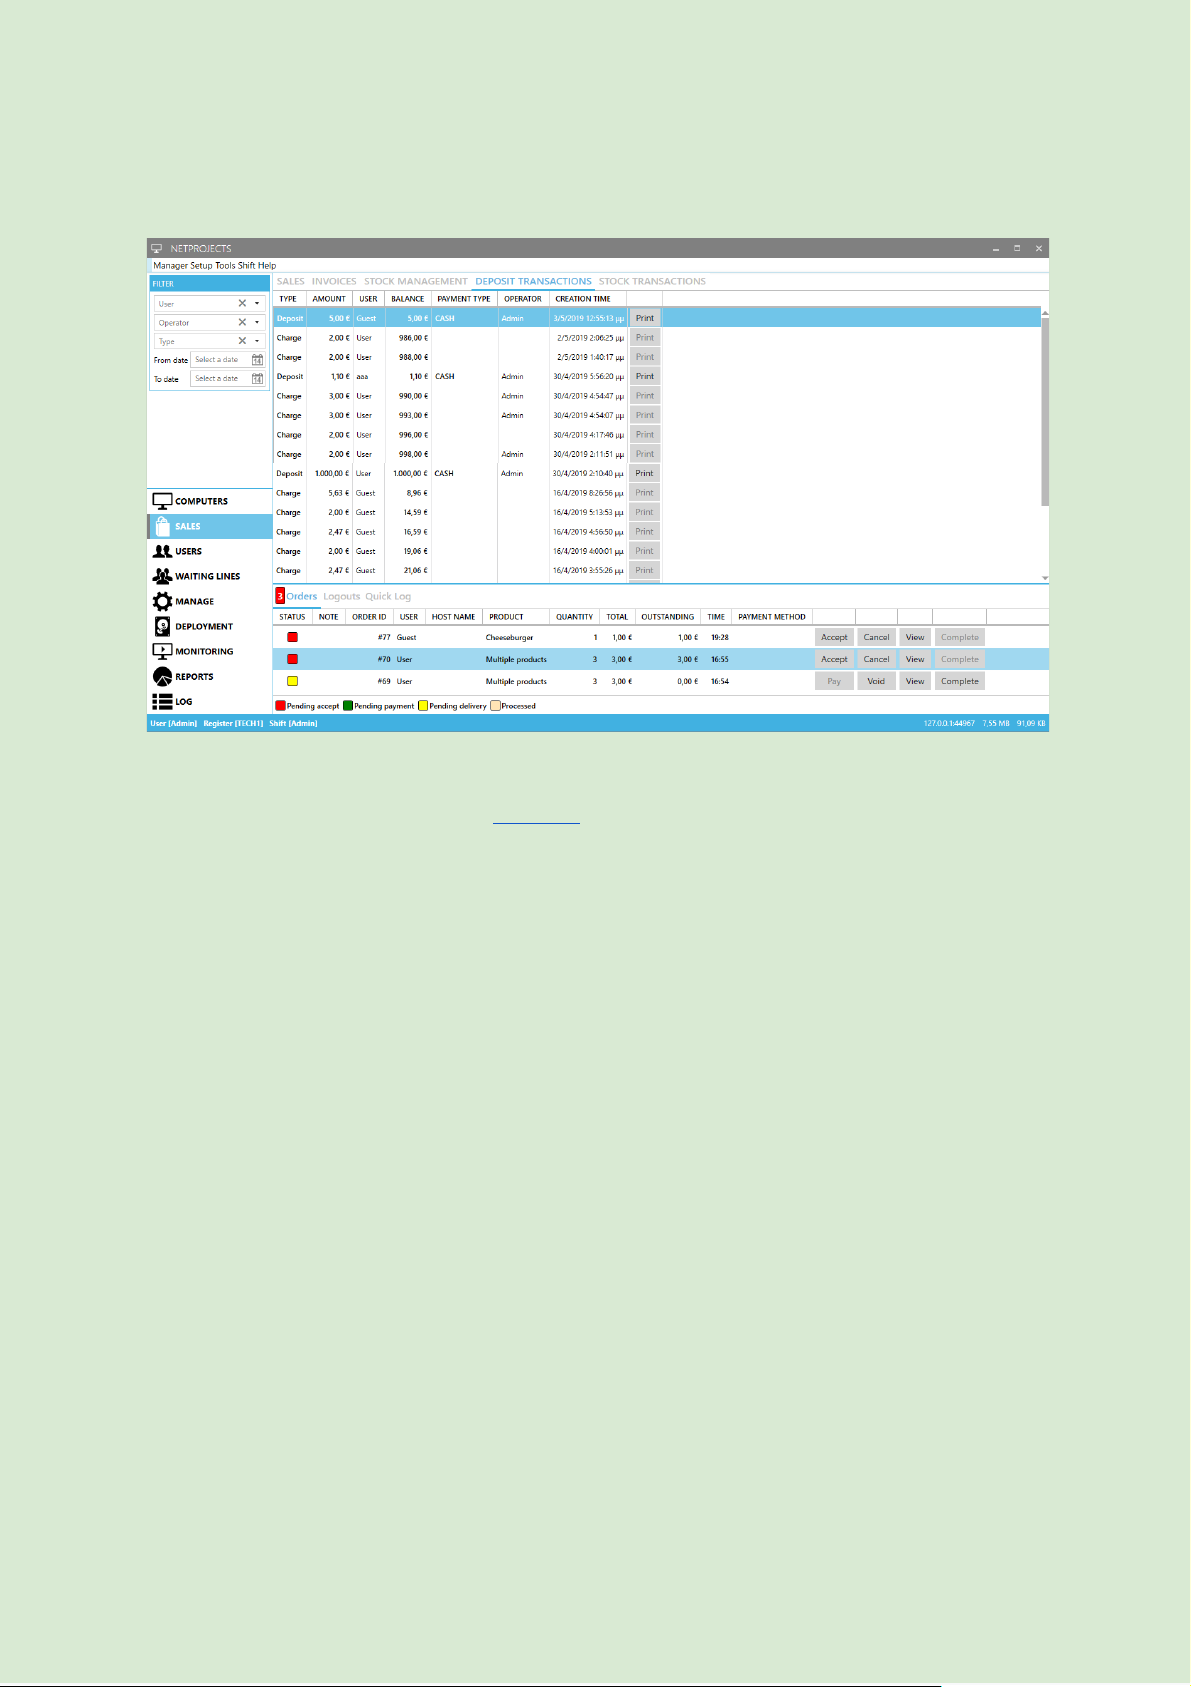
Gizmo manual v2
Deposit Transactions
Deposit Transactions Tab lists any user deposit changes that match filter criteria.
Deposits cannot be voided, use the withdraw function to undo a deposit.
Columns
➢ Type Type of transaction
➢ Amount Transaction amount
➢ User Account Username
➢ Balance User Balance after transaction
➢ Payment Type Payment method used (only for deposits)
➢ Operator Employee who handled transaction
➢ Creation Date Date and time of transaction
➢ Print Print/Reprint transaction receipt
Filters
● "User" filters specific user orders
● "Operator" filters based on employee orders
● "Type" filters based on event type
● From" - "To" filters order creation date
● "Voided" filters voided transactions
28
Gizmo manual v2
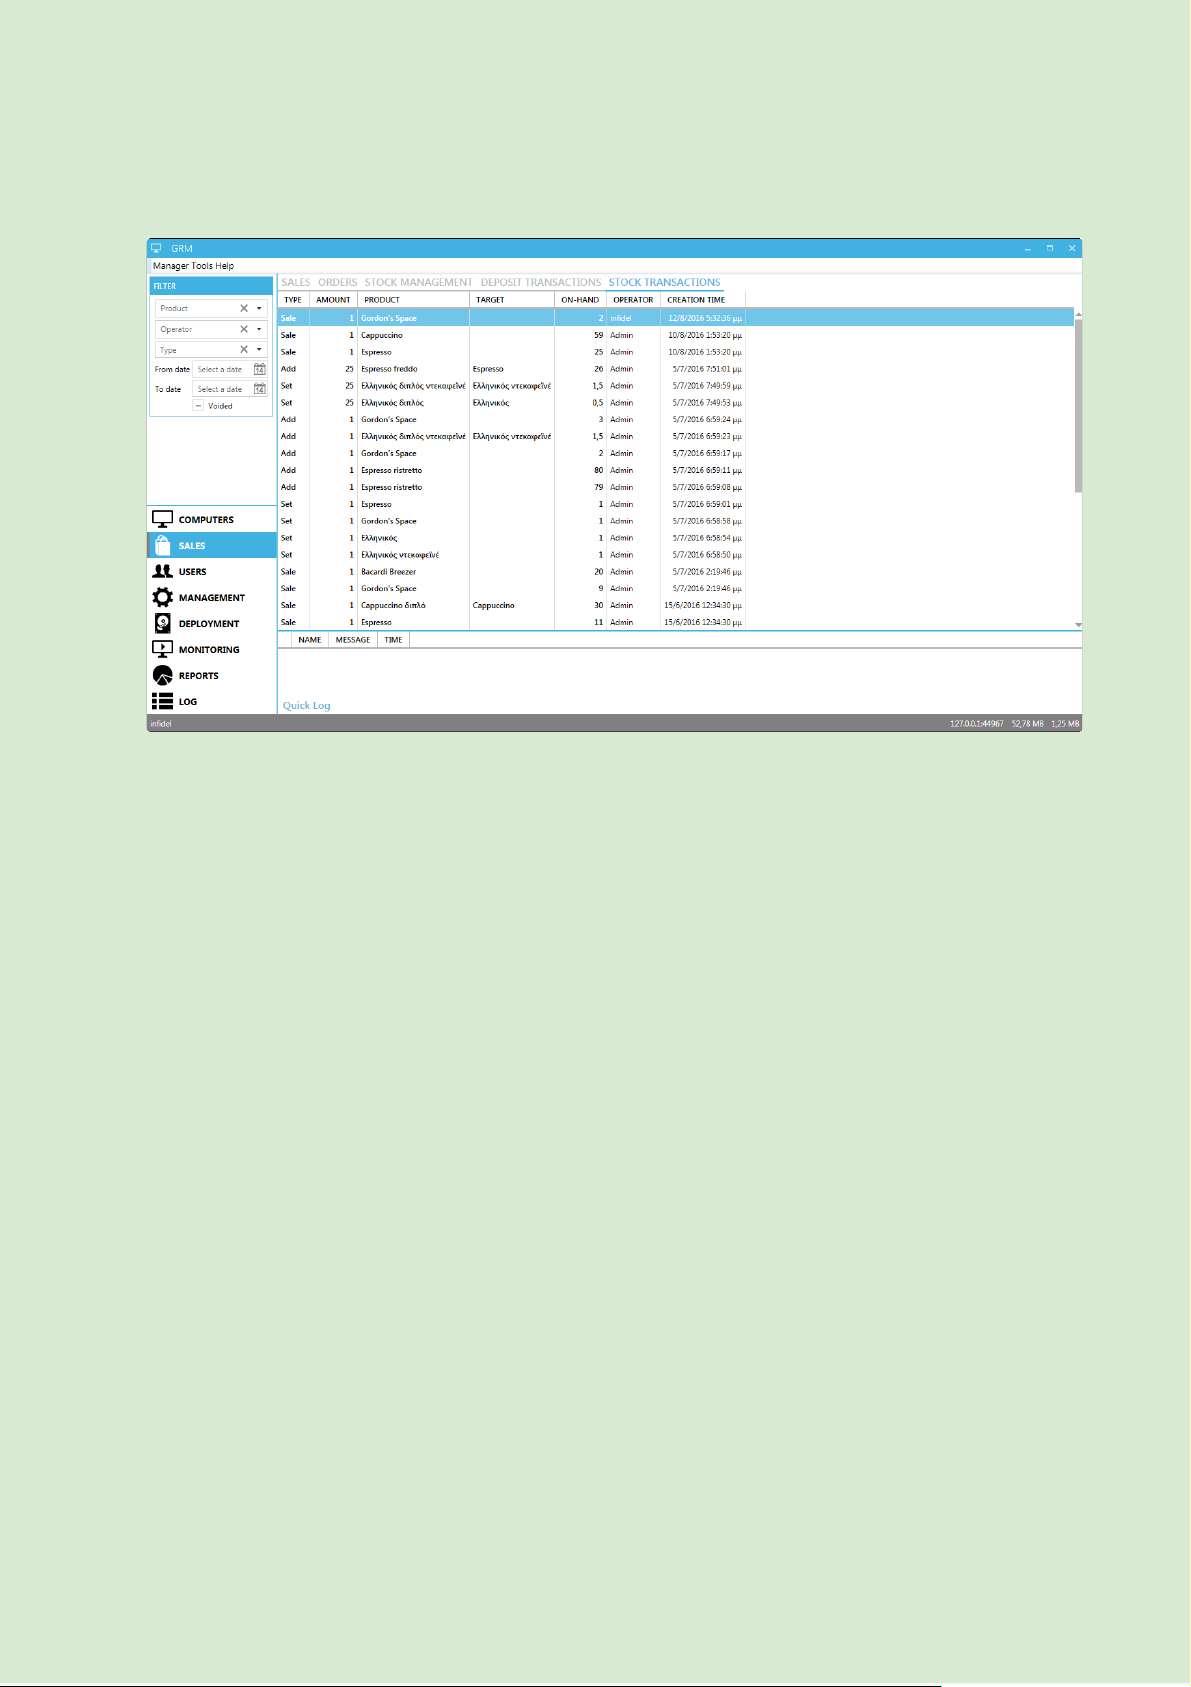
Stock Transactions
Stock Transactions Tab lists any product stock changes, caused by selling or restocking, that
match filter criteria.
Columns
➢ Type Type of stock modification
➢ Amount Product amount
➢ Product Product name
➢ Target Actual product used to determine stock level when
stock is calculated based on another product's stock.
➢ On-Hand Product stock level after transaction
➢ Operator Employee responsible for transaction
➢ Creation Date Date and time of transaction
Filters
● "User" filters specific user orders
● "Operator" filters based on employee orders
● "Type" filters based on event type
● From" - "To" filters order creation date
● "Voided" filters voided invoices
29
Gizmo manual v2
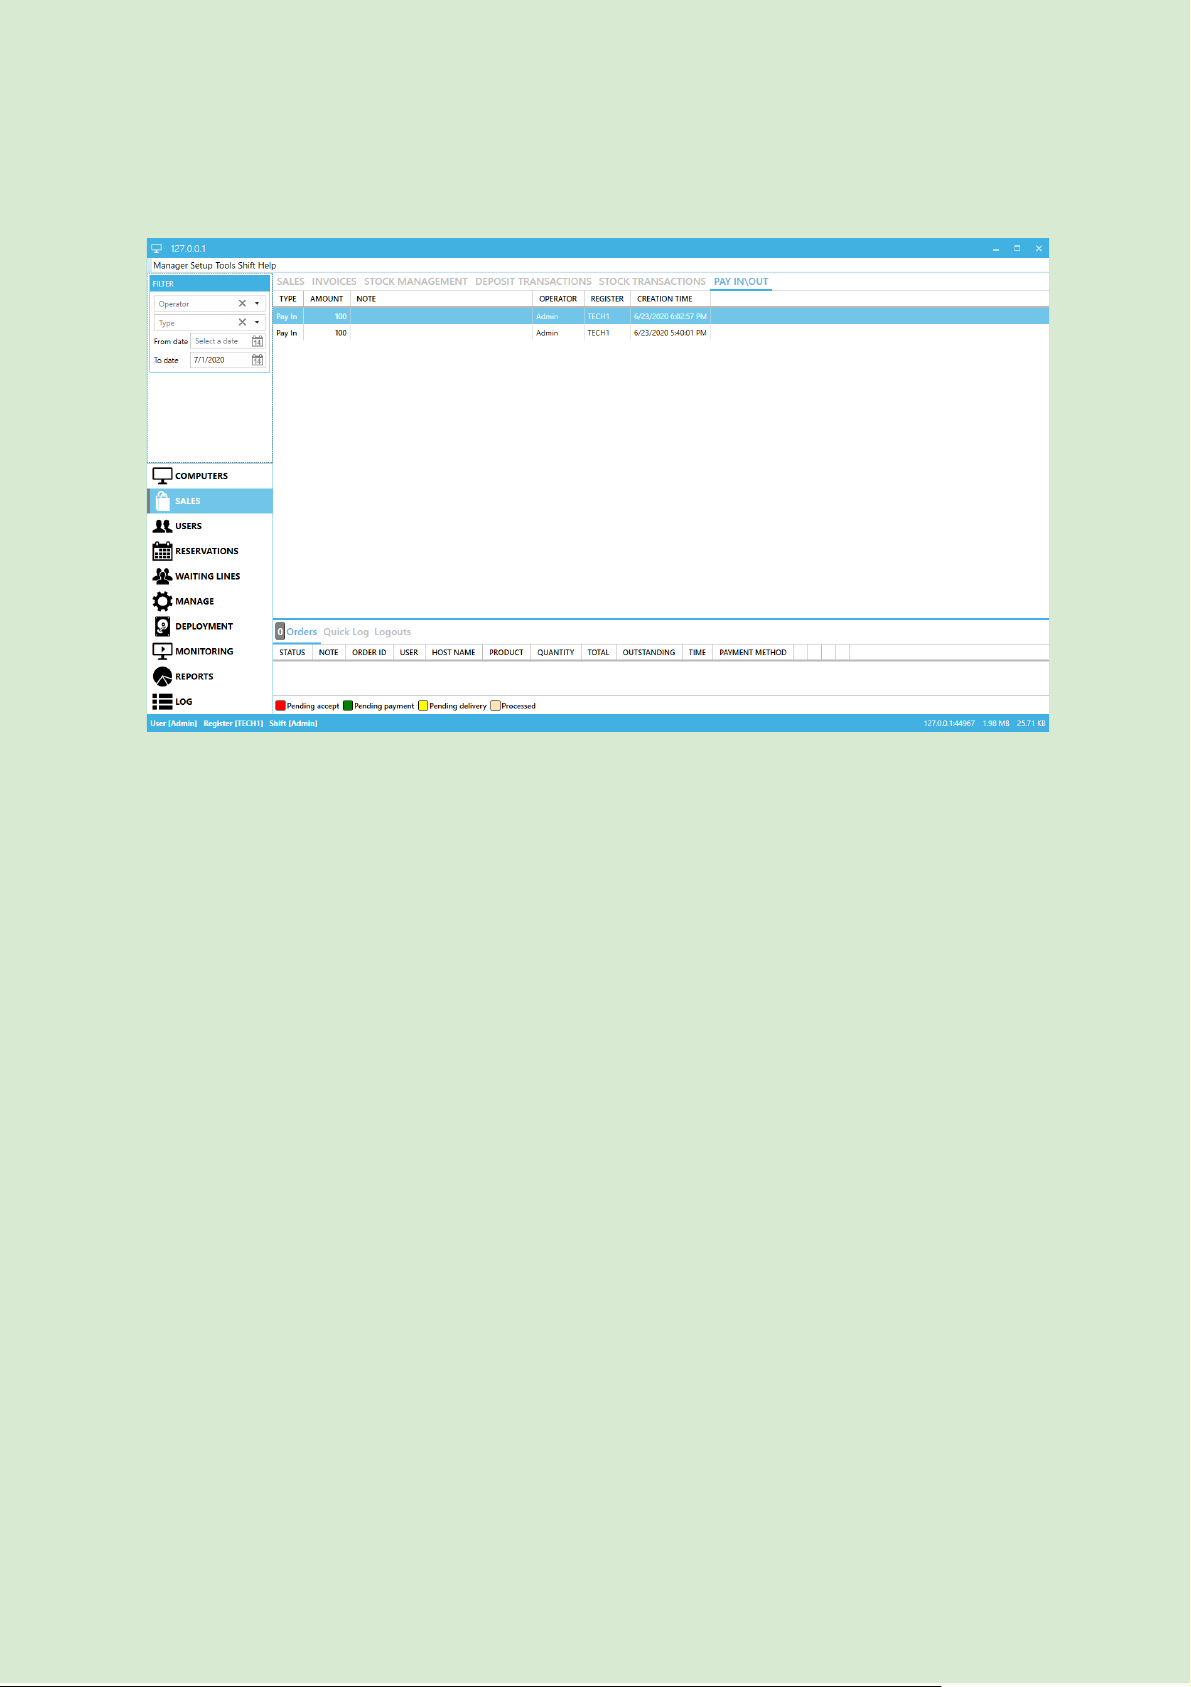
Pay In-Out
Pay in-out Tab lists any pay in and out transactions that match filter criteria.
Columns
➢ Type Type of transaction
➢ Amount transaction amount
➢ Note Transaction notes
➢ Operator Employee responsible for transaction
➢ Register Register where transaction was made
➢ Creation Date Date and time of transaction
Filters
● "Operator" filters based on employee orders
● "Type" filters based on event type
● From" - "To" filters order creation date
30

Gizmo manual v2
Users Module
User Module is used for:
● Creating/removing users
● Manually logging in and out users to/from hosts
● Depositing/withdrawing money from account, closing user balance, viewing user
product sales
● Viewing/editing user information
Columns
➢ Account state (icon) Account lock status
➢ Username Account Username
➢ Usergroup User’s Usergroup
➢ Session User Session total time
➢ Host Host used by user
➢ Slot Host slot used by user
➢ Balance User Balance
➢ Time Time currently available for use
➢ Deposits Total deposits amount
➢ Points Loyalty points
➢ Usage Type of billing currently in use
➢ Session state (icon) User Session Status
➢ Allow credit (icon) Allow credit
➢ Asset checkout (icon) Asset checkout status
31

Gizmo manual v2
Right clicking on a user brings up the contextual menu with the following options.
32
Login
Manually login the user to a host
Logout
Log the user
Sell
Open The Sales Module with user preselected
Close Balance
Opens the Close Balance window and initiates “ Close Balance ”
Action.
Deposit
Deposits money to user account
Withdraw
Withdraw money from the user's account
Billing options
Temporarily allow/block use of offers/fixed time/deposits.
Option resets on logout
Allow Credit
Permit user to go into negative balance . Option resets on logout
Add
Create a new user
Edit
Open user's profile window
Delete
Delete selected user
Waiting lines
Add/remove user from waiting lines
Check out
Checkout an asset to the user
Check in
Checkin an asset
Ban
Block login of user for specified duration

Gizmo manual v2
User Profile
To open a user’s Profile Window, double click the username
User Profile window displays the user’s status including Balance, total time and points. Use
“ Actions ” Menu for additional actions:
Actions
➢ Sell Opens the sales window.
➢ Deposit Deposits money to user account
➢ Withdraw Withdraws money from user account
➢ Close Balance Opens the Close Balance window and initiates “ Close
Balance ” Action.
➢ Ban Disables the account completely
➢ Reset Password Asks user for new password at next self login
➢ Reset personal info Asks user to fill in personal details at next self login
➢ Set picture Assigns user an image from file or webcam
➢ Assign RFID Tag Assigns user an RFID tag for POS use
➢ Unassign RFID Tag Unassigns registered RFID tag
33

Gizmo manual v2
User Profile Tabs
34
Purchases
View all purchases grouped by invoice
Time Products
View purchased time products/fixed time. Use top buttons to filter
Sessions
View User Sessions
Deposits
View deposit changes. Use top buttons to filter
Profile
View/edit customer info
Assets
Currently leased Assets and asset lease history
Notes
Operator notes
Stats
User overall stats

Gizmo manual v2
Purchases
Actions
➢ Void Void invoice with option to refund
➢ Pay Pay unpaid invoice, partially or in full
Columns
➢ Total Total invoice amount
➢ Points Total Points total deducted
➢ Outstanding Outstanding invoice amount
➢ Invoice Invoice Status
➢ Operator Employee who handled order
➢ Creation Time Date and time of transaction
➢ Void Time Date and time of transaction void
Note : Purchases Tab only displays the last 100 purchases
35

Gizmo manual v2
Time Products
Actions
➢ Trash Can (icon) Delete time product (Does not void transaction)
Columns
➢ Type (icon) Type of time product (time offer or fixed time)
➢ Name Time product Name
➢ Time left Unused time in minutes
➢ Purchased Date and time of purchase
➢ Paid Date and time of payoff
➢ Expires Time product expiration date (if any)
➢ Expires at logout (icon) Indicates if product expires at logout
Filters
● "Active" filters valid products
● "Depleted" filters products that have been completely used up
● "Deleted" filters products that have been deleted by an Operator
● "Expired" filters products that have expired
● "Voided" filters products from voided invoices
36

Gizmo manual v2
Sessions
Columns
➢ Name Host Name used for session
➢ Start Time Session start date & time
➢ End Time Session end date & time
➢ Duration Session duration
➢ Charge Total billing rate charges
➢ Prepaid Time used from offers and/or prepaid time
➢ New Indicates new Sessions
37

Gizmo manual v2
Deposits
Columns
➢ Type Transaction kind
➢ Amount Transaction amount
➢ Balance Deposits after transaction
➢ Operator Employee who executed action
➢ Creation Time Date and time of transaction
Filters
● "Withdraw" filters specific user orders
● "Deposit" filters based on employee orders
● "Charge" filters based on event type
● “Credit” filters
Note : Deposits Tab only displays the last 100 transactions
38

Gizmo manual v2
Profile
User profile containing user details such as first/last name and phone numbers.
39

Gizmo manual v2
Assets
Manage assets checked out by the user
Columns
➢ Name Name of checked out Asset Type
➢ Checked out by Employee responsible for check-out
➢ Check out time Date/Time of asset check-out
➢ Checked in by Employee responsible for check-in
➢ Check in time Date/Time of asset check-in
Click the button next to an asset to check it in
Click “Asset Check out” button to check out an assets
Click “Check in All” button to check all assets in
Checked in tab displays all assets that have been checked out in the past
40

Gizmo manual v2
Notes
You can add notes to a customer for future reference.
Notes are marked red/green/blue based on note severity.
Red notes will popup every time the customer’s profile is opened.
41

Gizmo manual v2
Stats
Stats show the user’s metrics since registration
42

Gizmo manual v2
Reservations
Reservations Module is used for reserving one or more hosts for the specified duration.
During the reservation period, only reserved users can manually login to the reserved hosts.
Use right click to:
Add a new reservation
Edit an existing reservation
Delete an existing reservation
43

Gizmo manual v2
Reservation Details
44
User
Username of the customer making reservation
Date
Date and time of reservation start
Duration
Duration of reservation
End Date
Date and time of reservation end
Contact phone
Customer’s contact phone
Contact email
Customer’s contact email
Notes
Reservation notes area
Login Pin
PIN used by customer to login to reserved hosts
PIN allows login to host with any account
Additional Users
Customer usernames allowed to login to reserved hosts
Hosts
Reserved hosts

Gizmo manual v2
Waiting Lines
Waiting Line Module is used for:
● Adding and removing users from waiting lines
● Rearranging users in waiting lines
● Manually logging users to available pcs
Each host group has an independent waiting line.
A user can participate in one or more waiting lines at the same time.
Waiting line options are configured in Profiles & groups - Waiting lines
Use right click to:
Reorder users in a waiting line
Remove a user from a waiting line or from all waiting lines
Manually login a user to a specific host
45
Position
User position in waiting line
Username
Customer username
User group
Customer usergroup
Host group
Host group waiting line
Time in waiting line
Time elapsed since user addition to waiting line

Gizmo manual v2
46
Estimated time
Estimated time until host becomes available
Estimated host
Name of estimated host
Login
Login button to manually login user to available host

Gizmo manual v2
Manage Module
Management Module is used for:
● Monitoring host processes
● Managing and transferring files to hosts
● Executing custom processes and scripts to hosts
Switch between Management functions using the Tabs below the host list.
Management functions
Columns
➢ Host state (icon) Host status
➢ Number Host number
➢ Name Host Gizmo name
➢ Hostname Windows Hostname
➢ IP Address Network IP address
➢ Mac Address NIC mac address
➢ Version Gizmo client version
➢ Group Host Group
47
Processes
Client Process Management Tab
Files
Dual-Tab Server-Client File Management Tab
Tasks
Manual process/script Execution Tab

Gizmo manual v2
Processes
● The Processes Pane lists all processes running on the selected Gizmo client.
● Search using the " Filter " box, and modify refresh speed from the drop-down menu.
● Right clicking on a process brings up a contextual menu with the following options.
Keyboard shortcuts
48
Terminate
Ends the selected process
Terminate Tree
Ends the selected process as well as any other processes created by this
process.
Add As Task
Adds selected process as Task that can be launched from the Task Pane .
Properties
Displays the properties of the process
DEL
Ends process
CTRL+DEL
Ends process tree
F5
Refreshes process list

Gizmo manual v2
Files
The File Management Pane displays local (left) and remote (right) file systems. It is a file
manager that enables you to easily manage files/folders between Gizmo Server and clients.
● To move one folder up, click ↑ on the corresponding panel.
● To select a drive, use the "Drive list" menu.
● To refresh the current panel view, click 🔃 next to the folder path.
Right click on a file/folder to display the contextual menu with the following options.
49
Shell Execute
Launches selected file/folder on the corresponding PC
Refresh
Refreshes current view
New
Creates a new folder
Copy
Copies selected files/folders to the other host.
Rename
Renames selected file/folder
Delete
Deletes selected files/folders
Properties
Displays selected file/folder properties

Gizmo manual v2
Keyboard shortcuts
50
ENTER
Navigate folder
DEL
Delete
CTRL+C
Copy
CTRL+N
Create New Folder
BACKSPACE
Up one level
F2
Rename
F5
Refresh
ALT+ENTER
Folder/file Properties

Gizmo manual v2
Tasks
Task Pane enables the user to execute a wide range of tasks on the selected Gizmo clients.
● To create a temporary task, click ➕ and select task type.
● Load an existing task by selecting it from the task list.
● Execute a loaded task by selecting target computers with standard windows selection
methods (ctrl+a, ctrl+click, shift+click) and clicking "Execute" button.
Tip : Manage tasks in Tasks setup
51

Gizmo manual v2
Deployment Module
The Deployment Tab is a powerful tool that helps you deploy files from Manager to clients
fast, easy and error-free. It can also be used to sync/update game files previously deployed.
You can select to deploy a preconfigured deployment profile, or enter information manually
for a one time deployment.
To deploy a pre-existing deployment profile, select the Application. If the deployment profile
is not associated with any applications, it will appear under "Unassigned Deployment
profiles". Next, select the executable the deployment profile is associated with. Finally select
the actual deployment profile.
Check the boxes next to target computers and click " Compare " to start the process.
Gizmo will check and compare source files with any existing files on each Gizmo Client, and
determine the files that need to be copied to each client. During the check (which varies
depending on the files' number & size) you can click cancel to abort. When the comparison
completes, the number of different files and folders, as well as the total size of the
different/missing files is reported for each client.
At this stage you can either click " Deploy " to initiate the file copy, or " Reset " to reset the
procedure and start from the beginning.
52

Gizmo manual v2
To perform a one-time deploy, instead of selecting a profile from the list, input source
(relevant to Gizmo manager) and destination folder manually. You may also use the "folder"
button to locate the source folder. Add any file/subfolder exclusions, using the "exclusions"
button.
Advanced menu adds a number of settings you can tweak to affect file comparison and
deployment.
Comparison option: These options affect the way Gizmo Server determines stale files on
clients More info
53

Gizmo manual v2
Monitoring Module
Monitoring tab displays screenshots of client screens. You can select which client computers
to monitor, as well as change quality & refresh rate.
Action
Options
Each client monitor panel has a button and a switch
54
Monitor
Enables automatic screenshot refresh for selected hosts
Refresh all
Manually refreshes screenshots of all hosts
Size
Change size of screenshot windows
Quality
Change quality of screenshots
Refresh Rate
Adjusts refresh rate of screenshots
Hide unmonitored
Hide all client computers currently inactive (disconnected)
Monitored on top
Sorts screenshot windows with active first
Hide numbers
Hides screenshot window number watermark
💾
Save current screenshot to file
On/off Switch
Starts/stops screenshot refresh

Gizmo manual v2
Reports Module
Summary
Summary report presents an overview of financial data for the selected time period.
The summary is broken down into 2 different reports: SALES report (on the left) and
PROCEEDS report (on the right).
Sales Report
Sales report displays data regarding all sales made during the selected period. It includes
fully paid, partially paid and unpaid invoices. It does not include deposits or withdrawals.
Overview
Invoices Number of issued invoices
Sales Total value of issued invoices
Cost Cost of sold items (based on product cost)
Voids Number of voided invoices
Voids Total Total value of voided invoices
TAX Total VAT of issued invoices
Revenue Sales minus cost, voids and tax
55

Gizmo manual v2
Sales breakdown
By Payment Status Paid & unpaid subtotals
By Payment Method Cash, credit etc (only for Paid amount)
By Operator Broken down by Employee
Voids breakdown
By Operator Broken down by Employee
Proceeds Report
Proceeds report displays data regarding payments and withdrawals only. It can give you an
accurate image of the registers.
Overview
Proceeds Total sum of payments received
Withdrawals Total sum of withdrawals
Total Proceeds minus withdrawals
Proceeds breakdown
By Invoice Issue Period Broken down by date/time of invoice
By Payment Method Cash, credit etc
By Category Broken down by payment reason
By Operator Broken down by Employee
Withdrawals breakdown
By Operator Broken down by Employee
Refunds breakdown
By Operator Broken down by Employee
By refund method Cash or credit to deposits
Total breakdown
By Operator Broken down by Employee
56

Gizmo manual v2
Applications
The Application Report Tab displays Application & Executable statistics based on filter
parameters.
Filters
● Title Application title
● Direction Top or bottom results
● Maximum results Number of maximum results
● Simple/Advance Hide/show executable statistics
57

Gizmo manual v2
Shifts
Shift reports display all active and ended shift for the time period selected.
Each shift row can be expanded to display the following information
Payment type Method of payment (cash, credit etc)
Start cash Shift starting amount
Sales Total received for sales
Deposits Total received for deposits
Withdrawals Total handed out for withdrawals
Expected End total expected
Actual End total counted by operator at end of shift
Difference Difference between expected and actual totals
58

Gizmo manual v2
Sales
Sales report display products and time offers invoiced on the selected period. It also displays
time invoiced from user sessions (session time) as well as time offers that were deleted from
users
Product & time offers Product sales
Fixed time Fixed time sales
Session time Session time invoiced
Deleted time Time offers/fixed time that was deleted
59

Gizmo manual v2
Login Sessions
Login Sessions Reports display the user logins and logouts.
You can filter the results
Filters
● Host Computer or host user logged in
● Operator The operator that logged the user
● User The user that logged in
60

Gizmo manual v2
Web Reports
Web reports is a suite of new reports. Click on “ Open in browser ” to view the extra reports.
To enable web reports, consult this article .
61

Gizmo manual v2
Log Module
System log displays all informational messages regarding module communication, alerts and
errors. You can filter the log to display only specific types of messages.
Filter
Filter Type
62
Message Filter
Free text filter
Date
Date and time of message creation
Results
Select max number of results displayed
Current log message
Displays detailed information regarding the currently selected
message. Copy message contents to clipboard by right clicking on
the message on the log list.
Filter
Check Log message categories displayed

Gizmo manual v2
Setup
News & Feeds
The News & Feeds Drawer hosts the news articles displayed on the homepage of Gizmo
client.You can specify the News title, content, Hyperlink, as well as the time period the News
Article will appear. HTML formatted news tutorial
● Create an article by clicking ➕ on the top left.
● Delete an article by selecting it from the list and clicking ➖.
● Edit the article by selecting it and clicking ✎ , or by double clicking the Title.
News
Columns
➢ Title Title of article, displayed on top
➢ Start Date Date to display article
➢ End Date Date to stop displaying article
➢ URL Link to article
➢ Media URL Image link or youtube video link
Feeds
Columns
➢ Title Title of article, displayed on top
➢ Maximum results Number of feed entries to display
➢ URL News RSS link
63

Gizmo manual v2
Configure
General
Subscription
View/Modify Gizmo license credentials.
Subscription Settings
To create a trial account, visit www.gizmopowered.net
64
Username
Account name selected during registration
Password
Password entered during registration

Gizmo manual v2
Variables
● To add a variable, click ➕ and select variable type from the drop-down menu.
● To rearrange the variable order, use the ↑ and ↓ buttons.
● To edit a variable, select it from the list and click ✎ .
● To permanently delete a variable, select it from the list and click the ➖ button.
To understand what variables are, read Environment variables
Gizmo comes with built-in environment variables that you cannot modify or delete. You can
use them right away without any previous action.
65

Gizmo manual v2
Built-in Variables
66
Variable Name
Resolves to
%HOST_NUMBER%
Host Gizmo Number
%HOST_NAME%
Host Gizmo Name
%CUR_HOST_GROUP_NAME%
Host Group Name
%CUR_HOST_GROUP_ID%
Host Group ID
%CUR_USER%
Currently login user’s Username
%CUR_USER_ID%
Account's ID
%CUR_USER_STATE%
Currently login user's Account State
%CUR_USER_TYPE%
Currently login user's Account Type
%CUR_USER_GROUP%
Currently login user's User Group
%CUR_APP_PROFILE%
Currently active Application Group
%CUR_SEC_PROFILE%
Currently active Security Profile
%USERMINUTESLEFT%
Minutes until user logout
%CUR_WORKING_DIRECTORY%
Working directory of Gizmo Client executable
%ENTRYTITLE%
Application's title text
%ENTRYPUBLISHER%
Application's publisher selected in the Application
Main Settings .
%ENTRYDEVELOPER%
Same as above but for application's developer
%CUR_EXE_PATH%
Executable path
%CUR_EXE_ARGUMENTS%
Executable arguments
%CUR_EXE_WORKING_DIRECTORY%
Executable working directory
%ENTRYSOURCE%
Same as above but for the text entered in the
Source field in the Default Deployment Profile
%ENTRYDESTINATION%
Same as above but for the text entered in the
Destination field in the Default Deployment
Profile
%LICENSE%
License Key currently assigned. (Only for tasks
after License Management)
%LICENSEKEYUSER%
Username of currently assigned License Key .

Gizmo manual v2
67
(Only for tasks after License Management & LM
profiles of the Username/Password Type)
%LICENSEKEYUSERID%
User ID of currently assigned License Key . (Only
for tasks after License Management & LM
profiles of the Username/Password/ID Type)
%DEVICEID%
Number entered in the Device ID field in the
Virtual CD Image Options of the application.
%CDIMAGE%
Text entered in the Virtual Image Path field in the
Virtual CD Image Options of the application.

Gizmo manual v2
Attributes
Attributes are custom properties that can be used exclusively with the Web API provided by
Gizmo. This means that any attribute configured can only be used if you are creating your
own application that interacts with Gizmo service.
● To add an attribute, click ➕ and select variable type from the drop-down menu.
● To edit an attribute, click on it.
● To permanently delete an attribute, select it from the list and click the ➖ button.
68

Gizmo manual v2
Plugins
Plugins are modules that add new features to Gizmo. For example, a plugin that enables
Gizmo to communicate with your web server, displaying Game statistics of your business.
● To install a new plugin, copy the plugin inside the plugins folder of the Gizmo
service’s installation directory. Restart service for plugin to load.
● You can enable/disable a plugin without removing it from the list by
checking/unchecking the " Enable " checkbox
Depending on the type of the plugin, select which Gizmo modules will load it. By selecting
Global, all three modules will load the plugin.
When adding a new plugin make sure to load it on all required Gizmo modules.
69

Gizmo manual v2
WEB
Enable web portal to activate API and web reports.
Enable SMTP functionality:
1. to enable the emailing of Gizmo reports
2. to verify customer’s e-mail during self registration
Enable SMS functionality to verify customer’s phone number during customer’s self signup
Web Settings
70
Enable web portal
Enables the built in HTTP and API service. Required for WEB
reports & API use
Port Number
Network Port used by web portal
Enable SSL
Enables the SSL certificate for the web portal
SSL Port
SSL Port used by web portal
PFX Path
PFX Password

Gizmo manual v2
SMTP Settings
To use a gmail account for sending e-mails from gizmo, follow these instructions: Google -
Send email from a printer, scanner, or app
SMS Gateway
71
Enable SMTP
Enable E-mail functionality
SMTP Host
Mail server Hostname/IP used for sending e-mails from Gizmo
SMTP Port
Mail server Port
Enable SSL/TLS
Enable SSL/TLS encryption
Username
Mail account username
Password
Mail account password
SMTP Authentication
Use stored credentials for authenticating with SMTP server
Enable SMS Gateway
Enable SMS sending functionality
Provider
SMS provider
Gateway URL
Url string with SMS provider settings

Gizmo manual v2
Business
Business Settings
● Business name is used in SMS account validation
● “Start of business week” and “Business day start” is used in report preset filters in
(Daily, weekly, monthly etc)
● Business day end is used to calculate host usage % in reports
Report Emailing
Example: 8AM daily & weekly - An email will be sent daily at 8AM. The report start will be
that of the previous day at 8AM and the end +24Hours.
72
Business name
Company name
Start of Business week
First day of the week
Business day start
Venue opening time
Business day end
Venue closing time
Name
Name of report set
Time
Report start & end time as well as report emailing time
Recurrence
Frequency of report sending
Enable
Enable / disable report set

Gizmo manual v2
Furthermore, an email will be sent on the 1st day of each week at 8AM. The report period
will be that of the previous week’s first day (8AM) till the first day of the current week (8AM)
Report Set
73
Name
Name of report set
Reports
Report type and subtype to email
Recipients
E-mail addresses to mail reports to
Enable
Enable / disable recipient

Gizmo manual v2
Reservations
Global Settings for “Reservation” feature
74
Block user login
If configured, the host will not allow logins from any customer
other than the one that has made the reservation
Unblock user login
If configured, the host will allow logins from any customer after
the specified time

Gizmo manual v2
Server
Network
Network Interface Settings
Multicast Settings
Options
75
Network Interfaces
LAN card Gizmo uses to communicate with clients
Bind address
Network address Gizmo uses. Input preferred server IP address.
Use 0.0.0.0 for communication through all available IPs.
Bind port
Network port that server listens for clients
Manager
Network Port that server listens for managers
Multicast IP Address
Multicast IP address Gizmo uses to broadcast multicast messages
Multicast Port
Multicast port on which multicast messages are received
Multicast Time to Live
Time to Live of the Multicast packets
Registered Only
If checked, registered-only clients are able to connect to the Gizmo
Server. Any new client will be dropped.
Leave unchecked to auto register new clients.
Restore Hostnames
Restores computer Hostnames to those configured in Hosts .
Used in diskless configurations
Enable Client
Autodiscovery
Advertises Gismo service on network for client automatic
connection

Gizmo manual v2
Database
Gizmo stores all information in an SQL Database. You must have an up and running SQL
installation. Gizmo currently supports only MSSQL databases.
Tip : To modify database & connection parameters, launch Service configuration tool .
76
Database Type
Displays connected MS SQL Server type
Connection String
Displays connection string

Gizmo manual v2
Backup
77
Backup folder
Folder Gizmo stores Database backup files. Default path:
C:\Program Files (x86)\NETProjects\Gizmo Service\Data\Backup\
Maximum backup
files to keep
Number of backup files to keep. Gizmo will automatically delete older
backups when creating new ones.
Recurrence
Daily backup time. If the server is not running at that time, the backup
will happen on server startup.

Gizmo manual v2
File System
* Default Personal user Files are PUF files deployed to new customers as seed.
If a customer does not yet have a save file for a particular application, gizmo will deploy the
default PUF instead. This allows you to initially seed game settings while allowing the
customer to retain their personal settings at logout.
78
User storage path
Folder Gizmo stores users' files (PUF) & Personal Drive . Default path
C:\Program Files (x86)\NETProjects\Gizmo Service\DefaultUserFiles\
Defaults path
Folder for Default Personal User files * . Default path
C:\Program Files (x86)\NETProjects\Gizmo Service\DefaultUserFiles\

Gizmo manual v2
Misc
General Settings
79
Terminate Pending
Sessions
Terminate user sessions that have lost connection with the
server and are in a pending state
Force user balance
reprocess
Recalculates all users’ time balances every minute. Warning!
May impact the system’s response time and CPU usage
Automatically update
client module
If checked, client modules will auto update if there is a newer
version on Server. Recommended
Automatically downgrade
client module
If checked, client modules will auto downgrade if there is a
newer version on Server. NOT recommended

Gizmo manual v2
Auto Invoicing
Auto invoicing gives you the option to automatically invoice any uninvoiced time (session
time) and (optionally) pay (partially or fully) the generated invoice using user deposits
Auto invoicing session time is crucial for the following reasons:
● Any uninvoiced time from deposits or allow credit is invoiced
● The billing cycle is reset. Next login incurs a startup fee and bill from 1st minute.
● Time offers with “expire on logout” enabled expire
● Guest accounts with sufficient deposits are autoclosed
80
User Type
Type of user (member or client)
Auto invoice
Auto close session and create invoice
After Minutes
Time after logout to auto invoice
Auto Pay From Deposits
Pay auto-created invoice with deposits

Gizmo manual v2
Client
Shell
Shell Settings
Shell Security Settings
General Settings
Notifications
81
Skin Name
Select default skin for Clients. Default skin can be overridden in
host group settings
Disable start menu
Disables windows start menu functionality
Sticky shell
Removes gizmo from taskbar
Disable desktop
switching
Disables multiple desktops keyboard shortcut in Windows 10
(Windows Key + Ctrl + D)
Client Language
Select interface language for Clients. Contact us if you would
like to help translate Gizmo to your Language
Logout Action
Action to perform on user logout
User Time Notification
message
Message to display on client when user time is running out.
Use “ {0} ” without quotes for minutes left
Visual/Audible/Minimize
Select notification method on client for time left message.

Gizmo manual v2
Client Settings
File System Mappings
File system mappings refer to the various types of drives and folders that Gizmo Server
supports.
● To add a mapping, click ➕ and select variable type from the drop-down menu.
● To edit a mapping, select it from the list and click ✎ .
● To permanently delete a variable, select it from the list and click the ➖ button.
For more information regarding different Mapping types, read File System Mappings
User File Storage / Personal Drive
User file storage is a Gizmo feature with which you can provide to select User groups a
virtual hard disk to save personal files. It does not require sharing any folders on the server
and does not require a Server OS. The files are stored directly to the folder on the server.
User file storage is NOT required for the use of the Personal User File functionality.
82
Drive Letter
Select default Gizmo skin for Clients
Storage Size
Check icons to appear on the desktop
Redirect folders
If checked, Gizmo client redirects local special folders to
corresponding folders created on Gizmo Server.
Enable Personal Storage
If checked, Gizmo creates and maps a virtual drive for each user
located on Gizmo Server.

Gizmo manual v2
Virtual CD Mounter Settings
Gizmo supports a number of Virtual CD Image software. These software are used to mount
virtual copies of cd images on the clients in order for other programs to work correctly. This
eliminates the need of distribution of physical disks to the clients.
Gizmo supports Daemon Tools Lite, Daemon Tools Pro, Farstone Virtual Drive, Alcohol
120% and Alcohol 52%.
First select the Virtual CD software you use from the drop-down menu. Gizmo auto-fills the
field with the default settings for the selected software. If you have installed the software to a
different location, edit the Virtual Image Mounter Path field to reflect the correct path. You
can modify the parameters used in mounting the images by editing the Virtual Image
Mounter Options field.
You can use any other Virtual CD Image software as long as it supports command line
execution. Gizmo sets the following variables only during image mounting.
Free Space Allocation
Before Gizmo starts copying a deployment profile on the client, it checks for available disk
space on the target partition. If the free space is not enough, and the "Allocate Free Space"
is enabled, Gizmo will attempt to make additional space by deleting older deployment
profiles.
Deletion is based on global application usage statistics (kept by Gizmo).
Furthermore, if "Always keep %..." is enabled, Gizmo will attempt to free extra disk space
equal to the % selected. This option ensures that there is always free space on the partition
for normal operation.
Power Saving
83
%DEVICEID%
Resolves to the number entered in the Device ID field in the Virtual CD
Image Options of the application.
%CDIMAGE%
Resolves to the text entered in the Virtual Image Path field in the
Virtual CD Image Options of the application.
Turn off / sleep idle
computers
Shuts down or suspends unused computers after predefined
minutes

Gizmo manual v2
Tasks
Client Tasks
Client tasks are tasks executed at specific times. Gizmo supports process execution, various
scripting languages (Batch, vb, autoit), registry import, notifications and folder junctions.
Tasks can be configured to run on client startup and shutdown, user login and logout.
Task List
● To create a new task, click ➕ and select task type from the drop-down menu.
● To permanently delete a task, select it from the list and click ➖.
● To modify a task, select it from the list and click ✎
Task Execution Groups
● To add a task to a task execution group, select it on top and click ➕ on the
corresponding group
● To remove a task from a group, select it in the task group and click ➖.
● To modify the task execution order in a group, use the ↑ and ↓ buttons.
● To temporarily disable a task, uncheck the box next to it.
84

Gizmo manual v2
Misc
Misc Settings
85
Client Data Path
Path where Gizmo client stores internal application data.
Manager Password
Password for disabling the client (Default: password )
(Ctrl + Alt + Shift + `) or (Ctrl + Alt + Shift + ñ)
Enable Age Rating
If enabled, users cannot launch applications with an Age Rating
higher than their age.
Limit launch of
multiple applications
Does not allow customer to launch more than one application at
a time. Enable “ignore execution limit” to bypass restriction.
Enable client ordering
If enabled, users can order products and time offers directly
from Client PC
Enable client user
registration
If enabled, new customers can create accounts from the client
PC interface
Enable web user
registration
If enabled, new customers can create accounts from Gizmo
Website running on your Gizmo Web Service
http://”serverIP”/MemberRegistration

Gizmo manual v2
86
Unlock Client interface - keyboard shortcut
Ctrl + Alt + Shift + a or Ctrl + Alt + Shift + ` or Ctrl + Alt + Shift + ñ

Gizmo manual v2
Financial
Products
● To create a Product, click ➕ and choose product type from the drop-down menu.
● To delete Product(s), check the box next to it and click ”Delete”
● To undelete Product(s), check the box next to it and click ”Undelete”.
● To move Product(s) to a different Product Group , check the box next to them, click
“Move” and finally select the new product group
● To edit a Product, double click the Product’s name.
Products are never completely deleted. They are marked “Deleted” and hidden in the Sale
Tab.
Columns
➢ Product type (icon) Icon
➢ Name Product Name
➢ Product Group Product Group assigned
➢ Price Purchase price
➢ Points Purchase points
87

Gizmo manual v2
General
Global Properties
Time Offer specific Properties
88
Name
Product/Time Offer/Bundle Name
Image
Image of product for the client interface
Description
Description of Product/Time Offer/Bundle
Image
Product image displayed on client Shop
Price
Sell price and/or loyalty points required, including VAT
Cost
Purchase cost for business
Award
Loyalty points awarded on sale with money.
Barcode
Scanner Barcode
Product Group
Product Group assigned
Delete
Indicates when deleted
Tax
Tax(es) on Product/Time Offer/Bundle. Topmost enabled Tax is
preselected at sale. Taxes are included in Price.
Minutes
Time in minutes contained in offer
App Group
Application group applied to host when Time offer is used

Gizmo manual v2
Bundle specific Properties
Pricing
Global Properties
Bundle specific Properties
Restrictions
Global Properties
89
Bundle
Products and/or Time Offers sold as Bundle
Usergroup
Modify sell price and/or loyalty points per user group, including VAT
Product
Modify sell price and per user group, including VAT
User group
Disable sale to specific User Groups

Gizmo manual v2
Time Offer specific Properties
Availability
Global Properties
Time Offer specific Properties
90
Host group
Disable use in specific Host Groups
Purchase time range
Allow sale only during specified hours of the day
Purchase date range
Allow sale only after and/or before specified date
Use time range
Limit use to specified hours of the day
Use date range
Allow use after and/or before specified date
Expires after
Disable offer after a specific period of time has passed
At day time
Disable offer after specific time of day
At logout
Disable at the time the user session is closed ( manually or
automatically )

Gizmo manual v2
Order
Global Properties
91
Disallow client order
Disallow customer to order product from PC
Restrict non-customer order
Disallow guests to order product from PC
Disallow sale
Disable sale of item as standalone. Product can be sold
only as part of a bundle
Host group
Hide product in Client Ordering for specific Host Groups

Gizmo manual v2
Stock
Global Properties
“Target different” is used when two or more products share the same stock. Target different
number is the ratio between the two products’ stock. When selling, the Target Different
number is multiplied with the item count and the result is deducted from the Target’s stock.
Bundle Properties
92
Enable stock control
Activate stock monitoring
Disallow sale out of stock
Deny sale when item out of stock
Enable stock alert
Notify Operator when alert level is reached
Target different
Correlate stock level with another product’s stock
Self Stock
Bundle’s stock is recorded separately and is not affected
by the bundle’s products’ stock

Gizmo manual v2
Payment Methods
Payment methods are extra types of payments that you accept
You can add your own payment methods and select whether or not they can be used from
the Manager and/or Client
All custom payment methods count as money. You cannot define custom payment methods
for Points
● To create a Payment method, click ➕.
● To delete a Payment method, select it from the list and click ➖. (Only for not saved)
● To rename a Payment method, click on the method’s name
● To reorder Payment methods, use the ↑ and ↓ buttons
Payment Method ordering is for rearranges payment methods in the POS Manager interface
93

Gizmo manual v2
Assets
Assets are store items that you lend to your customers for the duration of their visit. The
purpose of asset tracking is to individually monitor each item in order to record any damage
done during use.
Each asset type is a group of the same items you lend.
● To create an Asset Type, click ➕.
● To delete an Asset Type and all assets contained, select it from the list and click ➖.
● To edit an Asset Type, select it from the list and click ✎
94

Gizmo manual v2
Priority
Priority defines the order in which time offers are consumed by customer. An offer higher in
the list will have a higher priority over the offers below it. Notice that priority does not affect
any time offer restriction.
95

Gizmo manual v2
Product Groups
Product groups are used to organise products into categories. Product groups appear in the
Manager’s Sales Module as well as the Client’s Shop Module
● To create a new group, click ➕
● To delete a group, select it from the list and click ➖
● To reorder Product groups, use the ↑ and ↓ buttons
● To rename a group, click on the group’s name
● To change product display order inside a Product group, use the drop-down menu.
Manual sorting allows you to rearrange the products of the group by hand
Columns
➢ Name Product Name
➢ Sort type Sorting method used in Sales Modules
96

Gizmo manual v2
Registers
Registers are used to manage the POS terminals. They are automatically added and
configured upon first successful login. Registers are identified by the hardware MAC
address. Each register is given an ID and a friendly name. You can modify the name, as well
as the starting cash of every shift.
Columns
➢ ID Unique Identification No.
➢ Name Friendly Name
➢ MAC Address Network interface MAC
➢ Start Cash Preset start cash for shifts
➢ Idle Timout (not implemented) Time of inactivity (minutes) for Manager logout
* Register using loopback interface to connect to Gizmo service will always report
00:00:00:00:00:00 as the MAC address.
97

Gizmo manual v2
Tax
Enter tax percentages used in Product sales. Tax percentages are configured per Product in
the Product’s main window
● To create a new tax percent, click ➕
● To permanently delete a tax percent, select it from the list and click ➖.
● To edit a tax percent click on the tax percent name or value.
● To reorder tax percentages, use the ↑ and ↓ buttons.
98

Gizmo manual v2
Time Sale Tax: Tax used when selling fixed time
99

Gizmo manual v2
Monetary Units (not implemented yet)
Enter all currency unit denominations. Denominations are used in calculating cashier drawer
total at the end of shifts.
● To create a new denomination, click ➕
● To permanently delete a denomination, select it from the list and click ➖.
● To edit a denomination click on the denomination name or value.
● To reorder denominations, use the ↑ and ↓ buttons.
100
 Loading...