

Givi Misure MTS Installation Manuals
Manuale di Installazione
Riga Magnetica
M
M
T
T
S
S
Installation Manual
Magnetic Scale
www.givimisure.it

RIGA MAGNETICA MTS MAGNETIC SCALE MTS
MT01_A25_B_MTS_GIVI_ENGITA rev. I
Pag. 2/8
1
CONSIDERAZIONI PRELIMINARI
1
PRELIMINARY REMARKS
Prima di procedere all’installazione del prodotto, leggere attentamente le
note riportate di seguito.
Eseguire le connessioni in assenza di tensione di alimentazione
escludendo anche l’alimentazione di sicurezza (batterie) nelle
apparecchiature che la prevedono.
Nel corso delle lavorazioni rimuovere gli accumuli di trucioli, polveri, ecc.
che si oppongono al libero scorrimento delle parti mobili.
L’aggiunta di un carter (soprattutto per gli assi particolarmente esposti),
può costituire un valido riparo dalla caduta accidentale di attrezzi o
lavorati.
Before proceeding with the installation of the product, read carefully the
following instructions.
Make connections when power supply is switched off, and batteries
(when present) are excluded as well.
During machining, remove any accumulation of swarfs, dusts, etc. that
does not allow the free sliding of the movable parts.
The use of a protection cover is recommended to prevent any damage
from falling tools or material.
)
Assicurarsi che gli attrezzi utilizzati per il montaggio siano
rigorosamente smagnetizzati.
)
Verify that all the tools used for mounting are strictly
demagnetized.
2
RESISTENZA AD AGENTI CHIMICI
2
RESISTANCE TO CHEMICAL AGENTS
PRODOTTI POCO INFLUENTI
Acido formico, acido lattico, formaldeide 40%, glicerina 93 °C, esano,
iso-ottano, olio di lino, olio di semi di cotone, olio di semi di soia, olio
minerale.
PRODOTTI DI MEDIA INFLUENZA
Acetilene, acetone, acido acetico, acido oleico, acido stearico 70 °C,
acqua di mare, ammoniaca, benzina, etere isopropilico, petrolio, vapore.
PRODOTTI DI FORTE INFLUENZA
Acido nitrico, benzene, dimetilbenzene, furano tetraetile, nitrobenzene,
solvente per vernice, toluene, tetracloruro di carbonio, trementina,
trielina.
LOW-IMPACT AGENTS
Formic acid, lactic acid, formaldehyde 40%, glycerine 93
°
C, hexane,
iso-octane, linseed oil, cotton oil, soybean oil, mineral oil.
MEDIUM-IMPACT AGENTS
Acetylene, acetone, acetic acid, oleic acid, stearic acid 70
°
C, seawater,
ammonia, gasoline, ether isopropyl, petroleum, vapour.
STRONG-IMPACT AGENTS
Nitric acid, benzene, dimethylbenzene, tetraethyl furan, nitrobenzene,
solvent, toluene, carbon tetrachloride, turpentine, trichloroethylene.
)
Proteggere la banda da campi magnetici esterni. Il contatto
con calamite o altri magneti permanenti può danneggiare la
banda magnetica in modo irreparabile.
)
Protect the band from external magnetic fields. Contact with
any permanent magnet can irreparably damage the magnetic
band.
3
FISSAGGIO DELLA BANDA MAGNETICA MPx00
3
FIXING OF MAGNETIC BAND MPx00
)
Per garantire l’accuratezza del sistema, la banda magnetica 1
deve essere più lunga di circa 80 mm rispetto alla corsa utile
della macchina (40 mm per parte).
Durante il montaggio, posizionare la banda magnetica
centrandola opportunamente sulla corsa utile.
)
To guarantee the system accuracy, the magnetic band 1 has
to be 80 mm longer than the measuring length of the machine
(40 mm for each side).
During mounting, the magnetic band has to be adequately
centered on the measuring length.
La banda magnetica può essere applicata su qualsiasi superficie di
materiale non magnetizzato. Per una miglior protezione della banda
magnetica in presenza di trucioli, liquidi, polvere, ecc., è consigliabile
utilizzare il nastro di acciaio di protezione CV103
d, già provvisto di
biadesivo
e, oppure il supporto di protezione in alluminio SP202, che
mantiene in posizione la banda magnetica (si veda la figura nella pagina
seguente).
La temperatura ottimale di incollaggio è compresa tra 20 °C e 30 °C.
Si sconsiglia di eseguire l’incollaggio a temperature inferiori ai 10 °C.
Nel caso in cui la banda magnetica sia stata immagazzinata ad una
temperatura inferiore o superiore a quella della macchina, è preferibile
attendere alcune ore per la sua stabilizzazione. L’adesione delle parti
incollate si completa dopo almeno 48 ore.
Per l’incollaggio della banda magnetica, procedere come segue:
• Pulire accuratamente la superficie di fissaggio da qualsiasi traccia di
olio, grasso o sporcizia, utilizzando solventi la cui evaporazione non
lasci residui.
• Sollevare di alcuni centimetri il supporto di protezione del biadesivo
f
e posizionare opportunamente la banda magnetica, esercitando una
leggera pressione nella zona di adesione iniziale.
• Procedere nella stesura della banda magnetica rimuovendo
progressivamente il supporto di protezione del biadesivo ed
esercitando una pressione uniforme. Se possibile utilizzare un piccolo
rullo manuale.
• Procedere come sopra all’incollaggio del nastro di protezione in
acciaio sulla superficie della banda magnetica, dopo averla
accuratamente pulita.
• Utilizzare il tratto eccedente del nastro di protezione per il suo
fissaggio meccanico ed il suo collegamento alla terra, con viti TC
M3x8
g.
The magnetic band can be fixed on any kind of non-magnetic surface.
For a better protection of the magnetic band from shavings, liquids,
powder, etc., we recommend the use of the protective cover CV103
d,
already equipped with a double-sided adhesive tape
e, or of the
aluminium support SP202 which keeps the magnetic band in the proper
position (see the picture in the next page).
The best gluing temperature is between 20 °C and 30 °C. It is not
advisable to perform the operation at temperatures below 10 °C.
In case the magnetic band has been stocked at a lower or higher
temperature than the machine, it is advisable to wait some hours before
gluing it, to stabilize the magnetic band. The adhesion of glued parts is
completed after at least 48 hours.
To glue the magnetic band, proceed as follows:
• Clean carefully the fixing surface from oil, grease or any kind of dirt,
using trace-free solvents.
• Raise few centimeters of the adhesive protection
f and place the
magnetic band properly, exerting a light pressure on the initial
adhesive zone.
• Proceed with the magnetic band fixing, removing progressively the
adhesive protection and exerting a uniform pressure. If possible,
use a small manual roller.
• Proceed as above to glue the stainless steel cover tape on the
magnetic band, after having accurately cleaned the surface.
• Use the exceeding part of the protective cover tape for its
mechanical fixing and ground connection, by means of screws M3x8
g.
RIGA MAGNETICA MTS MAGNETIC SCALE MTS
MT01_A25_B_MTS_GIVI_ENGITA rev. I
Pag. 3/8
)
Non è possibile utilizzare il supporto SP202 se la banda
magnetica è protetta dal cover CV103.
)
It is not possible to use the SP202 support if the magnetic
band is already protected by the CV103 cover.
)
Sulla banda magnetica MP100 non è possibile applicare alcun
nastro protettivo.
)
It is not possible to apply any protective cover on the
magnetic band MP100.
4
FISSAGGIO DELLA BANDA MAGNETICA MPx00Z
4
FIXING OF MAGNETIC BAND MPx00Z
La banda magnetica MP200Z / MP500Z (con impulsi di zero in posizioni
a richiesta, solo per MTS MxxxZ / HxxxZ), deve essere fissata alla
macchina come le altre bande magnetiche seguendo le indicazioni
riportate nel paragrafo 3.
The magnetic band MP200Z / MP500Z (with zero references positioned
upon request, only for MTS MxxxZ / HxxxZ), must be fixed to the
machine as the other magnetic bands following the indications provided
in paragraph 3.
)
Per la definizione delle posizioni di zero, sensore e banda
magnetica sono da considerare orientati come nel disegno
seguente.
)
For the definition of the zero reference position, the sensor
and the magnetic band have to be considered oriented as in
the following drawing.
ORIENTAMENTO MP200Z / MP500Z – MP200Z / MP500Z ORIENTATION
5
MONTAGGIO DEL SENSORE MTS
5
MTS SENSOR MOUNTING
Procedere al fissaggio del sensore magnetico utilizzando i due fori
filettati M4. In alternativa, considerarli come fori passanti per viti TCEI
M3x18.
Il sensore può essere montato in qualsiasi posizione mantenendo il lato
attivo, indicato dalle frecce, verso la superficie della banda magnetica.
Una volta concluso il montaggio meccanico, compiere manualmente la
corsa totale per accertarsi che nulla si opponga al libero scorrimento
delle parti mobili.
Controllare il rispetto delle tolleranze di allineamento del sensore e la
sua distanza, rispetto alla banda magnetica, lungo tutta la corsa. Ogni
errore di posizione deve essere corretto.
Eventuali squadrette o sbracci di supporto vanno opportunamente
dimensionati e resi rigidi, in maniera tale da escludere qualsiasi loro
flessione o vibrazione che possa
compromettere la precisione del
sistema.
Use the two M4 threaded holes to fix the magnetic sensor. As an
alternative, they can be used as through holes for TCEI M3x18 screws.
The sensor can be mounted in any position, keeping the active side,
marked by arrows, towards the surface of the magnetic band.
Once the mechanical mounting has been concluded, manually cover the
entire measuring length to make sure that both the sensor and the cable
are able to move without interferences.
Check the respect of the alignment tolerances and the distance between
sensor and magnetic band along the entire measuring length. Any
positioning error must be corrected.
Spacer blocks or supporting arms should be adequately sized and made
rigid to exclude any flexion or vibration that could compromise the
system’s
accuracy.
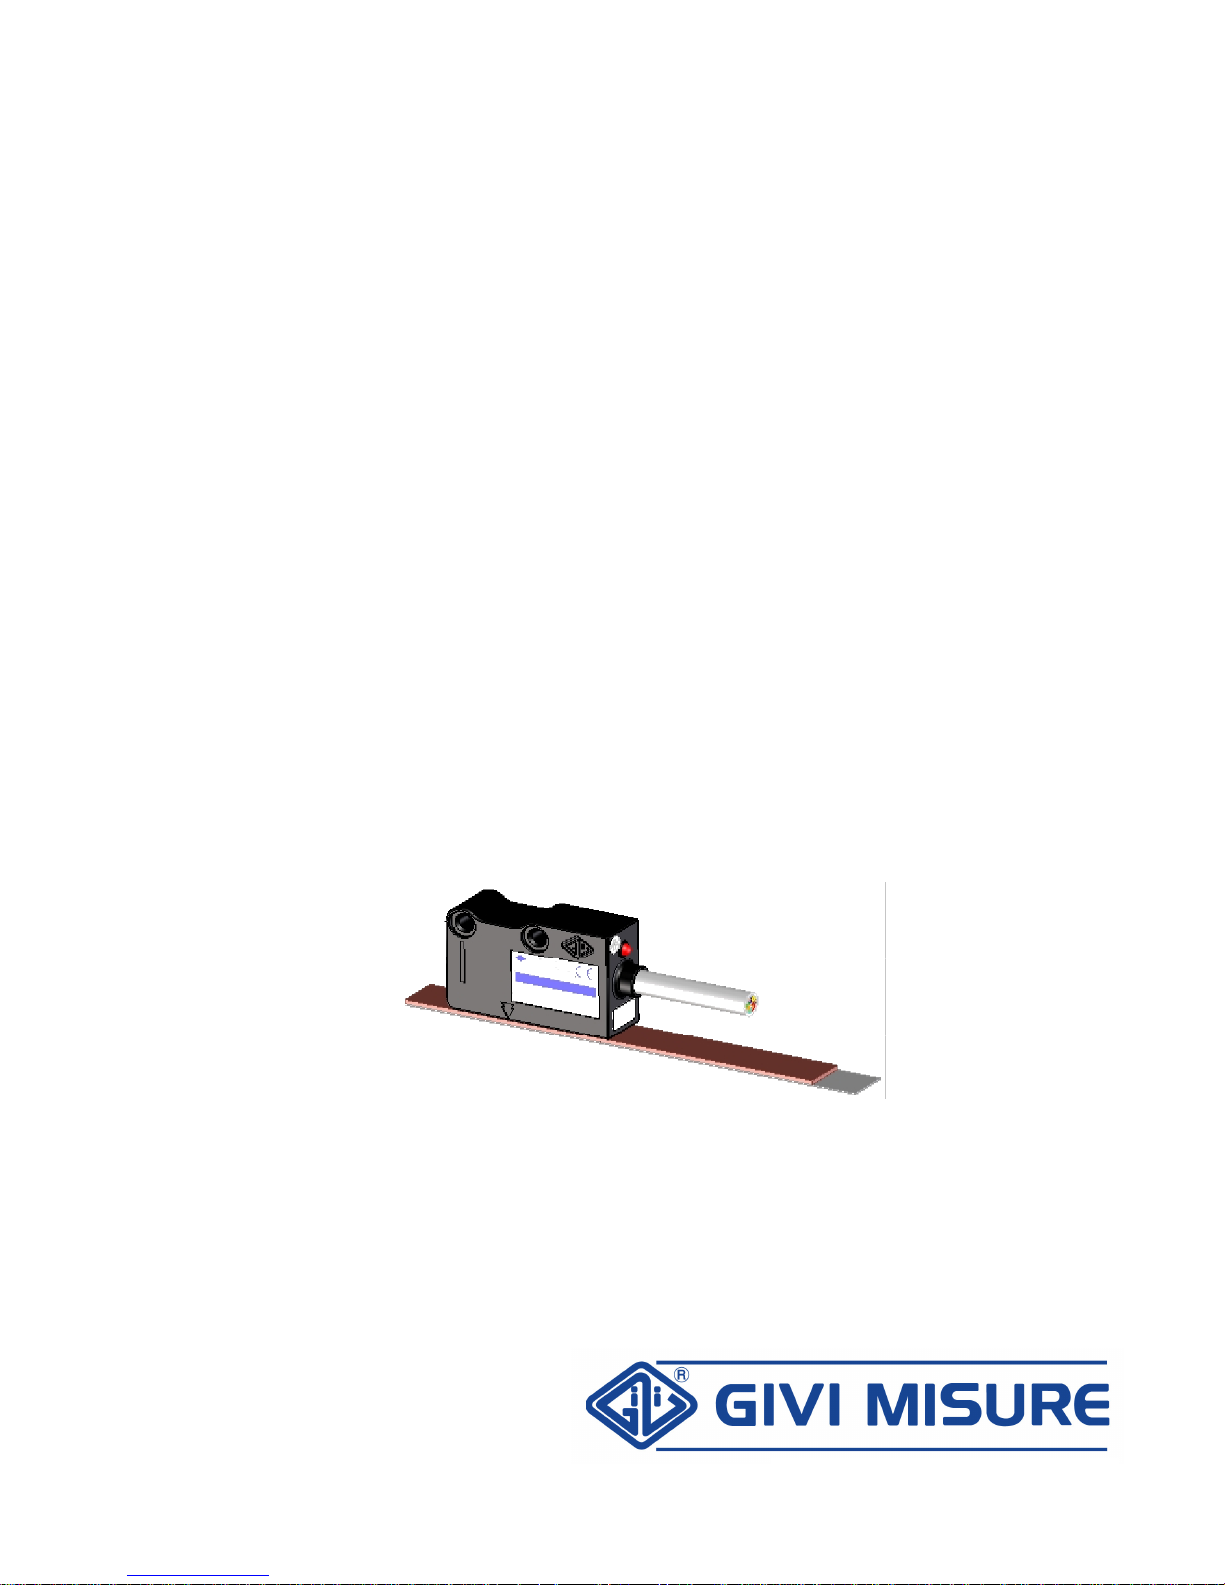
FISSAGGIO CONSIGLIATO PER IL SUPPORTO SP202
RECOMMENDED FIXING OF SUPPORT SP202
1
2
543
SP202
MP
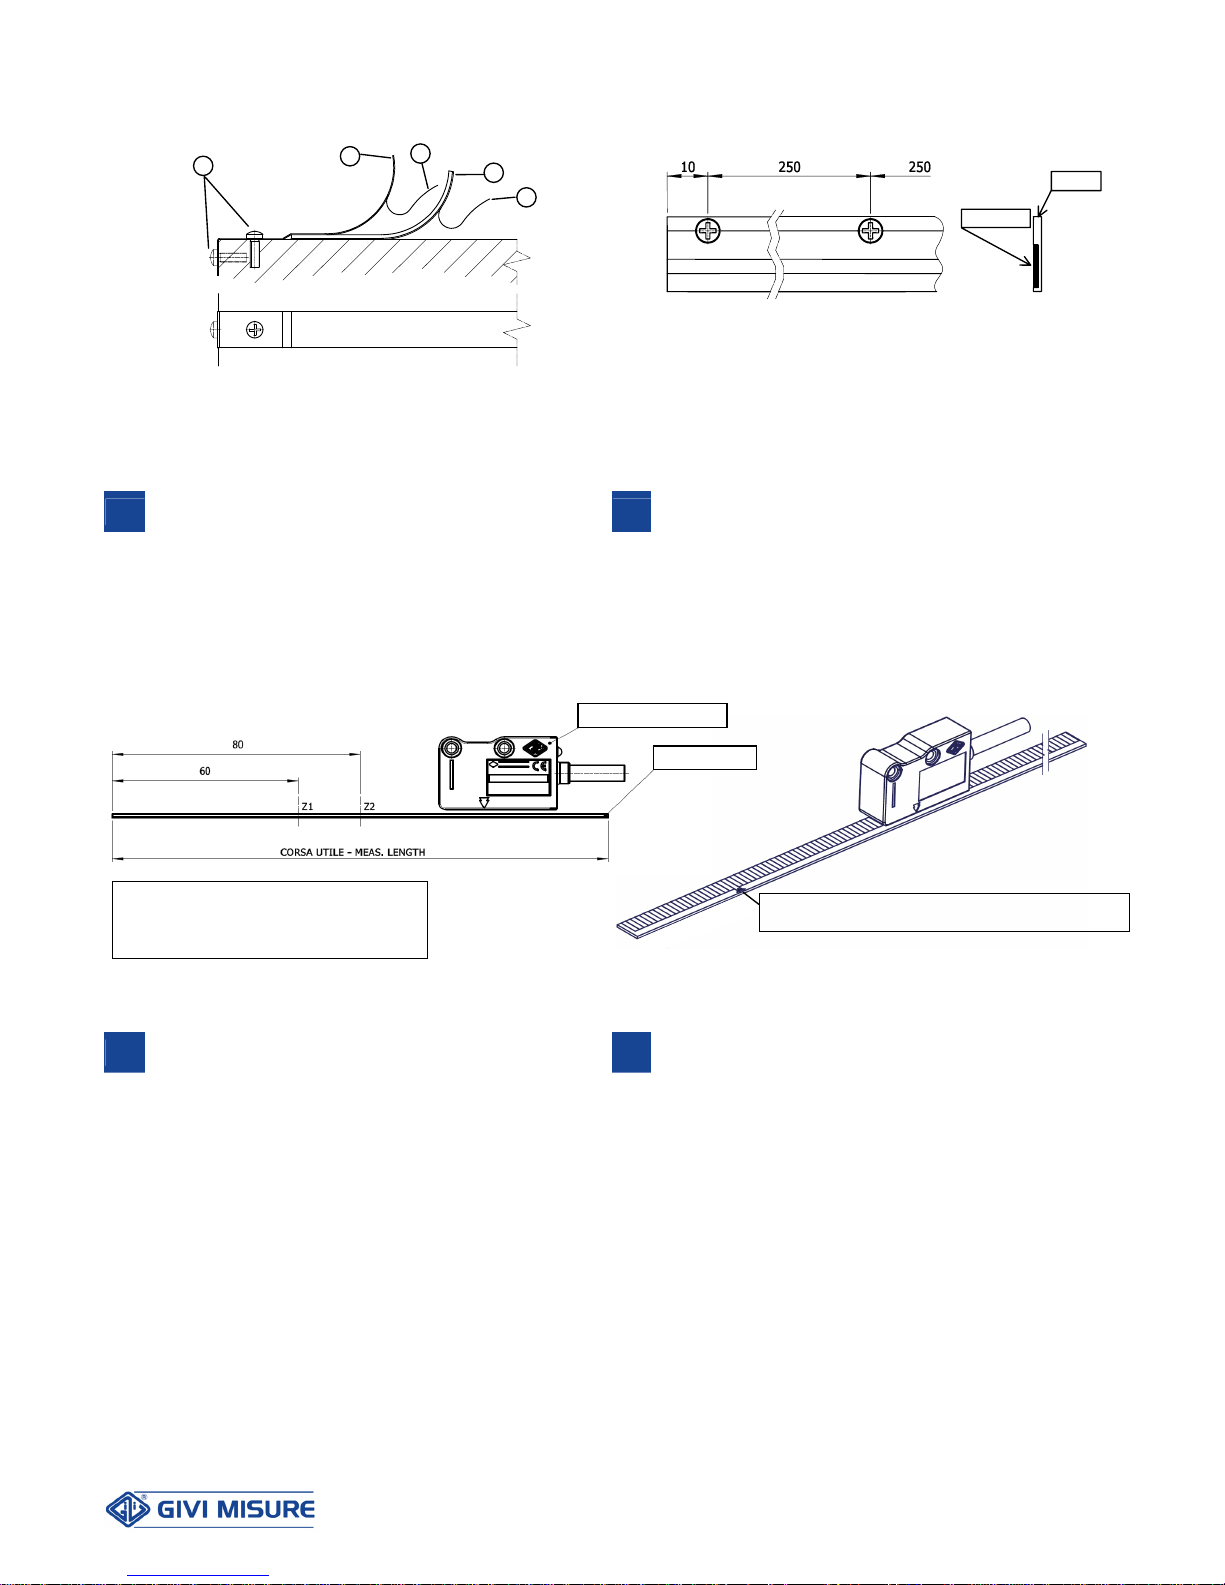
MP200Z/MP500Z IMPULSO DI ZERO SU BANDA MAGNETICA
MP200Z/MP500Z ZERO REFERENCE ON MAGNET
I
C
BAN
D
ESEMPIO: MP200Z / MP500Z con impulsi di zero
a 60 mm e 80 mm da sinistra.
EXAMPLE: MP200Z / MP500Z with zero references
at 60 mm and 80 mm from the left.
MTS MxxxZ / MTS HxxxZ
MP200Z / MP500Z
 Loading...