

Page 1
70mm
D_ac` mmi, com/gi tup.ltd
100mm
n
o
i
t
r Ac
fo
Action Camera
Git1
Congra tulation s on your new GitUp Ac tion camer a!
This Qu ick Start Gui de will show you th e basic instr uctions.
pleas e read it carefu lly and we hope you en joy using your ne w
acti on camera!
QUICK START GUIDE
GitUP Ltd.
01 02 0 3 04 05
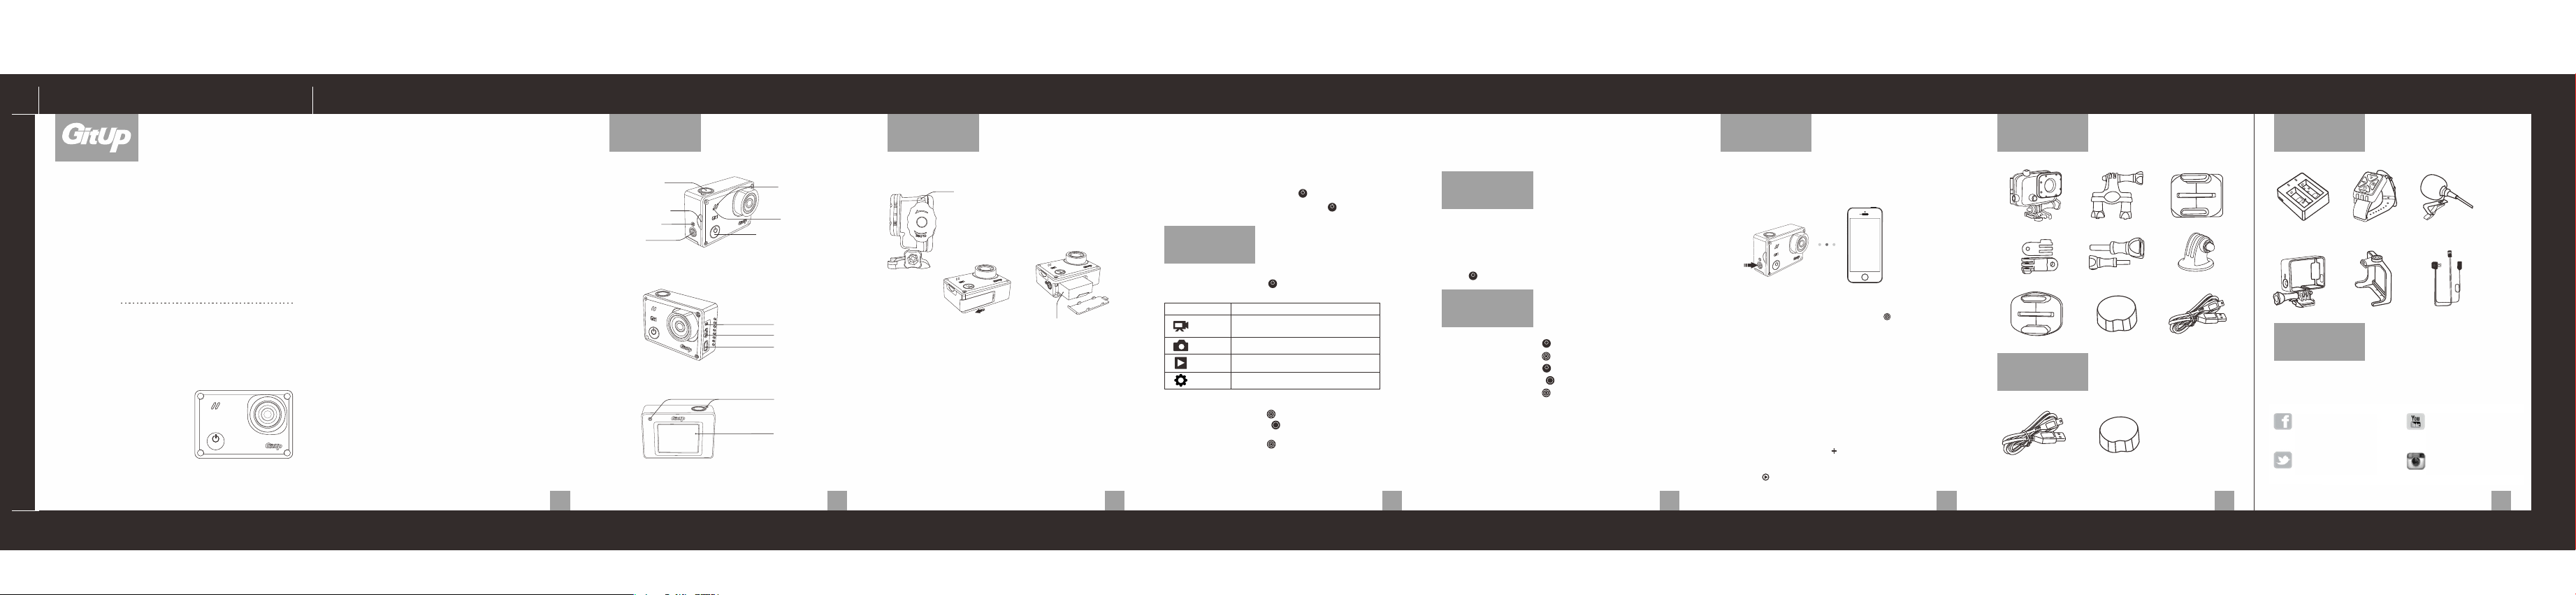
TheBasics
Shutter/Select
MicroSD Card Slot
Wi-F i Status
Setting,
Wi-Fi Enable/Disable
Mo
d
e
Pho to Statu s
de
Mo
Vide o Statu s
Power ON/OFF, Mode
Mic ropho ne
HD MI por t
Mini-US B port
(supports composi te A/V
cable/3.5mm stereo mic
adapter,not included)
Work S tatus
Dis play Sc reen
Getting Started
CH ARGI NG TH E BATTE RY
Press and hold this part to unlock the knob,
then rotate to open or close. Please follow
the arrows for the right direc tion
then push it out.
1. Remove the camera from the waterproof housing
(if it's in the waterproof housing)
2. lnsert a MicroSD card (sold separately). Class 6 or above required,
or a UHS-I card
3. Open the battery cover and insert the battery (normally a battery is
already installed)
4. Charge the battery by connecting the camera to a computer or other USB
charging adapter using the included USB cable. The camera status light turns
on during charging
NOTI CE: Using wall charger s marked: output 5V 1A. If you don’t
know the volta ge and current of your charger, use the inclu ded
USB cabl e to charge the came ra from your computer or a power
bank.
Rechargeab le BatteryPress to unlock the battery cover,
PO WERI NG CA MER A ON AN D OFF
To Power On: Press the Power/Mode button [ ] for two seconds.
To Power Of f: Press and hold the Power/Mode button [ ] for four seconds.
Mode
Mode
Selec ting
Cam era Modes
1. Press the Power/Mode button [ ] repeatedly to cycle through the
camera modes.
Cam eraM ode s
Vid eo
Pho to
Pla yba ck Play content on the camera or a T V
Set up
2. If necessary, select a dif ferent capture mode:
a) Press the Setting/Wi-Fi button [ ] to open the settings menu.
b) Press the Shutter/Select button [ ] repeatedly until you get
to the desired capture mode.
c) Press the Setting/Wi-Fi button [ ] to close the settings menu.
Mode
Video, Time Lapse Video, Video + Photo,
Video Looping
Sin gle ,Tim eLap sePh oto
Adj ustg ene ralc ame rase tti ngs
Des cri pti on
Capturing
Video and Photos
Select your camera mode, then press the Shutter/Select
button to start/stop recording or take a photo.
Take photo while recording
When the camera is recording, you can press the Power/Mode
button [ ] to take a photo.
Mode
Adjusting
Camera Settings
1. Press the Power/Mode button [ ] to cycle to your desired mode.
2. Press the Setting/Wi-Fi button [ ] to enter the Settings menu for that mode.
3. Press the Power/Mode button [ ] to cycle through the options.
4. Press the Shutter/Select button [ ] to select your desired option.
5. Press the Setting/Wi-Fi button [ ] to exit the settings menu.
Mode
Mode
Connecting
to the GitUp APP
The GitUp App allows you to control your camera remotel y using
a smartphone or tablet. Feature s include full camera control,
live preview, playback and video /photo download.
1.Enable the Wi-Fi
If the camera is powered on and ready to capture videos or photos,
you can press and hold the Settings/Wi-Fi butto n [ ] for three
seconds to turn Wi-Fi on/of f. When Wi-Fi is on, a Wi-Fi
status icon appears on the camera statu s screen and the blue Wi-Fi
light blinks intermi ttently. The Wi-Fi SSID and password are shown
on the camera screen, and the default passwo rd is 12345678.
Notice: When the Wi-Fi is enabled, the camera is waiting for the
Wi-Fi connection with smar tphone or tablet, and you can not take video
or photo until the connection est ablished.
2. To Connect your camera to the GitUp APP:
a). Download and install to your smartphone/tablet the supported
GitUp application from the Apple App Store or Google Play
b). Power on the camera and enable the Wireless
c). Connect to the Wi-Fi connection named Gitup****
( the stars are dif ferent for each camera )
d). Open the application, click the [ ] to add the camera, the
application will automatically search for a camera and show
"Add device succeeded" on the screen if connected successfully.
e). Click the [ ] icon to live preview the video.
06
Accessories
(Pro Pack ing)
Waterproof Case
Connector
Curved Adhesive Mount
Accessories
(Standard Packing)
USB Data/Charging Cable
Bike Roll Bar Mount
Screw
Lens Cover
Lens Cover
Flat Adhesive Mount
Tripod Mount
USB Data/Charging Cable
07
Optional
Accessories
CH2
CH1
2
CH
1
H
C
Battery Charger
Frame
Wrist Remote
Holder
External Microphone
s
FPV Cable
Customer
Support
GitUp is dedicate d to providing the bes t possible service. To reach GitUp
Customer Supp ort, visit gitup.com.
Join GitUp Community
Facebook.com/gitup.ltd
Twitter.com/gitup_com
Youtub e.com/ gitup_c om
Youtube.com/gitup_com
Instagram.com/gitup.world
08
 Loading...