

Page 1

1
REMOTE ENGINE STARTER SYSTEM
FOR MANUAL OR AUTOMATIC VEHICLES
INSTALLATION MANUAL
Page 2

2
WIRING DESCRIPTION
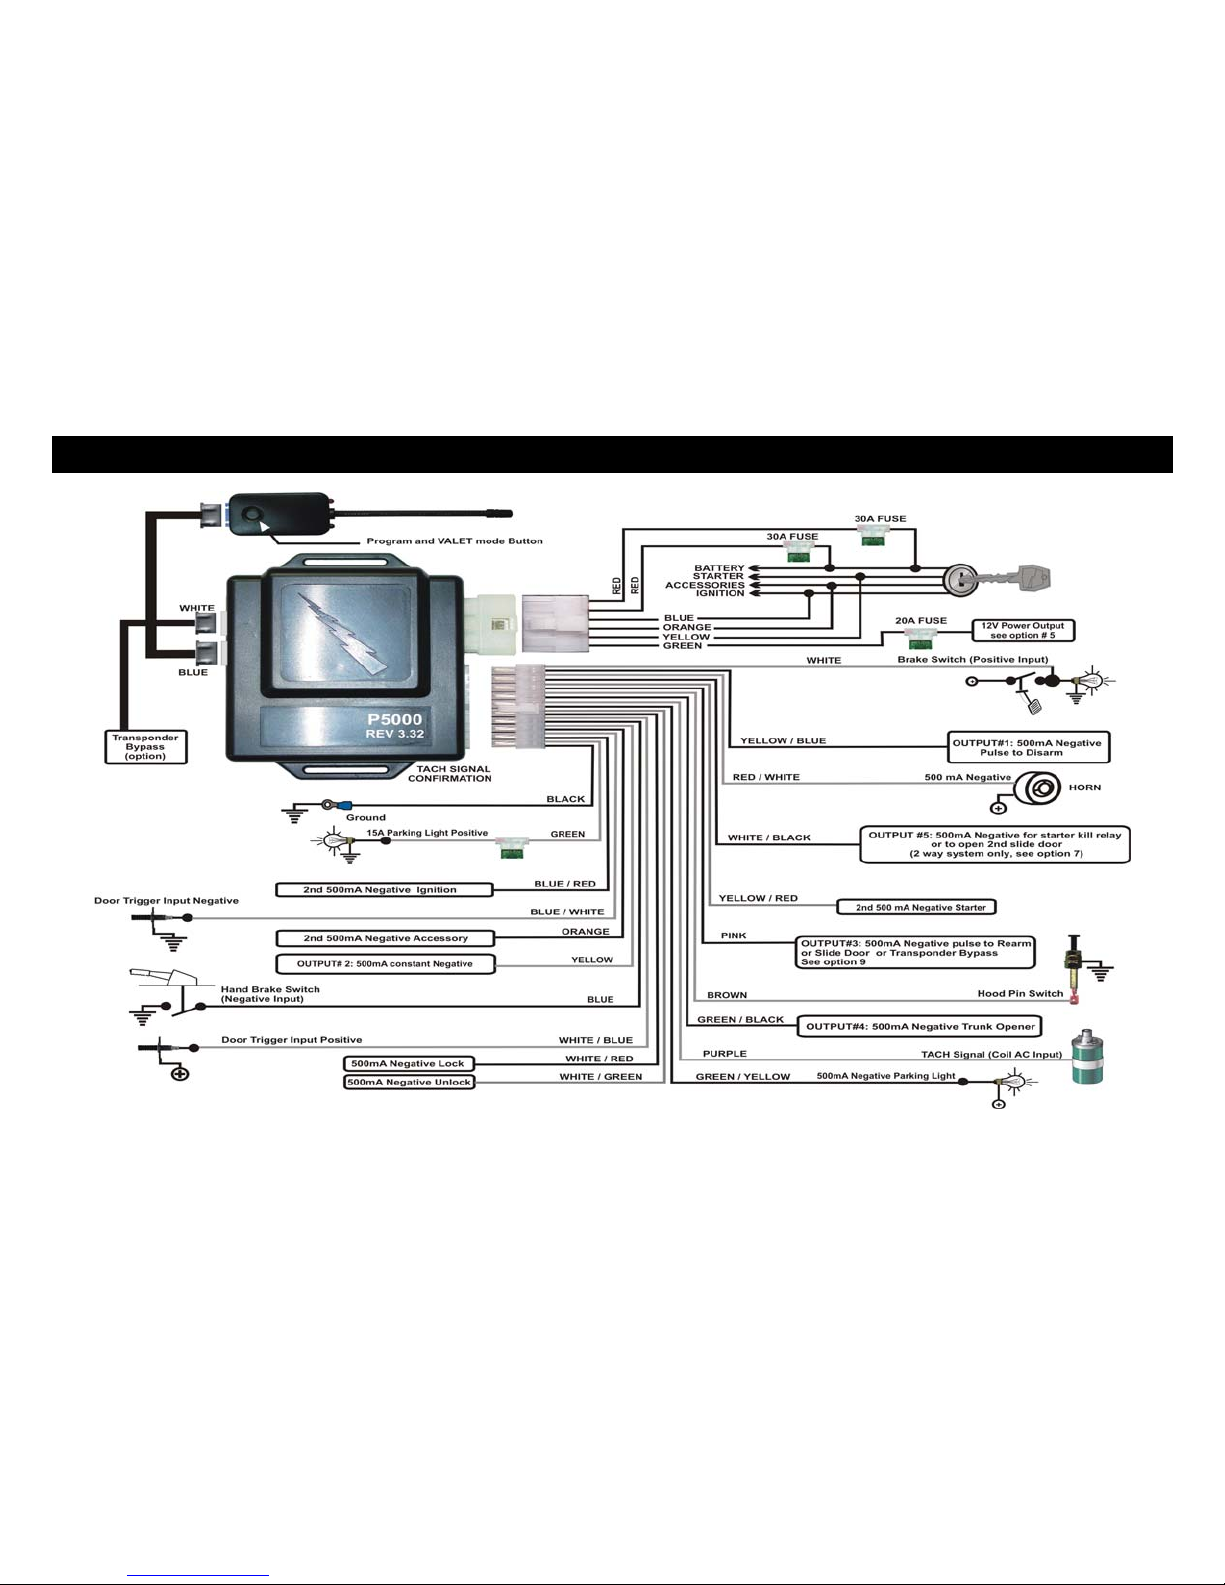
6 WIRE CONNECTOR (14 GAUGE WIRE)
RED
12V constant wire (12V positive input) connect to a 12V constant, 30A fuse built-in
RED
12V constant wire (12V positive input) connect to a 12V constant, 30A fuse built-in
GREEN
Auxiliary 12V positive output for 2
nd
ignition, 2nd accessory, 2nd starter, 20A fuse built-in (see option # 5)
ORANGE
Accessories wire (12V positive output) connect to accessory wire that controls the heater/air conditioning fan
YELLOW
Starter wire (12V positive output) connect to starter wire
BLUE
Ignition wire (12V positive output) connect to main ignition
20 WIRE CONNECTOR (20 GAUGE WIRE)
WHITE
Brake wire (12V positive input) connect to the switched side of the brake pedal switch
YELLOW / BLUE
OUTPUT #1 (500mA negative output) give a pulse to disarm the factory alarm
RED / WHITE
Horn or siren wire (500mA negative output) connects to horn or siren. Require a relay if siren is used
WHITE / BLACK
Starter kill disable wire (500mA negative output) connect to starter kill relay. Can be programmed
for 2
nd
slide-door (see option #7, only for 2way FM system)
YELLOW / RED
500mA negative starter output
PINK
OUTPUT #3: 500mA negative output. It can give a pulse to rearm factory alarm or open Sliding
Door or Transponder Bypass (see option # 9)
BROWN
Hood wire (negative input) connect to hood pin switch
Page 3

3
WIRING DESCRIPTION
20 WIRES CONNECTOR (20 GAUGE WIRE)
GREEN / BLACK
OUTPUT# 4: 500mA negative output for trunk opener
PURPLE
TACH wire (AC input) connect to TACH signal wire (coil or injector or alternator DC voltage)
GREEN / YELLOW
Negative parking light 500mA
WHITE / GREEN
Unlock wire (500mA negative output) See central door lock connection diagram
WHITE / RED
Lock wire (500mA negative output) See central door lock connection diagram
WHITE / BLUE
Door trigger positive input, connect to positive door switch
BLUE
Hand brake wire (negative input) connect to the switched side of hand brake switch (for vehicle
with manual transmission only)
YELLOW
OUTPUT #2: 500mA constant negative
ORANGE
500mA negative accessory output
BLUE / WHITE
Door trigger negative input, connect to negative door switch
BLUE / RED
500mA negative ignition output
LIGHT GREEN
Parking lights Positive output, 15A fuse built in
BLACK
Ground wire, Important connect to a proper ground
Page 4
4
WIRING DIAGRAM
Page 5
5
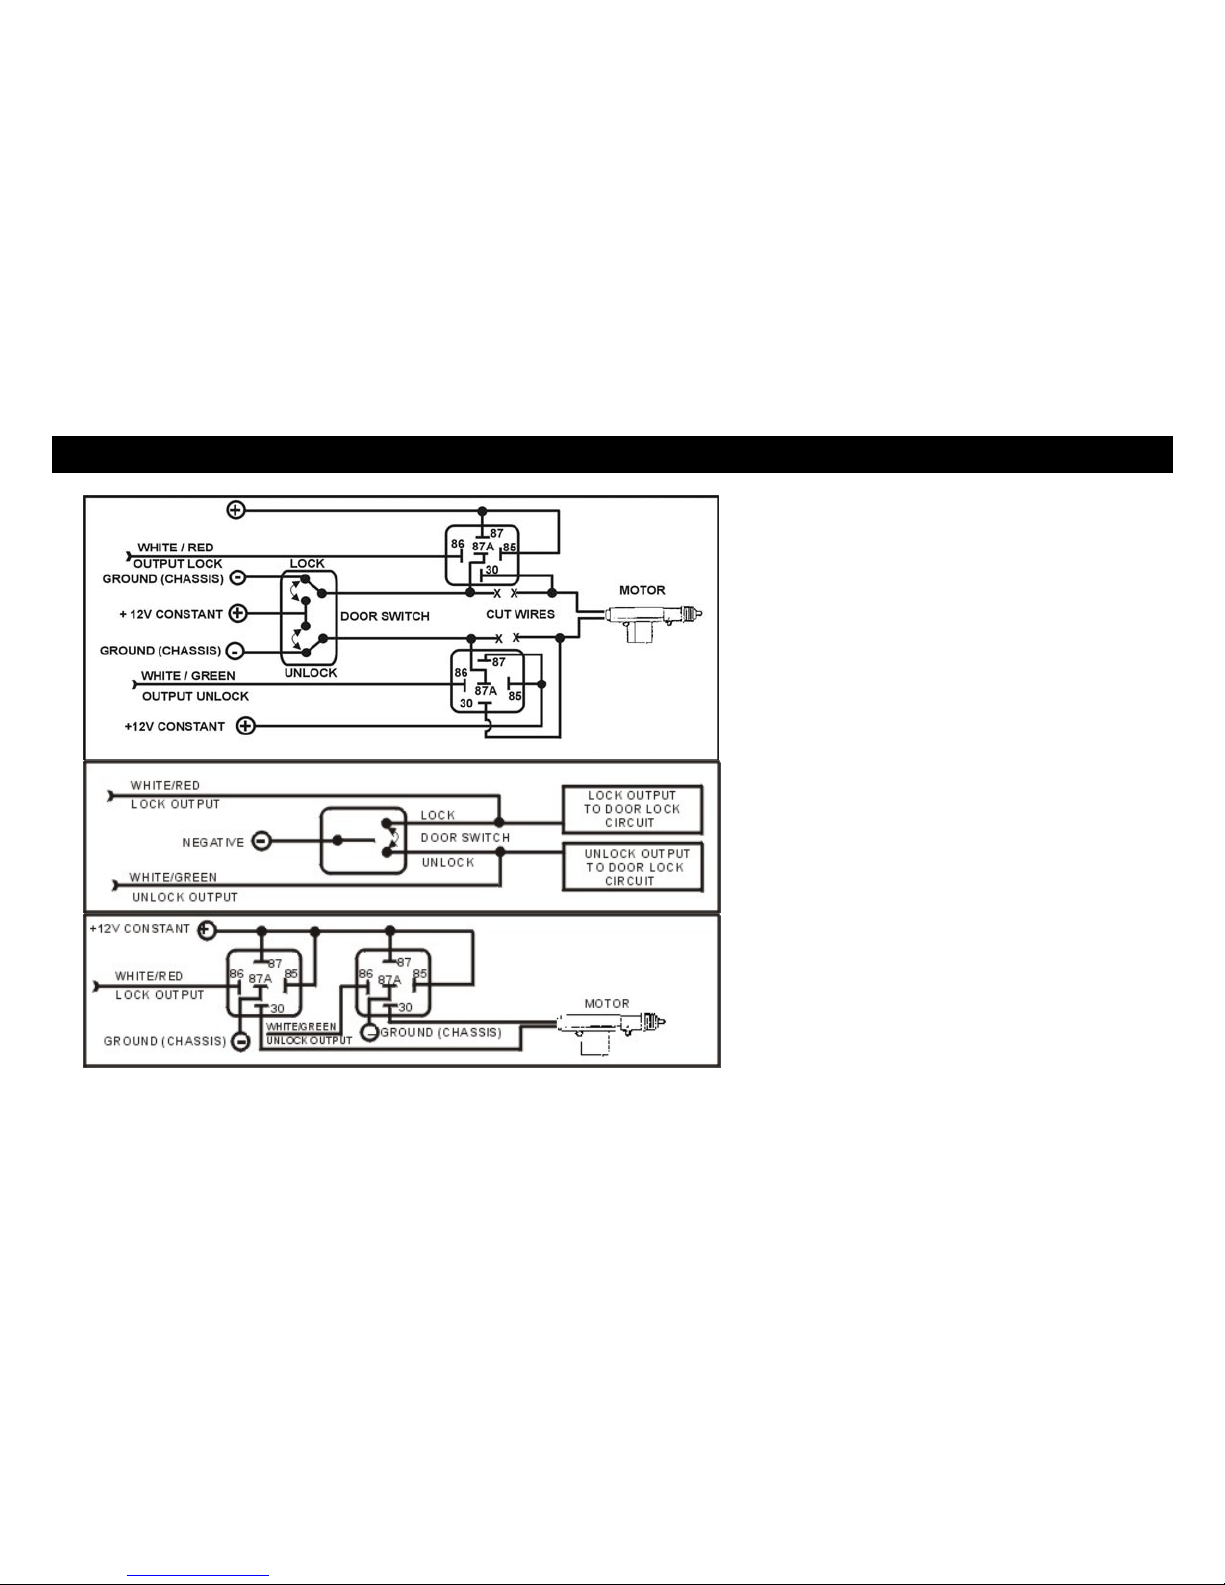
CENTRAL DOOR LOCK CONNECTION
DIAGRAM 1:
REVERSE POLARITY TYPE
DIAGRAM 2:
NEGATIVE TYPE
DIAGRAM 3:
ADDING DOOR LOCK ACTUATOR
Page 6

6
PROGRAMMING
Our remote starter is delivered with factory default settings. You can install it without programming or you can modify the
configuration to suit your customer’s need. Important
: the installation must be completed before accessing
programming mode.
Programming the system:
1. Turn the ignition 3 times OFF to ON and leave the key in the ON position (engine not running).
2. Within 15 seconds, push 1 time on the antenna button. You will hear 5 beeps to confirm that the system is now in
programming mode. The L.E.D. built-in receiver will flash slowly.
Note
: If the 15 seconds delay has expired, just turn the ignition OFF and repeat steps 1 and 2.
The system has 20 programmable options and there are 1 to 3 different possibilities to modify.
Step 1 Press then release antenna button to select option 1 to 20 (depend on models, see programming chart).
Every time you press on receiver button you will hear one beep. Count the beep to reach desired option.
Step 2 When you have reached the desired option depress brake pedal to confirm.
Step 3 Press button , or on transmitter to choose between different possibilities ( to select column 1, you
will hear 1 beep,
to select column 2, you will hear 2 beeps or to select column 3, you will hear 3 beeps).
Depress brake pedal again and count the beep to confirm that the feature has been changed.
Note
: if you have more than one option to modify, repeat steps 1 to 3.
Step 4 When finished, Turn ignition OFF to exit programming mode. One long beep will be emitted.
Page 7

7
PROGRAMMING CHART
OPTION FUNCTION
PRESS
BUTTON TO:
PRESS
BUTTON TO:
PRESS
BUTTON TO:
1A
TACH Learning
See example: #3
Learn
1B
TACH fine tuning
See example # 4
Increase Decrease
2
Cranking adjustment
♦ Normal
Slight increase Increase
3
Audible Arming/Disarming Enable
♦ Disable
4
Running time Duration 10 minutes
♦15 minutes
25 minutes
5
Auxiliary output
♦ 2
nd
ignition
2
nd
accessory 2nd starter
6
Glow plug waiting time
before starting
♦ 0 second
10 seconds
20 seconds
7
White/Black: Output # 5
select
2
nd
slide door (for 2 way
only)
♦ Starter kill
8
Night timer mode Starts engine every 2 hours
♦Starts engine every 3hours
Starts engine every 4 hours
9
Pink: Output # 3 Select
♦ Rearm Pulse
Slide Door Opener Transponder bypass
10
Door lock Signals
♦ 0.5 second
3 seconds Unlock double pulses
11
Ignition lock
♦ Disable
Enable
12
Passive lock Enable
♦ Disable
L.E.D. OFF
13
Starter kill/Alarm Arming
See example #1
♦ Passive arming
Active arming
14
Reservation mode
(For manual vehicle
only)
You do not need to press on
any button of your transmitter
to enter the reservation mode
♦ Press
button of transmitter
each time you want to enter into
the reservation mode
♦ Factory default setting
Page 8
8
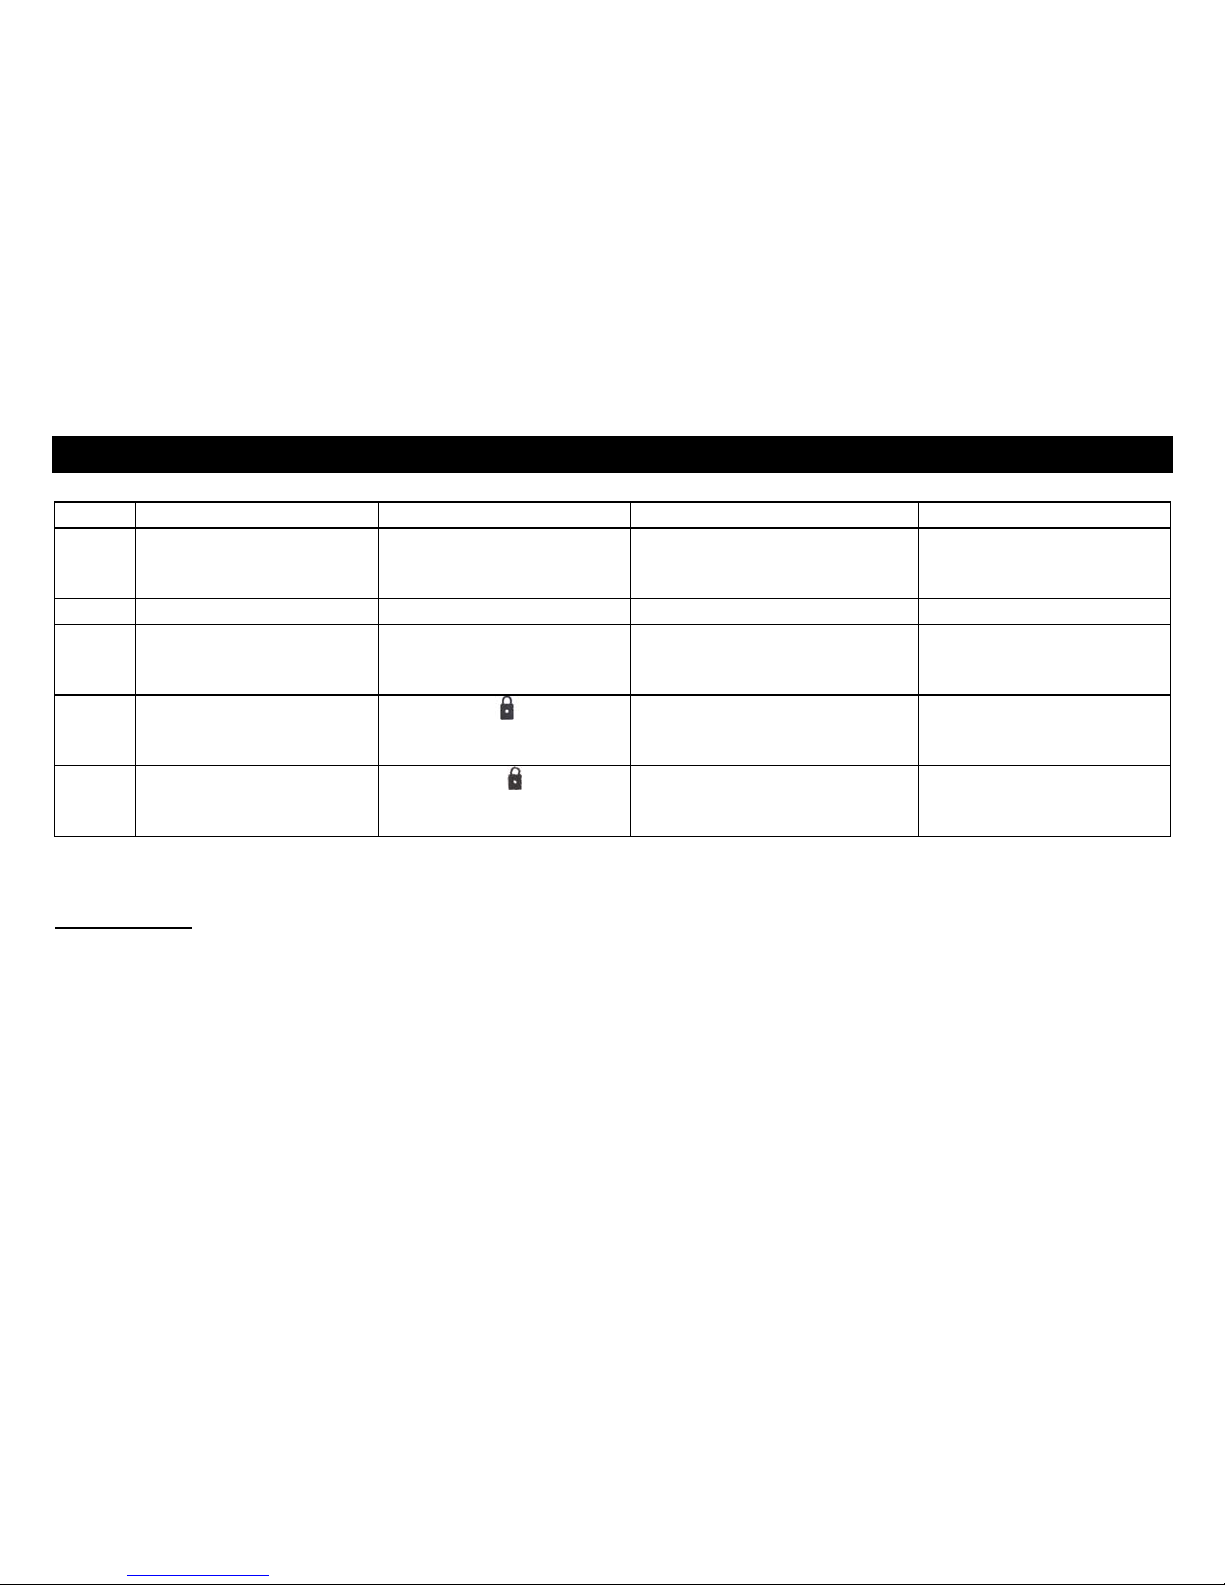
PROGRAMMING CHART
♦ Factory default setting
VALET MODE:
Turn the ignition key to ON position (engine not running). Push and hold the receiver button for 5 seconds to enter into valet
mode. The system will chirp 3 times and the receiver’s L.E.D. will stay solid. When the system is in the valet mode, you can
not remote start (parking light will flash 2 times when you try remote start).
To remove valet mode, repeat the same operation. The system will chirp 1 time and the receiver L.E.D. will turn OFF.
15
Horn/Siren
♦ Horn
Siren
16
Dome light delay
♦ Disable
Enable & Doors Bypass for
45 seconds when engine
shut-off
17
Fast Unlock (2 way only)
♦ Normal
Fast Unlock
18
Door Lock/Unlock
configuration
♦ Normal
Unlock before start
Lock after start
Lock after shut down
Lock only after remote
start shut down
19
Factory default setting
See example #5
Press button
to reinitialize
4 beeps confirmation will be
emitted
20
Transmitter code
learning.
See example # 2
Press button
until 4
chirps confirmation
Page 9

9
PROGRAMMING OPTIONS
OPTION 1A: TACH LEARNING ( SEE EXAMPLE #3 )
The factory default setting should normally adapt to most vehicles on the market. After the installation is completed, start
engine with transmitter and most of the time you will have a perfect start. If the starter motor is over crank or release too fast,
you must process with the TACH learning option or manual fine-tuning.
OPTION 1B: TACH FINE TUNING ( SEE EXAMPLE #4 )
Occasionally with factory default setting or TACH learning feature you might not reach the exact performance. This option
allows you to fine-tuning the TACH signal manually.
When this option is set for 10 beeps, the system will detect alternator DC voltage as valid Tachometer.
OPTION 2: CRANKING ADJUSTMENT
If you expect that the vehicle needs a djustin g you can force t he start er t o slig htly un der cran k or ov er cran k. Thi s adjust ment may be
necessary in some older vehicles or vehicles with diesel engines to help the engine start in extremely cold weather conditions.
OPTION 3: AUDIBLE ARMING / DISARMING
When this option is enabled, the system will chirp every time when system arms or disarms.
OPTION 4: RUNNING TIME DURATION
This option allows you to set the remote start engine running time for 10, 15 or 25 minutes. When remote started, the engine
will run for the selected amount of time.
OPTION 5: POWER AUXILIARY OUTPUT
This option allows you to set the AUXILIARY OUTPUT as:
1
: 2nd ignition 2: 2nd accessory 3: 2nd starter
Page 10

10
PROGRAMMING OPTIONS
OPTION 6: GLOW PLUG WAITING TIME ( FOR DIESEL ENGINE )
Diesel engines need to warm up glow plugs before starting. Turn ignition key ON and count how many seconds it takes for the
glow plug light to turn OFF then select the closest waiting time.
OPTION 7:OUTPUT # 5
1. Starter kill
2. 2
nd
Sliding door opened: press button for 2 seconds to open sliding door.(2 way system only)
OPTION 8: NIGHT TIMER MODE
The system will start engine by itself and wi ll run for 6 minutes every 2, 3 or 4 hours f or a maximum 4 ti mes. This fe ature is highly appreciated
when very cold nights are forecast. To access night timer mode: Keep pressing “*” button for 2 seconds, the parking light will flash 4 times.
OPTION 9: OUTPUT # 3 CAN BE PROGRAMMED AS
1.
Factory Alarm Rearm
2. Sliding door opened: press AUX button for 2 seconds to open sliding door.
3. Transponder bypass (output release upon accessory turn on).
OPTION 10: DOOR LOCK SIGNAL TIMING
1. Lock or unlock: pulse for 0.5 second
2. Lock or unlock: pulse for 3 seconds
3. Unlock: 2 pulses, the first pulse to open the driver door, the second for all passenger doors
Page 11

11
PROGRAMMING OPTIONS
OPTION 11: IGNITION LOCK
This feature allows the system to lock all doors when ignition key is ON. By depressing the brake pedal, all doors will unlock
automatically when ignition key is OFF.
OPTION 12: PASSIVE LOCK
Passive lock works only when passive arming option is enable (see option #13). Passive lock allows the system to lock all
doors when armed. If this option is disabled, all the doors will lock only when system is armed by transmitter. However, if this
option is programmed for L.E.D. OFF, the L.E.D. on the antenna will be OFF permanently even when the system is armed.
OPTION 13: PASSIVE OR ACTIVE ARMING (SEE EXAMPLE # 1)
1. Passive arming arms the starter kill / alarm 30 seconds after the ignition is OFF, hood is closed.
2. Active arming arms the starter kill / alarm only by remote transmitter.
OPTION 14: FOR MANUAL TRANSMISSION VEHICLE ONLY
You can choose with or without transmitter to program exit sequence (reservation mode). When without transmitter sequence
is selected, it does not require pressing
button each time you perform an exit sequence.
OPTION 15: VEHICLE HORN OR SIREN
Horn will give a 500mA negative ground pulse signal when Alarm or Panic is triggered. When Siren option is selected, the
system will give a 500mA negative ground constant. We recommend using the relay for siren if installed.
Page 12

12
PROGRAMMING OPTIONS
OPTION 16: DOME LIGHT DELAY
If the vehicle comes with dome light delay, it is important to enable this option. Otherwise, the start sequence for manual
transmission only may be lost. Note
: When dome light delay mode is selected, the parking lights will flash 3 times when
arms the system.
OPTION 17: FAST UNLOCK DOOR (2 WAY ONLY)
This option is used to reduce unlock door response time.
OPTION 18: DOOR LOCK / UNLOCK CONFIGURATION
In some vehicles the doors unlock when the remote starting the car. Use this option to overpass this problem.
OPTION 19: FACTORY DEFAULT SETTING (SEE EXAMPLE # 5)
This option allows you to reinitialize the system back to factory default settings in case of confusion or when you reinstall the
system in another vehicle and you do not want to keep the old setting.
OPTION 20: TRANSMITTER CODE LEARNING (SEE EXAMPLE # 2)
This option allows you to add or learn the new transmitter into your system. You can program up to 4 different transmitters.
Page 13

13
PROGRAMMING EXAMPLES
EXAMPLE 1, OPTION 13: CHANGE FROM PASSIVE ARMING TO ACTIVE ARMING
Option 13, default setting is passive arming. System will arm automatically after ignition key is OFF for 30 seconds delay. You
want to change to active arming.
1. Access programming mode (see programming procedure).
2. Press and release program button 13 times and count 13 beeps.
3. Depress brake pedal to confirm. You should hear 1, 2 or 3 beeps to confirm which option is currently programmed.
Note
: If you hear 1 beep, it means current option is passive arming.
If you hear 2 beeps, it means current option is active arming with safety rearm.
4. Press on transmitter to change option:
• Button
for passive arming, you will hear 1 beep.
• Button
for active arming, you will hear 2 beeps.
5. Turn ignition OFF to exit programming mode.
Page 14

14
PROGRAMMING EXAMPLES
EXAMPLE 2, OPTION 20: TRANSMITTER CODE LEARNING
The transmitter supplied is already programmed to the system. This option allows you to add more transmitters to your
system if needed.
1. Access programming mode (see programming procedure).
2. Press and release program button 20 times and count 20 beeps.
3. Depress brake pedal to confirm.
4. Press button
on the transmitter. You will hear 5 beeps. The new transmitter code is learned. If you press on the
same transmitter 4 times, all another previously stored transmitter codes in the system will be erased.
5. Turn ignition OFF to exit programming mode.
EXAMPLE 3, OPTION 1A: TACH LEARNING
The factory default setting should normally operate with most vehicles on the market. Note that some vehicles equipped with
multi coil system have a very low TACH signal. In that case, the TACH learning feature will allow the system to adjust itself to
the TACH signal of the vehicle.
Important note
: engine must be warm and at idle speed (approximately 800 rpm) before proceeding with TACH
learning, otherwise preheat engine for at least 10 minutes before processing.
1. Access programming mode (see programming procedure).
2. Press then release the antenna button 1 time and count 1 beep.
3. Depress brake pedal to confirm, you should hear 3 beeps, (factory default setting) Blue L.E.D. will flash rapidly.
4. Start the engine and wait for the lowest idle.
5. Press button
on the transmitter, you should hear 1 beep, TACH signal has been learned.
6. Turn ignition OFF to exit programming mode.
Page 15

15
PROGRAMMING EXAMPLES
EXAMPLE 4, OPTION 1B: FINE TUNING THE TACH SIGNAL
Even with the factory TACH default setting or TACH learning features you can not reach the exact setting; example: idle is too
high. This option will allow you to fine tune the TACH signal manually; make sure the engine is not running.
1. Access programming mode (see programming procedure).
2. Press then release the antenna button 1 time and count 1 beep.
3. Depress brake pedal, you should hear 3 beeps (factory default setting) You must count the number of beeps,
minimum 1 beep and maximum 9 beeps. If 9 beeps is selected the TACH signal will be sensed as DC voltage rather
then AC signal. If you miss the number of beeps, depress brake pedal again to count the beeps. Blue L.E.D built-in
receiver will flash rapidly.
Note
: At this step, you must carefully count the number of beeps when you depress brake pedal, in order to increase
or decrease TACH signal level, decrease when TACH signal is weak and increase when TACH signal is strong.
Example
: you start the engine via the transmitter, if the starter motor is over cranking decrease the signal level. If the
starter motor release too fast, increase the signal level.
4. Press button on the transmitter to increase signal level or press button to decrease signal level.
Page 16

16
PROGRAMMING EXAMPLES
EXAMPLE 5, OPTION 19: REINITIALIZE TO FACTORY DEFAULT SETTING
In case of confusion or you want to install the system in another vehicle and you don’t want to keep the old settings. The
option 19 allows resetting of the system back to factory default setting.
1. Access programming mode (see programming procedure).
2. Press and release program button 19 times and count 19 beeps.
3. Depress brake pedal to confirm.
4. Press button
on the transmitter, you will hear 1 beep. Factory default setting is reinitialized.
5. Turn ignition OFF to exit programming mode.
Page 17

17
REMOTE ENGINE STARTER DIAGNOSTIC
DIAGNOSTIC FOR REMOTE STARTER:
Each time you try to remote start the vehicle and it
doesn’t start, the parking lights will flash to indicate the
reason why.
1 Flash: Brake pedal depressed
2 Flashes: Valet mode ON
3 Flashes: Hood opened
4 Flashes: Shut down via transmitter
5 Flashes: Not used
6 Flashes: Running time expired
7 Flashes: Cranking time expired, engine not running
8 Flashes: Exit sequence cancelled (manual transmission only)
9 Flashes: TACH wire disconnected
10 Flashes: Hand brake not pulled (manual transmission only)
11 Flashes: Door opened (manual transmission only)
12 Flashes: Ignition is ON when start via remote
Page 18

18
LIMITED WARRANTY
The manufacturer guarantees to the purchaser of origin the remote starter and alarm to be free of defect material and labour. However, if it is proven that the product is defective,
inside the two year period as from the original date of purchase, the manufacturer will repair or replace, without expenses towards the purchaser, any part (excluding any expenses
incurred to deliver the product to the manufacturer) remote starter or alarm which the manufacturer considers defective. After the initial warranty period of 2 years, the manufacturer
must repair or replace the defective products with a forwarding costs of 30.00$US. All the guarantees apply to the original purchaser and ONLY to the vehicle in which it is initially
installed. Repairs or replacement of the defective modules must remain at the discretion of the manufacturer. All the other parts, components, accessories or optional equipment
relating to the remote starter and alarm are not included in the guarantee of the manufacturer. This guarantee is nontransferable. The original receipt must accompany a request
for guarantee of service of any authorized retailer in factory. The fact of not conforming to these conditions can result in cancellation of the guarantee.
This guarantee does not cover the following elements: expenses for labour of removal or reinstallation, transport charges, abuse, misuse or accidental damage of the remote
starter and the alarm or parts of the latter. This guarantee is cancelled in the event of amendments, repairs or deteriorations of any part of the product. The manufacturer does not
guarantee or does not insure against the loss of the vehicle or its contents. The models of alarm are used only as dissuasion against any possible loss. This alarm can be
considered for a reduction of the insurances; premiums please contact your insurance agent for more details. The manufacturer should not be held responsible for any consequent
damage connected to a violation of this or any other guarantee express or implicit. This guarantee gives you specific statutory duties. These rights vary according to the area in
which you reside.
CERTAIN DAMAGE IS EXCLUDED
. The manufacturer declines any responsibility for additional damage caused by the product, including a financial loss, loss of use of the
product, hiring of vehicle or all other expenses connected to the maintenance and the guard of the product. The manufacturer declines any responsibility for any additional damage
caused by the product or resulting from his use, including the expenses of repair or replacement of other goods damaged or caused by his use, even if the product functions
correctly. This product is designed to dissuade from an unauthorized use of the vehicles in which it is installed. The manufacturer does not guarantee that the product is proof
against loss and vandalism and the human error or an inadequate use. The manufacturer does not accept any responsibility for any damage occurring any kind that it is caused by
a vehicle in which the product is installed or resulting from damage from its use. The manufacturer does not accept any responsibility for any damage resulting from the loss of the
vehicle or its contents, caused or claimed caused, directly or indirectly, by a failure of the product.
STARTER WITH MANUAL SHIFT
– the installation of a remote starter MUST be carried out with an indicated manual transmission remote starter. It is the sole
responsibility of the operator of the vehicle to make sure that the vehicle is left with the transmission in neutral when the remote starter is used. The manual
transmission remote starter is designed as supplementary measure of safety ONLY! The manufacturer does not guarantee or does not insure against any damage or
loss of life, which can result from remote starting the remote starter when the vehicle is in gear. The models for manual transmission are only designed to act as a
preventive measure against starting in gear; it remains the sole responsibility of the operator or the owner of the vehicle to make sure the transmission is in neutral.
 Loading...