

Girafus 227PA User Manual
INTRODUCTION
Pet Tracker 227PA User Guide
KEY FEATURES
Search range
Remote / Tag unit specs
BaƩery type AAA x 2
Searching & Tracking 1 to 4 Tags
0~500 meters (*Distance will vary depending
on terrain and other factors)
95x65x14mm
SPECIFICATIONS
Page 1
- Helps you track down up to 4 pets should they go missing
- Directional tracking to guide you in the right direction
- Uses safe 2.4 GHz RF technology, will not interfere other wireless devices
- Water splash ressistant case for outdoor activites
- Smart sleep mode for longer battery life of up to two months
- Easily attaches to most collars including a velcro strap for larger collars
- Special Data Encryption so you won’t detect other pets
- Rhythm Buzzer- the closer you are to your pet, the faster the rhythm is
- Track by sound, tag beeps to help you zero in their hidden location
- Easy installation, insert battery, turn on, and you are good to go
- Multi application, can be used on pets, keys, bags, and even the kids
1
The Pet Tracker 227PA consists of a remote unit for the owner and
transmitter tag that easily attach onto your pets collars via a specially
designed water splash proof silicone case. In the unfortunate case of
losing sight of your pet, the Pet Tracker 227PA can help track your pet
down within a range of up to 500 meters.
Remote unit
Tag unit
Page 2
OVERVIEW
SUGGESTED LOCATION TO PLACE BASE / TAG units
Remote Unit
Tag Unit
PACKAGE CONTENTS (227PA2)
Strap attachment
Search status
Power switch
1
2
3
4
5
6
7
8
9
10
11
Search button
Direction indicator
Set button
Signal strength lights
Mute switch
Speaker
Clip
Battery cover
1
2
3
4
5
Page 3
This section shows how setup your Pet Tracker and do a one-off calibration
process.
BATTERY FITTING
1. Insert the batteries into the Remote unit and the available Tag units.
- Slide out (remove) the battery covers on the Remote and Tag Units.
- Insert batteries (included) according to the polarity markings (+/-) in
the battery compartments.
- Replace the battery compartment covers on both units.
2. Tag unit will flash for 30 seconds and enter sleep mode.
TESTING
1. Place the White Tag unit in a stationary location.
2. With the Remote base unit in hand, walk away from the Tag. At about
20~30 meters outside turn ON the Remote.
3. Once the remote base unit is turned on to start search the White Tag, this
will enable a green flash and initiate a slow tracking rhythm.
4. Now start walking back towards the tag, you should hear a increased
rhythm and get max signal rhythm when within 10~15 meters of the tag.
5. Press and hold the button ”1” to activate the tag to chirp to allow tracking
by sound. Once the search is done, turn off the remote.
6. Place the Tag into the silicone case and attach the case onto your pet’s
collar . If the collar is too wide to fit into the silicone case vents, please
use the provided velcro strap and fit the case onto the strap.
7. To test the second Tag (Black), just do the same steps as select button
”2” after turning on the Remote unit.
Note: You may turn the remote base unit off when not in use to save
battery. Turn back on when searching is required.
GETTING STARTED (example for 227PA2, 1 base to 2 tags)
2
Page 4
ADDITIONAL OUT OF RANGE NOTES (MUST READ)
1. When in Search mode, and if remote doesn't find tag, the Remote unit will
flash red continuously for over 30 seconds and give one last beep before
entering sleep mode. If this is the case, press the search button
no.(1,2,3 or 4) once to enter the search mode as you walk and search the
area for a signal.
2. When the tag is within range, the remote base unit will show a green light
and start a tracking tone within 15 seconds. Start walking in different
directions until one direction gives you an increase beeping frequency, that
way you know you are walking in the right direction. DO NOT turn in circles
on the same spot, keep walking in different directions until the beep tone
speeds up.
MANAGING ALL 4 TAG UNITS FROM THE BASE UNIT
Model Name
Remote Unit
Tag Unit
Strap
1 piece
Front
Back
Remote Unit
1
2
3
4
5
6
7
8
9
10
11
Front
Back
Tag Unit
1
2
3
4
6
Base Unit Tag Unit (base on purchased model)
CR 2032: 30 days
LIR 2032: 15 days
38x25x11 mm
CR 2032x1 or LIR 2032
Buzzer
Hanging hole for strap
Top cover
Bottom cover
LED (Connection status)
Remote unit
Tag unit
-
-
+
+
Replace Cover
Install Battery
Remove Cover
92db ± 3 db 85db ± 3 db
150 days
With CR2032 BaƩery: Temp. 5˚C∼40˚C、humi. 20%∼80%
With LIR2032 BaƩery: Temp. -15
˚C
∼40˚C、humi. 20%∼80%
Working environment
Batteries
User manual
Velcro strap
Hook
Silicon Sleeve
1 piece
AAA x 2 pieces
2 pieces
2 pieces
1 piece
1 piece
2 pieces
Search Buttons
Search Status Light
White Black
(Note: #3 & #4 tags OPTIONAL)
Beep Sound (at 10cm/3.9inch)
FuncƟon
CommunicaƟon Standard
Digital 2.4 GHz RF (Frequency range: 2.40 - 2.48MHz)
Dimension (L/W/H) in mm
BaƩery life Ɵme with search
( 10 mins a day )
CR2032 x 2 pieces
The Remote unit will always start searching for tag 1 (White tag) when it is
turned on. To search for the second tag (black) press button “2” and the
remote unit will start searching for the second tag while button 3 and 4 are
for the third and fourth. If the tag you are searching for isn’t in range the
status light will flash continuously with no signal or tracking tone. After 15
seconds it the Remote unit will chip and go to sleep mode until you press to
track the tags again.
When not tracking, turn off Remote unit to save power.
Page 5
When your pet is missing, you can start tracking your pet with the remote
unit within up to 500 meters in a open area like a large property, or park.
(Distance may vary)
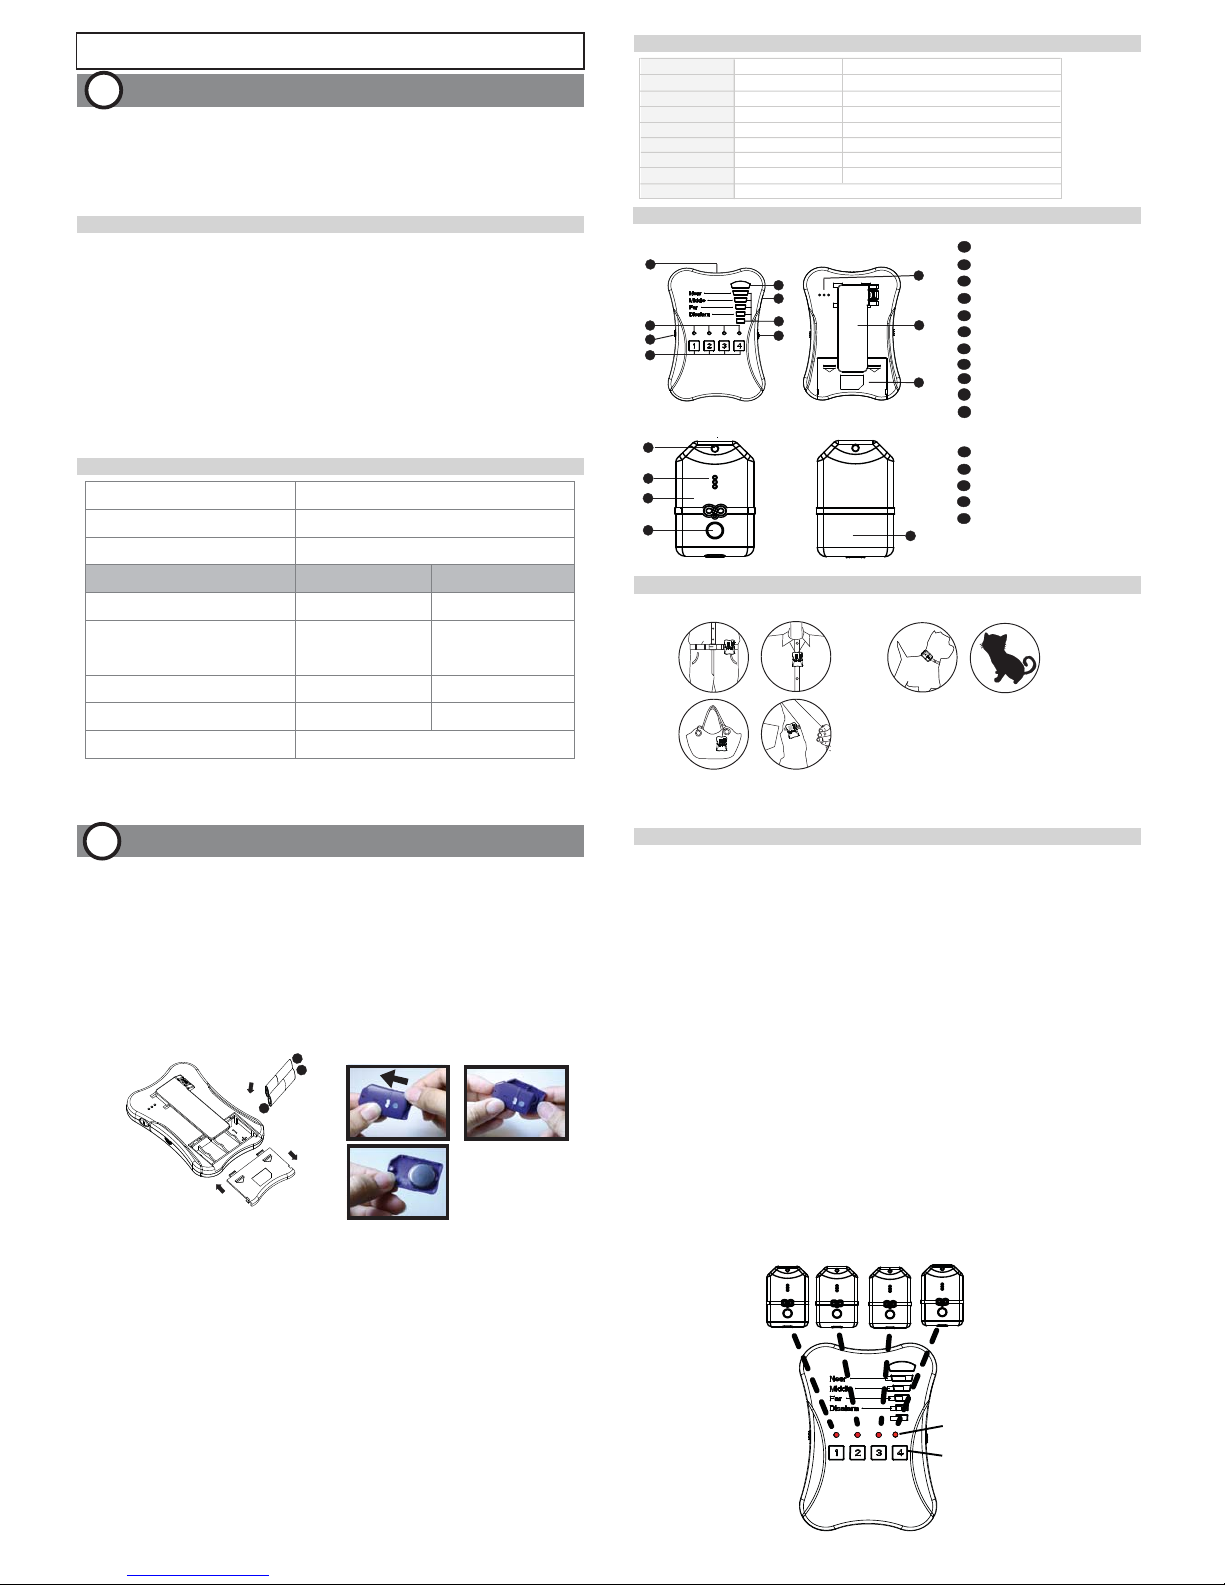
1. On the remote unit, press the “Search”
button once to search for the missing
pet or tag. The Rhythm and signal
strength indicators will initiate.
When going the right direction the
remote will increase in rhythm and
signal strength.
2. Y ou must first
calibrate the remote to
the current environment. Press the search
button, hold remote at chest level, and
scan the area slowly in a circular
direction, from right to left for 360° and
again from left to right (one 360° turn =
3-4 seconds).
Note
: If the “Direction Indicator”
illuminates green on the remote unit
during this calibration process, it does not
yet indicate a tag unit’s direction.
4. Next, slowly scan a third time from
left to right. The “Direction Indicator”
on the remote unit will illuminate (green)
when it establishes the direction of the
tag location.
Note:
Press and
release
Press and
release
Page 6
360360
Press and
release
How to search for your missing pet or tag
3
It is vital the above steps are done
to get the best tracking accuracy
as it may mean the difference
between finding your pet or not.
Important: Before you start searching,
you must follow the steps below to
calibrate your Pet Tracker 227PA!
Page 7
SEARCHING FOR YOUR L O S T PET (continued)
5. Start moving at the directions where you
think your pet may have wandered off to.
If a certain direction triggers the green LED
and starts increasing rhythm and signal
that means you are going the right way.
If you are walking the wrong way or direction
the green LED will likely stay off while the
signal indicator and rhythm will decrease.
If signal decreases, immediately turn and walk
the other direction or opposite way.
If your pet is moving around you may have
to keep trying different directions.
6. If you get close to within 15-25 meters
the signal strength and rhythm will go on
full via having all LED lights lid up.
The Direction Green LED indicator may
become inaccurate at this stage due to
the strong strength, but you should have
sight of your pet by now. If not, press and
hold to activate the tag to chirp to allow
tracking by sound.
.
7. Once the Tag unit is found, turn off the
Remote unit to stop searching
In quiet areas (e.g. libraries), it is possible to conduct a silent search,
where both the Remote and Tag units are muted. To do this simply, turn on
the “Mute” button on the Remote unit before turning on.
Afterwards, just use the signal strength indicator to search.
The “Mute” button on the side of the Remote unit can be switched on at any
time to silence the Remote unit to avoid distraction in quiet areas (e.g.
libraries).
Press and
release
Press and
release
MUTE MODE (on the Remote unit)
SILENT SEARCH
Page 8
1. When the base unit’s battery is low, the first indicator light at the bottom
will flash continuously while giving a low beeping tone.
2. When the tag unit’s battery is low, the LED will flash once every second
when it’s connected to the base unit and will beep a few times every
twenty seconds.
Note: If you run your units on low batteries, operations may become
unpredictable or results may become innacurate.
The Remote and each of the Tag units are ”Paired” before shipment - that is,
each Remote to Tag combination must have it’s own unique communication
handshake, so that the Remote does not get confused between the Tag
units.The procedures below are used to re-establish the ”Pairing” in case a
Tag unit is replaced or a Tag unit cannot communicate with the Remote. For
this example we ”Pair” the Remote unit to Tag #2 (black) - follow the
instructions below:
1. Make sure the Remote unit and ALL the Tag units are turned off.
2. To enter ”Registration” mode, hold down the ”Set” button (on side of
the Remote unit) and the ”Search” button for Tag #2 on the remote unit
and then, at the same time, turn on the Remote unit - as soon as the red
light above the ”Search” button (for Tag #2) flashes exactly twice,
release the buttons (if you’ve already reached the 3rd flash, you have to
start again).
If you’ve entered the ”Registration” mode successfully, the light above
”Search” button and the light below the ”Dis-alarm” light on the Remote
unit will flash together.
3. Finally, bring Tag #2 to within 10 cm (4 inches) of the Remote unit and
turn it on. TheTag unit will chirp twice, indicating a successful ”Pairing”.
4
BASE UNIT and TAG UNIT PAIRING
5
Low Battery Alerts
Federal Communication Commission Interference Statement
This equipment has been tested and improved to comply with the limits of a Class B digital device,
pursuant to Part 15 of the FCC Rules. These limits are designed to provide reasonable protection
against harmful interference in a residential installation. This FCC Certifications equipment generates,
uses and can radiate radio frequency energy, if installed and used not in accordance with the
instructions, may cause harmful interference to radio communications. However, there is no guarantee
that interference will not occur in a particular installation. If this equipment does cause harmful
interference to radio or television reception, which can be determinedly turning the equipment off and
on, the user is encouraged to try to correct the interference by one of the following measures:
■ Reorient or relocate the receiving antenna.
■ Increase the separation between the equipment and receiver.
■ Connect the equipment into an outlet on a circuit different from that to which the receiver is
connected.
■ Consult the dealer or an experienced radio/TV technician for help.
This device complies with Part 15 of the FCC Rules. Operation is subject to the following two
conditions:
(1) This device may not cause harmful interference, and
(2) this device must accept an interference received, including interference that may cause undesired
operation.
FCC Caution: Any changes or modifications are not expressly approved by the party responsible for
compliance which could void the user's authority to operate this equipment.
EU / RCM Declaration Conformity
This product is carrying the RCM and CE-Mark in accordance with the related European / Australia /
New Zealand Directives.
1. The Tag units are water-repellent, but not waterproof! Keep the device dry. Precipitation,
humidity, and all types of liquids or moisture can contain minerals that may corrode
electronic circuits. If your unit gets wet, remove the battery, and allow the unit to dry
completely before replacing it.
2. If you want to use the device during air flight, please comply with the air safety
regulations for each respective country.
3. We reserve the right to change the hardware/software specifications and designs, as
well as the information in the manuals, at any time without prior notice.
4. Proper operating temperatures for this product are between 40˚F ~104˚F (5˚C~32˚C).
Proper storage Temperatures are between -4˚F~185˚F (-20˚C~85˚C). For operating
temperatures under 40°F (5°C) please use LIR2032 batteries only – Ask your Pet
Tracker agent.
6. The batteries provided in this product should be disposed of properly according to
national or regional recycling regulations - contact local authorities for more information.
Warning: Do not expose the batteries to fire or heat - this may result in danger
from explosions.
Warnings and Important Information
6
 Loading...