

Gintec G10 User Manual

G10
G10 Multifunctional survey GNSS Receiver
User Manual
Copyright Guangzhou Geosurv Information Technology Co., Ltd
*All Right Reserved

G10
Contents
Chapter 1 Brief Introduction ......................................................................................... 1
1.1 Company Introduction .................................................................................. 1
1.2 Brief introduction of G10 .............................................................................. 1
1.2.1 Technical Innovation ............................................................................... 1
1.2.2 Advantage in use ..................................................................................... 2
Chapter 2 G10 Survey System ....................................................................................... 4
2.1 G10 mainframe ................................................................................................. 4
2.1.1 Front side of the mainframe ................................................................... 4
2.1.2 Back side of the mainframe .................................................................... 5
2.1.3 The bottom of receiver ........................................................................... 5
2.2 Basic operation of G10 ...................................................................................... 6
2.2.1 Power on/off ........................................................................................... 6
2.2.2 Self-checking ........................................................................................... 6
2.2.3 Check work station .................................................................................. 7
2.2.4 Switch work mode and datalink .............................................................. 7
2.3 WEB UI function ................................................................................................ 8
2.3.1 Status ...................................................................................................... 9
2.3.2 Information ............................................................................................. 9
2.3.3 Download .............................................................................................. 10
2.3.4 Managment ........................................................................................... 10
2.3.5 Settings .................................................................................................. 11
2.4 Device Register ................................................................................................ 17
2.4.1 Register via WEB UI ............................................................................... 17
2.4.2 Register via Controller ........................................................................... 18
2.5 Upgrade firmware ........................................................................................... 18
2.6 Measure the antenna height .......................................................................... 19
Chapter 3 Standard Accessories ................................................................................. 21
3.1 Base standard accessories .............................................................................. 21
3.2 External Radio Standard Accessories .............................................................. 22
3.3 Rover standard accessories ............................................................................. 22
3.4 Controller Standard Accessories ..................................................................... 23
Chapter 4 Tilt Survey ............................................................................................ 24
4.1 Activate tilt survey function ............................................................................ 24
4.2 Sensor Calibrate .............................................................................................. 25
Appendix 1 Default Radio configuration ............................................................... 33
Appendix 2 Specification ...................................................................................... 33

G10
1
Chapter 1 Brief Introduction
This chapter is mainly used to introduce GINTEC Company and the key features of
G10.
1.1 Company Introduction
Guangzhou Geosurv Information Technology Co., LTD is committed to providing
good surveying and mapping products for customers with good price. We devote to
producing advanced and high-quality products, oriented the product as first
competitive force. Our industrial GOAL is leading the industry development and
technology innovation and improving surveying and mapping, geographic information
field productivity. Our company is an OEM factory of many world famous GPS brands
and companies.
1.2 Brief introduction of G10
As the latest generation of GNSS receiver, G10 brings you GNSS technology
revolution. It uses magnesium alloy fuselage design, make sure the body it’s strong
and durable. The dimension and weight also has a great breakthrough, now the
dimension is diameter 14cm × height 14cm, the weight is just 2kg. Adopt many new
technology, there are some new functions add to G10 and this make survey work more
convenient.
Now give a brief introduction to those new function, in the next chapters, it has
detailed information.
1.2.1 Technical Innovation
Designed and developed by a group of excellent developers, G10 has many
technical innovation. All of the innovation can help you finish the survey work quickly

G10
2
and high efficiently. They can be summarized in 5 points, as follow:
(1) Tilt survey and electric bubble
G10 has industry-leading tilt survey auxiliary and electronic bubble technology,
can reach 0-3cm correction accuracy in 30 degree tilt range, so it’s convenient
to measure the unreachable targets such as the corner.
(2) WIFI wireless connection
When the WIFI function is opened, G10 can be used as a hotspot. You can
connect your phone to it via WIF. Log on the WEB UI, then you can do many
configurations with your phone, such as change work mode, change datalink,
download static data.
(3) Dual mode Bluetooth
G10 supports 4.0 long-distance Bluetooth and can connect to mainstream
mobile phone, pad and digital consume products. Meanwhile can be
compatible with Bluetooth 2.1 and connected with industrial-grade controller.
(4) Double backup of the survey data
G10 RTK survey data will have double back-up, by controller and receiver so
as to make sure the survey data is safe and reliable.
(5) Compatible with all satellite constellations
Not only can track all of the current satellite systems, but also can support the
satellites in planned. The excellent performance in tracking satellites make it
easily cope with and face to future.
1.2.2 Advantage in use
Besides the latest technical innovation, there are also development in the
hardware and accessories, such as the battery and some useful tools. All of these make
sure our users grasp the most advantaged thing in use.
(1) Innovation and durable interface design.
G10 use magnesium alloy fuselage design, it’s strong and durable. The
dimensions of G10 is radius 14cm × height 14cm, but its weight is just 2kg.

G10
3
(2) Advanced datalink
The radio module and the communication protocol are compatible with the
main RTK products in the market and able to work together with other brand
RTK products so as to optimize your asset allocation. he 3G modules support
WCDMA, HSDPA+, GPRS, GSM and other network. It can continuously and
stably work with CORS.
(3) Innovation high-capacity battery
3400mAH high capacity intelligent battery has a built-in LED battery status
indicator which help user can quickly check the remaining battery power.
(4) 50HZ high-speed acquisition
With powerful intelligence platform, G10 supports maximum 50HZ high rate
data acquisition so as to be convenient for taking expansion of high dynamic
survey.
(5) Large capacity storage
Configure with 4GB internal memory, G10 can store a large amount of survey
data. It also support storage expansion, the maximum32GB micro SD card.
(6) Productivity tools
G10 configures with user-friendly tools, intelligent calibration platform and
quick connector. The calibration platform can rapidly calibrate the gyroscope
sensor and enhance the accuracy of surveying. With quick connector you can
connect the receiver to the pole and support just with one key. So does take
apart the receiver.
All of the innovation and advantage in using can give a high efficiency survey
experience. We always do our best to support the best equipment and technical
service to the customers.
G10
4
Chapter 2 G10 Survey System
The first chapter has introduce the company and innovation of G10. But they are
all brief. In this chapter, it will show the detailed information of G10, such as
appearance, accessories and some basic operation.
2.1 G10 mainframe
The mainframe of G10 is a flat cylindrical, 144mm in height, 140mm in diameter.
The front side is a LED screen, 2 functional buttons and 6 indicators. The back side is a
battery compartment. In the compartment, there are two slots, one for SIM card
another for Micro SD card.
The bottom of the receiver is some interfaces. They include a radio antenna
interface, a GSM antenna interface, a 5 pin external power interface and a 7 pin
RS232/USB interface.
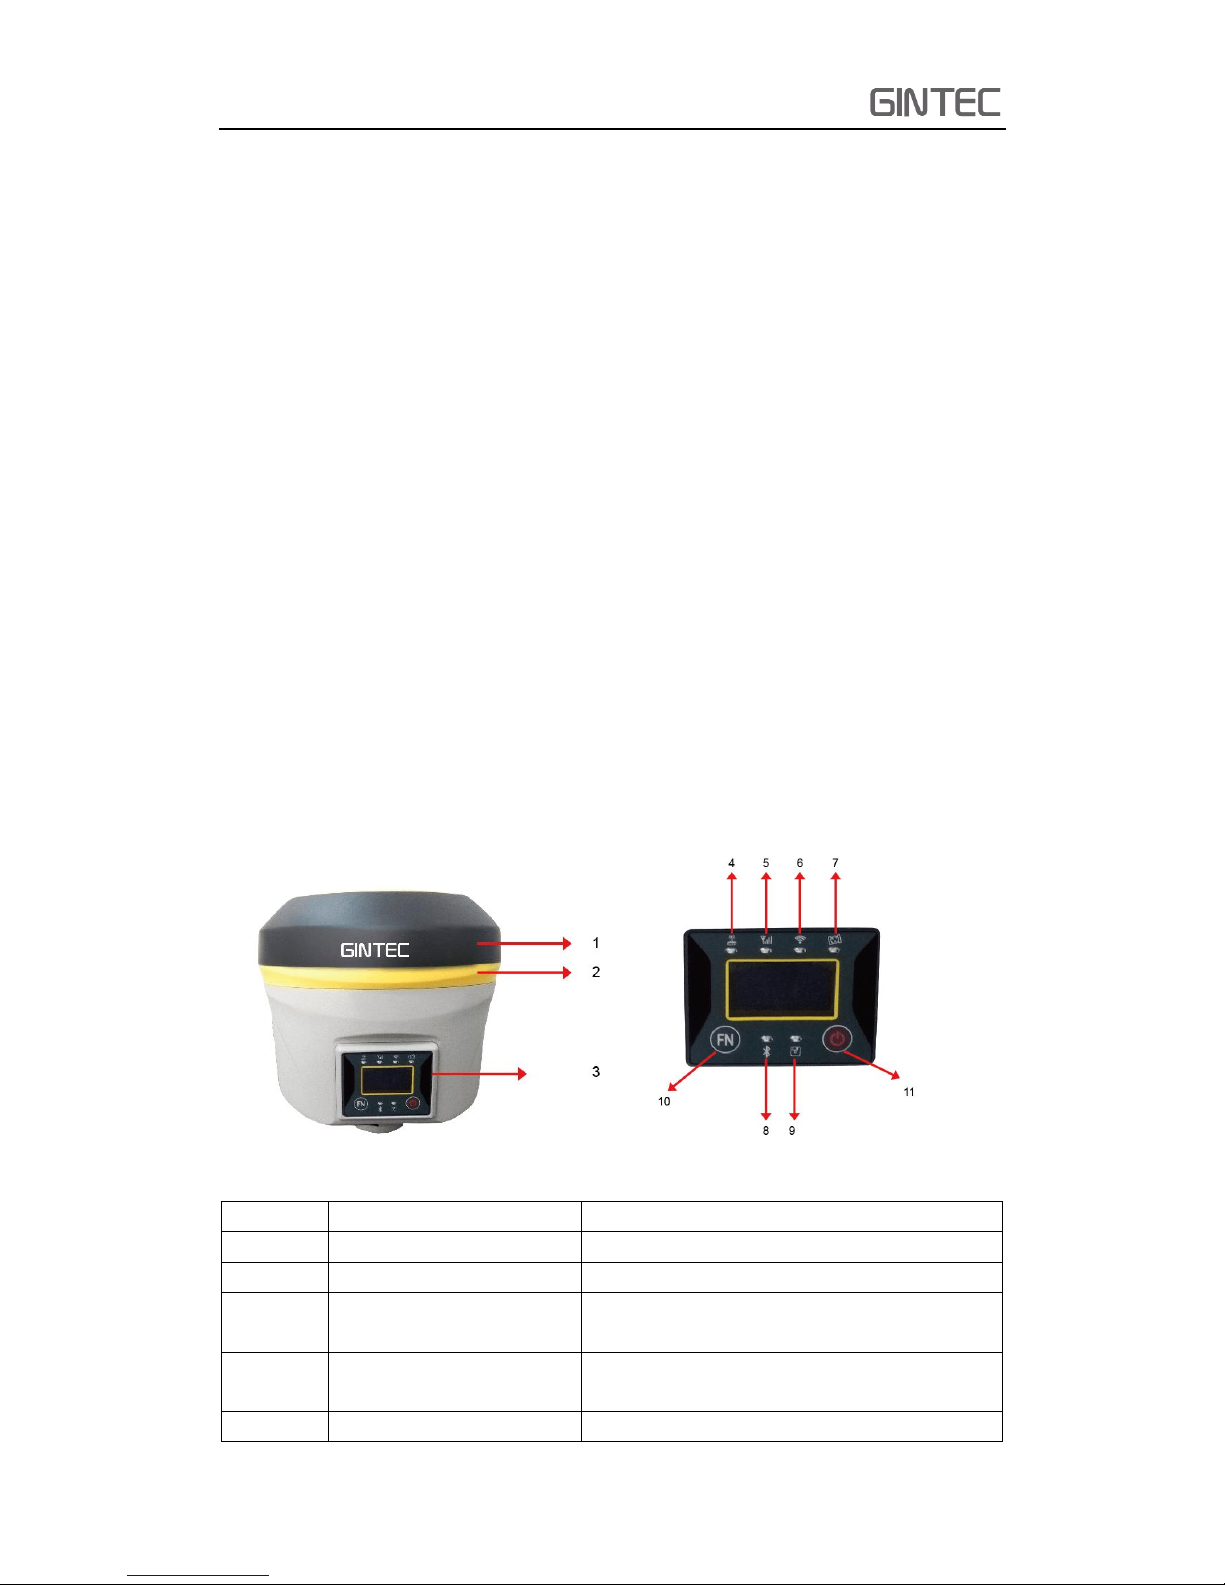
2.1.1 Front side of the mainframe
Figure 2-1 Front panel
Number
Name
Function
1
Top cover
Protect the antenna
2
Protection rubber ring
Protect the receiver in case of drop
3
LED screen
Show wok mode, datalink,
and configuration information
4
Radio indicator
When the receiver is transmitting/receiving
radio signals, it will blink
5
Network indicator
It will blink when G10 is receiving net signals
G10
5
6
WIFI indicator
It will be light when the G10 is connected via
WIFI function
7
Satellite indicator
How many time it blink, means how many
satellites are locked, cycle once every
5seconds
8
Bluetooth indicator
It will be light when G10 is connected via
bluetooth
9
Static indicator
It will blink when G10 begin to record static
data
10
Function key
Make a selection
11
Power key
Power on/off the receiver. Keep press to
enter main menu
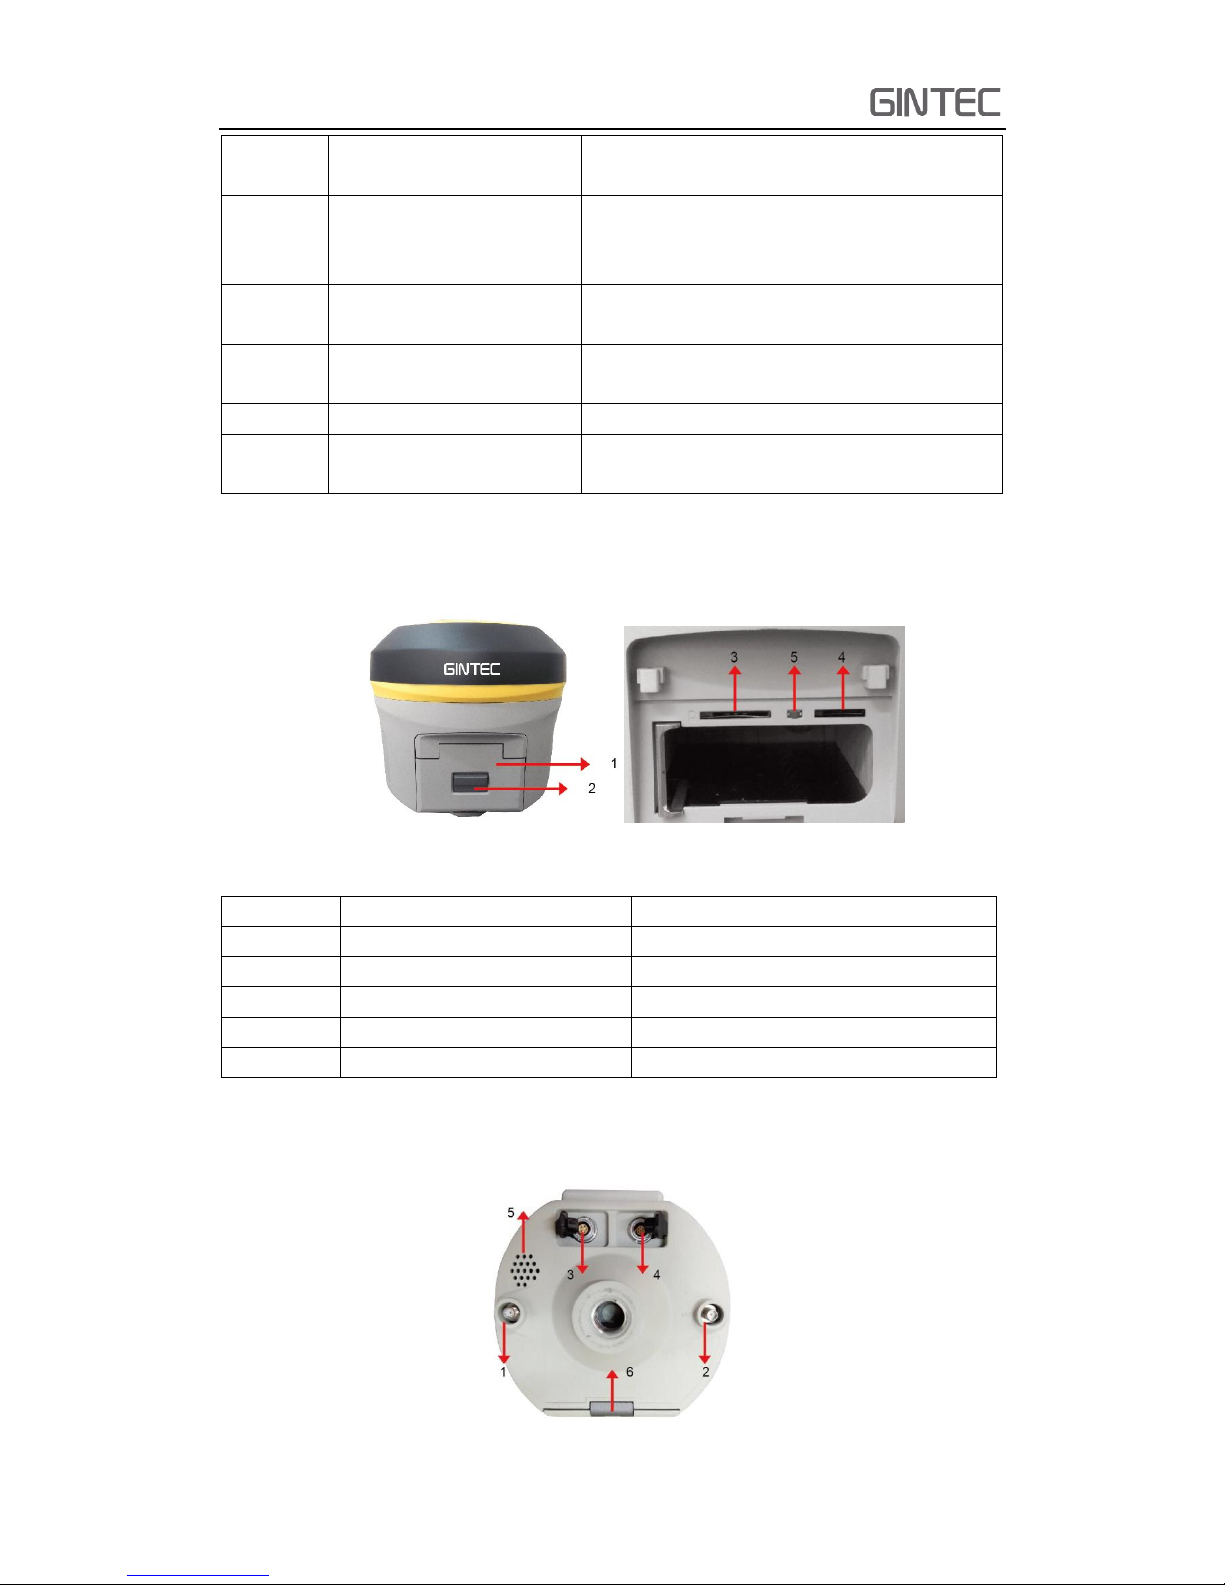
2.1.2 Back side of the mainframe
Figure 2-2 Back Side
Number
Name
Function
1
Battery compartment cover
Protect the battery
2
Compartment locker
Open/lock the cover
3
SIM card slot
Put and read SIM card
4
Micro SD card slot
Put and read Micro SD card
5
Reset key
Press to reset the receiver
2.1.3 The bottom of receiver
Figure 2-3 Bottom

G10
6
Number
Name
Function
1
Radio antenna interface
Connect to radio antenna
2
Network antenna interface
Connect to network antenna
3
5 pin interface
Connect to external radio and external
battery
4
7 pin interface
USB port, also can connect to controller
via the multi-function cable
5
Beeper
Broadcast voice message
6
Screw hole
Fix the receiver to tribrach or pole
2.2 Basic operation of G10
In this section, we highlight the basic operation of G10. It includes powering on/off,
checking work station, changing work mode, register receiver, download static data,
WEB UI function, self-checking, firmware upgrading. All of these basic operations are
simple and easy. But they are very important
2.2.1 Power on/off
This is the first step to use G10, it’s very easy to operate. When the receiver has
battery, keep press power key for some seconds, then you will see the LOGO of GINTEC.
If you want to power off the receiver, keep press power key again, when it’s in the
state of power-on.
2.2.2 Self-checking
If the indicators are abnormal or the receiver can’t work normally, for example the
Bluetooth can’t be connected, the radio mode can’t work, it can’t connect to the CORS.
Then you can use the automatic detection function, which is mainframe self-checking.
Self-checking will check radio mode, GSM mode, Bluetooth mode and. During this
procession, it has voice guide tell you whether it’s normal or not.
Power on, press and hold power button about 8 seconds until it powers on again
with voice guide from the receiver. Then release the button to hear the result.
G10
7
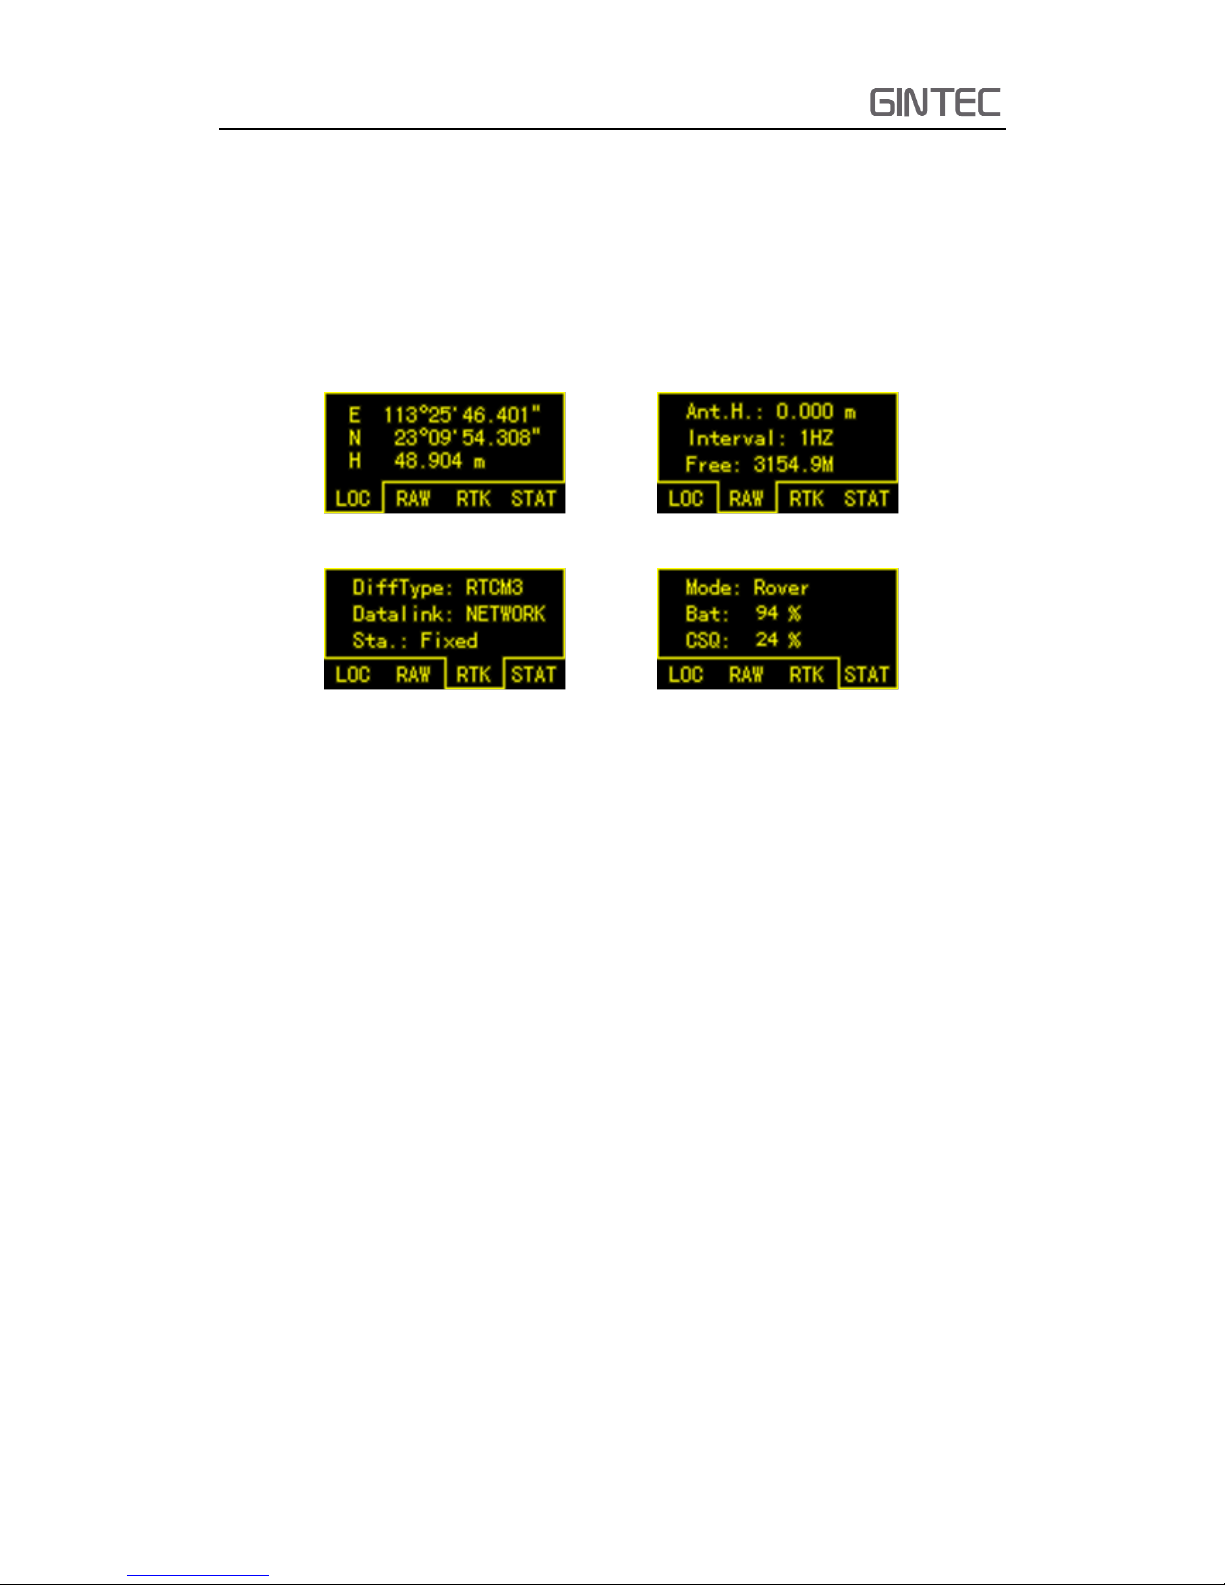
2.2.3 Check work station
This section will tell you how to check the work station. Sometimes you want to
know the solution, datalink, satellites information and so on. You can press function
key to see detailed information
Figure 2-4 Work station
LOC: Locate coordinate
RAW: Antenna height, data internal and frequency
RTK: Data difference type, current datalink, work solution state
STAT: Current work mode, battery station and signal CSQ
2.2.4 Switch work mode and datalink
When we use a RTK, usually we switch work mode and datalink via the receiver
directly. Of course sometimes we also can switch work mode and datalink via controller.
But it’s a little complex with controller. When we get a receiver, we should switch work
mode first, it includes base, rover, and static. Then switch the datalink, depend on
different work mode the datalink has different choices.
Keep press power key in the state of powering on until enter into another menu.
It shows as follow:

G10
8
Figure 2-5
Then press function key to select. Now we want to switch work mode, so select
“Mode” menu and press power key to enter. After entering “Mode” menu, there are
three choices, static, base and rover. Select the one you want to use, then press power
key to confirm.
Figure 2-6
Then next step is switching datalink. After pressing power key to confirm work
mode, we will go back to last menu, shows as follow. This time select “RTK” to change
datalink. Press function key to select, power key to confirm.
Figure 2-7
It includes UHF, 3G/GPRS, External, Bluetooth and dual mode. Select the one you
want to use.
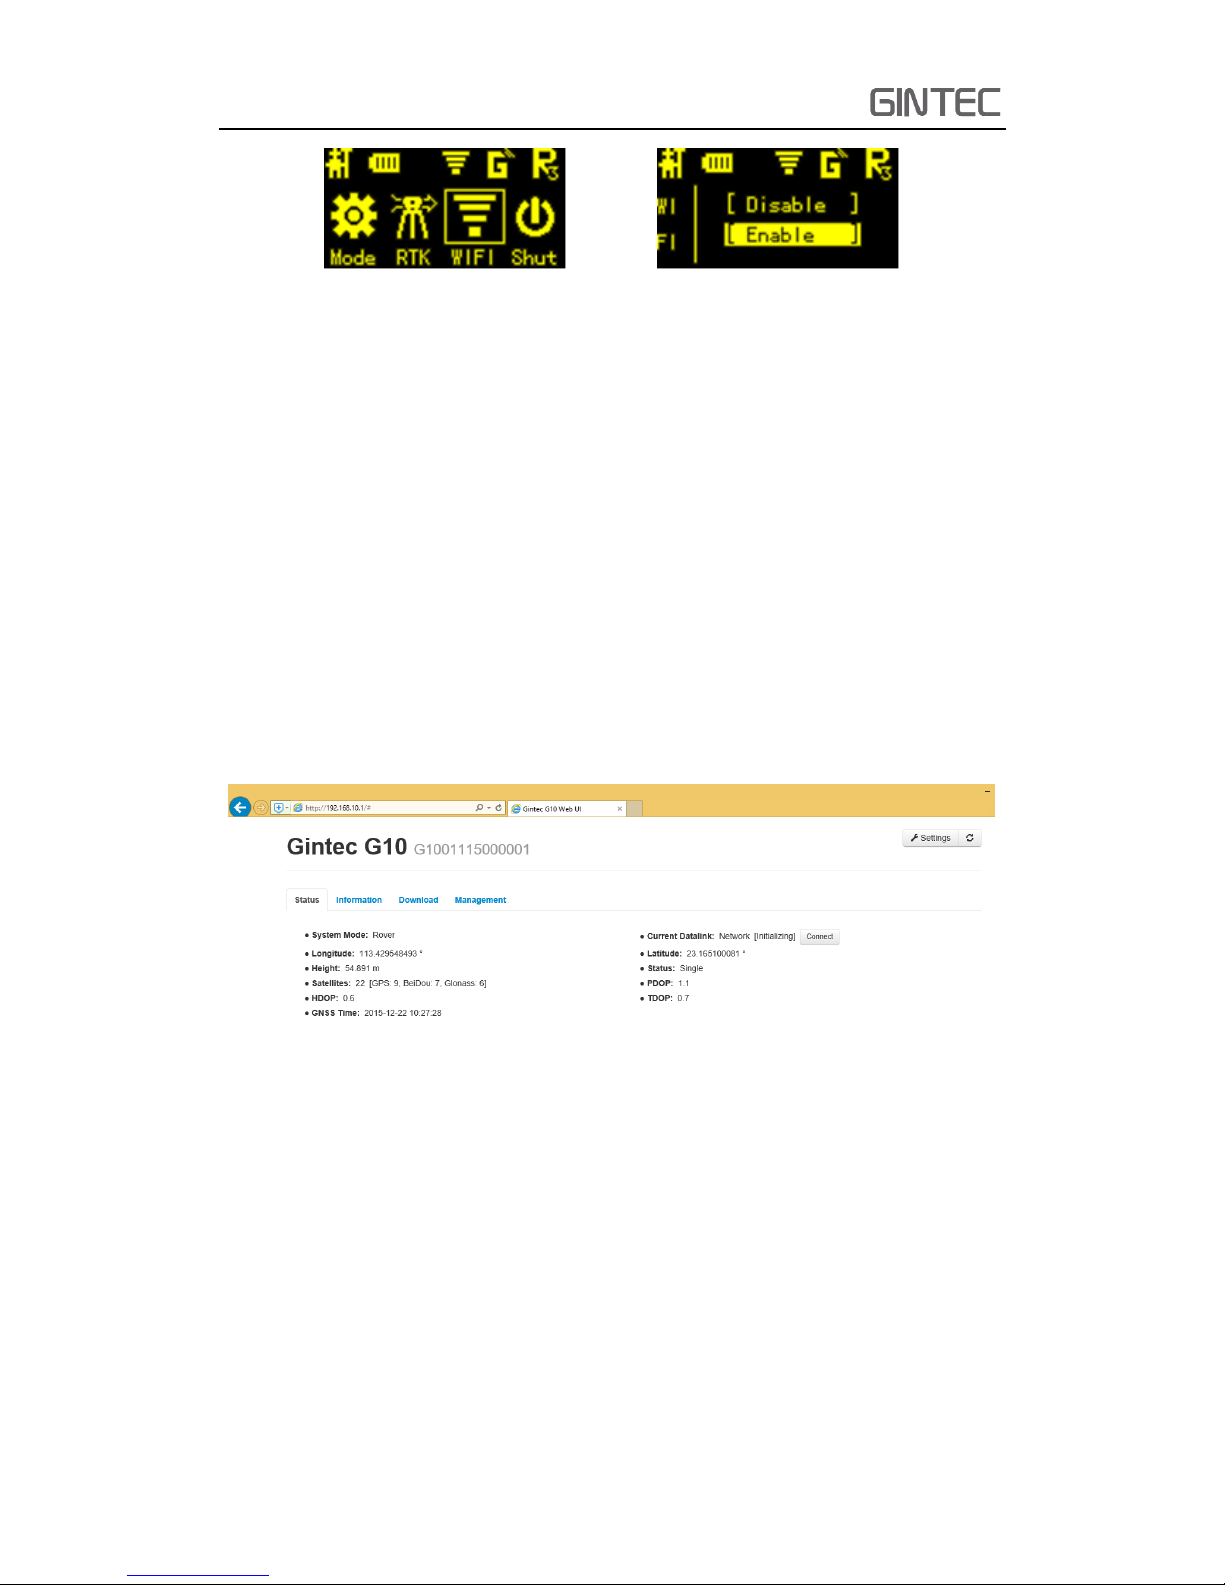
2.3 WEB UI function
G10 has WIFI function, it can work as a hotspot, then Phone, controller, PC and
other devices can connect its WIFI. The default WIFI name is device number, there is
no password for this WIFI.
Before using this function, you should make sure the WIFI function is available. In
the same interface with mode selection, press function button to select “WIFI”, press
power button to confirm. Then select “Enable” to activate WIFI function.
G10
9
Figure 2-8
After connecting the WIFI, input IP “192.168.10.1” into your web browser to open.
Then it will pop up a window. It ask for log account and password, default is:
Account: admin Password: password
The WEB UI contains Status, Information, Download, Management, and Settings.
It also can show the device number in the web.
2.3.1 Status
In Status, you can see the current work status of the receiver, some basic
information. Such as system mode, coordinate, satellites, solution and so on. The
detailed information you can see from the picture.
Figure 2-9 Status
2.3.2 Information
Then it’s the “Information”, this menu shows the information inside the receiver,
such as firmware version of the receiver, GPS firmware version, UHF mode information,
GSM mode information, and so on.
 Loading...