

Gin Gliders Safari Pilot 2 User Manual
1

User manual
v1.3 - 08/2018
Lightweight Tandem

Contents
Thank you
Warning
About Gin Gliders
Introducing the Safari Pilot 2
Technical specifications
Harness diagram
Optional extras
Before you fly
Flying with the Safari Pilot 2
Maintenance and repairs
Materials
GIN guarantee
Final words
Pilot details
Inspections
.......................................................................4
.........................................................................5
..........................................................6
.................................................8
............................................................9
............................................................10
..............................................................11
.......................................................................25
..............................................................26
...................................................................27
................................................................28
.................................................................29
.........................................7
........................................22
..............................................24
3

Thank you...
...for choosing Gin Gliders. We are confident you’ll enjoy many rewarding experiences in the air with
your GIN harness.
This manual contains important safety, performance and maintenance information. Read it before your
first flight, keep it for reference, and please pass it on to the new owner if you ever re-sell your harness.
Any updates to this manual, or relevant safety information, will be published on our website: www.
gingliders.com. You can also register for e-mail updates via our website.
Happy flying and safe landings,
GIN team
4

Warning
Like any extreme sport, paragliding involves unpredictable risks which may lead to injury or death. By
choosing to fly, you assume the sole responsibility for those risks. You can minimize the risks by having
the appropriate attitude, training and experience and by properly understanding, using and maintaining
your equipment. Always seek to expand your knowledge and to develop self-reliance. If there is anything
you do not understand, consult with your local dealer as a first point of contact, with the GIN importer in
your country or with Gin Gliders directly.
Because it is impossible to anticipate every situation or condition that can occur while paragliding, this
manual makes no representation about the safe use of the paragliding equipment under all conditions.
Neither Gin Gliders nor the seller of GIN equipment can guarantee, or be held responsible for, the safety of
yourself or anyone else.
Many countries have specific regulations or laws regarding paragliding activity. It’s your responsibility
to know and observe the regulations of the region where you fly.
INTENDED USE: Lightweight air sports
equipment with a maximum mass of less than
120kg, operated in the paragliding division.
5

About Gin Gliders
Dream
In forming Gin Gliders, designer and competition pilot Gin Seok Song had one simple dream: to make
the best possible paragliding equipment that pilots all over the world would love to fly—whatever their
ambitions.
At Gin Gliders, we bring together consultant aerodynamists, world cup pilots, engineers and paragliding
school instructors, all dedicated to fulfilling this dream.
Touch
We’re a “hands-on” company that puts continuous innovation and development at the center of
everything we do.
At our purpose-built R&D workshop at head office in Korea, we are able to design, manufacture, test-fly
and modify prototypes all in a matter of hours. Our international R&D team is on hand both in Korea and
at locations worldwide. This guarantees that your equipment has been thoroughly tested to cope with the
toughest flying conditions.
Our own production facilities in East Asia ensure the quality of the finished product and also the wellbeing of our production staff.
Believe
We believe that the product should speak for itself. Only by flying can the pilots understand their
equipment and develop trust and confidence in it. From this feeling comes safety, comfort, performance
and fun. The grin when you land should say it all!
6

Introducing the Safari Pilot 2
The Safari Pilot 2 is for both professional and leisure tandem pilots who are looking for a harness that’s
lightweight, compact and easy-to-use.
The Safari Pilot 2 weighs only 2.6kg (including moussebag) and is made of high quality, durable
materials. It’s compact and streamlined, yet offers excellent comfort in the air. There are no pressure
points, even on longer flights.
Storage and pockets have been well thought-out. There are 2 new side pockets with loops for a selfie
stick, besides a large back pocket with integrated radio pocket.
The harness also includes improved safety features. There is a new buckle for the leg loops which ensure
that the buckles cannot be connected incorrectly. Back protection is a 14cm moussebag and the dorsal
rescue container is designed for rapid and easy deployment. The split leg design makes the harness easy
to move with on the ground and easy to get into after take-off.
7

Technical Specifications
The Safari Pilot 2 is EN and LTF certified.
Size One Size
Weight (kg) 2.6
Height of attachment points (cm) 42
Carabiner distance (cm) 34-46
Certification
The Safari2 Pilot has EN and LTF certification, max load 120 daN
Safari Pilot 2 harness: (EN/LTF) EAPR-GZ-0493/17
Parachute container
Integrated container behind seat
Back protection
17cm mousse bag
Delivery package
1 Harness
1 Rescue deployment handle
2 GIN 30mm carabiners
1 Foam back protector
8
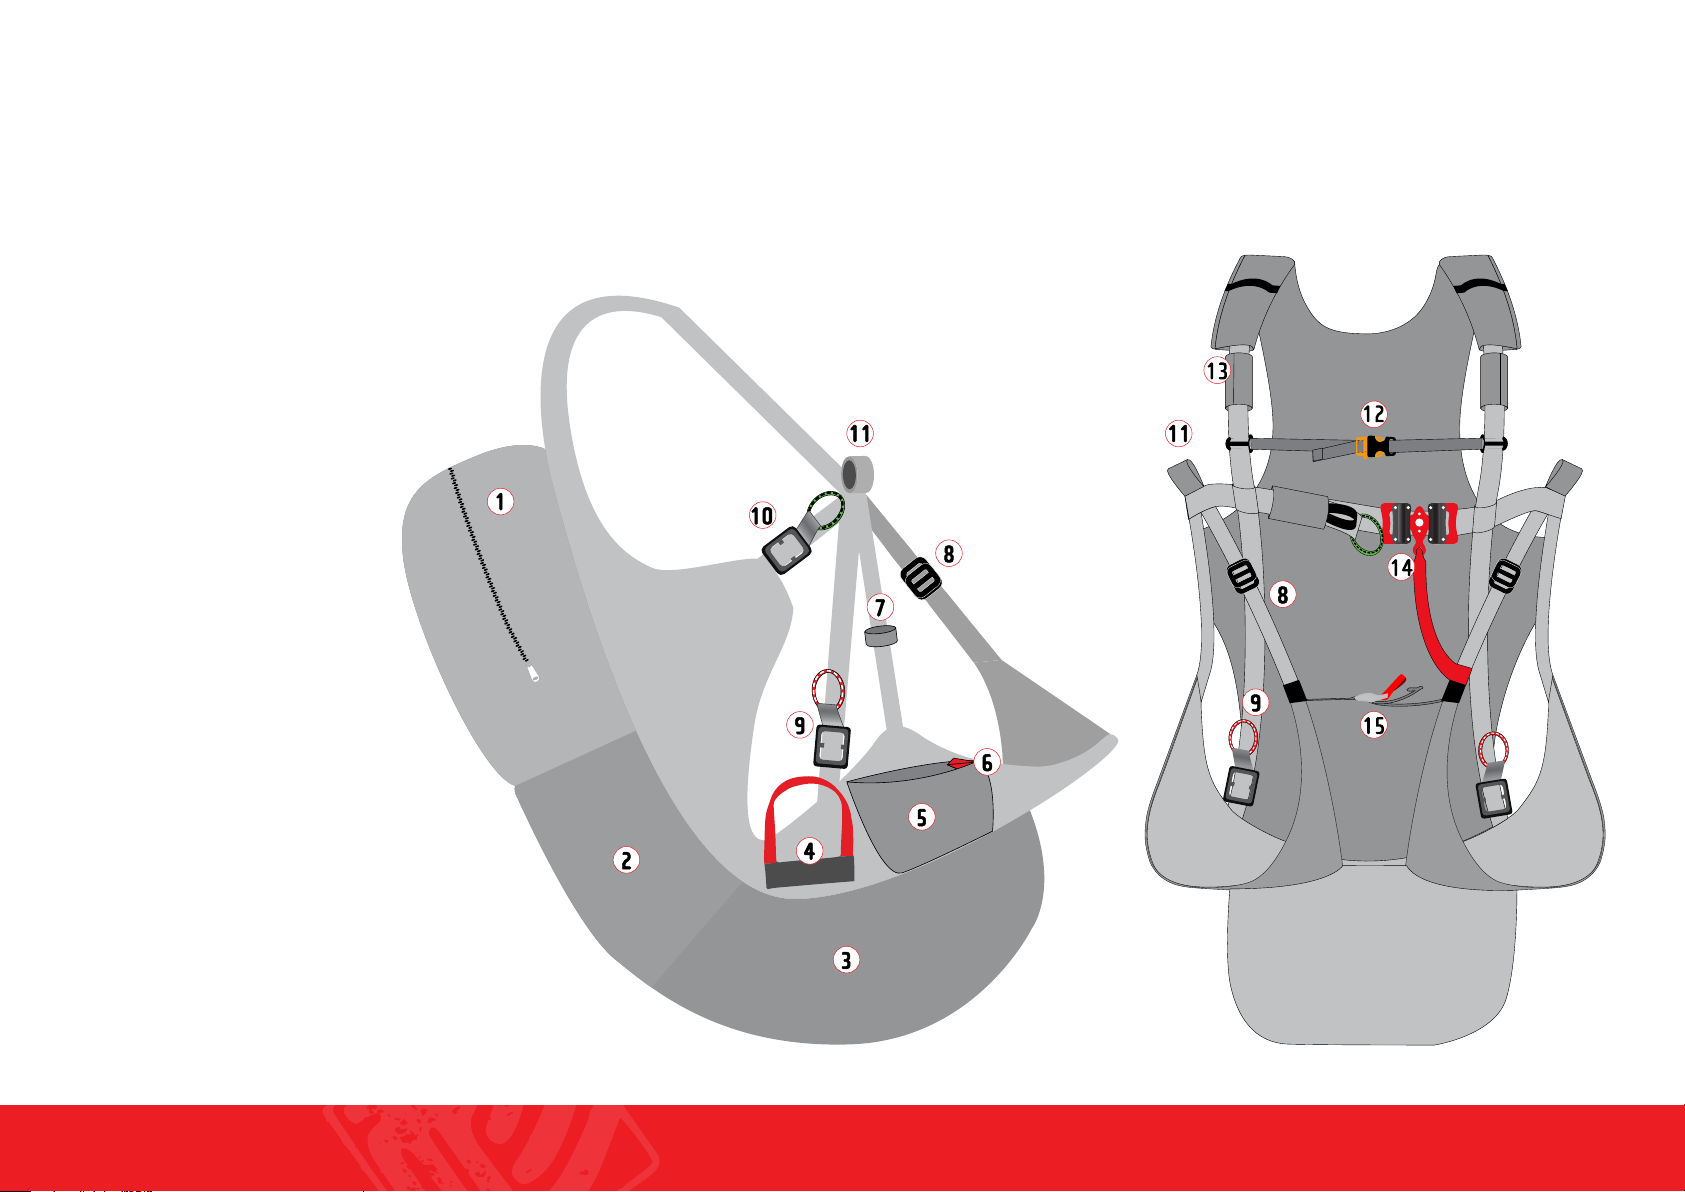
Harness diagram
1.
Back Pocket
2.
Rescue Container
3.
Back Protector
4.
Rescue Handle
5.
Camera Pocket
6.
Camera Safety Loop
7.
Selfie Stick Loop
8.
King Snaps Buckle
9.
Shoulder Adjustment
10.
Lateral Strap
11.
Hooking Points
12.
Breast Buckle
13.
Velcro Bridle Cover
14.
T-Lock Safety Buckle
15.
Leg Adjustment
9
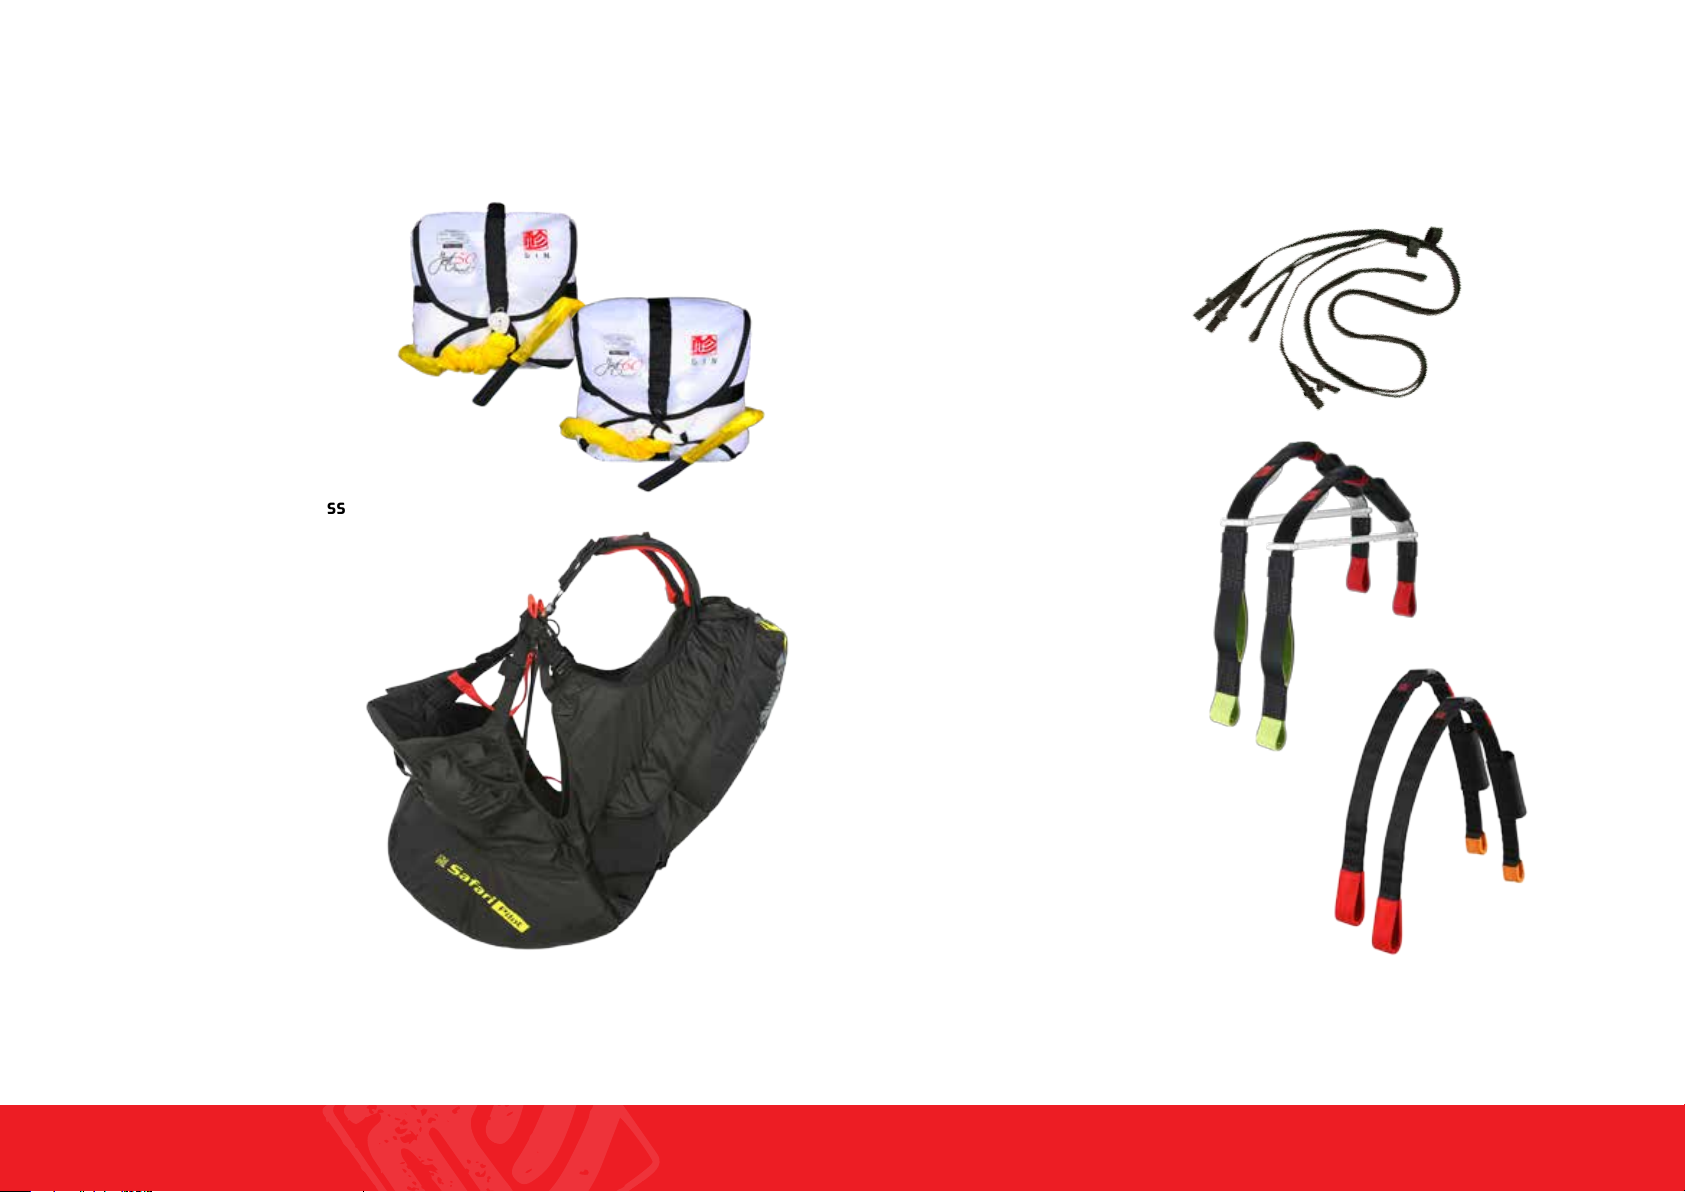
Optional Extras
Yeti rescue #50 or #60
Safari Passenger 2 harness
Tandem rescue bridle
Spreader bar 30cm
Supple Spreader
For up-to-date information on additional accessories, visit www.gingliders.com.
10

Before you fly
Make sure your harness has been check by a professional authorised by GIN for completeness and basic
settings. Your harness must be assembled by a suitably qualified paragliding professional.
Rescue Installation and compatibility check
Gin Gliders recommend that rescue installation is performed properly by a competent person. The
rescue parachute is a pilots last resort and failure to pack or connect the reserve parachute in the correct
way may cause death or severe injury. The pilot is responsible for ensuring proper installation.
This harness is compatible with the Yeti #50 and #60 rescue parachutes. Other manufacturers’
rescues may also be used but we cannot guarantee their function. The pilot is responsible for checking
compatibility.
Every installation of a rescue system into the harness must be checked by a qualified paragliding
professional for compatibility. To verify the installation, you must perform a test deployment by sitting
in a simulator. Make sure that the rescue parachute can be released from the rescue container—it must
be done by you, the pilot, sitting in the harness hanging from a simulator. The pilot should be able to pull
the rescue free from the harness with one hand. If the rescue becomes stuck or is difficult to extract from
the rescue container then the harness and rescue may not be compatible and should not be used together.
WARNING: If you are in any doubt about
any aspect of rescue installation, seek a
professional authorised by GIN for assistance.
IMPORTANT: You must perform a test
deployment from a simulator to verify the
installation.
11
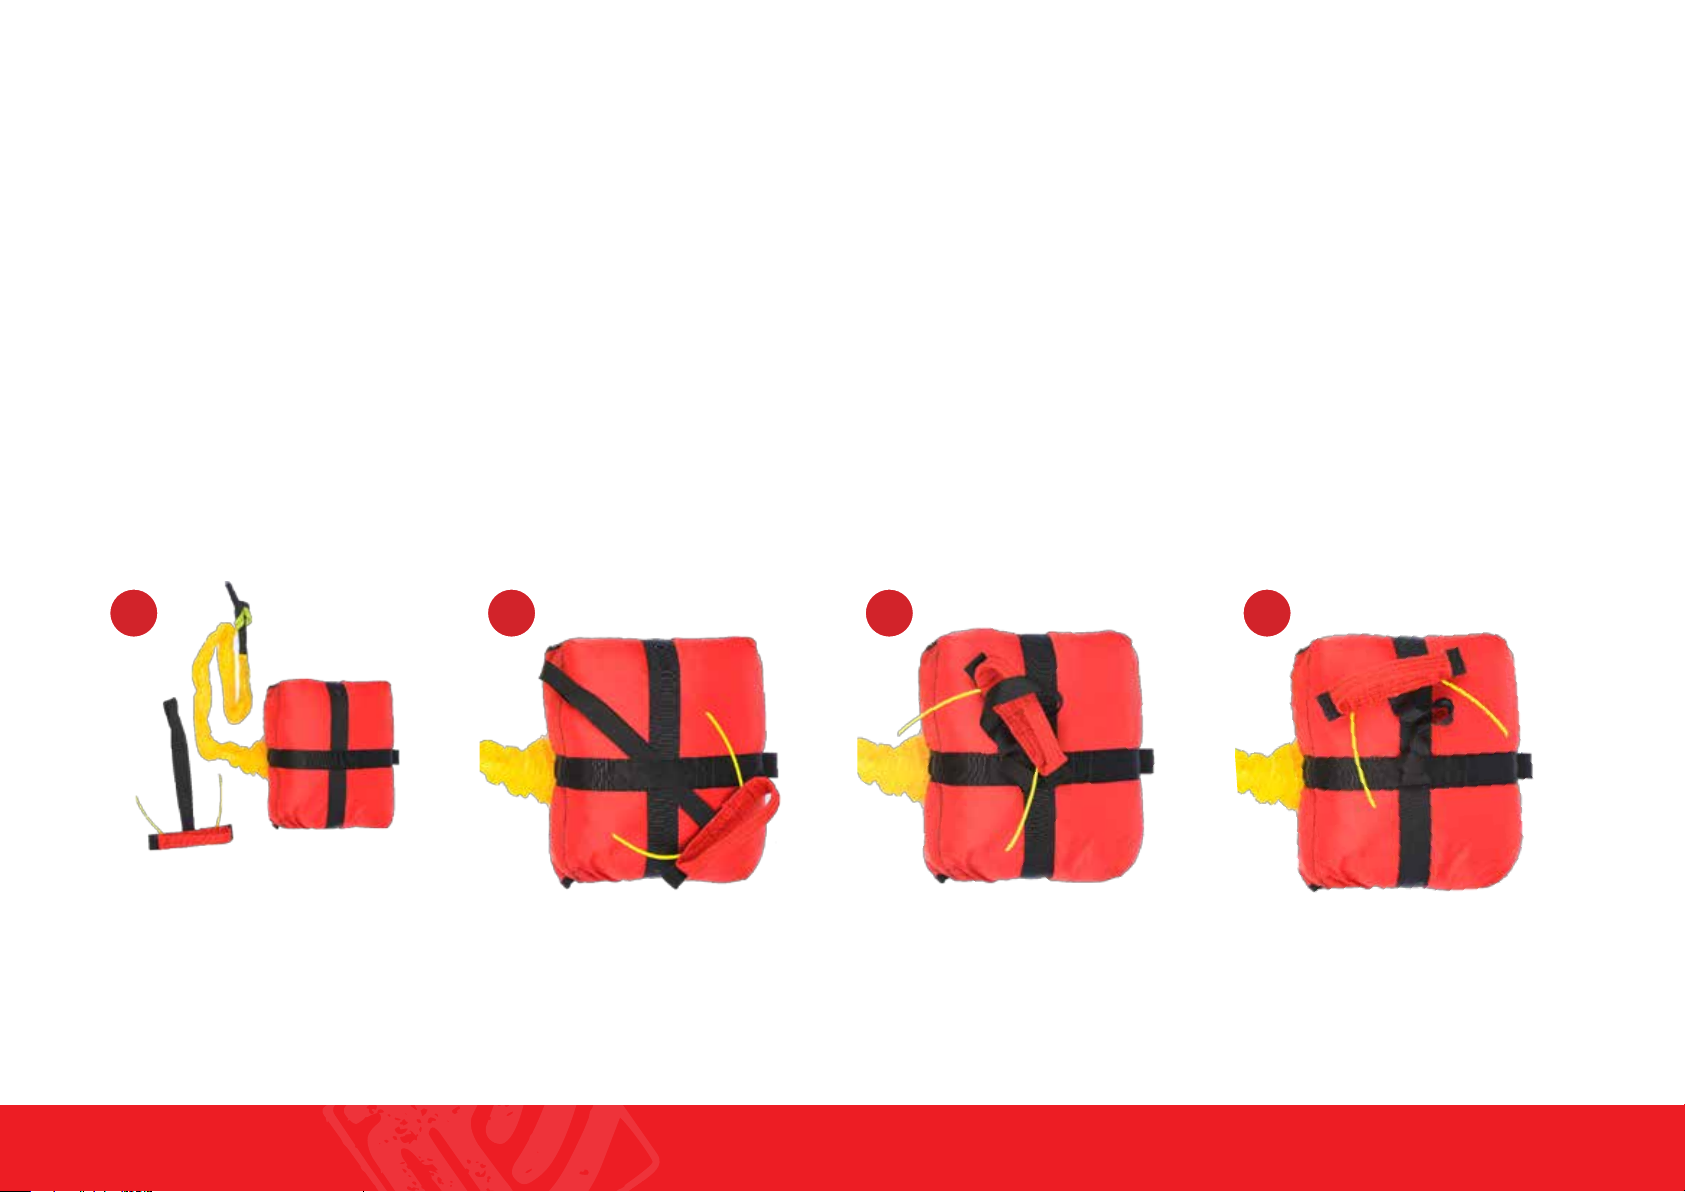
Attaching the rescue deployment bag to the harness deployment handle
The rescue container for this harness comes with its own deployment handle. This handle and its strap
must be connected to the deployment bag of the parachute. In particular, check the length of the strap
connecting the rescue deployment handle to the rescue inner container. It should be long enough that the
reserve can be extracted without the danger of the pins not being pulled before the strap tightens on the
reserve, but not so long that there is excessive slack that extends the movement required for deployment.
The deployment bag of other manufacturers’ rescue systems (i.e. non-GIN rescue systems) may have
different loop positions which may cause a deployment failure. Be sure to contact your parachute dealer
or a qualified professional to check the connection, position and secure deployment, and refer to the
rescue manual for details.
2 41 3
Handle attachment Pass the handle through the center loop Pass the handle through itself Pull to make a clean, tight knot
12
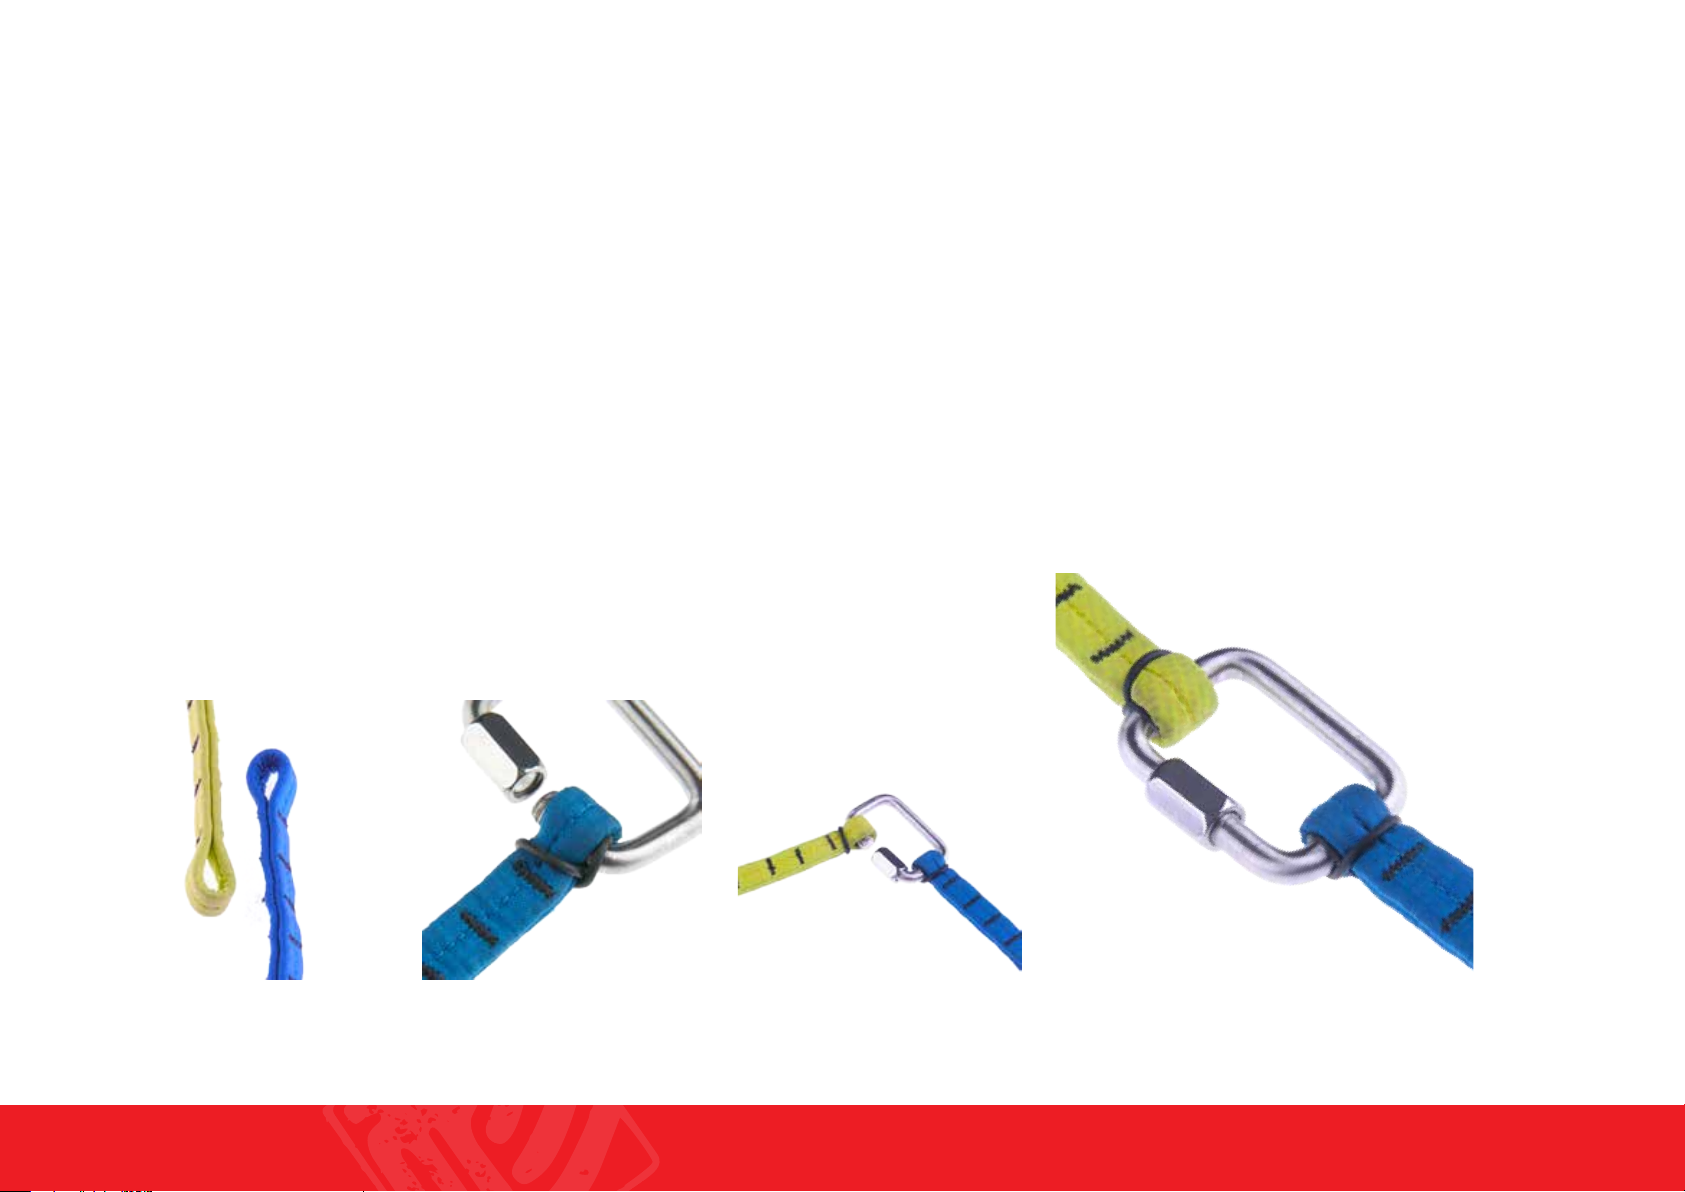
Connecting the rescue bridle
To connect a rescue to your harness we recommend using a GIN Rescue Carabiner. If you choose to
use different type of connector, it should be rated at least 9 times the maximum weight. For example, our
recommended 8mm Stainless Steel screwgate maillon (square) connector has a minimum breaking load of
28kN (2855 Kgf). It is the pilot’s responsibility to check the compatibility of the rescue system and ensure
that it is installed properly.
Be sure to inspect your connector during normal maintenance and safety checks. Replace it whenever
there are any signs of wear, and check your rescue system with a professional after any deployment. We
recommend that you cover the connection using the Maillon rapid cover to prevent excess friction. Rubberbands should also be used to secure the attachment and prevent excess friction.
Recommended: 8mm stainless steel screwgate maillon
8mm square maillon
Breaking load: 24kN
Maillon connection (Recommended by Gin Gliders)
WARNING: When connecting the rescue bridle
be sure to secure the connection using tape,
rubber bands or heat shrink wrap. If the lines
are not secure they may burn or cut from
excess friction.
e
u
c
s
e
R
Bridle attachment Attach the bridle to the maillon
Y
-
b
r
i
d
l
e
and secure it with a rubber band
Attach the rescue to the maillon
and secure with a rubber band
Must be made tight, finish by
making 1/4 turn with a tool
13
Rescue installation guide
The Safari Pilot 2 rescue is located behind the pilot’s seat. The handle can be placed on the left or right
side with a velcro bridle tunnel running along both sides of the harness to allow the pilot to customize the
harness to their needs. It is very important to properly install the rescue parachute. If the parachute is
not folded correctly or the lines are not placed properly, then a serious if not fatal accident could result. If
you have any doubts speak with your instructor or GIN dealer.
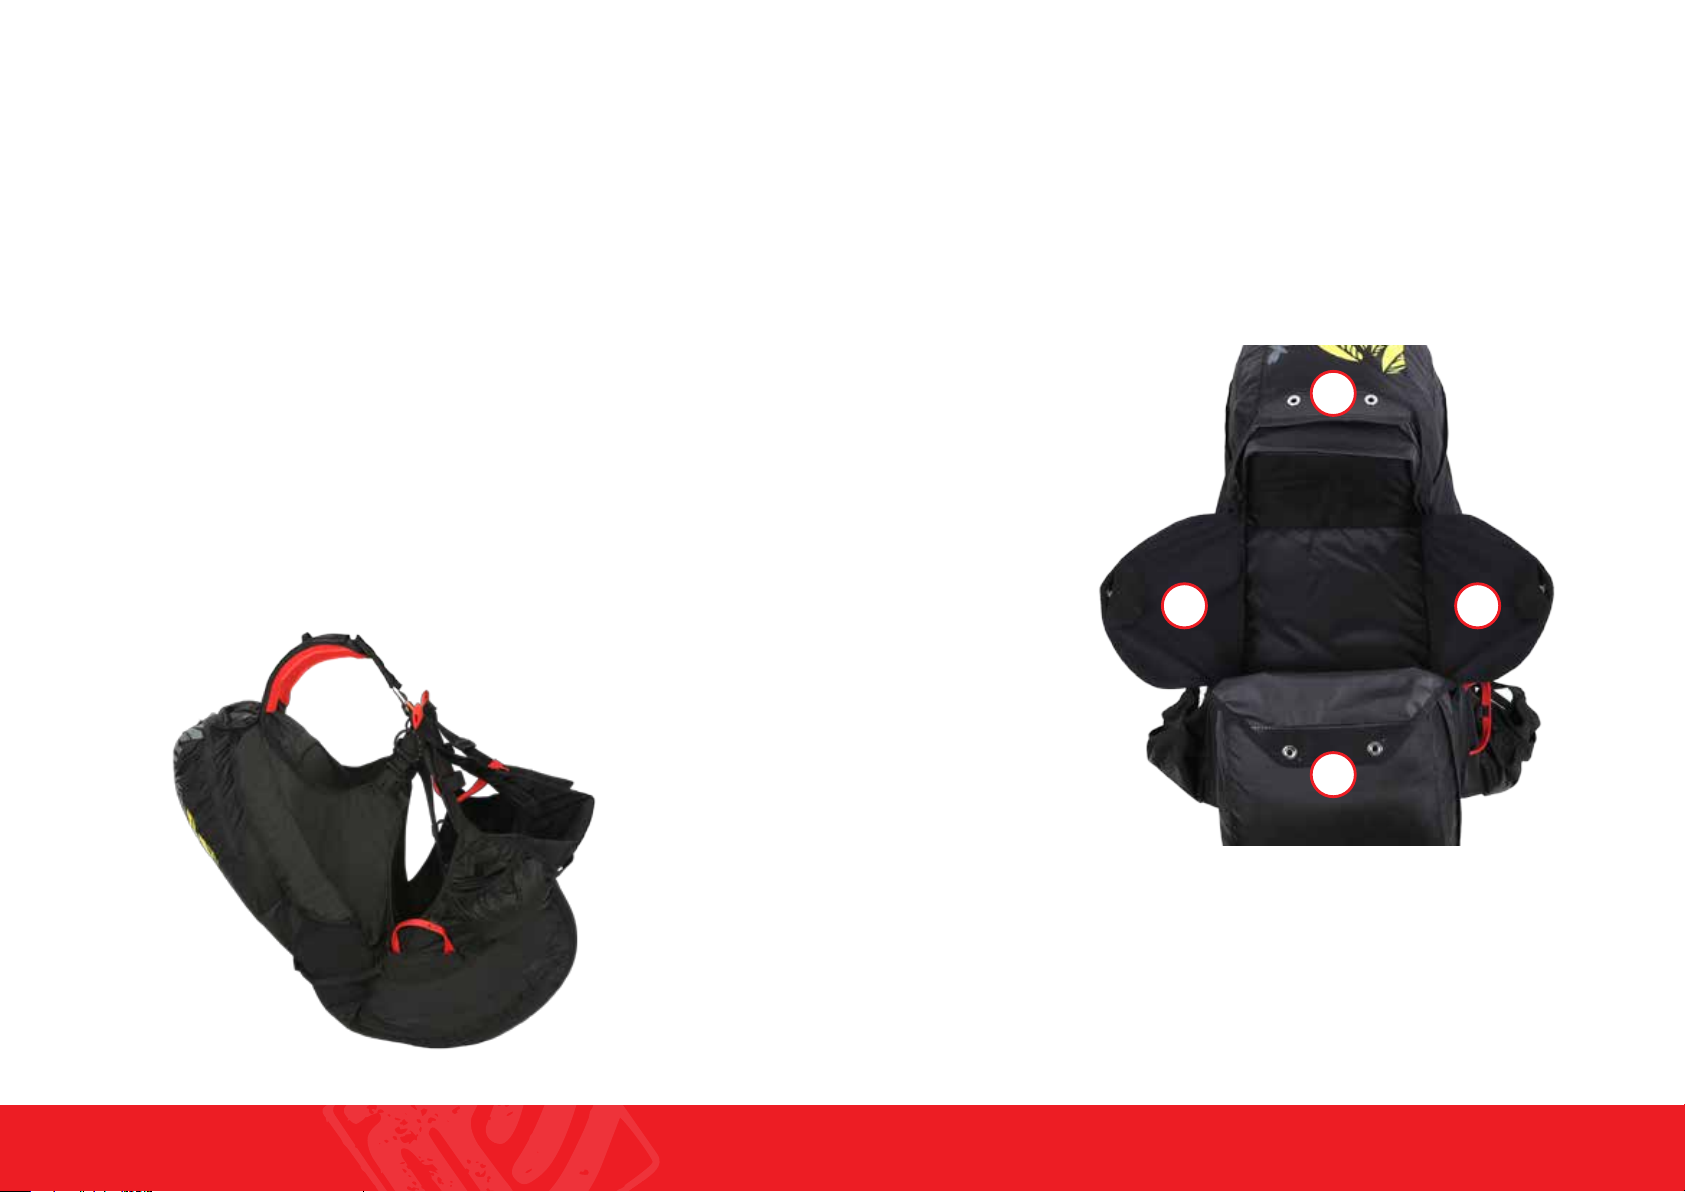
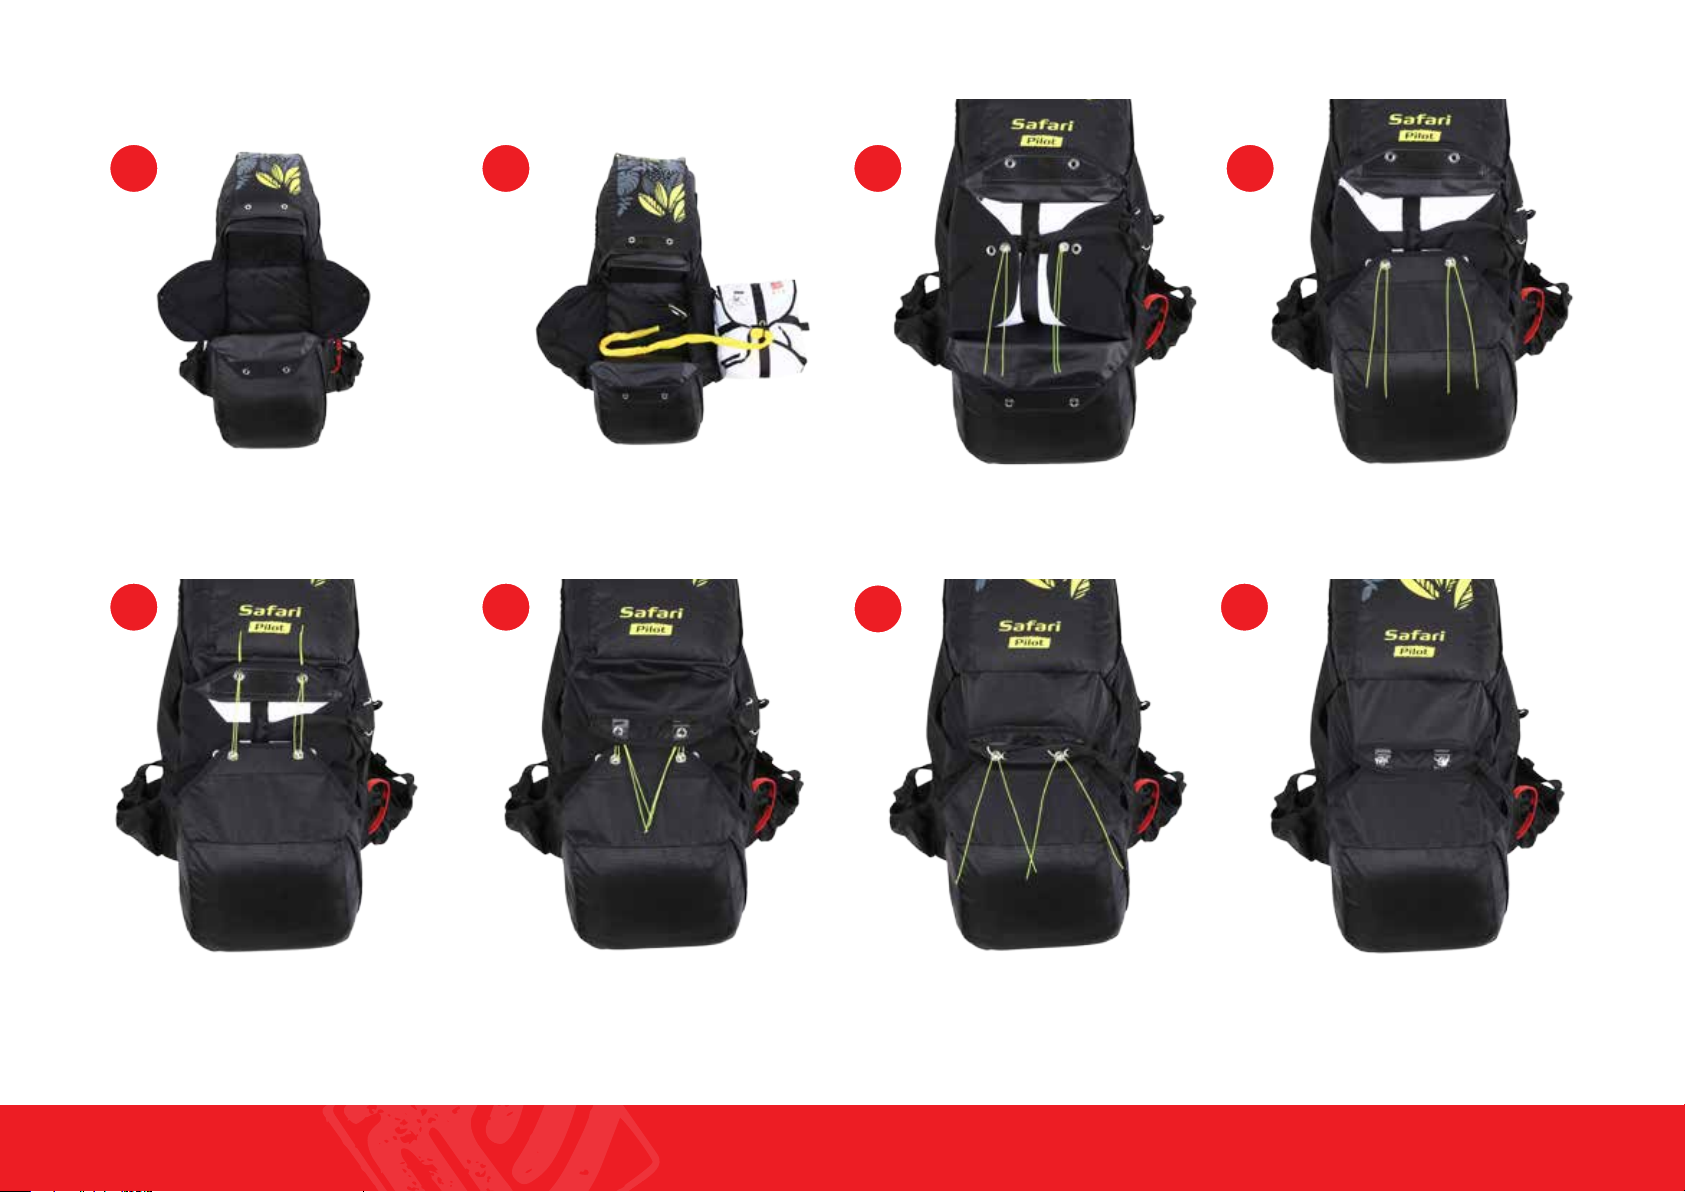
Main rescue installation guide
Begin by first connecting the rescue bridle and the rescue handle to the rescue parachute . Install the
rescue into the harness with the handle connection FACING OUT and the extra para line neatly folded on
the bottom of the container. Be sure that the inner bag is installed so the rescue handle loop is facing the
opening of the rescue container.
Using the closing line provided with your harness, pull the built-in loops through the grommets of the
rescue container flaps. Close the rescue container flaps in the order shown. Secure the rescue container
flaps by placing the metal release pins through the loops as shown.
WARNING: When installing the reserve make
sure the reserve handle is up and the reserve
lines are facing down.
C
A A
B
14
1 4
2
3
5
6 8
7
15
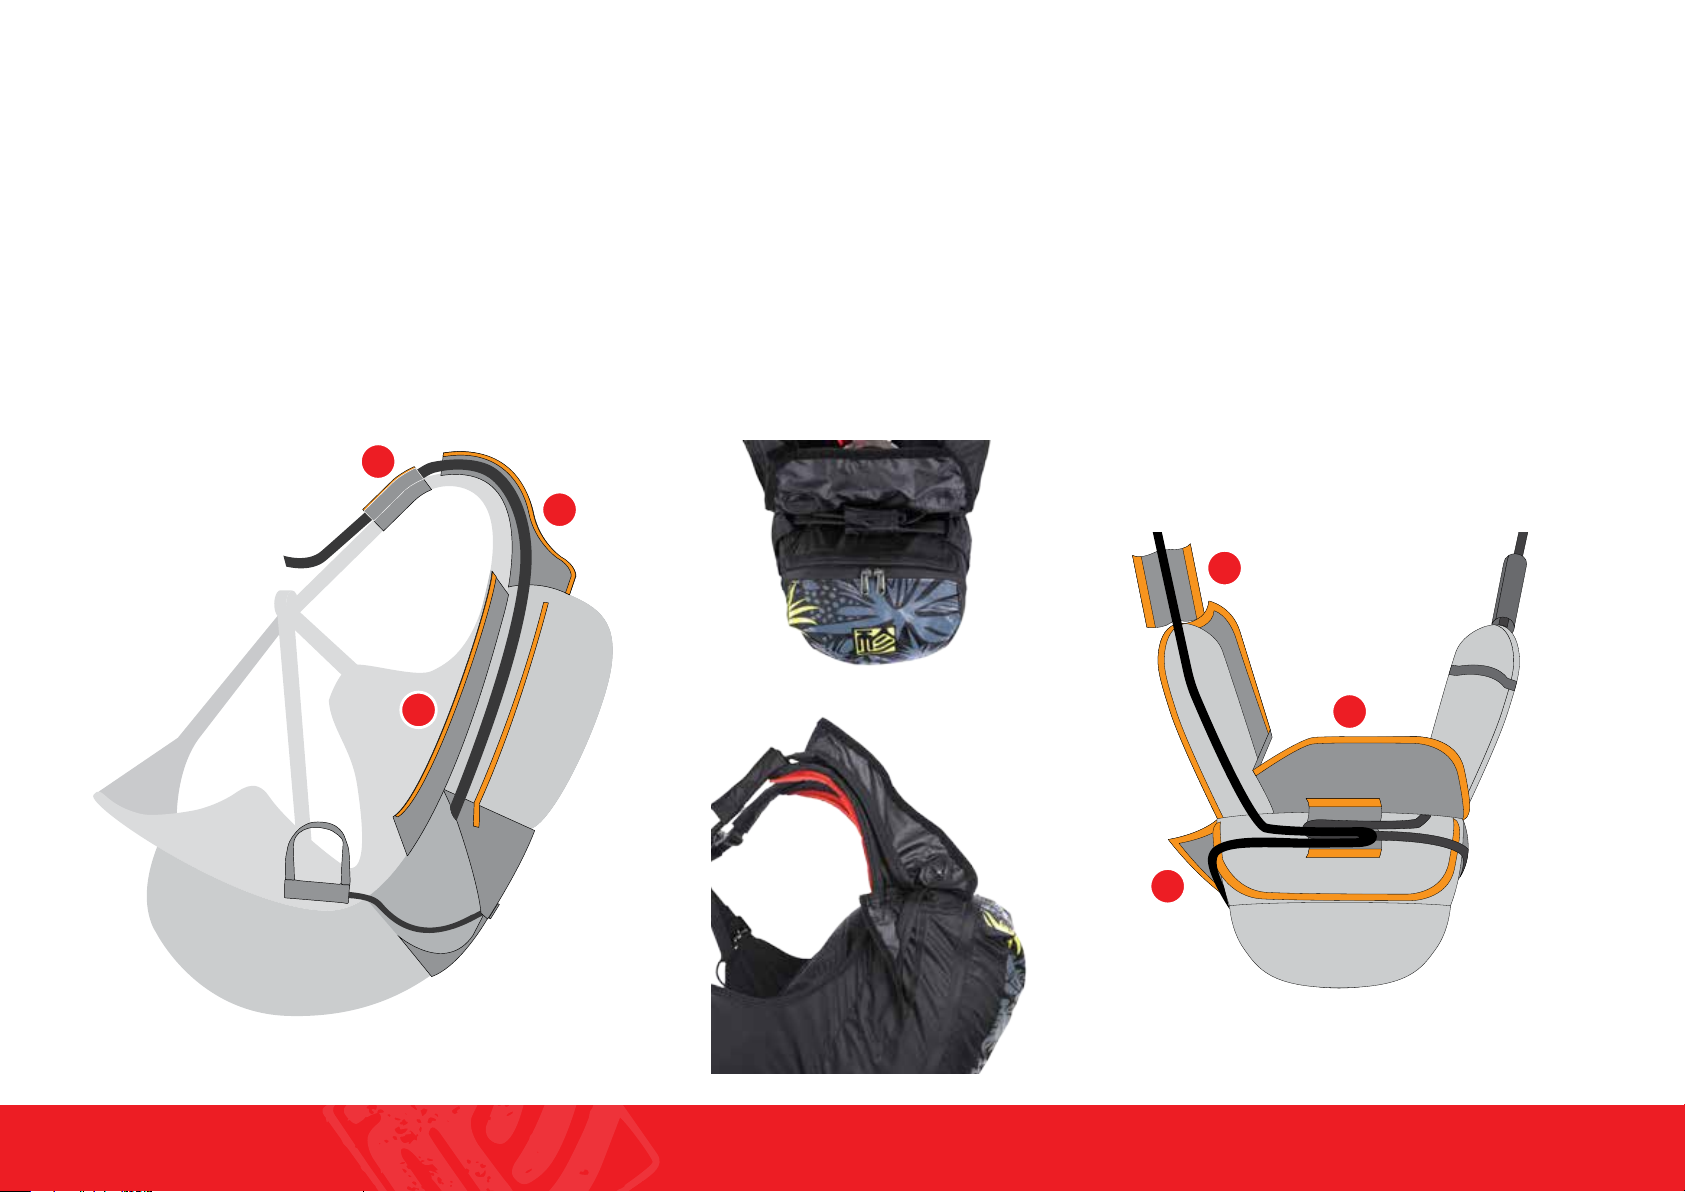
Rescue bridle installation
Bridle tunnel
After installing the rescue into your harness, run the rescue bridle through the bridle tunnel on both
sides of the harness.
1) Velcro SIDE cover
2) Velcro TOP cover
3) Velcro SHOULDER strap cover
3
2
NOTE: Use the Velcro strap under the TOP
cover to secure extra rescue bridle.
3
1
2
1
Side Top
16
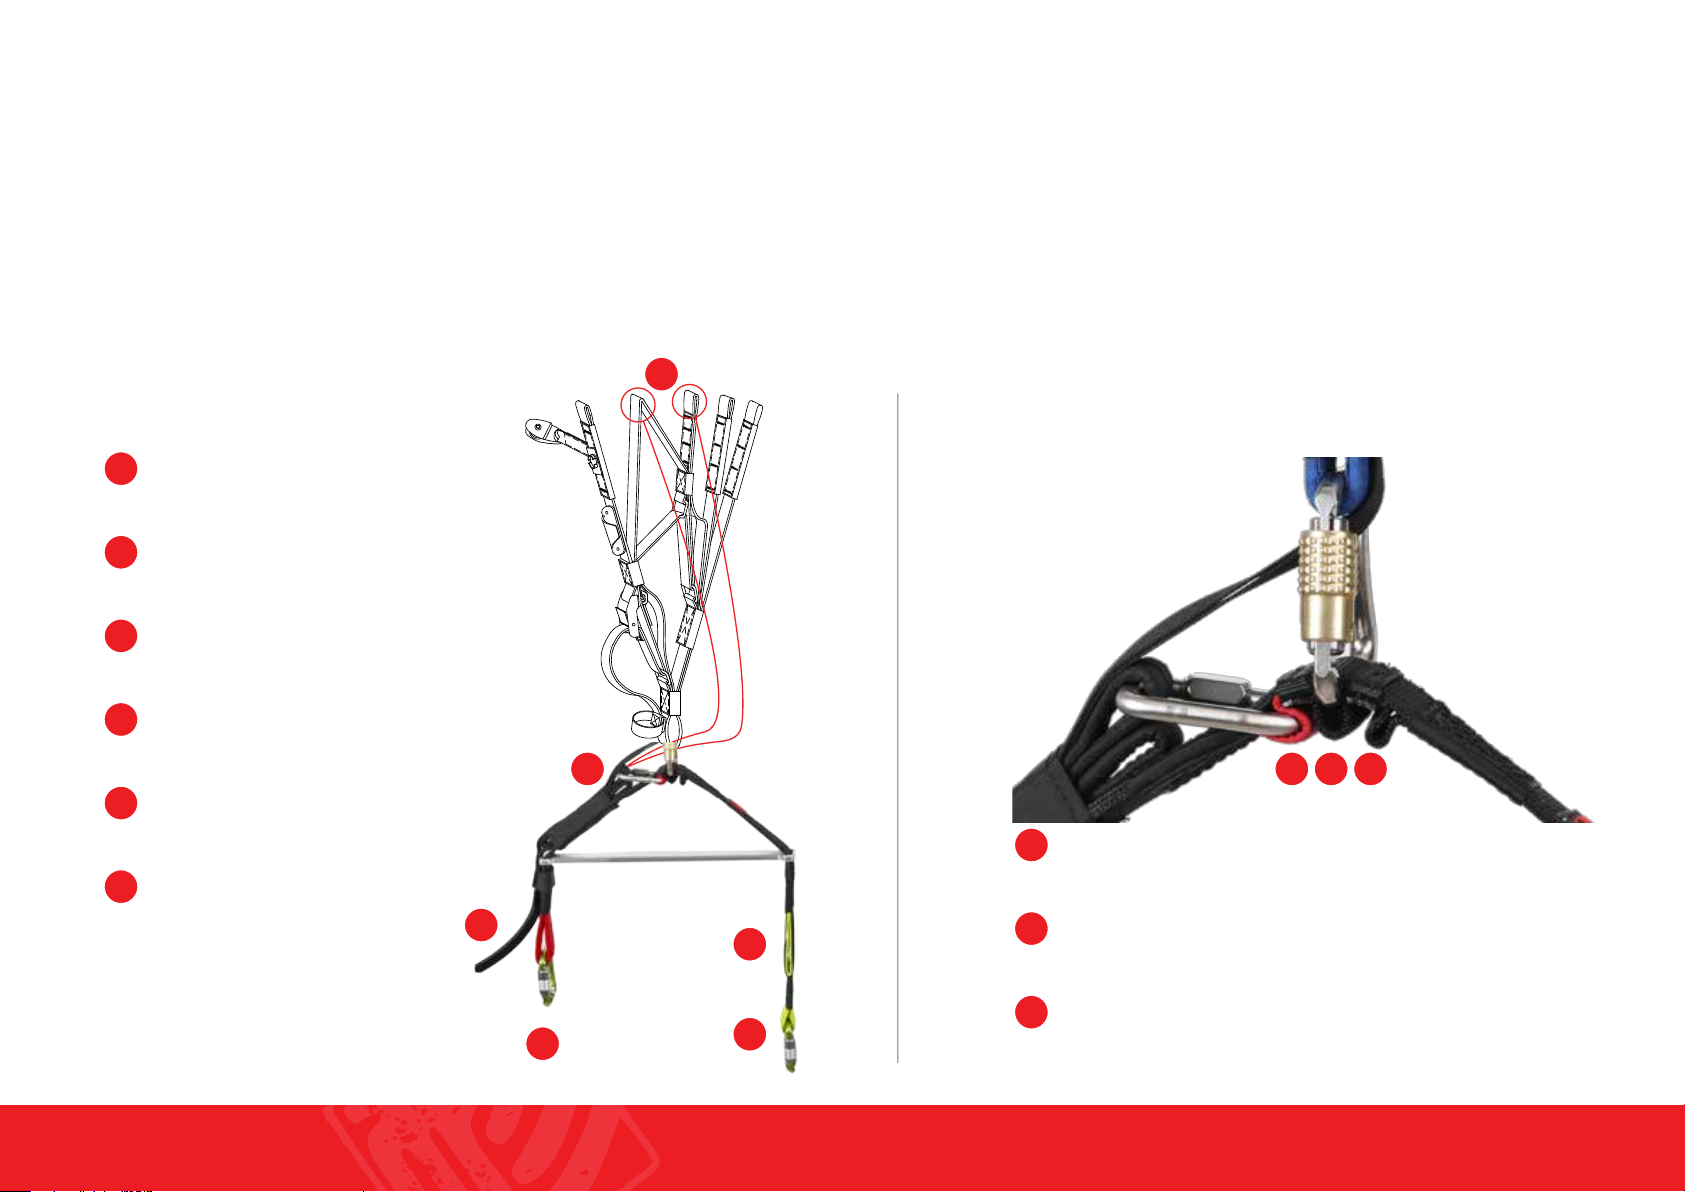
Spreader bar
The tandem spreader bars have been designed with a safety feature that prevents the main canopy from
re-inflating after the reserve parachute has been deployed. By connecting the rescue bridle to the “B” and
“C” risers the main canopy will be stalled into a more stable position for descent.
5
Rescue bridle
1
Pilot attachment
2
(Red Loop)
Small passenger attachment
3
(Lyme Loop)
Large passenger attachment
4
(Lyme Loop)
6
“B” & “C” attachment points
5
1
2
3
Rescue carabiner
6
(Red Loop)
1
2
3
4
Rescue carabiner (Red Loop)
1
Main carabiner (Small passenger)
2
Main carabiner (Large passenger)
3
17
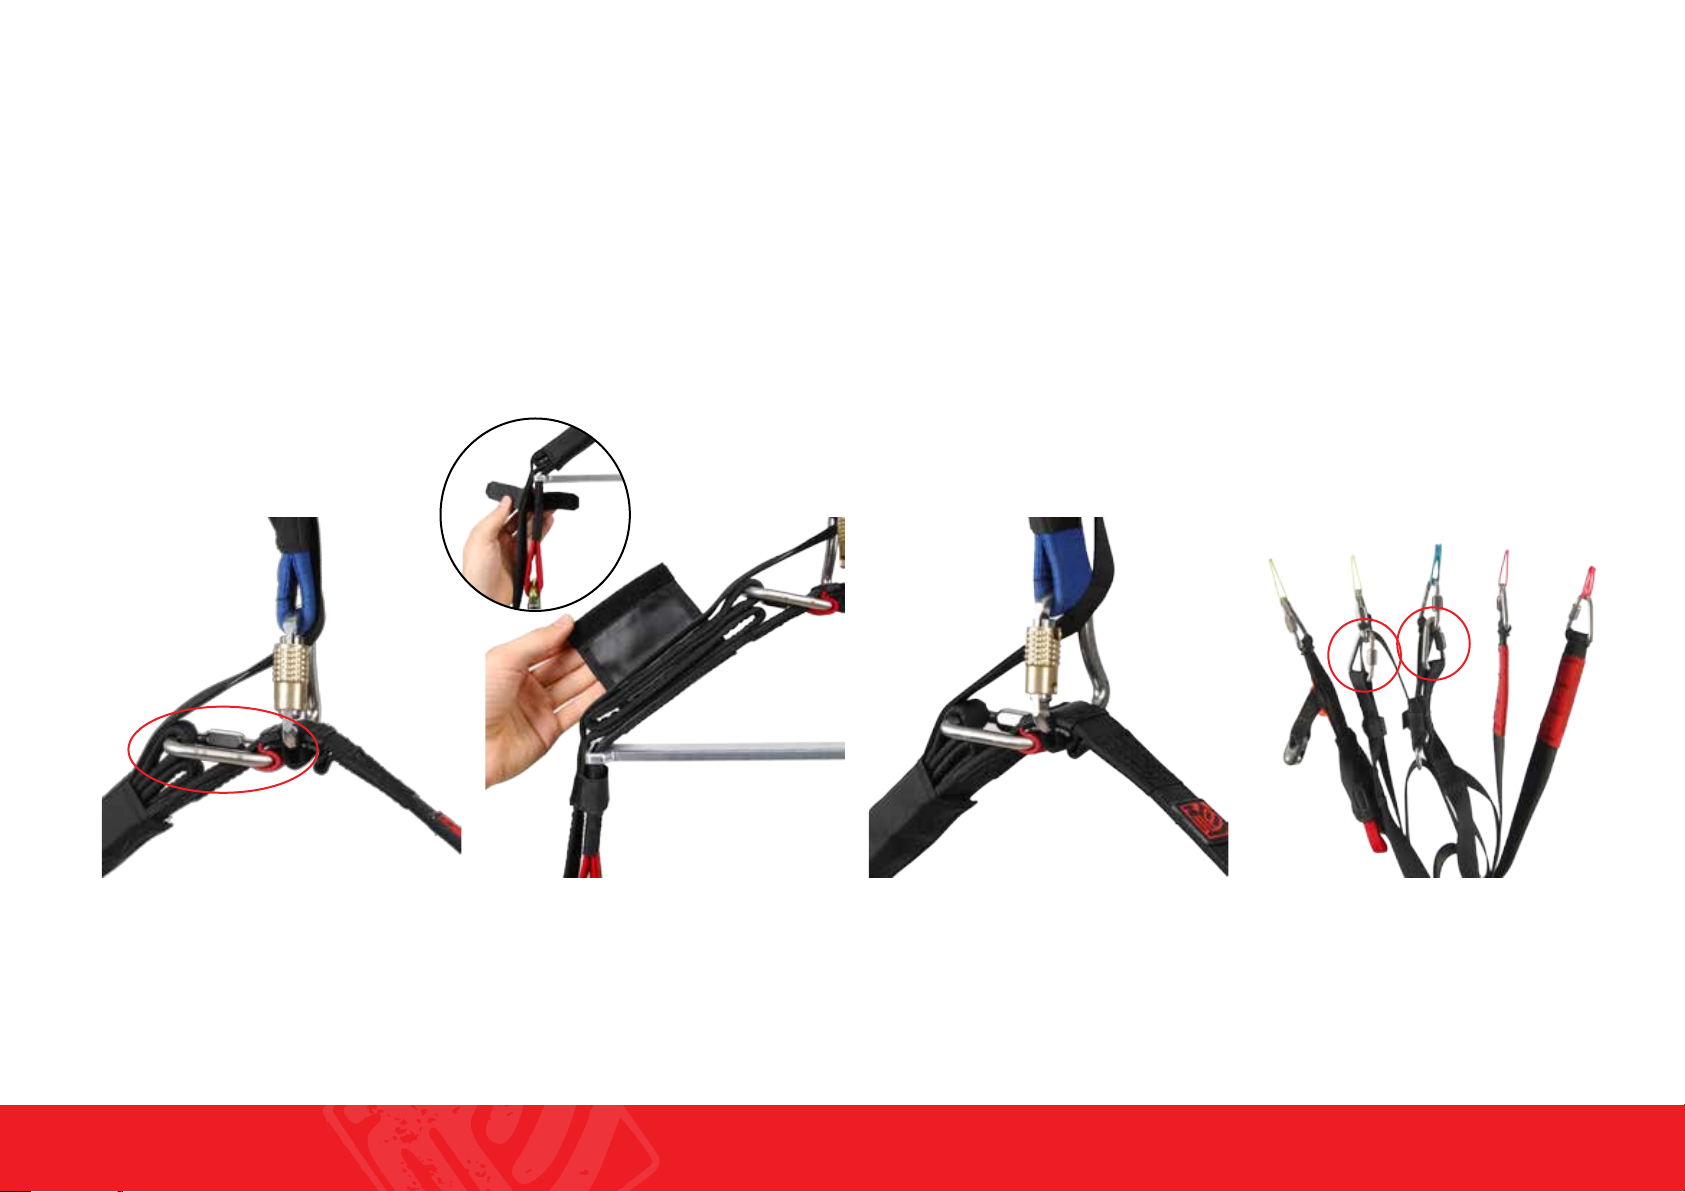
Bridle to spreader bar connection
Connect the rescue bridle in the following order. If you are not certain of the proper connection
procedure then see your GIN dealer. If not connected properly then the bridle may fail, causing serious
injury or death.
D C B A A
Connect the rescue bridle to the rescue
carabiner
Fold the extra bridle webbing neatly and
secure with the Velcro cover followed by
the main line Velcro
Pass the riser connections through the
main carabiner
Attach bridle to the B & C riser carabiners
and secure with the Velcto straps
* Shown with a GIN Fuse riser, check
compatibility with your riser
18
 Loading...